Undertaking a focused assessment: physical assessment of body systems
Anthony Schoenwald
Clint Douglas
Auscultation, p. 585
Body systems assessment, p. 580
Cardiovascular system, p. 593
Gastrointestinal system, p. 605
Inspection, p. 580
Integumentary system, p. 618
Musculoskeletal system, p. 614
Neurological system, p. 587
Palpation, p. 585
Percussion, p. 585
Physical assessment, p. 580
Renal system, p. 611
Respiratory system, p. 603
Introduction
Developing health assessment skills is one of the most important and challenging aspects of becoming a registered nurse (RN). While often invisible to others, patient assessment comprises a major part of what expert RNs do in their daily practice. Particularly in acute care settings, RNs are usually the first healthcare professional to recognise and respond to changes in a patient’s condition (see Chapter 39). It can be argued that ‘nurses are the professional group that carry the highest level of responsibility for patient assessment, accurate data collection and interpretation’ (Considine & Currey 2015:300). They are responsible for implementing most of the hands-on patient care, monitoring patients for complications of illnesses and adverse reactions to treatment, as well as protecting them from deadly healthcare errors. RNs use their knowledge and clinical assessment skills at the bedside to diagnose and manage rapidly-developing, life-threatening emergencies. Well-developed physical assessment skills are also equally important for recognising subtle trends and early changes in a patient’s condition to prevent clinical deterioration (Osborne et al 2015). Through this continuous cycle of 24/7 clinical monitoring, decision-making and intervention, RNs save lives and improve patient outcomes every day (Considine & Currey 2015).
As a student nurse you will learn to constantly observe and analyse situations to make clinical judgements. Learning to assess patients systematically and comprehensively is important because your assessment drives all components of patient care. Objective data, collected by performing a physical assessment, builds on the subjective data, gathered when taking a patient history (see Chapter 5), and is the foundation for clinical decisions, interventions and evaluations. This chapter presents an introduction to the fundamental knowledge and skills you will need as a beginning RN to conduct patient physical assessment. Other chapters will build on this with common focused assessments you will undertake, such as assessment of mobility, fluid and electrolyte balance and nutritional status.
Building on the primary survey approach to patient assessment
A framework provides a logical structure for learning the process of assessment and communication of your findings. Using a structured patient assessment framework has been shown to enhance clinician performance of patient assessment and has the potential to improve patient care and outcomes (Munroe et al 2013). There are multiple frameworks available and you must decide which is the most relevant to the clinical situation. This chapter builds on the primary survey discussed in Chapter 23 and follows a body systems framework.
The key to a successful nursing assessment is to be organised and systematic. In the acute hospital setting the bedside assessment begins with a primary survey to determine the vital functioning of the patient and signs of acute deterioration, such as loss of consciousness (see Chapter 23). A focused body systems assessment can then be initiated once the patient is stable, using the core physical assessment skills in Box 24-1. Skill 24-1 reflects this approach to patient assessment and provides a framework to discuss the core skills you will need as a beginning RN in this chapter.
SKILL 24-1 Nursing physical assessment using a body systems framework
Delegation and other considerations
• Comprehensive patient assessment is the basis for the development of the nursing care plan and therefore should not be delegated by the registered nurse.
• Perform hand hygiene and apply personal protective equipment when appropriate before, during and after patient assessment.
Therapeutic relationship and patient considerations
• Initiates communication by introductions and clarification of patient’s immediate needs and problems
• Identifies how the skill will affect the patient
• Discusses procedure with the patient to clarify understanding
• Assesses patient knowledge and expectations and ensures patient understanding
• Where necessary, provides further clarification
• Explains actions and potential discomfort at all stages of procedure
| STEPS | RATIONALE |
|
1. Before you begin the active part of the physical examination, perform a rapid visual assessment of the patient and their environment for important cues. |
Based on your nursing knowledge and information from handover, some of your observations will be expected. Allows you to determine if there is equipment in use that you need education about before you take over care. |
| The primary survey is concerned with identifying life-threatening circumstances that require immediate attention. It should take about 1 minute to complete. The ABCDE approach is used. | |
|
3. Neurological
• If indicated, perform a focused neurological assessment (see Skill 24-2), including Glasgow Coma Scale, pupil size and reaction, limb assessment and vital signs.
|
Prevents transmission of microorganisms. Applying the knowledge of normal neurological parameters to the patient’s assessment enables identification of normal and abnormal values and immediate intervention. |
| Prevents transmission of microorganisms. Applying the knowledge of normal cardiovascular parameters to the patient’s assessment enables identification of normal and abnormal values and immediate intervention. | |
| Prevents transmission of microorganisms. Applying the knowledge of normal respiratory parameters to the patient’s assessment enables identification of normal and abnormal values and immediate intervention. | |
|
6. Gastrointestinal
d. Palpate the abdomen lightly noting any tenderness, guarding or rigidity; feel for any masses or pulsations.
(1) Is the patient nil by mouth (NBM)? If oral diet: normal, soft, smooth/minced? Percent of meal eaten?
|
Prevents transmission of microorganisms. Applying the knowledge of normal gastrointestinal parameters to the patient’s assessment enables identification of normal and abnormal values and immediate intervention. |
| Prevents transmission of microorganisms. Applying the knowledge of normal renal parameters to the patient’s assessment enables identification of normal and abnormal values and immediate intervention. | |
| Prevents transmission of microorganisms. Applying the knowledge of normal musculoskeletal parameters to the patient’s assessment enables identification of normal and abnormal values and immediate intervention. | |
| Prevents transmission of microorganisms. Applying the knowledge of normal integumentary parameters to the patient’s assessment enables identification of normal and abnormal values and immediate intervention. | |
| Allows you to make decisions about whether there are clinically significant changes in the patient’s condition. | |
| Promotes involvement in care and understanding of health status. | |
| RECORDING AND REPORTING | HOME CONSIDERATIONS |


Fundamental physical assessment skills
Physical assessment is defined as the collection of objective patient data using the skills of inspection, palpation, percussion and auscultation (Fennessey & Wittmann-Price 2011).
Inspection
Inspection is the process of careful observation and visual examination of the patient and relevant body region or part. To use inspection effectively:
• position and expose body parts so that essential surfaces can be viewed (use adequate lighting) while maintaining the patient’s dignity
• compare each area inspected with the same area on the opposite side of the body for symmetry
• be aware of normal physical characteristics related to age and gender
• always pay attention to the patient, watching all movements and non-verbal cues
• do not hurry inspection – be thorough and pay attention to detail.
An example of inspection is observing the patient’s work of breathing during your assessment of respiratory rate. Beyond increased respiratory rate, you may observe increased work of breathing with use of accessory muscles, soft tissue retraction (tracheal tug, rib or abdominal recession), or an inability to speak in sentences or cough properly. These represent signs of respiratory distress in your patient that you would identify through the use of inspection.
Palpation
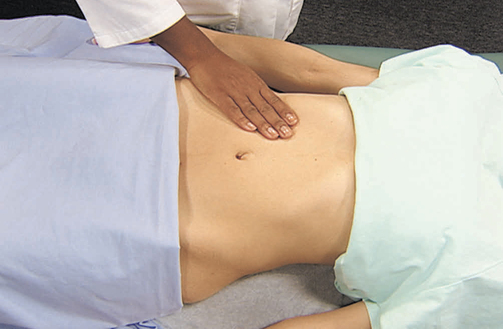
Further assessment is made through the use of touch. Through palpation, the fingers or hands can be used to examine underlying body structures. For example, palpation is a major component of gastrointestinal assessment. The abdomen is lightly palpated and should feel soft, non-tender and without masses.
Percussion
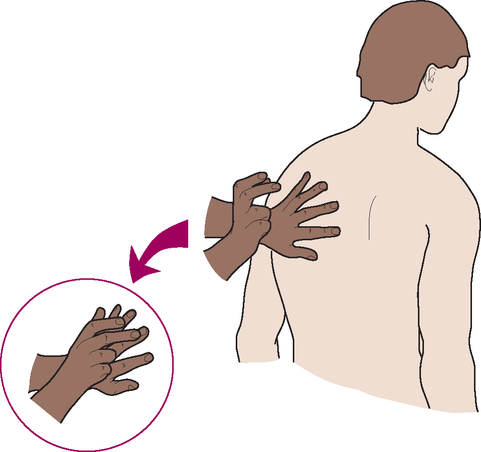
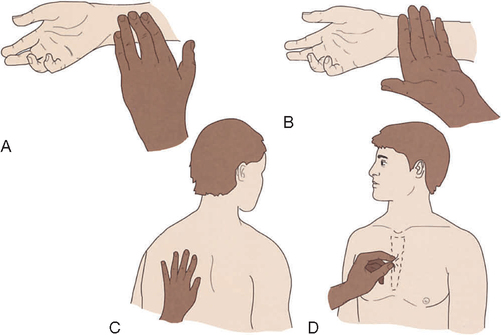
Percussion involves tapping the body with the fingertips to evaluate the size, borders and consistency of body organs and to discover fluid or air in body cavities. When the examiner strikes the middle finger of the non-dominant hand resting against the body’s surface with the tip of the middle finger of the dominant hand, percussion tones are generated which can be heard and felt (Figure 24-2). Use a loose swinging motion at the wrist of the percussing hand. With practice you can hear different sounds depending on the density of the underlying tissue (Table 24-1). For example, percussion of fluid in the abdomen can elicit a dull sound over structures that should sound tympanic. Ascites from liver failure would be an example of stony dullness on percussion.
TABLE 24-1
Percussion tones
| Sound | Quality | Common location |
| Tympanic | Drum-like | Abdominal areas |
| Resonance | Hollow | Normal lung |
| Dullness | Thud-like | Urine in the bladder, liver, spleen |
| Flatness | Flat | Muscle |
Auscultation
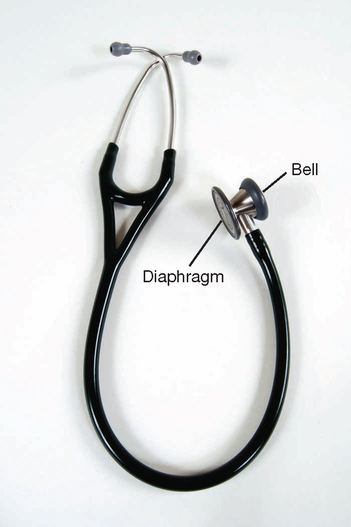
Auscultation is listening to sounds produced by the body. Some sounds may be audible without a stethoscope, such as stridor with a partial airway obstruction. However, lung, heart and bowel sounds are routinely assessed with a stethoscope. A good quality stethoscope and correct technique is necessary to hear sounds easily (Figure 24-3). When the ear tips are in your ears, the ear pieces should be pointed forward (towards your nose). Place the chest piece directly against the skin, because clothing obscures sound. The diaphragm is used most often and is best for high-pitched sounds, such as lung sounds, whereas the bell (held lightly against the skin) is best for low-pitched sounds, such as heart murmurs. A number of extraneous sounds created by movement of the tubing or chest piece interfere with auscultation. You will learn to recognise and disregard them during the actual examination.
Preparing for patient assessment
A few simple considerations can make physical assessment easier, while improving data collection and patient safety:
• Ensure patient privacy and protect the patient’s dignity at all times.
• Consider the cultural and developmental needs of the patient and how the assessment might need to be adapted (refer to Chapters in Part 4).
• Explain the purpose of the assessment and obtain verbal consent.
• Make sure there is adequate lighting in the room and minimal noise (difficult in most settings).
• Have all the equipment and documentation available at hand (Box 24-2).
• Infection control: Always wash your hands before and after the activity. Use precautions as per facility policy.
Neurological system
The rapid primary survey provides you with some basic information about the patient’s level of consciousness based on the AVPU scale (Alert, responds to Voice, responds to Pain, or is Unresponsive). Changes in vital signs can also reflect important neurological changes and are always completed first during the primary survey. A more focused assessment of the neurological system is then needed to examine the functioning of the central nervous system (CNS). The three most important components covered in this chapter include (1) the Glasgow Coma Scale, (2) pupil size and reaction to light, and (3) limb assessment. You should also evaluate the patient’s speech and screen for normal functioning of the special senses such as vision and hearing. Skill 24-2 demonstrates how to perform these steps in a neurological assessment. More advanced skills, such as evaluation of cranial nerves or deep tendon reflexes, are needed for a comprehensive neurological examination, but are not discussed here.
SKILL 24-2 Focused neurological assessment
Delegation and other considerations
• Comprehensive patient assessment is the basis for the development of the nursing care plan and therefore should not be delegated by the registered nurse.
• Perform hand hygiene and apply personal protective equipment when appropriate before, during and after patient assessment.
Therapeutic relationship and patient considerations
• Initiates communication by introductions and clarification of patient’s immediate needs and problems
• Identifies how the skill will affect the patient
• Discusses procedure with the patient to clarify understanding Provides reassurance
• Assesses patient knowledge and expectations and ensures patient understanding
• Where necessary, provides further clarification
• Explains actions and potential discomfort at all stages of procedure
| STEPS | RATIONALE |
|
1. Review the patient’s baseline assessment data. |
The key point of clinical examination is to determine if something has changed. Refer to baseline or previous findings to determine an acute change in patient status. |
| Prevents transmission of microorganisms. | |
| Promotes patient’s cooperation and comfort during the assessment. | |
|
4. Approach the patient with a structured Glasgow Coma Scale (GCS) assessment to determine level of consciousness (see Figure 24-4). Score and describe the patient’s responses according to:
|
A subtle change in level of consciousness or mentation is usually the earliest and most sensitive indicator of neurologic deterioration. A decrease in total GCS score of 2 or more points is a critical finding and should trigger a rapid response call. |
|
5. Check pupils for size (mm), shape and reaction to light.
b. Use a pen torch to elicit a reflex response from the pupils (Figure 24-6), which should be brisk constriction to light in both eyes.
|
Changes in pupillary function can indicate cranial nerve dysfunction associated with increased intracranial pressure. |
|
|
All four extremities are tested for muscle strength and for any asymmetry that could indicate neurological deficit. |
| Lower limbs | |
| Certain conditions place patients at high risk of neurological alterations (e.g. stroke, seizures, head injuries). | |
| RECORDING AND REPORTING | |

Glasgow Coma Scale
Changes in mental state or level of consciousness are major signs of patient deterioration. The Glasgow Coma Scale (GCS) is the most widely used tool to assess level of consciousness and is incorporated in standard neurological observation charts. It provides a standardised approach to assessment of level of consciousness and a common language for healthcare workers, although consistency in scoring between staff can be unreliable (Reith et al 2015). It is best that the same RN monitors the patient’s neurological status each time and performs the GCS together with the oncoming staff during handover. You can watch a video that demonstrates how to correctly perform the GCS (see Online resources).
Figure 24-4 shows how the GCS is divided between the eye (E), verbal (V) and motor (M) responses of the patient. It is best to describe the patient responses you actually observed and document a score for each response, such as ‘E = 2, V = 2, M = 5’. A total score can be added up, although this score should not be used alone because it does not indicate changes in each area of functioning (Teasdale et al 2014). A fully responsive, awake, alert and oriented patient will score 15/15 (highest possible score), whereas a completely unresponsive patient in a deep coma will score 3/15 (lowest possible score). A patient with a score of 8 or less requires airway management. A drop in overall score by 2 or more points requires a medical emergency team response.

The GCS is scored according to the patient’s best response and you need to use adequate stimulation to elicit the patient’s best response, otherwise your assessment will be incorrect. Teasdale and colleagues (2014) provide an updated, simple and structured approach to GCS assessment. After checking for factors that could interfere with assessment (e.g. hearing loss, injury or sedation with medication), observe for spontaneous behaviour in each of the three response domains. If stimulation is required, begin by speaking in a normal voice. If they do not respond, call the patient’s name loudly. Then try applying increasing peripheral fingertip pressure over the nail bed for up to 10 seconds to assess eye opening. To determine the best motor response with stimulation, use a trapezius squeeze/pinch by twisting the muscle with the thumb and two fingers where the head meets the shoulder, followed by pressure over the supraorbital notch if needed. Always start with the least noxious irritation or pressure and proceed to more painful stimulation for up to 10 seconds if the patient does not respond. Explain what you are doing to the patient even if they are unresponsive.
Assess whether the patient’s eyes open spontaneously when you approach the patient (score 4), only to sound, including spoken or shouted requests (score 3), only to fingertip pressure (score 2), or not at all (score 1). Wake a sleeping patient before evaluation and if they require ongoing verbal stimulation to keep eyes open, then score a 3.
Assess verbal response to evaluate speech and orientation to person, place and time. Ask open-ended questions, such as ‘What is your name?’ ‘Where are you at the moment?’ and ‘What month is it?’ Remember patients may have moved from ward to ward and been unwell for a number of days, so they may not be able to identify the exact location, day or date. The patient is orientated if they are able to correctly report who they are, where they are (e.g. in hospital or other specific location) and why they are there, and the month (score of 5). A patient may be able to hold a conversation but cannot correctly answer your questions, indicating they are confused (score 4), only replies with inappropriate words (score 3), only makes sounds such as moaning and groaning (usually with physical stimulus; score 2), or makes no verbal response to any stimulus (score 1).
Assess the patient’s best motor response only in the upper limbs. Ask the patient to follow simple commands such as ‘squeeze my fingers and let go’ or ‘stick out your tongue and pull it in again’ and assess if they can obey commands, even weakly (score 6). If unable, with an increasing central pain stimulus described above (trapezius squeeze), assess the patient’s ability to move their hand to localise to pain by bringing their hand up to above clavicle level (score 5). Withdrawal from pain – also called normal flexion (score 4) – occurs when patient rapidly flexes or bends their arm towards the source of the pain, but does not actually localise or try to remove the source of the pain (they do not manage to get their arm up to clavicle level or to the point where the central pain stimulus is coming from). Follow up by checking whether the hand quickly withdraws from fingertip pressure. Abnormal posturing (see Figure 24-3) in response to pain includes abnormal flexion where the arm bends at the elbow, the forearm rotates and wrist and fingers are flexed (score 3) and extension where the patient straightens the arm at the elbow (score 2). No response to a central pain stimulus is scored as ‘none’ (score 1).
Pupil size and reaction to light
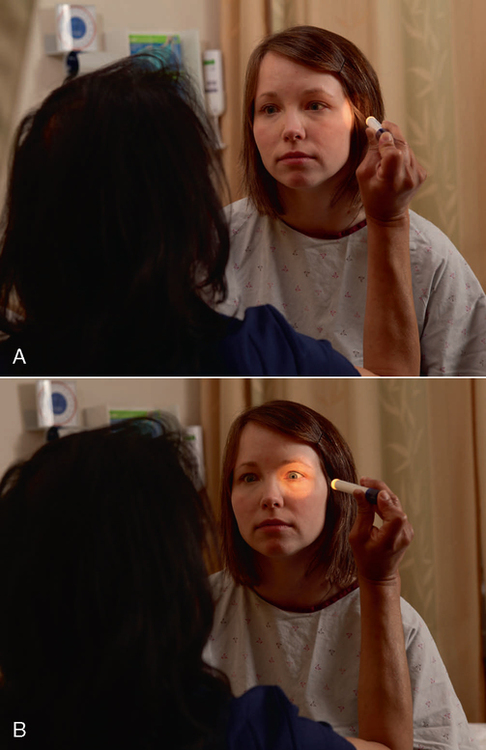
Inspect both eyes for pupil size (normal range 2–6 millimetres in diameter) and symmetry. Left and right pupils should be equal in size (although slight differences may be a normal variation). Patients with normal neurology demonstrate a brisk and consensual pupillary reaction to light. Ask the patient to look straight ahead past your shoulder and then briefly shine a penlight torch from the side of the face into each eye. The pupils of both eyes should briskly constrict. Repeat the procedure with the other eye and record this on the neurological observation chart:
• Reacts ‘+’ if there is a brisk constriction of the pupil.
• Sluggish ‘SL’ if the pupil takes longer to constrict.
• No reaction ‘–’ if the pupil is non-reactive and has not changed in size.

Limb assessment: Motor and sensory function
Evaluating muscle strength in each limb is also a key component of neurological assessment. Limb power should be present in all major and minor joints. Diminished function may indicate a lesion in the central or peripheral nervous system. You may ask the patient to flex each knee one at a time and get the person to try and straighten the leg or push against resistance applied by you (Figure 24-7). Similarly, ask to flex each elbow while you gently hold the arm in the straight position. Unlike the GCS where you are assessing for the ‘best response’ in either arm, here you are carefully assessing for bilateral equality of muscle strength in the arms and legs. Note any neurologic deficit such as weakness in one limb. Record upper and lower extremity power on both sides of the body using a scale ranging from ‘normal power’ to ‘none’, as in Table 24-2.
TABLE 24-2
Scoring limb power based on the Medical Research Council (MRC) scale for muscle strength
| Score | Explanation |
| 5 Normal power | Active movement of the limb against gravity with full resistance. Muscle strength is equal to the examiner. |
| 4 Active movement against resistance | Active movement of the limb against gravity with some resistance. Muscle strength is weak and the examiner easily overpowers the patient when resistance is applied. |
| 3 Active movement against gravity | Active movement of the limb against gravity, not resistance. The patient can lift the extremity, but it collapses as soon as the examiner applies resistance. |
| 2 Active movement of limb with gravity eliminated | Active movement of the limb when effect of gravity is eliminated (limb can roll in bed but not lift). The patient can move the limb, but cannot lift the limb from the bed. |
| 1 Flicker of movement | Weak muscle contraction observed or palpated without active movement. |
| 0 None | No detectable muscle contraction or movement of the extremity. |
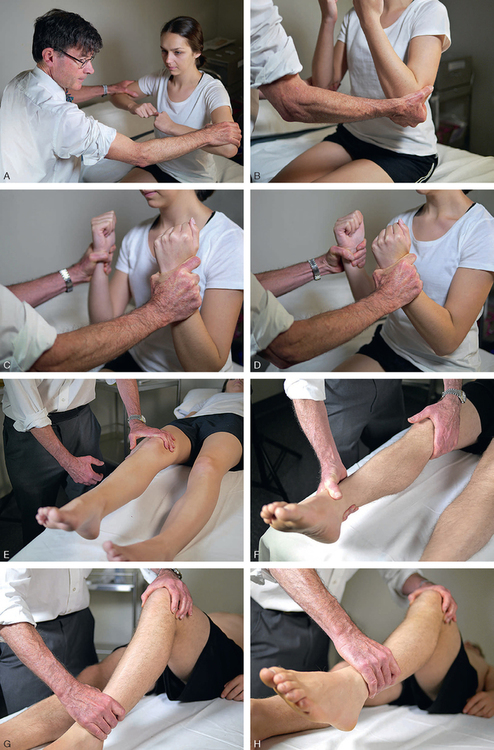
For most patients, a quick screening of sensory function is sufficient unless there are symptoms of reduced sensation, motor impairment or paralysis. Sensations along the body’s surface are felt equally on both sides of the face, trunk and extremities. Sensation to light touch is usually sufficient to conduct a basic assessment. Ask the patient to close their eyes and indicate when they feel light touch in each sensory distribution, comparing side to side. Try to map the area of any sensory loss to a single peripheral nerve territory (see neurovascular assessment) or sensory dermatomes (Chapter 36) of the spinal nerves, such as when assessing epidural blockade for pain management. There may be loss of sensation on one side of the body (hemisensory loss) with some types of stroke or spinal cord injury.
Assessing the special senses: Vision, hearing and speech
Speech is a function of the higher centres of the brain and is a core part of your neurological assessment. Routinely evaluate speech during general interaction and communication with the patient, noting abnormally slurred speech or abnormal responses to the conversation. Facial structures, including the mouth, should appear symmetrical.
Screening for sensory-perceptual deficits will help you identify problems that will interfere with activities of daily living and put patients at risk for injury. The assessment of visual acuity – the ability to see small details – tests central vision. If the patient wears glasses, they should wear them during the examination. Assess distant vision by asking the patient to read or identify objects in the distance. If patients cannot identify objects in the distance, their ability to count upraised fingers or distinguish light is assessed. A hand is held 30 cm from the patient’s face and they count the upraised fingers. Near vision can be assessed by asking patients to read from a newspaper, wristwatch or similar item. Ask the patient to hold the item at a comfortable distance (5–6 cm) from the eyes and read the smallest line possible.
As the patient looks straight ahead, all objects in the periphery can normally be seen. To assess visual fields, the patient stands or sits 60 cm away, facing you at eye level (Figure 24-8). The patient closes or covers one eye (e.g. the left) and looks at your eye directly opposite. Close your opposite eye (in this case the right) so that your left eye aligns with the patient’s right eye. Move your left finger outside the field of vision, then slowly bring it back into the visual field. Ask the patient to tell you when they first see your finger. Repeat the test for the opposite eye and if you detect your finger before the patient does, the patient’s visual field is reduced.

TABLE 24-3
Assessment of sensory function
| Function | Equipment | Method | Precautions |
| Light touch | Cotton ball or cotton-tip applicator | Apply light wisp of cotton to different points along skin’s surface. Ask patient to say when sensation is felt. | Apply at areas where skin is thin or more sensitive (e.g. face, neck, inner aspect of arms, top of feet and hands). |
| Position sense | None | Grasp finger or toe, holding it by its sides with thumb and index finger. Alternate moving finger or toe up and down. Ask patient to state when finger is up or down. Repeat with toes. | Avoid rubbing adjacent appendages as finger or toe is moved. Do not move joint laterally; return to neutral position before moving again. |
| Pain | Broken tongue blade or wooden end of cotton applicator | Ask patient to say when dull or sharp sensation is felt. Alternately apply sharp and blunt ends of tongue blade to skin’s surface. Note areas of numbness or increased sensitivity. | Remember that areas where skin is thickened, such as heel or sole of foot, may be less sensitive to pain. |
Hearing acuity can be grossly assessed from the patient’s response to normal conversation or using the whisper test. Explain to the patient that you are testing their hearing and that you will come close to their face. Whisper a different word in both ears and ask the person to repeat it back to you. Loss of hearing may indicate a blocked external ear or neurological deficit relating to the acoustic nerve (cranial nerve VIII).
Cardiovascular system
The rapid primary survey and vital signs establish adequate perfusion. A focused assessment of the cardiovascular system may be further divided into cardiac assessment (the heart) and peripheral vascular assessment (arteries and veins). An efficient approach is to start with the hands and nails (inspect and palpate skin colour, temperature, capillary refill), move up to the arms (palpate radial pulses and measure BP) and neck (inspect neck veins), then the chest (auscultate heart sounds) and finally lower limbs (palpate for distal pulses, tenderness, oedema). Skill 24-3 demonstrates how to perform a focused cardiovascular assessment.
SKILL 24-3 Focused cardiovascular assessment
Delegation and other considerations
• Comprehensive patient assessment is the basis for the development of the nursing care plan and therefore should not be delegated by the registered nurse.
• Perform hand hygiene and apply personal protective equipment when appropriate before, during and after patient assessment.
Therapeutic relationship and patient considerations
• Initiates communication by introductions and clarification of patient’s immediate needs and problems
• Identifies how the skill will affect the patient
• Discusses procedure with the patient to clarify understanding
• Assesses patient knowledge and expectations and ensures patient understanding
• Where necessary, provides further clarification
• Explains actions and potential discomfort at all stages of procedure
| STEPS | RATIONALE |
|
1. Review the patient’s baseline assessment data. |
The key point of clinical examination is to determine if something has changed. Refer to baseline or previous findings to determine an acute change in patient status. |
| Prevents transmission of microorganisms. | |
| Promotes patient’s cooperation and comfort during the assessment. | |
| Assists with performance and interpretation of data. | |
| These are indicators of adequate tissue perfusion. | |
| An indicator of volume status. | |
| New abnormal findings require further clinical investigations. | |
| These are indicators of adequate tissue perfusion. | |
| An indicator of venous thromboembolism. | |
| New abnormal findings require further clinical investigations. | |
| Certain conditions place patients at high risk of cardiovascular alterations (e.g. chest pain, arrhythmias, bleeding). |

• Core documentation includes pulse rate and rhythm, blood pressure, capillary refill time, and urine output. Note any new abnormal findings or investigations.
• Report early and late warning signs associated with cardiovascular deterioration (Box 24-6) as a priority to senior nursing or medical staff.
Inspection and palpation
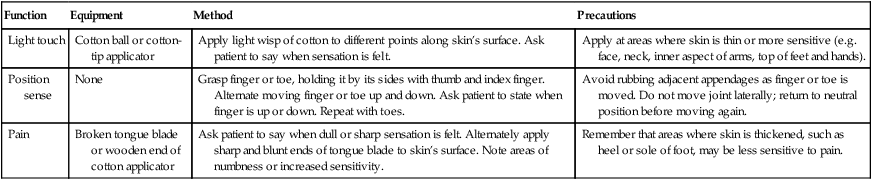
Start with a general survey of the patient’s appearance and activity tolerance to assess perfusion. Look for any obvious signs of distress, such as chest pain or shortness of breath. Skin colour/temperature, urine output and mental status are three clinical indicators of end-organ perfusion. Is the patient’s skin cool, pale, dusky or mottled (patchy discolouration)? Is it warm, flushed and sweaty (diaphoretic)? Blue extremities (peripheral cyanosis) can be a sign of poor peripheral perfusion (Figure 24-9). Blue lips and tongue (central cyanosis) is a late sign of serious respiratory or cardiac compromise and oxygen therapy should be started if not already in place (Adam et al 2010). Measure the urine output if possible (see renal system assessment) because it reflects renal perfusion, which in turn is an extremely important measure of systemic perfusion. A reduced urine output may be the earliest sign of shock. Altered mental status (agitation and confusion) with low blood pressure also suggests decreased cerebral perfusion.
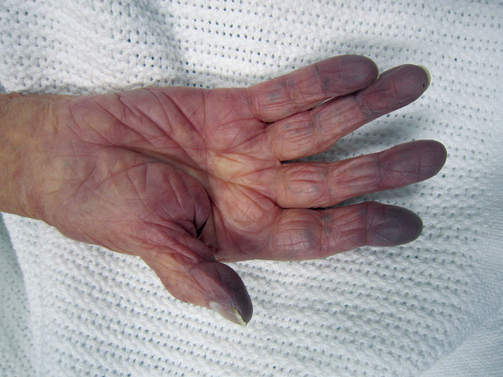
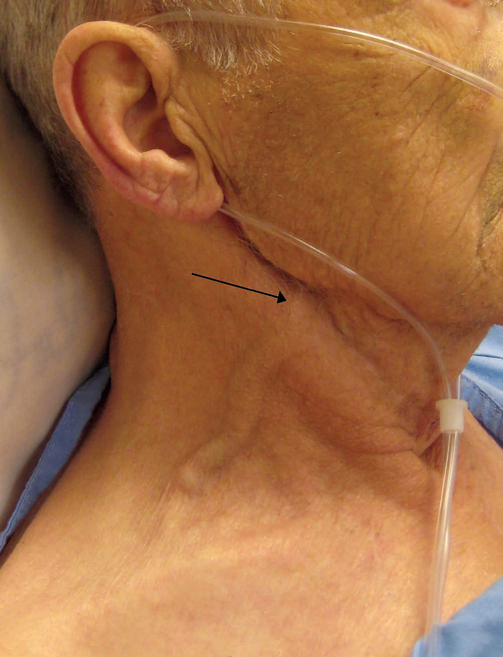
The nails are palpated for capillary refill that should return within 2 seconds after blanching the nail bed and releasing pressure in an adult (Figure 24-10). Palpate the radial pulses for rate, rhythm and strength. Feel the patient’s hands and feet: are they warm or cold? If the feet and knees are warm the cardiac output is nearly always okay (Jacques et al 2011). Inspect for any inserts, such as central venous catheters or arterial lines, to measure blood pressure directly. Check all drains for any fluid losses. Measure blood pressure manually if not already completed (Skill 23-4). Determine correct positioning and functioning of monitoring equipment (e.g. cardiac monitoring). With the patient sitting at 45 degrees, inspect the neck for jugular venous distension (Figure 24-11), which is an abnormal sign associated with fluid overload and heart failure.
Cardiac auscultation
To understand the significance of cardiac assessment findings, you will need to have a working knowledge of the cardiac cycle (Figure 24-12). The heart normally pumps blood through its four chambers during two phases. During systole, the ventricles contract and eject blood from the left ventricle into the aorta and from the right ventricle into the pulmonary artery. During diastole, the ventricles relax and the atria contract to move blood into the ventricles and fill the coronary arteries.
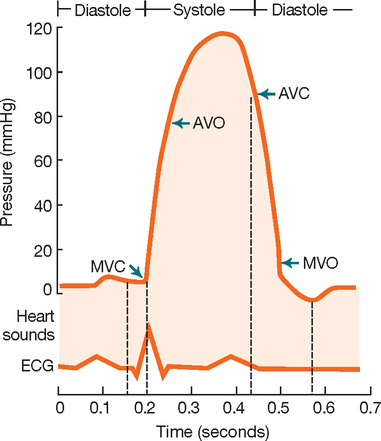
At the beginning of systole the ventricles contract and the mitral and tricuspid valves close to prevent regurgitation of blood into the atria, creating the first heart sound (S1). When the ventricles empty, pressure within the chambers fall. At the beginning of diastole the aortic and pulmonic valves close, creating the second heart sound (S2). Auscultation of the normal heart therefore reveals dual heart sounds (S1 and S2), with a regular rate and rhythm. Abnormal findings include added sounds such as extra heart sounds and murmurs.
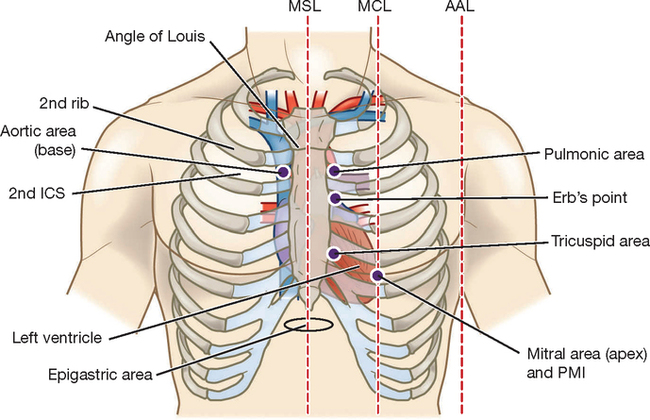
As a beginning RN you should be able to identify normal heart sounds (S1 and S2) from abnormal, which need to be validated by more experienced staff (Box 24-4). Begin by listening over the apex of the heart with the diaphragm of the stethoscope, palpated at approximately the fourth to fifth intercostal space just medial (to the left) of the mid-clavicular line (Figure 24-13). It may be necessary to ask an adult female to lift their left breast while you locate the apex. You should palpate the carotid pulse while you listen to heart sounds to identify S1, which correlates with the timing of the pulse wave. Normally no sound is heard between S1 and S2 during the periods of systole and diastole. Count the apical heart rate for 1 minute and determine whether the rhythm is regular or irregular while listening and feeling.

Peripheral vascular
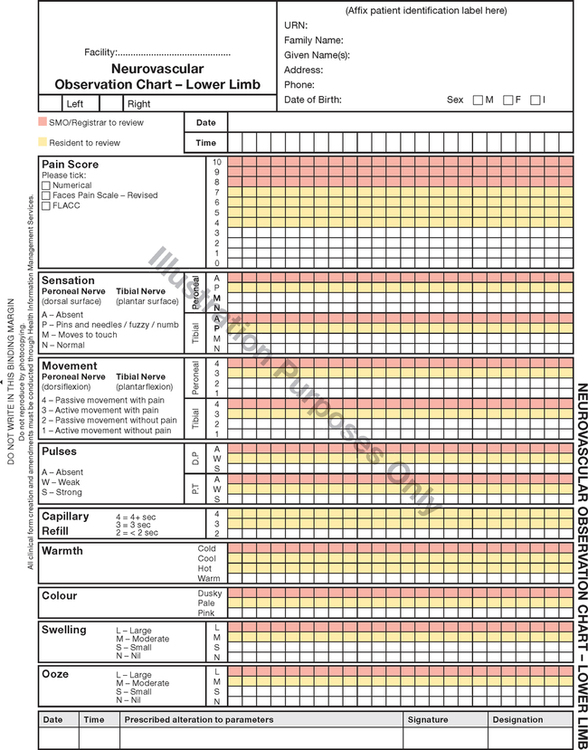
A focused peripheral vascular assessment is normally undertaken as an extension to cardiac evaluation. For example, it may be necessary if there are cues from the health history that there may be peripheral vascular disease or deep vein thrombosis. Or a neurovascular assessment may be indicated by the patient’s presentation or type of surgery (e.g. orthopaedic or vascular). The most important neurovascular assessment skills are summarised in Figure 24-14. Look and feel for colour, warmth, movement and sensation. Palpate distal pulses and capillary refill time. Monitor for swelling and ooze from any wound. Every student nurse should be able to recall the signs of an acute ischaemic limb in Box 24-5 – known as the six Ps of acute limb ischaemia – indicating a limb-threatening medical emergency.
To examine the peripheral vascular system, first assess the adequacy of blood flow to the extremities by measuring arterial pulses and inspecting the condition of the skin and nails. Use a head-to-toe approach, starting with the carotid arteries in the neck and moving down to the arteries in the upper and lower extremities. The wall of an artery is normally elastic, making it easily palpable. After the artery is depressed, it will spring back to shape when pressure is released. The arterial pulses to be palpated include the carotid, brachial, radial, femoral, popliteal, posterior tibial and dorsalis pedis. Compare left and right sides of the body for equal strength.
Each peripheral artery is examined using the distal pads of the fingers. Gentle pressure is applied without occluding the pulse. When it is difficult to find a pulse, it is helpful to vary pressure and feel all around the pulse site.
Carotid arteries
For palpation of the carotid pulse, the patient turns the head slightly towards the side being examined. This manoeuvre relaxes the neck muscles for easier palpation. Slide the tips of your index and middle fingers around the medial edge of the sternocleidomastoid muscle.
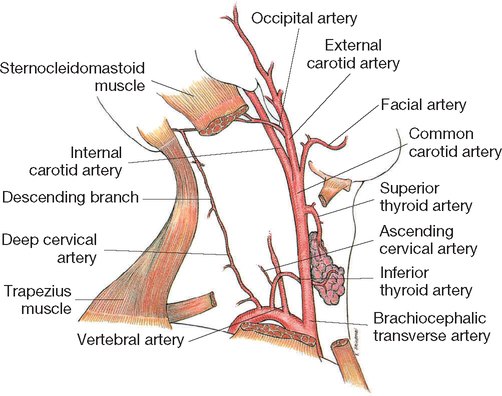
Both carotid arteries should be equal in pulse rate, rhythm and strength, and should be equally elastic (never palpate both together as they provide the main blood supply to the brain). The carotid is commonly auscultated using the bell of the stethoscope for abnormal vascular sounds indicating stenosis. When the lumen of a blood vessel is narrowed, blood flow is turbulent sometimes causing a bruit (pronounced brew-ee), which is a soft, blowing sound.
Brachial arteries
In the upper extremities the main artery is the brachial artery, which channels blood to the radial and ulnar arteries of the forearm and hand. To palpate the brachial pulse, find the groove between the biceps and triceps muscles above the elbow at the antecubital fossa (Figure 24-16). The artery runs along the medial side of the extended arm. Palpate the artery with the fingertips of the first three fingers in the muscle groove. If circulation in this artery becomes blocked, the circulation in the radial or ulnar arteries will be impaired and the hands will not receive adequate blood flow.

Radial arteries
To locate pulses in the arm and hand, have the patient sit or lie down. The radial pulse is found along the radial side of the forearm, at the wrist. In a thin person, a groove is formed lateral to the flexor tendon of the wrist. The radial pulse can be felt with light palpation in the groove (Figure 24-17).

Femoral arteries
The femoral artery is the main artery in the leg, delivering blood to the popliteal, posterior tibial and dorsalis pedis arteries (Figure 24-18). It is one of the strongest arteries in an infant or small child. An interconnection between the posterior tibial and dorsalis pedis arteries guards against local arterial occlusion.

Popliteal arteries
The popliteal pulse is found behind the knee and is difficult to locate. The patient should slightly flex the knee, with the foot resting on the bed, or assume a prone position with the knee slightly flexed and leg muscles relaxed (Figure 24-19). With the fingers of both hands, palpate deeply into the popliteal fossa, just lateral to the midline. The popliteal pulse sometimes used to take a leg BP measurement with the cuff placed on the thigh.

Dorsalis pedis arteries
With the patient’s foot relaxed, locate the dorsalis pedis pulse. The artery runs along the top of the foot in line with the groove between the extensor tendons of the great toe and first toe (Figure 24-20). Locate the pulse by placing the fingertips between the great and first toe and slowly inching up the foot. This pulse may be congenitally absent.

Posterior tibial arteries
The posterior tibial pulse is found on the inner side of each ankle (Figure 24-21). Place the fingers behind and below the medial malleolus. The artery is easily located with the foot relaxed and slightly extended.

Doppler ultrasound
Factors influencing the ability to assess a pulse include obesity, reduction in the heart’s stroke volume, diminished blood volume or arterial obstruction. A Doppler can amplify the sounds of a pulse wave. A thin layer of transmission gel is applied to the patient’s skin at the pulse site or directly onto the transducer tip of the probe. The volume control is then turned to ‘on’, and the tip of the probe placed at an angle of 45–90 degrees on the skin (Figure 24-22). The probe is moved until a pulsating ‘whooshing’ sound is heard, indicating the presence of arterial blood flow.

Peripheral veins
The status of the peripheral veins is assessed by asking the patient to assume sitting and standing positions. Assessment includes inspection and palpation for abnormal findings. For example, varicosities are superficial veins that become dilated, especially when the legs are in a dependent position. They are common in older adults and people who spend a lot of time standing.
Deep vein thrombosis (DVT) is characterised by pain and swelling in one of the extremities. Feel for increased warmth and palpate the calves for tenderness. It is of utmost importance that you report this finding to prevent emboli to the lungs and central nervous system. Prevention and early detection of DVT and pulmonary embolism (PE) is a priority in health facilities as patients become more at risk due to immobility and venous stasis. Health facilities should have policies and procedures for venous thromboembolism prophylaxis (VTE) and this usually involves the application of compression stockings, administration of anticoagulants and postoperative pressure devices that deliver gentle pressure sequentially to both limbs to increase venous blood flow (see Chapter 39).
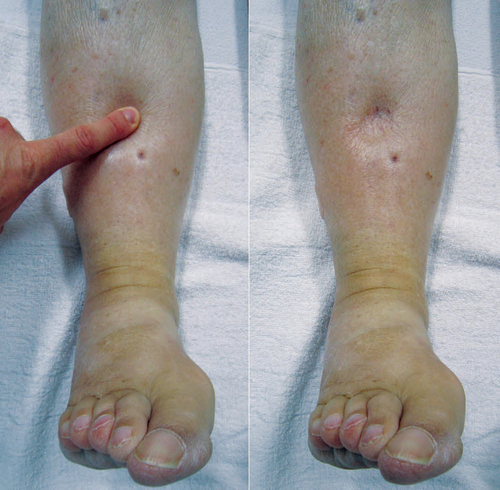
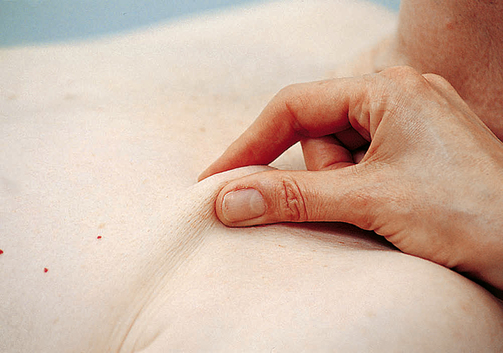
The upper and lower extremities should be inspected and palpated for any signs of oedema. Areas of the skin become swollen or oedematous from a build-up of fluid in the tissues as a result of impaired venous return, systemic diseases (e.g. cardiac, hepatic, renal) or some drugs. Typical sites for dependent oedema caused by poor venous return are the feet, ankles and sacrum. In particular, bilateral oedema in the lower extremities may signify cardiac failure or fluid overload from intravenous fluids. Inspection for oedema is a fundamental component of cardiovascular assessment.
Oedematous skin looks stretched and shiny. Palpate areas of oedema against bony structures with your thumb for at least 10 seconds. Oedema may be pitting (the skin is indented and only slowly refills, see Figure 24-23) or non-pitting. If oedema is present note the upper level (e.g. ‘pitting oedema to mid-calf’ or ‘pitting oedema to mid-thigh’). Severe pitting oedema can begin to weep exudate.
Respiratory system
Because respiratory changes are often the first sign of patient deterioration, RNs frequently perform assessment of the respiratory system. Your rapid primary survey will have examined airway and breathing. The airway is patent if the patient can talk normally and is conscious and alert. The work of breathing and peripheral oxygen saturation (SpO2) are routinely assessed with vital signs (see Chapter 23). Skill 24-4 demonstrates how to then perform a focused respiratory assessment.
SKILL 24-4 Focused respiratory assessment
Delegation and other considerations
• Comprehensive patient assessment is the basis for the development of the nursing care plan and therefore should not be delegated by the registered nurse.
• Perform hand hygiene and apply personal protective equipment when appropriate before, during and after patient assessment.
Therapeutic relationship and patient considerations
• Initiates communication by introductions and clarification of patient’s immediate needs and problems
• Identifies how the skill will affect the patient
• Discusses procedure with the patient to clarify understanding
• Assesses patient knowledge and expectations and ensures patient understanding
• Where necessary, provides further clarification
• Explains actions and potential discomfort at all stages of procedure
| STEPS | RATIONALE |
|
1. Review the patient’s baseline assessment data. |
The key point of clinical examination is to determine if something has changed. Refer to baseline or previous findings to determine an acute change in patient status. |
| Prevents transmission of microorganisms. | |
| Promotes patient’s cooperation and comfort during the assessment. | |
| Assists with performance and interpretation of data. | |
| Identify signs of respiratory distress that require immediate intervention. | |
| These are indicators of adequate ventilation and oxygenation. | |
| New abnormal findings require further clinical investigations. | |
| Certain conditions place patients at high risk of respiratory alterations (e.g. post-anaesthesia, acute exacerbation of COPD or asthma). | |
| RECORDING AND REPORTING
• Core documentation includes respiratory rate, effort of breathing, oxygen saturation and any oxygen requirement. Note any new abnormal findings or investigations. • Report early and late warning signs associated with respiratory deterioration (Box 24-8) as a priority to senior nursing or medical staff. |
|

Inspection
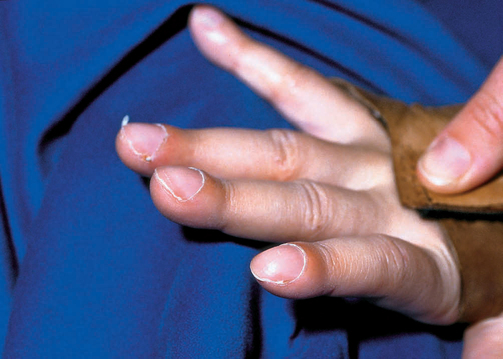
Once again, start with general observation of appearance and behaviour of the patient and observe for signs of respiratory distress (see Box 24-7). Is the respiratory rate fast, slow or normal? Are they able to talk in sentences without stopping to take a breath? What is the patient’s oxygen requirement to maintain adequate oxygen saturation? Anxiety, agitation and confusion can be due to hypoxia. Examine the face, looking at the colour of the skin for central cyanosis (blue-tinged tongue and mucous membranes: a late sign and medical emergency). Inspect the nose for symmetry of nares, presence of discharge and evidence of nasal flaring. Assess the patient’s ability to cough and whether it is productive of sputum. Inspect the nail beds for clubbing (Figure 24-24) which is a sign of chronic respiratory disease. Note oxygen saturation if a monitor is attached.
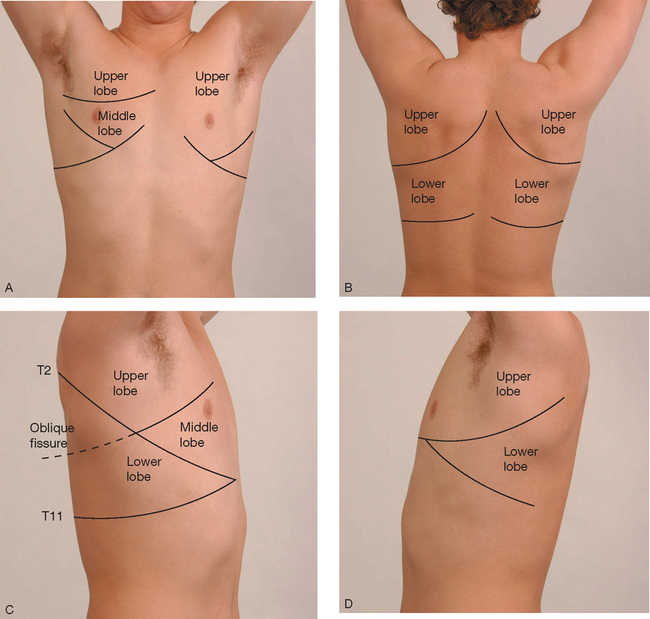
Inspect the chest for pattern, depth and symmetry of breathing. Note barrel chest associated with air trapping in COPD (Figure 24-25). There should be no audible respiratory sounds, such as wheezing or stridor. Use of accessory muscles like neck muscles and retraction of intercostal muscles are signs of distress. If the patient has a chest drain, observe for swinging of dependent fluid in the chest tube and the amount and colour of drainage (see Chapter 35).

Palpation
If chest movement is only present on one side, the trachea can be gently palpated to identify if it is midline. Locate the trachea above the sternal notch and gently palpate with two fingers. Tracheal deviation would usually be accompanied by respiratory distress due to significant disease such as lung collapse.
Auscultation
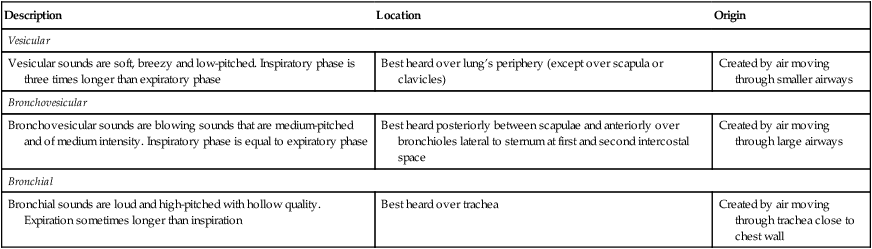
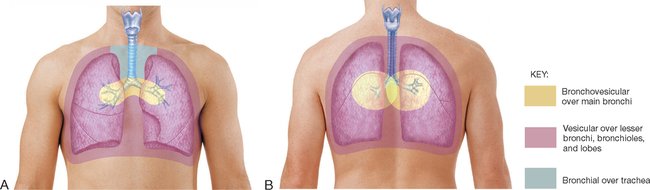
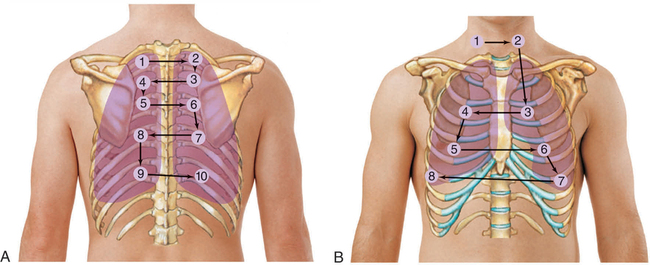
Chest percussion is not covered here and is only useful in very quiet environments. In acute care settings, clinicians usually move straight to auscultation of the chest. Normal lung sounds differ in character, depending on the area of the chest being auscultated and normally include bronchovesicular and vesicular sounds (Table 24-4 and Figure 24-26). Position the patient sitting upright if possible and ask them to breathe through the mouth. It is easier to hear air entry over the main bronchi, so it is often useful to start there. It is important to auscultate in an ordered sequence over upper, middle and lower lung zones, comparing each side with the other (Figure 24-27 and Figure 24-28). Then listen over the posterior chest, which contains primarily the lower lobes. During each breath listen to whether lung sounds can be heard at all, the volume of sound is more or less than normal, and is similar on both sides. If abnormal sounds are heard, ask the patient to cough to see whether they clear.
TABLE 24-4
Normal lung sounds
| Description | Location | Origin |
| Vesicular | ||
| Vesicular sounds are soft, breezy and low-pitched. Inspiratory phase is three times longer than expiratory phase | Best heard over lung’s periphery (except over scapula or clavicles) | Created by air moving through smaller airways |
| Bronchovesicular | ||
| Bronchovesicular sounds are blowing sounds that are medium-pitched and of medium intensity. Inspiratory phase is equal to expiratory phase | Best heard posteriorly between scapulae and anteriorly over bronchioles lateral to sternum at first and second intercostal space | Created by air moving through large airways |
| Bronchial | ||
| Bronchial sounds are loud and high-pitched with hollow quality. Expiration sometimes longer than inspiration | Best heard over trachea | Created by air moving through trachea close to chest wall |
Abnormal lung sounds result from air passing through moisture, mucous or narrowed airways. Adventitious (abnormal) lung sounds often occur superimposed over normal sounds. The two types of adventitious sounds which beginning RNs should be able to identify are crackles and wheezes. Crackles are fine or coarse, discontinuous, crackling or moist sounds and are associated with small airways and alveoli popping open during inspiration with secretions or fluid as in heart failure. Wheezes are continuous musical sounds that occur with airway narrowing and are a key sign of asthma or COPD. Diminished or absent sounds may occur with collapse or consolidation. This may be a common finding on both sides if there is postoperative atelectasis caused by reduced respiratory effort. Table 24-5 explains the mechanisms and characteristic features of key abnormal lung sounds.
TABLE 24-5
Abnormal (adventitious) lung sounds
| Sound | Site auscultated | Cause | Character |
| Crackles | Most commonly heard in dependent lobes: right and left lung bases | Random, sudden re-inflation of groups of alveoli; disruptive passage of air |
Fine crackles are high-pitched fine, short, interrupted crackling sounds heard during end of inspiration, usually not cleared with coughing Medium crackles are lower, more moist sounds heard during middle of inspiration; not cleared with coughing Coarse crackles are loud, bubbly sounds heard during inspiration; not cleared with coughing |
| Wheeze | Can be heard over all lung fields | High-velocity airflow through severely narrowed bronchus | High-pitched, continuous musical sounds like a squeak heard continuously during inspiration or expiration; usually louder on expiration |

Based on: Ball J et al 2015 Seidel’s guide to physical examination, 8th edn. Elsevier, St Louis.
Gastrointestinal system
After a rapid primary survey, an abdominal (gastrointestinal system) assessment is a major component of any body systems assessment. Abdominal pain is also a common indication for a focused assessment and the beginning RN needs to be able to distinguish an acute abdomen (a medical emergency) from benign causes. Taking an elimination history is important to interpret your physical assessment findings. You should also routinely assess the most recent bowel movement and frequency of bowel movements each shift (see Chapter 32).
Skill 24-5 demonstrates how to perform a focused gastrointestinal (GIT) assessment.
SKILL 24-5 Focused gastrointestinal assessment
Delegation and other considerations
• Comprehensive patient assessment is the basis for the development of the nursing care plan and therefore should not be delegated by the registered nurse.
• Perform hand hygiene and apply personal protective equipment when appropriate before, during and after patient assessment.
Therapeutic relationship and patient considerations
• Initiates communication by introductions and clarification of patient’s immediate needs and problems
• Identifies how the skill will affect the patient
• Discusses procedure with the patient to clarify understanding
• Assesses patient knowledge and expectations and ensures patient understanding
• Where necessary, provides further clarification
• Explains actions and potential discomfort at all stages of procedure
| STEPS | RATIONALE |
|
1. Review the patient’s baseline assessment data. |
The key point of clinical examination is to determine if something has changed. Refer to baseline or previous findings to determine an acute change in patient status. |
| Prevents transmission of microorganisms. | |
| Promotes patient’s cooperation and comfort during the assessment. | |
| Assists with performance and interpretation of data. | |
| These are indicators of normal gastrointestinal function. | |
| Identify changes in bowel habit that suggest need for intervention. | |
| Certain conditions place patients at high risk of gastrointestinal alterations (e.g. post-surgery, critical illness). | |
| RECORDING AND REPORTING | |

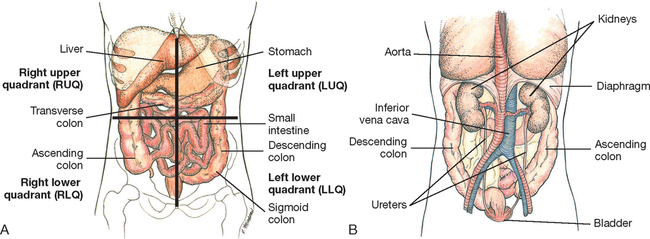
By dividing the abdomen into four imaginary quadrants (Figure 24-29), you can then record assessment findings in relation to each quadrant. For example, you may determine that the patient is experiencing tenderness over the left lower quadrant (LLQ) with normal bowel sounds present.
Inspection
The order of an abdominal examination, or inspection, differs slightly from that in other assessments: inspect and auscultate before you feel the abdomen. Inspect the skin over the abdomen for colour, scars, lesions, wounds, stomas and drains. Inspect for contour and symmetry of the abdomen, noting any masses, bulging or abdominal distension. Common causes of acute abdominal distension are found in Box 24-9. Note bleeding or ooze from surgical wounds and drains. Inspect for the correct functioning of wound vacuum devices and stomas.
Auscultation
Peristalsis, or intestinal motility, is a normal function of the small and large intestine. Bowel sounds are the audible passage of air and fluid created by peristalsis. The warmed diaphragm of the stethoscope is placed lightly over the middle of the abdomen. Because bowel sounds are easily transmitted over the abdomen there is no need to listen in more than one place (Talley & O’Connor 2014).
Normally, air and fluid move through the intestines, creating soft gurgling or clicking sounds that occur irregularly, depending on when the last meal was eaten. Bowel sounds should be described as either present or absent. It normally takes 5–20 seconds to hear a bowel sound, but may take up to 5 minutes of continuous listening before determining the absence of bowel sounds. Absent bowel sounds indicates ileus, or the absence of peristalsis in the bowel. Loud tinkling bowel sounds may be heard with a bowel obstruction.
Percussion
Percussion of the abdomen is done less often, but helps reveal the presence of fluid and air in the stomach and intestines or urine in the bladder. Each quadrant is systematically percussed to assess tympanic areas, dullness and for any pain. A tympanic sound usually predominates because of air in the stomach and intestines. Eliciting pain during percussion is an important sign known as percussion tenderness and suggests peritoneal inflammation.
To assess urinary elimination, percuss the abdomen starting at the symphysis pubis and move towards the umbilicus. A dull percussion note is heard over a distended bladder. Dullness when percussing outwards from the midline over the abdominal flanks signifies fluid. Dullness on percussion may shift with patient position when there are significant ascites and is called shifting dullness (Figure 24-31).

Palpation
Palpation is aimed mainly at detecting areas of abdominal tenderness and noting the quality of abnormal distension or masses. After rubbing your hands together to warm them, use light palpation over each quadrant. Lay the palm of the hand with fingers extended and close together lightly on the abdomen, keeping the palm and forearm horizontal (Figure 24-32). The pads of the fingertips depress approximately 1.5 cm in a gentle dipping motion. Avoid quick jabs and use smooth, coordinated movements. A systematic palpation of each quadrant assesses for muscular resistance, distension, tenderness and superficial masses. While palpating, observe the patient’s face for signs of discomfort. The abdomen is normally smooth with consistent softness and non-tender without masses. The older adult often lacks abdominal tone.
If a sensitive area is palpated, guarding or voluntary muscle contraction may occur. Involuntary guarding may be localised or generalised (rigid abdomen) and is a sign of acute peritonitis. A distended bladder is easy to detect with light palpation. Normally the bladder lies below the umbilicus and above the symphysis pubis. Palpate for a distended bladder if the patient has been unable to void, has been incontinent or if an indwelling urinary catheter is not draining well.
Most organs in the abdomen (liver, kidneys, spleen, bladder) are not normally palpable. For example, easy palpation of the spleen may signify splenomegaly and liver enlargement may accompany ascites in liver failure (Figure 24-33).

Renal system
The kidneys play a central role in maintaining homeostasis. The glomeruli filter blood and excrete unwanted solutes, including the products of metabolism. Hormones act on the kidneys to control body water and help to regulate blood pressure and electrolyte balance. Renal function is closely related to the cardiovascular system and blood pressure regulation. Clinically, investigations such as the estimated glomerular filtration rate (eGFR) and blood urea, creatinine and electrolyte values are the mainstay of routine kidney assessment. However, your bedside-focused fluid balance assessment (see Chapter 33) and renal system assessment skills are critical to detect changes in kidney function (Skill 24-6).
SKILL 24-6 Focused renal assessment
Delegation and other considerations
• Comprehensive patient assessment is the basis for the development of the nursing care plan and therefore should not be delegated by the registered nurse.
• Perform hand hygiene and apply personal protective equipment when appropriate before, during and after patient assessment.
Therapeutic relationship and patient considerations
• Initiates communication by introductions and clarification of patient’s immediate needs and problems
• Identifies how the skill will affect the patient
• Discusses procedure with the patient to clarify understanding
• Assesses patient knowledge and expectations and ensures patient understanding
• Where necessary, provides further clarification
• Explains actions and potential discomfort at all stages of procedure
| STEPS | RATIONALE |
|
1. Review the patient’s baseline assessment data. Review recent blood results for urea and electrolytes (U&Es) and creatinine. |
The key point of clinical examination is to determine if something has changed. Refer to baseline or previous findings to determine an acute change in patient status. |
| Prevents transmission of microorganisms. | |
| Promotes patient’s cooperation and comfort during the assessment. | |
| Assists with performance and interpretation of data. | |
| Reduced or increased urine output may be the earliest signs of impaired renal function. | |
| New abnormal findings require further clinical investigations. | |
|
8. Perform urinalysis (see Chapter 33). |
|
| Certain conditions place patients at high risk of renal alterations (e.g. chronic kidney disease, nephrotoxic medications, shock). | |
| RECORDING AND REPORTING
• Core documentation includes urine output, colour and positive findings on urinalysis, and cumulative fluid balance. Note any new abnormal findings or investigations. • Report early and late warning signs associated with renal deterioration (Box 24-11) as a priority to senior nursing or medical staff. |
|

Most important is measurement of urine output, which should be at least > 0.5 mL/kg/hour in adults. Of course, always check that the IDC is patent and draining properly (check for blocked catheter, kinks or a misplaced catheter) before concluding your patient is not producing urine. Remember to palpate the bladder for distension (see above) or do a bladder scan. Measure and observe urine output for colour and presence of sediment. Is it clear, dark or blood-stained? For example, dark concentrated urine can indicate dehydration and blood-tinged urine (haematuria) is always abnormal. A pungent smell of urine may be a sign of urinary tract infection. Urinalysis needs to be performed (see Chapter 34). If there is no IDC, determine the last time the patient voided (e.g. since returning from surgery).
Determine the patient’s volume status (see Box 24-10). Fluid balance charts are used to record all input and output as well as the results of urinalysis. Recording the daily weight of patients each morning at the same time is often the most accurate way to determine fluid shifts (remember 1 kg = 1 L fluid). Measurement of abdominal girth (cm) and oedematous limbs may also be conducted.
Part of your hydration assessment includes mucous membranes and skin turgor. Grasp a fold of skin on the back of the forearm or over the sternal area with your fingertips and release (Figure 24-34). Normally the skin lifts easily and recoils immediately to its resting position.
Poor skin turgor is when skin is slow to resume its normal contour or shape. With worsening dehydration the skin remains pinched up, called tenting.
Chronic kidney disease patients receiving dialysis treatment may have an arteriovenous fistula observed on the forearm (Figure 24-35) or a Tenkhoff catheter in the abdomen for peritoneal dialysis. Inspect the skin for any signs of infection.

Musculoskeletal system
Following a systematic approach, once the head (CNS), neck and chest (CVS and RESP) and abdomen (GIT and RENAL) are examined, the extremities and skin are carefully assessed. You will have already collected a significant amount of data about these systems. The neurological and musculoskeletal systems are closely interrelated, so assessment is often conducted simultaneously (e.g. limb assessment for Tone/Power/Reflexes/Sensory). General skin inspection also occurs during each system and body region examination.
Key components of a focused musculoskeletal assessment include examination of gait, arms, legs and spine (Skill 24-7). A focused assessment of the musculoskeletal system is especially important when the patient reports pain or loss of function in a joint or muscle. Musculoskeletal assessment is also part of your mobility and falls risk assessment (see Chapter 28).
SKILL 24-7 Focused musculoskeletal assessment
Delegation and other considerations
• Comprehensive patient assessment is the basis for the development of the nursing care plan and therefore should not be delegated by the registered nurse.
• Perform hand hygiene and apply personal protective equipment when appropriate before, during and after patient assessment.
Therapeutic relationship and patient considerations
• Initiates communication by introductions and clarification of patient’s immediate needs and problems
• Identifies how the skill will affect the patient
• Discusses procedure with the patient to clarify understanding
• Assesses patient knowledge and expectations and ensures patient understanding
• Where necessary, provides further clarification
• Explains actions and potential discomfort at all stages of procedure
| STEPS | RATIONALE |
|
1. Review the patient’s baseline assessment data. |
The key point of clinical examination is to determine if something has changed. Refer to baseline or previous findings to determine an acute change in patient status. |
| Prevents transmission of microorganisms. | |
| Promotes patient’s cooperation and comfort during the assessment. | |
| Assists with performance and interpretation of data. | |
| Basic clinical assessment of mobility and falls risk. May indicate need for safety interventions and need for mobility aid. | |
| Certain conditions place patients at high risk of musculoskeletal alterations (e.g. immobility, trauma, risk of falls). | |
| RECORDING AND REPORTING | |

Inspection
You can integrate portions of the musculoskeletal assessment when observing the patient walking (to assess gait), moving in bed or performing any type of physical activity, including self-care activities. Normally, walking is initiated in a smooth and rhythmic motion. The foot is lifted and propelled forwards in a straight line; as the heel strikes the floor, bodyweight is shifted to the ball of the foot. The patient remains erect and balanced during all stages of gait. Routinely observe your patient’s ability to transfer and mobilise during the course of each shift. Observe safe use of mobility aids and need for patient teaching and/or referral to physiotherapist.
The assessment of musculoskeletal function focuses on inspecting major joints for range of motion (ROM). During general inspection, look at the extremities for overall size, alignment and symmetry. Note any deformities, swelling, erythema, bruising, and muscle atrophy. Ask the patient to put each major joint through active full ROM. If passive joint movement is required, then gently support and move the joints of the extremities through their normal ROM. Do not force a joint if there is pain or muscle spasm. Knowledge of each joint’s normal range and the extent to which it can be moved is important to detect abnormal findings (see Chapter 33). Describe your findings using the correct clinical terminology (Table 24-6). Normal joints are non-tender, without swelling and move freely. If a joint appears swollen and inflamed, palpate it for warmth.
TABLE 24-6
Clinical terminology for normal range of motion
| Term | Range of motion | Examples of joints |
| Abduction | Movement of extremity away from midline of body | Leg, arm, fingers |
| Adduction | Movement of extremity towards midline of body | Leg, arm, fingers |
| Dorsiflexion | Flexion of toes and foot upwards | Foot |
| Eversion | Turning of body part away from midline | Foot |
| Extension | Movement increasing angle between two adjoining bones | Elbow, knee, fingers |
| External rotation | Rotation of joint outwards | Knee, hip |
| Flexion | Movement decreasing angle between two adjoining bones; bending of limb | Elbow, fingers, knee |
| Hyperextension | Movement of body part beyond its normal resting extended position | Head |
| Internal rotation | Rotation of joint inwards | Knee, hip |
| Inversion | Turning of body part towards midline | Foot |
| Plantar flexion | Bending of toes and foot downwards | Foot |
| Pronation | Movement of body part so that front or ventral surface faces downwards | Hand, forearm |
| Supination | Movement of body part so that the front or ventral surface faces upwards | Hand, forearm |
Palpation
Apply gentle palpation to bones, joints and surrounding muscles of the extremities and the spine. As you palpate, note any heat, tenderness, oedema or resistance to pressure. Feel for joint crepitus during ROM, which is a grating sensation caused by the rubbing together of synovial surfaces of the joints, such as in osteoarthritis. For assessment of muscle strength, each muscle group is examined comparing left with right, following a routine (e.g. starting with the hand and working upward towards the shoulder). Ask the patient to first flex the muscle to be examined and then resist when opposing force is applied against that flexion (Table 24-7).
TABLE 24-7
Assessing muscle strength
| Muscle group | Manoeuvre |
| Neck (sternocleidomastoid) | Place hand firmly against patient’s upper jaw. Ask patient to turn head laterally against resistance |
| Shoulder (trapezius) | Place hand over midline of patient’s shoulder, exerting firm pressure. Have patient raise shoulders against resistance |
| Biceps | Pull down on forearm as patient attempts to flex arm. |
| Triceps | As patient’s arm is flexed, apply pressure against forearm. Ask patient to straighten arm |
| Quadriceps | When patient is sitting, apply downward pressure to thigh. Ask patient to raise leg up from table |
| Gastrocnemius | Patient sits, holding shin of flexed leg. Ask patient to straighten leg against resistance |
Barkauskas VH et al 2002 Health and physical assessment, 3rd edn. Mosby, St Louis.
Musculoskeletal assessment is also closely tied to neurovascular assessment. Trauma or surgery to limbs increases the risk of compartment syndrome from swelling and sometimes bleeding in the affected limb. This may cause compartments to put excessive pressure on nerves and vascular structures which can result in irreversible tissue injury. For these reasons, neurovascular observations are routine after orthopaedic surgery or trauma as well as in vascular assessment (Figure 24-14).
Integumentary system
RNs are responsible for regular assessment of the skin each shift to prevent skin breakdown and pressure injuries. Patients most at risk of significant skin lesions are those suffering from neurological impairments, chronic illnesses, orthopaedic problems, diminished cognitive and/or mental status, poor tissue oxygenation, low cardiac output, inadequate nutrition and immobility (see Chapter 26). The skin is routinely assessed for colour, temperature, moisture, turgor and oedema (see renal and cardiovascular assessment), as well as for any vascular changes or lesions (Skill 24-8).
SKILL 24-8 Focused skin or integumentary assessment
Delegation and other considerations
• Comprehensive patient assessment is the basis for the development of the nursing care plan and therefore should not be delegated by the registered nurse.
• Perform hand hygiene and apply personal protective equipment when appropriate before, during and after patient assessment.
Therapeutic relationship and patient considerations
• Initiates communication by introductions and clarification of patient’s immediate needs and problems
• Identifies how the skill will affect the patient
• Discusses procedure with the patient to clarify understanding
• Assesses patient knowledge and expectations and ensures patient understanding
• Where necessary, provides further clarification
• Explains actions and potential discomfort at all stages of procedure

Inspection and palpation are used to assess the function and integrity of the integumentary system and mucous membranes, which includes the skin, hair, scalp, oral cavity and nails. Initially either inspect all skin surfaces or assess the skin gradually while other parts of the body are being examined. Remember that the skin is most of what we can see about a patient and skin abnormalities are often associated with other body system disorders.
Colour
The skin is normally free of lesions, except for common freckles or age-related changes such as skin tags, senile keratosis (thickening of skin), cherry angiomas (ruby-red papules) and atrophic warts. Jaundice is a yellowish skin colour that may indicate liver disease, often noticed first in the sclera of the eyes (Figure 24-36). Pallor of the conjunctiva may be a sign of anaemia.

Temperature
The temperature of the skin depends on the amount of blood circulating through the dermis. Therefore a reduction in skin temperature reflects a decrease in blood flow. Use the back of your hands to assess skin temperature. Skin infections, such as cellulitis, result in an area that is red, hot and painful (Figure 24-37).

Moisture
Skin and mucous membranes are assessed for hydration. The skin is normally smooth and dry. Skin folds, such as the axillae, are normally moist. Flaking is the appearance of flakes resembling dandruff when the skin surface is lightly rubbed. Scaling involves fishlike scales that are easily rubbed off the skin’s surface. Both flaking and scaling are common in older adults, people who use excessive amounts of soap and in skin conditions such as eczema and dermatitis. Other factors causing dry skin include lack of humidity, exposure to sun, smoking, stress, excessive perspiration and dehydration.
TABLE 24-8
Skin colour variations
| Colour | Condition | Causes | Assessment locations |
| Cyanosis (bluish) | Increased amount of deoxygenated haemoglobin (associated with hypoxia) | Heart or lung disease | Nail beds, lips, mouth, skin (severe cases) |
| Pallor |
Reduced amount of oxyhaemoglobin Reduced visibility of oxyhaemoglobin resulting from decreased blood flow |
||
| Loss of pigmentation | Vitiligo | Congenital or autoimmune condition causing lack of pigment | Patchy areas on skin over face, hands, arms |
| Jaundice (yellow-orange) | Increased deposit of bilirubin in tissues | Liver disease, destruction of red blood cells | Sclera, mucous membranes, skin |
| Erythema (redness) | Increased visibility of oxyhaemoglobin caused by dilation or increased blood flow | Fever, direct trauma, blushing, alcohol intake | Face, area of trauma, sacrum, shoulders, other common sites for pressure ulcers |
| Tan-brown | Increased amount of melanin | Suntan, pregnancy | Areas exposed to sun |
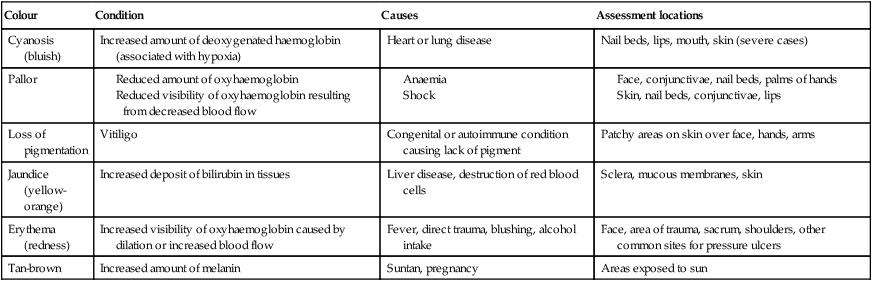
Data from Jacques T, Fisher M, Hillman K et al (eds) 2011 DETECT Manual. Detecting deterioration, evaluation, treatment, escalation and communicating in teams, 3rd edn. NSW Health and Clinical Excellence Commission, Neutral Bay.
Vascularity
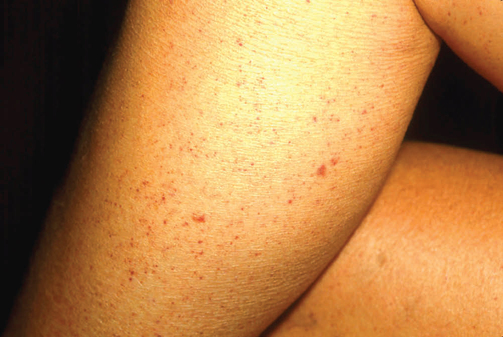
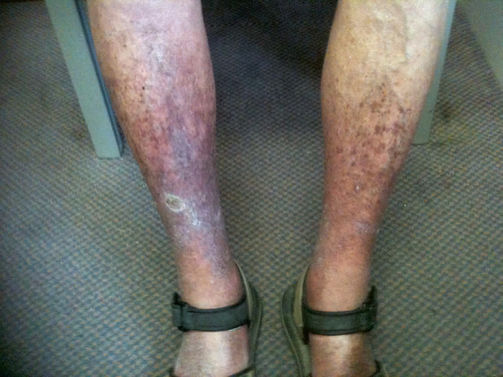
Look for signs of vascular changes during skin assessment. Localised pressure areas, found after a patient has been in one position for a time, appear reddened, pink or pale (see Chapter 30). Petechiae are tiny, pinpoint-sized red or purple spots on the skin caused by small haemorrhages in the skin layers (Figure 24-38). Petechiae may indicate serious blood-clotting disorders, drug reactions or liver disease. You might observe the brownish discolouration of the lower legs in older adults with chronic venous stasis (Figure 24-39).
Skin eruptions can be a sign of acute systemic illness such as allergy and anaphylaxis. Allergy may start simply with an urticarial rash (known as hives; Figure 24-40) and progress rapidly to angioedema (commonly seen in the lips; Figure 24-41) and anaphylactic shock. Quickly notify relevant staff if you see any of these potentially life-threatening signs of allergy.


Documentation and communication of assessment findings
An important aspect of patient assessment is your documentation and communication of events. These are essential for the continuity of effective care of the patient. Your clinical judgement about the patient’s condition based on your assessment, as well as a management plan, must be clearly stated. This defines professional nursing practice and the contribution of nursing to patient care. Clearly document your assessment findings and care plan in the healthcare record or progress notes:
• Nursing notes should be written in a logical, structured way (following your assessment framework).
• Avoid narrative progress notes. They are confusing to other members of the team.
• Use headings to make it thorough but concise.
• There is no clinical requirement to complete every line in the progress notes.
• Some organisations have an electronic health record system. Review this and consider how you might adapt your style of nursing documentation.
Always communicate significant abnormal findings to appropriate nursing and medical staff as a priority. Report data that indicate deterioration in the patient’s condition such as any abnormal finding in your primary survey (ABCDE), as well as clinically significant problems identified during body system assessment. It is imperative that your findings are reported urgently and action taken to keep the patient safe. We recommend you use the ISBAR (identify, situation, background, assessment, recommendation) communication tool when you call to inform a colleague about a problem (see Chapter 13).
Conclusion
The importance of learning how to correctly perform and integrate physical assessment of body systems into your nursing practice cannot be overstated. Patient assessment begins with a primary survey, including vital signs, which then triggers the need for a more focused body systems assessment. The fundamental physical assessment skills for each body system include inspection, palpation, percussion and auscultation. With a little practice, it takes much less time to integrate these skills into a head-to-toe, body systems assessment.
Patient assessment should be targeted or focused on the individual’s needs, so you don’t need to perform every step in every situation. We have focused on the most important skills that a beginning RN will need to apply in everyday practice – but there is much more to learn! Consult a textbook on physical examination when you encounter the need for more advanced or specialist skills.
Communicate your assessment findings in the healthcare record using a logical framework and verbally using an ISBAR approach. Again, use critical thinking skills to be selective in what you report including the most salient positive and negative findings. Always consider how you would like to be treated during a clinical examination: ensure privacy and respect the patient’s preferences.
Online resources
Glasgow Coma Scale video, www.glasgowcomascale.org/.
A practical guide to clinical examination. Excellent images and videos of physical assessment skills, https://meded.ucsd.edu/clinicalmed/
The NSW DETECT Online learning program is available for NSW Health staff or university students through ClinConnect. Provides online education using the ABCDE assessment framework, www.cec.health.nsw.gov.au/programs/between-the-flags.
The UCLA Auscultation Assistant. Provides examples of heart and lung sounds, www.wilkes.med.ucla.edu