Grooming
- • Define the key terms and key abbreviations in this chapter.
- • Explain why grooming is important.
- • Explain how to safely provide grooming measures—hair care, shaving, nail and foot care, and changing garments.
- • Perform the procedures described in this chapter.
- • Explain how to promote PRIDE in the person, the family, and yourself.
Key Terms
anticoagulant A drug that prevents or slows down (anti) blood clotting (coagulate)
dandruff Excessive amounts of dry, white flakes from the scalp
infestation Being in or on a host
mite A very small spider-like organism
pediculosis Infestation with wingless insects; lice
pediculosis capitis Infestation of the scalp (capitis) with lice
pediculosis corporis Infestation of the body (corporis) with lice
pediculosis pubis Infestation of the pubic (pubis) hair with lice
scabies A skin disorder caused by a female mite—a very small spider-like organism
Hair care, shaving, nail and foot care, and clean garments prevent infection and promote comfort. Such measures affect love, belonging, and self-esteem needs.
People differ in their grooming measures. Some want only clean hair. Others want a certain hairstyle. Some want only clean hands. Others want polished nails. Men may shave and groom their beards. Likewise, women may shave their legs and underarms. Some women use hair removal methods for facial hair.
As with hygiene, the person performs grooming measures to the extent possible. This promotes independence and quality of life. The person may use adaptive devices (Fig. 23-1).

See Focus on Surveys: Grooming.
See Teamwork and Time Management: Grooming.
Hair Care
The look and feel of hair affect mental well-being. The nursing process reflects the person's culture, personal choice, skin and scalp conditions, health history, and self-care ability. You assist with hair care as needed.
See Focus on Long-Term Care and Home Care: Hair Care.
Focus on Long-Term Care and Home Care
Hair Care
Long-Term Care
Beauty and barber shops are common in nursing centers (Fig. 23-2). Residents can have their hair shampooed, cut, and styled. Men can have their mustaches and beards groomed.

Skin and Scalp Conditions
Skin and scalp conditions include hair loss, excessive body hair, dandruff, lice, and scabies.
- • Alopecia means hair loss. Hair loss may be complete or partial. A result of heredity, male pattern baldness occurs with aging. Hair thins in some women with aging. Cancer treatments (radiation therapy to the head and chemotherapy) may cause alopecia in all age-groups. Skin disease, stress, poor nutrition, pregnancy, some drugs, and hormone changes are other causes. Except for hair loss from aging, hair usually grows back.
- • Hirsutism is excessive body hair. It can occur in men, women, and children. It results from heredity and abnormal amounts of male hormones.
- • Dandruff is the excessive amount of dry, white flakes from the scalp. Itching is common. Sometimes eyebrows and ear canals are involved. Medicated shampoos correct the problem.
- • Pediculosis (lice) is the infestation with wingless insects (Fig. 23-3). Infestation means being in or on a host. Lice attach their eggs (nits) to hair shafts. Nits are oval and yellow to white in color. They hatch in about 1 week. After hatching, they bite the scalp or skin to feed on blood. About the size of a sesame seed, adult lice are tan to gray-ish white in color. Lice easily spread to others through clothing, head coverings, furniture, beds, towels, bed linens, and sexual contact. They also are spread by sharing combs and brushes. Lice are treated with medicated shampoos, lotions, and creams specific for lice. Thorough bathing is needed. So is washing clothing and linens in hot water. Lice bites cause severe itching in the affected body area.
- • Pediculosis capitis is the infestation of the scalp (capitis) with lice. It is commonly called “head lice.”
- • Pediculosis pubis is the infestation of the pubic (pubis) hair with lice. This form of lice is also called “crabs.”
- • Pediculosis corporis is the infestation of the body (corporis) with lice.
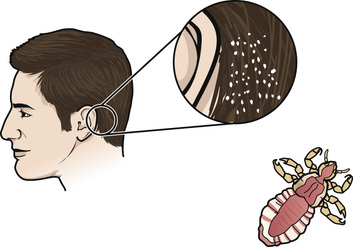 FIGURE 23-3 Head lice. (Redrawn from Medline Plus: Head lice. Bethesda, Md., National Institutes of Health.)
 - • Scabies is a skin disorder caused by a female mite (Fig. 23-4). A mite is a very small spider-like organism. The female mite burrows into the skin and lays eggs. After hatching, the females produce more eggs. Infested with mites, the person has a rash and intense itching. Common sites are between the fingers, the wrists, underarm areas, thighs, and genital area. Other sites include the breasts, waist, and buttocks. Highly contagious, scabies is transmitted to others by close contact. Persons in crowded living settings are at risk. So are persons with weakened immune systems. Special creams are ordered to kill the mites. The person's room is cleaned. Clothing and linens are washed in hot water.
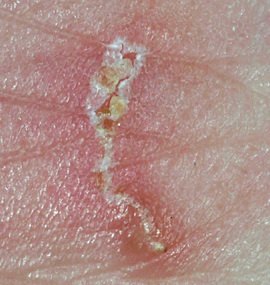 FIGURE 23-4 Scabies. (From Marks JG, Miller JJ: Lookingbill & Marks' principles of dermatology, ed 4, St Louis, 2006, Saunders.)
 Brushing and Combing Hair
Brushing and combing hair are part of early morning care, morning care, and afternoon care. Some people also do so at bedtime. Provide hair care when needed and before visitors arrive.
Encourage patients and residents to do their own hair care. The person chooses how to brush, comb, and style hair. Assist as needed. Provide hair care for those who cannot do so.
Brushing increases blood flow to the scalp. And it brings scalp oils along the hair shaft to help keep hair soft and shiny. Daily brushing and combing prevent tangled and matted hair. To brush and comb hair, start at the scalp. Then brush or comb to the hair ends.
Braiding prevents long hair from matting and tangling. You need the person's consent to braid hair. Report matted or tangled hair to the nurse. The nurse may have you comb or brush through the matting and tangling from the hair ends to the scalp. Never cut the person's hair.
Special measures are needed for curly, coarse, and dry hair. For curly hair, use a wide-tooth comb. Start at the neckline. Working upward, lift and fluff hair outward. Continue to the forehead. Wet hair or apply conditioner, petroleum jelly, or other hair care product as directed. This makes combing easier. Follow the care plan for coarse and dry hair.
The person may have certain hair care practices and products. They are part of the care plan. Also, let the person guide you when giving hair care.
See Caring about Culture: Brushing and Combing Hair.
See Focus on Children and Older Persons: Brushing and Combing Hair.
See Delegation Guidelines: Brushing and Combing Hair.
See Promoting Safety and Comfort: Brushing and Combing Hair.
See procedure: Brushing and Combing Hair, p. 370.
 Caring About Culture
Brushing and Combing Hair
Small braids (cornrows) are common in some cultural groups. The braids are left intact for shampooing. To undo these braids, the nurse obtains the person's consent.
 Brushing and Combing Hair


Quality of Life
- • Knock before entering the person's room.
- • Address the person by name.
- • Introduce yourself by name and title.
- • Explain the procedure before starting and during the procedure.
- • Protect the person's rights during the procedure.
- • Handle the person gently during the procedure.
Pre-Procedure
- 1 Follow Delegation Guidelines: Brushing and Combing Hair, p. 369. See Promoting Safety and Comfort: Brushing and Combing Hair, p. 369.
- 2 Practice hand hygiene.
- 3 Identify the person. Check the ID (identification) bracelet against the assignment sheet. Use 2 identifiers (Chapter 13). Also call the person by name.
- 4 Ask the person how to style hair.
- 5 Collect the following.
- 6 Arrange items on the bedside stand.
- 7 Provide for privacy.
Procedure
- 8 Lower the bed rail if up.
- 9 Position the person.
- 10 Place a towel across the person's back and shoulders or across the pillow.
- 11 Ask the person to remove eyeglasses. Put them in the eyeglass case. Put the case inside the bedside stand.
- 12 Brush and comb hair that is not matted or tangled.
- a Use the comb to part the hair.
- 1) Part hair down the middle into 2 sides (Fig. 23-5, A).
 FIGURE 23-5 Part hair. A, Part hair down the middle. Divide it into 2 sides. B, Then part 1 side into 2 smaller sections.
 - 2) Divide 1 side into 2 smaller sections (Fig. 23-5, B).
- 1) Part hair down the middle into 2 sides (Fig. 23-5, A).
- b Brush 1 of the small sections of hair. Start at the scalp and brush toward the hair ends (Fig. 23-6). Do the same for the other small section of hair.
 FIGURE 23-6 Brush hair by starting at the scalp. Brush down to the hair ends.
 - c Repeat steps 12, a(2) and b for the other side.
- a Use the comb to part the hair.
- 13 Brush or comb matted or tangled hair.
- 14 Style the hair as the person prefers.
- 15 Remove the towel.
- 16 Let the person put on the eyeglasses.
Post-Procedure
- 17 Provide for comfort. (See the inside of the front cover.)
- 18 Place the call light and other needed items within reach.
- 19 Lower the bed to a safe and comfortable level for the person. Follow the care plan.
- 20 Raise or lower bed rails. Follow the care plan.
- 21 Remove hair from the brush or comb. Clean and return hair care items to their proper place. Wear gloves for this step. Remove and discard the gloves. Practice hand hygiene.
- 22 Unscreen the person.
- 23 Complete a safety check of the room. (See the inside of the front cover.)
- 24 Follow agency policy for used linens.
- 25 Practice hand hygiene.
Shampooing
People vary in shampoo frequency—1, 2, or 3 times a week or daily. Factors affecting frequency include hair and scalp condition, hairstyle, and personal choice.
Some persons use certain shampoos and conditioners. Others use medicated products ordered by the doctor.
The person may need help shampooing. The nurse tells you what method to use. The shampoo method depends on the person's condition, safety factors, and personal choice.
- • Shampoo during the shower or tub bath. You use a hand-held nozzle for persons in shower chairs or taking tub baths. Direct a spray of water at the hair.
- • Shampoo at the sink. The person sits or lies facing away from the sink. A folded towel placed over the sink edge protects the neck. The person's head is tilted back over the sink edge (Fig. 23-7). Use a water pitcher or hand-held nozzle to wet and rinse the hair.
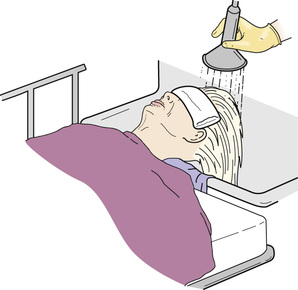 FIGURE 23-7 Shampooing while the person is on a stretcher. The stretcher is in front of the sink.
 - • Shampoo in bed. The person's head and shoulders are at the edge of the bed if possible. A shampoo tray is under the head to protect the linens and mattress from water. The tray drains into a basin on a chair by the bed (Fig. 23-8). Use a water pitcher to wet and rinse the hair. This method is used for persons:
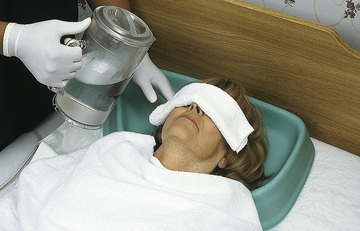 FIGURE 23-8 A shampoo tray for a person in bed. The tray is directed to the side of the bed so water drains into a collecting basin.
Some agencies have commercial shampoo caps. The cap has a cleaning agent that does not need rinsing. Some caps also have a conditioner. To use a shampoo cap:
- • Warm the package in a microwave oven or commercial warmer. Follow the manufacturer's instructions for microwave settings and warming times.
- • Check the temperature. The cap should be warm. Do not use a cap that is too hot.
- • Apply the cap to the person's head.
- • Massage the cap gently. Follow the manufacturer's instructions for how long to massage—usually 1 to 3 minutes. Longer hair may require more time.
- • Remove the cap. You do not need to rinse the hair. Dry the hair with a towel if needed.
- • Comb the hair.
Dry and style hair as soon as possible after the shampoo. Women may want hair curled or rolled up before drying. Check with the nurse before doing so.
See Focus on Children and Older Persons: Shampooing.
See Focus on Long-Term Care and Home Care: Shampooing, p. 372.
See Delegation Guidelines: Shampooing, p. 372.
See Promoting Safety and Comfort: Shampooing, p. 372.
See procedure: Shampooing the Person's Hair, p. 373.
Shampooing the Person's Hair
Quality of Life
- • Knock before entering the person's room.
- • Address the person by name.
- • Introduce yourself by name and title.
- • Explain the procedure before starting and during the procedure.
- • Protect the person's rights during the procedure.
- • Handle the person gently during the procedure.
Pre-Procedure
- 1 Follow Delegation Guidelines: Shampooing. See Promoting Safety and Comfort: Shampooing.
- 2 Practice hand hygiene.
- 3 Collect the following.
- 4 Arrange items nearby.
- 5 Identify the person. Check the ID bracelet against the assignment sheet. Use 2 identifiers (Chapter 13). Also call the person by name.
- 6 Provide for privacy.
- 7 Raise the bed for body mechanics for a shampoo in bed. Bed rails are up if used.
- 8 Practice hand hygiene.
Procedure
- 9 Lower the bed rail near you if up.
- 10 Cover the person's chest with a bath towel.
- 11 Brush and comb the hair to remove snarls and tangles.
- 12 Position the person for the method used. For a shampoo in bed:
- 13 Raise the bed rail if used.
- 14 Obtain water. Water temperature is usually 105°F (40.5°C). Test water temperature according to agency policy. Also ask the nurse to check the water. Adjust the water temperature as needed. Raise the bed rail before leaving the bedside.
- 15 Lower the bed rail near you if up.
- 16 Put on gloves (if needed).
- 17 Ask the person to hold a washcloth over the eyes. It should not cover the nose and mouth. (NOTE: A damp washcloth is easier to hold. It will not slip. However, your agency may require a dry washcloth.)
- 18 Use the water pitcher or nozzle to wet the hair.
- 19 Apply a small amount of shampoo.
- 20 Work up a lather with both hands. Start at the hairline. Work toward the back of the head.
- 21 Massage the scalp with your fingertips. Do not scratch the scalp with your fingernails.
- 22 Rinse the hair until the water runs clear.
- 23 Repeat steps 19 through 22.
- 24 Apply conditioner. Follow directions on the container.
- 25 Squeeze water from the person's hair.
- 26 Cover the hair with a bath towel.
- 27 Remove the shampoo tray, basin, and waterproof pad.
- 28 Dry the person's face with a towel. Use the towel on the person's chest.
- 29 Help the person raise the head if appropriate. For the person in bed, raise the head of the bed.
- 30 Rub the hair and scalp with the towel. Rub gently. Use the second towel if the first one is wet.
- 31 Comb the hair to remove snarls and tangles.
- 32 Dry and style hair.
- 33 Remove and discard the gloves (if used). Practice hand hygiene.
Post-Procedure
- 34 Provide for comfort. (See the inside of the front cover.)
- 35 Place the call light and other needed items within reach.
- 36 Lower the bed to a safe and comfortable level for the person. Follow the care plan.
- 37 Raise or lower bed rails. Follow the care plan.
- 38 Unscreen the person.
- 39 Complete a safety check of the room. (See the inside of the front cover.)
- 40 Clean, rinse, dry, and return equipment to its proper place. Remember to clean the comb and brush. Wear gloves for this step. Discard disposable items. Remove and discard the gloves.
- 41 Follow agency policy for used linens.
- 42 Practice hand hygiene.
- 43 Report and record your observations.
Shaving
Many men shave for comfort and well-being. Many women shave their legs and underarms. Some women shave facial hair. Other hair removal methods include waxing, hair removal products, plucking, and threading. See Box 23-1 for shaving rules.
Safety razors or electric shavers are used (Fig. 23-9). Some persons have their own electric shavers. If the agency's shaver is used, clean it before and after use. To brush out whiskers or hair, follow the manufacturer's instructions. Also follow agency policy for cleaning electric shavers.
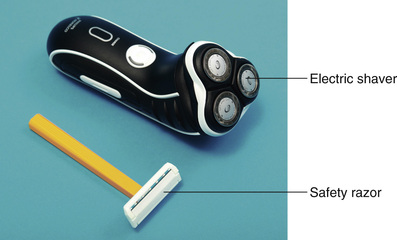
Safety razors (blade razors) have razor blades. They can cause nicks and cuts. Do not use safety razors on persons with healing problems or for those taking anticoagulant drugs. An anticoagulant is a drug that prevents or slows down (anti) blood clotting (coagulate). Bleeding occurs easily and is hard to stop. A nick or cut can cause serious bleeding. Electric shavers are used.
Soften the beard before shaving. To do so, apply a moist, warm washcloth or towel for a few minutes. Then pat dry the face and apply talcum powder if using an electric shaver. For a safety razor, lather the face with soap and water or shaving cream.
See Focus on Children and Older Persons: Shaving.
See Delegation Guidelines: Shaving.
See Promoting Safety and Comfort: Shaving.
See procedure: Shaving the Person's Face With a Safety Razor.
Shaving the Person's Face With a Safety Razor
Quality of Life
- • Knock before entering the person's room.
- • Address the person by name.
- • Introduce yourself by name and title.
- • Explain the procedure before starting and during the procedure.
- • Protect the person's rights during the procedure.
- • Handle the person gently during the procedure.
Pre-Procedure
- 1 Follow Delegation Guidelines: Shaving. See Promoting Safety and Comfort: Shaving.
- 2 Practice hand hygiene.
- 3 Collect the following.
- 4 Arrange paper towels and supplies on the over-bed table.
- 5 Identify the person. Check the ID bracelet against the assignment sheet. Use 2 identifiers (Chapter 13). Also call the person by name.
- 6 Provide for privacy.
- 7 Raise the bed for body mechanics. Bed rails are up if used.
Procedure
- 8 Fill the wash basin with warm water.
- 9 Place the basin on the over-bed table.
- 10 Lower the bed rail near you if up.
- 11 Practice hand hygiene. Put on gloves.
- 12 Assist the person to semi-Fowler's position if allowed or to the supine position.
- 13 Adjust lighting to clearly see the person's face.
- 14 Place the towel over the person's chest and shoulders.
- 15 Adjust the over-bed table for easy reach.
- 16 Tighten the razor blade to the shaver if necessary.
- 17 Wash the person's face. Do not dry.
- 18 Wet the washcloth or towel. Wring it out.
- 19 Apply the washcloth or towel to the face for a few minutes.
- 20 Apply shaving cream with your hands. Or use a shaving brush to apply lather.
- 21 Hold the skin taut with 1 hand.
- 22 Shave in the direction of hair growth. Use shorter strokes around the chin and lips (Fig. 23-10, p. 376).
 FIGURE 23-10 Shave the face in the direction of hair growth. Use long strokes on the larger areas of the face. Use short strokes around the chin and lips.
 - 23 Rinse the razor often. Wipe it with tissues or paper towels.
- 24 Apply direct pressure to any bleeding areas (Chapter 54).
- 25 Wash off any remaining shaving cream or soap. Pat dry with a towel.
- 26 Apply after-shave or lotion if requested. (If there are nicks or cuts, do not apply after-shave or lotion.)
- 27 Remove and discard the towel and gloves. Practice hand hygiene.
Post-Procedure
- 28 Provide for comfort. (See the inside of the front cover.)
- 29 Place the call light and other needed items within reach.
- 30 Lower the bed to a safe and comfortable level for the person. Follow the care plan.
- 31 Raise or lower bed rails. Follow the care plan.
- 32 Clean, rinse, dry, and return equipment and supplies to their proper place. Discard the razor blade or disposable razor into the sharps container. Discard other disposable items. Wear gloves.
- 33 Wipe off the over-bed table with paper towels. Discard the paper towels.
- 34 Unscreen the person.
- 35 Complete a safety check of the room. (See the inside of the front cover.)
- 36 Follow agency policy for used linens.
- 37 Remove and discard the gloves. Practice hand hygiene.
- 38 Report nicks, cuts, irritation, or bleeding to the nurse at once. Also report and record other observations.
Caring for Mustaches and Beards
Mustaches and beards need daily care. Food can collect in the whiskers. So can mouth and nose drainage. Daily washing and combing are needed. Ask the person how to groom his mustache or beard. Never trim a mustache or beard.
Shaving Legs and Underarms
Many women shave their legs and underarms. This practice varies among cultures. Some women shave only the lower legs. Others shave to mid-thigh or the entire leg.
To shave legs and underarms:
- • Follow the rules in Box 23-1.
- • Collect shaving items with bath items.
- • Shave after bathing. The skin is soft at this time.
- • Use soap and water, shaving cream, or lotion for the lather. Follow the care plan.
- • Use the kidney basin to rinse the razor. Do not use bath water.
Nail and Foot Care
Nail and foot care prevents infection, injury, and odors. Hangnails, ingrown nails (nails that grow in at the side), and nails torn away from the skin cause skin breaks. These breaks are portals of entry for microbes. Long or broken nails can scratch skin and snag clothing.
The feet are easily injured and infected. Dirty feet, socks, or stockings harbor microbes and cause odors. Shoes and socks provide a warm, moist environment for microbes to grow. Injuries occur from stubbing toes, stepping on sharp objects, or being stepped on. Poorly fitting shoes cause blisters.
Poor circulation prolongs healing. Diabetes and vascular diseases are common causes of poor circulation. Foot injuries or infections are very serious for older persons and persons with circulatory disorders. Gangrene and amputation are serious complications (Chapter 44).
Nails are easier to trim and clean right after soaking or bathing. Use nail clippers to cut fingernails. Never use scissors. Use extreme caution to prevent damage to nearby tissues.
Trimming and clipping toenails can easily cause injuries. Some agencies do not let nursing assistants cut or trim toenails. Follow agency policy.
See Teamwork and Time Management: Nail and Foot Care.
See Focus on Long-Term Care and Home Care: Nail and Foot Care.
See Delegation Guidelines: Nail and Foot Care.
See Promoting Safety and Comfort: Nail and Foot Care.
See procedure: Giving Nail and Foot Care, p. 378.
Promoting Safety and Comfort
Nail and Foot Care
Safety
To cut fingernails, use nail clippers. Clip the fingernails straight across (Fig. 23-11). Then file the nails.

Remember, some states and agencies do not let nursing assistants cut and trim toenails. The RN (registered nurse) or podiatrist (foot [pod] doctor) cuts toenails and provides foot care for the following persons. You do not cut or trim the toenails for persons who:
- • Have diabetes
- • Have poor circulation to the legs and feet
- • Take drugs that affect blood clotting
- • Have very thick nails or ingrown toenails
Check between the toes for cracks and sores. These areas are often overlooked. If not treated, a serious infection could occur.
The feet are easily burned. Persons with decreased sensation or circulatory problems may not feel hot temperatures.
After soaking, apply lotion or petroleum jelly to the feet. This can cause slippery feet. Help the person put on non-skid footwear before you transfer the person or let the person walk.
Breaks in the skin and bleeding can occur. Follow Standard Precautions and the Bloodborne Pathogen Standard.
Comfort
Sometimes you just trim the fingernails. Sometimes you just give foot care. To do both, the person sits at the over-bed table (Fig. 23-12). Provide for warmth and comfort.

Promote your own comfort during nail and foot care. Sit in front of the over-bed table to clean and trim fingernails. For foot care, rest the person's lower leg and foot on your lap. Or position the feet on the floor and kneel on the floor. Lay a towel across your lap or put a bath mat on the floor to protect your uniform. Use good body mechanics. Always support the person's foot and ankle during foot care.
Giving Nail and Foot Care
Quality of Life
- • Knock before entering the person's room.
- • Address the person by name.
- • Introduce yourself by name and title.
- • Explain the procedure before starting and during the procedure.
- • Protect the person's rights during the procedure.
- • Handle the person gently during the procedure.
Pre-Procedure
- 1 Follow Delegation Guidelines: Nail and Foot Care, p. 377. See Promoting Safety and Comfort: Nail and Foot Care, p. 377.
- 2 Practice hand hygiene.
- 3 Collect the following.
- 4 Arrange paper towels and other items on the over-bed table.
- 5 Identify the person. Check the ID bracelet against the assignment sheet. Use 2 identifiers (Chapter 13). Also call the person by name.
- 6 Provide for privacy.
- 7 Assist the person to the bedside chair. Remove footwear and socks or stockings. Place the call light and other needed items within reach.
Procedure
- 8 Place the bath mat under the feet.
- 9 Fill the wash basin or whirlpool foot bath
 (two-thirds) full with water. The nurse tells you what water temperature to use. (Measure water temperature with a bath thermometer. Or test it by dipping your elbow or inner wrist into the basin. Follow agency policy.) Also ask the person to check the water temperature. Adjust the water temperature as needed.
 - 10 Place the basin or foot bath on the bath mat.
- 11 Put on gloves.
- 12 Help the person put his or her bare feet into the basin or foot bath. Both feet are completely covered by water.
- 13 Adjust the over-bed table in front of the person.
- 14 Fill the kidney basin
 (two-thirds) full with water. See step 9 for water temperature.
 - 15 Place the kidney basin on the over-bed table.
- 16 Place the person's fingers into the basin. Position the arms for comfort (see Fig. 23-12).
- 17 Let the fingers soak for 5 to 10 minutes. Let the feet soak for 15 to 20 minutes. Re-warm water as needed.
- 18 Remove the kidney basin.
- 19 Dry the hands and between the fingers thoroughly.
- 20 Clean under the fingernails with the orangewood stick. Use a towel to wipe the orangewood stick after each nail.
- 21 Push cuticles back with the orangewood stick or a washcloth (Fig. 23-13).
 FIGURE 23-13 Push the cuticle back with an orangewood stick.
 - 22 Clip fingernails straight across with the nail clippers (see Fig. 23-11).
- 23 File and shape nails with an emery board or nail file. Nails are smooth with no rough edges. Check each nail for smoothness. File as needed.
- 24 Apply lotion to the hands. Warm lotion before applying it.
- 25 Move the over-bed table to the side.
- 26 Remove and discard the gloves. Practice hand hygiene. Put on clean gloves. (NOTE: Some state competency tests require clean gloves for foot care.)
- 27 Lift a foot out of the water. Support the foot and ankle with 1 hand. With your other hand, wash the foot and between the toes with soap and a washcloth. Return the foot to the water for rinsing. Make sure you rinse between the toes.
- 28 Repeat step 27 for the other foot.
- 29 Remove the feet from the basin or foot bath. Dry thoroughly, especially between the toes. Support the foot and ankle as needed.
- 30 Apply lotion or petroleum jelly to the tops, soles, and heels of the feet. Do not apply between the toes. Warm lotion or petroleum jelly before applying it. Remove excess lotion or petroleum jelly with a towel. Support the foot and ankle as needed.
- 31 Remove and discard the gloves. Practice hand hygiene.
- 32 Help the person put on non-skid footwear.
Post-Procedure
- 33 Provide for comfort. (See the inside of the front cover.)
- 34 Place the call light and other needed items within reach.
- 35 Raise or lower bed rails. Follow the care plan.
- 36 Clean, rinse, dry, and return equipment and supplies to their proper place. Discard disposable items. Wear gloves.
- 37 Unscreen the person.
- 38 Complete a safety check of the room. (See the inside of the front cover.)
- 39 Follow agency policy for used linens.
- 40 Remove and discard the gloves. Practice hand hygiene.
- 41 Report and record your observations.
Changing Garments
Hospital patients usually wear patient gowns or other sleepwear. Nursing center residents wear street clothes during the day and sleepwear at bedtime. Garments are changed:
Dressing and Undressing
When assisting with dressing and undressing, follow the rules in Box 23-2.
See Focus on Communication: Dressing and Undressing.
See Focus on Children and Older Persons: Dressing and Undressing.
See Focus on Long-Term Care and Home Care: Dressing and Undressing.
See Delegation Guidelines: Dressing and Undressing, p. 380.
See Promoting Safety and Comfort: Dressing and Undressing, p. 380.
See procedure: Undressing the Person, p. 380.
See procedure: Dressing the Person, p. 382.
Undressing the Person
Quality of Life
- • Knock before entering the person's room.
- • Address the person by name.
- • Introduce yourself by name and title.
- • Explain the procedure before starting and during the procedure.
- • Protect the person's rights during the procedure.
- • Handle the person gently during the procedure.
Pre-Procedure
- 1 Follow Delegation Guidelines: Dressing and Undressing. See Promoting Safety and Comfort: Dressing and Undressing.
- 2 Ask a co-worker to help turn and position the person if needed.
- 3 Practice hand hygiene.
- 4 Collect a bath blanket and clothing as requested by the person.
- 5 Identify the person. Check the ID bracelet against the assignment sheet. Use 2 identifiers (Chapter 13). Also call the person by name.
- 6 Provide for privacy.
- 7 Raise the bed for body mechanics. Bed rails are up if used.
- 8 Lower the bed rail on the person's weak side.
- 9 Position him or her supine.
- 10 Cover the person with a bath blanket. Fan-fold linens to the foot of the bed.
Procedure
- 11 Remove garments that open in back.
- a Raise the head and shoulders. Or turn him or her onto the side away from you.
- b Undo buttons, zippers, ties, or snaps.
- c Bring the sides of the garment to the sides of the person (Fig. 23-14). For a side-lying position, tuck the far side under the person. Fold the near side onto the chest (Fig. 23-15).
 FIGURE 23-14 The sides of the garment are brought from the back to the sides of the person. (NOTE: The “weak” side is indicated by slash marks.)
 FIGURE 23-15 A garment that opens in the back is removed from the person in the side-lying position. The far side of the garment is tucked under the person. The near side is folded onto the person's chest. (NOTE: The “weak” side is indicated by slash marks.)
 - d Position the person supine.
- e Slide the garment off the shoulder on the strong side. Remove it from the arm (Fig. 23-16).
 FIGURE 23-16 The garment is removed from the strong side first. (NOTE: The “weak” side is indicated by slash marks.)
 - f Remove the garment from the weak side.
- 12 Remove garments that open in the front.
- a Undo buttons, zippers, ties, or snaps.
- b Slide the garment off the shoulder and arm on the strong side.
- c Assist the person to sit up or raise the head and shoulders. Bring the garment over to the weak side (Fig. 23-17).
 FIGURE 23-17 A front-opening garment is removed with the person's head and shoulders raised. The garment is removed from the strong side first. Then it is brought around the back to the weak side. (NOTE: The “weak” side is indicated by slash marks.)
 - d Lower the head and shoulders. Remove the garment from the weak side.
- e If you cannot raise the head and shoulders:
- 1) Turn the person toward you. Tuck the removed part under the person.
- 2) Turn him or her onto the side away from you.
- 3) Pull the side of the garment out from under the person. Make sure he or she will not lie on it when supine.
- 4) Return the person to the supine position.
- 5) Remove the garment from the weak side.
- 13 Remove pullover garments.
- a Undo any buttons, zippers, ties, or snaps.
- b Remove the garment from the strong side.
- c Raise the head and shoulders. Or turn the person onto the side away from you. Bring the garment up to the person's neck (Fig. 23-18, p. 382).
 FIGURE 23-18 A pullover garment is removed from the strong side first. Then the garment is brought up to the person's neck so that it can be removed from the weak side. (NOTE: The “weak” side is indicated by slash marks.)
 - d Bring the garment over the person's head.
- e Remove the garment from the weak side.
- f Position him or her in the supine position.
- 14 Remove pants or slacks.
- a Remove footwear and socks.
- b Position the person supine.
- c Undo buttons, zippers, ties, snaps, or buckles.
- d Remove the belt.
- e Ask the person to lift the buttocks off the bed. Slide the pants down over the hips and buttocks (Fig. 23-19, p. 382). Have the person lower the hips and buttocks.
 FIGURE 23-19 The person lifts the hips and buttocks to remove the pants. The pants are slid down over the hips and buttocks. (NOTE: The “weak” side is indicated by slash marks.)
 - f If the person cannot raise the hips off the bed:
- 1) Turn the person toward you.
- 2) Slide the pants off the hip and buttocks on the strong side (Fig. 23-20, p. 382).
 FIGURE 23-20 Pants are removed in the side-lying position. They are removed from the strong side first. They are slid over the hip and buttock. (NOTE: The “weak” side is indicated by slash marks.)
 - 3) Turn the person away from you.
- 4) Slide the pants off the hip and buttocks on the weak side (Fig. 23-21, p. 382).
 FIGURE 23-21 The person is turned onto the strong side. The pants are removed from the weak side. (NOTE: The “weak” side is indicated by slash marks.)
- g Slide the pants down the legs and over the feet.
- 15 Dress the person. See procedure: Dressing the Person, p. 382.
Post-Procedure
- 16 Provide for comfort. (See the inside of the front cover.)
- 17 Place the call light and other needed items within reach.
- 18 Lower the bed to a safe and comfortable level for the person. Follow the care plan.
- 19 Raise or lower bed rails. Follow the care plan.
- 20 Unscreen the person.
- 21 Complete a safety check of the room. (See the inside of the front cover.)
- 22 Follow agency policy for soiled clothing.
- 23 Practice hand hygiene.
- 24 Report and record your observations.
Dressing the Person
Quality of Life
- • Knock before entering the person's room.
- • Address the person by name.
- • Introduce yourself by name and title.
- • Explain the procedure before starting and during the procedure.
- • Protect the person's rights during the procedure.
- • Handle the person gently during the procedure.
Pre-Procedure
- 1 Follow Delegation Guidelines: Dressing and Undressing, p. 380. See Promoting Safety and Comfort: Dressing and Undressing, p. 380.
- 2 Ask a co-worker to help turn and position the person if needed.
- 3 Practice hand hygiene.
- 4 Ask the person what he or she would like to wear.
- 5 Get a bath blanket and clothing requested by the person.
- 6 Identify the person. Check the ID bracelet against the assignment sheet. Use 2 identifiers (Chapter 13). Also call the person by name.
- 7 Provide for privacy.
- 8 Raise the bed for body mechanics. Bed rails are up if used.
- 9 Lower the bed rail (if up) on the person's weak side.
- 10 Position the person supine.
- 11 Cover the person with a bath blanket. Fan-fold linens to the foot of the bed.
- 12 Undress the person. (See procedure: Undressing the Person, p. 380.)
Procedure
- 13 Put on garments that open in the back.
- a Slide the garment onto the arm and shoulder of the weak side.
- b Slide the garment onto the arm and shoulder of the strong side.
- c Raise the person's head and shoulders.
- d Bring the sides to the back.
- e If you cannot raise the person's head and shoulders:
- 1) Turn the person toward you.
- 2) Bring 1 side of the garment to the person's back (Fig. 23-22, A).
 FIGURE 23-22 Dressing a person. A, The side-lying position can be used to put on garments that open in the back. Turn the person toward you after the garment is put on the arms. The side of the garment is brought to the person's back. B, Then turn the person away from you. The other side of the garment is brought to the back and fastened. (NOTE: The “weak” side is indicated by slash marks.)
 - 3) Turn the person away from you.
- 4) Bring the other side to the person's back (Fig. 23-22, B).
- f Fasten buttons, zippers, ties, snaps, or other closures.
- g Position the person supine.
- 14 Put on garments that open in the front.
- a Slide the garment onto the arm and shoulder on the weak side.
- b Raise the head and shoulders. Bring the side of the garment around to the back. Lower the person down. Slide the garment onto the arm and shoulder of the strong arm.
- c If the person cannot raise the head and shoulders:
- d Fasten buttons, zippers, ties, snaps, or other closures.
- 15 Put on pullover garments.
- a Position the person supine.
- b Slide the arm and shoulder of the garment onto the weak side (Fig. 23-23, A, p. 384).
 FIGURE 23-23 Applying pullover garments. A, The garment is applied to the weak side first. B, The garment is brought up over the head. The arms and shoulder of the garment are slid onto the strong side. (NOTE: The “weak” side is indicated by slash marks.)
 - c Raise the person's head and shoulders.
- d Bring the neck of the garment over the head.
- e Slide the arm and shoulder of the garment onto the strong side (Fig. 23-23, B, p. 384).
- f Bring the garment down.
- g If the person cannot assume a semi-sitting position:
- 1) Bring the neck of the garment over the head.
- 2) Slide the arm and shoulder of the garment onto the strong side.
- 3) Turn the person onto the strong side.
- 4) Pull the garment down on the person's weak side.
- 5) Turn the person onto the weak side.
- 6) Pull the garment down on the person's strong side.
- 7) Position the person supine.
- 16 Put on pants or slacks:
- a Slide the pants over the feet and up the legs.
- b Ask the person to raise the hips and buttocks off the bed.
- c Bring the pants up over the buttock and hip on the weak side.
- d Pull the pants over the buttock and hip on the strong side.
- e If the person cannot raise the hips and buttocks:
- f Fasten buttons, zippers, ties, snaps, a belt buckle, or other closures.
- 17 Put socks and non-skid footwear on the person. Make sure socks are up all the way and smooth.
- 18 Help the person get out of bed. If the person stays in bed, cover the person. Remove the bath blanket.
Post-Procedure
- 19 Provide for comfort. (See the inside of the front cover.)
- 20 Place the call light and other needed items within reach.
- 21 Lower the bed to a safe and comfortable level for the person. Follow the care plan.
- 22 Raise or lower bed rails. Follow the care plan.
- 23 Unscreen the person.
- 24 Complete a safety check of the room. (See the inside of the front cover.)
- 25 Follow agency policy for soiled clothing.
- 26 Practice hand hygiene.
- 27 Report and record your observations.
Changing Patient Gowns
Many patients wear patient gowns. So do some nursing center residents. Gowns are usually worn for IV (intravenous) therapy (Chapter 28). Some agencies have IV therapy gowns that open along the sleeve and close with ties, snaps, or Velcro. Sometimes standard gowns are used.
For injury or paralysis, remove the gown from the strong arm first. Support the weak arm while removing the gown. Put the clean gown on the weak arm first and then on the strong arm.
See Delegation Guidelines: Changing Patient Gowns.
See Promoting Safety and Comfort: Changing Patient Gowns.
See procedure: Changing a Patient Gown on a Person With an IV.
Changing a Patient Gown on a Person With an IV
Quality of Life
- • Knock before entering the person's room.
- • Address the person by name.
- • Introduce yourself by name and title.
- • Explain the procedure before starting and during the procedure.
- • Protect the person's rights during the procedure.
- • Handle the person gently during the procedure.
Pre-Procedure
- 1 Follow Delegation Guidelines: Changing Patient Gowns. See Promoting Safety and Comfort: Changing Patient Gowns.
- 2 Practice hand hygiene.
- 3 Get a clean gown and bath blanket.
- 4 Identify the person. Check the ID bracelet against the assignment sheet. Use 2 identifiers (Chapter 13). Also call the person by name.
- 5 Provide for privacy.
- 6 Raise the bed for body mechanics. Bed rails are up if used.
Procedure
- 7 Lower the bed rail near you (if up).
- 8 Cover the person with the bath blanket. Fan-fold linens to the foot of the bed.
- 9 Untie the gown. Free parts that the person is lying on.
- 10 Remove the gown from the arm with no IV.
- 11 Gather up the sleeve of the arm with the IV. Slide it over the IV site and tubing. Remove the arm and hand from the sleeve (Fig. 23-24, A).
 FIGURE 23-24 Changing a gown. A, The gown is removed from the arm with no IV. The sleeve on the arm with the IV is gathered up, slipped over the IV site and tubing, and removed from the arm and hand. B, The gathered sleeve is slipped along the IV tubing to the bag. C, The IV bag is removed from the pole and passed through the sleeve. D, The gathered sleeve of the clean gown is slipped over the IV bag at the shoulder part of the gown.
 - 12 Keep the sleeve gathered. Slide your arm along the tubing to the bag (Fig. 23-24, B).
- 13 Remove the bag from the pole. Slide the bag and tubing through the sleeve (Fig. 23-24, C ). Do not pull on the tubing. Keep the bag above the person.
- 14 Hang the IV bag on the pole.
- 15 Gather the sleeve of the clean gown that will go on the arm with the IV infusion.
- 16 Remove the bag from the pole. Slip the sleeve over the bag at the shoulder part of the gown (Fig. 23-24, D). Hang the bag.
- 17 Slide the gathered sleeve over the tubing, hand, arm, and IV site. Then slide it onto the shoulder.
- 18 Put the other side of the gown on the person. Fasten the gown.
- 19 Cover the person. Remove the bath blanket.
Post-Procedure
- 20 Provide for comfort. (See the inside of the front cover.)
- 21 Place the call light and other needed items within reach.
- 22 Lower the bed to a safe and comfortable level for the person. Follow the care plan.
- 23 Raise or lower bed rails. Follow the care plan.
- 24 Unscreen the person.
- 25 Complete a safety check of the room. (See the inside of the front cover.)
- 26 Follow agency policy for used linens.
- 27 Practice hand hygiene.
- 28 Ask the nurse to check the flow rate.
- 29 Report and record your observations.
Review Questions
Circle T if the statement is TRUE or F if it is FALSE.
2. T F Mustaches are trimmed weekly.
3. T F Feet are soaked for 5 to 10 minutes.
4. T F Fingernails are clipped straight across.
5. T F Wear gloves when giving nail care.
6. T F Clothing is removed from the weak side first.
7. T F The person chooses what to wear.
8. T F A person has poor circulation in the legs and feet. You can trim the person's toenails.
9. T F You can cut matted hair.
Circle the BEST answer.
10. A person with alopecia has
b Dry, white flakes from the scalp
11. Which prevents hair from matting and tangling?
12. A person's hair is not matted or tangled. When brushing hair, start at
a The forehead and brush backward
d The back of the neck and brush forward
14. A person requests a shampoo. You should
a Shampoo the hair during the person's shower
15. When shaving a person's face with a safety razor
a Discard the razor in the wastebasket when done
b Shave against the direction of hair growth
16. A person is nicked during shaving. Your first action is to
c To either the weak or the strong side first
d In the same way they are removed
20. When changing the gown on a person with an IV
a Keep the IV bag below the person's arm
b Stop the IV pump to change the gown
c Have the nurse check the flow rate afterward
d Disconnect the IV to change the gown
See Review Question Answers at the back of the text.