Bowel Elimination
- • Define the key terms and key abbreviations in this chapter.
- • Describe normal defecation and the observations to report.
- • Identify the factors affecting bowel elimination.
- • Explain how to promote comfort and safety during defecation.
- • Describe the common bowel elimination problems.
- • Describe bowel training.
- • Explain why enemas are given.
- • Describe the common enema solutions.
- • Describe the rules for giving enemas.
- • Describe how to care for a person with an ostomy.
- • Perform the procedures described in this chapter.
- • Explain how to promote PRIDE in the person, the family, and yourself.
Key Terms
colostomy A surgically created opening (stomy) between the colon (colo) and the body's surface
constipation The passage of a hard, dry stool
defecation The process of excreting feces from the rectum through the anus; a bowel movement
dehydration The excessive loss of water from tissues
diarrhea The frequent passage of liquid stools
enema The introduction of fluid into the rectum and lower colon
fecal impaction The prolonged retention and buildup of feces in the rectum
fecal incontinence The inability to control the passage of feces and gas through the anus
feces The semi-solid mass of waste products in the colon that is expelled through the anus; also called a stool or stools
flatulence The excessive formation of gas or air in the stomach and intestines
flatus Gas or air passed through the anus
ileostomy A surgically created opening (stomy) between the ileum (small intestine [ileo] ) and the body's surface
ostomy A surgically created opening that connects an internal organ to the body's surface; see “colostomy” and “ileostomy”
peristalsis The alternating contraction and relaxation of intestinal muscles
stoma A surgically created opening seen on the body's surface; see “colostomy” and “ileostomy”
suppository A cone-shaped, solid drug that is inserted into a body opening; it melts at body temperature
Key Abbreviations
| BM | Bowel movement |
| CMS | Centers for Medicare & Medicaid Services |
| GI | Gastro-intestinal |
| ID | Identification |
| IV | Intravenous |
| mL | Milliliter |
| oz | Ounce |
| SSE | Soapsuds enema |
Bowel elimination is a basic physical need. Wastes are excreted from the gastro-intestinal (GI) system (Chapter 10). Many factors affect bowel elimination—privacy, habits, age, diet, exercise and activity, fluids, drugs, disability. Problems easily occur. Normal bowel elimination is important. You assist patients and residents to meet elimination needs.
See Body Structure and Function Review: The Gastro-Intestinal Tract.
See Delegation Guidelines: Bowel Elimination.
See Promoting Safety and Comfort: Bowel Elimination.
 Body Structure and Function Review
The Gastro-Intestinal Tract
The GI tract is part of the digestive system (Chapter 10). Bowel elimination is the excretion of wastes through the GI tract. Food and fluids are normally taken in through the mouth. They are partially digested in the stomach. The partially digested food and fluids are called chyme.
Chyme passes from the stomach into the small intestine (small bowel). Further digestion and absorption of nutrients occur as the chyme passes through the small bowel. The chyme enters the large intestine (large bowel or colon) where fluid is absorbed. Chyme becomes less fluid and more solid in consistency. Feces (stool or stools) refers to the semi-solid mass of waste products in the colon that is expelled through the anus.
Feces move through the intestines by peristalsis. Peristalsis is the alternating contraction and relaxation of intestinal muscles. The feces move through the large intestine to the rectum. Feces are stored in the rectum and excreted from the body (Fig. 26-1). Defecation (bowel movement) is the process of excreting feces from the rectum through the anus. Stool refers to excreted feces.

Normal Bowel Elimination
Some people have a bowel movement (BM) every day. Others do so every 2 to 3 days. Some people have 2 or 3 BMs a day. Many people have a BM after breakfast. Others do so in the evening.
Stools are normally brown. Bleeding in the stomach and small intestine causes black or tarry stools. Bleeding in the lower colon and rectum causes red-colored stools. So do beets, tomato juice or soup, red Jell-O, and foods with red food coloring. Green vegetables can cause green stools. Diseases and infection can cause clay-colored or white, pale, orange-colored, or green-colored stools and stools with mucus. Figure 26-2, p. 424 shows a color chart for stools.

Stools are normally soft, formed, moist, and shaped like the rectum. They have a normal odor caused by bacteria in the intestines. Certain foods and drugs also cause odors.
See Focus on Children and Older Persons: Normal Bowel Elimination, p. 424.
Observations
Your observations are used for the nursing process. Ask the nurse to observe abnormal stools. Report and record the following.
- • Color (see Fig. 26-2)
- • Amount
- • Presence of mucus
- • Signs of bleeding
- • Odor
- • Shape and consistency (Fig. 26-3)
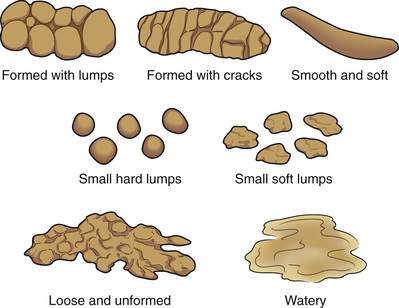 FIGURE 26-3 Stool shapes and consistencies.
 - • The time the person had a BM
- • Frequency of BMs
- • Complaints of pain or discomfort
See Focus on Communication: Observations.
Focus on Communication
Observations
Many patients and residents tend to their own bowel elimination needs. However, information is needed for the person's record and the nursing process. You may need to ask about BMs. You can say:
- • “Did you have a BM today?”
- • “Please tell me about your BM.”
- • “When did you have a BM?”
- • “What was the amount?”
- • “Were the stools soft or hard?”
- • “Were the stools formed or loose?”
- • “What was the color?”
- • “Did you have any bleeding, pain, or problems having a BM?”
- • “Did you pass any gas?”
- • “Do you need to pass more gas?”
- • “Do you need help cleaning yourself?”
For some people and children, poop is the common term for a BM. Follow the care plan for what word to use with the person.
Report and record what the person said or what you observed. Some agencies have forms for recording BMs (Fig. 26-4). Or you may need to record in the person's chart. For example:

Mr. Jansen stated that he had a medium-sized, soft, formed, brown BM after breakfast today. He denied bleeding, pain, straining, or other problems. Mr. Jansen performed his own perineal care.
Follow agency policy for reporting and recording BMs.
Factors Affecting BMs
These factors affect BM frequency, consistency, color, and odor. They are part of the nursing process to meet the person's elimination needs. Normal, regular elimination is the goal.
- • Privacy. Lack of privacy can prevent a BM despite the urge. Odors and sounds are embarrassing. Some people ignore the urge when people are present.
- • Habits. Many people have a BM after breakfast. Some drink a hot beverage, read, or take a walk. These activities are relaxing. A BM is easier when a person is relaxed, not tense.
- • Diet—high-fiber foods. High-fiber foods leave a residue for needed bulk to prevent constipation (p. 426). Fruits, vegetables, and whole-grain cereals and breads are high in fiber. Many people do not eat enough fruits and vegetables. Some cannot chew these foods. They may not have teeth. Or dentures fit poorly. Some people think that they cannot digest fruits and vegetables. So they refuse to eat them. Sometimes bran is added to cereal, prunes, or prune juice.
- • Diet—other foods. Milk and milk products can cause constipation in some people and diarrhea in others. Chocolate and other foods cause similar reactions. Spicy foods can irritate the intestines, causing frequent stools or diarrhea. Gas-forming foods stimulate peristalsis, aiding BMs. Such foods include onions, beans, cabbage, cauliflower, radishes, and cucumbers.
- • Fluids. Feces contain water. Stool consistency depends on the amount of water absorbed in the colon. Fluid intake, urine output, and vomiting are factors. Feces harden and dry when large amounts of water are absorbed or from poor fluid intake. Hard, dry feces move slowly through the colon. Constipation can occur. Drinking 6 to 8 glasses of water daily promotes normal BMs. Warm fluids—coffee, tea, hot cider, warm water—increase peristalsis.
- • Activity. Exercise and activity maintain muscle tone and stimulate peristalsis. Constipation is a risk from inactivity and bedrest. Inactivity may result from disease, surgery, injury, and aging.
- • Drugs. Drugs can prevent constipation or control diarrhea. Other drugs have diarrhea or constipation as side effects. Pain-relief drugs often cause constipation. Antibiotics (used to fight or prevent infections) often cause diarrhea. Diarrhea occurs when the antibiotics kill normal flora in the colon. Normal flora is needed to form feces. (See “Normal Flora” in Chapter 16.)
- • Disability. Some people cannot control BMs. They have a BM whenever feces enter the rectum. A bowel training program is needed (p. 430).
- • Aging. Age affects bowel elimination.
See Focus on Children and Older Persons: Factors Affecting BMs.
Safety and Comfort
The care plan has measures for meeting elimination needs. It may involve diet, fluids, and exercise. The measures in Box 26-1 promote safety and comfort.
Common Problems
Common problems include constipation, fecal impaction, diarrhea, fecal incontinence, and flatulence.
Constipation
Constipation is the passage of a hard, dry stool. The person strains to have a BM. Stools are large or marble-sized. Large stools cause pain as they pass through the anus. Constipation occurs when feces move slowly through the bowel. This allows more time for water absorption. Common causes of constipation include:
- • A low-fiber diet
- • Ignoring the urge to have a BM
- • Decreased fluid intake
- • Inactivity
- • Drugs
- • Aging
- • Certain diseases
Diet changes, fluids, and activity prevent or relieve constipation. The doctor may order 1 or more of the following.
- • Stool softeners. These drugs soften feces. A BM is easier when feces are soft.
- • Laxatives. Laxative comes from the Latin word that means to loosen. A laxative is a drug that promotes bowel elimination. It increases the bulk of feces, softens feces, and lubricates the intestinal wall.
- • Suppositories (p. 430).
- • Enemas (p. 431).
 Fecal Impaction
A fecal impaction is the prolonged retention and buildup of feces in the rectum. Feces are hard or putty-like. Fecal impaction results if constipation is not relieved. The person cannot have a BM. More water is absorbed from the already hard feces. Liquid feces pass around the hardened fecal mass in the rectum and seep from the anus.
The person tries many times to have a BM. Abdominal discomfort, abdominal distention (swelling), nausea, cramping, and rectal pain are common. Older persons may have poor appetite or confusion. Some persons have a fever. Report such signs and symptoms to the nurse.
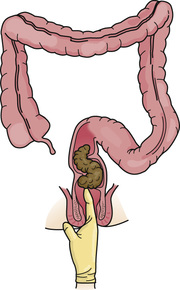
The nurse does a digital (finger) exam to check for an impaction. A lubricated, gloved finger is inserted into the rectum to feel for a hard mass in the lower rectum (Fig. 26-5). Sometimes it is out of reach higher in the colon. The digital exam often causes the urge to have a BM. The doctor may order drugs, suppositories, or enemas to remove the impaction.
Sometimes digital removal of an impaction is done. A lubricated, gloved finger is hooked around a piece of feces. Then the finger and feces are removed. The stool is dropped into the bedpan. The process is repeated as needed. The procedure can be uncomfortable and embarrassing.
Checking for and removing impactions are very dangerous. The vagus nerve can be stimulated. Stimulation of the vagus nerve slows the heart rate. The heart rate can slow to unsafe levels in some persons.
See Focus on Long-Term Care and Home Care: Fecal Impaction.
See Delegation Guidelines: Fecal Impaction.
See Promoting Safety and Comfort: Fecal Impaction.
See procedure: Checking For and Removing a Fecal Impaction, p. 428.
 Checking For and Removing a Fecal Impaction
Quality of Life
- • Knock before entering the person's room.
- • Address the person by name.
- • Introduce yourself by name and title.
- • Explain the procedure before starting and during the procedure.
- • Protect the person's rights during the procedure.
- • Handle the person gently during the procedure.
Pre-Procedure
- 1 Follow Delegation Guidelines:
- See Promoting Safety and Comfort:
- 2 Practice hand hygiene.
- 3 Collect the following.
- 4 Practice hand hygiene.
- 5 Identify the person. Check the ID (identification) bracelet against the assignment sheet. Use 2 identifiers (Chapter 13). Also call the person by name.
- 6 Provide for privacy.
- 7 Raise the bed for body mechanics. Bed rails are up if used.
Procedure
- 8 Lower the bed rail near you if up.
- 9 Cover the person with a bath blanket. Fan-fold top linens to the foot of the bed.
- 10 Position the person in Sims' position or in a left side-lying position (Chapter 17).
- 11 Check the person's pulse (Chapter 29). Note the rate and rhythm.
- 12 Practice hand hygiene. Put on the gloves.
- 13 Place the waterproof under-pad under the buttocks.
- 14 Expose the anal area.
- 15 Lubricate your gloved index finger.
- 16 Ask the person to take a deep breath through his or her mouth.
- 17 Insert the gloved finger while the person is taking a deep breath.
- 18 Check for a fecal mass. Remove your finger and go to step 20 if:
- 19 Remove the impaction.
- a Hook your index finger around a small piece of feces.
- b Remove your finger and the feces.
- c Drop the stool into the bedpan.
- d Clean your finger with toilet tissue. Place the toilet tissue in the bedpan.
- e Repeat steps 19, a-d until you no longer feel feces.
- f Check the person's pulse at intervals. Use your clean gloved hand. Note the rate and rhythm. Stop the procedure if the pulse rate has slowed or if the rhythm is irregular.
- 20 Wipe the anal area with toilet tissue.
- 21 Remove and discard the gloves. Practice hand hygiene. Put on clean gloves.
- 22 Help the person onto the bedpan. Raise the head of the bed and raise the bed rail if used. Or assist the person to the bathroom or commode. The person wears a robe and non-skid footwear when up. The bed is in a low position safe and comfortable for the person.
- 23 Place the call light and toilet tissue within reach. Remind the person not to flush the toilet.
- 24 Discard disposable items.
- 25 Remove and discard the gloves. Practice hand hygiene.
- 26 Leave the room if the person can be left alone.
- 27 Return when the person signals. Or check on the person every 5 minutes. Knock before entering.
- 28 Practice hand hygiene and put on gloves. Lower the bed rail if up.
- 29 Observe stools for amount, color, consistency, shape, and odor.
- 30 Provide perineal care as needed.
- 31 Remove the waterproof under-pad.
- 32 Empty, rinse, clean, and disinfect equipment. If the person had a BM, flush the toilet after the nurse observes it.
- 33 Return equipment to its proper place.
- 34 Remove and discard the gloves. Practice hand hygiene after removing and discarding the gloves.
- 35 Assist with hand-washing. Wear gloves for this step. Practice hand hygiene after removing and discarding the gloves.
- 36 Cover the person. Remove the bath blanket.
Post-Procedure
- 37 Provide for comfort. (See the inside of the front cover.)
- 38 Place the call light and other needed items within reach.
- 39 Lower the bed to a safe and comfortable level for the person. Follow the care plan.
- 40 Raise or lower bed rails. Follow the care plan.
- 41 Unscreen the person.
- 42 Complete a safety check of the room. (See the inside of the front cover.)
- 43 Follow agency policy for used linens and used supplies.
- 44 Practice hand hygiene.
- 45 Report and record your observations.
Diarrhea
Diarrhea is the frequent passage of liquid stools. Feces move through the intestines rapidly. This reduces the time for fluid absorption. The need for a BM is urgent. Some people cannot get to a bathroom in time. Abdominal cramping, nausea, and vomiting may occur.
Causes of diarrhea include infections, some drugs, irritating foods, and microbes in food and water. Diet and drugs are ordered to reduce peristalsis. You need to:
- • Assist with elimination needs promptly.
- • Dispose of stools promptly. This prevents odors and the spread of microbes.
- • Give good skin care. Liquid stools irritate the skin. So does frequent wiping with toilet tissue. Skin breakdown and pressure ulcers are risks.
Fluid lost through diarrhea must be replaced to prevent dehydration. Dehydration is the excessive loss of water from tissues. The person has pale or flushed skin, dry skin, and a coated tongue. Urine is dark and scant in amount (oliguria). Thirst, weakness, dizziness, and confusion also occur. Falling blood pressure and increased pulse and respirations are serious signs. Death can occur. The nursing process is used to meet fluid needs. The doctor may order IV (intravenous) fluids in severe cases (Chapter 28).
Microbes can cause diarrhea. Preventing the spread of infection is important. Always follow Standard Precautions and the Bloodborne Pathogen Standard when in contact with stools.
Fecal Incontinence
Fecal incontinence is the inability to control the passage of feces and gas through the anus. Causes include:
- • Intestinal diseases.
- • Nervous system diseases and injuries.
- • Fecal impaction or diarrhea.
- • Some drugs.
- • Chronic illness.
- • Aging.
- • Mental health problems or dementia (Chapters 48 and 49). The person may not recognize the need for or the act of having a BM.
- • Unanswered call lights.
- • Not getting to the bathroom in time. The person may have mobility problems or may walk slowly. The bathroom may be too far away or occupied by another person.
- • Problems removing clothes.
- • Not finding the bathroom in a new setting.
Fecal incontinence affects the person emotionally. Frustration, embarrassment, anger, and humiliation are common. The person may need:
- • Bowel training
- • Help with elimination after meals and every 2 to 3 hours
- • Incontinence products to keep garments and linens clean
- • Good skin care
See Focus on Children and Older Persons: Fecal Incontinence.
Flatulence
Gas and air are normally in the stomach and intestines. They are expelled through the mouth (burping, belching, eructating) and anus. Gas or air passed through the anus is called flatus. Flatulence is the excessive formation of gas or air in the stomach and intestines. Causes include:
- • Swallowing air while eating and drinking. This includes chewing gum, eating fast, drinking through a straw, and drinking carbonated beverages. Tense or anxious people may swallow large amounts of air when drinking.
- • Bacterial action in the intestines.
- • Gas-forming foods—onions, beans, cabbage, cauliflower, radishes, and cucumbers.
- • Constipation.
- • Bowel and abdominal surgeries.
- • Drugs that decrease peristalsis.
If flatus is not expelled, the intestines swell or enlarge (distend) from the pressure of gases. Abdominal cramping or pain, shortness of breath, and a swollen abdomen occur. Bloating is a common complaint. Exercise, walking, moving in bed, and the left side-lying position often expel flatus. Doctors may order enemas and drugs to relieve flatulence.
Bowel Training
Bowel training has 2 goals.
- • To gain control of BMs.
- • To develop a regular pattern of elimination. Fecal impaction, constipation, and fecal incontinence are prevented.
Meals, especially breakfast, stimulate the urge for a BM. The person's usual time for a BM is noted on the care plan. So is toilet, commode, or bedpan use. Offer help with elimination at the times noted. The care plan includes a high-fiber diet, increased fluids, warm fluids, activity, and privacy. The nurse tells you about a person's bowel training program.
Suppositories
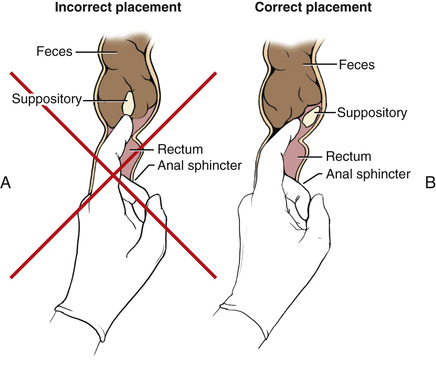
A suppository is a cone-shaped, solid drug that is inserted into a body opening. It melts at body temperature. A rectal suppository is inserted into the rectum (Fig. 26-6). A BM occurs about 30 minutes later.
The doctor may order a suppository for:
See Delegation Guidelines: Suppositories.
See Promoting Safety and Comfort: Bowel Elimination, p. 423.
Enemas
An enema is the introduction of fluid into the rectum and lower colon. Doctors order enemas to:
- • Remove feces.
- • Relieve constipation, fecal impaction, or flatulence.
- • Clean the bowel of feces before certain surgeries and diagnostic procedures.
Safety and comfort measures for bowel elimination are practiced when giving enemas (see Box 26-1). So are the rules in Box 26-2.
The doctor orders the enema solution. The solution depends on the enema's purpose—cleansing, constipation, fecal impaction, or flatulence.
- • Tap water enema—is obtained from a faucet.
- • Saline enema—a solution of salt and water. For adults, 1 or 2 teaspoons of table salt is added to 500 to 1000 mL (milliliters) of tap water.
- • Soapsuds enema (SSE)—for adults, 3 to 5 mL of castile soap is added to 500 to 1000 mL of tap water.
- • Small-volume enema—the adult size has about 120 mL (4 ounces [oz]) of solution. The child size has about 60 mL (2 oz).
- • Oil-retention enema—has mineral, olive, or cottonseed oil. The adult size has about 120 mL (4 oz) of solution. Children usually receive 60 mL (2 oz).
Other enema solutions may be ordered. Consult with the nurse and use the agency's procedure manual to safely prepare and give enemas. You do not give enemas that contain drugs. Nurses give them.
See Delegation Guidelines: Enemas, p. 432.
See Promoting Safety and Comfort: Enemas, p. 432.
 Focus on Math
Enemas
Cleansing enemas are given over 10 to 15 minutes. The nurse tells you the amount of solution to give and the amount of time to give it in. As you give the solution, monitor how fast the fluid flows. To calculate the amount to give per minute, divide the total amount (in mL) by the time (in minutes). Each minute as you give the enema, subtract this amount to gauge if the rate is too fast or too slow.
For example, you are to give a 750 mL saline enema over 15 minutes. Divide 750 mL by 15 minutes. The fluid in the bag should decrease by about 50 mL each minute.

Note the start time. Check the amount at least each minute. At 1 minute, the solution should be at the 700 mL mark.

At 2 minutes, the solution should be about half-way between the 700 mL and 600 mL marks (650 mL).

At 3 minutes, the solution should be at the 600 mL mark, and so on.

If the solution is flowing too fast, clamp the tube and call for the nurse. The nurse may lower the bag to slow the flow. If the solution is flowing too slowly, call for the nurse. The nurse may adjust the tube or raise the bag to quicken the flow.
The Cleansing Enema
Cleansing enemas clean the bowel of feces and flatus. They relieve constipation and fecal impaction. They are given before certain surgeries and diagnostic procedures. Cleansing enemas take effect in 10 to 20 minutes.
The doctor orders a tap water, saline, or soapsuds enema. An enemas until clear order means that enemas are given until the return solution is clear and free of stools. Agency policy may allow repeating enemas 2 or 3 times. The nurse tells you what enema to give and how many times to repeat the enema.
- • Tap water enema. The colon may absorb some of the water into the bloodstream. This creates a fluid imbalance. Only 1 tap water enema is given. Do not repeat the enema. Repeated enemas increase the risk of excessive fluid absorption.
- • Saline enema. The solution is similar to body fluid. However, some of the salt solution may be absorbed, causing a fluid imbalance. The body retains water from the excess salt.
- • Soapsuds enema. The SSE irritates the bowel's mucous lining. Repeated enemas can damage the bowel. So can using more than 3 to 5 mL of castile soap or stronger soaps.
See Focus on Children and Older Persons: The Cleansing Enema.
See procedure: Giving a Cleansing Enema.
Focus on Children and Older Persons
The Cleansing Enema
Children
Saline enemas are used for cleansing enemas in children. Check with the nurse for the amount of solution to give. These are guidelines.
The nurse tells you to insert the enema tube usually 2 to 3 inches in children and 1 to  inches in infants.
Infants cannot tell you they hurt. If cramping occurs, the child draws up the knees. The child's cry is higher-pitched than normal.
In children, cleansing enemas take effect in about 2 to 5 minutes.
Giving a Cleansing Enema 

Quality of Life
- • Knock before entering the person's room.
- • Address the person by name.
- • Introduce yourself by name and title.
- • Explain the procedure before starting and during the procedure.
- • Protect the person's rights during the procedure.
- • Handle the person gently during the procedure.
Pre-Procedure
- 1 Follow Delegation Guidelines:
- a Bowel Elimination, p. 423
- b Enemas
- See Promoting Safety and Comfort:
- a Bowel Elimination, p. 423
- b Enemas
- 2 Practice hand hygiene.
- 3 Collect the following before going to the person's room.
- 4 Arrange items in the person's room and bathroom.
- 5 Practice hand hygiene.
- 6 Identify the person. Check the ID bracelet against the assignment sheet. Use 2 identifiers (Chapter 13). Also call the person by name.
- 7 Put on gloves.
- 8 Collect the following.
- 9 Remove and discard the gloves. Practice hand hygiene. Put on clean gloves.
- 10 Provide for privacy.
- 11 Raise the bed for body mechanics. Bed rails are up if used.
Procedure
- 12 Lower the bed rail near you if up.
- 13 Cover the person with a bath blanket. Fan-fold top linens to the foot of the bed.
- 14 Position the IV pole so the enema bag is 12 inches above the anus. Or it is at the height directed by the nurse.
- 15 Raise the bed rail if used.
- 16 Prepare the enema.
- a Close the clamp on the tube.
- b Adjust water flow until it is lukewarm.
- c Fill the enema bag for the amount ordered.
- d Measure water temperature with the bath thermometer. The nurse tells you what water temperature to use.
- e Prepare the solution as directed by the nurse.
- f Stir the solution with the bath thermometer. Scoop off any suds (SSE).
- g Seal the bag.
- h Hang the bag on the IV pole.
- 17 Lower the bed rail near you if up.
- 18 Position the person in Sims' position or in a left side-lying position.
- 19 Place a waterproof under-pad under the buttocks.
- 20 Expose the anal area.
- 21 Place the bedpan behind the person.
- 22 Position the enema tube in the bedpan. Remove the cap from the tubing.
- 23 Open the clamp. Let solution flow through the tube to remove air. Clamp the tube.
- 24 Lubricate the tube 2 to 4 inches from the tip.
- 25 Separate the buttocks to see the anus.
- 26 Ask the person to take a deep breath through the mouth.
- 27 Insert the tube gently 2 to 4 inches into the adult's rectum (Fig. 26-7). Do this when the person is exhaling. Stop if the person complains of pain, you feel resistance, or bleeding occurs.
 FIGURE 26-7 Enema tubing inserted into the adult rectum.
 - 28 Check the amount of solution in the bag.
- 29 Unclamp the tube. Give the solution slowly (Fig. 26-8).
 FIGURE 26-8 Giving an enema. The person is in Sims' position. The enema bag hangs from an IV pole. The bag is 12 inches above the anus and 18 inches above the mattress.
 - 30 Ask the person to take slow, deep breaths. This helps the person relax.
- 31 Clamp the tube if the person needs to have a BM, has cramping, or starts to expel the solution. Also, clamp the tube if the person is sweating or complains of nausea or weakness. Unclamp when symptoms subside.
- 32 Give the amount of solution ordered. Stop if the person cannot tolerate the procedure.
- 33 Clamp the tube before it is empty. This prevents air from entering the bowel.
- 34 Hold toilet tissue around the tube and against the anus. Remove the tube.
- 35 Discard toilet tissue into the bedpan.
- 36 Wrap the tubing tip with paper towels. Place it inside the enema bag.
- 37 Encourage retention of the enema for the time ordered.
- 38 Assist the person to the bathroom or commode. The person wears a robe and non-skid footwear when up. The bed is at a low level that is safe and comfortable for the person. Or help the person onto the bedpan. Raise the head of the bed. Raise or lower bed rails according to the care plan.
- 39 Place the call light and toilet tissue within reach. Remind the person not to flush the toilet.
- 40 Discard disposable items.
- 41 Remove and discard the gloves. Practice hand hygiene.
- 42 Leave the room if the person can be left alone.
- 43 Return when the person signals. Or check on the person every 5 minutes. Knock before entering the room or bathroom.
- 44 Practice hand hygiene and put on gloves. Lower the bed rail if up.
- 45 Observe enema results for amount, color, consistency, shape, and odor. Call the nurse to observe the results.
- 46 Provide perineal care as needed.
- 47 Remove the waterproof under-pad.
- 48 Empty, rinse, clean, and disinfect equipment. Flush the toilet after the nurse observes the results.
- 49 Return equipment to its proper place.
- 50 Remove and discard the gloves. Practice hand hygiene.
- 51 Assist with hand-washing. Wear gloves for this step. Practice hand hygiene after removing and discarding the gloves.
- 52 Cover the person. Remove the bath blanket.
Post-Procedure
- 53 Provide for comfort. (See the inside of the front cover.)
- 54 Place the call light and other needed items within reach.
- 55 Lower the bed to a safe and comfortable level for the person. Follow the care plan.
- 56 Raise or lower bed rails. Follow the care plan.
- 57 Unscreen the person.
- 58 Complete a safety check of the room. (See the inside of the front cover.)
- 59 Follow agency policy for used linens and used supplies.
- 60 Practice hand hygiene.
- 61 Report and record your observations.
The Small-Volume Enema
Small-volume enemas irritate and distend the rectum. This causes a BM. They are ordered for constipation or when the bowel does not need complete cleansing.
These enemas are ready to give. This solution is usually given at room temperature. To give the enema, squeeze and roll up the plastic container from the bottom. Do not release pressure on the bottle. Otherwise, solution is drawn from the rectum back into the bottle.
Urge the person to retain the solution until he or she needs to have a BM. This usually takes 5 to 10 minutes. Staying in the Sims' or left side-lying position helps retain the enema.
See procedure: Giving a Small-Volume Enema.
Giving a Small-Volume Enema
Quality of Life
- • Knock before entering the person's room.
- • Address the person by name.
- • Introduce yourself by name and title.
- • Explain the procedure before starting and during the procedure.
- • Protect the person's rights during the procedure.
- • Handle the person gently during the procedure.
Pre-Procedure
- 1 Follow Delegation Guidelines:
- See Promoting Safety and Comfort:
- 2 Practice hand hygiene.
- 3 Collect the following before going to the person's room.
- 4 Arrange items in the person's room.
- 5 Practice hand hygiene.
- 6 Identify the person. Check the ID bracelet against the assignment sheet. Use 2 identifiers (Chapter 13). Also call the person by name.
- 7 Put on gloves.
- 8 Collect the following.
- 9 Remove and discard the gloves. Practice hand hygiene. Put on clean gloves.
- 10 Provide for privacy.
- 11 Raise the bed for body mechanics. Bed rails are up if used.
Procedure
- 12 Lower the bed rail near you if up.
- 13 Cover the person with a bath blanket. Fan-fold top linens to the foot of the bed.
- 14 Position the person in Sims' or left side-lying position.
- 15 Place the waterproof under-pad under the buttocks.
- 16 Expose the anal area.
- 17 Position the bedpan near the person.
- 18 Remove the cap from the enema tip.
- 19 Separate the buttocks to see the anus.
- 20 Ask the person to take a deep breath through the mouth.
- 21 Insert the enema tip 2 inches into the adult's rectum (Fig. 26-9). Do this when the person is exhaling. Insert the tip gently. Stop if the person complains of pain, you feel resistance, or bleeding occurs.
 FIGURE 26-9 The small-volume enema tip is inserted 2 inches into the rectum.
 - 22 Squeeze and roll up the container gently. Release pressure on the bottle after you remove the tip from the rectum.
- 23 Put the container into the box, tip first. Discard the container and box.
- 24 Assist the person to the bathroom or commode when he or she has the urge to have a BM. The person wears a robe and non-skid footwear when up. The bed is at a low level that is safe and comfortable for the person. Or help the person onto the bedpan and raise the head of the bed. Raise or lower bed rails according to the care plan.
- 25 Place the call light and toilet tissue within reach. Remind the person not to flush the toilet.
- 26 Discard disposable items.
- 27 Remove and discard the gloves. Practice hand hygiene.
- 28 Leave the room if the person can be left alone.
- 29 Return when the person signals. Or check on the person every 5 minutes. Knock before entering the room or bathroom.
- 30 Practice hand hygiene. Put on gloves.
- 31 Lower the bed rail if up.
- 32 Observe enema results for amount, color, consistency, shape, and odor. Call the nurse to observe the results.
- 33 Provide perineal care as needed.
- 34 Remove the waterproof under-pad.
- 35 Empty, rinse, clean, and disinfect equipment. Flush the toilet after the nurse observes the results.
- 36 Return equipment to its proper place.
- 37 Remove and discard the gloves. Practice hand hygiene.
- 38 Assist with hand-washing. Wear gloves for this step. Practice hand hygiene after removing and discarding the gloves.
- 39 Cover the person. Remove the bath blanket.
Post-Procedure
- 40 Provide for comfort. (See the inside of the front cover.)
- 41 Place the call light and other needed items within reach.
- 42 Lower the bed to a safe and comfortable level for the person. Follow the care plan.
- 43 Raise or lower bed rails. Follow the care plan.
- 44 Unscreen the person.
- 45 Complete a safety check of the room. (See the inside of the front cover.)
- 46 Follow agency policy for used linens and used supplies.
- 47 Practice hand hygiene.
- 48 Report and record your observations.
The Oil-Retention Enema
Oil-retention enemas relieve constipation and fecal impaction. The oil softens feces and lubricates the rectum so feces pass with ease. The oil is retained for 30 minutes to 1 to 3 hours. Most oil-retention enemas are ready-to-use.
See Promoting Safety and Comfort: The Oil-Retention Enema.
See procedure: Giving an Oil-Retention Enema.
Giving an Oil-Retention Enema
Quality of Life
- • Knock before entering the person's room.
- • Address the person by name.
- • Introduce yourself by name and title.
- • Explain the procedure before starting and during the procedure.
- • Protect the person's rights during the procedure.
- • Handle the person gently during the procedure.
Pre-Procedure
- 1 Follow Delegation Guidelines:
- See Promoting Safety and Comfort:
- 2 Practice hand hygiene.
- 3 Collect the following.
- 4 Arrange items in the person's room.
- 5 Practice hand hygiene.
- 6 Identify the person. Check the ID bracelet against the assignment sheet. Use 2 identifiers (Chapter 13). Also call the person by name.
- 7 Provide for privacy.
- 8 Raise the bed for body mechanics. Bed rails are up if used.
Procedure
- 9 Put on gloves.
- 10 Follow steps 12 through 23 in procedure: Giving a Small-Volume Enema, p. 435.
- 11 Cover the person. Leave him or her in the Sims' or left side-lying position.
- 12 Encourage retention of the enema for the time ordered.
- 13 Place more waterproof under-pads on the bed if needed.
- 14 Remove and discard the gloves. Practice hand hygiene.
Post-Procedure
- 15 Provide for comfort. (See the inside of the front cover.)
- 16 Place the call light and other needed items within reach.
- 17 Lower the bed to a safe and comfortable level for the person. Follow the care plan.
- 18 Raise or lower bed rails. Follow the care plan.
- 19 Unscreen the person.
- 20 Complete a safety check of the room. (See the inside of the front cover.)
- 21 Follow agency policy for used linens and used supplies.
- 22 Practice hand hygiene.
- 23 Report and record your observations.
- 24 Check the person often.
The Person With an Ostomy
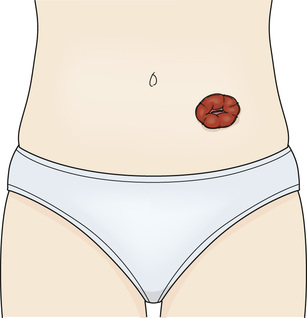
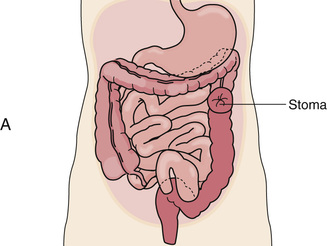
Sometimes part of the intestines is removed surgically. Cancer, bowel disease, and trauma (stab or bullet wounds) are common reasons. An ostomy is sometimes necessary. An ostomy is a surgically created opening that connects an internal organ to the body's surface. The surgically created opening seen on the body's surface is called a stoma (Fig. 26-10). A pouch is worn over the stoma to collect stools and flatus.
Colostomy
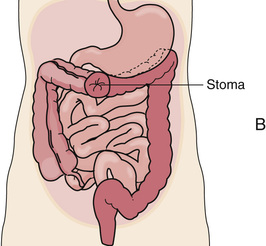
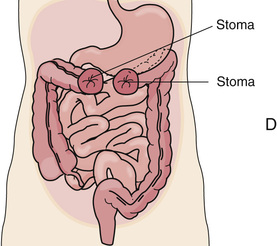
A colostomy is a surgically created opening (stomy) between the colon (colo) and the body's surface. Part of the colon is brought out onto the body's surface and a stoma is made. Feces and flatus pass through the stoma instead of the anus.
With a permanent colostomy, the diseased part of the colon is removed. A temporary colostomy gives the diseased or injured bowel time to heal. After healing, the bowel is surgically reconnected. The colostomy site depends on the site of disease or injury (Fig. 26-11). Stool consistency—liquid to formed—depends on the colostomy site. The more colon remaining to absorb water, the more solid and formed the stool. If the colostomy is near the end of the colon, stools are formed.

Stools irritate the skin. Skin care prevents skin breakdown around the stoma. The skin is washed and dried. Then a skin barrier is applied around the stoma. It prevents stools from having contact with the skin. The skin barrier is part of the pouch or a separate device.
Ileostomy
An ileostomy is a surgically created opening (stomy) between the ileum (small intestine [ileo]) and the body's surface. Part of the ileum is brought out onto the body's surface and a stoma is made. The entire colon is removed (Fig. 26-12, p. 438).
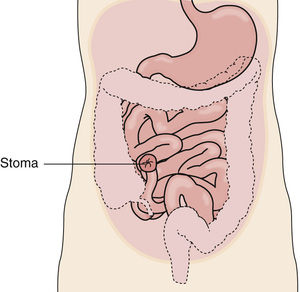
Liquid stools drain constantly from an ileostomy. Water is not absorbed because the colon was removed. Feces in the small intestine contain digestive juices that are very irritating to the skin. The ileostomy pouch must fit well. Stools must not touch the skin. Good skin care is required.
Ostomy Pouches
A plastic pouch with an adhesive backing is applied to the skin. Some pouches are secured to ostomy belts (Fig. 26-13).

Pouches have a drain at the bottom that closes with a clip, clamp, or wire closure. The drain is opened to empty the pouch. The pouch is emptied when stools are present. It is opened when it balloons or bulges to release flatus. The drain is wiped with toilet tissue before closing.
The pouch is changed every 2 to 7 days and when it leaks. Frequent pouch changes can damage the skin.
Odors are prevented by:
- • Using odor-free pouches.
- • Performing good hygiene.
- • Emptying the pouch.
- • Avoiding gas-forming foods.
- • Putting deodorants into the pouch. The nurse tells you what to use.
The person wears normal clothes. However, tight garments can prevent feces from entering the pouch. Also, bulging from stools and flatus can be seen with tight clothes.
Peristalsis increases after eating and drinking. Therefore stomas are usually quiet after sleep. That is, expelling feces is less likely at this time. If the person showers or bathes with the pouch off, it is best done before breakfast. Showers and baths are delayed for 1 to 2 hours after applying a new pouch. This gives adhesive time to seal to the skin.
Do not flush pouches down the toilet. Follow agency policy for disposal.
See Focus on Children and Older Persons: Ostomy Pouches.
See Delegation Guidelines: Ostomy Pouches.
See Promoting Safety and Comfort: Ostomy Pouches.
See procedure: Changing an Ostomy Pouch.
Changing an Ostomy Pouch
Quality of Life
- • Knock before entering the person's room.
- • Address the person by name.
- • Introduce yourself by name and title.
- • Explain the procedure before starting and during the procedure.
- • Protect the person's rights during the procedure.
- • Handle the person gently during the procedure.
Pre-Procedure
- 1 Follow Delegation Guidelines:
- a Bowel Elimination, p. 423
- b Ostomy Pouches
- See Promoting Safety and Comfort:
- a Bowel Elimination, p. 423
- b Ostomy Pouches
- 2 Practice hand hygiene.
- 3 Collect the following before going to the person's room.
- 4 Place the paper towels on the over-bed table. Arrange supplies on top of the paper towels.
- 5 Practice hand hygiene.
- 6 Identify the person. Check the ID bracelet against the assignment sheet. Use 2 identifiers (Chapter 13). Also call the person by name.
- 7 Put on gloves.
- 8 Collect the following.
- 9 Remove and discard the gloves. Practice hand hygiene. Put on clean gloves.
- 10 Provide for privacy.
- 11 Raise the bed for body mechanics. Bed rails are up if used.
Procedure
- 12 Lower the bed rail near you if up.
- 13 Cover the person with a bath blanket. Fan-fold linens to the foot of the bed.
- 14 Place the waterproof under-pad under the buttocks.
- 15 Disconnect the pouch from the belt if one is worn. Remove the belt.
- 16 Remove and place the pouch and skin barrier in the bedpan. Gently push the skin down and lift up on the barrier. Use adhesive remover wipes if necessary.
- 17 Wipe the stoma and around it with a gauze pad. This removes excess stool and mucus. Discard the gauze pad into the disposable bag.
- 18 Wet the gauze pads or washcloth.
- 19 Wash the stoma and the skin around it with a gauze pad or washcloth. Wash gently. Do not scrub or rub the skin.
- 20 Pat dry with a gauze pad or the towel.
- 21 Observe the stoma and the skin around the stoma. Report bleeding, skin irritation, or skin breakdown.
- 22 Remove the backing from the new pouch.
- 23 Apply a thin layer of paste around the pouch opening. Let it dry following the manufacturer's instructions.
- 24 Pull the skin around the stoma taut. The skin must be wrinkle-free.
- 25 Center the pouch over the stoma. The drain is downward.
- 26 Press around the pouch and skin barrier so it seals to the skin. Apply gentle pressure with your fingers. Start at the bottom and work up around the sides to the top.
- 27 Maintain the pressure for 1 to 2 minutes. This allows the adhesive on the skin barrier to activate. Follow the manufacturer's instructions.
- 28 Tug downward on the pouch gently. Make sure the pouch is secure.
- 29 Add deodorant to the pouch (if needed).
- 30 Close the pouch at the bottom. Use a clamp, clip, or wire closure.
- 31 Attach the ostomy belt if used. The belt should not be too tight. You should be able to slide 2 fingers under the belt.
- 32 Remove the waterproof under-pad.
- 33 Discard disposable supplies into the disposable bag.
- 34 Remove and discard the gloves. Practice hand hygiene.
- 35 Cover the person. Remove the bath blanket.
Post-Procedure
- 36 Provide for comfort. (See the inside of the front cover.)
- 37 Place the call light and other needed items within reach.
- 38 Lower the bed to a safe and comfortable level for the person. Follow the care plan.
- 39 Raise or lower bed rails. Follow the care plan.
- 40 Unscreen the person.
- 41 Practice hand hygiene. Put on gloves.
- 42 Take the bedpan and disposable bag into the bathroom.
- 43 Empty the pouch and bedpan into the toilet. Observe the color, amount, consistency, and odor of stools. Flush the toilet.
- 44 Discard the pouch into the disposable bag. Discard the disposable bag.
- 45 Empty, rinse, clean, and disinfect equipment. Return equipment to its proper place.
- 46 Remove and discard the gloves. Practice hand hygiene.
- 47 Complete a safety check of the room. (See the inside of the front cover.)
- 48 Follow agency policy for used linens.
- 49 Practice hand hygiene.
- 50 Report and record your observations.
Review Questions
Circle the BEST answer
a A person must have a BM every day.
b Stools are normally brown, soft, and formed.
c Diarrhea occurs when feces move slowly through the bowel.
d Constipation occurs when feces move quickly through the bowel.
2. Which should you ask the nurse to observe?
b The person's first BM of the day
d Liquid stool from an ileostomy
3. The prolonged retention and buildup of feces in the rectum is called
4. These measures promote normal BMs. Which is outside your role limits?
a Provide oral fluids according to the care plan.
b Assist with activity according to the care plan.
c Give drugs to control diarrhea.
d Provide privacy for bowel elimination.
5. A person has C. difficile. You should
a Disinfect care items with soap and water
b Use an alcohol-based hand rub before leaving the room
d Refuse to care for the person
a Bowel control and regular elimination
7. Your state and agency allow you to insert rectal suppositories. You insert a suppository
8. Which is used for a cleansing enema?
a Mineral, olive, or cottonseed oil
d Tap water, saline, or a soapsuds enema
9. Which is used for cleansing enemas in children?
b Place the person in the supine position
c Have the person void after giving the enema
11. In adults, the enema tube is inserted
12. A small-volume enema is retained
d Until the urge to have a BM is felt
13. Which care measure for an ostomy should you question?
b Perform good skin care around the stoma.
d Apply a skin barrier around the stoma.
14. An ostomy pouch is usually emptied
See Review Question Answers at the back of the text.