Parenteral Administration
Safe Preparation of Parenteral Medications
Objectives
1. Identify the parts of a syringe and needle, as well as examples of the safety-type syringes and needles.
2. Describe how to select the correct needle gauge and length and how the needle gauge is determined.
3. List the advantages and disadvantages of using a glass syringe versus a plastic syringe.
4. Compare and contrast the volumes of medications that can be measured in a tuberculin syringe and those of larger-volume syringes.
5. Compare and contrast the advantages and disadvantages of using prefilled syringes.
6. Differentiate among ampules, vials, and Mix-O-Vials.
7. Describe the technique used to prepare two different drugs in one syringe (e.g., insulin).
Key Terms
The routes of drug administration can be classified into three categories: enteral, parenteral, and percutaneous. The term parenteral means administration by any route other than the enteral—or gastrointestinal—tract. As ordinarily used, the term parenteral route refers to intradermal, subcutaneous (subcut), intramuscular (IM), or intravenous (IV) injections.
When drugs are given parenterally rather than orally, the following factors are involved: (1) the onset of drug action is generally more rapid but of shorter duration; (2) the dosage is often smaller because drug potency tends not to be altered immediately by the stomach or liver; and (3) the cost of drug therapy is often higher. Drugs are administered by injection when all of the drug must be absorbed as rapidly and completely as possible, when the drug must be absorbed at a steady and controlled rate, or when a patient is unable to take a medication orally because of nausea and vomiting.
Safe Preparation, Administration, and Disposal of Parenteral Medications and Supplies
Drug preparation and administration errors have been identified as contributing factors to the high incidence of adverse drug events as discussed in Chapter 6. The actual rate of errors that occur during the preparation and administration of medications is not known, but the potential is high. Thus the nurse must be diligent to prevent errors from occurring.
The role of the nurse in providing accurate drug administration requires attention to detail in all facets of pharmacotherapy. It is essential that nurses who are preparing and administering medications focus on the following: (1) the basic knowledge needed regarding the individual drugs being ordered, prepared, and administered; (2) the symptoms for which the medication is prescribed and the collection of baseline data to be used for the evaluation of the therapeutic outcomes desired for the prescribed medicine; and (3) the nursing assessments necessary to detect, prevent, or ameliorate adverse events. Finally, the nurse must exercise clinical judgment regarding the scheduling of new drug orders, missed doses, modified drug orders, the substitution of therapeutically equivalent medicines by the pharmacy, or changes in the patient's condition that require consultation with a physician, healthcare provider, or pharmacist.
Injection of drugs requires skill and special care because of the trauma at the site of needle puncture, the possibility of infection, the chance of allergic reaction, and the fact that, after it is injected, the drug is irretrievable. Therefore medications must be prepared and administered carefully and accurately. Aseptic technique is used to avoid infection, and accurate drug dosing—along with the correct rate and site of injection—is followed to avoid injuries such as abscess formation, necrosis, skin sloughing, nerve injuries, and prolonged pain. Thus the parenteral administration of medications requires specialized knowledge and manual skills to ensure safety and therapeutic effectiveness for patients.
Healthcare professionals place the safety of their patients first, but the Occupational Safety and Health Administration (OSHA) has reported that more than 5 million workers in the healthcare industry and related occupations are at risk for occupational exposure to blood-borne pathogens, including such devastating diseases as human immunodeficiency virus, hepatitis B virus, and hepatitis C virus. It is estimated that there are 600,000 to 800,000 needlesticks and percutaneous injuries involving healthcare workers annually. Studies have indicated that nurses sustain the majority of these injuries and that as many as one third of all sharps injuries (i.e., from needles, lancets, and scalpels) are related to the disposal process. Consequently, nurses have three primary safety concerns: for the patient, for themselves, and for other healthcare workers. Paramount to the safe administration of medicines is the need for nurses to follow established policies and procedures while checking and transcribing orders; preparing, administering, recording, and monitoring therapeutic responses to drug therapy; and disposing of parenteral supplies and equipment.
Equipment Used for Parenteral Administration
Syringes
Syringes are made of glass or hard plastic; glass syringes are rarely used in clinical practice. A syringe has three parts (Figure 9-1). The barrel is the outer portion on which the calibrations for the measurement of the drug volume are located (Figure 9-2). The plunger is the inner cylindrical portion that fits snugly into the barrel. This portion is used to draw up and eject the solution from the syringe. The tip is the portion that holds the needle. Syringes are considered to be sterile when the package is still intact from the manufacturer. The nurse will remove the outer sheath that covers the syringe and then hold the barrel; the barrel is then considered unsterile or contaminated, whereas the inside of the barrel remains sterile. Nurses must keep the tip of the syringe sterile when connecting needles.


All syringes, regardless of their manufacturer, are available with a Luer-Slip or Luer-Lok tip. The Luer system consists of two parts: the male tapered end (Figure 9-3, A) and the reverse tapered female connector with an outer flange (see Figure 9-3, B).
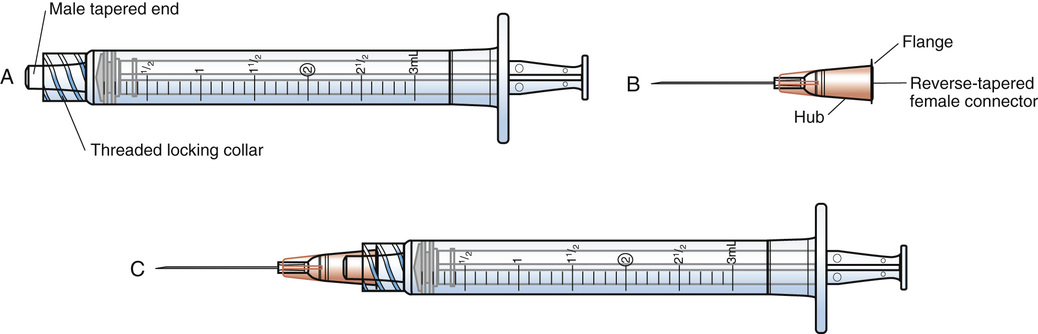
The two types of syringe tips are the Luer-Slip, which has a male tapered end (Figure 9-4, A), and the Luer-Lok (see Figure 9-4, B), which has a threaded locking collar outside of the male Luer-Slip that will lock the flange of the female connector securely. When the female connector is placed on a male Luer-Slip with a locking collar and given a half twist, it is securely locked in place (see Figure 9-3, C or Figure 9-4, B). However, if a female adapter is placed on a male Luer-Slip without a collar (see Figure 9-4, A), the connection is only relatively secure.
Syringe Calibration
A syringe is calibrated in milliliters (mL) (see Figure 9-2). The most commonly used syringes are 1, 3, and 5 mL, but syringes of 10, 20, and 50 mL are also available. (NOTE: Technically, the milliliter is a measure of volume.)
Reading the Calibration of the Syringe
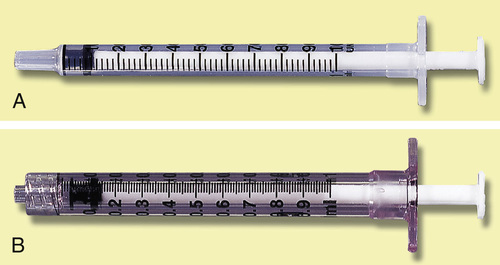
The milliliter scale represents the units whereby medications are routinely ordered. For volumes of 1 mL or less, use a 1-mL or tuberculin syringe for the more precise measurement of the drug. Milliliters are read on the scale marked “mL” (see Figures 9-2 and 9-6). The shorter lines represent 0.1 mL, and the longer lines each represent 0.5 mL.
Tuberculin syringe.
The tuberculin syringe, or 1-mL syringe, was originally designed to administer tuberculin inoculations (see Figure 9-4, A and B; Figure 9-5). Today, it is used to measure small volumes of medication accurately. This type of syringe holds a total of 1 mL; each of the longest lines represents 0.1 ( ) mL, the intermediate lines represent 0.05 (
 ) mL, and the shortest lines represent 0.01 (
 ) mL.
) mL.

The volumes within glass syringes are read at the point where the plunger is directly parallel with the calibration on the syringe (Figure 9-6). Volumes in disposable plastic syringes are read at the point where the rubber flange of the syringe plunger is parallel to the calibration scale of the barrel (Figure 9-7). In addition, note the area of the needle to keep sterile and the area on the syringe plunger to avoid touching.


Insulin syringe.
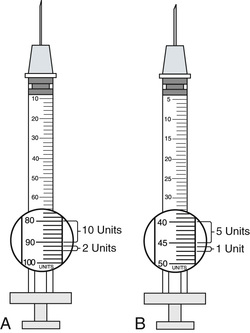
The insulin syringe has a scale that has been specifically calibrated for the measurement of insulin. Insulin is now manufactured with a U-100 concentration in the United States. The U-100 syringe (Figure 9-8, A) holds 100 units of insulin per milliliter. Variations may be noticed in the way that units are marked on the scale, but, in general, the shorter lines represent 2 units of insulin, whereas the longer lines measure 10 units of insulin. Low-dose insulin syringes (see Figure 9-8, B) may be used for patients who are receiving 50 units or less of U-100 insulin. The shorter lines on the scale of the low-dose insulin syringe measure 1 unit, whereas the longer lines each represent 5 units. When traveling abroad, be aware that U-40 concentration insulin (i.e., 40 units of insulin/mL) is commonly available. A specific insulin syringe that has been calibrated for U-40 insulin should be used with the U-40 insulin.
Insulin delivery aids (e.g., nonvisual insulin measurement devices, syringe magnifiers, needle guides, vial stabilizers) are available for people with visual impairments. Information about these products is available in the American Diabetes Association's annual diabetes resource guide, which is published each January.
 Life Span Considerations
Tuberculin Syringe
The tuberculin syringe (see Figure 9-5), which makes use of the metric system of measurement, will provide the most accurate measurement for doses of parenteral medications of 1 mL or less. The practice of adding 0.2 mL of air bubbles to empty all of the medication contained in the needle of a syringe thoroughly can significantly increase a drug dose, especially when small volumes of medicine are being administered to neonates or infants. Check institutional policy regarding medication administration for the procedure to be used.
Prefilled Cartridges and Syringes
Several manufacturers supply a premeasured amount of medication in either presealed cartridge-needle units or in prefilled complete syringes. Both are used once and then discarded. Advantages of the prefilled cartridges and syringes include the time saved in preparing a standard amount of medication for one injection and the diminished chance of contamination between patients and hospital personnel. Disadvantages include additional expense and the limitation of the volume if a second medication is be added to the cartridge or syringe.
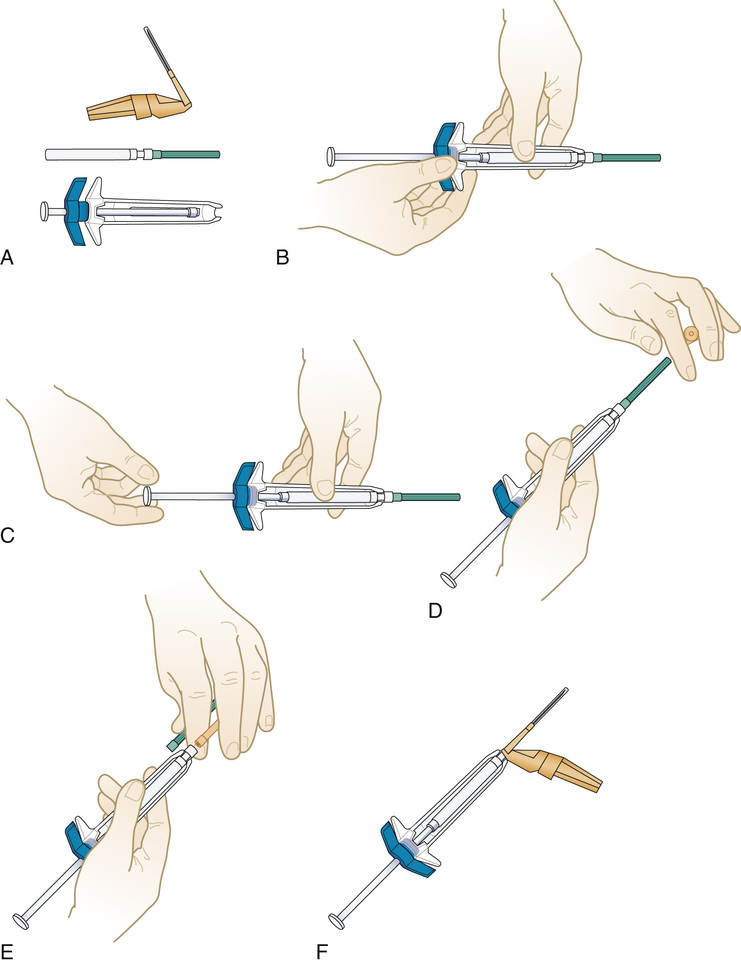
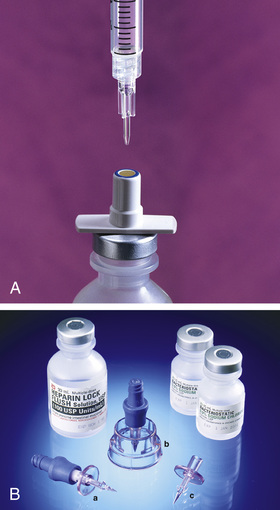
The prefilled cartridge units are marketed under the brand name Carpuject. The cartridge contains the amount of drug for one standard dose of medication. The drug name, concentration, and volume are clearly printed on the cartridge. The Carpuject prefilled cartridges require a holder that corresponds with the type of cartridge used (Figure 9-9). Examples of drugs dispensed in prefilled cartridges are morphine, ketorolac, hydromorphone, ondansetron and heparin. Other medicines (e.g., specific vaccines, enoxaparin, dalteparin, diclofenac, amiodarone) are shipped from the manufacturer in a syringe for ease of use. Many hospital pharmacies prefill syringes for specific doses of medication for patients with specific conditions. The syringe is labeled with the drug name and dosage, the patient's name and room number, and the dates of preparation and expiration.
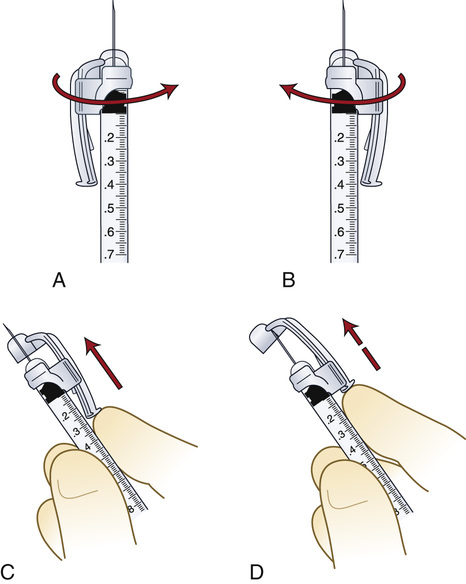
Insulin is also available in a prefilled syringe known as an insulin pen (Figure 9-10). When capped, these pens look very much like ink pens, which allows the patient to carry insulin in a discreet manner. When needed, the cap is removed, a needle is attached, air bubbles are removed, the dose is dialed in, the needle is inserted into the subcut tissue, and a trigger is pushed to inject the measured dose. When finished, the needle is removed and the cap replaced, and the device again takes on the appearance of a pen. These pens are available in a variety of colors and styles, including a prefilled, disposable model; a smaller, low-dose model; and a refillable model into which a new cartridge can be inserted when needed. The patient should be instructed regarding the correct method of holding the pen and reading the dosing dial as indicated by the manufacturer; this will help to prevent dosing errors.

Another type of prefilled syringe is the EpiPen (Figure 9-11). This syringe is a disposable automatic injection device that has been prefilled with epinephrine for use in an emergency, such as that caused by an allergic reaction to insect stings or bites, foods, or drugs. When held perpendicularly against the thigh and activated, a needle penetrates the skin into the muscle, and a single dose of epinephrine is injected into the muscle. This product is available in adult and pediatric dosages for use at home or when traveling for those who have strong reactions when they are exposed to allergens. It is important to educate those who are carrying these prefilled syringes to monitor the expiration date of this medication on a regular basis. After the epinephrine has been administered, the person should go to a hospital emergency department because additional treatment may be necessary. Another recently released product of injectable epinephrine for allergies is Auvi-Q.

The Needle
Parts of the Needle
The needle parts are the hub, the shaft, and the beveled tip (Figure 9-12). The angle of the bevel can vary; the longer the bevel, the easier the needle penetration.

Needles are sterile when they arrive from the manufacturer. Nurses must pay careful attention to keep the parts of the needle sterile and to avoid contamination. If contamination is suspected during the process of withdrawing medications, discard the needle in a sharps container and start again with a new one.
Needle Gauge
The needle gauge is the diameter of the hole through the needle. The larger the gauge number, the smaller the hole. The gauge number is marked on the hub of the needle and on the outside of the disposable package. The proper needle gauge is usually selected on the basis of the viscosity (thickness) of the solution to be injected. A thicker solution requires a larger diameter, so a smaller gauge number is chosen (Figure 9-13). Finer needles (e.g., 27, 29, 31, and 32 gauge) are available for specialty use.

Selection of the Syringe and Needle
The size of the syringe used is determined by the volume of medication to be administered, the degree of accuracy needed for the measurement of the dose, and the type of medication to be administered.
Needle selection should be based on the correct gauge for the viscosity of the solution and the correct needle length for the delivery of the medication to the correct site (e.g., intradermal, subcut, IM, or IV). Table 9-1 may be used as a guide to select the proper volume of syringe and the length and gauge of needle for adult patients.
Table 9-1
Selection of Syringe and Needle
| ROUTE | VOLUME (mL) | GAUGE | LENGTH* |
| Intradermal | 0.01-0.1 | 26-29 |  to to  inch inch |
| Subcutaneous | 0.5-2 | 25-27 | Individualized on the basis of the depth of the appropriate tissue at the site |
| Intramuscular | 0.5-2† | 20-23 | Individualized on the basis of the depth of the appropriate tissue at the site |

In small children and older infants, the usual maximum volume for an IM injection at one site is 1 mL. In small infants, the muscle mass may only be able to tolerate a volume of 0.5 mL using a  -inch–long needle. For older children, the volume should be individualized; generally, the larger the muscle mass, the greater the similarity to the adult volume for one injection site. Pediatric IM injections routinely use a 25- to 27-gauge needle that is 1 to
  inches long, depending on the assessment of the depth of the muscle mass of the child. Also available for pediatric use are 31-gauge,
  -inch needles.
Selection of Needle Length
Assess the depth of the patient's tissue for administration (e.g., muscle tissue for IM administration, subcutaneous tissue for subcut injection), and choose a needle length that corresponds to the findings.
EXAMPLE:
Compare the muscle depth of a 250-pound, obese, sedentary woman with the muscle depth of a 105-pound, debilitated adult patient. The obese individual may require a  - to 2-inch needle, and the frail person may need a 1- to
  -inch needle. A child may require a 1-inch needle (Figure 9-14).

Packaging of Syringes and Needles
The sterility of the syringe and needle to be used should always be inspected and verified when preparing and administering a parenteral medication. Wrappers should be checked for holes, signs of moisture penetrating the wrapper, and the expiration date. With prepackaged disposable items, the continuity of the wrapper, loose lids or needle guards, and any penetration of the paper or plastic container by the needle should also be checked. Should contamination be suspected, do not use the syringe; return it to the pharmacy for replacement.
Safety Systems for Parenteral Preparation, Administration, and Disposal
The Centers for Disease Control and Prevention estimates that 62% to 88% of sharps injuries can potentially be prevented with the use of medical devices. In response to this important public health concern, the U.S. Congress passed the Needlestick Safety and Prevention Act in 2000. This act required OSHA to revise its standards on blood-borne pathogens for the closer monitoring and reporting of needlestick injuries and to mandate the development of new safety equipment for the healthcare industry. One of the major developments has been the broader use of needleless systems. In accordance with OSHA regulations, needleless systems are required for the following: (1) for the collection of body fluids or the withdrawal of body fluids after initial venous or arterial access is established; (2) for the administration of medication or fluids; or (3) for any other procedure involving the potential for occupational exposure to blood-borne pathogens as a result of percutaneous injuries from contaminated sharps. Needleless systems provide an alternative to needles for routine procedures, thereby reducing the risk of percutaneous injury involving contaminated sharps. Another delivery system under development is a jet injection system that delivers subcut injections of liquid medication (e.g., insulin, vaccine) through the skin without requiring the use of a needle.
Blunt Access Devices
The blunt access device (e.g., the spike) is a safety innovation that was created to reduce the frequency of needle injuries. Note in Figure 9-15, A that needleless access devices do not have a stainless steel needle that is suitable for injection. The spike is used when drawing liquid from a rubber-diaphragm–covered vial. Another type of blunt access device that is more commonly known as a filter needle looks similar to other spikes, but it contains an internal filter. This device is used to withdraw liquid from a glass ampule. The filter screens out glass particles that may have fallen into the ampule when the top was broken off (see Figure 9-24). In addition to preventing needlestick injuries, these blunt access devices have the advantage of drawing larger fluid volumes from the container more rapidly. After the spike is used to draw up a medication, it is removed, and the appropriately sized needle is attached to the syringe if the medication is intended for injection directly into the patient.
Safety Devices
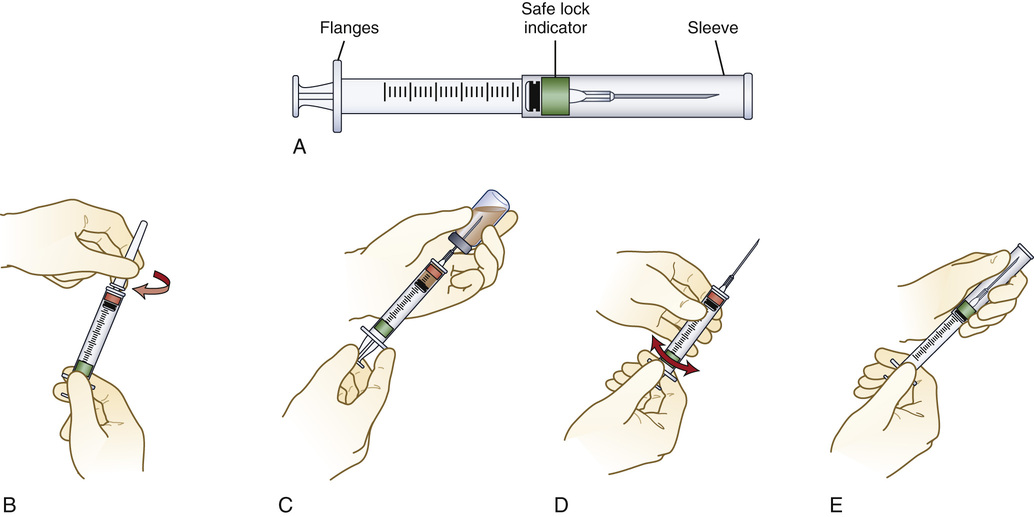
Safety devices have been developed for syringes and needles. Some products have a sleeve that is stored around the syringe barrel while the syringe is being filled through the needle (Figure 9-16). After administration, the sleeve is pulled forward fully to lock the shield permanently in place to cover the needle. Another type of safety shielding device attaches to the needle hub (Figure 9-17). After the medicine is injected, the healthcare provider pushes the hinged shield forward, thereby covering the needle. Other safety shield devices are also available for short needles (Figure 9-18). The BD Integra Syringe System is a spring-loaded syringe that retracts the needle into the syringe after injection. This system also uses a technology called Tru-Lok Technology, which involves an apparatus that is similar to Luer-Lok technology. It allows for the changing of the needle between aspiration and administration, it locks the syringe and needle together securely, and it has a very low waste space in the hub and the safety device can be closed “hands-free” (Figure 9-19). Like all safety-designed syringes and needles, it is necessary to read the accompanying literature for adjustments that need to be made when operating these devices.


Appropriate Disposal
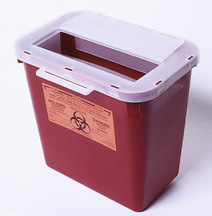
The appropriate disposal of used syringes and needles—including those with needle protection devices—is crucial to the prevention of needle injury and the transfer of blood-borne pathogens. To help minimize accidental needlesticks, a needle disposal container is commonly used for all sharps (Figure 9-20). When the container is full, the lid stays in place, and the entire container is disposed of in a specific manner to comply with OSHA standards. It is important to teach self-injecting patients how to protect themselves and others from accidental stick injury. Patients are encouraged to purchase a Sharps Disposal by Mail System at their pharmacy for the disposal of syringes, needles, and lancets. It is critical that patients use these systems to prevent the accidental exposure of sanitation workers to needles. The mail system includes a sharps container, an outer shipping box, and a prepaid postage label so that, when the container is filled, it can be mailed to an appropriate disposal center. If a patient is uncertain about the safest procedure for the disposal of used syringes and needles, he or she should contact the local sanitation service or department.
Parenteral Dose Forms
All parenteral drug dose forms are packaged so that the drug is sterile and ready for reconstitution (if needed) and administration.
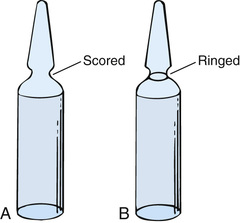
Ampules
Ampules are glass containers that usually contain a single dose of a medication. The container may be scored (Figure 9-21, A) or have a darkened ring around the neck (see Figure 9-21, B) to indicate where the ampule should be broken open for withdrawing the medication.
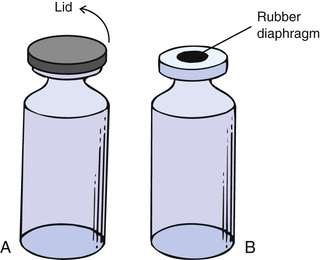
Vials
Vials are glass or plastic containers that contain one or more doses of a sterile medication. Before use, the rubber diaphragm is sealed with a metal lid to ensure sterility (Figure 9-22, A). The mouth of the vial is covered with a thick rubber diaphragm through which a needle is passed to remove the medication (see Figure 9-22, B). The medication in the vial may be in solution, or it may be a sterile powder to be reconstituted just before administration. The drug also can be withdrawn from the vial using a spike attached to the syringe (see Figure 9-15).
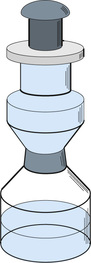
Mix-O-Vials
Mix-O-Vials are glass containers with two compartments (Figure 9-23). The lower chamber contains the drug (solute), and the upper chamber contains a sterile diluent (solvent); between the two areas is a rubber stopper. A single dose of medication is normally contained in the Mix-O-Vial. At the time of use, pressure is applied to the top rubber diaphragm plunger. This forces the solvent and the rubber stopper to fall into the bottom chamber where the diluent mixes with the powder, thereby dissolving the drug.
Preparation of Parenteral Medication
Technique
Procedure Protocol
The standard procedures for preparing all parenteral medications are as follows:
1. Perform hand hygiene before preparing any medication or handling sterile supplies. During the actual preparation of a parenteral medication, the primary rule to remember is “sterile to sterile” and “unsterile to unsterile” when handling the syringe and the needle.
2. Use the seven rights of medication preparation and administration throughout the procedure.
3. Check the drug dose form ordered against the source available.
4. Check compatibility charts or contact the pharmacist before mixing two medications or before adding medication to an IV solution.
5. Check medication calculations. When in doubt about a dose, check it with another qualified nurse. (Most hospital policies require fractional doses of medications and doses of heparin and insulin to be checked by two qualified personnel before administration.)
6. Know the institutional policy regarding limitations on the types of medications to be administered by nursing personnel.
7. Prepare the drug in a clean, well-lit area, and use aseptic technique throughout the entire procedure.
8. After completing the standard procedures for preparing all parenteral medications, concentrate on the procedure at hand to ensure accuracy during preparation.
Guidelines for Preparing Medications
Preparing a Medication From an Ampule
1. Move all the solution to the bottom of the ampule, and flick the side of the glass container with the fingers to displace the medication from the top portion of the ampule (Figure 9-24, A).
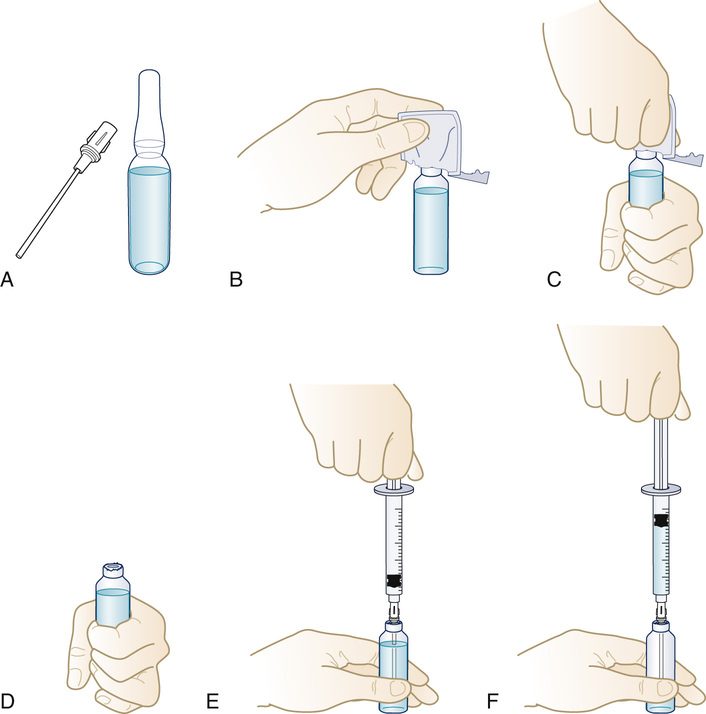
2. Cover the ampule neck area with an antiseptic alcohol wipe in its sleeve while breaking the top off (see Figure 9-24, B, C, and D). Discard the wipe and the top in a sharps container.
3. With the use of a filter needle, withdraw all the medication from the ampule (see Figure 9-24, E and F).
4. Remove the filter needle from the ampule, and point vertically. Pull back on the plunger (this allows air to enter the syringe), and then replace the filter needle with a new sterile needle of the appropriate gauge and length for administration.
5. Push the plunger slowly until the medication appears at the tip of the needle or measure the amount of air to be included to allow for the total clearance of the medication from the needle when injected. (Never add air to a syringe that is to be used to administer an IV medication.)
Drugs in a vial may be in solution ready for administration, or they may be in powdered form for reconstitution before administration.
Preparing a Medication From a Vial
Reconstitution of a Sterile Powder
1. Read the accompanying literature from the medication's manufacturer, and follow specific instructions for reconstituting the drug that has been ordered. Add only the diluent specified by the manufacturer.
2. Cleanse the rubber diaphragm of the vial of diluent with an antiseptic alcohol wipe (Figure 9-25, A).
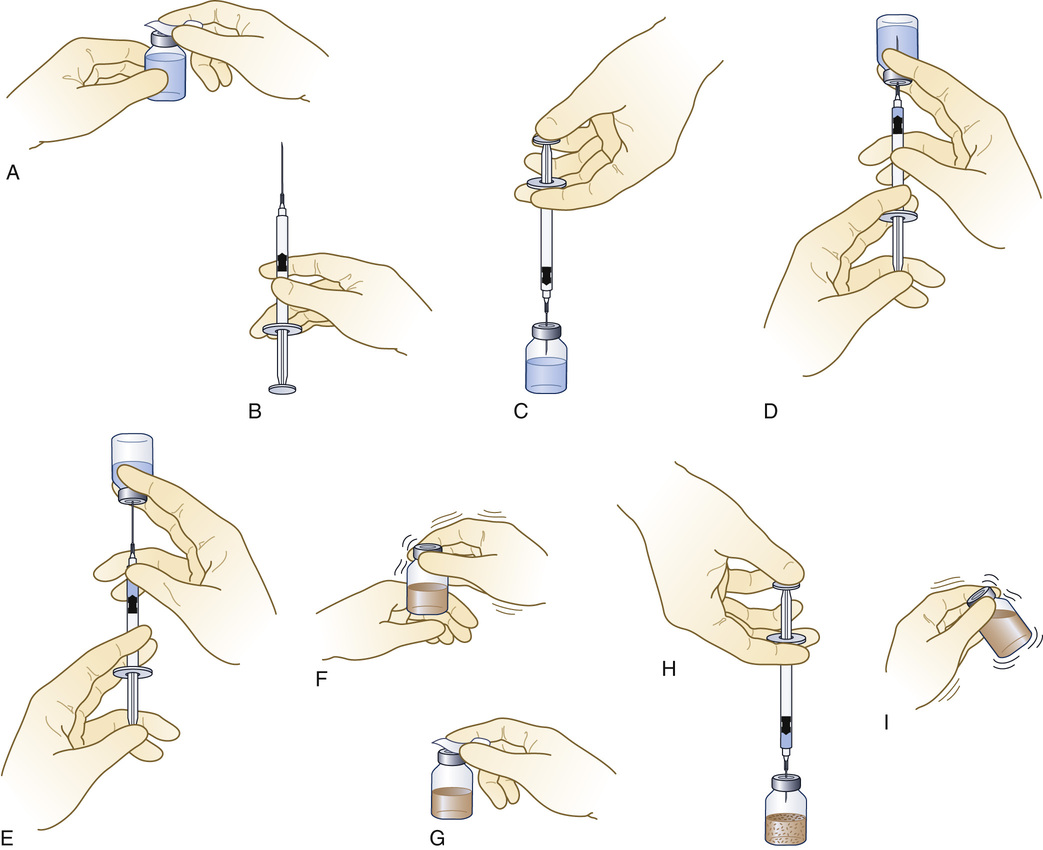
3. Pull back on the plunger of the syringe to fill it with an amount of air equal to the volume of solution to be withdrawn (see Figure 9-25, B).
4. Insert the needle or needleless access device through the rubber diaphragm, and inject the air (see Figure 9-25, C).
5. Withdraw the measured volume of diluent required to reconstitute the powdered drug (see Figure 9-25, D and E). Remove the needle from the diaphragm of the diluent container.
6. Recheck the type and volume of diluent to be injected against the type and amount required.
7. Tap the vial containing the powdered drug to break up the caked powder (see Figure 9-25, F). Wipe the rubber diaphragm of the vial of powdered drug with a new alcohol wipe (see Figure 9-25, G).
8. Insert the needle or needleless access device in the diaphragm, and inject the diluent into the powder (see Figure 9-25, H).
9. Remove the syringe and needle from the rubber diaphragm.
10. Mix thoroughly to ensure that the powder is entirely dissolved before withdrawing the dose (see Figure 9-25, I).
11. Label the reconstituted medication, and include the date and time of reconstitution, the volume and type of diluent added, the name of the reconstituted drug, the concentration of the reconstituted drug, the expiration date and time, and the name of the person who reconstituted the drug. Store the medication in accordance with the manufacturer's instructions.
12. Change the needle (as described previously), or remove the needleless access device. Attach a needle of the correct gauge and length to administer the medication to the patient.
Removal of a Volume of Liquid From a Vial (see Figure 9-25)
1. Calculate the volume of medication required for the prescribed dose of medication to be administered.
2. Cleanse the rubber diaphragm of the vial of diluent with an antiseptic alcohol wipe.
3. Pull back on the plunger of the syringe to fill it with an amount of air equal to the volume of solution to be withdrawn.
4. Insert the needle or needleless access device through the rubber diaphragm, and inject the air.
5. Withdraw the volume of drug required to administer the prescribed dose.
6. Recheck all aspects of the drug order.
7. Change the needle or remove the needleless access device. Attach a needle of the correct gauge and length to administer the medication to the patient.
Preparing a Drug From a Mix-O-Vial
1. Check the drug order against the medication available for administration.
2. To mix the drug, do the following:
• Tap the container in the hand a few times to break up the caked powder.
• Remove the plastic lid protector (Figure 9-26, A).
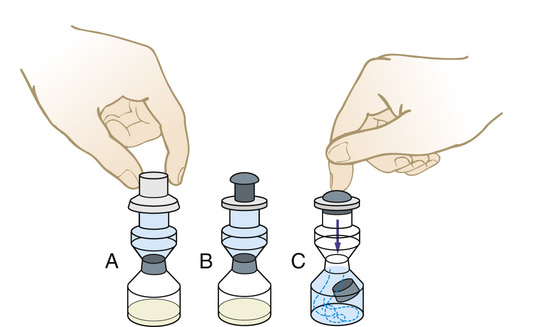
• Push firmly on the diaphragm/plunger. The downward pressure will dislodge the divider between the two chambers (see Figure 9-26, B and C).
• Mix thoroughly to ensure that the powder is completely dissolved before drawing up the medication for administration.
• Cleanse the rubber diaphragm, and remove the drug in the same manner as described for the removal of a volume of liquid from a vial (see Figure 9-25, A through E).
Preparing Two Medications in One Syringe
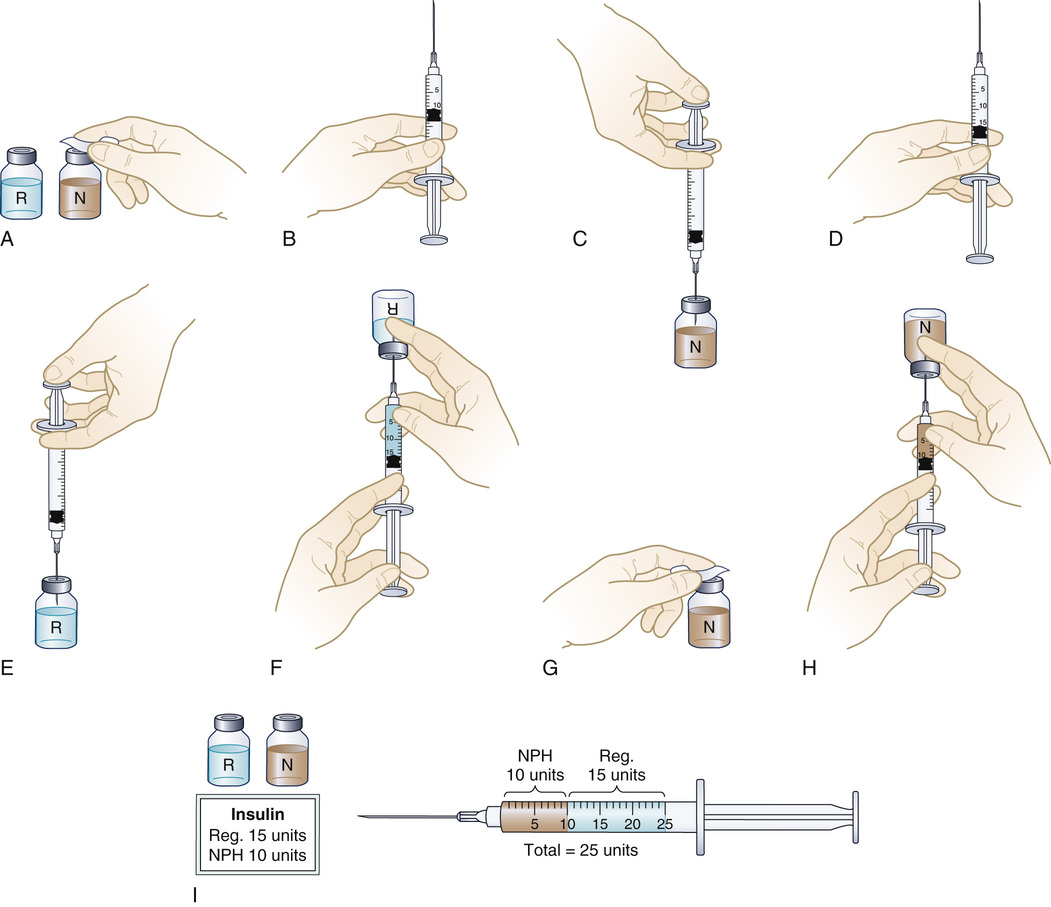
Occasionally, two medications may be drawn into the same syringe for a single injection. This is usually done when preparing a preoperative medication or when two types of insulin are ordered to be administered at the same time. Mixing insulin is a routine procedure, so it will be used to illustrate this technique (Figure 9-27). Before administering insulin, the nurse always evaluates the patient's blood glucose level.
1. Check the compatibility of the two drugs to be mixed before starting to prepare the medications.
2. Check the labels of the medications against the medication order.
• Type: NPH, regular, Humulin, other
• Concentration: U-100 (U-100 = 100 units per mL)
• Expiration date: Do NOT use the insulin if the expiration date has passed.
• Appearance: Clear? Cloudy? Precipitate present?
• Temperature: The insulin should be at room temperature.
4. The American Diabetes Association's 2003 guidelines state that “when mixing rapid- or short-acting insulin with intermediate or long-acting insulin, the clear rapid- or short-acting insulin should be drawn into the syringe first.” When teaching a patient to mix insulin for self-administration, using a consistent method of preparing the mixture should be stressed so that this becomes a habit for the patient. This can help to prevent the patient from inadvertently reversing the dose of short- and long-acting insulin in the mixture.
• Check the expiration date on the vial of insulin.
• To resuspend the insulin, roll the vial or pen between the palms of the hands or invert the vial several times to mix the contents thoroughly.
• Check the insulin order and the calculations of the preparation with another qualified nurse in accordance with institutional policy.
• Cleanse the top of both vials with separate antiseptic alcohol wipes (see Figure 9-27, A).
• Pull back the plunger on the syringe to an amount that is equal to the volume of the longer-acting insulin that has been ordered (see Figure 9-27, B).
• Insert the needle through the rubber seal of the longer-acting insulin bottle, and inject the air (see Figure 9-27, C). Do not bubble air through the insulin solution, because it might break up insulin particles.
• Remove the needle and the syringe. Do not withdraw insulin at this time.
• Pull back the plunger on the syringe to an amount that is equal to the volume of the shorter-acting insulin that has been ordered (see Figure 9-27, D).
• Insert the needle through the rubber seal of the second bottle, and inject the air (see Figure 9-27, E). Invert the bottle, and withdraw the volume of shorter-acting insulin (see Figure 9-27, F).
• NOTE: Check for bubbles in the insulin in the syringe. Flick the side of the syringe with the fingers to displace the bubbles, and then recheck the amount of insulin in the syringe.
• Check the medication order against the label of the container and the amount in the syringe.
• Wipe the lid of the longer-acting insulin container again (see Figure 9-27, G). Recheck the drug order against this container, insert the needle of the syringe containing the shorter-acting insulin, and withdraw the specified amount of longer-acting insulin (see Figure 9-27, H). Be careful not to inject any of the first type of insulin already in the syringe into the vial.
• Remove the needle and syringe. Recheck the drug order against the label on the insulin container and the amount in the syringe (see Figure 9-27, I).
• Withdraw a small amount of air into the syringe, and then mix the two medications. Remove air carefully so that part of the medication is not displaced.
• Administer the insulin to the patient by the subcut route.
Preparing Medications for Use in the Sterile Field During a Surgical Procedure
Drugs Used in the Operating Room
• All medications used during an operative procedure must remain sterile.
• All medication containers (e.g., ampules, vials, piggyback containers, blood bags) used during the surgical procedure should remain in the operating room until the entire procedure is completed. If a question arises, the container is then available.
• Do not save any unused portion of medication for use during another surgical procedure. Discard this medication at the end of the surgical procedure, or send the patient's medication to the patient care unit with the patient, if appropriate (e.g., antibiotic ointment for a patient who is having ophthalmic surgery).
• Adhere to hospital policies that address the handling and storage of medications in the operating room.
• Always tell the surgeon the name and dosage or concentration of the medication or solution that is being handed to him or her.
• Always repeat the entire medication order back to the surgeon when the request is made to verify all aspects of the order. If in doubt, repeat this information again until accuracy is certain.
Drugs Used in the Sterile Surgical Field
• Prepare the drug prescribed in accordance with the directions.
• Always check the accuracy of the drug order against the medication being prepared at least three times during the preparation phase: (1) when it is first removed from the drug storage area; (2) immediately before removing the solution for use in the sterile field; and (3) immediately after completing the transfer of the medication or solution to the sterile field. Always tell the surgeon the name and dose or concentration of the medication or solution when passing it to him or her for use.
• The circulating (nonsterile) nurse retrieves the medication from storage, reconstitutes it as needed, and turns the medication container so that the scrubbed (sterile) person can read the label. It is best to read the label aloud to ensure that both individuals are verifying the contents against the verbal order from the surgeon.
Method 1
1. The circulating (nonsterile) nurse cleanses the top of the vial or breaks off the top of the ampule, as described previously.
2. The scrubbed (sterile) person chooses a syringe of the correct volume for the medication to be withdrawn and attaches a large-bore needle to facilitate the removal of the solution from the container.
3. The circulating (nonsterile) nurse holds the ampule or vial in such a way that the scrubbed (sterile) person can easily insert the sterile needle tip into the medication container (Figure 9-28, A).
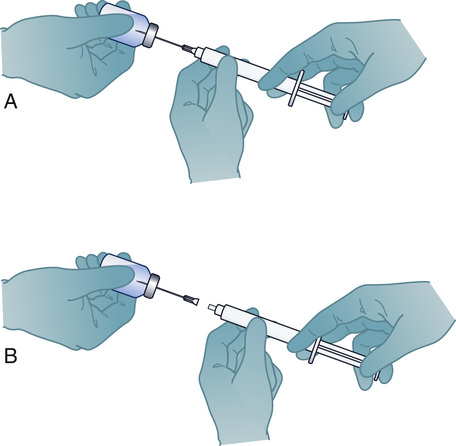
4. The scrubbed person pulls back the plunger on the syringe until all of the medication prescribed has been withdrawn from the container and from the needle used to withdraw the medication.
5. The needle is disconnected from the syringe and left in the vial or ampule (see Figure 9-28, B).
6. The medication container is again shown to the scrubbed person and read aloud to verify all components of the drug prepared against the medication or solution requested.
Method 2
1. The circulating (nonsterile) nurse removes the entire lid of the vial with a bottle opener, cleanses the rim of the vial, and pours the medication directly into a sterile medicine cup held by the scrubbed nurse.
2. The scrubbed person continues drug preparation on the sterile field in accordance with the intended use (e.g., irrigation, injection).
Regardless of the method used to transfer the medication to the sterile field, both the sterile scrubbed person and the nonsterile circulating nurse should know the location and the exact disposition of each medication on the sterile field.
Get Ready for the NCLEX® Examination!
Key Points
• A syringe has three parts: the barrel, the plunger, and the tip that holds the needle. Types of safety syringes and needles include the Luer-Lok and needleless systems of blunt needles and shields over the needles.
• To correctly determine the gauge and length of the needle to use, the site of injection and the size of the patient are factored in, as well as the volume of medication to be administered.
• The tuberculin syringe is used to measure volumes of less than 1 mL; the standard syringe sizes are 1, 3, and 5 mL.
• Prefilled cartridge-needle units and syringes contain a standard dose of a medication and are a time saver for the nurse, but more expensive than a multidose vial of medication. Cartridges require a special cartridge holder to administer the medication. Ampules are glass containers of medications that need to be opened by snapping (breaking) the neck of the ampule before use. Vials have a rubber diaphragm that a needle passes through to access the medication. Mix-O-Vials are glass containers with two compartments. The lower compartment contains the medicine in powder form, and the upper compartment contains the diluent needed to dissolve the medicine. The two chambers are separated by a rubber plug. To mix the medicine, a rubber stopper on the top chamber is pushed, forcing the rubber stopper between the chambers to drop into the lower chamber, along with the diluent. Shaking the container dissolves the medicine, allowing it to be drawn up into a syringe for administration.
• Insulin can be mixed in one syringe by drawing up the short-acting insulin first, then adding the longer-acting insulin to the same syringe using a specific method.
Additional Learning Resources
 Go to your Study Guide for additional Review Questions for the NCLEX® Examination, Critical Thinking Clinical Situations, and other learning activities to help you master this chapter content.
Review Questions for the NCLEX® Examination
1. Which parts of the syringe and needle are considered sterile? (Select all that apply.)
2. The outer barrel of the syringe
3. The plunger tip of the syringe
5. The inner barrel of the syringe
2. The nurse was preparing to give an injection into her patient's abdomen for his early morning insulin dose. Which needle length and gauge are appropriate to use?
 inch
inch inch
inch3. The nurse is preparing an IM injection of 1 mL of flu vaccine for an average adult patient and will be using this needle length and syringe size when administering the dose:
 inch, 3 mL
 inch, 5 mL
 inch, 5 mL
4. The tuberculin syringe can be used for medications that are: (Select all that apply.)
3. for diabetic patients with insulin if a syringe marked in units is not available.
5. Prefilled cartridge-needle units and syringes have many advantages that include: (Select all that apply.)
1. they require special cartridge holders.
2. they diminish the chance of contamination of the medication.
3. they are cheaper than the multidose vials.
4. they save the nurse the time it takes to prepare the injection.
5. they contain a standard amount of medication.
6. When removing a parenteral medication from an ampule, what must the nurse do?
1. Inject air equal to the amount of medication to be removed.
2. Use a needleless spike for removing the medication.
3. Use a filter needle or filter straw to ensure that no glass is drawn into the syringe.
4. Depress the top rubber diaphragm to displace the stopper.
7. The nurse is teaching the patient how to prepare 10 units of regular insulin and 5 units of NPH insulin for injection. List in the correct order the proper sequence for preparation that the nurse will describe to the patient.
1. Inject appropriate volumes of air into the NPH vial and the regular insulin vial.
2. Withdraw 10 units of regular insulin into the syringe.
3. Wipe the tops of the insulin vials with alcohol.
4. Withdraw 5 units of NPH insulin into the syringe to mix with the regular insulin.