Parenteral Administration
Intravenous Route
Objectives
1. Define intravenous (IV) therapy and describe the three intravascular compartments and the three fluid compartments of the body.
2. Discuss the different IV access devices used for IV therapy.
3. Differentiate between isotonic, hypotonic, and hypertonic IV solutions and explain their clinical uses.
4. Identify the general principles for administering medications via the IV route.
5. Compare and contrast the differences between a peripheral IV line and a central IV line.
6. Describe the correct techniques for administering medications by means of a saline lock, an IV bag, an infusion pump, and a secondary piggyback set.
7. Describe the recommended guidelines and procedures for IV catheter care.
8. Identify baseline assessments for IV therapy and proper maintenance of patency of IV lines and implanted access devices.
9. Explain the signs, symptoms, and treatment of the complications associated with IV therapy (e.g., phlebitis, thrombophlebitis, localized infection, septicemia, infiltration, extravasation, air in tubing, pulmonary edema, catheter embolism, and “speed shock”).
Key Terms
The term intravenous (IV) administration refers to the introduction of fluids directly into the venous bloodstream. The advantage of this technique is that large volumes of fluids can be rapidly administered into the vein for volume expansion in cases of shock, or more rapid onset of medications administered intravenously in cases of emergency. Intravenous administration is the most rapid of all parenteral routes because it bypasses all barriers to drug absorption. Drugs may be given by direct injection with a needle in the vein, but they are more commonly administered intermittently or by continuous infusion through an established peripheral or central IV line.
An advantage of IV administration compared with other forms of parenteral administration is that it is generally more comfortable for the patient, especially when several doses of medications must be administered daily. However, disadvantages to the IV route include nurses needing the skill to establish and maintain an IV site. In addition, the patient tends to be less mobile with IV administration, and there is a greater possibility for infection and for severe adverse reactions to the drug.
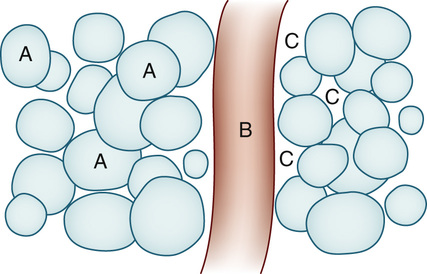
From a physiologic standpoint, the water in the body is distributed among three compartments: (1) the intravascular compartment—within the vascular system (e.g., the arteries, veins, and capillaries) (Figure 11-1, B); (2) the intracellular compartment—within the cells (Figure 11-1, A); and (3) the interstitial compartment—within the spaces between the cells that are outside of the vascular compartment (Figure 11-1, C). The extracellular compartment (the spaces outside the cells) is composed of the intravascular and interstitial compartments, and it contains about one third of the total body water, whereas the intracellular compartment (within the cells) contains about two thirds of the total body water.
All IV therapy requires a written order from a healthcare provider that is dated and that specifies the type of solution or medication to be administered, the dosage, and the rate and frequency of administration. Some hospitals use infusion therapy teams for administration via the intravenous system, but many now assign the responsibility for infusion therapy to nurses with earned credentials. The nurse who is performing venipuncture (initiation of an IV line) and infusion therapy must be well versed in the guidelines established by the Infusion Nurses Society.
The Infusion Nurses Society, a professional nursing organization, publishes the Infusion Nursing Standards of Practice as it relates to quality assurance, technology and application, fluids and electrolytes, pharmacology, infection control, pediatrics, oncology, and parenteral nutrition. Most state laws recognize the role of the licensed practical nurse/licensed vocational nurse (LPN/LVN) in IV therapy, but delegate the scope of practice to be defined in the policies and procedures of individual practice sites. The nurse should check with his or her particular state board of nursing to determine the current guidelines and education requirements. In general, LPN/LVN responsibilities do not include the administration of IV medication, blood products, or antineoplastic agents.
Before any nurse administers IV therapy, he or she should ask the following questions:
• “Does the law in this state delegate this function to the nurse?”
• “Does the written policy of the institution or agency through which I am employed, with the approval of the medical staff, permit a nurse with my level of education and experience to administer IV therapy?”
• “Does the institution or agency policy limit the types of fluids and medications that I may administer?”
Equipment Used for Intravenous Therapy
Intravenous Administration Sets
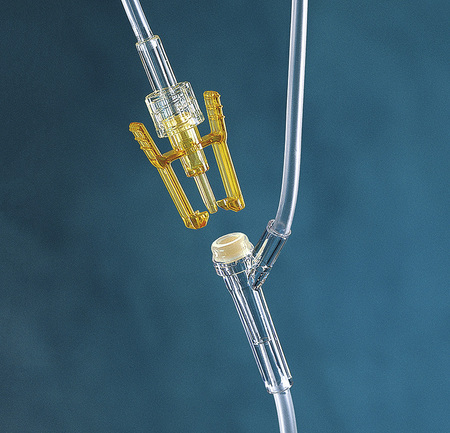
An IV administration set is an apparatus that connects a large volume of parenteral solution with the IV access device in the patient's vein. All sets (Figure 11-2) have an insertion spike, a drip chamber, plastic tubing with a rate-control clamp, a rubber injection portal (also referred to as a Y port), a needle adapter, and a protective cap over the needle adapter. Depending on the manufacturer, the sets are available in a variety of styles (e.g., different volumes and sizes of drip chamber, “piggyback” portals, filters, and styles of control clamps [Figure 11-3]).
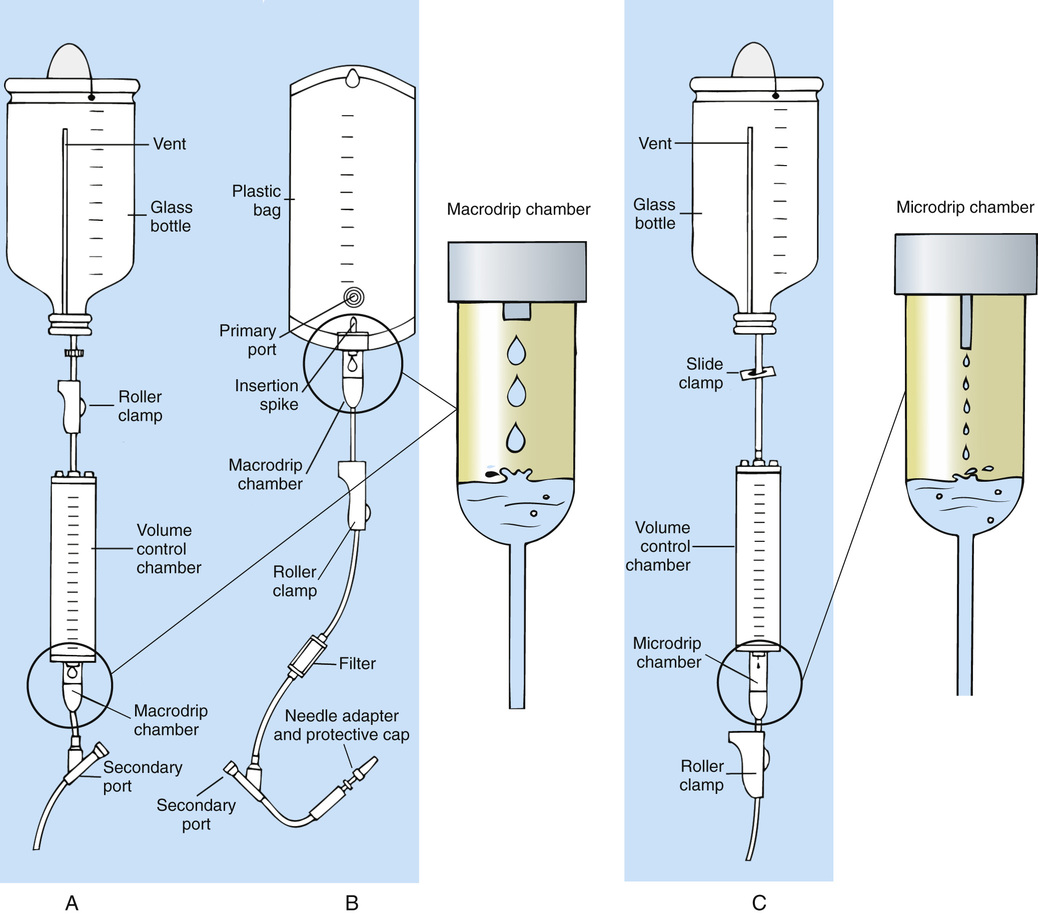
The type of system used by a particular institution is usually determined by the manufacturer of the IV solutions used by the institution. Each manufacturer makes adapters to fit a specific type of plastic or glass large-volume solution container. A crucial point to remember about administration sets is that the drops delivered by drip chambers vary among manufacturers. Macrodrip chambers (see Figure 11-2, A and B) provide 10, 15, or 20 drops/mL of solution, whereas microdrip chambers (see Figure 11-2, C) deliver 60 drops/mL of solution.
Microdrip administration sets are used when a small volume of fluid is being administered, particularly when accuracy of volume administration is indicated (e.g., with neonatal and pediatric populations; for those patients with fluid volume concerns). Volume-control chambers (see Figure 11-2, A and C) are also used as a safety factor to limit the volume administered. In many clinical settings, microdrip sets are used for all volumes of IV fluid ordered that are administered at less than 100 mL/hr. It is essential to read the label on the box before opening it to ensure that the correct IV administration set has been selected.
The nurse must be able to calculate the flow rate for any IV solution. The flow rates that are used for infusion pumps are generally in mL per hour. A typical flow rate problem would be as follows: At what rate will the nurse set the infusion pump if the order reads, “Infuse 1000 mL of D5W over 8 hours”? Calculate the rate of infusion using a simple formula: mL divided by hours.

The nurse sets the pump rate for 125 mL/hour, making sure to note the time the infusion started. This information is key to pass on to the next shift if the infusion is not completed within the time frame that the nurse who started the infusion will be present. All parts of the IV need to be labeled; the IV fluid needs a label that indicates when it needs to be changed (usually in 24 hours), and the IV tubing needs a label indicating when it needs to be changed (usually in 72 hours).
Equipment Used in Conjunction With Intravenous Therapy
A large variety of connector and access devices are available for various components of infusion therapy. The nurse must become familiar with the IV access systems and the terms used for these systems at the clinical site. Knowing which parts of the system are clean and which parts are to remain sterile is crucial for the provision of safe IV therapy.
Types of Infusion-Control Pumps
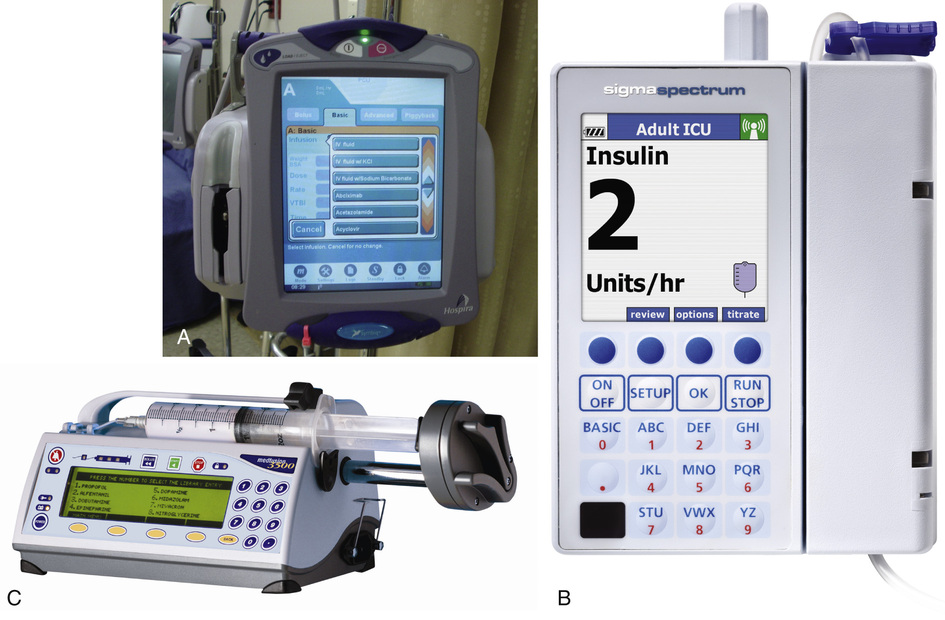
Precise infusion rates are important for certain therapeutic effects (e.g., with a continuous heparin infusion for anticoagulation) or when monitoring the administration of medications to prevent toxicity (e.g., nephrotoxicity, ototoxicity). Programmable infusion pumps are used to assure the safe administration of IV fluids and medications (Figure 11-4).
Pumps
The programmable infusion pumps apply external pressure to the administration set tubing to squeeze the solution through the tubing at a specific rate (e.g., a certain number of mL/min or mL/hr). These pumps are programmed for a specific volume over time and are more accurate than previous infusion control devices. These pumps have an alarm system that sounds if there is resistance in the IV line caused by a developing occlusion as a result of thrombus formation or a kink in the administration set line caused by patient movement. Disadvantages of pumps are the cost of the equipment and the training of personnel, the cost of maintenance, more equipment needed at the bedside, and the potential for serious IV infiltration.
Syringe Pumps
Syringe pumps hold a prefilled syringe and apply positive pressure to the plunger to deliver a specific volume of medicine over a set time. Syringe pumps are more commonly used when small volumes need to be administered. Examples of small syringe pumps are those that continually infuse insulin into the subcutaneous tissue of patients with diabetes mellitus and patient-controlled analgesia pumps, which allow patients who are receiving pain medications to administer continual infusions and intermittent boluses of the medicine for comfort.
Syringe pumps are easy to use, and their use is taught to patients needing home infusion therapy, when patients self-administer medications through an implanted infusion port. It is important that the nurse become familiar with the specific devices that are used in the clinical setting for safe and efficient patient care.
Intravenous Access Devices
Intravenous access devices are often subdivided into four groups on the basis of the location of the terminal tip of the access device: (1) peripheral devices are for short-term use in peripheral veins in the hand or forearm; (2) midline catheters are for use over 2 to 4 weeks, and are inserted into intermediate-sized veins and advanced into larger vessels; (3) central devices are inserted into intermediate-sized vessels and advanced into central veins where the tip of the catheter typically will be in the superior vena cava to allow for maximal mixing with large volumes of blood; and (4) implantable venous infusion ports, which are placed into central veins for long-term therapy.
Peripheral Access Devices
All needles—if they are long enough—may be used to administer medications or fluids intravenously. However, special equipment has been designed for this purpose. Winged needles, which are also known as butterfly or scalp needles, are short, sharp-tipped needles (Figure 11-5) that were originally designed for venipuncture of small veins in infants and for geriatric use. These needles are available in sizes that range from 17 to 29 gauge, and have been designed to minimize tissue injury during insertion. The winged area is pinched together to form a handle while the needle is being inserted. The wings are then laid flat against the skin to form a base that can be anchored with tape. Two types of these needles are now available: one with a short length of plastic tubing and a permanently attached resealable injection port and one with a variable length of plastic tubing with a female Luer adapter for the attachment of a syringe or an administration set (see Figure 11-5). The patency of the needle is maintained with the use of a heparin or saline flush routine in accordance with facility policy.

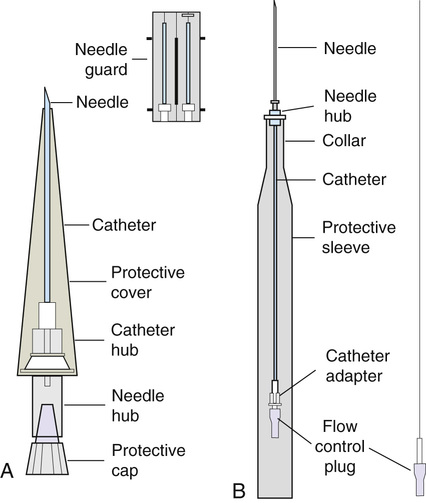
Over-the-needle catheters, which are also known as short peripheral venous catheters, are recommended for routine peripheral infusion therapy. The needles are stainless steel and coated with a Teflon-like plastic catheter (Figure 11-6, A). After the needle penetrates the vein in the hand or forearm, the catheter is advanced into the vein, and the metal needle is removed, thereby leaving the plastic catheter in place. An IV administration set is then attached to the catheter for continuous infusion. This unit is used when IV therapy is expected to continue for a few days. The rationale for the use of the plastic catheter is that it does not have a sharp tip that could cause venous irritation and extravasation.
When a patient no longer requires IV fluid therapy but venous access is still needed for medication administration, an extension tube with an injection port is attached to the catheter and the IV fluid is discontinued. This type of IV access device is called a saline lock or a medlock (i.e., medication lock). Normal saline flushing rather than heparin is sufficient to prevent clotting and maintain the peripheral catheter integrity. Generally, peripheral catheters should be changed every 72 to 96 hours to prevent infection and phlebitis. Blood samples should not be drawn from peripheral catheters. If sites for venous access are limited and no evidence of infection is present, peripheral venous catheters can remain in place, although the patient and the insertion site should be monitored closely for signs and symptoms of phlebitis, infiltration, and infection. The Centers for Disease Control (CDC) recommends that peripheral catheters not be changed for pediatric patients unless this is clinically indicated.
In-the-needle catheters make use of large-bore needles for venipuncture (see Figure 11-6, B). A 4- to 6-inch sterile, smaller-gauge, plastic catheter is then advanced through the needle into the vein. The needle is withdrawn, and the skin forms a seal around the plastic catheter. The IV administration set is attached directly to the plastic catheter. In-the-needle catheters are seldom used today for peripheral IVs because of the risk of shearing the through-the-needle catheter.
Midline access catheters are selected for use if it is anticipated that IV access will be needed for 7 days or more. These catheters are often left in place for 2 to 4 weeks. Midline catheters are flexible and 3 to 8 inches long, and are inserted at the antecubital fossa into the cephalic or basilic vein and advanced to the distal subclavian vein. They do not enter the superior vena cava. Midline catheters appear to be associated with lower rates of phlebitis than short peripheral catheters; they have a lower rate of infection, and they cost less than central venous catheters. The CDC recommends the replacement of the catheter and the rotation of the injection site no more frequently than every 72 to 96 hours, but the CDC does not provide recommendations regarding the maximum length of time that the catheter may remain in place. Many institutions require that the healthcare provider write an order that indicates that the IV may be left in place for more than 72 hours. Midline catheters are used for continuous access, repeated access, or IV solutions with high flow rates. This type of catheter needs to be flushed with saline and heparin solution after each use, or at least once daily if it is not in use. Blood should not be drawn through this catheter.
Central Access Devices
Central IV access devices, which are also known as indwelling catheters, are used in the following situations: when the purpose of therapy dictates their use (e.g., large volumes of medication, for irritating medicine such as chemotherapy, or when hypertonic solutions such as total parenteral nutrition [TPN] are to be infused); when peripheral sites have been exhausted as a result of repeated use or the condition of the veins for access is poor; when long-term or home therapy is required; or when emergency conditions mandate adequate vascular access.
The central venous sites that are most commonly used for central venous catheters are the subclavian and jugular veins. When the upper body veins are not acceptable, the femoral veins may be accessed for short-term or emergency use. A physician can also elect to perform a venisection or a cutdown to insert this type of catheter into the basilic or cephalic veins in the antecubital fossa. Three types of devices, based on the placement of the catheter's proximal tip, are routinely used for central catheters: peripheral devices, tunneled devices, and implantable devices.
Peripherally inserted central venous catheters (PICCs) are inserted into the superior vena cava or just outside the right atrium by way of the cephalic or basilar veins of the antecubital space, thereby providing an alternative to subclavian or jugular venous catheterization. Peripherally inserted central venous catheters are available in sizes that range from 14 to 28 gauge, with various lengths, thereby making them available for pediatric use. The catheter itself can have an open tip or a valved (Groshong) tip, and it comes with a single or double lumen. The PICC line has the advantage of ease of insertion because the procedure can be performed at the bedside by a qualified nurse. Peripherally inserted central venous catheters are associated with fewer mechanical complications (e.g., thrombosis, hemothorax); they cost less than other central venous catheters, they are easier to maintain than short peripheral catheters (because there is less frequent infiltration and phlebitis), and they require less frequent site rotation. Peripherally inserted central venous catheter lines routinely remain in place for 1 to 3 months, but they can last for 1 year or more if they are cared for properly. When the device is not in use, the IV is disconnected and the catheter is flushed and capped. The line should be flushed with a saline-heparin solution after every use or daily, if not used, in accordance with institutional policy.
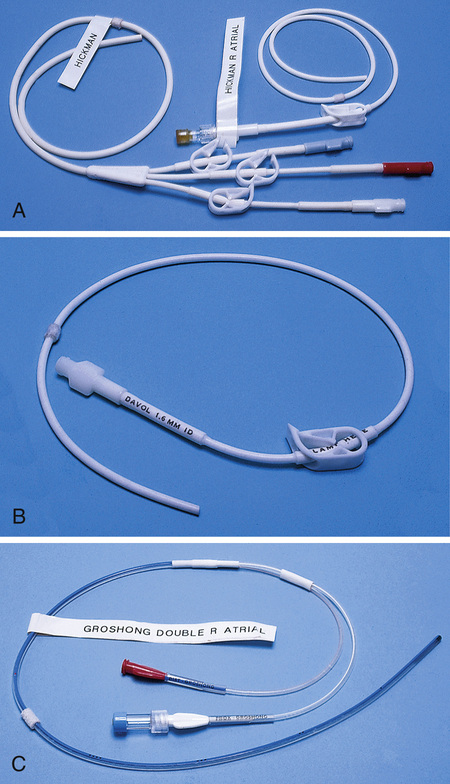
Tunneled central venous catheters are surgically placed during an outpatient procedure with the patient under local anesthesia. The terminal tip of the catheter is inserted through an incision and into the subclavian vein, where it is then advanced to the superior vena cava. The proximal end of the catheter is tunneled about 6 inches away under the skin on the chest to exit near a nipple. A Dacron cuff is often placed around the catheter under the skin, which anchors the catheter and forms a seal around the catheter as the skin heals, thereby helping to keep the tunnel sterile.
Three types of catheters that are frequently used are the Hickman, Broviac, and Groshong catheters (Figure 11-7). The Broviac catheter is a single-lumen catheter with a larger external diameter and a standard end hole. The Hickman catheter is larger in diameter than the Broviac catheter, but it contains two or three lumens; it also has a standard end hole. When they are not in use, both of these catheters are clamped to prevent contamination, clotting, and air embolism. These catheters must also be flushed with a saline-heparin solution after every medication administration, or at least once daily if they are not in use. The Groshong catheter contains one to three lumens, and each one has a rounded valved tip. The Groshong valve opens inward for blood sampling and outward for infusion, but it remains closed when it is not in use. Because the valve remains closed when it is not in use, it seals the fluid inside the catheter and prevents it from coming into contact with the patient's blood. Thus weekly flushing with saline solution is all that is required to keep the catheter patent. The valve also eliminates the need for routine clamping of the catheter, although it should remain capped when it is not being used.
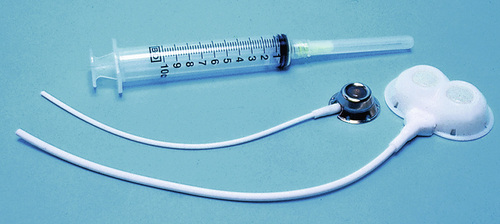
Implantable infusion ports (e.g., Infus-A-Port, Port-A-Cath) are used when long-term therapy is required and intermittent accessing of the central vein is required for the administration of IV fluids, medications, TPN, chemotherapy, and blood products. The implantable devices are similar to tunneled devices with regard to placement; however, the proximal end of the single- or double-lumen catheter is attached to a single- or double-lumen access port (Figure 11-8) and then implanted and sutured into a subcutaneous pocket in the chest area or the upper arm. The double ports are designed to allow for the administration of two IV solutions, two IV medications, or one of each simultaneously. One port can also be reserved for drawing blood samples. The ports contain a self-sealing silicone rubber septum that has been specifically designed for repeated injections over an extended period of time. A special noncoring, 90-degree–angle Huber needle is used to penetrate the skin and the septum of the implanted device to minimize damage to the self-sealing septum. To prolong the life of the septum, only the smallest-gauge noncoring needles should be used. The chest port is estimated to withstand up to 2000 punctures, whereas the arm port has an estimated life of 1000 punctures.
An implanted central venous access catheter may remain in place for more than 1 year, and it requires only a saline-heparin solution flush after every access or once monthly. Because the entire port and catheter are under the skin, there is no daily maintenance needed, although the site should be monitored visually on a regular basis to check for swelling, redness, or drainage. This type of central venous catheter gives the patient the greatest flexibility in terms of daily activities and exercise, including swimming; however, contact sports should be avoided.
All central venous access devices require postinsertion radiography to verify the location of the device and to check for the presence of a pneumothorax for catheters that are tunneled on the chest. The CDC recommends that central venous catheters not be routinely replaced to prevent catheter-related infection.
Intravenous Dose Forms
Review Chapter 9 for information about the use of ampules, vials, and Mix-O-Vials. All parenteral drug dose forms are packaged so that the drug is sterile and ready for reconstitution (if needed) and administration.
Types of Intravenous Solutions
Under normal and healthy conditions, the body loses water and electrolytes daily through urine, perspiration, and feces. Fluids are replenished as a result of the absorption of water in the gastrointestinal tract from the liquids and foods that are consumed. However, as a result of many different disease states (e.g., vomiting, diarrhea, gastrointestinal suctioning, hemorrhage, drainage from a wound, decreased intake, nausea, anorexia, fever, excess loss from disease [e.g., uncontrolled diabetes mellitus, diabetes insipidus]), patients are unable to ingest sufficient quantities of fluid and electrolytes to offset these losses. When this happens, the IV infusion of solutions may be necessary for replacement. See a medical-surgical nursing textbook for more information about patient assessments for deficient fluid volume.
Intravenous (IV) solutions (Box 11-1) consist of water (e.g., a solvent) that contains one or more types of dissolved particles (e.g., solutes). The solutes that are most commonly dissolved in IV solutions are sodium chloride, dextrose, and potassium chloride. The solutes that dissolve in water and dissociate into ion particles (e.g., Na+, K+, Cl−) are called electrolytes because these ions give water the ability to conduct electricity. Total parenteral solutions contain all the electrolytes necessary in addition to enough carbohydrates (usually dextrose), amino acids, and fatty acids to sustain life.
The spontaneous movement of water across the intravascular compartment capillary membranes to the interstitial spaces and across the cell membranes and back to the intravascular capillary space is called osmosis. The water moves from an area of high concentration of water (e.g., of low electrolyte concentration) to an area of low water concentration (e.g., of high electrolyte concentration). The electrolyte and protein concentrations of each fluid compartment are what draw water into the compartment until there is equilibrium between compartments. The force caused by the electrolytes and proteins is called osmotic pressure. The concentration of the dissolved particles in each compartment is known as the osmolality. Normal blood serum osmolality is 295 to 310 milliosmoles per liter (mOsm/L). Because IV solutions also contain dissolved particles, they also have an osmolality. If the IV solution and the blood have approximately the same osmolality, then the solution is said to be isotonic. Solutions that have fewer dissolved particles than the blood are considered to be hypotonic, and those with a higher concentration of dissolved particles are thought of as hypertonic. A 0.9% solution of sodium chloride, which is also known as normal saline (NS) or physiologic saline, is an isotonic solution with an osmolality of 308 mOsm/L. Table 11-1 lists commonly used IV solutions, their electrolyte concentrations, and their osmolalities. Those solutions with osmolalities below 270 mOsm/L are hypotonic, those with values from 270 to 310 mOsm/L are isotonic, and those with values of more than 310 mOsm/L are hypertonic.
Table 11-1
Intravenous Solutions, Electrolyte Concentrations, and Osmolality
| SOLUTION | Na+ (mEq/L) | Cl− (mEq/L) | GLUCOSE (g/L) | OSMOLALITY (mOsm/L) |
| 0.45 Normal saline | 77 | 77 | 0 | 154 |
| 0.9 Normal saline | 154 | 154 | 0 | 308 |
| 5% Dextrose in 0.2% sodium chloride | 34 | 34 | 50 | 320 |
| 5% Dextrose in 0.45% sodium chloride | 77 | 77 | 50 | 405 |
| 5% Dextrose in 0.9% sodium chloride | 154 | 154 | 50 | 560 |
| Lactated Ringer's solution* | 130 | 109 | 0 | 273 |

Isotonic solutions (e.g., 0.9% sodium chloride, lactated Ringer's) are ideal replacement fluids for the patient with an intravascular fluid deficit (e.g., acute blood loss as a result of hemorrhage, gastrointestinal bleeding, or trauma). This type of fluid is used for hypovolemic, hypotensive patients to increase vascular volume to support blood pressure; however, these patients must be monitored for fluid overload (potential pulmonary edema), especially if the patient has congestive heart failure. Another isotonic solution, dextrose 5% with 0.2% sodium chloride (D5/0.2 NS), is a standard solution for maintaining hydration and electrolytes (e.g., potassium chloride), administering continuous infusion IV medications, and to keep open (TKO) IV therapy for the intermittent administration of medications. D5/0.2 NS solutions are infused as isotonic solutions, but they rapidly become hypotonic solutions as the dextrose is metabolized. Therefore D5/0.2 NS solutions—even though they are initially isotonic—should not be used to maintain vascular volume in a patient who is hypovolemic and hypotensive.
Hypotonic solutions (e.g., 0.2% or 0.45% sodium chloride) have lower osmolality than serum. This type of solution contains fewer electrolytes and more free water, so the water is rapidly pulled from the vascular compartment into the interstitial and intracellular fluid compartments. Although these solutions are useful in conditions of cellular dehydration, administering them too rapidly may cause a sudden shift of fluids being drawn from the intravascular space into the other compartments.
Hypertonic solutions have an osmolality that is higher than that of the serum. Although hypotonic and isotonic solutions are used in particular situations because of their tonicity, hypertonic solutions are rarely used in this way because hypertonic solutions have the potential to pull fluid from the intracellular and interstitial compartments into the intravascular compartment, thereby causing cellular dehydration and vascular volume overload. In cases of extravascular volume overload, these solutions are used to diurese patients because these solutions will draw fluid into the vascular compartment, which then can be excreted by the kidneys, usually with the help of diuretics such as furosemide. Hypertonic solutions also have the disadvantage of causing phlebitis and venous spasm, with infiltration and extravasation occurring in the peripheral veins. In general, solutions with osmolalities of more than approximately 600 to 700 mOsm/L should not be administered in peripheral veins. Hypertonic solutions (e.g., parenteral nutrition solutions) must be administered through central infusion lines, where the solution can be rapidly diluted by large volumes of rapidly flowing blood (e.g., in the superior vena cava near the entrance to the right atrium).
Large-Volume Solution Containers
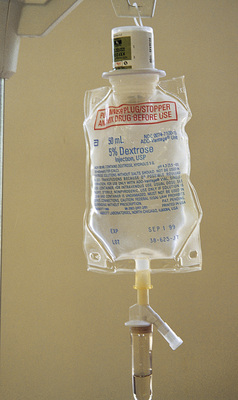
Intravenous solutions are available in both plastic and glass containers in a variety of types and concentrations (see Table 11-1 and Box 11-1) and in volumes that range from 100 to 2000 mL. Both the glass and plastic containers are vacuum sealed. The glass bottles are sealed with a hard rubber stopper and then a metal disk, and this is followed by a metal cap. Right before use, the metal cap and disk are removed, thereby exposing the hard rubber stopper. The insertion spike of the IV administration set is pushed into a specifically marked area on the rubber stopper. Some brands also have another opening in the rubber stopper that serves as an air vent (see Figure 11-2, A and C). As the solution runs out of the container, it is replaced with air. Other brands make use of a flexible plastic container (see Figure 11-2, B). As the solution runs out of the bag, the flexible container collapses.
Plastic bags are somewhat different in that the entire bag and solution are sealed inside another plastic bag for removal just before administration. When the insertion spike is forced into the specially marked portal, an internal seal is broken, which allows the solution to flow into the tubing.
Small-Volume Solution Containers
Some medicines (e.g., antibiotics) are administered by intermittent infusion through an apparatus known as a tandem setup, piggyback, or IV rider (Figure 11-9). These medicines are given by a setup that is hung in tandem and connected with the primary setup. The secondary setup may consist of a drug infusion from a small volume of fluid in a small bag or bottle (≤250 mL; see Figure 11-9) or from a volume-control set (also known as a Volutrol or a Buretrol; see Figure 11-2, A and C). A volume-control set is composed of a calibrated chamber that is hung under the primary IV solution container and that can provide the necessary 50 to 250 mL of diluent per dose of drug. Most intermittent diluted drug infusions are infused over 20 to 60 minutes.

Administration of Medications by the Intravenous Route
Dose Forms
Medications for IV administration are available in ampules, vials, prefilled syringes, and large-volume IV solution bags. Be certain that the label specifically states that the medication is for IV use. IV fluid and electrolyte solutions come in a variety of volumes and concentrations in glass and plastic containers (see Box 11-1).
Equipment
• Administration set with appropriate needle or needleless connector, drip chamber, and filter
• Physiologic solution ordered
• Syringe and needle or needleless connector (if giving by bolus)
• Saline solution, piggyback, and additional solutions as appropriate
Additional supplies may be required to access, flush, or change IV administration sets, inline filters, or dressings, depending on the type of peripheral, central, or implantable device being used.
Sites
Peripheral Intravenous Access
When selecting an IV site, consider the following: the length of time that the IV will be required; the condition and location of the veins; the purpose of the infusion (e.g., rehydration; delivery of nutritional needs [e.g., TPN], chemotherapy, and antibiotics); and the patient's status, cooperation level, and preference for and amount of self-care needed for the injection site (if appropriate).
Peripheral IV devices include the wing-tipped needle (see Figure 11-5), the over-the-needle catheter (see Figure 11-6, A), and the inside-the-needle catheter (see Figure 11-6, B). The over-the-needle catheters are the most commonly used venous access systems for entering the peripheral veins.
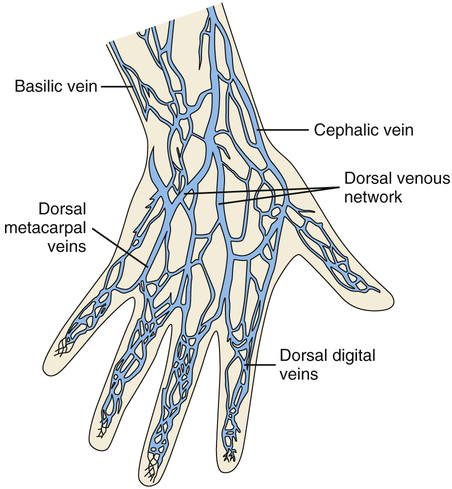
If a prolonged course of treatment is anticipated, start the first IV in the hand (Figure 11-10). The metacarpal veins, the dorsal vein network, the cephalic vein, and the basilic vein are commonly used. To avoid irritation and leakage from a previous puncture site, the subsequent venipuncture sites should be made above the earlier site. Figure 11-11 shows the veins of the forearm area that could be used for additional venipuncture sites.

Central Intravenous Access
Central IV access devices are used for the following situations: when the purpose of therapy dictates (e.g., large-volume, high-concentration, or hypertonic solutions are to be infused); when peripheral sites have been exhausted as a result of repeated use or when the condition of the veins for access is poor; when long-term or home therapy is required; or when an emergency condition mandates adequate vascular access.
The central veins that are most commonly used for central venous catheters are the subclavian and jugular veins. When upper body veins are not acceptable, the femoral veins may be accessed for short-term or emergency use.
General Principles of Intravenous Medication Administration
• The nurse shall have passed a skill competency that demonstrates his or her knowledge of the IV administration procedure.
• If it is institutional policy to use a local anesthetic to anesthetize the IV site before insertion, the nurse must determine the patient's allergies to anesthetic agents.
• Use appropriate barrier precautions (e.g., universal blood and body fluid precautions) to prevent the transmission of any infectious diseases, including human immunodeficiency virus, as recommended by the CDC.
• Gloves should be worn throughout the venipuncture procedure. Care should be taken to wash the skin surface if the area is contaminated with blood.
• When the procedure is complete, remove the gloves and dispose of them in accordance with the policies of the practice setting. Perform hand hygiene as soon as the gloves are removed. Care should be taken to avoid contaminating the IV tubing and the rate regulator.
• Any used needles, syringes, venipuncture catheters, or vascular access devices should be placed in a puncture-resistant needle disposal container in the immediate vicinity for disposal in accordance with the policies of the practice setting. Needle safety devices should be activated before placing in the disposal container.
• Never recap, bend, or break used needles because of the danger of inadvertently puncturing the skin.
• Whenever possible, use needle-protector systems such as blunt needles, injection ports, needle sheaths, or needleless systems to prevent inadvertent needlesticks, as well as the risk of introducing pathogens into oneself.
• Be certain that medications to be administered intravenously are thoroughly dissolved in the correct volume and type of solution. Always follow the manufacturer's recommendations.
• Most clinical practice sites now use transparent dressings over the IV insertion site that are changed in accordance with hospital policies, generally every 72 hours. Some clinical practice sites still use gauze dressings. When gauze is used, the four edges of the dressing should be sealed with tape. Always check the specific policies of the employing institution, as well as the healthcare provider's orders, with regard to the frequency of dressing changes.
• Do not use topical antibiotic ointments or creams on insertion sites (except when using dialysis catheters) because of the potential to promote fungal infections and antimicrobial resistance.
• At the time of the dressing change for any type of IV site, the area should be thoroughly inspected for any drainage, redness, tenderness, irritation, or swelling. The presence of any of these symptoms should be reported to the healthcare provider immediately. (In addition, take the patient's vital signs and report these at the same time.)
• Use inline filters as recommended by the manufacturer of the drug to be infused.
• Do not administer any drug or IV solution that is hazy or cloudy or that has foreign particles or precipitate in it.
• Do not mix any other drugs with blood or blood products (e.g., albumin).
• Do not administer a drug in an IV solution if the compatibility is not known.
• Use aseptic technique, including the use of a cap, mask, sterile gown, sterile gloves, and a large sterile sheet for the insertion of central venous catheters (including PICCs) and for guidewire exchanges.
• Drugs must be entirely infused through the IV line before adding a second medication to the IV line.
Drugs that are given by IV push or bolus generally are given in accordance with the SASH guideline—Saline flush first; Administer the prescribed drug; Saline flush after the drug; Heparin flush line (depending on the type of line [e.g., Hickman catheter]; check institutional policy). The SAS technique is similar to the SASH guideline but without the heparin: Saline flush first; Administer the drug; Saline flush after the drug.
• After a medication has been mixed, know the length of time that it remains stable; all unused IV solutions should be returned to the pharmacy if they are not used within 24 hours.
• Check the institutional policy for the definition of TKO. It is usually interpreted as an infusion rate of 10 to 20 mL/hr, and less than 500 mL/24 hr should be infused.
• Shade IV solutions that contain drugs that should be protected from light. All IV solution bags or bottles should be changed every 24 hours (check institutional policy) to minimize the development of new infections. Label all IV solutions with the date and time initiated and the nurse's initials. Do not use marking pens directly on plastic IV containers, because the ink may penetrate the plastic and enter the IV solution.
• Intravenous administration sets that are used to deliver blood or blood products should be changed after the unit is administered. Sets that have been used to infuse lipids or TPN should be changed every 24 hours. Administration sets that are used only for physiologic IV fluids (e.g., D5/0.2 NS) may be changed every 72 hours (check institutional policy). The sets or tubing must be labeled with the date and time initiated, the date upon which to change the set, and the nurse's initials.
• Whenever a patient is receiving IV fluids, monitor his or her intake and output accurately. Report declining hourly outputs, as well as those of less than 30 to 40 mL/hr.
• Never speed up an IV flow rate to catch up when the volume to be infused has fallen behind. In certain cases, this could be dangerous. The healthcare provider should be consulted, particularly for pediatric patients and for those who have cardiac, renal, or circulatory impairment.
 Clinical Pitfall
• NOTE: Never start an IV in an artery!
• Whenever possible, initiate the IV in accordance with the patient's preference or in his or her nondominant arm.
• Do not initiate an IV in an arm with compromised lymphatic or venous flow (e.g., after mastectomy or axillary node dissection) or in an extremity with a dialysis or apheresis catheter or shunt inserted.
• Avoid the use of blood vessels over bony prominences or joints unless absolutely necessary.
• In the older adult, using the veins in the hand area may be a poor choice because of the fragility of the skin and veins in this area.
• Veins that are commonly used in infants and children for IV administration are on the back of the hand, the dorsum of the foot, or the temporal region of the scalp (Figure 11-12). The scalp veins are to be used as a last resort for infants.

• When possible, avoid using the veins of the lower extremities because of the danger of the development of thrombi and emboli.
Preparing an Intravenous Solution for Infusion
Dose Form
Check the healthcare provider's order for the specific IV solution ordered and for any medication to be added to the container. If the order has not already been prepared by the pharmacy, check the accuracy of the drug order against the medication or solution being prepared at least three times during the preparation phase: (1) when first removing the drug or solution from the storage area; (2) immediately after preparation; and (3) immediately before administration. Check the expiration date on any additives and on the primary solution. If an IV medication is to be added, ensure that the drug is approved for administration by nurses.
Perform preintravenous access assessments.
Equipment
• Administration set with appropriate drip chamber (microdrip or macrodrip; see Figure 11-3), needle, IV catheter, and inline filter (if used); the primary line administration set is usually labeled “universal” or “continuous flow”
• IV start set and kit (e.g., antiseptic alcohol wipes, nonsterile gloves, site labels, tape, transparent dressing materials, and tourniquet)
• Medications for IV delivery and label
Sites
The most commonly used veins for IV administration in infants and children are in the temporal region of the scalp, the back of the hand, and the dorsum of the foot.
Technique
1. Assemble equipment, and perform hand hygiene.
2. Check the vein for the size and type of needle required to access the vein selected for venipuncture or for the type of needle required to access an implanted access device for the delivery of the IV solution or medication.
3. Check the healthcare provider's order against the physiologic solution chosen for administration.
4. Inspect the IV container for cloudiness, discoloration, and the presence of any precipitate. Verify the expiration date on the IV fluid container.
5. Remove the plastic cover from the IV container, and inspect the plastic IV bag to be certain that it is intact; squeeze it gently to detect any punctures. Inspect a glass container of IV solution for any cracks.
6. Choose the administration set that is appropriate for the type of solution ordered, for the rate of delivery requested (e.g., microdrip or macrodrip), and for the type of IV container being used. Plastic bag IV containers do not require an air vent in the administration set. Glass containers for IV delivery must be vented or have an administration set with an air filter vent in it. Remove the administration set from its container, and inspect it for any faults or contamination.
7. Move the roller or slide clamp to the upper portion of the IV line 6 to 8 inches from the drip chamber; close the clamp.
8. Connect the IV administration set or tubing to the IV solution:
a. Plastic IV bags: Remove the tab from the spike receiver port, remove the tab from the administration set spike, and insert the spike firmly into the bag port. Maintain the sterility of the port and spike throughout the process.
b. Glass IV bottle: Peel back the metal tab, and lift the protective metal disk from the container; remove the latex-type covering (if present) from the top of the rubber stopper. As the latex diaphragm is removed, a sudden noise should be heard as the vacuum within the glass container is released. If the noise is not heard, the contents of the IV container may not be sterile and should be discarded. Remove the tab from the administration set spike; insert the spike firmly into the port in the rubber stopper. Maintain the sterility of the port and spike throughout the process. NOTE: When additive medications are ordered, they should be added to the large-volume container before tubing is attached to help ensure a uniform mixing of the medication and the physiologic solution. If medication is added to an existing IV solution, clamp the line before adding the medication to the container, and make sure that adequate mixing takes place before the infusion is started again. (See the technique that is used for adding a medication to an IV solution described earlier.)
9. Hang the solution on an IV pole, squeeze the drip chamber, and fill it halfway. Prime the IV line by removing the protective tab or cap from the distal end of the IV line, invert the Y port, open the roller or slide clamp, and allow the solution to run until all of the air is removed from the line. If using a pump, prime the tubing in accordance with hospital policy. Cover the end of the IV tubing with a sterile cap. Inspect the entire length of tubing to be certain that all air is removed from the line. Place an IV measuring device or tape strip on the plastic bag or glass IV container. Label the container with the patient's name along with the date and time of preparation. If medication has been added, all details of the medication must be marked on the container's label: the drug name and dose, the rate of administration requested in healthcare provider's order, and the name of the nurse who prepared the IV. The IV tubing is labeled with the date and time that it is opened and the date and time that it is to be changed. The CDC recommends that IV tubing be changed every 72 hours. Administration sets that are used to deliver blood or blood products may be changed after each unit is infused, as defined by institutional policy, or within 24 hours of initiating the infusion. Lipid solutions have special tubing that should be changed every 24 hours if they are administered by continuous infusion or after every unit if they are administered intermittently. Follow institutional policies. NOTE: It may be necessary to add inline filters to the setup if this is recommended for the administration of the ordered medication. Purge air from the line before attaching the filter.
10. The IV solution can now be taken to the bedside for attachment after a venipuncture is performed or for addition to an existing IV system. For safety, all aspects of the IV order should be checked again immediately before attaching the IV for infusion. NOTE: Always identify the patient by checking his or her ID bracelet before initiating any procedure. Have the patient state his or her name and birth date or provide other identifiers.
Intravenous Fluid Monitoring
The infusion of IV fluids requires careful monitoring for patients of all ages. The microdrip chamber, which delivers 60 drops (gtt)/mL, is used whenever a small volume of IV solution is ordered to be infused over a specific time. Many clinical sites interpret a small volume as less than 100 mL/hr. In pediatric units, volume-control chamber devices (e.g., a Buretrol, a SoluSet) and syringe pump controllers are commonly used to regulate the volume of fluid that is infused.
Basic Guidelines for the Intravenous Administration of Medications
Equipment
Premedication Assessment
1. Know basic patient data, the patient's diagnosis, the symptoms of the disorder or disease process for which the medication is ordered, and the desired action of the drug for the particular individual.
2. Obtain baseline vital signs.
3. Check for any tape, latex, and drug allergies or prior drug reactions.
4. Check the accuracy of the drug order against the medication or solution being prepared at least three times during the preparation phase: (1) when first removing the drug or solution from the storage area; (2) immediately after preparation; and (3) immediately before administration.
5. Check for leaks, the clarity, and expiration date on the solution and on the drug to be added to the solution.
6. Review the individual drug monograph to identify laboratory studies recommended before or intermittently during therapy, the calculation of the dose, the adverse effects, the monitoring parameters recommended for the specific drug prescribed, and other considerations. (With certain light-sensitive medications [e.g., amphotericin B, nitroprusside], it is necessary to shield the IV bag with a dark plastic bag to prevent the degradation of the drug.)
7. Know the type of IV access that the patient has in place, the date and time of insertion, the type of IV fluid or medication running, and the rate of flow prescribed.
Procedure Protocol
The standard procedures for preparing all parenteral medications are as follows:
1. Perform hand hygiene before preparing any medication or handling sterile supplies. During the actual preparation of a parenteral medication, the primary rule is “sterile to sterile” and “unsterile to unsterile” when handling the syringe and needle.
2. Use the seven rights of medication preparation and administration (see Chapter 7) throughout the procedure: right patient, right drug, right indication, right route, right dose, right time, and right documentation.
3. Check the drug dose form ordered against the source used for the preparation.
4. Check compatibility charts or contact the pharmacist before mixing two medications or adding medications to an IV solution.
5. Check medication calculations. When in doubt about a dose, check it with another qualified nurse. (Most institutional policies require fractional doses of medications and doses of heparin and insulin to be checked by two qualified individuals before administration.)
6. Know the institutional policy regarding limitations on the types of medications to be administered by nursing personnel.
7. Prepare the drug in a clean, well-lighted area with the use of aseptic technique throughout the entire procedure.
8. Concentrate on the procedure; ensure accuracy during preparation.
9. Check the expiration date of the medication.
10. Before administering an IV drug, the nurse should check the list of drugs approved for administration by nurses in the clinical care setting.
Research the medication ordered as an IV additive; this procedure also applies for direct push or bolus administration:
2. Usual dose (take into consideration the patient's age, weight, and hydration state).
3. Compatibility of the drug with existing IV drugs that are currently infusing.
4. For IV push or bolus, does the drug need to be diluted, or can it be given undiluted? If it should be diluted, what types and amounts of diluent can be used? If it is being added to an existing IV, is the drug compatible with the primary solution?
Venipuncture
Perform the following preintravenous assessments:
• Assess the patient's demeanor. Does the patient appear cooperative, or will assistance be needed? (Always have sufficient assistance when working with pediatric patients.)
• Check for and avoid previously used IV sites, areas of impaired circulation, and any fistulas that may be present in the extremities.
• Examine the extremities for potential sites, and estimate the size of the veins that are available for use.
Equipment
• Transparent dressing materials
• Two gauze sponges, 2 × 2 inches
• One roll of transparent tape
• As appropriate, medications and physiologic solutions ordered for IV delivery and IV equipment needed
• For a saline lock or a medlock, obtain the correct extension tubing and injection cap, as appropriate; use a saline-heparin flush solution in accordance with institutional policy (use 10-mL syringes that contain an appropriate volume of solution for flushing)
Selection of the Catheter or Butterfly Needle
When selecting a catheter or butterfly needle for use, choose the smallest size that is feasible for administering the specific type of fluid that has been ordered. Catheters are available in 27 gauge,  inch to 14 gauge,
  inches, and the butterfly needles are available in sizes 17 to 29 gauge. A more viscous fluid such as blood requires a larger-diameter catheter. As with other needles, the lower the number of the gauge, the larger the diameter of the opening of the catheter. During the assessment process, the nurse notes the size of the vein to be accessed.
For a pediatric patient, obtain a sheet or blanket to use to wrap the child for the procedure.
Prepare the IV solution or medication, if ordered.
Technique
1. See the procedure protocol described above.
2. Assemble the necessary equipment, and perform hand hygiene.
3. Check all aspects of the healthcare provider's orders.
4. Recheck the size and type of catheter or butterfly needle needed to access the vein selected and any extension tubing or injection caps that are needed to prepare the site for future intermittent or continuous use for the prescribed IV therapy.
5. If ordered, the IV solution and medication should be prepared and taken to the bedside for attachment after a venipuncture has been performed. For safety, all aspects of the IV therapy orders should be checked again immediately before initiating the venipuncture and attaching the IV for infusion. NOTE: Always identify the patient by checking his or her ID bracelet before initiating any procedure. Have the patient state his or her name and birth date or other identifiers.
6. Position the patient appropriately. Immobilize an infant or child for patient safety, if necessary. (Be sure that the patient is wearing the type of hospital gown that has openings on the shoulder seams.)
7. Cut tape for stabilizing the IV catheter or butterfly needle before starting the procedure. Turn the ends of the tape back on themselves to form a tab that will not adhere to a glove when the tape is to be applied or removed. The nurse must consider his or her gloves to be contaminated when they come into contact with blood. If the gloves come into contact with the tape and dressing materials that have been used at the venipuncture site, the outside of the dressings and tape are then potentially contaminated. Therefore, during the procedure, the nurse must focus on allowing contamination only of the dominant gloved hand; the nondominant hand must be maintained as uncontaminated to handle the taping and stabilization of the peripheral access device. After the needle or catheter is stabilized, the gloves can be removed; perform hand hygiene, and apply the gauze or the occlusive type of dressing materials in accordance with practice setting policies.
8. When extension tubing is used with the catheter or the butterfly needle, fill the extension tubing with saline, and purge it of all air.
9. Apply the tourniquet using a slipknot 2 to 6 inches above the site chosen (this is the shaded area in Figure 11-13, A). Inspect the area to identify a vein of sufficient size to accommodate the catheter and provide adequate anchorage.
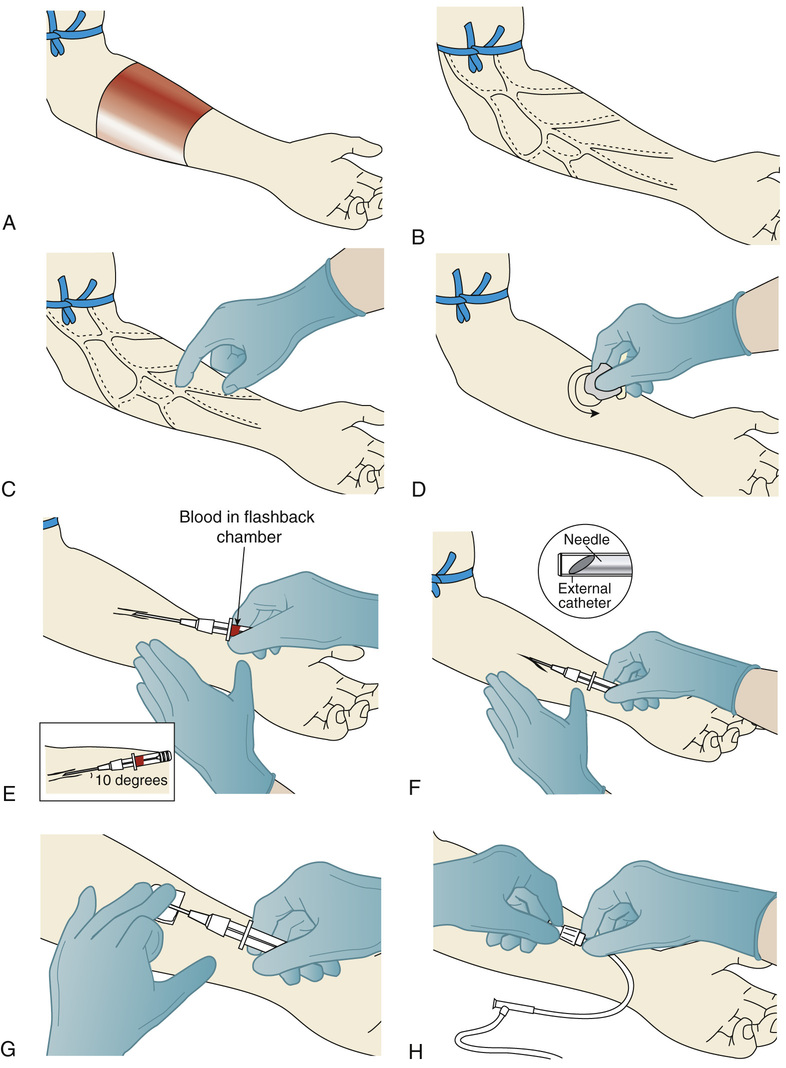
10. Put on nonsterile gloves. As the vein dilates, palpate the vein to feel its depth and direction (see Figure 11-13, B and C). To dilate the vein, it may be necessary to place the extremity in a dependent position. Massage the vein against the direction of blood flow, have the patient open and close the hand repeatedly, or remove the tourniquet and apply a heating pad or warm wet towels to the extremity for 15 to 20 minutes, and then restart the process.
11. Cleanse the skin surface with the antiseptic alcohol wipe, starting at the site of entry and working outward in a circular motion toward the periphery (see Figure 11-13, D). Do not retouch the area where the puncture site will be made. (Alternatives are to put a sterile glove on one hand so that the site can be touched again or to prepare the fingertip with antiseptic.)
12. Allow the area to air-dry.
13. Hold the catheter or butterfly needle to be inserted in the dominant hand, and remove the protective cover while maintaining the sterility of the needle. Approach the vein directly from above or from slightly to one side of the vein. Provide tension on the skin surface to stretch the skin and stabilize the vein.
a. For a peripheral over-the-needle catheter (see Figure 11-6, A):
• Inspect the IV catheter, and loosen the catheter needle by rotating the catheter.
• Hold the flash chamber with the thumb and forefinger, and insert the catheter with the needle at a 10- to 30-degree angle with the bevel up (see Figure 11-13, E) (check the manufacturer's product instructions for the recommended angle of entry), and assess the depth of the vein; the deeper the vein, the greater the angle of entry to puncture the skin and venous wall.
• Watch for blood in the flashback chamber; after blood is seen, advance the needle and catheter an additional  to
to  inch into the vein.
• Withdraw the needle from the catheter (see Figure 11-13, F), lower the angle of the catheter slightly, and advance the catheter into the vein.
• Hold the catheter hub in place while applying gentle pressure on the catheter tip to prevent the excessive backflow of blood while the needle is removed from the catheter and the catheter and IV are attached (see Figure 11-13, G).
b. For a butterfly needle insertion:
• Prepare the site as described previously.
• Hold the butterfly needle by the tabs, and align the needle, bevel up, with the vein that has been selected.
• Puncture the skin and vein surface as described previously.
• After the vein is entered, lower the angle, and advance the needle into the vein until the tabbed area of the butterfly is adjacent to the puncture site.
14. Release the tourniquet, and secure the connection of the IV tubing to the over-the-needle plastic needle hub (see Figure 11-13, H) or to the butterfly apparatus.
15. Cleanse the area to eliminate any blood that may have contacted the skin or IV tubing. Remove the gloves, and anchor the needle and tubing to the arm or hand with tape and dressing, as prescribed by the practice setting policy. (Because it is difficult to handle tape with gloves on, it is helpful to have a second person anchor the needle and tubing and to adjust the flow rate.)
16. If no continuously flowing IV is attached, flush the catheter in accordance with institutional policy.
17. The individual who is performing the venipuncture can dispose of all soiled dressings and contaminated supplies in accordance with the practice setting's policy.
18. Remove the gloves, and perform hand hygiene.
19. Adjust the rate of flow solution or set the rate on the pump.
20. Regardless of the apparatus used, mark the label with the date and time of insertion and the initials of the nurse who started it.
21. In a way that is appropriate to the age, site, and physical orientation of the individual, attach a padded arm board to support and stabilize the infusion site.
Documentation
Provide the right documentation of the venipuncture (e.g., IV started or IV medication administered and response to drug therapy).
1. Chart the date and time; the size and type of butterfly or IV catheter used; the site accessed; and the number of attempts made to perform the venipuncture. Make entries on the appropriate IV site flow sheets that are used at the clinical site.
2. On the medication administration record (MAR), chart the type and amount of IV fluid started or added to an existing line; the rate of administration; and, if medication was added, the date, the drug name, the amount added (e.g., the dose), and the date and time of preparation and initiation.
3. Perform and record regular patient assessments for the evaluation of therapeutic effectiveness (e.g., blood pressure, pulse, output, lung field sounds, degree and duration of pain relief).
4. Chart any signs and symptoms of the adverse effects of the drugs given or problems encountered during the venipuncture procedure. If more than one attempt was required to perform the venipuncture, record the relevant details.
Patient Teaching
Teach the patient about any symptoms that should be reported at the insertion site (e.g., pain, swelling, discomfort).
Administration of Medication by a Saline Lock or a Medlock
See Figure 11-14. Perform premedication assessments and follow procedure protocol as described earlier in this chapter. In addition, refer to the individual drug monographs.
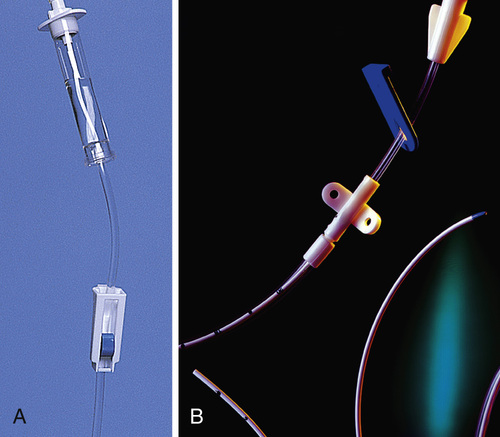
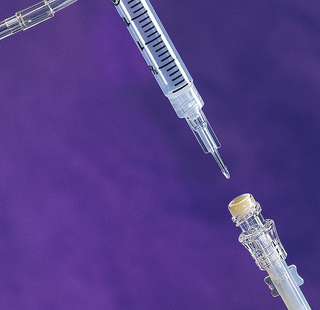
1. Select a syringe that is several milliliters larger than required for the volume of the drug. This allows room for the aspiration of blood to ensure the proper placement of the needle or catheter in the vein and to allow blood to mix with the drug solution. Place a needleless access device on the syringe (Figure 11-15), or use a syringe that is used with a needleless system (Figure 11-16).
2. Research and prepare the medication as described previously. Prepare the saline in syringes with needleless access devices to flush the line before and after medication administration in accordance with institutional policy. It is recommended that 10-mL syringes that contain a few milliliters of flush solution be used for flushing to reduce the pressure exerted in the vein or catheter.
3. Identify the patient by checking his or her ID bracelet. Recheck the medication order, explain the procedure, and provide education about the drug being administered. Have the patient state his or her name and birth date or two other identifiers.
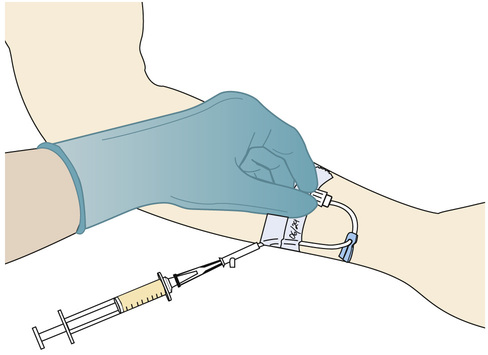
5. Swab the self-sealing portal of the injection site with an antiseptic alcohol wipe for 15 seconds, and attach the syringe via the injection cap.
6. Access the injection portal or cap with a syringe that contains flush solution, and gently pull back on the plunger for blood return. If return is not obtained or if resistance is felt, stop and evaluate the cause. Do not force the insertion of the solution, or a clot could be dislodged.
7. When blood return is established, inject the saline for the flush followed by the medication at the rate specified by the manufacturer. Always carefully check the drug order and a reliable reference for the proper dilution and recommended rate of administration of the drug. Watch the clock, and time the injection rate as accurately as possible!
8. Periodically pull back on the plunger to mix blood with the saline or drug solution and to ensure that the needle is in the vein. In addition, observe the IV site at the catheter tip for swelling, and monitor the patient for complaints of discomfort.
9. After administration, withdraw the needleless device from the injection port and dispose of it in a sharps safety container.
10. Access the injection cap, and then insert another syringe that contains (usually) 1 to 2 mL of normal saline to flush the remaining drug from the catheter.
11. Optional: In accordance with institutional policy, flush the lock with 1 mL of heparin (10 to 100 units/mL). Maintain constant pressure on the plunger of the syringe while simultaneously withdrawing the needle from the injection port to prevent the backflow of blood. Always verify the heparin dose with another qualified nurse.
12. Cleanse the site of any blood or fluids. Remove gloves and dispose of them properly. Perform hand hygiene. Dispose of equipment in accordance with Occupational Safety and Health Administration standards.
The saline lock or medlock should be flushed when it is initially placed, after administration of medications, after withdrawing blood samples, or every 8 hours if medications are not administered more frequently. Check the institutional policy to determine how long a lock may remain in place before it is changed. Monitor the venipuncture site for any adverse effects or complications.
Documentation
In the patient's MAR, document the date, time, drug, and dosage; the rate of administration; and any assessment data that have been obtained (e.g., how well the procedure was tolerated).
 Life Span Considerations
Benzyl Alcohol Preservative
Do not use bacteriostatic water or saline that contains the preservative benzyl alcohol to reconstitute or dilute medications or to flush the IV catheters of newborns because this preservative is toxic to these patients.
Patient Teaching
Explain to the patient the purpose of the medication administered and any adverse effects for that medication that should be reported.
Administration of Medications Into an Established Intravenous Line (Intravenous Bolus)
Perform premedication assessments. See the individual drug monographs.
1. Research and then prepare the medication as described in the procedure protocol previously in this chapter. Ensure that the drug to be prepared is compatible with the IV solution that is currently being infused. Always carefully check the drug order and a reliable reference for the proper dilution and recommended rate of administration of the drug. Many medications ordered as IV push or bolus must be administered slowly over several minutes. An excessive rate of administration can result in shock and cardiac arrest.
2. Identify the patient by checking his or her ID bracelet, and explain the procedure. Have the patient state his or her name and birth date or two other identifiers.
3. Recheck the medication order.
4. Put on gloves when there is a potential for exposure to blood or body fluids. It is helpful to keep one gloved hand uncontaminated.
5. Swab the self-sealing portal of the injection site with an antiseptic alcohol wipe for 15 seconds, and attach a syringe via the injection cap.
6. Using a needleless device on the syringe, puncture the Y port site (see Figure 11-15). Alternatively, for an injection cap (see Figure 11-16), attach the syringe with medication directly.
7. Inject the prescribed medication into the IV line at the rate recommended by the manufacturer.
If the medication and the IV solution are not compatible:
• Swab the injection port nearest the catheter with an alcohol wipe for 15 seconds.
• Insert a needleless device into the port; stop the primary infusion, and inject 2 mL of 0.9% NS (e.g., saline flush), in accordance with institutional policy, via IV push.
• Swab the port with an alcohol wipe; insert the needleless device that contains medication, and administer the drug at the prescribed rate.
• Remove the medication syringe, swab the port again, and inject 2 mL of 0.9% NS (e.g., saline flush), in accordance with institutional policy, via IV push. If injecting into a central line, follow institutional policy regarding the need to irrigate with a saline and heparin solution.
8. When all of the medication has been administered, use the uncontaminated gloved hand to open the established IV line and to readjust the flow rate to correspond with the healthcare provider's order. Remove gloves, and perform hand hygiene.
Documentation
In the patient's MAR, document the date, time, drug, and dosage; the rate of administration; and any assessment data that are obtained (e.g., how well the procedure was tolerated, observations of the venipuncture site).
Patient Teaching
Explain to the patient the purpose of the medication administered, and discuss any potential adverse effects of the medication.
Clinical Pitfall
Flushing the IV line by accelerating the IV infusion rate is not recommended because the medication that is still in the line will be administered too rapidly. This is contrary to the manufacturer's safety recommendation. Sudden boluses of certain medications may also cause severe hypotension or other signs of toxicity.
Administration of Medication Through an Implanted Venous Access Device
Perform premedication assessments, and see the individual drug monographs.
Equipment
• Dressing kits (at some clinical sites)
• 2 to 10 mL of 0.9% NS flush syringes
• One heparin flush (10 to 100 units/mL), amount as specified by practice setting procedure; use a 10-mL syringe that contains an appropriate volume of heparin solution
• 18- to 22-gauge ( -inch) needle
• Antiseptic solution or swab sticks per institutional policy
Technique
1. Research and prepare the medication as described in the procedure protocol previously in this chapter.
2. Add the medication to an IV piggyback bag.
3. Insert the administration set into the IV container, prime the IV line to remove all air, and then cover the end of the IV line with a sterile cap. Leave the prescribed medication in a sterile syringe.
4. Take all supplies and the IV medication to the patient's bedside.
5. Identify the patient by checking his or her ID bracelet; recheck the drug order, and explain what you are going to do. Have the patient state his or her name and birth date or two other identifiers.
6. Recheck all aspects of the medication order.
8. If the implanted port is not already accessed, palpate the site to identify landmarks.
9. Open the dressing kit, set up and prepare the flushing supplies, and prime the infusion set while maintaining the sterility of the Huber needle.
11. Use the nondominant gloved hand to cleanse the skin over the implanted port with alcohol; cleanse from the intended site of insertion outward in widening circles. Repeat the cleansing process two more times. Allow the alcohol to dry, and then repeat the cleansing process with the use of antiseptic swab sticks.
12. Using the sterile gloved hand, grasp the Huber needle by the winged flanges, attach it to the syringe that contains saline, and insert the needle perpendicular to the patient's skin until the needle tip comes into contact with the bottom of the port. Support the Huber needle with folded 2 × 2-inch sponges.
13. Withdraw the plunger of the saline syringe slightly until blood returns. Inject normal saline to flush the port of heparin, and then attach the syringe that contains medication or the IV piggyback container with medicine. (If administering from the syringe, use the bolus technique described earlier.) If administering as an infusion with the IV piggyback container (see “Adding a Medication With a Piggyback Set” later in this chapter), attach the primed administration set to the Huber needle, and adjust the rate of infusion. Provide support for the IV line. Apply transparent or gauze dressing, and tape it in place. When the medication administration is completed, flush the line with saline and heparin in accordance with institutional policy. Maintain steady pressure on the plunger of the syringe as the needle is withdrawn from the access device to prevent the backflow of blood.
14. Label the site with the date of access, the size and length of the Huber needle, the nurse's initials, and the date.
15. If the Huber needle is removed from a healed site at this time, cleanse the injection site with an alcohol wipe, and apply an adhesive bandage.
16. Dispose of used needles into a sharps safety container. Dispose of used extension tubing and other supplies in accordance with institutional policy.
17. Remove and dispose of gloves properly. Perform hand hygiene.
Documentation
In the patient's MAR, document the date, time, drug, and dosage; the rate of administration; and any assessment data that are obtained (e.g., how well the procedure was tolerated, observations of the injection site).
Patient Teaching
1. Stress the importance of preventing infection in the port; the patient should avoid touching the site. If medication is being given intermittently with the use of a pump, have the patient put the call light on when the machine alarm sounds.
2. Explain to the patient the purpose of the medication being administered, and discuss the potential adverse effects of that medication.
Adding a Medication to an Intravenous Bag, Bottle, or Volume-Control Device
Perform premedication assessments, and review the individual drug monographs.
1. Prepare and research the medication as described in the procedure protocol previously in this chapter.
2. Identify the patient by checking his or her ID bracelet, and explain to him or her what to expect. Have the patient state his or her name and birth date or two other identifiers.
3. Identify the injection port on the specific type of IV container or volume-control set that is being used; cleanse the portal with an antiseptic swab.
5. Insert the sterile access device into the port, and slowly add the prescribed medication to the IV solution. Always check to be certain that the medication is being added to a compatible solution of sufficient volume to ensure the proper dilution of the medication as specified by the manufacturer. Agitate the bag, bottle, or volume-control device to disperse the medication in the fluid thoroughly.
6. For a volume-control apparatus, fill the volume chamber with the specified amount of IV solution (see Figure 11-2, A and C), and then clamp the tubing between the IV bottle or bag and the volume-control chamber. Add the medication, as described previously, via the cleansed injection port. Be sure that the medication is dispersed in the solution, and adjust the rate of the flow solution.
7. Affix a label to the container. Indicate the medication's name and dose, the date and time, the prepared rate of infusion, and the length of infusion time, and include the nurse's signature.
Clinical Pitfall
When IV medications are administered by a volume-control apparatus, the calculation of the rate of infusion for administering the drug over the proper time must include an allowance for the volume of the fluid in the IV tubing and for the volume of medication.
Documentation
In the patient's MAR, document the date, time, drug, and dosage; the rate of administration; and any assessment data that are obtained (e.g., how well the procedure was tolerated).
Patient Teaching
Explain to the patient the purpose of the medication administered, and advise him or her of any adverse effects of the medication.
Adding a Medication with a Piggyback Set
1. Research and then prepare the medication as described in the procedure protocol previously in this chapter, and then add it to an IV piggyback bag.
a. Reconstitute a powder using a preassembled piggyback as follows:
(1) An example of a preassembled intravenous medication system is the ADD-Vantage System (Figure 11-17). This is a needleless system with two distinctly separate components: (1) an ADD-Vantage diluent container (e.g., a plastic piggyback bag) that contains 0.9% NS, D5W (5% dextrose), or 0.45% sodium chloride; and (2) an ADD-Vantage drug vial, which contains medicines (e.g., ampicillin powder).
b. Immediately before use, check all aspects of the drug order against the drug container.
(1) Hold the ADD-Vantage vial and plastic container in a vertical position by the bottom of the attached drug vial (the vial is actually upside down), reach through the flexible container of diluent, grasp the inner stopper in the vial by the plastic ring that surrounds it, and pull straight down on the ring; the stopper disconnects and falls into the diluent solution. The drug powder also falls out and, with a few squeezes of the diluent bag, mixes with the diluent to reconstitute the drug.
(2) The ADD-Vantage container is now ready for the attachment of the secondary IV tubing when it is taken to the bedside.
2. Identify the patient by checking his or her ID bracelet, and explain the procedure. Have the patient state his or her name and birth date or two other identifiers.
3. Determine the compatibility of the primary IV solution and its additives with that of the piggyback medication or solution.
4. Insert the administration set into the piggyback container, and attach a needleless device.
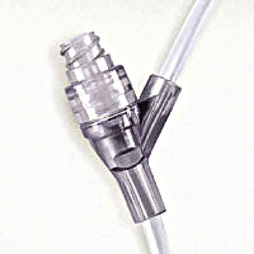
5. Connect to the primary IV tubing by arranging the piggyback container so that it is elevated higher than the primary container (see Figure 11-9). Cleanse the portal on the primary line with an antiseptic swab for 15 seconds, and insert the needleless device connector (Figure 11-18) by attaching the piggyback tubing to the port of the tubing of the primary solution. Secure this in place.
6. Lower the piggyback container below the level of the primary solution, open the secondary tubing clamp, and slowly purge the secondary tubing of air with the use of the backflow method; this will allow the primary solution to fill the secondary tubing. Place the piggyback solution higher than the primary IV solution before administration.
7. Check the specific orders for the infusion rate and the sequence of the solution or medication administration.
8. Affix a label to the container. Indicate the medication name and dose, the date and time that it was prepared, the rate of infusion, and the length of infusion time, and include the nurse's signature.
9. When the piggyback empties, the check valve in the primary line releases, and the primary infusion resumes. If a pump is used, the primary infusion will resume when the piggyback or secondary infusion is complete.
Documentation
In the patient's MAR, document the date and time; the drug, its dosage, and the rate of administration; and any assessment data that were obtained (e.g., how well the procedure was tolerated).
Patient Teaching
Explain to the patient the purpose of the medication that is being administered, and discuss with him or her any potential adverse effects of the medication.
Changing to the Next Container of Intravenous Solution
1. Monitor the rate of infusion and the intravenous insertion site at least once hourly. When the container nears completion, notify the nurse who is responsible for adding the next container.
2. Slow the rate to keep the vein open if the level of solution in the container is low.
3. Check the IV site, the dates on the IV lines, and the compatibility of the IV solution that is running with the new container of IV solution to be added. (Medications may have been added to the IV solution per the healthcare provider's orders.)
4. Prepare the IV as described previously. Hang the new IV on the IV pole.
• If the same tubing is used, clamp the tubing on the primary IV line. Using aseptic technique, quickly exchange the new container for the empty one.
• If new tubing is used, attach the administration set to the solution container, fill the chamber on the IV line half full, prime the line to purge the air, and attach it to the venous access device. Date and initial the new tubing with the label that is used in the clinical site. If a pump is used, prime the IV tubing, connect the tubing to the venous access device, and start the pump.
5. Unclamp the tubing and adjust the flow rate as previously described; inspect the venipuncture site.
Clinical Pitfall
One of the most common mistakes when using preassembled IV medication containers (for safety and ease of reconstitution) is forgetting to activate the system and mix the drug powder with the diluent before hanging it for administration.
Patient Teaching
Explain to the patient the purpose of the IV solution.
Care of Peripheral Sites, Central Venous Catheters, and Implanted Ports
• Gauze and transparent semipermeable membranes are the two types of dressing materials that are most frequently used for IV dressings. When using gauze dressings, always seal all of the edges with tape.
• Always label the dressing with the date, the time of the dressing change, the gauge and length of the catheter, and the name of the nurse who inserted the catheter or changed the dressing.
• Always stabilize the catheter when changing a dressing to prevent the movement of the catheter and irritation of the vein.
Flushing of Peripheral Catheters
See the section “General Principles of Intravenous Medication Administration” for information about the SAS and SASH procedures, and consult the procedures used at the clinical site.
Peripheral Site Dressing Changes
The CDC recommends that venipuncture site dressings be changed when they become damp, loose, or soiled or whenever the venipuncture site is changed. Most clinical sites use this procedure for midline catheters as well.
Technique
1. Gather the necessary supplies, and check the healthcare provider's order and the clinical site guidelines.
2. Identify the patient by checking his or her ID bracelet, and explain what is to be done. Have the patient state his or her name and birth date or two other identifiers.
4. Put on unsterile gloves to remove and discard the existing dressing. Stabilize the catheter to minimize movement and irritation.
5. Remove gloves and perform hand hygiene.
6. Open kit using sterile technique.
8. Assess the IV insertion site and the surrounding tissues for redness, swelling, drainage, and warmth.
9. Maintaining sterile technique, cleanse the site with 70% alcohol swabs or chlorhexidine swabs (whatever is available in the kit). When using alcohol swabs, start at the insertion site and continue outward in concentric circles until an area approximately 6 inches in diameter is covered; when using chlorhexidine swabs, use a back-and-forth motion for 15 seconds over an area of about 2.5 by 2.5 inches to cleanse the area. Allow the area to dry for 30 seconds.
10. Cover the site with transparent dressing or sterile gauze dressing in accordance with clinical site guidelines. Affix a label to the site as appropriate, with the date and time, the catheter gauge and length, and the initials of the person performing the procedure.
Documentation
1. Document the dressing change in the patient record and on any IV flow sheets maintained by the clinical site. State the date, the time, and the name of the nurse who performed the procedure. The nurse should also record his or her observations of the peripheral site whenever the procedure is performed and at least once per shift daily.
2. If the IV access device was flushed, it should be documented on the flow sheet and on the MAR.
Patient Teaching
The patient and significant others should be taught the signs and symptoms of infection (e.g., temperature, redness, swelling, drainage). If the patient is immunocompromised or receiving corticosteroids, analgesics or antipyretics (e.g., acetaminophen), then his or her temperature may not be elevated or may only be minimally elevated.
Flushing of Central Venous Catheters
Technique
1. Gather the necessary equipment and check the healthcare provider's order.
2. Identify the patient by checking his or her ID bracelet, and explain what is to be done. Have the patient state his or her name and birth date or two other identifiers.
3. Perform hand hygiene, and prepare the equipment. Check the condition of the insertion site, the dates on the insertion site, and all IV tubing in use.
4. Cleanse the injection cap with an alcohol wipe for 15 seconds and allow it to dry.
5. Eliminate all air from the syringes immediately before performing the SAS or SASH (non-Groshong) procedure.
6. Insert the syringe into the center of the injection cap, release the clamp, aspirate a small amount of blood, and then inject the solution using a pause-push technique.
7. Continue with steps 4 through 6 until the SAS (for Groshong) or SASH procedure of flushing is completed. Always close the clamp as the last 0.5 mL of solution is inserted to prevent backflow into non-Groshong catheters.
8. Check the injection cap. Be sure that it is securely in place, and then resume IV therapy as prescribed. Check the rate of any infusing IV solutions before leaving the area.
Documentation
1. Document the condition of the insertion site and the dressing in the patient record, and record any IV tubing changes if they are done at this time on the IV flow sheets maintained by the institutional site.
2. Document the flushes used on the MAR.
3. Document any problems with catheter function in the record and the measures taken to rectify the problem. Always record any notification of the healthcare provider, additional orders obtained, and the patient's condition.
Patient Teaching
During the flushing procedure, explain to the patient what is being done and why, and offer him or her reassurance.
Dressing Changes for Central Lines
Check individual institutional guidelines regarding the frequency of dressing changes. In general, gauze dressings on central venous access sites are changed every 48 hours, and semipermeable transparent dressings are changed every 3 to 7 days. However, it should be emphasized that whenever the site dressing is loose or sterility is compromised, the dressing should be changed.
Technique
1. Gather the necessary supplies, and check the healthcare provider's order and the institutional site guidelines.
2. Identify the patient, and explain what is to be done. Have the patient state his or her name and birth date or two other identifiers.
3. Perform hand hygiene, and put on the mask; offer a mask to the patient. NOTE: Some institutional sites require that the patient also wear a mask during the central line dressing change.
4. Put on the unsterile gloves to remove and discard the existing dressing; stabilize the catheter to minimize movement.
5. Assess the IV insertion site and the surrounding tissue for redness, swelling, drainage, and warmth.
6. Remove the unsterile gloves, perform hand hygiene, and put on the sterile gloves.
7. Maintaining sterile technique, cleanse the site with 70% alcohol swabs or chlorhexidine swabs (whatever is available in the kit). When using alcohol swabs, start at the proposed insertion site and continue outward in concentric circles until an area approximately 6 inches in diameter is covered; when using chlorhexidine swabs, use a back-and-forth motion for 15 seconds over an area of about  inches to cleanse the area. Allow the area to dry for 30 seconds.
8. Cover the site with transparent dressing or sterile gauze dressing in accordance with institutional site guidelines. Affix a label to the site as appropriate, with the date, the time, and the initials of the person performing the procedure.
Documentation
1. Document the dressing change in the appropriate patient records. State the date, the time, and the name of the nurse who performed the procedure. The nurse should also record his or her observations of the peripheral site whenever the procedure is performed and at least once per shift daily.
2. If the IV access device was flushed, it should be documented on the flow sheet and on the patient's MAR.
Patient Teaching
The patient and significant others should be taught the signs and symptoms of infection (e.g., temperature, redness, swelling, drainage). If the patient is immunocompromised or receiving corticosteroids, analgesics or antipyretics (e.g., acetaminophen), then his or her temperature may not be elevated or may only be minimally elevated.
Care of Venous Ports
Generally, Huber infusion sets are changed every 7 days or when contaminated or not functioning. Check the IV flow sheet and the labeling on the dressing for the date of insertion of the Huber needle.
Equipment
• Noncoring Huber needle infusion set of the correct size and length. (NOTE: For flushing an arm port, a  - or
- or  -inch Huber needle of 20 gauge or smaller is preferred.)
• SAS or SASH flushing equipment, depending on whether the catheter has a Groshong valve and on institutional policy; use a 10-mL or larger syringe for routine flushing and medication administration
• 2 × 2-inch gauze pads to support the Huber needle
• Sharps safety container for used needle and receptacle for old dressing material that is removed
Technique
1. Gather the necessary equipment, and check the healthcare provider's order.
2. Identify the patient and carefully explain what you plan to do. Have the patient state his or her name and birth date or two other identifiers.
3. The nurse and the patient should put on masks. (Explain to the patient that this is to keep microorganisms in the respiratory tract from depositing on the site.)
4. Perform hand hygiene, put on sterile gloves, and palpate the port. Hold the port firmly in place with the thumb and middle finger to stabilize it as the dressing is removed from the package, infusion set, and needle. Keep the needle in a straight line while pulling it upward; do not twist or bend it from side to side to prevent an inadvertent needlestick or the causing of discomfort or a scratch to the patient as the needle is withdrawn.
5. Remove the sterile gloves, and perform hand hygiene again.
6. Put on a new pair of sterile gloves.
7. Maintain aseptic technique throughout the procedure.
8. Open the sterile dressing kit, and prepare the flushing supplies.
9. Use the gloved dominant hand to handle the sterile supplies. Use the nondominant gloved hand for nonsterile supplies.
10. Attach an access or injection cap to the extension tubing, and prime the infusion set with 0.9% NS (leave the saline syringe attached) while maintaining the sterility of the Huber infusion set.
11. Maintaining sterile technique, cleanse the site with 70% alcohol swabs or chlorhexidine swabs (whatever is available in the kit). When using alcohol swabs, start at the insertion site and continue outward in concentric circles until an area approximately 6 inches in diameter is covered; when using chlorhexidine swabs, use a back-and-forth motion for 15 seconds over an area of about  inches to cleanse the area. Allow the area to dry for 30 seconds.
12. Grasp the Huber needle firmly, and support the edges of the port as the Huber needle is inserted in a straight line through the skin into the septum until the needle reaches the bottom of the port reservoir. Support the Huber needle with folded 2 × 2-inch gauze sponges.
13. Aspirate to view a small amount of blood return.
14. Flush the port with 10 mL 0.9% NS in a 10-mL syringe using the push-pause technique to create turbulence in the reservoir, and then thoroughly flush the port. If the port is not going to be used immediately, flush it with 5 mL of heparin (100 units/mL) in a 10-mL syringe, or follow institutional policy. Anchor the Huber needle with sterile tape and 2 × 2-inch folded gauze pads to support the needle and to keep it from shifting.
15. Apply the transparent dressing.
16. Remove the gloves, anchor the edges of the dressings with tape, and then tape the infusion set to anchor it in place.
17. Fill out the label with the date, the time of access, the size and length of the Huber needle, and the initials of the nurse who performed the procedure.
18. Discard the used Huber needle in a sharps safety container and the dressing materials in the proper biohazard receptacle as established by clinical policy.
Documentation
1. Document the insertion and dressing change in the patient record and on any IV flow sheets maintained by the institutional site.
2. Include the date, the time of access, the size and length of the Huber needle, and the initials of the nurse who performed the procedure. The nurse should also record any observations about the port site whenever the procedure is performed and at least once per shift daily.
3. Document the flushes used on the MAR.
4. Document the dressing changes in the patient's record and the condition of the port site.
Patient Teaching
1. The patient and significant others should be taught the signs and symptoms of infection (e.g., temperature, redness, swelling, drainage at the port site) and the actual catheter care procedures. Explain throughout the procedure what is being done and why.
2. At the time of discharge, flush the port with saline and heparin. Have specific orders regarding the when, where, and who of the future care of the port. Stress the importance of keeping appointments to maintain port function.
Clinical Pitfall
• The flushing of central lines is an important aspect of maintaining the patency of the central venous access device. Two types of solutions are used to maintain the patency of vascular access devices: heparin is used to prevent clot formation, and 0.9% NS is used to clean the interior diameter of the device of blood or particles of medication. It is recommended that a 10-mL syringe be used for flushing lines and medication administration to prevent excessive pressure within the catheter that could result in rupture. Always follow institutional guidelines for recommended procedures to maintain line patency.
• Preventing infection is a major concern with all IV devices. Appropriate procedures for cleansing the area and the access device with the recommended antiseptics are mandatory.
• If unable to aspirate blood when performing a flush procedure, the catheter may be occluded. Never force the solution into the IV line. Start interventions by doing the simple things, like checking that the clamp is open and that the catheter and IV tubing are not kinked. Reposition the patient's upper body, and have the patient perform a Valsalva maneuver. (Check institutional policy regarding the removal and replacement of the injection cap.) It may be necessary to remove the injection cap, attach a 20-mL syringe, and aspirate the blood clot. Immediately after the aspiration of the blood clot, replace the injection cap with a new sterile cap, and institute 0.9% NS and heparin (100 units/mL) flushing of the catheter in accordance with institutional guidelines. Report any malfunctioning of the catheter to the healthcare provider. Radiographic evaluation and the instillation of a thrombolytic agent (e.g., urokinase) may be necessary.
Discontinuing an Intravenous Infusion
Technique
If the IV site is being discontinued completely, the following should be done:
1. Review institutional policy regarding the placement of a tourniquet. (Some healthcare agencies state that a tourniquet should be applied before the removal of the needle or IV catheter in case the tip breaks during removal. Other agencies state that the tourniquet should be loosely attached to the limb but not tightened unless necessary.)
2. Check the healthcare provider's orders. Verify that all IV solutions and medications have been completed.
3. Check the patient's identity using his or her ID bracelet, and carefully explain what is being done and why. Have the patient state his or her name and birth date or two other identifiers.
5. Adequately expose the IV site.
6. Clamp the IV tubing and turn off the electronic controller or pump.
7. Prepare a gauze sponge and tape for use on the venipuncture site.
8. Loosen the tape at the site while simultaneously stabilizing the needle to prevent venous damage. If the IV site is contaminated by blood or drainage, put on gloves before handling the tape.
10. With the use of a gauze pad, gently apply pressure with the nondominant hand to the venipuncture site. Withdraw the needle or catheter, pulling it out parallel to the skin surface. Inspect the tip of the needle or catheter to be sure that it is intact. Release the tourniquet, if one is in place. Place the needle or catheter in the sharps safety container.
11. Cleanse the area if it has been contaminated with any blood or fluid.
12. Continue to hold the IV site firmly until all bleeding ceases. If the venipuncture site was in the antecubital fossa, have the patient flex the elbow to hold the gauze in place.
13. Check for bleeding after 1 to 2 minutes. Remove the gauze, and discard it with other contaminated dressings. Cleanse the area as appropriate.
14. Remove and discard the gloves in accordance with institutional policy, and perform hand hygiene.
15. Apply a small dressing or adhesive bandage as stated by institutional policy.
If the IV site is to be converted to a saline lock when the large-volume solution is discontinued, the following should be done:
1. Perform steps 1 through 5 as described previously.
2. Prepare a saline flush, attach the syringe to the extension tubing, purge air from the tubing, and then clamp the extension tubing. Leave the syringe attached.
3. Clamp the tubing on the IV line, and then shut off the infusion equipment, if present.
4. Put on gloves, and cleanse the connector site with antiseptic alcohol wipe. Let dry.
5. Stabilize the catheter hub while disconnecting the IV primary tubing, and then quickly connect the extension tubing.
6. Unclamp the extension tubing, and flush the catheter with saline in accordance with institutional policy; clamp the tubing as the last 0.5 mL is injected.
7. Tape the site securely, and label and date the extension tubing.
Documentation
Provide the right documentation of the termination of IV therapy.
1. Chart the date and time of the termination of the IV site or of the conversion to a saline lock.
2. Perform and record regular patient assessments (e.g., site data, size of site, color of skin at venipuncture site).
3. Chart and report any signs of adverse effects (e.g., redness, warmth, swelling, pain at venipuncture site).
4. Record the total amount infused on the intake and output record and on any flow sheets used in the clinical site.
Monitoring Intravenous Therapy
Before initiating therapy, perform baseline patient assessments to evaluate the patient's current status. Report at appropriate intervals throughout the course of treatment.
Immediately after receiving a report regarding assigned patients, check the MAR or Kardex for IV medications and IV infusion orders for those patients. Make rounds to perform a baseline assessment. Data that should be gathered and analyzed with reference to IV therapy include the following:
• Check that the ordered IV solution (with or without medications) is being administered to the correct patient at the correct rate of infusion.
• Check the total amount infused against the amount that should have been infused. Is the volume of infused IV solution or IV medication “on target,” “ahead,” or “behind”? Inspect the volume-infused strips attached to the infusing solution bag or bottle.
• Calculate the drip rate to administer the medicine over the appropriate time interval. With a programmable infusion pump, ensure that the pump is set to deliver the prescribed volume (mL) per hour.
• Check for inline filters. If one is recommended for the medicine being infused, is it being used?
• Check the date and time that the infusing IV solution or IV medication was hung. Identify when the infusing IV solution, administration set and tubing, IV site, IV catheters, and dressings are to be changed in accordance with the policies of the practice setting. The CDC recommends that venipuncture site dressings are to be changed when they become damp, loose, or soiled or whenever the venipuncture site is changed.
• Check the date and time that procedures are ordered to maintain the patency of the established IV lines. (Follow institutional policies.) The following are general guidelines:
• Peripheral intermittent IV lines are usually flushed every 8 to 12 hours with the use of 1 to 2 mL of saline solution. Use positive pressure to prevent the backflow of blood and possible occlusion.
• Central venous IV lines are usually flushed with a minimum of 10 mL of normal saline solution whenever they are irrigated. Use a push-pause method to irrigate (rather than continuous pressure). To prevent excessive pressure within the line, always use at least a syringe with a 10-mL capacity to irrigate and maintain the patency of a central line. Follow institutional policy for the use of saline and heparin solutions.
• Groshong catheters have a two-way valve that prevents backflow; therefore these catheters do not require heparin. Groshong catheters are flushed with 5 mL of NS weekly or at an interval determined by institutional policy for lumens that are not in use. After medication administration or TPN infusion, flush with 10 mL of NS. After blood sample draws or blood product infusion, flush with 20 mL of sterile NS.
• The amount of solution used to flush a Hickman, Broviac, or Groshong catheter varies and must be sufficient to equal two times the volume required to fill the catheter lumen plus the volume of any extension tubing that is being used.
• Implantable vascular access ports (e.g., Port-A-Cath, Infus-A-Port) require that the port be filled with sterile heparinized solution, usually 100 units/mL, after each use. If the port is not accessed regularly, flushes may only be performed once each month or at an interval cited by institutional policy.
• Prevent damage to central venous catheters by clamping only the catheter with a padded hemostat or a smooth-edged clamp.
• Change the injection caps for lumen hubs on central venous catheters every 72 hours or as stated in the institutional policy.
• Check the IV tubing for any obstructions or air in the line. The patient and the venipuncture site should be checked at least every hour for flow rate, infiltration (e.g., tenderness, redness, puffiness), and adverse effects. Report and take immediate action if the infusion is infiltrated, if it is improperly infusing, or if signs of infection exist. If the flow rate is falling behind schedule, do the following:
1. Check for mechanical obstruction of the tubing (e.g., closed clamp, kinking) or filter, and either irrigate or change the tubing.
2. Check the drip chamber. If it is less than half full, squeeze it to fill it more completely. Do not overfill.
3. Check to make sure that the IV container is not empty. Also, check to make sure that the container is more than 3 feet above the venipuncture site. The height may be inadvertently incorrect if the patient is repositioned or if the bed height is readjusted.
4. Check for tubing that has fallen below the venipuncture site. If a significant length has fallen, elevate and carefully coil the tubing near the site of the venipuncture.
• Wear gloves to inspect the IV site. Check the transparent dressing for the date that the infusion device was started; palpate gently around the catheter or needle for edema, coolness, or pain, which indicate infiltration. Check for any signs of redness or heat, which indicate that an inflammatory process is occurring.
• Check to determine whether the bevel of the needle is pushing against the wall of the vein. Do this by cautiously raising or lowering the angle of the needle slightly to see if flow is restored. If so, reposition the needle slightly with the use of a gauze pad in the most appropriate location.
• Check the temperature of the solution that is being infused. Cold solutions can cause spasms in the vein.
• Check to ensure that a restraint or blood pressure cuff applied to the arm has not interfered with the flow.
• If it appears that the intravenous access device is clotted, do not attempt to clear the needle by flushing it with fluid. This will dislodge the clot, and it may cause a thromboembolus. The aspiration of the needle or catheter with a syringe to dislodge the clot is no longer recommended; rather, the site should be discontinued and the IV restarted.
• Remain alert at all times for complications associated with IV therapy of any type (e.g., phlebitis, infection, air in the tubing, circulatory overload, pulmonary edema, pulmonary embolism, drug reactions from the IV medications).
• Document all findings and procedures performed in association with IV therapy.
• During shift report, identify the exact volume of IV solution or medication that has been infused on the current shift and the volume remaining to be infused during the next shift. In addition, report any IV sites that are functioning poorly or that require frequent site changes.
Complications Associated With Intravenous Therapy
Complications that can occur with IV therapy include phlebitis, thrombophlebitis, localized infection, septicemia, infiltration, extravasation, air in tubing, pulmonary edema, catheter embolism, and “speed shock.”
Phlebitis, Thrombophlebitis, and Local Infection
Phlebitis is the inflammation of a vein, and thrombophlebitis is the inflammation of a vein with the formation of a thrombus in the area of inflammation. The three primary causes of phlebitis are as follows:
1. Irritation of the vein by the catheter (e.g., catheter that is too large for the vein, improper insertion, improper anchoring with excessive movement of the catheter).
2. Chemical irritation from medicines (e.g., solutions infused too rapidly or at a volume that was too large for the vein, solution is irritating to the vein).
3. Infection caused by improper aseptic technique during accessing, dressing changes, or from long-term catheter placement.
If signs of redness (erythema), warmth, tenderness, swelling, and burning pain along the course of the vein are present, phlebitis or thrombophlebitis and infection may be developing (Table 11-2). Confirm the presence of these signs with the supervising nurse. The treatment of phlebitis depends on the cause of venous irritation. If the IV line is a peripheral IV and there is evidence of infiltration using the Infiltration Scale (Table 11-3), then the IV is discontinued, and a new IV using all new equipment is inserted at a different location. For people with any type of midline catheter (e.g., PICC), the healthcare provider should be notified. Not all midline catheters are removed when infection occurs; some may be treated with antibiotic therapy. Many institutions also require that the infection control nurse be notified. If purulent drainage is present, a sample of the drainage is obtained for culture and sensitivity. If a fever and chills (e.g., signs of septicemia) accompany these symptoms, cultures of the patient's blood and the catheter tip may also be indicated. Check institutional policies regarding whether a healthcare provider's order is necessary to do this or whether standing orders exist as part of infection-control procedures. Generally, follow-up treatment includes elevation and the application of warm, moist compresses to the site. Document the findings, the treatment that is administered, and the results of ongoing assessments.
Clinical Pitfall
Only a Huber needle is used to access an implanted port.
Table 11-2
Assessing the Severity of Phlebitis
| SCORE | DESCRIPTORS |
| 0 | No clinical symptoms |
| 1 | Erythema at access site, with or without pain |
| 2 | Pain at the access site with erythema and/or edema |
| 3 | Pain at the access site with erythema, streak formation, and/or palpable venous cord ±1 inch long |
| 4 | Pain at the access site with erythema, streak formation, palpable venous cord >1 inch long, and/or purulent drainage |
Table 11-3
Infiltration Scale
| GRADE | CLINICAL CRITERIA |
| 0 | No symptoms |
| 1 | Skin blanched |
| Edema <1 inch in any direction | |
| Cool to touch | |
| With or without pain | |
| 2 | Skin blanched |
| Edema 1 to 6 inches in any direction | |
| Cool to touch | |
| With or without pain | |
| 3 | Skin blanched, translucent |
| Gross edema >6 inches in any direction | |
| Cool to touch | |
| Mild to moderate pain | |
| Possible numbness | |
| 4 | Skin blanched, translucent |
| Skin tight, leaking | |
| Skin discolored, bruised, swollen | |
| Gross edema >6 inches in any direction | |
| Deep pitting tissue edema | |
| Circulatory impairment | |
| Moderate to severe pain | |
| Infiltration of any amount of blood product, irritant, or vesicant |
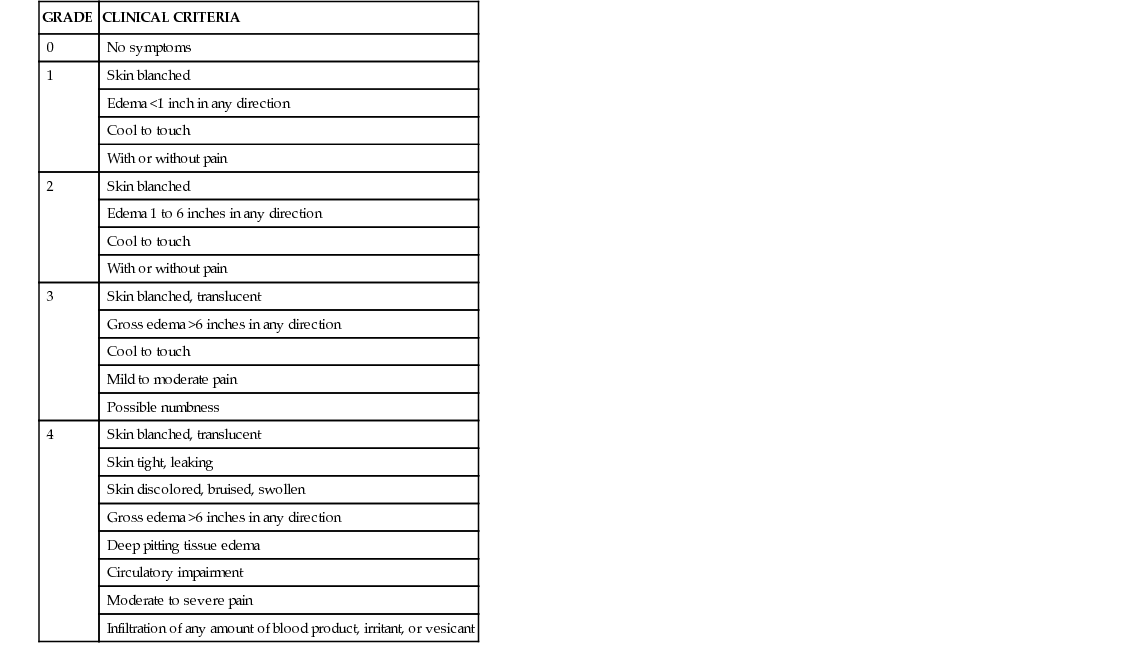
Septicemia
When pathogens that are associated with a local infection invade the bloodstream, are carried to other parts of the body, and trigger an inflammatory response (e.g., fever, chills), the infection is no longer local; it is now systemic, and this condition is called septicemia. People who already have an infection or who are immunocompromised are at higher risk for the development of septicemia. The importance of maintaining aseptic technique throughout all aspects of catheter insertion and maintenance care cannot be overemphasized. The potential for contamination exists during every aspect of intravenous therapy, starting at the time of the manufacture and packaging of IV fluids and equipment and continuing throughout the actual preparation and administration of the intravenous therapy. The risk of septicemia also increases with the frequency with which the catheter and site are manipulated and with how long an IV catheter remains in place. Perform catheter-site inspections in accordance with institutional policy. Suspect localized infection at the catheter site if redness, edema, or purulent drainage is present at the entry site or if the patient has an elevated temperature or an elevated white blood cell count. Keep in mind that immunocompromised patients or those who are receiving an antipyretic (e.g., acetaminophen, ibuprofen) may not develop a fever.
Suspect septicemia if the patient develops the following: a sudden onset of flushing; fever; chills; general malaise; a weak, rapid pulse; headache; nausea; vomiting; hypotension; or shock. Obtain the patient's vital signs, and notify the healthcare provider immediately of all findings. Obtain the healthcare provider's orders, which will usually include blood cultures, the discontinuation of the IV catheter, and antibiotic therapy after cultures are obtained. Return the unused portion of the IV solution to the pharmacy or laboratory for testing as specified by institutional policy.
Document the findings, the treatment administered, and the ongoing assessments.
Infiltration and Extravasation
Infiltration is the leakage of an intravenous solution into the tissue that surrounds the vein; extravasation is the leakage of an irritant chemical (e.g., the medicine being infused) into the tissue that surrounds the vein. Infiltration or extravasation may be accompanied by redness and warmth, coolness and blanching of the skin, swelling, and a dull ache to a severe pain at the venipuncture site (see Table 11-3). Infiltration or extravasation occurs most commonly when a needle tip punctures the vein and the IV solution leaks into the tissue that surrounds the vein. Serious tissue damage may occur, particularly if the medicine in the solution is irritating to the tissue (e.g., a calcium salt) or causes vasoconstriction (e.g., levarterenol) to the vasculature in the area.
The nurse should always educate the patient regarding the signs and symptoms of these conditions so that the patient can report early discomfort and thus early interventions can be initiated in the event that infiltration or extravasation does occur.
Inspect the IV site at regular intervals for infiltration. Whenever a change in the limb's color, size, or skin integrity is observed, make a comparison with the opposite limb. General guidelines are as follows:
• For infiltration, stop the infusion and elevate the affected limb. Assess for circulatory compromise: check capillary refill and pulses proximal and distal to the area of infiltration. If the infiltration is caused by an IV solution, remove the catheter as directed by policy and as described earlier. Whether cold or heat is applied to the site depends on the specific type of IV solution and the type of medication that has infiltrated. Consult institutional guidelines, and describe the patient's condition using the infiltration scale (see Table 11-3).
• For extravasation, the protocol will call for the IV infusion to be stopped, but the catheter is left in place. With authorization from the healthcare provider, attempts may be made to aspirate the medication, with orders that an antidote may be injected or infused to minimize tissue damage. Elevate the extremity. Apply ice (per institutional policy) rather than heat for 24 hours, except for treatment of vincristine or vinblastine extravasation, which requires heat rather than cold. Document the condition on the patient's chart as 4+ infiltration, and describe the visual appearance and measurements of the size of the site where extravasation has occurred. Photographs of the site may be part of the protocol. After the protocol for extravasation is complete, restart the IV solution at a new site proximal to the area of extravasation.
• Document the findings, the treatment administered, and the ongoing assessments.
Air in Tubing or Air Embolus
If an air bubble is found in the IV tubing, clamp the tubing immediately. Swab the injection site in the rubber hub near the needle or the piggyback portal—whichever is closer to the air bubble—with an alcohol wipe. Using sterile technique, insert a needleless access device on a syringe into the portal below the air bubble, and withdraw the air pocket.
Air embolism occurs as a result of an air bubble entering the cardiovascular system. Symptoms of an air embolism may include patient complaints of palpitations; chest pain; shortness of breath; cyanosis; hypotension; and a weak, thready pulse. If air has actually entered the patient via the IV tubing, turn the patient onto his or her left side with the head in a dependent position. Administer oxygen, and notify the healthcare provider immediately. Monitor vital signs. Be prepared for possible orders to draw arterial blood gases and for ventilatory support, if necessary. Air emboli can be prevented by clamping catheters when they are not in use, instructing the patient to perform the Valsalva maneuver during tubing and injection cap changes, using proper inline filters, not allowing IV containers to run dry, and removing all air from tubing or syringes before connecting them to an IV access device. Always purge the flush or medication syringe of air before attachment and injection.
Document the findings, the treatment administered, and the ongoing assessments.
Circulatory Overload and Pulmonary Edema
Circulatory overload that leads to pulmonary edema is caused by infusing fluid too rapidly or by giving too much fluid, particularly to older adults, infants, or patients with cardiovascular disease. Signs of circulatory overload are engorged neck veins; dyspnea; reduced urine output; edema; bounding pulse; and shallow, rapid respirations. The signs of pulmonary edema are dyspnea, cough, anxiety, coarse crackles, possible cardiac dysrhythmias, thready pulse, elevation or drop in blood pressure (depending on severity), and frothy sputum. When these symptoms develop, slow the IV immediately to a TKO rate. Place the patient in a high Fowler position, start oxygen, obtain vital signs, and summon the healthcare provider immediately. During severe respiratory distress, the patient may require intubation and a mechanical ventilator to improve oxygen delivery. Anticipate the healthcare provider's orders for medications such as diuretics, vasodilators, and morphine sulfate.
Document the findings, the treatment administered, and the ongoing assessments.
Pulmonary Embolism
A pulmonary embolism may occur as a result of foreign materials being injected into the vein or from a blood clot that breaks loose and travels to the lungs, where it lodges in the arterioles. Symptoms include the sudden onset of apprehension and dyspnea, pleuritic pain, sweating, tachycardia, cough, unexplained hemoptysis, low-grade fever, and cyanosis. When this condition is suspected, immediately place the patient in a semi-Fowler position, administer oxygen, obtain vital signs, and notify the healthcare provider. Anticipate orders for the drawing of blood for arterial blood gases, performing a lung scan to verify the presence of the pulmonary embolism, and determining the baseline prothrombin time before initiating anticoagulant therapy.
Foreign-particle emboli can be prevented by using an inline filter, using proper diluents for reconstitution, ensuring the complete dissolution of any medications that are added to a solution, and ensuring that there are no visible signs of foreign matter in IV solutions. Thromboemboli can be avoided by not using the veins in the lower extremities in adults and by using a 10-mL syringe when flushing all central lines. A 10-mL syringe decreases the pressure that is exerted within the vascular system. (The smaller the syringe, the greater the pressure exerted.) When flushing a catheter, never force the flush solution because this may dislodge a clot.
Document the findings, the treatment administered, and the ongoing assessments.
“Speed Shock”
“Speed shock” occurs as a systemic reaction to a foreign substance that is given too rapidly into the bloodstream. This can occur when an IV drug is administered too rapidly into the circulation, most commonly by IV push. The rapid delivery of the IV drug creates a concentrated plasma level in the patient that may result in shock, syncope, and cardiac arrest. Different resources (e.g., AHFS Drug Information, Physicians' Desk Reference) and package inserts that accompany medications state the recommended rate of injection or flow rate to prevent complications that may result from a rapid infusion rate. Nurses need to time the administration of an IV push medication by observing the infusion time on a clock or watch directly. The nurse also needs to frequently check the flow rate of IV infusions, use infusion-control devices and to resist speeding up medications or IV rates when therapy is behind schedule. Assess the patient before initiating an IV drug to obtain baseline data (e.g., vital signs), and continue monitoring during IV therapy for dizziness; flushing; tightness in the chest; rapid, irregular pulse; hypotension; and anaphylactic shock. When speed shock is suspected, immediately stop the infusion, maintain IV patency at a TKO rate, obtain the patient's vital signs, and notify the healthcare provider. Anticipate the treatment of shock by checking institutional policy.
Documentation
Provide the right documentation of the medication administration, the patient's responses to drug therapy, and any complications of or untoward reactions to the prescribed therapy.
1. Chart the date and time, the drug name and dosage, and the route of administration.
2. Perform and record regular patient assessments for the evaluation of therapeutic effectiveness (e.g., blood pressure, pulse, intake and output, lung field sounds, respiratory rate, pain at infusion site).
3. Perform regular assessments of the patient and the IV access sites for complications associated with IV therapy or the administration of IV drug therapy.
4. Chart and report any signs and symptoms of adverse drug effects related to therapy. Notify the healthcare provider of any complications.
5. Chart any dressing changes performed, and cite any signs and symptoms of complications at the insertion site (e.g., redness, tenderness, swelling, drainage).
6. Chart any difficulty with irrigation of any venous access device, and notify the healthcare provider as appropriate.
7. Chart the dates and times that procedures are performed to maintain the patency of the IV site, needle, peripheral or midline catheter, central venous catheter, or port (e.g., heparinized flush; saline flush for a Groshong catheter).
8. Perform and validate essential patient education regarding the drug therapy and other essential aspects of intervention for the disease process that is affecting the individual.
9. Perform and validate essential patient education regarding the drug therapy, site or central venous catheter care, dressing care, and the flushing of the IV system that is being used to administer medication.
Always teach the patient and his or her significant others about the signs and symptoms of complications that should be reported immediately to the healthcare provider. Depending on the type of IV delivery system that is used to administer the medication, instruct those being treated on an outpatient basis or in a home health setting when to return for the catheter to be changed and when to return for the next visit to the healthcare provider or clinic.
Get Ready for the NCLEX® Examination!
Key Points
• Intravenous therapy involves the administration of fluids and medications directly into the bloodstream. The three intravascular compartments are veins, arteries, and capillaries. The three fluid compartments are intracellular spaces, intravascular spaces (e.g., arteries, veins and capillaries) and interstitial spaces.
• Intravenous access devices include peripheral IVs, central catheters, and implantable infusion ports.
• Intravenous solutions that are hypotonic are used for dehydration, isotonic solutions are used to maintain hydration, and hypertonic solutions may be used to draw fluid into the intravascular compartment to support blood pressure and promote diuresis.
• Principles of IV administration include:
• Review the chart to determine the medical and nursing diagnosis, the patient's history and allergies, and the significant presenting symptoms.
• Review the assessment of the patient's baseline data, current vital signs, laboratory and diagnostic data, and type and use of any IV access. After the IV site is established, the IV solution or blood product is hung, or an IV medication is administered, an ongoing assessment is required to monitor the patient's condition, IV site, and response to the IV therapy that is being delivered.
• Patient education needs to be implemented. All aspects of the patient's care needs must be explained to the patient and his or her family. In addition, community resources must be arranged to assist with home infusion therapy.
• Complications of IV therapy include phlebitis, thrombophlebitis, localized infection, septicemia, infiltration, extravasation, air in tubing, pulmonary edema, catheter embolism, and “speed shock.”
Additional Learning Resources
 Go to your Study Guide for additional Review Questions for the NCLEX® Examination, Critical Thinking Clinical Situations, and other learning activities to help you master this chapter content.
Review Questions for the NCLEX® Examination
1. When determining the patency of an IV, the nurse recognizes that the fluid runs into an area known as the:
2. A nurse is starting a peripheral IV for the first time in an extremity of an elderly patient and knows that the best site for an IV is:
1. near the antecubital space.
2. in the biggest vein that is visible.
4. in the metacarpal vein, if it is large enough.
3. The nurse notified the healthcare provider that a patient had signs of peripheral dehydration. Which type of IV solution would be anticipated to be ordered for this condition?
4. After changing a primary IV, the nurse finds that it will not run. What does the nurse check for first?
4. Piggyback or rider set needed
5. A patient's skin at the site of a running peripheral IV appears swollen and feels cool, and the patient reports discomfort. What does the nurse do next?
1. Flushes the site with saline
2. Instructs the patient to perform the Valsalva maneuver
3. Applies warm compresses to the area
6. The technique used to flush central lines is known as the:
7. To minimize the risk of air embolism with IV therapy, the nurse should routinely do which of the following: (Select all that apply.)
1. cap off the IV when not in use.
2. instruct the patient to perform the Valsalva maneuver during tubing and injection cap changes.
3. always use proper inline filters.
4. allow IV containers to run dry to ensure all fluid/medication is given.
5. remove all air from tubing or syringes before connecting to an IV access device.
8. When inserting a Huber needle into a port, the next step the nurse takes includes:
1. covering the site with a clean pad.
2. using clean technique throughout the procedure.
3. wearing latex examination gloves.
4. putting on a mask and using sterile technique with gloves and supplies.
9. The nurse knows to watch for the following signs and symptoms of phlebitis in an IV site: (Select all that apply.)