12
Patient Transfer
At the conclusion of this chapter, the student will be able to:
• List two steps to be taken to ensure accuracy of patient identification.
• Demonstrate safe techniques for moving and transferring patients, using the principles of good body mechanics.
• Safely assist a patient into and out of a wheelchair.
• Use a gait belt to assist a weak patient to stand and walk.
• Demonstrate the correct method for assisting patients who are weak on one side.
• List precautions to take in moving and positioning patients following a surgical hip replacement.
• Perform two-person transfer of a patient from bed to stretcher and stretcher to bed.
• Demonstrate use of draw sheets, a slider board, and a sliding mat to facilitate stretcher transfers.
• Demonstrate proper use of safety straps and side rails on stretchers.
Key Terms
draw sheet
gait belt
orthostatic hypotension
sedation
slider board
sliding mat
Patient Transfer Considerations
When inpatients are moved from one place to another in a hospital, wheeled transport is required. Patients may believe that they can walk to the radiology department, but they must not be allowed to do so. If an ambulatory patient becomes weak or faints in a corridor or elevator during the trip, there is no safe way to cope. Likewise, infants and small children should not be carried to the radiology department. A change in the patient’s status may require that you have both hands free to deal with the problem or to obtain help.
 Inpatients must not be allowed to walk to the imaging department. Likewise, infants and small children should not be carried. Wheeled transport is necessary.
The usual method of transport is a wheelchair for patients who can stand and sit with safety and comfort, and a stretcher for those who cannot. Patients who cannot stand, and those who have not stood or walked since an accident, surgery, stroke, or heart attack, should not be transported by wheelchair; stretcher transfer is a safer method. These patients must not be allowed to stand or walk in the imaging department, even if they believe they are capable of doing so. A stretcher is also the best means of transfer for patients who have had recent trauma and/or surgery to the spine.
When a patient’s condition makes it extremely difficult or hazardous to move him/her onto a stretcher, the patient may be transported in the bed. Bed transfers require at least two people because the bed is heavy and cumbersome, and patients who must be transferred in their beds require careful attention to their physical status during transfer. They may also require considerable auxiliary equipment.
Active infants and toddlers are often transported in their cribs. The high sides of the crib provide greater safety than the side rails of a stretcher, and the crib provides a safe place if the child must be left unattended at any time. Premature infants may be transported in a closed incubator, an infant bed with a plastic hood that provides a closed environment for warmth, moisture, and oxygen while reducing exposure to airborne infection (see illustration in Chapter 20, Fig. 20-2).
 Transfer by stretcher is the proper method for patients who cannot stand safely and those who cannot sit comfortably or climb safely onto the radiographic table.
Preparation for Transfer
The steps in preparing for patient transfer are summarized in Box 12-1. Always check with the nursing station before transferring a patient to the imaging department. The nursing service must be advised because they are responsible for knowing the patient’s whereabouts at all times. In addition, nurses can often provide you with helpful information about the patient’s status and transfer requirements; they may also assist with the transfer if necessary. If paper charts are used, obtain the patient’s chart from the nursing service at this time.
If the patient is very ill, receiving multiple intravenous fluids, or on ECG monitoring, a nurse should monitor the patient during transport and during the procedure. If you are not comfortable transporting the patient alone, you should not hesitate to ask for assistance in transporting the patient.The next step in safely moving a patient is to be certain that you have the right patient. You must make use of two patient identifiers, as required by The Joint Commission. Check the identification bracelet against the name and birth date on the x-ray requisition, or ask the patient to state both his/her name and birth date, and compare this response with the order or requisition.
Always double-check two patient identifiers before transport.A brief visit with the patient will help you assess how much the patient can help with the transfer, allowing you to plan for additional hands if needed to ensure a safe move. Most patients appreciate an estimate of how long the procedure will last. Decide on the safest, easiest method of moving your patient, obtain the necessary equipment, and ensure that it is functional and safe. The person transporting the patient is responsible for ensuring that the buckles on safety straps are secure, that side rails lock in the up position, and that brakes work properly. Move any furniture or obstacles that may be in the way.
Take note of any special equipment that may need to be transported with the patient, such as monitors or medication pumps. A urine collection bag may need to be detached from the bed and attached to the stretcher or wheelchair below the level of the patient’s bladder. Portable oxygen equipment may be required if the patient is currently receiving oxygen from a wall outlet. Other equipment may need to be disconnected or rearranged before patient transfer, but consult the nursing service before disconnecting any equipment.
Next tell the patient what you plan to do, and explain his or her role in the transfer. Because patients can often anticipate painful errors, you should listen carefully and allow the patient to participate in the plan.
After the patient has been safely moved to the stretcher or wheelchair, check that the safety rails or straps are in place and that the patient is comfortable and adequately covered for warmth and modesty. Have you forgotten anything? An emesis basin or a small box of tissues may be handy along the way. If hard copy charts are used, transport them with the patient.
Wheelchair Transfers
Transferring a patient from a bed to a wheelchair may seem simple, but it is a common cause of falls and accidents. The correct technique makes this procedure safer and easier (Procedure 12-1).
Start by lowering the bed to the level of the wheelchair seat and elevating the head of the bed. Position the wheelchair parallel to the bed with wheels locked, footrests out of the way, and a sheet covering the sitting surface of the wheelchair. With the patient in the supine position, place one arm under the patient’s shoulders, one under the knees, and in a single, smooth motion, raise and turn the patient to a sitting position with his or her feet dangling over the side. Patients with back pain may find it easier to sit up from a lateral recumbent position.
Take a moment to assist the patient with his/her slippers and a robe and allow time for the patient to regain a sense of balance. After long periods of rest, many patients have orthostatic hypotension, a mild reduction in the oxygen supply to the brain that occurs with changes in body position and may cause them to feel light-headed or faint when rising suddenly.
At this point, competent patients are able to stand and move to the wheelchair with little assistance, although a steadying hand at the patient’s elbow is a good practice.
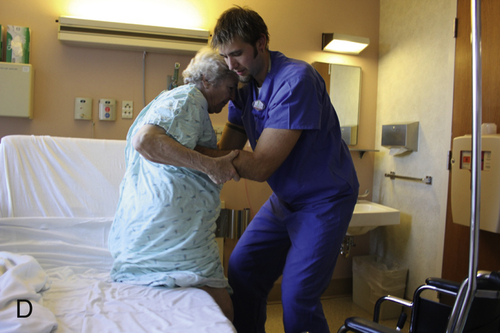
A gait belt, also called a transfer belt, should be used when assisting patients who are weak or unsteady (Fig. 12-1). These belts are heavy fabric straps with a strong buckle. When placed snugly around the patient’s waist, they provide a secure handhold for you to use in helping the patient to stand and walk.
If assistance is required, stand facing the patient, grasp the gait belt or reach around the patient and place your hands firmly over the scapulae; the patient’s hands may rest on your shoulders. On your signal, lift upward and help the patient rise to a standing position. Remember to use a broad base of support and keep your back straight.
If working independently, it is wise to remember that patients wearing gait belts are considered to be at risk for falling—do not assume they will be able to walk and/or bear their own weight unassisted for more than a brief moment. Consider the size of the patient in relation to yourself and determine if you need additional help should they become unsteady.Now instruct and assist the patient to pivot a quarter turn so that the edge of the wheelchair is touching the back of the knees, then ease the patient into a sitting position in the chair. Position the foot and leg rests, and cover the patient’s lap and legs with a sheet or bath blanket to provide warmth and comfort and protect modesty.
The most common type of fall associated with a wheelchair transfer occurs when the patient backs into the wheelchair to sit down. The patient may miss the edge of the seat or tip the chair by sitting too near the edge. To avoid such an accident, be sure to lock the wheels of the chair and assist the patient until he/she is seated securely.
To move the patient from the wheelchair to the x-ray table, follow the steps illustrated in Procedure 12-2. Place the wheelchair parallel to the table, lock the brakes, and move the footrests out of the way. At this point, the procedure will vary depending on whether you are fortunate enough to have an x-ray table that is adjustable in height.
If the height of the x-ray table is adjustable, lower the table to chair height. In this instance, the transfer to the x-ray table is the reverse of the transfer from the bed. Using the face-to-face assistance explained previously, help the patient to stand and pivot with the patient’s back to the table. Then ease the patient into a sitting position on the edge of the table.


If the table height is stationary, position a step stool with a tall handle nearby. Have the patient place one hand on the stool handle, put the other arm on your shoulder, and step up onto the stool, pivoting with the back to the table. Now ease the patient to a sitting position.
When the patient is seated on the table, raise it if the height is adjustable. Then place one arm around the patient’s shoulders and one under the knees. With a single, smooth motion, place the patient’s legs on the table while lowering the head and shoulders into the supine position. Patients with back pain may want to lie on one side before moving into the supine position.
Special Considerations for Wheelchair Transfers
Stroke
Stroke patients typically have weakness on one side of the body. Determine which side is the patient’s weak side, and position yourself on that side. Brace the patient’s weak leg with your knee as the patient stands, as illustrated in part B of Procedure 12-2. When moving from the wheelchair to a bed or table, position the patient with the strong side adjacent to the bed or table and instruct him/her to lead with the strong leg. It is often advisable to use stretcher transport with these patients.
Fractures of the Lower Extremity
Lower-extremity fractures limit a patient’s ability to bear weight, but as recovery progresses, a patient may be able to bear weight on an extremity that is immobilized in a cast or splint, thus permitting transport by wheelchair. The skills used to assist a stroke victim are also useful in this case. Support the patient from the affected side and encourage him/her to lead with the strong leg. Elevate the leg-rest of the wheelchair to support the injured leg during the transfer, and help the patient lift the leg when changing position. Take care that the fractured limb is not twisted or bumped during the transfer. Similar precautions are appropriate for the patient with an undiagnosed leg injury who is sufficiently stable to allow transfer by wheelchair.


Joint Replacements
Joint replacement surgery makes it necessary for a patient to receive special care, especially when being transferred during the recovery period. Restrictions vary in accordance with the surgical approach taken (Table 12-1). Movement must be restricted to avoid any stress on muscles that have been surgically disrupted, so always check the chart to determine the patient’s limitations.
Hip Replacement
Patients who have undergone hip replacement by means of the anterior surgical approach are able to sit upright in a chair at a 90-degree angle. Do not permit the patient to adduct, abduct, or rotate the affected leg, and avoid any hyperextension, especially when walking.
Patients who have undergone hip replacement by means of the posterior approach, which is the most common, are able to tolerate abduction, but must not be allowed to cross the affected leg over the midline; both adduction and internal rotation must be avoided. Furthermore, these patients must not flex at the hip beyond 90 degrees. These restrictions prevent stress on the posterior joint capsule, which needs time to heal and strengthen after surgery. During the initial period after surgery, patients must be transported by stretcher. If they need to sit up for any reason, take care that they do not bend forward, because most dislocations occur when the patient bends forward past 90 degrees, such as when getting up from a low chair. Patients are at an increased risk of dislocation for up to 1 year after surgery.
TABLE 12-1
Precautions for Patients with Hip Replacements
| Surgery via the Anterior Approach | Surgery via the Posterior Approach |
| May sit upright | Must not flex hip beyond 90 degrees |
| Weight bearing is usually tolerated (check chart) | Weight bearing is usually tolerated (check chart) |
| Avoid abduction | Abduction is permitted |
| Avoid adduction | Avoid adduction |
| Avoid internal or external rotation | Avoid internal rotation |
| Avoid hyperextension |
Knee Replacement
Knee-replacement surgery requires similar considerations when transferring a patient. Weight bearing is usually tolerated, but a walker is needed when taking more than one or two steps. Move the patient toward the strong side and provide support under the calf and knee of the affected leg for comfort and safety.
Spinal Trauma or Spinal Surgery
Patients suffering from spinal trauma or recovering from recent spinal surgery should be transferred by stretcher. During the initial phase of injury or postoperative recovery, the patient should be accompanied by the primary caregiver who will instruct the radiology staff in safe positioning. As recovery progresses, transfer by wheelchair may be tolerable and safe. Moving from a supine position to a sitting position, or from sitting to a supine position, places considerable stress on the spine. Instead, the patient should sit from a lateral recumbent position. When lying down, the patient should lie first on one side and then turn to the supine position with the knees flexed. Provide support and assistance to the patient while extending the legs, and place a bolster or pillow under the knees for support when he/she is supine.
Patients Who Cannot Stand Safely
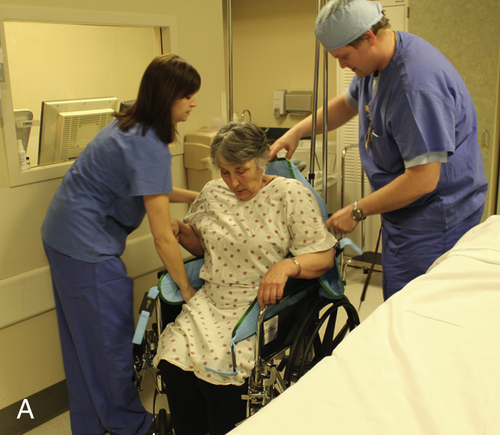
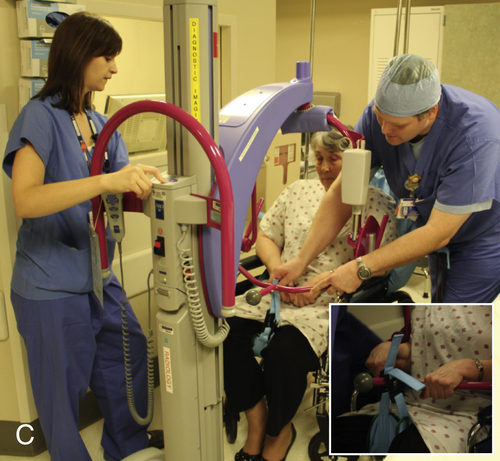
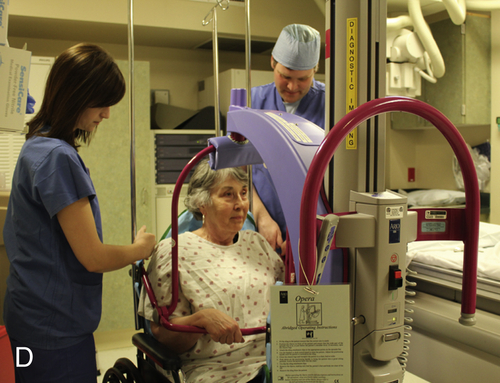
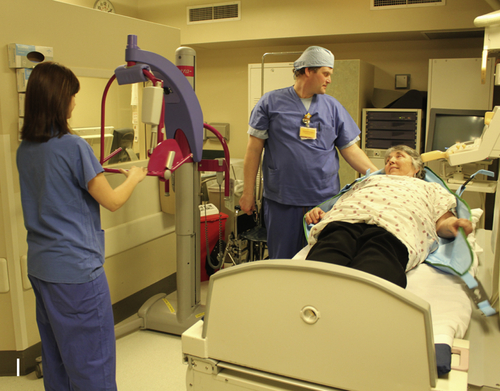
Inpatients that are paralyzed or unable to stand for any reason are always transported by stretcher within a hospital, but outpatients who are unable to stand may arrive at the hospital in a wheelchair. Depending on the design of the chair and the requirements of the procedure, examinations of the extremities and chest radiography may be performed with the patient seated in the wheelchair, but most procedures will require placing these patients on the radiographic table. When a patient in a wheelchair cannot stand, a hydraulic lift is required (Procedure 12-3). Do not attempt to use this equipment until you have been properly instructed in its safe use. When a patient must be lifted from a wheelchair and no mechanical lift is available, a two or three-person lift is used (see Appendix I).
Do not attempt to operate the hydraulic lift until you have been instructed in its safe use.Stretcher Transfers
A stretcher, sometimes called a cart or gurney, should be used to transport any patient who is unable to stand safely. This is also the method of choice for patients who cannot sit comfortably for an extended period. Remember that the patient may have to wait in the imaging department before or after the examination. A weak patient who cannot stand may be under a physician’s order to sit in a chair as part of the daily routine. A visit to the radiology department should not be seized as an opportunity to meet this requirement. Such patients can be moved from chair to bed more easily than from chair to x-ray table, especially if the table height cannot be adjusted. If you have any doubt about the patient’s ability to transfer safely from the chair to the table, be safe and start with a stretcher.
If the patient’s safety or comfort requires elevation of the head, select a stretcher that provides upper body support. The following stretcher transfer techniques may be used to move patients to the stretcher from either the bed or the radiographic table. It is not recommended to attempt a stretcher transfer by yourself except in the case of providing assistance to a patient who is capable of self-transfer. To avoid injury to yourself and the patient, it is best to obtain the help of one or more persons; additional help is essential if the patient is obese or very weak.
Respect the patient’s privacy by closing the door to the hallway or drawing the curtain around the bed. Start the procedure with the patient near the edge of the bed in the supine position with both knees flexed and feet flat. Adjust the bed and the stretcher to the flat horizontal position, and adjust the height of the bed to the height of the stretcher. Position the stretcher parallel to the bed and lock the wheels. Check to ensure that oxygen lines, intravenous tubing, and urinary catheters are free and will not be pulled during the transfer.
If you must work alone, lean across the stretcher, placing one arm under the patient’s shoulders and the other arm under the pelvis. On your instructions, have the patient push with feet and elbows as you lift and pull him/her toward the stretcher. Do not attempt to make the transfer in a single motion. The maneuver may be repeated several times until the transfer is complete.
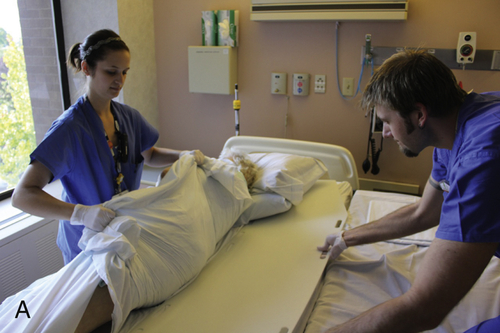
When you are working with an assistant, one person supports the head, neck, and shoulders while the second person lifts at the pelvis and knees (Fig. 12-2). Both use the lift-pull or lift-push motion with the patient’s assistance until he/she is safely positioned on the stretcher.
As soon as the patient is situated on the stretcher, provide a cover, secure a safety belt across the pelvic area if available, and raise the side rails. Elevate the head of the stretcher, if necessary. Before you leave the room, check to ensure you have everything you will need. Equipment may be placed at the foot of the stretcher beside the patient’s feet.
To reverse this transfer, position the stretcher parallel to the bed, lock the wheels, and lower the side rails. Return the stretcher to the flat horizontal position if the head has been elevated; move any equipment out of the way. Because beds are wider than stretchers, it may be easier to work from the stretcher side. Position and support the patient as before. This time, on a signal, the patient pushes toward the bed while you assist with a lift-push movement. Repeat as required until the transfer is complete. This same method may be applied to transfers from the stretcher to the x-ray table, but it may be easier to reach across the table and pull the patient toward you.


Various techniques are used for stretcher transfers, depending on the patient’s weight and ability to assist. With problem transfers, it is best to obtain experienced help. Three methods of transfer involve the use of draw sheets, slider boards, and sliding mats. These are often useful when the patient is unable to assist with the transfer. Practice these transfers in class before attempting to use them with patients.
In addition to the methods described here, some hospitals may have Air-Assisted Lateral Patient Transfer devices. These inflatable devices facilitate transfers and repositioning of patients with paralysis or multiple lines, and especially those who are morbidly obese. This method requires at least two people and must only be done by those who have received special training in the use of this equipment. Most facilities have trained lift teams to assist with difficult transfers.

Draw Sheet Transfers
Patients who need frequent help with moving are often placed on a draw sheet. This is a single sheet folded in half that is placed under the patient and over the middle third of the bed. When moving the patient, the edges of the draw sheet are loosened from the bed and rolled up close to the patient’s body (Procedure 12-4). The rolled edge provides a handhold for lifting and pulling the patient. Care must be taken that the patient’s head and feet move safely with the trunk of the body, which requires two or more persons.
Slider Board Transfers
Transfers using slider boards and sliding mats are variations of the draw sheet method. The slider board is a strong sheet of smooth plastic large enough to support the patient’s body with handholds cut into the edges. The patient is rolled to one side and the board is slipped below the draw sheet and about halfway under the patient’s body (Procedure 12-5). The remaining width of the board covers the space between the stretcher and the bed. With the patient’s arms folded safely across the chest, two people grip the draw sheet and slide the patient safely and smoothly across the board. Where the patient is being transferred onto an exam table, the entire slider board may be transferred under the patient; otherwise, the board is simply a sliding tool to bridge the gap between the bed and stretcher.
Flexible slider boards must not be used in place of rigid backboards for spinal immobilization.
Sliding Mat Transfers
A sliding mat is a soft, tubular sheet of flexible plastic that has a low friction surface and is used in more or less the same way as a slider board (Procedure 12-6). The sliding mat is especially helpful when transferring patients from soft mattresses, waterbeds, or other specialty mattresses. Be sure to remove the sliding mat once the patient is securely positioned on the stretcher.
Safety Side Rails
Stretchers are equipped with side rails to ensure that patients do not fall or attempt to climb off without assistance. This is especially important when the patient’s state of consciousness is impaired because of sedation (calming medication), intoxication, shock, or senility. Application of side rails during transport is such an important safety practice that it must be followed without exception (Fig. 12-3). Side rails must also be in the elevated position whenever a patient is left unattended on a stretcher.


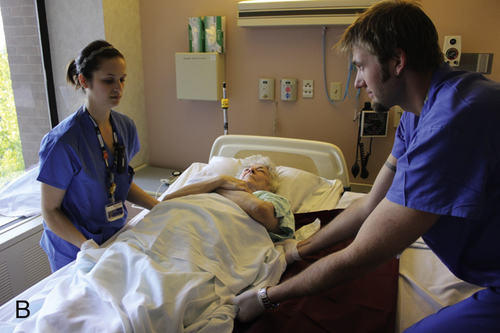 Safety straps must be used if available and stretcher side rails must be in the up position except when moving patients on or off the stretcher.
Summary
• Before transporting a patient, check with the nursing service, obtain the patient’s chart, check the patient’s identification, plan the transfer, check the equipment, communicate effectively with the patient, and obtain help if necessary.
• Wheelchair transfers are appropriate for patients who can sit, stand, and walk safely. Set the brakes before the transfer and assist the patient until he/she is safely seated.
• Additional precautions are necessary for patients who have suffered strokes or lower extremity injuries, and for those who have undergone joint replacement surgery.
• A patient who is unable to stand must be assisted from a wheelchair using a hydraulic lift.
• Transfer by stretcher is appropriate for patients who cannot be safely transported by wheelchair.
• When the patient is unable to assist with stretcher transfer, two people using a draw sheet, with or without a slider board or sliding mat, are necessary for a safe transfer. Use of side rails is essential.