Chapter 15 Technical Aspects of Fluid Therapy
Hospitalized veterinary patients frequently require parenteral fluid therapy for several days, sometimes with complex combinations of intravenous fluids and drugs that require specialized catheters and delivery techniques. This chapter will provide an overview of the technical aspects of delivering fluids and mediations to patients by parenteral routes, with emphasis on intravenous techniques. There have been only a few reports of clinical studies comparing therapy methods or identifying complications in veterinary patients, and many of the principles described in this chapter are adapted from human medical practice, extrapolated from experimental work on animal models, or based on the author’s experience in a veterinary teaching hospital intensive care unit.
Routes of fluid administration
The most frequently used routes of parenteral therapy are intravenous, intraosseous, and subcutaneous. Intraperitoneal administration of fluids is potentially hazardous and offers no significant advantages over other routes; therefore it is not discussed further. The route of parenteral fluid administration is chosen based on the underlying disorder and its severity, therapeutic goals, fluid composition, and characteristics of the patient, including species, size, age, and accessibility of veins.
Subcutaneous
Subcutaneous fluid administration (hypodermoclysis) is a convenient and inexpensive route of maintenance fluid therapy for patients that do not require vascular access for other purposes. It should be reserved for relatively stable animals because peripheral vasoconstriction in illness may limit absorption of fluids and prevents successful use of the subcutaneous route. The fluid should be nearly isotonic (200 to 400 mOsm) to limit discomfort and complications. Although sodium-free or low-sodium fluids are tolerated by many human patients, the composition of fluid administered subcutaneously should ideally be comparable with that of extracellular fluid because electrolyte-free or hypertonic fluids are associated with higher complication rates.2,24,68 In humans, subcutaneous fluids can be supplemented with potassium at a concentration up to 40 mEq/L and in the author’s experience this concentration is usually well-tolerated by companion animals.70
The potential for pain, inflammation, and electrolyte imbalances from a large volume of subcutaneous electrolyte-free fluid may be a realistic concern in small animals; therefore it is prudent to avoid subcutaneous administration of large volumes of low-sodium fluids to cats and small dogs. Other potential complications include infection resulting in subcutaneous cellulitis and skin necrosis from caustic or hypertonic fluids or fluids administered under high pressure into an unyielding subcutaneous space.
The volume administered at any single site is limited by the distensibility of subcutaneous tissue. Therefore fluids are usually administered in the subcutaneous space over the dorsal neck and cranial trunk, where loose connective tissue is abundant. Although the addition of hyaluronidase to fluids for hypodermoclysis therapy in humans increases the rate of absorption of fluid, there is no evidence that the addition of this enzyme improves patient tolerance.12,68 However, it may be of value in dogs and cats with limited distensibility of their subcutaneous tissue when rapid administration is necessary because of time constraints. The fluid should be warmed to body temperature before administration to limit patient discomfort and enhance local blood flow and absorption. The skin should be cleansed with a cotton ball and alcohol to remove debris from the surface. Fluid may be administered with a syringe and 22-gauge needle in small animals or by gravity flow with a fluid administration set through a 20- to 18-gauge needle in larger animals. One company markets a subcutaneous catheter (Endo-Sof, Global Veterinary Products, New Buffalo, Mich.) designed to be implanted for repeated use. Although the catheter material is inert and can stay in place for a long time, failure to adhere to strict aseptic technique will result in bacterial contamination.
Intravenous
Intravenous administration is the route of choice when blood volume expansion is desired. It is clearly superior to subcutaneous administration for any critically ill patient with poor perfusion of tissues. Indications for vein cannulation include administration of fluids, drugs, total parenteral nutrition, blood products, intravenous anesthetics, and as a precaution against the need for venous access in the event of an emergency.
Intraosseous
Intraosseous fluid administration provides access to the vascular space via the capillary beds of the medullary vascular system. It is an excellent alternative to the intravenous route in neonates, (in whom vascular access is technically difficult) or animals with circulatory collapse. This route is best suited for rapid, short-term administration of fluids, blood products, or drugs in emergency situations.
Intravenous catheters
Catheter product designs currently available include winged needle, over-the-needle, through-the-needle, and those placed through an introducer or over a guide wire (Table 15-1). Selection is influenced by operator experience, availability, cost, and patient requirements. Smaller diameter catheters and those made of soft material are less traumatic to veins than large or stiff catheters. For routine maintenance therapy, the smallest gauge catheter that provides adequate flow should be used. If rapid administration of fluid is required, the largest gauge size possible should be used (Table 15-2). The maximal fluid flow rate increases as the radius of the catheter lumen is increased. For small catheters (<14 gauge), this relationship is linear, whereas for larger catheters, flow rate increases geometrically with size and is proportional to the lumen radius raised to the fourth power (r4).25 Short over-the-needle catheters are preferred for rapid intravenous access in emergencies because they can be inserted rapidly and are available in sizes up to 8.5 French.
Table 15-1 Intravenous Catheter Design
| Style | Advantages | Disadvantages |
|---|---|---|
| Winged steel needle | Can be inserted rapidly with little to no skin prep | Suitable for short-term use only |
| High risk of extravasation | ||
| Over-the-needle (OTN) | Well suited for peripheral vein | Most brands cannot use for central access |
| Inexpensive | Cannot be tunneled very far subcutaneously | |
| Technically easy to use | Stiff materials more damaging to veins | |
| Multiple veterinary distributors | Unreliable for aspirating blood Fluid flow affected by limb position |
|
| Over-the-needle with guide wire | Can be inserted into small/difficult veins | Same as OTN |
| Arterial catheters useful for dorsal pedal artery | More expensive than OTN | |
| Through-the-needle (TTN) | Can be used for central access | Technically more difficult to insert |
| Useful for repeated blood collection | Greater potential for hemorrhage than OTN type | |
| Can be tunneled subcutaneously | More expensive than OTN | |
| Made of softer/less irritating material | ||
| Less likely to produce thrombophlebitis over time | ||
| Through introducer sheath with or without guide wire | Can be used to achieve central venous access | Same as TTN, plus: |
| Can insert relatively large/multilumen catheter | Requires drape/sterile field/sterile gloves | |
| Can create a long subcutaneous tunnel | ||
| Catheter material may be very soft (silicone, polyurethane) | ||
| Can be placed in veins too difficult for TTN-style catheter |
Table 15-2 Suggested Intravenous Catheter Gauges
| Weight | Jugular Vein (Through-the-Needle) | Limb Vein (Over -the-Needle) |
|---|---|---|
| Maintenance Therapy | ||
| <5 kg | 22 | 24-20 |
| 5-15 kg | 22-19 | 22-18 |
| *15 kg | 19-16 | 20-18 |
| Resuscitation | ||
| <5 kg | 22-19 | 22-18 |
| 5-15 kg | 19-16 | 18-14 |
| *15 kg | 16-14 | 16-10 |
Winged needle catheters
Winged needle catheters may be used for short-term (single dose) administration of fluid or drugs into a peripheral vein. They are available in needle sizes of 27 to 16 gauge and with various lengths of plastic tubing bonded to the needle and connecting to a Luer adapter. Plastic wings at the needle hub facilitate handling and securing the needle. The risk of needle puncture of the vessel wall and subsequent extravasation is high because the sharp needle bevel is left exposed within the lumen of the vein. Therefore these catheters are best used only for collection of blood or for single infusions of nonirritating drugs or fluids under direct supervision. They are usually positioned in the cephalic vein, where there is less risk of displacement by patient movement. They must be located sufficiently distal to the elbow so that joint flexion will not displace the needle through the vessel wall. Although these are not useful for long-term fluid administration, they have two major advantages for emergency or critical care patients: (1) they may be inserted rapidly with little or no skin preparation; and (2) in many operators’ experience they are the most effective device to obtain percutaneous venous access in cats (and occasionally small dogs) with poor peripheral perfusion, via cannulation of the medial cutaneous saphenous vein under direct visualization through the thin skin of the medial thigh.
Over-the-needle catheters
Over-the-needle catheters are well suited for easy insertion into peripheral veins in companion animals. The wide range of available gauge sizes allows flexibility in vein selection and maximal flow rates. Some are designed for arterial cannulation (e.g., Arrow Radial Artery catheter, Arrow International, Reading, Pa.) and incorporate a wire guide stylet that facilitates placement. Multilumen catheters (e.g., the Arrow Twin Cath, Arrow International) allow infusion of incompatible solutions through a single catheter. In the past 15 years there has been an industry-wide move toward catheters that incorporate safety mechanisms to limit the risk of operator injury and exposure to patient blood. Safety catheters irreversibly retract or cover the needle after the vein is punctured and can be used for only one attempt.
Over-the-needle catheters are useful for short procedures such as anesthesia and for intravenous fluid administration for 48 to 72 hours. These catheters are usually positioned in the cephalic, accessory cephalic, medial and lateral saphenous, or femoral veins. Any other accessible superficial vein may be satisfactory (e.g., ear veins in rabbits or dogs with pendulous ears).
There are several disadvantages associated with over-the-needle catheters. They may fray or splinter at the tip during insertion and cause excessive injury to the vein with a high risk of thrombosis. They are difficult to secure adequately and may slide in and out of the skin with limb movement. This action increases the risk of trauma to the vein and may also facilitate entry of skin surface bacteria through the catheter wound and into the vein. When they are located in distal limb veins, fluid flow through these catheters is often affected by limb position (e.g., elbow flexion often stops gravity flow of fluids through a cephalic vein catheter). Several brands of these catheters are composed of stiff Teflon or irritating polypropylene and are not suited for extended dwell periods in an external jugular vein or in veins that cross a joint where motion enhances catheter-induced vessel trauma.
Through-the-needle catheters
Through-the-needle catheters are long (6 to 36 inches) and are often used to gain deep or central venous access from peripheral sites. These catheters are generally known as midline catheters in human medicine because they are designed to obtain access to proximal limb veins from distant venipuncture sites. Because of the anatomy of the external jugular and lateral saphenous veins in companion animals, these catheters work well to obtain central venous access. This allows the catheter tip to be positioned in a large central vein with rapid blood flow, allowing safe administration of viscous or hypertonic solutions. It is often difficult to thread these catheters past the elbow and axillary regions of the forelimb; thus they are of limited usefulness in cephalic veins.
Through-the-needle style catheters are usually long and provide several advantages over short, over-the-needle style catheters. Body position and movement do not affect the rate of fluid flow when the tip of the catheter is positioned in a deep or central vein. Multiple blood samples may be withdrawn easily from these catheters. They may be anchored securely to the skin and tunneled extensively through subcutaneous tissue and are therefore less likely to conduct surface bacteria into a vein than are shorter catheters.51,57 However, small vein cannulation is often more difficult than with over-the-needle catheters, and the risk of catheter or air embolization during catheterization is greater.
Guided catheters and peripherally inserted central catheters
Central venous catheters designed for insertion into a human internal jugular or subclavian vein use almost always use a guide wire placement technique to increase the likelihood of successful cannulation. Because they are composed of soft material, they either incorporate a wire stylet or are threaded over a preplaced guide wire using the technique of Seldinger.72 Some of the catheters marketed for use in humans are suitable for use in dogs and cats (e.g., Arrow Pediatric Central Venous Catheterization Sets, Arrow International). Some guide wire catheters are marketed specifically for use in dogs and cats (e.g., Mila International, Florence, Ky.; Global Veterinary Products). The guide wire technique allows central vein access via insertion into veins that may not be successfully cannulated otherwise. Other peripherally inserted central catheters (PICCs; Mila International, Global Veterinary Products) are inserted through a short, larger introducer sheath with or without a guide wire. A major advantage of these catheter designs is the availability of double or even triple lumen products that allow greater vascular access through a single catheter.
Catheter composition
Catheter composition affects handling characteristics during insertion and influences the potential for thrombosis and phlebitis. Widely used catheter materials include polyvinyl chloride (PVC), polyethylene, polypropylene, polyurethane, silicon elastomer (Silastic), tetrafluoroethylene (TFE Teflon), and fluoroethylene-propylene (FEP Teflon) (Table 15-3). These materials are chemically inert, but leaching of plasticizers and stabilizing agents from some plastics probably contributes to the development of phlebitis, especially in small veins with low blood flow.63,75,85 Silicone elastomer catheters are the most chemically inert, whereas PVC, polypropylene, and polyethylene are the most reactive. Teflon and polyurethane are intermediate in reactivity. Some catheters composed of more irritating material are coated with silicone elastomer to reduce their reactivity. Catheter thrombogenicity is related not only to chemical reactivity but also to the stiffness of the material and the smoothness of its surface.18,33 Teflon is the stiffest material; polypropylene, PVC, and polyethylene are more flexible. Stiff catheters are easier to pass through the skin and subcutaneous tissues but are more prone to kinking and more likely to damage vessel walls and cause thrombophlebitis. Polyurethane elastomer (e.g., Vialon, Becton Dickinson, Franklin Lakes, N.J.) and silicone elastomer catheters are much softer and more flexible. Silicone elastomer catheters are so flexible that they are difficult to introduce into a vein without a stylet or guide wire.
Many brands of catheters are made radiopaque by the addition of heavy metal salts (barium or bismuth) to the plastic. When mixed uniformly into the material, these salts increase the roughness of the catheter surface and increase the risk of thrombosis.33 If embedded within the wall of the catheter, or if the catheter is coated with another, less thrombogenic material (e.g., silicon elastomer), this risk is lower. Heparin coating may significantly reduce catheter thrombus formation, at least for 1 to 2 days.67,74 Some manufacturers have developed antibiotic-coated catheters that appear to reduce the risk of catheter-associated sepsis.27,43,45 Examples of antiseptics either coated onto or impregnated into catheters include chlorhexidine-silver sulfadiazine and rifampicin-miconazole.27,43
Vein selection
Catheter site selection depends on several factors, including operator experience, accessibility, therapeutic goals, risk of infection, risk of damage to the catheter, and risk of thrombosis.
Accessibility
Peripheral vein cannulation is most often performed in the cephalic and accessory cephalic veins of the thoracic limbs and the lateral saphenous vein of the pelvic limbs. Other suitable veins include the medial saphenous (cats), the femoral veins (in some cats and dogs), and the ear veins in dogs with pendulous ears. These veins may fill very slowly in animals with poor peripheral perfusion and can be difficult to visualize or palpate. In this setting, the saphenous veins may be superior (lateral in dogs, medial in cats) because the relatively thin skin overlying them allows better visualization and control over catheter insertion. Catheterization may be facilitated by the vascular access procedures described in the following sections.
Therapeutic goals
Short-term administration of fluids may be accomplished using any vein, and choice of vein in this setting depends primarily on operator experience and catheter design. Central venous catheterization is preferred in patients that require long-term fluid administration or parenteral nutrition, administration of hypertonic solutions or irritating drugs, frequent blood sampling, or central venous pressure (CVP) monitoring. Central venous access is most easily accomplished by cannulation of the external jugular or saphenous veins. The right external jugular is preferred over the left because this vein joins the cranial cava in a straighter line through the brachycephalic trunk than does the left, facilitating catheter passage into the cranial vena cava.
Risk of infection
The risk of infection is increased in the presence of bandage contamination. Catheters inserted into peripheral veins that are likely to be soiled by vomiting, diarrhea, or urine pose a greater threat. Therefore the saphenous veins are not ideal choices in animals with diarrhea or polyuria, and the cephalic vein is not a good choice in an animal with frequent vomiting. There is a greater threat of infection of catheters inserted through a cut-down incision or through skin that is wounded or infected. Therefore unhealthy skin is avoided, and catheters inserted through incisions are removed as soon as possible, ideally within 6 hours.
Risk of damage to the catheter
Catheters located in limb veins are particularly accessible to the animal’s teeth, and some animals chew at and damage or remove the catheter. Catheters located in an ear vein may prompt scratching and head shaking that eventually dislodge the device. Some form of restraint, such as an Elizabethan collar, may be necessary to prevent damage to catheters located at these sites. The risk of catheter damage is considerably lower when the jugular vein is used and bandaged adequately. Surprisingly, most sick dogs and cats do not disturb properly positioned, carefully bandaged intravenous catheters. Animals that chew or scratch at their catheters frequently do so because of excessive irritation. Catheters and bandages that were tolerated initially and subsequently provoke chewing or scratching should be carefully inspected for evidence of tightness, wetness, or infection.
Risk of thrombosis
There is a risk of thrombosis whenever a vein is cannulated. Thrombosis is more likely in small veins with low blood flow or when the intravascular portion of the catheter traverses a mobile joint. Some specific diseases such as preexisting phlebitis, glomerulonephritis, protein-losing enteropathy, autoimmune hemolytic anemia, and any disorder that causes systemic inflammation are complicated by increased risk of serious thrombosis and pulmonary thromboembolism.21,37,42,62 Intravenous catheterization in these animals is probably accompanied by a higher risk of clinically significant thrombosis than in other diseases. It may be advisable to avoid venous catheterization in these animals when possible. When catheterization is unavoidable, one should use short, soft, small diameter catheters that are removed as soon as possible. Compared with catheterization of peripheral veins, catheterization of the jugular vein in companion animals is probably not an independent risk factor for venous thrombosis and pulmonary thromboembolism, but the consequences of thrombosis in that location are more apparent and severe. Cats with aortic saddle thrombi have poor blood flow to their pelvic limbs and devitalization of those tissues. Pelvic limb vein catheterization in these animals is associated with a high risk of venous thrombosis and infection and must be avoided.
Catheter placement
Skin preparation
Healthy animals undergoing short-term catheterization for elective procedures (e.g., anesthesia for ovariohysterectomy) rarely develop phlebitis or sepsis from sloppy technique during catheter placement. In contrast, sick animals with compromised immunity may not tolerate even a minor breach of aseptic technique, and intravenous catheters may quickly become colonized and serve as a point source for bacteremia and septic phlebitis. With the exception of emergency venous access, these patients require careful aseptic technique for skin preparation and catheter insertion. If an intravenous catheter is to remain in place for more than a few hours, the skin must be prepared as for any surgical procedure. Every effort must be made to be thorough but gentle because abraded or scarified skin is not healthy and will support colonization by pathogenic bacteria. Key points include avoiding clipper burn and avoiding rough cotton gauze for skin cleansing:
1. A wide clip centered on the intended venipuncture site is performed. A No. 40 blade is used to obtain a close cut. The clipper blade must be well lubricated and held parallel to the skin (not raked across it) to limit clipper burn, and the coat is clipped sufficiently far from the point of insertion so that there is no risk the catheter will touch hair during the procedure. If it is not possible to clip a sufficiently wide area, consider wrapping the appendage or neck with a temporary bandage to hold down the hair coat and keep it out of contact with the catheter.
2. Wash your hands and apply a germicidal lotion (e.g., Avagard [3M, St. Paul, Minn.], Citrus II [Beaumont Products, Kennesaw, Ga.], IC Lotion [R&R Lotion, Scottsdale, Ariz.], or Purell [GOJO Industries, Akron, Ohio]). Don a clean examination glove on the dominant hand using a “no touch” technique. Treat this glove as though it were sterile, and do not touch its fingers with your bare hand when removing it from the container.
3. Local anesthesia with subcutaneous lidocaine often facilitates catheterization. Although some animals react to the transient sting of injected lidocaine, this is often less stressful than the sensation produced by a large-gauge catheter being forced through the skin. Local anesthesia also provides the option of making a facilitation incision at the venipuncture site (see the Percutaneous Facilitation Procedure section). If local anesthesia is desired, it should be done immediately after clipping to allow time to take effect while the skin is prepared. The skin is wiped once with an alcohol-soaked cotton ball, and the venipuncture site is anesthetized with 0.1 to 0.5 mL of lidocaine/bicarbonate 9:1 mixture administered subcutaneously. By mixing nine parts of lidocaine with one part of sodium bicarbonate solution, the sting of lidocaine is reduced.53,64 If made in advance, the lidocaine/bicarbonate mixture should be used within 1 month because the lidocaine in this mixture degrades at a rate of approximately 11% per week.82
4. The skin must be cleaned for at least 2 and preferably 3 minutes with cotton balls freshly soaked with the surgical scrub of choice. Do not use containers of premade antiseptic-soaked gauze or cotton balls; people reaching into the container with their bare hands contaminate these. Most antiseptic soaps require continuous wet contact for that entire time to be effective. This means that there is no rinsing with alcohol or water between scrubs until the full 2 to 3 minutes have elapsed. Frequent changing of the cotton balls facilitates removal of surface debris. The following antiseptic agents are useful:
5. Residual soap solution is removed from the skin and surrounding hair with cotton balls or gauze sponges soaked in alcohol, hydrogen peroxide, sterile water, or sterile saline solution. Soap left on the skin and coat will cause dermatitis—remove all of it.
6. If desired, the skin may be painted with a povidone-iodine solution or an iodine tincture. The solution is allowed to dry before catheter insertion.
Percutaneous catheterization
Winged needle catheters
Materials Needed
2. Two clean latex examination gloves
3. One roll of 1-inch white tape
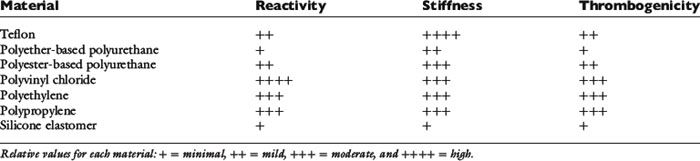
4. One catheter injection cap, intravenous tubing set, syringe filled with drug or intravenous solution, catheter “T” piece, or other needleless injection site device (e.g., Interlink connectors, Baxter Healthcare, Deerfield, Ill.; CLAVE or CLC 2000 connectors, ICU Medical, San Clemente, Calif.; Abbott Laboratories, Abbott Park, Ill.) (Figure 15-1)
5. Single dose of povidone-iodine ointment applied on a sterile gauze sponge (if the needle is to remain in place unobserved)
Procedure
1. Because this device is intended for short infusions and because the stainless steel needle may be less likely to drag surface contamination into the wound, skin preparation may be minimal. Although not essential, clipping the hair at the injection site facilitates visualization of the vein for needle placement. Whether the coat is clipped, wipe the area once with alcohol-soaked cotton balls or gauze to remove dander and flatten the coat.
2. Wash your hands, and put on clean examination gloves.
3. Flush the catheter with intravenous fluid or drug solution to purge air from the system. Disconnect the syringe from the tubing, and hold the catheter by its “wings” in your dominant hand. To prevent fluid from draining out of the system, hold the tubing coiled in the same hand, with the Luer adapter end held level with the needle tip.
4. After an assistant occludes the vein, tense the skin slightly with the opposite hand to stabilize. Do not touch the needle shaft or the skin at the intended point of insertion.
5. Hold the catheter by the plastic wing(s) with the bevel facing up, and push it through the skin and into the vein. There are two technique options:
6. Blood flows into the catheter tubing when the vein is entered. Advance the needle fully into the vein. Lift the needle slightly as it is advanced, a technique that is important for any venipuncture, to minimize the risk of penetrating the vessel wall (Figure 15-2).
7. The assistant should immediately release the pressure on the vein.
8. Attach the syringe with drug solution or intravenous fluid to the tubing, and fill the catheter with solution. Alternatively, an intravenous fluid line may be attached if immediate fluid administration is desired. Examine the skin near the end of the catheter for any evidence of extravasation at the start of the infusion.
9. If the catheter has two pliable wings, lay them flat on the skin surface, and wrap a single piece of white tape over them and around the limb. This tape should be applied snugly but not tightly enough to occlude the vein. The tape does not cover the point of entry.
10. If the needle is to remain in place and unobserved, it may be prudent to apply a gauze sponge with antiseptic ointment to the skin penetration site, and secure this to the limb with a second piece of 1-inch white tape.
11. Coil the tubing, and secure the Luer end to the limb with another piece of tape. This coil helps prevent movement of the catheter if traction is applied to the tubing.
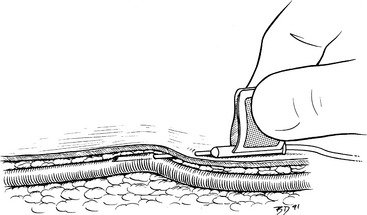
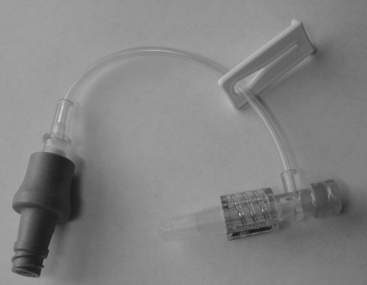
Figure 15-2 Technique for placement of a needle into a superficial vein. Once the vein has been entered, the bevel remains oriented toward the skin, and the shaft of the needle is lifted up against the superficial wall of the vessel as the needle is advanced. The needle bevel functions like the curved tip of a ski and prevents the point from catching on the vessel wall.
Over-the-needle style catheters
Materials Needed
2. Two pairs of clean examination gloves
3. One roll 1-inch waterproof white tape
4. One roll each of appropriately sized stretch gauze, stretch bandaging material, and cast padding
5. One catheter injection cap, catheter “T” piece, or needleless connection device
All materials are arranged ready for use on a clean tray or Mayo stand:
Procedure
1. Prepare the venipuncture site aseptically as described previously.
2. Wash your hands, apply germicidal skin lotion (if not already done), and don new clean examination gloves.
3. A small incision through the skin facilitates insertion of large-gauge catheters (Figure 15-3, A) or placement of the catheter through tough skin (see the Percutaneous Facilitation Procedure section). The techniques for direct and indirect insertion are the same as noted previously. Indirect catheterization is strongly preferred because this forms a subcutaneous tunnel between the point of entry through the skin and the point of entry into the vein that serves as a barrier to bacterial migration.52,56
4. An assistant restrains the animal and occludes the proximal vein. Grasp the catheter firmly at the junction of the needle and catheter hubs, ensuring that the catheter does not loosen and partially slide off the needle during manipulation. Never touch the skin at the point of insertion, and never touch the needle/catheter shaft. The needle bevel is directed up during the procedure. Advance the needle, first subcutaneously and then into the vein. Penetration of the vein often is heralded by a distinct “pop” as the needle punctures the tough vessel wall and by the flow of blood into the needle hub (Figure 15-3, B).
5. Advance the needle and catheter as a unit for another 3 to 5 mm. This ensures that both the needle and catheter tips are within the lumen of the vein. During this maneuver, hold the needle shaft as parallel to the long axis of the vein as practical, and lift the catheter tip away from the deep wall of the vein (as described for winged needle catheterization, see Figure 15-2). Once the catheter tip has entered the vessel, slide the catheter off the needle and into the lumen of the vein (Figure 15-3, C). If the catheter material is very soft and flexible, an alternative technique is to retract the needle 5 mm back into the catheter and advance the catheter and needle in unison all the way into the vein.
6. Your assistant should now release the vein occlusion, and the needle is withdrawn.
7. Attach the catheter injection cap, “T” piece, or needleless connector device, and flush the catheter with heparinized saline solution (Figure 15-3, D).
8. Remove any blood or fluid on the catheter hub and surrounding skin with sterile or clean gauze sponges.
9. If a cephalic or lateral saphenous vein is cannulated, wrap the catheter hub with a strip of 1.5-to 2.5-cm (0.5 or 1 inch) white tape, and extend this strip around the limb. The tape should be pressed tightly onto the catheter hub but loosely anchored to the limb (Figure 15-3, E-G). The goal is to secure it to the limb, yet avoid wrapping it too tightly. When cannulating the medial saphenous or femoral vein (or any vein at a large, flat surface), the catheter hub should be anchored to the skin with a suture to limit in-and-out movement during flexion and extension of the limb. To provide a secure anchor without strangulating skin, place a single loop of suture material through the skin under the catheter hub, and create a slightly loose loop incorporating skin only by tying a secure square knot. Then tie the free ends of this anchor tightly around the catheter hub with a surgeon’s knot.
10. Cover the point of insertion with antiseptic ointment on a sterile gauze sponge (Figure 15-3, F).
11. If the catheter is to remain in place for more than 6 hours, it should be covered with a short, light bandage that extends 6 to 12 cm (2 to 4 inches) above and below the point of insertion (Figure 15-3, G-J).
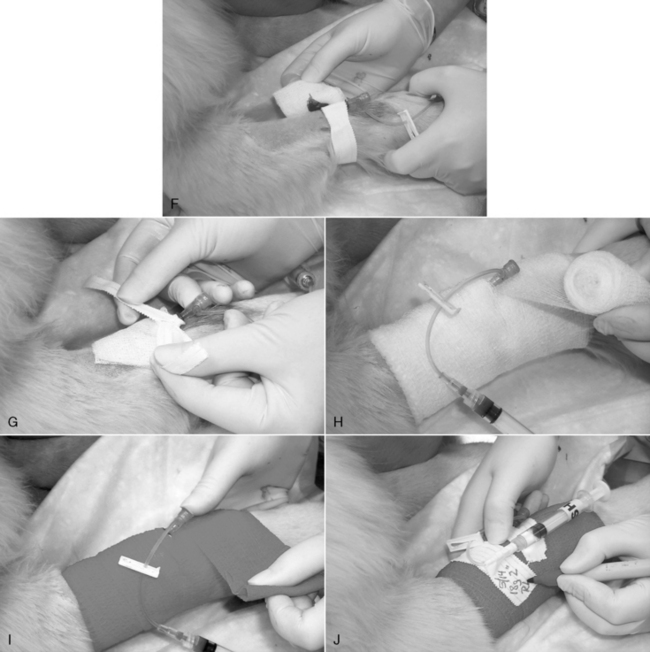
Figure 15-3 Catheterization of the cephalic vein with an over-the-needle style catheter. A, The skin has been clipped widely, the insertion site blocked with a 9:1 lidocaine/bicarbonate mixture, and the skin has been aseptically prepared as described in the text. An 18-gauge injection needle is used to create a facilitation incision in the skin. The skin at that site must never be touched. B, The tip of the needle-catheter assembly is advanced into the skin puncture and proximally, parallel to the long axis of the vein, through the subcutis as far as practical before entering the vein. The catheter shaft is not allowed to contact the distal limb hair. The catheter is angled toward the vein and advanced into it. The goal should be to “snag” the outer layer of the vein with the needle tip. The flow of blood into the clear needle hub depicted here confirms venipuncture. C, The needle is held stationary, and the catheter is advanced fully to the Luer hub, or as deeply as possible without crossing a joint. D, The needle is removed, and an injection plug or “T” piece is connected to the Luer fitting. Any air is aspirated, and the system is purged with heparinized saline. E, The end of a 1-cm-wide (0.4 inch) strip of white porous tape is secured around the catheter hub, and then the remainder of the tape is wrapped firmly, but loosely, around the limb. F, A 5- × 5-cm (2- × 2-inch) gauze with antiseptic ointment is laid over the skin insertion site and secured with more porous white tape. G, In this example, a 0.5-inch-wide (1-cm) strip is applied as a “yoke” around the hub, with the long ends directed proximally. Incorporation of those ends into the bandage will help prevent the catheter from becoming partially withdrawn. H and I, The catheter and adjacent limb are wrapped with 5- to 8-cm-wide (2- to 3-inch) cotton cast padding, applied heavily enough to provide some support to the catheter and prevent a tourniquet effect. A layer of stretch gauze is applied more snugly over the cast padding. A final layer of stretch bandaging material (with or without adhesive) is applied, more snugly still, over the stretch gauze. The “T” piece extension is secured to the stretch bandage material with white tape to prevent any traction on the Luer connection. It may be connected to an intravenous administration set, needleless connector, or a new locking Luer syringe filled with heparinized saline. The bandage is initialed and dated.
Through-the-needle intermediate-style catheters
Materials Needed for Placement in the External Jugular Vein
1. Appropriate catheter: the ideal length will result in the tip of the catheter within the anterior vena cava just anterior to the right atrium.
2. Two clean latex examination gloves
3. 00 or 000 monofilament nylon, needle holders, suture scissors
5. One roll each 1 inch (2.54 cm) waterproof white tape and porous white tape
6. One roll each of appropriately sized stretch gauze, cast padding, and adhesive (Elastikon, Johnson & Johnson, New Brunswick, N.J.) or coadhesive (Vetrap. 3M, St. Paul, Minn.) wrap
7. One catheter injection cap, catheter “T” piece, or needleless connection device
8. Syringe with heparinized saline solution, 1 to 2 U/mL
10. Single dose of povidone-iodine ointment
11. Tube of cyanoacrylate adhesive (DURO superglue, Loctite Corp., Cleveland) (optional)
All materials are arranged ready for use on a clean tray or Mayo stand:
Procedure
1. Prepare the venipuncture site as described previously.
2. Wash your hands, apply germicidal lotion (if not already done), and put on clean examination gloves.
3. Proper positioning is critical for successful cannulation of the external jugular vein. In animals with thin skin and large, easily distended veins, the procedure is easily accomplished with the animal restrained in lateral recumbency. In this position, the external jugular vein is usually located directly lateral to the trachea. Sternal recumbency or a sitting position is preferred in animals that resist being restrained on their side and in those with thick skin or small, poorly distensible veins. In both the sternal and sitting positions, the animal should be held with its pelvic limbs directed away from the side chosen for venipuncture (Figure 15-4, A). This maneuver makes the neck more convex on that side and reduces the depth of the jugular furrow. An assistant elevates the head, and the nose should be initially held in a horizontal position and directed away from the intended site at a 30- to 45-degree angle with the median plane. If the animal has abundant loose skin on the neck, elevating the nose tenses the skin and facilitates identification of the vein. It is helpful to experiment with different head and nose positions until the optimal position is found. If you are right handed, occlude the vein at the thoracic inlet with the thumb of the left hand, and use your left index finger to palpate the vein. The patient’s right external jugular vein is preferred because it may be easier to advance the catheter into the cranial vena cava from this side. The puncture site should be 1 to 2 cm (about 0.5 to 0.75 inch) lateral to the vein and in the cranial half of the neck.
4. As with over-the-needle catheters, a small skin incision facilitates insertion of large-gauge catheters and eases access through tough skin (Figure 15-4, B). The techniques for direct and indirect insertion are the same as noted previously. Indirect insertion is strongly preferred because this forms a subcutaneous tunnel between the point of entry through the skin and the point of entry through the vein that serves as a barrier to bacterial migration. Never touch the skin at the point of insertion, and never touch the needle/catheter shaft.
5. Fully retract the catheter into the sterile sheath so that it is not visible at the needle bevel. Grasp the device firmly at the hub of the needle, and penetrate the skin with the bevel of the needle facing away from the skin surface. When possible, advance the needle subcutaneously parallel to the vein for at least 2 cm (0.75 inch) before introducing it into the vein (Figure 15-4, C). Penetration of the vein is usually heralded by a distinct pop as the needle punctures the tough wall of the vessel. A flashback of blood entering the needle hub is usually, but not always, seen (Figure 15-4, D). The catheter may then be manipulated through the sterile sheath and advanced through the needle.
6. If you suspect successful venipuncture but do not see a flashback, try advancing the catheter through the needle. If the catheter is not easily advanced, it is likely that the catheter has entered subcutaneous tissue. In that case, withdraw the entire assembly in unison. Do not pull the catheter back through the needle until the needle is withdrawn because of the risk of shearing on the needle bevel. Inspect the needle and catheter for damage; if none is present, it may be used for another attempt. Any subsequent attempts can be made through the original skin wound.
7. Because the needle forms a hole in the vessel wall that is larger in diameter than the catheter, postcatheterization hemorrhage is occasionally a problem. This can be minimized by holding the venipuncture site above the level of the heart to reduce venous pressure, such as by performing jugular vein cannulation with the animal in a sitting position. Accurate needle positioning minimizes laceration of the vein, and rapid application of a sterile dressing and bandage provides direct compression and tamponade.
8. Depending on the brand of catheter used, the needle is split off the catheter or is covered with a plastic needle guard as directed by the manufacturer (Figure 15-4, E).
9. Remove the wire stylet (Figure 15-4, F).
10. Attach the “T” piece, injection cap, or needleless connection device to the Luer hub. If using a “T” piece, first attach a syringe with heparinized saline solution to it, and purge all air from the lumen. If you use an injection cap, purge the air from its dead space by filling it with sterile solution. Attach the device, aspirate any air from the catheter, and confirm catheter patency by successful aspiration of blood. Purge the catheter with the solution (Figure 15-4, G).
11. If the catheter was inserted completely, withdraw it 1 to 2 cm (0.5 to 0.75 inch) from the skin, and dry this exposed section with a sterile gauze sponge. Wrap a 2.5- to 5-cm (1 to 2 inches) “butterfly” of waterproof white tape around the catheter and needle guard. This piece of tape should bridge the needle guard and the exposed portion of catheter to where it enters the skin (Figure 15-4, H). Through-the-needle catheters frequently fail because of kinking at the point of exit from the needle guard or the point of entry into the skin. The tape prevents this by forming a protective “sandwich” around the catheter as it exits the needle guard or hub.
12. If the catheter was too long, leave an appropriate length outside the skin, and incorporate it into a “sandwich” of white tape as described previously. If there is sufficient length, it may be coiled into a loop that is completely encased between the two layers of tape.
13. Dry the Luer connection at the junction of the needle and catheter hubs with a sterile gauze sponge, and compress them together firmly. If desired, a drop of cyanoacrylate adhesive may be applied to the surfaces before forcing them together (Figure 15-4, I). This connection may also be bridged with a “sandwich” created by two strips of 1-inch white tape that cover the first “butterfly” strip of tape and extend from the suture site all the way to the injection cap (Figure 15-4, J).
14. Suture the tape “sandwich” to the skin at points on both sides of the catheter within 0.5 cm (0.2 inch) of the penetration site (Figure 15-4, K).
15. Cover the point of insertion with the antiseptic-treated gauze sponge.
16. Anchor the catheter with a strip of porous white tape. If a jugular vein is cannulated, firmly apply the tape to the base of the needle guard, and then wrap it in a manner that pulls the catheter in a dorsal direction on the ipsilateral side to help prevent the catheter from slipping ventrally later (Figure 15-4, L). The goal is to secure the catheter to the skin, not to wrap it on tightly.
17. Apply layers of cast padding, stretch gauze, and elastic bandage material, wrapping up (dorsally) on the ipsilateral side in the case of a jugular vein catheter. While wrapping the catheter bandage, hold the limb or neck in a natural position (partially flexed limb or nose pointed down) to prevent binding (Figure 15-4, M-O).
18. If the catheter is intended to be positioned into the anterior vena cava or the intrathoracic portion of the caudal vena cava, a lateral thoracic radiograph should be obtained to confirm ideal location of the catheter tip.
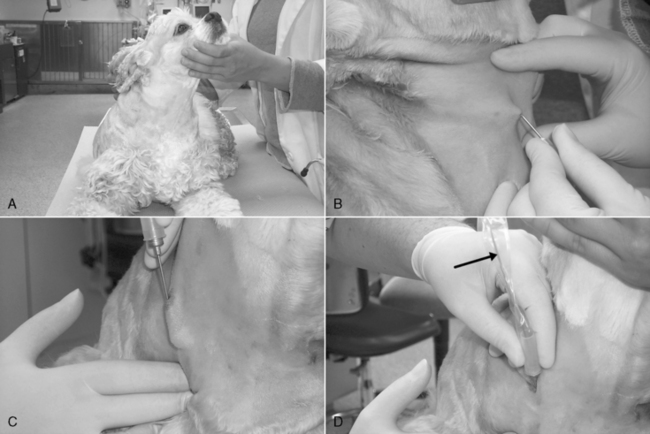
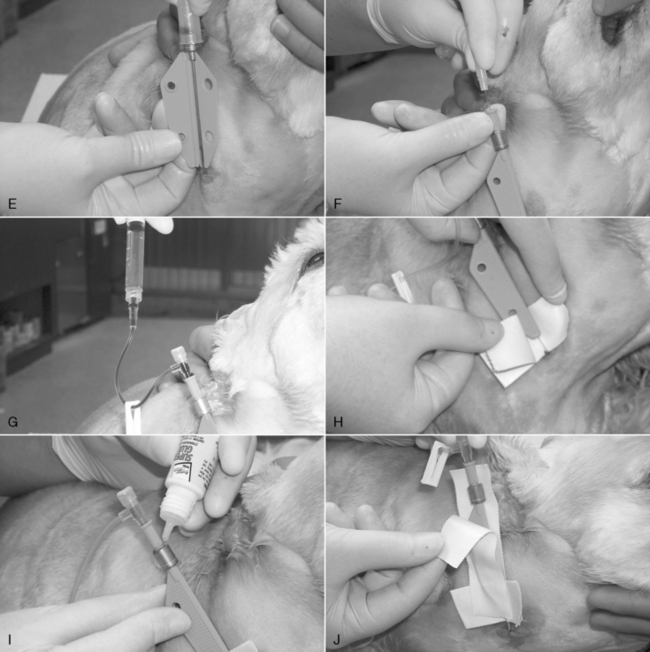
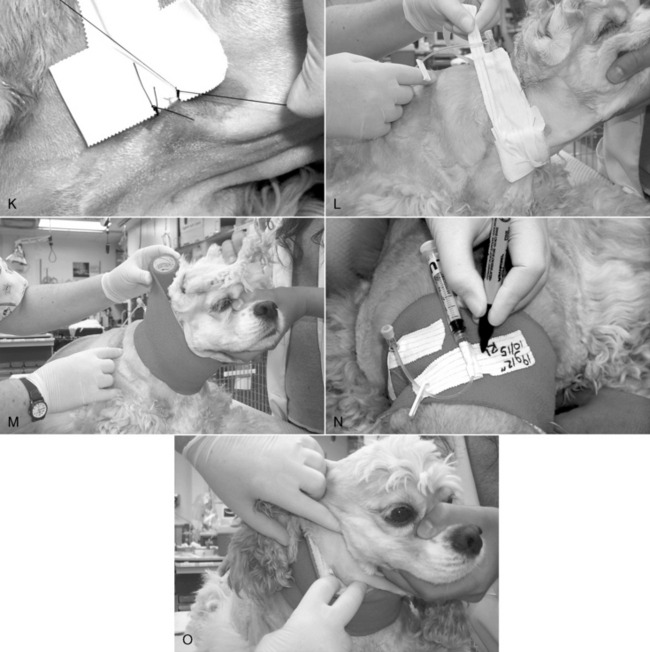
Figure 15-4 Procedure for jugular vein catheterization using a 19-gauge, 20-cm (8-inch) Intracath (Becton Dickenson). A, Proper positioning in sternal recumbency, with the nose and rear legs directed away from the side to be catheterized. B, Following blockade with a 9:1 mixture of lidocaine/bicarbonate and sterile prep, a facilitation incision is made in the skin lateral and cranial to the point of entry into the vein. C, The device is grasped firmly at the hub of the needle, and the skin wound is penetrated with the bevel of the needle facing away from the neck. The needle is advanced subcutaneously parallel to the vein and with the bevel oriented away from the neck for at least 0.75 inch (2 cm) before introduction into the vein. D, Penetration of the vein is often heralded by a distinct pop as the needle punctures the tough wall of the vessel. A flashback of blood entering the catheter (arrow) is often seen. Note that the needle has been advanced subcutaneously nearly to the hub before venipuncture. E, A plastic needle guard is applied over the needle. F, The catheter wire stylet is removed while holding the catheter hub steady. G, The injection plug should be applied quickly to prevent air embolization. The syringe and “T” piece have been applied and air aspirated back into the syringe. The blood is then purged back through the catheter and the catheter filled with heparinized saline. H, A “butterfly” of waterproof 2.5 cm (1 inch) white tape is applied to bridge the end of the needle guard and the first 1 cm (0.4 inch) of catheter. I, If desired, the friction connection between the catheter hub and needle hub may be secured with cyanoacrylate adhesive. J, A “sandwich” of 2.5-cm (1-inch) waterproof white tape is applied to the long axis of the needle guard, catheter hub, and original “butterfly” of tape. K, This provides a secure connection between the catheter assembly and skin sutures. L, The point of insertion is covered with povidone-iodine impregnated gauze, and the catheter is loosely anchored to the neck with porous 2.5-cm (1-inch) white cloth tape. In this example, the tape has been split down the middle to the last 13 cm (5 inches), which has been applied directly to the original “sandwich” of waterproof tape. One of the strip halves was wrapped down and around the dog’s neck, and the other was wrapped upward in the opposite direction. M, Sequential layers of 5-cm (2-inch) cast padding, stretch gauze, and coadhesive stretch bandage material are applied, rolling up the neck on the catheter side. During the application, the animal’s nose should be oriented down in a natural head position. N, A piece of split tape is applied to hold the bandage material down around the exposed hub of the catheter, and the Luer end of the “T” piece is anchored with another piece of tape, which is labeled with a description of the catheter, the date, and the operator initials. O, With the animal’s nose pointed down, the front of the ventral aspect of the bandage is checked for tightness. If it is too snug, it is partially split with scissors.
Guidewire placement of central venous catheters
Materials Needed
1. Commercial guide wire-style central venous catheter (e.g., Arrow Two-Lumen Central Venous Catheterization Set, Arrow International). Most commercial products are sold as a kit with a sterile drape.
3. 00 or 000 monofilament nylon, needle holders, suture scissors
5. One roll each 1-inch (2.54-cm) waterproof white tape and porous white tape
6. One roll each of appropriately sized stretch gauze, cast padding, and adhesive (Elastikon, Johnson & Johnson) or coadhesive (Vetrap. 3M) wrap
7. One catheter injection cap, catheter “T” piece, or needleless connection device
Procedure
Many animated and graphical instructional resources for the Seldinger guide wire technique are available on the Internet.
1. Prepare the skin as described previously.
2. The catheter set is opened, and sterile gloves are worn.
3. The catheterization site is draped with a sterile field drape.
4. A facilitation incision is created at the skin insertion site with a No. 11 blade. The incision should be no wider than the diameter of the catheter. As with through-the-needle catheters, the skin insertion site is as far away from the vein penetration site as practical.
5. The vein is cannulated with either a guide needle or an over-the-needle style catheter supplied with the kit.
6. A flexible guide wire is threaded through the introducer catheter several inches into the vein, taking care to avoid threading it into the heart (Figure 15-5, A).
7. The guide wire is held stationary, and the introducer catheter is removed over it (Figure 15-5, B).
8. A vein dilator is threaded over the guide wire into the vein (Figure 15-5, C). The dilator tears an opening in the vein to the same diameter as the central catheter.
9. The vein dilator is removed, and the central venous catheter is threaded over the guide wire. Be sure that the guide wire protrudes from the Luer fitting at the end of the catheter (Figure 15-5, D).
10. The catheter is passed along the guide wire to a depth calculated to place the tip near the right atrium in the anterior vena cava (Figure 15-5, E).
11. All air is aspirated from the catheter, and then it is purged with heparinized saline solution (Figure 15-5, F).
12. If the catheter is not fully seated, a suture collar is placed around it and anchored to the skin at the insertion site (Figure 15-5, G).
13. The catheter is wrapped as previously described.
14. A lateral thoracic radiograph should be obtained to confirm ideal location of the catheter.
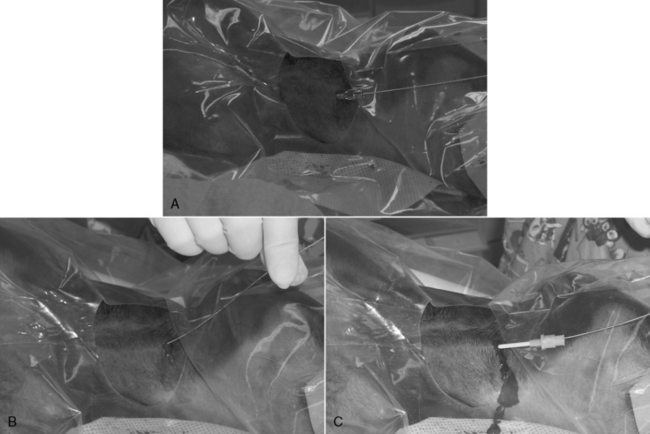
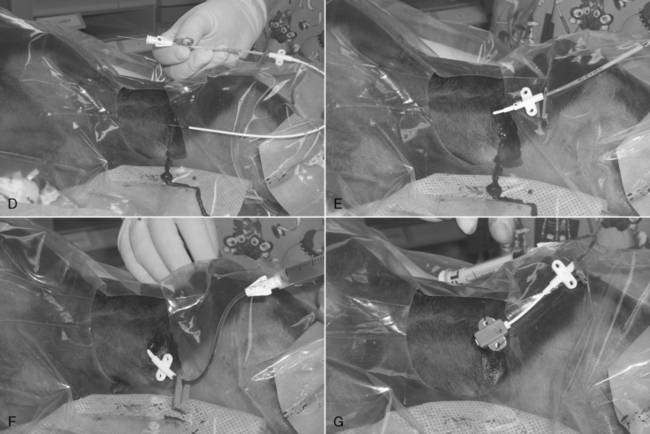
Figure 15-5 Seldinger technique for jugular vein cannulation. The dog is in left lateral recumbency with its head to the right. A, An 18-gauge over-the-needle style catheter has been inserted into the right jugular vein through a small skin incision, and the central catheter’s guide wire has been threaded approximately 4 inches into the vein. B, The 18-gauge catheter has been removed, leaving the guide wire in place. C, A vein dilator has been threaded over the needle and advanced into the vein. It helps to rotate the dilator back and forth while pushing it into the vessel. The dilator is rigid and functions to tear a hole in the vessel wall the same diameter as the central catheter. D, The dilator has been removed and the catheter threaded over the exposed portion of the guide wire. It is essential to confirm that the end of the guide wire is visible beyond the Luer catheter connection before advancing the catheter into the vein. E, Once confirmed, the guide wire is held stationary, and the catheter is advanced into the vein. F, The wire is removed, and a syringe and “T” piece assembly have been attached to the catheter, and all air has been aspirated out. G, The catheter has been partially withdrawn to the ideal depth, and a catheter collar has been attached and is securely sutured to the skin at the insertion site. The catheter is then bandaged as for through-the-needle catheters.
Vascular access procedures
These techniques aid catheterization when direct percutaneous access is difficult. They are especially helpful in emergencies when cannulation with a large-gauge catheter is required.14,32
Percutaneous facilitation procedure
A facilitation incision is a small cut made just through the skin at the intended point of entry, directly over or just to the side of the vein. This incision is easily made with the bevel edge of an 18-gauge needle or with the tip of a No. 11 Bard-Parker blade. In the conscious patient, inject a lidocaine/bicarbonate 9:1 mixture subcutaneously at the site at least 2 to 3 minutes before performing the procedure. Hold the needle (or blade) like a pencil, and incise the skin to the subcutis parallel to, but not directly over, the vein, creating a wound just large enough for the catheter to pass through. This incision reduces the resistance encountered as the catheter traverses the skin and provides greater control of the venipuncture when compared with forcing the catheter through unbroken skin. The catheter should be tunneled subcutaneously as far parallel as practical before it enters the vein. As long as the wound is no larger than the catheter diameter, the dermis will form a tight seal around the catheter shaft to limit bacterial migration from the skin.
Minicut-down procedure
This approach is the same as the facilitation procedure, but the incision is sufficiently extended so that the vessel’s sides and superficial surface are visible. The vessel may then be catheterized under direct visualization, or it is carefully dissected free of surrounding tissue, elevated from the wound, incised with the bevel of a 20-gauge needle, and then catheterized. This procedure is best done on any superficial vessel that has not been previously traumatized by percutaneous attempts. It is a reliable technique when direct percutaneous catheterization is difficult because of vascular collapse. However, the resultant skin wound promotes bacterial migration along the outer surface of the catheter. Therefore the catheter should be removed as soon as possible.
Emergency cut-down procedure
An emergency cut down is used to cannulate a vein when attempts at percutaneous catheterization have failed or are likely to fail in a patient that requires immediate venous access. This is an essential skill for emergency clinicians that should be considered for any patient requiring immediate venous access. Any vein may be used, but the author prefers the lateral saphenous vein in dogs (Figure 15-6, A) because the thin skin overlying this vein facilitates access, and the vein may be successfully and rapidly isolated with shaking hands. With practice, you should be able to catheterize this vein within 30 to 60 seconds.
1. If time permits, clip the hair and cleanse the skin. This step may be omitted in patients with short hair-coats that require immediate access; if the hair coat is long or matted, it is worth the time and effort to clip it first. Relatively stable, conscious animals should receive a local anesthetic with a 1% to 2% lidocaine/bicarbonate 9:1 mixture.
2. Create a 0.75- to 2-inch (1.3- to 5-cm) incision with a No. 11 Bard-Parker blade cranial and parallel to (not directly over) the vein. Orient the cutting edge of the blade away from the leg; poke the tip through a fold of elevated (tented) skin over the lateral tibia; and lift the blade as you advance it up the leg in a sweeping motion (Figure 15-6, B).
3. Retract the wound to expose the vein, and push against the vein from underneath the leg with an index finger to elevate it from the wound (Figure 15-6, C).
4. Vigorously push the closed jaw tips of a curved mosquito forceps directly down on the vein, and then open the jaws along the long axis of the vessel to strip perivascular fascia away from the vein (Figure 15-6, D and E). Lift the forceps from the wound; close the jaws; and repeat this step three to five times to completely free up the vein. This is critical to allow rapid, reliable access to the vein lumen in the next step.
5. Close the forceps jaws; pass the instrument tip under the cranial edge of the vein; and advance it caudally to stretch the vein over the handles at the finger holds (Figure 15-6, F).
6. If your hands are steady, you can attempt direct catheterization of the vein with an over-the-needle style catheter. This is more difficult than it may first appear because the fascia around the vein no longer anchors it, and if your hands tremble, there is a high chance you will lacerate the vein and lose your chance for success.
7. If your hands are trembling, it is safer to use a catheter introducer. These may be purchased (Catheter Introducer [part 6999], Becton Dickinson) or made from an injection needle for cats and small dogs or from a microchip implantation needle for large dogs (Figure 15-6, G).
8. Set the needle aside, and connect an intravenous fluid line directly to the catheter (Figure 15-6, L). Draw the wound edges together over the catheter, and wrap the entire area with white tape to close the wound temporarily, protect it from contamination, and secure the catheter and fluid line to the limb (Figure 15-6, M).
9. When the patient has been stabilized, an elective, sterile catheter should be inserted into a different limb and the cut down catheter removed.
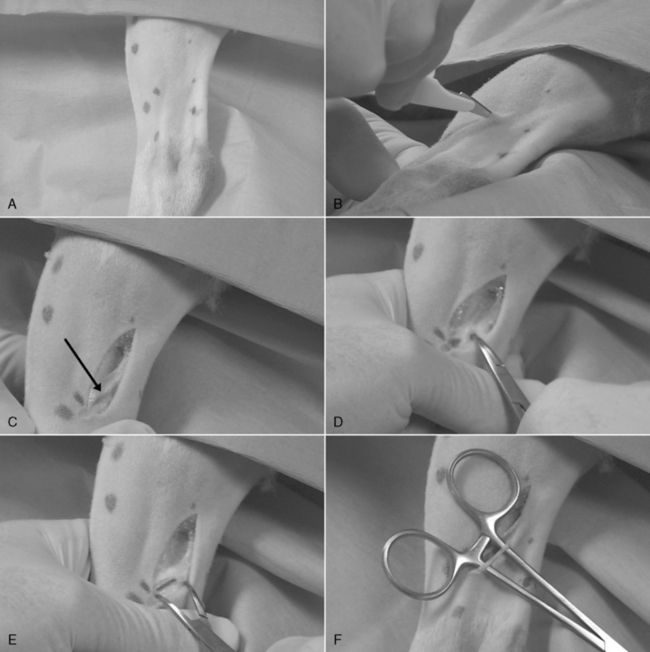
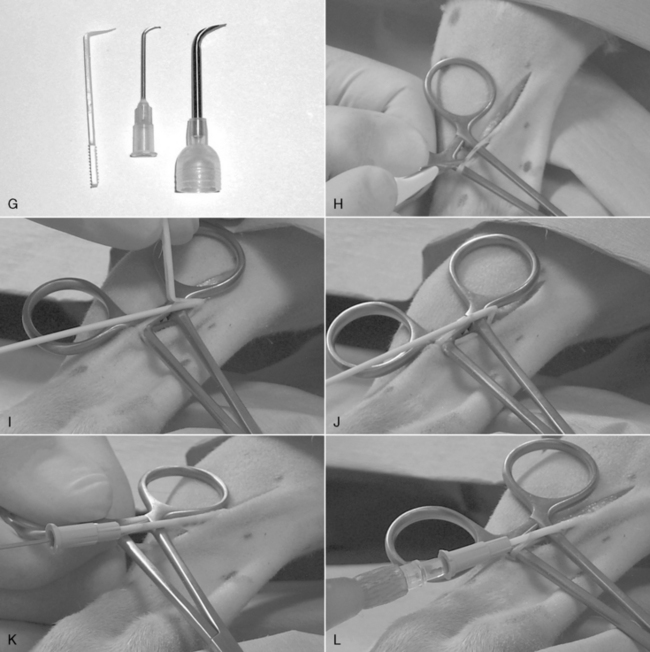
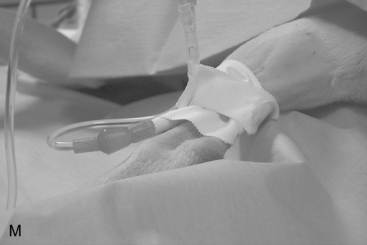
Figure 15-6 Emergency venous cut down on a canine lateral saphenous vein (A). B, A No. 11 B-P blade is poked through the skin on the lateral aspect of the tibia 1 cm (0.4 inch) proximal to the saphenous vein and is lifted as it is advanced through the skin for about 4 cm (1.6 inches) parallel to the vein. C, The distal aspect of the skin wound is retracted to expose the vein (arrow). D, The index finger of the hand holding the leg is pushed up under the vein, and the closed jaws of a 4-inch mosquito forceps is forced onto the vein directly over the fingertip. E, The jaws of the forceps are opened along the long axis of the vein while firmly pushing the forceps into it and against the finger underneath. F, All perivascular fascia should be stripped away within three to five repeats of step E. The forceps jaws are closed, and the forceps are slid under the vein in a cranial-to-caudal direction. Once pushed all the way to the finger holds, the weight of the hinge end will prevent the forceps from falling off the leg. The vein is now elevated from the wound and occluded proximally and distally by the forceps handles. G, A catheter introducer will be used to facilitate entry of the catheter into the vein. It may be purchased (plastic introducer at left) or fashioned from the bent and dulled tip of a suitable size needle. H, The No. 11 blade is held upside down to make a venotomy incision directly over the distal handle. I, The venotomy wound is opened with the catheter introducer, and the needle is partially withdrawn from the tip of the catheter and is advanced into the wound until it lodges where the vein makes a 90-degree turn into the wound. J, The catheter introducer is then set aside. K, The forceps are pulled toward the hock to straighten out the vein, and the catheter is advanced off of the needle up the vein. L, An intravenous fluid line is connected immediately.M, The wound margins are pulled together, and the entire area is wrapped with waterproof white tape. The tape should securely anchor a loop of fluid administration set tubing.
Intraosseous vascular access
This route is useful for emergency administration of fluids, blood products, and drugs to animals with difficult venous access because of vascular collapse or small size.22,61 If a commercial intraosseous needle placement system (EZ-IO, Vidacare, Shavano Park, Tex.) is not available, venous cutdown is preferred in older and larger animals. Intraosseous access may be accomplished by hand with a needle or bone marrow needle in puppies or kittens or with the commercial system, using the intertrochanteric fossa of the femur, the tibial tuberosity, the medial surface of the proximal tibia 1 to 2 cm (0.5 to ¾ inch) distal to the tibial tuberosity or the greater tubercle of the humerus.
Materials Needed
1. One to two milliliters of 2% lidocaine/bicarbonate 9:1 mixture
2. No. 11 Bard-Parker scalpel blade
5. Heparinized saline solution in a 3- to 6-mL syringe

Figure 15-7 The EZ-IO system. A, The drill body and a needle/stylet assembly. B, Disassembled needle and stylet. The stylet screws onto the needle hub, and the shaft of the drill body firmly engages the hub of the stylet. C, The catheter is firmly seated within the bone marrow of the proximal humerus and the stylet is unscrewed and removed. D, A test aspiration collects a bone marrow sample to confirm proper placement. E, An intravenous fluid line is connected to the catheter.
Procedure for Hand Placement of a Bone Marrow Needle
1. When time permits, clip the site, and prepare it aseptically. In the conscious animal, anesthetize the skin and periosteum with a lidocaine:bicarbonate 9:1 mixture.
2. Create a stab incision through the skin with the blade; introduce the needle into the wound; and advance it to the periosteum. Seat the needle into the cortex by pushing the needle lightly into the bone while rotating it about its long axis back and forth over 30-degree turns.
3. When the needle is seated in the cortex, apply increasing pressure to it as you rotate back and forth to force it through the cortex. A sudden reduction in resistance is often felt as the cortex is breached. If using a threaded commercial intraosseous needle, screw it through the cortex as soon as you gain purchase into it, and drill it into the marrow.
4. The position of the needle may be tested by flicking it with a finger. If the needle is firmly seated in bone, it will not wobble when struck. When the limb is moved, the needle should move solidly with the bone.
5. Attach the 12-mL syringe, and apply vacuum. If the needle tip is within the bone marrow, some marrow elements should enter the syringe. If an injection needle without a stylet was used, the needle may be obstructed with a “core” of cortical bone. This may sometimes be expelled by forceful injection of saline with a 1-mL syringe. If no marrow elements are aspirated, try rotating the needle 90 degrees, or advance it a bit further.
6. Flush the needle with a small amount of the saline solution. Only modest resistance to injection is encountered unless the bone is very small. Fluid delivered by gravity flow should flow freely (although more slowly than through a venous catheter). Begin the fluid infusion, and frequently palpate the surrounding tissue for any evidence of fluid leakage from the bone. Leakage usually occurs when the needle has penetrated the opposite cortex and the tip is outside the bone or when excessive rocking motion was used during insertion, leaving a large hole in the cortical bone surrounding the needle through which fluid escapes.
7. If the needle is to remain in place for more than a few minutes, anchor it by passing a suture through the periosteum and tying it to the hub of the needle or to a tape butterfly secured to the hub.
8. If the animal needs to be moved and repositioned with the catheter in place, cover the entry site with antiseptic ointment. A “doughnut” of limb stocking material can be placed around the needle to provide enough padding to protect the needle from contact with the examination table or cage floor. It should be at least thick enough to be level with the top of the needle hub. Secure this padding to the patient with bandaging material.
Procedure for Using the EZ-IO Device46
1. The patient is placed in lateral recumbency and the greater tubercle of the humerus is identified.
2. If time allows, shave and aseptically prepare the anatomic site. Infiltrate the skin, subcutis, and periosteum with approximately 0.25 to 0.5 mL of 2% lidocaine and make a small stab incision. In some emergency cases, such as cardiopulmonary cerebral resuscitation (CPCR), local anesthetic infiltration and the stab incision are skipped.
3. The intraosseous catheter is loaded onto the power driver and the tip of the needle is pushed through the skin and into the periosteum of the greater tubercle. Forward pressure is applied to make sure the needle does not slip off the cortical bone. The power button of the drill is depressed and the catheter is drilled until it is seated in the bone.
4. Once the catheter is properly positioned, the hub should be firmly implanted and you should be able to move the leg with the hub of the catheter. The stylet is then removed (Figure 15-7, C), and correct placement can be confirmed by aspiration of bone marrow through the catheter (Figure 15-7, D). Aspiration may cause some minor discomfort and the patient may react.
5. A t-port, syringe, or fluid administration set (Figure 15-7, E) can be attached for administration of emergency drugs, and crystalloid or colloid solutions.
Solutions can be administered at rates similar to those used intravenously but may be slower in smaller patients. Drug dosages for IO administration are the same as intravenous dosages. Pain may be associated with high rates of fluid infusion and this may be reduced by the infusion of lidocaine (1 to 2 mg/kg of a 2% solution).
Bandaging
All intravenous catheters must be adequately secured to the body. Catheters left in place in unattended animals should be covered with a sterile dressing and a bandage that provides protection against traction, damage, and contamination. The bandage should be heavy enough to protect the catheter but should not be completely occlusive so that moisture can evaporate from the skin and dressing. The point of entry should be covered with povidone-iodine ointment on a sterile gauze sponge. Single-dose packets of ointment are preferred over jars that become contaminated with repeated use, and povidone-iodine is preferred over triple antibiotic ointments, which support growth of fungi and resistant bacteria.55,88 Catheters used for short procedures may be dressed with a small amount of ointment at the entry site and secured to the neck or limb with white tape. White tape is inelastic and must be wrapped loosely (with the neck or limb held in a natural position) to prevent binding, venous occlusion, and edema. Additional stability is achieved by suturing the catheter hub to the skin before wrapping. The catheter should be anchored securely enough to minimize any in-and-out movement through the skin; this allows the skin to close around the catheter and form a natural barrier to bacterial migration.
Interestingly, there is little evidence from human patients that any type of dressing reduces the incidence of catheter infection compared with catheters left exposed and kept clean and dry.58 Transparent “breathable” dressings appear to offer little advantage for human patients over gauze dressings28 unless impregnated with chlorhexidine34 (e.g., Tegaderm CHG Chlorhexidine Gluconate IV Securement Dressing, 3M Corp., Minneapolis) and do not adhere as well to animal skin. If the catheter is to remain in place for longer periods, a layer of cast padding thick enough to provide some physical support to the entire bandage is applied. A layer of stretch gauze may be wrapped around the padding; this should be applied snugly enough to create a firm unit of material but not tightly enough to occlude venous return. The outermost layer may be an adhesive or coadhesive bandaging material. This material is also wrapped on snugly but not tightly enough to occlude venous return. If the animal is prone to peripheral edema, a limb bandage may be extended distally to the paw. However, this is not routinely necessary in an ambulatory animal with a properly applied catheter bandage. A heavy full limb bandage may be used (with or without a rigid splint) if the indwelling catheter crosses a joint. Immobilization of the joint in this setting helps reduce endothelial trauma and may help prevent venous thrombosis secondary to mechanical injury by the catheter.
Catheter maintenance
The need for an intravenous catheter should be reviewed daily and the catheter removed when it is no longer therapeutically necessary. Until then, the vein and the limb or face should be examined at least twice daily for evidence of infection or edema. Regional lymph nodes should be palpated for signs of swelling or tenderness. If any evidence of inflammation or thrombosis is found, the catheter should be removed. If the bandage is too tight, it should be loosened or completely replaced. When distal edema is evident, the culprit is usually white tape that was applied too tightly.
Although increasing duration of catheterization does not necessarily increase the rate of bacterial colonization,47,48 catheters (especially over-the-needle designs) should be routinely considered for removal by 72 to 96 hours, especially if there is palpable evidence of thrombosis or phlebitis. The dressing covering a through-the-needle catheter should be routinely replaced at 48 hours or more frequently if it appears wet or soiled. At this time, the skin and vein are examined and palpated for evidence of inflammation or thrombosis. If either is suspected consider removing the catheter. If the catheter and vein appear in good condition, the skin surrounding the entry site is cleansed with an antiseptic scrub and cotton balls. Disruption of the entry wound or any in-and-out movement of the catheter through the wound is avoided. The skin is allowed to dry completely; fresh antiseptic ointment on sterile gauze is applied; and the catheter is rewrapped.
Removal of percutaneously inserted through-the-needle catheters is also routinely considered after 4 days; however, they may be safely left in place for much longer periods if they were inserted using a long subcutaneous tunnel and are carefully maintained.48 If intravenous therapy is to be continued, a new catheter is inserted before the old one is removed whenever possible. Intraosseous catheters are removed when they are no longer needed, when fluid begins leaking into surrounding tissue or by 48 hours, whichever comes first. Surgically inserted catheters made of inert materials and with long subcutaneous tunnels may be left in place for days to months.
Catheters in use for continuous fluid therapy probably do not need to be flushed periodically to prevent catheter obstruction with a clot. Continuous infusion of central venous and arterial catheters with solutions containing 1 U/mL of heparin prolongs the life of those catheters in human patients.17,38,67 In contrast, the value of intermittent flushing of catheters with heparin solutions is less clear, with some recent studies showing that use of heparinized saline prolongs catheter patency and others showing no benefit from intermittent heparin solutions compared with saline alone.54,66,67 These discrepancies may be partly because of study differences in training nursing staff to properly flush catheters (Figure 15-8) or disparities in data analysis.71 No objective studies have addressed this issue in veterinary patients. Based on human practice and observations of veterinary patients, catheters that are not being used may be filled once daily with concentrated heparin (100 to 1000 U/mL). Catheters used only for intermittent administration of drugs should be flushed with sterile saline (with or without heparin) and locked with a more concentrated heparin solution immediately after drug administration. Frequent flushing with higher concentrations of heparin in cats and small dogs may produce systemic anticoagulation and should be avoided.
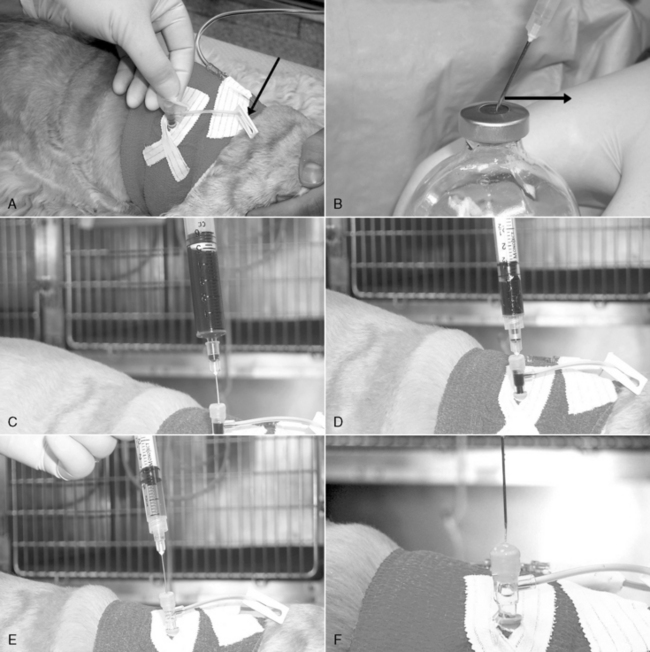
Figure 15-8 Proper injection and blood collection technique. A, Using a conventional “T” piece (the principles are the same if using an injection cap), fluid administration has been interrupted, and the extension tube on the “T” piece has been clamped (arrow). The rubber diaphragm of the injection port is cleaned with alcohol and allowed to air dry. B, Proper needle insertion for injection ports and medication bottles. After the needle tip contacts the rubber surface, the needle is dragged slightly away from the bevel orifice (in the direction of the arrow). This stretches the rubber surface at the injection point and reduces the likelihood of “coring” the rubber with the needle during insertion. When the needle is withdrawn, the rubber will return to its original conformation and seal the needle tract. C, Use needles less than 20 gauge to inject or aspirate through the injection ports. A 3- to 6-mL purge sample is collected by inserting a 22-gauge needle just inside the rubber diaphragm. This purges the dead space of the injection port and the catheter. After the purge sample is collected, the needle is withdrawn from the injection port, capped, and set aside. D, The syringe used for sample collection is attached to a new 22-gauge needle that is inserted all the way to the hub. This allows the needle to bypass the injection port dead space during sample collection. E, After sample collection, the purge sample is returned by injection. A 3-mL syringe with (heparinized) saline flush with a 22-gauge injection needle is used to flush the purge sample completely into the animal. The needle is advanced just inside the rubber diaphragm, and 0.5 to 2.0 mL of flush is injected. F, The injection of flush is continued as the needle is completely withdrawn. If the injection ceases before needle withdrawal, removal of the needle will create a vacuum that pulls blood back into the tip of the catheter, creating a potential obstruction with a clot. When removed, a fully seated 22-gauge injection needle will pull blood into the distal 5 cm (2 inches) of a 22-gauge intravenous catheter.
Sterility of the infusion system must be maintained. Only new sterile administration sets should be attached to a new catheter (unless it is used for just a few hours [e.g., for intraoperative fluid therapy]), and disconnections are made only when essential. Hands should be washed and disposable gloves worn for setting up a new system, making disconnections, injecting medications, or withdrawing blood. When fluids are to be administered, a “T” piece or needleless connection device should be used at the catheter, and locking Luer connections should be used between the administration set, extension sets (if used), and the patient catheter. Needleless connection devices that allow blood withdrawal, intravenous administration set disconnections, and drug administration minimize contamination of catheter connection when compared with opening the tubing system to attach a syringe directly.5 The patient’s end of fluid administration tubing must be anchored to the catheter bandage with a piece of white tape to relieve traction on the catheter connector (“T” piece or similar device) and prevent separation. If the animal needs to be moved, avoid disconnecting the fluid line whenever possible. If a needleless connector is not used, the fluid line should be clamped at the “T” piece and the fluid bag and line carried with the patient.
All intravenous tubing and containers are changed every 72 hours or sooner if contamination is suspected. Injection ports and needleless connection devices should be cleaned carefully with 70% isopropanol before needle puncture. Injection port caps are replaced if they are observed to leak or if they have been penetrated more than approximately 20 times.
Complications of intravenous therapy
Extravasation
Extravasation of fluid and infiltration of surrounding tissue occur when a catheter is displaced out of the vein. Needle catheters and stiff plastic catheters are more likely to perforate the vessel wall than softer polyurethane or silicone catheters. Extravasation at a peripheral vein site is heralded by swelling and tenderness. Cooling of the skin over the catheter tip may be palpated as a high-pressure pocket of fluid impairs circulation, especially if room temperature fluids are being administered. If the intravenous solution contains irritating drugs such as thiobarbiturates or thiacetarsamide, swelling may be accompanied by increasing pain, heat, redness, and induration followed by necrosis and sloughing of skin and perivascular tissues.
Signs of central vein extravasation may be absent until large quantities of fluid have been administered. Complications of central venous extravasation include mediastinal or pleural fluid accumulation resulting in difficulty breathing. This may be identified by evaluation of physical signs, thoracic radiographs, and fluid analysis. Penetration of the right atrium may occur with a catheter positioned too deeply in the chest, resulting in accumulation of blood and fluid in the pericardial sac and cardiac tamponade.
Extravasation of a short catheter at a peripheral site may be detected early by frequent inspection of the vein. Catheter positioning and patency should be evaluated before injecting any irritating substance. This may be accomplished by aspirating blood and administering a test injection of sterile saline while observing the perivascular area. To aspirate blood without disconnecting a fluid administration line, lower the fluid container below the level of the catheter tip. Gravity flow pulls blood back until it is visible at the catheter hub or administration set tubing. Other recommendations to minimize the risk of extravasation include the following: (1) avoid winged needle catheters for prolonged infusions; (2) use the smallest and softest catheter that will perform adequately; (3) select a large vein at a location well away from a joint; and (4) limit movement of peripheral vein catheters located near joints by immobilizing the limb with a heavy bandage or splint.
Thrombosis
Thrombosis is a common complication of indwelling catheters. Catheters left in place for more than a few hours are covered with a fibrin sheath and platelets. Within days, cells from the injured vessel wall invade this sheath. If left in place for a week or longer, this process yields a sheath composed of smooth muscle and collagen and covered by endothelium.86 This sheath strips away from the catheter surface during catheter removal and either is incorporated in the vessel wall or embolizes the pulmonary arteries. When small in mass, these emboli usually go unnoticed, but some fibrin sheaths extend to a larger thrombus hanging freely from the end of the catheter and may embolize the lung with significant consequences (Figure 15-9).77,87 Another, potentially more damaging type of thrombus usually forms at contact points between the catheter and the vessel or atrial wall.4 Endothelial injury at these points results in local inflammation and thrombus formation.50 These thrombi are more likely to develop when stiff or reactive catheter materials are used, on long catheters that cross a joint or enter the right atrium, and on catheters with frayed tips. Mural thrombi may grow progressively and eventually obliterate the vessel lumen. Complications of these thrombi may be both obvious and serious.18,74,85 Heparin-bonded catheters result in less fibrin deposition on catheters used experimentally in dogs and reduce the incidence of catheter-associated thrombosis in humans, at least for a few days.35,65
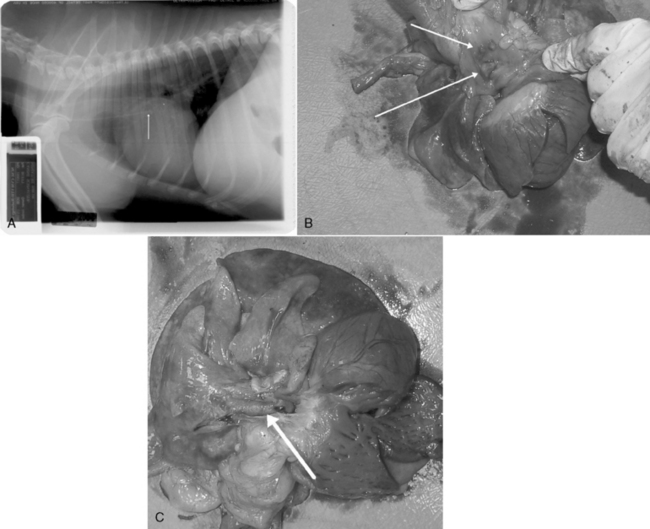
Figure 15-9 Catheter-related thrombosis. A, A 19-gauge through-the-needle style central catheter was placed too deeply into the external jugular vein of this patient and terminates within the right atrium (arrow). B, Contact damage to the right atrial wall has resulted in cellular proliferation on the endothelial surface (arrows). C, A large catheter-associated thrombus was stripped off of the catheter during removal and immediately killed the patient. The thrombus obstructs the main pulmonary artery (arrow).
Thrombophlebitis
Thrombophlebitis represents the most severe end of the spectrum of catheter-related vessel damage and may be caused by mechanical, chemical, or infectious processes. Damage to the endothelial lining of the vein initiates both inflammation (phlebitis) and thrombus formation on the vessel wall. Early signs of thrombophlebitis include tenderness and erythema of the skin over the vessel and palpable induration of the vessel itself. If left untreated, these early signs progress, and the vessel may become completely thrombosed. This is recognized as severe hardening of the vessel and may be accompanied by complete occlusion and inability to infuse fluids. Purulent discharge may be noted from the catheter site. Systemic signs of inflammation including fever and leukocytosis may be present, although some animals develop severe local reactions in the absence of systemic signs.
Mechanical damage is minimized by selecting small catheters and large veins; by using soft, inert catheter materials; and by securely anchoring the catheter to the skin to minimize in-and-out motion. If an indwelling catheter crosses a joint, the limb should be immobilized to limit trauma to the vascular endothelium. Irritating drugs should be administered after adequate dilution and only into central veins with high blood flow rates to minimize local endothelial injury. Hypertonic solutions with an osmolality higher than 600 mOsm/kg should be administered only into central veins whenever possible.
Infection
Any intravenous catheter supports infection, and there are multiple routes for possible exogenous catheter contamination. In humans and experimental animal models, catheter colonization has been documented from the skin at the exit site,3,13,36,73 contamination of the hub connection,16,39,69 and the hands of nursing staff.57 In addition, the catheter may be colonized by blood-borne bacteria originating from remote locations. In humans receiving intravenous fluid therapy, infection arising from contamination of the catheter hub and fluid administration set connections is comparatively less likely if sterile technique is strictly followed.9 Veterinary patients that chew, disconnect, and defecate on their administration sets are probably at higher risk for this source of contamination. The prevalence of positive bacteriologic cultures from catheters at the time of removal ranged from 10.7% to 26% in four small surveys of veterinary patients.6,40,47,48 Signs of infection may be identical to those of sterile thrombophlebitis. There is normally a small (1 to 5 mm) diameter zone of inflammation surrounding the skin puncture site, and inflammation extending beyond this range is suspect.32 Systemic signs including fever and leukocytosis may develop in bacteremic animals. Some may develop organ infection at remote sites (endocarditis, abscessation), and some develop sepsis syndrome.6 However, other animals develop catheter-related bacteremia with minimal clinical signs. Catheter infection should always be suspected in animals developing clinical evidence of infection while an indwelling catheter is present. If catheter infection is suspected, the catheter should be removed immediately.
Bacteriologic culture of the catheter tip assists in the diagnosis of catheter infection. Before removal, the skin is scrubbed with antiseptic solution and carefully cleaned with alcohol. When the alcohol has dried, the catheter is removed aseptically, and the catheter tip is cut off with a sterile blade and dropped into a sterile tube containing either sterile saline (to keep it moist before transfer to culture medium) or culture medium broth for direct bacteriologic evaluation.47 If the catheter is suspected to be the cause of infection in a bacteremic animal but the catheter cannot be easily replaced (e.g., catheters inserted surgically in animals with limited venous access), differential bacteriologic culture may be performed. In this procedure, cultures are performed on blood drawn simultaneously through a peripheral vein and through the catheter. In humans, if the catheter blood sample shows a sevenfold increase in identical bacterial colonies compared with the peripheral vein blood culture, the catheter is probably the source of the bacteremia.20 Prevention of infection is assisted by using sterile technique during catheterization, tunneling the catheter subcutaneously before venipuncture, using needleless connection devices, avoiding tubing disconnections, properly maintaining the catheter dressing, and carefully managing injection ports and fluid containers.48,57,80 Antibiotic therapy does not appear to alter the risk of catheter infection but is used to treat infections after catheter removal.
Catheter embolism
Catheter embolism occurs when a fragment of the catheter becomes free and is carried by blood flow until it lodges in the heart or a pulmonary artery. This may occur in any of the following circumstances:
1. The catheter is accidentally cut during bandage removal.
2. A through-the-needle catheter is advanced, then pulled back into the needle shaft and sheared off by the needle bevel.
3. The needle within an over-the-needle catheter is partially withdrawn and then reinserted while the catheter tip is still within the vein. If the flexible catheter tip is bent to the side, the needle catches on the catheter shaft and amputates the end of the catheter.
If catheter amputation is observed, a tourniquet is immediately applied proximal to the venipuncture site to hold the embolus and prevent further migration. If the catheter is made of radiopaque material, the area is radiographed to identify the embolus position, and it is removed surgically if possible. Long fragments that have migrated to the right ventricle may be removed with a transvenous loop snare under fluoroscopic guidance.15,23 Catheter embolization is best prevented by careful technique during catheter insertion and removal. A misplaced catheter is never withdrawn while the needle is left in place; instead, the catheter and needle are withdrawn together as a unit.
Air embolism
Air embolism may occur whenever a catheter is within a vein, but the risk is probably highest during insertion of central venous catheters. When the catheter tip enters the thoracic cavity it is exposed to negative intrathoracic pressure during inspiration, and aspiration of air occurs if the free end of the catheter is exposed to the atmosphere. This risk may be higher in dogs with extrathoracic airway obstruction (e.g., brachycephalic breeds) because the obstruction produces markedly negative intrathoracic pressure during a relatively long inspiratory phase. Clinically significant air embolism during catheterization is avoided by completing the procedure and sealing the Luer end as rapidly as possible.
Air embolism may also result from problems with the fluid administration setup such as accidental disconnection of tubing or presence of air within the fluid path, as may occur with vented fluid administration sets or fluid containers that hold an excessive volume of air. The risk may be reduced substantially by using collapsible plastic containers and nonvented administration sets.
Small air emboli are trapped in the pulmonary vasculature and usually go unnoticed. Administration of a bolus of air produces an air lock in the right ventricular outflow tract and circulatory obstruction. Larger emboli markedly increase pulmonary vascular resistance and cause respiratory distress and pulmonary edema.30 A slow infusion of air into the vascular space of dogs increases pulmonary artery and CVPs and produces a progressive decrease in arterial blood pressure. Ultimately, arterial blood pressure is markedly reduced, and cardiovascular collapse occurs.
The best approach to treatment of air embolism is to immediately attempt to aspirate air from the right atrium and ventricle if a central venous catheter is in place. If this is not possible, the animal may be positioned in left lateral recumbency to trap gas in the right ventricular apex and allow blood to flow through the right ventricular outflow tract. However, one group found that no one position was better than another to resuscitate dogs with air embolism.26 Standard cardiopulmonary resuscitation procedures should be instituted if the animal develops respiratory or cardiac arrest.79
Exsanguination
Exsanguination is possible whenever the unobserved animal disconnects the catheter or administration tubing. Metal floor grates pose a unique threat: they can snag and separate tubing connection sites, and during the resulting hemorrhage, blood dripping to the cage floor underneath the grate may be difficult to see. Disconnections are particularly likely in dogs that change position frequently. Blood loss may be most severe through cephalic vein catheters when an animal is in sternal recumbency with its elbows flexed. Anchoring the patient’s end of the administration tubing to the catheter bandage helps prevent disconnection at the catheter. Use of locking Luer connections (as opposed to slip-Luer connections) is the best way to reduce the likelihood of an accidental disconnection. Those junctions may also be bridged with waterproof white tape to further reduce that risk.
Fluid administration and monitoring
The many different types of available fluid administration sets and connection devices offer considerable flexibility in intravenous fluid administration. Multiple port flow connectors allow simultaneous infusion of compatible solutions through a single catheter. In-line volume control sets (Buretrol, Baxter Healthcare) permit accurate delivery of small volumes of fluids. A variety of different tubing lengths, diameters, and connections allow many different configurations and combinations of fluids to be delivered to a single catheter. Fluid administration sets are available from several manufacturers. The two basic types are vented and nonvented; these are available in several lengths. All administration sets use an in-line drip chamber to estimate the rate of flow. Depending on the brand, the drip sizes are calibrated so that 1 mL = 10, 15, 20, or 60 drops. Drops per minute are calculated from the formula:

For example, to administer 2000 mL over 24 hours using a basic solution set (10 drops = 1 mL):

The rate of flow is regulated by tightening or releasing the intravenous tubing clamp while watching and counting the drip rate. Fluid administration rate may also be controlled by in-line flow regulators (Stat 2 Pumpette, ConMed Corp., Utica, N.Y.) or more accurately by electronic fluid pumps or rate controllers. In-line flow regulators are calibrated tubing clamps. Accurate use of these devices depends on unimpeded flow through short catheters 20 gauge or larger and on maintaining a minimum height of about 75 cm (30 inches) between the drip chamber and the level of the heart.
Fluid pumps are available from many manufacturers. All are either peristaltic or metered cassette in design (Figure 15-10). Peristaltic pumps typically use standard intravenous administration sets, although some devices are restricted to certain brands of tubing. This pump design uses a continuous peristalsis mechanism to continuously drive fluid at a constant rate. Cassette-style pumps require an in-line fluid path pump mechanism (cassette) as an integral component of an intravenous fluid administration set that works only with a specific model(s) of pump. When fluids need to be given at a very constant rate from moment to moment, peristaltic pumps are generally better than cassette designs, which alternate between pulling fluid from the bag and pushing it to the patient. Peristaltic pumps are less accurate over time, and their accuracy also depends on using an approved intravenous tubing set and changing the tubing position within the pump at regular intervals. Metered cassette pumps are volumetric and are used to deliver prescribed volumes of fluid accurately over longer units of time (many minutes to hours). The rate-constant peristaltic type of fluid pump (or a screw mechanism syringe pump for small volumes) is useful for infusions of fluid with drug additives that require a constant flow rate (e.g., a consistent minute-to-minute dose of norepinephrine), whereas the volumetric pumps are preferred for accurate administration of prescribed volumes of fluid over longer units of time (e.g., hour-to-hour). Pumps marketed specifically for use in animals are available (e.g., Vet/IV, Heska, Fort Collins, Colo.).
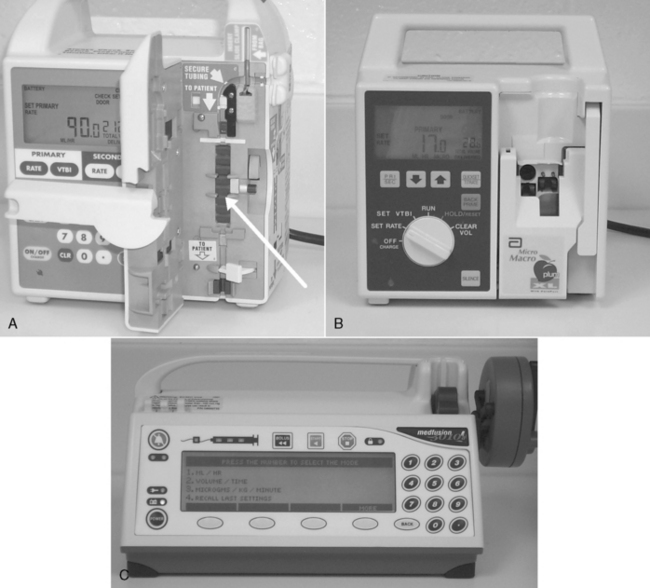
Figure 15-10 Fluid pumps. A, A peristaltic pump, with its fluid path exposed to show the peristalsis mechanism (arrow), which massages fluid through the tubing set. B, A volumetric pump that requires a specific in-line cassette that snaps into the drive mechanism. C, A syringe pump useful for administration of drugs and very slow administration of fluids.
All pumps deliver fluid under pressure. This pressure can overcome resistance to flow from viscous solutions, filters, and partially occluded veins. It also increases the risk to the patient in the case of extravasation because fluid is pumped into the perivascular tissues under pressure. To prevent this, most modern pumps are equipped with pressure monitoring circuitry and some can be adjusted to produce an occlusion alarm at preset values.
Intravenous solution containers should be numbered consecutively and clearly labeled with the date, time, and patient’s name. Any additives should be clearly identified as to type, quantity added, date and time added, and by whom. Do not use an indelible marker to write directly on the bag because the solvents in the ink may leach through the plastic into the solution inside. When not using a volumetric pump that tracks cumulative fluid administered, a calibrated timing label should be applied to the container and is used to monitor and verify the rate of flow over time.
All patients receiving intravenous fluid therapy should be weighed at least daily. Abnormal fluid losses through the urinary tract, nasogastric suction, or cavity drainage should be measured and replaced with equal volumes of appropriate intravenous replacement fluids at frequent intervals. Fluid losses in animals with vomiting or diarrhea may be monitored by knowing the average dry weight of cage paper used in the clinic and subtracting this from the weight of soiled cage papers. The difference (in grams) is converted to milliliters of water and replaced with appropriate intravenous replacement fluid. Monitoring of the PCV and total plasma solids is an inaccurate (PCV) and insensitive (total plasma solids) indicator of hydration status in sick dogs and should not be relied upon as sole measures of hydration.31 Finding a high urine specific gravity in animals capable of concentrating their urine assists in detection of inadequate circulating blood volume (in animals being treated for shock or extracellular fluid losses) or inadequate administration of water (in animals receiving maintenance fluid therapy).
Central venous pressure monitoring
CVP measurement is a useful diagnostic procedure for hemodynamic assessment and management of fluid therapy in critically ill animals. It can be used in a variety of situations to assist in diagnosis and optimal fluid therapy management. It is important to obtain CVP measurements in as technically precise a manner as possible and to obtain consecutive measurements with the patient in the same position each time. As with any monitoring tool, CVP measurements must be interpreted in light of other diagnostic findings, and the pitfall of relying too heavily on a single test must be avoided.
The CVP is the blood pressure within the intrathoracic portions of the cranial or caudal vena cava. CVP is measured clinically for two reasons: (1) to gain information about cardiac function, and (2) to gain information about intravascular blood volume. The CVP is slightly higher than the mean right atrial pressure (RAP), and the two terms, CVP and RAP, are sometimes used interchangeably. However, in some circumstances, the mean RAP may vary independently of CVP.81 The CVP (or RAP) affects, and is affected by, cardiac output. RAP is quantitatively similar to the pressure in the right ventricle at the end of diastole. As RAP and right ventricular end-diastolic pressure (EDP) increase, right ventricular end-diastolic volume (EDV) increases. The relationship between ventricular EDP and EDV is not linear (Figure 15-11). At low ventricular volumes, an increase in EDV does not increase ventricular EDP significantly. At high ventricular volumes when the limit of ventricular distention is reached, small increases in EDV increase both ventricular EDP and atrial pressure substantially. Clinically, if EDV is increased by administration of intravenous fluids, there is little initial increase in EDP (steep portion of curve, Figure 15-11) until the limit of ventricular expansion is reached. At that point, administration of more fluids no longer increases EDV substantially, but EDP and atrial pressure increase rapidly (plateau portion of curve, Figure 15-11). Ventricular EDV is an important determinant of stroke volume and cardiac output. The relationship between EDV and stroke volume is nearly linear in normal animals; as EDV increases, stroke volume and cardiac output increase according to the Frank-Starling law of the heart. In many situations (e.g., shock states) it is desirable to increase both stroke volume and cardiac output maximally to optimize oxygen transport to tissues. This is accomplished most effectively by increasing ventricular EDV.
Figure 15-11 Graph depicting the relationship between left ventricular diastolic pressure and left ventricular volume gain in the dog. As pressure increases from zero, diastolic volume increases rapidly until the limit of the ventricular distention is reached. At that point, even large increases in pressure will not increase ventricular volume substantially.
EDV is not easily measured clinically. However, CVP can be monitored to make inferences about possible changes in ventricular EDV or cardiac output. Just as the relationship between EDP and EDV is not linear, the relationship between CVP or RAP and cardiac output is not linear (Figure 15-12). At low pressures, a small increase in CVP/RAP generates a large increase in cardiac output. At higher pressures, a large increase in RAP does not substantially increase cardiac output (plateau phase of Frank-Starling curves in Figure 15-12).
Figure 15-12 Family of Starling curves plotting the relationship of right atrial pressure (RAP) (or right ventricular end-diastolic pressure) with cardiac index (CI). In the normal heart, small increments in RAP within the normal range (0 to 4 mm Hg) yield large increases in CI. This response is augmented in dogs with endogenous sympathetic cardiac stimulation or in dogs receiving inotropic drugs (“amplified” curve) and is depressed in dogs with myocardial failure (“depressed” curve).
The relationship between CVP, RAP, EDV, cardiac output, and the vascular system is complex and dynamic. Consequently, a single measurement of CVP usually provides no information about cardiac output or vascular blood volume. Indeed, even when used to evaluate hemodynamic response to fluid challenge, the CVP can be misleading, particularly when the fluid challenge is administered slowly.38,84 Although there is a general trend for animals with reduced blood volume to have a low CVP, a dog or cat could experience lethal blood loss and yet have a normal CVP. Nevertheless, repeated measurements during fluid therapy can give important clues about the relationship between blood volume and cardiac function. When these results are interpreted in light of other clinical findings, valuable information about hemodynamic status may be obtained.
Measurement
A central venous catheter must be in place. The catheter tip should ideally reside within the thorax just outside the right atrium. A catheter placed in the lateral saphenous vein and positioned so that the tip resides in the caudal vein cava may be an acceptable substitute.1,44,83 Materials necessary for CVP measurement using a water manometer include:
1. Central venous catheter in place
2. Water manometer (Medex manometer set, Smiths Medical, London)
3. One 30-inch intravenous extension tubing set if needed
4. Three-way stopcock if needed
The manometer and tubing are primed with saline solution, and the column is filled to a level well above the anticipated CVP of the patient. The animal is positioned in sternal or lateral recumbency with lateral recumbency preferred for accuracy. The stopcock at the bottom of the manometer column should rest on the table or cage floor. When the stopcock is turned to connect the column of saline with the catheter, the hydrostatic pressure in the column forces fluid through the catheter. The saline column continues to fall until the hydrostatic pressure of the column reaches equilibrium with the hydrostatic pressure of the blood at the end of the catheter. When it has reached equilibrium and has stopped decreasing, the height of the saline column above the catheter tip, expressed as centimeters of water, reflects the blood pressure within the vessel at the catheter tip. Therefore it is important to know approximately where the catheter tip lies in relation to the manometer fluid column. When the animal is in lateral recumbency, the cranial vena cava lies near the midline, and the sternum is a good reference point. In sternal recumbency, the cranial vena cava is approximately level with the point of the shoulder (scapulohumeral) joint.
When the appropriate external anatomic landmark is found, the manometer column is positioned with the stopcock resting on the table surface immediately next to the landmark, and the centimeter mark nearest that point is labeled. This mark is now the zero reference point on the manometer, and all subsequent measurements are read as the distance from that mark. Measurements can be made with the manometer located anywhere nearby that is convenient, as long as the stopcock rests on the same horizontal surface as the animal (Figure 15-13). If the animal is in a cage, the manometer may be taped to the wall of the cage and used there.
Figure 15-13 Measurement of central venous pressure (CVP) using a saline column manometer. The dog is positioned in lateral recumbency, and the manometer rests on the table surface. The location of the patient’s midline was estimated to be level with the “0” mark on the column, and the marker ring has been slid to that point (large arrow). The saline column has stopped falling, and the ball floating on the top of the saline column rests at 4.5 cm at the end of expiration (small arrow). Therefore this patient’s CVP is read as 4.5 – 0 = 4.5 cm of water.
Interpretation
When obtaining a CVP measurement, rhythmic fluctuations in the height of the saline column meniscus are usually seen. These oscillations are caused by two factors: large ones occur with respiration, and smaller ones occur with each heartbeat. Fluctuations in the column synchronized with respirations are usually easily seen. As the patient inhales, the intrathoracic pressure and CVP decrease; the reverse occurs during exhalation. These excursions are exaggerated in animals with upper airway obstruction and are reversed by positive pressure ventilation. With regard to the cardiac cycle, CVP increases steadily until atrial contraction, jumps up a bit during atrial contraction, and then decreases rapidly at the beginning of diastole (Figure 15-14). The response of the fluid column in the manometer is too slow to show all of the peaks and valleys of these pressure changes accurately. When using a water column manometer, the best method is to measure the CVP just before inspiration and at the lowest diastolic swing. This value correlates best with real CVP.11 If the rhythmic fluctuations are absent, malpositioning of the catheter should be suspected: either it is too short or too long and the tip is not within the thoracic cavity, or the tip is butted up against a vessel wall or the right atrial wall. Obstruction of the catheter tip can be confirmed by aspirating blood from the catheter: blood flows rapidly and with little resistance if it is floating freely within the lumen of the vessel. A high CVP or the presence of large fluctuations synchronous with the heartbeat suggests that the catheter tip is in the lumen of the right ventricle; if this is the case, it should be partially withdrawn to the proper level. Dorsal recumbency, abdominal compartment syndrome, or pleural effusion will increase the CVP and may lead to erroneous assumptions about the cardiovascular system if the pressure influence of those syndromes is not taken into consideration.19,29

Figure 15-14 Tracing from a patient monitor screen with simultaneous display of the electrocardiogram (top) and right atrial pressure (RAP, bottom). The RAP trace is characterized by the positive a, c, and v waves and by the two negative depressions termed the x and y descents. The a wave represents the increase in RAP during atrial contraction; the c wave represents the slight increase in atrial pressure as the tricuspid valve bulges into the right atrium during early ventricular contraction; and the v wave represents the increase in pressure that occurs as blood flows into the atrium while the tricuspid valve is still closed. The x descent corresponds to the period of ventricular ejection when blood is emptied from the heart. The y descent represents the decrease in atrial pressure that follows opening of the tricuspid valve and rapid blood flow into the ventricle. The mean RAP is 3 mm Hg, and the electrocardiograph-derived heart rate is 86 beats/min.
Water manometers tend to overestimate CVP by 0.5 to 5 cm H2O; this overestimation varies from patient to patient and from measurement to measurement in the same patient, even when positioning is done as carefully as possible.11 This variation can be important when following a critically ill animal that requires aggressive fluid support and in animals that are hyperventilating, dyspneic, or being treated with positive pressure ventilation. A calibrated electronic pressure transducer connected to the catheter with a short, stiff tube is more accurate in these patients.
Measurement of CVP in animals during fluid challenge yields important information about cardiovascular status. As intravenous fluids are administered and the intravascular blood volume expands, venous return and CVP begin to increase. A rapid infusion of 20 mL/kg of crystalloid or 5 mL/kg of colloid into a euvolemic animal with normal cardiac function results in a modest increase in CVP (2 to 4 cm H2O) that returns to baseline within 15 minutes. A minimal increase or no increase in CVP implies that the vascular volume is markedly reduced. A CVP that increases and returns to baseline rapidly (<5 minutes) implies that there is reduced vascular volume and that the initial volume load has been accommodated by rapid changes in vasomotor tone. A very prolonged return to baseline (>30 minutes) suggests that the intravascular blood volume is elevated relative to cardiac performance. A large increase in CVP (>4 cm H2O or >3 mm Hg) implies reduced cardiac compliance or increased venous blood volume or both.
When administering fluids to treat a dog or cat with noncardiogenic shock, an immediate therapeutic goal may be to give an intravenous fluid challenge using the doses recommended above and administered rapidly (< 5 minutes). The impact of this maneuver on CVP (both the magnitude of any increase and how quickly it returns to its baseline value), heart rate, pulse profile, mucous membrane color, capillary refill time, blood pressure, and skin temperature can then be used to make inferences about venous return relative to cardiac performance. If the change seen in those parameters is modest and the CVP returns to baseline rapidly, another fluid challenge is administered, and the process is repeated. If necessary, repeated fluid boluses may be given until the CVP is elevated 2 to 4 cm water (2 to 3 mm Hg) above baseline and takes 10 to 15 minutes to fall back to its baseline value. Once this condition is met, it is likely that blood volume and venous return are nearly optimal relative to cardiac performance and that further increases in CVP are unlikely to yield significant increases in cardiac output. In animals with normal right-sided heart function and normal pleural and intraabdominal pressures, the CVP should not be pushed higher than about 15 cm of water (10 to 12 mm Hg). When that pressure is reached, it is likely that pulmonary venous pressure is above 12 to 15 mm Hg (assuming that the left and right ventricles are functioning symmetrically), increasing the likelihood of pulmonary edema. When this limit has been reached, giving more fluids will not help cardiac output (because it will no longer significantly increase EDV) but will only make the patient congested. If there is a need to further increase cardiac output or blood pressure, positive inotropic agents such as dobutamine and/or vasoactive drugs, such as norepinephrine or vasopressin, are administered.
CVP monitoring is also useful in less critical situations. When administering fluids to an animal with oliguria or congestive heart failure, the CVP can be used to monitor therapy and help prevent inadvertent overadministration of fluids. In that setting, the baseline CVP is measured before fluid therapy is begun and subsequently measured at intervals frequent enough to minimize the risk of fluid overload, usually every 2 to 8 hours. During chronic (slow) fluid administration, significant increases in CVP will not occur until the venous system’s volume capacity has been reached. Since this typically occurs only after the onset of physical signs of edema or congestion, any observed increase merits evaluation.
1 Anter A.M., Bondok R.S. Peripheral venous pressure is an alternative to central venous pressure in paediatric surgery patients. Acta Anaesthesiol Scand. 2004;48:1101-1104.
2 Arinzon Z., Feldman J., Fidelman Z., et al. Hypodermoclysis (subcutaneous infusion) effective mode of treatment of dehydration in long-term care patients. Arch Gerontol Geriatr. 2004;38:167-173.
3 Bjornson H.S., Colley R., Bower R.H., et al. Association between microorganism growth at the catheter insertion site and colonization of the catheter in patients receiving total parenteral nutrition. Surgery. 1982;92:720-727.
4 Borow M., Crowley J.G. Evaluation of central venous catheter thrombogenicity. Acta Anaesthsiol Scand Suppl. 1985;81:59-64.
5 Brown J.D., Moss H.A., Elliott T.S. The potential for catheter microbial contamination from a needleless connector. J Hosp Infect. 1997;36:181-189.
6 Burrows C.F. Inadequate skin preparation as a cause of intravenous catheter-related infection in the dog. J Am Vet Med Assoc. 1982;180:747-749.
7 Burrows C.F. Inadequate skin preparation as a cause of intravenous catheter-related infection in the dog. J Am Vet Med Assoc. 1982;180:747-749.
8 Calfee D.P., Farr B.M. Comparison of four antiseptic preparations for skin in the prevention of contamination of percutaneously drawn blood cultures: a randomized trial. J Clin Microbiol. 2002;40:1660-1665.
9 Cercenado E., Ena J., Rodríguez-Créixems M., et al. A conservative procedure for the diagnosis of catheter-related infections. Arch Intern Med. 1990;150:1417-1420.
10 Chaiyakunapruk N., Veenstra D.L., Lipsky B.A., et al. Chlorhexidine compared with povidone-iodine solution for vascular catheter-site care: a meta-analysis. Ann Intern Med. 2002;136:792-801.
11 Clayton D.G. Inaccuracies in manometric central venous pressure measurement. Resuscitation. 1988;16:221-230.
12 Constans T., Dutertre J.P., Froge E. Hypodermoclysis in dehydrated elderly patients: local effects with and without hyaluronidase. J Palliat Care. 1991;7:10-12.
13 Cooper G.L., Hopkins C.C. Rapid diagnosis of intravascular catheter-associated infection by direct Gram staining of catheter segments. N Engl J Med. 1985;312:1142-1147.
14 Crowe D.T. Practical life-saving surgical procedures involving the cardiovascular system. In: Proceedings of the First International Emergency and Critical Care Symposium. San Antonio, Tex: VECCS; 1988:32-37.
15 Culp W.T., Weisse C., Berent A.C., et al. Percutaneous endovascular retrieval of an intravascular foreign body in five dogs, a goat, and a horse. J Am Vet Med Assoc. 2008;232:1850-1856.
16 de Cicco M., Panarello G., Chiaradia V., et al. Source and route of microbial colonisation of parenteral nutrition catheters. Lancet. 1989;2:1258-1261.
17 de Neef M., Heijboer H., van Woensel J.B., et al. The efficacy of heparinization in prolonging patency of arterial and central venous catheters in children: a randomized double-blind trial. Pediatr Hematol Oncol. 2002;19:553-560.
18 Di Costanzo J., Sastre B., Choux R., et al. Mechanism of thrombogenesis during total parenteral nutrition: role of catheter composition. J Paren Enter Nutr. 1988;12:190-194.
19 Drellich S. Intraabdominal pressure and abdominal compartment syndrome. Compend Contin Educ Pract Vet. 2000;22:764-769.
20 Fan S.T., Teoh-Chan C.H., Lau K.F. Evaluation of central venous catheter sepsis by differential quantitative blood culture. Eur J Clin Microbiol Infect Dis. 1989;8:142-144.
21 Faust S.N., Heyderman R.S., Levin M. Coagulation in severe sepsis: a central role for thrombomodulin and activated protein C. Crit Care Med. 2001;29:S62-S67.
22 Fiser D.H. Intraosseous infusion. N Engl J Med. 1990;322:1579-1581.
23 Fox P.R., Sos T.A., Bond B.R. Nonsurgical removal of a catheter embolus from the heart of a dog. J Am Vet Med Assoc. 1985;187(3):275-276.
24 Frisoli J.A., de Paula A.P., Feldman D., et al. Subcutaneous hydration by hypodermoclysis. A practical and low cost treatment for elderly patients. Drugs Aging. 2000;16:313-319.
25 Fulton R.B., Hauptman J.G. In vitro and in vivo rates of fluid flow through catheters in peripheral veins of dogs. J Am Vet Med Assoc. 1991;198:1622-1624.
26 Geissler H.J., Allen S.J., Mehlhorn U., et al. Effect of body repositioning after venous air embolism. An echocardiographic study. Anesthesiology. 1997;86:710-717.
27 Gilbert R.E., Harden M. Effectiveness of impregnated central venous catheters for catheter related blood stream infection: a systematic review. Curr Opin Infect Dis. 2008;21:235-245.
28 Gillies D., O’Riordan L., Carr D., Frost J., Gunning R., O’Brien I. Gauze and tape and transparent polyurethane dressings for central venous catheters. Cochrane Database Syst Rev. (4):2010. URL: http://www.mrw.interscience.wiley.com/cochrane/clsysrev/articles/CD003827/frame.html
29 Gookin J.L., Atkins C.E. Evaluation of the effect of pleural effusion on central venous pressure in cats. J Vet Int Med. 1999;13:561-563.
30 Hall J.E., Hofman W.F., Ehrhart I.C. Venous occlusion pressure and vascular permeability in the dog lung after air embolization. J Appl Physiol. 1988;65:34-40.
31 Hansen B., DeFrancesco T. Relationship between hydration estimate and body weight change after fluid therapy in critically ill dogs and cats. J Vet Emerg Crit Care. 2002;12:235-243.
32 Haskins S.C. Emergency anesthesia and critical care procedures. In: Proceedings of the First International Emergency and Critical Care Symposium. San Antonio, TX: VECCS; 1988:153-157.
33 Hecker J.F., Scandrett L.A. Roughness and thrombogenicity of the outer surfaces of intravascular catheters. J Biomed Mater Res. 1985;19:381-395.
34 Ho K.M., Litton E. Use of chlorhexidine-impregnated dressing to prevent vascular and epidural catheter colonization and infection: a meta-analysis. J Antimicrob Chemother. 2006;58:281-287.
35 Idezuki Y., Watanabe H., Hagiwara M., et al. Mechanism of antithrombogenicity of a new heparinized hydrophilic polymer: chronic in vivo studies and clinical application. Trans Am Soc Artif Intern Organs. 1975;21:436-449.
36 Kelsey M.C., Gosling M. A comparison of the morbidity associated with occlusive and non-occlusive dressings applied to peripheral intravenous devices. J Hosp Infect. 1984;5:313-321.
37 Klein M.K., Dow S.W., Rosychuk R.A. Pulmonary thromboembolism associated with immune-mediated hemolytic anemia in dogs: Ten cases (1982-1987). J Am Vet Med Assoc. 1989;195:246-250.
38 Kumar A., Anel R., Bunnell E., et al. Pulmonary artery occlusion pressure and central venous pressure fail to predict ventricular filling volume, cardiac performance, or the response to volume infusion in normal subjects. Crit Care Med. 2004;32:691-699.
39 Linares J., Sitges-Serra A., Garau J., et al. Pathogenesis of catheter sepsis: a prospective study with quantitative and semiquantitative cultures of catheter hub and segments. J Clin Microbiol. 1985;21:357-360.
40 Lippert A.C., Fulton R.B., Parr A.M. Nosocomial infection surveillance in a small animal intensive care unit. J Am Anim Hosp Assoc. 1988;24:627-636.
41 Little J.R., Murray P.R., Traynor P.S., et al. A randomized trial of povidone-iodine compared with iodine tincture for venipuncture site disinfection: effects on rates of blood culture contamination. Am J Med. 1999;107:119-125.
42 Littman M.P., Dambach D.M., Vaden S.L., et al. Familial protein-losing enteropathy and protein-losing nephropathy in soft coated Wheaten terriers: 222 cases (1983-1997). J Vet Int Med. 2000;14:68-80.
43 Lorente L., Lecuona M., Ramos M.J., et al. The use of rifampicin-miconazole-impregnated catheters reduces the incidence of femoral and jugular catheter-related bacteremia. Clin Infect Dis. 2008;47:1171-1175.
44 Machon R.G., Raffe M.R., Robinson E.P. Central venous pressure measurements in the caudal vena cava of sedated cats. J Vet Emerg Crit Care. 1995;5:121-129.
45 Marin M.G., Lee J.C., Skurnick J.H. Prevention of nosocomial bloodstream infections: effectiveness of antimicrobial-impregnated and heparin-bonded central venous catheters. Crit Care Med. 2000;28:3332-3338.
46 Marks S.L., Hanel R. EZ-IO®: A new technique for emergency vascular access. NAVC Clinician Briefs. 2010. In press
47 Marsh-Ng M.L., Burney D.P., Garcia J. Surveillance of infections associated with intravenous catheters in dogs and cats in an intensive care unit. J Am Anim Hosp Assoc. 2007;43:13-20.
48 Mathews K.A., Brooks M.J., Vallient A.E. A prospective study of intravenous catheter contamination. J Vet Emerg Crit Care. 1996;6:33-43.
49 Mermel L.A. Prevention of intravascular catheter-related infections. Ann Intern Med. 2000;132:391-402.
50 Mesfin G.M., Higgins M.J., Brown W.P., et al. Cardiovascular complications of chronic catheterization of the jugular vein in the dog. Vet Pathol. 1988;25:492-502.
51 Murphy L.M., Lipman T.O. Central venous catheter care in parenteral nutrition: a review. J Paren Enter Nutr. 1987;11:190-201.
52 Nahum E., Levy I., Katz J., et al. Efficacy of subcutaneous tunneling for prevention of bacterial colonization of femoral central venous catheters in critically ill children. Pediatr Infect Dis J. 2002;21:1000-1004.
53 Nakayama M., Munemura Y., Kanaya N., et al. Efficacy of alkalinized lidocaine for reducing pain on intravenous and epidural catheterization. J Anesth. 2001;15:201-203.
54 Niesen K.M., Harris D.Y., Parkin L.S., et al. The effects of heparin versus normal saline for maintenance of peripheral intravenous locks in pregnant women. J Obstet Gynecol Neonatal Nurs. 2003;32:503-508.
55 Norden C.W. Application of antibiotic ointment to the site of venous catheterization - a controlled trial. J Infect Dis. 1969;120:611-615.
56 O’Grady N.P. Applying the science to the prevention of catheter-related infections. J Crit Care. 2002;17:114-121.
57 O’Grady N.P., Alexander M., Dellinger E.P., et al. Guidelines for the prevention of intravascular catheter-related infections. Pediatrics. 2002;110:e51.
58 Olson K., Rennie R.P., Hanson J., et al. Evaluation of a no-dressing intervention for tunneled central venous catheter exit sites. J Infus Nurs. 2004;27:37-44.
59 Osuna D.J., DeYoung D.J., Walker R.L. Comparison of three skin preparation techniques in the dog. Part 1: Experimental trial. Vet Surg. 1990;19:14-19.
60 Osuna D.J., DeYoung D.J., Walker R.L. Comparison of three skin preparation techniques. Part 2: Clinical trial in 100 dogs. Vet Surg. 1990;19:20-23.
61 Otto C.M., Kaufman G.M., Crowe D.T. Intraosseous infusion of fluids and therapeutics. Compend Contin Educ Pract Vet. 1989;11:421-430.
62 Otto C.M., Rieser T.M., Brooks M.B., et al. Evidence of hypercoagulability in dogs with parvoviral enteritis. J Am Vet Med Assoc. 2000;217:1500-1504.
63 Otto C.W. Central venous pressure monitoring. In: Blitt C.D., editor. Monitoring in anesthesia and critical care medicine. 2nd ed. New York: Churchill Livingstone; 1990:169-210.
64 Palmon S.C., Lloyd A.T., Kirsch J.R. The effect of needle gauge and lidocaine pH on pain during intradermal injection. Anesth Analg. 1998;86:379-381.
65 Pierce C.M., Wade A., Mok Q. Heparin-bonded central venous lines reduce thrombotic and infective complications in critically ill children. Intensive Care Med. 2000;26:967-972.
66 Rabe C., Gramann T., Sons X., et al. Keeping central venous lines open: a prospective comparison of heparin, vitamin C and sodium chloride sealing solutions in medical patients. Intensive Care Med. 2002;28:1172-1176.
67 Randolph A.G., Cook D.J., Gonzales C.A., et al. Benefit of heparin in peripheral venous and arterial catheters: systematic review and meta-analysis of randomised controlled trials. Br Med J. 1998;316:969-975.
68 Rochon P.A., Gill S.S., Litner J., et al. A systematic review of the evidence for hypodermoclysis to treat dehydration in older people. J Gerontol A Biol Sci Med Sci. 1997;52:M169-M176.
69 Salzman M.B., Isenberg H.D., Shapiro J.F., et al. A prospective study of the catheter hub as the portal of entry for microorganisms causing catheter-related sepsis in neonates. J Infect Dis. 1993;167:487-490.
70 Sasson M., Shvartzman P. Hypodermoclysis: an alternative infusion technique. Am Fam Physician. 2001;64:1575-1578.
71 Schultz A.A., Drew D., Hewitt H. Comparison of normal saline and heparinized saline for patency of IV locks in neonates. Appl Nurs Res. 2002;15:28-34.
72 Seldinger S.I. Catheter replacement of the needle in percutaneous arteriography; a new technique. Acta radiol. 1953;39:368-376.
73 Snydman D.R., Gorbea H.F., Pober B.R., et al. Predictive value of surveillance skin cultures in total-parenteral-nutrition-related infection. Lancet. 1982;2:1385-1388.
74 Solomon D.D., Arnold W.L., Martin N.D., et al. An in vivo method for the evaluation of catheter thrombogenicity. J Biomed Mater Res. 1987;21:43-57.
75 Spilezewski K.L., Anderson J.M., Schaap R.N., et al. In vivo biocompatibility of catheter materials. Biomaterials. 1988;9:253-256.
76 Strand C.L., Wajsbort R.R., Sturmann K. Effect of iodophor vs iodine tincture skin preparation on blood culture contamination rate. J Am Med Assoc. 1993;269:1004-1006.
77 Suojanen J.N., Brophy D.P., Nasser I. Thrombus on indwelling central venous catheters: the histopathology of “Fibrin sheaths”. Cardiovasc Intervent Radiol. 2000;23:194-197.
78 Swaim S.F., Riddell K.P., Geiger D.L., et al. Evaluation of surgical scrub and antiseptic solutions for surgical preparation of canine paws. J Am Vet Med Assoc. 1991;198:1941-1945.
79 Thayer G.W., Carrig C.B., Evans A.T. Fatal venous air embolism associated with pneumocystography in a cat. J Am Vet Med Assoc. 1980;176:643-645.
80 Timsit J.F., Sebille V., Farkas J.C., et al. Effect of subcutaneous tunneling on internal jugular catheter-related sepsis in critically ill patients: a prospective randomized multicenter study. J Am Med Assoc. 1996;276:1416-1420.
81 Tkachenko B.I., Evlakhov V.I., Poyasov I.Z. Relationship between venous return and right-atrial pressure. Bull Exp Biol Med. 2001;131:421-423.
82 Trissel L.A. Handbook on injectable drugs, 11th ed. Bethesda, Md: American Society of Health-System Pharmacists, Inc; 2001.
83 Tugrul M., Camci E., Pembeci K., et al. Relationship between peripheral and central venous pressures in different patient positions, catheter sizes, and insertion sites. J Cardiothorac Vasc Anesth. 2004;18:446-450.
84 Wagner J.G., Leatherman J.W. Right ventricular end-diastolic volume as a predictor of the hemodynamic response to a fluid challenge. Chest. 1998;113:1048-1054.
85 Wistbacka J.O., Nuutinen L.S. Catheter-related complications of total parenteral nutrition (TPN): A review. Acta Anaesthiol Scand. 1985;29:84-88.
86 Xiang D.Z., Verbeken E.K., Van Lommel A.T., et al. Composition and formation of the sleeve enveloping a central venous catheter. J Vasc Surg. 1998;28:260-271.
87 Xiang D.Z., Verbeken E.K., Van Lommel A.T., et al. Sleeve-related thrombosis: a new form of catheter-related thrombosis. Thromb Res. 2001;104:7-14.
88 Zinner S.H., Denny-Brown B.C., Braun P., et al. Risk of infection with intravenous catheters: Effect of application of antibiotic ointment. J Infect Dis. 1969;120:616-619.