Chapter 6
Maxillary Antrostomy
Alexander G. Chiu, and James N. Palmer
Introduction
- ▪ The maxillary antrostomy is the first step in performing functional endoscopic sinus surgery.
- ▪ Based on a good working knowledge of the anatomy and using proper visualization and mucosa-sparing techniques, a well-performed maxillary antrostomy will not only address maxillary sinus disease but properly set up the remaining portions of the sinus surgery.
Anatomy (Figs. 6.1, 6.2, and 6.3)
- ▪ The uncinate process is composed of thin bone covered by mucosa. It has attachments superiorly to the agger nasi cell or skull base.
- ▪ The uncinate process covers the infundibulum—the functional area where the maxillary sinus, anterior ethmoids, and frontal sinus drain.
- ▪ The uncinate process attaches anteriorly to the lacrimal bone and is in the shape of a quarter moon. The posterior-inferior portion of the uncinate runs in a horizontal plane toward the posterior fontanelle.
- ▪ The maxillary line is the attachment of the uncinate process to the lacrimal bone. The natural os of the maxillary sinus can be visualized at the junction of the lower 1⁄3 and upper 2⁄3 on the maxillary line (Fig. 6.4). The ostiomeatal complex is a functional area not an anatomic area. Opening the ostiomeatal complex involves removing the uncinate process and ethmoid bulla as well as enlarging the natural maxillary ostium.
- ▪ The middle turbinate serves to humidify inspired air. Care should be taken to preserve the middle turbinate if possible when performing a maxillary antrostomy. If removal is necessary, consider amputating only the anterior inferior quadrant of the turbinate.
Radiographic Considerations
- ▪ Look at the axial and coronal computed tomographic (CT) scans
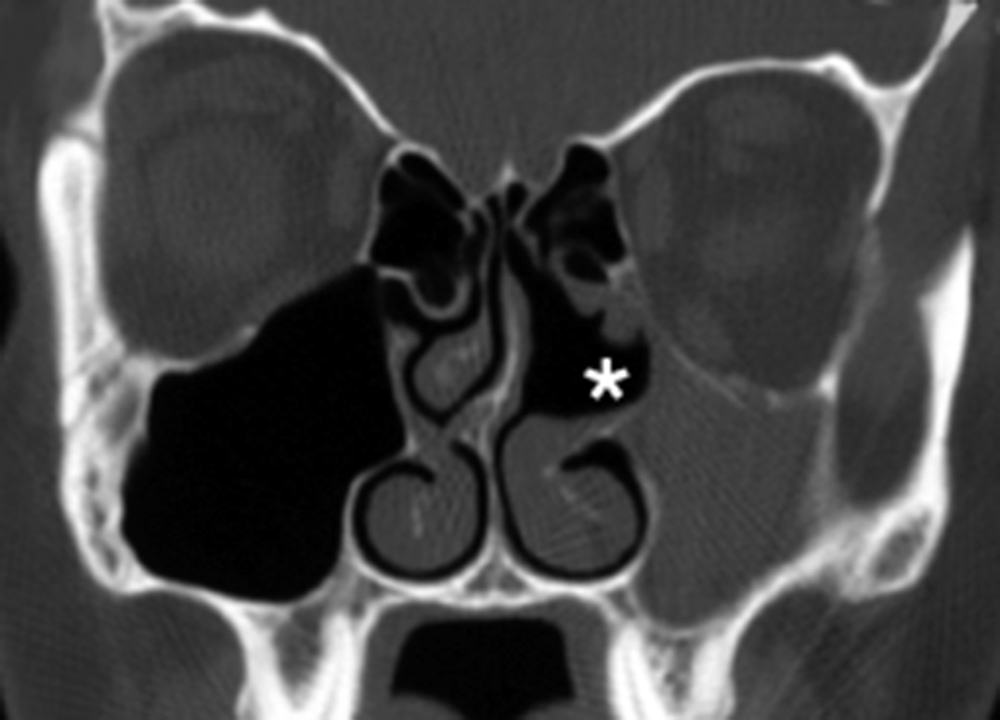
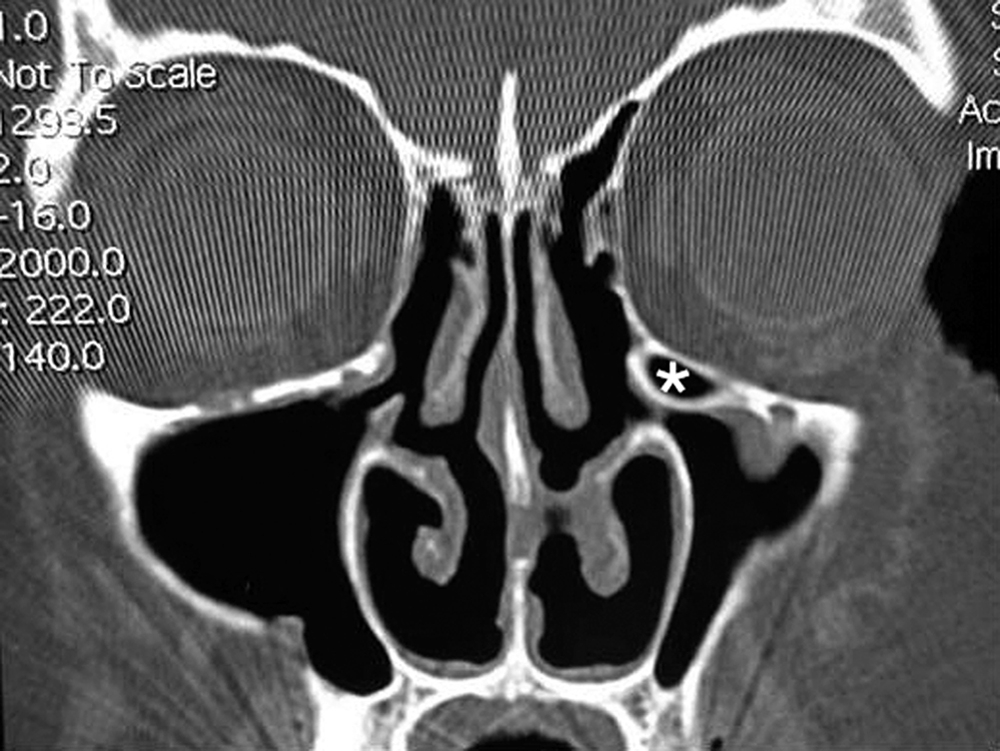
- ▪ Identify the uncinate process and its relation to the medial orbital wall.
- – Beware of an uncinate process that is lateralized against the medial orbital wall (Fig. 6.5). If identified, make sure to take great caution in using a sickle knife or microdébrider against the uncinate to prevent inadvertent orbital entry.
- ▪ Identify the presence of any Haller cells, also called infraorbital ethmoid cells, that may be contributing to the obstruction of the middle meatus.
- ▪ Identify the presence of any pathologic process along the floor and/or anterolateral walls of the maxillary sinus. If a retention cyst or polyp is present, make preparations to have angled instruments and endoscopes available to address these hard-to-reach locations.
Instrumentation (FIG. 6.6)
Preoperative Considerations
- ▪ The first 15 minutes after anesthesia induction is often a time when the patient’s heart rate and blood pressure are at their highest. Starting to operate before proper mucosal decongestion and local injection have been accomplished will often result in mucosal trauma and excess mucosal bleeding, especially in the areas of the anterior septum, anterior middle turbinate, and lateral nasal wall. Trauma to these areas will add to the difficulty of the remainder of the procedure.

Fig. 6.1 (A) Drawing in coronal view of the middle turbinate, uncinate, and ostiomeatal complex. Dashed circles represent the ostiomeatal complexes. Local anesthetic should be infiltrated at both Xs, which correspond to the axilla of the middle turbinate as it attaches to the lateral nasal wall, and injected into the anterior face of the middle turbinate itself. (B) Coronal CT scan showing bilateral conchae bullosae, which are air cells inside the middle turbinate. 
Fig. 6.7 (A–C) Accurate placement of decongestive pledgets will allow better visualization of the middle meatus. Here, endoscopic placement of the pledgets superiorly will allow for adequate decongestion of the nasal swell body, thus improving visualization of the superior attachment of the middle turbinate and the superior middle meatus. - ▪ Take at least 5 minutes to allow the vasoconstrictive pledgets to decongest the mucosa and local injections to take effect.
- ▪ It is important to accurately place the nasal pledgets to optimize the visual field. A common mistake is to place the pledgets low in the nose, failing to decongest the nasal swell bodies, which can obscure endoscopic visualization of the middle meatus and frontal recess (Fig. 6.7).
- ▪ To avoid unnecessary trauma and clouding of the operative field, be careful in manipulation of the middle turbinate. To create more space to address the uncinate process, gently move the middle turbinate medially with a Freer elevator and slide an oxymetazoline-soaked pledget into the middle meatus for 5 minutes.
- ▪ When in doubt, perform a septoplasty if a septal deflection is preventing access to the middle meatus. A septal deflection will not only make intraoperative access difficult but will also create problems for effective postoperative débridement.


Pearls and Potential Pitfalls
Pearls
- ▪ Removal of the uncinate process will often enlarge the middle meatus, making what appears to be a narrow space adequate for maneuvering endoscopic instruments.
- ▪ The uncinate process is in the shape of a crescent moon that vanishes in the superior plane.
- ▪ The key to a proper antrostomy is to find the natural ostium and enlarge it by removing the fontanelle posteriorly and the uncinate process anteriorly.
- ▪ When the uncinate process is intact, the height of the lower 1⁄3 of the middle turbinate approximates the location of the natural ostium.

Fig. 6.8 Injection of local anesthesia. (A) Artist’s depiction of endoscopic view. Local anesthetic should be infiltrated at the points marked with an X. (B) Endoscopic photograph demonstrating infiltration of lidocaine with epinephrine. On slow injection, the mucosal lining of the middle turbinate and uncinate process should blanch. - ▪ The antrostomy may be started with a 0-degree scope, but use of a 30-degree scope makes it much easier to identify the natural ostium.
- ▪ A 45-degree or 70-degree scope is useful to visualize the anterior wall and floor of the sinus after an antrostomy has been performed. It is especially useful in removing a retention cyst along the floor or anterior wall.
Potential Pitfalls
- ▪ Beware of an uncinate process that is atelectatic and pressed against the lamina. Incision of the uncinate with a sickle knife or microdébrider can result in orbitotomy and damage to the orbital contents.
- ▪ Remove the uncinate process from posterior to anterior, starting from the free edge, with backbiting forceps. The bone of the uncinate process is thin. Bite anteriorly until the hard lacrimal bone is encountered. “Bite to the hard bone, not through the hard bone.” Biting through the lacrimal bone may result in an injury to the lacrimal duct system.
- ▪ Be careful in manipulation of the middle turbinate. Take care to gently move the middle turbinate medially with the smooth back end of the instruments while using the working end to remove the uncinate. Trauma to the lateral surface of the middle turbinate will cloud the operative field with blood and make visualization and instrumentation difficult.
- ▪ When using the microdébrider, “tap” the pedal to use in short bursts. This will prevent a prolonged débridement and damage to orbital contents if the orbit is entered.
Surgical Procedure
- ▪ You may elect to begin with a 0-degree endoscope for the removal of the uncinate process, but as you gain experience, you will find that a 30-degree endoscope allows much better visualization of the natural ostium.
- ▪ Inject 1 mL of 1% lidocaine with epinephrine at the superior attachment of the middle turbinate to the lateral nasal wall (Fig. 6.8).
- ▪ Inject 1 mL of local anesthetic into the anterior head of the middle turbinate. This will limit bleeding, which will cloud the operative field if the lateral surface of the middle turbinate is roughened.
- ▪ While looking in the nose with a 0-degree endoscope, identify the curve and free edge of the uncinate process, the anterior bulge of the agger nasi cell, and the superior attachment of the inferior turbinate.
Step 1: Medialize the Middle Tubinate
Step 2: Outfracture the Inferior Turbinate to Better Visualize the Middle Meatus


Step 3: Remove the Uncinate Process and Identify the Natural Ostium
- ▪ Use a ball-tip probe to reflect anteriorly the free edge of the uncinate process (Fig. 6.9).
- ▪ Use the backbiter to remove the uncinate process from posterior to anterior to its attachment to the lacrimal bone (Fig. 6.10).
- ▪ When first using the backbiter, place and open the blade at the 12 o’clock position in the middle meatus, then pronate your wrist to slide behind the free edge of the uncinate process.
- ▪ Stray mucosal edges of the uncinate process can be removed with a straight or angled microdébrider.
Step 4: Reflect and Remove the Superior Uncinate Process (Fig. 6.11)
Step 5: Remove the Inferior Uncinate Process (Fig. 6.12)
Step 6: Enlarge the Antrostomy by Removing the Posterior Fontanelle (Fig. 6.13)


Step 7: Débride Polyps Within the Maxillary Sinus (If Present; Fig. 6.14)
Postoperative Considerations
- ▪ Avoid formation of synechiae between the middle turbinate and lateral nasal wall.
- ▪ Prevent synechiae formation by medializing the middle turbinate at the end of the case.
- ▪ Before finishing, make sure to look one last time with a 30-degree or 70-degree endoscope at the natural ostium. Use a ball-tip probe to feel the lacrimal bone anteriorly and ensure that the uncinate process has been completely removed. This will help prevent postoperative mucus recirculation.
- ▪ Make sure that all allergic mucin is removed from the sinus. Failure to do so will result in persistent postoperative edema. A 70-degree endoscope can be used to visualize the floor and anterior wall of the sinus, and saline irrigations can be used to flush the mucin out of the sinus.


Special Considerations
- ▪ An infraorbital ethmoid cell (Haller cell) will crowd the middle meatus, may be difficult to reach, and may harbor disease (Fig. 6.15).
- ▪ Silent sinus syndrome is from an atelectatic uncinate process that results in negative pressure producing a downward retraction of the floor of the orbit (Fig. 6.16).