Physical examination
3.0 Introduction to examination skills
Clinical examination stations are certain to appear in an OSCE. These stations represent a good opportunity to get high marks, as they are easy to practise. We have covered many of the common examinations, but more detailed versions are covered in the Macleod's Clinical Examination text. We have adapted these examinations so that you should be able to complete them within the limited timescale of an OSCE.
The examinations will either be on normal individuals with no pathology or on patients with real disease. It is worth practising the systematic examinations on your colleagues so that these flow smoothly and expertly. The patients that are used in OSCEs tend to have a limited number of chronic and stable conditions. This is because the examiners will usually need a number of patients with similar signs who they can use for multiple examinations. It is also for this reason that acutely unwell patients are mostly not used. For example in a respiratory examination, if you hear crepitations they are much more likely to be due to someone having a chronic condition such as pulmonary fibrosis rather than pneumonia. This means that you should be sure to learn about diseases that commonly crop up in OSCEs – so that you can get top marks if these appear.
 Key skills
There are several key skills for every clinical examination station:
1. Introduce yourself to the patient
2. Ensure good hand hygiene
3. Explain to the patient what you are going to do and ask their permission
4. Be systematic in your examination
5. Be wary of causing discomfort to the patient
6. Be systematic in your presentation, giving key clinical findings
7. Give a differential diagnosis and then the most likely diagnosis.
We have suggested a structure for clinical examinations that you should follow. Try to practise using this structure and using colleagues. Following this makes it less likely that you will miss things. As a general rule you should start a general examination at the hands, work up the arm to the neck, look at the face and then continue down the chest/abdomen and legs as appropriate.
Suggested structure for clinical examination (mnemonic PIPPAS):
• Inspection
• Palpation
• Percussion
• Auscultation
• Special tests.
3.1 Examining the patient with a murmur
Setting: Outpatient clinic
Time: 10 min
Level: Intermediate
Candidate information
Approach to the station
The station information is fairly vague and therefore could be used as the candidate information for any murmur. The history of intermittent palpitations may direct you to a valvular lesion that predisposes to atrial fibrillation—but bear in mind that palpitations are commonly reported even in people with structurally normal hearts. You will need to perform a full cardiovascular examination and report your findings. Valvular heart disease is commonly encountered in OSCEs as the patients tend to be clinically stable for long periods.
When examining the chest of female patients, you should keep their chest covered with a sheet for as long as possible. Alternatively, you could suggest that they keep their bra on but unfasten it so that you will be able to examine underneath it more easily. Ensure the patient is reclining at 45° (if comfortable) for the examination.
Patient information
Clinical knowledge and expertise
Cardiovascular examination
Introduction
• Introduce yourself, explain what you are about to do and obtain consent.
• Clean your hands prior to beginning.
Inspection
• Observe the patient from the end of the bed—do they look unwell or breathless?
• Start with the hands—look for clubbing and splinter haemorrhages.
• Face—look around the eyes for xanthalasma and a corneal arcus. Gently examine the conjunctivae for pallor or petechial haemorrhages. A malar flush is an uncommon finding suggestive of mitral stenosis. Look at the lips and tongue for central cyanosis.
• Neck—examine the JVP (see Macleod’s Clinical Examination, Chap. 6 for a detailed explanation). Palpate the carotid pulse at this point.
• Chest—examine front and sides for scars (midline sternotomy scar or left thoracotomy scar for mitral valve repair).
• Inspect legs for peripheral oedema (this could be done at the end of the examination).
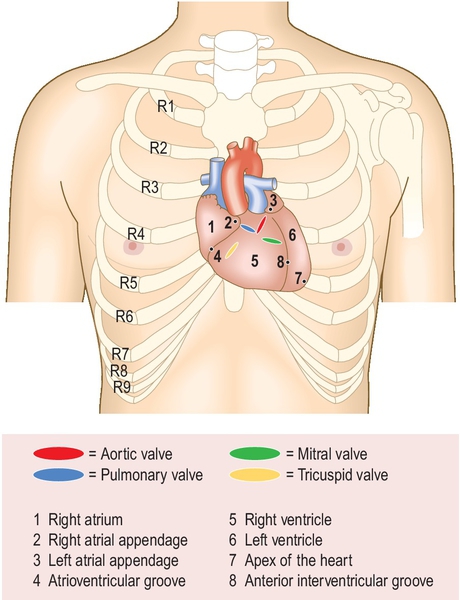
Palpation (Fig. 3.1.1)
• Palpate the pulses. Palpate both radial pulses simultaneously to check for radio-radial delay and to check the rate. Examine a central pulse for character.
• Palpate for a collapsing or water-hammer pulse by placing three fingers of your right hand loosely around the wrist, covering the radial area but not applying pressure. Support the elbow and check for any shoulder discomfort before lifting the patient’s arm. If a collapsing pulse is present you will feel the sharp pulse in the radial area.
• Palpate the apex beat by placing your fingers flat on the chest parallel to the ribs in the 5th intercostal space mid-clavicular line.
• Examine for a heave by placing the heel of your hand firmly over the left parasternal position.
• Palpate for thrills by placing the flat of your fingers at the apex and then on both sides of the sternum.
Auscultation (Fig. 3.1.2)

• Listen at the apex, lower left sternal edge and upper right and left sternal edges first with the bell and then the diaphragm.
• Ask yourself whether the first or second heart sound is easily heard, loud or soft.
• Roll the patient onto their left side. Listen with the bell using light pressure at the apex, specifically the mid-diastolic low-pitch rumbling murmur of mitral stenosis.
• Sit the patient up and ask them to lean slightly forwards. Using the diaphragm, listen over the right and left upper sternal edges at end-expiration for the high pitched murmur of aortic regurgitation.
• Listen over the carotids on end-expiration and in the left axilla for radiation of any murmurs.
• If you hear a murmur, palpate the carotid pulse while you auscultate.
Special Tests
• Examine for pulmonary oedema by auscultating the lung bases only (you could do this after examining for aortic regurgitation), and examine for dependent oedema in the lower legs and sacrum.
• Ask to check the blood pressure.
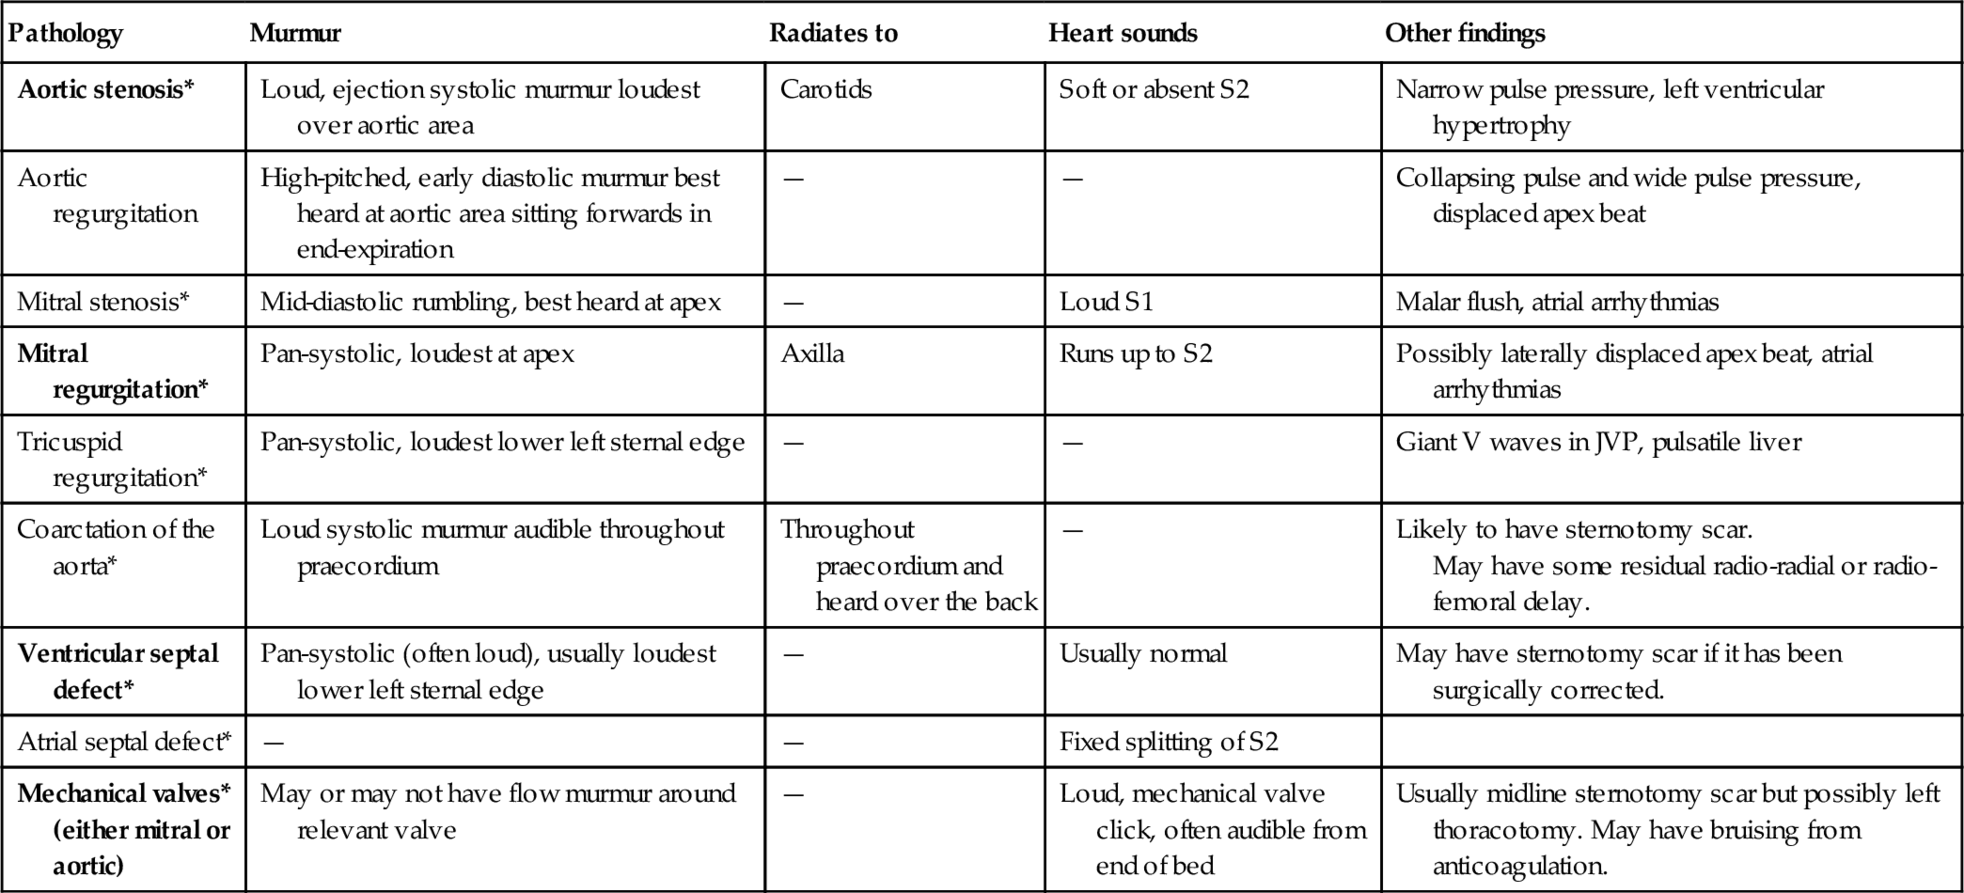
After finishing your examination, thank the patient and fit your findings together. This can be the hardest part of a cardiovascular examination, but be methodical—Table 3.1.1 may help. The asterisks show stable conditions that can easily be brought to OSCEs and those in bold are common.
Table 3.1.1
Differential diagnosis of cardiac murmurs
| Pathology | Murmur | Radiates to | Heart sounds | Other findings |
| Aortic stenosis* | Loud, ejection systolic murmur loudest over aortic area | Carotids | Soft or absent S2 | Narrow pulse pressure, left ventricular hypertrophy |
| Aortic regurgitation | High-pitched, early diastolic murmur best heard at aortic area sitting forwards in end-expiration | — | — | Collapsing pulse and wide pulse pressure, displaced apex beat |
| Mitral stenosis* | Mid-diastolic rumbling, best heard at apex | — | Loud S1 | Malar flush, atrial arrhythmias |
| Mitral regurgitation* | Pan-systolic, loudest at apex | Axilla | Runs up to S2 | Possibly laterally displaced apex beat, atrial arrhythmias |
| Tricuspid regurgitation* | Pan-systolic, loudest lower left sternal edge | — | — | Giant V waves in JVP, pulsatile liver |
| Coarctation of the aorta* | Loud systolic murmur audible throughout praecordium | Throughout praecordium and heard over the back | — | Likely to have sternotomy scar. May have some residual radio-radial or radio-femoral delay. |
| Ventricular septal defect* | Pan-systolic (often loud), usually loudest lower left sternal edge | — | Usually normal | May have sternotomy scar if it has been surgically corrected. |
| Atrial septal defect* | — | — | Fixed splitting of S2 | |
| Mechanical valves* (either mitral or aortic) | May or may not have flow murmur around relevant valve | — | Loud, mechanical valve click, often audible from end of bed | Usually midline sternotomy scar but possibly left thoracotomy. May have bruising from anticoagulation. |
Present your findings
• Comment on any findings from your inspection.
• Comment on the heart sounds—S1 (closure of the mitral valve) and S2 (closure of the aortic valve).
• Describe any murmurs (systolic or diastolic, loud/harsh or soft, mid to late or pan), including where they were loudest and whether they radiate.
• Comment on any other tests and suggest a differential diagnosis.
• Suggest appropriate initial investigations—ECG and transthoracic echocardiography are reasonable initial investigations for possible valvular heart disease.
 Warning
• Patients with valvular heart disease should be considered for surgery if they become symptomatic—i.e., if they complain of syncope, chest pain or increasing dyspnoea.
 How to excel in this station
| Action | Reason | How |
| Present your findings clearly. | Succinctly presenting your examination findings after completing the examination can turn a good performance into an excellent one. | When you practise examinations, also practise presenting your findings. Start with other tests that you would request and then present your findings methodically. It can be tricky to remember all the findings, but if you practise you will improve. |
| Good knowledge of the different patterns of valvular lesions. | It is difficult to approach an examination without an idea of what the different pathologies present with. | You will get good experience from a cardiology ward or clinic. You can also listen to recordings of heart sounds and murmurs online. If you have not had much exposure to clinical signs, then at least ensure the basic examination is polished. |

 Common errors in this station
| Common error | Remedy | Reason |
| Not treating the patient with dignity and respect, nor giving clear instructions or being polite. | Introduce yourself and explain the examination. Ensure the patient is comfortable and if female, cover their chest or suggest they leave their bra on but unfastened. | Remember the essential aspects of good communication skills—make good eye contact, have a reassuring manner and explain what you are going to do clearly. It is better to run short of time and ensure the patient is comfortable and not distressed than to finish and have upset the patient. |
| Poor technique or disordered examination. | Practise the examination and be methodical. Gain experience from clinical practice and from observing others where appropriate. | This is a frequently encountered examination so the examiner will be expecting it to be slick. |

Station extensions
 Advanced
You may be asked to perform a cardiovascular examination combined with data interpretation of an ECG and possibly an echocardiograph report.
3.2 Peripheral arterial examination
Setting: Surgical clinic
Time: 10 min
Level: Intermediate
Candidate information
Approach to the station
The history is suggestive of peripheral arterial disease (see Table 3.2.1), especially with the multiple risk factors. After your focused examination, remember to leave enough time (2 min) to discuss investigations (see Table 3.2.2). If a real patient is used, then comment on findings as you proceed.
Table 3.2.1
Symptoms of peripheral arterial disease
| Intermittent claudication | Pain in calf, thigh or buttocks when walking; typically relieved with rest. |
| Nocturnal pain | Wakes patient and relieved by hanging legs out of bed or walking; suggestive of severe disease. |
| Erectile dysfunction | Often an early sign of peripheral arterial disease (ask in history). |
| Ulceration | Signs of severely ischaemic limbs and poor wound healing is also common. |
Table 3.2.2
Immediate tests to be requested
| Blood tests | FBC, U + E, lipids. LFT if considering statin therapy. |
| ABPI | Ankle-brachial pressure index—an ABPI of < 0.9 is predictive of atherosclerosis. |
| Duplex ultrasound | Allows evaluation of all the vascular beds. |
| ECG | Screen for cardiovascular disease—looking for LVH, LBBB and other markers. |
| Angiography | Not usually first-line investigation. Can be digital subtraction angiogram, CT angiogram or MR angiogram. |
Patient information
Clinical knowledge and Expertise
Examination of the peripheral arterial system
Introduction
• Gain permission to examine patient and explain what you are about to do.
• Clean your hands prior to beginning.
Inspection
• Start with hands—look for tobacco staining.
• Face—look for xanthelasma.
• Scars—look for scars on the abdomen (aortic aneurysm repair), groin (angiography) or medial aspect of thighs (bypass grafting).
• Ulcers—comment on arterial ulcers (punched out, usually over medial malleoli) or venous (anterior aspect of shin, associated with venous eczema and skin changes).
• Skin changes—loss of hair and skin thinning.
• Feet—examine dorsum and plantar aspects and between toes for ulcers.
• Feel for the skin temperature in the feet.
Palpation (Fig. 3.2.1)
• Measure (or say you would) the blood pressure in both arms.
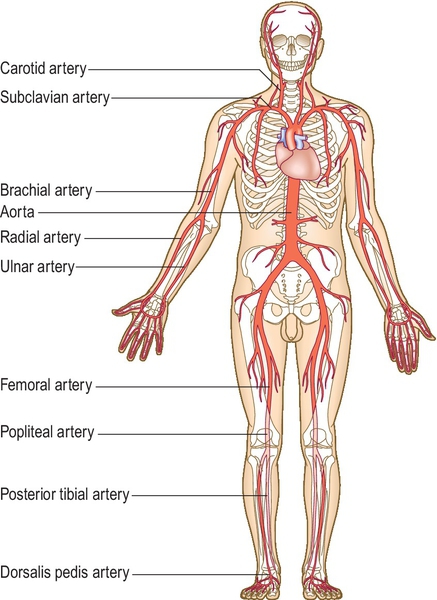
• Palpate the major pulses—radial, carotid, aortic, femoral, popliteal and dorsalis pedis.
• Check for radio-femoral delay after palpating radial pulse—explain this to the patient.
• Check for capillary refill time over big toe.
Auscultation
• Listen over the aorta, carotid and femoral arteries for bruits.
Special tests
Buerger’s test—With patient lying on their back, raise their feet to 45° for 2 minutes. Then sit the patient on the edge of the bed with legs down. A positive test (peripheral arterial disease) occurs when legs initially go pale when raised then hyperaemic (red) when down.
Warning
Acute limb ischaemia—
The following suggest the requirement for urgent assessment (the 6 P’s): pallor, perishing cold, pulseless, paresthesia, paralysis, pain on squeezing muscle.
Critical limb ischaemia—
Pain at rest, non-healing ulcers and gangrene require urgent vascular assessment.
How to excel in this station
| Action | Reason | How |
| Look confident and follow a system for the examination. | This means you are less likely to miss something important and helps the examiner to see you know what you are doing. | Follow the systematic approach to examination as discussed above. |
| Explain to patient what you are doing. | In this examination you will be examining sensitive areas such as the patient’s groin. | Explain to the patient what you are doing especially when examining sensitive areas such as the groin. |
| Discuss why you are requesting tests. | This shows the examiner you understand why tests are appropriate. | For example, ‘I would like to check the U + E to look for any possible signs of renovascular disease.’ |


Station Extensions
Advanced
You may be asked to use a Doppler machine to detect the pulses or to complete the ABPI, so familiarise yourself with these investigations. You may also be asked to look at an angiogram and comment on lesions.
 Basic
Basic
You may be asked about the treatment of peripheral arterial disease including prevention.
3.3 Examining the breathless patient
Setting: Outpatient clinic
Time: 10 min
Level: Intermediate
Candidate information
Approach to the station
You should think of the most common differential diagnoses and look specifically for these. Most candidates can do the basic respiratory exam but the best will tailor this to the history. In an OSCE it is most likely that a real patient will have chronic disease with stable signs. In this case the likely differential would be between chronic obstructive pulmonary disease, lung fibrosis and cardiac failure, so show the examiner that you are looking for features of these.
Patient information
Clinical knowledge and expertise
Respiratory examination
Introduction
• Gain permission to examine patient and explain what you are about to do.
• Clean your hands prior to beginning.
Inspection
• Start with hands—look for tobacco staining, finger clubbing and a flap (indicates CO2 retention).
• Look for central cyanosis in the tongue and lips.
• Neck—examine the JVP, which may be raised in cor pulmonale or fixed in superior vena cava obstruction. Examine the patient for lymphadenopathy.
• Chest—examine front, back and sides for scars (lobectomy/pleural drain scars).
• Look for hyper-expansion and poor or unequal chest wall movement.
• Count the respiratory rate and look for accessory muscle use.
• Inspect for peripheral oedema (end of the examination).
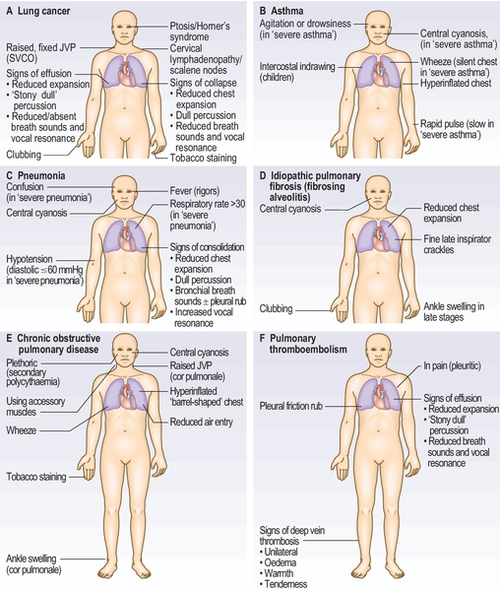
Figure 3.3.1 illustrates the signs you will find in the common respiratory diseases.
Palpation
• Palpate trachea for deviation.
• Chest expansion—usually best seen on the posterior chest wall.
Divide the chest into three zones—upper, middle and lower (see Fig. 3.3.2).
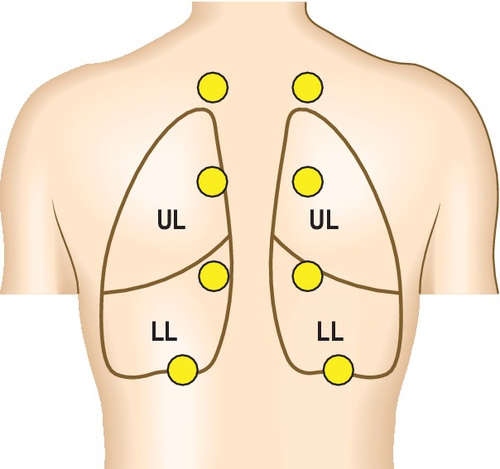
• Tactile vocal fremitus—place hands on both sides of the chest and ask patient to say 99—repeat three times down the posterior chest wall.
Percussion
• Percussion—percuss four areas down the back and front of the chest. Pay special attention to lung bases—is there unilateral dullness suggesting an effusion or collapse?
Auscultation
• Listen with either bell or diaphragm in the zones as above. Are there any added sounds (crepitations or wheezes)? Pay special attention to the lung bases—are there crepitations? Are they unilateral/bilateral, coarse or fine?
Special tests
• State you would check oxygen saturations using a pulse oximeter.
• You may be asked to check peak flow so be prepared to do so.
Common tests that you would request (and justify your suggestions) would include: pulse oximetry, chest X-ray, full blood count (erythrocytosis), spirometry (see Fig. 3.3.3; obstructive, restrictive patterns), peak flow variability (asthma), full pulmonary function testing (including flow volume loops—see Fig. 3.3.4) with reversibility and transfer factor.


Warning
• Lymphadenopathy on examination may suggest lung cancer and you should ask the patient about haemoptysis and weight loss.
• If a patient is breathless or centrally cyanosed at rest, this would indicate severe respiratory disease.
How to excel in this station
| Action | Reason | How |
| Give a differential diagnosis. | This shows examiner you have breadth of knowledge and have considered alternative diagnoses. | Give a differential diagnosis and then state which you feel is most likely and why (based on the clinical signs that you can find). |
| Tailor further investigations to most likely diagnosis. | This shows examiner you are not just requesting a set list of ‘routine’ investigations. | For example, if clinically the patient has pulmonary fibrosis then state that you would like to perform lung function tests to look for a restrictive pattern of lung disease and a high resolution CT scan to look for honeycombing and the pattern of fibrosis. |

Common errors in this station
| Common error | Remedy | Reason |
| Running out of time. | Practise the examination. Focus on examining the patient’s chest from the back. | You are more likely to pick up clinical signs on the patient’s back, so if you are pressed for time, focus your examination here. |
| Percussing poorly. | Practise on yourself. | Percussion is a learned skill and examiners will be able to tell if you are not experienced in performing it. |

Station extensions
Advanced
You may be presented with a chest radiograph or some pulmonary function tests (including a flow volume loop) to interpret after examining the patient. As with your physical examination, you should comment in a structured manner. Radiograph interpretation is discussed in further detail in station 7.2.
Basic Pulmonary Function Testing
Calculate the FEV1/FVC—this is called the FEV1%.
FEV1% > 70 suggests restrictive lung disease (such as fibrosis).
FEV1% < 70 suggests obstructive lung disease (the lower the figure the more severe the obstructive disease).
3.4 Examining a lump in the scrotum
Setting: General practice
Time: 10 min
Level: Intermediate
Candidate information
Approach to the station
This station requires examination of the groin and external genitalia, as well as some clinical knowledge regarding scrotal and testicular lumps. Furthermore, as this is an intimate examination, good communication, gaining appropriate consent and establishing a rapport are essential to perform well.
This station may involve a simulated patient for you to explain briefly the examination and gain consent. Occasionally the examiner may take on this role. You will then perform the examination on a specialised model, but will be instructed to continue to explain what you are doing as if it were a real patient. These models can usually be set up to have any scrotal or testicular pathology, or can be set up as a normal examination.
The examiner will ask you to present your findings and may ask some brief questions on causes of scrotal swellings or an appropriate initial management plan.
Patient information
Clinical knowledge and expertise
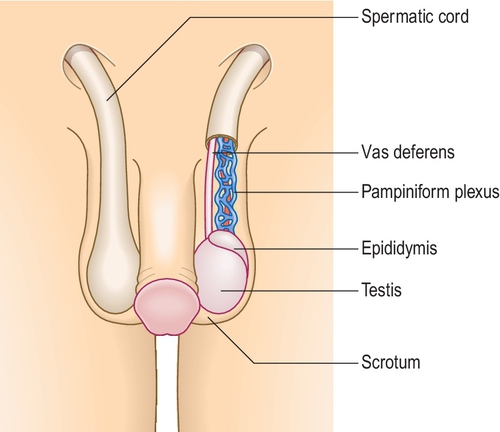
Examination of the scrotum and groin (Fig. 3.4.1)
Introduction
• Introduce yourself, and explain briefly what you plan to do.
• Ask for consent and offer a chaperone.
• Clean your hands and put on a pair of gloves.
• Examination of the scrotum is best performed with the patient standing. You will also need to examine the groin so this must be visible—explain that you will need to examine the lower abdomen to the upper thigh. Allow the patient privacy to undress.
• Check with the patient whether there is any pain or tenderness before you start.
Inspection
• Look at the scrotum and groin. Are there any obvious areas of swelling? Are there any previous surgical scars? Is there any redness?
Palpation
• Palpate the scrotum gently, using both hands (thumb and forefingers). Check that both testes are present in the scrotum; if not, examine the inguinal canals.
• With each testis in turn, immobilise one side by placing one hand behind it, and use the index finger and thumb to palpate the entire body of the testis, and then the cord structures and epididymis at the top of each testis.
• If you palpate a swelling, try to ascertain whether it is separate to the testis or part of it, or part of the epididymis. If you cannot get ‘above’ the swelling, it may be an inguinal hernia.
• Finally, palpate both groins for any swelling and for inguinal lymph nodes which may be present in epididymitis (but remember that testicular tumours spread to the para-aortic nodes).
Auscultation
• You should auscultate any scrotal swelling for bowel sounds as it may be an inguinal hernia.
Special tests
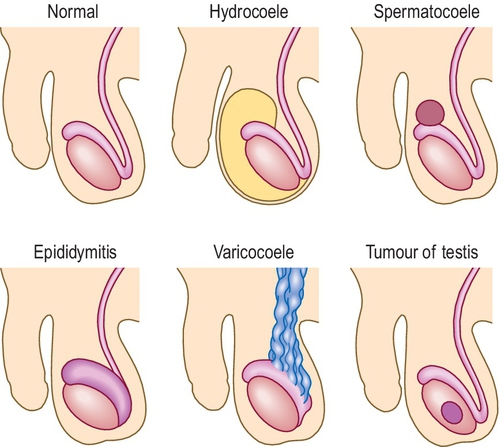
• Using a torch, shine the light through any scrotal swellings. Hydrocoeles and larger epididymal cysts will transmit the light and transilluminate, whereas other swellings will not (Fig. 3.4.2).
• If you suspect an inguinal hernia, ask the patient if they can reduce (push back or move) the swelling, and if not, try and reduce it yourself. If it is reducible, then once reduced place your fingers over the deep inguinal ring and ask the patient to cough to see if it is contained.
Comparison of examination findings for different scrotal pathologies
Table 3.4.1
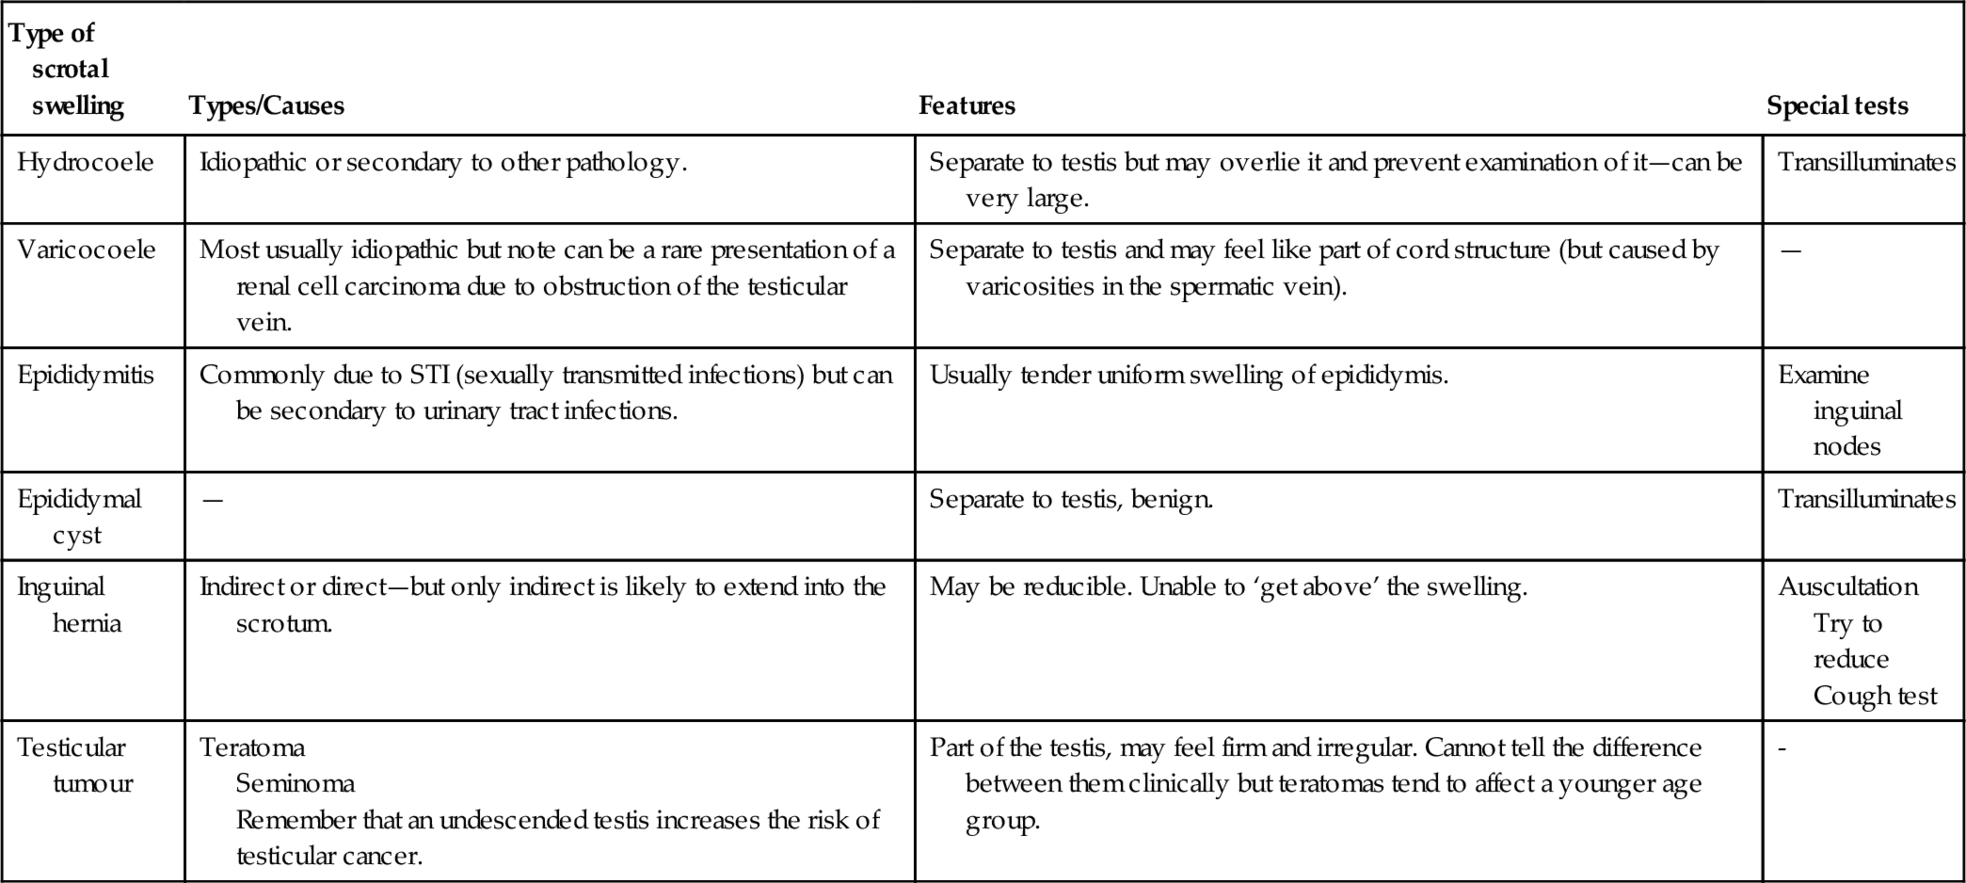
Comparison of examination findings for different scrotal pathologies
| Type of scrotal swelling | Types/Causes | Features | Special tests |
| Hydrocoele | Idiopathic or secondary to other pathology. | Separate to testis but may overlie it and prevent examination of it—can be very large. | Transilluminates |
| Varicocoele | Most usually idiopathic but note can be a rare presentation of a renal cell carcinoma due to obstruction of the testicular vein. | Separate to testis and may feel like part of cord structure (but caused by varicosities in the spermatic vein). | — |
| Epididymitis | Commonly due to STI (sexually transmitted infections) but can be secondary to urinary tract infections. | Usually tender uniform swelling of epididymis. | Examine inguinal nodes |
| Epididymal cyst | — | Separate to testis, benign. | Transilluminates |
| Inguinal hernia | Indirect or direct—but only indirect is likely to extend into the scrotum. | May be reducible. Unable to ‘get above’ the swelling. | Auscultation Try to reduce Cough test |
| Testicular tumour | Teratoma Seminoma Remember that an undescended testis increases the risk of testicular cancer. | Part of the testis, may feel firm and irregular. Cannot tell the difference between them clinically but teratomas tend to affect a younger age group. | - |
Warning
• Testicular torsion is an emergency. Any male presenting with acute scrotal or lower abdominal pain and scrotal swelling should be referred to the urology department immediately.
• Remember that testicular cancer affects males of all ages. Scrotal swellings should be further investigated by ultrasound in the majority of cases.
• A hydrocoele may be idiopathic, but can be secondary to a testicular tumour, and its presence will usually impair clinical examination of the testis. Ultrasound is mandatory.
How to excel in this station
| Action | Reason | How |
| Professional and respectful approach. | The patient may be nervous about an intimate examination; you must behave professionally and put the patient at ease. | Remember the essentials of good communication—make good eye contact, have a reassuring manner and explain clearly what you are going to do. Offer the patient privacy to undress and always offer a chaperone for intimate examinations. |
| Good knowledge of the different scrotal pathologies. | It is difficult to approach an examination without an idea of what the different pathologies feel like. | Read about the different pathologies. Practise the examination in a skills lab where you can examine models with a range of different pathologies. You can also get relevant experience in a urology or sexual health clinic. |

Common errors in this station
| Common error | Remedy | Reason |
| Poor communication/consent, unable to establish rapport. | Understand that good communication is a central element. | Intimate examinations when performed inappropriately or without a chaperone can be a cause of complaints and even litigation. |
| Poor technique or disordered examination. | Practise the examination and be methodical. Gain experience from clinical practice and from observing others where appropriate. | This is an important examination but not encountered as frequently as others. It will be obvious if you have little clinical knowledge of the anatomy and relevant pathologies. |

Station Variations
 Basic–Intermediate
A digital rectal examination or breast examination is frequently encountered, both of which require a similar approach, with similar considerations of communication and consent. Refer to Macleod’s Clinical Examination (rectal examination, pp. 207–8; breast examination, pp. 239–42) for the clinical knowledge, and you can use this station (and adapt the mark-sheet) to practise your general approach to intimate examinations.
3.5 Examining the patient with liver disease
Setting: Outpatient clinic
Time: 10 min
Level: Intermediate
Candidate information
Approach to the station
After reading the above you should think of the most common differential diagnoses and look out specifically for these. A standard abdominal examination is straightforward; however, the candidate information suggests that you should tailor this towards liver disease. In an OSCE it is most likely that a real patient would have chronic disease with stable signs. In this case, there is a heavy alcohol history, but also weight loss. As well as alcoholic liver disease, a gastrointestinal malignancy with liver metastasis should be high on the list of differentials. You should consider all causes of chronic liver dysfunction including fatty liver disease (alcoholic or non-alcoholic), viral hepatitis and potentially congestive cardiac failure, so look for their features and demonstrate this to the examiner.
Patient information
Clinical knowledge and expertise
Examining a patient with liver disease
Introduction
• Gain permission to examine patient and explain what you are about to do.
• Clean your hands prior to beginning.
Inspection
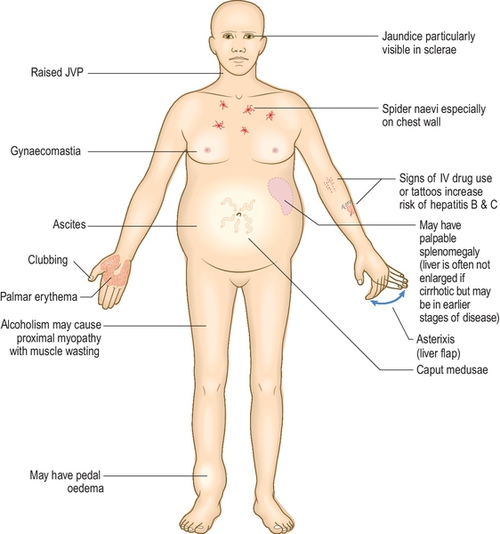
• Look at the patient from the end of the bed—are they noticeably jaundiced or cachectic, or is there obvious abdominal distension? Are there any visible tattoos (risk factor for viral hepatitis)?
• Move to the hands—look for finger clubbing, leukonychia, palmar erythema and a liver flap (asterixis).
• Face—look at the sclerae for signs of jaundice and the conjunctiva for pallor (possible GI malignancy).
• Neck—examine the JVP, which may be raised in congestive cardiac failure. Examine the patient for lymphadenopathy in the left supra-clavicular fossa only (see diagram).
• Chest—have a brief look for spider naevi and gynaecomastia.
• Abdomen—look for spider naevi, caput medusa (enlarged veins around the umbilicus indicative of portal hypertension) and distension. It is helpful to crouch at the bedside and look across the abdomen, which can help to identify organomegaly or masses even before palpating the abdomen. Comment on any scars, herniae or stomas.
• Inspect legs for peripheral oedema (this can be done at the end).
Figure 3.5.1 shows signs of chronic liver disease.
Palpation
• Ask the patient whether they have any tenderness. If they do, palpate this area last and check with the patient if they are in discomfort; stop if they are.
• Palpate the nine areas of the abdomen first superficially, then more deeply, whilst looking at the patient’s face. Try to keep your hand flat on the abdomen and bend your hand rather than poking your finger tips in.
• Palpate for organomegaly, this time with your hand tilted so that you are palpating mainly along the index finger. For the liver, start in the right iliac fossa gently palpating upwards on inspiration and moving sequentially upwards. For the spleen, use the same technique starting in the right iliac fossa and moving diagonally towards the left hypochondrium.
• In a standard examination you would also ballot the kidneys.
• Palpation may be difficult if the abdomen is very distended or in the presence of ascites.
Percussion
• Percuss the liver from the lower ribs to below the level that you felt a liver edge on palpation. If you could not feel a liver edge then percuss downwards until the note changes (becomes tympanic).
• If the abdomen is distended, percuss horizontally across the abdomen at the level of the umbilicus to assess for dullness in the flanks. If there is dullness, proceed to test for shifting dullness.
Auscultation
• In a standard abdominal examination you would listen for renal bruits, but this is not as relevant here. In this case, you may want to perform a liver scratch test (see further reading).
Special Tests
• A standard abdominal examination would finish with a request to perform examination of the groin and external genitalia for hernias, and a PR examination.
Warning
• Any history of weight loss should prompt you to consider malignancy as a differential diagnosis. Some GI malignancies (such as pancreatic cancer) present late, often with metastatic disease.
• If a patient has signs of liver cirrhosis and portal hypertension they need to undergo screening for oesophageal varices as these can cause life-threatening upper GI bleeding.
How to excel in this station
| Action | Reason | How |
| Focus your examination. | This shows the examiner you are adapting your examination based on your clinical knowledge. | Look specifically for signs of liver disease and concentrate on these. |
| Establish a rapport with patient. | This demonstrates you have good communication skills and respect for the patient. | Tell the patient what you are going to do during the examination and check with them that it is alright to proceed. |

Common errors in this station
| Common error | Remedy | Reason |
| Causing discomfort to the patient. | Ask the patient to tell you whether the examination is uncomfortable, and watch their facial expression for signs of discomfort. | Hurting a patient is not acceptable practice. |
| Difficulty performing examination. | Mention to the examiner that you have tried to perform that specific part of the examination but have been unable to due to ascites. | If the patient has large volume ascites then some parts of the examination such as balloting kidneys may not be possible. |

Station Variations
Basic
A standard abdominal examination, usually on a healthy volunteer.
Intermediate
Other focused abdominal stations could include renal disease or haematological disease. Think about the ways in which you would adjust your clinical examination to make it particularly relevant to these systems.
Advanced
As well as the examination above, you may be asked questions at the end about investigation and management of the patient. Basic investigation of patient presenting with liver disease would include:
• Imaging—such as an ultrasound
• Bloods—bilirubin, liver enzymes (ALT, AST, Alk phos, GGT), INR and prothrombin time, albumin, full blood count, U + E
• Autoantibodies—antimitochondrial antibody, anti-smooth muscle antibody, anti-nuclear antibody
• Screening for other diseases—immmunoglobulins, ferritin and transferrin, α1-antitrypsin, ceruloplasmin, α-fetoprotein
• Screening for infection—hepatitis B and C, cytomegalovirus, Epstein–Barr virus, HIV.
3.6 Assessing a stoma
Setting: Surgical ward
Time: 10 min
Level: Intermediate
Candidate information
Approach to the station
This station is asking you to assess the patient’s stoma with no information as to the operation. This indicates that not only should you comment on the appearance and health of the stoma, you should also establish the stoma type; look at the appearance of the stoma and where it has been positioned on the abdomen. Having a stoma fitted can have a huge psychological impact in terms of body image and requires a significant adjustment, especially in the first few weeks, so any examination should be undertaken with care and sensitivity.
Patient information
Clinical knowledge and expertise
A stoma is an opening in the skin, allowing the connection of a hollow organ to the outside; with a bag attached for the organ contents to drain. Most commonly this is gastrointestinal (colon, ileum), although urostomies are required in some cases of invasive bladder or prostate cancer. Stomas may be permanent or temporary, with the intention of closing the latter at a later date.
Assessment of a stoma
Introduction
• Introduce yourself and gain consent.
• Wash hands and apply gloves.
• Ensure that the patient is appropriately exposed (ideally this would be nipples to knees—but to preserve dignity would normally just expose abdomen).
Inspection (Table 3.6.1)
Table 3.6.1
Differences between a colostomy and an ileostomy
| Stoma | Colostomy | Ileostomy |
| Surface | Mucosa sutured to and flush with skin | Spout appearance, proud from skin |
| Location | Usually in the left iliac fossa | Usually in the right iliac fossa |
| Contents | Brown solid formed stool, intermittently present | Green liquid stool, continuously present |
| Indications | Colorectal carcinoma, diverticular disease | Inflammatory bowel disease, familial adenomatous polyposis coli |
• From the end of the bed: Look for abdominal scars, stoma position and whether the patient appears unwell (unlikely in OSCE) and any other indicators of systemic disease.
• Looking at the stoma: Note appearance (flush with skin or has a spout?), health (colour should be pink/red and appear moist and glistening), stoma contents (comment if absent) and colour, consistency and volume.
Palpation
• Check whether the patient is in any pain—both asking and reviewing patient’s face for discomfort.
• Palpate abdomen for any surrounding tenderness, masses or the presence of parastomal hernias.
• In addition you should percuss the abdomen and auscultate for bowel sounds (indicating a functioning bowel).
Special tests
For completion you should offer to perform a digital stomal examination using the index finger with gloves and lubricant (not expected in the OSCE).
Problems with stomas
Although these are unlikely to feature within the OSCE, it is important to comment on their presence or absence to demonstrate that you are aware of possible complications including:
• Erythema, rash or ulceration;
• Bleeding or fissuring;
• Parastomal hernias;
• Stomal prolapse, retraction or necrosis;
• Separation of the mucocutaneous edge;
• Narrowing or obstruction of the stoma lumen;
• Diarrhoea or constipation; and
• Iatrogenic injury, e.g., resulting from rubbing of clothing.
How to excel in this station
| Action | Reason | How |
| Demonstrate knowledge. | Show an awareness of stoma types and how to differentiate between these and demonstrate knowledge of possible complications. | An excellent candidate will comment on findings systematically throughout their examination before summarising, including what type of stoma the patient has and why. |
| Treat patient with dignity and respect. | Acknowledge that this can be an intimate and sensitive examination with stomas having a profound effect on confidence and body image. | Ensure the patient’s comfort throughout and explain each stage of the examination to ensure continuing consent. Remember to cover the patient at the end. |

Common errors in this station
| Common error | Remedy | Reason |
| Accidentally cause pain to the patient. | Check with the patient prior to starting whether they have any pain and recheck throughout verbally and through checking the patient’s expressions. | The skin surrounding any stoma can be sensitive, especially early postoperatively although the stoma mucosa itself doesn’t have any nerve endings—which can make it prone to injury. |
| Inadequate exposure of the stoma itself. | Ask the patient if they would be able to remove their stoma bag after inspection of the patient at the end of the bed. | Fear and embarrassment about asking the patient to remove their stoma bag, but without doing so, it is not possible to assess stoma health and check for any complications. |

3.7 Examining vision
Setting: General practice
Time: 10 min
Level: Advanced
Candidate information
Approach to the station
This station requires you to examine vision thoroughly, not just testing the patient’s visual acuity. Clues to the examiner’s expectations can be the equipment provided and that no past medical history is given indicates that the examiner may wish to focus on a complete examination rather than identification of specific signs.
Fundoscopy can be uncomfortable for a patient, especially if performed repeatedly, and adequate explanation and consent should be obtained. You should assess vision with and without any visual aids required and, if their glasses are not available, a pinhole in a piece of card can be used to correct refractive errors.
Pitfalls in examining vision can occur if there is a lack of comprehension or understanding and it can be difficult to perform such tests on a confused patient or a child with limited attention. The examination relies upon the candidate having a good level of vision and deficiencies within the candidate’s own visual fields could affect the accuracy of the test. Ideally candidates should remove their own glasses (if worn) when using the ophthalmoscope and use the dial provided to correct for their visual impairment prior to performing fundoscopy.
Patient information
It is not necessary to have any abnormalities for this examination; however, should glasses normally be worn, they should be available for use.
Clinical knowledge and expertise
Examination of vision
Introduction
• Introduce yourself and confirm the patient’s identity.
• Gain consent and explain the need for a darkened room with the use of a bright light that may be ‘dazzling but not damaging’.
• Check whether the patient requires glasses and that they are available.
Inspection
• Examine the eyes externally to look for any indicators of pathology, e.g., proptosis, lid retraction, ptosis, asymmetrical pupils at rest.
Visual acuity
• Examination should be performed with the patient’s glasses both on and off.
• The Snellen (or LogMar) chart should be used 6 m away from the patient.
• Ask the patient to cover one eye with their hand and read the lowest line possible on the chart before switching eyes.
• If the patient is not able to make out any of the letters on the chart, then assess their ability to count fingers, see hand movement or distinguish between light and dark.
Visual fields
• Sit directly across from the patient, about a metre away, so that your eyes are level with theirs.
• Ask the patient to cover one eye with a hand and cover your eye directly opposite their covered one, i.e., the contralateral eye to theirs.
• Ask the patient to stare directly ahead into your eye at all times—to detect any unwanted eye movement.
• Extending your arm outwards, wiggle your index finger in each of the four outer quadrants of their visual field; ask the patient to say ‘yes’ when they see your finger move and bring it in from the periphery inwards until it is seen.
• If sensory inattention is suspected, ask the patient to stare forwards at you with their eyes open whilst testing both visual fields at the same time.
• Use the hat pin to detect the patient’s blind spot (and your own) by asking the patient to cover an eye as before (and you do the same) and focus on your eye then, holding the pin laterally, move it horizontally and inwards until it disappears and reappears in your vision.
Pupillary reaction (to light and accommodation)
• Using a pen torch, compare the size and shape of each pupil.
• Asking the patient to stare straight ahead, shine the light from the side directly at each pupil and look for constriction of both pupils (direct and indirect reflexes).
• Test accommodation by asking the patient to fix on a point in the distance, then quickly focus on your finger close to their nose—look for constriction of both pupils.
Eye movements (Fig. 3.7.1)
• Note any convergent or divergent squint.
• Hold your index finger vertically and, whilst asking the patient to keep their head still, slowly move your finger in the shape of an H to assess each ocular muscle.
• Look for nystagmus and ask the patient about any diplopia.
• Remember that nystagmus can be normal on extreme gaze.
• If diplopia is detected, establish the direction and ask the patient to close one eye to confirm whether it is binocular.
• The direction that the diplopia is worse in corresponds with the direction of action of the affected muscle.
Fundoscopy
• State that you would want to dilate the pupils for best visualisation of the fundus—unlikely in an OSCE (unless already done).
• Remember to adjust the dial to correct for your own refractive error before starting if removing your glasses.
• Test for the red reflex by standing back from the patient and shining the ophthalmoscope at each eye whilst looking through it; any abnormalities would appear opaque.
• Examine the patient’s left eye using your left eye, holding the ophthalmoscope in your left hand, and vice versa, whilst asking the patient to stare at a point in the distance.
• Get as close as you can to the patient without knocking heads and do not forget to breathe!
• Adjust the dial until the fundus comes into focus then follow the path of a blood vessel to the optic disc and assess the disc and surrounding retina and arteries for any abnormalities such as haemorrhages or scarring.
Colour vision (if required)
• This can be assessed using Ischihara plates if provided. If not provided, still state that you would test it for completeness.
Warning
• Sudden visual loss, or sudden onset of a visual field defect, should be regarded as a medical emergency and prompt immediate referral.
• New onset impairment of red-green colour vision can be an early sign of optic nerve damage before visual acuity is lost and should warrant urgent ophthalmology assessment.
How to excel in this station
| Action | Reason | How |
| Know how to use the equipment. | Fumbling around with an ophthalmoscope is a waste of valuable time and also looks unprofessional and unprepared. | Fundoscopy is a difficult skill to master (including for qualified doctors). The key is to practise repeatedly on colleagues or patients. |
| Use simple to understand instructions. | With so much to fit in within the time allocated, instructions must be succinct and easy to follow so time is not wasted repeatedly explaining one area. | Avoid medical jargon and keep instructions brief and to the point. Ensure a focused examination; e.g., ‘read out the smallest line that you can make out on the Snellen chart’ rather than ‘read out the Snellen chart from the top downwards’. |

Common errors in this station
| Common error | Remedy | Reason |
| Running out of time. | Practise breaking down the visual examination into sections and work out how long to allow for each to ensure all are completed within the time. | The tendency can be to focus too much on one aspect of the examination and not allow enough time to complete a full assessment. |
| Forgetting one section entirely. | Work systematically through the sections remembering that each is testing a different cranial nerve (II, III, IV and VI) and check that each has been assessed before finishing—talk through them aloud if needed. | In the rushed panic of the exam situation it can be possible to forget sections of such a complex assessment entirely, thus leaving the exam incomplete. |

Station extensions
Advanced
To add clinical signs to a simulated patient, abnormal fundoscopy photographs could be provided with the candidate being asked to describe the findings (or use a patient with diabetic eye disease). Alternatively, the examiner may provide a normal fundoscopy photograph, so do not try to identify abnormalities that are not actually there in an attempt to impress!
3.8 Lower limb sensory examination
Setting: Accident and Emergency
Time: 10 min
Level: Intermediate
Candidate information
Approach to the station
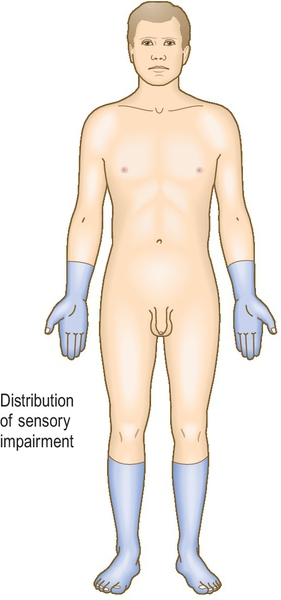
You are told about the background diabetes, making it likely that sensory examination will reveal a peripheral neuropathy in a ‘stocking’ distribution (Fig. 3.8.1). The examination should focus on eliciting the relevant signs and assessing the severity and extent of the neuropathy. Vibration sense is often the first to be affected in diabetes and this must not be missed through time pressures. You must use a systematic process: working up the lower limbs comparing one side with the other whilst testing the different sensory modalities.
Patient information
The key assessment is the methodical approach, thus making simulated patients useful even without clinical signs to elicit. A simulated patient may be briefed to assume a pattern of sensory loss typical of a peripheral diabetic neuropathy.
Clinical knowledge and expertise
Peripheral neuropathy can be divided into acute and chronic presentations that can be symmetrical or affect several nerves (mononeuritis multiplex). Most peripheral neuropathies are chronic and develop slowly over several months, with sensory neuropathies starting distally. Diabetes is the commonest cause of chronic peripheral neuropathy in the western world but, in the absence of diabetes, other differentials should be considered, especially alcohol—through direct nerve damage or through an associated nutritional deficiency (see Box 3.8.1).
Diabetic peripheral neuropathy is common (20–40% of diabetic patients). It often coexists with peripheral arterial disease with high risk of complications such as ulceration, deformity or amputation. Those particularly at risk include older people, patients with poor vision, smokers, patients with a long history of diabetes and those with poor self-care or footwear.
Examination of the sensory system
Introduction
• Introduce yourself and gain informed consent.
• Explain that you may be discussing your findings with the examiner during the examination.
• Wash your hands.
• Ensure that the patient is adequately exposed—with the lower limbs fully visible and any clothing removed.
Inspection
• Inspect the lower limbs, commenting on signs of muscle wasting, peripheral vascular disease (hair loss and dusky skin colour), ulceration or joint deformity, e.g., Charcot’s joint.
• Comment on additional findings present such as insulin injection sites in the tops of the thighs or any walking aids visible next to the bed.
Light touch
• Use a small piece of clean cotton wool provided.
• Ask the patient to look away or close their eyes.
• Working your way up the lower limbs, comparing one leg with the other, touch each leg sequentially and ask the patient to comment each time they feel the touch.
• Use a dabbing rather than stroking motion and time each touch irregularly to avoid anticipation by the patient.
• Confirm any areas of reduced or absent sensation.
Superficial pain (pinprick)
• Use a fresh neurological pin and dispose of it in the sharps bin provided.
• Explain to the patient the need to assess pinprick and demonstrate normal sensation over the sternal edge.
• Ask the patient to report whether the sensation is sharper or blunter than normal whilst moving systematically up the limbs, comparing limb with limb.
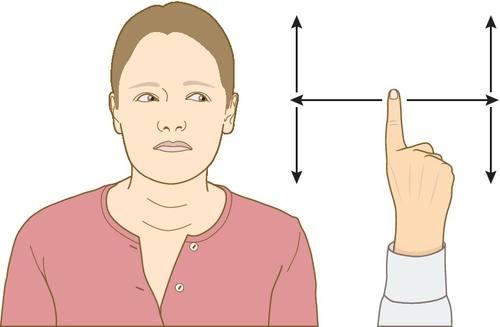
Vibration sense (see Fig. 3.8.2)
• Use the 128-Hz tuning fork provided and hit it against your hand or the examination couch.
• Demonstrate normal vibration sense by placing the tuning fork on the sternum and checking that the patient feels a buzzing sensation (Fig. 3.8.2).
• Place the tuning fork on the tip of each great toe and ask the patient to confirm whether they can feel the vibration.
• If impairment is evident, move up to the medial malleolus, then the tibial tuberosity before the anterior iliac spine, stopping when normal sensation is felt.
• If answers are equivocal, ask the patient to tell you when the vibration stops and then you hold the tuning fork prongs.
Joint position sense (proprioception)
• Demonstrate what this involves to the patient with their eyes open initially.
• Hold the distal phalanx of the great toe at the sides and move it up and down, confirming this with the patient.
• With the patient’s eyes closed ask them to confirm whether subsequent small movements in a random order are ‘up’ or ‘down’.
• Do not press on the top or bottom of the toe when performing this to avoid giving any pressure clues.
• Compare each side with the other.
Temperature
• Often missed due to time but is worth mentioning or attempting to perform a basic assessment.
• Touch the patient with a cold object, e.g.,+ a tuning fork, and ask if it feels cold over sequential parts of the lower limbs, moving upwards.
Special tests
• Offer to assess gait and Romberg’s test when standing (patient sways when standing with eyes closed, suggesting posterior column disease).
• Thank the patient and ensure that they are adequately covered up.
• Wash hands or apply alcohol hand gel.
• Present findings concisely to the examiner, focusing on important positive findings rather than a long list of negatives.
Warning
• Assessing pinprick sensation can be uncomfortable. Ensure that the patient has consented and understands what will happen so as to avoid any distress or embarrassment.
• Diabetic peripheral neuropathy can often coexist with peripheral arterial disease and you must offer to check the pedal pulses and assess the peripheral vascular system to complete the lower limb examination.
• Injury to a high risk diabetic foot leads to increased ulceration risk, which if infected can lead to amputation. All diabetic feet should be closely examined for any new injury, ulceration, swelling or dusky discolouration, which must prompt urgent referral.
How to excel in this station
| Action | Reason | How |
| A systematic approach to the examination. | A fluid, well-rehearsed and organised approach demonstrates competence to the examiner and also ensures that you are less likely to miss out important components. | Work methodically through the different sensory modalities, comparing one limb with the other before moving on to the next stage. |
| Explanation to the patient of the examination process. | The sensory examination can be confusing and good explanation throughout can mean that it progresses more smoothly. | Ensure that normal sensation is demonstrated for each modality at the beginning of each component, e.g., by touching the sternum. |

Common errors in this station
| Common error | Remedy | Reason |
| Influencing the patient’s answers through suggestion. | Give the patient their response instructions at the start of each component and ask them to respond without prompting, with their eyes closed. Time your touch irregularly, thereby minimising anticipation. | The patient may be eager to please, or worried about not getting the answer correct and just answer ‘yes’ if asked the question ‘Can you feel this?’ |
| Running out of time during the examination. | Do not take a history, as this is not necessary. Keep the examination succinct and present your findings during the examination if needed. | A laborious sensory examination can be tedious for both the examiner and the patient, and patient fatigue can result in inconsistent results from having to concentrate hard. A focused concise examination is preferable. |

3.9 Limb weakness
Setting: Medical ward
Time: 10 min
Level: Advanced
Candidate information
Approach to the station
The main distinction is between weakness secondary to an upper motor neurone (UMN) and that to a lower motor neurone (LMN) lesion. This will provide a differential diagnosis and guide your investigations. The initial inspection is key as it can provide important clues as to which lesion is present—you can then examine for features that confirm this. For example, if the arm is held in flexion and there is obvious leg weakness (with extension), it is likely to be upper motor neurone (most likely a stroke).
Patient information
Clinical knowledge and expertise
This station requires a full neurological examination of the upper limbs and, if time allows, some focused quick examination of other aspects of neurological examination. It is important to do your examination systematically and compare both sides as you go along—for example, examine tone on the left and then the right before moving on to examining power. When examining, you should decide whether the weakness is unilateral or bilateral and if it is an UMN or a LMN lesion (Table 3.9.1).
Table 3.9.1
Differentiating between upper motor neurone (UMN) and lower motor neurone (LMN) lesions
| Domain | UMN lesion | LMN lesion |
| Inspection | Pyramidal pattern weakness | Flaccid weakness, prominent wasting |
| Tone | Increased—clasp knife spasticity | Decreased |
| Power | Reduced | Reduced—usually focally (depending on site of lesion) |
| Reflexes | Increased | Reduced/absent |
| Sensation | If sensory disturbance is present, usually entire limb is affected | Either a peripheral sensory loss or a dermatomal sensory reduction may be present |
Introduction
• Gain permission to examine patient and explain what you are about to do.
• Clean your hands prior to beginning.
Inspection
• General inspection—look for other pathological signs such as facial droop or ipsilateral leg weakness. Listen to the patient’s voice when you introduce yourself—is there any dysarthria or dysphasia? Do they have any walking aids near them, which would suggest lower limb weakness as well?
• Look for posture—is the arm held in flexion at elbow and wrist (pyramidal pattern suggesting UMN lesion)?
• Compare both sides—is there any muscle wasting or are any fasciculations present?
Tone
• Hold arm at the wrist and assess tone in the wrist and then the elbow. Compare the sides.
• Clasp knife increase in tone suggests an upper motor neurone lesion.
• Cog wheel (or ‘lead pipe’) increases are seen in extrapyramidal lesions (e.g., Parkinson’s disease).
Power
• Again compare left to right. Grade using the MRC power rating (see Table 3.9.2). Myotomes tested are in brackets.
Table 3.9.2
MRC power table
| Grade | Power |
| 1 | No movement |
| 2 | Flicker of movement |
| 3 | Movement with gravity eliminated |
| 4 | Movement against gravity, not resistance |
| 5 | Normal power |
• Test shoulder abduction (C4), then adduction (C5).
• Elbow flexion (C6), then extension (C7).
• Wrist flexion (C7), then extension (C6).
• Finger abduction (T1).
Reflexes
• Biceps (C5)—put thumb in biceps tendon and observe for elbow flexion.
• Supinator (C6)—strike supinator tendon on lateral side forearm and observe for elbow extension.
• Triceps (C7)—strike triceps tendon just above elbow on posterior surface and observe for elbow extension.
Coordination
• Examine finger to nose coordination at the extremes of reach, looking for pass pointing.
• Pyramidal drift—ask patient to hold both arms out in front of them, palms up and then close their eyes—if the arm pronates, the test is positive, suggesting an upper motor neurone lesion.
Special tests
• You may wish to examine the median, radial and ulnar nerves—this is detailed in station 3.12.
• You should say you would like to examine the rest of the neurological system including cranial nerves and lower limbs. In this station you could quickly look for signs of upper motor neurone weakness of the face (facial drooping on right) and the leg.
Stroke is a very common disease with a consistent persistent pattern of weakness and therefore the most common form of unilateral weakness that will appear in OSCEs. You should therefore know about common patterns of stroke so you can gain extra marks (Fig. 3.9.1). The Bamford classification subdivides stroke into the following clinical presentations:
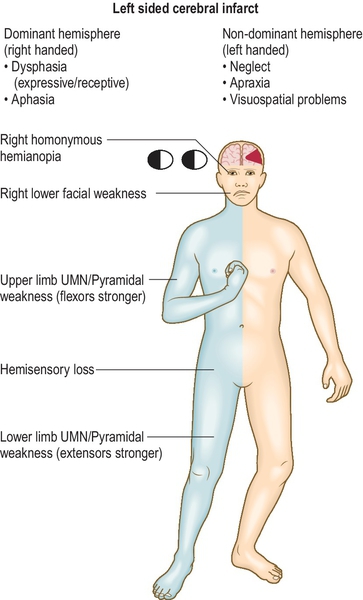
1. Total anterior circulation stroke (TACS)—all three of (1) arm weakness, (2) homonymous hemianopia and (3) cortical dysfunction (dysphasia/ apraxia).
2. Partial anterior circulation stroke (PACS)—2/3 of the above or cortical dysfunction by itself.
3. Lacunar stroke (LACS)—limited motor/sensory deficits without cortical dysfunction.
4. Posterior circulation stroke (POCS)—cerebellar dysfunction/visual defects/brainstem events.
Warning
• A sudden onset of weakness may mean a stroke or TIA and requires urgent assessment.
• In a younger person, sudden onset of stroke following trauma caused by neck rotation or extension may mean a carotid artery dissection.
• A mixture of upper and lower motor neurone signs (usually bilaterally) could mean motor neurone disease—fasciculation is a prominent feature. Examine for speech and swallowing difficulties.
How to excel in this station
| Action | Reason | How |
| Be confident testing reflexes. | It is easy for examiners to tell whether you have practised your skills on real patients. | Practise testing left- and right-sided reflexes standing on one side of the bed. Practise with a real tendon hammer and remember the key is to let the hammer fall onto the tendon under gravity rather than hitting it forcefully. |
| Look for risk factors for stroke. | This demonstrates that you are aware of the risk factors for stroke and you know how to examine for them. | Feel pulse for atrial fibrillation, check blood pressure and listen to carotid arteries for a bruit. |

Common errors in this station
| Common error | Remedy | Reason |
| Examining only one side. | Examine both sides, comparing one side to the other. | You would not want to miss bilateral weakness. |
| Being unsystematic. | Follow the structure suggested above and stick to it. | Neurological examination can be complex so following the structure means you are unlikely to miss something important. |

Station Variations
Intermediate
You may be asked to assess lower limb weakness instead—do this following the same pattern and decide: is it unilateral or bilateral and is it a UMN or LMN lesion?
Advanced
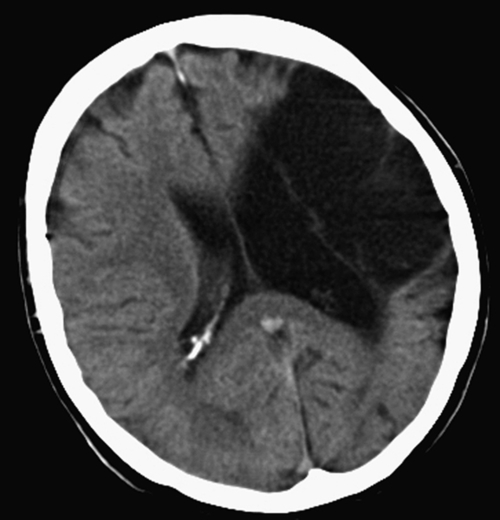
You may be asked to comment on a CT or MR scan—this is similar to commenting on an X-ray (see station 7.2). Compare the sides and look for the obvious abnormality. Remember in stroke the infarct will be on the contralateral side to the clinical signs.
3.10 The patient with a tremor
Setting: Neurology clinic
Time: 15 min
Level: Advanced
Candidate information
Approach to the station
There are two parts to this station—a focused neurological examination and then a discussion that may involve breaking bad news—leave adequate time for both. You should have a clear idea of the differential diagnosis so that you focus on positive features. The main differential is between Parkinsonism, essential tremor and other less likely causes (see Table 3.10.1). You must consider which cause of Parkinsonism is most likely based on your examination (see Table 3.10.2). A diagnosis of idiopathic Parkinson’s disease (IPD) is based on the triad of bradykinesia, rigidity and tremor.
Table 3.10.1
Differential diagnosis of tremor
| Location | Timing | Frequency | Symmetry | Other signs | |
| Parkinson’s disease | Hands or legs | Worse at rest | Coarse | Presents asymmetrically | See Table 3.10.2 |
| Essential tremor | Hands | Worse on action | Coarse | Usually bilateral | Head titubation (nodding) |
| Hyperthyroidism | Hands | Ever present | Fine | Bilateral | Goitre, tachycardia; see station 3.11 |
| Cerebellar | Arms | Worse on action/intention (end of movement) | Usually fine | Depends on site of lesion—can be either | Ataxia, dysdiadochokinesia, nystagmus |

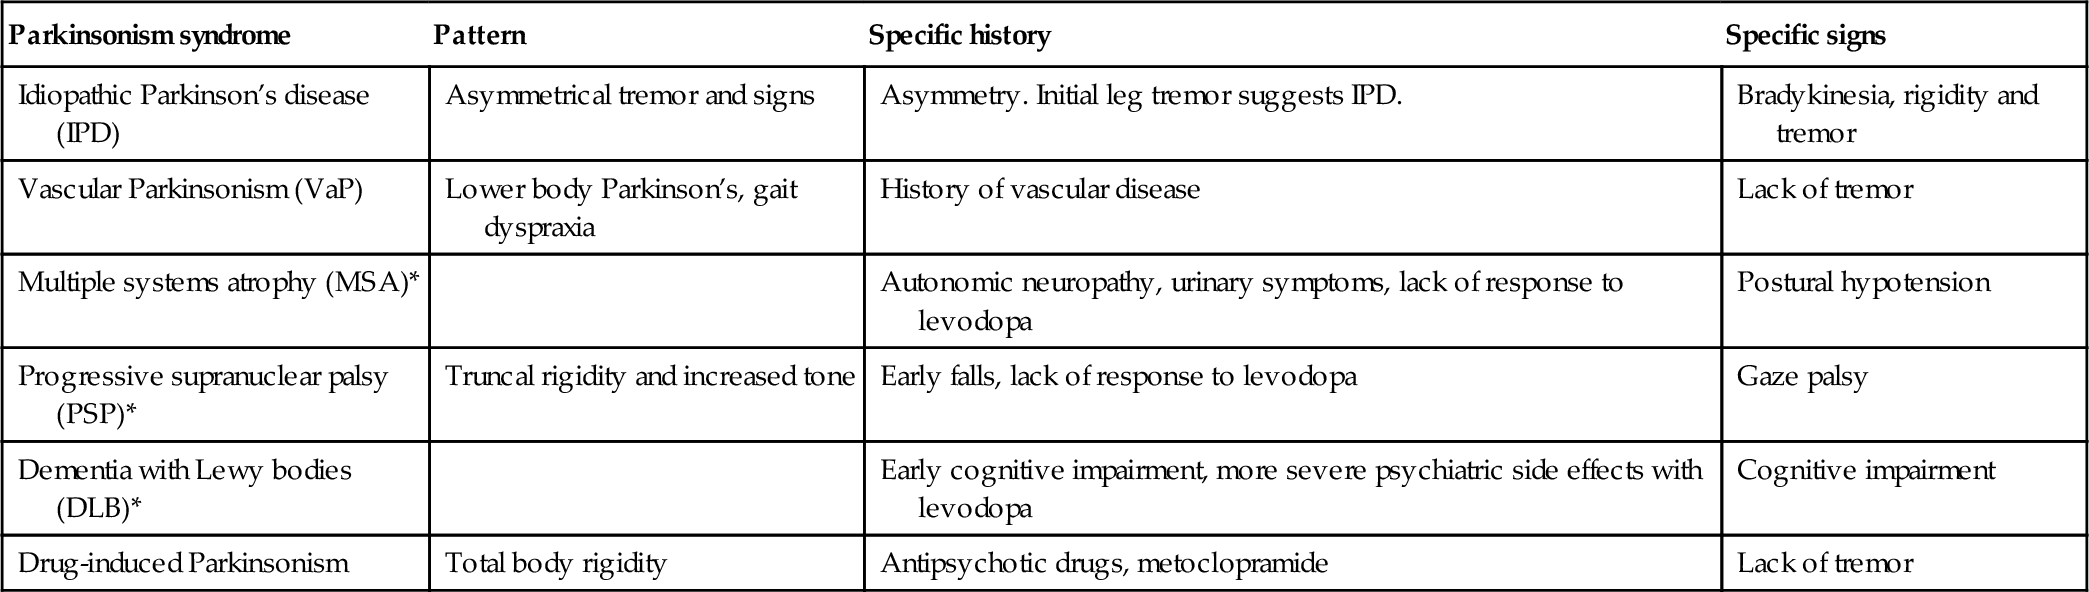
Table 3.10.2
Parkinsonian syndromes (* = Parkinson’s plus syndromes)
| Parkinsonism syndrome | Pattern | Specific history | Specific signs |
| Idiopathic Parkinson’s disease (IPD) | Asymmetrical tremor and signs | Asymmetry. Initial leg tremor suggests IPD. | Bradykinesia, rigidity and tremor |
| Vascular Parkinsonism (VaP) | Lower body Parkinson’s, gait dyspraxia | History of vascular disease | Lack of tremor |
| Multiple systems atrophy (MSA)* | Autonomic neuropathy, urinary symptoms, lack of response to levodopa | Postural hypotension | |
| Progressive supranuclear palsy (PSP)* | Truncal rigidity and increased tone | Early falls, lack of response to levodopa | Gaze palsy |
| Dementia with Lewy bodies (DLB)* | Early cognitive impairment, more severe psychiatric side effects with levodopa | Cognitive impairment | |
| Drug-induced Parkinsonism | Total body rigidity | Antipsychotic drugs, metoclopramide | Lack of tremor |
Patient information
Clinical knowledge and expertise
This is a focused version of a neurological examination (see station 3.9). Examining sensation is not required, but assessing function including gait is key.
Introduction
• Gain permission and explain what you are about to do.
• Clean your hands prior to beginning.
Inspection (Fig. 3.10.1)
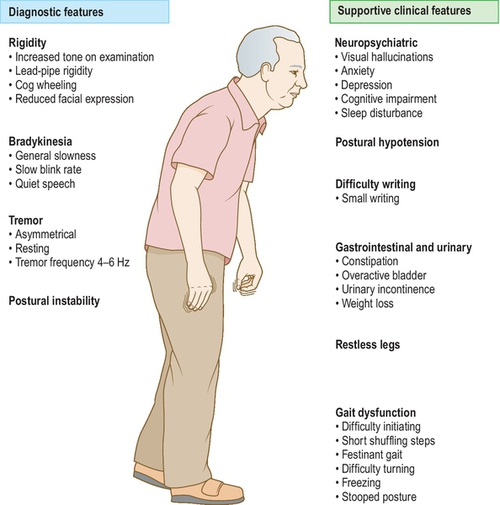
• General inspection—look for hypomimia (lack of facial expression), use of walking aids. Look for any dyskinesia (may be a side effect of levodopa).
• Look for tremor (see Table 3.10.1).
• Check eye movements (PSP) and for nystagmus (cerebellum).
• Listen for low volume monotonous speech.
Tone
• Check tone for cogwheel rigidity in Parkinson’s disease. Bring this out by asking the patient to tap their other hand on their knee.
• Check for tone in lower limbs.
Power
Reflexes
Coordination
• Examine the tremor—ask patient to do finger/nose coordination. Is tremor worse at rest or on action?
• Look for bradykinesia—ask patient to rapidly tap index finger and thumb together. Also look for a progressive reduction in amplitude—both suggest idiopathic PD.
• Ask patient to write a sentence—look at grip (can they pick up the pen?) and at writing (typically smaller than normal in idiopathic PD).
• Examine gait—ask patient to walk a short distance, turn around and walk back. Look for arm swing, difficulty turning, bradykinesia, shuffling gait, freezing, festinant gait (Parkinsonism).
Special tests
Say you would screen for non-motor features of Parkinson’s disease by enquiring about falls, mood and sleep disorders, testing cognition (see station 3.18) and checking postural BP.
Warning
• Look for signs and symptoms of Parkinson’s plus syndromes (see Table 3.10.2—these patients deteriorate more rapidly)—where patients have signs of Parkinson’s but also evidence of other system involvement.
How to excel in this station
| Action | Reason | How |
| Ask about non-motor signs. | Demonstrates breadth of knowledge as these can often have a significant impact on quality of life. | Comment that you would like to ask about mood, sleep disturbance and test cognitive function. |

Common errors in this station
| Common error | Remedy | Reason |
| Not examining gait. | Examine gait—ask the patient to walk a short distance and then turn around. | Gait abnormalities are a key feature of Parkinsonism. |
| Not focusing the examination. | Follow the focused neurological examination described above. | Shows that you can apply your knowledge practically. |

Station variations
Advanced
You may be asked to comment on the treatment options for Parkinson’s disease (Table 3.10.3).
Table 3.10.3
Treatment options for Parkinson’s disease
| Patient and carer support | Specialist nurses, charities (e.g., Parkinson’s UK) and sources of information about disease and prognosis |
| Multidisciplinary management | Physiotherapy, occupational therapy, social work, speech and language therapy, Parkinson’s disease specialist nurses |
| Levodopa | Usually combined with a peripheral dopa-decarboxylase inhibitor to reduce systemic side effects |
| Dopamine agonists | Usually used in younger patients. Include pramipexole, ropinirole, rotigotine |
| COMT inhibitors | Entacapone: Used for reduction in ‘off time’ (dopamine effects wearing off before next dose due) |
| Apomorphine | Subcutaneous infusion used in severe disease |
| Anti-cholinesterase inhibitors | Rivastigamine—used if cognitive impairment ± hallucinations |
| Surgery | Deep brain stimulation in severe treatment resistant cases |