Overview of Positioning
Marg Brown RVT, BEd Ad Ed
In the end we will conserve only what we love; we will love only what we understand; and we will understand only what we have been taught.
—Baba Dioum, Senegalese poet and environmentalist, b. 1937
- 1. Understand the proper anatomical positioning terminology used in veterinary radiography.
- 2. Indicate the common rules for radiographic projections that are used when identifying and radiographing animals.
- 3. Apply the various principles of nonmanual restraint and animal handling so that the patient does not need to be manually restrained when being radiographed.
- 4. Demonstrate radiation and patient safety procedures that should always be followed when any radiograph is taken.
- 5. Describe patient preparation that should be completed before radiographic exposure.
- 6. Describe the advantages and disadvantages of the various positioning aids available.
- 7. Understand the required views.
- 8. List positioning guidelines to ensure production of high-quality diagnostic images.
- 9. Explain how the three important principles of radiation safety are used to protect the radiographer.
- 10. Describe when and how cassette masks should be used in film/cassette imaging.
- 11. Understand the importance of collimation, particularly with the digital image.
- 12. Describe important issues for labeling and identifying an image.
- 13. Correctly display radiographs on a monitor or illuminator.
- 14. Determine whether a radiograph is diagnostic using a checklist.
Key Terms
Key terms are defined in the Glossary on the Evolve website.
Caudal (Cd)
Caudocranial (CdCr)
Cranial (Cr)
Craniocaudal (CrCd)
Distal (Di)
Dorsal (D)
Dorsal plane
Dorsopalmar (DPa)
Dorsoplantar (DPl)
Dose creep
Lateral (L)
Lateromedial (LaM)
Medial (M)
Oblique (O)
Palmar (Pa)
Palmarodorsal (PaD)
Plantar (Pl)
Plantarodorsal (PlD)
Proximal (Pr)
Recumbent
Rostral (R)
Sagittal plane
Skyline
Transverse plane
Ventral (V)
Technical Note:
To preserve space, the radiographs presented in this chapter do not show collimation. For safety, you should always collimate so that the beam is limited to within the image receptor edges. In film radiography, you should see a clear border of collimation (frame) on every radiograph. In some jurisdictions, evidence of collimation is required by law.
Part Two of this text educates the radiographer on how to properly position animals, with a focus on nonmanual restraint. In no other diagnostic imaging field is the patient held by the radiographer. Often patients in veterinary medicine are held while exposures are made, thereby needlessly exposing personnel to harmful radiation. With simple tools and common sense, most exposures can be completed without exposing the radiographer to direct or secondary radiation.
If proper positioning is to occur with nonmanual restraint, the patient should be immobilized by chemical restraint (sedation or general anesthesia) and/or positional devices. Please refer to a good anesthetic text for possible chemical agents. Overt manual restraint should be minimized. Even if chemical restraint is contraindicated, common behavior, restraint, and positioning principles can be applied to minimize radiographer exposure. The welfare of both the patient and the radiographer should be kept in mind during the production of accurate diagnostic radiographs.
If manual restraint is necessary, the radiographer must take all available precautions to minimize being exposed to ionizing radiation. All personnel in the radiographic suite during exposure must be shielded properly with the appropriate leaded apparel. (See Chapter 3 for proper manual restraint and shielding guidelines.) As is also stressed in the chapter on safety, judicious adherence to distance, protection, and exposure time will help minimize radiation exposure to the restrainer. A familiarity with the normal anatomy of the species and the proper terminology is essential. A basic understanding of what is normal assists in producing diagnostic radiographs for accurate interpretation and diagnosis by the veterinarian.
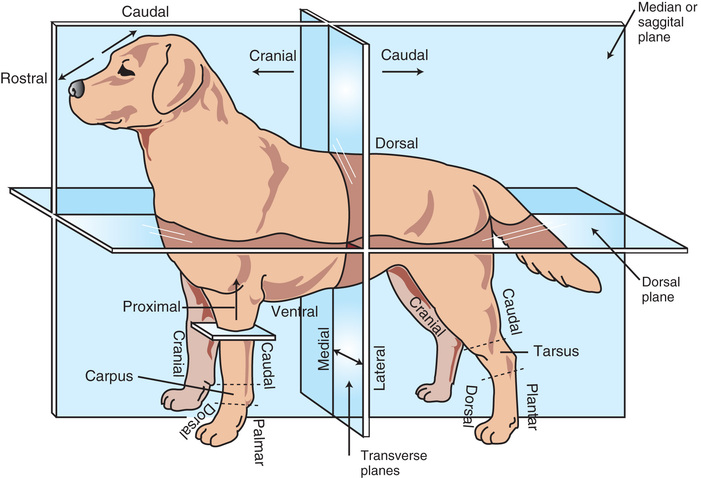
Positional Terminology
It is important to understand the correct terminology. Most associations still use the Nomina Anatomica Veterinaria as the point of reference. The American College of Veterinary Radiology (ACVR) terms are also shown in Fig. 15.1. The basic terms used are listed in Box 15.1.

Rules of Positioning
There are a few rules to keep in mind based on ACVR (see Fig. 15.1):
- 1. Radiographic projections are named according to the direction in which the central beam anatomically enters the body part, followed by the area of exit of the x-ray beam.
- 2. Many projections require combinations of basic directional terms to accurately describe the point of entrance and point of exit. It is recommended that these terms be combined in a consistent order to increase standardization of the nomenclature. With the use of an overhead vertical beam, the position in which a patient lying on its:
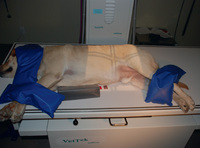
- a. Back (dorsal recumbency), is called ventrodorsal (VD). The beam goes in the ventral (V) portion—the abdomen—and exits out the dorsal (D) aspect, or the patient's spine (Fig. 15.2).
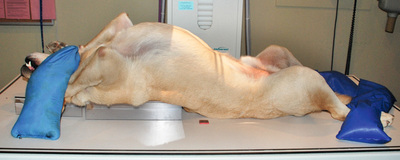 FIG. 15.2 Patient lying in ventrodorsal recumbency. The beam enters the abdomen and exits out the back or spine.
 - b. Abdomen (ventral recumbency), is called dorsoventral (DV). The beam goes in the dorsal (D) portion—the spine—and exits out the ventral (V) aspect, or the abdomen.
 Technician Notes
According to etymological rules, when two terms are combined, the combining vowel (generally “o”) is used to connect them.
- a. Back (dorsal recumbency), is called ventrodorsal (VD). The beam goes in the ventral (V) portion—the abdomen—and exits out the dorsal (D) aspect, or the patient's spine (Fig. 15.2).
- 3. For lateral recumbency, the image is labeled according to the side the patient is lying on. Conventionally, for ease of description, only the area of exit is included.
- a. Thus in a right lateral image, the patient is lying on its right side. The right limb in this case would be the side against the image receptor, and it is called a right lateral (area of exit).
- b. Technically a right lateral radiograph is properly referred to as a Le-RtL, although this term is not commonly used.
- 4. The terms right and left should precede any other terms (e.g., right lateral).
- 5. The terms medial (M) and lateral (L) should be subservient (follow) when used in combination with other terms (e.g., dorsomedial).
- 6. On the head, neck, trunk, and tail, the terms rostral (R), cranial, (Cr), and caudal (Cd) should take precedence (go first) when used in combination with other terms (e.g., caudoventral).
Limb Terminology
- 1. Cranial (Cr) and caudal (Cd) refer to the portion of the limb proximal to the carpus and tarsus.
- 2. The descriptors dorsal (D), palmar (Pa), and plantar (Pl) are used for that portion of the limb distal to and including the carpus and tarsus. Palmar (Pa) is used in reference to the forelimbs, whereas plantar (Pl) refers to the hind limbs.
- 3. In describing the limbs, the terms dorsal, palmar, plantar, cranial, and caudal should take precedence when used in combination with other terms—for example, dorsoproximal.
- 4. The term oblique (O) is added to the names of those projections in which the central ray passes obliquely (not parallel) to one of the three major directional axes—mediolateral (ML), dorsopalmar/dorsoplantar (DP), or craniocaudal (CrCd)—through the body part. They are named in the same manner as the standard views. The term oblique is generally used in reference to equine limbs.
- a. Thus in a dorsomedial-palmarolateral oblique (DM-PaLO) image of the carpus, the beam enters the dorsomedial side of the carpus and exits the palmarolateral aspect of the carpus (Fig. 15.3).
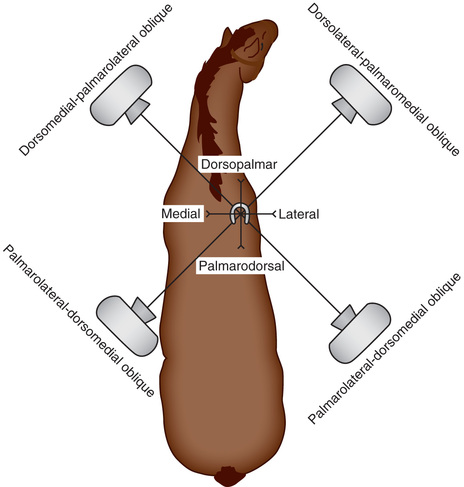 FIG. 15.3 Correct anatomical directional terms for oblique views.
 - b. Technically, if this view was made by positioning the x-ray tube 60 degrees medially from the dorsal side, the designation would be D60°M-PaLO. Oblique terminology is discussed further in Chapter 24.
- a. Thus in a dorsomedial-palmarolateral oblique (DM-PaLO) image of the carpus, the beam enters the dorsomedial side of the carpus and exits the palmarolateral aspect of the carpus (Fig. 15.3).
- 5. In those views requiring a combination of directional terms, a hyphen should be inserted to separate the point of entry and point of exit.
- 6. The tangential and skyline views require no special designation because the point of entry to point of exit method describes these views concisely.
- a. For example, palmaroproximal-palmarodistal (PaPr-PaDi) in reference to an equine forelimb navicular region means that the beam is aiming strictly at the palmaro- (back) aspect of the foot starting at the top (proximo-) and ending toward the sole of the hoof (disto-). Further terminology will be discussed in Chapter 24.
Patient Positioning
The Patient
The comfort and welfare of the patient should be considered at all times. Patience is vital, especially with animals that cannot be sedated, are critically ill, are compromised in any way, or are in pain. Make sure that any required supplies or monitoring equipment are close at hand. Constantly assess and monitor the patient.
Animals are often put in positions with which they are not familiar, but if they feel secure, patients will generally tolerate abnormal positions. To minimize anxiety, animals should be handled in a slow, quiet manner in a darkened room:
- • Animals often respond to a calm, soft voice and gentle stroking.
- • Quick, loud movements and severe restraint usually result in a frightened, tense, and even aggressive patient.
- • Permit the patient time to settle, either with or without sedation.
Do not underestimate the value of a muzzle. Muzzles often distract the patient, as well as being a “technician saver.” Cats especially do not respond to overrestraint, but are often uncooperative. The combination of patience with mild sedation and strategically placed positioning aids generally produces highly diagnostic radiographs.
The rotor noise (spinning of the rotating anode) of the x-ray tube often startles animals. When working with patients exhibiting signs of anxiety, consider starting and releasing the rotor switch just before taking the radiograph so the patient becomes accustomed to the noise. However, be careful not to cause rotor damage.
To prevent retakes, make sure that proper exposure factors are used and that the patient is correctly positioned. Use a collimator, limiting the field of view to cover only the area of interest plus the peripheral borders (Fig. 15.4). You should see evidence of a border of collimation (frame) on each image, ensuring that the field of view is still included. Thus it is essential to include the full anatomy of the area of interest and know the peripheral borders that should be included for each position (e.g., the thorax should include the shoulder joint and diaphragm). Peripheral borders will be stressed for each position in the relevant chapters. Proper collimation not only further protects the patient and positioner from secondary radiation but also increases the radiographic contrast of the image.
Always wear protective equipment if you must hold the patient or be in the room when an exposure is made. For film/screen systems, use a fast combination to lessen the milliamperage and exposure time needed. In digital radiography, minimize dose creep, or the tendency to increase your kV and mAs.
There is also the temptation to obtain more rather than fewer radiographs because digital images are easy to delete. An increased number of radiographs means increased exposure to the patient and personnel, so do limit the number taken by being correct the first time. It is essential to collimate the beam as much as possible to minimize secondary radiation.
Carefully plan and complete as much technical preparation for the exposure as possible before positioning the patient on the table to minimize the length of time the patient is being restrained. This includes measuring the patient, setting the exposure technique on the machine console, positioning the cassette, making the label (if needed), collimating the beam, gathering positional aids, and donning any protective gear. Proper preparation may mean being able to temporarily step away from the beam and secondary radiation even without chemical restraint. Aim for excellent diagnostic images the first time.
Technician Notes
Always measure the animal in the position it is to be radiographed.
Patient Preparation
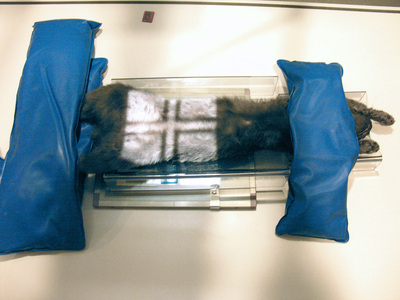
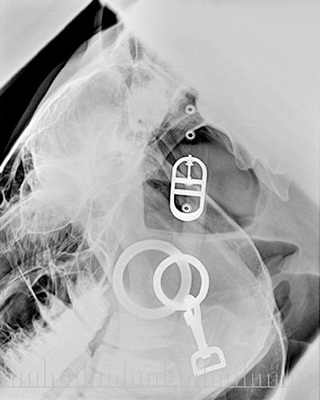
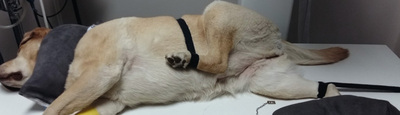
The patient should be clean and free of any debris. If the hair coat of the patient is wet or full of debris, confusing artifacts can appear on the radiograph. Collars, harnesses, and leashes of any sort, especially those made of metal, should be removed (Fig. 15.5). Remove bandages, splints, and casts before radiography unless there is a definite medical reason for leaving them in place. Pedal radiography of the horse may require removing the shoe and cleaning the frog of the foot to minimize any artifacts that may obscure an area of interest.
For radiography of the small animal abdomen, the gastrointestinal tract must be free of ingesta and fecal material. A cathartic such as an enema or a laxative may be indicated to remove the obstructive material. A more detailed discussion of patient preparation for abdominal studies is provided in Chapter 23.
Technician Notes
Always remember the safety rules of time, distance, and shielding when working with x-rays. What you don't see can cause you future damage and impair your health. Protect yourself.
Positioning Aids for Human Safety
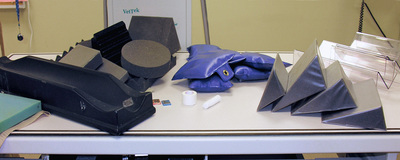
To assist in the positioning of the patient, devices such as sandbags, foam blocks and wedges, wood blocks, and a radiolucent trough can be used (Fig. 15.6). Tape is essential; gauze, rope, bungee cords, and compression bands are also useful positioning aids. Any reusable aids should be waterproof, washable, and stain resistant, as well as easy to store.
Positioning devices are commercially available. Prepared sandbags are generally prefilled with clean silica sand, permanently sealed, and often made of vinyl or nylon with plastic linings. Other material, such as bean bags, which are filled with polyester beads, can also be used; however, they do not offer the same support as sand does. Sand and bean bags are radiopaque, so should not be in the field of interest.
Commercial foam, available in various shapes and sizes, is generally covered in washable heavy vinyl covers (Fig.15.7A). Triangular and rectangular foam blocks are the most common. Foam tends to produce an air density shadow and, if not properly covered, absorbs and retains liquids that may be radiopaque when dry. The cover on foam blocks may also leave density shadows on the processed radiograph.
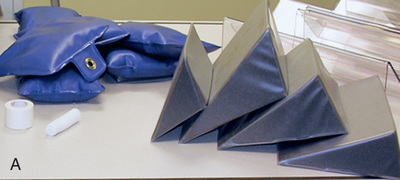
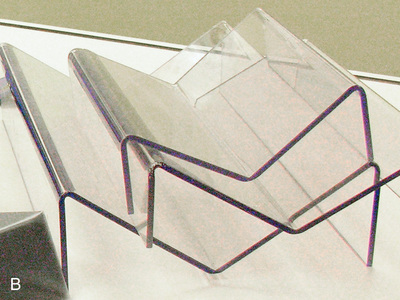
U- and V-shaped troughs are essential to maintain a patient in dorsal recumbency. Generally they are clear plastic or vinyl covered. The plastic/acrylic troughs are radiolucent, lightweight, and easy to clean (Fig. 15.7B). U-shaped troughs offer good head support. Those with acrylic rods can be used to maintain the shape of the skull. When using troughs for abdominal or thoracic radiographs, ensure that the entire field of view is either on or off the trough; otherwise, the radiograph may display distortion, artifacts, or asymmetry. Positioning troughs used for areas such as the pelvis should be fully outside the collimated area for the same reasons.
Tape, gauze, and compression bands are extremely effective. These must be functional to be satisfactory. Rope and gauze, using a half-hitch knot or variation (placing the end through the loop and then around the object), can be tied to the table if the patient is heavily sedated or anesthetized, or held by a person who can then back away from both the primary beam and secondary radiation. Velcro on the underside of the table allows soft Velcro straps to stick and is effective for many views (Fig. 15.8).
Adhesive tape can be used to extend and hold limbs, rotate limbs, secure the patellae and femurs for a hip dysplasia view, widen the space between the toes, temporarily secure a head out of the field of view, and so on (Fig. 15.9). A wooden spoon can be used to keep a cat's head out of the field of view so the radiographer is farther away from the primary beam.
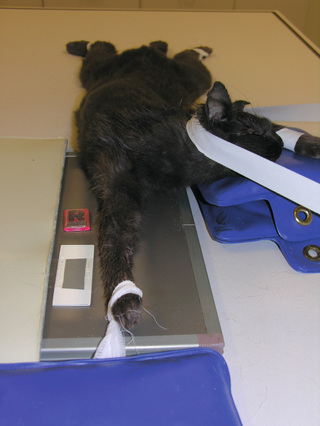
Compression bands and hook-and-loop tape (Velcro) can be applied. Clothes pegs/clothes pins for cats, commercially available cat scruffers (Fig. 15.10), or nylon towel clamps applied to the dorsal neck region (a feline behavior principle that the queen uses with her kittens) is a valuable tool for feline patients and is almost as effective as sedation, especially if the positioning is quick and the patient is not in pain. Place the sandbag over the device. Wrapping a cat in a towel (“cat burrito”) can be effective if you need to pull out the limbs for imaging or even for abdominal and thoracic views. Sandbagging the towel keeps cats in position. Wrapping does allow many angry cats to become compliant.
Your own devices can be made at a fraction of the cost of the commercially available positioning devices. Sandbags can easily be sewn and filled with sand. Empty sealable bags that can be filled with sand are also available. If you are making your own out of canvas (jean legs work well) or thick vinyl, make sure to use very narrow stitching so the sand does not leak out. Fabric sand bags are not easily disinfected, so before each use, wrap them in disposable plastic. Most fabric stores sell foam that can be cut into desired shapes with a scalpel blade or electric knife. Covering the bags and wedges is essential for disinfection between patients and for keeping the devices dry to minimize radiographic artifacts. With these devices, and sedation if necessary, minimal manual restraint can be used.
Any nonmanual restraint used must always focus on the safety and comfort of the patient. The devices should be quickly applied and released and should never compromise the patient. Positioning aids should give the patient the illusion that it is being held. Strategically placed sandbags or compression devices over the neck and limbs, judicious use of tape, a dimly lit room, calm deliberate movements, and a gloved hand placed over the head and held until the rotor is depressed may keep patients, especially dogs in lateral recumbency, calm long enough for the restrainer to step back at least 6 feet.
The moment the rotor is depressed, slip your hand out of the glove, leaving it over the animal's head so the patient assumes that you are still there. Keep talking to the patient as you quietly step back. Move forward as soon as the radiograph has been taken. Another person should be depressing the exposure buttons on the console; if you are using the foot pedal, step back as far as possible. Increasing your distance from the beam drastically reduces your exposure.
If there is no alternative but to restrain a patient, it is imperative to look away from the field of view and lean back as far as possible while taking the radiograph. At no point should any part of your body be in the field of view. Protective equipment protects you from secondary radiation, not from the primary beam.
Acrylic tubes, stockinette material, pillowcases, paper bags, and plastic containers can also be strategically used for the positioning of exotic animals. Please see Chapter 25 for more detail on this subject.
Equine radiographers are less likely to practice nonmanual restraint because of perceived physical safety for both the handler and the horse. However, every effort should be made to practice the three essential components of radiation safety (time, distance, and shielding). See Chapter 24 for further information on equine positioning.
Technician Notes
Have everything ready before taking the exposure. This includes measuring the animal, turning on the machine, setting the main voltage calibration if required, having proper source image distance, using a grid or not, and collimating and setting the exposures. Have the cassettes or plates ready. Positioning devices should be close at hand, but any objects or distractions should be removed.
The patient should be clean, have no artifacts in the area of interest, and be chemically restrained if possible.
Required Views and Positioning Guidelines
The following guidelines assist in producing high-quality images:
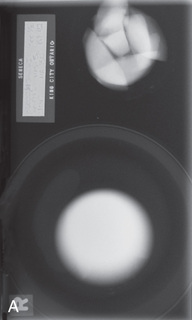
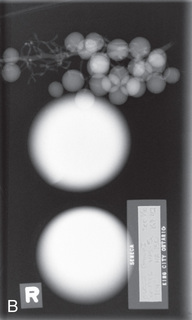
- • Two views of each anatomical area taken at right angles to each other are the minimum recommended exposures. You are trying to visualize a three-dimensional body on a two-dimensional image, so details will be missed if two perpendicular views are not taken (Fig. 15.11). There may be exceptions if the patient is debilitated or in trauma, or if positions other than the lateral will cause undue stress to the animal. A horizontal beam radiograph should then be considered so that you still have two perpendicular views (Fig. 15.12).
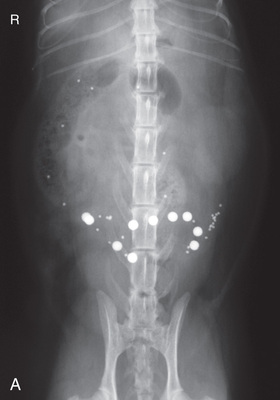
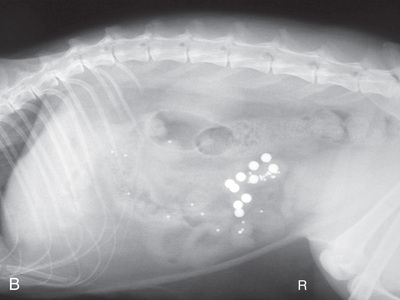 FIG. 15.11 A and B, It would be difficult to determine exactly where the barium-impregnated polyurethane spheres (BIPS) are positioned without the two perpendicular views. Note the proper placement for viewing of VD and lateral radiographs.
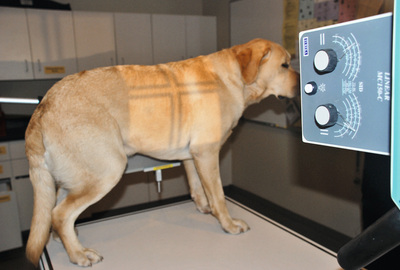 FIG. 15.12 Horizontal beam of a dog in a standing lateral view.
 - • Position the area of interest closest to the image receptor to reduce distortion and magnification of the area under examination (Fig. 15.13).
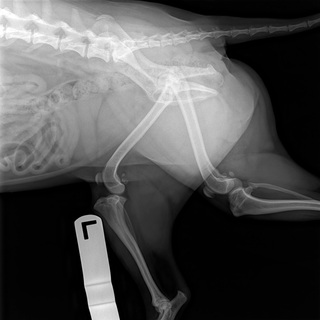 FIG. 15.13 Note the difference in magnification between the left limb, which is closer to the plate, and the opposite right limb, which is raised from the image receptor. Also note that the bone edges are not as defined on the right limb.
 - • When radiographing a limb, especially in immature or older patients, consider imaging the opposite corresponding limb to allow the pathological structure of one limb to be compared with the normal anatomy of the other.
- • When the tabletop technique is used, an image receptor can be divided to image more than one view, limiting the number of films utilized (Fig. 15.14).
- • Place a lead sheet over half of the cassette (cassette mask) to prevent exposure while the other side is being radiographed.
- • The image receptor should still be collimated to the image only so that secondary radiation will not cause unnecessary fogging of the image.
- • Lead sheets, which can be purchased from most x-ray supply companies, are usually supplied in preselected sizes; or larger sheets can be purchased and cut to the desired size.
- • The lead should be at least 2 mm thick. If a lead sheet is unavailable, a lead glove can be placed over the area to be shielded.
- • When using the tabletop technique, place a nonslip pad, such as a rubber shelf liner, under the cassette to keep it from slipping (Fig. 15.15).
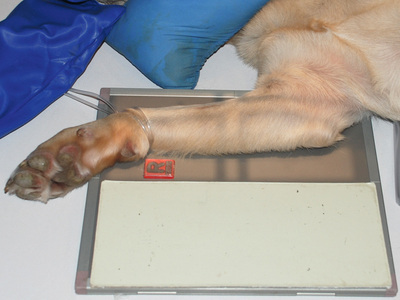 FIG. 15.14 Divided image receptor view of a dog extremity. Through the use of a lead shield, both views can be exposed on one plate. The receptor is not divided when a grid is used.
 - • When two separate views will be positioned on a radiograph, both views should be facing the same direction. For limbs, this would mean that the toes are facing the same side of the cassette; for the skull, the nose is in the same direction on each view.
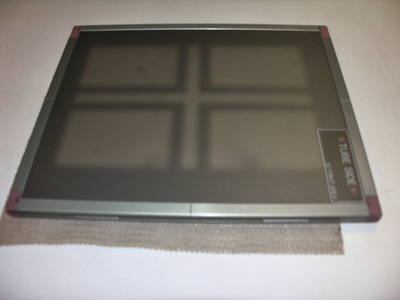 FIG. 15.15 Placing a grip pad under the image receptor helps keep the cassette from sliding when using the tabletop technique. Note also how the beam is collimated inside the cassette.
 - • In general, the central ray should be centered directly over the area of interest.
- • The measurement for any anatomical region is generally taken over the thickest part.
- • This practice ensures that all regions of the area of interest will be penetrated with sufficient exposure factors.
- • A caliper is used to measure the anatomical area of interest so that proper exposures can be made. This is an inexpensive device that measures part thickness in centimeter increments (Fig. 15.16).
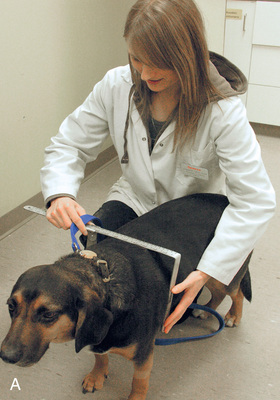
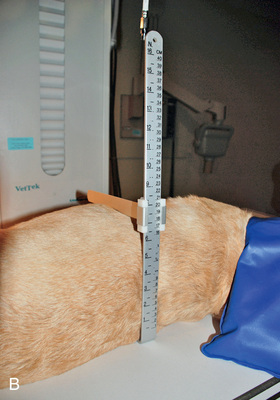 FIG. 15.16 A, Measuring with a caliper in this position may lead to extra tissue thickness. B, Calipers are properly used when the patient is measured lying in the radiographic view to be projected. This patient measures 17 cm.
- • The patient should be measured in the same position used for the radiograph; if the animal is measured while standing, for example, the tissue thickness measurement will be greater than when the animal is recumbent, especially for soft tissue studies (see Fig. 15.16A-B).
- • Use an image receptor that is large enough to cover the body area being radiographed. Specific anatomy must be included for each anatomical area.
- • For example, all radiographs of long bones (humerus and femur) should include the shaft of the bone, as well as the joints both distal (Di) and proximal (Pr) to the bone.
- • For joint radiography, the central ray must be centered over the joint space, and the beam should include a portion of the long bones distal and proximal to the joint.
- • Proper centering and inclusion is further expanded in Chapters 18 and 19.
- • Have the thickest part of the area of interest toward the cathode side so that the most penetrating x-rays can assist in proper exposure (Fig. 15.17; see Chapter 2).
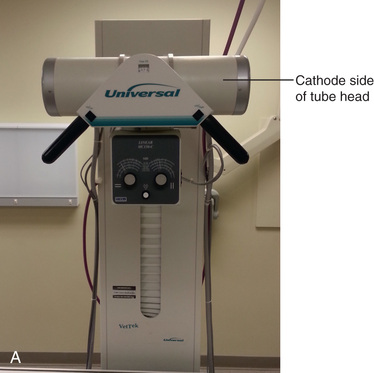
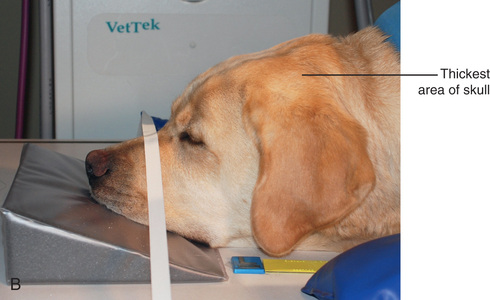 FIG. 15.17 A, The thickest part of the area of interest should be toward the cathode, which is usually to the right side of the tube head. B, Positioning for radiograph.
Image Identification
Identification (ID) of the radiographs is important both for legal purposes and for knowledge that the radiographs belong to the patient in which you are interested. Please see Chapter 7 for further details. Be sure that each radiograph contains the following information: owner and patient ID, date of examination, name and location of the facility, veterinarian, and other state or provincial requirements. Additional helpful information includes age, breed, and sex of the patient that should be written in the radiography log.
Positioning markers (right, left, front, hind) should be used so that the radiographs may be correctly interpreted. This is especially true for equine radiographs of areas distal to the carpus and tarsus or symmetrical anatomical areas such as a skull. Conventionally, markers are placed laterally (as opposed to medially) for DP, CrCd, or CdCr and oblique limb radiographs.
Place the markers cranially for lateral radiographs. In DV or VD views, place the appropriate L or R marker on the correct side of the patient. When a lateral projection of the body is taken, the marker should indicate the side that is directly on the table or cassette. Thus an R would indicate a patient lying in right lateral recumbency. The marker or label would generally be placed cranially and ventrally (Fig. 15.18).

When a special procedure is performed, such as a gastrointestinal contrast study that is part of a series, time elapsed or order taken is also important. In film radiography this designation can be made on the lead tape label. Specialized time clocks can be used in which it is easy to adjust the time lapse (Fig. 15.19). Gravity markers that indicate a patient is standing are also available, although not frequently used.

Technician Notes
Quickly go through a mental checklist such as this one before pushing the exposure button:
- • Are the settings correct?
- • Is the plate/cassette/machine/grid in position?
- • Is the thickest part toward the cathode, if applicable?
- • Are the markers and ID (if using) in the proper location and away from relevant anatomy?
- • Do you have the correct body part and view?
- • Is the patient properly centered? Are the peripheral borders correct?
- • Is the x-ray beam correctly collimated?
- • Is the patient properly prepared, positioned, and restrained so that the body part is parallel to the image receptor and so that the central ray is perpendicular to both?
- • Is the patient in the correct phase of respiration if applicable?
Viewing Radiographs
To assist in understanding normal radiographic anatomy, you should always view radiographs on the illuminator or monitor in the following manner (see Fig. 15.11):
- Lateral radiographs: The cranial part of the animal is to your left.
- Dorsoventral/ventrodorsal radiographs: The cranial part of the animal points up, and the animal's left side is on your right (as if you are going to shake its paw).
- Lateromedial/mediolateral or oblique radiographs of the limbs: The proximal part of the limb points up, and the cranial or dorsal aspect of the limb is to your left.
- DP/PD/CrCd/CdCr radiographs: The proximal end of the extremity is at the top of the illuminator or monitor.
For proper illumination specifications and concerns, see Chapter 7. Consistency is important. When labeling film radiographs, consider how the labels and markers are positioned so that they can easily be read when the radiographs are viewed in the proper positions.
Fig. 15.20 is a mystery radiograph. Review it and answer the question presented with it.
Radiographic Checklist
Before submitting the radiographs to the veterinarian, you should ask yourself the following questions to ensure that you have optimal diagnostic and legal radiographs:
- • Is the image label present and legible?
- • Are positional lead markers present?
- • Do you have good exposure with appropriate contrast and density?
- • Is your image properly centered?
- • Is the body part properly positioned, with no rotation?
- • Are the appropriate borders included, and is there evidence of collimation?
- • Is there no evidence of a human exposure, such as a glove?
- • Is the film properly processed (if applicable)?
- • Have artifacts been kept to a minimum to prevent interference with the image?
If the answer is no to any of these questions, consider the next two:
 Key Points
- 1. The radiographic projection is described according to where the beam first enters and then exits the area of interest.
- 2. Label the side that the animal is lying on for lateral radiographs.
- 3. For pectoral limbs, use the term dorsopalmar (DPa)/palmarodorsal (PaD) to designate the area distal to and including the carpus. For pelvic limbs, dorsoplantar (DPl)/plantarodorsal (PlD) is used to designate the area distal to and including the tarsus. Craniocaudal (CrCd)/caudocranial (CdCr) is used for areas proximal to the carpus and tarsus.
- 4. The area of interest should be closest to the image receptor.
- 5. Keep human safety in mind at all times, utilizing the three important safety principles of time, distance, and shielding.
- 6. Careful planning and preparation help minimize retakes.
- 7. Use chemical restraint if possible and nonmanual restraint.
- 8. Knowledge of the proper positioning technique along with creativity leads to inventive and effective use of positioning aids and nonmanual restraint.
- 9. Generally utilize slow and deliberate movements in a dimly lit room to keep the patient calm.
- 10. When identifying limbs, place the markers laterally for DP, CrCd, or CdCr views and cranially for lateral views.
- 11. When looking at radiographs on the viewer, position for a VD/DV so that you are “shaking its paw” or looking at the ventral aspect. For a lateral view, have the animal's head to your left.
Review Questions
1. A cat is lying on its abdomen with its limbs extended. The view of the tarsus in this position would be called:
a. Radiolucent and can be in the field of view
b. Radiolucent and should not be in the field of view
c. Radiopaque and can be in the field of view
d. Radiopaque and should not be in the field of view
3. It is important to collimate the beam as much as possible so that there is less:
a. Contrast and density on the image
b. Secondary exposure to the patient and restrainer
c. Chance of magnification or distortion
d. Likelihood that the patient will move
4. An image of the radius/ulna of a dachshund has been collimated to include the humerus and metacarpus. This is:
a. Correct, as the joints above and below the area of interest have been included
b. Incorrect, as not enough of the limb has been included
c. Incorrect, as it should be collimated to include from the elbow to the carpus
d. Incorrect, as only the radius and ulna should be included
5. You are going to divide an image receptor for a feline skull. You should:
a. Have the nose in each view pointing in the same direction
b. Do so when utilizing a grid
c. Use a lead sheet to cover the side being radiographed
d. Place the marker at the caudal aspect of the skull in each case
6. You are radiographing a right craniocaudal humerus of a standard poodle. The “R” marker is best placed:
b. At the toes on the right side
c. Along the medial side of the humerus
d. Along the lateral side of the humerus
7. You can be farther from the beam when the image is exposed if you:
a. Wear appropriate apparel and hold your patient
b. Use the shortest exposure time possible
c. Utilize positioning aids whenever possible
d. Measure at the thickest part
8. You are to radiograph the full abdomen of a sedated Doberman. The thickest part measures 20 cm. You are best to radiograph the:
a. Cranial aspect and then remeasure and radiograph the caudal aspect
b. Full abdomen on one large image receptor using the cranial measurement
c. Average of both the cranial and caudal measurements of the abdomen
d. Thickest part only and not include the caudal abdomen
9. When placing an image of an extremity on the illuminator for the veterinarian to read, you should position it so that the digits are pointing:
10. The veterinarian required a follow-up radiograph of the abdomen of a patient. The technique chart was correctly followed, but your image was darker than the one taken by your colleague a month ago. This could be because:
a. Your patient has gained weight
b. You measured at the thickest part while the patient was on the table
c. You collimated more than your colleague did
d. You measured while the patient was standing
11. The veterinarian requests a right lateral of the thorax of a Pomeranian. The patient will be tranquilized and:
c. Standing so that its right side is against the plate
d. The beam will enter the patient from the right side
12. The collimation for this Pomeranian patient in Question 11 will extend to the:
a. Thorax and abdomen because both will fit on the image
b. Heart and lungs, as this is the area that the veterinarian is interested in
c. Third rib cranially and the 12th rib caudally, as this is the area of interest
d. Diaphragm and shoulder joint, as the full thorax should be included
13. You are to radiograph a lateral abdomen of a well-behaved golden retriever. To keep your patient in position so you can move away from the beam, you should place:
a. Sandbags over the chest and abdomen
b. Sandbags over the head/neck, pelvis, and limbs
c. Foam pads over the head/neck, pelvis, and limbs
d. A scruffer over the neck region behind the ears
14. A dorsolateral-palmaromedial oblique (D60°L-PaMO) of an equine right carpus means that the beam is entering the right limb at 60 degrees from the:
a. Front and lateral side of the limb
b. Front and medial side of the limb
c. Back and lateral side of the limb
d. Back and medial side of the limb
15. The (D60°L-PaMO) of an equine right carpus in Question 14 means that the image receptor is against the:
a. Dorsal and medial side of the limb
b. Dorsal and lateral side of the limb
c. Palmar and medial side of the limb
d. Palmar and lateral side of the limb
Chapter Review Question answers are located in the Instructor Resources on Evolve and can be provided to students at the discretion of the Instructor.