Chapter 4: Upper Limb
Contributions By Janelle M. Black, B.S.(DMIT), R.T.(R)(ARRT), Contributors to Past Editions Nancy Johnson, MEd, RT(R)(CV)(CT)(QM)(ARRT), FASRT, Kathy M. Martensen, BS, RT(R), Donna Davis, MEd, RT(R)(CV), and Linda S. Lingar, MEd, RT(R)(M)
Radiographic Anatomy
Upper Limb
The bones of the upper limb can be divided into four main groups: (1) hand and wrist, (2) forearm, (3) arm (humerus), and (4) shoulder girdle (Fig. 4.1). The first two groups are discussed in this chapter. The important wrist and elbow joints are included; the shoulder joint and proximal humerus are discussed in Chapter 5.
The shape and structure of each of the bones and articulations, or joints, of the upper limb must be thoroughly understood by technologists so that each part can be identified and demonstrated on radiographs.
Hand and Wrist
The 27 bones in each hand and wrist are divided into the following three groups (Fig. 4.2):
| Phalanges (fingers and thumb) | 14 |
|---|---|
| Metacarpals (palm) | 5 |
| Carpals (wrist) | 8 |
| Total | 27 |
The most distal bones of the hand are the phalanges (fa-lan′-jez), which constitute the digits (fingers and thumb). The second group of bones is the metacarpals (met″-ah-kar′-palz); these bones make up the palm of each hand. The third group of bones, the carpals (kar′-palz), consists of the bones of the wrist.
Phalanges: Fingers and Thumb (Digits)
Each finger and thumb is called a digit, and each digit consists of two or three separate small bones called phalanges (singular, phalanx [fa′-lanks]). The digits are numbered, starting with the thumb as 1 and ending with the little finger as 5.
Each of the four fingers (digits 2, 3, 4, and 5) is composed of three phalanges—proximal, middle, and distal. The thumb, or first digit, has two phalanges—proximal and distal.
Each phalanx consists of three parts: a distal rounded head, a body (shaft), and an expanded base, similar to that of the metacarpals.
Metacarpals (Palm)
The second group of bones of the hand, which make up the palm, consists of the five metacarpals. These bones are numbered the same way as the digits are, with the first metacarpal being on the thumb, or lateral, side when the hand is in the anatomic position.
Each metacarpal is composed of three parts, similar to the phalanges. Distally, the rounded portion is the head. The body (shaft) is the long curved portion; the anterior part is concave in shape, and the posterior, or dorsal, portion is convex. The base is the expanded proximal end, which articulates with associated carpals.


Joints of the Hand
The joints, or articulations, between the individual bones of the upper limb are important in radiology because small chip fractures may occur near the joint spaces. Therefore, accurate identification of all joints of the phalanges and metacarpals of the hand is required (Fig. 4.3).
Thumb (First Digit)
The thumb has only two phalanges, so the joint between them is called the interphalangeal (IP) joint. The joint between the first metacarpal and the proximal phalanx of the thumb is called the first metacarpophalangeal (MCP) joint. The name of this joint consists of the names of the two bones that make up this joint. The proximal bone is named first, followed by the distal bone.
For radiographic purposes, the first metacarpal is considered part of the thumb and must be included in its entirety in a radiograph of the thumb—from the distal phalanx to the base of the first metacarpal. This inclusion is not the case with the fingers, which for positioning purposes include only the three phalanges—distal, middle, and proximal.
Fingers (Second through Fifth Digits)
Each of the second through fifth digits has three phalanges, and they have three joints each. Starting from the most distal portion of each digit, the joints are the distal interphalangeal (DIP) joint, followed by the proximal interphalangeal (PIP) joint, and, most proximally, the MCP joint.
MPJ and CMC Joints
The metacarpals articulate with the phalanges at their distal ends and are called metacarpophalangeal (MCP) joints. At the proximal end, the metacarpals articulate with the respective carpals and are called carpometacarpal (CMC) joints. The five metacarpals articulate with specific carpals as follows:
Review Exercise With Radiographs
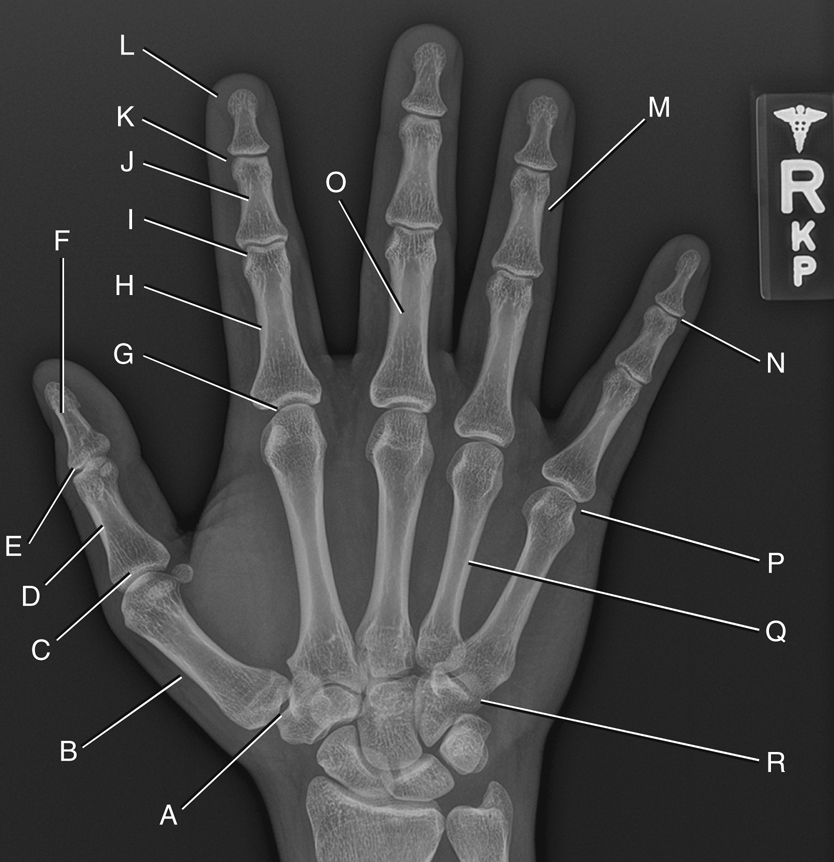
In identifying the joints and phalanges of the hand, the specific digit and hand must be included in the descriptions. A PA radiograph of the hand (Fig. 4.4) shows the phalanges and metacarpals and the joints described previously. A good review exercise is to identify each part labeled A through R on Fig. 4.4 (cover up the answers listed next). Then check your answers against the following list:
- A. First carpometacarpal joint of right hand
- B. First metacarpal of right hand
- C. First metacarpophalangeal joint of right hand
- D. Proximal phalanx of first digit (or thumb) of right hand
- E. Interphalangeal joint of first digit (or thumb) of right hand
- F. Distal phalanx of first digit (or thumb) of right hand
- G. Second metacarpophalangeal joint of right hand
- H. Proximal phalanx of second digit of right hand
- I. Proximal interphalangeal joint of second digit of right hand
- J. Middle phalanx of second digit of right hand
- K. Distal interphalangeal joint of second digit of right hand
- L. Distal phalanx of second digit of right hand
- M. Middle phalanx of fourth digit of right hand
- N. Distal interphalangeal joint of fifth digit of right hand
- O. Proximal phalanx of third digit of right hand
- P. Fifth metacarpophalangeal joint of right hand
- Q. Fourth metacarpal of right hand
- R. Fifth carpometacarpal joint of right hand

Carpals (Wrist)
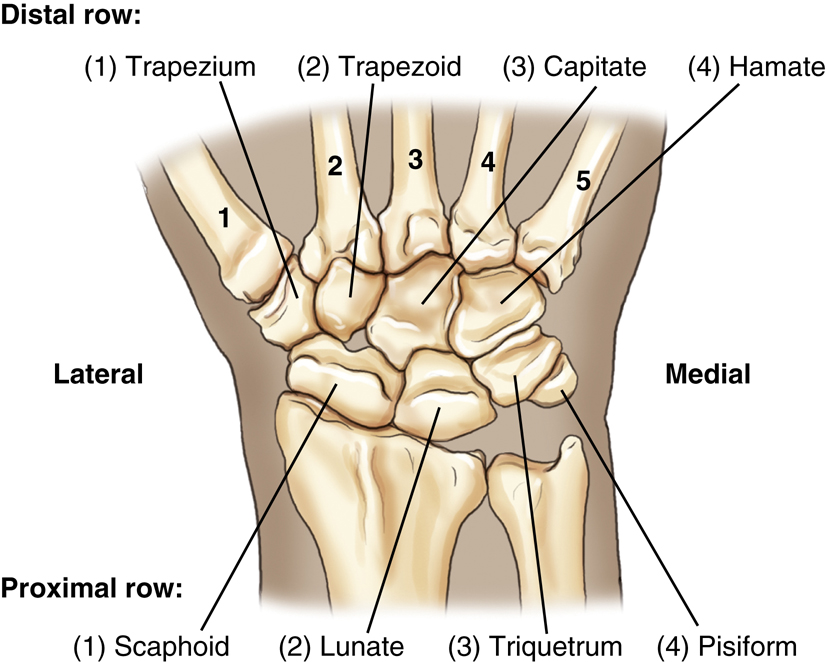
The third group of bones of the hand and wrist are the carpals, the bones of the wrist. Learning the names of the eight carpals is easiest when they are divided into two rows of four each (Fig. 4.5).
Proximal Row
Beginning on the lateral, or thumb, side is the scaphoid (skaf′-oyd), sometimes referred to as the navicular. One of the tarsal bones of the foot also is sometimes called the navicular or scaphoid. However, the correct term for the tarsal bone of the foot is the navicular, and the correct term for the carpal bone of the wrist is the scaphoid.
The scaphoid, a boat-shaped bone, is the largest bone in the proximal row and articulates with the radius proximally. Its location and articulation with the forearm make it important radiographically because it is the most frequently fractured carpal bone.
The lunate (moon shaped) is the second carpal in the proximal row; it articulates with the radius. It is distinguished by the deep concavity on its distal surface, where it articulates with the capitate of the distal row of carpals (best seen on anterior view; Fig. 4.6).
The third carpal is the triquetrum (tri-kwe′-trum), which has three articular surfaces and is distinguished by its pyramidal shape and anterior articulation with the small pisiform.
The pisiform (pi′-si-form) (pea shaped), the smallest of the carpal bones, is located anterior to the triquetrum and is most evident in the carpal canal or tangential projection (Fig. 4.7).
Distal Row
The second, more distal row of four carpals articulates with the five metacarpal bones. Starting again on the lateral, or thumb, side is the trapezium (trah-pe′-ze-um), a four-sided, irregularly shaped bone that is located medial and distal to the scaphoid and proximal to the first metacarpal. The wedge-shaped trapezoid (trap′-e-zoyd), also four sided, is the smallest bone in the distal row. This bone is followed by the largest of the carpal bones, the capitate (kap′-i-tate) (capitate means “large bone”). It is identified by its large rounded head that fits proximally into a concavity formed by the scaphoid and lunate bones.
The last carpal in the distal row on the medial aspect is the hamate (ham′-ate), which is easily distinguished by the hooklike process called the hamulus (ham′-u-lus), or hamular process, which projects from its palmar surface (see Fig. 4.7).
Carpal Sulcus (Canal or Tangential Projection)
Fig. 4.7 is a drawing of the carpals as they would appear in a tangential projection down the wrist and arm from the palm or volar side of a hyperextended wrist. This view demonstrates the carpal sulcus formed by the concave anterior or palmar aspect of the carpals. The anteriorly located pisiform and the hamulus process of the hamate are visualized best on this view. This concave area or groove is called the carpal sulcus (carpal tunnel or canal), through which major nerves and tendons pass.
The term hamate means hooked, which describes the shape of the hamate in the illustration. The trapezium and its relationships to the thumb and trapezoid are well demonstrated.
Summary Chart of Carpal Terminology


Review Exercise With Radiographs
Five projections for the wrist are shown in Figs. 4.8 through 4.12. A good review exercise is to identify each carpal bone as labeled (first cover the answers that follow). Check your answers against the following list.
In the lateral position (see Fig. 4.12), the trapezium (E) and the scaphoid (A) are located more anteriorly. Also, the ulnar deviation projection (see Fig. 4.10) best demonstrates the scaphoid without the foreshortening and overlapping seen on the posteroanterior (PA) (see Fig. 4.8).
The radial deviation projection (see Fig. 4.9) best demonstrates the interspaces and the carpals on the ulnar (lateral) side of the wrist-hamate (H), triquetrum (C), pisiform (D), and lunate (B). The outline of the end-on view of the hamulus process of the hamate (h) also can be seen on this radial deviation radiograph. The hamulus process also is demonstrated well on the carpal canal projection in Fig. 4.11, as is the pisiform (D), which is projected anteriorly and is seen in its entirety. Answers are as follows:


Forearm—Radius and Ulna
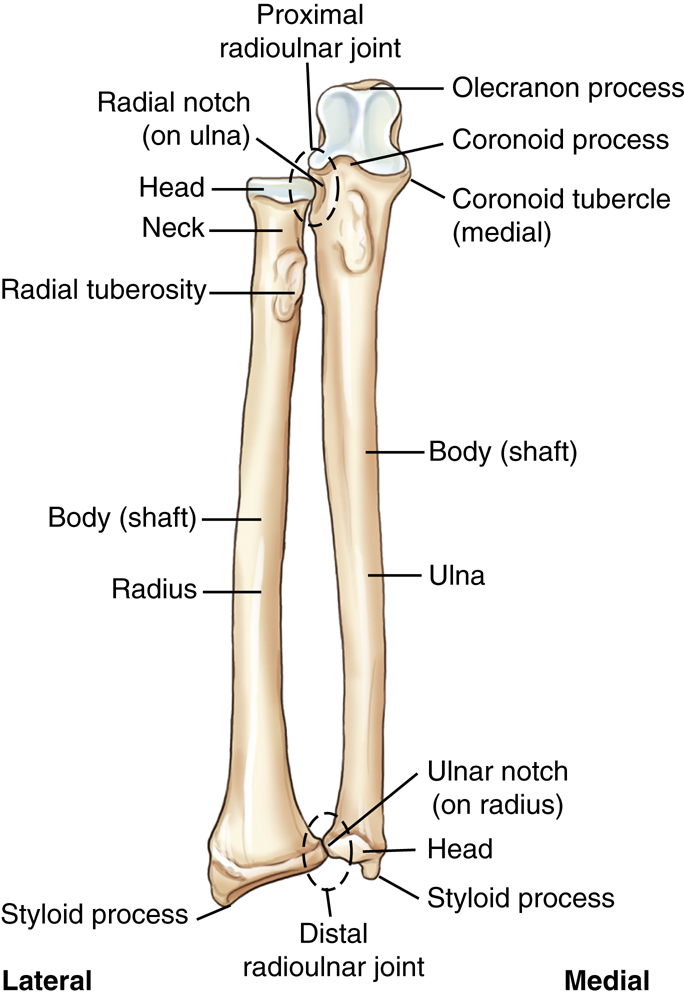
The second group of upper limb bones consists of the bones of the forearm—the radius on the lateral or thumb side and the ulna on the medial side (Fig. 4.13). The radius and ulna articulate with each other at the proximal radioulnar joint and at the distal radioulnar joint, as shown in Fig. 4.14. These two joints allow for the rotational movement of the wrist and hand, as described later in this chapter.
Radius and Ulna
Small conical projections, called styloid processes, are located at the extreme distal ends of both the radius and the ulna (see Fig. 4.14). The radial styloid process can be palpated on the thumb side of the wrist joint. The radial styloid process extends more distally than the ulnar styloid process.
The ulnar notch is a small depression on the medial aspect of the distal radius. The head of the ulna fits into the ulnar notch to form the distal radioulnar joint.
The head of the ulna is located near the wrist at the distal end of the ulna. When the hand is pronated, the ulnar head and the styloid process are easily felt and seen on the “little finger” side of the distal forearm.
The head of the radius is located at the proximal end of the radius near the elbow joint. The long midportion of both the radius and the ulna is called the body (shaft).
The radius, the shorter of the two bones of the forearm, is the only one of the two that is directly involved in the wrist joint. During the act of pronation, the radius is the bone that rotates around the more stationary ulna.
The proximal radius shows the round, disklike head and the neck of the radius as a tapered constricted area directly below the head. The rough oval process on the medial and anterior side of the radius, just distal to the neck, is the radial tuberosity.
Proximal Ulna
The ulna, the longer of the two bones of the forearm, is primarily involved in the formation of the elbow joint. The two beaklike processes of the proximal ulna are called the olecranon and the coronoid processes (Figs. 4.14 and 4.15). The olecranon process can be palpated easily on the posterior aspect of the elbow joint.
The medial margin of the coronoid process opposite the radial notch (lateral) is commonly referred to as the coronoid tubercle (see Fig. 4.14 and anteroposterior [AP] elbow radiograph in Fig 4.19).
The large concave depression, or notch, that articulates with the distal humerus is the trochlear (trok′-le-ar) notch (semilunar notch). The small, shallow depression located on the lateral aspect of the proximal ulna is the radial (ra′-de-al) notch. The head of the radius articulates with the ulna at the radial notch, forming the proximal radioulnar joint. This joint, or articulation, is the proximal radioulnar joint that combines with the distal radioulnar joint to allow rotation of the forearm during pronation. During the act of pronation, the radius crosses over the ulna near the upper third of the forearm (see Fig. 4.25).


Distal Humerus
Specific structures of the proximal humerus are discussed along with the shoulder girdle in Chapter 5. However, the anatomy of the midhumerus and distal humerus is included in this chapter as part of the elbow joint.
The body (shaft) of the humerus is the long center section, and the expanded distal end of the humerus is the humeral condyle. The articular portion of the humeral condyle is divided into two parts: the trochlea (troke′-le-ah) (medial condyle) and the capitulum (kah-pit′-u-lum) (lateral condyle).
The trochlea (meaning “pulley”) is shaped like a pulley or spool; it has two rimlike outer margins and a smooth depressed center portion called the trochlear sulcus, or groove. This depression of the trochlea, which begins anteriorly and continues inferiorly and posteriorly, appears circular on a lateral end-on view; on a lateral elbow radiograph, it appears as a less dense (more radiolucent) area (see Figs. 4.17 and 4.20). The trochlea is located more medially and articulates with the ulna.
The capitulum, meaning “little head,” is located on the lateral aspect and articulates with the head of the radius. (A memory aid is to associate the capitulum [“cap”] with the “head” of the radius.) In earlier literature, the capitulum was called the capitellum (kap″-i-tel′-um).
The articular surface that makes up the rounded articular margin of the capitulum is just slightly smaller than that of the trochlea (Fig. 4.18). This structure becomes significant in the evaluation for a true lateral position of the elbow, as does the direct superimposition of the two epicondyles (ep″-e-kon′-dylz).
The lateral epicondyle is the small projection on the lateral aspect of the distal humerus above the capitulum. The medial epicondyle is larger and more prominent than the lateral epicondyle and is located on the medial edge of the distal humerus. In a true lateral position, the directly superimposed epicondyles (which are difficult to recognize) are seen as proximal to the circular appearance of the trochlear sulcus (see Fig. 4.17).
The distal humerus has specific depressions on both anterior and posterior surfaces. The two shallow anterior depressions are the coronoid fossa and the radial fossa (see Figs. 4.16 and 4.17. As the elbow is completely flexed, the coronoid process and the radial head are received by these respective fossae, as the names indicate.
The deep posterior depression of the distal humerus is the olecranon fossa (not specifically shown on these illustrations). The olecranon process of the ulna fits into this depression when the arm is fully extended. Soft tissue detail as depicted by specific fat pads located within the deep olecranon fossa is important in trauma diagnosis of the elbow joint.
The lateral view of the elbow (see Fig. 4.17) clearly shows specific parts of the proximal radius and ulna. The head and neck of the radius are well demonstrated, as are the radial tuberosity (partially seen on the proximal radius) and the large concave trochlear (semilunar) notch.
True Lateral Elbow
Specific positions, such as an accurate lateral with 90° flexion, along with possible associated visualization of fat pads, are essential for evaluation of joint pathology of the elbow.
A good criterion by which to evaluate a true lateral position of the elbow when it is flexed 90° is the appearance of the three concentric arcs, as labeled in Fig. 4.18. The first and smallest arc is the trochlear sulcus. The second, intermediate arc appears double lined as the outer ridges or rounded edges of the capitulum and trochlea.
1 (The smaller of the double-lined ridges is the capitulum; the larger is the medial ridge of the trochlea.) The trochlear notch of the ulna appears as a third arc of a true lateral elbow. If the elbow is rotated even slightly from a true lateral, the arcs do not appear symmetrically aligned in this way, and the elbow joint space is not as open.


Review Exercise With Radiographs
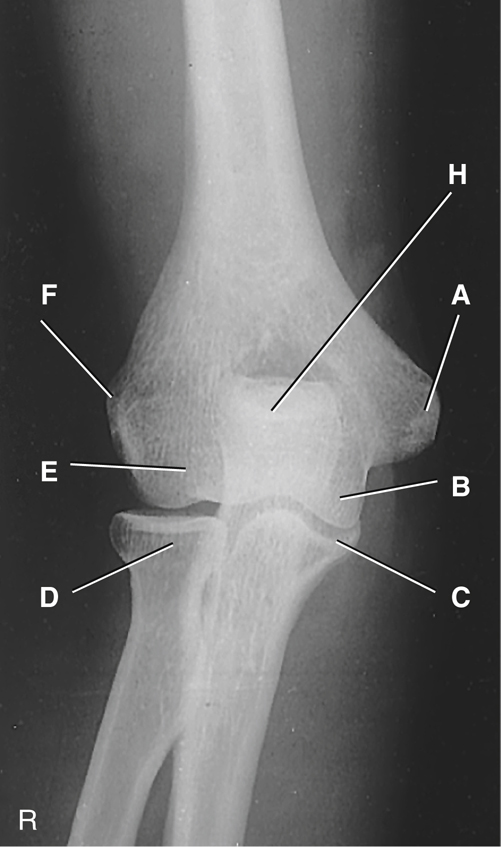
The AP and lateral radiographs of the elbow provide a review of anatomy and demonstrate the three concentric arcs as evidence of a true lateral position (Figs. 4.19 and 4.20). Answers to the labels are as follows:
- A. Medial epicondyle
- B. Trochlea (medial aspect)
- C. Coronoid tubercle
- D. Radial head
- E. Capitulum
- F. Lateral epicondyle
- G. Superimposed epicondyles of humerus
- H. Olecranon process
- I. Trochlear sulcus
- J. Trochlear notch
- K. Double outer ridges of capitulum and trochlea (capitulum being the smaller of the two areas and trochlea the larger)
- L. Coronoid process of ulna
- M. Radial head
- N. Radial neck
Classification of Joints
Table 4.2 provides a summary of hand, wrist, forearm, and elbow joints. Refer back to Chapter 1 for a general description of joints or articulations, along with the various classifications and movement types. These classifications are reviewed and described here more specifically for each joint of the hand, wrist, forearm, and elbow.
All joints of the upper limb as described in this chapter are classified as synovial and are freely movable, or diarthrodial. Only the movement types differ.
Hand and Wrist
Interphalangeal Joints
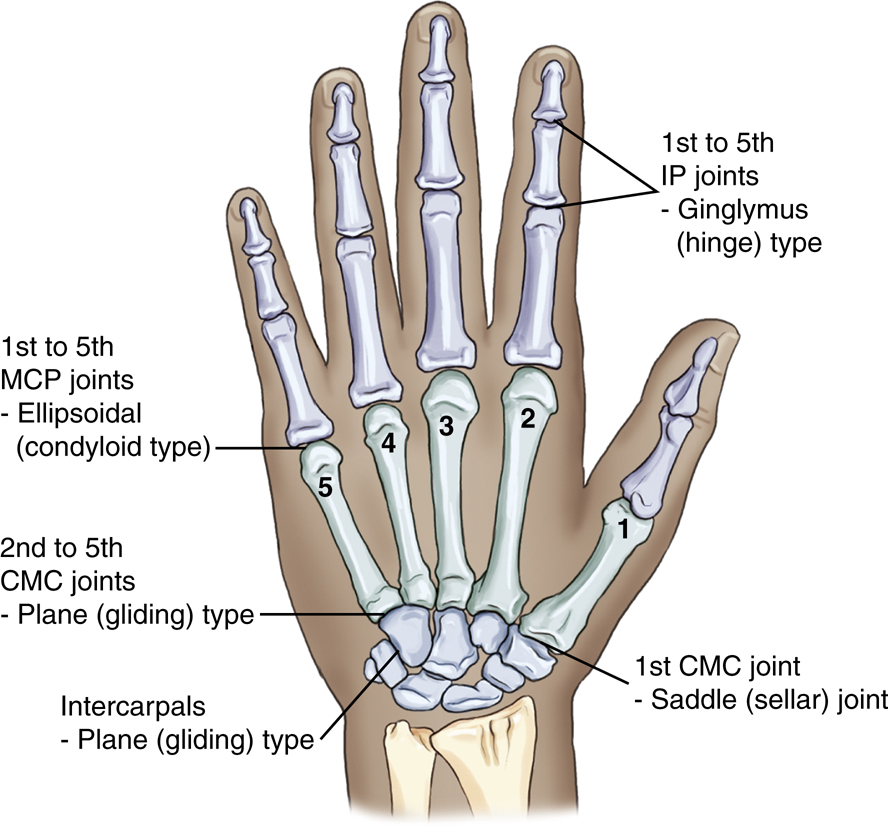
Beginning distally with the phalanges, all IP joints are ginglymus, or hinge-type, joints with movement in two directions only—flexion and extension (Fig. 4.21). This movement occurs in one plane only, around the transverse axis. This includes the single IP joint of the thumb (first digit) and the distal and proximal IP joints of the fingers (second to fifth digits).
Metacarpophalangeal Joints
The second to fifth MCP joints are ellipsoidal (condyloid)-type joints that allow movement in four directions—flexion, extension, abduction, and adduction. Circumduction movement, which also occurs at these joints, is conelike sequential movement in these four directions.
The first MCP joint (thumb) also is generally classified as an ellipsoidal (condyloid) joint, although it has very limited abduction and adduction movements because of the wider and less-rounded head of the first metacarpal (see Fig. 4.21).
Carpometacarpal Joints
The first CMC joint of the thumb is a saddle (sellar)-type joint. This joint best demonstrates the shape and movement of a saddle joint, which allows a great range of movement, including flexion, extension, abduction, adduction, circumduction, opposition, and some degree of rotation.
The second through fifth CMC joints are plane (gliding)-type joints, which allow the least amount of movement of the synovial class joints. The joint surfaces are flat or slightly curved, with movement limited by a tight fibrous capsule.
Intercarpal Joints
The intercarpal joints between the various carpals have only a plane (gliding) movement.

Wrist Joint
The wrist joint is an ellipsoidal (condyloid)-type joint and is the most freely movable, or diarthrodial, of the synovial classification. Of the two bones of the forearm, only the radius articulates directly with two carpal bones—the scaphoid and the lunate. This wrist joint is called the radiocarpal joint.
The triquetral bone is also part of the wrist joint in that it is opposite the articular disk. The articular disk is part of the total wrist articulation, including a joint between the distal radius and ulna of the forearm—the distal radioulnar joint.
The articular surface of the distal radius along with the total articular disk forms a smooth, concave-shaped articulation with the three carpals to form the complete wrist joint.
The total wrist joint is enclosed by an articular synovial capsule that is strengthened by ligaments that allow movement in four directions, plus circumduction.
The synovial membrane lines the synovial capsule and the four wrist ligaments as they pass through the capsule, in addition to lining the distal end of the radius and the articular surfaces of adjoining carpal bones.
Wrist Ligaments
The wrist has numerous important ligaments that stabilize the wrist joint. Two of these are shown in the drawing in Fig. 4.22. The ulnar collateral ligament is attached to the styloid process of the ulna and fans out to attach to the triquetrum and the pisiform. The radial collateral ligament extends from the styloid process of the radius primarily to the lateral side of the scaphoid (scaphoid tubercle), but it also has attachments to the trapezium.
Five additional ligaments not shown in this drawing are crucial to the stability of the wrist joint and often are damaged during trauma. These five ligaments are commonly imaged with conventional arthrography or magnetic resonance imaging (MRI):
Elbow Joint
The elbow joint is also of the synovial classification and is freely movable, or diarthrodial. The elbow joint generally is considered a ginglymus (hinge)-type joint with flexion and extension movements between the humerus and the ulna and radius. However, the complete elbow joint includes three joints enclosed in one articular capsule. In addition to the hinge joints between the humerus and ulna and the humerus and radius, the proximal radioulnar joint (pivot or trochoidal type) is considered part of the elbow joint (Fig. 4.23).
The importance of accurate lateral positioning of the elbow for visualization of certain fat pads within the elbow joint is discussed later in this chapter.
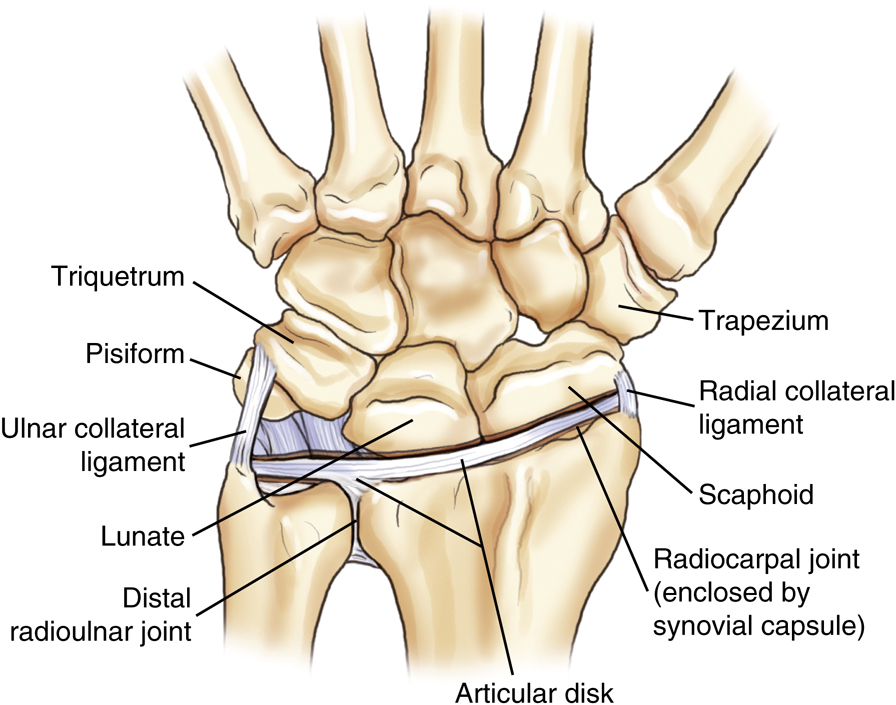

TABLE 4.2

Wrist Joint Movement Terminology
Certain terminology involving movements of the wrist joint may be confusing, but these terms must be understood by technologists because special projections of the wrist are described by these movements. These terms were described in Chapter 1 as turning or bending the hand and wrist from its natural position toward the side of the ulna for ulnar deviation and toward the radius for radial deviation (Fig. 4.24).
Ulnar Deviation
The ulnar deviation movement of the wrist “opens up” and best demonstrates the carpals on the opposite side (the radial or lateral side) of the wrist—the scaphoid, trapezium, and trapezoid. Because the scaphoid is the most frequently fractured carpal bone, this ulnar deviation projection is commonly known as a special scaphoid projection.
Radial Deviation
A less frequent PA wrist projection involves the radial deviation movement that opens and best demonstrates the carpals on the opposite, or ulnar, side of the wrist—the hamate, pisiform, triquetrum, and lunate.
Forearm Rotational Movements
The radioulnar joints of the forearm also involve some special rotational movements that must be understood for accurate imaging of the forearm. For example, the forearm generally should not be radiographed in a pronated position (a PA projection), which may appear to be the most natural position for the forearm and hand. The forearm routinely should be radiographed in an AP projection with the hand supinated, or palm up (anatomic position). The reason becomes clear in studying the “cross-over” position of the radius and ulna when the hand is pronated (Fig. 4.25). This cross-over results from the unique pivot-type rotational movements of the forearm that involve both the proximal and the distal radioulnar joints.
Summary
To prevent superimposition of the radius and ulna that may result from these pivot-type rotational movements, the forearm is radiographed with the hand supinated for an AP projection.
Elbow Rotational Movements
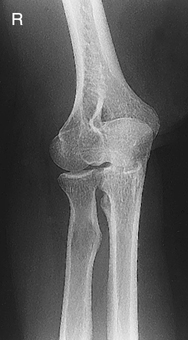
The appearance of the proximal radius and ulna changes as the elbow and distal humerus are rotated or positioned obliquely either medially or laterally as shown on these radiographs. On the AP radiograph with no rotation, the proximal radius is superimposed only slightly by the ulna (Fig. 4.26).
The radius and ulna can be separated through lateral rotation (40-45 degrees) of the elbow, as shown in Fig. 4.27, whereas medial rotation (pronated hand) completely superimposes them, as can be seen in Fig. 4.28. This relationship is crucial in evaluation of AP projections of the elbow; lateral rotation separates and medial rotation superimposes the proximal radius and ulna.


Importance of Visualizing Fat Pads
Radiographs of the upper and lower limbs are taken not only to evaluate for disease or trauma to bony structures but also to assess associated soft tissues, such as certain accumulations of fat called fat pads, fat bands, or stripes.
In some cases, displacement of an adjoining fat pad or band may be the only indication of disease or significant injury or fracture within a joint region.
For diagnostic purposes, the most important fat pads or bands are those located around certain joints of the upper and lower limbs. These fat pads are extrasynovial (outside the synovial sac) but are located within the joint capsule. Therefore, any changes that occur within the capsule itself alter the normal position and shape of the fat pads. Most often, such changes result from fluid accumulation (effusion) within the joint, which indicates the presence of an injury involving the joint.
Radiolucent fat pads are seen as densities that are slightly more lucent than surrounding structures. Fat pads and their surrounding soft tissue are of only slightly different tissue density (brightness), making them difficult to visualize on radiographs. This visualization requires optimum exposure for visualization of these soft tissue structures.
2
(They generally are not visible on published radiographs without enhancement, as is shown on the illustrations on this page.)
Wrist Joint
The wrist joint includes two important fat stripes. First, a scaphoid fat stripe (A) is visualized on the PA (Fig. 4.29) and oblique (Fig. 4.30) projections. It is elongated and slightly convex in shape and is located between the radial collateral ligament and adjoining muscle tendons immediately lateral to the scaphoid. Absence or displacement of this fat stripe may be the only indicator of a fracture on the radial aspect of the wrist.
A second fat stripe is visualized on the lateral view of the wrist. This pronator fat stripe (B) is normally visualized approximately ¼ inch (1 cm) from the anterior surface of the radius (Fig. 4.31). Subtle fractures of the distal radius can be indicated by displacement or obliteration of the plane of this fat stripe.
2
Elbow Joint
The three significant fat pads or stripes of the elbow are visualized only on the lateral projection. They are not seen on the AP because of their superimposition over bony structures. On the lateral projection, the anterior fat pad (Fig. 4.32C), which is formed by the superimposed coronoid and radial pads, is seen as a slightly radiolucent teardrop shape located just anterior to the distal humerus. Trauma or infection can cause the anterior fat pad to be elevated and more visible and distorted in shape. This is usually visible only on a true lateral elbow projection flexed 90°.
The posterior fat pad (see Fig. 4.32D) is located deep within the olecranon fossa and normally is not visible on a negative elbow examination. Visualization of this fat pad on a 90° flexed lateral elbow radiograph indicates that a change within the joint has caused its position to change, suggesting the presence of a joint pathologic process.
To ensure an accurate diagnosis, the elbow must be flexed 90° on the lateral view. If the elbow is extended beyond the 90° flexed position, the olecranon slides into the olecranon fossa, elevates the posterior fat pad, and causes it to appear. In this situation, the pad is visible whether the examination is negative or positive. Generally, visualization of the posterior fat pad is considered more reliable than visualization of the anterior fat pads.
The supinator fat stripe (see Fig. 4.32E) is a long, thin stripe just anterior to the proximal radius. It may indicate the diagnosis of radial head or neck fractures that are not obviously apparent.
2
3
Summary
For the anterior and posterior fat pads to be useful diagnostic indicators on the lateral elbow, the elbow must be (1) flexed 90° and (2) in a true lateral position; (3) optimum exposure techniques, including soft tissue detail for visualization of fat pads, must be used.