Developmental/Sensory Assessment
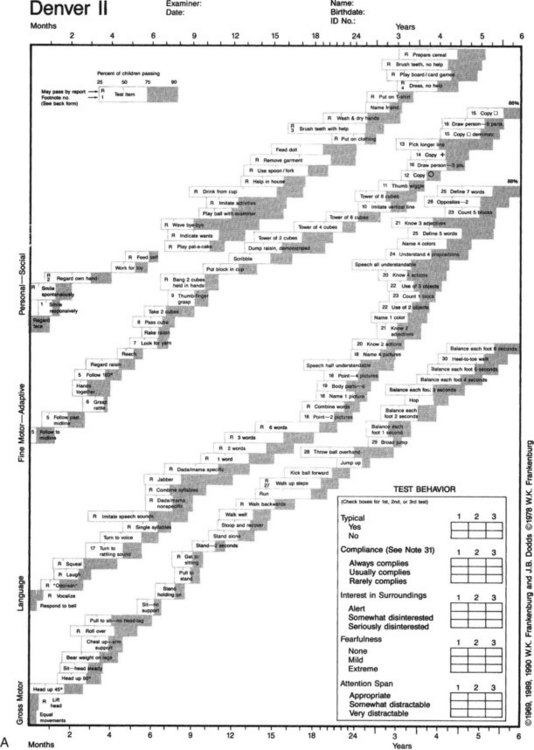

Fig. A-1 A, Denver II. (From WK Frankenburg and JB Dodds, 1990.) B, Directions for administration of numbered items on Denver II.
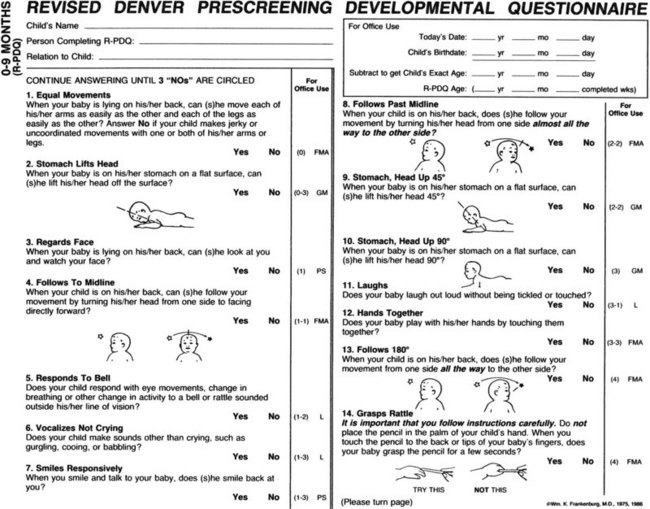
Fig. A-2 Revised Denver Prescreening Developmental Questionnaire (sample of first page only). (Reprinted with permission of William K. Frankenburg. Copyright 1975, 1986, WK Frankenburg.)
Snellen Screening*
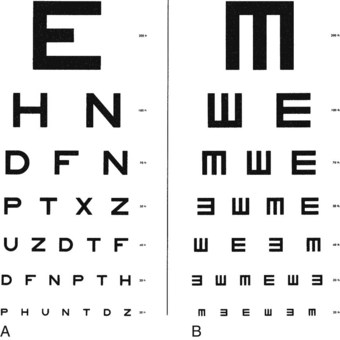
1. Hang the Snellen chart on a light-colored wall so that the 20- to 30-foot lines are at eye level when children 6 to 12 years old are tested in the standing position (Fig. A-3).
2. Secure the chart to the wall with double-stick tape on the back side of all four corners. If the chart must be reversed for use of letter or E chart, secure it at the top and bottom with tacks. Make certain that the chart does not swing when in place.
3. The illumination intensity on the chart should be 10 to 30 footcandles, without any glare from windows or light fixtures. The illumination should be checked with a light meter.
4. Mark an exact 20-foot distance from the chart. Mark the floor with a piece of tape or “footprints” positioned so that the heels touch the 20-foot line.
Procedure
1. Place the child at the 20-foot mark, with the heel edging the line if the child is standing or with the back of the chair placed at the marker if the child is seated.
2. If the E chart is used, accustom the child to identifying which direction the “legs of the E” are pointing. Use a demonstration E card for this purpose.
3. Teach the child to use the occluder to cover one eye. Instruct the child to keep both eyes open during the test. Provide a clean cover card for each child and then discard after use.
4. If the child wears glasses, test only with glasses on.
5. Test both eyes together, then the right eye, then the left eye.
6. Begin with the 40- or 30-foot line and proceed with the test to include the 20-foot line.
7. With a child suspected of low vision, begin with the 200-foot line, and proceed until child can no longer correctly read three out of four or four out of six symbols on a line.
8. Use covers on the Snellen chart to expose only one symbol or one line at a time. When screening kindergarten or older children, expose one line but use a pointer to point to one symbol at a time.
Recording and Referral
1. Record the last line the child read correctly (three out of four or four out of six symbols).
2. Record visual acuity as a fraction. The numerator represents the distance from the chart, and the denominator represents the last line read correctly. For example, 20/30 means that the child read the 30-foot line at a 20-foot distance.
3. Observe the child’s eyes during testing and record any evidence of squinting, head tilting, thrusting the head forward, excessive blinking, tearing, or redness.
4. Only make referrals after a second screening has been made on children who are potential candidates for referral.
5. The following children should be referred for a complete eye examination:
a. Three-year-old children with vision in either eye of 20/50 or less (inability to correctly identify one more than half the symbols on the 40-foot line) or a two-line difference in visual acuity between the eyes in the passing range (e.g., 20/20 in one eye and 20/40 in the other)
b. All other ages and grades with vision in either eye of 20/40 or less (inability to correctly identify one more than half the symbols on the 30-foot line)
c. All children who consistently show any of the signs of possible visual disturbances, regardless of visual acuity