Chapter 9 Wrist and Hand
The wrist is a flexible osseo-ligamentous complex forming a connective link between the forearm and the hand. Multidirectional mobility results from the numerous multiarticular carpal bones which, along with the radio-ulnar joints, allow the hand to be positioned functionally at any angle. Stability is derived from the complex array of ligaments often injured when falling on an outstretched hand.
The hand, while being the most active and intricate joint complex in the body, is the least protected. Constructed as a series of complex, delicately balanced joints, it offers manipulating ability, dexterity and precision. This highly sensitive structure, used to hold, catch and manipulate, is particularly vulnerable to trauma when subjected to repetitive stresses or impact of falls.
Providing adequate support while maintaining functional movement is the prime consideration when taping the hand and or wrist.
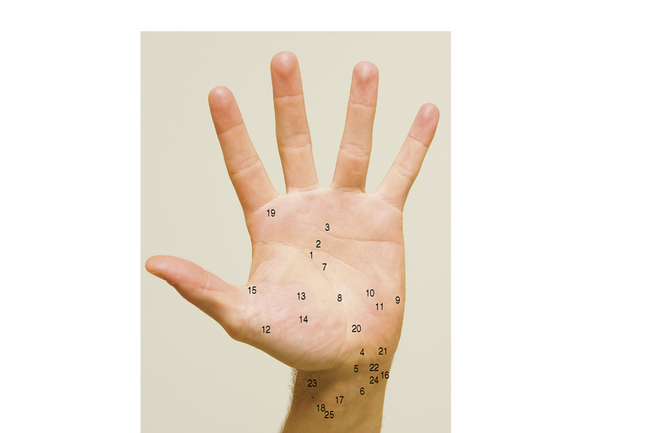
Palm of the left hand The surface markings of various structures within the wrist and hand are indicated. Not all of them are palpable, e.g. the superficial and deep palmar arches (7, 8), but their relative positions are important.
• The curved lines proximal to the base of the fingers indicate the ends of the head of the metacarpophalangeal joints.
• The creases on the fingers indicate the level of the interphalangeal joints.
• The middle crease at the wrist indicates the level of the wrist joint.
• The radial artery at the wrist (23) is the most common site for feeling the pulse. The vessel is on the radial side of the tendon of flexor carpi radialis (18) and can be compressed against the lower end of the radius.
• The median nerve at the wrist (25) lies on the ulnar side of the tendon of flexor carpi radialis (18).
• The ulnar nerve and artery at the wrist (22, 23) are on the radial side of the tendon of flexor carpi ulnaris (16) and the pisiform bone (21). The artery is on the radial side of the nerve and its pulsation can be felt, though less easily than that of the radial artery (23).
• Abductor pollicis brevis (12) and flexor pollicis brevis (13), together with the underlying opponens pollicis, are the muscles which form the thenar eminence – the ‘bulge’ at the base of the thumb. Abductor digiti minimi (9) and flexor digiti minimi brevis (10), together with the underlying opponens digiti minimi, form the muscles of the hypothenar eminence, the less prominent bulge on the ulnar side of the palm where palmaris brevis (11) lies subcutaneously.
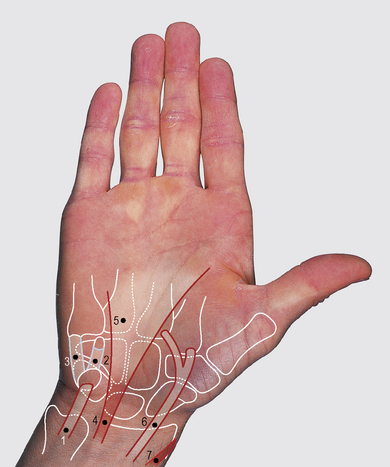
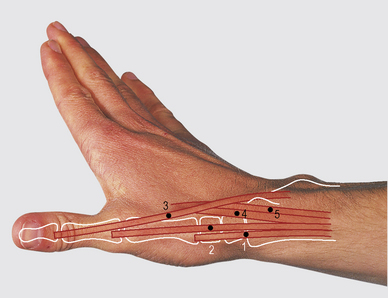
Anterior aspect of the wrist and hand: superficial tendons. 1 Flexor carpi ulnaris. 2 Pisohamate ligament. 3 Pisometacarpal ligament. 4 Palmaris longus. 5 Palmar aponeurosis. 6 Flexor carpi radialis. 7 Radial artery.
SURFACE ANATOMY
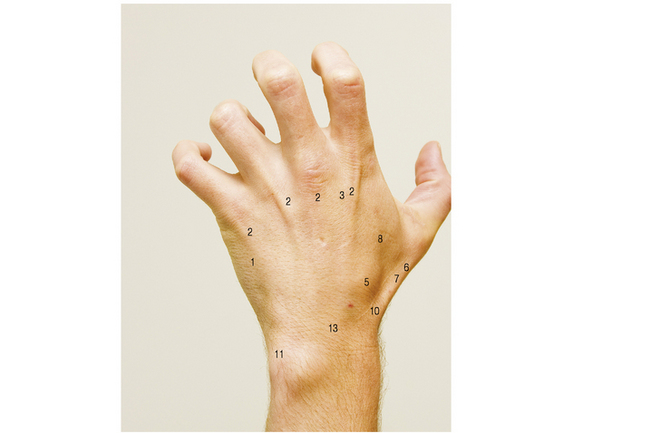
Dorsum of the left hand The fingers are extended at the metacarpophalangeal joints, causing the extensor tendons of the fingers (1, 2 and 3) to stand out, and partially flexed at the interphalangeal joints. The thumb is extended at the carpometacarpal joint and partially flexed at the metacarpophalangeal and interphalangeal joints. The lines proximal to the bases of the fingers indicate the ends of the heads of the metacarpophalangeal joints. The anatomical snuffbox (9) is the hollow between the tendons of abductor pollicis longus (7) and extensor pollicis brevis (6) laterally and extensor pollicis longus medially (5).
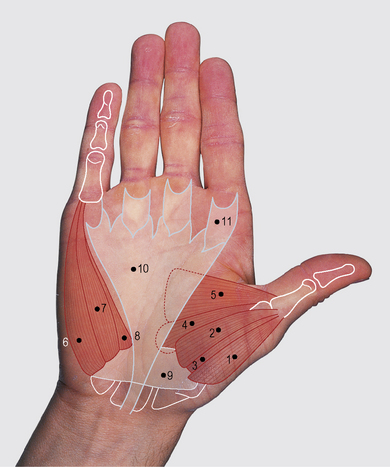
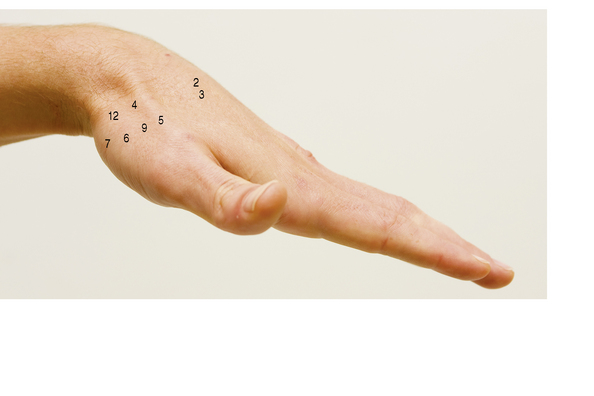
Thenar and hypothenar eminences. 1 Abductor pollicis brevis. 2 Flexor pollicis brevis. 3 Opponens pollicis. 4 Adductor pollicis oblique head. 5 Adductor pollicis transverse head. 6 Abductor digiti minimi. 7 Flexor digiti minimi. 8 Opponens digiti minimi. 9 Flexor retinaculum. 10 Palmar aponeurosis. 11 Flexor fibrous sheaths

ANATOMICAL AREA: WRIST AND HAND
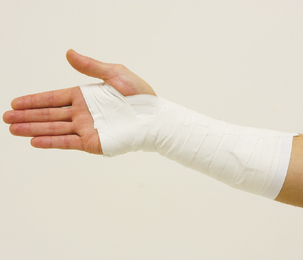
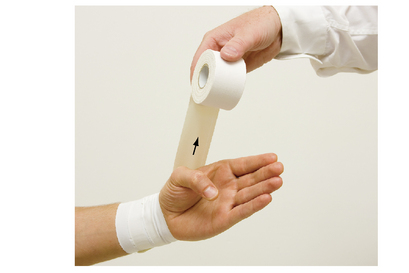
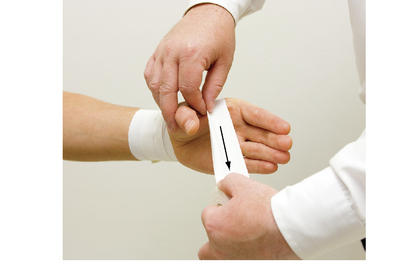
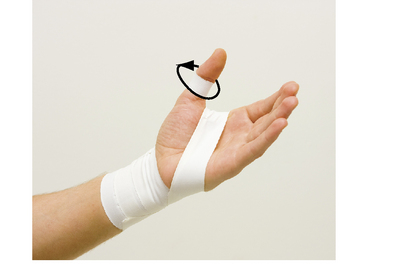
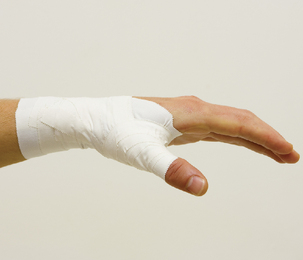
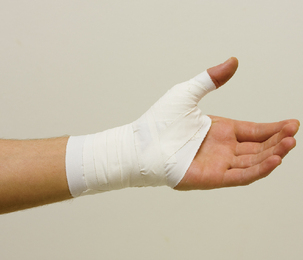
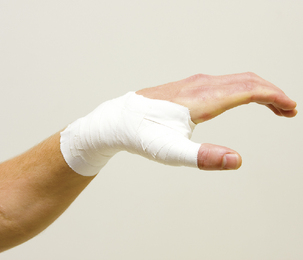
WRIST HYPEREXTENSION SPRAIN TAPING
Indications for use
• palmar radio-carpal ligaments sprains (hyperextension)
• for dorsal radio-carpal ligament (hyperflexion): apply the check-reins dorsally and add restraining Xs to the dorsal aspect, thus limiting end-range of flexion
• for radial collateral ligament sprain: reinforce the lateral X and add lateral palmar X to prevent ulnar deviation
• for ulnar collateral ligament sprain: reinforce the medial X and add medial palmar X to prevent radial deviation
• diffuse pain in the wrist due to repeated compression or ‘jamming’ the wrist
 NOTES:
• Ensure that the proper diagnosis has been made to rule out fractures, particularly if the injury was caused by an outstretched hand (the scaphoid bone is the most commonly fractured).
• Clarify the mechanism of injury, whether it was hyperflexion or hyperextension that occurred.
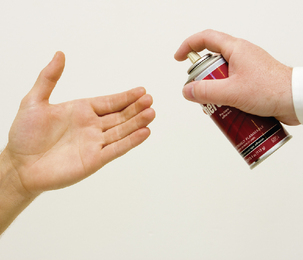
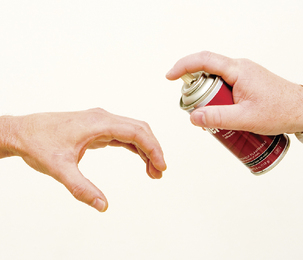
• The use of skin toughener or quick-drying adhesive spray is essential for good adherence of taping, especially in rainy or hot conditions when hands, wrists and forearms can become quite damp.
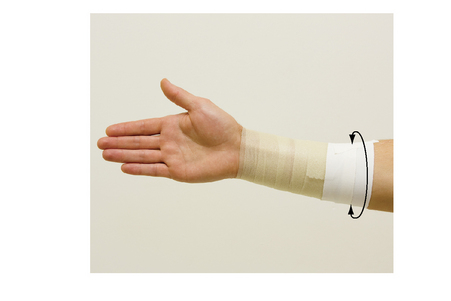
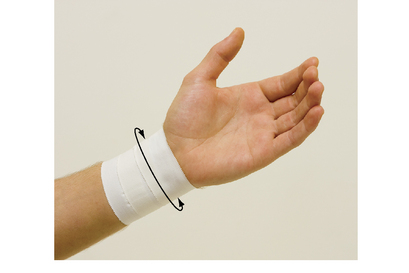
• Wrap the circumferential strips with minimal tension, to avoid neurological or vascular compromise.
• Monitor circulatory status and sensation prior to, during and after taping.
For additional details regarding an injury example see T.E.S.T.S. chart, p. 199.
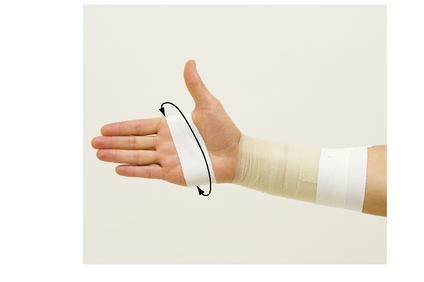
Positioning
Sitting, with the wrist in a neutral position held in slight extension (approximately 20 °).
 TIP:
TIP: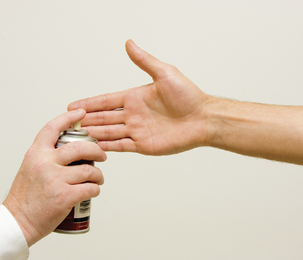
 TIP:
TIP:
 NOTE:
NOTE:
 NOTE:
NOTE:
 NOTE:
NOTE:
 NOTE:
NOTE: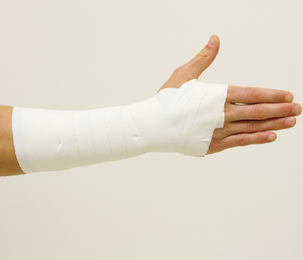
 NOTE:
NOTE:ANATOMICAL AREA: WRIST AND HAND
INJURY: WRIST HYPEREXTENSION SPRAIN
• partial or complete tearing of anterior wrist capsule
• partial or complete tearing of radial and/or ulnar collateral ligaments
• pain over anterior joint capsule and ligaments
• active movement testing: pain on end-range extension
• resistance testing (neutral position): no significant pain with moderate resistance; pain possible on flexion if flexors also involved
 NOTE:
NOTE:• initially: elastic tensor compression and sling support with careful attention to circulation for the first 48 hours
• continued therapy including:
• total rehabilitation programme for mobility, flexibility, strengthening and dexterity
• taping for gradual return to pain-free functional activities
 NOTE:
NOTE:Sprains that do not respond well to treatment should be reassessed by a hand specialist. Pain and clicking on the ulnar side may imply damage to the triangular fibro-cartilage (meniscus). Persistent pain on the radial side may indicate a necrosis or missed fracture of the scaphoid.
ANATOMICAL AREA: WRIST AND HAND
THUMB SPRAIN TAPING
Indications for use
• MCPJ sprain (ulnar ligament)
• carpo-metacarpal joint (CMCJ) sprain (ulnar aspect); reinforce the diagonal anchor
• ‘skier’s thumb’, ‘gamekeeper’s thumb’
 NOTES:
• If 3rd-degree sprain is suspected, a hand surgeon should be seen as early as possible.
• X-rays will rule out the possibility of an avulsion fracture.
• Thoroughly inspect the hand for cuts, abrasions and any other possible sources of infection.
• Watch carefully for signs of restricted circulation, particularly during the first 48 hours post injury when swelling tends to be greatest.
• Restricted circulation, apart from causing discomfort, can be particularly dangerous in below freezing weather (increased risk of frostbite).
• Hand and thumb size will dictate the width of tape required.
For additional details regarding an injury example see T.E.S.T.S. chart, p. 206.
 TIP:
TIP: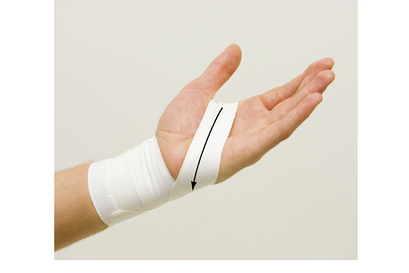


 TIP:
TIP: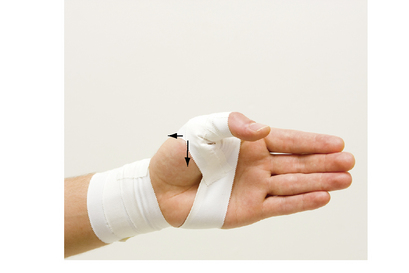

 TIP:
TIP: NOTE:
NOTE:
 NOTE:
NOTE:ANATOMICAL AREA: WRIST AND HAND
INJURY: THUMB SPRAIN
• partial or complete tearing of ulnar collateral ligament: the first MCPJ; degree of severity 1st–3rd
• tenderness over medial aspect of the MCPJ
• local swelling and/or discolouration
• active movement testing: pain on end-range extension
• passive movement testing: pain on extension plus abduction
• resistance testing (neutral position): no significant pain on moderate resistance
• R.I.C.E.S. for first 48 hours
• therapeutic modalities; contrast baths
• range of motion (ROM) exercises
• taping: for Thumb Sprain, see p. 200
 NOTE:
NOTE:• continued therapy including:
• gradual return to pain-free functional activities with taped support
• complete rehabilitation programme including range of motion, flexibility, strengthening and dexterity
ANATOMICAL AREA: WRIST AND HAND
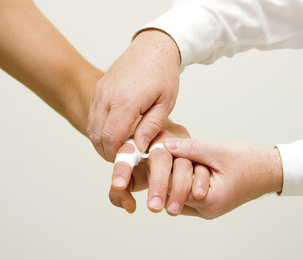
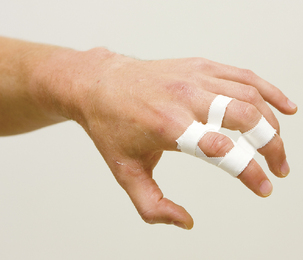
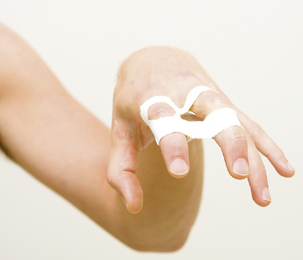
FINGER SPRAIN TAPING
Indications for use
• palmar ligament sprain (hyperextension) of the finger
• post-immobilization painful stiffness of the finger
• ‘jammed’ or ‘stubbed’ finger
• medial collateral ligament (MCL) sprain of the finger: reinforce medial X
• lateral collateral ligament (LCL) sprain of the finger: reinforce lateral X
 NOTES:
• Never allow the athlete to continue playing (even when taped) if a serious injury is suspected.
• Ensure a correct diagnosis by a doctor or hand specialist. (Fractures and dislocations are often misdiagnosed and mistreated.)
• Localize the exact site of the injury – which aspect of which joint of which finger – and re-test for pain through range during and after the tape job is completed.
• Taping the injured finger to its neighbour (‘buddy taping’) further protects the injured ligaments while allowing function and movement.
• If the athlete needs to use the injured hand to handle a ball during a game, ‘buddy tape’ the fingers slightly apart to allow better control of the ball.
For additional details regarding an injury example see T.E.S.T.S. chart, p. 211.
Positioning
Sitting with the elbow supported on a table and the finger(s) placed in a neutral, functional position (approximately 20 ° flexion).
Procedure
 TIP:
TIP: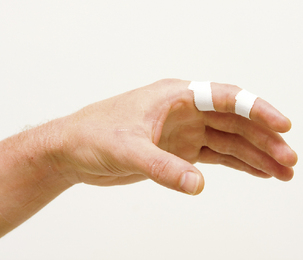
 TIP:
TIP:

 NOTE:
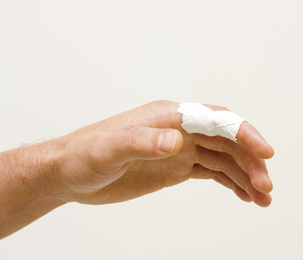
NOTE:This step is useful for sports not needing full hand function (as in soccer, excluding goalkeeper), when the fingers can function as a unit.
 NOTE:
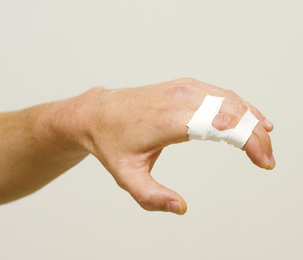
NOTE:This technique is useful for sports requiring full functional dexterity and use of individual fingers (as in basketball or volleyball). Note that more space is left between the fingers with this option.
 NOTE:
NOTE:ANATOMICAL AREA: WRIST AND HAND
INJURY: FINGER SPRAIN
• partial or complete rupture of palmar ligament (anterior capsule), medial collateral (ulnar) ligament or lateral collateral (radial) ligaments: degree of severity, 1st–3rd
• telescoping blow: direct compressive force on the tip of the finger (i.e. jamming it against a ball as in basketball, volleyball or rugby)
• sideways stress to a finger: may catch on clothing, equipment or terrain
• active movement testing: pain on end-range extension and/or flexion (pinching the injured capsule)
• passive movement testing: pain on end-range extension and/or possibly on flexion
• resistance testing (neutral position): no significant pain on moderate resistance

• continued therapy including:
• strengthening exercises for all hand musculature
• taping for gradual return to pain-free functional activities
• progressive exercises for range of motion, strength and dexterity