Restraint, handling and administration of medication
Restraint for General Examination
Procedure: Administering a tablet
Procedure: Administering a liquid feed or medication
Procedure: Applying ear medication
Procedure: Applying eye medication
Procedure: Administering a subcutaneous injection. Site: Scruff of the neck
Procedure: Administering an intramuscular injection. Site: Quadriceps femoris muscle
Procedure: Administering an intravenous injection. Site: Cephalic vein
Procedure: Collection of a blood sample from the cephalic vein
Procedure: Administering an intravenous injection. Site: Jugular vein
Procedure: Administering an intravenous injection. Site: Lateral saphenous vein
Procedure: Placement of an intravenous catheter in a peripheral vein
Procedure: Placement of an intravenous catheter in the jugular vein using the modified Seldinger technique
Procedure: Administering a tablet
Procedure: Administering liquid medication or oral fluids
Procedure: Applying ear medication
Procedure: Applying eye medication
Procedure: Administering a subcutaneous injection. Site: Scruff of the neck
Procedure: Administering an intramuscular injection. Site: Quadriceps femoris muscle
Procedure: Administering an intravenous injection. Site: Cephalic vein
Procedure: Administering an intravenous injection. Site: Jugular vein
Procedure: Administering an intravenous injection. Site: Lateral saphenous vein
Procedure: Administering fluids or liquid medication
Procedure: Administering a subcutaneous injection. Site: Scruff of the neck
Procedure: Administering an intramuscular injection. Site: Quadriceps femoris muscle
Procedure: Administering an intravenous injection. Site: Marginal ear vein
Procedure: Administering an intraperitoneal injection. Site: Mid abdomen
Correct handling and restraint of the patient are essential if you are to perform any procedure effectively. If the animal is allowed to move it may hurt itself or you. An animal that is held firmly will feel much more secure and will be less inclined to struggle or to make an escape.
The majority of animals that are brought into the surgery are used to being handled, but this does not mean that they necessarily enjoy having things done to them, especially by a ‘strange-smelling stranger’. There will also be a small proportion of animals that are wary of human contact and this includes stray dogs and feral cats. These animals may be unpredictable and potentially dangerous and you must protect your own safety and that of anyone around you.
When handling any species you must approach quietly and confidently; you must know exactly what you are going to do and get it right the first time – the more often you have to attempt a procedure the more frightened or aggressive an animal becomes and the more likely you or the animal are to get hurt. Animals become very upset by clumsy inept handling, but respond positively to someone with a calm, confident demeanour.
So, at the very least, before you start anything:
1. Know how to do the procedure correctly – this will give you confidence and affect your attitude to the animal.
2. Have all your equipment prepared and ready to hand – this may include restraint equipment such as dog catchers or cat bags.
3. Organize assistance if you think you are likely to need it – having a ‘go’, failing and then deciding you need help causes delay, upsets the patient and may upset the watching client.
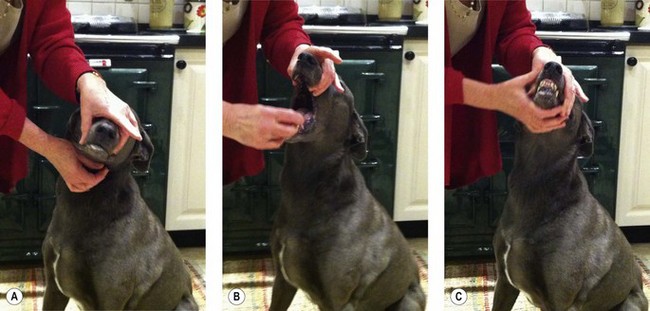
Procedure: Muzzling a dog (Fig 1.1)
It will not be necessary to muzzle every canine patient, but it is essential to be able to perform this technique quickly and effectively when you need it. It is rarely necessary, and it is much more difficult, to muzzle cats. If you do need to muzzle a cat there are suitable commercial muzzles available.
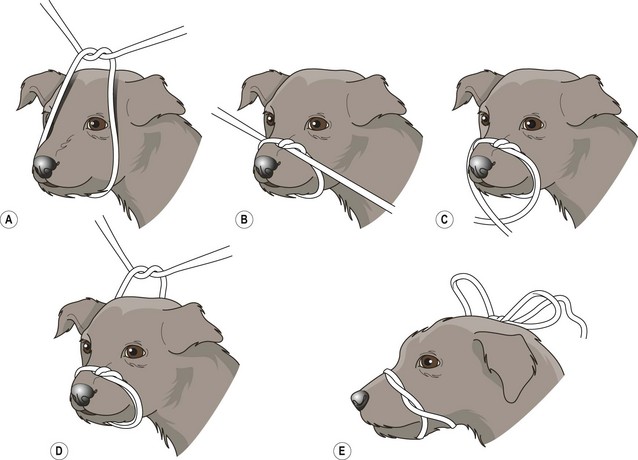
1. Action: Place the dog in a sitting position on the floor or on a stable examination table covered with a non-slip mat.
Rationale: In this position the dog will feel comfortable and will be less likely to wriggle.
2. Action: Ask an assistant to stand astride the dog, or if on a table to stand behind the dog, and grasp the scruff on either side of the head just below the ears.
Rationale: The head must be held firmly to prevent it moving around, allowing the muzzle to be tied quickly.
3. Action: Using a length of cotton tape or bandage, you should tie a loop in it.
Rationale: Any long strip of material can be used (e.g. a tie or even tights) but the material must be strong enough to hold the jaws together.
4. Action: Approach the dog slowly and deliberately, crouching down to its level if necessary.
Rationale: Crouching low prevents fear aggression; standing over the dog may provoke it to jump up and bite.
5. Action: Place the looped tape over the dog’s nose and tighten it quickly with the knot over its nose.
Rationale: Any delay in tightening the loop may give time for the dog to shake its head free.
6. Action: Bring the long ends of the tape downwards and cross over under the chin.
Rationale: Further throws around the nose before finally crossing over will strengthen the muzzle.
7. Take the two ends of the tape backwards and tie them in a bow behind the ears.
Rationale: A bow allows a quick release if the dog becomes distressed.
8. Ask the assistant holding the dog to keep the head pressed down.
Rationale: This position prevents the dog from lifting its forefeet to pull the muzzle of its nose.
9. If the dog is a brachycephalic breed insert another length of tape under the loop on the nose and under the piece at the back of the head.
Rationale: This prevents the muzzle from slipping off the short nose. This technique could be used for cats.
10. Bring the two ends of this piece of tape together and tie them into a bow on the bridge of the nose.
Rationale: The dog must be carefully observed as pressure over the nose of a brachycephalic breed could lead to respiratory distress.
NB Never leave a muzzled animal unattended, as there is always a risk of asphyxiation by vomit or saliva. There are commercial muzzles available. These come in a range of sizes and may be quicker to put on, but they are much more expensive.
Restraint for general examination
When examining any animal it is important that it is restrained correctly. This allows you to complete the examination quickly, efficiently and confidently without damage to yourself or to your patient. Restraint may be carried out by a nurse, the client or by you, the veterinary surgeon – in many cases it is perfectly possible to both restrain and examine at the same time. You should understand how to restrain an animal so that you can explain it to the person assisting you.
Dogs
Procedure: To examine the cranial end of the body
1. Action: Using a correct technique, lift the dog on to a stable examination table covered in a non-slip mat.
Rationale: If the table does not shake and the animal’s paws do not slip, the animal will feel more secure and will be less inclined to try and escape.
2. Action: Stand to one side of the dog.
3. Action: Place one hand under the dog’s neck and pull the head close to your chest with your hand.
Rationale: If the head is held firmly against your chest the dog cannot move to bite you.
4. Action: Place the other arm over the dog’s back with your elbow pointing towards the far side.
5. Action: Apply pressure with your elbow along the spine making the dog sit down.
NB Always remember that the closer you are to the animal the less able it will be to bite you!
Procedure: To examine the caudal end of the body or take the rectal temperature
(This continues from the previous procedure.)
1. Action: Keep one arm under the neck pulling the head close to your chest.
Rationale: If the head is held firmly against your chest, the dog cannot move to bite you.
2. Action: Move the other arm and place it under the abdomen, gently lifting the dog into a standing position.
3. Action: Pull the body close to your chest by bringing your forearm up under the abdomen.
Rationale: In this position the dog is held securely against you, preventing movement during the examination and reducing the risk of your being bitten.
4. Action: If you are required to restrain the dog for a long period of time, move your hand to lie over the spine but be careful that the dog does not sit down again.
Rationale: This position may be more comfortable for you while still retaining control of the dog.
5. Action: If the dog starts to move or to object to the procedure, quickly return to the previous position.
Rationale: You must always be aware of the dog’s mood and respond quickly to prevent anyone being bitten.
Procedure: To examine the dog on its side or to provide stronger control (Fig. 1.2)
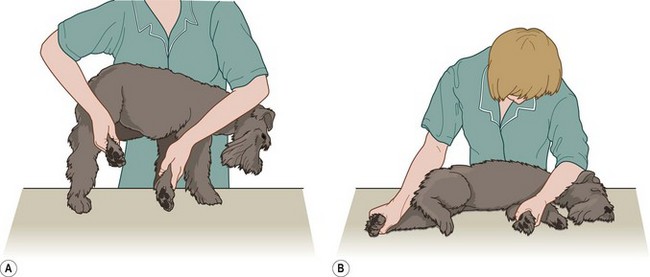
1. Action: Apply a tape muzzle if appropriate (Fig. 1.1).
Rationale: This method is used to restrain more aggressive or more difficult dogs so you should be prepared for trouble.
2. Using correct lifting procedure, lift the dog on to a stable examination table covered in a non-slip mat.
Rationale: If the table does not shake and the dog’s paws do not slip, the dog will feel secure and less inclined to try and escape.
3. With the dog in a standing position, stand to one side of it.
4. Reach over the dog’s back and grasp the foreleg and hindleg furthest away from you (Fig. 1.2) at the level of the radius and tibia.
Rationale: It may be difficult to reach over the back of large dogs especially if you are short or the table is too high.
5. As quickly and as firmly as possible, pull the dog’s legs away from you supporting its spine against your chest.
Rationale: This must be done quickly before the dog begins to struggle and change position.
6. Action: Gently lower the body down to the table.
Rationale: Avoid letting the body drop to the table as it may frighten or injure the animal.
7. Action: Place your arm across the chest and neck and apply firm pressure to keep the dog’s head on the table.
Rationale: Most dogs will become submissive in this position, but some will try to stand up again and you must be prepared. With a large dog you may have to lean quite heavily on it, but you must always observe the condition of the animal.
Procedure: To examine or restrain a dog on its back
1. Action: Place the dog on its side as previously described.
2. Action: Ask an assistant to hold both the back legs while you hold the forelegs.
Rationale: If the dog is small this manoeuvre can be performed by one person.
3. Action: Roll the dog over until it is lying on its back.
4. Action: Extend the forelegs and hindlegs presenting the ventral abdomen for examination.
5. Action: Greater restraint can be achieved by bringing each forelimb to lie on either side of the neck then grasping the scruff of the neck on each side with the same hands.
Rationale: Most dogs will feel quite comfortable in this position and will struggle only if they feel insecure or in pain.
Cats
Most cats are used to being handled and will respond to being stroked and spoken to quietly. Examining these cats should not pose too much of a problem, but some, and particularly feral cats, can be very difficult to handle and you must be prepared to exercise varying degrees of restraint depending on the individual. Remember cats have five weapons of offence: one set of teeth and four sets of claws!
Cats that are used to being handled respond to minimal restraint, but you should be prepared to use firmer methods on more difficult cats, particularly if you are single-handed.
Procedure: Restraint for the examination of a friendly cat
1. Action: Place the cat on a stable examination table covered with a non-slip mat.
Rationale: The cat will feel secure and comfortable and will be less inclined to make its escape.
2. Action: Stand to one side of the cat.
3. Action: Run the hand closest to the cat over its back and under the jaw, gently raising the head up a little.
Rationale: If the cat is relaxed this hand can be placed gently on the front of the chest, but you should be ready to restrain the head if necessary.
4. Action: Place the other hand over the forelegs.
Rationale: This prevents the cat from raising its forepaws to scratch.
5. Action: If the cat begins to struggle or object to the examination, move the hand from under the chin and grasp the scruff.
Rationale: This controls the head allowing examination of the body.
6. Action: Use the elbow on this side to press the cat’s body firmly against your side.
Rationale: In this position the cat is unable to move or gain enough grip to make an escape. It may be more comfortable to lift the cat, supporting it against your body rather than leaning over the examination table.
7. Action: Use the other hand to hold the forelegs firmly down on the table.
Rationale: This controls the forepaws and prevents scratching.
NB This position uses minimal restraint but will allow you to examine the whole body and take the rectal temperature.
Procedure: Restraint for examination of a fractious cat
1. Action: Firmly grasp the scruff of the cat with one hand.
Rationale: Some fractious cats seem to have the ability to ‘use up’ their scruffs by hunching their shoulders and letting their heads sink down, which makes the scruff very difficult to grasp. Adult tomcats also develop thickened scruffs that are difficult to hold for any length of time.
2. Action: Pick up the cat and, with the other hand, grasp its hindlegs.
Rationale: You should never suspend a cat by its scruff for any length of time. Always be prepared to support its weight as quickly as you can.
3. Action: Place the cat on the table in lateral recumbency extending its head and hindlegs.
Rationale: The cat is unable to move against the strength of the handler’s arms, but a really angry cat will continue to attempt to escape and a great deal of growling and mewing may be heard!
4. Action: As the cat struggles, make sure that you keep your arms wide apart to maintain the position.
Rationale: As the forelegs are not restrained you must be careful to avoid getting scratched.
NB This position allows examination of most of the body but it is inadvisable to use it to take the rectal temperature as the cat may struggle and injure itself. For the welfare of the cat, another method of restraint should be adopted as soon as possible.
Restraint equipment, which can be useful for more aggressive cats, includes crusher cages, cat grabbers and cat bags out of which the head or legs can be extended while the rest of the body is retained inside. Wrapping an aggressive cat in a towel is also a useful and cheaper means of restraint. Chemical restraint is widely used, principally by means of an intramuscular injection, but some form of contact with the cat is still required.
In the surgery when moving a cat from room to room it is important to ensure that it does not escape – cats are far more likely to try to escape than dogs. The procedure used depends very much on the nature of the cat.
Procedure: Lifting a friendly cat used to being handled
1. Action: Approach the cat calmly and confidently, talking to it quietly.
Rationale: Most cats are used to the sound of the human voice and will be reassured by a low quiet tone.
2. Action: Assess whether the cat is safe to stroke.
Rationale: A frightened or aggressive cat will warn you by hissing or growling as you approach, while a friendly cat may rub itself against your hand and even purr!
3. Action: If safe, gently stroke the top of the head and run your hand along its back.
Rationale: This will reassure the cat and may elicit a purr. If the cat hisses, use another method of lifting and restraint.
4. Action: Gently but firmly grasp the scruff of the neck with one hand and lift the cat.
Rationale: Picking a cat up by the scruff mimics the way in which the queen carries her kittens. It initiates an innate relaxation response which in the wild would enable the queen to move her kittens safely from place to place without the risk of them struggling and escaping.
5. Action: Place the other hand under the sternum and support the cat.
Rationale: Kittens and smaller cats may be lifted by the scruff, but heavier cats need added support.
6. Action: Place the cat on an examination table covered in a non-slip mat.
Rationale: If the cat feels insecure, it may try to scratch bite or escape.
Procedure: Lifting a frightened or aggressive cat
1. Action: Grasp the scruff of the cat quickly and firmly.
Rationale: If you do not take enough scruff or make any mistake in handling, you are likely to get bitten or scratched.
2. Action: Lift the cat by the scruff letting the body hang down.
Rationale: Do not leave the cat ‘hanging’ for more than a few seconds, as this is unpleasant for the cat, particularly if it is large.
3. Action: Place the cat on a table and restrain in an appropriate way.
Rationale: Aggressive cats may have to be restrained using such equipment as a crusher cage or a cat bag.
Procedure: Carrying a cat (Fig. 1.3)
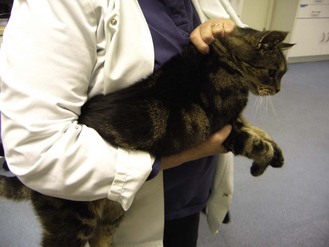
1. Action: Place the body of the cat under one elbow and forearm, holding it close to your side. Let the hindlegs dangle.
Rationale: The body is supported by the angle of your arm, but the hindlegs are unable to push the cat’s body up in order to make an escape. Watch out for the hindlegs getting caught in your side pockets.
2. Action: Hold the forepaws together between the fingers and thumb of the hand on that side.
Rationale: This controls the forepaws and prevents them from scratching you.
3. Action: Hold the scruff of the cat firmly with your free hand.
Rationale: In this position the cat feels secure and comfortable. If it tries to escape you have control of the head via the scruff and you can apply stronger pressure to the body with your elbow.
NB Avoid carrying aggressive or frightened cats around in your arms as such animals’ movements are unpredictable. They should be carried in a wire cat basket, which allows them to see out whilst providing you with clear visibility to assess their condition.
Rabbits
The rabbit is the third most popular pet in the UK and it is the most difficult to handle correctly. The rabbit has thinner bones than either the dog or cat and this makes it more prone to fractures of the legs and spine. The domestic rabbit has developed from the wild rabbit Oryctolagus cuniculus and its reactions are much the same, in that its instinct is to run and hide when threatened. There are around 50 breeds of domestic rabbit and they vary in size from dwarf breeds weighing around 1 kg to breeds such as the Flemish Giant, which can weigh up to 8 kg. This may be a significant factor in restraint and handling.
Procedure: To restrain a rabbit (Fig. 1.4)
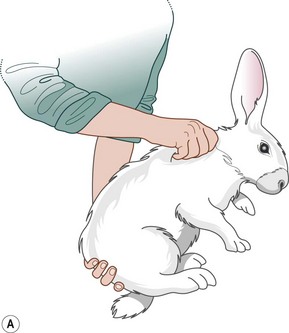

1. Action: Observe the rabbit before attempting to handle it.
Rationale: This allows you to assess the nature of the patient – if it is aggressive you may need to ask for assistance. Restraint may cause respiratory distress.
2. Action: Rabbits should be handled gently but firmly.
Rationale: Rabbits have an innate fear of humans whom they perceive as predators.
3. Action: Talk quietly to the rabbit and approach from behind its head.
Rationale: The eyes of a rabbit are placed on either side of the head providing good lateral vision but very poor backwards vision. There is no need to offer a hand to sniff as you might do with a dog or cat and it may be mistaken for food!
4. Action: If the animal is fractious, grasp by the scruff and support the weight with one hand (Fig. 1.4) under the hindquarters.
Rationale: Never pick a rabbit up by the ears! The hindlegs must be supported at all times. Rabbits have a fragile skeleton and strong lumbar muscles, so they can easily dislocate or break their legs and spines by struggling or kicking.
5. Action: More docile rabbits may be restrained by placing one hand under the thorax, gripping the forelegs between the thumb and forefingers of that hand. Support the hind end with your other hand.
Rationale: Some rabbits may resent being scruffed. The back should be kept in a normal curved position to avoid spinal fracture.
6. Action: To carry the rabbit, tuck the head and front feet under your upper arm and support the body along your forearm (Fig. 1.5A).
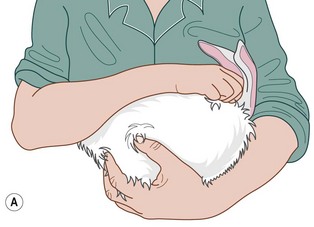

Figure 1.5 (A) Carrying a rabbit with the head tucked under your arm. (B) A large towel wrapped securely around the rabbit can be very helpful for restraint.
Rationale: Keeping the rabbit close to your body avoids the risk of it kicking and scratching you. Keeping its head in the dark makes the rabbit relax.
7. Action: A large towel can be used as an additional means of restraint. Unfold the towel on a table. Place the rabbit on the towel with its head projecting from one side. Wrap the towel around the body, covering the feet and leaving the head exposed (Fig. 1.5B).
Rationale: Covering the feet protects the handler from injury while the head is available for examination and administration of medications.
8. Action: An excessively aggressive rabbit may be removed from a cage by throwing a towel over the animal and covering it completely. The rabbit can be unwrapped when it has been safely placed on an examination table.
Rationale: Aggressive rabbits can come at you as you open the cage and may growl and hiss in fury! Being in the dark may help to reduce the rabbit’s stress. Care must always be taken to prevent injury to you and to the rabbit.
Procedure: To differentiate the sex of rabbits (Fig. 1.6)
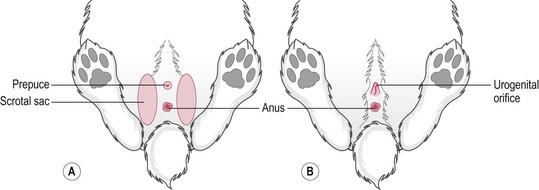
1. Action: Hold the scruff of the rabbit and support its weight by placing one hand under its hindquarters.
Rationale: The rabbit must be held firmly to avoid possible injury to you or the rabbit.
2. Action: Gently lower the rabbit onto an examination table so that it lies in dorsal recumbency. Maintain your hold on the scruff and tilt the animal so that it is almost upside down.
Rationale: In this position the rabbit is almost hypnotized and will then be easier to examine.
3. Action: Using your forefinger and middle finger, apply pressure to the vent area just in front of the anus. With some rabbits you may find it easier if the examination is carried out by you while an assistant restrains the rabbit as described above.
Rationale: In both sexes the area will protrude when pressure is applied. Bucks under 5 weeks will show a blunt white tube without a central line, whereas older bucks will show a pink tube with a pointed end that resembles a bullet. The doe has central slit-like opening to the vulva with a band of pink tissue on either side.
NB Young rabbits are notoriously difficult to sex up to the age of 3 weeks – you will not be the first to make a mistake! Adult bucks have large scrotal sacks that are visible lateral and cranial to the penis. The adult testes can be retracted into the abdominal cavity. Adult does have a prominent fur-covered dewlap under the chin from which hair is plucked to line the nest prior to giving birth.
Administration of medication
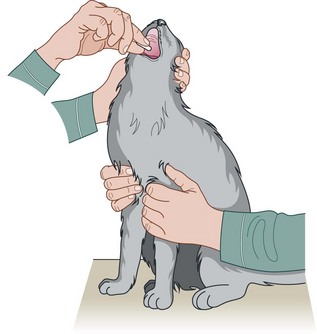
Procedure: Administering a tablet (Fig. 1.7)
1. Action: Place the dog in a sitting position on the floor or on an examination table covered in a non-slip mat.
Rationale: If the dog feels secure it will be less inclined to try and escape. Select a surface of a suitable height for you. Bending over for long periods may injure your back. Place small dogs on a table, but dose larger dogs on the floor.
2. Action: If necessary ask an assistant to hold the tail end of the dog.
Rationale: This prevents the dog moving backwards or standing up.
3. Action: Place one hand over the top of the dog’s muzzle and, using your fingers and thumb, gently raise the head until the nose is pointing at the ceiling, and open the mouth (Fig. 1.7).
Rationale: Raising the head to a vertical position causes the lower jaw to relax enabling the mouth to be opened more easily.
4. Action: Hold the tablet in the fingers of your other hand and with the forefinger of this hand pull down the lower jaw.
5. Action: Place the tablet on the back of the tongue.
Rationale: If the tablet is placed as far back on the tongue as possible, the swallowing reflex is initiated and the dog cannot spit it out.
6. Action: Close the mouth and hold it closed with one hand.
Rationale: This also prevents the dog from spitting it out.
7. Action: Stroke the dog’s throat until you feel the dog swallow.
Rationale: The dog may hold the tablet in the side of its mouth and spit it out as soon as you relax your grip. If you know that swallowing has occurred, the tablet should be passing down the oesophagus!
Procedure: Administering a liquid feed or medication
1. Action: Place the dog in a sitting position on the floor or on an examination table covered in a non-slip mat.
Rationale: If the dog feels secure it will be less inclined to try and escape. Select a surface of a suitable height for you. Bending over for long periods may injure your back. Place small dogs on a table, but dose larger dogs on the floor.
2. Action: If necessary ask an assistant to hold the tail end of the dog.
Rationale: This prevents the dog moving backwards or standing up.
3. Action: Place one hand over the top of the dog’s muzzle and, using the fingers and thumb of one hand, gently tilt the head upwards and to one side.
Rationale: This position restrains the head while encouraging the jaw to relax.
4. Action: Open the jaw slightly creating a pocket at the angle of the jaw.
Rationale: The pocket holds the liquid as it runs into the main part of the oral cavity.
5. Action: Using a syringe filled with the liquid, insert it into the side of the mouth.
Rationale: Try to avoid scraping the syringe over the gums as you may damage the mucous membranes.
6. Action: Depress the plunger so that the liquid trickles into the back of the mouth.
Rationale: If you depress the plunger too quickly the liquid will squirt out over both you and the dog.
7. Action: Continue until the syringe is empty and repeat as necessary.
8. Action: When the procedure is complete, wipe the mouth clean and wipe up any spillage on the dog’s coat.
Rationale: Never leave the dog covered in liquid as it will become wet and cold and, in summer, dried material may attract flies.
Procedure: Applying ear medication (Fig. 1.8)

1. Action: Place the dog in a sitting position on the floor or on an examination table covered in a non-slip mat.
Rationale: If the dog feels secure it will be less inclined to try and escape. Select a surface of a suitable height for you. Bending over for long periods may injure your back. Place small dogs on a table, but dose larger dogs on the floor.
2. Action: If necessary apply a muzzle.
Rationale: Some dogs may object to the application of ear medication, especially if their ears are sore.
3. Action: Ask your assistant to stand to one side of the dog and follow the instructions for steps 4 and 5.
Rationale: This method can be done single-handedly on an amenable dog and many clients have to do this by themselves; however, if help is available the procedure is better carried out with two people.
4. Action: Placing one arm under the dog’s neck and over the muzzle, pull the head towards your chest.
Rationale: This prevents the head from moving suddenly when the medication is applied. Avoid holding the head in the area of the ear as this will interfere with the treatment.
5. Action: Place the other arm over the dog’s back with your elbow pointing towards the far side.
Rationale: If the dog begins to struggle you can apply extra pressure by pressing your elbow closer to your side.
6. Action: You, the veterinary surgeon, will stand on the other side of the dog and apply the medication to the nearest ear.
Rationale: The applicator is introduced down the vertical ear canal and squeezed.
7. Action: Massage the ear gently.
Rationale: To disperse the medication along the ear canal.
8. Action: Wipe the surrounding area.
Rationale: To remove any spilt medication. Never leave a dog in a messy state – it wastes medication and annoys the client.
9. Action: To treat the other ear, change places with your assistant.
NB Restraining the animal in this position also allows you to examine the ear with an auroscope.
Procedure: Applying eye medication
1. Action: Place the dog in a sitting position on the floor or on an examination table covered in a non-slip mat.
Rationale: If the dog feels secure it will be less inclined to try and escape. Select a surface of a suitable height for you. Bending over for long periods may injure your back. Place small dogs on a table, but dose larger dogs on the floor.
2. Action: If necessary apply a muzzle.
Rationale: Some dogs may object to the application of eye medication, especially if their eyes are sore.
3. Action: Ask your assistant to stand to one side of the dog and follow the instructions for steps 4 and 5.
Rationale: This method can be done single-handedly on an amenable dog and many clients have to do this by themselves; however, if help is available the procedure is better carried out with two people.
4. Action: Placing one arm under the dog’s neck and over the muzzle, pull the head towards your chest.
Rationale: This prevents the head from moving suddenly when the medication is applied. Avoid holding the head in the area of the eye as this will interfere with the treatment.
5. Action: Place the other arm over the dog’s back with your elbow pointing towards the far side.
Rationale: If the dog begins to struggle you can apply extra pressure by pressing your elbow closer to your side.
6. Action: You, the veterinary surgeon, should stand in front of the dog and cup the head in both hands. Using the thumb of one hand the lower eyelid of one eye can be pulled down and the medication can be applied around the edge of the conjunctiva.
Rationale: You must ensure that the head is held firmly as sudden movement may result in damage to the eye.
7. Action: Release the tension on the eyelid and close the eyelids over the medication.
Rationale: This enables the medication to spread over the tissues of the eye and the eyelid.
8. Action: If necessary repeat with the other eye.
9. Action: After the procedure is completed make sure that, as your assistant relaxes his / her hold, the dog does not rub at its eye with its paws or rub its face on the ground.
Rationale: After about a minute most medication will have dispersed and will no longer cause any discomfort. If there is evidence of persisting pain, then consider using an Elizabethan collar to prevent self-trauma to the eye.
NB Restraining an animal in the position described also allows you to examine the eye.
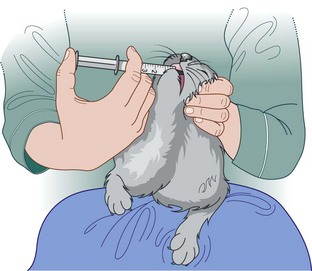
Procedure: Administering a subcutaneous injection. Site: Scruff of the neck
1. Action: Place the dog in a sitting position or in sternal recumbency on an examination table covered in a non-slip mat.
Rationale: If the dog feels secure and comfortable it will be less inclined to move or to try and escape.
2. Action: Apply a muzzle if necessary.
Rationale: This procedure is usually quick and painless, but some dogs may object and should be muzzled to prevent injury to you.
3. Action: Make sure that your syringe is already filled and that a suitable-sized needle is attached.
Rationale: To complete this procedure quickly and efficiently you must have your equipment prepared and ready to hand.
4. Action: Grasp the scruff firmly with one hand.
Rationale: This restrains the head and tents the skin ready for injection.
5. Action: Using the other hand, insert the point of the needle with the bevel-side uppermost into the raised skin of the scruff.
Rationale: The needle will go through the skin more smoothly if the bevel-side is uppermost. Be careful to avoid pushing the needle right through the scruff to the other side, causing you to spray the contents over the dog’s coat.
6. Action: Inject the contents of the syringe into the subcuticular space and withdraw the needle.
Rationale: If you wish you may draw back on the syringe before injecting the contents to check that you have not penetrated a small blood capillary. This is good practice, but the blood supply to the area is relatively poor so the chances of penetrating a blood capillary are low.
7. Action: Gently massage the site of the injection.
Rationale: To disperse the drug. Absorption from this site takes about 30–45 minutes.
NB If the dog is likely to object to this procedure, it may be safer to arrange for an assistant to restrain the dog.
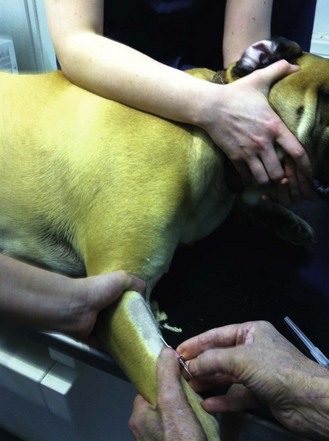
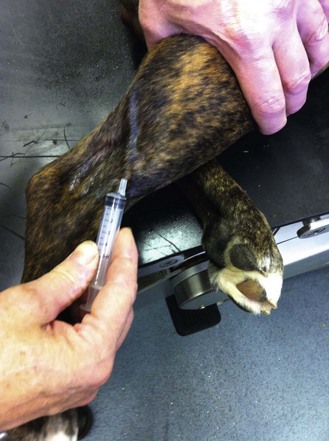
Procedure: Administering an intramuscular injection. Site: Quadriceps femoris muscle (Fig. 1.9A)
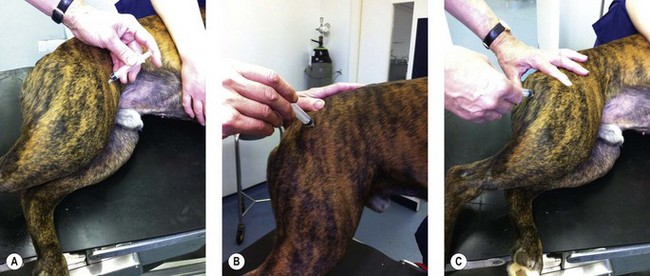
Figure 1.9 Administering an intramuscular injection to a dog: (A) to the quadriceps femoris muscle; (B) to the gluteals; (C) to the hamstring muscles.
1. Action: Place the dog in a sitting position or in sternal recumbency on an examination table covered in a non-slip mat.
Rationale: If the dog feels secure and comfortable it will be less inclined to move or to try and escape.
2. Action: Apply a muzzle if necessary.
Rationale: This injection may be slightly painful and some dogs may object.
3. Action: Make sure that your syringe is already filled and that a suitable-sized needle is attached.
Rationale: To complete this procedure quickly and efficiently you must have your equipment prepared and ready to hand.
4. Action: Ask your assistant to stand to one side of the dog and then follow the instructions for steps 5, 6 and 7.
Rationale: This procedure should never be done single-handedly as it can be painful. Lack of restraint may cause the dog to move suddenly, resulting in damage to the muscle tissues.
5. Action: Place one arm under the dog’s neck and pull the head close to your chest.
Rationale: If the head is firmly restrained the dog cannot move suddenly or turn to bite.
6. Action: Place your other arm over the dog’s chest.
Rationale: Be prepared to restrain the dog in this position as sudden movement may cause damage and pain at the site of injection.
7. Action: You, the veterinary surgeon, should stand to one side of the dog and towards the hind end of the body.
Rationale: The quadriceps femoris muscle is located on the cranial aspect of the femur.
8. Action: Pick up the hindlimb nearest to you. Fix the quadriceps femoris muscle between the thumb and fingers of the non-injecting hand.
Rationale: The quadriceps femoris muscle is the most common site for intramuscular injections because it is easily reachable and because there are relatively few vital structures running through it (Fig. 1.9A).
9. Action: Using your other hand, introduce the needle, bevel-side uppermost, through the skin and the muscle mass pointing towards the femur and almost at right angles to the lateral aspect of the thigh.
Rationale: At this angle the needle is unlikely to penetrate any major blood vessels or nerves.
10. Action: Draw back slightly on the plunger.
Rationale: Muscle tissue has a good blood supply and there is a risk of vascular penetration. Drawing back also helps to free the needle tip of muscle fibres, which could impede the flow of the drug.
11. Action: If there is no blood in the syringe, inject the contents slowly.
Rationale: Muscle tissue is very dense and rapid injections may be very painful. The density of muscle tissue also limits the volume that can be given. Avoid giving any more than 2 ml in one injection.
12. Action: Withdraw the needle and massage the site.
Rationale: Gentle massage will help to disperse the drug into the blood stream. Absorption from this site takes about 10–15 minutes.
NB It is possible to use other muscle masses for intramuscular injections. The choice may be largely due to personal preference and the ability to restrain the animal appropriately. Other muscles used include:
• Lumbar – approximately midway between the last rib and the wing of the ilium.
• Gluteals – on the dorsal aspect of the pelvis (Fig. 1.9B).
• Hamstring group (semimembranosus / semitendinosus) – located on the caudal aspect of the hindlimb; insert the needle caudal to the femur and direct the tip caudally to avoid damaging the sciatic nerve, which runs along the line of and caudal to the femur (Fig. 1.9C).
• Triceps – runs on the caudal aspect of the humerus; direct the needle caudally away from the humerus.
Procedure: Administering an intravenous injection. Site: Cephalic vein (Fig. 1.10)
(Assume that the skin has been clipped and cleaned with a swab soaked in spirit prior to the procedure.) The cephalic vein is the most common site for venepuncture and runs down the dorsal aspect of the lower forelimb.
1. Action: Place the dog in sternal recumbency on a stable examination table covered in a non-slip mat.
Rationale: If the dog feels secure it will be less likely to try and escape. Select a surface of a suitable height for you – bending over for long periods may injure your back.
2. Action: Apply a muzzle if necessary.
Rationale: Some dogs may object to this procedure and a muzzle will protect you from being bitten.
3. Action: Make sure that your syringe is filled and that you have attached a suitable gauge and length of needle.
Rationale: The syringe should be of a size to hold the appropriate volume of drug, but not too large as this will make it difficult to control. Gauge of needle depends on the thickness of the drug and the species of animal – usually 21G is suitable for dogs. The most common length is  inch (16 mm).
4. Action: Ask your assistant to stand to one side of the dog and then follow the instructions for steps 5, 6, 7, 8 and 9.
5. Action: Place one arm under the dog’s chin and around the head, holding the head close to your chest.
Rationale: If the head is held firmly and as close to you as possible the dog is less likely to be able to bite.
6. Action: Using your other hand, extend the foreleg on the opposite side towards the veterinary surgeon.
Rationale: Your hand can rest on the table ensuring that the foreleg is supported and held firmly.
7. Action: Cup the elbow in the palm of your hand, bringing your thumb across the crook of the elbow.
8. Action: Apply gentle pressure with your thumb and rotate your hand slightly outwards.
Rationale: This pressure acts as a tourniquet trapping blood passing up the foreleg towards the heart. The result is that the vein dilates – known as ‘raising the vein’ – and becomes more visible.
9. Action: The assistant should maintain this pressure while you, the veterinary surgeon, continue with the procedure.
Rationale: The cephalic vein should clearly be seen under the skin.
10. Action: You should hold the leg firmly and insert the needle bevel-side uppermost into the cephalic vein (Fig. 1.10).
Rationale: Inserting the needle bevel-side uppermost makes it easier to penetrate the wall of the blood vessel.
11. Action: Draw back on the plunger of the syringe to check that you have penetrated the vein.
Rationale: If the vein has been correctly penetrated a small amount of blood will appear in the syringe. Perivascular injection may lead to tissue damage. Do NOT continue with the injection if you are not in the vein.
12. Action: If you are certain that the needle is in the vein, ask your assistant to raise his / her thumb a little, and slowly inject the contents of the syringe into the vein.
Rationale: Releasing the pressure allows the drug to flow into the vein and around the circulation.
13. Action: When the procedure is complete, withdraw the needle slowly and apply gentle pressure to the entry point with a swab or small piece of cotton wool for about 30 seconds.
Rationale: This prevents haemorrhage into the area around the vein.
Procedure: Collection of a blood sample from the cephalic vein
1. Action: Place the dog in sternal recumbency on a stable examination table covered in a non-slip mat.
Rationale: If the dog feels secure it will be less likely to try and escape. Select a surface of a suitable height for you – bending over for long periods may injure your back.
2. Action: Apply a muzzle if necessary.
Rationale: Some dogs may object to this procedure and a muzzle will protect you from being bitten.
3. Action: Make sure that you have a needle of an appropriate size attached to a 2 ml syringe close to hand. You will also need a suitable blood-collecting tube.
Rationale: You should use a 21G needle to collect a blood sample from a dog. If the gauge is too narrow there is a risk that the blood cells will rupture as they pass into the syringe. Selection of the blood-collecting tube depends on the reason for sampling. The most common ones contain anti-clotting agents such as heparin or EDTA. An unclotted sample is required for the majority of blood tests.
4. Action: Ask your assistant to stand to one side of the dog and then follow the instructions for steps 5, 6, 7, 8 and 9.
5. Action: Place one arm under the dog’s chin and around the head, holding the head close to your chest.
Rationale: If the head is held firmly and as close to you as possible the dog is less likely to be able to bite.
6. Action: Using your other hand, extend the foreleg on the opposite side towards the veterinary surgeon.
Rationale: Your hand can rest on the table ensuring that the foreleg is supported and held firmly.
7. Action: Cup the elbow in the palm of your hand, bringing your thumb across the crook of the elbow.
8. Action: Apply gentle pressure with your thumb and rotate your hand slightly outwards.
Rationale: This pressure acts as a tourniquet trapping blood passing up the foreleg towards the heart. The result is that the vein dilates – known as ‘raising the vein’ – and becomes more visible.
9. Action: The assistant should maintain this pressure while you, the veterinary surgeon, continue with the procedure.
Rationale: The cephalic vein should clearly be seen under the skin.
10. Action: You should hold the leg firmly and insert the needle bevel-side uppermost into the cephalic vein.
Rationale: Inserting the needle bevel-side uppermost makes it easier to penetrate the wall of the blood vessel.
11. Action: Draw back on the plunger of the syringe to check that you have penetrated the vein.
Rationale: If the vein has been correctly penetrated a small amount of blood will appear in the syringe.
12. Action: If you are certain that the needle is in the vein, your assistant should maintain pressure on the vein while you continue to withdraw blood.
Rationale: Maintaining the pressure ensures that blood flowing up the leg towards the heart is prevented from doing so and is easier to withdraw into the syringe.
13. Action: When the procedure is complete, withdraw the needle slowly and apply gentle pressure to the entry point with a swab or small piece of cotton wool for about 30 seconds.
Rationale: This prevents haemorrhage into the area around the vein.
14. Action: As quickly as possible gently squirt the blood from the syringe into the collecting tube. Replace the lid and rotate the tube between your finger and thumb for at least 1 minute.
Rationale: Do everything gently – blood cells can easily be damaged by rough treatment and this may affect the results of the blood analysis. Rotating the blood tube allows the blood to mix with the anticoagulant so preventing clotting.
Procedure: Administering an intravenous injection. Site: Jugular vein (Fig. 1.11)
(Assume that the skin has been clipped and cleaned with a swab soaked in spirit prior to the procedure.) The jugular vein runs in the jugular furrow, on either side of the trachea.
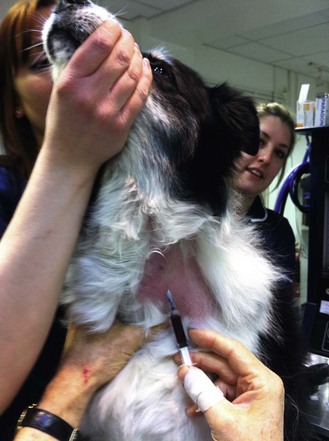
Figure 1.11 Raising the jugular vein of a dog by placing the thumb at the base of the jugular furrow.
1. Action: Small dogs – place the dog in a sitting position on a stable examination table covered in a non-slip mat. Large dogs may be placed in a sitting position on the floor.
Rationale: The dog must feel secure and comfortable so that it will not try to move or to escape.
2. Action: Apply a muzzle if necessary.
Rationale: Some dogs may object to this procedure.
3. Action: Make sure that your syringe is filled and that you have attached a suitable gauge and length of needle.
Rationale: The syringe should be of a size to hold the appropriate volume of drug, but not too large as this will make it difficult to control. Gauge of needle depends on the thickness of the drug and the species of animal – usually 21G is suitable for dogs. The most common length is  inch (16 mm).
4. Action: Ask your assistant to stand to one side of the dog and then follow the instructions for steps 5 and 6.
5. Action: Place one hand under the dog’s chin and raise the head, bringing it close to your chest.
Rationale: Firm restraint is essential for this procedure to prevent the dog moving suddenly and causing injury to itself or to you.
6. Action: Place your other arm over the dog’s back and round to the front of the chest, holding it close to your body.
Rationale: The closer the dog is to you the less able it is to move or to bite.
7. Action: You, the veterinary surgeon, should stand in front of the dog and apply pressure at the base of the jugular furrow with the fingers of one hand (Fig 1.11).
Rationale: The jugular vein on each side of the trachea runs in a groove known as the jugular furrow. It collects venous blood from the head and neck and returns it to the heart. Pressure applied at the base of the vein will prevent the flow of blood towards the heart causing the vein to dilate – known as ‘raising the vein’.
8. Action: Using the other hand, insert the needle bevel-side uppermost through the skin and into the underlying vein.
Rationale: The vein should be clearly visible. Positioning the needle with the bevel-side uppermost makes it easier to insert through the skin and wall of the blood vessel.
9. Action: Draw back on the plunger of the syringe to check that you have penetrated the vein.
Rationale: If the vein has been correctly penetrated a small amount of blood will appear in the syringe. Perivascular injection may lead to tissue damage. Do NOT continue with the injection if you are not in the vein.
10. Action: If you are certain that the needle is in the vein, release the pressure exerted by your other hand and slowly inject the drug.
Rationale: Releasing the pressure allows the drug to flow into the vein and around the circulation.
11. Action: When the procedure is complete, withdraw the needle slowly and apply gentle pressure to the entry point with a swab or small piece of cotton wool for about 30 seconds.
Rationale: This prevents haemorrhage into the area around the vein.
NB Jugular puncture can also be used for collecting a blood sample and may be a better site than the cephalic vein for collecting large volumes. If a blood sample is to be collected maintain pressure on the vein until there is enough blood in the syringe (see procedure for the cephalic vein).
Procedure: Administering an intravenous injection. Site: Lateral saphenous vein (Fig. 1.12)
(Assume that the skin has been clipped and cleaned with a swab soaked in spirit prior to the procedure.) The lateral saphenous vein runs over the lateral aspect of the hock.
1. Action: Apply a muzzle if necessary.
Rationale: Some dogs may object to this procedure. It is easier to apply the muzzle before restraining the dog.
2. Action: Place the dog in lateral recumbency on a stable examination table covered in a non-slip mat.
Rationale: If the dog feels secure it will be less likely to try and escape.
3. Action: Make sure that your syringe is filled and that you have attached a suitable gauge and length of needle.
Rationale: The syringe should be of a size to hold the appropriate volume of drug, but not too large as this will make it difficult to control. Gauge of needle depends on the thickness of the drug and the species of animal – usually 21G is suitable for dogs. The most common length is  inch (16 mm).
4. Action: Ask your assistant to stand on the dorsal side of the dog with the legs directed away from him / her and follow steps 4–7.
5. Action: Using the arm closest to the head, place your forearm across the dog’s neck and hold both forepaws.
Rationale: In this position you can use the weight of your body to restrain the cranial end of the dog’s body.
6. Action: Place the other hand around the uppermost hindleg at the level of the mid tibia / fibula.
Rationale: The lateral saphenous vein collects blood from the hindpaw and runs superficially on the caudal aspect of the hock and distal tibia.
7. Action: Stretch out the leg and apply gentle pressure.
Rationale: Pressure applied around the distal tibia acts as a tourniquet trapping venous blood and causing the vein to dilate – known as ‘raising the vein’ (Fig. 1.12).
8. Action: You, the veterinary surgeon, should hold the leg and insert the needle bevel-side uppermost through the skin and into the vein.
Rationale: The vein should be clearly visible. Positioning the needle with the bevel-side uppermost makes it easier to insert through the skin and wall of the blood vessel.
9. Action: Draw back on the plunger of the syringe to check that you have penetrated the vein.
Rationale: If the vein has been correctly penetrated a small amount of blood will appear in the syringe. Perivascular injection may lead to tissue damage. Do NOT continue with the injection if you are not in the vein.
10. Action: If you are certain that the needle is in the vein, ask your assistant to release the pressure on the vein and gently inject the drug.
Rationale: Releasing the pressure allows the drug to flow into the vein and around the circulation.
11. Action: When the procedure is complete, withdraw the needle slowly and apply gentle pressure to the entry point with a swab or small piece of cotton wool for about 30 seconds.
Rationale: This prevents haemorrhage into the area around the vein.
NB The saphenous vein may also be used to collect a blood sample. Your assistant should maintain pressure on the vein while the sample is being collected (see procedure for the cephalic vein).
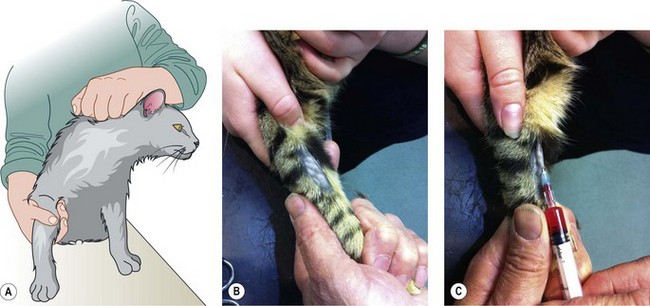
Procedure: Placement of an intravenous catheter in a peripheral vein
Intravenous catheters may be used for fluid and drug administration and in situations where repeated blood samples are required. It is essential that the catheter is placed in as aseptic a manner as possible to prevent the introduction of infection.
For peripheral veins an over-the-needle catheter is recommended. This consists of a stylet (or needle) with a catheter that fits closely over it. Select the size and length of catheter to deliver as rapid a flow of fluid as possible and to reduce the chance of blockage – for dogs select 18–22G, for cats 22G, and for puppies and kittens 24G. The most common peripheral vein is the cephalic vein.
Figure 1.13 illustrates the procedure in a cat, but the technique is the same in all species.
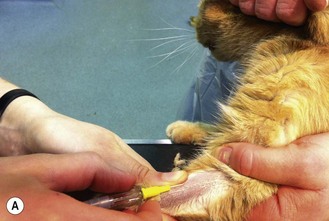
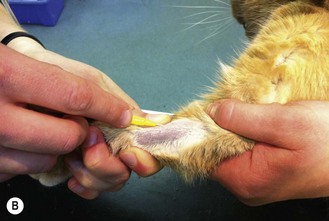
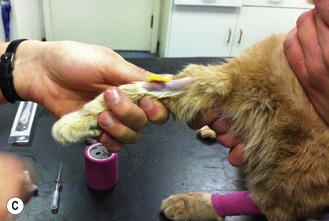
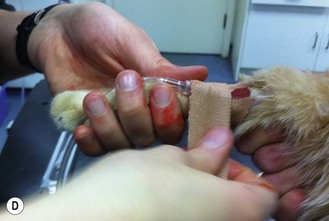
Figure 1.13 Placing an intravenous catheter in the cephalic vein of a cat. The catheter is placed in the vein, held in place using zinc oxide tape and the giving set is attached.
1. Action: Ask an assistant to restrain the patient as described previously.
Rationale: The patient must feel secure, and correct restraint will prevent injury to the patient and to you and your assistant.
2. Action: In some cases it may be necessary to muzzle the patient.
Rationale: Some animals will object to the procedure.
3. Action: Clip an area of skin on the dorsal surface of the forelimb surrounding the intended point of entry (Fig. 1.13A).
Rationale: This will make aseptic preparation more effective. Cutting any long hair away from the palmar surface of the forepaw will help to prevent contamination and to secure the catheter when it is in place.
4. Action: Prepare the site aseptically using an appropriate antiseptic solution.
Rationale: To prevent introduction of infection into the site.
5. Action: Wear sterile gloves.
Rationale: This may not be essential but, at the very least, your hands must be washed in an antiseptic solution prior to placing the catheter.
6. Action: Ask your assistant to raise the vein.
Rationale: To visualize the vein.
7. Action: Make a small incision in the skin over the vein with a scalpel blade.
Rationale: To facilitate introduction of the catheter. This may not always be necessary, but it may help in dehydrated patients or those with thick skin.
8. Action: Push the tip of the catheter, with the bevel of the stylet uppermost, through the incision at an angle of 30–40 degrees and advance it into the vein (Fig. 1.13A, B).
Rationale: By pushing the catheter at this angle you reduce the risk of pushing it through the vein and out the other side.
9. Action: Watch for blood within the flash chamber of the catheter (Fig. 1.13C).
Rationale: This indicates that you have penetrated the vein satisfactorily.
10. Action: Once blood has been seen, reduce the angle between the catheter and the leg by flattening the catheter.
Rationale: This makes it easier to advance the catheter further up the vein without the danger of going right through the vein.
11. Action: Slowly advance the catheter and stylet a short distance into the vein.
Rationale: To make sure that the catheter lies fully in the lumen.
12. Action: Hold the stylet in position and advance the catheter completely into the vein.
13. Action: Remove the stylet.
Rationale: The catheter is now in position.
14. Action: Ask your assistant to apply pressure over the vein at the distal end of the catheter.
Rationale: This occludes the vein preventing unnecessary spillage of blood.
15. Action: Secure the catheter in place with adhesive tape (Fig. 1.13D).
Rationale: To prevent it slipping out of the vein.
16. Action: Flush with a small amount of heparin saline.
Rationale: To make sure it is in place and to prevent the formation of clots.
17. Action: Depending on its intended use either attach to a giving set and fluid bag or close the end with an injection cap.
Rationale: Never leave the end of the catheter open to the air as contaminants may get into the circulation.
18. Action: Cover with a bandage and pack with swabs (Box 1.1).
Rationale: This ensures that the area is comfortable, reduces the chance of slippage, self-mutilation and contamination.
Procedure: Placement of an intravenous catheter in the jugular vein using the modified Seldinger technique (Fig. 1.14)
This procedure is used when fluids are to be administered for longer than 5 days or when hypertonic fluids are to be given. It is also used for measuring central venous pressure and in some cases where the conformation or temperament of the patient makes use of a peripheral vein more difficult. It is not recommended where there may be a problem with blood clotting.
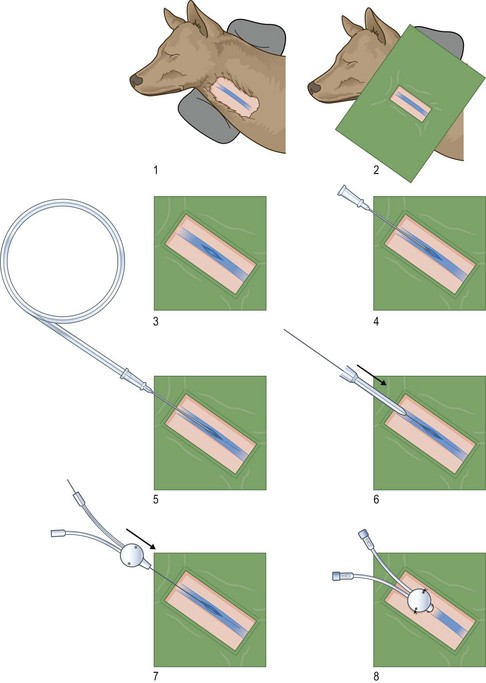
Figure 1.14 Steps involved in the modified Seldinger method of placing a catheter in the jugular vein. (Reproduced with permission from Nick Bexfield and Karla Lee: BSAVA Guide to Procedures in Small Animal Practice 2010, figs e-f, originally illustrated by Samantha J Elmhurst.)
The patient may be conscious if it is weak or debilitated, but general anaesthesia or sedation will make placement of the catheter much easier. The patient should be attached to an ECG monitor.
1. Action: Place the animal in lateral recumbency.
Rationale: This position provides the best access to the jugular vein.
2. Action: Place a sandbag under the neck.
Rationale: This makes the neck bend over the sandbag, enabling the jugular vein to be accessed more easily.
3. Action: Prepare area over and around the jugular vein aseptically.
Rationale: It is vital to ensure that infection is not introduced into the vein.
4. Action: Cover with a sterile fenestrated drape.
Rationale: To prevent introduction of infection.
5. Action: Wear sterile gloves.
Rationale: To prevent introduction of infection.
6. Action: Ask your assistant to raise the jugular vein by placing his / her hand under the drape and applying pressure to the base of the jugular furrow.
Rationale: To visualize the jugular vein.
7. Action: Make a stab incision over the jugular vein.
Rationale: To facilitate introduction of the catheter.
8. Action: Insert either the introducer needle from the Seldinger catheter pack or an over-the-needle catheter into the vein in a rostro-caudal direction (Fig. 1.14).
Rationale: The needle or catheter is pushed towards the heart, i.e. away from the head.
9. Action: If using an over-the-needle catheter, remove the needle.
Rationale: This clears the way for introduction of the guide wire.
10. Action: Ask your assistant to stop raising the vein.
11. Action: Insert the guide wire into the vein through the introducer or the catheter holding it within an adapter.
Rationale: Holding the adapter helps placement of the guide wire. The guide wire may have a J-shaped tip and this should be straightened by withdrawing it into the adapter before it is inserted.
12. Action: Monitor the ECG for arrhythmias.
Rationale: Over-long wires can enter the heart and cause arrhythmias.
13. Action: Do not let go of the guide wire at any time.
Rationale: There is a risk of losing the wire in the vein if you let it go.
14. Action: Remove the introducer needle or catheter, leaving the guide wire in place.
15. Action: Advance the vessel dilator over the guide wire and into the vein.
Rationale: To enlarge the subcutaneous tunnel.
16. Action: Remove the dilator.
17. Action: Advance the Seldinger catheter over the guide wire and into the vein and remove the wire.
Rationale: The catheter is now in place.
18. Action: Put sterile injection caps over each port of the catheter.
Rationale: This prevents air and infection entering the vein. There are two ports to this type of catheter and ideally each cap should incorporate an on / off tap.
19. Action: From each port, withdraw any air and a little blood into a syringe containing a little heparinized saline.
Rationale: This prevents an air embolism and ensures that the catheter is positioned intravascularly.
20. Action: Immediately flush through each port with heparinized saline.
Rationale: To prevent clotting within the port.
21. Action: Place sutures through specific holes on the wing at the base of the catheter into the skin within the area.
Rationale: To secure the catheter to the patient.
22. Action: Place a sterile dressing over the entry site and cover with a bandage.
Rationale: This keeps the area clean and helps to hold the catheter in place. Make sure that the bandage is not too tight.
Cats
Procedure: Administering a tablet
Assistance may be required, but it is perfectly possible to do this single-handedly providing that the cat is docile (Fig. 1.15).
1. Action: Place the cat in a sitting position on a stable examination table covered in a non-slip mat.
Rationale: If the cat feels secure it will be less inclined to try and escape.
2. Action: If you have an assistant (often the client) ask him / her to hold the cat’s forelimbs.
Rationale: This prevents the cat from bringing its forelimbs up to scratch you.
3. Action: Grasp the cat’s head by placing one hand over the head and your thumb and forefinger at the angle of the jaw, applying gentle pressure to the angle of the jaw.
Rationale: At this point some unrestrained cats may raise their forepaws.
4. Action: Gently but firmly tilt the head backwards.
Rationale: As the head is tilted the jaw will naturally relax and the mouth should be easier to open.
5. Action: Hold the tablet between the thumb and forefinger of your other hand.
6. Action: Use your second and third fingers to apply gentle downward pressure to the cat’s lower jaw.
Rationale: At the first attempt the jaws should open easily. At later attempts the cat may clench its jaws tightly making the procedure more difficult – an experience often reported by clients!
7. Action: As the jaw opens, place or drop the tablet on to the back of the tongue.
Rationale: If the tablet is placed as far back as possible, the swallowing reflex will be induced.
8. Action: Keeping the head tilted vertically, close the mouth and hold it closed with your hand.
Rationale: It is important to hold the mouth closed as this prevents the cat from spitting the tablet out.
9. Action: Gently stroke the throat until the cat is seen to swallow.
Rationale: Some cats learn to hold the tablet in the side of their cheeks until the head is released when they then spit the tablet out!
Procedure: Administering liquid medication or oral fluids (Fig. 1.16)
1. Action: Sit on a chair with a towel or other absorbent material over your knees.
Rationale: This procedure can be messy and the towel will absorb any spilt liquid.
2. Action: Take the cat on to your knee with its head pointing away from you.
Rationale: In this position the cat will be comfortable and easy to restrain.
3. Action: Grasp the cat’s head with one hand, with your thumb and forefinger at the angle of the jaw, and slightly tilt the head to one side.
Rationale: If the cat raises its forepaws ask an assistant to hold them down or wrap them in the towel.
4. Action: Open the mouth slightly, creating a pocket at the angle of the jaw.
Rationale: This pocket holds the liquid as it runs into the main part of the oral cavity.
5. Action: Using your other hand and a small syringe filled with the liquid, gently insert the end of the barrel into the mouth at the angle of the jaw.
Rationale: Be as gentle as possible – rough handling can easily damage the mouth.
6. Action: Slowly depress the plunger so that the liquid trickles into the mouth.
Rationale: If you depress the plunger too quickly the liquid may squirt out over you and the cat.
7. Action: Continue until the syringe is empty, refilling if necessary.
8. Action: When the procedure is complete, clean the cat’s mouth, paws and any other parts which that are wet or covered in liquid.
Rationale: Never leave the cat covered in liquid as it will become wet and cold and may attract flies.
Procedure: Applying ear medication
1. Action: Place the cat in a sitting position on a stable examination table covered in a non-slip mat.
Rationale: If the cat feels secure it will be less inclined to try and escape.
2. Action: Ask your assistant to stand to one side of the cat and place his / her hands on either side of the cat bringing them forward to restrain the forelegs on the table.
Rationale: Cats used to being handled prefer minimal restraint. This procedure does not usually cause too much discomfort and the cat is unlikely to struggle. However, if struggling does occur your assistant should hold the scruff with one hand and use the other to restrain the forelegs.
3. Action: Stand in front of the cat and take hold of the ear pinna on the side to be treated, with the finger and thumb of one hand.
Rationale: In this position you can gain maximum access to the ear.
4. Action: Gently twist the head so that it faces upwards.
Rationale: This brings the ear uppermost so that any medication runs down the ear canal by gravity. It also helps to restrain the head.
5. Action: Using the reverse position, apply medication to the other ear.
Procedure: Applying eye medication
1. Action: Place the cat in a sitting position on a stable examination table covered in a non-slip mat.
Rationale: If the cat feels secure it will be less inclined to try and escape.
2. Action: Ask your assistant to place one hand on either side of the cat’s rump.
Rationale: This prevents the cat moving backwards and slipping off the table.
3. Action: Stand in front of the cat and take the cat’s head in one hand, placing your thumb over the cranium and your fingers under the cat’s chin. The affected eye should be on the far side of the head away from the palm of your hand.
Rationale: In this position the head is held still, reducing the risk of damage to the eye. If the cat struggles the nozzle of the tube may penetrate the eye.
4. Action: Gently stretch the skin around the affected eye with the forefinger and thumb of this hand.
Rationale: This will open the eyelids, allowing examination of the eye and the conjunctiva.
5. Action: Using your other hand, apply the medication around the edges of the conjunctiva.
Rationale: If your hands are too rough you may cause damage to the delicate conjunctiva.
6. Action: Relax your thumb and forefinger so that the stretched tissues return to normal.
Rationale: This enables the eyelids to close.
7. Action: Gently close the eyelids over the medication.
Rationale: This allows the drops or ointment to spread around the external tissues of the eye and the eyelids.
8. Action: It is important to maintain control of the forepaws for a short time to prevent the cat from clawing at the eye or rubbing its head on the table.
Rationale: After a few minutes the ointment will have dissipated and the cat should feel no discomfort.
Procedure: Administering a subcutaneous injection. Site: Scruff of the neck
1. Action: Place the cat in sternal recumbency on a stable examination table covered in a non-slip mat.
Rationale: If the cat feels secure it will be less inclined to escape.
2. Action: Grasp the scruff of the neck firmly with one hand.
Rationale: This gives control of the head and the cat is unable to turn and bite. It also tents the skin ready for the injection.
3. Action: Make sure that your syringe is already filled and that a suitable-sized needle is attached.
Rationale: To complete this procedure quickly and efficiently you must have your equipment prepared and ready to hand.
4. Action: Using your other hand, introduce the point of the needle, bevel-side uppermost, into the raised skin of the scruff.
Rationale: Having the needle bevel-side uppermost makes it easier to push through the skin. Make sure that you do not push the needle right through the two layers of skin and squirt the contents out on to the cat or the client!
5. Action: Inject the contents into the subcuticular space and withdraw the needle.
Rationale: If you wish, you may draw back on the syringe before injecting to check that you have not penetrated a small blood vessel but the blood supply to the area is relatively poor and the risk is low.
6. Action: Gently massage the site of the injection.
Rationale: To disperse the drug. Absorption from this site takes about 30–45 minutes.
NB Most cats will not object to this procedure and it can usually be performed single-handedly, provided that you give the injection quickly. However, some cats may resent it and you may need the help of an assistant.
Procedure: Administering an intramuscular injection. Site: Quadriceps femoris muscle
1. Action: Place the cat on a stable examination table covered in a non-slip mat.
Rationale: If the cat feels secure it will be less inclined to escape.
2. Action: Ask your assistant to stand to one side of the cat and follow step 3.
Rationale: You should not perform this technique on your own as you could damage the muscle tissues if the cat moves.
3. Action: Restrain the head by grasping the scruff of the neck.
Rationale: The head must be held tightly as this potentially painful procedure could cause the cat to bite.
4. Action: Make sure that a syringe is already filled and that a suitable-sized needle is attached.
Rationale: To complete this procedure quickly and efficiently, you must have your equipment prepared and ready to hand.
5. Action: You, the veterinary surgeon, should take the nearest hindleg and locate the quadriceps group of muscles lying on the cranial aspect of the femur.
Rationale: The quadriceps group is a large muscle mass that provides easy access for injection. The hamstring group and the gluteals may be used but there is a risk of bone and sciatic nerve damage.
6. Action: Fix the muscles between the thumb and forefingers of the hand closest to the caudal end of the cat by encircling the top of the cat’s thigh with that hand.
Rationale: This prevents the muscle mass moving as you insert the needle.
7. Action: Using the other hand introduce the needle, bevel-side uppermost, through the skin and the muscle mass in a direction running towards the femur and almost at right angles to the lateral aspect of the thigh.
Rationale: At this angle the needle is unlikely to penetrate any major blood vessel or nerve.
8. Action: Draw back slightly on the plunger and look for blood in the hub of the syringe.
Rationale: To ensure that you have not penetrated a blood vessel. Muscle tissue has a good blood supply and there is a risk of vascular penetration.
9. Action: If there is no blood in the syringe, inject the contents slowly.
Rationale: Muscle tissue is very dense and rapid injections of any volume of fluid may be very painful. Avoid giving any more than 2 ml at a time.
10. Action: Withdraw the needle and massage the site gently.
Rationale: Gentle massage will help to disperse the drug into the blood stream. Absorption from the area usually takes about 20–30 minutes.
NB It is possible to use other muscle masses for intramuscular injections. The choice may be largely due to personal preference and the ability to restrain the cat appropriately.
• Lumbar – approximately midway between the last rib and the wing of the ilium
• Hamstring group (semimembranosus / semitendinosus) – located on the caudal aspect of the hindlimb; insert the needle caudal to the femur and direct the tip caudally to avoid damaging the sciatic nerve, which runs along the line of and caudal to the femur
• Triceps – runs on the caudal aspect of the humerus; direct the needle caudally away from the humerus.
Procedure: Administering an intravenous injection. Site: Cephalic vein (Fig. 1.17)
(Assume that the skin has been clipped and cleaned with a swab soaked in spirit prior to the procedure.) The cephalic vein is the most common site for venepuncture and runs down the dorsal aspect of the lower forelimb.
1. Action: Place the cat in sternal recumbency or in a sitting position on a stable examination table covered in a non-slip mat.
Rationale: If the cat feels secure it will be less inclined to escape.
2. Action: Ask your assistant to take a firm grasp of the cat’s scruff with one hand and face it towards you and then follow steps 3–7.
Rationale: It is vital that the cat is held firmly as sudden movement may cause to injury to the patient, to the assistant or to you.
3. Action: Your assistant should hold the cat’s body close using his / her forearm and elbow of this same arm.
Rationale: Extra control can be achieved by changing the pressure exerted by the elbow.
4. Action: Using the other hand, extend a foreleg towards the vet.
5. Action: Support the cat’s elbow in the palm of your upturned hand and place your thumb across the crook of the elbow.
Rationale: Your hand can rest on the table, ensuring that the foreleg is supported and held firmly.
6. Action: Apply pressure with your thumb and rotate your hand slightly outwards.
Rationale: This pressure acts as a tourniquet trapping blood as it flows up the forelimb and resulting in dilation of the vein – known as ‘raising the vein’.
7. Action: Maintain the pressure while the needle is inserted into the vein (Fig. 1.17).
Rationale: The cephalic vein should be clearly visible under the skin running down the dorsal aspect of the lower forelimb.
8. Action: You, the veterinary surgeon, should make sure that your syringe is filled and that you have attached a suitable gauge and length of needle.
Rationale: The syringe should be of a size to hold the appropriate volume of drug, but not too large as this will make it difficult to control. Gauge of needle depends on the thickness of the drug and the species of animal – usually 23G is suitable for cats. The most common length is  inch (16 mm).
9. Action: Insert the needle through the skin and into the cephalic vein, bevel-side uppermost.
Rationale: Inserting the needle bevel-side uppermost makes it easier to penetrate the wall of the blood vessel.
10. Action: Draw back on the plunger of the syringe to check that you have penetrated the vein.
Rationale: If the vein has been correctly penetrated a small amount of blood will appear in the syringe. Perivascular injection may lead to tissue damage. Do NOT continue with the injection if you are not in the vein.
11. Action: If you are certain that the needle is in the vein, ask your assistant to raise his / her thumb a little and slowly inject the contents of the syringe into the vein.
Rationale: Releasing the pressure allows the drug to flow into the vein.
12. Action: When the procedure is complete, withdraw the needle slowly and apply gentle pressure to the entry point with a swab or small piece of cotton wool for about 30 seconds.
Rationale: This prevents haemorrhaging into the area around the vein.
NB If you are collecting a blood sample from this site your assistant should maintain pressure on the vein while you draw back on the syringe. The type of restraint is identical. Please refer to the section on Dogs above.
Procedure: Administering an intravenous injection. Site: Jugular vein
(Assume that the skin has been clipped and cleaned with a swab soaked in spirit prior to the procedure.) The jugular veins run in the jugular furrows on either side of the trachea.
Method 1 (Fig. 1.18):
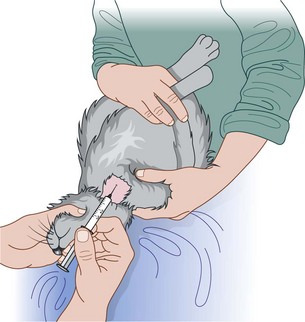
1. Action: Ask your assistant to sit on a chair and place the cat on his / her lap, and then follow steps 2 and 3.
Rationale: This ensures that the assistant is comfortable and enables the cat to be restrained more effectively.
2. Action: Turn the cat over to lie in dorsal recumbency with its head directed towards the vet.
Rationale: In this position there is easy access to the ventral part of the neck. If the cat feels secure and comfortable it will be less likely to struggle.
3. Action: Take all four legs in one hand.
Rationale: Control of the legs prevents scratching.
4. Action: You, the veterinary surgeon, should extend the head with one hand, placing the thumb under the chin and cupping the cranium in the palm of the hand.
Rationale: Extending the head and neck stretches out the jugular as it runs beside the trachea and tenses the overlying skin, making it easier to penetrate the vein with the needle.
5. Action: Ask your assistant to place his / her thumb of the hand not controlling the legs at the base of the jugular furrow, at the point where the trachea enters the thoracic cavity, and apply gentle pressure.
Rationale: The jugular vein on each side of the trachea runs in the jugular furrow and collects venous blood from the head, carrying it towards the heart. Applying pressure will prevent the flow of blood towards the heart causing the vein to dilate – known as ‘raising the vein’.
6. Action: Make sure that your syringe is filled and that you have attached a suitable gauge and length of needle.
Rationale: The syringe should be of a size to hold the appropriate volume of drug, but not too large as this will make it difficult to control. Gauge of needle depends on the thickness of the drug and the species of animal – usually 23G is suitable for cats. The most common length is  inch.
inch.
7. Action: Your assistant should maintain the pressure on the vein while you insert the needle through the skin and into the underlying vein, bevel-side uppermost.
Rationale: The jugular vein should be clearly visible under the skin. Positioning the needle with the bevel-side uppermost makes it easier to insert through the skin and wall of the blood vessel.
8. Action: Draw back on the plunger of the syringe to check that you have penetrated the vein.
Rationale: If the vein has been correctly penetrated a small amount of blood will appear in the syringe. Perivascular injection may lead to tissue damage. Do NOT continue with the injection if you are not in the vein.
9. Action: If you are certain that the needle is in the vein, ask your assistant to release the pressure on the vein and slowly inject the drug.
Rationale: Releasing the pressure allows the drug to flow into the vein and around the circulation.
10. Action: When the procedure is complete, withdraw the needle slowly and apply gentle pressure to the entry point with a swab or small piece of cotton wool for about 30 seconds.
Rationale: This prevents haemorrhage into the area around the vein.
NB Jugular puncture can also be used for collecting a blood sample and may be a better site than the cephalic vein for collecting large volumes. If a blood sample is to be collected, maintain pressure on the vein until there is enough blood in the syringe.
Method 2 (Fig. 1.19):
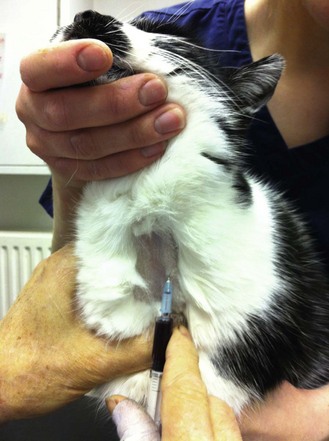
Figure 1.19 Raising the jugular vein of a cat by placing the thumb in the jugular furrow (method 2). The vein is clearly visible and is useful for collecting a blood sample.
1. Action: Place the cat in a sitting position on a stable examination table covered in a non-slip mat.
Rationale: This ensures that the assistant is comfortable and enables the cat to be restrained more effectively.
2. Action: It may be necessary to ask another assistant to place a hand on either side of the cat’s rump.
Rationale: To maintain it in this position. The cat may struggle during this procedure and your assistant must be prepared to use force if necessary. In some cases you may need two assistants – one to restrain the rump, the other to deal with the head.
3. Action: Ask your assistant to bring one hand over the cat’s back and restrain the forelegs, keeping the paws on the table.
Rationale: If the cat struggles your assistant may have to use the scruff to extend the head. However, this leaves the legs free to scratch.
4. Action: Ask your assistant to place the other hand under the cat’s chin raising the head so that the head and neck are in a straight line.
Rationale: In this position the jugular vein and overlying skin are tensed making it easier to penetrate the vein with the needle.
5. Action: Make sure that your syringe is filled and that you have attached a suitable gauge and length of needle.
Rationale: The syringe should be of a size to hold the appropriate volume of drug, but not too large as this will make it difficult to control. Gauge of needle depends on the thickness of the drug and the species of animal – usually 23G is suitable for cats. The most common length is  inch (16 mm).
6. Action: You, the veterinary surgeon, should apply pressure at the base of the jugular furrow with the fingers of one hand.
Rationale: The jugular vein on each side of the trachea runs in the jugular furrow. It collects blood from the head and neck and returns it to the heart. Applying pressure to the base of the furrow causes the vein to distend.
7. Action: Using your other hand insert the needle, bevel-side uppermost, through the skin into the underlying vein, continuing to maintain the pressure on the vein.
Rationale: The jugular vein should be clearly visible under the skin. Positioning the needle with the bevel-side uppermost makes it easier to insert through the skin and wall of the blood vessel.
8. Action: Draw back on the syringe.
Rationale: Perivascular injection may lead to tissue damage and a check must be made to ensure that the vein has been penetrated before attempting injection.
9. Action: If blood appears at the hub of the needle, release the pressure on the vein and slowly inject the contents of the syringe into the vein.
Rationale: Releasing the pressure allows the drug to flow into the circulation.
10. Action: When the procedure is complete, slowly withdraw the needle from the vein.
Rationale: This ensures that the vein is not damaged.
11. Action: Apply gentle pressure, with a piece of cotton wool, to the injection site for about 30 seconds.
Rationale: This prevents haemorrhaging into the area around the vein.
NB Jugular puncture can also be used for collecting a blood sample and may be a better site than the cephalic vein for collecting large volumes. If a blood sample is to be collected maintain pressure on the vein until there is enough blood in the syringe (Fig. 1.19).
Procedure: Administering an intravenous injection. Site: Lateral saphenous vein
(Assume that the skin has been clipped and sterilized ready for venepuncture.) The lateral saphenous vein runs over the lateral aspect of the hock.
1. Action: Place the cat in lateral recumbency on a stable examination table covered in a non-slip mat.
Rationale: The cat will feel secure and comfortable and will be less likely to try and escape.
2. Action: Ask your assistant to grasp the scruff firmly and follow steps 3 and 4.
Rationale: The head must be restrained to prevent the cat from wriggling and biting.
3. Action: Using the other hand, extend the cat’s uppermost hindleg, at the same time stretching out the body.
Rationale: If the cat struggles or is aggressive, it may be necessary to exert extra control by wrapping the cat in a towel with the head out. The hindleg can be extended from the towel.
4. Action: Place your hand around the lower leg at the level of the mid tibia / fibula and apply gentle pressure.
Rationale: The lateral saphenous vein collects blood from the hindpaw and runs superficially on the caudal aspect of the hock and distal tibia. Pressure applied around the distal tibia acts as a tourniquet, trapping venous blood as it returns to the heart and causing the vein to dilate – known as ‘raising the vein’.
5. Action: Make sure that your syringe is filled and that you have attached a suitable gauge and length of needle.
Rationale: The syringe should be of a size to hold the appropriate volume of drug, but not too large as this will make it difficult to control. Gauge of needle depends on the thickness of the drug and the species of animal – usually 23G is suitable for cats. The most common length is  inch (16 mm).
6. Action: Your assistant should maintain the pressure on the vein while you, the veterinary surgeon, insert the needle, bevel-side uppermost, through the skin and into the underlying saphenous vein.
Rationale: The saphenous vein should be clearly visible lying just under the skin.
7. Action: Draw back on the syringe.
Rationale: Perivascular injection may lead to tissue damage and a check must be made to ensure that the vein has been penetrated before attempting injection.
8. Action: If blood appears at the hub of the needle, release the pressure on the vein and slowly inject the contents of the syringe into the vein.
Rationale: Releasing the pressure allows the drug to flow into the circulation.
9. Action: When the procedure is complete, slowly withdraw the needle from the vein.
Rationale: This ensures that the vein is not damaged.
10. Action: Apply gentle pressure with a piece of cotton wool, to the injection site for about 30 seconds.
Rationale: This prevents haemorrhaging into the area around the vein.
NB The saphenous vein can also be used for collecting a blood sample; however, as the vein is quite small it is better to collect a large sample from another site such as the jugular vein. If a blood sample is to be collected, maintain pressure on the vein until there is enough blood in the syringe.
For the placement of intravenous catheters, please see the instructions for the dog and use the appropriate methods of cat restraint.
Rabbits
Most rabbits are easy to handle and rarely cause injury unless they are incorrectly or roughly handled. They are capable of using their teeth and their claws, and their back legs are extremely powerful and can inflict deep scratches.
Procedure: Administering fluids or liquid medication
1. Action: Place the rabbit in sternal recumbency on a stable examination table and wrap it in a towel as previously described.
Rationale: By doing this, the legs are restrained but the head is exposed.
2. Action: You may need an assistant to hold the rabbit gently, but if the rabbit is docile you can do this single-handedly.
Rationale: To prevent it leaping off the table.
3. Action: Take the head in one hand and tilt it slightly to one side.
Rationale: In this position one corner of the mouth is uppermost.
4. Action: Using a syringe of an appropriate size filled with the liquid, place the nozzle into the uppermost corner of the mouth.
Rationale: Do not use a large syringe as this can be difficult to control.
5. Action: Apply gentle pressure to the syringe and dispense the fluid into the mouth. Allow time for the rabbit to swallow.
Rationale: Give fluid in boluses of 0.25–0.50 ml. If you give the fluid too quickly the rabbit may choke or the fluid may flow out of its mouth.
Procedure: Administering a subcutaneous injection. Site: Scruff of the neck
1. Action: Place the rabbit in sternal recumbency on a stable examination table covered in a non-slip mat.
Rationale: If the rabbit feels secure it will be less likely to struggle and try to escape. You can use minimal restraint, but the animal must not be allowed to leap off the table and injure itself.
2. Action: Make sure that your syringe is filled and that you have attached a suitable gauge and length of needle.
Rationale: The syringe should be of a size to hold the appropriate volume of drug, but not too large as this will make it difficult to control. Gauge of needle depends on the thickness of the drug and the species of animal – usually 21G or 23G is suitable for rabbits. The most common length is  inch (16 mm).
3. Action: Grasp the scruff of the neck with one hand.
Rationale: The scruff of a rabbit is usually quite large and the site can be used to administer relatively large volumes.
4. Action: Using the other hand, introduce the point of the needle, bevel-side uppermost, into the raised skin of the scruff.
Rationale: Having the bevel-side uppermost makes it easier to push through the skin. Make sure that you do not push the needle right through the two layers of skin and squirt the contents out onto the rabbit or the client!
5. Action: Inject the contents into the subcuticular space and withdraw the needle.
Rationale: If you wish, you may draw back on the syringe before injecting to check that you have not penetrated a small blood vessel, but the blood supply to the area is relatively poor and the risk is low.
6. Action: Gently massage the site of the injection.
Rationale: To disperse the drug. Absorption from this site takes about 30–45 minutes.
NB Most rabbits will not object to this procedure and it can usually be performed single-handedly, provided that you give the injection quickly.
Procedure: Administering an intramuscular injection. Site: Quadriceps femoris muscle
1. Action: Place the rabbit in sternal recumbency on a stable examination table covered in a non-slip mat.
Rationale: If the rabbit feels secure it will be less likely to struggle and try to escape.
2. Action: Make sure that your syringe is filled and that you have attached a suitable gauge and length of needle.
Rationale: The syringe should be of a size to hold the appropriate volume of drug, but not too large as this will make it difficult to control. Gauge of needle depends on the thickness of the drug and the species of animal – usually 23G is suitable for rabbits. No more than 0.5–1.00 ml can be given by this route. Large volumes will cause great pain and damage to the muscle tissue.
3. Action: Ask your assistant to restrain the rabbit by holding the scruff and then extend one of the hindlimbs.
Rationale: In this position the rabbit is restrained and there is easy access to the muscle group.
4. Action: Hold the quadriceps muscle between the finger and thumb of one hand and introduce the needle, bevel-side uppermost, into the muscle with the other hand.
Rationale: The quadriceps femoris muscle runs on the cranial aspect of the femur.
5. Action: Draw back slightly on the plunger and look for blood in the hub of the syringe.
Rationale: To ensure that you have not penetrated a blood vessel. Muscle tissue has a good blood supply and there is a risk of vascular penetration.
6. Action: If there is no blood in the syringe, inject the contents slowly.
Rationale: Muscle tissue is very dense and rapid injections of any volume of fluid may be very painful.
7. Action: Withdraw the needle and massage the site gently.
Rationale: Gentle massage will help to disperse the drug into the blood stream. Absorption from the area usually takes about 20–30 minutes.
NB It is also possible to use the lumbar muscles, which run in a large mass on either side of the lumbar spine. Injection into this area can be done single-handedly if the rabbit is docile.
Procedure: Administering an intravenous injection. Site: Marginal ear vein (Fig. 1.20)
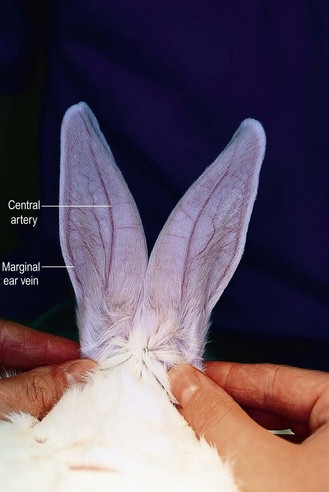
Figure 1.20 The blood vessels within the pinna of the rabbit: the central artery is clearly visible. The marginal ear veins can be used for venepuncture.
1. Action: Place the rabbit in sternal recumbency on a stable examination table covered in a non-slip mat.
Rationale: If the rabbit feels secure it will be less likely to struggle and try to escape.
2. Action: Wrap the rabbit in a towel with the head uncovered as previously described.
Rationale: This restrains the body while providing easy access to the ear.
3. Action: Clip the fur overlying the ear vein on one ear.
Rationale: The marginal ear vein runs down the lateral side of each ear (Fig. 1.20).
4. Action: Clean the site, but avoid the use of spirit.
Rationale: The vein must be cleaned to avoid the introduction of infection into the vein. Spirit may cause the vein to collapse, making injection and blood sampling more difficult.
5. Action: Apply local anaesthetic cream to the area and wait for 10 minutes.
Rationale: This desensitizes the area so that the rabbit is less likely to shake its head when the needle is introduced.
6. Action: Place a ball of cotton wool soaked in hot water under the ear.
Rationale: This causes the vein to dilate, making it easier to visualize.
7. Action: Ask your assistant to apply pressure to the base of the selected ear and maintain it.
Rationale: This acts as a tourniquet preventing blood returning from the ear tissue to the heart. The vein will dilate and become more visible.
8. Action: Make sure that your syringe is filled and that you have attached a suitable gauge and length of needle.
Rationale: The syringe should be of a size to hold the appropriate volume of drug, but not too large as this will make it difficult to control. Gauge of needle depends on the thickness of the drug and the species of animal – usually 23G is suitable for rabbits.
9. Action: Insert the needle bevel-side uppermost through the overlying skin and into the vein, directing it towards the ear tip.
Rationale: Using the needle in this position makes it easier to penetrate the tissues.
10. Action: Draw back on the syringe.
Rationale: Perivascular injection may lead to tissue damage and a check must be made to ensure that the vein has been penetrated before attempting injection.
11. Action: If blood appears at the hub of the needle, ask your assistant to release the pressure on the vein and slowly inject the contents of the syringe into the vein.
Rationale: Releasing the pressure allows the drug to flow into the circulation.
12. Action: When the procedure is complete, slowly withdraw the needle from the vein.
Rationale: This ensures that the vein is not damaged.
13. Action: Apply gentle pressure with a piece of cotton wool to the injection site for about 30 seconds.
Rationale: This prevents haemorrhage into the area around the vein.
NB The marginal ear vein could be used to collect a blood sample; larger volumes can be collected from other veins. If repeated injections are to be given through this vein, use an intravenous or butterfly catheter attached firmly to the ear with superglue or sticky tape.
Other sites can be used for venepuncture in the rabbit:
Cephalic vein – restrain the rabbit in a similar way to the cat
Lateral saphenous vein – be careful with restraint as the hindlegs of a rabbit may be easily broken.
NB Use of the jugular vein is not recommended as rabbits do not like their heads being raised.
Procedure: Administering an intraperitoneal injection. Site: Mid abdomen (Fig. 1.21)
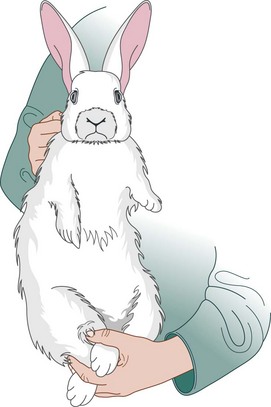
1. Action: Place the rabbit in sternal recumbency on a stable examination table covered in a non-slip mat.
Rationale: If the rabbit feels secure it will be less likely to struggle and try to escape.
2. Action: Ask your assistant to grasp the scruff of the rabbit with one hand and the hindlegs with the other, and then follow step 3.
Rationale: The rabbit must be held firmly to prevent it struggling during the procedure.
3. Action: Pick up the rabbit and hold it in dorsal recumbency with its spine against your chest.
Rationale: This position exposes the ventral part of the abdomen for injection, but care must be taken with dyspnoeic patients.
4. Action: You, the veterinary surgeon, should make sure that your syringe is filled and that you have attached a suitable gauge and length of needle.
Rationale: The syringe should be of a size to hold the appropriate volume of drug, but not too large as this will make it difficult to control. Gauge of needle depends on the thickness of the drug and the species of animal – usually 23G is suitable for rabbits. For this procedure you should use a short needle to avoid penetration of any of the viscera.
5. Action: You should introduce your needle bevel-side uppermost at a point midway between the xiphisternum and the pubis.
Rationale: This position should avoid accidental penetration of the bladder or stomach. Rabbit skin is thin and a short needle easily penetrates the abdominal wall.
6. Action: Draw back on the syringe and examine the contents.
Rationale: If blood, urine or gut contents appear, reposition the needle and try again. If nothing appears in the syringe, it is safe to proceed with the injection.
7. Action: If there is nothing in the syringe, gently inject the contents of the syringe.
Rationale: Up to 50 ml of fluid can be given by this route.
8. Action: When the procedure is complete withdraw the needle.
NB This technique can be also used to collect samples of fluid from the peritoneal cavity and samples of urine from the bladder.
Procedure: Placing an intraosseus catheter
This technique is often used to provide fluid to a range of exotic species and is useful if the veins are damaged or are fragile. It is also used in the critical care of cats and dogs. The advantage is that absorption of fluids can be rapid and, if the needle is dislodged, haemorrhaging from the site is unlikely to occur. The disadvantages are infection, fat emboli and damage to the growth plates of the bone.
The patient should be heavily sedated or under a general anaesthetic as the procedure is very painful.
1. Action: Select a suitable site.
Rationale: In the rabbit the proximal femur and the proximal tibia provide easy access and a medullary cavity from which fluid can be easily absorbed.
2. Action: Prepare the site aseptically.
Rationale: To prevent the introduction of bacteria that would cause severe osteomyelitis.
3. Action: Infiltrate the area with local anaesthetic.
Rationale: To desensitize the tissues.
4. Action: Select a spinal needle or 20–21G needle and insert into the bone using a screwing action.
Rationale: The needle must be of an appropriate size to enter the medullary cavity. This can be assessed by radiography or previous experience.
5. Action: Flush the needle with heparinized saline.
Rationale: This will ensure that the needle is patent as it may become blocked with tissue fragments.
6. Action: Fix the needle in place with tissue glue or by suturing.
Rationale: It is important that the needle does not become dislodged.
7. Action: Apply antibiotic cream around the base of the needle.
Rationale: To prevent infection.
8. Action: Attach a short length of tubing and a syringe or attach a fluid giving set to the needle.
Rationale: This procedure may be used to give a bolus of fluid or a slow infusion. Absorption from this site is as rapid as the intravenous route.
9. Action: If the needle is to be left in situ, bandage the area.
Rationale: To prevent the risk of infection, to reduce limb mobility and to prevent patient interference.
10. Action: If necessary use an Elizabethan collar.
Rationale: To prevent patient interference. Intraosseus catheters are usually well tolerated.
11. Action: When giving further fluids or medication through the needle it is vital to maintain asepsis.
Rationale: To prevent the introduction of infection.
12. Action: Always flush with heparinized saline before use, and flush at least three times a day if the catheter is not being used.
Rationale: To maintain patency.
13. Action: When the needle is not in use make sure that the needle is capped.