Normal Anatomy
Panoramic Images
After completion of this chapter, the student will be able to do the following:
• Define the key terms associated with normal anatomy on panoramic images
• Identify and describe the bony landmarks of the maxilla and surrounding structures as viewed on the panoramic image
• Identify and describe the bony landmarks of the mandible and surrounding structures as viewed on the panoramic image
A panoramic image allows the dental professional to view large areas of the mandible and the maxilla on a single projection. Just as dental professionals must be able to recognize normal anatomic landmarks on periapical images, they must also be able to recognize normal anatomic structures viewed on panoramic images. The recognition of landmarks enables dental professionals to interpret panoramic images accurately. Without a working knowledge of anatomy, normal anatomic structures may be mistaken for pathologic conditions.
To interpret the panoramic image and identify normal anatomic landmarks, dental professionals must have thorough knowledge of the anatomy of the maxilla and the mandible. Each normal anatomic landmark seen on a panoramic image corresponds to what is seen on the human skull. If dental professionals are familiar with the anatomy of the human skull, they will be able to identify normal anatomy viewed on a panoramic image.
The purpose of this chapter is to describe the normal anatomy of the maxilla and the mandible as viewed on a panoramic image. In addition to the normal anatomic landmarks, air space images and soft tissue images are also described in this chapter.
Normal Anatomic Landmarks
Bony Landmarks of Maxilla and Surrounding Structures
The maxilla forms the floor of the orbit of the eyes, the sides and floor of the nasal cavity, and the hard palate. The lower border of the maxilla supports maxillary teeth. This section reviews the bony landmarks of the maxilla and surrounding structures that can be viewed on a panoramic image.
Each of the following bony landmarks of the maxilla and surrounding structures is identified on Figure 29-1.
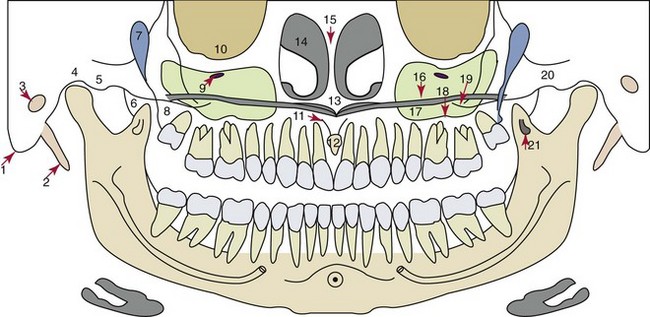
FIGURE 29-1 Normal anatomic landmarks of the maxilla and surrounding structures: 1, mastoid process; 2, styloid process; 3, external auditory meatus; 4, glenoid fossa; 5, articular eminence; 6, lateral pterygoid plate; 7, pterygomaxillary fissure; 8, maxillary tuberosity; 9, infraorbital foramen; 10, orbit; 11, incisive canal; 12, incisive foramen; 13, anterior nasal spine; 14, nasal cavity and conchae; 15, nasal septum; 16, hard palate; 17, maxillary sinus; 18, floor of maxillary sinus; 19, zygomatic process of maxilla; 20, zygomatic arch; 21, hamulus. (Modified from Dental Auxiliary Education Projects: Normal radiographic landmarks, New York, Teachers College Press, 1982 by Teachers College, Columbia University. All rights reserved.)
Mastoid Process
Styloid Process
External Auditory Meatus
Glenoid Fossa
Articular Eminence
Lateral Pterygoid Plate
Pterygomaxillary Fissure
Maxillary Tuberosity
Infraorbital Foramen
Incisive Canal
Incisive Foramen
Anterior Nasal Spine
Nasal Cavity
Nasal Septum
Maxillary Sinus and Floor of Maxillary Sinus
Zygomatic Process of Maxilla
Zygoma
Hamulus
Description: The hamulus (also known as the hamular process) is a small, hooklike projection of bone that extends from the medial pterygoid plate of the sphenoid bone. The hamulus is located posterior to the maxillary tuberosity.
Appearance: On a panoramic image, the hamulus appears as a radiopaque hooklike projection posterior to the maxillary tuberosity area.
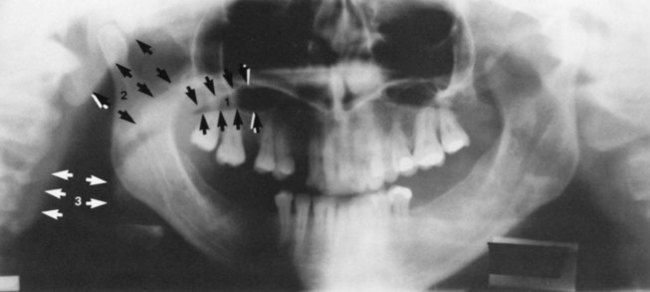
Figures 29-2, 29-3, and 29-4 illustrate the normal anatomic landmarks of the maxilla and surrounding structures that can be viewed on a panoramic image.
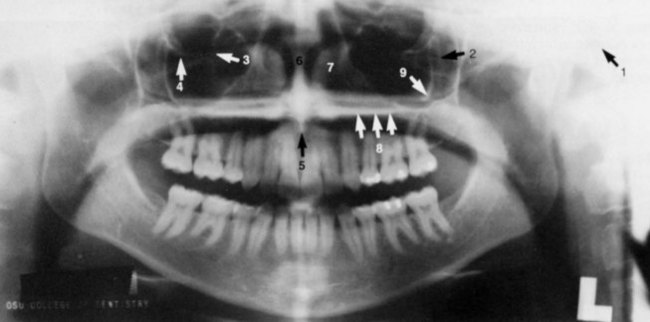
FIGURE 29-2 Normal anatomic landmarks of the maxilla and surrounding structures seen on panoramic images: 1, external auditory meatus; 2, pterygomaxillary fissure; 3, infraorbital foramen; 4, orbit; 5, anterior nasal spine; 6, nasal septum; 7, nasal conchae; 8, hard palate; 9, zygomatic process of maxilla. (From Haring JI, Lind LJ: Radiographic interpretation for the dental hygienist, Philadelphia, 1993, Saunders.)
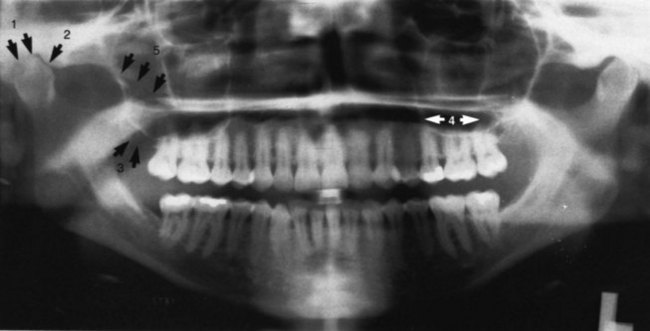
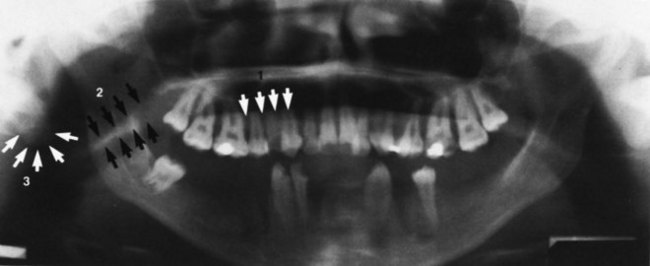
FIGURE 29-3 Normal anatomic landmarks of the maxilla and surrounding structures seen on panoramic images: 1, glenoid fossa; 2, articular eminence; 3, maxillary tuberosity; 4, maxillary sinus; 5, zygoma. (From Haring JI, Lind LJ: Radiographic interpretation for the dental hygienist, Philadelphia, 1993, Saunders.)
Bony Landmarks of Mandible and Surrounding Structures
This section reviews the bony landmarks of the mandible and surrounding structures that can be viewed on a panoramic image. Each of the following bony landmarks of the mandible and surrounding structures is identified on Figure 29-5.
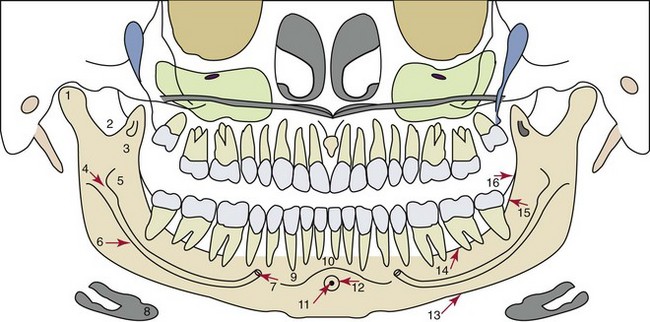
FIGURE 29-5 Normal anatomic landmarks of the mandible and surrounding structures: 1, condyle; 2, coronoid notch; 3, coronoid process; 4, mandibular foramen; 5, lingula; 6, mandibular canal; 7, mental foramen; 8, hyoid bone; 9, mental ridge; 10, mental fossa; 11, lingual foramen; 12, genial tubercles; 13, inferior border of mandible; 14, mylohyoid ridge; 15, internal oblique ridge; 16, external oblique ridge. (Modified from Dental Auxiliary Education Project: Normal radiographic landmarks, New York, Teachers College Press, 1982 by Teachers College, Columbia University. All rights reserved.)
Mandibular Condyle
Coronoid Notch
Coronoid Process
Mandibular Foramen
Lingula
Mandibular Canal
Mental Foramen
Mental Ridge
Mental Fossa
Lingual Foramen
Genial Tubercles
Inferior Border of Mandible
Mylohyoid Ridge
Internal Oblique Ridge
External Oblique Ridge
Angle of Mandible
Appearance: On a panoramic image, the angle of the mandible appears as a radiopaque bony structure where the ramus joins the body of the mandible.
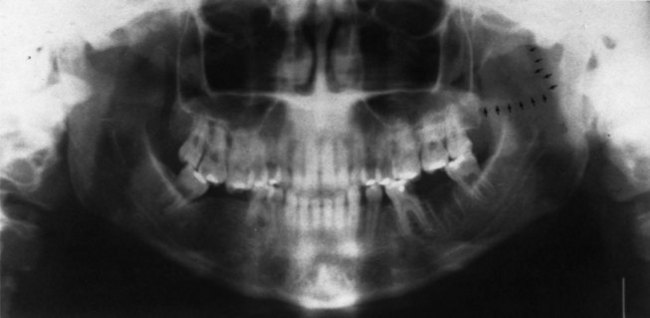
Figures 29-6, 29-7 and 29-8 illustrate the normal anatomic landmarks of the mandible and surrounding structures that can be viewed on a panoramic projection.
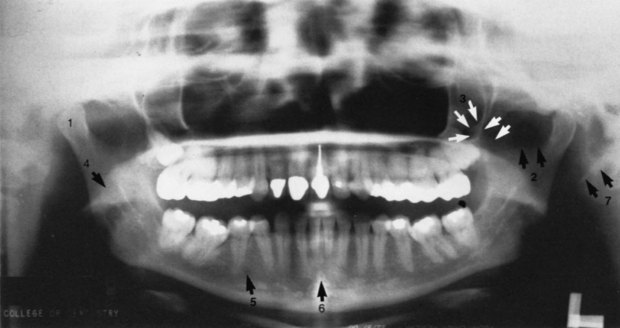
FIGURE 29-6 Normal anatomic landmarks of the mandible and surrounding structures seen on panoramic images: 1, condyle; 2, coronoid notch; 3, coronoid process; 4, mandibular foramen; 5, mental foramen; 6, genial tubercles; 7, styloid process. (From Haring JI, Lind LJ: Radiographic interpretation for the dental hygienist, Philadelphia, 1993, Saunders.)
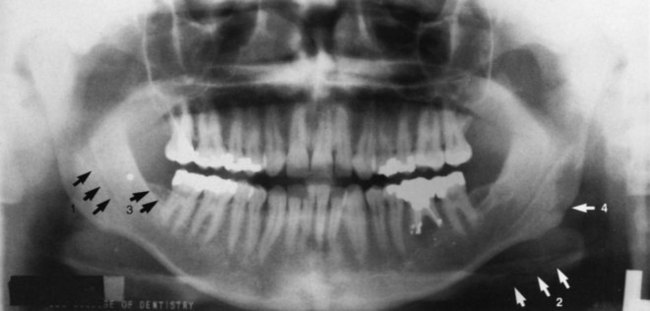
FIGURE 29-7 Normal anatomic landmarks of the mandible and surrounding structures seen on panoramic images: 1, mandibular canal; 2, hyoid; 3, internal oblique ridge; 4, angle of mandible. (From Haring JI, Lind LJ: Radiographic interpretation for the dental hygienist, Philadelphia, 1993, Saunders.)
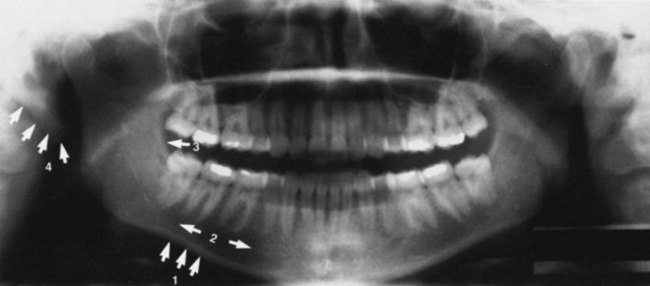
FIGURE 29-8 Normal anatomic landmarks of the mandible and surrounding structures as seen on panoramic images: 1, inferior border of mandible; 2, submandibular fossa; 3, external oblique ridge; 4, soft tissue of ear. (From Haring JI, Lind LJ: Radiographic interpretation for the dental hygienist, Philadelphia, 1993, Saunders.)
Air Spaces Seen on Panoramic Images
This section reviews air space images that can be seen on a panoramic image. Each of the following air space images is identified on Figure 29-9.
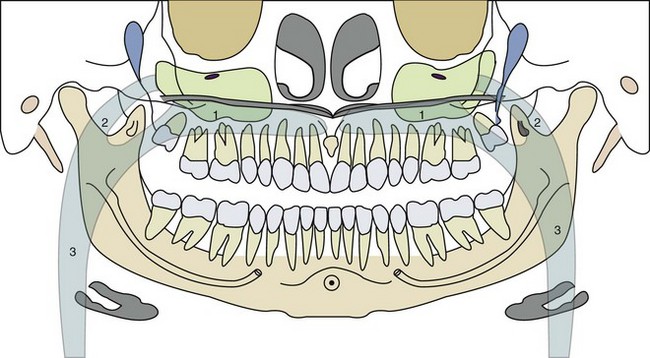
FIGURE 29-9 Air spaces seen on panoramic images: 1, palatoglossal air space; 2, nasopharyngeal air space; 3, glossopharyngeal air space. (Modified from Dental Auxiliary Education Project: Normal radiographic landmarks, New York, Teachers College Press, 1982 by Teachers College, Columbia University. All rights reserved.)
Palatoglossal Air Space
Nasopharyngeal Air Space
Glossopharyngeal Air Space
Description: The term glossopharyngeal air space refers to the portion of the pharynx (pharyngeal) that is located posterior to the tongue (glosso) and the oral cavity.
Appearance: On a panoramic image, the glossopharyngeal air space appears as a vertical radiolucent band superimposed over the ramus of the mandible. The glossopharyngeal air space is continuous with the nasopharyngeal air space superiorly and the palatoglossal air space inferiorly.
Figure 29-10 shows air spaces that can be viewed on a panoramic image.
Soft Tissues Seen on Panoramic Images
This section describes soft tissues that can be seen on a panoramic image. Each of the following soft tissues is labeled on Figure 29-11.
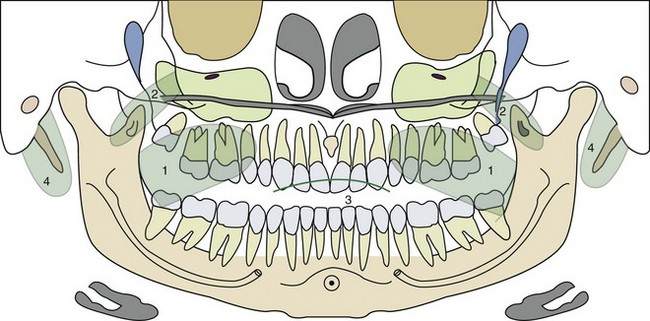
FIGURE 29-11 Soft tissues seen on panoramic images: 1, tongue; 2, soft palate and uvula; 3, lipline; 4, ear. (Modified from Dental Auxiliary Education Project: Normal radiographic landmarks, New York, Teachers College Press, 1982 by Teachers College, Columbia University. All rights reserved.)
Soft Palate and Uvula
Ear
Appearance: On a panoramic image, the ear appears as a radiopaque shadow that projects anteriorly and inferiorly from the mastoid process. The ear is seen superimposed over the styloid process.
Figure 29-12 shows soft tissues that can be seen on a panoramic image.
Summary
• The panoramic image allows the dental professional to view a large area of the maxilla and the mandible on a single projection.
• Knowledge of normal anatomic landmarks is necessary to interpret panoramic images; each normal anatomic landmark seen on a panoramic image corresponds to that seen on a human skull. Knowledge of the anatomy of the maxilla, the mandible, and adjacent bones as viewed on the human skull enables the dental radiographer to identify normal anatomy seen on a panoramic image.
• Knowledge of air spaces and soft tissues is necessary to interpret panoramic images.
• All anatomic landmarks, air spaces, and soft tissues viewed on a panoramic image are described in this chapter.
Identification
___ 1. Identify the normal anatomic landmarks labeled 1 to 15 in Figure 29-13.
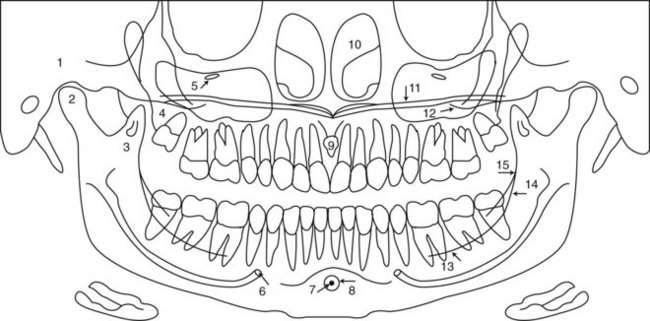
FIGURE 29-13 (From Haring JI, Lind LJ: Radiographic interpretation for the dental hygienist, Philadelphia, 1993, Saunders.)
___ 2. Identify the normal anatomic landmarks labeled 1 to 16 in Figure 29-14.
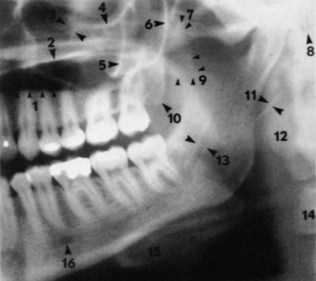
FIGURE 29-14 (From Haring JI, Lind LJ: Radiographic interpretation for the dental hygienist, Philadelphia, 1993, Saunders.)