CHAPTER 1 The Basics
Direct and Indirect Ophthalmoscopy
Direct ophthalmoscopy
The direct ophthalmoscope is the instrument of choice for fundus examination by medical students and physicians. It allows for a magnified, monocular image of the retina and optic disc.
Principle
The instrument illuminates the subject’s fundus by light reflected off a mirror on the instrument head. A perforation in the centre of the mirror helps the observer view the area illuminated. The emanating rays from the subject’s eyes are parallel, assuming the subject is emmetropic (normal sighted). These rays are converged to a focus (assuming the observer is also normal sighted) by the observer’s cornea and crystalline lens onto the observer’s retina. The emanating rays from a myopic subject’s eye would be convergent and therefore will require a concave lens to make it parallel before entering the observer’s eye and the converse if the subject is hyperopic. These lenses are mounted on a wheel on the ophthalmoscope head which can be dialled appropriately.
Methods
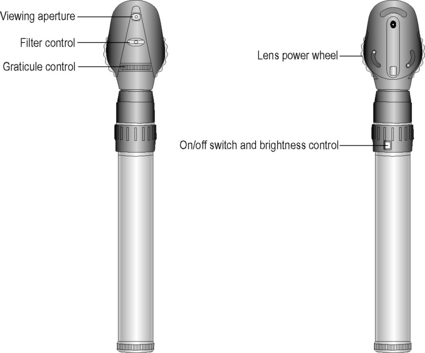
If you are using an unfamiliar ophthalmoscope it would help to familiarise yourself with the colour coding of the lens wheel and the various apertures and filters. To undertake successful ophthalmoscopy it is essential that both you and the patient are comfortable. Adjust the height of the patient in such a way that you don’t have to stoop too much. Dim the main lights to allow for physiological mydriasis if the pupil is not pharmacologically dilated. Tropicamide 1% is a short-acting dilator which can be used safely unless contraindicated by allergy or due to a shallow anterior chamber which may precipitate an acute glaucoma on dilation of the pupil. A shallow chamber can be reasonably assessed by using a pen light that is shone from the side of the cornea, parallel to the iris. Normally the opposite half of the iris beyond the pupil should be illuminated by your light. If it is shadowed, the configuration of the iris is considered convex, thus indicating a shallow anterior chamber.
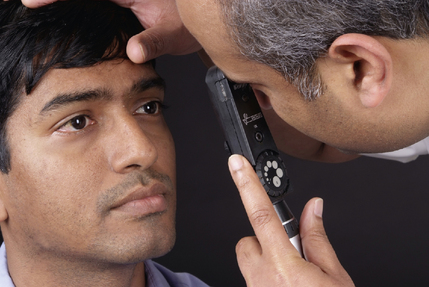
Instruct the patient to look at a distant target. Let the patient know that they can blink if required. Stand at the side of the patient. Ideally use your left eye and left hand to examine the patient’s left eye. Rest your free hand on the patient’s forehead, using your thumb to hold the upper lid open if necessary. Use only the minimum required intensity of light. The field of view of the fundus is increased the closer you are to the patient’s eye. For low myopes and low hyperopes it is best to remove their spectacles; however, for high myopes, hyperopes and for subjects with high astigmatism it is advisable to keep the spectacles on in order to overcome problems associated with magnification, minification or distortion, respectively. The extra reflexes produced by the spectacle lenses may at first prove distracting but can be overcome with practice.
Examination of the red reflex
Start the examination by doing a ‘distant direct’ ophthalmoscopy from a distance of 30 cm using a plano lens in the aperture of the ophthalmoscope. This technique is used to study the red reflex and each eye should be compared. While examining the red reflex, ask the patient to look up or down slightly. If, when the patient looks up, the opacity appears to move in the same direction within the red reflex, then it must lie anterior to the pupil plane (i.e. the cornea or the anterior chamber). One that remains stationary must be in the plane of the pupil and one that moves in the opposite direction to that of the patient’s gaze must lie posterior to the pupil plane (i.e. the posterior lens or vitreous). You may find it easier to move yourself slightly up or down rather than ask the patient to move their eye to achieve the same effect.
During ophthalmoscopy it is advisable to keep both eyes open and suppress the image from the other eye. This reduces the effect of accommodation. It may take some practice to accomplish this.
Examination of the optic disc
Slowly move closer to the patient and at the same time gradually increase the power of the lens in the wheel to focus on the retina. The power necessary to focus on the fundus will depend on both the patient’s and the observer’s uncompensated refractive error and their accommodation. When the patient is looking straight ahead, the optic disc should naturally come into the field of view. If not, try to locate a blood vessel on the retina and then move along it and locate the point at which it branches. Move your field of view in the direction in which the apex of the branch is pointing. By moving along a blood vessel in this manner the optic disc will be located. You will need to consider its colour, clear definition of its margins, cup (if there is one) and the ratio of the size of the cup to the size of the optic disc (cup disc ratio, denoted as, e.g., 0.3:1, meaning it occupies one-third of the area of the optic disc). Note the capillaries on the optic disc and look for the presence of a spontaneous venous pulsation. Also note the presence of any pigment, choroidal or scleral crescents around the disc.
Examination of the retinal blood vessels
Retinal blood vessels should be examined by following the temporal and nasal arcades from the optic disc. Veins are larger and dark red, whereas arteries are relatively thinner and lighter (normal artery:vein ratio is 2:3).
Examination of the macula
The macula is visualised by asking the patient to look at the light source as this brings the fovea (fixation point) into view. The macula is the area between the superior and inferior temporal arcades and its centre is the fovea. Since using an excessively bright light can make the macula difficult to visualise, it may be useful to use a smaller aperture beam and minimal required intensity.
Examination of the peripheral fundus
Finally, ask the patient to look in the eight cardinal directions to allow you to view the peripheral fundus – ‘Look up’, to see the superior periphery and so on. You will need to adjust the lens in the wheel slightly as the periphery is closer to you than the optic disc, requiring more focusing power.
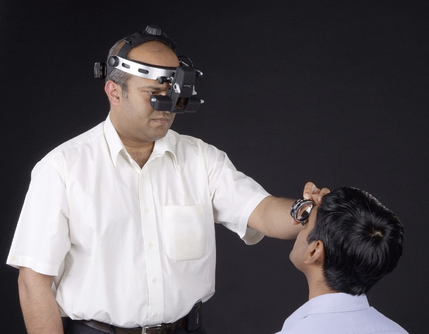
Indirect ophthalmoscopy
Binocular indirect ophthalmoscopy
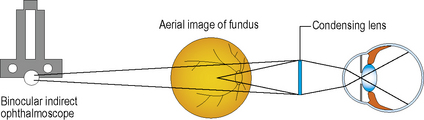
This technique allows for viewing the fundus at a wider angle which allows examination of the peripheral retina and also a better view through lens opacities as well. Binocularity is achieved by the use of mirrors in the instrument to reduce the pupillary distance of the observer to about 15 mm. The instrument also carries a light source which is attached to a headband or spectacle frame worn by the examiner.
The patient’s pupil may be dilated and background lights dimmed as for direct ophthalmoscopy. The patient is examined either seated in a reclining chair or lying on a couch. A condensing lens (varying from +15 D to +30 D) is held in one hand of the examiner in front of the patient’s eye. The image formed is magnified three-fold with a 20 D lens and is inverted and laterally reversed (superior seen inferiorly and temporal seen nasally).
Ensure that the patient’s and the observer’s eye are aligned before placing the lens in front of the eye. Check for the red reflex first and then bring the condensing lens in front of the patient’s eye. Now
gradually pull the lens towards you until the whole lens is filled with the retinal image. Systematically view the patient’s fundus in primary and all secondary positions of gaze. Also remember to compare the two eyes. The ora serrata can be viewed by scleral indentation with the free hand of the observer under local anaesthetic (proxymetacaine). It is important to remember that you are viewing the superior retina when the patient is looking up despite the image being inverted and laterally reversed, and this relationship is maintained for the other quadrants.
Slit lamp biomicroscopy
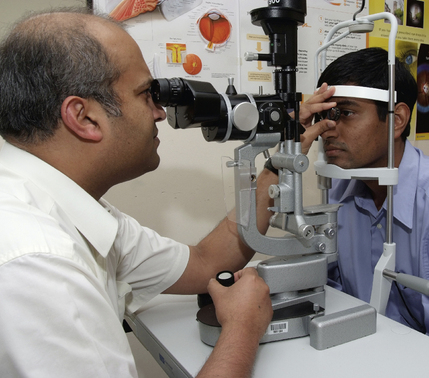
The fundus also can be viewed by using a non-contact Volk condensing lens (+60 to +90 D) or a Goldmann contact lens (−64 D) and the slit lamp. This is the most common method of examination of the fundus dilated or undilated at the ophthalmology clinic. The patient’s pupil may be dilated and background lights dimmed as for direct ophthalmoscopy.
Once the patient is positioned comfortably at the slit lamp, the patient is advised to look straight ahead and not into the light (ask the patient to look at the examiner’s right ear with the left eye while examining the patient’s right eye and vice versa). The slit lamp viewing piece and the light column are kept at an angle of 90 degrees. The intensity of the beam is kept to the minimum possible and the magnification preferably set at 10× initially. The slit beam is set around 1.5–2.5 mm wide and 5–10 mm long. The beam is focused onto the patient’s pupil and the condensing lens aligned at around 1 cm from the patient’s eye. The slit lamp is then pulled backwards gradually towards the examiner until it comes into focus with the aerial image of the fundus between the condensing lens and the slit lamp. Alternatively, the slit lamp could be drawn back completely towards the examiner and then gradually moved forwards until the image comes into focus.
As with indirect ophthalmoscopy, the image from a non-contact Volk lens slit lamp biomicroscopic examination is inverted and laterally reversed. The fundus is viewed systematically in primary and all secondary positions of gaze. The ora serrata can be brought to view using the Goldmann three-mirror lens.