2 The upper limb
At the end of this chapter you should be able to:
1. Find and recognize the shape and position of the clavicle, scapula, humerus, radius, ulna, carpal, and metacarpal bones and the phalanges
2. Recognize and palpate many of the bony features.
3. Name all the joints of the upper limb and understand their structure.
4. Trace the lines of the joints and where possible indicate their bony landmarks and surface markings.
5. Describe or carry out any accessory movements, possible noting the ranges in which they are most easily performed.
6. Note the ranges of each of the joints and indicate the factors limiting their movement.
7. Give the class and type of each joint, noting the axes of movement where possible.
8. Name and demonstrate the action of all the muscles palpable in the upper limb.
9. Outline the shape of the muscle on the surface and palpate its contraction.
10. Palpate tendons and attachments where possible.
11. Name and trace all the main nerves supplying the upper limb.
12. Demonstrate the course and distribution of each of the main nerves of the upper limb.
13. Name the main arteries of the upper limb, outlining their course and indicating their distribution.
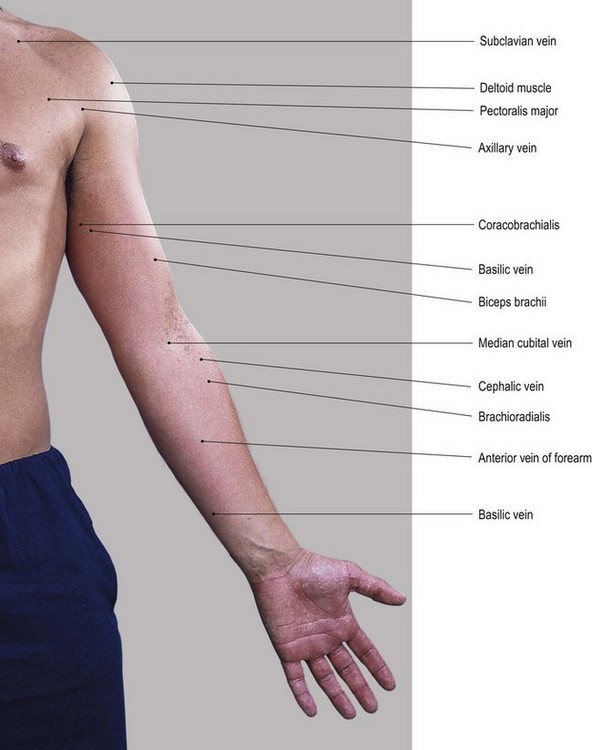
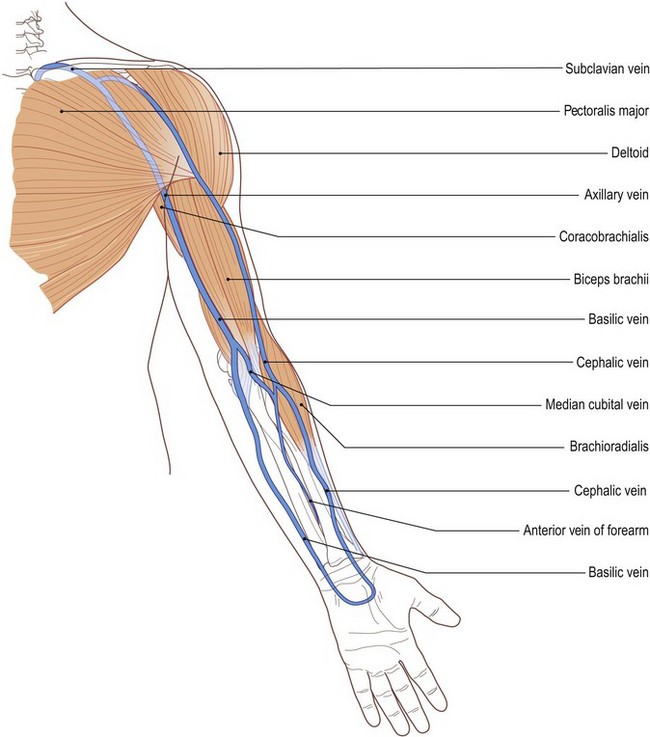
14. Name the main veins of the upper limb, noting their drainage areas and course.
Bones
The pectoral region
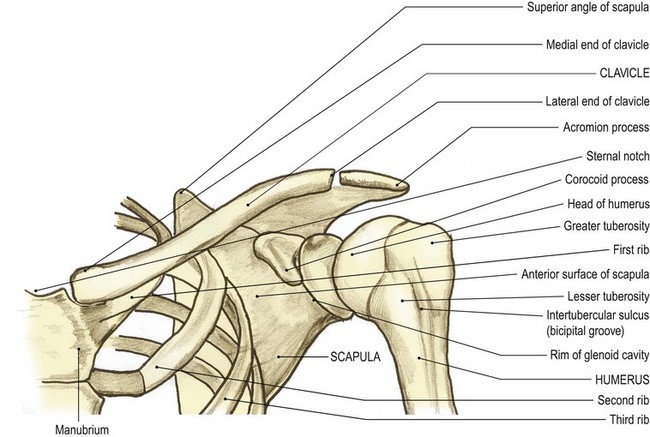
The bones in this region comprise the clavicle and scapula. These bones form the pectoral girdle, with the upper end of the humerus situated vertically under its lateral margin. The clavicle is situated on the upper part of the anterolateral aspect. The scapula is situated on the upper part of the posterolateral aspect of the chest wall. The humerus is the upper bone of the arm articulating with the glenoid [glene (Gk) = a socket] cavity of the scapula at the shoulder (glenohumeral) joint.
The clavicle (Fig. 2.1)
The clavicle [clavis (L) or kleis (Gk) = key; also, clavis (L) = an S-shaped bar for striking a gong] is a bone about 10 cm long and situated between the manubrium sterni medially and the acromion process of the scapula laterally (Fig. 2.1). It is a long bone and is a shallow S-shape when viewed from above. It ossifies in membrane, which means that its articular surfaces are covered with fibrocartilage and it has no medullary cavity.
Palpation
For palpation in this region, the model should be in the sitting position.
• The sternal (jugular) notch. Palpate the sternal (jugular) notch which is located centrally, at the lower boundary of the front of the neck. This is formed by the superior border of the manubrium sterni inferiorly and the medial end of each clavicle on either side. Articular cartilage together with an interarticular disc and interclavicular ligament are interposed between the medial ends of the clavicles and the skin.
• The medial third of the clavicle. Move your hands laterally and you will palpate the medial third of the bone which is convex forward with a superior and anterior surface. These features are easily palpable despite giving attachment to the sternocleidomastoid muscle superiorly and pectoralis major muscle anteriorly.
• The anterior end of the first rib. Now move your hands downwards to palpate the anterior end of the first rib. It is easily identifiable where it articulates with the lateral border of the manubrium sterni.
• The middle third of the clavicle. If you move your hands further laterally, you will notice that the middle third of the clavicle begins to curve backwards, being a little more rounded in cross-section.
• The supraclavicular fossa. Posterior to the superior surface of the clavicle you will palpate a depression: the supraclavicular fossa. This fossa contains the cord-like structures of the trunks of the brachial plexus running downwards and laterally towards the upper limb.
• The upper surface of the first rib. If you now apply deep, but careful, pressure in this notch in an inferomedial direction, you will be able to palpate the upper surface of the first rib, over which the trunks of the brachial plexus pass.
• The lateral third of the clavicle. You will notice that the lateral third of the clavicle becomes flattened from above down and that its sharper anterior border is concave forward. Its subcutaneous superior surface can be easily palpated through the skin, becoming thicker at the lateral end toward the acromioclavicular joint.
• The infraclavicular fossa. Below the anterior border of the clavicle you will palpate a depression: the infraclavicular fossa. This fossa is situated between the deltoid muscle laterally and pectoralis major inferomedially.
• The coracoid process of the scapula. The coracoid [korax (Gk) = a crow and oeides (Gk) = shape] process lies within the infraclavicular fossa and you can palpate its tip lying approximately 3 cm below the junction of the middle and lateral thirds of the anterior border of the clavicle and just medial to the anterior fibres of deltoid muscle.
• Note. Both anterior and posterior borders of the clavicle give attachment to muscles: deltoid anteriorly and trapezius posteriorly.
• The lateral end of the clavicle. This can be identified by a small tubercle on its superior surface which is palpable lying just medial to the acromioclavicular joint (see joints of the upper limb).
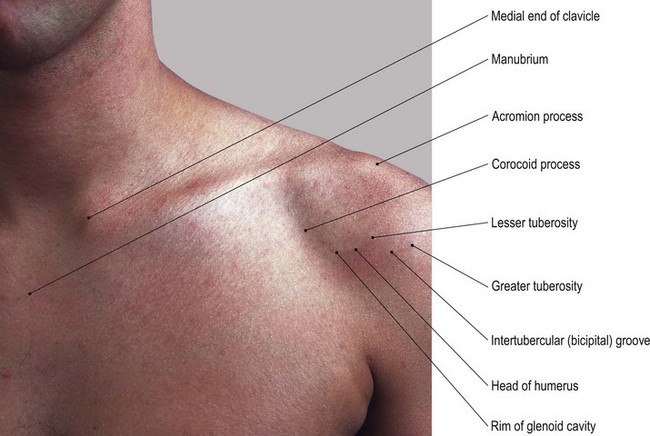
The upper end of the humerus
This comprises the head, the greater tuberosity and the lesser tuberosity.
Palpation
• The head of the humerus. On palpation, you will notice that the head is slightly more than half a sphere. It is smooth and is directed medially, slightly backwards and upwards. Its greater tuberosity lies laterally and the lesser tuberosity projects forwards with the intertubercular groove running vertically between the two tuberosities.
• The lesser tuberosity of the humerus. If you now move lateral to the coracoid process, you will palpate a slightly pointed projection. This is the lesser tuberosity of the humerus [humerus (L) = the shoulder].
• Note. This forms the medial border of the intertubercular groove, through which passes the tendon of long head of biceps.
• The intertubercular groove of the humerus. This groove can easily be palpated as it runs vertically downwards (Fig. 2.1).
• The greater tuberosity of the humerus. Lateral to the tendon of biceps, the anterior surface of the greater tuberosity may be difficult to palpate as it is covered by deltoid muscle. Place your fingers on the anterior aspect and bring your thumb in, just below and lateral to the angle of the acromion. You should now be able to grasp the greater tuberosity with your thumb and fingers between the fibres of deltoid muscle.
• Note. The greater tuberosity accounts, in part, for the rounded shape of the shoulder region.
The scapula (Fig. 2.2)
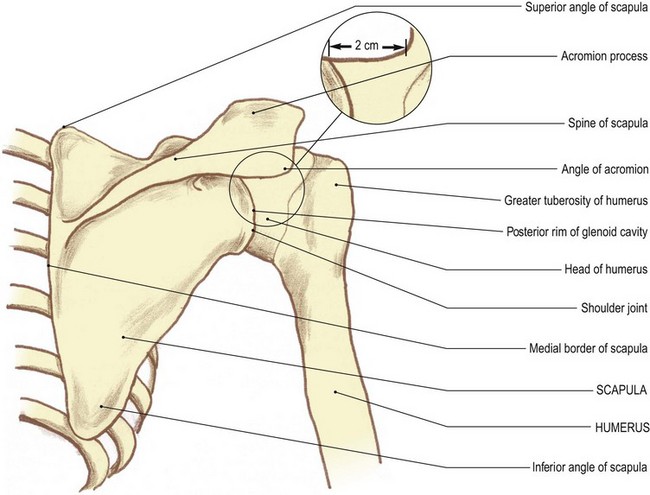
The scapula [scapulae (L) = shoulder blades] (Fig. 2.2) is a flat triangular bone situated on the posterolateral aspect of the upper chest wall. It has three angles, three borders and costal and dorsal surfaces, the latter being marked by a ledge-shaped spine running almost horizontally.
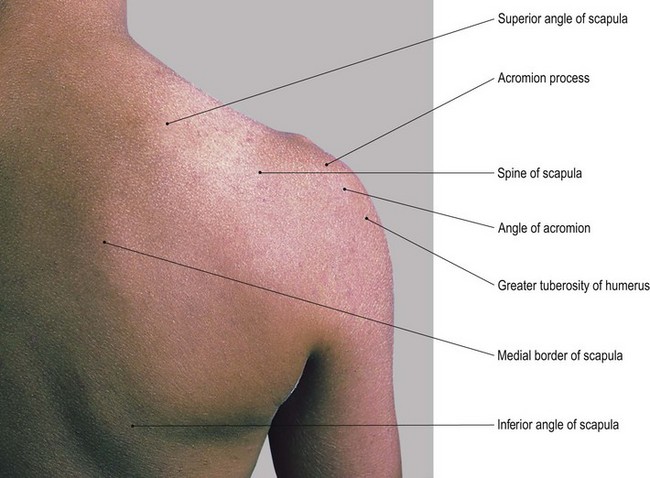
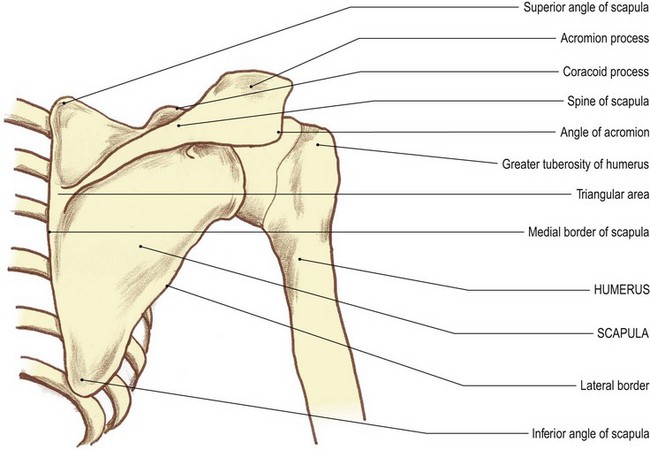
The spine is wider laterally where it joins the acromion process, but narrows as it passes medially. Its upper and lower borders diverge as it meets the medial border forming a small smooth triangular area. Above the spine there is a deep hollow called the supraspinous fossa and below a larger but shallower depression called the infraspinous fossa.
The lateral angle is expanded and forms the glenoid cavity for articulation with the head of the humerus at the shoulder joint. It presents a sharp bony projection passing forward just below the lateral end of the clavicle. This is the coracoid process, which is roughened for the attachment of muscle.
Palpation
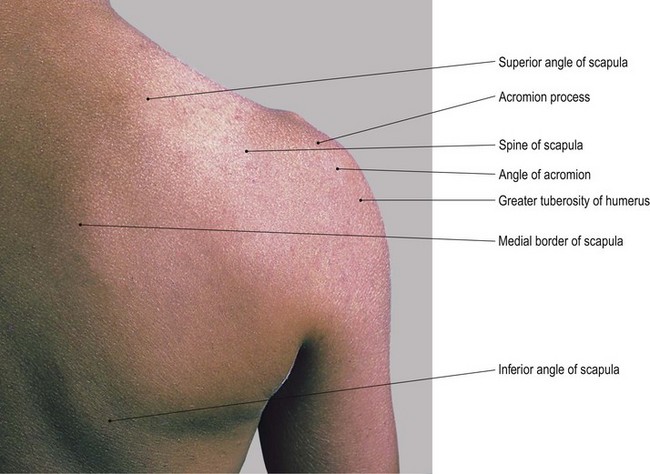
• The spine of the scapula. The whole length of the spine can be palpated between the acromion process laterally and the medial border of the scapula. You will be able to recognize its upper and lower lips even though they give attachment to the trapezius and deltoid muscles, respectively. The posterior surface is easily visible and palpable. Notice that it is narrow medially but that it gradually broadens out as it passes laterally to become the superior surface of the acromion.
• Note 1. At this point the spine is covered by a bursa (the supra-acromial bursa), enabling the skin to move easily over the bone.
• Note 2. The bone then appears to form a large quadrilateral surface, which is directed upwards and slightly backwards having posterior, lateral and short anterior borders. On its medial side, the lateral end of the clavicle and the small gap produced by the acromioclavicular joint can be palpated. The smooth triangular area at the medial end of the spine is also covered by a bursa and can be palpated through the tendinous lower fibres of trapezius muscle.
• The medial border of the scapula. The medial border of the scapula is approximately 5 cm lateral to the spines of the second to eighth thoracic vertebrae. Its full length can only be palpated with difficulty, except in lean subjects, as it gives attachment to levator scapulae above and rhomboid major and minor below, as well as being mostly covered by trapezius muscle.
• The superior angle of the scapula. This is buried in muscle and is tender on deep palpation.
• The inferior angle of the scapula. This can be identified lying on the posterolateral parts of the seventh and eighth ribs. Ask the model to raise the arm above the head. You will now be able to see and feel the inferior angle of the scapula moving laterally around the chest wall as far as the mid-axillary line.
• The lateral border of the scapula. This is very difficult to palpate as it is embedded in thick muscle (teres major and minor).
• Note. The lateral border of the scapula is by far the thickest of the borders and acts as a lever for its strong muscles to pull it laterally in scapula rotation.
• The coracoid process of the scapula. This process can be palpated where it lies anteriorly, in the infraclavicular fossa, 3 cm below the junction of the lateral and middle thirds of the clavicle. This is in spite of the fact that it gives attachment to three muscles: the short head of the biceps, coracobrachialis and pectoralis minor. Care should be taken not to apply very deep pressure as this may elicit tenderness in some subjects.
• The anterior rim of the glenoid cavity. The concave anterior rim of the glenoid cavity can be palpated just lateral to the coracoid process, running downwards and laterally for approximately 3 cm, with the head of the humerus lying on its lateral side.
Palpation on movement
Once you have been able to recognize the boundaries of the scapula by palpation of its various features, it is important to be able to follow its movements around the chest wall during activities of the shoulder girdle and upper limb.
For palpation in this area, the model should be in the standing or sitting position.
• Protrusion. Place your right hand on the point of the model’s right shoulder. Now place your left hand on the inferior angle and the lower part of the medial border of the scapula. Ask the model to pull the shoulder girdles forward as in hunching the shoulders (protrusion). You will be able to see and palpate the scapula moving forwards around the chest wall whilst remaining in its vertical position.
• Retraction. Ask the model to brace back the shoulder girdles. You will be able to see and palpate the scapula moving backwards, again not changing its vertical position.
• Elevation and depression. Keep your hands in the same position. Ask the model to raise (elevation) and lower (depression) the shoulder girdles as in shrugging. You will be able to see and palpate the scapula rising and lowering but still holding its vertical position.
• Lateral rotation. Ask the model to raise the right arm above the head. When the upper limb reaches 20°, you will be able to see and palpate the scapula rotating around an axis just below the spine nearer to its medial end. The superior angle will rise, moving medially, and the inferior angle will be observed, moving laterally and slightly upwards around the chest wall (lateral rotation). In fact, the inferior angle will reach as far as the mid-axillary line on full elevation of the humerus.
• Medial rotation. Ask the model to lower the right arm from above the head. As the arm is lowered, you will be able to see and palpate the scapula returning to its original position (medial rotation). If, however, the arm is taken behind the back, medial rotation continues and the inferior angle will come close to the spines of the vertebrae.
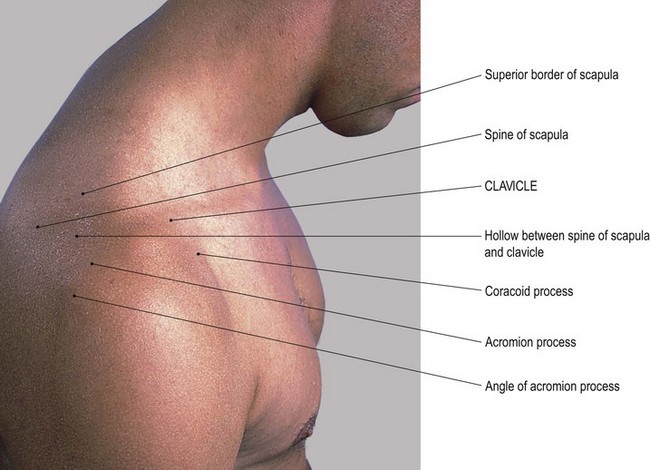
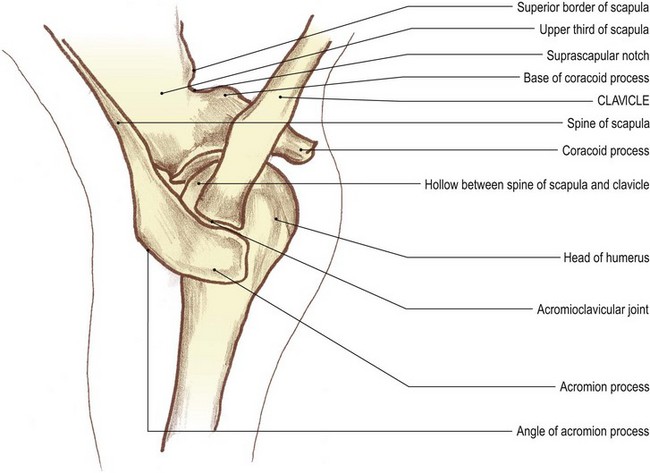
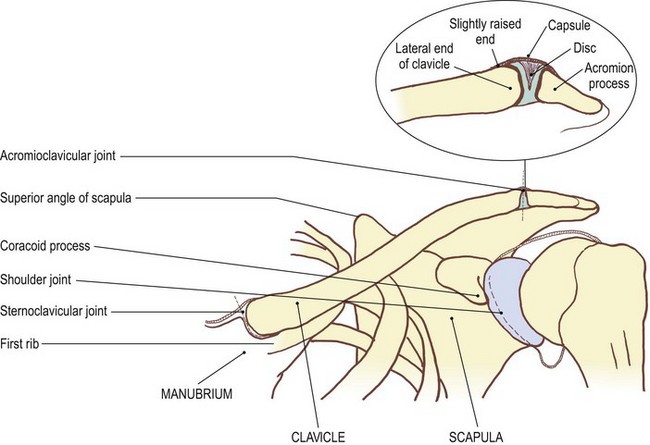
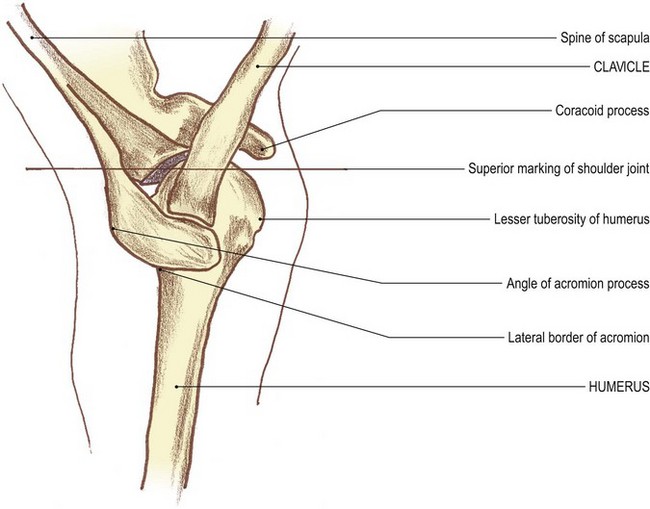
Anatomy
Viewed from above and slightly laterally with the upper limb in about 45° of abduction, the shoulder girdle forms a ‘V’ shape with the clavicle being the anterior and the spine of the scapula the posterior stem. They form an angle with each other of approximately 70° and are joined at the acromioclavicular joint. The greater tuberosity of the humerus is now tucked underneath the arch of the acromion. Below the junction of the middle with the lateral third of the clavicle lies the coracoid process and below the lateral third of the clavicle lies the head of the humerus. The acromion appears quadrilateral from above and continues medially and backwards as the spine of the scapula. The upper third of the scapula lies above and anterior to the spine with the superior angle being most medial and the superior border passing laterally, presenting the suprascapular notch and continuing to the base of the coracoid process.
The anterior border of the lateral third of the clavicle continues laterally with the short anterior border of the acromion process. It continues as the lateral and posterior borders, becoming the inferior border of the spine.
Palpation
• The acromion process of the scapula. [Akros (Gk) = summit and omos = shoulders]. Run your fingers from the anterior border of the clavicle across the acromioclavicular joint where the anterior border of the acromion process of the scapula continues in line for approximately 1.5 cm.
• The lateral border of the acromion process. It then passes backwards as the lateral border of the acromion for a further 5 cm.
• The inferior lip of the spine of the scapula. The border then turns medially (acromial angle) to become the inferior lip of the spine of the scapula. You will be able to palpate the whole of this area.
Palpation on movement
• Protraction. Place the fingers and thumb of your right hand on the medial end of the right clavicle. Now place the fingers and thumb of your left hand on the lateral end of the right clavicle. Ask the model to draw the shoulder girdle forward (protrusion). Palpate the lateral end of the clavicle as it moves forward, accompanied by the gliding of the scapula around the chest wall. Now palpate the medial end of the clavicle and note that it glides backwards in the clavicular notch of the sternum.
• Note. The axis around which this movement occurs is approximately 3 cm from the medial end of the clavicle, where the costoclavicular ligament attaches to the undersurface of the bone.
• Retraction. Ask the model to draw the shoulders backwards (retraction). Palpate the lateral end of the clavicle which will move backwards. Now palpate the medial end of the bone which will move forwards and become proud of the sternum.
• Elevation. Ask the model to raise the shoulder girdle (elevation). Now palpate the lateral end of the clavicle which will rise. Palpate the medial end of the bone which will move down, rolling into the clavicular notch of the sternum using the same fulcrum as above.
• Depression. Ask the model to lower the shoulder girdle. Now palpate the lateral end of the clavicle which will drop. If you palpate its medial end, you will feel this end of the bone rising to its original position. If you now ask the model to depress the shoulder girdle further, you will feel the medial end of the clavicle protruding upwards.
• Elevation of the upper limb. Ask the model to raise the arm above the head. Now palpate the clavicle as, initially, it will move as in the movement of elevation. In the final stage of the movement, however, you will be able to feel the entire bone rotating with its anterior surface moving upwards. You will also be able to palpate the lateral rotation of the scapula which accompanies this movement. If the model now lowers the arm, the shoulder girdle will return to its original position.
• Note. Movements of the clavicle, scapula and humerus and the joints between them are highly complex and should be studied in Anatomy and Human Movement (Palastanga et al 2002).
Functional anatomy
The clavicle acts as a rigid lever bracing the shoulder girdle backwards, allowing the upper limb to move freely away from the chest wall. With the powerful upper fibres of trapezius muscle raising or supporting its lateral end and the adjoining acromion process, it helps to transmit weight from the upper limb to the vertebral column via the manubrium sterni and the upper ribs. The clavicle moves around an axis close to its medial end at the attachment of the costoclavicular ligament. It is tightly bound to the coracoid process laterally by the coracoclavicular ligament.
Fractures of the bone may occur due to a fall on the shoulder, as in horse riding, motorcycling and rugby. Normally the fracture will take place where the medial two-thirds joins the lateral third, medial to the coracoclavicular ligament. The shoulder girdle may protrude forwards and a large hard swelling can be palpated and seen at the site of the fracture. Complications can occur following fractures of this bone if it is more central and the sharp bone ends are forced backwards, thus damaging the brachial plexus and/or the subclavian artery.
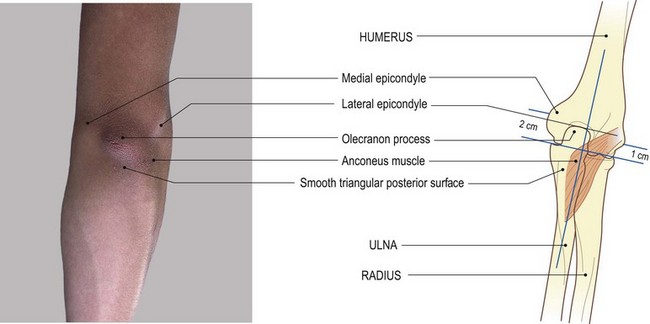
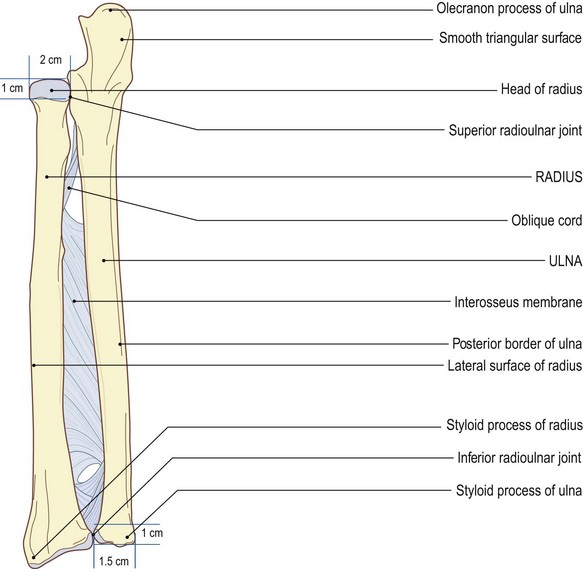
The elbow region (Fig. 2.3)
This region comprises the lower end of the humerus and the upper ends of the radius and ulna.
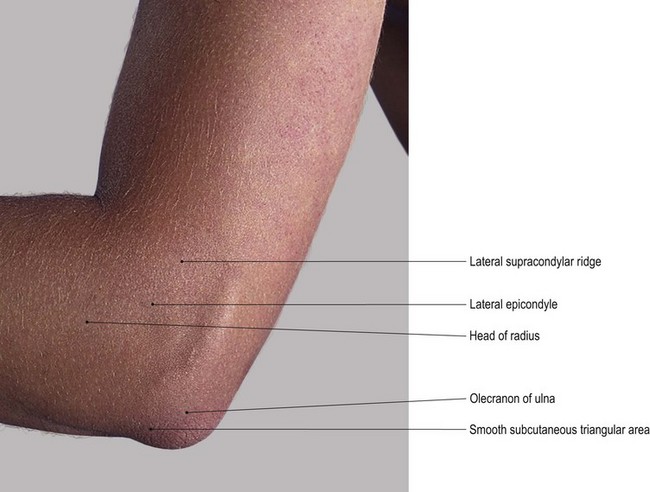
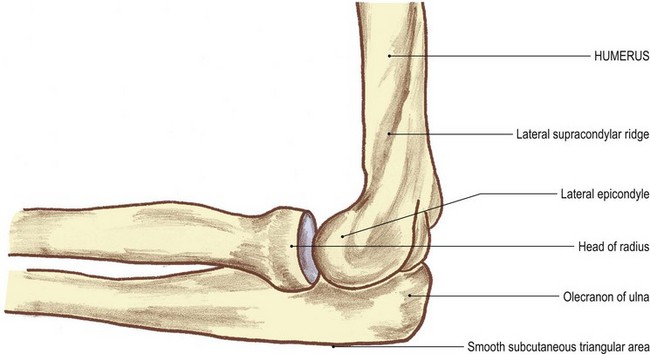
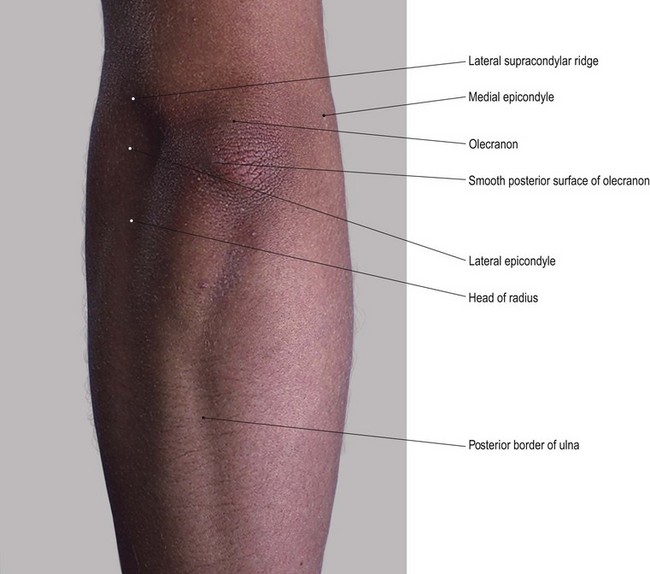
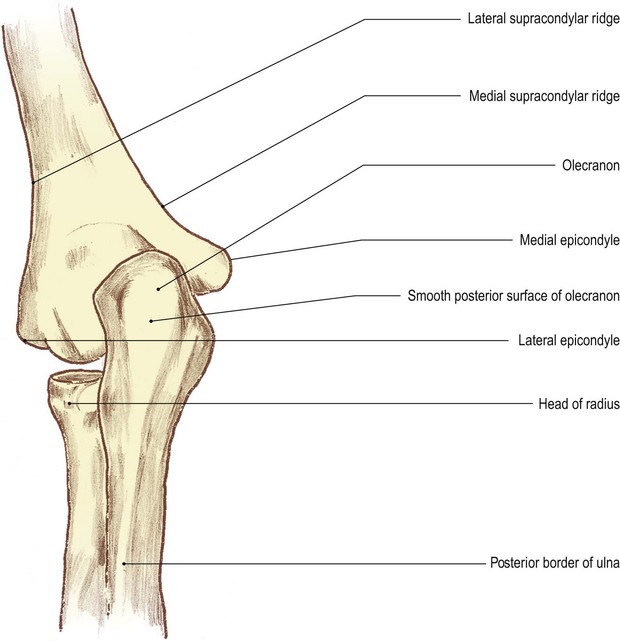
The lower end of the humerus is composed of a medial and lateral condyle, having two articular surfaces: the trochlea and the capitulum, respectively. Above these surfaces anteriorly are two fossae: the coronoid medially and radial laterally. Posteriorly, there is a larger depression: the olecranon fossa. On the lateral side of the lateral condyle is a prominence: the lateral epicondyle. This lies at the lower end of the lateral supracondylar ridge. The upper end of the radius is composed of a head which is button-shaped and articular on its upper surface, and the medial third of its rim. There is a neck, which is cylindrical, joining the head to the upper end of the shaft. There is also a large tuberosity (bicipital tuberosity), which projects from its medial side at the base of the neck. It is roughened on its posterior aspect for the attachment of the tendon of biceps brachii.
Palpation
For palpation in this area, the model should be in the sitting position.
• The humerus. Find the lower attachment of deltoid muscle which is halfway down the lateral side of the arm. Just below this, you will be able to palpate the humerus.
• Note. The humerus is crossed laterally by the radial nerve running downwards and forwards. Trauma in this area can cause pain, tingling and, sometimes, numbness of the posterolateral aspect of the hand.
• The lateral supracondylar ridge of the humerus. Inferiorly, you will palpate a sharp border on the bone. This is the lateral supracondylar ridge which terminates at the large lateral epicondyle.
• The lateral epicondyle of the humerus. You will be able to palpate the posterior surface of this epicondyle which is subcutaneous.
• The olecranon fossa of the humerus. Ask the model to flex the elbow. Now you can trace the ridge medially across the back of the humerus to the commencement of the olecranon [olekranon (Gk) = the point of the elbow] fossa.
• The head of the radius [radius (L) = spoke of a wheel]. Ask the model to extend the elbow. Now you will be able to palpate the lateral side of the button-shaped head of the radius situated immediately below the humeral epicondyle. The narrow groove running horizontally between the two is the radiohumeral part of the elbow joint.
• The neck of the humerus. Palpate around the lateral half of the radial head, posteriorly, as far as the posterior aspect of the superior radioulnar joint. Just below the head, laterally, palpate the narrowed radial neck which is hidden by muscles anteriorly and posteriorly.
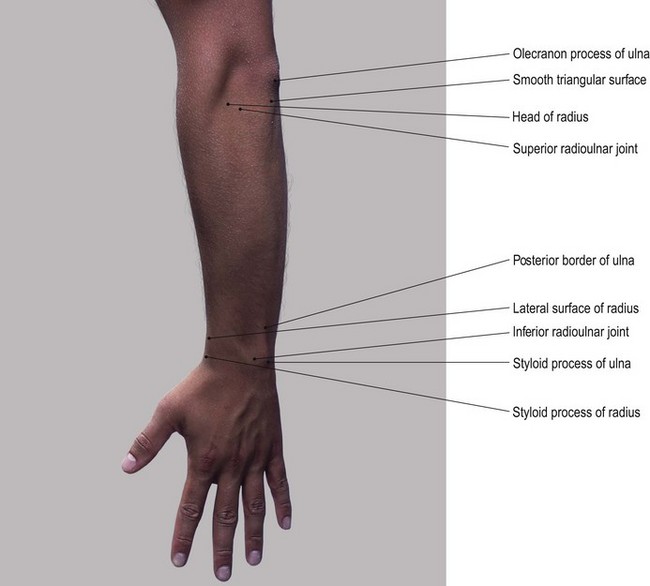
• The olecranon process of the ulna (Fig. 2.3a, b). Ask the model to extend and then to flex the elbow. Now palpate the large bony formation of the olecranon, particularly when the elbow is flexed. Its superior surface is more difficult to feel because it is covered by the tendon of triceps as the tendon inserts into its posterior aspect.
• The olecranon bursa. Now place your fingers on the posterior triangular surface of the olecranon. You will find that the skin and superficial fascia can easily be moved owing to the presence of the subcutaneous olecranon bursa.
• Note. If pressure is applied for some time to this area, as in leaning on the elbows, the bursa can become inflamed and swollen (bursitis).
• The medial and lateral surfaces of the olecranon process. Palpate the narrow triangular surface which has its apex downwards and is continuous with the posterior border of the ulna. Palpate this border which is subcutaneous as far as its head. Whilst you will be able to palpate the medial and lateral surfaces of the olecranon relatively easily, they are covered by muscle lower down and are more difficult to identify. The olecranon is much more difficult to palpate when the elbow is extended, as it moves into the olecranon fossa of the posterior surface of the distal end of the humerus.
Palpation on movement
• Extension. Ask the model to flex the right elbow joint to 90°. Place the fingers of your left hand on the superior surface of the olecranon, which will be at the back of the elbow. Now place the fingers of your right hand on the medial epicondyle and your thumb on the lateral epicondyle of the humerus. Ask the model to extend the elbow joint. You will be able to palpate the olecranon which will virtually disappear into the olecranon fossa on the posterior aspect of the humerus.
• Pronation and supination. Ask the model to flex the right elbow joint. Now locate the outer edge of the disc-like head of the radius. Ask the model to pronate and supinate the forearm. Note the rotation of the head of the radius beneath your fingers.
• Finally, stand in front of the model. Ask the model to flex the elbow joint fully. Take the arm in your left hand and the forearm in your right. Now ask the model to extend the elbow joint. You will observe that the forearm, which was slightly medial to the line of the humerus, now moves more to the lateral side forming an angle with the upper part of the arm. This is termed ‘the carrying angle’.
On the medial surface of the medial condyle of the humerus there is a large projection: the medial epicondyle. This is slightly hollowed posteriorly. Above this is the medial supracondylar ridge which passes up to the medial side of the shaft.
The pulley-shaped trochlea is articular and covers the anterior, inferior and posterior aspect of the bone. Its medial flange is lower than the lateral and accounts for the angle at the elbow joint.
The upper end of the ulna, lying below the trochlea of the humerus, is composed mainly of a hook-shaped process: the olecranon. There is a shelf-like process projecting forwards from the upper end of the shaft: the coronoid process. The two form a socket shape facing forwards: the trochlear notch. This articulates with the trochlea of the humerus in the elbow joint.
Palpation
• The medial supracondylar ridge of the humerus. On the medial side of the elbow, you will be able to palpate the sharp medial supracondylar ridge. Trace this ridge upwards for approximately the lower quarter of the humerus.
• The medial epicondyle of the humerus. At the lower end of the medial supracondylar ridge, palpate a large, bony prominence 2 cm above the elbow joint and approximately 1 cm below the level of the lateral epicondyle. This is the medial epicondyle of the humerus, behind which there is a deep groove for the ulnar nerve.
• Note. Palpation of this area may be quite tender and could cause tingling or even numbness on the medial side of the hand due to pressure on the ulnar nerve. This is often erroneously referred to as the ‘funny bone’, owing to the strange sensation when the nerve is compressed.
• The olecranon fossa. Ask the model to flex the elbow joint fully. It is just possible to feel the depression of the olecranon fossa through the tendon of triceps.
• The medial and lateral epicondyles of the humerus. From the posterior aspect, locate the medial and lateral epicondyles.
• The olecranon process of the ulna. At a point midway between the two epicondyles, press your thumb onto the back of the triceps tendon. You will observe that the tendon will sink slightly into the olecranon fossa. Just below your thumb you will palpate the bony olecranon.
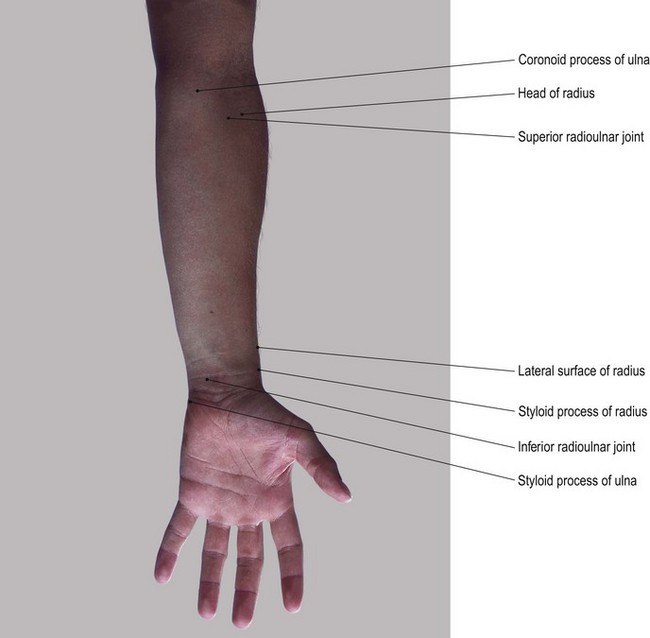
• The coronoid process of the ulna (coronoid [corone (Gk) = crown; also the name given to the pointed front of a ship or plough]). Ask the model to extend the right elbow joint and and fully supinate the forearm. With the forearm in this fully extended position, examine the anterior aspect of this region. Place the flat surface of your right hand 2.5 cm below and 2.5 cm lateral to the medial epicondyle of the humerus. You will feel a hard bony projection deep to the mass of the flexor muscles. This is the coronoid process of the ulna.
Functional anatomy
• Note 1. The title ‘carrying angle’ at the elbow joint must have been given when the carrying of pails of water was common. In fact most objects carried in the hand with the elbow extended are normally accompanied by the forearm being held in the mid prone position. This eliminates the angle at the elbow.
• Note 2. When the elbow is fully flexed the hand does not oppose the shoulder joint; it is located in the mid clavicular area.
• Note 3. If the model now flexes the shoulder joint, the hand is taken first to the chin and then to the mouth, thus facilitating feeding. Keep the arm in this position. If the forearm is then fully pronated and the fingers extended, the hand now becomes a protection to the face.
Injuries and degeneration of the elbow and superior radioulnar joint often lead to loss of flexion or extension or both. This results in serious dysfunction of the upper limb, impeding its shortening and positioning of the hand. In one elbow this is perhaps acceptable, but if this dysfunction is present in both elbow complexes it may be devastating to a person’s quality of life.
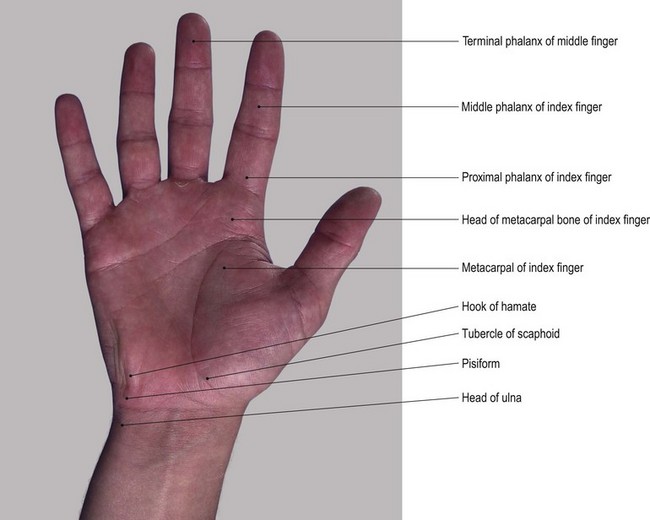
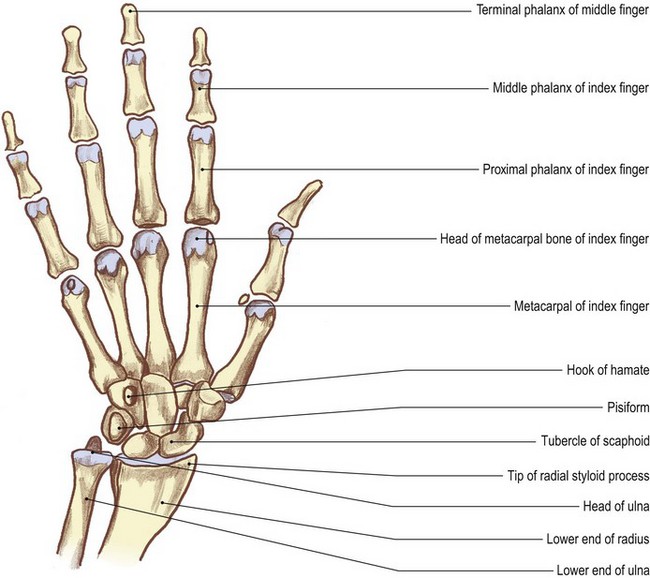
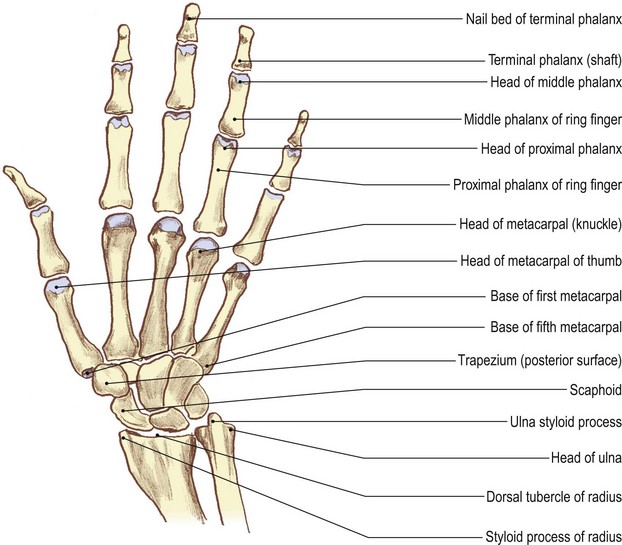
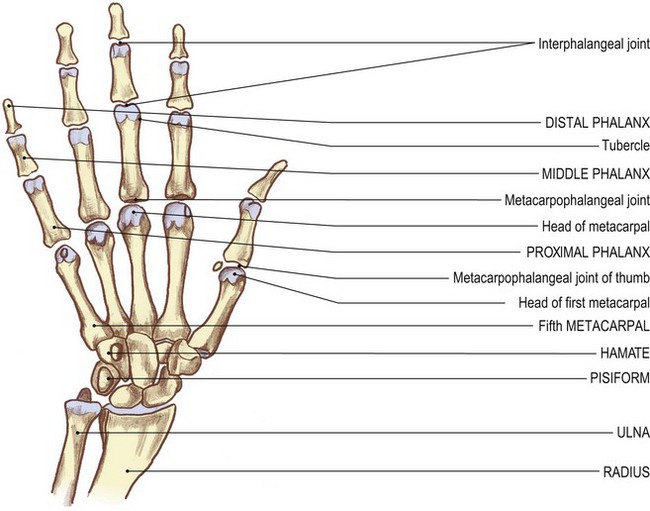
The wrist and hand
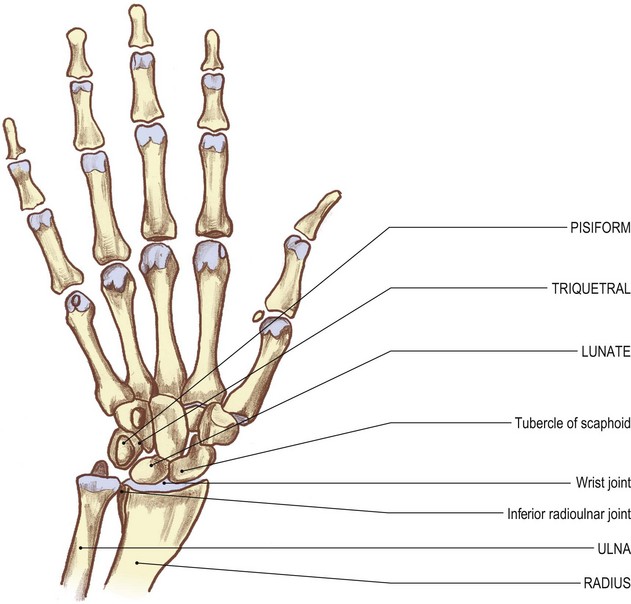
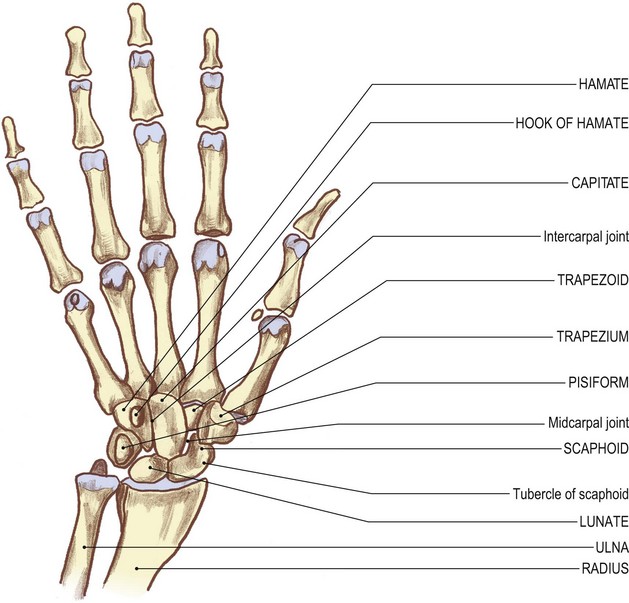
The lower ends of the radius and ulna form a shallow mortice into which three of the four bones of the proximal row of carpals – scaphoid, lunate and triquetral – fit. The fourth bone in the proximal row, the pisiform, lies anterior to the triquetral. Distally, the proximal row of carpal bones form another concavity for the reception of the second row of carpal bones: the trapezium, trapezoid, capitate [capitate (L) = head-shaped] and hamate. The capitate is the largest of the four and fits snugly into the deepest part of the concavity, being in contact with all the carpal bones except the pisiform, triquetral and trapezium (Fig. 2.4b).
The metacarpals are miniature long bones lying distal to the carpals. The metacarpal of the thumb articulates with the trapezium; the second mainly articulates with the trapezoid; that for the middle finger mainly articulates with the capitate and the fourth and fifth articulate with the hamate.
Each metacarpal head articulates with a proximal phalanx. Each finger has a middle and a distal phalanx, the thumb has only a distal phalanx.
Anterior, medial and lateral aspects
Palpation
The bones of the wrist and hand are more difficult to locate on the anterior surface as they tend to be hidden by the muscles which arise and insert in the hand.
For palpation in this region, the model should be in the sitting position with the forearm resting on a pillow or an alternative support.
• The triquetral bone [triquetrus (L) = having three corners]. Return to the wrist joint. Locate the head of the ulna on its medial side (Fig. 2.4). Immediately distal to this, palpate the medial and posterior surfaces of the triquetral bone.
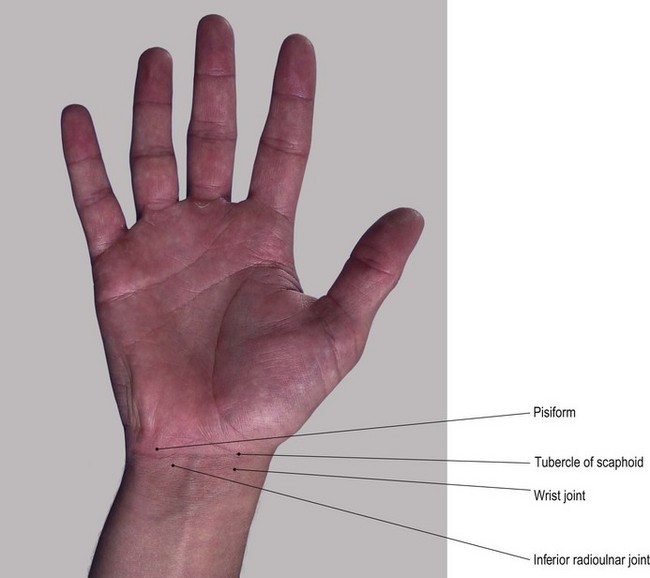
• The pisiform bone [pisum (L) = a pea]. On the anterior surface of the triquetral bone, palpate the pea-shaped pisiform bone. This bone is easily recognizable owing to its prominence and by the attachment of the tendon of flexor carpi ulnaris to its proximal side.
• Note. Application of deep pressure on the pisiform bone may elicit tenderness.
• The hook of the hamate bone [hamatus (L) = hooked]. If you now apply relatively deep pressure with the tip of your thumb 1 cm distal and slightly lateral to the pisiform bone, you will be able to feel a small but distinct bony prominence. This is the hook of the hamate bone. Now move your thumb from side to side and palpate two small nerves: the superficial terminal branches of the ulnar nerve. These can be compressed against the prominent hook of the hamate.
• The tip of the radial styloid process. On the lateral side of the wrist, locate the tip of the radial styloid process. It lies within a space termed the ‘anatomical snuff box’.
• The anterior border of the radius. From the styloid process, trace upwards for a short distance and palpate the sharp anterior border of the radial shaft. The radial artery lies just medial to the crest of the anterior border.
• The scaphoid bone [skaphe (Gk) = a skiff] and the trapezium [trapezion (Gk) = an irregular four-sided figure]. Distal to the styloid process of the radius, palpate the lateral surfaces of the scaphoid and trapezium bones.
• The first metacarpal bone and its proximal and distal phalanges. The first metacarpal bone is identified by a small tubercle. Its shaft leads distally to its head. You should find the base, shaft and the head of the proximal phalanx easy to palpate. The base and shaft as far as the nail of the distal phalanx [phalanx (Gk) = a band of soldiers] are equally identifiable.
• Note. The posterior surface of the bones of the thumb face laterally due to the thumb lying at right angles to the palm. Medially, the anterior surfaces are difficult to palpate due to the presence of muscle and tendon.
• The tubercle of the scaphoid bone. To facilitate palpation of the tubercle of the scaphoid bone, ask the model to extend the wrist. The tubercle should then be palpable at the proximal end of the thenar eminence, on the front of the carpal region, 1 cm medial to the tip of the radial styloid process.
• The vertical edge of the trapezium bone. If you apply deep pressure, the vertical ridge of the trapezium is just palpable 1 cm distal to the scaphoid tubercle.
• Note 1. This can often be a painful area for deep palpation so it is advisable to limit the number of times this technique is performed.
• Note 2. The scaphoid tubercle is prominent enough to be damaged by falls on the outstretched hand leading to a fracture. This is likely to cause pain and dysfunction of the hand for many months due to its poor blood supply leading to a long healing time.
• The second–fifth metacarpal and phalangeal bones. The anterior surfaces of these remaining bones are difficult to palpate as they lie deep to the muscle and fascia. To facilitate palpation, ask the model to extend the fingers fully. The anterior surfaces of the heads of the metacarpals can be felt in line with each finger, 2 cm proximal to the web between the fingers. Ask the model to extend/hyperextend the metacarpophalangeal joints. Now palpate the heads of each phalanx, just proximal to the creases of the interphalangeal joints. If you now grip the lateral sides of the heads between your finger and thumb, you should be able to palpate a small tubercle situated on each side.
Posterior aspect (Fig. 2.5)
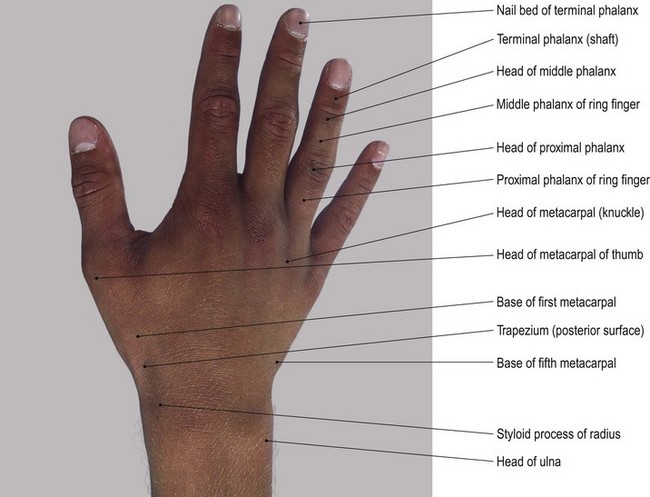
Palpation
• The styloid process of the ulna. Place your finger on the button-shaped head of the ulna. This is clearly palpable posteromedially, but is hidden by the tendon of flexor carpi ulnaris anteriorly. Palpate the ulna styloid process as a small projection on its posteromedial aspect, although this may be difficult as the bone is partially hidden by the tendon of extensor carpi ulnaris muscle. To facilitate palpation, ask the model to deviate the wrist radially. You will find that the head of the ulna and its styloid process become much easier to identify.
• The styloid process of the radius. Palpate the radial styloid process situated on the lateral side of the wrist, having tendons running in front and behind.
• The lateral side of the lower half of the radius. From the styloid process, trace upwards and palpate the lower half of the lateral side of the radius. From here, palpation becomes more difficult because the bone is covered by the bulk of brachioradialis muscle.
• Note. This region may be quite tender to palpate as it is often crossed by the superficial terminal branch(es) of the radial nerve.
• The dorsal tubercle of the radius. On the posterior aspect of the distal end of the radius, just above the level of the styloid process, the dorsal tubercle of the radius can be palpated. The tendon of extensor pollicis longus muscle grooves its medial side and uses it as a pulley.
• The posterior surfaces of the scaphoid, lunate [luna (L) = the moon] and triquetral bones. Find the dorsal tubercle of the radius. Below the level of this tubercle and the head of the ulna, locate a hollow; this is limited 2 cm below by the bases of the metacarpal bones. Ask the model to flex the wrist joint. Now palpate the posterior surfaces of the scaphoid, lunate and triquetral bones. They form a line distal to the tips of the radial and ulnar styloid processes.
• The trapezoid, capitate and hamate bones. Move your fingers just distal to the previous line of bones. Grip the bones between your fingers posteriorly and your thumb anteriorly. Just beyond them, palpate the trapezoid bone, which is situated at the base of the second metacarpal. Now palpate the capitate bone, situated at the base of the third metacarpal. Lastly, palpate the hamate, situated at the base of the fourth and fifth metacarpal bones.
• The second–fifth metacarpal and phalangeal bones. The lower limit of this area is marked by the bases of the metacarpal bones with their shafts running distally to end in rounded heads, all of which are easily palpable. To facilitate palpation, ask the model to flex the fingers. The base, shaft and head of each phalanx are now equally easy to palpate posteriorly. Anteriorly, they are hidden by tendons and the pulp of the fingers.
Palpation on movement
• Flexion and extension of the wrist. Ask the model to extend the wrist. Locate the tubercle of the scaphoid and the pisiform bone. Now ask the model to flex the wrist. Palpate the scaphoid and pisiform bones as they appear to move backwards and become indistinct. Keep the model’s wrist in flexion. Palpate the posterior aspect of the carpal bones just below the ulna and radius. Ask the model to extend the wrist. Palpate the posterior aspect to the carpal bones as they appear to move forwards and become indistinct.
• Flexion and extension of the fingers. Ask the model to extend the index finger. Now grip the base of the proximal phalanx with your thumb anteriorly and your fingers posteriorly. Ask the model to flex the finger. Palpate the phalanx as it moves round to the front of the head of the metacarpal leaving the head prominent (the knuckle). This is common to all the fingers, but more obvious in the index finger.
• Flexion of the interphalangeal joints. If you apply the technique as described above on the interphalangeal joints, you will palpate the head of the most proximal of the two bones as a small ‘knuckle’ shape.
• Flexion and extension of the thumb. If you now apply the same procedure as described above to the base of the proximal phalanx of the thumb, you will note that only half the movement is available and the head of the metacarpal is only partially exposed.
Functional anatomy
Fractures of the carpal bones are rare except in the case of the tubercle of the scaphoid, which is sometimes damaged by a fall on the outstretched hand.
Fractures of the metacarpal bones are fairly common at all ages and are often due again to a fall on the outstretched hand or a longitudinal force along the metacarpal, as in punching.
Injuries to the phalanges are usually due to direct violence such as trapping the fingers in a door.
Joints
Joints of the pectoral girdle
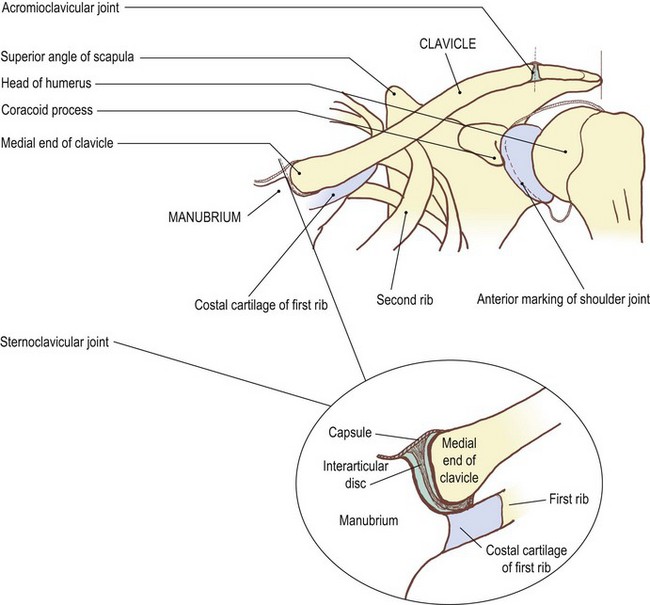
The sternoclavicular joint (Fig. 2.6)
At its medial end the clavicle articulates with the clavicular notch of the manubrium sterni. The joint is synovial, being surrounded by a capsule lined with synovial membrane, except where it is attached to the edges of a fibrous disc which divides the joint space into two separate cavities. It is a modified saddle (sellar) joint and its capsule is supported by ligaments, the intercostal above and medially, the costoclavicular laterally below the clavicle and the anterior and posterior across the front and back of the joint. It is subcutaneous, allowing easy palpation of the joint line and a reasonable examination of joint movement.

Palpation
Surface marking
For palpation in this region, the model is in the sitting position.
• The sternoclavicular joint. You can palpate this joint at the upper lateral corner of the manubrium sterni. Draw a curved line concave laterally. It is approximately 1 cm in length, extending over the lower half of the medial surface of the clavicle, passing inferolaterally for approximately 0.5 cm. Run your fingers down the front of the neck until you reach the sternal notch. Below you will feel the manubrium sterni and laterally the medial end of the clavicle with the sternoclavicular joint between the two.
Palpation on movement
• Retraction. Immediately lateral to the joint, between the clavicle and the first rib, is the costoclavicular ligament. This is not palpable, but acts as the fulcrum for movements of the clavicle at the joint. Thus when the lateral end of the clavicle is drawn backwards (retraction), the medial end can be observed gliding forward, projecting anterior to the plane of the manubrium.
• Protraction. Similarly, when the lateral end of the clavicle is brought forwards (protraction), you will be able to palpate the medial end moving backwards behind the plane of the manubrium.
• Elevation 1. Ask the model to raise the lateral end of the pectoral girdle. Palpate the medial end of the clavicle as it glides downwards on the clavicular notch of the manubrium sterni until it is level with the superior border of the manubrium sterni.
• Elevation 2. Ask the model to raise the upper limb above the head. The scapula laterally rotates around the chest wall and the lateral end of the clavicle is elevated. During the final few degrees of movement, the clavicle rotates around its long axis so that the anterior surface faces more superiorly. This rotation is due to the tension developed in the coracoclavicular ligament.
• Depression. Ask the model to pull the pectoral girdle downwards (depression). Palpate the medial end of the clavicle as it rises on the clavicular notch.
• Note. All these movements can be observed occurring around the attachment of the costoclavicular ligament.
Accessory movements
Palpation
• Gliding movements of the medial end of the clavicle. The forwards, backwards, upwards or downwards, or rotating the clavicle’s articular surfaces upwards, are all normal movements. Pressure applied to the medial end of the clavicle will produce little movement, as the stress is taken by the costoclavicular ligament which usually remains taut and reasonably inflexible.
• Movements of the medial end of the clavicle. If you apply similar pressures to the medial end of the clavicle, with the pectoral girdle in an appropriate position to aid the movement, additional movement can be achieved. Ask the model to protrude the shoulder girdle. Now apply pressure anteroposteriorly. This will augment the movement of the medial end of the clavicle. Pressure to raise the anterior surface of the medial end of the clavicle, as in the final stages of elevation, is best applied when the upper limb is as near to full elevation as possible.
The acromioclavicular joint (Fig. 2.7)
The acromioclavicular joint is immediately lateral to the anterior concavity of the lateral one-third of the clavicle, approximately 1.5 cm medial to the lateral border of the acromion process.
The acromioclavicular joint is a plane synovial joint. It lies in a paramedian plane of the body. It is surrounded by a joint capsule supported above by the superior acromioclavicular ligament. It relies for its stability, however, on the costoclavicular and the coracoclavicular ligaments which act as accessory ligaments to this joint. The two oval facets, one on the lateral end of the clavicle and the other on the medial aspect of the acromion process, are not congruent and rely on a small disc or part of a disc which fills the upper part of the joint space.
Palpation
• The angle of the acromion. Stand facing the model’s left shoulder. Run your right hand up over deltoid muscle on the lateral aspect of the shoulder. At the top you will feel the lateral border of the acromion process marked posteriorly by its angle.
• The acromial indentations. Now trace along the anterior border of the acromion for 1.5 cm. You will feel a small indentation where the clavicle joins the acromion. A very faint groove passes posteriorly to another small indentation on the posterior surface. The joint is quite difficult to palpate unless movement is occurring.
Palpation on movement
• Twisting or gapping. With careful palpation, you may be able to detect slight twisting or gapping of the acromion against the clavicle with movements of the pectoral girdle.
• Rotation. Ask the model to elevate the upper limb fully. Now palpate the acromion process as it rotates backwards against the lateral end of the clavicle. This occurs until the final few degrees of elevation when you will feel the clavicle also rotating backwards. This produces an upward movement of the anterior surface of the clavicle in its entire length.
• Note 1. This is partly due to the tension of the conoid part of the coracoclavicular ligament pulling down the posterior aspect of the clavicle, and partly due to the costoclavicular ligament at the medial end of the clavicle attaching to its posterior aspect.
• Note 2. This movement is also facilitated by the thickness of the disc in the sternoclavicular joint allowing a longitudinal rotation to occur.
• Note 3. The superior surface of the acromioclavicular joint is usually quite tender on palpation due to pressure on the superior acromioclavicular ligament. This tenderness is increased after prolonged activity involving the pectoral girdle or after carrying heavy loads on the shoulder.
Accessory movements
This joint is capable of slight gliding movements, these being forwards, backwards, upwards and downwards. It can also rotate, with one surface pivoting on the other, as well as allowing a certain amount of gapping anteriorly and posteriorly.
Palpation
• Note 1. All the above movements are normal but, as with the sternoclavicular joint, the end-range can be increased by addition of pressure in the appropriate direction.
• Note 2. The movements are best performed at the end of normal range.
• Posterior gliding of the acromion. An increase in this movement is facilitated if you ask the model to retract the shoulder girdle. Using your thumbs, now apply pressure, either to the lateral end of the clavicle or the anterior aspect of the acromion. You may find it easier to apply the former technique.
• Note 3. Although the acromioclavicular and sternoclavicular joints may appear to be insignificant, stiffness of either will reduce the range of movement of the pectoral girdle. This may result in serious functional loss in the range of movement of the upper limb and may be misdiagnosed as shoulder joint stiffness.
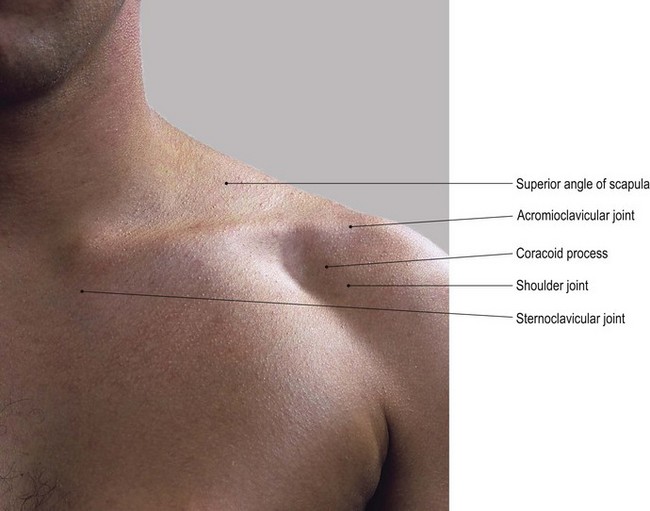
The shoulder joint (Fig. 2.8)
This is a synovial joint of the ball-and-socket type. The head of the humerus is slightly less than half a sphere, but is more ovoid in shape. The glenoid cavity is shallow and is estimated to contain only one-third the articular surface of the head of the humerus. Both surfaces are covered with articular cartilage. The joint is capable of a large range of movements which are essential for full functional activity of the upper limb. The apparent range of the joint is further increased by the movements of the shoulder (pectoral) girdle, allowing the glenoid cavity to be directed more upwards than laterally.
The joint is surrounded by a loose capsule which is lined by synovial membrane and is supported by ligaments. Anteriorly, it is supported by the glenohumeral, above and posteriorly by the coracohumeral and across the bicipital groove by the transverse ligament. A fibrous ring, triangular in cross section (the glenoidal labrum) is attached to the outer rim of the glenoid cavity, deep to the joint capsule.
Palpation
Surface marking
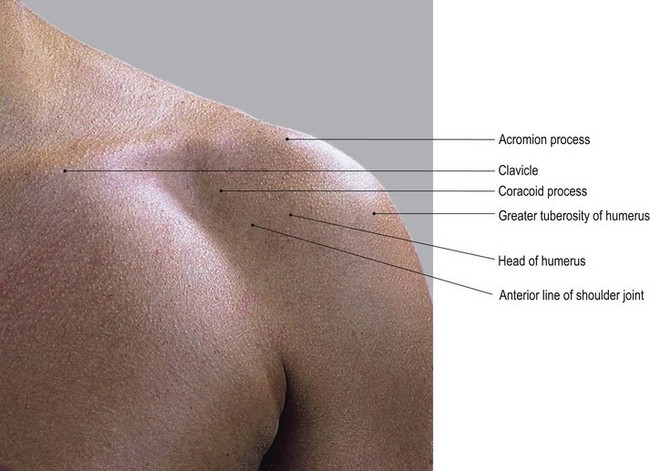
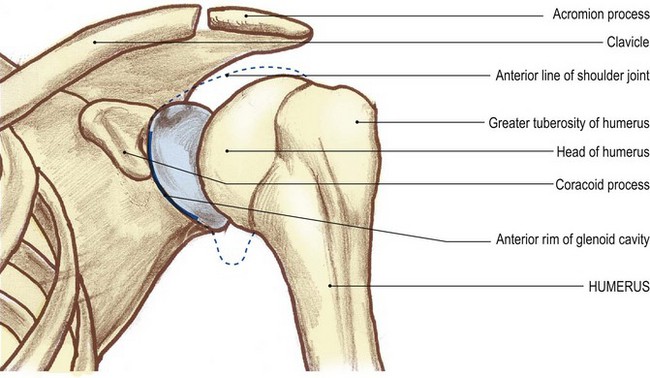
• The anterior joint line. This is identified by a shallow curve concave laterally. Palpate its upper boundary, which is just lateral to, and above the coracoid process. It passes downwards and slightly laterally for approximately 2–3 cm.
• The head of the humerus. Palpate the humeral head, which lies lateral to the joint line.
Palpation
The joint is deep, being surrounded by strong, thick muscles, and is therefore not easy to palpate.
For palpation in this region, the model is in the sitting position.
• The anterior part of the head of the humerus. The anterior aspect of the joint is the nearest to the surface. First, palpate the rounded anterior part of the head of the humerus. You should find this relatively easy.
• The anterior rim of the glenoid fossa of the scapula. Now carefully palpate the anterior rim of the glenoid fossa lying just medial to the humeral head.
• The head of the humerus. If you trace this bone upwards, you will feel that it is masked by the anterior part of the acromion. If you now move your fingers downwards, you will note that it becomes lost in the axilla. Laterally, you will feel that the head is bounded by the lesser tubercle of the humerus. This projects forwards and forms the medial lip of the bicipital (inter-tubercular) groove.
• The long head of biceps brachii muscle. Now palpate the long head of the biceps brachii muscle running up the groove and on to the anterolateral aspect of the humeral head.
Palpation on movement
• Lateral rotation. Ask the model to rotate the upper limb laterally. In this position, you will be able to palpate more of the humeral head.
• Medial rotation. Now ask the model to medially rotate the upper limb. You will feel the humeral head sliding backwards against the glenoid fossa and eventually disappearing.
• The lesser tubercle of the humerus. You can palpate the lesser tubercle which you will feel moving laterally and medially with the movement of rotation of the humerus.
• Abduction. Ask the model to raise the arm laterally. Now palpate the anterior part of the humeral head gliding downwards.
• Adduction. Now ask the model to lower the arm. Palpate the anterior part of the humeral head gliding upwards.
• Note 1. Palpation of the head during the movement of abduction is made more difficult by the contraction of the anterior fibres of deltoid muscle which pass across the anterior aspect of the joint.
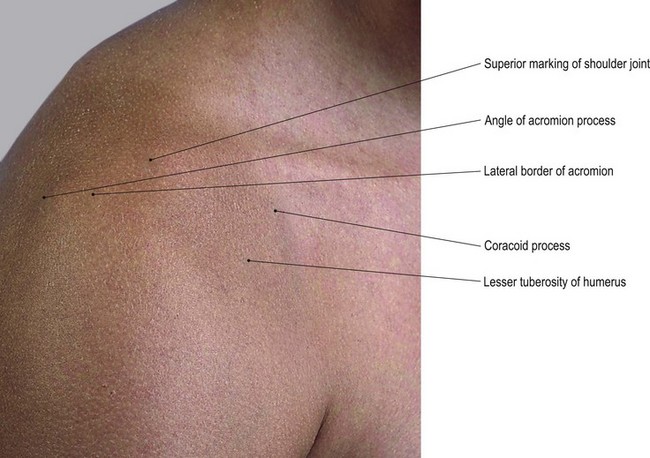
• Note 2. Posteriorly (see Fig. 2.8e, f), the shoulder joint is estimated to be at the same level and in the same sagittal plane as it is anteriorly, being just below the spine of the scapula 2–3 cm medial to the angle of the acromion.
• Note 3. Laterally (see Fig. 2.8c, d), the centre of the joint is approximately 2 cm below the anterior half of the lateral border of the acromion.
Although the spine of the scapula, its inferior angle and medial border are easily palpable and useful for calculating the position of the shoulder joint from the back, the joint itself is set so deeply in muscle that it is impossible to recognize in normal subjects.
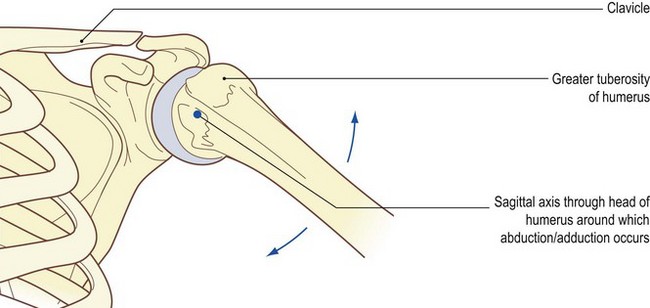
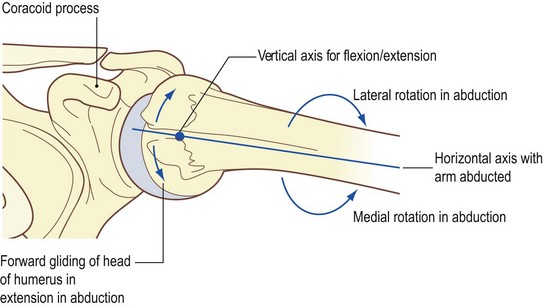
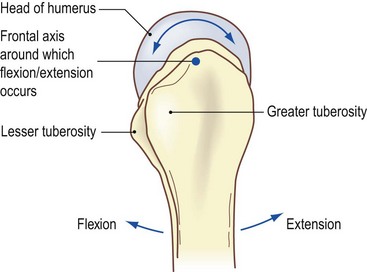
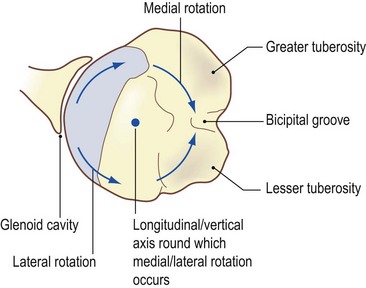
Movements of the head of the humerus
As the axis of movement of the shoulder joint is through the centre of the head of the humerus (Palastanga et al 2002), movements of the distal end of the humerus produce an opposite gliding of the head against the glenoid fossa. Thus, abduction causes a downward gliding and an upward rolling of the head of the humerus on the glenoid cavity around a sagittal axis (Fig. 2.9a, b). Flexion and extension (Fig. 2.9d), however, produce rotation or spin of the head around a frontal axis within the glenoid fossa, similar to that produced by rotating the limb in abduction (Fig. 2.9c). Rotation, with the arm by the side, however, produces a gliding forwards and rolling backwards of the head on lateral rotation and a gliding backwards and rolling forwards on medial rotation around a vertical axis. The combination of rolling in one direction and gliding in the other maintains the position of the centre of axis of the head (Fig. 2.9e). With the subject performing one movement at a time and with your fingers placed over the head of the humerus, these movements can be observed. It becomes even clearer if palpation is performed with one hand and the humerus is carefully taken through the movement passively.

The shoulder joint has a loose joint capsule and relatively weak associated ligaments. It relies to a large extent on muscular activity, especially by the ‘rotator cuff’ muscles (supraspinatus, infraspinatus, teres minor and subscapularis), for joint stability. It has an extensive range of movement together with a complementary range of accessory movements.
Accessory movements
If the accessory movements are reduced, or lost, normal movement becomes reduced or occasionally eliminated.
Palpation
For palpation in this region, the model should be in supine lying or in side lying. Where necessary, the arm should be supported on a pillow.
• Lateral distraction of the humeral head. For this technique to be successfully produced, the muscles of the upper limb need to be completely relaxed. The head of the humerus can now be drawn laterally away from the glenoid fossa for approximately 1–2 cm. The technique is usually possible when the humerus is between 0° and 90° of abduction. You will find it easier to palpate the movement if you ask a colleague to perform the technique. Place your fingers on the anterior aspect of the joint and palpate the head and anterior rim of the glenoid fossa.
• Gliding of the head of the humerus. Gliding of the humeral head can be in either a downwards or an upwards direction. This is achieved by pulling down or pushing up along the line of the humeral shaft. The humeral head can also glide in a forwards or backwards direction within the glenoid fossa. This is achieved by applying direct pressure on the upper end of the humerus. Again, you will find that it is easier to palpate the movement if you ask a colleague to perform the techniques as described above. Using several fingers, you should gently palpate over the area at the front of the joint where the head and glenoid fossa are identifiable.
The elbow joint (Fig. 2.10)
The elbow joint is basically a hinge joint between the humerus above and the ulna and radius below. The articular surfaces are, medially, the trochlea of the humerus above and the trochlear notch of the ulna below, and laterally the capitulum of the humerus above and the upper surface of the head of radius below.
The articular surfaces of the trochlea, capitulum, trochlear notch and the head of the radius are all covered with articular cartilage. The joint is surrounded by an extensive capsule which extends up onto the front and back of the humerus above the radial, coronoid and olecranon fossae. It is supported on either side by two strong ligaments. The ulna collateral ligament is triangular and joins the medial epicondyle to the medial side of the olecranon and coronoid processes. The lateral ligament is also triangular and joins the lateral epicondyle to the annular ligament surrounding the head of the radius. The capsule is lined with synovial membrane.
Palpation
Surface marking
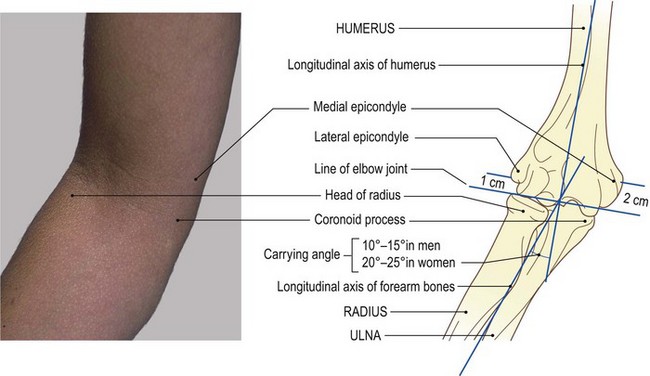
• Draw a line from a point 2 cm below the tip of the medial epicondyle to a point 1 cm below the tip of the lateral epicondyle of the humerus (Fig. 2.10, b). The line passes downwards and medially due to the medial margin of the trochlea projecting down further than the lateral margin.
• Note. When viewed from the front, this produces an angle at the elbow where the long axis of the ulna deviates laterally from that of the humerus by approximately 10–15° in men and 20–25° in women (Palastanga et al 2002). The angle at the elbow is only apparent on full extension and supination of the forearm and is commonly termed the ‘carrying angle’ (Fig. 2.10b).
Palpation
• The lateral aspect of the elbow joint. You will be able to identify the joint easily on the lateral side between the lateral epicondyle of the humerus and the lateral side of the head of the radius.
• The anterior aspect of the elbow joint. Anteriorly, the joint is not palpable as it lies deep to muscles: the extensor muscles laterally and the strong flexor muscles anteromedially, with brachialis and biceps between.
• The posterior aspect of the elbow joint. Posteriorly, trace the joint line as far as the radial notch of the ulna at the posterior aspect of the superior radioulnar joint (Fig. 2.10d). Ask the model to flex the elbow joint to 90°. In this position, you can palpate the anterior edge of the olecranon which can be traced downwards on either side until it is hidden by anconeus laterally and by the medial collateral ligament medially (Fig. 2.10d).
Accessory movements
Palpation
• Rocking. Ask the model to flex the elbow joint to approximately 15°. In this position, the ulna and radius can be rocked from side to side. Stabilize the arm just above the medial and lateral supracondylar ridges with one hand and apply a side-to-side force just above the wrist. The correct angle is critical for the movement to take place which varies from individual to individual.
• Distraction. The model is lying supine or in side lying. Ensure that the muscles are relaxed. Ask the model to flex the elbow joint. Distraction is achieved by applying a considerable force in the direction of the long axis of the humerus. With the elbow at a right angle and the upper arm stabilized, you will be able to move the forearm very slightly in its long axis. This produces a gapping at the anterior and posterior aspect of the joint.
• Note. These techniques require practice and are best studied from the mobilization and manipulation literature.
The radioulnar union
The movements of pronation and supination occur between the radius and ulna. They involve a type of rotation movement at the superior and inferior radioulnar joint and a twisting movement between the shafts of both bones. This is often referred to as the radioulnar union because the two bones are held together by the interosseous membrane.
The superior radioulnar joint
The superior radioulnar joint is a synovial pivot joint between the medial one-fifth of the head of the radius and the radial notch on the lateral side of the coronoid process of the ulna.
Both surfaces are covered with articular cartilage and are reciprocally curved. The head is surrounded by the annular ligament. This is attached in front and behind the radial notch of the ulna and forms the other four-fifths of the ring and is lined with fibrocartilage. The annular ligament is supported from above by the capsule and the triangular radiocollateral ligament of the elbow joint and from below by the quadrate ligament attaching it to the ulna. The joint is further stabilized by the interosseous membrane which binds the radius and ulna together. Synovial membrane lines the inner surface of the annular ligament in a double fold attaching to the edges of the articular facets of ulna and radius. It emerges just below the annular ligament as a loose fold. It is continuous with that of the elbow joint, although functionally it is a completely separate joint.
Palpation
Surface marking
• The superior radioulnar joint. Anteriorly and posteriorly, draw a vertical line 1 cm long downwards from the line of the elbow joint (see above), 2 cm medial to the lateral edge of the head of the radius (Fig. 2.11).
Palpation on movement
• Pronation and supination. Locate the head of the radius just below the lateral epicondyle of the humerus. Trace backwards around the radial head until the movement is arrested by contact with the lateral side of the ulna. The joint space is usually hidden by anconeus muscle. Anteriorly, the surface marking is covered by muscle and is not palpable. When the forearm is pronated and supinated, you will be able to feel the head of the radius rotating under your fingers.
Accessory movements
• Gliding of the radial head. The model is in the sitting position. Grip the head of the radius firmly between your fingers and thumb of one hand. Stabilize the upper end of the ulna with your other hand. You will now be able to produce slight backwards and forwards gliding of the head.
• Upwards and downwards gliding of the radial head. If you apply traction on the lower part of the radius, you will produce a slight gliding up and down of the head of the radius against the radial notch of the ulna.
• Note. If you apply too much traction to the radius in younger children (as in lifting the child by the forearm) the head of the radius may dislocate out of the annular ring, causing much pain and discomfort.
The inferior radioulnar joint
This joint is also a synovial pivot joint, being between the ulnar notch on the medial side of the distal end of the radius and the lateral rim of the head of the ulna. Both surfaces are covered with articular cartilage and the joint is surrounded by a capsule which is thicker in front and behind. A triangular interarticular disc is situated between the lower end of the ulna and the carpus. This attaches medially to the base of the styloid process of ulna and laterally to the medial edge of the inferior surface of the radius. At this joint, the radius moves around the head of the ulna in conjunction with the rotation of the head of the radius against the ulna at the superior radioulnar joint.
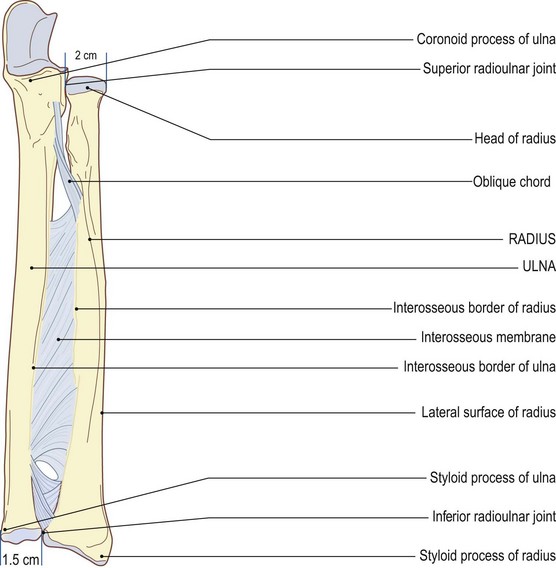
The mid radioulnar union
The radius and the ulna are joined together for most of their length by the interosseous membrane. This attaches to the interosseous borders of both bones, except for a small space at the upper part. This thin collagenous sheet, broader at its middle, is made up of fibres which pass downwards and medially from the radius to the ulna. Its fibres help to bind the two bones together whilst allowing movement between them. It gives support to the superior and inferior radioulnar joints. Due to the direction of its fibres, it transmits weight from the radius to the ulna.
Palpation
• Specific features of the radius and ulna. Examine both the radius and the ulna. Note that the lower end of the radius is large and takes any force transmitted from the carpus. In contrast, note that the radial head is relatively small and obviously transmits very little, if any, force to the capitulum. Note that, compared with the lower end of the radius, the ulna has a very small head at its lower end. This takes very little force from the carpus. Note also that its upper end is large and obviously transmits most of the force through to the trochlea of the humerus.
There is an oblique cord running downwards and laterally which attaches the tubercles at the upper part of the ulna with the radius just below its tuberosity. It is distinct from the interosseous membrane.
The interosseous membrane and oblique cord cannot be palpated.
Palpation
Surface marking
Palpation
• The posterior aspect of the inferior radioulnar joint. You will find it easier to palpate the joint line posteriorly where there is a vertical depression for 1 cm immediately above the line of the wrist joint 1.5 cm lateral to the ulnar styloid process (Fig. 2.11). Here, the tendon of extensor digiti minimi crosses the posterior aspect of the joint. Ask the model to extend the little finger and identify the tendon.
• The anterior aspect of the inferior radioulnar joint. Anteriorly the joint is much more difficult to palpate. In order to do so, slip your fingers under the thick tendon of flexor carpi ulnaris from the medial side.
• Pronation and supination. Ask the model to pronate and supinate the forearm. Now feel the radius moving around the lateral side of the head of the ulna. Note that the ulna also moves slightly laterally on pronation and medially on supination.
Accessory movements
Palpation
• Forwards and backwards gliding of the head of the ulna. Grip the head of the ulna firmly between your fingers and thumb of one hand. Now stabilize the lower end of the radius with the other hand. Now glide the lower end of the ulna forwards and backwards.
• Pronation and supination. Ask the model to flex the elbow joint. Hold the model’s forearm in your hand. Ask the model to pronate and supinate the forearm. In pronation, note the radius as it rotates around the head of the ulna. At the same time the lower end of the ulna moves slightly laterally. In supination the reverse occurs. Loss of this movement will limit the range.
• Lateral movement of the head of the ulna. Ask the model to pronate the forearm fully. Now apply pressure to the anteromedial aspect of the head of the ulna with your thumbs.
• Medial movement of the head of the ulna. Ask the model to supinate the forearm fully. Now apply pressure with your thumbs to the posterolateral side of the head of the ulna.
• Note. Both these manoeuvres achieve slight movement of the head of the ulna.
The wrist (radiocarpal) joint (Fig. 2.12)
The wrist joint is formed, superiorly, by the inferior surface of the lower end of the radius and an interarticular disc. Inferiorly, it is formed by the proximal surfaces of the scaphoid, lunate and triquetral bones. These, together with the ulnar and radial styloid processes, form a synovial ellipsoid joint. All joint surfaces are covered with articular cartilage. The joint is surrounded by a capsule, lined with synovial membrane. It is supported by the palmar and dorsal radiocarpal, ulnocarpal, radial and ulnar collateral ligaments. The interarticular disc lies between the inferior surface of the head of the ulna and the triquetral bone.
Palpation
Surface marking
• The wrist joint. Draw a line between the tips of the ulnar and radial styloid processes, slightly concave distally. The line becomes increasingly curved as it approaches the styloid processes (Fig. 2.12).
Palpation
For palpation in this area, the model is in the sitting position with the forearm resting on a support.
The joint is covered both anteriorly and posteriorly by tendons running from the forearm into the hand. There are, however, areas, mainly on the medial side, where the joint space of the wrist can be palpated.
• The posteromedial aspect of the wrist joint. Locate the ulnar styloid process on the posteromedial side of the wrist. Trace along both the medial and posterior edges of the head of the ulna. Medially, you will notice a gap just distal to this area. This contains the interarticular disc, the inferior surface of which takes part in the wrist joint articulation.
• The lateral aspect of the wrist joint. Press your fingers between the extensor tendons. Now trace the joint line just distal to the dorsal tubercle of the radius across the back of the wrist as far as the head of the ulna.
• Note. The joint line cannot be palpated anteriorly. You can draw its line horizontally just proximal to the tubercle of the scaphoid.
• The anterior aspect of the wrist joint. Ask the model to flex the wrist slightly. This will facilitate identification of the joint line. Identify the anterior line of the joint by tracing the crease across the anterior aspect of the wrist between the flattened lower end of the forearm and the elevations of the thenar and hypothenar eminences.
Accessory movements
Palpation
• Movements of the carpus. Ask the model to pronate the forearm. Now grip the dorsum of the lower end of the radius and ulna with one hand and the carpal bones with the other, so that the radial sides of your index fingers and thumbs are nearly touching. You can now move the carpus forwards and backwards, from side to side and even rotate it slightly.
• Note. Take care not to flex the wrist joint. The technique is to glide one surface on the other in a transverse plane. It will be difficult to prevent some movement occurring between the bones of the midcarpal joint.
• Distraction. Ask the model to pronate the forearm. Adopt the same hand hold as described above. Draw your two hands apart, taking care to grip the bones tightly. Do not allow too much slide of the skin and fascia.
• Note. Accessory movement at the wrist, if performed correctly, is quite dramatic, producing considerable movement in unusual directions. It must be remembered, however, that some of this movement occurs at the intercarpal and carpometacarpal joints.
• Movement of the carpal bones. With practice, it is possible to move each of the carpal bones individually on each other or on the lower end of the radius and disc. Grip one bone between your finger and thumb of one hand, while stabilizing its neighbour as described above. Alternatively, use the finger and thumb of your other hand. Slight gliding movement between the two bones can be achieved.
The hand
The intercarpal joints (Fig. 2.13)
These are all synovial, plane joints. Their surfaces are covered with articular cartilage and their capsules are lined with synovial membrane. With the exception of the pisotriquetral joint, the capsule is supported by the palmar and dorsal ligaments and radial and ulnar collateral carpal ligaments. There are also some interosseous ligaments between the proximal ends of the proximal row and distal ends of the distal row of carpal bones.
The pisotriquetral joint is also a synovial plane joint, but it has a distinct capsule which is supported by the tendon of flexor carpi ulnaris proximally and pisohamate and pisometacarpal ligaments distally.
Palpation
With the exception of the joint between the pisiform and triquetral, the joints between the carpal bones are very difficult to palpate with any degree of accuracy.
• The posterior aspects of the joints of the carpal bones. These can be identified either by relating their position to the metacarpals or by noting any particular features. You can grip each carpal bone between your finger and thumb and move it against the adjacent bone. The joint line remains elusive to the touch.
• The pisotriquetral joint. The medial aspect of the joint line is the easiest to palpate. Run your fingers dorsally for 1 cm from the anterior point of the pisiform on its medial side. Slight movement of the pisiform will emphasize the joint line.
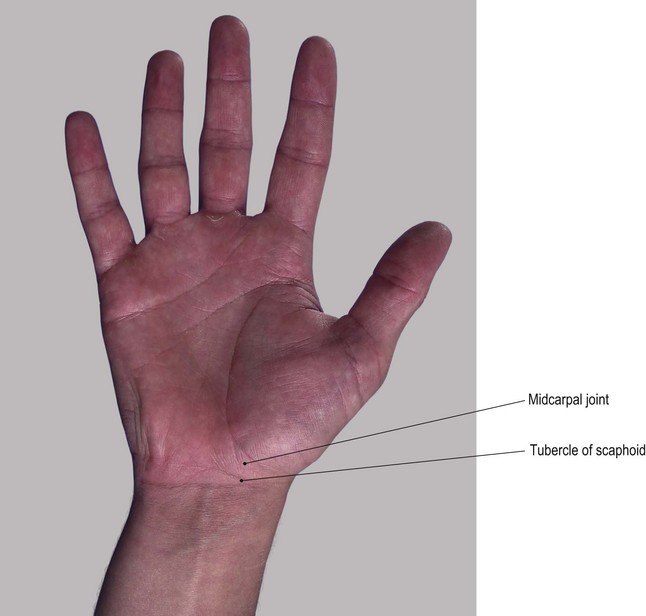
• The midcarpal joint. The joint between the two rows of carpal bones is known as the midcarpal joint. It permits gliding forwards, backwards and from side to side, augmenting the movements of flexion, extension, abduction and adduction at the wrist joint.
Accessory movements
• Side-to-side movement of the pisiform bone. Ask the model to flex the wrist joint slightly and then deviate the joint medially. Ensure that flexor carpi ulnaris is relaxed. The pisiform bone can now be moved from side to side.
• Gliding movement of the carpal bones. Now locate the capitate bone which is situated at the base of the third metacarpal bone. Stabilize the capitate bone by gripping it between your index finger anteriorly and your thumb posteriorly. You will be able to glide the surrounding carpal bones anteriorly and posteriorly by using a similar grip with the other hand on each bone in turn.
• Side-to-side and anterior and posterior movement of the trapezium bone. Palpate the trapezium at the lateral side of the distal row of carpal bones. Use the same hold as described above and stabilize the rest of the carpus. The trapezium can also be moved anteriorly and posteriorly.
• Note. A good knowledge of the anatomy of the carpal bones is essential and should be combined with practise of this type of movement. Consult the literature on mobilization and manipulations for therapeutic techniques.
• Passive movement between the two rows of carpal bones (the midcarpal joint). Use a similar hold to that described for producing accessory movements of the wrist joint. In this case, stabilize the proximal row of bones with one hand and move the distal row with the other. You should grip the proximal row of carpal bones with the index finger and thumb of your stabilizing hand just distal to the radial and ulnar styloid processes.
• Note. During the anterior, posterior, lateral and medial gliding, however, it is impossible to prevent some movement occurring in the neighbouring joints.
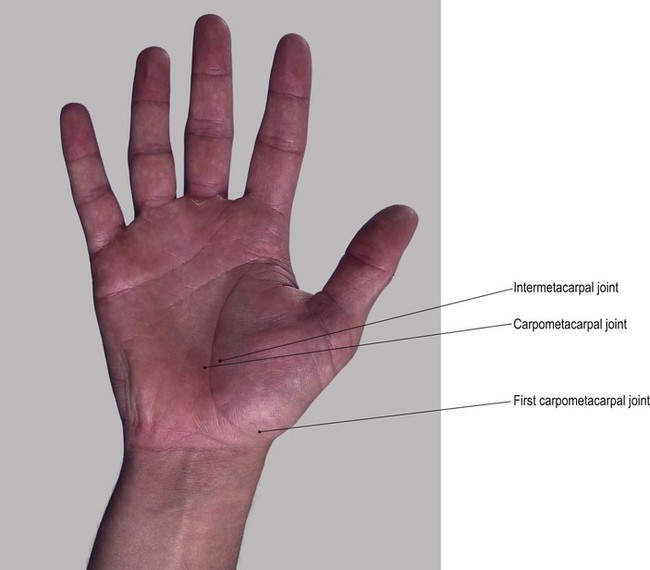
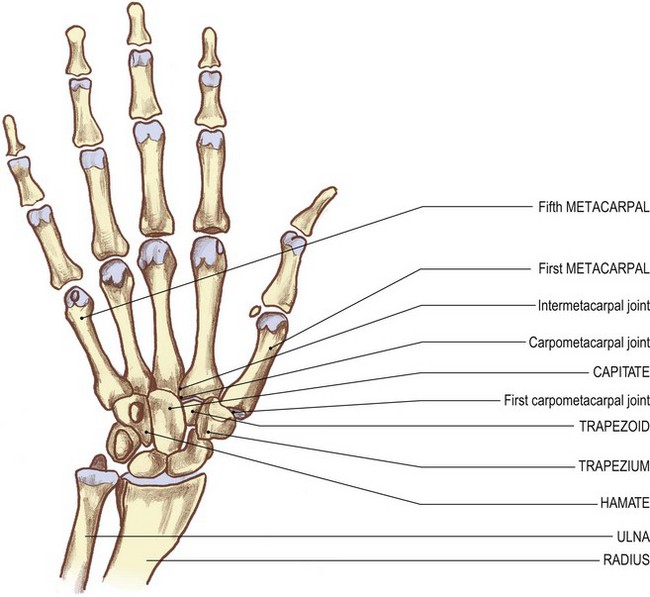
The carpometacarpal joints (Fig. 2.14)
The first metacarpal articulates with the trapezium by means of a synovial saddle (sellar) joint and is separate from the remaining carpometacarpal joints. It is surrounded by a capsule which is lined with synovial membrane and supported by the radial carpometacarpal, anterior and posterior oblique ligaments. The second metacarpal articulates mainly with the trapezoid, having small facets on either side for the trapezium laterally and the capitate medially. The third metacarpal articulates only with the capitate, while the fourth and fifth articulate with the hamate. Except for that of the thumb, they are all plane synovial joints. They have a capsule lined with synovial membrane and are supported by palmar and dorsal ligaments. There is normally an interosseous ligament between the distal ends of the hamate, capitate and trapezoid bones.
Palpation
These joints are only palpable from the posterior aspect.
• The carpometacarpal joints. Trace proximally along the back of the first metacarpal to its enlarged base, beyond which is a depression. At this point, palpate the joint line on either side of the tendon of extensor pollicis longus.
• The common carpometacarpal joint. Dorsally, just proximal to the bases of the second, third, fourth and fifth metacarpals, 2 cm distal to the line of the wrist joint, is a line of depressions between the extensor tendons. These represent the surface marking of the common carpometacarpal joint.
• Movements of the carpometacarpal joint of the thumb. Ask the model to flex, extend, abduct and adduct the thumb. Now feel the base of the first metacarpal moving on the trapezium.
• Note. There is little movement at the common carpometacarpal joint, except a slight gliding of the surfaces against each other accompanying movements of the hand.
Accessory movements
Palpation
• Movements of the carpometacarpal joint of the thumb. Ask the model to flex the elbow joint. Stabilize the trapezium with your finger and thumb of one hand. Grip the first metacarpal bone with your other hand. Now you can produce anterior, posterior, medial and lateral gliding of the metacarpal base against the trapezium. You can also produce a limited amount of rotation (i.e. rotation of the metacarpal about its long axis). Slight distraction of the joint is also possible.
• Distraction of the metacarpal bones. Stabilize the remaining carpus with one hand. In turn, grip each metacarpal between your fingers and thumb of the other hand. You can now move each metacarpal base slightly forwards and backwards.
The intermetacarpal joints (Fig. 2.14)
Between the bases of the second to fifth metacarpals are small plane synovial joints surrounded by a capsule lined with synovial membrane and supported by palmar, dorsal and interosseous ligaments. These ligaments allow the joints to be moved individually, giving the hand more mobility and thus more dexterity.
Palpation
Surface marking
• The intermetacarpal joints. On the posterior aspect of the hand, trace proximally up the spaces between the second and third, third and fourth, and fourth and fifth, metacarpal bones until you feel the two bones touching. Palpate the joint line running vertically for approximately 1 cm from the line of the carpometacarpal joint (see above).
Accessory movements
Palpation
It is extremely difficult to move the base of one metacarpal against another, except when they are used as levers.
• Upwards and downwards movement of the metacarpal bones. Ask the model to pronate the forearm. Now grip one metacarpal head between your index finger and thumb of one hand and its neighbour similarly in the other. Move the bones up and down against each other.
• Note. There may be up to a centimetre of movement at the level of the heads, with a much smaller twisting movement of one base against its neighbour.
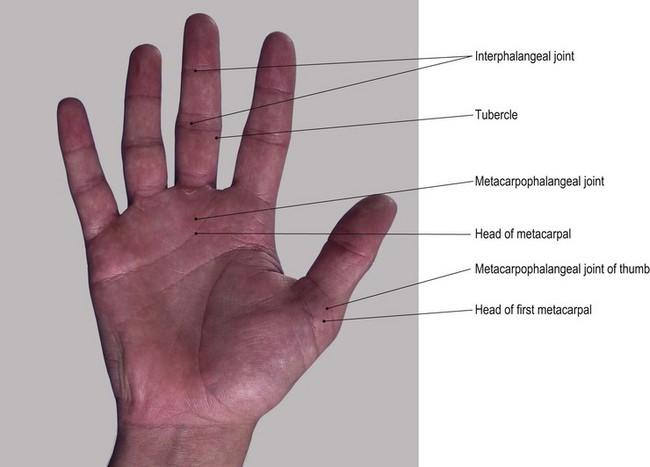
The metacarpophalangeal joints
Metacarpophalangeal joints are synovial ellipsoid joints between the head of each metacarpal and the proximal end of each associated proximal phalanx. Each joint is surrounded by a fibrous capsule enclosing the head of the metacarpal and the proximal surface of the phalanx.
The capsule is lined with synovial membrane and is supported by strong, cord-like collateral ligaments and a dense palmar ligament. The posterior aspect of the joint is protected by the dorsal expansion of extensor digitorum longus tendon. The palmar ligaments of the second to fifth metacarpophalangeal joints are linked by the deep transverse metacarpal ligament.
• Note 1. Flexion of the metacarpophalangeal joint of the thumb is only 45°, whereas that of the fingers is 90°.
• Note 2. This movement occurs at right angles to that in the other metacarpal joints taking the thumb across the palm.
Palpation
• The metacarpophalangeal joints. The joints of each finger can be palpated just distal to the head of the metacarpal. Ask the model to flex the finger to 90°. Palpate the joint line which appears to be beyond the knuckles, on the anterior surface of the head of the metacarpal (Fig. 2.15). It is easily palpable dorsally on either side of extensor digitorum longus tendons.
• The metacarpophalangeal joint of the thumb. Palpate this joint posteriorly, just beyond the metacarpal head.
Accessory movements
Palpation
• Movements of the proximal phalanges. Stabilize the metacarpal with one hand and grip the digit with your other hand. Now move the base of the proximal phalanx forwards, backwards and from side to side. You can also rotate the digit about its long axis, producing spin between the two surfaces. If sufficient distraction is applied, you will produce the characteristic ‘pop’.
• Note. This is not normally possible at the metacarpophalangeal joint of the thumb.
The interphalangeal joints
Each finger has two interphalangeal joints, whereas the thumb has only one. They are synovial hinge joints between the head of the more proximal phalanx and the base of the more distal phalanx. These joints are surrounded by a capsule which is lined with synovial membrane and supported by collateral and palmar ligaments.
Palpation
• The interphalangeal joints. The joints are easier to palpate posteriorly. Ask the model to flex the joint to 90°. Now trace distally down the back of each phalanx. Palpate the joint line just beyond the slightly expanded head. It is covered centrally by the expansion of extensor digitorum (dorsal digital expansion).
Accessory movements
Palpation
• Rocking. Ask the model to pronate the forearm and to flex the interphalangeal joint to approximately 30°. Stabilize the more proximal phalanx with one hand and grip the more distal phalanx between fingers and thumb of your other hand. You can now rock the base of the more distal phalanx from side to side. This movement often causes a ‘cracking’ sound.
• Forwards and backwards gliding. It is possible, but not easy, to produce a slight forwards and backwards gliding of the base on the head.
• Distraction. This movement is limited by the tight collateral ligaments. The space gained between the articular surfaces is only a fraction of that gained at the metacarpophalangeal joints.
Muscles
The muscles that move the arm
Deltoid (Figs 2.16 and 2.17)
The deltoid is a triangular or delta-shaped muscle situated on the lateral aspect of the shoulder joint. It comprises anterior, middle and posterior sections. These fibres arise above from the lateral end of the anterior border of the clavicle, anterior, lateral and posterior borders of the acromion process, and the lower lip of the spine of the scapula, respectively. They all unite below to attach to the deltoid tubercle on the lateral side of the humerus.
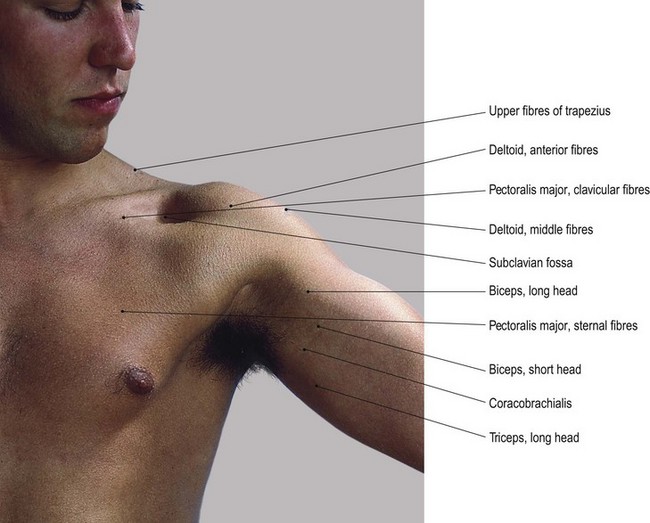
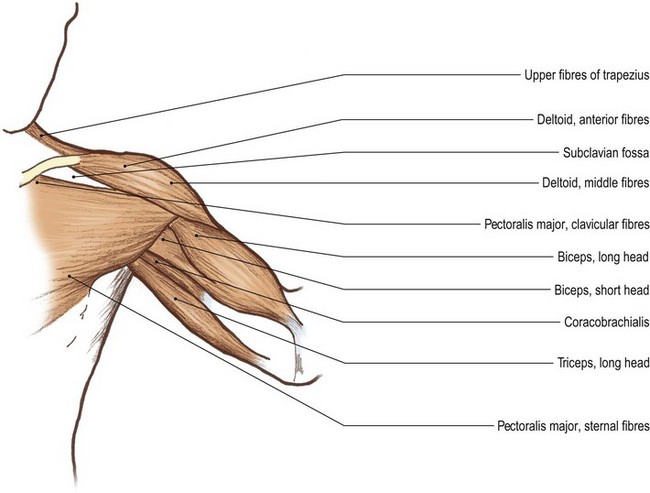
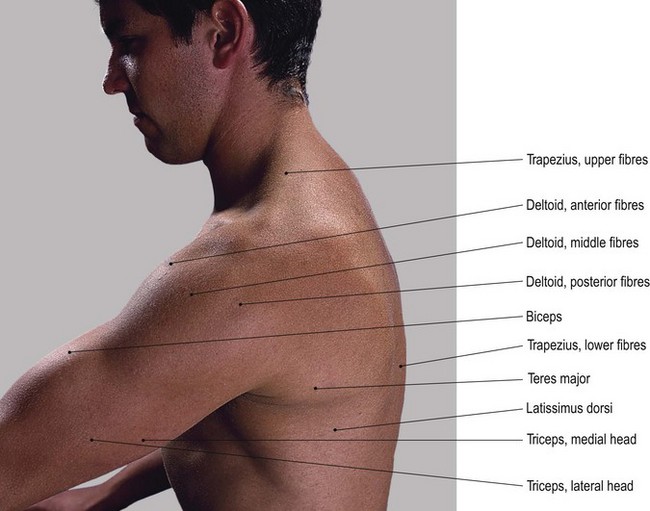
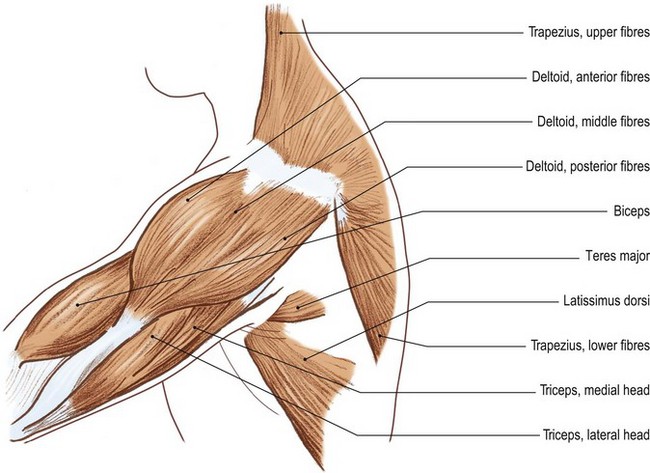
Below the pectoral girdle, the anterior fibres of deltoid can be seen some 3 cm below the lateral lip of the acromion, level with the greater tuberosity of the humerus. This delta-shaped muscle also covers the anterior and posterior aspects of the shoulder joint and feels thick and well developed.
Palpation
For palpation in this region, the model should be in the standing or sitting positions.
• Deltoid: general features. Palpate the anterior and posterior fibres which feel smooth and strap-like. Now palpate the middle fibres which feel coarse with stringy fibrous bands running vertically. This is because the middle section of deltoid is composed of multipennate muscle fibres, which pass obliquely from one vertical tendinous intersection to another. Palpate these coarse strips of muscle as they pass vertically from the lateral border of the acromion downwards to the final common tendon of all three sections halfway down the lateral aspect of the humerus. Ask the model to abduct the shoulder joint. Palpate the anterior and posterior fibres as triangular sections with facial septa separating them from the central fibres.
• The anterior fibres of deltoid. Ask the model to flex and/or medially rotate the shoulder joint. Now trace the clearly visible anterior fibres from the clavicle above to humerus below.
• The posterior fibres of deltoid. Ask the model to extend and/or laterally rotate the shoulder joint. Now trace the clearly visible posterior fibres from the lower lip of the spine of the scapula above to the humerus below.
• The middle fibres of deltoid. Ask the model to abduct the shoulder joint to 90°. Palpate the middle fibres of deltoid between its anterior and posterior sections.
Pectoralis major (Fig. 2.16)
Pectoralis major is a thick, strong, triangular muscle which covers the upper anterior chest wall. It has its tendinous apex laterally. It comprises two functionally distinct groups of fibres: clavicular and sternal. The clavicular section attaches medially to the anterior surface of the medial half of the clavicle. The sternal fibres have an extensive attachment medially to the manubrium sterni, body of the sternum, anterior surfaces of the upper six costal cartilages and ribs and the upper part of the aponeurosis of the external oblique muscle. Laterally, the muscle forms a broad tendon which attaches to the lateral lip of the bicipital groove of the humerus. The lower border of the muscle appears thickened. This is due to its lower fibres being folded up behind its upper fibres and forming a bilaminal tendon at its insertion.
Palpation
• Pectoralis major: general features. Trace this muscle laterally as it passes across, and forms the anterior wall of the axilla.
• The clavicular fibres of pectoralis major. Ask the model to flex the shoulder joint. Palpate the clavicular fibres as a thick muscular column passing from the medial end of the clavicle to the humerus.
• The sternal fibres of pectoralis major. Ask the model to extend the shoulder joint from the flexed position. Apply resistance to the movement. Palpate the sternal fibres passing from the lower ribs and sternum to the same insertion.
• Note. In women, much of the muscular section is covered by the breast but contraction of the muscle is evident to see or palpate. In men, the whole of the muscle is clearly palpable and becomes hard and tense on adduction and medial rotation of the shoulder joint. Laterally, a groove can be palpated between its upper border and the lower border of deltoid.
Biceps brachii (Figs 2.16–2.18)
Biceps brachii is fusiform in shape, situated on the anterior aspect of the upper arm. Its upper end attaches by two heads, as its name implies. One attachment is from the supraglenoid tubercle, the other from the tip of the coracoid process of the scapula. Below, it attaches by a strong tendon to the posterior aspect of the radial tubercle on the upper medial aspect of the radius and by an expansion from its medial aspect which blends with the fascia on the medial side of the forearm.
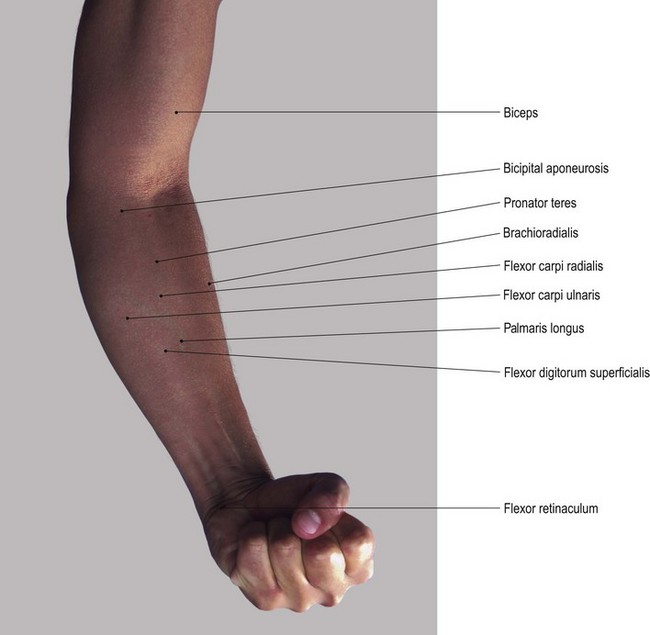
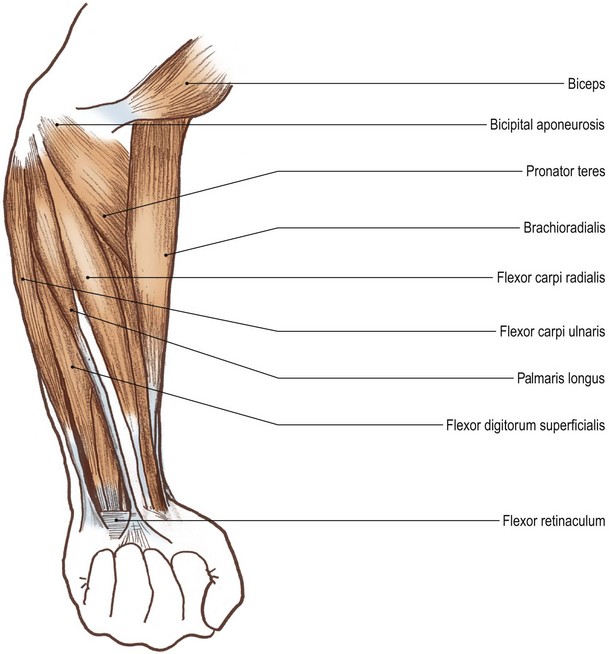
Palpation
• Biceps brachii: general features. The fusiform shape of biceps brachii can be seen and palpated covering the front of the arm. Trace the muscle upwards as it runs deep to pectoralis major and splits into two parts.
• The long head of biceps brachii. Palpate the long head passing as a tendon in the intertubercular groove of the humerus. Trace the tendon up the bicipital (intertubercular) groove and passing over the head of the humerus to the supraglenoid tubercle of the scapula.
• The short head of biceps brachii. Palpate the short head passing medially to the coracoid process of the scapula.
• The common tendon of biceps brachii. Below, palpate the muscle as it forms a well-defined tendon which passes through the cubital fossa giving off an expansion (the bicipital aponeurosis). This blends with the fascia on the medial side of the forearm, reaching as far as the posterior border of the ulna, forming a sickle-shaped edge.
• The bicipital apponeurosis. Ask the model to supinate the flexed forearm. Apply resistance to the movement. You will now find it easier to palpate the shape and tendons of biceps. You will also be able to palpate the aponeurosis spreading medially from the tendon.
• Note. In a well-developed subject, you can slip the tips of your fingers under the posterior border of the bicipital aponeurosis approximately 2 cm anteroinferior to the medial epicondyle of the humerus (Fig. 2.18).
Brachialis
Brachialis is a thick, triangular muscle situated deep to the lower part of the biceps. It attaches above to the lower half of the anterolateral and anteromedial surfaces of the humerus, crosses the front of the elbow joint and attaches below to the anterior surface of the coronoid process of the ulna.
Triceps (Figs 2.16a, b and 2.17a,b)
Triceps is a thick muscular mass situated on the posterior aspect of the arm. As its name implies, it arises from three heads.
1. The long head. This is tendinous and passes upwards, below the shoulder joint to attach to the infraglenoid tubercle of the scapula.
2. The lateral head. This attaches to the upper lateral part of the posterior surface of the humerus above and lateral to the radial groove.
3. The medial head. This attaches to the lower medial part of the posterior surface of the humerus below and medial to the radial groove.
All three heads attach to the posterior part of the superior surface of the olecranon via the triceps tendon.
Palpation
• The long head of triceps. Medially, trace the long head of triceps upwards as a tendon on the medial aspect of the arm. It passes up, under the posterior fibres of deltoid, infraspinatus, teres major and minor, to lie in front of the posterior wall of the axilla.
• The medial and lateral heads of triceps. Palpate these heads as they form a much more fleshy mass down the posterior aspect of the whole of the arm.
• The common tendon of triceps. Just above the elbow joint, palpate the three heads as they form a strong, thick tendon which attaches to the upper surface of the olecranon process.
• Note. You will find it easier to palpate the muscle and its tendon by applying resistance to extension of the elbow joint. On palpation, you will note that the lateral head lies slightly higher and lateral in relation to the medial head. (Fig. 2.17).
Latissimus dorsi (Fig. 2.17)
Latissimus dorsi is a large triangular muscle situated on the lower posterior part of the trunk. It passes upwards and laterally to attach to the upper part of the humerus.
This muscle has an extensive origin. It arises from the lower part of the thoracolumbar fascia, the spines of the lower six thoracic, all the lumbar and sacral vertebrae, the supraspinous and interspinous ligaments which lie between the thoracic and lumbar vertebrae and from the outer lip of the posterior sixth of the crest of the iliac crest. As it passes upwards it also attaches to the lower three ribs and the posterior aspect of the inferior angle of the scapula. It attaches above by a flattened tendon, which twists under the axilla and attaches to the floor of the intertubercular groove of the humerus.
Palpation
For palpation in this region the model should be in the standing position.
• The tendon of latissimus dorsi. Palpate the tendon as it passes under teres major, forming the posterior wall of the axilla. Ask the model to extend and medial rotate the arm. Apply resistance to the movement. Now trace the tendon along the medial side of the humerus towards its insertion into the floor of the intertubercular groove.
• The muscle fibres of latissimus dorsi. To facilitate palpation, ask the model to pull down on a fixed beam above the head (beam heaves) and/or to cough. Now palpate the muscle fibres on the posterolateral area of the chest wall.
Coracobrachialis (Fig. 2.16a, b)
Coracobrachialis is a long thin fusiform muscle situated on the upper medial area of the arm. It attaches above to the tip of the coracoid process of the scapula by a tendon common to it and biceps brachii. Below it attaches by a short tendon to a point halfway down the medial side of the humerus.
Palpation
• The tendon of coracobrachialis. Palpation is facilitated by abducting the upper limb. Ask the model to place the hand on the hip and then to adduct the arm forcefully. Now trace the tendon to the posterior aspect of the short head of biceps. It can be identified blending with this tendon.
• The belly of coracobrachialis. Palpate the belly of coracobrachialis (see Fig. 2.16a, b) high up on the medial side of the arm, passing upwards and forwards towards the coracoid process.
• Note. Care must be taken when palpating this area as it contains numerous branches of the brachial plexus and major blood vessels.
The posterior aspect of the scapula (Fig. 2.17c, d)
• Supraspinatus. Supraspinatus arises from the supraspinus fossa on the posterior aspect of the scapula. It attaches laterally to the upper facet on the greater tuberosity of the humerus.
• Infraspinatus arises from the infraspinus fossa on the posterior aspect of the scapula. It passes upwards and laterally to attach to the posterior aspect of the greater tuberosity of the humerus.
• Teres minor arises from the lateral border of the scapula. It passes upwards and laterally to insert into the posterior aspect of the greater tuberosity of the humerus.
• Teres major arises from the lateral border and the inferior angle of the scapula. It inserts into the medial border of the bicipital groove of the humerus.
Palpation
• The muscle belly of supraspinatus. Ask the model to begin to abduct the arm. Now palpate the muscle belly above the spine of the scapula.
• The muscle belly of infraspinatus. Ask the model to laterally rotate the arm. Apply resistance to the movement. Now palpate the muscle belly below the scapula spine as it passes upwards and laterally to the humerus.
• Teres major and the upper part of latissimus dorsi. Ask the model to adduct the arm. Apply resistance to the movement. Palpate these muscles which form the large bulk of muscle covering the lateral border of the scapula.
• Teres minor. Ask the model to rotate the arm laterally. Apply resistance to the movement. Palpate the teres minor.
• Teres major and latissimus dorsi. Ask the model to rotate the arm medially. Apply resistance to the movement. Palpate the teres major and latissimus dorsi.
The anterior aspect of the forearm and wrist
Because of their close proximity, palpation of individual forearm muscles is difficult. The point at which they are most easily identifiable is where their tendons cross the wrist joint. For purposes of palpation, therefore, most muscles will be identified at this point and then traced proximally and distally.
Generally the forearm is greater in circumference in its upper half than in its lower half owing to the presence of the muscle bellies, whereas lower down the muscles give way to tendons (Fig. 2.18).
Palpation
For palpation in this region, the model is in the sitting position.
• Brachioradialis. Palpate this muscle which is situated most laterally and which gives shape to the upper part of the forearm. Note its strap-like shape, being thicker near the elbow and narrowing to a broad tendon towards the lateral surface of the radius. Ask the model to flex the elbow in the mid-prone position. Apply resistance to the movement. Palpate the muscle from its origin at the supracondylar ridge of the humerus (Fig. 2.18).
• Flexor carpi radalis. Palpate the tendon of flexor carpi radialis on the anterior aspect of the wrist, approximately 1 cm medial to the styloid process of the radius. Distally, it passes in front of the scaphoid, being lost in the groove on the front of the trapezium. Now trace the tendon halfway up the front of the forearm. Note that it becomes muscular in the upper part which attaches to the medial epicondyle of the humerus (Fig. 2.18).
• The tendon of palmaris longus. Ask the model to flex the wrist slightly and to draw the base of the thumb and the little finger together. Now palpate the slim tendon of palmaris longus medial to the tendon of flexor carpi radialis. Trace the tendon distally and note that it blends with the palmar aponeurosis.
• The belly of palmaris longus. Trace the tendon proximally. Now palpate the narrow belly of palmaris longus on the medial side of flexor carpi radialis muscle.
• Note. Palmaris longus may not be present in all subjects.
• Flexor carpi ulnaris. Palpate the stout tendon of flexor carpi ulnaris on the anteromedial aspect of the wrist. Distally, it blends with the pisiform bone. Proximally, trace the tendon to a point almost halfway up the forearm, approximately 2 cm anterior to the posterior border of the ulna. Now palpate the thick muscle which replaces the tendon lying in front of the posterior border of the ulna.
• The tendons of flexor digitorum superficialis. Locate the depressed area between the tendons of palmaris and flexor carpi ulnaris. Ask the model to flex the fingers (particularly the middle and ring fingers). Observe and palpate the tendons of flexor digitorum superficialis in that groove.
• Note. The tendons to the index and little fingers, and those of flexor digitorum profundus, lie deeper and are difficult to differentiate.
• The belly of flexor digitorum superficialis. Ask the model to flex the fingers only at the metacarpophalangeal and proximal interphalangeal joints. Now palpate flexor digitorum superficialis immediately medial to the tendon of palmaris longus.
• Flexor digitorum profundus. Ask the model to press the fingertips against the palm of the hand. Palpate flexor digitorum profundus on the medial side of the forearm, deep to flexor carpi ulnaris.
• Note. In the palm, the tendons of these muscles are well covered with fascia and are difficult to determine, except for an area just proximal to the metacarpophalangeal joints.
The posterior aspect of the forearm and wrist
Palpation
In order to palpate muscles in this area, you must ensure that the model’s forearm is maintained in the anatomical position: i.e. the arm should be hanging loosely by the side with the palms facing forwards.
• Brachioradialis. This muscle can be palpated most laterally (see above).
• Extensor carpi radialis longus and brevis. Locate a point about 1 cm medial to the radial styloid process. Here two tendons cross the wrist. They are so close to each other that they are often mistaken as one. Palpation is facilitated if you ask the model to extend the wrist gently. The most lateral tendon is that of extensor carpi radialis longus. Trace this tendon distally to the base of the second metacarpal. The most medial is the tendon of extensor carpi radialis brevis, which can be traced to its attachment to the base of the third metacarpal distally (see Fig. 2.21a). Proximally, trace both muscles along the medial side of the bulk of brachioradialis to their attachment to, and just above, the lateral epicondyle of the humerus.
• The tendon of extensor pollicis longus. Ask the model to extend the thumb. Now palpate this tendon where it passes around the dorsal tubercle of the radius. Follow the tendon to its insertion into the base of the distal phalanx of the thumb. Proximally, the tendon is covered almost immediately by superficial muscles (Figs 2.19 and 2.21).
• Extensor digitorum. Ask the model to extend all the fingers. Palpate the tendon of extensor digitorum immediately medial to the tendon of extensor pollicis longus (Fig. 2.19). Note that it is broad and flat, dividing into four separate tendons distally. Trace each tendon over the back of the hand and along the posterior aspect of each finger. Note that each becomes slightly broader over the back of the metacarpophalangeal joint (dorsal digital expansion). Distally, trace each tendon to its attachment to the base of the distal phalanx.
• The belly of extensor digitorum. Proximally, trace extensor digitorum up the middle of the forearm medial to extensor carpi radialis longus and brevis to its attachment to the lateral epicondyle of the humerus.
• Note. Often a separate muscle belly can be identified on the lateral side which passes to the index finger only.
• The tendon of extensor indicis. Palpate this tendon as it accompanies extensor digitorum across the back of the wrist. Note that it is more easily identifiable as it joins the ulnar side of the tendon of extensor digitorum to the index finger at the metacarpophalangeal joint.
• The tendon of extensor digiti minimi. Palpation is facilitated if you ask the model to extend and relax the little finger rhythmically. Trace this thin tendon as it passes over the inferior radioulnar joint towards the little finger where it joins the tendon of extensor digitorum at its dorsal digital expansion.
• The belly of extensor digiti minimi. Trace the tendon proximally to a thin fusiform belly which attaches to the lateral epicondyle of the humerus.
• The tendon of extensor carpi ulnaris. Palpation of this tendon is facilitated if you ask the model to extend the wrist. Palpate this thick tendon as it crosses the posteromedial aspect of the wrist, just lateral to the styloid process of the ulna. Trace it distally to the base of the fifth metacarpal and proximally, via its muscle belly, to the lateral epicondyle of the humerus (Fig. 2.19). In the mid-forearm the muscle belly lies lateral to the posterior border of the ulna.
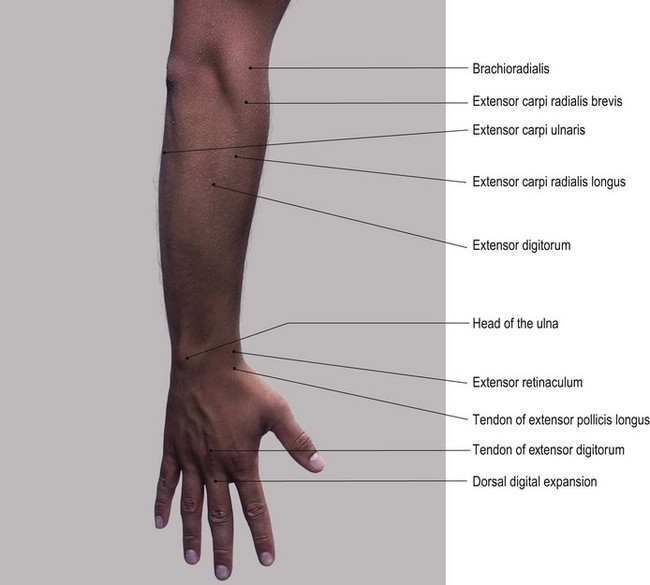
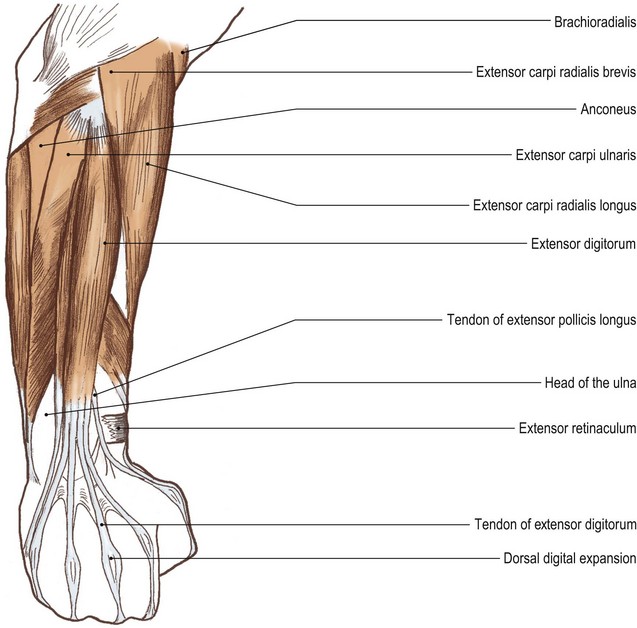
The anterior aspect of the hand
The bones and joints of the hand are moved and controlled by two main groups of muscles:
1. The muscles of the forearm: the extrinsic muscles. Their tendons pass over the wrist to attach to particular bony points in the hand and govern the relationships between the forearm and hand.
2. The muscles within the hand: the intrinsic muscles. These change the relationships of the component parts of the hand from within.
The palm appears to have a flattened central portion with muscular masses on either side which are closer together proximally and diverge distally (Fig. 2.20a). The lateral mass, the thenar eminence, is the larger of the two and consists of muscles responsible for producing movements of the thumb. The medial mass, the hypothenar eminence, consists of muscles responsible for producing movements of the little finger.
• Note. Movements of the thumb take place in a plane at right angles to the palm of the hand. Consequently, abduction is movement of the thumb anteriorly away from the index finger. Flexion is movement of the thumb medially across the palm of the hand.
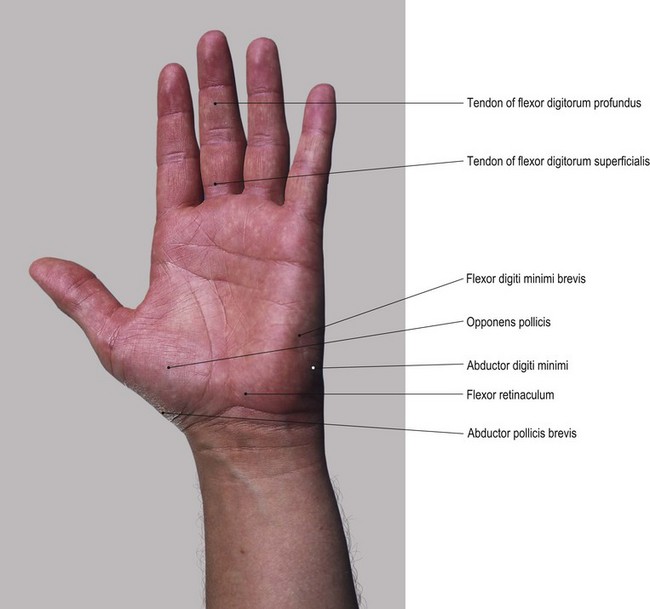
Fig. 2.20 (a) Muscles on the anterior aspect of the left hand (lumbrical muscles cannot be palpated)
Palpation
• The belly of abductor pollicis brevis. Ask the model to abduct the thumb. Palpate the belly of abductor pollicis brevis on the lateral side of the thenar eminence.
• The tendon of abductor pollicis brevis. Palpate this tendon as it passes distally to the lateral side of the proximal phalanx of the thumb (Fig. 2.20).
• Opponens pollicis. Ask the model to oppose the pad of the thumb to the pads of the fingers. Palpate opponens pollicis and the resulting contraction of the whole central section of the thenar eminence.
• Flexor pollicis brevis. Ask the model to flex the thumb at the metacarpophalangeal joint. Apply resistance to the movement. Palpate flexor pollicis brevis contracting on the medial aspect of the thenar eminence.
• Abductor digiti minimi. Ask the model to abduct the little finger (to move it away from the ring finger). Palpate abductor digiti minimi on the medial side of the hypothenar eminence. Trace this via a short tendon to the medial side of the base of the proximal phalanx of the little finger (Fig. 2.20).
• Opponens digiti minimi. Ask the model to oppose the little finger to the thumb. Palpate the hard hypothenar eminence caused by the contraction of opponens digiti minimi.
• Flexor digiti minimi brevis. Ask the model to flex the little finger. Apply resistance to the movement. You should be able to palpate flexor digiti minimi brevis on the lateral side of opponens digiti minimi (Fig. 2.20).
• Note. The central section of the palm of the hand is covered by the strong and thick palmar aponeurosis, making palpation of muscles such as adductor pollicis (transverse head), the palmar interossei or the lumbrical muscles impossible.
• The long tendons of flexor digitorum superficialis and profundus. Palpation is facilitated if you ask the model to flex the fingers and apply resistance to the movement. Whilst it may be difficult, trace these tendons, particularly over the fronts of the metacarpophalangeal joints.
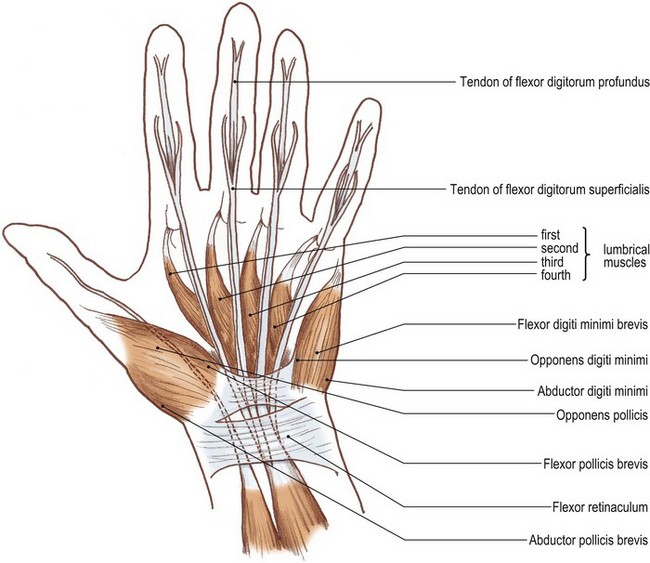
The posterior aspect of the hand (Fig. 2.21)
The skin and fascia on the posterior aspect of the hand are thin and relatively loose, giving easy access for palpation of muscles. As the main function of the hand is to manipulate and hold implements and tools, often with great care and precision, most of the muscles are situated anteriorly. Releasing the grip tends to be left to the long extensor muscles whose bellies lie in the forearm, with their connection to the hand being through long tendons which cross the back of the wrist (see muscles on the posterior aspect of the forearm). Nevertheless, there are a few muscles which can be palpated and are worthy of note.
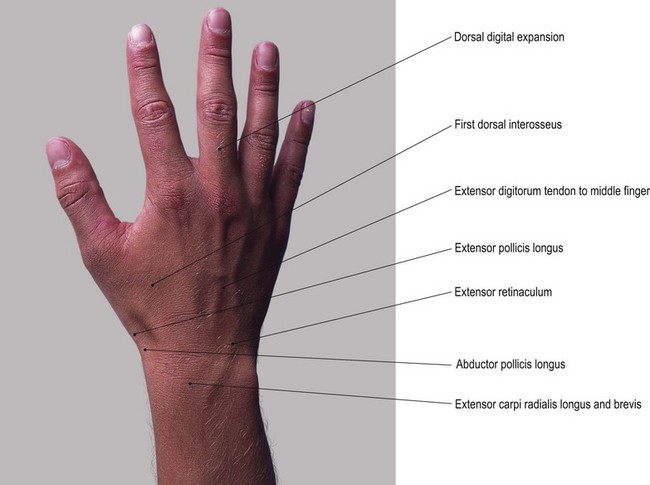
Fig. 2.21 (a) The posterior aspect of the right hand (for clarity only the first dorsal interosseus is identified, but all can be palpated)
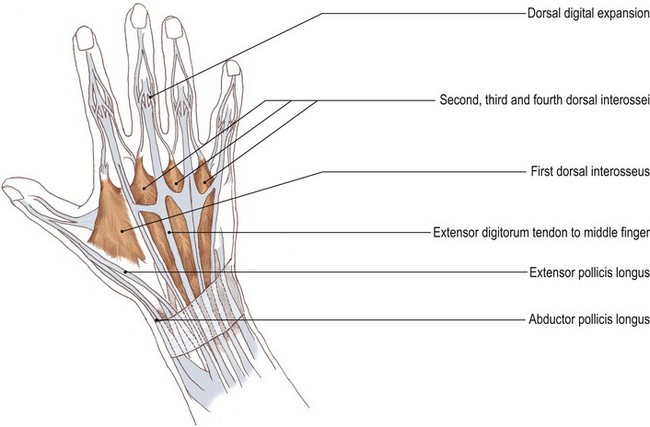
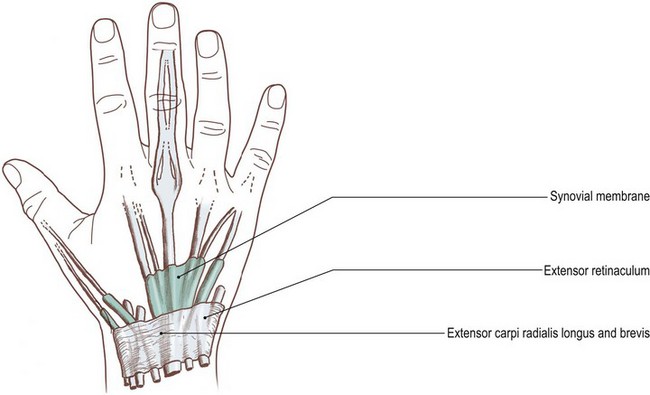
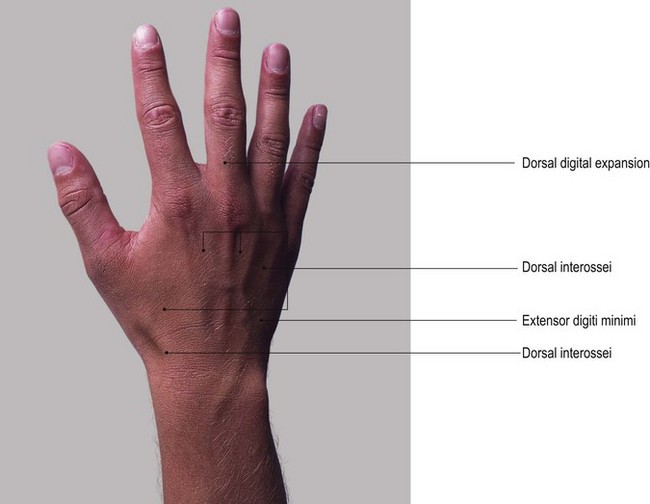
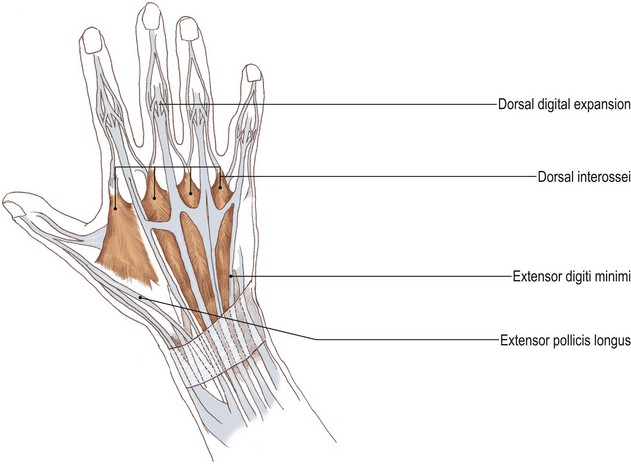
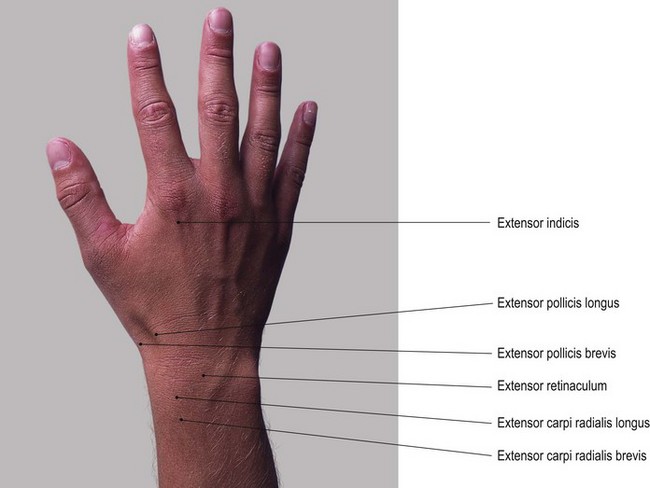
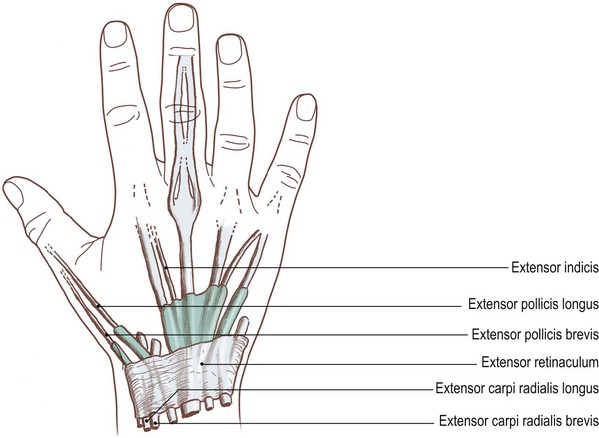
Palpation
• The posterior part of abductor pollicis brevis. Palpate the posterior part of this muscle on the lateral side of the thumb, lying just lateral to the tendon of extensor pollicis longus.
• The tendon of abductor pollicis brevis. Palpate the short tendon attaching to the lateral side of the proximal phalanx of the thumb. Trace its proximal attachment to the tubercle of the scaphoid.
• Abductor pollicis longus. Ask the model to abduct and extend the thumb. Identify two tendons crossing the wrist joint just in front of the radial styloid. Abductor pollicis longus is the most lateral. Trace this tendon to the base of the metacarpal.
• Extensor pollicis brevis. This lies medial to abductor pollicis longus. Ask the model to extend and abduct the thumb. Trace the tendon to the base of the proximal phalanx.
• Note. Proximal to the radial styloid both tendons wrap posteriorly around the lateral surface of the radius and disappear deep between the other muscles.
• The first dorsal interosseous. Palpation is facilitated by asking the model to place the fingers on the upper surface of a table with the thumb over the edge running down the vertical section. Ask the model to abduct the index finger (to draw it laterally away from the middle finger). Palpate the contraction of the large muscle mass in the cleft between the thumb and index finger. Trace the muscle belly from its attachment at both the first and second metacarpals to its tendon which attaches distally to the lateral side of the base of the proximal phalanx of the index finger (Fig. 2.21a).
• The second dorsal interosseous. Ask the model to abduct the middle finger laterally (i.e. towards the index finger). Palpate the muscle fibres bulging between the proximal half of the second and third metacarpals.
• The third dorsal interosseous. Ask the model to abduct the middle finger medially (i.e. towards the ring finger). Palpate the muscle between the proximal half of the third and fourth metacarpals (Fig. 2.21d).
• The fourth dorsal interosseous. Ask the model to abduct the ring finger. Palpate the muscle between the proximal half of the fourth and fifth metacarpals.
• Abductor digiti minimi. Palpate the muscle on the medial side of the hand (see above).
Nerves (Figs 2.22 and 2.23)
Most of the upper limb is innervated by nerves via the brachial plexus. The nerve roots contributing to this plexus are C5, C6, 7, C8 and T1. The root of C5 may receive a contribution from C4 (pre-fixed plexus), while the T1 root may receive a contribution from T2 (post-fixed plexus). The roots combine to form three trunks: the upper, middle and lower trunks, each of which split into anterior and posterior divisions. The posterior divisions of all three join together to form the posterior cord. The anterior divisions of the upper and middle form the lateral cord. The anterior division of the lower forms the medial cord of the brachial plexus. It is from these cords that the majority of branches arise to be distributed to the whole of the upper limb. For a more detailed description see Palastanga et al (2002).
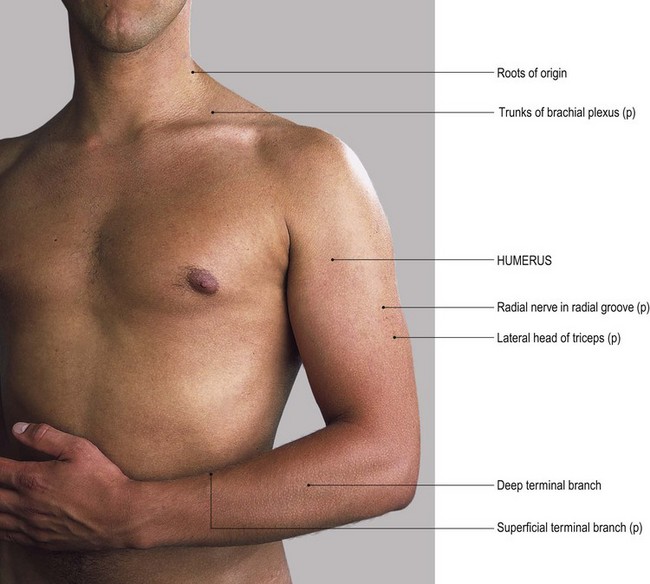
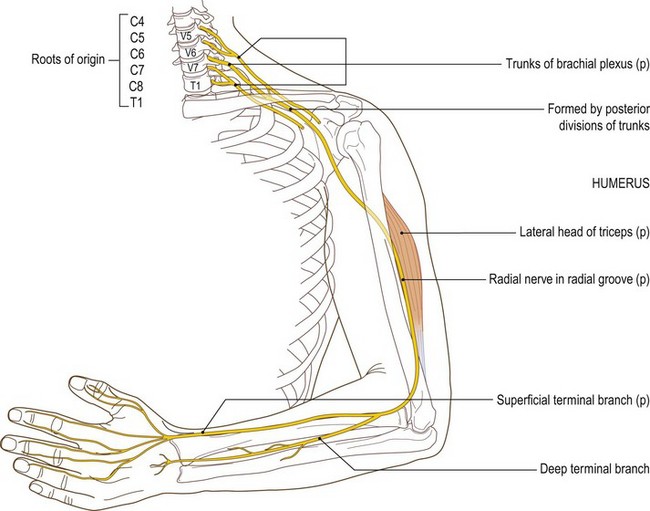
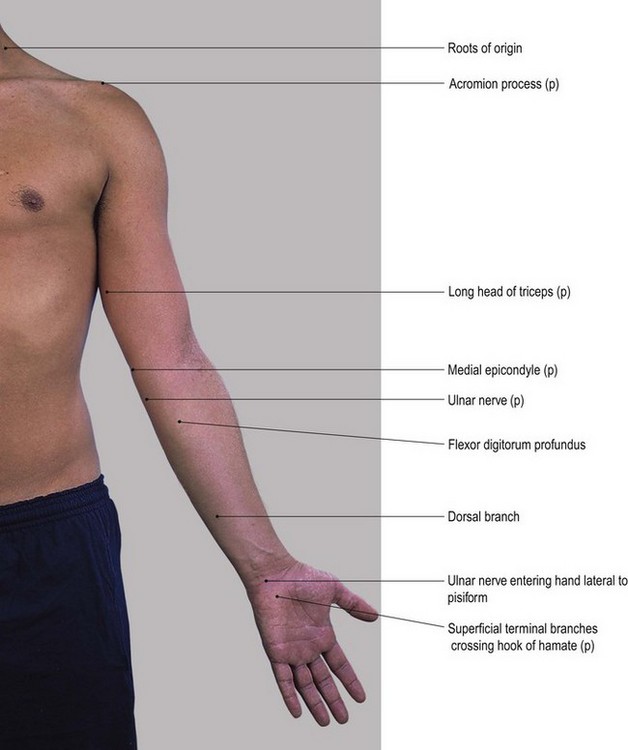
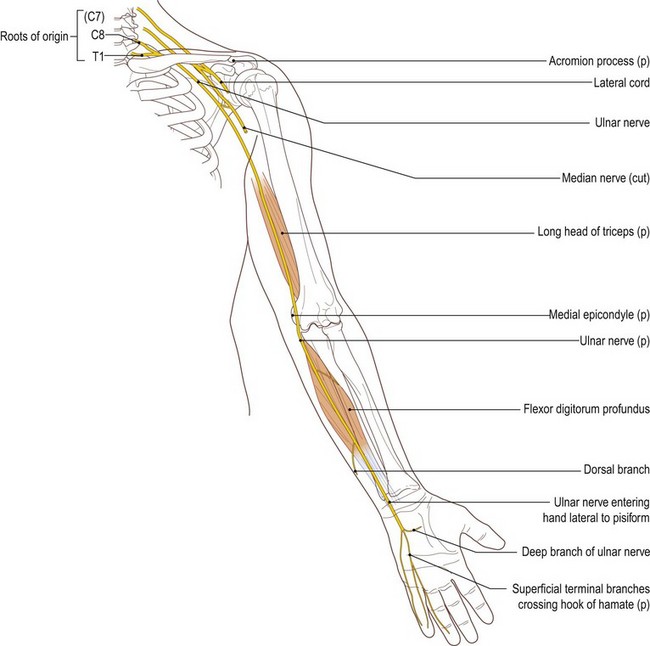
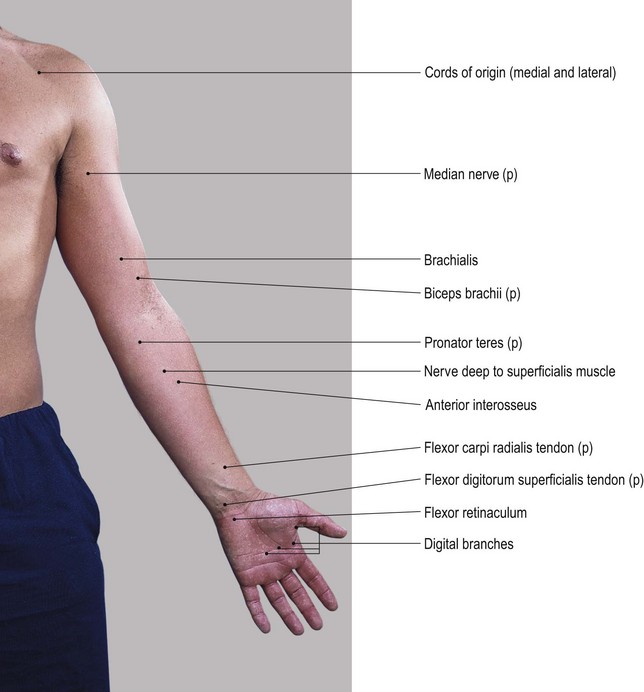
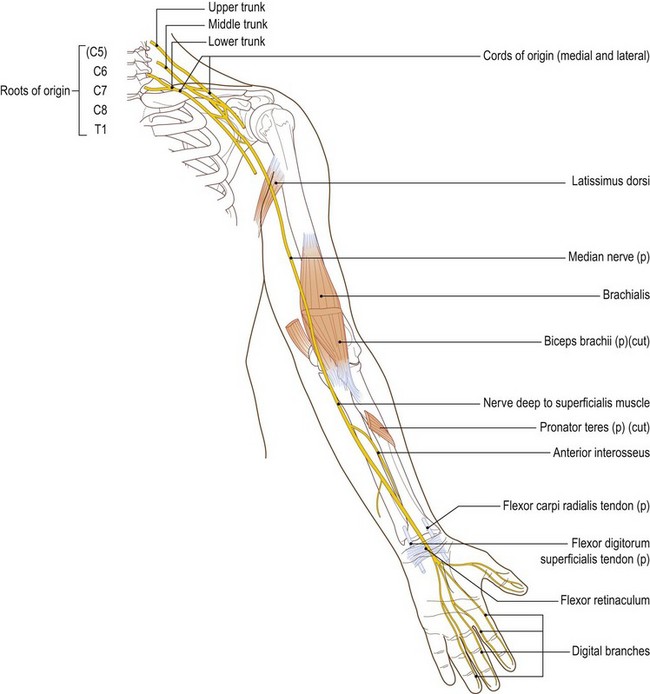
Palpation
Palpation of nerves must be performed with care. To the palpator, nerves appear as slippery cord-like structures which only occasionally become superficial, being mostly buried deep to other structures for protection.
• Note. Pressure on a nerve may elicit localized pain. Palpation may also produce a tingling sensation, pain or numbness over the area of its distribution. The accurate location of nerves is important, but over-palpation must be avoided as this may lead to unpleasant sensations.
For palpation in this area, the model should be in the sitting position.
• The trunks of the brachial plexus. Press your fingers into the depression above the medial end of the clavicle, just lateral to sternocleidomastoid. Palpate the trunks of the brachial plexus which appear as a bundle of tense cords running downwards and laterally.
• Note. Palpation in this area can be uncomfortable if you apply too much pressure.
• The radial nerve. Locate the groove approximately halfway down the lateral side of the arm, below the insertion of deltoid, running downwards and forwards. Palpation of the nerve is facilitated in the area just behind the groove. With care, roll the nerve against the humerus just anterior to the lateral head of triceps.
• Note. Anteriorly, the nerve enters a muscular groove between brachioradialis and brachialis, passing anterolateral to the elbow joint but too deep to be palpated.
• The superficial branch of the radial nerve. Take the model’s right forearm in your left hand with the thumb uppermost. Now glide the radial side of your right thumb up and down the lower end of the radius. You will feel the superficial branch(es) of the radial nerve rolling against the bone. Repeat this at variable points on the lower half of the lateral side of the radius as the nerve passes from under brachioradialis to its distribution on the back of the lateral side of the hand.
• Note 1. The nerve may be single or split into five divisions (Fig. 2.22).
• Note 2. Even though the superficial branches of the radial nerve lie superficially on the back of the hand, they are still difficult to trace.
• Branches of the brachial plexus (including the ulnar and median nerves). Press the pads of your fingers against the lateral wall of the axilla (the upper medial surface of the arm). Palpate the cord-like structures extending down the medial aspect of the arm. You will be able to palpate numerous branches of the brachial plexus surrounding the brachial artery, including the ulnar and median nerves on the medial side of the arm. They are not, however, easily identifiable.
• The upper section of the ulnar nerve. Locate the medial supracondylar ridge of the humerus with the medial epicondyle projecting medially. Move the tips of your fingers to the posterior aspect of this structure. Palpate the nerve behind the medial epicondyle as it passes from the medial aspect of the arm, over the medial collateral ligament of the elbow joint, to enter the forearm between the two heads of flexor carpi ulnaris.
• Note. Careful palpation is essential because the entire medial aspect of the arm is tender.
• The lower section of the ulnar nerve (Fig. 2.23a, b). Trace the nerve from the groove behind the medial epicondyle of the humerus, down the medial aspect of the elbow joint and medial side of the olecranon until it disappears under the fibrous arch of flexor carpi ulnaris. Follow its course down the medial aspect of the forearm deep to this muscle until approximately 7 cm above the wrist. Here it appears on the lateral side of the tendon before passing over the flexor retinaculum to enter the medial side of the hand.
• Note. You may find it difficult to palpate the nerve where it lies lateral to the tendon of flexor carpi ulnaris because it is often covered with a layer of fascia.
• The superficial branches of the ulnar nerve. You will be able to roll its two superficial terminal branches against the hook of the hamate just distal to the pisiform, deep in the hypothenar eminence.
• Note. This procedure will elicit a sensation of tingling over the anterior surface of the medial one-and-a-half digits.
• The median nerve. You will only be able to palpate this nerve in the arm, on the medial side of biceps just before it forms its tendon.
• Note. The nerve then passes under biceps tendon and retinaculum to enter the forearm. It is too well covered by flexor digitorum superficialis to be palpated in the upper forearm.
• The superficial section of the median nerve. Palpate the nerve where it becomes superficial and emerges from the lateral side of flexor digitorum superficialis to cross the wrist. You will feel it as a cord-like structure between the tendons of this muscle and those of flexor carpi radialis. It then disappears into the thenar muscles on the lateral side of the hand.
• Note. Because the median nerve passes through the same compartment as the tendons of flexor digitorum superficialis and profundus it can become compressed. This is commonly due to tightening of the flexor retinaculum or swelling of the synovial sheath surrounding the flexor tendons. This condition is referred to as ‘carpal tunnel syndrome’.
Arteries (Fig. 2.24)
Important preliminary notes
A different technique from that described for palpating other structures must be used when palpating arteries. As previously noted, your fingers should remain stationary when the tissue to be palpated is moving. When palpating arteries you should use only your fingertips. Never use your thumb because you could be misled by the pulse in your own thumb. This is due to the presence of the relatively large artery (princeps pollicis) which supplies its pulp. Although the index finger is commonly used, all the fingertips are extremely sensitive. Sometimes the fingers are placed along the line of the artery, as it may be concealed for a short distance by another structure. Very gentle, sensitive touch must be employed because too much pressure may compress the artery and prevent its pulsations.
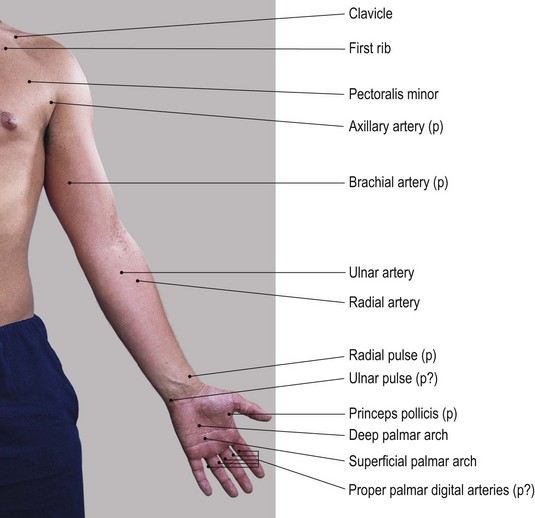

Palpation
For palpation in this region the model should be in the sitting position.
• Note. Palpation of arteries throughout the limb varies from individual to individual. It is modified by such factors as:
• Note. The blood supply to the upper limbs is via the left subclavian artery, directly from the arch of the aorta, and the right subclavian, via the brachiocephalic trunk. All of these arteries are too deep to palpate, except where the subclavian passes over the first rib.
• The subclavian artery. Carefully palpate the pulsations of this artery just posterior to the mid-point of the clavicle, behind the insertion of scalenus anterior to the first rib.
• The axillary artery. As the subclavian artery passes into the axilla it becomes the axillary artery. Palpate the artery behind the anterior and against the lateral wall of the axilla by pressing gently upwards and laterally with your fingers.
• Note. This may prove uncomfortable for the model because the cords of the brachial plexus may intervene.
• The brachial artery. Carefully trace the pulsations of the artery down the medial side of the arm where its upper part lies in a furrow anterior to coracobrachialis, in its upper part, and medial to biceps and its tendon in its lower part.
• Note 1. If you apply too much pressure, discomfort will be experienced throughout the the whole length of the artery. This is because the ulnar nerve lies superficial to the artery in its upper half and the median nerve lies superficial to it in the lower half of its course.
• Note 2. The artery becomes easier to palpate just prior to passing under the bicipital aponeurosis in front of the elbow joint, but even here it can remain quite elusive.
• Note 3. It is at this point that the pulsation of the brachial artery is auscultated with a stethoscope when taking blood pressure.
• The brachial artery divides into the radial and ulnar arteries just below the line of the elbow joint. These are both well covered by muscle and difficult to palpate until they emerge from between the tendons proximal to the wrist.
• The radial artery 1. This is the easiest artery to palpate. Wrap your hand around the back of the model’s wrist. Rest your fingertips on the lower end of the anterior border and styloid process of the radius. The artery lies in a groove between flexor carpi radialis and the anterior border of the radius. Now move your fingers gently medially some 0.5 cm. Here, you will be able to identify the pulsation of the artery.
• Note. This technique should be practised regularly because it is the pulse that is most commonly checked during a medical examination.
• The radial artery 2. Palpate the artery on the lateral side of the scaphoid deep in the ‘anatomical snuff box’, between the tendons of extensor pollicis longus medially, and extensor pollicis brevis and abductor pollicis longus laterally.
• Note. This area is, however, quite tender if too much pressure is applied.
The ulnar artery is much more difficult to palpate in the region of the wrist and hand as it is covered by the palmar aponeurosis. Nevertheless, its pulsations are recognizable just lateral to the pisiform bone. It then passes deep into the palm as the superficial palmar arch, too deep to be palpated.
Branches of the radial and ulnar arteries
Throughout the hand, small branches of the radial and ulnar arteries can be palpated by an experienced practitioner beyond the superficial and deep palmar and carpal arches.
• The posterior metacarpal arteries. Palpation of these arteries is possible between the metacarpal bones, especially at their bases.
• The palmar digital arteries. Palpate the pulsations of the very slender proper palmar digital arteries on each side of the palmar aspect of each finger. These become clearer beyond the cleft of the fingers.
• The dorsal digital arteries. Situated on either side of the dorsum of each finger. These are less obvious.
• The princeps pollicis artery. Palpate the pulsations of this artery in the cleft between the thumb and index finger. Trace this relatively large artery up the anteromedial side of the thumb, particularly opposite the proximal phalanx.
• The radalis indicis artery. Palpate this artery on the lateral side of the metacarpal of the index finger, running up the dorsolateral side of the finger.
• The posterior carpal arch arteries. It is sometimes possible to palpate these arteries as they cross the posterior aspect of the carpus, just below the level of the wrist joint. This will only be possible in those subjects who have good strong pulsations and thin fascia.
Veins (Fig. 2.25)
For convenience, the veins of the upper limb are divided into two groups: deep and superficial. The deep veins tend to follow the arteries deep within the limb, whereas the superficial veins lie within the superficial fascia forming a variable network. All veins in the upper limb possess valves, more numerous in the deep than in the superficial veins. The function of the valves is to facilitate venous return to the heart.
Palpation
The superficial veins are extremely difficult to palpate as they are normally thin-walled, variable in position, concealed within the superficial fascia and possess low internal pressure. Thus, only a few of the superficial veins are palpable in the normal limb. The deep veins are impossible to palpate.
Gentle brushing of the skin surface may be all that is required to indicate the course of superficial veins. Some veins merely show as a bluish line just below the skin, while others are accompanied by raised areas. The appearance of the veins varies considerably in individuals. These variations are dependent on such factors as sex, body weight and age. In males the veins are usually more prominent. In individuals classified as obese, they are more difficult to find. Veins tend to show more clearly in elderly subjects, as the fascia becomes thinner and the veins themselves become tortuous and distended.
Superficial drainage
• The cephalic vein (Fig. 2.25). Trace the vein from the posterolateral aspect of the dorsal venous network. From there it passes upwards around the lateral border of the forearm anterior to the head of the radius. It then ascends on the lateral side of biceps brachii to the groove between deltoid and pectoralis major (Fig. 2.25a, b). It ends in the infraclavicular fossa where it pierces the clavipectoral fascia to join the axillary vein.
• Note. Proximal to the head of the radius the vein is more difficult to identify.
• The basilic vein (Fig. 2.25). Trace the course of the vein from its beginning on the medial side of the dorsal venous network. It then passes up the medial aspect of the forearm, coming to lie anterior to the medial condyle of the humerus. It continues up the medial side of the arm, piercing the deep fascia, near the insertion of coracobrachialis, to accompany the brachial vessels before becoming the axillary vein.
• Note. The distal half of the vein can usually be palpated, whereas proximally it may only appear as a bluish line.
• The veins of the forearm. On the front of the forearm there is normally a midline vein, the median antebrachial, which commonly joins with the median cubital vein. The median cubital vein itself passes across the cubital fossa, uniting the cephalic and basilic veins. You should be able to palpate all of these veins. Palpation is facilitated if you apply pressure to the inner aspect of the arm.
• Note 1. The position and size of these veins varies considerably in individuals.
• Note 2. Compression of these superficial veins is easily achieved if you apply light pressure with your finger or thumb. This will emphasize the vein distal to the point of compression and may, on larger veins, indicate the position of the valves.