4 The head and neck
At the end of this chapter you should be able to:
1. Find, recognize and name the constituent components of the external surface of the skull, noting their size and position.
2. Palpate many of the bony features, being able to relate one to another.
3. Locate, name and palpate the bony and cartilaginous structures at the front of the neck.
4. Recognize and palpate bony landmarks of the cervical spine.
5. Name all the joints of the skull, recognizing the bones which form them.
6. Palpate and trace the lines of the sutures and joints of the skull and cervical spine, where possible, indicating their bony landmarks and surface markings.
7. Describe or carry out any accessory movements possible, noting the ranges in which they are most evident.
8. Note the range of movement of the cervical spine and indicate the factors limiting the movement.
9. Give the class and type of each of the joints.
10. Name and demonstrate the action of all the muscles palpable in the head and neck.
11. Draw the shape of the muscle on the surface and palpate its contraction.
12. Name all the main cutaneous nerves supplying the head and neck, giving their distribution.
13. Name the main arteries of the head and neck, giving their course and distribution.
14. Name the main veins of the head and neck, noting their drainage areas and course.
Bones
The skull
Superior aspect (Fig. 4.1a)
The skull, viewed from above, is shaped like a flattened egg. It is broader across the posterior dimension and narrower across the anterior dimension. Its length, from front to back, is normally almost twice its breadth from side to side.
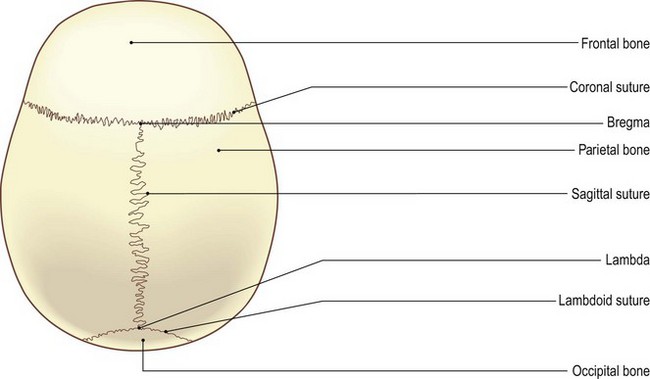
It comprises the frontal, two parietal [paries (L) = a wall] and part of the occipital [occipitum (L) = the back of the head] bones. Viewed from above, the frontal bone makes up the anterior section, forming approximately one-third. The two parietal bones form most of the posterior two-thirds. The occipital bone fits into just the central posterior part of the skull.
The frontal bone joins the anterior borders of the two parietal bones at the coronal [corona (L) = crown] suture which runs transversely across the skull. The intersection of all three bones is known as ‘bregma’ [brechein (Gk) = to moisten, the most humid and delicate part of the infant’s brain]. The two parietal bones join at the sagittal [sagitta (L) = an arrow, the direction in which an arrow would pass through the body] suture, which runs anteroposteriorly along the centre of the skull.
The posterior borders of both parietal bones meet the anterior border of the squamous part of the occipital bone at the lambdoid [lambda = the Greek letter ‘L’] sutures. The point at which all three bones meet is termed ‘lambda’.
Palpation
The skull is covered, superiorly, by a fibromuscular sheet (aponeurosis) from the eyebrows anteriorly to the external occipital protuberance and the superior nuchal lines posteriorly. This is thick and adherent to the skin covering the skull but only attached to the pericranium by areolar tissue. This gives it a certain amount of freedom to move over the skull. It is continuous laterally with the temporal and zygomatic fascia.
Due to this arrangement and the fact that there is normally a covering of hair, palpation of the bones, sutures and landmarks of the skull requires a slightly different technique if exact location is required. Use all the fingertips of both hands to locate and mark the structures, using a gentle forward and backward motion, moving the aponeurosis on the underlying bone.
For palpation in this region, the model is in the sitting position.
• The sagital suture. Place your fingers anterior and posterior to the vertex of the skull. On pressing the tips in and moving them from side to side, the sagittal suture can be palpated, particularly posteriorly.
• The point of lambda. Halfway between the vertex and the external occipital protuberance a hollow can be felt with two sutures running downwards and laterally in front of the occipital bone. This is the point ‘lambda’.
• The point of bregma. Moving approximately 5 cm forwards from the vertex there is another palpable slight hollow with the coronal suture running laterally to either side. This point is termed ‘bregma’.
• The frontal bone (forehead). In front of the coronal suture the frontal bone can be palpated, sometimes with a central raised line where the two bones have fused.
• The parietal bones. Either side of the sagittal suture, behind the frontal bones and in front of the occipital bone, are the two large plates of the parietal bones.
Posterior aspect (Fig. 4.1b, c)
The posteroinferior part of the skull consists mainly of the occipital bone. On either side it joins the temporal bones, each of which has a large downward-projecting prominence termed the mastoid [mastos (Gk) = a breast, oeides (Gk) = shape] process. Superiorly the occipital bone joins the two parietal bones forming the vault of the skull. Its anterior portion forms the base of the skull, surrounding the foramen magnum and projecting forwards as the basilar section.
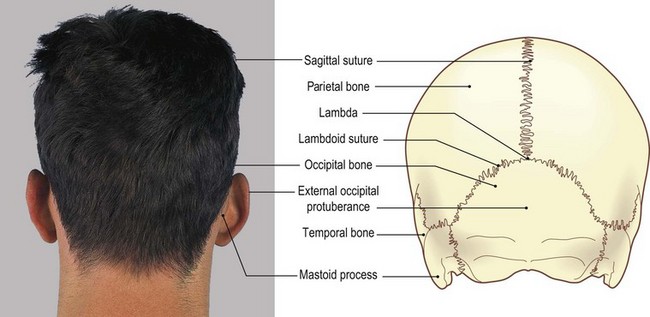
Posteriorly, at its apex, the occipital bone fits between the two parietal bones at the point lambda. Running downwards and laterally from this point, the two lambdoid sutures divide the occiput from the two parietal bones. The bone presents a large tuberosity, about 5 cm below the point lambda, termed the external occipital protuberance, with superior, middle and inferior nuchal lines radiating laterally. The external occipital protuberance varies considerably in its size, being very prominent in some and almost non-existent in others.
Palpation
• The external occipital protuberance. The most prominent bony feature of the posterior aspect of the skull is the external occipital protuberance situated just below its centre. It varies in size and shape between individuals, being large and prominent in some and difficult to find in others.
• The superior nuchal lines of the occipital bone. Radiating laterally and upwards from the external occipital protuberance are the two superior nuchal lines. (Nuchal: believed to come from Arabic ‘nugraph’ = the back of the neck.) These are palpable in their central section on most subjects, but are difficult to trace for more than a few centimetres laterally.
• The sagital suture. Approximately 5 cm above the external occipital protuberance the sagittal suture meets two occipitoparietal sutures. In the young child this is the region of the posterior fontanelle [fons (L) = small fountain or spring], which in the adult becomes the lambda.
• The occipital bone. Inferiorly the occipital bone can be traced forwards under the skull, but is soon lost in the deep hollow at the level of the tubercle of the first cervical vertebra.
• The mastoid process of the temporal bone. Moving to either side, just behind the pinna of each ear, the mastoid process of the temporal bone can be palpated. It is pointed at its inferior aspect where the sternocleidomastoid muscle attaches.
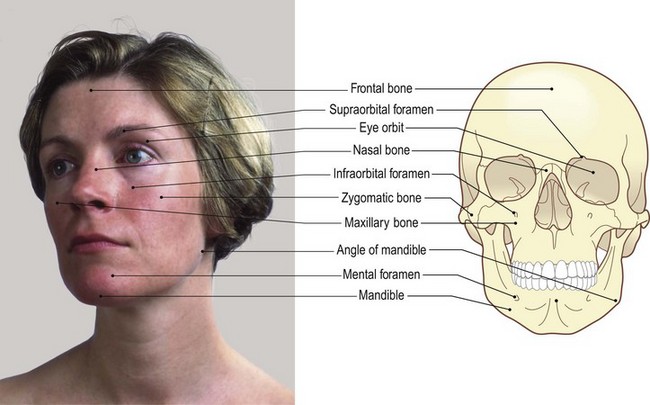
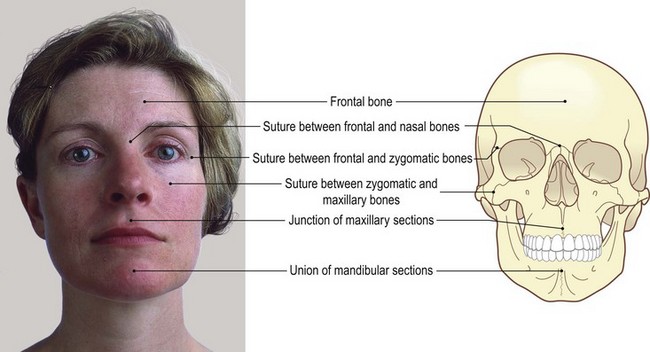
Anterior aspect (Fig. 4.2a, b)
Each eye orbit is formed superiorly by the frontal bone (which forms the forehead), laterally by the zygomatic bone, medially by the nasal bone and inferiorly by the maxilla. The upper teeth are associated with the maxilla, while the lower teeth are located in the superior border of the mandible.
Palpation
• The eye orbit. Deep to the eyebrow the upper rim of the eye orbit can be palpated, being slightly notched at its centre where it is crossed by the supraorbital artery. The whole margin of the orbit is subcutaneous and can thus readily be palpated.
• The two nasal bones. These can be palpated centrally, projecting forwards and continuing as a cartilage down to the centre of the nose.
• The upper part of the maxilla. Below this, the upper part of the maxilla can be palpated, investing the upper teeth.
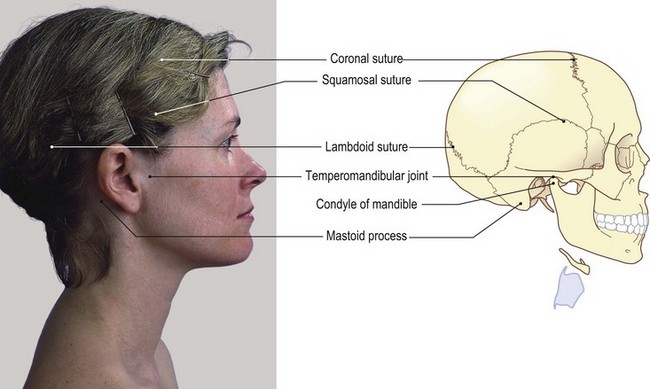
Lateral aspect (Fig. 4.2c, d)
The temporal [tempus (L) = time (pertaining to the passing of time and the greying of the temples)] bone forms the central area on the side of the skull. Posteriorly it articulates with the occipital bone, superiorly with the parietal bone and anteriorly, with the sphenoid [sphen (Gk) = a wedge] and zygomatic [zygoma (Gk) = a yoke or bar] bones.
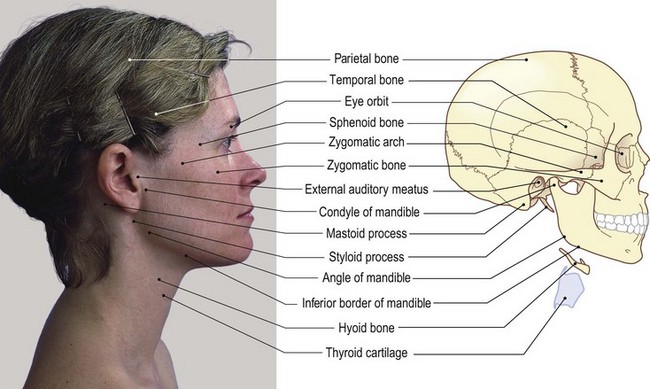
The anterior section of the lateral aspect consists of the frontal bone and the maxilla, with the lateral part of the ethmoid [ethmos (Gk) = a sieve] just projecting between the sphenoid and frontal bones. Inferiorly the mandible [mando (L) = I chew] articulates by its condyle with the undersurface of the temporal bone just anterior to the external auditory meatus [meatus (L) = a passage].
Palpation
• The external auditory meatus. This is an obvious landmark on the lateral side of the head. The little finger can be pressed deep into this opening to be surrounded by its bony walls. The pinna lies around three sides, while the tragus is the pointed area of soft tissue overlapping the meatus from the front.
• The zygomatic arch. Running horizontally forwards just anterior to the tragus [tragos (Gk) and tregus (L) = a goat (possibly pertaining to the shape of a goat’s beard)], a bony bridge can be palpated. This is the zygomatic arch. It forms the point of the cheek at the front where it joins the zygomatic bone (Fig. 4.2c, d). The arch is formed partly from the temporal and partly from the zygomatic bones.
• The condyle of the mandible. Below the posterior part of the zygomatic arch anterior to the tragus a small tubercle can be palpated. This is the most lateral part of the condyle of the mandible. If the model opens the mouth, this bony prominence can be felt, first rotating then moving forwards and downwards over the articular eminence of the temporal bone.
• The angle of the mandible. Some 7 cm directly below the condyle of the mandible, the angle of the mandible can be identified, being more prominent in men than in women as it is slightly everted.
• The inferior border of the mandible. This can be traced forward to a raised vertical line centrally at the front, where it joins the bone of the opposite side.
• The mental tubercle. A small tubercle (the mental tubercle) can be palpated on the inferior border either side of this line.
• The anterior and lateral surfaces of the mandible. These are subcutaneous and can be traced posteriorly as far as the angle where they are hidden by the powerful muscles of mastication. The lower border is thickened all round, giving a concave appearance to the anterior surface.
• The maxilla. Below the zygomatic bone the maxilla can be palpated, with the teeth and gums easily identifiable through the flesh of the cheek and the upper lip.
The neck
Anterior aspect (Fig. 4.3a, b)
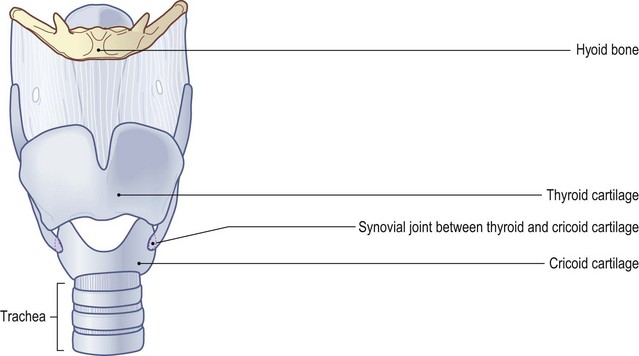
A series of midline structures run down the anterior aspect of the neck. These are part of the respiratory tract. Just below the mandible is the small horseshoe-shaped hyoid bone [hyoeides (Gk) = U-shaped, i.e. shaped like the Greek letter ipsilon]. Below, the thyroid [thyreos (Gk) = a shield] cartilage is formed from two cartilaginous plates which are fused anteriorly to form the ‘Adam’s apple’ (prominent in the male) and the thyroid notch.
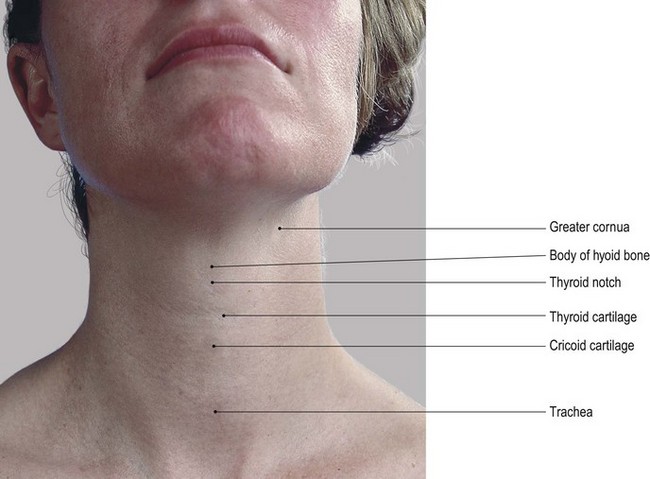
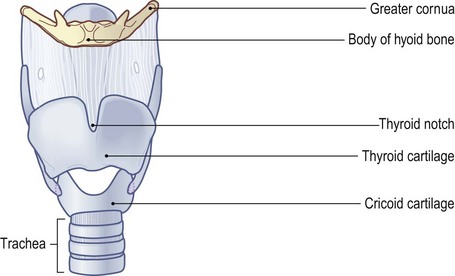
Behind the sternal notch lie the upper rings of the trachea [trachys (Gk) = uneven]. Interestingly, Aristotle mistakenly thought that this structure was an uneven surfaced artery. Between the upper ring and the thyroid cartilage lies the thicker and stronger signet-shaped ring of the cricoid cartilage [krikos (Gk) = a ring].
The larynx, formed mainly from the thyroid and cricoid cartilages, lies centrally at a level with the third to the sixth vertebral bodies and between the two sternomastoid muscles which converge from above downwards.
The mandible, hyoid bone, thyroid and cricoid cartilages, and the upper part of the trachea are all linked by muscle and ligaments. They provide the tube for air to enter the lungs: ‘the windpipe’.
Palpation
It is quite unpleasant, and often frightening, to have these structures palpated by another person. It is therefore advisable to perform the palpation on yourself.
• The hyoid bone. Place the fingers and thumb of one hand on either side of the mandible halfway along its inferior border. Then slide your fingers and thumb down on to the sides of the throat. Some 3–5 cm below the mandible, you will feel the hyoid bone lying almost horizontal. It will appear as a horseshoe-shaped structure, rounded and thicker anteriorly and becoming pointed on either side posteriorly as it curves upwards slightly. This is the greater wing (cornua). Gentle pressure applied to either side will confirm its bony consistency.
• The laminae of the thyroid cartilage. Continue down the sides of the neck from the hyoid. After crossing a small space (felt as a depression), you will encounter the broad flat lamina of the thyroid cartilage on either side. Each lamina is angled medially so that they meet in the midline anteriorly.
• The larynx. A marked projection (the laryngeal prominence), more pronounced in men, can be felt superiorly in the midline. This projection is commonly referred to as the ‘Adam’s apple’.
• The thyroid notch. Now place your finger on the anterosuperior aspect of this prominence. You will identify a small space, concave upwards: this is the thyroid notch.
• The cricoid cartilage. Trace down the sides of the thyroid cartilage for about 4 cm to a line just above the level of the medial ends of the clavicles. Here, after crossing another small space, you will palpate a further ring-shaped structure. This is the cricoid cartilage which presents with a small tubercle at its centre.
• The trachea. Below the cricoid cartilage and deep in the supra-sternal (jugular) notch you can palpate the cartilaginous rings of the upper part of the trachea.
• Note. Each of the structures identified above can be taken between the finger and thumb of the same hand and carefully moved from side to side for a distance of about 1 cm. Too much side movement can, however, lead to tenderness in this part of the neck. During swallowing, each of the structures rises and then falls approximately 1 cm.
• The sternocleidomastoid muscle. This muscle can be felt on either side of these central structures. This is facilitated if the model adopts the supine lying position. Ask the model to raise the head from a pillow. These muscles are widely spaced at the level of the hyoid bone but become much closer together as they approach the level of the clavicles.
Posterior aspect (Fig. 4.4)
There are seven cervical vertebrae. Except for C1 (the atlas [derived from atlao (Gk) = I sustain]), C2 (the axis [axis (L) = a pivot or axle]) and C7, they all exhibit similar characteristics: small oval bodies, large vertebral canal, long laminae, a bifid spine and a broad transverse process with a foramen transversarium.

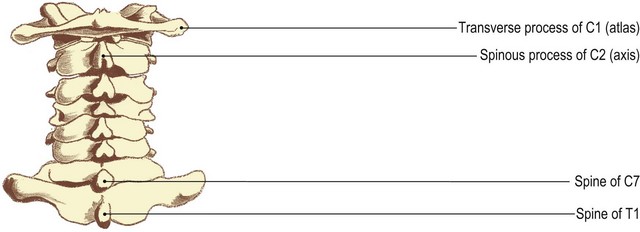
C1 does not possess a body, but has two lateral masses to support the weight of the head transferred via the occipital condyles. It has a posterior tubercle instead of a spine and its transverse processes are wide and relatively pointed.
C2 has a tooth-like process projecting superiorly from its body, the dens or odontoid [ódous (Gk) = tooth) peg, a large prominent spine and small transverse processes. The seventh cervical vertebra is noted for its long non-bifid spine (vertebra prominens).
Palpation
For palpation of the neck, the model is in the prone lying position with the forehead resting on the backs of the hands on a pillow to facilitate maximum relaxation. The chin should be tucked in slightly and the neck straight.
• The external occipital protruberance. Begin the palpation by finding the external occipital protuberance, with the raised crescentic superior nuchal lines curving laterally.
• The external occipital crest. Running inferiorly and under the back of the skull from the protuberance, you can palpate the external occipital crest It ends at a deep hollow which is level with the tubercle of the atlas (not palpable). The hollow is bounded below by the large prominence of the spine of the axis. This is approximately 3 cm below the external occipital protuberance.
• The spine of the axis. This is easy to find and can be used for identification and location of other bony features.
• The spines of C3–C4. Below, the spines of C3, C4 and C5 are closely packed together due to the curvature of the spine at this point. The spine of C3 lies close under the spine of C2 and is therefore difficult to palpate. The spine of C4 is often mistaken for that of C3.
• The spine of C5. Just above the spine of C6, that of C5 is identifiable, being very close to that of C4.
• The spines of C5–T1. Progress to the lower part of the cervical spine where you will feel two, clearly prominent, spinous processes. They are close together and rigid to the touch. The lower of the two is the spine of T1; that just above is the spine of C7. The spine of C6 stands out clearly above that of C7 and can at times be mistaken for it.
• The spine of C7. Differentiation between the spines of C6 and C7 is achieved by asking the model to extend the head and neck while keeping your finger on the spine of C6. This spine tends to move forward, causing it to disappear from beneath the palpating finger, while the spine of C7 remains stationary.
• Note. It would be expected that flexion of the neck would improve identification. Unfortunately, except for the spines of C7 and T1, this is not the case as the tightening ligamentum nuchae hides the spines. The spines of C3, C4, C5 and C6, although difficult to identify separately, appear broad due to their bifid nature (Fig. 4.4).
Lateral aspect (Fig. 4.5)

Palpation
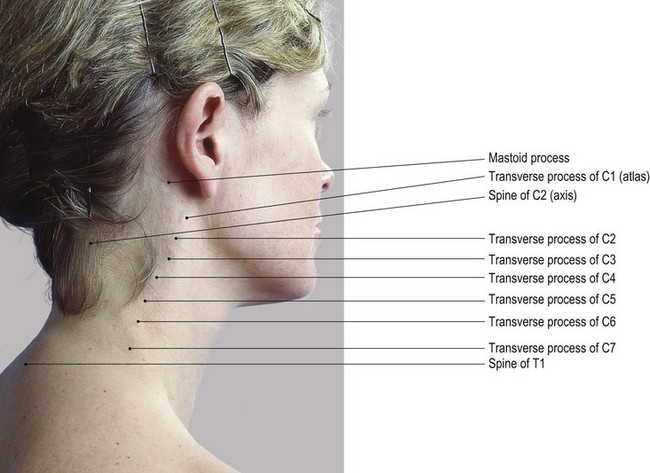
• The transverse processes of the cervical vertebrae. Although the transverse processes of the cervical vertebrae appear to project well out to the side, they are in fact quite difficult to palpate and identify.
• The tip of the transverse process of C1. It is possible to palpate the tip of the transverse process of C1 between the angle of the mandible and the tip of the mastoid process. In some subjects, the transverse process of C1 is not only palpable but also visible, as a small prominence. In others, it is difficult to identify even on deep palpation.
• Note. This region can be quite tender if too much pressure is applied and care must be taken to avoid the long and narrow styloid process just deep and anterior to the mastoid process.
• The transverse processes of C2–T1. The other transverse processes, with the exception of C2, present a double point laterally, the anterior and posterior tubercles, but owing to muscle attachments and fascial coverings they are not easy to distinguish. You can identify the line of the transverse processes from the back by easing your fingers into the side of the neck some 2 cm anterior to the tips of the spines. With care, you will be able to palpate the lower articular pillar of the vertebra above, lying medial to each posterior tubercle. This is at the inferior limit of the facet (zygapophyseal) joint. Pressure on this tubercle will produce compression of the facet joint, whereas pressure just below the tubercle will produce an anterior movement of the lower articular pillar and slight gapping of the joint surfaces.
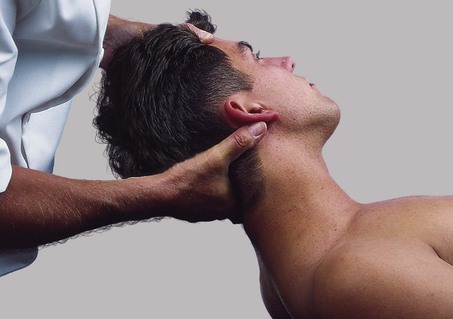
• The transverse processes – general. Normally the thick muscles covering the transverse processes need to be moved aside to facilitate palpation. More ‘feel’ of the transverse processes is possible if you ask the model to adopt a supine position. Stand at the head of the plinth, facing the model’s feet, and cradle the occiput in both hands. With the fingers of either hand resting on the posterolateral part of the neck, move the head from side to side. Apply gentle pressure to the transverse process with your fingers on the opposite side to that being examined. This opens up the side of interest with the space between the transverse processes increasing, facilitating their identification.
• The facet joints. The facet joints of this side are also being gapped, causing a greater convexity to the side being examined. You will notice that slight rotation to the opposite side occurs during this movement (see Fig. 4.7a, b). This technique can be used from C1 to T1.
• The transverse processes – anterior aspect. In the lower section of the neck, you can palpate these transverse processes from the front, although it is slightly uncomfortable. Occasionally, the costal element (the anterior segment of the transverse process) of C7 projects more anterolaterally than usual and can be palpated 2 cm above and 2 cm lateral to the medial end of the clavicle. This is often referred to as a ‘cervical rib’.
Joints
The skull (Fig. 4.6)
Most of the plates of bone which contribute to the vault of the skull are united by fibrous joints in the form of sutures. These are often visible on the surface and were described and palpated in the section on bones (see p. 150–153). Other suture lines which can be palpated are those between the parietal and temporal bones, between the temporal and zygomatic bones and between the two halves of the mandibles.
Palpation
• The first suture of the temporal bone. This lies at the upper edge of the squamous portion of the temporal bone. It arches convexly upwards from the depression just lateral to the eye orbit to just anterior to the upper part of the pinna of the ear. Ask the model to clench the teeth and palpate the temporalis muscle contracting above the zygomatic arch (see p. 153). At the curved upper part of this muscle, the line of the suture can be identified.
• The second suture of the temporal bone. This can be palpated approximately halfway along the zygomatic arch. Run your finger anteroposteriorly where the suture can be felt as a raised ridge crossing the arch vertically.
• The suture of the mandible. This can be palpated between the two halves of the mandible, running vertically downwards from the centre of the lower lip to the inferior border between the two mental tubercles. It is often marked by a sharp ridge.
Accessory movements of the joints of the skull
In the unborn child and infant these plates of bone can allow considerable movement and, on occasions, even override each other. There is slight movement throughout childhood and early adult life, but from the twenties through to middle age there is gradual fusion of the various sutures, beginning with the sagittal suture (Palastanga et al 2002). Some authorities believe that the movement of one plate of bone on another influences the structures below and can be used as a therapeutic technique.
The temporomandibular joint (Fig. 4.6c, d)
This is a bicondylar articulation taking place between the mandibular fossae of the temporal bone and the condylar processes of the mandible, the two joints being linked by the mandible.
Palpation
surface marking
• The joint line. From the tragus of the ear, trace forwards under the posterior section of the zygomatic arch for 2 cm, where a small tubercle on the condyle of the mandible can be palpated. The line of the joint lies just above this tubercle, running forwards for approximately 2 cm concave downwards posteriorly and convex downwards anteriorly. Ask the model to open the mouth; the joint line then becomes clearer as the condyle first rotates and then moves forward on the undersurface of the temporal bone.
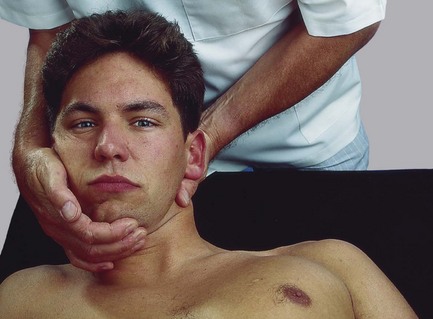
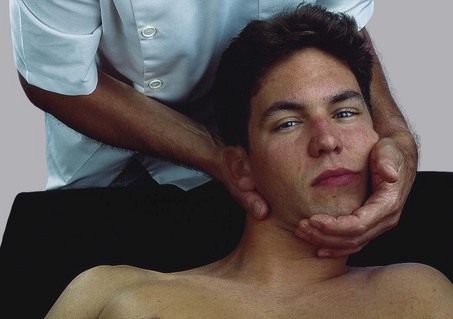
Accessory movements
This joint is capable of many physiological movements, mainly involved in mastication. Its only true accessory movement, however, is distraction.
Palpation on movement
• Distraction. This can be produced by placing the thumbs in the mouth on the lower molar teeth on both sides, with the fingers of each hand supporting the underside of the mandible from outside. Downward pressure is then applied to the teeth via the thumbs, using the fingers to hold the anterior part of the mandible stationary. This creates the necessary leverage to pull the condyles away from the temporal bone. Complete relaxation of the muscles of mastication is essential for any gapping to occur.
The cervical spine (Figs 4.7 and 4.8)
With the exception of the joints between the occiput and C1, and C1 and C2, the cervical vertebrae articulate by a series of fibrous discs centrally, synovial zygapophyseal joints between the articular processes laterally, and synovial uncovertebral joints between the lateral margins of adjacent vertebral bodies.
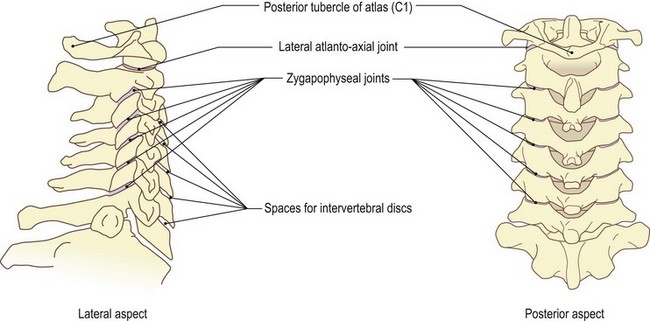
The occipital condyles either side of the foramen magnum articulate with the facets on the superior surface of the lateral masses of the atlas (C1) as a bicondylar joint. The atlas articulates with the axis (C2) via plane joints either side of the dens and a single central pivot joint between the dens and the anterior arch of the atlas, in front, and with the transverse ligament, behind. All of these are synovial joints.
Palpation
It is difficult to palpate any joints in the cervical region owing to their depth and location. Movements of many can be achieved by pressure on the bones that take part, but actual joint lines are normally impossible to determine and feel.
• Joint lines. Find the articular pillars of C2–C7 lying 2 cm lateral to the spines (see p. 164). With deep but sensitive palpation, the lines of the lower zygapophyseal joints can just be detected level with the tip of the spinous process of the same vertebra.
Accessory movements
• Traction on the cervical spine (C2–C7), either mechanically or manually, is a true accessory movement, as it is a movement that the subject cannot perform alone. It can be carried out in extension, flexion, rotation or any combination of these, depending on the results required. It produces parting of the surfaces of the zygapophyseal and central joints with a stretching of the disc, the surrounding ligaments and muscles. There will be a decrease in the pressure within the disc, and an increase in the size, particularly in flexion, of the intervertebral foramen, through which the cervical nerves emerge.
• Traction on the joints between the occiput, C1 and C2. This is best obtained when the neck is slightly extended. Its use, however, is normally restricted as it can produce undesirable and dangerous effects, due to the complex nature of these joints, particularly concerning the ligaments around the dens. The ligaments remain taut in all movements, thereby maintaining the relationship of the dens with the atlas and occiput. Accessory movement, necessary for gliding to occur, is only possible because of the precise curvatures of the articular surfaces.
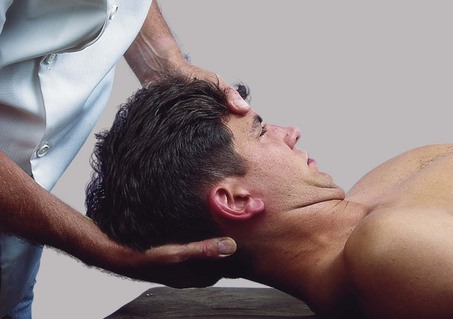
• Sideways movement of the neck. The model is in the supine lying position in which a sideways movement of the whole neck can be achieved. Hold the head between both hands and move it from side to side while maintaining its longitudinal position (Fig. 4.7a, b).
• Forwards and backwards movement. A similar movement forwards and backwards can also be achieved. Place one hand over the forehead and the other hand behind the occiput. Move the head forwards and backwards, again maintaining its longitudinal position (Fig. 4.7c, d).
• Localization of the side-to-side movement. Using a sagittal axis, passing through the nose, the side-to-side movement can be localized to the joints between the condyles of the occipital bone and the lateral masses of the atlas.
• Localized forwards and backwards movement. Using a frontal axis through the centre of the skull, localized forward and backward gliding can also be achieved (Fig. 4.7c, d).
Other movements of the cervical vertebrae, often considered to be accessory movements, are very similar to normal physiological movements. Nevertheless, certain elements are exaggerated and therefore worthy of note.
• Forward gliding of a vertebra on its neighbour. The model is in the prone lying position. In this position, forward gliding of a whole vertebra on its neighbour can be achieved by pressure applied with your thumbs on the tip of the spinous process. Movement is greatest around C4 and least between C7 and T1. Pressure on the spine of C2 produces no movement between C1 and C2, as the dens is in contact with the anterior arch of C1; however, slight forward gliding will be achieved between the occiput and C1, due to the two bones moving together.
• Forward gliding of the inferior articular surface. Pressure on the inferior articular pillar of C3–C7 produces a forward gliding of the inferior articular surface and a slight gapping of the superior zygapophyseal joint in a rotation-type movement.
• Forward gliding of the lateral mass. If a similar pressure is applied to the posterior aspect of the transverse process of C1, similar gliding of the lateral mass of that side against the occipital condyle and upper facet of C2 occurs.
• Side-to-side movement of the vertebrae. The model is in the supine lying position. Side-to-side movement of the vertebrae can be produced in this position. Cradle the head in your palms, as described on p. 163. Using your fingers of one side, apply pressure to the transverse process of the chosen vertebra. Your fingers of the opposite side will then feel the transverse processes opening up, as an accompaniment to the gapping of the zygapophyseal joint.
• Rotation of one vertebra on another. This can be taken to its limit if you carefully fix the lower vertebrae with your fingers and thumb and rotate the head with your other hand. These movements can be produced between any two cervical vertebrae, and even to some extent between the occiput and C1, producing gapping of their surfaces.
• Note. Most accessory movements of the cervical spine are difficult to perform without a great deal of knowledge and practice. It can be highly dangerous for an unskilled therapist to employ these procedures in this area, and it is recommended that the student must be carefully monitored by an experienced practitioner, who should test for contraindications prior to any movement being performed.
For further information, it is suggested that the reader consults the literature on manipulation and mobilization (Grieve 1986, Maitland 1991).
Anterior aspect of the neck
The hyoid bone and the thyroid and cricoid cartilages can all be moved from side to side approximately 1 cm using the finger and thumb alternately. They are linked by muscle and ligaments to the mandible and temporal bone above and the upper trachea below.
Between the inferior cornua of the thyroid cartilage and the arch of the cricoid cartilage are small synovial joints which can be located just above the posterior projections of the cricoid cartilage. These possess a capsule and can, at times, give pain and distress when they become inflamed or degenerated.
Muscles
Muscles of facial expression (Figs 4.9–4.11)
The muscles associated with the skull are mainly situated anteriorly, where they produce facial expressions, and laterally, where they produce the movements of mastication. The muscles are, however, very difficult to palpate unless they are contracting. Most muscles of the face arise from broad bony and fibrous attachments and pass to the fascia deep to the skin.
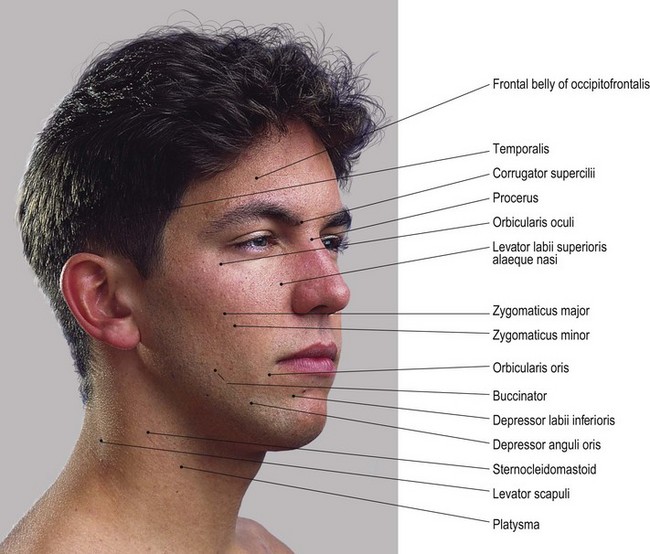
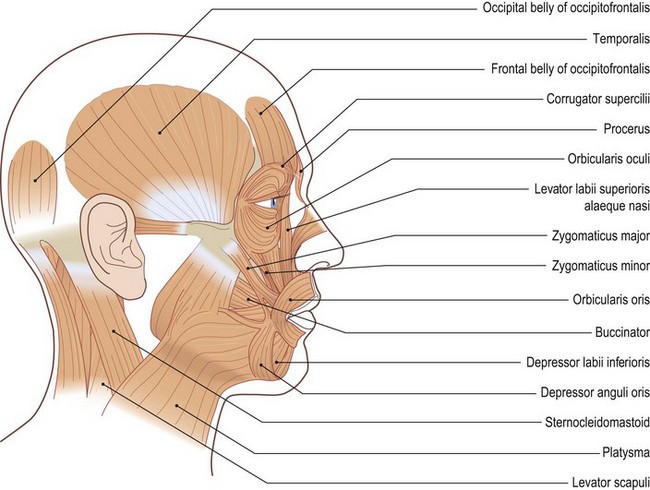
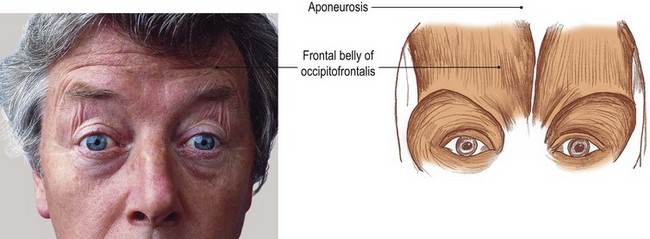
Fig. 4.10 (a, b) Muscles raising the eyebrows (surprise). Frontal belly attaches to the fascia over the upper eye orbit. Posterior belly attaches to the lateral two-thirds of the superior nuchal line. Both bellies attach superiorly to the aponeurosis covering the scalp
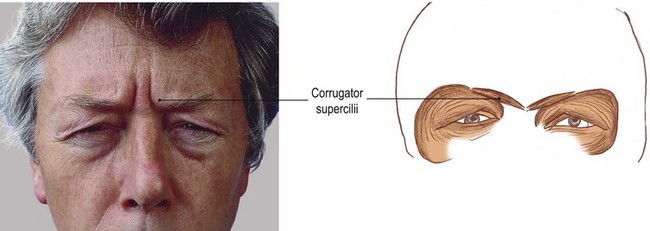
Fig. 4.10 (c, d) Muscles drawing the eyebrows together (frowning). Medially attaches to bone at the medial end of the superciliary arch. Laterally attaches to the skin over mid point of the eye orbit
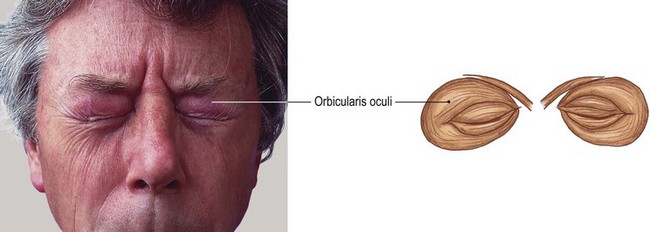
Fig. 4.10 (e, f) Muscles closing the eyes. Elliptical muscle attaching to the bone surrounding the eye orbit
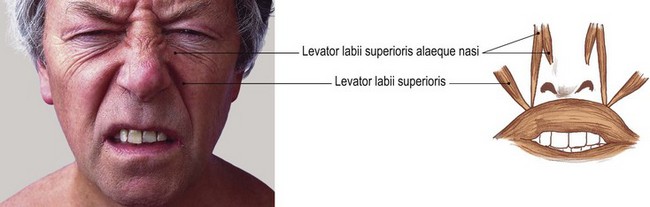
Fig. 4.10 (g, h) Muscles raising the upper lip and opening the nasal cavity (sneering). Levator labii superioris alaeque nasi attaches above to the maxillary bone and below to the greater alar cartilage and skin covering it. Levator labii superioris attaches above to the maxilla and zygomatic bone and below to the upper lip halfway between the angle of the mouth and the mid point
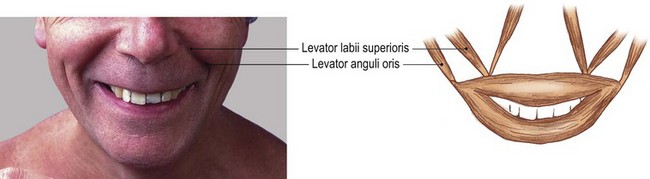
Fig. 4.11 (a, b) Muscles raising the corners of the mouth (smiling). The levator anguli oris attaches above to canine fossa just below the infraorbital foramen of maxilla and attaches below to the corner of the mouth
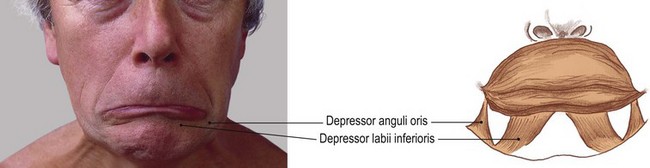
Fig. 4.11 (c, d) Muscles pulling the corners of the mouth and lower lip downwards (indicating sadness). Depressor anguli oris attaches to the mental tubercle of the mandible below and to the angle of the mouth above. Depressor labii inferioris attaches below to the oblique line close to the mental foramen and above to the centre of the lower lip
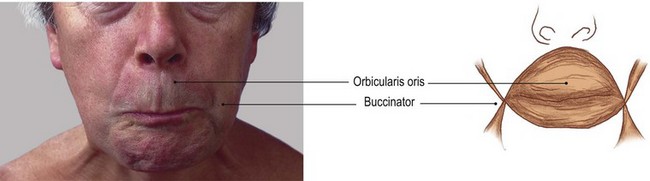
Fig. 4.11 (e, f) Muscles closing or pursing the lips. Orbicularis oris is a highly complex raphe of fibres surrounding the mouth composed of eight blending sections and functionally acting in four quadrants. In addition it receives fibres from all the surrounding muscles. Buccinator basically attaches to the molar area of the maxilla and mandible. Its fibres pass forwards, blending with the orbicularis oris, its upper fibres into the upper lip, its lower fibres into the lower lip, but its middle fibres crossing at the corners of the mouth
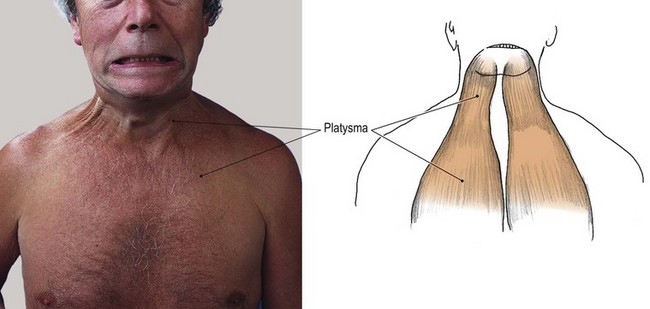
Fig. 4.11 (g, h) Muscles drawing fascia around the mouth downwards (protecting the structures in the neck and producing a snarling expression). Below it attaches to the fascia covering the upper part of pectoralis major and deltoid. Above it attaches to the inferior border of the mandible with some of its lateral fibres passing over to the lower lip and its medial fibres crossing over to the opposite side
Their attachments at both ends are normally highly complex, sending fibres to blend with surrounding muscles, thus influencing the action which produces the many expressions possible in the human face. Because of this complexity only the basic attachments will be given in this text, but enough to demonstrate the action of the muscle.
Palpation
For palpation in this region, the model is in the sitting position.
• The muscle bellies of occipitofrontalis (Figs 4.9 and 4.10a, b). These attach superiorly via a fibrous aponeurotic sheet which passes over the scalp. Anteriorly the muscle attaches to the upper margin of the fascia over the eye orbit and posteriorly to the superior nuchal line. Ask the model to raise and lower the eyebrow several times. The scalp can be felt moving forwards and backwards, with the posterior and anterior bellies contracting alternately.
• Corrugator supercilii (Fig. 4.10c, d). This muscle can be palpated above the nose at the medial end of the eyebrow. Ask the model to frown and palpate the short almost vertical ridges that are produced as the muscle contracts.
• Orbicularis oculi (Fig. 4.10e, f). This muscle closes the eye. The muscle can be palpated easily. Ask the model to close the eye. With your fingers gently resting on the eyelids, ask the model to squeeze the eyes shut tightly. A hard muscular covering can be felt.
• Levator labii superioris alaeque nasi (Fig. 4.10g, h). Ask the model to attempt a sneer. Place your fingers over the corner of the nose and the upper lip where you will feel the muscle contracting. The alae of the nose will also be raised and move apart while the upper lip is raised at its centre.
• Levator anguli oris, zygomaticus major and minor (Figs 4.9 and 4.11a, b). Ask the model to smile and note that the corners of the mouth are drawn upwards and laterally. This movement is produced by contraction of levator anguli oris and zygomaticus major and minor. These muscles are all palpable between the angle of the mouth and the zygomatic bone (the point of the cheek).
• Depressor anguli oris (Fig. 4.11c, d). This muscle can be palpated just below the angle of the mouth.
• Depressor labii inferioris (Fig. 4.11c, d). Ask the model to draw the mouth downwards, as in the expression of sadness. The muscle is palpable between the lower lip and the chin. It curls the whole lower lip downwards, thereby exposing the lower teeth.
• Orbicularis oris (Fig. 4.11e, f). Ask the model to close the lips tightly. The hard ring of muscle surrounding the mouth can be palpated.
• Buccinator (Fig. 4.11e, f). Ask the model to attempt to blow through the closed mouth and palpate the muscle contraction in the cheeks.
• Platysma (Fig. 4.11g, h). Ask the model to clench the teeth together as in a ‘snarling’ expression. The muscle can be palpated anywhere between the mandible and the superior part of the chest. This muscle appears to expand the neck volume. It will also be brought into action if you apply resistance to hands being tightened around the neck.
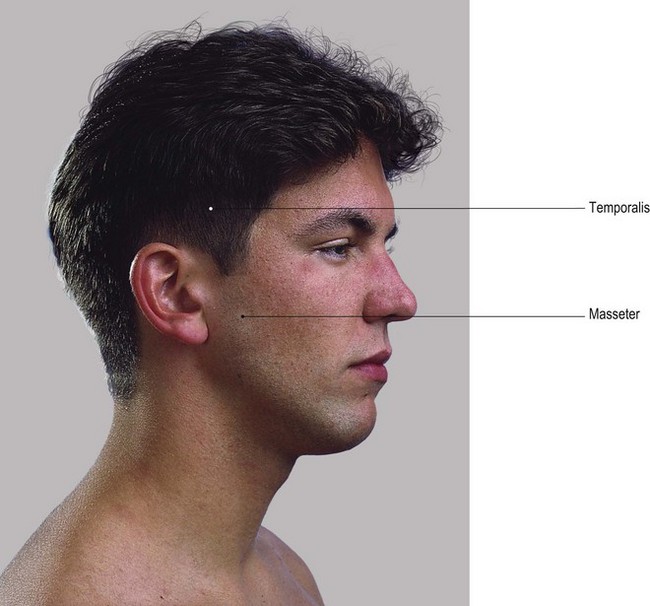
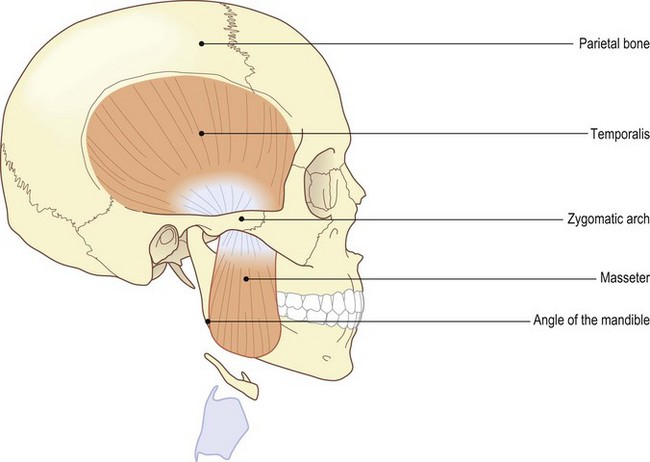
Muscles of mastication (Fig. 4.12)
These are powerful muscles situated more deeply on the lateral side of the face. Temporalis is a fan-shaped muscle attaching above to the lateral side of the temporal bone, reaching as high as the suture between it and the parietal bone. The muscle passes down under the zygomatic arch to the coronoid process of the mandible. Masseter attaches above to the zygomatic arch, its fibres passing downwards and backwards to attach to the lateral surface of the mandible close to its angle.
The medial and lateral pterygoid muscles lie deep to the upper part of the ramus and coronoid process of the mandible. The medial pterygoid attaches above to the medial side of the lateral pterygoid plate and palatine bone to pass downwards and backwards to the medial side of the ramus and angle of the mandible. The lateral pterygoid attaches above to the lateral side of the lateral pterygoid plate and the temporal bone and passes backwards to attach to the neck of the mandible and the capsule and disc of the temporomandibular joint.
Palpation
• Temporalis. Ask the model to alternatively clench and relax the teeth. Place your fingers just above the zygomatic arch. Although hidden to a certain extent by the thick fascia which covers it, the contraction of the fan-shaped belly of temporalis can be palpated. Passing almost vertically deep to the zygomatic arch of the mandible, its fibres become too deep to be palpated.
• Masseter. Again, ask the model to clench and relax the teeth. Place your fingers over the side of the mandible just above and in front of the angle. The powerful masseter muscle can be felt contracting and relaxing. A series of ridges can be palpated, indicating the direction and power of its fibres. In some subjects, particularly lean males, the coarse muscle fibres can be seen crossing the side of the jaw obliquely. The lower fibres can be traced as far as the lower border of the mandible inferiorly, and the anterior end of the zygomatic arch superiorly.
• Note 1. Palpation of the medial and lateral pterygoid muscles is impossible, as they are too deeply situated. It will be noted that the temporalis and the masseter muscles are concerned with closing the mouth and with powerful biting. Although the mandible acts as a third-order lever in the initial bite, as the food moves backwards between the molars it changes so that the food is first in line with the muscle pull and then nearer to the temporomandibular joint than the muscles. The mandible then becomes a second-order lever, with its decrease in range but increase in power. It is at this point that the act of chewing takes place.
• Note 2. During the act of chewing, place your fingers over the posterior part of the cheeks. As the food makes its way backwards, the muscles contract harder and the jaw moves from side to side in a grinding action, utilizing the pterygoid muscles. If the food is tough, these muscles will ache.
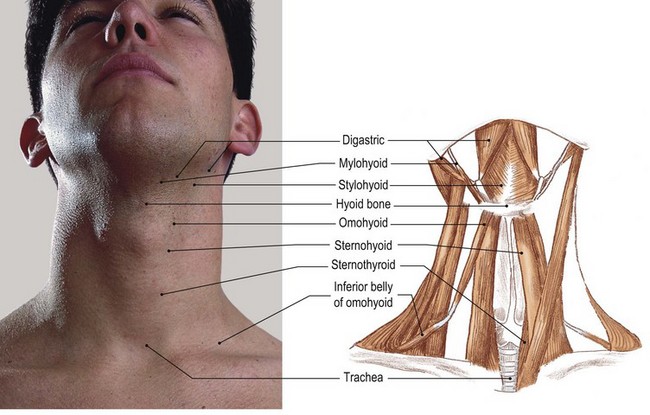
Muscles of the neck (Fig. 4.13)
The neck is surrounded by layers of muscle. These vary in their function, which may include moving the neck itself, moving the head, mastication, swallowing and moving the shoulder girdle. Some are involved in a combination of several of these functions.
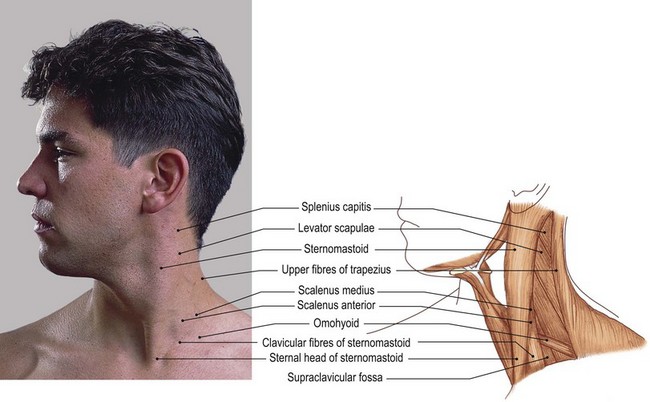
The more superficial muscles tend to be the more powerful and are therefore easier to find and palpate. Because of their size, however, they do tend to cover the smaller, deeper muscles.
Some of the muscles are only attached to different parts of the vertebral column: some attach the column to the head and thoracic cage. Others, usually the longer, attach to the head and the thoracic cage. All the attachments are complex, but have a direct bearing on the resultant movement and function. Thorough knowledge of this region is essential and further study must be undertaken. (See Palastanga et al 2002, Standring 2004).
Palpation on movement
For palpation in this region, the model is in the sitting position.
• The upper fibres of trapezius (Fig. 4.13a, b). Place your hands over the posterosuperior area of the neck, halfway between the occiput and the acromion process. Ask the model to raise the pectoral girdle, as in a shrugging movement. The powerful upper fibres of trapezius can now be felt contracting. Trace the muscle superiorly to its aponeurotic attachment to the medial third of the superior nuchal line of the occipital bone, external occipital protuberance and the sides of the ligamentum nuchae. Trace the muscle inferiorly to its attachments to the posterior border of the lateral third of the clavicle, medial border of the acromion and lateral part of the upper lip of the spine of the scapula.
• The central muscular fibres of trapezius. These sometimes appear to be stringy and are often quite tender, particularly after a period of sustained activity.
• Sternomastoid (sternocleidomastoid) (Fig. 4.13a, b). This muscle attaches to the mastoid process above, and the upper surface of the medial end of the clavicle and upper border of the sternum below. Place your fingers over the lower attachment. Ask the model to turn the head to the opposite side. Two distinct attachments can be felt, one more cord-like from the sternum and the other more aponeurotic from the clavicle. These appear to twist on each other as they are traced upwards. The thick strap-like sternomastoid stands away from the neck when contracted. It becomes cord-like again as it approaches and attaches to the mastoid process, spreading as a sheet to the lateral part of the superior nuchal line.
• Both sternomastoid muscles. When both muscles contract strongly they are easily palpable. The model is in the supine lying position. Ask the model to raise the head.
• Contraction of sternomastoid and trapezius. This can be produced by asking the model to move the head and neck to the same side (lateral flexion). Now resist this movement. Ask the model to rotate the head to the opposite side and, again, resist this movement. Palpate the contracting muscle.
• The scalene muscles (Fig. 4.13a, b). These lie just behind and deep to sternomastoid. The model is in the sitting position. These muscles can be palpated deep in the hollow between sternomastoid and the upper fibres of trapezius in the posterior triangle of the neck. These cord-like muscles, running down to attach to the first and second ribs, appear to be continuously contracted while the head is in the upright position.
• The inferior belly of the omohyoid muscle (Fig. 4.13a, b). During coughing, it is often possible to palpate the inferior belly of the omohyoid muscle as it crosses the lower anterior part of the posterior triangle of the neck.
• Note. Posterosuperior to this is scalenus anterior, and a little higher, scalenus medius.
• Levator scapulae (Fig. 4.13a, b). Ask the model to elevate the pectoral girdle. The fibres of levator scapulae can be palpated nearer the top of the posterior triangle.
• Mylohyoid (Fig. 4.13c, d). During swallowing, the muscles between the mandible, hyoid, thyroid cartilage and sternum contract and relax. Place your fingers on either side of the throat between the mandible and the hyoid during swallowing. Myohyoid can be observed, contracting and lifting the hyoid bone.
• Sternohyoid. This is difficult to palpate during swallowing, but in yawning its fibres can be observed on either side of the thyroid cartilage passing downwards towards the sternum.
Nerves (Fig. 4.14)
The cutaneous innervation of the face, including forehead, is by the cranial nerves. These are mainly the ophthalmic, maxillary and mandibular branches of the trigeminal nerve. The occipital, temporal and posterior parts of the parietal regions are supplied by the greater auricular, and greater and lesser occipital, branches of the cervical plexus. The neck is supplied almost entirely through the anterior and posterior rami of the cervical nerve roots, via the transverse cutaneous and supraclavicular branches of the cervical plexus (Fig. 4.14a, b). The muscles of facial expression are supplied by the facial nerve (cranial VII), the muscles of mastication via the mandibular branch of the trigeminal (cranial V). All the muscles of the neck are supplied by the cervical nerve roots via the cervical or brachial plexuses. Some of these roots receive communication from other cranial nerves: for example, the glossopharyngeal (cranial IV), accessory (cranial XI) and hypoglossal (cranial XII).
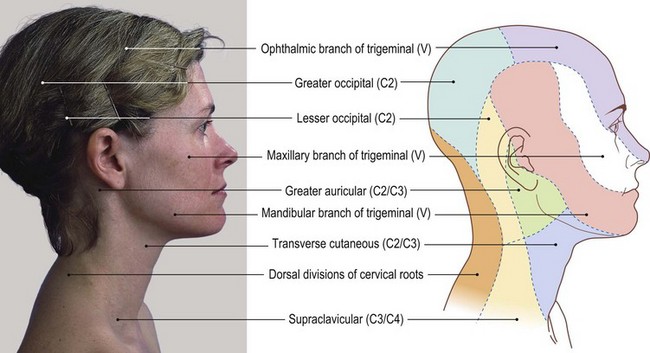
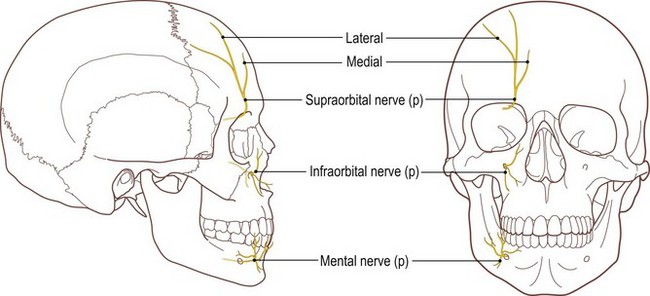
Fig. 4.14 (c, d) Cutaneous branches emerging onto the face, lateral and anterior aspect (p, palpable)
Palpation on movement
Very few nerves are palpable in the head and neck region. Usually only the terminal branches reach the surface and even these are difficult to find.
• The greater occipital nerve (Fig. 4.14a, b). The model is in the prone lying position. Posteriorly it is possible to palpate the greater occipital nerve (root value C2) as it passes vertically to supply the skin over the back of the skull as far forwards as the vertex. This cord-like structure can be palpated over the lower part of the occipital bone approximately 3 cm from the midline. Pressure on the nerve, produced either by your fingers or muscle tension due to poor posture, or long periods of continuous contraction, can lead to unpleasant sensations and headaches. Care should be taken, therefore, when palpating in this area.
• Note. Massage to relieve the tension of the muscles surrounding the nerve can produce almost immediate relief from the resulting headache.
• The orbital nerves. Pressure on the supraorbital nerve as it crosses the superomedial rim of the eye orbit and on the infraorbital nerve as it emerges from the maxilla just below the centre of the eye orbit (Fig. 4.14c, d) causes discomfort over these areas and the area supplied by the nerves. They are, however, quite difficult to palpate.
• The mental nerve (Fig. 4.14c, d). On the anterior surface of the mandible, approximately 1 cm lateral to the midline and approximately 1 cm above the inferior border, the mental nerve (a continuation of the inferior dental nerve) emerges on to the surface. The nerve is often palpable in this region. If you apply pressure to the area, the model will experience an unpleasant sensation.
• Note. This is the area which appears to become numb first when the dentist gives an anaesthetic injection for drilling the lower teeth.
• The trunks of the brachial plexus. Just above the central part of the clavicle in the supraclavicular fossa, you will be able to palpate a series of ‘cord-like’ structures running downwards and laterally. These are the trunks of the brachial plexus emerging from between scalenus anterior and scalenus medius before passing deep to the clavicle to enter the axilla. Pressure in this area will cause discomfort locally and possibly also result in a ‘tingling’, pain or numbness over the distribution of these nerves in the upper limb.
Arteries (Fig. 4.15)
The left common carotid artery arises from the arch of the aorta, while the right is a division of the brachiocephalic artery. They pass up on either side of the neck deep to sternomastoid to the level of the upper border of the thyroid cartilage, where each divides into the internal and external carotid arteries.
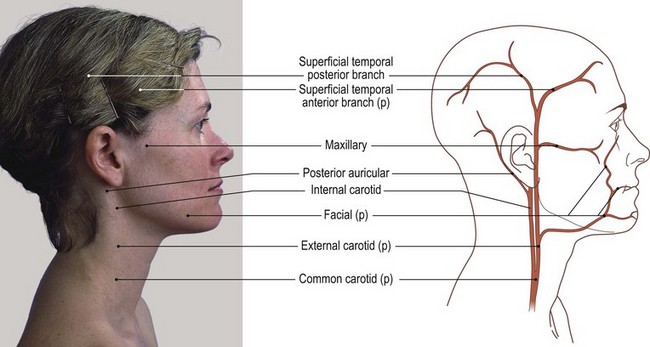
The former passes superiorly, anterior to the upper three transverse processes, to enter the skull through the carotid canal. Each supplies the cerebral hemisphere, orbit and nose of its own side.
The external carotid artery passes vertically from the upper border of the thyroid cartilage, deep to the parotid gland behind the ramus of the mandible, where it divides into the superficial temporal and maxillary arteries (Fig. 4.15a, b).
Palpation on movement
• The common carotid artery. This artery can be palpated on either side of the thyroid cartilage deep to sternomastoid. The muscle has to be moved laterally so that your fingers can be slipped from the anterior aspect into the cleft between the cartilage and the muscle. The pulsations of the artery can be felt on the lateral side of the upper part of the thyroid cartilage, close to the greater cornua of the hyoid bone as the artery divides.
• Note. This point is important for checking the pulsations of the carotid arteries and it is worth spending some time practising the technique.
• The superficial temporal artery. Between the tragus of the ear and the neck of the mandible the pulsations of the superficial temporal artery can be felt. It can also be palpated above the upper limit of temporalis.
• The maxillary artery. Just below the zygomatic bone, this artery is not quite so obvious as it is covered by muscle and fascia, although, with practice, it is palpable running anteriorly.
• The facial artery (Fig. 4.15a, b). This artery can be palpated as it crosses the lower border of the body of the mandible, halfway between the angle of the mandible and the mental tubercle. With care, it can be traced upwards to the corner of the mouth and cheek.
• The supraorbital artery. Finally, above the eye the pulsations of the supraorbital artery can be palpated as it crosses the medial superior margin of the orbit.
• Note. It is at this point that injuries, particularly in the sport of boxing, occur. The artery is often ruptured and large quantities of blood pulse out on to the eye and face. It is worth remembering that if pressure were applied to this point for just a few minutes, this loss of blood would cease and the area could be cleaned up, exposing the injury which is usually just a minor trauma.
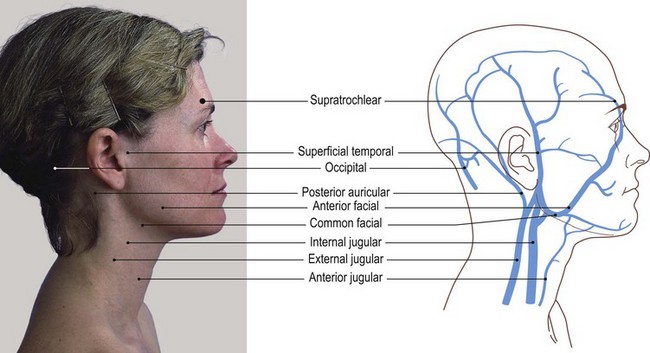
Veins (Fig. 4.16)
The veins of the head, neck and face are divided into two main groups: (a) those that drain the exterior of the cranium and deep tissues of the face, and (b) those that drain the brain, the neck and the superficial areas of the face. The former mainly drain into the external jugular vein, while the latter mainly drain into the internal jugular vein.
Palpation
None of these veins are easy to palpate but is important to be able to locate their general outline. The lower part of the external jugular vein contains two valves: one, as it joins the subclavian vein and the other, 4 cm above. The valves do not prevent regurgitation of blood. The area between them often bulges and is termed ‘the sinus’.
For identification of the veins, the model is in the sitting position.
• The external jugular vein. The surface marking of the external jugular vein is from the angle of the mandible to the middle of the clavicle.
• The internal jugular vein. The surface marking of the internal jugular vein is by a broad line drawn from the lobe of the ear to the medial end of the clavicle.
• Note. This vein also contains a valve at its junction with the subclavian vein and is often distended just above. This vein lies deep to sternocleidomastoid muscle and cannot be palpated.