23 Imaging guidance for intervention
A wide range of interventional procedures can only be safely performed with accurate imaging guidance. The aim of this chapter is to outline the basic principles of imaging-directed intervention. Ultrasound, CT and fluoroscopy have complementary roles; individual circumstances dictate the optimal modality.
Ultrasound guidance
Ultrasound is ideal for many biopsy and drainage procedures and allows the procedure to be visualized in real time. Use ultrasound if it clearly demonstrates the target and a suitable approach. Usually this is achieved in solid organs or for larger abdominal collections. As a basic principle, use the highest frequency probe that gives a good image from the skin to the target site. Use a 7.5 MHz probe for superficial structures and a 3.5–5 MHz probe for deeper structures. It is exceedingly helpful to have a probe with a small footprint, as this improves access.
Sterility
All invasive procedures should be performed with aseptic technique. Sterile ultrasound probe covers and ultrasound gel are readily available. Sterile ultrasound gel is used outside the ultrasound probe cover, but ordinary ultrasound gel can be used inside the probe cover. A clean drape should be used to cover the probe cable. Attach the cable to the drapes with a towel clip to save dropping an expensive probe.
 Tip
TipDirecting punctures
The ultrasound image represents a slice of tissue only 1 mm thick; much less than the width of the probe! For effective guidance, the needle must pass along the scan plane, which runs directly along the midline of the probe; even a small degree of misalignment will mean that the needle is not in the scan plane (Fig. 23.1). The importance of this relationship cannot be overemphasized; this is the single most important factor in successful ultrasound guidance.
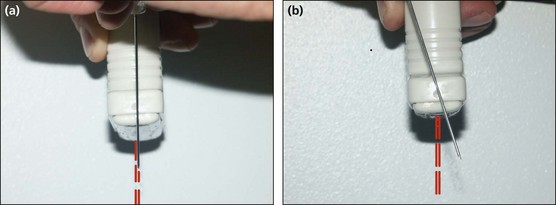
Fig. 23.1  The importance of keeping the needle in the plane of the ultrasound beam: (A) the needle path will be in the focused ultrasound beam; (B) despite starting in the middle of the probe, the needle is angled out of beam and will not be visualized.
A needle guide is so simple to use that no experience is needed to manage it. The guide attaches to the probe and constrains the needle to a predetermined path. The needle trajectory is displayed as two broken parallel lines superimposed on the image. This usually has to be selected on the ultrasound machine itself. The probe is positioned so that the projected needle path crosses the target. The needle is then advanced to the target (Fig. 23.2).
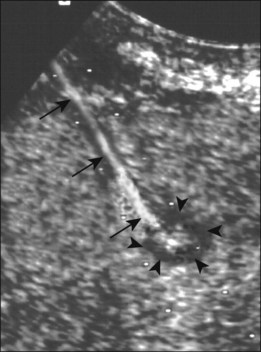
Fig. 23.2 Biopsy of a small hepatic metastasis using a needle guide (arrowheads). The white dots showing the projected needle path are clearly visible and the needle (arrows) can be seen entering the lesion.
The freehand technique is required when there is no suitable path within the constraints of the needle guide. As the name suggests, the needle is advanced along the scan plane with one hand, while the probe is fixed with the other. The most common problems are due to angulation or rotation of the probe relative to the path of the needle.
CT guidance
CT is used to guide biopsies and drainage of areas that cannot be seen on ultrasound, e.g. the lung, mediastinum, bone and areas of the abdomen obscured by bowel gas. There are several disadvantages to using CT compared with ultrasound:
The principles of CT guidance are simple, although the procedure can be technically challenging. When performing procedures in the chest and abdomen, it is important to explain to the patient the necessity to try to take the same size breath during each scan and needle pass.
Patient positioning
The diagnostic scans are reviewed and a suitable needle path is chosen. The patient is positioned either supine or prone, depending on the position of the target. Remember that, although angled needle trajectories can be used, it is simplest to judge a vertical needle pass.
The simplest way to mark the puncture site is to use a reference grid placed over the region of interest. Grids can be purchased or can be readily made from some thin plastic tubing (Fig. 23.3).
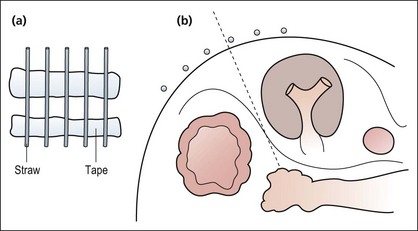
Fig. 23.3 (A) A CT grid can be readily made using plastic tubing and adhesive tape. (B) The optimal approach is determined by the markers.
 CT guidance: a step-by-step approach
If you are lucky, your unit will have a CT fluoroscopy module. Don’t get too excited as it’s not quite as dynamic as real fluoroscopy, but it does speed the procedure up significantly. Exact designs vary, but essentially this system allows the operator to control the X-ray exposure at the table side, doing a very small number of cuts at your chosen level. Some systems have motor-driven movement to the chosen position.
A common pitfall is for the needle to pass obliquely through the scan plane. This can be demonstrated by performing one or two cuts above and below the target plane. If the needle tip is still in a satisfactory position, proceed as normal; if not, reposition the needle, compensating for the incorrect angle.
Fluoroscopic guidance
Fluoroscopic guidance is used principally to guide percutaneous nephrolithotomy and biliary drainage and more rarely to biopsy pulmonary masses and bones. Whenever possible, use an X-ray machine with a C-arm, and avoid machines with overcouch explorators. Remember the basic principle of radiology: two views are necessary for localization.
Position the patient for the procedure and fluoroscope to identify the target lesion. Centre the field on the lesion and mark the position with a pair of sponge forceps. It is nearly always possible to choose an approach that allows the needle to be advanced perpendicular to the skin. For pulmonary biopsy, ask the patient to suspend respiration. Advance the needle part-way to the target and then fluoroscope to confirm that the tract is passing in the correct direction. Rotate the C-arm through 90° and fluoroscope again to determine the position of the needle tip relative to the target. Advance the needle until it reaches the target and reconfirm the position on the original projection.
The situation is slightly different during biliary drainage and nephrostomy, as an oblique approach is required for catheter and guidewire manipulation. When aiming at a specific duct or calyx, it is essential to know whether the needle is passing anterior or posterior to the target duct. This is resolved by rotating the C-arm (the patient can be rotated but remember there is a long needle sticking in them) and observing the movement of the needle relative to the target. If the needle is posterior, when the C-arm is rotated, the needle moves in the same direction as the C-arm rotation; if it moves in the opposite direction, it is anterior to the target. Remember that the reverse is true if you are turning the patient. When you think that you have grasped this concept, just wait until you try it in practice.