OVINE AND CAPRINE VENIPUNCTURE

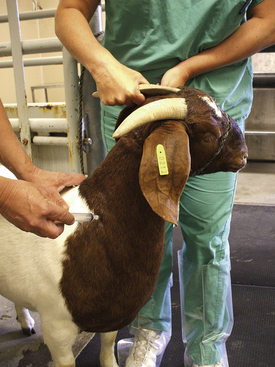
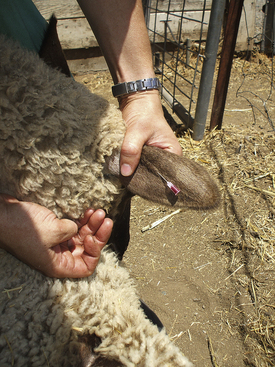
The jugular, cephalic, and femoral veins are commonly used in sheep and goats. The ear also provides an accessible site for blood sampling.

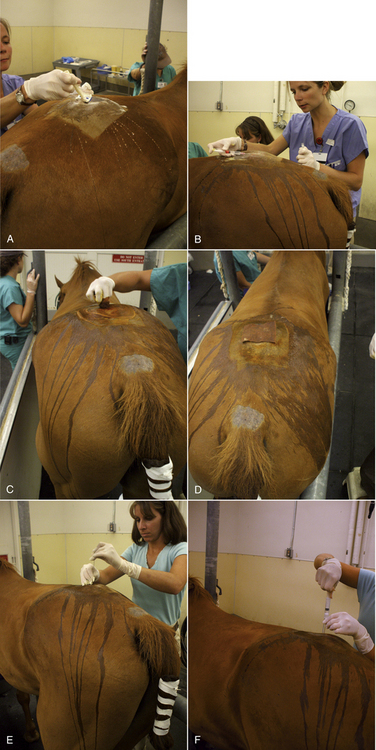
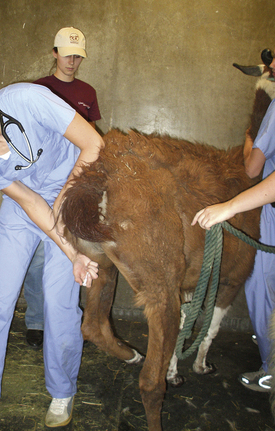
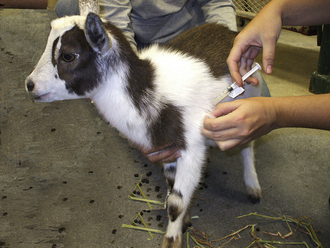
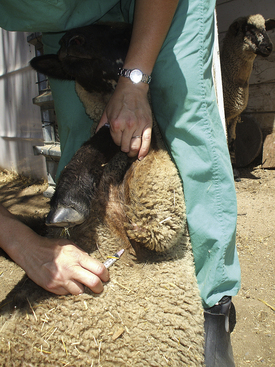
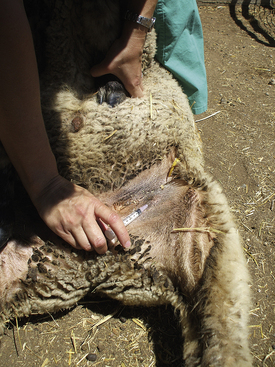
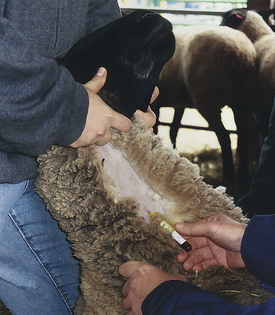
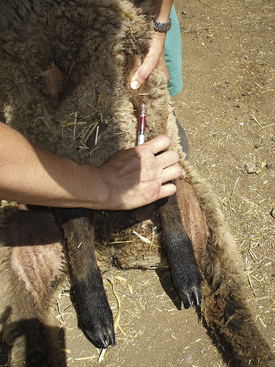
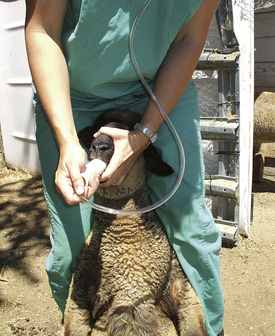
Most sheep will be restrained in a “set up” position on their rumps with their back side leaning up against the handler (Figure 20-50). Jugular, cephalic, femoral, and ear samples can be taken from this position. Jugular, cephalic, and ear samples can be obtained from some sheep while they are standing, but having sheep “set up” on their rumps will drastically reduce the amount of effort required to carry out most procedures (Figures 20-51 through 20-54). The jugular, cephalic, and ear veins can be easily accessed in goats while they are standing. The handler can restrain the animal by backing it into a corner and by straddling the goat with the handler's legs tight on either side of the neck or push the goat up against a wall. The femoral vein is accessible when the goat is in lateral recumbency.

image

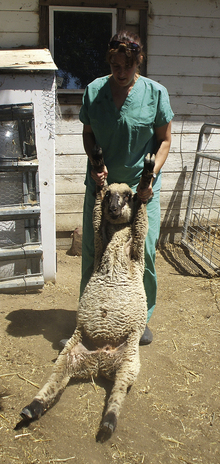
FIGURE 20-50 Setting sheep on the rump is an effective method of restraint for venipuncture and many other procedures.

image

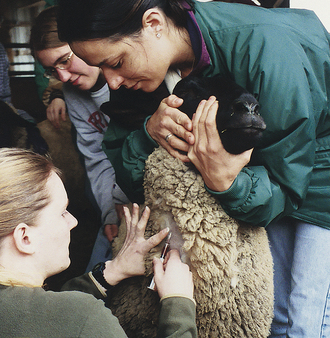
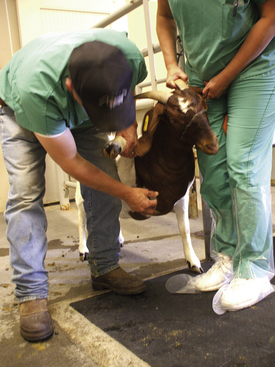
FIGURE 20-51 A technician crouches in front of a standing sheep to collect blood from the jugular vein. Note that the assistant at the rear of the sheep prevents the sheep from backing away from the technician.

image

FIGURE 20-52 Sheep placed in a seated position to allow blood to be collected from the jugular vein.

image

FIGURE 20-53 Collecting blood sample from cephalic vein while sheep set up on rump for restraint.

image

FIGURE 20-54 Blood samples can be obtained from auricular vein in sheep.

PORCINE VENIPUNCTURE

Blood collection from swine is more difficult than in other large animals. They are challenging to restrain, have thick jowls, short legs, tough skin, and are fat. Sampling can be done with the animal restrained or with the animal under anesthetic. The technician should be aware that in addition to commercial hogs, many pigs that are receiving veterinary care are beloved pets, and the handling and restraint required for venipuncture and other procedures should be explained well to the owner.

The common veins used for venous blood collection in pigs include the cranial vena cava, jugular, auricular, cephalic, peripheral leg veins, and occasionally the orbital sinus or tail vein.

Cranial Vena Cava: The cranial vena cava is located in the thoracic inlet between the first pair of ribs. The right side of the animal should be used to prevent damaging the phrenic nerve, which is anatomically more protected on the right side of the animal than the left. Hitting the phrenic nerve may alter the function of the diaphragm and can result in life-threatening cardiac or respiratory problems. For piglets, a 20-gauge × 1.5-inch needle is used. An 18- to 20-gauge × 1- to 1.5-inch needle is appropriate for small pigs (up to approximately 25 kg). For pigs weighing more than 25 kg an 18- to 20-gauge × 1.5- to 3.5-inch needle is used. Large adults require a 16- to 18-gauge × 4- to 4.5-inch needle.

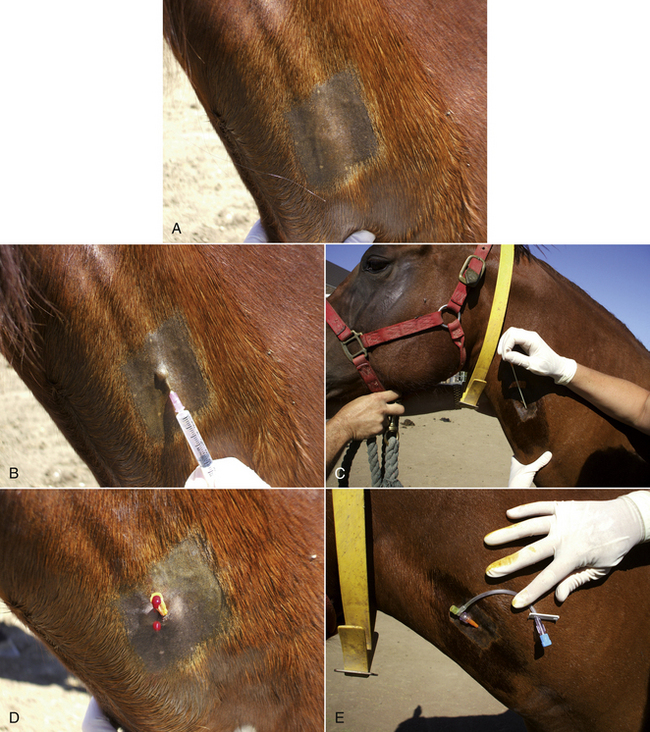
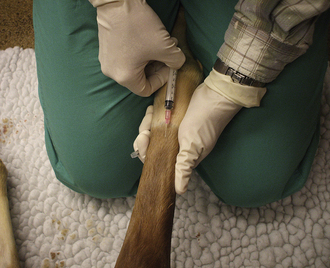
To collect blood from a small pig, the animal is placed on its back (dorsal recumbency) on a 45-degree incline with the head lower than the hips. The head is extended and front legs pulled caudally. The jugular furrow is visualized, and the needle with a syringe attached is inserted in the furrow lateral to the manubrium of the sternum. The needle is pointed toward the caudal aspect of the top of the opposite shoulder blade (Figure 20-55). As the needle is inserted, the syringe plunger should be pulled slightly to maintain negative pressure. When blood enters the syringe, the needle is held in place while the desired amount of blood is aspirated.

image

FIGURE 20-55 A blood sample from the right anterior vena cava is taken with the needle directed into the jugular fossa just lateral to the manubrium sterni.

Larger hogs are restrained with the use of a hog snare in a standing position with the head slightly elevated. The person with the syringe crouches in front of the right side of the pig facing the body of the pig or can crouch to the side of the right shoulder facing the neck. The needle is inserted into the right jugular furrow lateral to the manubrium (Figure 20-56), directed toward the shoulder. The cranial vena cava in large pigs is deep (4 inches may be required to reach the lumen).

image

FIGURE 20-56 Venipuncture of right anterior vena cava in a small pig in dorsal recumbency.

Jugular Vein: The jugular vein can be used for a blood sample collection in pigs of any age. It is located in the jugular furrow. It is not as deep as the vena cava, so fewer potential complications are associated with its use. The jugular vein has a smaller diameter than the vena cava and is more difficult to access, especially in large or heavy pigs. The needle size selected depends on the size of the animal. A jugular venipuncture in piglets can be done with a 20-gauge × 1.5-inch needle. Large pigs may require 16-gauge × 3- to 3.5-inch needles. To prevent the puncture of the phrenic nerve, the right side of the animal should be used when possible. The needle should be inserted cranially to the manubrium where the jugular furrow appears deepest. The animal is restrained as for a vena cava venipuncture. An imaginary horizontal line that passes through the shoulders and manubrium sterni is visualized. A second line is visualized that extends from the manubrium sterni to the scapula at an angle of 45 degrees with the first line. The needle is inserted perpendicular to the skin at the intersection of the second line with the deepest part of the right jugular fossa. The needle is directed caudodorsally and should not be angled toward either scapula. Because the vein is superficial, the syringe plunger should be retracted slightly as soon as the needle penetrates the skin. The needle is advanced until blood is aspirated into the syringe. Once a sufficient volume of blood has been collected, the needle is removed.

The technician should be aware that fewer complications and a lower risk for incidental injury to the animal are associated with a venipuncture of the more distal veins listed below.

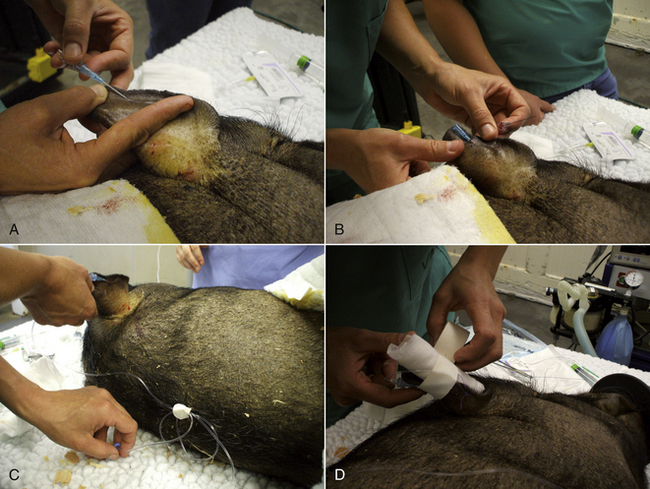
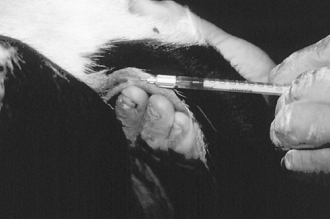
Auricular Vein: The auricular vein is located near the lateral border of the pinna of the ear. It is easily visualized on the dorsal side of the ear and can be seen even more clearly by placing digital pressure at the base of the lateral surface of the ear. The ear is held and digital pressure (or rubber-band tourniquet) applied at the base of the ear to distend the vein. A needle with a syringe attached can be inserted into the vein while gently pulling back on the plunger. To prevent the collapse of the vein with aspiration, some people prefer to insert the needle and allow the blood to drip from the needle hub directly into the uncapped collection tube. For most pigs, a 20-gauge × 1-inch needle is appropriate. For large adult pigs, an 18- to 19-gauge × 1-inch needle may be used. Vacutainer collection needles and tubes may also apply too much suction, and as in the case of excess pressure on the syringe plunger, these tend to cause the vein to collapse. When an adequate blood sample has been collected, pressure is released from the base of the ear, the needle removed, and pressure applied to the insertion site. For repeated sampling, the placement of an IV catheter should be considered.

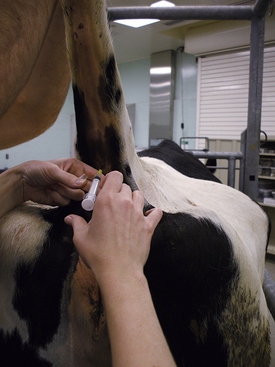
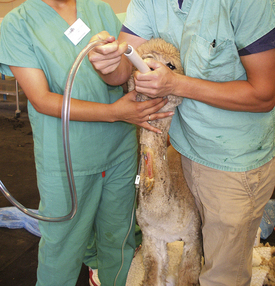
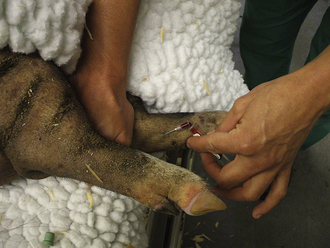
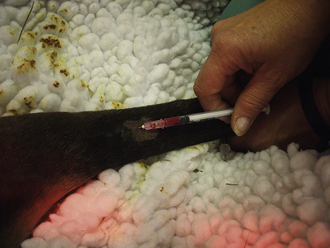
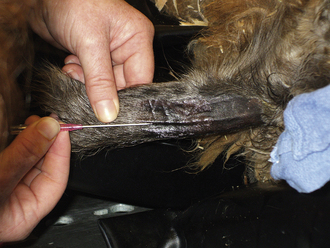
Peripheral Leg Veins: The cephalic vein on the front leg, saphenous vein on the hind leg, and branches of veins located on the lower limbs are accessible in small pigs and can be used for venous sampling. The veins can be visualized and are readily accessible in anesthetized pigs. To prevent the collapse of the vein, the needle is inserted, and blood is allowed to drip from the hub of the needle into the open collection tube (Figure 20-57). The collection of blood from the standing and restrained pig can be done by placing hand pressure or a tourniquet above the collection site to distend the vein. A 20-gauge × 1- to 1.5-inch needle is inserted at approximately a 45-degree angle to the skin in the direction of the body.

image

FIGURE 20-57 Collecting blood from peripheral leg vein in pig. Blood dripping from needle hub into collection tube prevents vein collapse.

Coccygeal Vein: Though this site is not commonly used, it can be used for a venipuncture in adult pigs with intact (not docked) tails. A 20-gauge × 1-inch needle is inserted in the ventral midline of the tail perpendicular to the skin. Small blood samples can be obtained from this site.

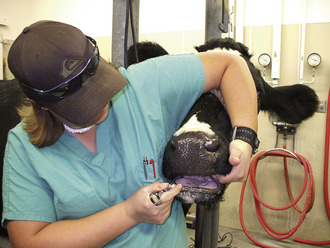
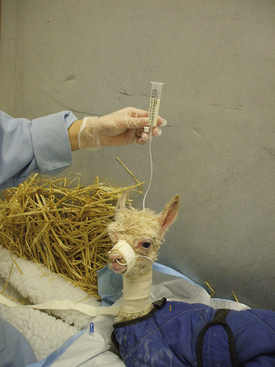
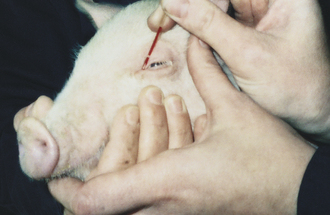
Orbital Sinus (Medial Canthus of Eye): The orbital sinus is adjacent to the medial canthus of the eye and can be used for the collection of small volumes of blood. A 20- to 22-gauge × 1 inch-needle can be used for piglets. Sampling on larger pigs may require a 16- to 18-gauge × 1.5-inch needle. The needle is inserted into the medial canthus deep into the third eyelid (nictitating membrane) and advanced at a 45-degree angle toward the opposite jaw until bone is felt. The needle is then rotated between the fingers until blood enters the hub. The syringe is attached and blood collected with gentle aspiration. When the collection is complete, the needle is removed and digital pressure applied over the medial canthus with the head elevated. A microcapillary tube with the end broken to form a rough point can be used in lieu of a needle (Figure 20-58).

image

FIGURE 20-58 Small quantities of blood can be collected from the orbital sinus of the pig.

ARTERIAL BLOOD SAMPLE COLLECTION

Arterial blood samples are commonly obtained for a blood gas analysis. This analysis usually provides information on the oxygen and carbon dioxide content, pH, base deficit, and bicarbonate in the sample. This information is used to evaluate respiratory status. If the data includes base deficit and bicarbonate, it is also used to assess the metabolic (acid-base) status. Arterial blood more accurately reflects the ventilation status of an animal than does venous blood because arteries carry freshly oxygenated blood from the heart to the body. Veins carry blood back to the heart for circulation to the lungs where the oxygen is replenished and carbon dioxide is released. Arterial blood gas samples are frequently performed intraoperatively on animals under a general anesthetic. Arterial catheters are commonly placed in anesthetized animals to facilitate sequential blood sampling. The values obtained from the sample analysis allow for close anesthesia monitoring.

Arterial samples are routinely collected in nonanesthetized foals and crias, though less frequently in adult equines and camelids. Arterial sampling in cattle, sheep, goats, and pigs is rarely done on nonanesthetized animals.

The smallest gauge needle possible should be used to minimize trauma to the vessel. For most sample sites, a 25-gauge needle and 1- or 3-ml syringe are used. A very small amount of heparin (enough to fill the needle and appear in the hub) is aspirated into the needle and the plunger pulled back on the syringe to coat the syringe. The needle is removed, and a new 25-gauge needle is placed on the syringe, and then all of the heparin is expelled from the syringe and through the needle (this allows for the sharpest needle because the needle has not even punctured the stopper on a bottle of heparin). The heparin residue that remains is sufficient to prevent coagulation, but not enough to alter laboratory results. Some veterinarians prefer to use commercially prepared blood gas syringes containing powdered heparin (Figure 20-59).

image

FIGURE 20-59 Syringes for blood gas sample collection. A, Sodium heparin (1000 U/ml). B, 3-ml syringe with barrel coated with heparin. C, Rubber stopper. D, Blood sample in syringe. E, Commercial preheparinized syringe (Micro A.B.G., Marquest). F, Stopper. G, Micro A.B.G. syringe with needle inserted into rubber stopper. H, Micro A.B.G. syringe with cap.

Some veterinarians prefer to have sites for arterial puncture shaved before cleaning with alcohol (this is often the case with arterial samples on neonatal patients). The area is palpated to determine the location of the artery. Arteries pulsate, veins do not. The selected artery site is given a surgical prep or at least cleaned well with 70% isopropyl alcohol before insertion of the needle. It is not necessary to occlude arteries as is done with venous blood sampling. Depending on the patient's behavior and site selected, the needle may be inserted first and the syringe attached when blood comes from the hub or the needle may be inserted with a syringe attached. When the needle enters the artery, bright red blood pulses from the needle hub into the syringe. With most arterial samples, the blood will rapidly fill the syringe. Very little force is placed on the plunger of the syringe because the blood in the artery is under pressure and will spurt out. Do not expect blood to spurt from the needle as would be expected with a large-gauge needle. A minimum of 1 ml of blood should be collected into the syringe that has been prepared with liquid heparin to ensure results with diagnostic value. Smaller volumes can be taken using the commercial blood gas syringes because these syringes are designed to eliminate dilutional errors. When the needle is withdrawn, firm digital pressure should be applied immediately to the puncture site and should be maintained for several minutes. Arteries are far more susceptible to hematoma formation than veins. The technician must make sure to apply sufficient pressure long enough to stop bleeding and prevent formation of a hematoma. If care is taken with this step, the artery will be preserved and will be able to handle repeated sampling. If insufficient pressure and time is taken to hold off the collection site, the artery will become damaged, may become unusable for future sampling, and the related area may suffer from impaired circulation, thus compromising the condition of the patient.

image TECHNICIAN NOTE

Following the collection of arterial blood samples, firm digital pressure should be applied immediately to the puncture site and maintained for several minutes.

Any bubbles present in the syringe are expelled, and the tip of the needle is inserted into a rubber stopper to occlude the needle tip and prevent air from entering the syringe. Samples for blood gas analysis must remain anaerobic (not contaminated by atmospheric air) because exposure to air will modify the oxygen and carbon dioxide values. The syringe should be rolled between the palms to ensure distribution of the anticoagulant throughout the sample. If the sample is not analyzed promptly, is should be placed in an ice water bath. Placing the sample in a freezer or on ice (with no water added) can damage the sample and affect the results of the analysis.

image TECHNICIAN NOTE

Samples for a blood gas analysis must remain anaerobic (not contaminated by atmospheric air) because exposure to air will alter the laboratory values obtained.

EQUINE ARTERIAL SAMPLING

Arteries commonly used for blood sampling in horses include the facial (most often used in anesthetized animals), transverse facial, carotid, and metatarsal (in recumbent foals and anesthetized animals). In addition to those sites, arterial sampling on foals can include brachial and palmar (digital) arteries.

The facial artery is accessible in the area under the mandible to the facial crest. This site is commonly used for arterial catheterization in anesthetized animals (Figure 20-60, A-D).

image

FIGURE 20-60 A, Nicking skin with needle to ease insertion for placing arterial catheter in facial artery. B, Inserting catheter. C, Placing stopcock on catheter. D, Securing arterial catheter with glue.

The transverse facial artery lies caudal to the lateral canthus of the eye (Figure 20-61). Some people prefer to inject 0.25 ml of 2% lidocaine into the skin over the artery before a sample needle insertion, but often there is little or no objection from the horses when this site is used without a lidocaine block.

image

FIGURE 20-61 Collecting arterial sample from facial artery in awake equine.

The carotid artery is accessible in the lower third of the neck, in the dorsal aspect of the jugular groove, and deeper than the jugular vein. The artery feels like a cord, and a pulse is not usually palpable. An 18- to 19-gauge × 1.5-inch needle is directed into the artery at a 90-degree angle.

The dorsal metatarsal artery is located on the lateral aspect of the third metatarsal bone (cannon bone on hind limb) and is the preferred site in recumbent foals (Figure 20-62). A pulse is usually quite palpable. If a pulse is not obvious, the technician may put firm digital pressure proximal to the selected site, slowly release pressure, and feel for the pulse; this often enhances the pulse quality distally. In very sick neonates with poor blood pressure, the pulse may not be felt. In these patients, it is helpful to place a warm water bottle or compress over the artery to enhance the feel of local pulsation of the artery. The technician sits with the foal's hind hoof secured between the technician's knees. The artery is palpated with one hand and the needle inserted with the other hand. The foal's leg can be secured by holding it between the technician's legs (Figure 20-63). Some patients require another handler restraining the foal, and the technician should make use of available help because procedures can be done quicker and with less stress to the patient and less risk for injury to the personnel when sufficient restraint is used. The behavior and condition of some foals allows the procedure to be done by the technician with no additional restraint. This will depend on the patient and the experience and skill of the technician. Many foals will accept this procedure if the needle is slowly and smoothly inserted into the skin. Some foals (even though very sick) will vehemently object to the needle insertion and jerk and kick the leg. In these foals, a quick insertion of the needle is done, and the syringe is attached after the foal's leg is again secured in place.

image

FIGURE 20-62 Restraining foal's hind leg between the technician's knees facilitates collection of arterial samples from the metatarsal artery in foals.

image

FIGURE 20-63 Collecting arterial sample from metatarsal artery in recumbent foal.

The palmar (digital) artery is palpable on the abaxial surface of the fetlock. This site is more difficult to access because the artery moves around quite a bit, so the location precludes restraining the foal's leg between the technician's legs.

The brachial artery may be palpated where it crosses the medial aspect of the proximal forearm and may yield a sample when attempts at other sites have been unsuccessful.

CAMELID ARTERIAL SAMPLING

The auricular (ear) artery is often used in llamas and alpacas for arterial sampling (Figure 20-64).

image

FIGURE 20-64 Placing arterial catheter in ear of llama.

BOVINE, OVINE, AND CAPRINE ARTERIAL SAMPLING

Arteries used for sampling in these animals include the transverse facial, carotid, auricular, and dorsal metatarsal. As noted above, the collection of arterial samples from these animals is usually restricted to anesthetized individuals or neonatal patients.

ARTERIAL CATHETERIZATION

A short OTN catheter can be placed in the artery of an anesthetized patient.

Common arteries catheterized in the horse include the transverse facial and dorsal metatarsal. Common arteries catheterized in food animals include the transverse facial, dorsal metatarsal, and auricular.

URINE SAMPLE COLLECTION

Urine is collected from patients to screen for systemic (e.g., rhabdomyolysis, azoturia) or urinary tract disease. Urine is also routinely analyzed in race and performance horses for drug detection purposes. Urine can be collected for urinalysis from all large animal species in a free-catch midstream sample. Catheterization is recommended for samples that will be cultured, but as described later, bladder catheterization is not always possible. Cystocentesis is not practical in horses because of the inability to stabilize the bladder and the risk for intestinal perforation with a needle. It may be performed by some veterinarians on small ruminants.

For all urine samples, the sample should be collected in a dry, clean container (sterile if a culture is desired and catheterization is performed). A midstream sample should be collected because the initial stream contains more bacteria, mucus, and cell debris than the rest of the urine and does not as accurately reflect the actual content of the urine. Bacterial contamination in free-catch samples is significant. Urine samples degrade rapidly, so samples should be analyzed promptly (within 20 minutes) or refrigerated for no more than 2 days.

image TECHNICIAN NOTE

Urine samples degrade rapidly, so they should be analyzed promptly or refrigerated for no more than 2 days.

Complications of urinary catheterization include infection of the urinary tract if sterile technique is not followed, mucosal irritation, slow and painful urination, and bacterial contamination of the sample.

EQUINE URINE COLLECTION

Free-catch Method

Urination may be encouraged by placing the horse in a freshly bedded stall. Sometimes standing the horse on a grassy area will encourage urination. Other suggestions include running water on cement and tickling the prepuce with a piece of straw. Some race and performance horses have been conditioned to urinate when whistled to. Recumbent neonates frequently will urinate when they are assisted to stand. The technician should be prepared by having a urine collection container within reach when helping a foal to rise or supporting it in a standing position.

image TECHNICIAN NOTE

A midstream sample should be collected.

Cleansing of the external genital area is not necessary when collecting urine for drug testing.

Urinary Catheterization

Supplies needed:

Urinary catheter: use the tube with the smallest outer diameter as possible to minimize trauma to the urethra (Figure 20-65)

image

FIGURE 20-65 Urinary catheters. A, Stallion catheter. B, Mare Chambers catheter. C, 28F Foley catheter. D, 12 F Foley catheter. E, 12F red rubber feeding tube.

Adult males: Urinary (Foley) catheter 24F to 28F with 6- to 9-mm outer diameter and approximately 140 cm long

Colts: red rubber feeding catheter 12F

Adult females: Chambers catheter or Foley catheter 30F

Fillies: Foley catheter 12F

Sixty-milliliter catheter tip syringe

Sterile gloves

Gentle antimicrobial soap and 70% rubbing alcohol or other disinfectant cleanser (povidone-iodine solution and scrub)

Soft cotton

Sterile lubricant

Sterile collection containers (for urinalysis, cytology, and culture specimens)

Sedation

Male Horses: Sedation is usually required when catheterizing stallions and geldings for restraint and extension of the penis from the prepuce. The technician should be positioned cranially to avoid being kicked. Retract the prepuce, grasp the penis gently but firmly caudal to the glans penis (hold steady as the horse may attempt to retract the penis), and wash the penis with dilute antibacterial soap. Care must be taken to cleanse the urethral process and urethral diverticulum (a blind pouch located dorsal to the urethral opening) making sure to remove any smegma “bean” present in the diverticulum. It is then rinsed with water. This must be done to prevent the introduction into the bladder of bacteria that are present at the urethra and prepuce and to prevent bacterial contamination of the urine sample. Wearing sterile gloves, apply sterile water-soluble lubricant to the tip of a flexible urinary catheter. The penis is held with one hand, and the other hand is used to gently advance the catheter through the urethra and into the bladder. There is a curvature in the area of the ischial arch (just ventral to the anus), and slight force may be necessary to advance the catheter past this point. The horse will characteristically raise his tail when the catheter passes over the ischial arch just before it reaches the bladder.

If urine does not flow from the catheter, a syringe can be attached to gently aspirate the sample. Excessive negative pressure must not be used because it may cause minor hemorrhage and can alter the sample composition. A small volume of air can be injected into the catheter, or the catheter can be repositioned, if necessary, to encourage flow.

Female Horses: Wrap the tail and tie it out of the way to prevent hair from entering the vagina, touching the glove or catheter, and thus introducing contaminants.

Thoroughly clean the vulva and perineum. Using sterile gloves with sterile water-soluble lubricant locate the urethral orifice on the ventral aspect of the vaginal vault. The orifice is approximately 10 to 12 cm from the ventral commissure of the vulvar lips. A small Chambers catheter, stallion catheter, or Foley catheter can be used. Lubricate the catheter and using a finger, slide the catheter in and down into the urethral orifice and advance the catheter 5 to 10 cm (2 to 4 inches) until it enters the bladder (Figure 20-66, A-D). The flow of urine can be encouraged as described earlier.

image

FIGURE 20-66 Urinary catheterization in mare. A, Applying sterile water-soluble lubricant to back of sterile gloved hand holding urinary catheter. B, Inserting urinary catheter. C, Urinary catheter with small plastic bag on end for sample collection. D, Collecting urine sample from catheter.

CAMELID URINE COLLECTION

Free-Catch Method

Llamas and alpacas urinate and defecate on communal dung piles, so, if possible, the animal should be lead to a dung pile. Attaching a collection cup to the end of a broom or dowel facilitates collection without requiring personnel to be close enough to distract the animal. Both males and females urinate in a caudal direction while in a squatting position. Complete urination usually takes 30 to 60 seconds.

Urinary Catheterization of Llamas and Alpacas

In addition to the sigmoid shape of the penis, which makes passage of urinary catheters extremely difficult, male llamas and alpacas have a membranous flap at the ischial arch that prevents passage of urinary catheters into the bladder, so this procedure cannot be done in males.

Females: Supplies needed:

Sterile gloves

Sterile water-soluble lubricant

Sixty-milliliter catheter tip syringe

Red rubber tube or polypropylene catheter 5F

Gentle antimicrobial soap or other cleanser

Soft cotton

Sample collection containers (sterile if culture desired)

Sedation, if necessary

Restrain the llama or alpaca. Clean the lips of the vulva and dry the area. Wearing sterile gloves, place a small amount of lubricant on the glove. Insert a finger into the vulva and locate the external urethral orifice. This is felt as a groove on the floor of the vulva. When located, withdraw the finger slightly and slide the catheter along the dorsal aspect of the index finger into the orifice. Sliding the catheter along the finger in this manner avoids insertion into a blind ventral urethral diverticulum, which is located just caudal to the orifice of the urethra. Slowly advance the catheter. For most adult llamas or alpacas, the catheter is inserted about 25 cm from vulvar lips to enter the bladder. Collect a free-flowing sample into a sterile container or attach a syringe and gently aspirate the fluid.

BOVINE URINE COLLECTION

Free Catch

Place the animal in a chute or stanchion and allow the animal to relax. Urination in cows may be encouraged by lightly stroking the vulva tip and the skin beneath the vulva with fingers or straw. The technician may also try repeated parting of the lips of the vulva to elicit urination. Steers and bulls may oblige with urination if the prepuce is massaged and splashed with warm water. Urine is collected into a container or, depending on the required analysis, a urine dipstick (litmus paper test strip) can be held directly in the stream of urine. This technique is often used to monitor urine pH and ketones.

Urethral to bladder catheterization in male cattle is virtually impossible because of the anatomy and therefore is not performed by the technician.

Cows can be catheterized with a small-diameter (0.5 cm) catheter using similar techniques as used for mares. With sterile gloved and lubricated hand, a finger is inserted into the suburethral diverticulum, and the catheter tip is guided over the diverticulum and into the external urethral orifice.

OVINE AND CAPRINE URINE SAMPLES

Free Catch

Both ewes and does tend to urinate immediately after rising following a period of recumbency. The technician should be prepared to collect a urine sample when the animal rises. This is the easiest approach and causes the least stress to the animal.

Urination may be induced in ewes by occluding the nostrils for up to 45 seconds while the animal is standing. This causes stress to the animal. The animal will indicate discomfort by struggling, and as the nostrils are released and the animal allowed to breathe again, she will urinate. Two people are required for this procedure to go smoothly. One occludes the nostrils and restrains the ewe while the other catches the urine.

Holding the nostrils of does seldom results in urination. Sometimes urination may be encouraged by placing the animal in a new stall or pen.

Male ruminants may respond to manual stimulation of the prepuce, but the technician should be prepared with a collection container and make every effort to collect a sample when the animal obliges.

Urinary Catheterization

Males: As with male cattle, male sheep (rams) and male goats (bucks) have anatomic obstacles that make catheterization of the bladder extremely difficult, and the procedure is not commonly attempted. Catheterization of the urethra (not completely into the bladder) is commonly performed on blocked goats (urinary passage is blocked with urinary stones). The urethra opens 1 to 2 cm beyond the tip of the glans penis through the urethral process. It is difficult to enter this narrow structure with a catheter. The S-shaped curvature of the penis (sigmoid flexure) hinders the passage of a catheter beyond the flexure. There is also a urethral diverticulum (a blind sac) near the ischial arch that prevents the catheter from entering the bladder.

Females: Properly restrain the animal and hold or tie the tail out of the way during the procedure to prevent contamination. Cleanse the vulva. Wearing sterile gloves, apply sterile water-soluble lubricant to the fingers and pass the fingers into the vagina. The urethral opening is found midline on the ventral surface within 5 to 10 cm of the vulva (depending on the size of the animal). The vulvae of ewes and does are quite small. A small animal vaginal speculum may be helpful to allow visualization of the urethral opening. A 5F to 12F urinary catheter is inserted. Female ruminants have a small suburethral diverticulum (blind sac) that extends from the ventral aspect of the urethra. If the catheter is inadvertently fed into the diverticulum, it will not advance, and obvious resistance will be felt. If resistance is encountered, the catheter can be pulled out slightly and redirected in a more dorsal direction. Once in the bladder, urine may be collected by gravity flow or by aspirating with a sterile syringe.

PORCINE URINE COLLECTION

The technician should be ready with a collection cup because free-catch urine is necessary for a urinalysis in swine. It is common for adult swine to urinate two to three times a day.

Males should be confined and, if quiet and amenable, attempts to encourage urination can include stroking the prepuce with a warm, wet towel or soft brush. Male pigs cannot be catheterized because of the inaccessibility of the penis and the small diameter of the urethra.

Female pigs may respond when fingers, straw, or a soft brush are used to gently stroke the vulva. Females can be catheterized with the aid of a vaginal speculum and canine catheter, but the procedure is not routinely performed.

FECES SAMPLE COLLECTION

Fecal samples are collected for gross visual inspection; to check for the presence of mucus, sand, or blood (frank or occult); a microscopic examination to check for intestinal parasites; and for microbiologic culture or PCR assay. Occasionally, feces may be evaluated for osmolality and electrolyte concentration (to determine the presence of an osmotic diarrhea). The technician should be familiar with the normal character (content, consistency, color, and odor) and volume of feces for each species.

Feces contain a variety of bacteria that are normal and nonpathogenic. Fecal samples are cultured for specific microorganisms (such as Salmonella) by inoculating the feces into an enrichment medium that is designed to inhibit the growth of many normal bacteria while encouraging the growth of the specific bacterium to be identified. Some PCR assays that are now available are more sensitive and provide quicker results than a microbial culture for specific pathogens. If the animal is not producing feces, the technician may be asked to collect a rectal swab for a laboratory culture.

Fresh feces should be collected and placed in a clean container. Fresh feces will yield more accurate diagnostic information for parasite identification and an accurate culture result. Feces may be collected from the ground or from the rectum with a gloved hand.

image TECHNICIAN NOTE

Fresh feces will yield more accurate diagnostic information for parasite identification and a culture.

If feces are to be collected directly from the rectum, the person must have their fingernails clipped short and should be wearing no rings or watches. The horse is restrained (preferably in stocks) and an obstetrical sleeve worn with generous amounts of lubrication gel applied to the sleeve. The person will stand slightly to the side of the horse, touch fingertips together, and slowly and gently insert the hand just far enough into the rectum to collect a handful of feces. The glove or sleeve can be turned inside out and tied in a knot to store the sample. The utmost care must be taken by the technician because rectal tears can occur and can be life threatening.

If sand colic is suspected in a horse, fecal sedimentation may be used as a diagnostic test. Feces can be mixed in the glove or sleeve with water and the sleeve hung up to allow the solid material to settle in the sleeve. Sandy material may be seen or felt through the fingers of the glove.

MILK SAMPLE COLLECTION

Milk samples are routinely collected from dairy animals to test for the presence of mastitis. Mastitis is an inflammation of the mammary gland and is commonly caused by a bacterial infection. Inflammation may be present without a bacterial component if the teat or udder has received a traumatic injury (kicked, stepped on, cut). Clinical mastitis refers to the presence of obvious clinical signs, including hard, hot udder; abnormal appearance or smell of the milk; and pain. Subclinical mastitis must be determined by diagnostic testing of the milk.

Colostrum samples are frequently collected from mares and tested to determine the quality of colostrum present.

STERILE MILK SAMPLE

Thoroughly wash and dry hands. Clean the teat end with an alcohol-soaked cotton swab. Repeat until the cotton is clean after rubbing the end of the teat. Allow the alcohol to dry. Using clean, dry hands, remove the top of a culture tube. Each quarter of the cow's udder (each half in small ruminants) is considered individually. If milk from more than one teat is collected, the teats nearest the milker should be sampled first to prevent contamination of the far-side teats by the arm of the milker. Hold the tube so that no dirt or debris will fall into the tube and do not allow anything to touch the opening of the tube. Discard the first few squirts of milk then squirt a stream of milk directly into the collection tube and replace the top. Refrigerate the sample for up to 24 hours before lab processing.

NONSTERILE MILK SAMPLE

Samples for California Mastitis Test

The California mastitis test (CMT) is commonly used to identify the presence of mastitis in cows (or does and ewes). The test involves the use of a white plastic test paddle with four cups labeled A to D and a reagent fluid (Figure 20-67).

image

FIGURE 20-67 CMT (California mastitis test) paddle.

The teats are cleaned and dried. It is not necessary to clean the entire udder. If washed completely, there is an increased risk of introducing contaminants from the udder into the teat orifice. Strip a small amount from one teat into one well of the paddle. Do the same for the remaining teats and note which teat was milked into each well (Figure 20-68). An equal volume of CMT reagent solution (one part milk to one part reagent solution) is added to each well, the paddle is gently moved to swirl the milk, and the resultant solution is graded based on gel formation.

image

FIGURE 20-68 Collecting milk samples into CMT test paddle. Milk from each teat is collected separately into a cup on the paddle.

0 = No gel

Trace = Precipitate that disappears with continued movement of the sample

1 = First visible precipitate does not disappear

2 = First visible gel—mixture moves toward the center of the cup, leaving the bottom of the outer edge of the cup exposed

3 = Egg yolk–type clot that sticks to the bottom of the plate

The number indicates the severity of inflammation.

COLOSTRUM SAMPLE COLLECTION

Colostrometers provide a specific gravity assessment of the sample. Colostrum may also be submitted for a laboratory analysis, including immunoglobulin (Ig) (IgG) content and an antierythrocyte alloantibody determination. Sterile samples are not required.

The mare's udder should be washed well with soft cotton saturated with gentle soap and warm water and rinsed well before milking after foaling. The technician should be familiar with the use of a colostrometer and collect the appropriate volume (usually 5 to 10 ml) of colostrum. Samples can be milked directly into a collection tube or poured from another container into the necessary tubes.

RUMEN FLUID COLLECTION

Rumen fluid is collected for an analysis to aid in the diagnosis of diseases of the forestomachs (the reticulum, rumen, and omasum) in large and small ruminants. Characteristics of interest include the color, pH, odor, identification, and assessment of microbial organisms and numbers and electrolyte levels. Rumen fluid may also be collected for therapeutic purposes. When collected from a healthy animal, it may be used for transfaunation (inoculation of the sick animal's rumen with normal rumen flora needed to aid digestion).

ORAL GASTRIC TUBE (OROGASTRIC, ORORUMEN, STOMACH TUBE) METHOD

Tubes are inserted orally (through the mouth) in cattle. The nasal passages of cattle are a smaller diameter than horses, and this significantly limits the diameter of tube that can be placed nasally.

Equipment needed:

Stomach tube—For adult cattle: medium to large diameter with internal diameter no less that 1.5 cm because smaller size is more likely to become obstructed with ingesta. For calves, sheep and goats, small and medium foal stomach tubes can be used

Water-based lubricant

Frick speculum (cattle)

PVC pipe “speculum,” block of wood with hole cut in center, roll of tape (sheep, goats)

Dose syringe

Sample collection container

image TECHNICIAN NOTE

A Frick speculum is commonly used on cattle to pass OGTs. For small ruminants, a short piece of polyvinyl chloride (PVC) pipe may be used as a mouth speculum.

BOVINE RUMEN FLUID COLLECTION

Restrain the animal to sufficiently limit movement of the head. Do not overly elevate the head during this procedure. Ruminants may regurgitate fluid around the tube and having the head overly elevated increases the likelihood of aspiration of the fluid.

Estimate the length of tube needed to reach the rumen by extending the tube outside the animal from the mouth to the rumen. The restrainer wraps one arm around the muzzle and places nose tongs (or places one finger into one of the animal's nostrils and a thumb into the other nostril and pulls the nose upward to open the mouth). Standing to the side of the animal, insert the speculum (to prevent biting of the tube) over the root of the tongue in the center of the mouth. A popping or “give” is felt as the speculum passes over the root of the tongue and into the pharynx.

Lubricate the tip of the tube with a water-soluble lubricant or with water. Insert the tube through the speculum. Resistance is usually felt when the tube reaches the back of the pharynx. As the animal swallows, the tube is advanced down the esophagus. If the tube is not easily advanced, it may be necessary to slightly withdraw and rotate the tube and try again. Blowing into the tube dilates the esophagus and may ease the passage of the tube. The proper placement of the tube in the esophagus is confirmed by palpating (the trachea and tube may be felt as two distinct tubular structures) or visualizing the tube in the esophagus and feeling mild resistance as it is passed. Coughing may indicate that the tube is in the trachea, and feeling air pass out of the tube upon exhalation may indicate the placement into the trachea (these are not always reliable).

The placement of the tube within the rumen can be confirmed by blowing into the tube and listening for gurgling from the end of the tube and by blowing into the tube with an assistant auscultating the abdomen with a stethoscope over the rumen (left paralumbar fossa) listening for gurgles. Air should be heard bubbling in the rumen. An additional confirmation of the placement is done by smelling the exposed end of the tube (Figure 20-69). The distinctive odor of fermented gas may be detected coming from the tube. The aspiration of rumen fluid (rumen juice) clearly confirms placement of the tube.

image

FIGURE 20-69 Checking for rumen smells to confirm placement of OGT in cow.

A dose syringe is used to collect the rumen fluid sample. The initial fluid is discarded because it often contains an excessive amount of saliva, which may erroneously elevate the pH of the fluid. When the process is complete, the tube is kinked and withdrawn with a smooth downward motion. This prevents the rumen contents from leaking out of the tube and entering the trachea as the tube is withdrawn. The pH of the sample should be measured immediately after the sample is obtained.

SMALL RUMINANTS RUMEN FLUID COLLECTION

Restrain as necessary. Sheep may be backed into a corner and straddled or “set up” on their rump; goats may be pushed against a wall or backed into a corner and straddled. A speculum is placed between the lower incisors and the dental pad. A short piece of PVC pipe may be used as a speculum or a block of wood with a hole in the center or even a roll of tape (Figure 20-70). Whatever is used must be long enough to reach the back of the mouth so that the tube is not deflected to the side where it can be bitten or chewed by the animal.

image

FIGURE 20-70 PVC pipe used as mouth speculum in sheep for OGT insertion. The speculum prevents the animal from biting the tube.

Select a suitable size and length tube (approximately image- 
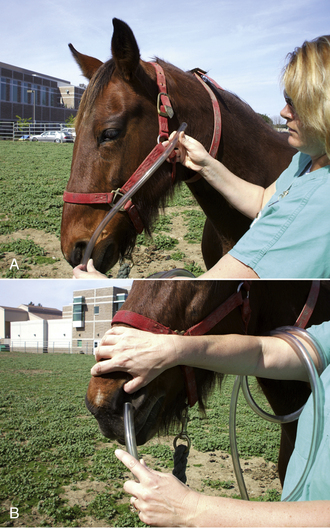
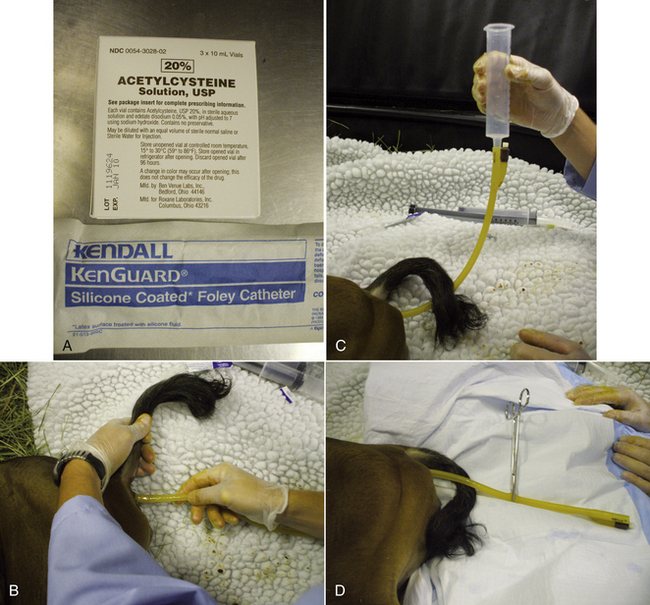
to ½-inch outside diameter) and estimate the necessary length as described for cattle and proceed with tube passage as described previously.

Rumenocentesis

This method is seldom done because of the ease and safety of the stomach tube method described earlier.

The ventral abdomen caudal to the xiphoid process and left of the ventral midline is clipped and surgically prepared. The veterinarian inserts a needle with a syringe attached (14-gauge needle for cattle, 16- to 18-gauge needle for small ruminants) through the skin and into the rumen. Rumen fluid is aspirated into the syringe.

THORACOCENTESIS (THORACENTESIS, PLEUROCENTESIS, CHEST TAP, PLEURAL TAP)

Thoracocentesis is the aspiration of fluid from the thoracic cavity. It is performed in large animals to obtain pleural fluid samples for diagnostic purposes and therapeutically to drain fluid, air, or exudate from the pleural cavity. Pleural fluid is produced by the cells of the pleura, which line the pleural cavity and surface of the lungs. The fluid volume and character changes with the presence of disease in the pleural cavity or lungs. In the normal animal, little or no fluid is obtained from the thorax. When disease is present, large volumes of fluid may be obtained from the thorax. A gross analysis of the fluid includes the color, opacity, presence of fibrin material, pus, and odor. A laboratory analysis includes cytologic and microbiologic examinations and often pH, lactate, and glucose. Occasionally, a PCR analysis is done for the identification of certain pathogens.

This procedure is generally performed by the veterinarian, and the technician will be called upon to set up, prep, and assist with the procedure. If facilities allow, the technician may perform the laboratory analysis of the sample. When an indwelling chest drain is placed, the technician will be expected to maintain the drain and monitor the patient (Figure 20-71).

image

FIGURE 20-71 Indwelling chest drain with Heimlich valve.

EQUINE AND BOVINE THORACOCENTESIS

Materials:

• Sterile gloves

• Ample collection tubes:

• EDTA (for cytology)

• Serum (for microbiology)

• Heparin (for pH, lactate, and glucose) or fluoride (for pH and glucose), depending on specific laboratory analyzer requirements

• Instrument of veterinarian's choice:

• Needle (minimum 3 inches) with large gauge

Or

• 14- to 16-gauge IV catheter

Or

• Sharp trocar and cannula

Or

• Teat cannula

Or

• Bitch catheter

• Two percent lidocaine 3 to 5 ml

• Six-milliliter syringe with 20- to 22-gauge × 1-inch to 1.5-inch needle

• Scalpel blade #15

• Sterile 35- to 60-ml luer tip syringe

• Three-way stopcock

• IV extension tubing

• Suture material, needle drivers, and scissors

• Ultrasound machine, if available and requested by veterinarian

Restrain the horse and administer sedation, as needed. The veterinarian will select the appropriate site on the right or left lateral thorax and may use ultrasound to identify the most appropriate site. The patient may require thoracocentesis on both the left and right side. Each side of the thorax may yield different laboratory results because diseases of the plural cavity may cause blockage of the normal communication between the right and left side. It is possible that abnormal fluid may be present on one side while the other side remains essentially normal.

image TECHNICIAN NOTE

A patient may require thoracocentesis on both the left and right side because each may yield different laboratory results.

Shave and aseptically prepare a large area from the olecranon back to the tenth intercostal space and from the point of the shoulder to well below the olecranon. The needle will be inserted in the ventral portion of the sixth and seventh intercostal (between the ribs) space 10 to 12 cm dorsal to the olecranon, above the lateral thoracic vein, and below the anticipated level of fluid. The site can also be determined with the use of ultrasonography, if indicated. Inject 5 ml of 2% lidocaine in the skin and SQ to make a bleb on the cranial aspect of the rib and deep enough into the intercostal muscles to include the parietal pleura. A stab incision is made into the anesthetized bleb with a scalpel blade. Avoid allowing the entrance of air during the procedure. A teat cannula (12- to 14-gauge × 3 inches) can be used to remove small volumes of air or fluid. A wider-bore sterile metal bitch catheter or human thoracic drainage cannula may be needed if there is a large volume of fluid or if the fluid is thick. The needle, catheter, or cannula with extension tubing and three-way stopcock attached is inserted cranial to the rib border and advanced through the parietal pleura. This approach is done to prevent damaging the intercostal vessels and nerves that run along the caudal border of the ribs. The heart, pericardial sac, and the lateral thoracic vein must be avoided. Once in the pleural cavity, a syringe is attached to the stopcock, and fluid is aspirated. When the fluid has been collected, the veterinarian may stitch a purse-string suture around the stab incision and tighten the suture as the cannula is removed.

CAMELID THORACOCENTESIS

The preferred site for thoracocentesis is at the sixth or seventh intercostal space 10 to 15 cm dorsal to the sternum (Figure 20-72). The area is clipped and surgically prepped. Any long fiber that may contaminate the shaved site should be taped back out of the way. Inject a local anesthetic as described for equines. A 14- to 16-gauge × 2-inch needle or teat cannula with a syringe attached is inserted near the cranial border of the rib. The pleural space is entered approximately 2 to 3 cm under the skin. The sample is aspirated into the syringe, and the needle is withdrawn and antibiotic ointment applied to the centesis site.

image

FIGURE 20-72 Side view of alpaca ribs.

Thoracentesis in other large animals is similar to the procedures described for camelids and equines, with the cannula's size dependent on the animal's size.

Complications of thoracocentesis include pneumothorax, dyspnea, and iatrogenic infection.

Transtracheal Wash (Tracheal Wash, Trach Wash)

Transtracheal aspiration is the collection of fluid from the lower respiratory tract (bronchi, bronchioles, and alveoli) for a cytologic and microbiologic analysis and is performed to aid in the diagnosis of lower airway and lung disease. The fluid is a mixture of secretions and cellular material that has collected in the distal portion of the trachea.

EQUINE TRANSTRACHEAL ASPIRATION

The two methods used for this procedure are percutaneous and endoscopic.

Percutaneous Method

Restrain the horse appropriately and identify the location for the procedure. A horse may require mild sedation (heavy sedation should be avoided because it may suppress the cough reflex). Select a site on the midline of the neck directly over the trachea about one third of the way down the neck. Clip or shave an area approximately 4 inches × 4 inches, perform a sterile prep, and set up necessary materials.

image TECHNICIAN NOTE

A horse may require mild sedation when a transtracheal wash is performed, but heavy sedation should be avoided because it may suppress the cough reflex.

Materials:

• Sterile gloves

• #20 to #30 surgical blade is used for adults, #15 to #20 for foals a few months old

• 12Sixty-milliliter syringe containing 30 ml of 0.9% NaCl (do not use bacteriostatic saline). Place the syringe back into the case.

• Twelve- to 14-gauge Medicut IV cannula or 12- to 14-gauge needle

• Five to 6F polyvinyl canine urinary catheter placed on sterile field

• Twenty-five-gauge needle for capping the collection syringe after sample is obtained

Inject approximately 1 to 2 ml of 2% lidocaine ID and SQ over the selected site on the trachea and apply a final prep.

Wearing sterile gloves, tie the canine urinary catheter in a loose half hitch knot. This will allow the catheter to stay completely on the sterile field and makes it easier to control the distal tip to prevent contamination by accidentally touching it on something before or during the insertion. Using the scalpel blade, cut off the distal tip (approximately 1 inch) of the canine catheter and place it back on the sterile field. This step makes aspirating thick mucus possible.

Make a stab incision with the scalpel blade through the skin between the tracheal rings. Grasp the 12-gauge Medicut with one hand. Stabilize the trachea with the other hand, palm side up, use fingers and thumb placed on each side of the trachea and hold firmly. Insert the distal tip of the needle with bevel side down through the incision and advance it into the tracheal lumen. If resistance is felt, redirect the tip of the needle between the tracheal ring spaces, then advance into trachea. A burst of air will exit the needle when it penetrates the lumen of the trachea. A 3-ml syringe comes attached to the needle with the Medicut. The syringe can be kept attached to the needle and plunger pulled back to aspirate for the presence of air.

Remove the Medicut stylet. This prevents possible laceration and loss of the canine catheter tubing. Place on sterile field in case it is needed again. Insert the canine urinary catheter until it reaches the thoracic inlet. Attach the 60-ml syringe and retract the plunger. Air is aspirated if the catheter is within the tracheal lumen. If no air is aspirated, reposition the catheter because it may be bent or occluded against the tracheal wall. Once air is aspirated, infuse 30 ml of NaCl and immediately try to aspirate a 5-ml or greater fluid sample (only a small portion of the fluid that is instilled will be retrieved). A 5-ml sample should be sufficient for microbiology and cytology. Continue aspirating while slowly withdrawing the canine catheter. Stop withdrawing when fluid for aspiration is evident and collect as much as possible with a catheter at that location. Withdraw again as needed to continue the collection of fluid (do not reinsert the catheter). If fluid is not obtained, remove the canine catheter, insert a second sterile canine catheter, and infuse another 20 ml of NaCl and try again (Figure 20-73). The total volume of saline infused (first and second attempt) should not exceed 50 ml. Some horses will cough while the saline is infused, which may have the positive effect of increasing the yield of mucopurulent material. Unfortunately, coughing may also cause the catheter to kink cranially, which may prevent the collection of any sample. With a sample syringe, remove the 5F catheter while keeping the Medicut in place (this helps to prevent an SQ infection). Remove the Medicut, apply pressure to the site, control any bleeding, and place a 4 inch × 4 inch gauze with antiseptic ointment over the incision for 24 hours. Use a sterile needle to cap the syringe containing the sample for transport to the laboratory.

image

FIGURE 20-73 Transtracheal aspiration of equine patient. A, Insertion of Medicut needle. B, Aspirating air to confirm placement in tracheal lumen. C, Coiling catheter to keep sterile and easily controlled. D, Inserting catheter into trachea. E, Aspirating sample. F, Following completion of procedure, neck is wrapped to keep puncture site clean and dry.

An alternate to using a Medicut catheter is to use a 12- to 14-gauge needle and insert the canine catheter through the needle. The needle is removed after the canine catheter is inserted into the tracheal lumen. Using the needle alone rather than an insertion catheter (Medicut) makes laceration of the canine catheter more likely and increases the likelihood of SQ contamination of the insertion site because the contaminated canine catheter will be in direct contact with the tissue at the insertion site when removed.

Cellulitis or SQ abscessation at the tracheal puncture site is the most common complication. If swelling occurs, warm compresses are applied. Other complications include SQ emphysema around the trachea, pulmonary foreign body as a result of the presence of a catheter piece in the airway, acute dyspnea, tracheal laceration, minor SQ hemorrhage, and iatrogenic infection.

Endoscopic Method

The use of an endoscope is considered noninvasive and allows for the visual examination of the upper airways, trachea, carina, and primary and secondary bronchi, but the presence of the endoscope leads to the questionable accuracy of the microbial samples recovered with this technique. An endoscope is inserted through the nasal cavity to the tracheal lumen. Special tubing (polyethylene tubing or endoscopic microbiology aspiration catheter) is placed through the biopsy channel of the endoscope and fluid injected and aspirated to collect the sample. The use of these specialized sample collection items decreases the likelihood of contamination from the pharynx or the endoscope that would otherwise occur with the endoscopic approach. It is usually necessary to infuse saline, as described for the percutaneous approach, to aspirate a fluid sample from the trachea.

BOVINE, CAPRINE, OVINE, AND CAMELID TRANSTRACHEAL ASPIRATION

Use methods as described for equines.

Bronchoalveolar Lavage (BAL)

Bronchoalveolar lavage is a procedure done to collect fluid samples from the lower airway. BAL provides fluid samples that are better for a cytologic assessment than samples obtained by transtracheal aspiration, but the fluid samples are representative of only a limited area of the lung and are subject to contamination from passing the tube through the nares. The BAL is done by the insertion of sterile tubing through the nares and down the trachea as far as possible. To prepare for the procedure, the technician should have sterile BAL tubing, a syringe containing 50 ml of 2% lidocaine, and three syringes each containing 60 ml of sterile saline (not bacteriostatic saline). The veterinarian may choose to use more or less saline, so the technician should check before the procedure to be sure of the desired amount of saline to have ready in syringes.

The horse should be sufficiently restrained and may require sedation. While the tube is passed into the trachea, 2% lidocaine is injected into the tube whenever the horse coughs. This acts as a local anesthetic to the bronchi and is done to decrease the cough reflex. It is not uncommon to use the entire 50 ml of lidocaine before the procedure is complete. Sterile saline (previously drawn up into three separate 60-ml syringes) is injected and aspirated (as is done with the transtracheal aspiration procedure) (Figure 20-74).

image

FIGURE 20-74 BAL of equine patient. A, Inserting BAL tubing with syringe containing lidocaine attached to end of tube. B, Collecting BAL sample. C, Syringe containing BAL sample is capped before transport to the lab.

image TECHNICIAN NOTE

While the BAL tubing is passed into the trachea, 2% lidocaine may be injected into the tube whenever the horse coughs to decrease the cough reflex.

The procedure can also be done with the use of an endoscope, with sterile tubing passed through the biopsy channel of the scope so that saline can be injected and fluid samples aspirated. This method is the preferred method for a sample collection when bronchial and/or alveolar disease is suspected. The use of the endoscope allows for sampling from specific areas of the lung, but a limited sample is obtained rather than the pooled secretions that are obtained when a transtracheal aspiration is done.

If the veterinarian intends to perform both a percutaneous transtracheal aspiration and a BAL, the transtracheal aspiration should be performed first. This will allow the fluid samples to be obtained before any contamination that may be introduced with the passage of the BAL tubing (or endoscope). Often the cough reflex is intentionally suppressed for the BAL, whereas a cough may be desirable during the transtracheal aspiration procedure.

ABDOMINOCENTESIS

Peritoneal fluid obtained by abdominocentesis (abdominal tap, peritoneal tap, paracentesis, belly tap) can provide valuable diagnostic information. Peritoneal fluid is produced by the cells of the peritoneum. These cells line the abdominal cavity and the outer surfaces of the abdominal organs. The composition of this fluid is determined by the condition of the abdominal organs. An analysis includes gross appearance, laboratory results, and the volume of fluid present. The accumulation of fluid in the abdominal cavity is abnormal.

image TECHNICIAN NOTE

The composition of peritoneal fluid is determined by the condition of the abdominal organs.

Abdominocentesis is commonly performed on horses, camelids, cattle, sheep, and goats. The veterinary technician may be asked to prepare for and assist with the procedure or to perform the procedure. There are several variations on the procedure, and the technician will be directed by the veterinarian as to which approach is preferred. With any of the techniques, consideration should be made to ensure that the sample is not contaminated, that no contaminants are introduced into the patient, that as little trauma as possible is inflicted upon the patient, and that personnel are not injured while obtaining the sample.

Some indications for abdominocentesis include colic, suspected peritonitis, weight loss, abdominal distention, chronic diarrhea, signs of internal hemorrhage, abnormal ultrasound findings, and an FUO.

For all species:

Gather all required supplies (include alternate in case use of first-choice instrument is unsuccessful)

Appropriately restrain patient

Clip or shave the area chosen

Perform sterile prep

Wear sterile gloves and maintain sterility throughout procedure

EQUINE ABDOMINOCENTESIS

Many horses require minimal restraint for the procedure. If possible, restrain the horse in standing stocks. A handler should remain at the horse's head, twitch applied or sedation administered, depending on the nature of the horse and degree of discomfort the horse is exhibiting.

When preparing the site and when performing the procedure, the person should squat next to the horse adjacent to the forelimbs and facing the rear of the horse. This position reduces the likelihood of the person being kicked with the horse's hind leg. The person should take care to keep their head up and safely away from the belly and legs of the horse and be prepared to move quickly back if necessary to remain safe. If the technician is assisting with the procedure and will be collecting the fluid into tubes, they should be positioned similarly on the opposite side of the animal (if space permits) or wait until the instrument has been inserted and then squat or bend over next to the veterinarian (being prepared to step back quickly, if necessary) and with outstretched hand, place the collection tube under the needle or cannula.

Determine the site for the tap. Locate the lowest portion of the abdomen and locate the ventral midline. This is usually 2 to 4 inches caudal to the xyphoid. Abdominocentesis can be performed on the ventral midline, but a paramedian site 1 to 2 inches to the right of the midline reduces the likelihood of tapping the spleen (in horses) or the rumen (in ruminants). Abdominocentesis should not be performed through skin abrasions or surgical lesions and whenever possible, tapping through edema should be avoided. The clinician may perform ultrasonography to assist in determining the most desirable site for abdominocentesis and to prevent penetrating organs.

image TECHNICIAN NOTE

Abdominocentesis can be performed on the ventral midline, but a paramedian site to the right of the midline reduces the likelihood of tapping the spleen (in horses) or the rumen (in ruminants).

Teat Cannula or Female Canine Urinary Catheter (Bitch Catheter) Method

Using a blunt-tipped bovine teat cannula or stainless steel female canine urinary catheter reduces the risk of bowel penetration, therefore this method may be chosen over the needle method for animals with abdominal distention or bowel distention (as identified with a rectal examination by veterinarian). This method requires the use of a local anesthetic.

Shave an area approximately 2 inches square. Perform a sterile prep. Aspirate 2 ml of 2% lidocaine into a 3-ml syringe. Perform local anesthesia by infusing the skin and SQ tissue with approximately 1 ml of the lidocaine using a 25-gauge needle. Insert the needle into the center of the shaved area (avoid any obvious cutaneous vasculature), aspirate to check for blood, and then infuse the lidocaine. Remove the 25-gauge needle and place a 19-gauge × 1.5-inch needle directly into the center of the SQ bleb. Insert the needle completely to the hub and inject the remaining 1 ml of lidocaine while slowly removing the needle from the patient. This is to block the parietal peritoneum.

Complete the sterile prep with a final swab of Betadine solution (or alternate antiseptic).

Assemble the equipment:

Four-inch teat cannula or bitch catheter

#15 scalpel blade

Two-milliliter EDTA tube

Three-milliliter serum tube

Heparin tube or syringe (depending on lab capabilities)

Sterile 4-inch × 4-inch gauze sponges

(Figure 20-75)

image

FIGURE 20-75 Supplies for abdominocentesis. Bitch catheter, 4-inch × 4-inch sterile gauze sponges, #15 scalpel blade, 19-gauge × 1.5-inch needles, 2-ml EDTA tube, 3-ml plain tube, 3-ml syringe with 25-gauge × 1-inch needle containing 2% lidocaine, 12-ml syringe, 6-ml syringe.

Create a sterile field by opening a pair of sterile gloves and placing the teat cannula (or bitch catheter or needle), scalpel blade, and sterile gauze 4 inches × 4 inches on the field (Figure 20-76).

image

FIGURE 20-76 Sterile field with sterile supplies for abdominocentesis.

Put on sterile gloves.

Puncture the center of one gauze 4-inch × 4-inch sponge with the scalpel blade and put the teat cannula through the gauze. This will help prevent contamination of the sample with blood or dust.

Using the scalpel blade, make a stab incision through the skin. Hold the blade with about image inch exposed. Using the back of the gloved hand, gently touch the horse's belly then insert the scalpel blade straight in the bleb and then pull it straight out. Avoid cutting the musculature. Slowly but firmly insert the teat cannula through the incision perpendicular to the musculature. The muscle will feel “gritty,” and a slight “pop” will be felt when the peritoneum is punctured. A decrease in resistance is felt when the abdomen has been entered. If firm resistance is felt at this point, it may indicate contact with an organ, and care must be taken if further manipulation on the cannula is required. Once the cannula is in, expect to wait while the horse takes a few breaths before fluid begins to flow from the cannula. If fluid does not immediately flow, the cannula can be gently “flicked” with a finger in an effort to encourage the flow, and the cannula can be moved around slightly, rotated, or redirected. If necessary, a syringe may be attached to the cannula and aspiration may be attempted (Figure 20-77).

image

FIGURE 20-77 A, Incision on prepped and blocked ventral midline area for equine abdominal tap. B, Insertion of bitch catheter through incision. C, Collection of abdominal fluid through bitch catheter into collection tubes.

The first few drops of fluid may contain contaminants, so these drops should not be included in the sample. Collect the sample by gravity flow into collection tubes. The EDTA tube should be collected first since most of the desired laboratory tests will require this sample. The tube should be filled as much as possible to ensure the correct ratio of EDTA to abdominal fluid. If less than 1 ml of abdominal fluid is collected, the results of the laboratory analysis may be inaccurate. A common practice is to remove the rubber stopper from the EDTA tube and shake the tube to remove a bit of the EDTA before collecting the fluid sample. This is useful when a small sample volume is obtained. When refractometry is performed, excessive EDTA in relation to sample size will falsely elevate the protein reading. EDTA samples are used for cytologic analysis, protein measurement, and PCV (if fluid appears bloody). A serum (plain, clot) tube should be collected for bacterial culture (as little as 1 drop of fluid is sufficient for this purpose). Some facilities have the capability to perform pH, gas, lactate, and glucose analyses. The technician should be familiar with the laboratory capabilities and be familiar with the appropriate anticoagulant requirements. For many analyzers that perform these additional tests, heparin is the choice of anticoagulant. Some facilities will require a sodium fluoride tube for glucose and lactate measurements.

image TECHNICIAN NOTE

The technician should be familiar with the laboratory capabilities and be knowledgeable about the appropriate anticoagulant requirements.

When removing the cannula, the technician should be aware that some omentum may have attached to the cannula and can follow the cannula out when the cannula is pulled from the site. To prevent it from being exteriorized, care should be taken to use fingers to guard close to the site when removing the cannula. As a result of the incidental perforation of skin vessels, slight bleeding is common after the removal of the cannula. Manual pressure applied to the site usually stops the bleeding. If necessary, the veterinarian will suture or staple the site. The centesis site can be cleaned gently and antibiotic ointment applied daily for a couple of days.

18- to 22-gauge, 1.5-inch needle method

A local anesthetic is usually not required for this method, but that will vary depending on the horse.

The needle is held midway between the thumb and forefinger and inserted through the skin while avoiding superficial veins. The fingers are then moved slightly to grasp the hub of the needle for gradual advancement. The needle should be inserted in slight intervals, pausing before each interval of advancement to notice (by feel) if a scratching sensation is present. The scratching sensation indicates that bowel is rubbing over the tip of the needle. The fingers should be removed from the needle periodically to watch for rotary or “flicking” movement of the needle, which is also indicative of bowel contact. Periodic back and forth movement of the needle in time with respiration is normal. The needle is advanced slowly to the hub if no bowel is encountered or until fluid is obtained. If abdominal fluid is not seen in the needle hub, the needle can be repositioned and rotated, and a syringe may be used to try and aspirate a sample. If fluid is not obtained, 1 to 2 ml of air (in a sterile syringe) may be injected in an effort to dislodge any material that might be occluding the needle. Another option to encourage the flow of fluid is to insert a second or third needle a few centimeters from the first (while leaving the first needle in place) to release the negative pressure in the abdomen.

image TECHNICIAN NOTE

Periodic back and forth movement of the needle in time with the animal's respiration is normal.

18-Gauge, 3.5-Inch Spinal Needle Method

This long needle may be required in very large horses, draft horses, and obese individuals. Some clinicians report that this long needle is also useful in Arabian horses to facilitate penetration beyond the abdominal wall and subperitoneal fat layer.

A local anesthetic is not usually necessary for this method, but that will vary depending on the horse.

With the stylet in place, the needle is inserted to a depth of approximately ¼ inch. The stylet is removed before further advancement and the procedure continued as is done with a standard needle.

EQUINE ABDOMINOCENTESIS (FOAL)

Sedation is usually indicated. The procedure is safer for the patient and personnel if sufficient human assistance is used for physical restraint and positioning of the foal.

For neonates less than 1 month old or actively colicky foals, abdominocentesis can be done with the sedated foal restrained in lateral recumbency. A 20-gauge × 1- to 1.5-inch needle is inserted caudal to the xyphoid midline or right paramedian (off center but near the midline). Foal intestine is thin and fragile, and care must be taken to avoid contacting the bowel. A blunt-ended, small-diameter teat cannula or canine bitch catheter can be used and poses less risk for intestinal laceration than a needle, but a local anesthetic and stab incision are needed before the insertion of the cannula. The lack of subperitoneal fat in foals increases the risk for laceration of the bowel with a scalpel blade when a stab incision is made. The blade must be held with the fingers up near the tip of the blade to maintain control and ensure that it is not inserted too deeply. For foals older than 1 month of age, an 18- to 20-gauge × 1.5-inch needle, a teat cannula, or bitch catheter would be appropriate and the procedure performed as for younger foals.

image TECHNICIAN NOTE

Foal intestine is thin and fragile, and care must be taken to avoid contacting the bowel.

CAMELID ABDOMINOCENTESIS (ADULT)

There are two common sites for abdominocentesis in camelids: a ventral midline site and a right paracostal (near the ribs) site. The paracostal site is easier to tap because camelids will frequently choose to drop to sternal recumbency (“kushed” position) when they object to a procedure, making the ventral midline site unavailable. The midline site is also complicated by a thick subperitoneal fat layer on either side of the linea alba, and the visualization may be obscured by a long-fiber coat hanging from the sides of the animal.

Provide appropriate restraint by using a camelid chute or having a handler push the left side of the animal up against a wall or fence. Chemical sedation may be required for some animals.

The paracostal abdominal tap site is located on the right side of the animal about 4 inches behind the caudal most curve of the ribs (approximated by placing the palm of the hand behind the last rib) about one third of the way up between the ventral abdomen and the spine (Figure 20-78). Clip or shave a 3- to 4-inch square area. It is helpful to keep long fiber in the surrounding area clear of the site by taping it back.

image

FIGURE 20-78 Paracostal site on alpaca for abdominocentesis.

Perform a sterile prep. Using a 22- to 25-gauge needle inject 1 to 3 ml of 2% lidocaine into the skin and SQ tissue. Perform a final sterile prep of the site. Using a #11 or #15 scalpel blade, make a stab incision. Using a quick, controlled thrust, insert a 4-inch blunt-ended teat cannula perpendicular to the abdomen. Advance it slowly into the abdomen. If fluid does not flow, the tip of the cannula can be gently repositioned, a syringe may be attached, and negative pressure applied or a few milliliters of air can be injected into the abdominal cavity.

For the ventral midline approach, select the lowest site, which is just caudal to the umbilicus. To avoid the retroperitoneal fat pads on either side of the linea alba (which will obstruct the cannula and prevent a sample collection), the site chosen should be directly on the linea alba. Clip a 3- to 4-inch area, perform a sterile prep, and inject a small amount of local anesthetic (as listed for method described earlier). Using a scalpel blade, create a small stab incision and insert a teat cannula as described for an equine abdominal tap.

CAMELID ABDOMINOCENTESIS (NEONATAL)

The cria (neonatal llama or alpaca) can be mildly sedated, as needed and should be restrained in lateral recumbency. A teat cannula or 20-gauge × 1-inch needle may be used in the same site as for the standing adult camelid.

BOVINE ABDOMINOCENTESIS (ADULT)

The animal is placed in a head gate, stocks or chute that will allow access to the right side of the animal. A tail jack restraint may be sufficient but chemical sedation may be necessary depending on the behavior of the animal and site used.

An 18-gauge, 1.5-inch needle is sufficient for abdominocentesis in most adult cattle, although some very large individuals may require a 3-inch needle. A teat cannula can be used instead of a needle. If “hardware disease” (traumatic reticulitis from the ingestion of heavy foreign objects) is suspected, the site selected should be just caudal to the xyphoid and to the right of the midline as described for horses. The person performing the tap should stand by the animal's forelimbs facing backward and be aware of the risk of being kicked. If general effusion or widespread disease is suspected, alternate sites can be the flank fold on the right side of the animal or the ventral abdomen at the lowest point approximately 2 to 4 inches to the right of the umbilicus. Tapping the abdomen through the flank fold can be done successfully without a local anesthetic.

BOVINE ABDOMINOCENTESIS (NEONATAL)

Abdominal taps on calves can be done with the animal standing or in left lateral recumbency. Appropriate restraint is necessary, and sedation may be necessary to keep the animal still. A ventral midline site about 4 cm (approximately 1.5 inches) cranial to the umbilicus or a paramedian site approximately 4 cm to the right of the umbilicus can be used. As described earlier, a needle or teat cannula can be used for the centesis.

OVINE AND CAPRINE ABDOMINOCENTESIS

Abdominocentesis in sheep and goats may be used to investigate abdominal distention, poor forestomach motility, and suspected uroabdomen (caused by urinary tract obstruction or ruptured bladder). A ruptured bladder is common in male goats (bucks) secondary to obstructive urolithiasis and leads to the accumulation of urine in the abdominal cavity.

image TECHNICIAN NOTE

A ruptured bladder is common in male goats secondary to urolithiasis and leads to the accumulation of urine in the abdominal cavity.

Manually restrain the animal and sedate it, if necessary. A local anesthetic may be indicated, even if a needle is used for abdominocentesis. The procedure can be done with the animal standing.

Select a site at the lowest point of the abdomen 2 to 4 cm to the right of the ventral midline (to prevent tapping the rumen). Avoid the mammary veins (milk veins or SQ abdominal veins) of females and the penis and prepuce in males. An 18- to 20-gauge × 1.5-inch needle or teat cannula can be used. A local anesthetic is necessary for the stab incision required with the use of a teat cannula and may also be desirable, even if a needle is used. If peritonitis is suspected, the veterinarian may choose to tap multiple sites to increase the chances of a diagnosis. The additional sites include caudal to the xyphoid, medial to the right and left milk veins, and slightly cranial to the mammary gland on the right and left of the midline.

The most common complication associated with abdominocentesis is a failure to obtain a sample and slight skin hemorrhage. The protrusion of omentum through the site of puncture through the abdominal wall can also occur. More serious complications of abdominocentesis in large animals include penetration of the bowel, penetration of the spleen, damage to the xyphoid process if the centesis site is too cranial, and the introduction of bacteria leading to peritonitis or cellulitis. SQ abscessation and cellulitis are uncommon when an unremarkable abdominocentesis procedure is performed, but the risk for these complications increases markedly when the intestine has been punctured, if abdominocentesis is done through edematous tissue, and in animals that have septic peritonitis.

CEREBROSPINAL FLUID COLLECTION (SPINAL TAP, CSF TAP)

Cerebrospinal fluid may be collected from patients when central nervous system disease is suspected. A CSF fluid analysis includes the gross visualization of color, clarity, and presence of particulate matter. Total protein, cytology, and chemistry are performed on the fluid. The technician will be expected to prepare the site, restrain the patient, or assist the veterinarian while the veterinarian performs the procedure.

EQUINE

Atlanto-Occipital Site (AO Tap)

This site is located on the dorsal midline just caudal to the poll. Collecting spinal fluid from this site requires a general anesthetic. With the animal anesthetized, it is placed in lateral recumbency. The area is clipped, shaved, and a complete sterile prep performed. When all preparations have been made, the nose is directed down toward the front feet to flex the head. The head should be at a right angle to the neck. The veterinarian will insert an 18-gauge × 3-inch spinal needle into the atlanto-occipital space (about 5 to 7 cm depth) and once in, will remove the trocar (stylet) and place it on a sterile field. A sterile syringe is attached to the needle and a sample gently aspirated. Alternately the fluid may be collected directly into a tube by free flow. If the fluid is blood tinged, aspirate a few milliliters and then attach a new syringe. The technician should be prepared with additional syringes in case multiple samples can be obtained. The trocar (still sterile) is replaced in the needle, and the needle is withdrawn. Following the removal of the needle, any blood present can be cleaned from the site, and a Betadine-soaked gauze sponge can be placed on the site.

The AO tap in neonates is done with a 20-gauge × 1.5-inch needle directed at the mandible. Fluid should drip from the needle hub. Normally, 3 to 6 ml of fluid is obtained.

image TECHNICIAN NOTE

Collecting spinal fluid from the atlanto-occipital site requires a general anesthetic.

Lumbosacral Site (LS Tap)

This site can be located by making an imaginary line across from the caudal edge of each tuber coxae and another line on the dorsal midline. A slight depression can be palpated using firm pressure at the intersection of these imaginary lines, just caudal to the sixth lumbar spinal process (L6). A large area is clipped, shaved, and a sterile prep performed. Sedation is required, and the use of a twitch for restraint is indicated because the animal must remain very still for the procedure. The horse should be placed in stocks. A local anesthetic is injected into the skin and SQ. The patient should be standing as squarely as possible (the best that its condition will allow) because an asymmetric stance makes collection more difficult (Figure 20-79, A-F). If sufficient personnel are available, it is helpful to have someone standing behind the horse to comment to the veterinarian as to the placement of the needle so that small errors in the direction of insertion can be noted and corrected. The veterinarian will insert a 6-inch (15 cm) × 18-gauge spinal needle perpendicular to the midline (about 11 to 15 cm, or 4.5 to 6 inches). For some draft horses and warmblooded animals, longer needles (up to 8 inches) may be needed. When the needle reaches the subarachnoid space, the patient may respond with movement. The trocar is removed from the needle and placed on a sterile field. The technician will place a sterile syringe in the veterinarian's still sterile, gloved hands. The initial sample may be contaminated with blood, so a second or third syringe may be collected if sufficient fluid is aspirated. The veterinarian may instruct assistants to occlude both jugular veins in an attempt to increase the intracranial pressure. The trocar (still sterile) is replaced into the needle and the needle removed.

image

FIGURE 20-79 A, Shaving area for lumbosacral spinal tap. B, Injecting 2% lidocaine for local anesthetic block. C, Prepping site with Betadine solution. D, Site covered with Betadine-soaked gauze. E, Inserting spinal needle. F, Aspirating spinal fluid sample.

image TECHNICIAN NOTE

The patient should stand as squarely as possible for an LS tap.

The lumbosacral CSF tap in neonates can be done with the foal standing, in sternal recumbency, or in lateral recumbency using a 3-inch × 20-gauge spinal needle.

Complications that may result from CSF taps include trauma to the spinal cord during needle placement, herniation of the cerebellum (can occur with high intracranial pressure or from aggressive aspiration), and infection of the meninges. These can result in the death of the patient. The chances of these complications occurring are minimized by having the patient sufficiently restrained to remain still and by following strict sterile technique throughout the procedure.

Camelids

A CSF fluid collection from llamas and alpacas follows the same procedure guidelines as described for horses.

The atlanto-occipital site is located midline as it intersects the wings of the atlas. In adults, a 20-gauge × 2.5-inch spinal needle is used with the subarachnoid space usually reached at a depth of 4 cm.

The lumbosacral site is midline about 2 cm caudal to the dorsal spinal process of the seventh lumbar vertebra. The landmarks used to locate the site are the tuber sacrale of the pelvis and dorsal spinal process of the last lumbar vertebra. The site is cranial to the tuber sacrale. An 18- or 19-gauge × 3.5-inch spinal needle is appropriate for most adult llamas and alpacas.

TREATMENT TECHNIQUES IN LARGE ANIMALS

INTRAVENOUS ADMINISTRATION

IV injections are commonly performed on large animal patients. Drugs administered via the IV route are very rapidly absorbed. Some medications are quite caustic and injecting them into the vein dilutes the drug, making it less caustic than it would be if it were administered IM or SQ.

Equine

With most horses, minimal restraint (halter and lead rope) can be employed to successfully administer medication using this route. If the patient is uncooperative, aggressive, or sensitive to needles, placing the animal in the stocks or using a second person and a twitch may make the procedure easier and reduce the likelihood of injury to personnel and complications with misdirected puncture.

Jugular Vein: The jugular vein is the most common site used in equine patients for IV administration.

The right or left jugular vein is chosen, using the most cranial half of the neck. This is preferred because of the muscle layer that lies in the upper half of the neck that protects the underlying carotid artery from a potential puncture. The preference is the right jugular vein because in most horses, the esophagus lies within the left jugular furrow and could potentially be tapped with an aggressive venipuncture. The site is then wiped down with alcohol, and digital pressure is applied to the jugular furrow below the intended puncture site to distend the vein. For adult horses, a 1.5-inch needle is used (18-, 19-, or 20-gauge is adequate). Using the free hand, the needle is inserted into the vein in an upward direction (toward the head). Once blood drips from the hub of the needle, advance the needle all the way until just the hub is visible. It is critical to identify that the needle is in a vein and not an artery since the accidental injection of medication into the artery goes directly to the brain and can result in a serious, violent reaction and may even prove fatal. Certain substances that are injected perivascularly can cause severe necrosis to the tissue it comes in contact with (e.g., phenylbutazone). When a large-bore needle is inserted, arterial blood will forcibly pulse out of the hub of the needle and tends to be bright red, whereas venous blood will steadily drip from the hub of the needle and tends to be darker red.

image TECHNICIAN NOTE

Arterial blood will forcibly pulse out of the hub of the needle and tends to be bright red, whereas venous blood will steadily drip from the hub of the needle and tends to be darker red.

The syringe with medication can now be attached to the needle making sure not to inadvertently move the needle perivascularly. Before injecting any substance, confirmation of the placement needs to be reestablished. Gently aspirate the plunger of the syringe to confirm that blood enters the syringe and that it is not bright red in nature (indicating arterial puncture). Remove digital pressure from the jugular furrow and administer the medication in a slow and continuous fashion. Once all medication is administered, remove the needle and syringe and apply digital pressure over the site for a couple of minutes to reduce potential hematoma formation.

IV injection of a medication may result in an anaphylactic reaction (mild to severe). A reaction may include sweating, urticaria (hives), anxiety, agitation, difficulty breathing, and even collapse. If the technician notes any of these responses, the remainder of the drug in the syringe should not be given, the technician should move safely away from the animal, and the veterinarian notified of the situation. An injection of epinephrine may be necessary, and the technician should have prior arrangements with the veterinarian as to the amount to administer in the event that an anaphylactic emergency occurs when the veterinarian is not immediately present.

image TECHNICIAN NOTE

The administration of a drug by any route can result in an anaphylactic reaction.

Other sites for IV injections include the cephalic vein and the lateral thoracic vein, but these sites are usually reserved for a catheter placement instead of routine injections of medications because they are more awkward to access on the patient.

Equine IV Catheterization

For repeated IV drug injections or when large volumes of IV fluids are required, an indwelling catheter should be placed in the jugular vein. If either jugular vein is not accessible as a result of thrombosis or trauma or if the horse pesters the jugular catheter, it may be necessary to catheterize the cephalic vein or the lateral thoracic vein. There are many different options for catheters, and the choice should be made based on the length of time the catheter will be in place and the number of ports that may be necessary. For adult equine patients, when using OTN catheters, 14 gauge × 5.25 inches is sufficient, but for neonates, small ponies, or miniature horses, 16 gauge × 3.25 inches may be preferred. Miniature horse neonates may require a smaller catheter, and an 18- to 20-gauge × 3-inch catheter may be used, with the realization that the size of the catheter will dictate the fluid administration rates that can be achieved.

image TECHNICIAN NOTE

Polyurethane and Silastic catheters are less thrombogenic than catheters made of Teflon and can be maintained in veins for longer periods.

The site chosen is shaved and surgically scrubbed to remove all debris. A final wipe with Betadine solution over the area is then added and left on to dry. A “bleb” of lidocaine (ID administration using a 25-gauge needle and approximately 2 ml of lidocaine) should be administered over the intended injection site, including above the site, to desensitize an area for suturing the catheter in place. A sterile field is created by opening up a package of sterile gloves and aseptically laying the desired catheter on the gloves. All necessary items need to be either placed on the sterile field or readily accessible nearby.

Wearing sterile gloves, the technician grasps the catheter with the dominant hand and uses the other gloved hand to apply digital pressure to the jugular furrow. The catheter is inserted through the skin (into the “bleb”) at approximately a 45-degree angle and should be inserted toward the heart, with the direction of blood flow. Once the lumen of the vein has been accessed (identified by the “flash” of blood at the hub of the catheter), the catheter is aligned more perpendicular to the vein and advanced 1 cm more. If the catheter is still in the vein (as indicated by flash back blood coming from catheter), the hand applying the digital pressure releases and then grasps the top of the stylet portion of the catheter. The catheter is then slid all the way into the vessel, removing the stylet at the same time. Recheck to make sure that the vein is still catheterized by applying digital pressure yet again (below the tip of the catheter) and watch for blood to drip from the hub. Once this has been identified, attach a PRN or T-port and suture the catheter into place (Figure 20-80, A-E).

image

FIGURE 20-80 A, Distending the vein by placing pressure on the vein for IV catheter placement in equine jugular vein. B, Injecting ID lidocaine as local anesthetic. C, Inserting catheter. D, Catheter in vein, blood dripping from catheter confirms placement in the vein. E, T-port attached to catheter.

image TECHNICIAN NOTE

Once the stylet has been withdrawn from the catheter, it should not be reintroduced because the sharp tip may cut through the catheter causing a small piece to be dislodged into the vein or may make a very jagged edge on the catheter.

If the carotid artery is catheterized, bright red blood will forcibly pulse out of the catheter. If this should occur, immediately remove the catheter and apply digital pressure over the sight for a minimum of 5 minutes to prevent the formation of a hematoma. Neck wraps or stents can be placed over catheters to stabilize them and to prevent the patient from rubbing them out. A common practice is to apply a small amount of antibacterial ointment before placing a wrap over the catheter. If the catheter remains in place long term, the ointment used can be alternated (e.g., Nolvasan, Betadine, triple antibiotic) in an attempt to reduce the chances of a resistant staphylococcus infection taking hold. Foals and adult horses that spend a considerable amount of time in recumbency should have wraps placed over the catheter to protect the site from bedding, urine, and manure. When placing IV catheters in recumbent neonatal foals, it is helpful to place a rolled-up towel under the neck to enhance the view of the jugular vein and stretch the skin. Making a small nick in the skin at the insertion site with a needle or blade will facilitate the insertion of the catheter. It is also helpful to have an assistant stretch the skin while applying digital pressure and thus maintaining distention while the catheter is advanced.

When administering fluids or medications into an IV catheter, the technician should always first clean the injection port with isopropyl alcohol to prevent bacterial contamination.

If the technician wishes to use a guidewire-type catheter, the same steps for preparing and placing the catheter are used, but the guidewire-type catheters entail a few extra steps (refer to Seldinger guidewire technique described for small animals or read directions on individual packages). The most important thing to remember when placing these types of catheters is to NEVER let go of the guidewire until the catheter is successfully placed and the guidewire is fully removed.

Cephalic Vein: For IV catheterization of the cephalic vein (Figure 20-81), the standard preparation is made and the catheter inserted proximal to the carpus and upward. A 14- to 16-gauge × 3.25- to 5.25-inch catheter is an appropriate choice for an adult equine. The placement of a T-port is beneficial and in some cases, a piece of IV extension tubing is connected to the catheter so that IV infusions can be made without disturbing the catheter wrap. The catheter can be covered with sterile gauze and elastic wrap.

image

FIGURE 20-81 Site shaved for IV catheterization of equine cephalic vein.

Lateral Thoracic Vein: The site is shaved, and standard preparation is done. The IV catheter is inserted in a cranial direction (toward the front of the horse). This is a large diameter vein and can accommodate a large-bore catheter, if necessary. The vein is deeper than the other veins used for IV catheterization. A wrap is placed over the catheter and wrapped around the body of the horse.

Bovine

Jugular Vein: To administer IV medication or fluids to a bovine patient, the jugular vein is the most feasible route to use. Proper restraint of the animal is critical to the safety of the animal and the staff. For adult bovines, the head should be haltered, and ideally the animal should be placed into a head gate or stanchion. The head is slightly lifted and pulled away from the side to be used and tied with a quick-release knot. This will give the technician a good visual of the area and prevent the animal from knocking its head into the technician. Calves may be restrained standing with the handler holding the calf up against their body or in recumbency. Once the animal is sufficiently restrained, the site chosen is cleaned with 70% isopropyl alcohol until all organic material and debris are removed. Using fingers or a fist placed into the jugular groove, the technician occludes the vessel with one hand and performs a venipuncture with the other. Ballottement of the vessel (stroking with a finger over the vein in a downward direction) will help to make the vein more prominent and assist with visualization. For the jugular vein, a 16- to 18-gauge × 1½-inch needle should be used. The technician will introduce the needle into the skin at a 45-degree angle, using strong committed motion since the skin of cattle is relatively tough. Once the vein is accessed, blood should exit the needle hub. Confirmation of the placement in the vein and not an artery is made, and the needle is inserted all the way to the hub. At this time, the syringe containing the medication to be administered can be attached to the needle. By aspirating back, the technician can reconfirm that the needle is still in the vein. If no blood is obtained, the needle should be redirected without completely removing it from the skin. Once in the vein, pressure applied to the jugular groove for occlusion can be removed, and the medication can be administered. After the entire amount is administered, the needle and syringe are removed, and digital pressure is applied over the access site to prevent hematoma formation.

Coccygeal Vein: For small volumes (up to approximately 5 ml) of nonirritating (xylazine, acepromazine, oxytocin) medication, the coccygeal vein can be used.

image TECHNICIAN NOTE

Administering irritating drugs into the coccygeal vein can cause thrombosis of the vein and sloughing of the tail.

Dairy cows are fairly accepting of tail vein injections because holding the tail up vertically to access the vein also provides restraint (“tail jack”). Beef cattle may need to be placed in a chute for the safety of the personnel. An 18- to 20-gauge × 1.5-inch needle is appropriate for tail vein injections. Palpate the midline of the ventral surface of the tail, to determine the location of the second or third coccygeal vertebra. The site is cleaned with 70% isopropyl alcohol. The needle is inserted and the syringe attached (the needle may be inserted independent of the syringe or with a syringe attached) and plunger withdrawn slightly to check for placement in the vein. Once in the vein, the medication is injected (Figure 20-82).

image

FIGURE 20-82 IV injection into coccygeal vein of cow.

Subcutaneous Abdominal Vein: The SQ abdominal (milk or mammary) vein is occasionally used to administer IV injections, but use of this vein is strongly discouraged, as noted in the section on blood sample collection. It is hazardous to the animal and dangerous for the technician.

Auricular Vein: This vein can be used for IV injections of very small amounts of medications. The animal's head is secured. Nose tongs may be helpful in preventing movement of the head.

Bovine IV Catheter

When administering large volumes of fluids or repeated IV administrations, a catheter should be placed in the jugular vein to perform these tasks successfully and without the potential for causing problems or damage to the vessels. To place an IV catheter, the same restraint techniques should be employed as outlined previously. The site that is chosen needs to be clipped and surgically prepared, and an antiseptic, such as Betadine solution, is wiped onto the site and left to dry. Because of the skin thickness of cattle, a cutdown using a #15 scalpel blade or a puncture with the same size needle as the catheter will allow for easier insertion of the catheter. If a blade is used to cut the skin before the catheter insertion, a local anesthetic bleb should be placed. A 12- to 16-gauge × 5¼-inch catheter is used on adult cattle, but a smaller size, such as 15- or 18-gauge × 3¼-inch, can be used for calves (Figure 20-83).

image

FIGURE 20-83 Jugular catheter placement in adult bovine.

The cephalic vein can also be used to place a catheter if the jugular veins are inaccessible. The caudal auricular vein (ear vein) may be used for small-gauge catheters, but these are hard to maintain because it is difficult to stabilize the catheter and prevent the animal from rubbing the catheter (Box 20-6).

BOX 20-6   Materials Needed for Catheter Placement

Catheter of choice

Heparinized saline (flush) with syringe and needle

T-port

PRN adapter (intermittent infusion plug)

Razor

Surgical soap

Suture material

Sterile gloves

Betadine-soaked gauze

Alcohol-soaked gauze

Wrap materials (antibiotic ointment, Elastikon, gauze)

Camelid

Although the jugular vein is the most common site for IV injections for llamas and alpacas, it is not as easily accessed as the other large animal species. Injections can be given either high on the neck or low on the neck, but each has potential complications (see previous section of chapter). The high neck position is identified by landmarks as described earlier in the chapter for venous blood sampling. Using the same technique employed with all IV injections, the needle should be detached from the syringe and inserted to make sure that the vein has been punctured and not the artery. Once identified that you have successfully accessed the vein, the syringe is attached, aspirate back, and then gently administer the medication.

The same process is followed for the administration of the low neck site. The landmarks for jugular access on the lower neck are the space between the fifth and sixth cervical vertebrae. Locate the enlarged transverse process of the sixth cervical vertebra, and the jugular vein lies just medially to it. The advantage to choosing the low neck site is the thinner skin, better visualization, and fewer problems with the animal moving or flinching away from the needle and technician.

Camelid IV Catheterization: Camelids have very thick skin (up to 1 cm in adult males), and the large transverse processes of the cervical vertebrae help to protect the underlying vein. To place a catheter in the jugular vein, the lower third of the neck should be used. Fourteen gauge × 5¼ inches is acceptable for adults, and a 16- to 20-gauge × 3¼-inch catheter can be used for crias. The same process as outlined earlier should be used to place a catheter. In adult animals, it is beneficial to make a cut in the skin where the catheter will be inserted. The cephalic vein can also be used, but the placement and maintenance may be difficult because of the camelid's propensity to lie down in sternal recumbency (“kushed”).

image TECHNICIAN NOTE

The thick skin and large transverse processes of the cervical spine help to protect these animals from exsanguination caused by bites from fighting males.

Ovine and Caprine

As with the other large animal species listed above, the most common route for IV administration in the goat or sheep is the jugular vein. Proper restraint is essential to administer the medication efficiently and effectively. It is possible to perform the procedure with one person, but having additional help will make the procedure smoother. For both sheep and goats, backing the animal up against a wall, the technician then straddles the patient over the shoulders facing the head and gently grasps under the mandible and lifts the head up and away from the vein to be punctured. For sheep, the wool should be parted for the visualization of the skin. Sheep can be set up on their rump and veins accessed as described for blood collection. The area is to be wiped down with isopropyl alcohol, digital pressure applied in the jugular furrow to distend the vein, and then a needle is inserted into the vessel (20-gauge × 1 inch for adults; 22-gauge × 1 inch for kids and lambs). Once the vein has been punctured and it is established that it is venous blood, the syringe with medication can be attached, aspirate back for confirmation, then slowly inject substance. After all medication is delivered, remove the needle, and apply digital pressure for a couple of minutes to prevent hematoma formation.

Ovine and Caprine IV Catheterization: The jugular vein is the most suitable site for placing a catheter, but the cephalic vein can also be used if jugular access is not an option. The procedure for placing a catheter in the goat or sheep is the same as described previously. For adults, 14- to 18-gauge × 3.5- to 5.25-inch catheters are appropriate, and for lambs and kids, 18- to 22-gauge × 1.5- to 3.25-inch catheters are used. It is helpful to nick the skin at the insertion site with a needle to ease the insertion of the catheter through the skin.

Porcine

IV administration to pigs is accomplished using the auricular veins, located on the dorsal aspect of the pinna. There are three veins, and the most common one for injection is the lateral vein. The pig should be restrained by using a snare or chute, or if small enough, an assistant can hold the animal against their body. Pigs have very sharp teeth and strong jaws. Without sufficient restraint, a bite is a serous possibility. The ear should be cleaned with alcohol-soaked gauze and the base of the ear occluded with digital pressure. A small-gauge needle is inserted into the vessel at a very shallow angle. The needle should be attached to the syringe at the time of insertion because of the very fragile nature of these vessels. Aspirate very gently to confirm venous placement, release occlusion, and then inject the substance with steady pressure. Remove needle and syringe and apply digital pressure. The cephalic vein can also be used, but in small piglets, the jugular vein should be used because of the small diameter and difficultly accessing the cephalic and ear veins at that age.

Porcine IV Catheterization: To catheterize the ear vein, a 19- or 21-gauge butterfly catheter or 18-gauge OTN catheter is used. The base of the ear is occluded with digital pressure or by using a rubber-band tourniquet, and the dorsal aspect of the pinna is surgically prepared. The catheter is then inserted toward the base of the ear into the vein as described previously for injecting into the vein, and the tourniquet or pressure is released. The catheter is then capped with a PRN and secured to the ear using glue. The pinna is supported by placing a roll of gauze or roll of tape on the inside of the pinna, and the margins of the ear are gently folded over and secured with strips of adhesive tape (Figure 20-84).

image

FIGURE 20-84 A, Inserting an IV catheter in the auricular vein of a pig. B, Removing stylet. C, Attaching IV line to back of pig. D, Wrapping the ear with gauze and tape to secure catheter.

Complications of IV catheterization include phlebitis, thrombophlebitis, and local cellulitis. Septicemia may result if a venipuncture is made through dirt or fecal material. These can occur in veins that have been injected or catheterized, and thrombophlebitis can result in life-threatening conditions for the animal. Animals that are very compromised may develop these conditions, even when excellent cleanliness and technique are used. If veins are rendered unusable, it may become impossible to administer fluids and medications needed. The technician should be attentive to any changes in the appearance of the vein, including such things as swelling, heat, pus, a thick-corded feel to the vein, or the appearance of fluid from the catheter site, and promptly inform the veterinarian when any of these are noticed.

INTRAMUSCULAR ADMINISTRATION (IM)

Drugs that are administered directly into the muscle are absorbed relatively quickly. The IM route provides more rapid drug absorption than the SQ route and slower absorption than the IV route. The standard procedure for IM injections is to restrain the animal as needed based on its size and temperament and clean the injection site with 70% isopropyl alcohol or other appropriate disinfectant until dirt and debris are removed. Selection of the needle size is determined by the viscosity of the drug, the size of the muscle, and the volume to be administered. The needle is inserted into the muscle all the way to the hub, making sure to touch only the hub rather than the shaft. Inserting the needle without the syringe attached is useful so that if the animal moves, the needle is likely to remain in place. If the needle is inserted with the syringe attached, the added weight of the syringe may cause the needle to come out of the muscle if the animal moves. Attach the syringe containing the drug to be delivered and gently aspirate back to identify that you are in a muscle and have not hit a vessel. If you have punctured a vessel, remove the needle, start with a new needle, and repeat the process.

image TECHNICIAN NOTE

If the technician uses the same needle that hit a vessel on the first attempt, when aspirating back on the second attempt, residual blood will travel into the syringe causing the technician to believe that yet again a vessel has been struck.

Once you have confirmed that the needle is in the muscle, inject the substance with steady pressure. Do not aggressively force the solution into the muscle because the pressure may make the syringe detach from the needle, causing medicine to spray everywhere. The technician would be unable to determine the exact amount of drug actually delivered to the patient. Some substances that are injected can prove harmful to personnel if they come in contact with mucous membranes (eyes, mouth, etc.). Once the medication is delivered, remove the syringe and needle. Apply pressure if any blood comes from the injection site and massage the area gently.

If repeated IM injections are required on a patient, various sites should be used in an attempt to minimize muscle damage and pain.

Equine IM Administration

There are several locations that can be used on the equine patient for the IM administration of therapeutics. These sites include the lateral cervical (neck), semimembranosus and semitendinosus, and pectoral and gluteal muscles on both the left and right side of the animal. When choosing the location for IM injections, the technician should consider: the volume to be delivered, the viscosity of the solution, the potential injury to personnel, and the potential for complications in the muscle chosen. Restraint must be employed whenever giving an injection, with a halter and lead rope as the minimum. Placing a horse in stocks will greatly reduce the likelihood of the animal moving once the needle is introduced and will also prevent injury to personnel, although it can be detrimental to a patient that has a reaction to the medication given if they get caught in the stocks. Individual horses respond differently to needles. Some respond only slightly or not obviously at all. Others can respond violently. A method for desensitizing the injection site just before a needle insertion is to rub the site very firmly and rapidly back and forth 100 times using an alcohol-soaked cotton swab or piece of gauze and then immediately insert the needle. Some people like to tap the horse firmly with the edge of the fist just before inserting a needle into the muscle. This is also thought to desensitize the area before the insertion of the needle. Other people are convinced that tapping in this manner before a needle insertion simply lets the horse know what is about to happen. The technician should use whatever method proves to be a good approach for him or her.

Lateral Cervical (Neck) Muscles: IM injections into the neck allow for the safety of personnel. Small volumes should be delivered (less than 10 ml in an adult horse) into the lateral aspect of the neck. Choose a spot in the triangular space that is bordered dorsally by the nuchal ligament, ventrally by the cervical vertebrae, and caudad about 1 hand width in front of the cranial border of the scapula (Figure 20-85). An 18- to 22-gauge needle is appropriate for most horses. The needle is inserted with a quick thrust directly into the muscle. Some technicians make a point of grasping the skin next to the injection site between the fingers and pulling up. The injection is administered and the skin released back into place. This method results in the needle hole in the skin a few inches away from the needle hole in the muscle. When the skin is released, it acts as a barrier, preventing leakage of the drug. The neck muscles are not recommended for IM injections in foals because the soreness caused by the injections may make them reluctant to position themselves for nursing.

image

FIGURE 20-85 IM injection in neck of donkey. Needle is placed in an imaginary triangular area of the lateral neck to avoid the cervical vertebrae, the scapula, and the ligamentum nuchae.

Semimembranosus/Semitendinosus Muscles: Semimembranosus and semitendinosus muscles are located on the caudal aspect of the hind limb between the point of the buttock and the hock. These muscles are often used with minimal complications. Particular attention needs to be paid to the sciatic nerve that runs down the lateral aspect of the leg because an inadvertent injection into the nerve can cause paralysis. The technician should stand facing toward the tail end of the animal with his or her body next to the hip of the horse. Positioned with the body closely pressed into the horse's hip will lessen the impact if the animal chooses to kick. If the technician is tall enough, he or she can reach across the horse and insert the needle into the opposite leg (Figure 20-86, A, B). This reduces the chance of being kicked since a horse that kicks in response to the insertion of the needle will usually kick with the leg that has received the needle.

image

FIGURE 20-86 A, Technician positioned on opposite side from injection for an IM injection into semitendinosus muscle group of horse. B, Technician positioned on same side as injection.

An 18- or 19-gauge × 1.5-inch needle should be inserted with swift action into this muscle group. Once the animal has stopped moving, attach the syringe and proceed as described previously. If injecting large volumes of medication, it is preferential to detach the syringe from the needle after 15 ml has been administered, withdraw the needle slightly, and redirect the needle within the muscle. There is no need to remove the needle completely, but care should be taken to avoid side-to-side movement because moving the needle can cause trauma to the tissue. Once the needle has been redirected, reattach the syringe, aspirate, and inject as described earlier. Continue this process until all of the solution has been administered.

Excessive distention by injecting large volumes of medication can result in necrosis of the tissue. When doing repeated injections into these muscle groups, it is advisable to rotate between the right and left sides to minimize muscle soreness and decrease the likelihood of puncturing a vessel. Because of the large size of the muscles in this area, it is a good choice for IM injections in foals. It can be used with the foal standing and restrained or when recumbent. Repeated IM injections in the hind legs may cause soreness that appears as lameness. It usually lasts for only a few days following the last injection. Repeated injections may also lead to increased vascularization in the area, making it more difficult to insert the needle without encountering blood.

Pectoral muscles: The pectoral muscles are located between the front legs. As with the hind end, safety needs to be considered when choosing this site. A needle insertion at this site usually elicits less of a reaction than an injection into the hind legs, but the technician should assess the temperament of the animal and be prepared for the horse to move forward, jump to the side, strike, or rear. The technician should stand next to the shoulder of the horse facing the head. Reaching around with the hand farthest from the horse, insert the needle all the way to the hub. An 18- to 20-gauge × 1- to 1.5-inch needle is appropriate (Figure 20-87). The pectoral muscles are relatively small, and repeated IM injections in this site may cause pain and swelling. The resultant edema that may be seen following an IM injection at this site can be temporarily unsightly and may be of consideration, depending on the planned use of the horse.

image

FIGURE 20-87 IM injection into pectoral muscles of horse.

Gluteal Muscles: The gluteus, or rump, of the horse is the largest muscle mass on the hindquarters. It is located high on the rear limb, lateral to the spine, and caudal to the point of the hip (Figure 20-88). It can accommodate large volumes and repeated injections, but is not often chosen as the site for IM injections because it is difficult to detect inflammation caused by IM injections in the gluteus, and if an abscess forms, adequate drainage from this area can be very difficult. If the gluteus is used, the technician should stand close to the hip of the horse and insert the needle with a quick thrust, as for other IM sites.

image

FIGURE 20-88 IM injection into equine gluteals.

Bovine IM Administration

Because most cattle are eventually consumed, IM injections are highly discouraged to prevent muscle damage. If it is absolutely necessary to give an IM injection, the muscles of the neck should be used. The animal should be restrained in a head gate or squeeze chute. The technician should approach the animal from the forequarters, stay close, and leaning in to the animal, place a halter on the head and tie it securely to the side. The borders are the same as described for equine patients (the spine, nuchal ligament, and the scapula). The needle should be inserted with a quick thrust into the muscle. Following beef quality assurance guidelines, the needle must be clean and sharp, the injection smooth so as not to cause too much muscle damage, and no more than 10 ml of substance is to be administered at any one time.

The semitendinosus, semimembranosus, and gluteal muscles should not be used for IM injections in cattle.

Ovine and Caprine IM Administration

Sheep and goats have small muscle masses. The most common muscle groups used for IM injections are the semitendinosus and semimembranosus muscles (Figure 20-89). The technician must avoid the sciatic nerve, which runs down the caudomedial aspect of the hind legs. The neck, gluteals, and triceps can be used, but only for very small volumes (Figure 20-90). IM injections into the neck may cause significant soreness, and the animal may be reluctant to raise its head. This can be particularly problematic in kids and lambs because they may become too sore to nurse. Once the muscle to be used is identified, the standard procedure described for large animals is followed. For adult sheep and goats, an 18- to 20-gauge × 1-inch needle should be used. A 20- to 22-gauge × 1-inch needle is appropriate for lambs and kids.

image

FIGURE 20-89 Technician administering IM injection to sheep.

image

FIGURE 20-90 Site for IM injection in neck of goat.

Porcine IM Administration

IM injections in pigs can prove complicated because of the thickness of the skin, the tendency to store a thick layer of SQ body fat, the difficulty in restraining them, and potential damage to muscle (meat). Generally the cervical neck muscles are used just caudal and ventral to the ear. In adults, a maximum volume of 5 to 10 ml per site is recommended. Piglets can receive 1 to 2 ml per site. For adults, a long needle (at least 1.5 inches) should be used to avoid the fat because injecting into the fat will delay drug absorption. Depending on the size of the animal, the needle gauge can be anywhere from 20 gauge for piglets to 16 gauge for larger stock. Drug residues in various muscles will reduce the market value of the animal. The gluteal, semimembranosus, and semitendinosus muscles can be used, but not in animals destined to be used for meat. Following the same meat quality assurance guidelines as identified for cattle, the technician will grasp the skin in this area and pull cranially. With a firm motion, insert the needle at a perpendicular angle to the skin. Once the needle is in, attach the syringe, aspirate back, and inject the medication.

Camelid IM Administration

IM injection sites for llamas and alpacas are generally the same as in other large animal species. They do not have a large muscle mass in any one place, so SQ is the preferred route for the administration of large volumes or potentially irritating substances. The neck should not be used because of the potential for causing soreness in the area. The semimembranosus and semitendinosus muscles are good choices for IM injections in these animals (Figure 20-91). For adults an 18- to 20-gauge × 1-inch needle is appropriate. Twenty-gauge to 22-gauge × 1-inch needles are recommended for crias.

image

FIGURE 20-91 Llama receiving IM injection into semitendinosus.

Subcutaneous Administration (SQ, Subq, SC): In all species, SQ injections can be given anywhere that the skin is able to be lifted and tented. Medications that are administered SQ are absorbed less rapidly than IV or IM injections, but more rapidly than oral or intradermal (ID) administration. Therapeutic agents that are administered SQ include, vaccines, local anesthetics, and small volumes of other medications. Fluid therapy may also be administered via an SQ route for some large animal patients. SQ injections may be desired for use in show animals because there is less likelihood of a noticeable adverse reaction at the injection site with SQ versus IM injections. The meat animal production industry recommends that drugs be administered SQ in an effort to reduce any tissue damage (damage to the meat) that can occur with IM injections. There are strict regulatory requirements for the administration of pharmaceuticals to cattle, the medications must be administered per label, and most medications for use in cattle are labeled for SQ administration.

SQ injections are done by inserting a needle between the skin and the body of the animal. The site selected should have loose skin that is easily grasped. It is wiped with 70% isopropyl alcohol, the skin grasped and pulled away from the body of the animal, and then the needle inserted into the base of the tented skin. The needle size used will depend on the viscosity of the substance to be administered, the size of the animal, and the thickness of its skin. A 20- to 25-gauge needle no longer than 1 inch should be used for SQ injections in horses. An 18- to 22-gauge × 1.5-inch needle is a common choice for calves, sheep, goats, and pigs. Adult cattle may require a 16- to 18-gauge needle. Before injecting the substance from the syringe, aspirate back to make sure that the vessels have not been punctured. Once confirmation of the needle placement in the SQ space has been established, gently inject the medication. The solution should easily be ejected from the syringe and a bleb, or bump, is often visible under the skin. A slow flow of solution may indicate that the needle is ID rather than SQ. If this resistance is felt, the needle should be repositioned before proceeding with the injection. After removing the needle and syringe, the injection area should be gently rubbed to lessen the bump that has been created and to increase circulation in the area, which promotes absorption of the medication. If an SQ injection is made into edematous tissue, a bump is not likely to be observed.

For equines, the loose skin on the side and at the base of the neck is the easiest spot for this type of SQ injection (Figure 20-92).

image

FIGURE 20-92 SQ injection into loose skin on lateral neck of horse.

For bovines, the loose skin of the neck region is most easily used as the site for SQ injections. Large volumes of drugs may be injected SQ behind the elbow. Another site for SQ injections in cattle is in the loose skin on either side of the ischiorectal fossa. This site is used by veterinarians for the administration of leptospirosis vaccines in cattle that are restrained in lockup stanchions. The technician should not tent the skin when injecting Brucellosis vaccines. This is to make certain that there is no accidental injection of the drug into the person administering the drug.

For llamas, a common site for SQ injection is just behind the elbow (Figure 20-93).

image

FIGURE 20-93 Loose skin located behind the elbow in llamas can be a site for SQ injections.

In goats, injection sites for SQ administration include just behind the elbow (Figure 20-94), which can be done with the goat restrained in a standing position, and the axillary region where the forearm meets the body, which can be easily reached by lifting a front leg and the lateral chest, caudal to the shoulder (Figure 20-95).

image

FIGURE 20-94 Goat kid receiving SQ injection behind the elbow.

image

FIGURE 20-95 Lifting a front leg of goat provides access to axillary area for SQ injections.

For sheep, the sites chosen should be free of wool. SQ injections can be done with the animal restrained in a standing position, but are facilitated by restraining the sheep set up on its rump. This provides easy access to the most wool-free site, including the axillary area where the forearm meets the body and the inguinal area and flank fold (Figures 20-96 and 20-97).

image

FIGURE 20-96 Technician administering SQ injection in axillary area of sheep while restraining in set up position.

image

FIGURE 20-97 Administration of SQ injection in inguinal area of sheep.

In pigs, it is challenging to find loose skin. Possible SQ injection sites include the axillary and inguinal regions and the skin caudal to the base of the ear. The size of the animal will determine where the injection can be given. For piglets, holding them up by the hind legs will expose an injection site on the inside of the flank along the abdominal wall. Grasp the skin and pull dorsally and make sure the injection is shallow. The needle should be inserted at an approximately 10-degree angle. Larger pigs should be restrained using a hog snare or chute to access the loose skin just caudal to the ear.

INTRADERMAL ADMINISTRATION (ID)

Intradermal administration is the injection of a substance between the dermis and epidermis (skin layers). This route results in very slow absorption. ID injections are made primarily for the purpose of skin testing, allergen identification, and to provide local anesthesia. Cattle, goats, and sheep are tested for tuberculosis by means of an ID injection into the caudal tail fold (Figure 20-98). ID injections in swine can be given at the base of the ear. For allergy testing in horses, the side of the neck is commonly used. ID injections are also used to treat nodular skin lesions and sarcoids (a common tumor affecting the skin of horses).

image

FIGURE 20-98 ID injection is made into the caudal skinfold to test for tuberculosis in the cow.

For horses, the selected site should be clipped, cleaned, and allowed to dry. Depending on the purpose of the injection, the use of an antiseptic agent may be contraindicated because it may interfere with test results, so the technician preparing for the procedure should be clear on the intent of the veterinarian. The skin is grasped between the thumb and forefinger and pulled up from the body. A small needle (25 to 27 gauge × ⅝ inch) is placed parallel to the site with the bevel directed up and inserted at a slight angle. The syringe plunger is withdrawn slightly to aspirate and make sure that no vessels have been penetrated. The solution is slowly injected. Resistance should be felt if the needle is correctly placed in the dermis. A noticeable bleb should appear as the injection is made. If no bleb is visible, the needle has been placed too deep. Massaging the site (as is suggested with SQ injections) is not done following ID injections because the solution is intended to remain localized.

For goats, sheep, and swine, a 25- to 22-gauge × ⅕- to 1-inch needle is used. Cattle have very thick skin, and a 20- to 22-gauge × 1.5-inch needle is more appropriate.

INTRAPERITONEAL ADMINISTRATION

Equine Administration

In the equine patient, intraperitoneal (IP) administration of fluids and medication is usually accomplished through an abdominal lavage system. The drain system is inserted surgically by the veterinarian either during abdominal surgery or in a standing position when peritonitis is suspected and general anesthesia is not necessary. The technician will not be involved with the surgical procedure, but will be responsible for the care and maintenance afterward. To lavage the abdomen, latex tubing is attached to the desired fluids and connected to the drain system using a 5 in 1 connector. The desired amount of fluid (routinely 10 L for an adult equine patient, adjusted for smaller patients) is administered along with any medication (heparin, antibiotics, etc.), the latex tubing is clamped off, and the patient walked. This is done to attempt to distribute the fluid and medication throughout the abdominal cavity, washing internal organs, and breaking up any adhesions. The latex tubing is then unclamped, and the fluid is allowed to drain out of the abdomen back into the original fluid bag (Figure 20-99, A-C). Ideally the amount returned is equal to the amount originally administered. This process can be repeated several times per day. When handling the drain system, gloves should be worn, and the technician should pay careful attention to keeping the system clean and not introducing any contaminants during the administration.

image

FIGURE 20-99 A, Technician attaches latex tubing from IV fluid bag to abdominal drain tubing from animal for equine abdominal lavage. B, Fluid bag is raised to allow fluid to flow through tubing and into abdominal cavity. C, The empty fluid bag is lowered to the ground to retrieve peritoneal fluid from the abdominal cavity.

Bovine Administration

IP injections may be indicated if IV administration is not possible and for treatment of peritonitis. If an IP injection is administered in cattle, the site selected is usually in the paralumbar fossa. Care must be taken when on the left side to prevent puncturing the rumen and on the right side to prevent puncturing the intestine or dilated or displaced internal organs.

Caprine and Ovine Administration

IP injections are usually reserved for neonatal kids and lambs with umbilical infections or hypoglycemia. The neonate is lifted by its front legs, and using a 20-gauge needle attached to the syringe filled with medication, the technician inserts it just to the left of the umbilicus up to a depth of 1 cm. Aspirate back to verify that you have not hit a vessel or internal organ. Once placement is confirmed, inject medication into the peritoneal cavity. Remove the needle and syringe.

Porcine Administration

In neonatal pigs, fluids are generally administered IP because of the impracticality of placing IV catheters and administering fluids using that route. Fluids should be body temperature, nonirritating, and isotonic. The site used needs to be prepared using aseptic technique to ensure that contaminants are not introduced. The piglet is held up by the rear legs, and an 18-gauge × ¾- to 1-inch needle is inserted paramedially between the midline and flank. The needle is stabilized to prevent damage to internal organs. To do this procedure in a mature, standing pig, follow the preparation guidelines and use a 16- to 18-gauge × 3-inch needle inserted through the paralumbar fossa.

Complications from IP administration include peritonitis, abscess, and injury to internal organs.

INTRANASAL ADMINISTRATION

Certain vaccines and local anesthetics are administered intranasally. Intranasal anesthetics may be used before performing other procedures involving the nasal cavity. The head of the patient needs to be secured. Small piglets can be held, whereas a hog snare should be used for restraining larger pigs. A halter and lead rope (and head gate for adult cattle) may provide sufficient restraint for most large animals. The technician uses his or her free hand to steady the head. An easy method is to bring the free arm under the mandible and reach around placing the hand on top of the muzzle area. Any nasal discharge should be wiped away from the nares using damp gauze sponges. While slightly lifting the head, a needleless syringe containing the medication is introduced into the nostril, and the substance is injected, preferably when the animal inspires. The patient may sneeze afterward, causing the medication to spray. The technician should take precautions to prevent having his or her own mucous membranes sprayed from the sneeze.

Oxygen can be administered intranasally to help with certain conditions, such as pneumonia or hypoxic ischemic encephalopathy. Oxygen may be administered to preparturient females that are considered to have a high-risk pregnancy in an attempt to increase the oxygen content of the circulating blood in both the dam and fetus.

Using a commercially available product (AirLife O2 catheter) or small rubber feeding tube, identify the distance from the medial canthus of the eye to the entrance of the nostril. This will be how far the catheter is to be inserted into the nostril. Gently insert the catheter ventrally into the nasal passage to the point that was measured. To maintain the catheter in the nostril for the long term, it is beneficial to first wrap adhesive tape (Elastikon works very well) loosely around the muzzle. Then the catheter, with a piece of butterflied 1-inch adhesive tape attached, can be secured using suture material to connect the butterfly to the Elastikon. The end can be hooked up to an oxygen source providing the desired oxygen flow in liters per minute.

ORAL ADMINISTRATION

Medications to be administered orally (per os, PO) come in a variety of forms, including tablets, capsules, powders, pastes, and liquids.

The simplest way to administer oral medications to all large animal species is in food or water. For a variety of reasons, this route may not always be feasible (patient is NPO, detects bitter substance in food or water and refuses to consume, decreased appetite associated with illness, multiple animals housed and fed communally). It is also extremely unreliable since it is hard to determine the amount that is actually ingested. The oral route provides for slower absorption than IV or IM administration, but in many instances is the only route for certain medications.

Oral medications are administered in a variety of methods, including syringes, drenching, balling guns, and nasogastric and orogastric intubation.

Syringes

Many commercially available products come in a paste form in premeasured dosing syringes, which make accurate dosing and administration easy. Other oral medications come in tablet form that need to be both crushed and mixed with water or simply dissolved in water over time. The easiest way to do this is by placing the tablets in a 60-ml catheter tip syringe, adding water, and letting the tablets dissolve. If the medication is unpalatable to the patient, molasses, Karo, or maple syrup or thin applesauce can be added to the mixture. To use the syringe method, proper restraint of the head should be used, with the free arm cradling the head, reaching around so that the hand is up over the muzzle. The technician then inserts the syringe into the mouth at the commissure of the lips near the interdental space, between the cheeks and teeth, and advances it as far back into the mouth as possible (Figure 20-100). With firm pressure, the medication is given, and the syringe can be withdrawn. Lifting the head slightly may encourage the animal to swallow instead of spit the medication out. The medication should not be injected too rapidly because it may be lost from the other side of the mouth or may be aspirated. The technician should be conscious of the probability of the patient spitting the material out and getting it on the skin or mucous membranes of the personnel. Always wash hands and skin that has been in contact with the medication.

image

FIGURE 20-100 Administering oral medication via syringe to an adult.

Drench (Dose Syringe)

Liquid medication or small volumes of fluid can be administered using a dose syringe. For calves, sheep, and goats, a catheter tip syringe can be used, whereas a large dose syringe is appropriate for adult cattle. Drenching in sheep and goats should be limited to small volumes of fluid (no greater than 30 ml). Holding the animal with the nose slightly elevated and pulled toward the handler, the tip of the dose syringe is inserted into the interdental space, and the fluid is slowly dribbled onto the tongue (Figure 20-101).

image

FIGURE 20-101 Bovine drench with dose syringe.

image TECHNICIAN NOTE

Mineral oil should never be given via drench. Inhalation of mineral oil can be fatal.

Balling Guns (Pilling)

For cattle, sheep, and goats, balling guns are commonly used to accomplish oral tablet administration. There are several sizes available, and the appropriate size should be picked in accordance with the size of your patient. Using a large balling gun on a small calf, goat, or sheep can result in a splitting of the soft palate and rupture of the pharynx. The balling gun should have a smooth end, preferably made of rubber to limit the trauma that can be caused to the back of the mouth, including the soft palate, pharynx, and esophagus. It should be inspected before each use to make sure that no sharp edges have formed. All food should be removed from the patient's mouth before dosing. For cattle, placing the patient in a head gate will help restrain the animal for the procedure. The technician should stand next to the animal's head facing the same direction as the animal. The arm nearest the animal reaches over and grasps the mouth at the interdental space and pressing on the hard palate, opens the animal's mouth. Alternately, placing a finger in one nostril and the thumb in the other and then pulling the nose dorsally will encourage cattle to open their mouth making insertion of the gun easier. The balling gun is inserted into the mouth and gently worked back to the pharynx. Once the thumb rings of the gun are at the commissure of the lips, the plunger is depressed (Figure 20-102). The animal's head should be kept down to prevent the loss of the medication. Cattle will lick their nostrils once they swallow the pill.

image

FIGURE 20-102 Using balling gun to administer medication in pill form to cow.

For sheep and goats, back them up to a wall and straddle the shoulders as stated before. Insert a hand into the interdental space at the commissure of the lips, open the mouth, and insert the balling gun to the back of the throat before depressing the plunger. If the balling gun is not inserted far enough, the medication may be chewed by the animal and spit out. If the balling gun is inserted too far, there is a risk for serious damage to the pharynx and larynx. To decrease the chance of aspiration of the medication, the head of the animal should not be overly elevated and the neck should not be overextended.

image TECHNICIAN NOTE

Read labels carefully because certain medications can cause severe complications to the staff if they are mishandled. For example, chloramphenicol tablets should not be crushed because inhaling the powder has been shown to increase the risk to humans of developing fatal aplastic anemia.

Nasogastric and Orogastric Intubation

When large volumes of an oral medication need to be given (mineral oil, fluids, bismuth), oral fluid therapy or enteral feedings for extended periods of time are required, passage of an OGT (cattle, sheep, goats, pigs, and camelids) or an NGT (horses, cattle, adult sheep and goats, neonatal camelids) should be used.

Nasogastric intubation is a commonly used procedure in equine patients. Cattle, sheep, goats, and camelids have small nasal passages and although nasogastric intubation (with small diameter tubes) can be done (Figure 20-103), the usual method for these species is to place an OGT.

image

FIGURE 20-103 Nasogastric intubation of bovine with a foal stomach tube.

Nasogastric: There are many different sizes of tubes that can be used, and choosing one is dependent on the size of the patient and the thickness of the solution that needs to be given (or retrieved, if that is the intent of the procedure). An estimation should be made of the length of the tube required from the entrance of the nostril to the point of the stomach or rumen. For horses, it is helpful to mark the tube at a point where the tube should reach the pharynx (Figure 20-104). This is helpful because the tube can be rotated upward when it reaches the pharynx to deflect it into the esophagus rather than down the trachea. If the tube is cold, soaking it in warm water will make it more pliable for insertion. The tube should also be lubricated with water-soluble lubricant or warm water to aid in easy passage. The patient is restrained as outlined earlier, and with a hand over the muzzle and thumb placed into the nostril, the tube is passed in a ventral manner through the ventral nasal meatus and nasopharynx. Resistance is felt when the tube passes into the esophagus. Once the tube has passed into the esophagus and traveled down to the rumen or stomach, check the premeasured mark that you made with the tube, and then confirm you are in the rumen or stomach and not the trachea. Most patients will cough if the tube is placed in the trachea, but there are times when a cough will not be elicited (small-diameter tubes; flexible, soft tubes used in neonates; comatose patients that are lacking cough reflex, etc.), and therefore it is essential that proper placement is confirmed before medication is administered. When the tube is passing through the esophagus, it is often possible to visualize the tube advancement and feel the tube. This view can be enhanced by moving the tube in and out a bit and looking at the neck for the movement. For all patients, blowing into the tube should elicit gurgles from the tube, rumen or stomach fluid smell, and if an assistant places a stethoscope over the area of the rumen or stomach, he or she should be able to hear bubbling as air passes over the fluid. Aspirating on the tube should reveal negative pressure (but this should not be the only check because the opening of the tube may be up against tissue). Placing one's mouth on the distal end of the tube and sucking back may result in an unpleasant mouthful of gastric fluid, and this has the potential for causing illness in the person if enteric bacteria is present. Once the position of the tube is verified, the patient is checked for gastric reflux. If no abnormal amount of gastric fluid is noted, the medication, fluids, etc. can be administered using a stomach pump, dose syringe, or gravity flow (Figure 20-105). For neonates, a 60-ml syringe is placed on the end of the tube and aspirated to check for reflux. For some patients requiring repeated administration of medications or food, the NGT should be left in place. This can be accomplished in adult equines by coiling and then taping the tube to the halter of the patient (Figure 20-106). A syringe case, tube cap, or other adaptor should be placed on the end of the tube. In neonatal patients, the tubes can be secured into place by using elastic tape around the muzzle of the patient and then coiling the tube off to the side of the mouth (make sure it does not interfere with the action of the mouth). A 1-inch piece of butterflied tape can be secured to the tube at the base of the nostril, and then using suture material, the tape can be affixed to the elastic tape around the muzzle (Figure 20-107, A, B). This method of securing the tube is preferred over suturing the tube directly to the nostril because that is irritating to the patient, causing it to rub at the tube and pull it out.

image

FIGURE 20-104 A, Estimating the length of tube required to reach the pharynx of horse. B, Inserting NGT in horse. Technician stands to side of horse for safe positioning.

image

FIGURE 20-105 Technician administering enteral feeding via gravity flow into NGT in alpaca cria.

image

FIGURE 20-106 NGT secured to halter of horse for repeated NGT procedures.

image

FIGURE 20-107 A, Placing suture loops in tape that is adhered to the muzzle of a foal allows for securing the tube without causing irritation to the nares that occurs when sutures are placed directly through the skin. B, NGT well secured to foal, easily accessible and very likely to stay in place, even with movement of foal.

image TECHNICIAN NOTE

When placing “stay” tape around the muzzle of a neonate, care must be taken to keep the tape loose enough to allow for opening of the mouth and secured well above the nostrils to prevent occlusion of the nostrils.

Once the process is complete, the pump is removed from the end of the tube, and the tube is held up above the patient's head to deliver any remaining medication from the tube into the stomach/rumen. A small amount of water or air can be pumped into the tube to clear the tube. Care should be taken not to aggressively or forcibly pump it in. The end of the tube is then covered with the technician's thumb, kinked, and in gentle, long motions, the tube is pulled out. Complications from the removal of the tube can include nosebleed or aspiration of any residual fluid or medication. The patient should be closely monitored after delivering medication in this fashion for colic symptoms, bloat, or respiratory problems.

NGTs are routinely passed in horses to relieve gastric distention. The tube is passed as described earlier, and once placement in the stomach has been established, a known amount of water is pumped into the tube, causing a siphon, and gastric fluid and content is collected back from the tube into a bucket. The tube is manipulated as needed, and the procedure repeated while fluid is collected. If significant gastric fluid is retrieved, the tube can be secured in place by coiling it and taping it to the halter. This is less stressful to the patient than repeated passing of the tube and more time efficient for the staff. If a syringe casing is placed in the end of the tube, the gastric reflux can be very accurately quantified. If a large amount of gas is present, the veterinarian may decide it is prudent to leave the tube in place with no cap so as to provide continuous decompression and relief to the patient.

NGTs may also be inserted to provide gastric lavage. This may be helpful in relieving feed impactions. Water is pumped into the tube and gastric contents collected as described earlier. As long as the water that is inserted is being retrieved, more water can be inserted and so on to attempt to dilute the impacted material.

Orogastric: As a result of small nasal passages, OGT is the routine choice for food animals and camelids (Figure 20-108). Medications and oral fluids can be administered, transfaunation of rumen contents can be accomplished, enteral feeding administered, and some bloats can be relieved. Using the same restraint techniques as described earlier, an OGT can be passed into a large animal patient. OGTs can be passed in sheep restrained set up on their rumps. Piglets can be lifted by the back of the head and neck. A ⅝- to 1-inch diameter tube can be passed in adult cattle, whereas a 9.54-mm diameter tube is appropriate for adult sheep and goats. Small-diameter 10F to 18F tubes are useful for neonatal kids, lambs, and crias. The technician should hold the tube next to the animal and place a mark at the point estimated to reach the rumen (from mouth to last rib). A speculum should be used in the animal's mouth to prevent the patient from biting down on the tub, although neonatal kids, lambs, and crias do not require the use of a speculum. A wide assortment of items can be used as speculums ranging from a roll of tape for small patients to PVC pipe or a piece of garden hose to a metal Frick speculum for cattle. The speculum needs to be inserted over the tongue root in the middle of the mouth. In cattle, a “popping” or “give” will be felt when the speculum passes into the pharynx. At this point, the tube is passed through the speculum and down the esophagus into the rumen. Slight resistance should be felt when the tube enters the esophagus. It is essential to make sure that you are in the rumen and not the trachea before any medication is administered. This can be done by blowing on the end of the tube and listening for gas crackles, feeling negative pressure, and the smell of rumen fluid. In ruminants, placing a tube into the rumen may stimulate regurgitation through and around the tube.

image

FIGURE 20-108 Passing OGT in alpaca patient.

Once the placement is identified, the medication can be pumped into the patient or gravity flow used for smaller patients and neonates. Do not forcibly pump or administer medications to prevent rupture of the rumen or damage to the esophagus. When finished, the end of the tube is covered with the technician's finger and kinked, then pulled out using gentle motions.

image TECHNICIAN NOTE

Occluding the end of the tube and kinking it prevents any residual fluid from entering the trachea when the tube is removed from the patient.

INTRAMAMMARY ADMINISTRATION

Intramammary infusion of antibiotics is used routinely to treat or control mastitis in cows and is also performed on goats and sheep. Because of the high risk for introducing contaminants during this process (organic debris, yeast, or other opportunistic organisms), the procedure must be performed aseptically. Minimal restraint is usually required, but a tail jack restraint may be necessary for some cows.

The udder is completely milked out and manually stripped. Residual milk present will dilute the medication. The teats are cleaned with a teat dip and then thoroughly dried using a separate cloth for each teat. Each teat is then wiped with an alcohol-soaked sponge and air-dried. The teats on the far side from the technician are cleaned before those on the near side. This will prevent transmitting contaminants from the dirty teats to the clean teats.

Teats on the near side are infused first. The teat is grasped at the base, and a sterile teat cannula or disposable mammary infusion cannula on an antibiotic syringe is partially inserted into the teat (up to 4 mm), and the antibiotic is injected slowly into the canal. For goats and sheep with a very small teat orifice, a sterile tomcat catheter can be used. Proceed to the next teat with the new cannula and syringe and then move to the teats on the far side and repeat. It is recommended that the end of the teat be occluded and the teat and udder gently massaged to distribute the medication. After the teats have been infused, teat dip is reapplied and left to dry. In very cold (0° C) conditions, chapping and frostbite can occur, so the animal should not be moved outside while the udder is wet.

image TECHNICIAN NOTE

Partial insertion of the cannula into the teat canal delivers fewer contaminants to the udder than would occur with full insertion.

TOPICAL OPHTHALMIC ADMINISTRATION

To treat ocular diseases or conditions (ulcers, abrasions, lacerations, keratitis), topical ophthalmic ointment and solutions are routinely administered. When in an ointment form, a small amount is applied directly into the eye. To deliver the intended amount successfully into large animal patients (both adults and neonates), proper restraint of the head must be employed. Hands should be well cleaned or gloved. The lower eyelid of the particular eye that needs medicating is pulled down slightly, and the ointment is applied without touching the surface of the eye. The lid is then let go, and the blinking action will distribute the medication. Another method of ointment application is to wear sterile gloves and place a small ribbon of ointment on a gloved finger. The ointment on the finger is then touched directly to the eye. This eliminates the risk of scratching the eye with the end of the ointment tube.

Opthalmic solution can be applied by gently pulling the lower eyelid out slightly and placing drops into the lower conjunctival sac. Drops may come directly from a plastic bottle with dispenser or may be administered using a small sterile syringe—with no needle attached.

When applying both ointment and solution, the technician should apply the solution before applying the ointment. This will prevent the solution from running over the ointment without being absorbed directly on the eye.

Most patients become resentful of repeated applications into the eye, and many eye conditions are quite painful, so it may be necessary to place a long-term lavage system to properly treat the disease or condition.

image TECHNICIAN NOTE

Eye conditions may require aggressive treatment with the administration of ophthalmic medication as often as every hour.

There are two types of lavage systems that will supply medication. The subpalpebral lavage system is inserted through incisions made into the upper or lower eyelids (Figure 20-109). The narrow rubber tubing is inserted through the incision(s) of the eyelid to open directly in the conjunctival sac and away from the cornea. Since the tubing is very narrow, liquid solutions are delivered through the system instead of ointments. Once the tubing is placed, the system is secured to the skin above the eye and extended over the poll (IV extension tubing is attached to make the appropriate length to extend up and over the head). A PRN (intermittent infusion plug) is attached to the end of the system and should be changed every 24 hours or more often if it becomes friable from repeated injections. The medication to be delivered should be warm enough so as not to cause discomfort to the patient, and the lines should be cleared after the administration using either a saline flush or air. The injections should be made very slowly. If resistance is felt when injecting solution into the lavage system, the veterinarian should be notified so that the tube can be cleared of any debris. If air is used, the patient may startle when the air hits the eye, so the technician should be prepared for any adverse reactions.

image

FIGURE 20-109 Subpalpebral lavage system in equine patient.

The second type of lavage system is placed through the nasolacrimal duct (tear duct). The tubing is inserted into the nasal punctum, and a small stab incision through the nostril is created to pass the tubing through and attach to the skin. This will prevent the tubing from moving inside the nostril and prevent the patient from rubbing it out. The same method of medication delivery as described previously is used. This approach requires a greater volume of medication than the subpalpebral lavage method.

The veterinarian may choose to provide protection to the eye in the form of protective eye cups or hoods (Eye-Saver, JorVet; Guardian Mask, Guardian Mask Co.) (Figure 20-110). These provide protection from sunlight and provide a mechanical barrier, preventing the horse from rubbing the eye and keeping it free from debris.

image

FIGURE 20-110 Guardian Mask (Guardian Mask Co.) placed on head to provide protection to eyes of horse.

EPIDURAL ADMINISTRATION

Epidural administration deposits drugs into the epidural space. The procedure may be done to provide anesthesia or for pain control. The epidural injection of analgesics or local anesthetics provides complete analgesia and muscle relaxation caudal to the block. For all species, proper restrain is required for the success and safety of this procedure. There are two locations for epidural administration. The cranial epidural is located at the lumbosacral junction (between L6 and S1), and the caudal epidural is located between S5 and C1 or C1 and C2. The veterinarian will choose the location for the epidural, depending on the effect that he or she wishes to achieve.

Equine Epidural Administration

The horse should be restrained in stocks and a twitch applied. Some horses will require the administration of a sedative. The technician will clip, shave, and aseptically prepare a 3-inch square (approximately) area over the first and second coccygeal vertebrae. This site can be determined by lifting the tail up and down with one hand while feeling for the vertebral space with the other hand (Figure 20-111). This area is usually close to where the coarse tail hairs originate. An SQ bleb of local anesthetic is placed. The technician should attempt to have the horse stand still and squarely upon its legs. If the animal is not standing squarely, there will be an uneven distribution of the drug because more will run into one side of the epidural space.

image

FIGURE 20-111 Locating site for equine epidural injection.

The technician should prepare the supplies necessary, including sterile gloves, local anesthetic, a sterile 12-ml syringe, 19-gauge × 1.5-inch needle (3.5 inches for very large horses), or an 18-gauge epidural catheter with stylet.

image TECHNICIAN NOTE

To hand the sterile syringe to the veterinarian, open the plastic syringe casing and gently slide the syringe into the sterile gloved hand of the veterinarian without touching the outer casing to the glove. To provide him or her with a sterile needle, remove the needle cap and while holding the needle cover tightly, point the hub toward the veterinarian so that he or she may use sterile gloved fingers to pull the needle from the cover.

Directing the needle slightly cranially and ventrally into the epidural space at an approximately 45-degree angle to the rump, an 18- to 19-gauge × 1.5-inch needle is inserted about 1 inch in adult horses. When the needle enters the epidural space, a slight “pop” is felt, and there is a loss of resistance to the passage of the needle. The drug is injected, and the needle may be left in place to facilitate an additional injection. An epidural catheter may be placed and secured to the skin to facilitate repeated drug administration. When the needle or catheter is removed, antibiotic ointment is applied to the site.

The technician should be aware that hind leg instability may occur following epidural anesthesia. Lidocaine, Carbocaine, xylazine, and morphine are commonly administered as epidurals.

Bovine Epidural Administration

The technician must first ensure that the animal is sufficiently restrained. To locate the site, the tail is moved up and down using one hand while the other hand feels the top of the vertebrae to find the first moveable joint (S1 and S2). Clip, shave, and aseptically prep a 3 inch × 3 inch area (approximately). An 18-gauge × 1.5 to 3-inch needle is inserted perpendicular to the spine and into the vertebral space between S1 and S2 (Figure 20-112). A “pop” is felt when the space is entered. The epidural space is a relative vacuum compared with atmospheric conditions, and the medication will be sucked into the space. (A drop from the syringe into the hub of the needle should quickly be drawn into the needle.) Three milliliters of 2% lidocaine is commonly used for bovine epidurals.

image

FIGURE 20-112 Technician performing epidural injection in bovine patient.

Camelid Epidural Administration

The site is clipped and surgically prepared. Owners may object to the clipping of the fiber, so efforts should be made to shave only a small site and secure the surrounding fibers away from the site with adhesive tape. The tail is moved up and down to locate the intervertebral space between S5 and C1. In most llamas and alpacas, this will be the first moveable joint because the five sacral vertebrae are usually fused. A 20-gauge × 1.5-inch needle is inserted. The veterinarian will determine a successful insertion as described for other large animals.

Ovine and Caprine Epidural Administration

Following the procedure guidelines for cattle, an 18- to 21-gauge × 1 to 1.5-inch needle is inserted at a 45-degree angle. Sheep and goats are very sensitive to local anesthetics.

Porcine Epidural Administration

The site for epidural injections in pigs varies from the site described earlier for other large animal species. The lumbosacral junction (between L6 and S1) is accessible for porcine epidurals. This is considered a cranial epidural, whereas the common sites described for other species are caudal epidurals. To locate the site, an imaginary line is drawn vertically up from the patella to the back and a dorsal midline site clipped and surgically prepared. An 18- to 20-gauge spinal needle may be used, with the length determined by the size of the animal.

TRANSDERMAL ADMINISTRATION (CUTANEOUS, TOPICAL)

The application of medications through the skin comes primarily in the form of an impregnated patch that is applied directly to the skin and left on to be absorbed. Fentanyl, scopolamine, nitroglycerin, and estrogen are all common medications that can be delivered in this fashion. When applying any type of impregnated patch to the skin, gloves should be worn so that the technician does not medicate himself or herself. The location that is chosen to place the patch should be shaved and the area cleaned with alcohol-soaked gauze. After the area has dried, the patch can be applied.

When it is time to remove or replace the patch, gloves need to be worn in case there is any residual medication left on the patch. The patch should then be disposed of according to local guidelines (fentanyl has strict legal disposal requirements). The area should then be wiped with a gauze sponge to remove any excess product.

Caution needs to be applied when using any product that is to be administered transdermally so that the technician or other personnel do not come in contact with the substance and absorb it through their own skin.

Many other ointments, solutions, and creams may be applied topically without the need for bandaging the area. With these, gentle application of the desired medication on gauze sponges, swabs, or directly from the gloved hand to the affected area will be effective. Before the application, the area should be cleared of any debris. In some instances, such as severe burns or wounds, the outer perimeter will first be débrided. The technician should wear gloves at all times when using topical or transdermal applications to limit the potential for contaminants to be added to the medication and for personal safety (to prevent inadvertent absorption of the substance).

INTRASYNOVIAL ADMINISTRATION

Patients may require the administration of medication, such as antibiotics or anesthetic agents, directly into a joint. Intrasynovial administration affords high drug levels localized in the joint compared with the levels that would be present from systemic drug administration. Veterinarians commonly perform intrasynovial injections on equine patients, but the procedure may be performed on other large animal species. Although the technician usually does not perform the injection, he or she may be asked to prepare the joint that will be infused and assist with the procedure.

The site that is to be injected needs to be surgically scrubbed and cleaned to minimize the chance of introducing a contaminant into the joint. The technician will lay out the appropriate size sterile gloves, several needles of the requested gauge and length (18- or 19-gauge × 1.5 inches is common for adult horses), and the syringe with the solution to be injected. All of these items must be handled in an aseptic fashion.

Proper restraint of the patient is necessary to ensure the safety of personnel and the patient. Using a twitch in addition to a halter and lead rope will lessen the likelihood of movement during the procedure. In addition, chemical sedation should be used to prevent movement and subsequent trauma while introducing the needle into the joint.

Once the injection is complete, the needle and syringe are withdrawn, and pressure can be applied to the site to prevent any seepage. The patient should be monitored for pain, heat, or swelling over the joint.

Joint flushing (joint irrigation, joint lavage) is commonly performed with the animal given a general anesthetic, but is also performed on young animals who have received injectable anesthetics or very heavy sedation (because of the risk involved, heavy sedation is not commonly used). Two needles are placed at different sites on the affected joint capsule, and sterile flush forced through one needle exits through the other. Joint lavage may be followed with an intrasynovial injection of antibiotics after removing the exit needle.

RECTAL ADMINISTRATION

Rectal administration of therapeutics in large animals is used as a method of delivering medication to a patient that cannot tolerate oral medication as a result of ileus or regurgitation or to deliver an enema to a constipated patient.

Rectal Medications

To deliver medication per rectum, the appropriate size tube should be selected based on the size of the patient. A Harris enema tube (24F) or fenestrated tube (multiple holes along the distal end) are appropriate for adult animals, foals, and calves, whereas smaller-diameter soft rubber tubes can be used for lambs, kids, and crias. The fenestrated tube may provide better distribution of the medication, but the fenestrations on some tubes may be rough and may cause irritation to the rectal mucosa. The technician should always check the tube for any rough edges before using and avoid using anything that is not smooth. The distal end of the tube is lubricated with a water-soluble solution (such as KY jelly), and the tube is inserted from 1 to 12 inches into the rectum. This distance is determined by the size of the patient. Appropriate restraint is used, tailored to the individual species and age of the animal. For standing animals, the technician should take precautions to stand to the side of the animal so as not to get kicked. Medications are dissolved in a small amount of water (or at the veterinarian's request, in another solution, such as DMSO) and injected gently via a catheter tip syringe into the tube followed by a small “chaser” of water (or air) to ensure that all of the medication is administered and none remains in the tube. The tube is then gently removed. It may be necessary to remove feces from the rectum before the administration of medications. The technician must clarify this with the veterinarian in advance because it may or may not be necessary, and there is an increased risk for injury to the animal when a hand is inserted into the rectum. Rectal tears can be fatal. If instructed to do so, the technician must have fingernails clipped short and wear no rings or watches. With a well-lubricated rectal sleeve, the technician will gently insert the hand a short distance into the rectum and gently remove obvious feces present before the insertion of the tube.

The veterinarian may administer 2% lidocaine per rectum to facilitate performance of a rectal examination by reducing the straining of the patient. A 60-ml syringe containing lidocaine is attached to rubber tubing or IV extension tubing that is inserted into the rectum and the drug injected. Sedation may also be given via the epidural route for patients that are straining to prevent potential problems, such as rectal tears, during the examination.

Enema Administration

Enemas are administered to constipated animals to encourage defecation. They can be administered to animals of any age or species. The tube used, volume, and composition of fluid administered will vary with the size and condition of the animal. Fluids should be nonirritating and warmed to room temperature, but not above body temperature.

image TECHNICIAN NOTE

The administration of cold enema solutions can lead to hypothermia in young patients.

Neonates: A common practice by many horse owners is to routinely administer a prepackaged human enema to newborn foals to encourage passage of meconium (fetal feces). Warm-water enemas and enemas containing other agents, such as gentle soap, mineral oil, or other lubricants, are administered using a tube and gravity flow. Retention enemas are routinely used in hospitalized neonatal patients. An excessive enema volume and repeated enemas can be damaging to the patient. The technician must be aware of the individual variation in the patients’ size. The standard 120 to 180 ml of fluid delivered for an equine neonate would be far too much for a cria.

The tip of the tube is well lubricated with a water-soluble lubricant, and the tube is gently advanced into the rectum. Once the tube is inserted to the desired distance in the rectum, a 60-ml catheter tip syringe, funnel, or enema bucket can be attached to the end and the desired amount of solution delivered. Gravity flow is preferred to pumping fluid in because it is possible to tear the rectum. If a syringe is used, gentle pressure is applied until all of the enema solution has been delivered. After all of the solution has been administered, cap off the end of the tube with the thumb and gently remove the entire length of the tubing.

Retention Enemas: Retention enemas involve the insertion into the rectum of a well-lubricated Foley catheter with balloon. The tube is inserted a few inches (usually 2 to 4) into the rectum, and the balloon is inflated using a syringe containing air or water. The enema solution (often Mucomyst, acetylcysteine) is infused. The catheter is then clamped off using a hemostat and the tube left in place for at least 15 minutes. After that time, the hemostat is removed, the balloon deflated, and the catheter removed (Figure 20-113).

image

FIGURE 20-113 A, Acetylcysteine and Foley catheter for retention enema in equine neonate. B, Inserting well-lubricated Foley catheter into rectum. C, Administering enema solution via gravity flow. D, Foley catheter is clamped off to allow for retention of enema.

Enema Administration to Adult Animals: Enemas can be administered to adult animals. With the animal properly restrained, the technician stands to the side of the patient, inserts a well-lubricated tube (an NGT can be used for enema administration to large animals) and enema solution delivered. The technician administering the enema may find benefit from preparing in advance of the procedure by cutting one hole in the center of the bottom of a large plastic trash bag (for head) and cutting a hole on either side of the bottom of the bag (for arms). Wearing it as a protective covering may be desirable because the result of some enemas may be a rapid projectile expulsion of fluid and feces.

ACKNOWLEDGMENTS

The authors wish to acknowledge the faculty, residents, technical staff, and students at the William R. Pritchard Veterinary Medical Teaching Hospital of the University of California, Davis. Particular appreciation goes to Dr. Monica Aleman MVZ, PhD; Dr. Lisle George DVM, PhD; Fred Librach, Equine Clinical Instructor; Mike Reis, Food Animal Clinical Instructor; Sarah Hayes, RVT; and Teri Joseph, RVT.

RECOMMENDED READING

Bowden C., Masters J., eds. Textbook of veterinary medical nursing. London: Butterworth Heinemann, 2003.

Busch S.J., ed. Small animal surgical nursing. St Louis: Mosby Elsevier, 2006.

Colville T., Bassert J.M., eds. Clinical anatomy and physiology for veterinary technicians. St Louis: Mosby, 2002.

Ettinger S.J., Feldmen E., eds. Textbook of veterinary internal medicine, ed 6, Philadelphia: Elsevier Saunders, 2005.

Fowler, M.E. Medicine and surgery of South American camelids. Ames, Iowa: Iowa State University Press; 1998.

Frandson, R.D., Wilke, W.L., Fails, A.D. Anatomy and physiology of farm animals. Baltimore: Lippincott Williams & Wilkins; 2003.

Hanie, E.A. Large animal clinical procedures for veterinary technicians. St Louis: Mosby; 2006.

Hendrix C.M., Sirois M., eds. Laboratory procedures for the veterinary technician, ed 5, St Louis: Mosby Elsevier, 2007.

House, J.K., Smith, B.P., Van Metre, D.C., et al. Ancillary tests for assessment of the ruminant digestive system. Vet Clin North Am Large Anim Pract. 1992;8:203–232.

Jaffe, T.J. Diagnostic sampling and therapeutic techniques. In McCurnin D.M., Bassert J.M., eds.: Clinical textbook for veterinary technicians, ed 6, St Louis: Saunders, 2006.

Kopcha, M., Schultze, A.E. Peritoneal fluid. II. Abdominocentesis in cattle and interpretation of nonneoplastic samples. Compend Contin Educ Pract Vet. 1991;13:703–710.

Lawhorn, B. A new approach for obtaining blood samples from pigs. J Am Vet Med Assoc. 1988;192:781–782.

Macintire, D.K., Drobatz, K.J., Haskins, S.C., et al. Manual of small animal emergency and critical care medicine. Baltimore: Lippincott Williams & Wilkins; 2005.

McKenzie, E.C., Abdominocentesis in large animals: methods and interpretation of results. Proc 25th Forum ACVIM, 2007:27–30.

Orsini, J.A., Divers, T.J. Manual of equine emergencies, ed 3. St Louis: Saunders; 2008.

Sirois M., ed. Principles and practice of veterinary technology, ed 2, St Louis: Mosby, 2004.

Radostits, O.M., Gay, C.C., Blood, D.C., et al. Veterinary medicine, a textbook of the diseases of cattle, sheep, pigs, goats and horses, ed 10, Oxford: WB Saunders, 2007.

Rockett, J., Bosted, S. Veterinary clinical procedures in large animal practice. Clifton Park, NY: Thomson Delmar Learning; 2007.

Rose, R.F., Hodgson, D.R. Manual of equine practice, ed 2. Philadelphia: WB Saunders; 2000.

Smith B.P., ed. Large animal internal medicine, ed 4, St Louis: Mosby, 2009.

Smith M.C., Sherman D.M., eds. Goat medicine. Philadelphia: Lea & Febiger, 1994.

Taylor F.G.R., Hillyer M.H., eds. Diagnostic techniques in equine medicine. Philadelphia: WB Saunders, 1997.

Terry, C., Rashmir-Raven, A., Linford, R.L. Placing an intravenous catheter in horses. Vet Tech. 2000;4:207–212.

Williams, C.S.F. Routine sheep and goat procedures. Vet Clin North Am Large Anim Pract. 1990;6:737–758.