Dentistry and Oral Surgery
When you have completed this chapter, you will be able to:
1 Describe legal issues related to performance of dental services by veterinary technicians and list professional organizations related to veterinary dentistry.
2 Identify terminology used in veterinary dentistry to designate location and direction and describe the modified Triadan system for numbering of teeth.
3 Describe normal occlusion in dogs and cats and common malocclusions and treatment methods used in orthodontics in small animals.
4 Discuss aspects of the complete medical history as they relate to veterinary dentistry.
5 List and describe procedures used in extraoral and intraoral examinations in small and large animals.
6 Describe equipment and supplies used for dental radiography.
7 Differentiate between paralleling, bisecting angle, and occlusal techniques in dental radiography.
8 Differentiate between stomatitis, gingivitis, and periodontitis and explain grading of periodontal disease.
9 Describe equipment and procedures for periodontal débridement using power and hand scalers.
10 Explain methods for sharpening of dental instruments.
11 Discuss the rationale and procedures used in polishing teeth.
12 Discuss topics and methods for client education related to veterinary dentistry.
13 Discuss indications for restorative dentistry and endodontics and describe common procedures performed on small animals.
14 Discuss indications, procedures, and potential complications of exodontics.
15 List and describe common equine dental problems and treatments.
ETHICAL AND LEGAL ASPECTS
The level of dental care a veterinary technician may provide varies from state to state, and the laws and regulations for the state of practice need to be understood before providing dental care. The American Veterinary Dental College (AVDC) published a position statement in 1998 regarding veterinary dental heath care providers. This statement provides recommendations for the qualifications of persons performing veterinary dental procedures. The AVDC considers it appropriate for the veterinarian to delegate maintenance dental care and certain dental tasks to veterinary technicians. Tasks appropriately performed by veterinary technicians include dental prophylaxis and certain procedures that do not result in alterations in the shape, structure, or positional location of teeth in the dental arch.
 TECHNICIAN NOTE
The level of dental care the technician can legally provide varies from state to state. Become familiar with practice acts in your state.
In addition, the AVDC supports advanced training of veterinary technicians to perform additional dental services, such as taking impressions, making models, charting veterinary dental lesions, taking and developing dental radiographs, and performing nonsurgical subgingival root planing.
VETERINARY DENTAL ORGANIZATIONS
Opportunities exist for veterinary technicians to achieve advanced training and recognition in dentistry. The National Association of Veterinary Technicians in America (NAVTA) governs technicians who have completed credential requirements and passed specialty examinations to be considered Veterinary Technician Specialists (VTS). To date, there are advanced specialties in the fields of anesthesia, emergency and critical care, internal medicine, dentistry, and behavior. Technicians interested in pursuing the dental specialty must secure a mentor, maintain case logs, write case reports, and attend continuing education courses as part of the credentials process of the Academy of Veterinary Dental Technicians (AVDT). Before beginning the credentialing process, the technician must have 3000 hours of dental experience. For further information about becoming a member of the AVDT, visit the website www.avdt.us.
TECHNICIAN NOTE
The AVDT consists of technicians who have completed a credentials process and passed a specialty examination.
The American Veterinary Dental Society (AVDS) is an organization created to advance the awareness and knowledge of veterinary dentistry among the profession and the public. Membership in the AVDS is open to all veterinarians, veterinary technicians, and dental hygienists. Membership includes a subscription to the Journal of Veterinary Dentistry, the official journal of many national and international dental societies and colleges. More information can be found at the AVDS website www.avds-online.org.
The earliest organization established to provide dental knowledge to veterinary technicians and assistants is the American Society for Veterinary Dental Technicians (ASVDT). Membership includes a self-taught home study course that is a good introduction to basic dentistry. The ASVDT provides a baseline level of dental knowledge and is open to staff members who may or may not have formal veterinary education, whereas members of the AVDT have an advanced level of dental knowledge and are required to hold a certification or state license for membership.
DENTAL MORPHOLOGY
Morphology refers to the form and structure of an organism or its parts. Teeth can be classified as brachyodont or hypsodont based on their crown and root structure (Figure 32-1). All teeth of humans, carnivores, and pigs are brachyodont teeth. Brachyodont teeth have a relatively small, distinct crown compared with the size of their well-developed roots. The apices (singular: apex) of the roots are open for only a limited time during eruption and development of the teeth, and therefore the teeth do not continually grow or erupt. This is in contrast to hypsodont teeth (seen in horses, rodents, and lagomorphs) that have a comparatively large reserve crown beneath the gingival margin and root structure that allows for continued growth and/or continued eruption during all or most of an animal’s lifetime. Hypsodont teeth can be divided further into two categories: radicular and aradicular hypsodont teeth. The cheek teeth of horses are an example of radicular hypsodont teeth. The apices of these teeth remain open for a significant portion of adult life, but eventually close, after which point continued growth of the tooth ceases, and occlusal wear is offset only by continued eruption. Cheek teeth and incisors of rabbits and some rodents are aradicular hypsodont (also called elodont) teeth, indicating a lack of true root structure and lifelong tooth growth, which compensates for occlusal wear.
Dogs and cats have four types of teeth: incisors, canines, premolars, and molars. The incisor teeth are the most rostral teeth and are used for gnawing and grooming. The canine teeth are distal to the incisors. They are long and are used for prehending and holding. The premolars and molars (often referred to as cheek teeth) are used for shearing and grinding.
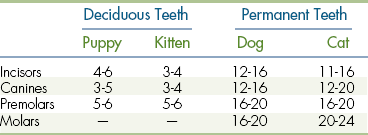
Most mammals are diphyodont, meaning that they have two sets of teeth. The first set of teeth is referred to as deciduous (also referred to as primary or baby teeth), and these are replaced with permanent teeth (also referred to as secondary or adult teeth). Mammals show great variety in the number and types of teeth depending on the species. Dental formulas used to classify the numbers and types of teeth are seen in Box 32-1. Normal eruption times of deciduous and permanent teeth in dogs and cats are seen in Table 32-1, though it should be mentioned that some normal variation exists.
It is important to be aware of the number of roots of each tooth. Table 32-2 lists the number of roots of each tooth of cats and dogs. Anatomic variation does occur, so preoperative dental radiographs are important to confirm numbers and shape of tooth roots before extraction or other procedures involving subgingival pathologic conditions. For example, the maxillary third premolar is usually a two-rooted tooth in dogs and cats, but it is not uncommon to see a third root in some dogs and cats.
TABLE 32-2
Permanent Dentition of the Dog and Cat
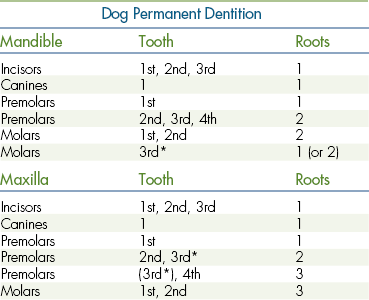
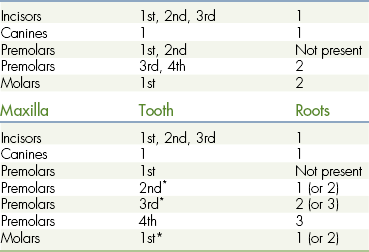
∗Anatomic variation in root numbers is common. There may be an extra root, or it may be partially fused to the normal root(s).
An understanding of dental anatomic terminology is necessary to accurately describe the location of a structure or lesion. “Rostral” is a term that when referring to cranial anatomy refers to a structure that is closer to the front of the head in comparison with another structure. “Caudal” is a term used to describe a structure that is toward the back of the head when compared with another structure. “Vestibular” is a term that describes the tooth surface facing the lips or vestibule (acceptable alternatives are buccal and labial). “Facial” is a term that describes the vestibular surface of teeth visible from the front (incisors). “Lingual” refers to the surface of the mandibular teeth adjacent to the tongue. “Palatal” refers to the surface of maxillary teeth adjacent to the palate. “Mesial” refers to the portion of the tooth in line with the dental arcade that is closest to the most rostral portion of the midline of the dental arch. “Distal” refers to the portion of the tooth that is closest to the most caudal portion of the midline of the dental arch. The concepts of mesial and distal surfaces are difficult to describe without referring to a diagram. Figure 32-2 shows a diagram with use of these terms. It may help to remember that the terms mesial and distal are used to describe the surfaces of the teeth where adjacent teeth touch or nearly touch. “Apical” refers to a portion of the tooth closer to the apex, or tip of the root. “Coronal” refers to a structure with a location closer to the crown of the tooth in relation to another structure.
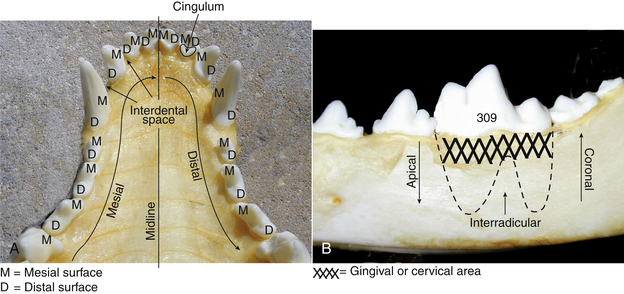
FIGURE 32-2 Positional terminology commonly used in dentistry. A, Palatal view of the canine maxilla. M, Mesial; D, distal. B, Mandibular left first molar.
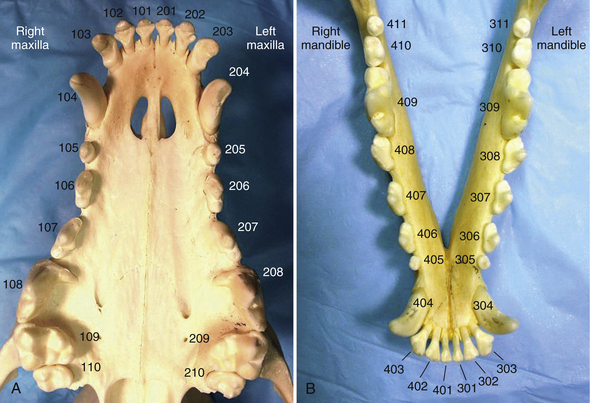
Referring to the teeth by a numeric system rather than using descriptive terminology saves time when performing detailed charting. The most commonly used numbering system is the modified Triadan system. Teeth in the maxillary right quadrant are considered the 100 series, with the left maxillary quadrant called the 200 series. The left mandibular quadrant is the 300 series, and right the mandibular quadrant is the 400 series. Each tooth within the quadrant has a two digit number starting at the anterior midline and moving along the dental arch in a caudal direction. The right maxillary first incisor is 101, right maxillary second incisor is 102, right maxillary third incisor 103, right maxillary canine 104, and so on. The left maxillary canine is 204, left mandibular canine is 304, and right mandibular canine is 404 (Figure 32-3). Deciduous teeth are assigned the 500 series for the right maxillary quadrant, 600 series for the left maxillary quadrant, 700 series for the left mandibular quadrant, and 800 series for the right mandibular quadrant.
TECHNICIAN NOTE
Knowledge of the Triadan tooth numbering system saves time during charting of oral pathologic conditions.
Cats have fewer teeth than dogs, but even when teeth are missing, the teeth that are present will have a predictable number with the Triadan system. For example, tooth 108 always refers to the right maxillary fourth premolar whether discussing a dog, hyena, cat, or lion. Since the cat does not have a maxillary first premolar, the premolar closest to the canine tooth is tooth 106 (Figure 32-4). Cats are missing their mandibular first and second premolars, so the premolars closest to the mandibular canine teeth are numbered 307 and 407, respectively for the left and right mandible. Keeping these numbers consistent among species allows veterinary professionals to quickly equate a tooth number with an anatomic location. When someone says tooth 208 is fractured, one should think of the left maxillary fourth premolar regardless of species.
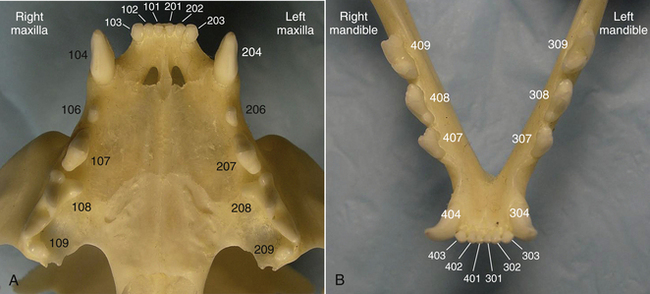
FIGURE 32-4 Triadan tooth numbering system in the cat. A, Maxilla. B, Mandible. Note that the canine tooth always ends with the numbers “04” and the first molar always ends with the numbers “09,” regardless of species.
OCCLUSION
Occlusion refers to the spatial relationship of teeth within the mouth. Malocclusion refers to the situation when teeth or jaws are not correctly aligned. Although cosmetic issues of misaligned teeth are not typically a concern in dogs and cats, malocclusions can result in discomfort from impingement of teeth on soft tissue structures of the opposing dental arcade. Dogs and cats with a normal occlusion have a scissors bite, where the incisors come together to closely overlap like blades of a scissors (Figure 32-5, A, B). When teeth are properly aligned in scissors occlusion, there is maximal function of all teeth with no occlusal trauma. Variations of dental occlusion in dogs and cats occur depending on the breed and skull type. The relationship of brachyodont teeth in normal occlusion is discussed later.
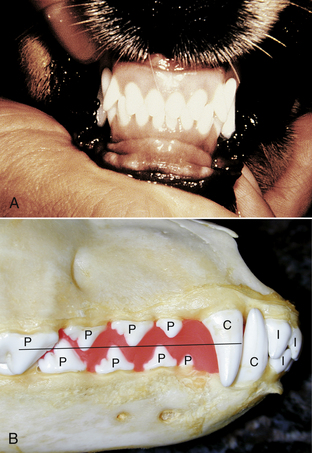
FIGURE 32-5 Normal scissors occlusion in a dog. I, Incisor; C, canine; P, premolar; M, molar. A, Rostral view of incisor and canine teeth in a dog. B, Lateral view of a dog skull. Premolar cusps interdigitate toward the opposing interdental space.
Incisors
The mandibular incisors should be palatal to (behind) the maxillary incisors, and the coronal third of the mandibular incisors should rest on the cingulum of the maxillary incisors. The cingulum is a smooth convex bulge located on the palatal side of the gingival third of the incisor teeth.
Canines
When the mouth is closed, the mandibular canine is distal to the maxillary third incisor and mesial to the maxillary canine, and it should be centered in between these two teeth without touching either of these teeth.
Premolars
The premolar cusps point to the interdental space of the opposing premolar teeth. The mandibular fourth premolar cusp points in the interdental space between the maxillary third and fourth premolars. When the mouth is closed, the mandibular first premolar is mesial to the maxillary first premolar. The premolars are not in occlusion with the opposing premolar teeth, but when the mouth is closed, the cusp tips should intersect a plane drawn midway between the mandibular and maxillary occlusal planes (see Figure 32-5, B).
Carnassial Teeth
The term “carnassial,” interpreted literally, means “tearing of flesh.” This adjective is used to describe the largest shearing tooth of the upper and lower jaw in dogs, cats, and other carnivores. These teeth work together during mastication and contribute most significantly to the masticatory effort. The carnassial teeth of dogs and cats are the maxillary fourth premolar and the mandibular first molar teeth. In most species, the upper jaw is wider than the lower jaw, referred to as anisognathism. Therefore the maxillary fourth premolar tooth normally occludes lateral (buccal) to the mandibular first molar tooth.
Molars
Humans have many flat occlusal surfaces of the maxillary and mandibular molars that come together during chewing to crush food particles. In contrast, carnivores have sharp, shearing cusps and less flat occlusal surfaces. Two maxillary and three mandibular molars of dogs have flat occlusal surfaces that are capable of grinding and crushing hard food particles. Cats, having the dentition of a true carnivore, have molars with few flat occlusal surfaces. Flat occlusal surfaces are often susceptible to development of caries lesions (also referred to by the term of “cavities”) in pits and fissures that occur as a result of incomplete development of enamel on the occlusal surface. The relative lack of flat occlusal surfaces partly explains the increased susceptibility of humans to caries lesions compared with dogs and cats.
ORAL EXAMINATION AND HISTORY
The patient’s medical history should be assessed before performing dental procedures because dental procedures require elective anesthesia. The technician can obtain a complete medical history and a history specifically pertinent to dentistry. Clinical symptoms to inquire about include pawing at the mouth, dropping food, walking away from the food bowl after showing initial interest in food, rubbing the face along furniture, or showing uncharacteristic aggression when approached or touched around the facial region (Box 32-2). These signs can indicate oral disease and may manifest earlier in the disease process than would anorexia or oral bleeding. A history of sneezing after drinking water is suggestive of the presence of an oronasal fistula, a common problem in small-breed dogs with severe periodontal disease.
History related to oral home care can also be obtained by the technician. Inquire about whether a home-care regimen is currently performed. If not, delve further to determine if the client is willing or able to provide oral care at home. If the client has attempted home care and was not successful, find out what was tried so that alternative methods may be suggested. If the client is currently providing home care, ask how frequently and what techniques and products are being used. History pertaining to diet, treats, and toys is also important. Ask if the pet is fed dry, canned, or semimoist food. Inquire about the kind of treats the pet is eating to determine what role treats are playing in the development or prevention of dental disease. Ask what kind of toys the pet plays with and if there are any inappropriate habits that may increase the risk of dental fractures. Once the dental history is established, the veterinary technician is in the perfect position to provide counseling on proper home-care techniques, diets, and toy products.
The dental or oral surgical procedure, whether routine or emergency, should begin with a comprehensive extraoral and intraoral examination. The mouth can be an indicator of general health, and a thorough oral examination is an integral part of any diagnostic sequence. The technician plays a crucial role in providing dental care and services, so it is imperative that the technician becomes familiar with the normal anatomy of the oral cavity and surrounding structures. By performing examination techniques on a regular basis and by establishing a routine sequence of examination, efficient and accurate recognition of abnormalities is possible. All information received from the examination should be recorded on a dental record, the legal document of clinical data and dental services that becomes part of the patient’s medical record (Figures 32-6, A, B, and 32-7, A, B). Any abnormalities should be brought to the veterinarian’s attention so that a diagnosis and proper treatment plan can be established for the patient.

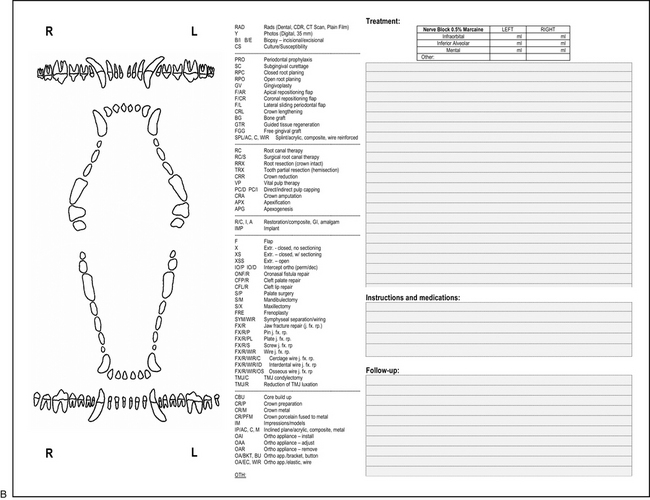
FIGURE 32-6 Canine dental chart. A, Front used to document diagnosis. B, Back used to document treatment.


FIGURE 32-7 Feline dental chart. A, Front used to document diagnosis. B, Back used to document treatment.
TECHNICIAN NOTE
Every dental procedure should begin with a comprehensive oral examination to evaluate extraoral structures of the face, head, and neck and intraoral structures, including the soft tissues of the oral cavity, the teeth, and their supporting structures.
EXTRAORAL EXAMINATION
The examination begins with extraoral observation of the head, face, eyes, ears, and neck using direct visual observation, palpation, and smell. Using both hands, palpate each side of the face, head, and neck for symmetrical comparison. Feel the temporal and masseter muscles for the presence of atrophy, enlargement, or pain. Palpate the ventral, lateral, and medial surface of the left and right mandibles for the presence of swelling that could be evidence of neoplasia or fracture. Small-breed dogs with advanced periodontal disease are commonly affected by bone loss and pathologic fracture of the mandible, which may be found as an incidental finding in the examination room.
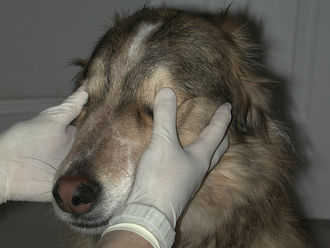
Visually inspect the ears and note evidence of discharge, odor or pain on palpation because middle ear disease may be a cause for the presenting complaint of pain on opening the mouth. Visually inspect the eyes and palpate using your thumbs on the closed eyelids to gently push (retropulse) both eyes at the same time. Bilateral retropulsion allows for symmetrical comparison of depth and firmness (Figure 32-8). Often if a space-occupying mass (as a result of neoplasia, inflammation, or infection) is present behind or beneath the eye, retropulsion may find a decreased ability of the globe to move caudally in the orbit on one side when compared with the opposite side. Ability to retropulse varies depending on facial conformation. Retropulsion of the eyes of brachycephalic dogs and cats results in less movement of the globe, so comparison of both eyes is important to determine relative differences. Observe for evidence of ocular discharge, which may be due to blockage of the nasolacrimal duct by a pathologic process, such as a tooth root abscess or neoplasia. Palpate the soft tissue in the area ventral to the medial canthus of the eye. Swelling in this area may be due to a tooth root abscess of the maxillary fourth premolar. Evaluation of the neck includes palpation of the right and left mandibular salivary glands beneath the skin of the ventral neck. The mandibular salivary gland is the only easily palpable major salivary gland in dogs and cats. The three other major salivary glands are either too diffuse to palpate easily (parotid, sublingual glands) or are not superficial enough to palpate (zygomatic gland). The mandibular gland is easily distinguished from the mandibular lymph nodes because it is softer, larger than, and caudomedial to the mandibular lymph nodes. Once the salivary glands are located, the mandibular lymph nodes can be identified by moving the finger tips cranially. Palpate the lymph nodes bilaterally for symmetry and firmness. In the cat, mandibular lymph nodes are difficult to palpate unless they are enlarged. In the dog, mandibular lymph nodes are almost always palpable, ranging in size from 0.5 to 1.5 cm in diameter depending on the size of the patient. Although we often refer to the mandibular lymph “node,” in reality, the area contains anywhere from one to five nodes. Other nodes that drain the head (retropharyngeal, parotid) are not normally palpable. Nine percent of dogs have another lymph node that is palpable in the subcutaneous tissue dorsal to the maxillary third premolar tooth. This node is referred to as the facial or buccal lymph node and is often bilateral, when present.
TECHNICIAN NOTE
The major salivary glands of the dog and cat are the paired mandibular, sublingual, zygomatic, and parotid glands.
The occlusion should be evaluated before intubation by noting any teeth that are positioned incorrectly. The technician should pay particular attention to discrepancies of jaw length, the spatial relationship of the teeth as they erupt, and to the relationship of the erupting teeth with the soft tissues of the opposing jaw. Note any deciduous teeth that have not exfoliated by the time their permanent counterpart has erupted because persistent deciduous teeth may create situations of periodontal disease and redirection of permanent tooth eruption. Once the deciduous and permanent canines begin to erupt, routinely monitor the relationship of the mandibular canines and the space between the maxillary third incisor and canine teeth. Deviations from normal canine positioning can cause trauma to the palate and require treatment.
INTRAORAL EXAMINATION
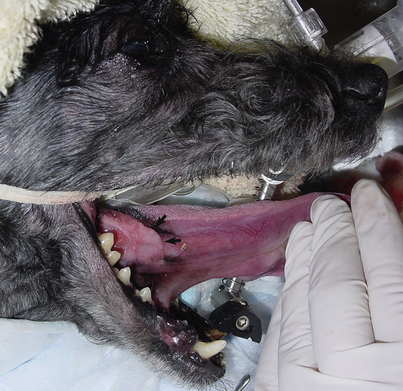
The intraoral examination consists of evaluations of the soft tissues of the oral cavity, the dental structures, and the periodontium, a term that describes the supporting structures of the teeth. A standard approach to the oral examination allows for efficiency and thoroughness. Begin by observing the skin and mucosa of the upper and lower lips. Some breeds are prone to lip fold dermatitis of the lip area caudal to the mandibular canine tooth that can cause oral malodor unrelated to periodontal disease. Buccal mucosa refers to the mucosa that begins at the mucocutaneous junction and lines the cheeks and lips. Alveolar mucosa refers to the mucosa that lies against the bone of the upper or lower jaw, which meets with the gingiva at the mucogingival junction. The normal appearance of the mucosa may be pink or pigmented, and the mucosa should exhibit no lesions, ulcerations, or swellings. Pay particular attention to areas of mucosa that lay adjacent to periodontally diseased teeth because the bacteria in the plaque may contribute to painful mucosal ulcerations, often referred to as chronic ulcerative paradental stomatitis (CUPS) (Figure 32-9). Observe the caudal cheek lining in the region of the carnassial and molar teeth. This mucosa frequently becomes pressed between the teeth during chewing, creating a condition known as “cheek chewing lesions” (Figure 32-10). Similarly, mucosa beneath the tongue may also show signs of chewing lesions referred to as “tongue chewing lesions,” which are usually bilateral (Figure 32-11). These lesions usually do not require treatment unless the lesions are not bilaterally similar or if the lesions are ulcerated. In these cases, the affected mucosa may be removed and submitted for histopathologic evaluation.
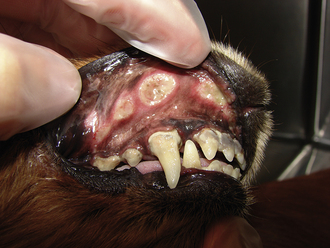
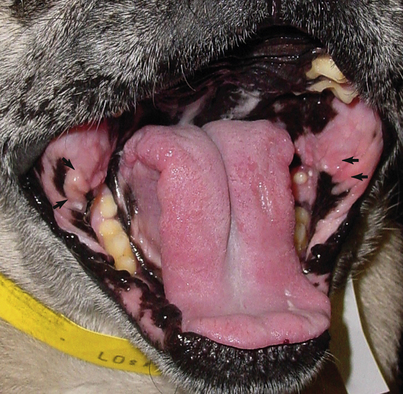
FIGURE 32-10 Bilateral cheek chewing lesions in a dog (arrows). These lesions can be proliferative and sometimes ulcerated.
Two raised bumps are found on the alveolar mucosa dorsal to the maxillary fourth premolar and first molar teeth. Salivary secretions from the parotid and zygomatic salivary glands travel through ducts leading to these duct openings (Figure 32-12).
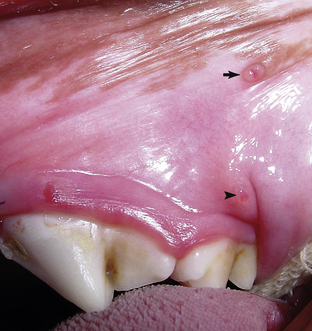
FIGURE 32-12 Parotid (arrow) and zygomatic duct opening in a dog (arrowhead). When the mucosa is not retracted caudally, the parotid opening is rostral and dorsal to the zygomatic duct opening.
The roof of the mouth is composed of the hard and soft palate. The hard palate forms the rostral two thirds and is covered by palatal mucosa arranged in prominent ridges, called rugae (Figure 32-13). These rugae range from eight to ten in number. In brachycephalic dogs, the rugae are closely positioned, and hair and debris can accumulate in these rugal folds. On the midline of the hard palate, just caudal to the incisor teeth, the incisive papilla is a round, slightly raised structure (Figure 32-14). Lateral to the incisive papilla, a small bilateral communication with the incisive duct and vomeronasal organ exist. The vomeronasal organ is a sensory organ involved in detection of pheromones and other chemical compounds. Palpation of the area lateral to the incisive papilla may normally feel as if there is air trapped beneath the mucosa as a result of the communication between the mouth and these nasal structures. The soft palate consists of mucosa and muscle that separate the oropharynx and nasopharynx. Two prominent bony structures can be palpated just lateral to the midline of the soft palate that are the hamular processes of the bilateral pterygoid bones. If one or both hamular processes are difficult to palpate, this may be due to the presence of a nasopharyngeal mass.
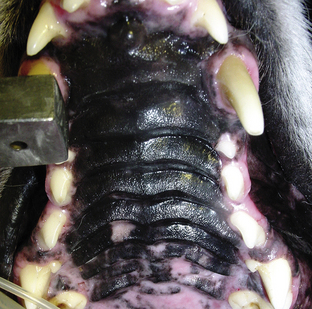
FIGURE 32-13 Palatal rugae in a dog. The rugae may be widely spaced in dolichocephalic dogs or close together in brachycephalic dogs.

FIGURE 32-14 Incisive papilla in a dog. The left and right incisive ducts open on the lateral aspects of the papilla.
TECHNICIAN NOTE
The incisive papilla is a raised structure located on the midline behind the maxillary incisors in dogs and cats.
The pharynx should be evaluated for evidence of inflammation or neoplasia. When the patient’s mouth is open, bilateral folds of pharyngeal mucosa will be evident lateral to the tongue. These are referred to as the palatoglossal folds, and this area and the mucosa lateral to these folds may be inflamed in cats with lymphocytic-plasmacytic stomatitis (LPS) (Figure 32-15).

Gently hold the tip of the tongue to enable visual examination of the dorsal, ventral, and lateral surfaces. Lift the tongue to observe the mucosa of the floor of the mouth and the base of the tongue. In the awake patient, the examiner’s thumb may be used extraorally to push the tongue dorsally for better visualization of the ventral surface of the tongue. The dorsal surface of the tongue is covered by thousands of papillae, some of which contain taste buds. The large, distinctive papillae located at the caudal third of the tongue are the vallate papillae, which are spaced in a curved line separating the body from the root of the tongue. Depress the tongue to visualize the tonsils, noting any enlargement or change in color or texture. The color of a normal tonsil is typically more hyperemic than the color of the adjacent mucosa. Normal tonsils may be fully contained within the tonsillar crypt and may be difficult to visualize.
During the soft tissue examination, any tissue variations from normal should be described by recording the size, shape, color, surface texture, and consistency (e.g., soft, firm, hard, or fluctuant). A dedicated area on the dental record may be created to allow for documentation of any abnormalities of oral soft tissue structures (see Figures 32-6, A and 32-7, A).
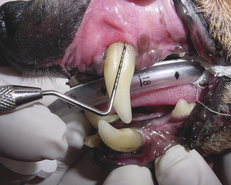
The next step in the intraoral examination is evaluation of the teeth and their supporting structures. First, determine the presence or absence of teeth in each quadrant. Missing teeth can be documented on the dental chart by darkening or circling the missing tooth. Further radiographic evaluation of areas of missing teeth is imperative because dentigerous cysts can develop as a result of an unerupted tooth. To evaluate the condition of the teeth and periodontium, the technician must use a periodontal probe and dental explorer. These dental instruments are important clinical tools for obtaining data about the health status of each tooth. Consider the canine mouth as containing 42 patients and the feline mouth containing 30 patients, each patient requiring a thorough evaluation. The periodontal probe has a handle with a round or flat rectangular working end that is marked in millimeter increments, ending in a blunt tip. The probe is used like a miniature intraoral ruler to measure attachment levels, sulcus and pocket depths, loss of bone in furcation areas, and size of oral lesions. It is also used to assess the mobility of teeth and the presence of gingival bleeding. Periodontal probes are available in an assortment of design styles, with variations in thickness of the diameter of the working end and variations in increments of millimeter markings (Figure 32-16). Probes with Williams’ markings have millimeter increments at 1, 2, 3, 5, 7, 8, 9, and 10 mm. The UNC 15 probe has millimeter markings at 1, 2, 3, 4, 5, 6, 7, 8, 9, 10, 11, 12, 13, 14, and 15 mm, which is useful for large dogs or patients with deep periodontal pockets. Some probes have a small 0.5-mm ball on the end to minimize tissue trauma; however, these probes typically have markings at 3.5, 5.5, 8.5, and 11.5 mm, resulting in inexact determination of pocket depth. Although many probes exist, a probe with markings beginning at 1 mm is necessary for assessing subtle pocket depths in cats. The Michigan “O” probe with Williams’ markings is best suited for use in cats because the working end of the probe is the narrowest in diameter. Some styles contain color-coded bands for easier viewing of calibrations. A Naber’s probe is a curved furcation probe that is used to assess the extent of bone loss in the furcation area.
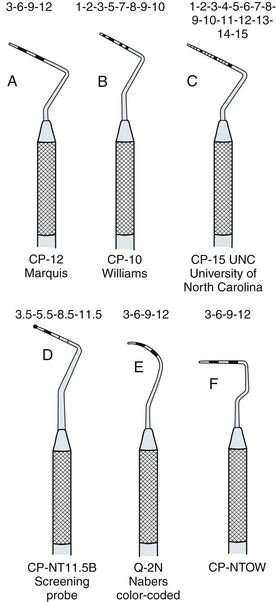
FIGURE 32-16 Periodontal probes with different calibrations. The blunt-tipped working end is used to measure sulcus or pocket depth, tooth mobility, furcation involvement, gingival recession, and gingival hyperplasia. (From Daniel SJ, Harfst SA, Wilder R: Mosby’s dental hygiene: concepts, cases, and competencies, ed 2, St Louis, 2008, Mosby.)
TECHNICIAN NOTE
The normal sulcus depth is 0 to 3 mm in dogs and 0 to 1 mm in cats. Probing depths greater than normal are documented on the chart as pockets.
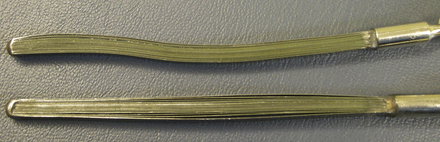
The dental explorer has a slender, wirelike working end that tapers to a sharp point and is used to explore the topography of the tooth surface. When the explorer is held with a light modified pen grasp, the technician will acquire a tactile sense to locate tooth surface irregularities, such as caries, feline resorption, calculus deposits, and pulp exposure. Tactile sensitivity is achieved when the flexible working end of the explorer vibrates as it detects surface irregularities. The vibrations are transmitted from the tip to the handle as felt by the technician. The explorer is also used to determine the completeness of treatment following calculus débridement and to ensure smooth transitions of dental restoratives (fillings). Several designs of explorers are available (Figure 32-17). Varying degrees of flexibility contribute to the degrees of tactile sensitivity. The shepherd’s hook is the most common explorer in most veterinary practices and is often paired with a periodontal probe as a double-ended instrument. Although it is convenient to have on the opposite end of a probe, it is bulky, inflexible, and less adaptable to subgingival use when compared with other explorers. The Orban explorer has a 2-mm tip that is bent at a 90-degree angle from the shank, allowing it to be used subgingivally with little tissue distention (stretching of the gingiva away from the tooth) or trauma to the epithelial lining of the sulcus. The 2-mm tip may be a limitation when using the Orban to determine depth of a dental lesion, such as caries or feline resorption. The curved 11/12 ODU explorer is an ideal choice for veterinary use. The curvature of the long shank and working ends make it adaptable to use on rostral and caudal teeth, supragingivally and subgingivally, and its smaller working end allows for detection of subtle hard tissue defects.
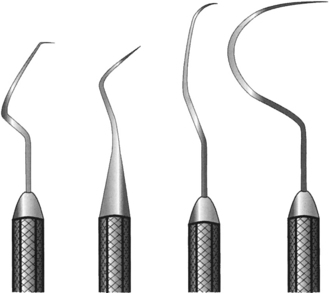
FIGURE 32-17 Dental explorers with sharp wirelike tips are used to explore the topography of the tooth surfaces: (left to right) Orban, Pigtail, 11/12 ODU, shepherd’s hook. (From Nelson DM: Saunders review of dental hygiene, Philadelphia, 2000, WB Saunders.)
Periodontal instruments, including the probe and explorer, are held with a modified pen grasp (Figure 32-18), which is a variation of the grasp used for writing. This recommended grasp facilitates good fingertip tactile sensitivity and precise control of the instrument’s working end, decreasing risk of trauma to the tissues. The modified pen grasp uses three fingertips placed in a triangular (tripod) position, plus a rest finger. The pads of the index finger and thumb rest on the instrument where the handle and shank meet to hold the instrument. The pad near the fingernail of the middle finger rests on the shank. The shank is the portion of the instrument that connects the handle with the working end (Figure 32-19). Proper placement of the middle fingertip pad against the shank is important for enhancing tactile sensitivity and helping to guide and control the working end. The ring finger should rest on an oral structure, such as a tooth located close to the working area, to provide stability of the hand for added control. Keeping the ring finger in contact with the middle finger will ensure proper wrist motion by limiting the amount of finger motion and will prevent finger fatigue. The little finger should be relaxed and has no specific function in this grasp.
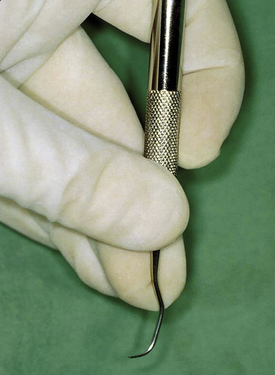
FIGURE 32-18 Modified pen grasp hand position for periodontal instrumentation: the thumb and index finger hold the instrument handle; the corner of the middle finger rests on the shank. The ring finger is used as a fulcrum and for control.
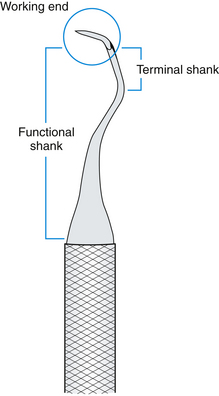
FIGURE 32-19 Parts of the instrument include the handle, shank, and working end. The functional shank extends from the handle to the working end, and the terminal shank is the part of the shank closest to the working end. (From Daniel SJ, Harfst SA, Wilder R: Mosby’s dental hygiene: concepts, cases, and competencies, ed 2, St Louis, 2008, Mosby.)
The assessment of the periodontium and teeth should begin at the midline of the mouth and systematically evaluate each tooth, one at a time, by using both visual observation and tactile use of the probe and explorer. Begin detecting excessive tooth mobility by placing the tip of the probe against the tip of the tooth and gently attempting to move the tooth in a buccolingual direction. Movement is estimated on a scale of 1, 2, or 3, based on the number of millimeters beyond normal physiologic mobility the tooth moves in one direction (Box 32-3). A slight amount of movement is normal as a result of the periodontal ligament that connects the tooth to alveolar bone. The most severe mobility, a classification of 3, includes any tooth with vertical movement. As each tooth is approached to check for mobility, visually notice the characteristics of the gingiva for color, shape, texture, and consistency. Healthy gingival tissues are pink (except where normally pigmented), stippled (orange peel appearance), firm, tapered to a thin margin, and scalloped to follow the contour of the cementoenamel junction (CEJ) and underlying alveolar bone. Any area of the gingiva that deviates from these normal characteristics should be examined closer by use of the probe.
TECHNICIAN NOTE
The periodontium, the term describing the attachment structures of the teeth, includes gingival connective tissue, alveolar bone, periodontal ligament, and cementum.
The probe is gently inserted into the sulcus or pocket, ensuring that the probe is kept as close to parallel to the long axis of the root as possible, with the side of the probe tip in contact with the tooth. When physical resistance is felt at the base of the sulcus or pocket, note the marking level on the probe that is adjacent to the gingival margin. The probe is then “walked” around the tooth using up and down bobbing strokes approximately 1 to 2 mm in height (↕) and in 1- to 2-mm horizontal steps (↔) to assess the entire circumference of the tooth (Figure 32-20). Abnormal measurements (those greater than 3 mm in dogs, greater than 1 mm in cats) should be noted on the dental chart along with the specific location of the pocket measurement (i.e., MB for mesiobuccal). Probe measurements between millimeter markings are rounded up to the larger measurement. For accurate readings, it is essential for the technician to develop skills in consistent probing forces (between 10 to 20 g of pressure). This pressure amount can be practiced by pressing the probe tip into the pad of a thumb until the skin is depressed approximately 2 mm.
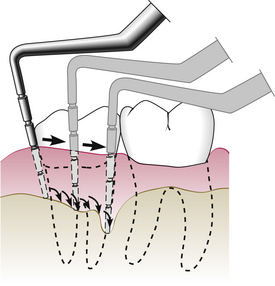
FIGURE 32-20 While keeping the side of the tip of the probe in contact with the tooth and using a light touch, the probe is “walked” around the circumference of the tooth with short up-and-down strokes every few millimeters. (From Newman MG, Takei H, Klokkevold PR et al: Carranza’s clinical periodontology, ed 10, St Louis, 2006, Saunders.)
In areas where the height of the free gingival margin has migrated apically toward or beyond the CEJ, the probe is used to measure gingival recession. Recession is measured in millimeters from the CEJ to the level of the gingival margin. Attachment loss is a term that more truly describes the periodontal state of a tooth because it accounts for both pocket depth and gingival recession (Figure 32-21). Gingival hyperplasia occurs when the free gingival margin migrates coronally, toward the crown of the tooth. Hyperplasia is measured in millimeters from the bottom of the sulcus to the gingival margin, which is covering a portion of the tooth crown. An increased pocket depth may be due to hyperplasia or attachment loss, so clinical examination findings are necessary to determine if the increased probing depth is due to a true pocket or a pseudopocket.
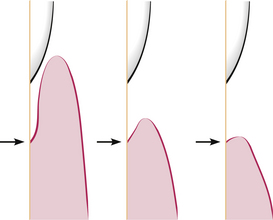
FIGURE 32-21 Attachment level is measured from the bottom of the pocket (arrows) to a fixed point on the tooth, such as the CEJ. Attachment level is a better indicator of periodontal status than pocket depth because gingival recession or hyperplasia can greatly affect pocket depth measurement. Note the three examples that have the same level of attachment loss yet different pocket depths, as a result of gingival recession. (From Newman MG, Takei H, Klokkevold PR et al: Carranza’s clinical periodontology, ed 10, St Louis, 2006, Saunders.)
When approaching multirooted teeth, the probe is used to assess loss of bone in the areas between and around the roots. A bifurcation is the furcation between two-rooted teeth and should be assessed from the buccal and lingual-palatal surfaces. Trifurcations of three-rooted teeth should be assessed between each of the three roots. The extent of bone loss determines the furcation classification (Box 32-4). A Naber’s furcation probe is curved to fit over the dental bulge of the crown so that the side of the tip can be held as parallel as possible to the long axis of the tooth. The tip is dragged horizontally across a root, dipping into the furcation area and continuing to the adjacent root. The depth of penetration into the furcation area determines the classification. If a straight probe is used, care must be taken to minimize tissue distention.
During the periodontal evaluation of each tooth, also observe the hard structures of the tooth and use the dental explorer when noticing any chips, fractures, pulp exposure, or abnormal wear patterns of abrasion or attrition. Abrasion refers to tooth wear associated with aggressive chewing on external objects, such as toys, rocks, and ice cubes. Attrition refers to two possible scenarios. Physiologic attrition refers to the normal wear associated with tooth-to-tooth contact of a patient over time with normal mastication. Pathologic attrition is caused by a malocclusion resulting in abnormal wear of teeth as a result of contact with teeth of the opposing jaw.
Dental caries (commonly referred to by the lay term of “cavities”) result from demineralization of the enamel and dentin from acids produced by certain oral bacteria. These lesions occur most commonly on occlusal (flat) surfaces of the molar teeth. Gently explore for pits and fissures of the occlusal surfaces of the maxillary first and second molars and the distal half of the mandibular first molar, feeling for areas of demineralization. Use the explorer to check for clinical signs of feline resorptive lesions by dragging the sharp point horizontally across the cervical portion of each tooth. Sometimes it is challenging to determine whether a concavity in the area of a furcation is a resorptive lesion or merely mild furcation exposure. If a resorptive lesion is present, the explorer tip will “catch” on the edge of the concavity, whereas the explorer will freely move out of the concave area as easily as it fell into it when encountering mild furcation exposure. When tooth fractures are present, gently drag the sharp point of the explorer across the tooth surface, feeling for any openings into the pulp. Teeth with significant abrasion may have a brown or black dot in the center of the worn tooth. This can be a sign of either chronic pulp exposure or a reparative material produced by the tooth in response to chronic wear (tertiary dentin). Pulp exposure can be distinguished from tertiary dentin by use of an explorer. If a tooth has pulp exposure, the tip of the explorer will “fall into a hole,” whereas a discolored area caused by tertiary dentin will feel smooth as glass when the explorer is run over this area. This is an important clinical distinction because treatment of pulp-exposed teeth is necessary, but worn teeth with tertiary dentin usually do not require treatment (Figure 32-22, A, B).
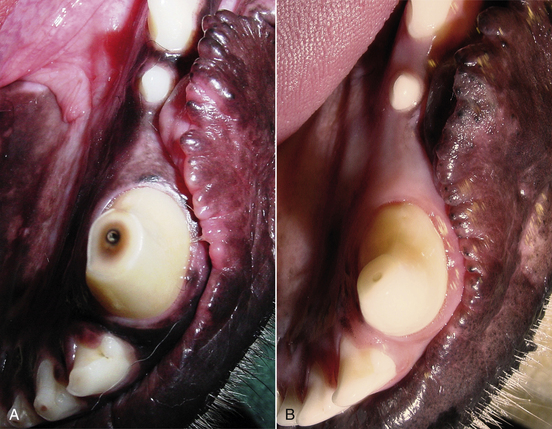
FIGURE 32-22 Abrasion of two canine teeth from different patients. A, Abrasion has occurred rapidly enough to result in pulp exposure, determined by running an explorer over the flat surface and “falling into” the pulp chamber. B, Abrasion has occurred slowly enough to allow the tooth to respond by producing tertiary (reparative) dentin, which feels smooth as glass when explored. Both teeth should be radiographed to assess for endodontic pathologic conditions, but the pulp-exposed tooth definitely requires extraction or root canal therapy.
DENTAL RADIOGRAPHY
Intraoral radiographs are essential for planning and assessing outcome of dental treatment for dogs, cats, and exotic species. Intraoral radiography is also used in horses, but is limited to the most rostral teeth because of difficulties in accessing the caudal teeth and small film size. Radiographs provide the clinician with an important diagnostic tool to detect pathologic conditions that are not clinically visible in the mouth. The following are types of pathologic findings for which dental radiographs are useful: root resorption, caries, periapical radiolucency (often seen with tooth root abscesses), periodontal bone loss, retained root tips, unerupted teeth, osteomyelitis, neoplasia, tooth and jaw fractures, foreign bodies, and disease of the temporomandibular joint (TMJ). The veterinary patient must be sedated or anesthetized to obtain quality dental radiographs. Intraoral dental radiography is becoming more routine in general veterinary practice.
EQUIPMENT
The dental x-ray machine may be wall mounted, or it may stand on the floor with wheels that permit storage when not in use. The unit is composed of three primary parts, the control panel, a long (72- to 86-inch) arm that extends from the control panel, and a tube head that is attached to the end of the arm (Figure 32-23). The control panel, typically mounted to a wall near the dental workstation, contains the power switch, selector buttons for kilovoltage and milliamperes, a dial or buttons for changing exposure time, and a button that is located at the end of a 6-foot coiled cord. Many dental x-ray units have an internally set level of kilovoltage and milliamperes, and only exposure time may be changed for a darker or lighter technique. The timing selection may also be located at the end of the cord of some newer models. An indicator light and an audible sound are emitted from the control panel when exposure is made.
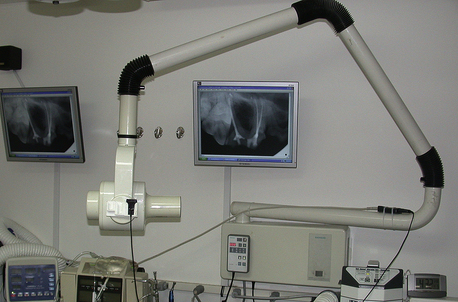
FIGURE 32-23 Intraoral radiograph machine control panel, arm, and tube head. (From DuPont GA, DeBowes LJ: Atlas of dental radiography in dogs and cats, St Louis, 2009, Saunders/Elsevier.)
TECHNICIAN NOTE
The dental radiograph machine should be inspected regularly for leakage. Many states require such inspections.
The milliamperage (mA) setting regulates the intensity of the electric current that heats the filament (cathode), thus controlling the quantity of electrons produced and available to bombard the target (anode). Milliampere seconds (mAs) describes the quantity of radiation, which is the milliamperes multiplied by the exposure time. For example, a film exposed for ½ second at 10 mA would be an exposure of 5 mAs.
The peak kilovoltage (kVp) is a measure of electric force that regulates the speed at which the electrons travel between the negatively charged cathode (filament) and the positively charged anode (target), thus controlling the quality of the x-ray beam. When the electrons hit the anode at a higher force, x-rays produced have a greater penetrating power at the surface of the skin. Most dental machines operate at 60 or 70 kVp. Low kilovoltage settings result in images with high black-white contrast, useful in detecting caries or resorption. High kilovoltage settings result in low contrast with a wider gray scale between the black-white densities, which is useful in monitoring periodontal disease.
The cathode and anode are housed in the Coolidge tube located in the tube head at the end of the articulating arm. Within the tube head, the Coolidge tube is immersed in oil to help absorb the heat produced at the target. The position-indicating device (PID) contains a collimator that controls the beam size. Varying from 8 to 16 inches in length, the PID extends from the tube head to the patient’s mouth and aids in minimizing scattered radiation.
The timer switch starts the production of the x-rays. Timers may be calibrated in fractions of seconds or numbers of impulses. Once the timer is activated, a short delay occurs while the filament is preheating. With experienced use of the radiograph machine, the technician will be able to determine proper exposure times based on the size of the patient and the density of the tissues through which the x-ray beam must penetrate. It is helpful to create an exposure time chart to post near the control panel for quick reference. New machine models marketed for veterinary use provide timers with preset exposure times associated with pictures of the dental arcade. The technician only needs to select the dog or cat, patient size, and specific tooth.
All veterinary staff must become familiar with radiation safety guidelines. The timer switch can be remotely wired and mounted outside of the dental treatment room or at least 6 to 8 feet away from the tube head. Standing at a distance behind a barrier or at a 90-degree to 130-degree angle that is perpendicular to the beam will place the technician at a safe position away from the direction of the beam. The film should never be held in the patient’s mouth by the technician while the radiograph is taken; therefore anesthesia is necessary not only to ensure diagnostic quality films, but also for safety reasons. Make certain that the machine is inspected regularly for leakage by a competent radiation expert, as may be required by state regulations. Development of skills will minimize unnecessary radiation from retakes resulting from poor technique or positioning.
FILM
Intraoral film consists of a plastic base covered on both sides with emulsion of silver halide crystals. The film is wrapped in black paper with a lead foil backing placed on the side that will be farthest from the beam. The lead foil prevents scatter radiation from affecting the back side of the film. The film, paper, and foil are wrapped in either a plastic or paper packet. This type of film is considered direct exposure or nonscreen film. The white surface of the film wrapper should always be placed in the mouth so that it faces the beam, and the colored surface of the film wrapper is placed away from the beam. A raised (convex) dot is present on the white surface of the film wrapper, and a recessed (concave) dot is present on the colored surface (Figure 32-24, A, B). The raised dot will always be placed so that it faces the beam, and the concave dot will be farthest from the beam.
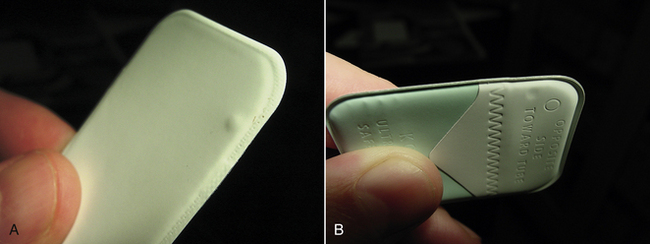
FIGURE 32-24 Two sides of a dental x-ray film packet. A, Convex (raised) dot is placed toward the beam. B, Concave (indented) dot is placed away from the beam.
TECHNICIAN NOTE
When placing intraoral film into the mouth, the white surface of the x-ray film (the surface with the raised dot) always faces toward the beam.
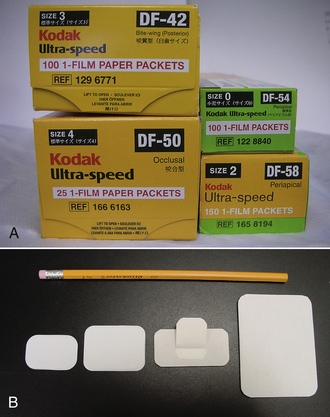
Dental film is available in several sizes, ranging from 0 to 4, and to accommodate variation in sizes of veterinary patients, it is important to keep all sizes of film in stock (Figure 32-25, A, B). Intraoral film also comes in several speeds. The speed refers to the sensitivity to radiation exposure, or the amount of radiation required to produce the image. Less radiation is required to produce an image using fast film; however, faster film, such as E-speed, contains larger silver halide crystals; thus appearance of the image is grainier than that of D-speed. Very slow speed films (speeds A, B, C) are associated with higher radiation exposure and are no longer used. Current choices include D-, E-, and F-speed film. Recent advances in F-speed film has allowed for reduction in radiation requirements up to 60% compared with D-speed film while maintaining good image quality. Film is sensitive to heat and moisture and should be stored in a dry, clean, cool place. Observe time limits printed on the boxes and discard the film when expired. The contents of a dental film packet are shown in Figure 32-26, C.
FILM PROCESSING
To convert the latent image into a visual image, the film is processed using chemicals that convert the silver halide crystals to metallic silver and preserve the image. Processing intraoral film can be accomplished in a dark room, a manual chairside developer (Figure 32-26, A), or an automatic processor.
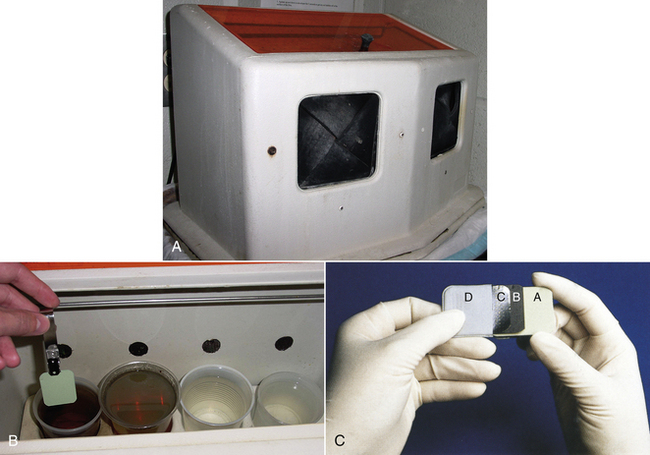
FIGURE 32-26 A, The chairside developer is convenient and more rapid than an automatic processor. B, Inside, the four containers are filled with developer, water rinse, fixer, and water rinse. The film is processed from left to right, with no movement of films in the opposite direction to prevent mixing of solutions. C, The dental film packet contains: A, film; B, protective black paper; C, lead foil; D, outer paper or plastic wrapping. (C from Robinson DS, Bird DL: Essentials of dental assisting, ed 4, St Louis, 2007, Saunders/Elsevier.)
Use of the chairside developer allows for rapid evaluation of radiographs following approximately 1 minute of processing time. Premixed chemicals (developer and fixer) are available from veterinary distributors. The developer box contains a light filtering window for viewing and hand portals with sleeves that keep light from entering. An orange filtering lid is used with D-speed film, whereas a red lid is used with E- and F-speed film. The films are opened inside the chairside developer and attached to a film clip. Inside, there are four cups into which the film will be dipped. Working from left to right, the first cup is filled with developer solution. The second cup contains water for rinsing. The third cup contains fixer solution that will halt the development process, wash off the silver halide crystals that were not exposed to radiation, and preserve the image on the film. The fourth cup contains water for rinsing (Figure 32-26, B). Films must be developed from left to right without backtracking to prevent contamination of the solutions. One exception is that films in the fourth cup may be placed back into the third cup (fixer) without a problem. The timing of each step is critical, and manufacturers’ directions should be followed. Keep in mind the possible need for adjustments in time when the temperatures of the chemicals are not the optimal 68° F. Following fixation, the films should be rinsed in slowly running water for 20 minutes before hung on a film rack to dry. Once completely dry, films can be placed into film mounts or small coin envelopes to be filed with the patient’s dental record.
TECHNICIAN NOTE
After initial viewing of the newly developed radiograph, it should be placed in fixer for at least 10 minutes to obtain archive-quality films.
Automatic processors used for standard x-ray films may be used to develop dental films by taping the dental film to the back end of a standard film and having it tag along with the larger film. This process is sometimes unreliable because it may cause the dental film to get lost or stuck in the rollers of the processor.
DIGITAL RADIOGRAPHY
Use of computed digital radiography (CDR) in the veterinary practice is increasing in favor as practitioners become more aware of the benefits when compared with conventional radiographic techniques. The quality of the digital images is improving since its first introduction in dentistry, and today the resolution is good, but still does not approximate that of nonscreen film. Direct method CDR technology, most commonly used today, uses an electronic intraoral sensor, a computer, and the x-ray machine. The sensor, called a charged coupled device (CCD), is either cordless or attached to a cord that connects to the computer. After covering the sensor with a plastic infection barrier, the sensor is placed into the mouth to capture the image and convert it to the digital format of “pixels,” picture elements in various shades of gray. A remote module transmits the data to the computer for the image to be immediately viewed, manipulated, and stored. The images can be magnified, and enhancements in contrast or darkness can be made. The sensors are available in sizes comparable with traditional dental film sizes 0, 1, and 2, limiting application in large-breed dogs that typically require size 4 films to view the entire tooth image. Because using a size 2 sensor for larger mouths requires more exposures to accomplish the task, it is practical to use standard radiography for some patients and digital radiography for other patients. When using digital technology, caution must be used to ensure that patients have adequate anesthesia depths because replacement of a damaged sensor is costly.
Digital technology reduces radiation exposure by 50% to 90% when compared with use of D- and E-speed film. Most modern dental x-ray machines are compatible with digital radiology if they have timers that allow the exposure setting in  of a second time frame. A disadvantage of digital radiography is the high initial cost of the sensor and software. However, the expense is offset by the cost of film and processing chemicals.
EXPOSURE AND PROCESSING ERRORS
Errors in film exposure and processing account for unnecessary radiation exposure and additional anesthetic time for the patient. Cone cutting occurs when the beam misses portions of the film, resulting in clear areas of the film. Elongation and foreshortening (stretched and shortened images, respectively) are caused by inaccurate vertical angulation during PID alignment (Figure 32-27, A-C). Images that are too dark or too light can result from errors in kVp and mA settings or in exposure and processing times. If the film is placed in the mouth with the wrong surface facing the beam, dotted streaks from the lead foil will appear across the film surface. Care must be taken when placing multiple films into the fixer cup, ensuring that each film is placed parallel to the adjacent film to prevent scratches that appear as white lines when emulsion is removed from the film surface.
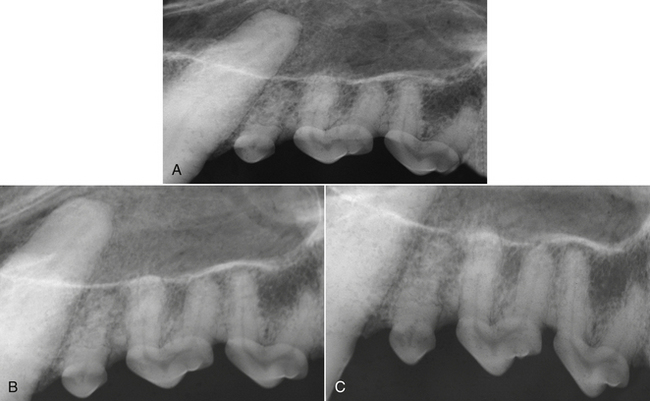
FIGURE 32-27 Three radiographs taken using the bisecting angle technique on the maxilla of a dog with three different PID angles. A, Foreshortened image from PID positioned too dorsally. B, Correctly determining the bisecting angle results in a film that most closely represents size and shape of subgingival structures. C, Elongated image from PID positioned too ventrally.
TECHNIQUES
Three techniques are commonly used to obtain dental radiographs. Each technique will consider the relationship of the beam to the film and tooth or area to be imaged. The proper-sized film is placed into the mouth and held in position with gauze. The paralleling technique requires the film to be placed parallel to the long axis of the tooth. The beam is then directed at a right angle to the film and teeth and positioned to aim for the center of the film (Figure 32-28). Parallelism can only be used on the mandibular teeth, caudal to the second premolars, where the film can easily slide toward the floor of the mouth.
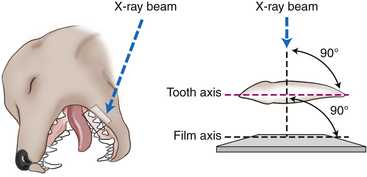
FIGURE 32-28 Paralleling technique is useful for caudal mandibular teeth where the film is placed parallel to the teeth, the beam is directed at a 90-degree angle to the film and teeth.
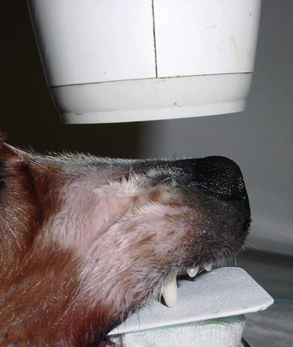
The symphysis at the rostral portion of the mandible and the flat palate of the maxilla prevent the use of the paralleling technique. To minimize inherent distortion of dental structures where the paralleling technique is not an option, the bisecting angle technique is used. The x-ray beam is projected at a right angle to an imaginary line that cuts in half (bisects) the angle formed by the plane of the film and the long axis of the tooth (Figure 32-29).
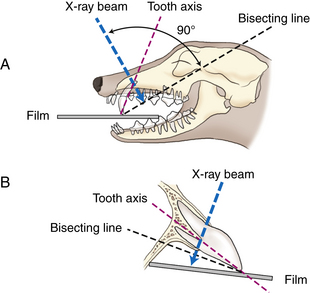
FIGURE 32-29 Bisecting angle technique is used for the maxilla and the rostral mandible where the film cannot be placed parallel to the roots. First, determine the angle created by the plane of the tooth and the plane of the film. Bisect that angle and direct the beam at a right angle to the bisecting line.
The occlusal technique places the film on the occlusal plane and directs the beam at a right angle to the film (Figure 32-30). Typically, this view is of value in showing larger areas on one film, with applications to view nasal disease and also for identifying root remnants.
RADIOGRAPHIC INTERPRETATION
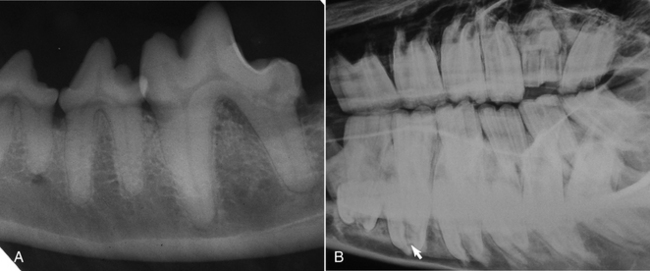
To assess the presence of intraoral pathologic conditions on radiographs, it is essential to have knowledge of the appearance of normal radiographic anatomic structures (Figure 32-31). The radiodensity of the components of the teeth and supporting structures varies widely; therefore the terms radiopaque and radiolucent are used to describe the relative radiographic appearance of oral and dental structures. Radiopaque structures, such as cementum, dentin, and bone block or absorb the radiation, causing that portion of the processed radiograph to appear light or white. The enamel covering of the crown is the most radiodense structure of the tooth. The lamina dura, which is a cribriform plate of bone lining the tooth socket, appears as a white line adjacent to the periodontal space surrounding a healthy tooth. Beyond the lamina dura, the trabecular pattern of bone may vary in radiodensity. The cortex of the mandible is radiodense.
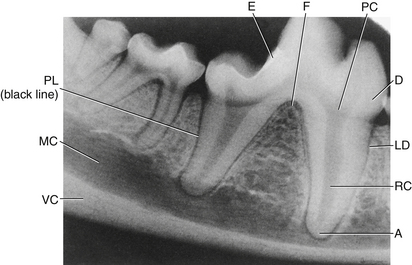
FIGURE 32-31 Normal radiopaque and radiolucent structures: A, root apex; RC, root canal; LD, lamina dura; D, dentin; PC, pulp chamber; F, furcation area; E, enamel; PL, periodontal ligament; MC, mandibular canal; VC, ventral cortex.
In contrast, radiolucent structures, such as the soft tissue and periodontal ligament space, appear dark or black because the x-ray photons can easily pass through to the film. The periodontal ligament fibers are not visible on the film; however, the space they occupy can be traced as a black line surrounding the roots. Because pulp is soft tissue, it also appears as a dark area (less radiodense) in the center of the tooth.
The radiolucent mandibular canal lies apical to most of the mandibular tooth roots. In small-breed dogs, the apices of the mandibular first molar roots may be seen at a level of or even below the mandibular canal, extending into the ventral cortex. Normal anatomic structures must be distinguished from pathologic structures. For example, the middle mental foramen is located apical to the mandibular second premolar in dogs and can be misinterpreted as a periapical pathologic condition if superimposed over a tooth root (Figure 32-32). It is helpful to have a textbook with normal and pathologic radiographic appearances to refer to (see Recommended Reading).
PERIODONTAL DISEASE
The periodontium is composed of four supporting structures of the tooth: (1) periodontal ligament; (2) gingival connective tissue; (3) alveolar bone forming the tooth socket; and (4) cementum covering the surface of the root (Figure 32-33). Healthy gingiva has a sharp, tapered edge (margin) that lies closely against the crown of the tooth. The free gingiva forms a moat around the tooth called the gingival sulcus. The epithelial attachment to the tooth crown forms the bottom of the gingival sulcus. The depth of this sulcus ranges from 1 to 3 mm in a healthy mouth of a dog and up to 1 mm in the cat.
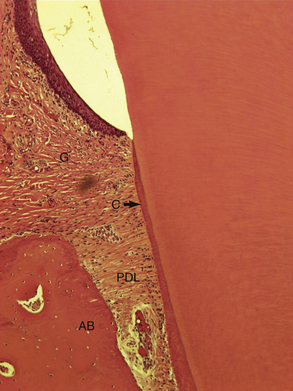
FIGURE 32-33 Histomicrograph showing the components of the periodontium. PDL, Periodontal ligament; G, gingival connective tissue; AB, alveolar bone; C, cementum. Cementum covers the root surface and the periodontal ligament attaches to cementum and alveolar bone.
Gingivitis refers to inflammation of the gingiva. Periodontitis describes inflammation of not only the gingiva, but also other structures of the periodontium. Gingivitis represents the earliest stages of periodontitis and is easily reversible with proper treatment and home care. Once advanced periodontitis occurs, these changes are more difficult to reverse. Periodontitis is the most common disease of animals.
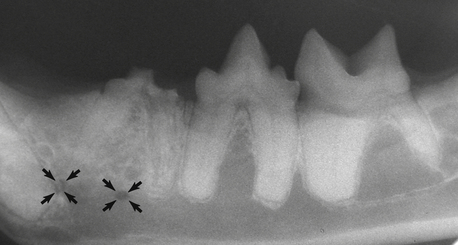
Periodontitis is caused by accumulation of subgingival plaque and the body’s response to it. Plaque is a white-tan film that collects around and within the gingival sulcus of the tooth. It is composed of bacteria, food debris, exfoliated cells, and salivary glycoproteins. Within as quickly as 24 hours if left undisturbed, plaque will mineralize on the teeth to form dental calculus (sometimes referred to by the term “tartar”), a light brown or yellow, raised, irregular deposit adherent to the tooth and root surfaces (Figure 32-34). This irregular, plaque-retentive surface of calculus allows for further plaque accumulation. As the plaque accumulates within the gingival sulcus, it damages the gingival tissues by releasing bacterial by-products that can damage the periodontium. The patient’s immune response may also cause tissue damage through the release of inflammatory cytokines from white blood cells as they attempt to destroy the bacteria. In the early stages, the gingiva becomes inflamed and bleeds easily (Figure 32-35). As the disease progresses, periodontitis results in attachment loss. Attachment loss is clinically detectable in its earliest stages by measuring pocket depths with a periodontal probe in the anesthetized patient (Figure 32-36, A, B).
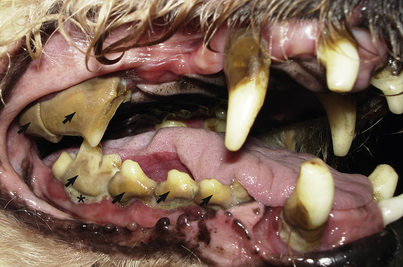
FIGURE 32-34 Plaque and calculus in a dog. Plaque is white-tan (asterisk) and accumulates on the rough surface of calculus. Plaque that is not removed within approximately 24 hours will become mineralized, adherent calculus (arrows).
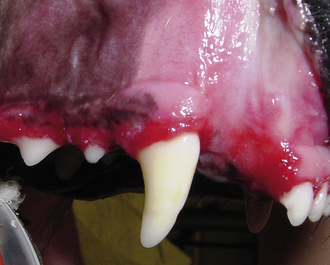
FIGURE 32-35 Gingivitis in a dog. Inflammation is limited to the gingival tissue and does not cross the mucogingival junction.
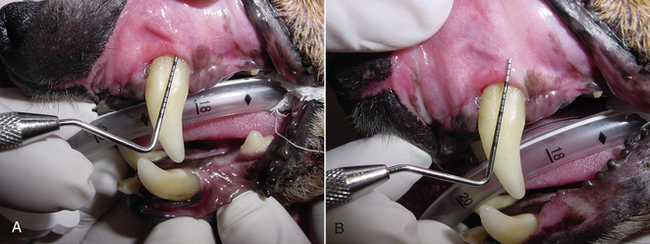
FIGURE 32-36 A, Probe is inserted to determine pocket depth. B, Probe is removed to show degree of attachment loss, which is pocket depth plus gingival recession.
TECHNICIAN NOTE
Plaque begins to mineralize as early as 24 hours after adhering to the tooth surface. Therefore daily brushing is necessary to minimize calculus formation.
Periodontal disease is difficult to control once it has developed. For this reason, great emphasis must be placed on its prevention. Other diseases can contribute to the severity of periodontal disease, but the bacteria in plaque are the primary cause. Early in the formation of plaque, the bacterial population consists mainly of gram-positive aerobic bacteria. Once these bacteria accumulate in substantial numbers, the oxygen gradient of the subgingival environment changes to support a shift to predominantly gram-negative anaerobic rods and spirochetes. Gram-negative bacteria are capable of producing endotoxin, which has direct adverse effects on cells of the periodontium and results in a more severe immune response. When periodontitis is already present, destruction of the junctional epithelium at the base of the gingival sulcus has begun and will continue if not treated. Once the junctional epithelium and periodontal ligament becomes destroyed, it is difficult to stimulate regeneration. As the tooth begins to lose its periodontal attachment, it becomes more susceptible to plaque accumulation in the deep periodontal pockets that form around the tooth roots. When the tooth loses a significant portion of its periodontium, it becomes mobile. The infection and inflammation associated with periodontitis is present for months to years before the tooth is eventually lost. Throughout the duration of the periodontitis, bacteremia occurs with the potential for colonization of bacteria at distant sites including the liver, kidneys, heart, and lungs.
For patients with periodontal disease, the treatment goal is removal of plaque and calculus from the teeth both supragingivally and subgingivally. General anesthesia is necessary to provide necessary access to subgingival areas, where bacteria can contribute to local and sometimes systemic inflammation. A second and equally important goal is minimization of plaque reattachment through proper home care and appropriate follow-up treatment.
PERIODONTAL DÉBRIDEMENT
Periodontal disease results from the presence of a biofilm rich in bacteria and bacterial by-products. Removal of the bacterial plaque, endotoxins, and hard calculus deposits is essential to halting the disease process. Endotoxins are believed to be attached to the tooth surface, loosely embedded in cementum, and unattached in the sulcular space. Home care can be effective in removing supragingival debris when the client is educated to perform the procedures on a daily basis. If the oral hygiene is not performed thoroughly, subgingival biofilm will mature and within 48 hours will contain enough periodontal pathogens to cause gingivitis. Within 3 to 12 weeks, the biofilm contains gram-negative anaerobes and provides an envelope that harbors and protects the periodontal pathogens. Professional clinical care is required to remove the pathogens and the calculus that harbor bacteria.
Periodontal débridement is the term used for nonsurgical instrumentation that focuses on the removal of hard and soft deposits from the supragingival and subgingival surfaces of teeth along with the disruption of the nonadherent bacteria within the sulcus. The goal of periodontal débridement is to prevent or arrest the infection and restore the oral soft tissues to health. Hand and power instrumentation are used to deplaque, scale, root plane, and polish. The traditional approach of scaling and root planing was based on beliefs that the bacterial endotoxins were firmly attached to the pitted, irregular surfaces of cementum. Instrumentation with a curette included root planing to remove all damaged layers of cementum, resulting in a glossy, smooth surface that would be less plaque retentive. Current research has shown that the endotoxins are only lightly adherent, and removal of superficial layers of cementum is adequate to achieve goals of periodontal débridement.
POWER SCALING
Ultrasonic devices, mechanized instruments currently used for periodontal débridement, were first introduced in the early 1950s to remove tooth material during treatment for caries in human patients. When high-speed air-driven handpieces were introduced shortly thereafter, the ultrasonic application was deemed to be too slow for removal of tooth structure. In 1955, ultrasonic scalers were introduced. The original scalers were limited to removing supragingival deposits as a result of their bulky tip design. More definitive scaling was routinely accomplished with hand scalers and curettes. During the 1980s, thinner probelike tips were developed, and today continued advances in technology have expanded the applications to subgingival use. Knowledge of the instrument and tooth morphology is critical for safe use. No longer considered to be an adjunct to hand instrumentation, ultrasonic scalers are now considered to be the primary instrument in veterinary practice for use in routine débridement and advanced periodontal therapy.
TECHNICIAN NOTE
When performing periodontal débridement, a cuffed endotracheal tube and gravity (tipping the nose lower than the rest of the head) should be used to prevent aspiration of fluids and debris.
Power-scaling instruments use a water-cooled vibrating tip to remove hard and soft deposits from the teeth and periodontal pockets. The vibrations are measured by the number of times that the tip moves back and forth in one second. This measurement is known as frequency and is measured in cycles per second (cps), or Hertz (Hz). Most units used in veterinary medicine are automatically tuned units with frequencies controlled by the unit. Manually controlled units are available and mostly used in the human field in advanced periodontal therapy. Research indicates that when skillfully performed, ultrasonic instrumentation is as effective as hand instrumentation. Box 32-5 lists the benefits of power scaling.
Two types of power scalers, sonic and ultrasonic, are categorized by the frequency of the tip vibrations and the type of power used to create movement at the working end.
SONIC SCALER
The sonic scaler is powered from an air compressor on a dental unit and is attached to the low-speed air line. It operates with a frequency between 2000 and 9000 cps. The tip vibrates in an elliptical pattern, with all surfaces around the diameter of the tip active. The vibrations are audible to the human ear creating a sound that may be uncomfortable to some operators. As a result of the low frequency, the sonic scaler has less ability to remove heavy, tenacious calculus and is slow to accomplish its task. It is best suited for use in cats or dogs with light accumulations.
ULTRASONIC SCALER
Ultrasonic devices use electrical energy that converts the working tip to mechanical energy in the form of rapid vibrations to effectively remove biofilm and calculus deposits. Ranging in frequency from 18,000 to 50,000 cps, above the audible human range, they are more popular and practical for veterinary use than the sonic scaler. The ultrasonic scaling unit contains the electronic generator inside plastic housing. A hose connects the unit to the water supply, either a portable pressure tank or a quick disconnect at the sink pipes. A cable attaches the unit to a foot pedal, and the handpiece is attached by tubing that transports the water for coolant. A power cord is also attached. Unlike hand scalers that only remove debris with direct contact, the ultrasonics also have the benefit of the stream of water coming from the tip that acts as a coolant and lavage, flushing debris from the sulcus. The flushing action is destructive to the biofilm by causing acoustic turbulence and cavitation. Acoustic turbulence, also known as acoustic microstreaming, is the disruption of the bacteria in plaque caused by the streaming of the fluid over the tooth surface or the churning of the fluid within the confined pocket space. Cavitation is the energy that is created from the mist of water. As the water coolant exits the handpiece and strikes the vibrating working end, it creates thousands of water bubbles. As the bubbles in the mist implode, enough energy is created to disrupt the bacterial cell walls.
SAFETY PRECAUTIONS
Because water is a necessary part of the dental cleaning, appropriate safety precautions must be taken for the technician and the patient. To reduce the amount of aerosolized bacteria, the mouth can be rinsed with chlorhexidine (0.1% to 0.2%) before scaling. This preemptive rinse will also reduce the severity of bacteremia of the patient, which invariably occurs during a dental cleaning. The technician and any co-workers in the vicinity of the workstation should wear gloves, masks capable of high bacterial filtration, and eye protection, such as plastic goggles or disposable face shields. The patient’s eyes should be lubricated and covered to protect against debris and contaminated fluid from entering. The single most important safety precaution when using ultrasonic scaling lavage is to intubate the patient and check to ensure that the endotracheal cuff is fully inflated. The airtight seal of the cuff should be checked occasionally to prevent the patient from developing aspiration pneumonia. However, care should be taken to avoid excessive inflation of the cuff that may result in a tracheal tear or necrosis. Placement of a radiopaque laparotomy sponge in the back of the throat before scaling will filter the loosened debris; however, remembering to remove the sponge after scaling is critical.
TIP DESIGNS
The tip designs have improved since the early 1990s, with more design options currently available. Standard-sized “universal” and broad tips are designed for removing medium and heavy deposits, whereas the slim tip designs provide for better access to subgingival pockets and furcation areas. Approximately 30% to 40% more narrow than standard tips, the slim tips are approximately 0.5 mm in diameter at the blunt end and designed to mimic periodontal probes. The slim profile enables easier access to the base of deeper pockets and improves tactility for better detection of calculus. They are available in straight and curved designs. Precision tips are available in diameters as narrow as 0.2 mm at the tip for use in advanced periodontal procedures. These are extremely fragile and must be used with a light touch. Another tip option is the diamond-coated tip. If used incorrectly during a nonsurgical procedure, the diamond coating can cause soft tissue damage and excessive loss of tooth substance; therefore this design should be reserved for use during open-flap procedures and only used by highly skilled clinicians. A new design offers a tip with a built-in LED light (Figure 32-37). The LED technology tends to offer only minimal additional light when used with a good surgical overhead light. A new tip designed for use in furcations has a 0.8-mm ball on the end that may be too large to access the furcations of some animal’s teeth.
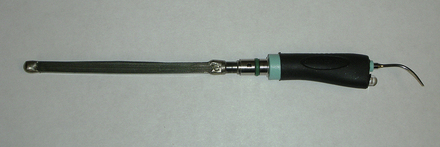
FIGURE 32-37 Magnetostrictive ultrasonic insert: metal stack transducer and LED light at working end.
Tips should be replaced at least annually or when they are bent or worn down (Figure 32-38). As the tip wears, it becomes shorter and the effectiveness of scaling diminishes. One ultrasonic manufacturer offers a wear indicator that helps to measure the amount of wearing of the tip. For each millimeter of wearing, there is a 25% decrease in efficiency.
ENERGY DISPERSION
For effective scaling during use of hand instrumentation, the sharp cutting edge of the working end must contact the calculus. In contrast, there is ultrasonic energy dispersion over a 360-degree circle around the tip of power instruments. The vibrating activity occurs on the back, face (concave surface), two side (lateral) surfaces, and on the point; however, each surface has varying degrees of vibrations, depending on the type of scaler used. Typically the strongest vibrations are concentrated 2 to 4 mm from the tip. Technicians must know the specific type of unit that they are working with and understand the differences in levels of energy dispersal among different tip surfaces to correctly adapt the tip to the tooth for efficient scaling.
TYPES OF ULTRASONIC SCALERS
Ultrasonic scalers are available in two types, magnetostrictive and piezoelectric, each distinct in their mechanism of action, type of transducer, and direction of tip movement. The transducer is the portion of the handpiece that converts electrical energy into mechanical energy.
The magnetostrictive scaler is the most common type of power scaler used in human and veterinary dentistry. The typical magnetostrictive unit has an insert that slides into the handpiece. The insert has two connected parts, the transducer and the working end. The magnetostrictive transducer is a stack of thin nickel alloy metal strips. When a magnetic field is created from the copper coil inside the handpiece, the dimension of the strips is altered by lengthening and shortening, thus sending vibrations to the tip.
Movement of the tip is in an elliptical pattern with the energy dispersion around the entire diameter of the tip, providing vibrations on all surfaces. The point of the tip can cause damage when directed at a 90-degree angle to the tooth, acting like a jackhammer on hard dental tissue (Figure 32-39). The face (concave surface) is the usable portion of the tip that has the most powerful vibrations, followed by the back. The two side surfaces have the least vibrations. The back and side surfaces are used for the majority of scaling. Magnetostrictive units range in frequency from 18,000 to 42,000 cps (18 to 42 kHz). Another type of magnetostrictive scaler uses a transducer that is a ferrite rod to produce a rotational tip movement. Differences in operation between magnetostrictive units require close attention to manufacturer’s recommendations. See Box 32-6 for preparation guidelines for a magnetostrictive unit with a metal stack transducer.
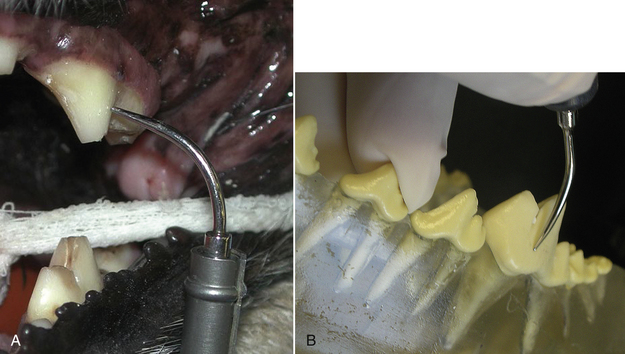
FIGURE 32-39 A, The tip of the ultrasonic insert will cause damage when directed at a 90-degree angle to the tooth surface. B, Correct angulation of the tip; the insert tip should be held at an angle of 0 degrees to 15 degrees from the long axis of the tooth.
TECHNICIAN NOTE
The ultrasonic scaler tip should never be directed at a 90-degree angle toward the tooth surface because the tip will cause damage to the enamel.
The piezoelectric scaler uses either ceramic disks or crystals as the transducer to produce the straight, linear movement of the tip. Electrical energy causes the disks to alter dimension by expanding and contracting, sending the vibrations to the tip at a frequency ranging from 25 to 50 kHz. Because of the back-and-forth motion, the tip is only active on the two lateral surfaces, forcing the operator to pivot the wrist as the tip is moved around the tooth. If the other surfaces are accidentally adapted to the tooth, the operator will be warned by a different sound and incomplete removal of debris. The limitations of effective vibrating surfaces cause the piezoelectric scaler to be more technique sensitive than other power scalers. The transducer’s ceramic disk is fragile and easily breakable if the handpiece is accidentally dropped.
KNOB SETTINGS
The power knob adjusts the amplitude, the distance the tip is moving back and forth in one cycle. Greater distance is higher power. Higher power is necessary to remove heavy deposits, whereas low power is satisfactory for removing plaque. It is good principal to use the lowest power setting that will accomplish the task. Low power should always be used with thin tips to prevent the tips from breaking.
The water knob adjusts the water flow through the handpiece. Because the ultrasonics produce heat, there must be adequate fluid to prevent pulp damage caused by heat during scaling. Pressure of the water supply line to the unit must be a minimum of 25 psi. A warm or hot handpiece is an indication that the water pressure is inadequate, and the clinician must immediately stop and make adjustments by increasing the water amount and checking the water pressure (if a portable water tank is used). With magnetostrictive units, the water knob should be turned until the water exits the tip as a mist, rather than just a straight stream. Water on the piezoelectric unit should be adjusted to a steady drip.
HAND SCALING
Periodontal débridement may be accomplished with the use of hand-activated instrumentation. Successful use of hand instruments is dependent on the technician’s understanding of instrument design and knowledge of the basic principles of instrumentation.
In general, dental instruments consist of three parts: the handle, shank, and working end (see Figure 32-19). The handle contains the instrument’s identification, the description of the instrument with abbreviations that include the name of the designer or the school where it was designed, the manufacturer, the classification type, and the design number. Classifications are determined by the design of the working ends and the instrument’s intended purpose. Examination instruments include probes and explorers. Scaling instruments include curettes, sickles, files, and hoes. Current trends in handles include hollow, lightweight designs that are more efficient in transmitting vibrations detected through tactile sensitivity. Use of wider handle sizes minimize finger pinching and hand fatigue. Various patterns of surface texture are knurled into the handle to prevent fingers from slipping.
The shank connects the handle with the working end. The curvature of the shank determines the best-suited location within the mouth for use of the instrument. In relation to the long axis of the handle, a straight shank is used for rostral teeth; an angled shank is used for caudal teeth (Figure 32-40). When the shank is bent to form an angle, the terminal shank is the portion below the bend and closest to the working end. Length and diameter of shanks vary; therefore the instrument of choice may depend on the situation for which the instrument is needed. Elongated shanks are useful for accessing deeper pockets and reaching further caudal in the mouth. A thick, rigid shank is useful for removing heavy tenacious calculus because the shank will not flex when pressed against the tooth. Thin, flexible shanks are more suited for removing light calculus deposits or plaque.
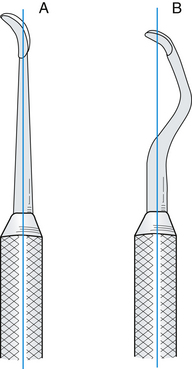
FIGURE 32-40 A straight shank (A) is best used for scaling teeth in the rostral portion of the mouth. A bent shank (B) is designed for working on premolars and molars. (From Daniel SJ, Harfst SA, Wilder R: Mosby’s dental hygiene: concepts, cases, and competencies, ed 2, St Louis, 2008, Mosby.)
The working end is designed to complete the task. The working end may be blunt, as in a probe, pointed and wirelike as in an explorer, or it may have sharp cutting edges like scaling instruments. An instrument handle may have one single working end (SE), or it may be double ended (DE) with two working ends. The working end of a hand-scaling instrument is called the blade, and it has several parts: the two lateral sides, face, back, heel, and toe or point (Figure 32-41). The face and lateral surfaces meet to form a cutting edge. The back is formed by the convergence of the two lateral surfaces. Instruments used for supragingival scaling have a pointed tip, whereas subgingival scalers, known as curettes, have a rounded tip. The tip of a curette (known as the toe) is designed to minimize trauma to the soft tissue lining the sulcus or pocket.
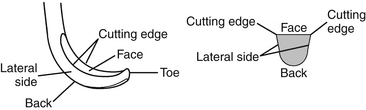
FIGURE 32-41 The parts of the working end of a hand instrument include the face, cutting edges, lateral sides, back, and toe (tip). (From Nelson DM: Saunders review of dental hygiene, Philadelphia, 2000, WB Saunders.)
The angulation of the face of the blade in relation to the terminal shank will classify the instrument as either universal or area specific. To determine this classification, position the instrument handle so the terminal shank is perpendicular to the floor, then identify the face. If the angle between the face and terminal shank is 90 degrees, the instrument is universal, meaning that when in use, the handle is placed parallel to the long axis of the tooth and then slightly tipped left or right to permit either cutting edge to be adapted to the tooth. If the face is offset at an angle of 60 degrees to 70 degrees, as in Gracey curettes, the instrument is considered to be area specific, and only one of the cutting edges may be adapted to the tooth (Figure 32-42).
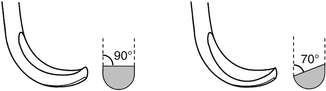
FIGURE 32-42 Universal versus area-specific (Gracey) curettes: The angle between the face and the terminal shank is 90 degrees on the universal, 70 degrees offset on the area specific. Notice that one cutting edge is lower when the face is offset. The lower cutting edge is the correct one when using an area-specific curette. (From Nelson DM: Saunders review of dental hygiene, Philadelphia, 2000, WB Saunders.)
SUPRAGINGIVAL INSTRUMENTS
Sickle scalers are the instruments used to scale the crowns of the teeth. The flat face may be either straight or curved lengthwise; the straight lateral surfaces are flat and converge to form a pointed back and tip. When envisioning the cross section of a sickle, the instrument is characteristically triangular in shape with 70-degree to 80-degree internal angles between the face and lateral surfaces (Figure 32-43, A). The sharp tip will cause lacerations if the instrument is used subgingivally; however, it may be used with caution slightly below the gingival margin where the gingiva is spongy and loose enough to permit insertion. Because the sickle is a universal instrument, either cutting edge may be used depending on how the handle is tipped. Owing to the straight side surfaces, the sickle is not conducive to following the curved contours of roots and is therefore reserved for coronal scaling.
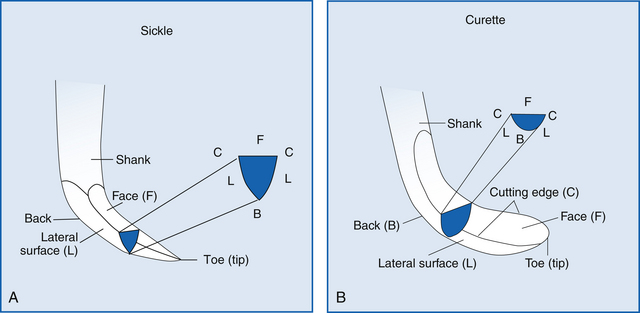
FIGURE 32-43 A, The cross section of a sickle scaler is triangular in shape. The sickle is used for supragingival scaling and has a pointed tip. B, The cross section of a curette is half-moon shaped. The curette is used for subgingival scaling and has a rounded toe. (From Novack DE: Contemporary dental assisting, St Louis, 2001, Mosby.)
TECHNICIAN NOTE
Scalers are designed to be used on the tooth crown, and curettes are designed to be used subgingivally.
When the handle, shank, and blade are on the same plane, the instrument is designed for use toward the front of the mouth. For caudal teeth, the shank will be angled and the instrument will be double ended to provide mirror images. This style is useful for veterinary patients during scaling of the buccal groove of maxillary carnassial teeth. One working end is contoured for scaling the mesial edge of the groove, and the contralateral end contours with the distal edge of the groove.
When placing the blade against the tooth, the face should be at an angle between 45 degrees and 90 degrees with the tooth surface. The cutting edge is directed to the apical edge of the calculus, lateral pressure is placed against the tooth, and the instrument is used with a short pull stroke to disengage the debris.
SUBGINGIVAL CURETTES
Curettes may be used for supragingival scaling, though they are designed for subgingival scaling and root planing. The flat face is curved lengthwise from the heel to the toe, meeting the lateral surfaces to create a cutting edge that extends around the toe. Unlike the flat lateral sides of the sickle scaler that converged to form a pointed back, the sides of the curette are rounded, creating a round back that is easier to insert into a sulcus or pocket. The cross section of the curette is classically shaped like a semicircle with internal angles of 70 degrees to 80 degrees between the face and lateral surfaces (Figure 32-43, B).
A universal curette can be adapted for all surfaces of the teeth, whereas use of an area-specific curette would require several different instruments to scale each tooth in the mouth. Use of area-specific instruments is an advanced concept and should be used only by technicians having an understanding of the inherent design features and thorough knowledge of root anatomy and shape. When an area-specific instrument is used incorrectly, it can cause gouging of the root surface and trauma to the adjacent soft tissues.
The terms site specific and area specific are often interchanged with Gracey instruments, though other area-specific instruments exist. Dr. Clayton Gracey designed curettes in the 1930s to be used as a set, each instrument having a complex curvature of the shank for better access to the specific teeth. Unlike the universal curette that is only curved on the plane of the face, the Gracey is also curved on the plane of the lateral surface. To help identify the two curved planes, hold the instrument with the terminal shank perpendicular to the floor and view the face at eye level. The face will slope downward, rather than parallel with the floor and perpendicular to the terminal shank, and the lateral surfaces will be curved to the left or right. This curvature enables adaptation around the contours of roots. As with universal curettes, site-specific curettes have two cutting edges; however, the site specific is unique in that only one edge is designed for use. Before adapting the blade to the tooth, the technician must confirm that the appropriate edge is chosen. To determine the correct cutting edge, hold the terminal shank perpendicular to the floor to view the honed face from above, enabling the lateral curves to be seen. One cutting edge forms an inner curve; another edge forms an outer curve that appears larger and closer to the floor. The proper cutting edge is always the curve that appears lower and further from the terminal shank. Unlike universal instruments that require parallelism of the handle with the tooth, area-specific instruments require parallelism of the terminal shank with the tooth. When in this position against a tooth surface, if the correct edge has been chosen, only the back should be visible. If the face is visible (reflecting light), flip the instrument to use the contralateral working end.
TECHNICIAN NOTE
When using an area-specific curette, the proper cutting edge is the lower edge, as determined by holding the terminal shank perpendicular to the floor. The terminal shank of an area-specific curette is kept parallel to the long axis of the tooth during a vertical scaling stroke. The handle of the universal scaler is kept parallel to the long axis of the tooth during a vertical scaling stroke.
Langer curettes have a combination of universal curette qualities (face 90 degrees to shank) with the Gracey curvature of shanks. Langers and Graceys are available with blades that are shorter in length (mini) that make them particularly suitable for use on small dogs and cats.
PRINCIPLES OF SCALING
Adaptation of hand-scaling instruments is the application of the cutting edge against the tooth. Approximately one third of the cutting edge of the tip should remain in contact with the tooth, and constant attention to this detail will prevent damage of the soft tissues as a result of trauma from the tip or toe (Figure 32-44). As the curvature of the tooth changes, adjustments must be made to that portion of the cutting edge that is adaptable to the tooth. Use of the thumb against the handle will enable the instrument to be rolled to maintain the contact of the cutting edge around curves.
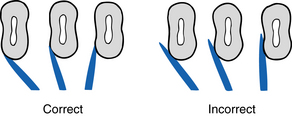
FIGURE 32-44 Correct adaptation, the lower third of the working end of the instrument must remain in contact with the tooth surface to prevent trauma of soft tissues. (From Novak DE: Contemporary dental assisting, St Louis, 2001, Mosby).
Angulation refers to the relationship of the face of the instrument to the tooth. When inserting a curette into a pocket, the angulation of the face should be as close to zero as possible (Figure 32-45). In this position, the face would be parallel with the root surface and the back of the blade would be against the soft tissue lining of the pocket. When the blade is positioned at the bottom of the pocket or apical to the intended piece of calculus, the angle should be opened, by tilting the handle, to the scaling and root planing angle of 45 degrees to 90 degrees, more often between 60 degrees to 80 degrees. Using an angle that is too closed will create a burnishing (smoothing) of the calculus, rather than biting into it for removal. An angle that is too open will place the noncutting edge sharply against the lining of the pocket when using a curette. This technique is useful if the operator purposely desires to perform a gingival curettage.
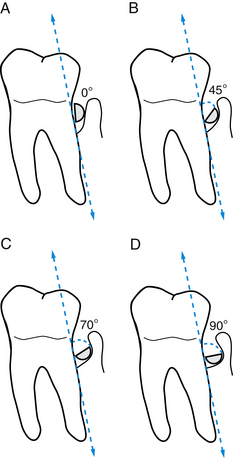
FIGURE 32-45 The angle formed by the tooth surface and face of instrument should begin at insertion into the sulcus or pocket at 0 degrees (A). The minimum angle when using the curette is 45° (B). The maximum angle when using the curette is 70° (C). An angle greater than 90 degrees (D) will cause damage of adjacent soft tissue. (Adapted from Daniel SJ, Harfst SA, Wilder R: Mosby’s dental hygiene: concepts, cases, and competencies, ed 2, St Louis, 2008, Mosby.)
Strokes used when performing dental procedures will vary according to the task. When hand scaling, the initial stroke is for assessment to determine the topography of the tooth surface by lightly feeling for irregularities. This exploratory stroke is also performed with an explorer or with the tip of a power scaler when the power is not activated. When using scalers and curettes, once an irregularity is detected, the working stroke is performed by applying lateral pressure against the tooth and pulling the blade either vertically, horizontally, or obliquely in a short, controlled stroke. A root-planing stroke is longer in length, and light lateral pressure is used. Apply the minimum number of strokes necessary to accomplish the task.
SHARPENING
Thorough periodontal débridement can only be accomplished with the use of sharp instruments. Each stroke of a sharp instrument against the tooth will wear away the metal of the cutting edge, causing it to transform from a precise sharp line at the junction of the face and lateral surfaces into a dull, rounded surface. Using a dull surface requires heavier lateral pressure against the tooth, reducing tactile sensitivity and creating hand fatigue. The dull surface will burnish the calculus, rather than causing it to be shaved off. Once burnished, this calculus is difficult to detect and remove.
Instrument sharpening can be accomplished manually using sharpening stones or with the help of mechanical sharpening devices. Either way, it is critical to have a thorough understanding of the instrument design, including the cross-sectional shape and the line angles between surfaces, to enable a sharp cutting edge to be reestablished without creating changes in the instrument’s original design.
Sharpening stones typically used for dental instruments include Arkansas, India, ceramic, and a synthetic composition, each differing in coarseness. A few drops of lubricant are required on most stones to keep metal particles from embedding into the stone and to reduce heat friction. Lubricate with sharpening oil on Arkansas and India stones; the ceramic stone can be lubricated with water or used dry, and the composition stone requires water.
Several methods of manual sharpening can be used; however, the technique that requires the instrument to be held stationary while the stone is moved provides a good view of the blade so that the angle can be precisely controlled. Hold the instrument in a palm grasp with the blade facing you and the face parallel to the floor. Elbows should be braced against the side of the body for stability, and the procedure should be performed under good lighting that is reflecting off the face. Hold the stone perpendicular to the face (Figure 32-46), beginning at a right angle (90 degrees), then tilt the stone against the lateral surface so the angle opens to 100 degrees to 110 degrees. An angle guide can be purchased or made by using a protractor to aid in visualizing correct angles.
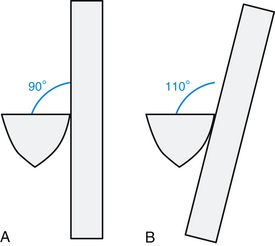
FIGURE 32-46 A, Initial setup of sharpening stone is 90 degrees to the face of the instrument. B, Open the angle to 110 degrees for sharpening. (From Daniel SJ, Harfst SA, Wilder R: Mosby’s dental hygiene: concepts, cases, and competencies, ed 2, St Louis, 2008, Mosby.)
TECHNICIAN NOTE
When sharpening hand instruments, the angle between the stone and the face should be approximately 110°. Remember when sharpening curettes to continue sharpening around the toe while maintaining this angle.
Using light pressure, move the stone in short up-and-down strokes against the lateral surface of the instrument, beginning at the heel of the instrument and working toward the toe, continuing around the toe when sharpening curettes (Figure 32-47). At the point where sharpening allows the lateral surface to meet sharply with the face, a black “sludge” will appear on the face. Finish with a few more light strokes, ending with a down stroke of the stone to remove wire particles that have been lifted from the metal.
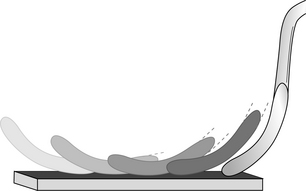
FIGURE 32-47 To maintain the original design of the instrument, when sharpening curved curettes, begin at the heel, sharpening small sections while working toward the toe. (From Nelson DM: Saunders review of dental hygiene, Philadelphia, 2000, WB Saunders.)
Sharpening methods that include sharpening of the face should be avoided because the blade will be weakened and may break during débridement. Instruments that have been oversharpened and are excessively thin should be discarded.
POLISHING
Polishing is the final but critical step performed on an anesthetized dental patient as part of routine cleaning or advanced periodontal therapy. During nonroutine dental procedures, such as endodontic therapy or jaw fracture repair, polishing may be the initial procedure that is performed to remove plaque from the treatment area. In human dentistry, the necessity for routine polishing has become controversial, and selective polishing is becoming standard procedure to minimize the amount of enamel loss from frequent polishing.
The rationale for polishing veterinary mouths is to smooth surfaces that have been microscopically scratched during scaling procedures and to remove any extrinsic stains that were not removed with hand or power scalers. Extrinsic stains are discolorations that accumulate on the surfaces from pigments in food, blood, and some antiplaque products, such as chlorhexidine rinses. Intrinsic stains, often seen on the occlusal surface of maxillary molars in dogs, are within the tooth substance and not removable by polishing procedures. Causes of intrinsic staining include exposure to certain drugs during tooth development (e.g., tetracyclines), trauma, and developmental defects.
Two methods of polishing are currently used in veterinary practices. The most common method is driven by either an electric motor or an air compressor from a dental unit. A low-speed handpiece is used with a rubber cup. A prophylaxis angle, also called a prophy angle, is the attachment that is connected to the handpiece and holds the rubber cup. The cup is available in soft, flexible rubber or firm rubber. Prophy angles are either single-use plastic disposable or autoclavable metal. The rubber cup can be filled with a polishing paste that contains an abrasive agent available in fine, medium, or course grits. Because the act of polishing removes tooth substance, the choice of prophy paste should contain the least abrasive agent that will accomplish the task.
The friction from the rotating rubber cup creates heat that has potential to injure the pulp. New prophy angles have been developed with cups that oscillate back and forth rather than rotating. To minimize risks for thermal damage, use adequate paste, refilling the cup for each tooth, especially when polishing large dog teeth. To further minimize adverse effects, use the handpiece on a low rpm (revolutions per minute) level, just enough to maintain torque and steady rotation. When using a low-speed handpiece without a gauge, activate the handpiece to full speed before touching the rubber to the tooth by depressing the foot pedal. Listen for the pitch clues of the highest rpm level of the low-speed unit, and then ease off the pedal to less than one quarter of the maximal rpm. Use a light pressure against the tooth, just enough to cause the rim of the cup to flare slightly, and polish for only 1 to 3 seconds on each tooth surface. Complete the procedure with a gentle rinse of water or chlorhexidine to flush the residual prophy paste from the mouth. Eye protection should be worn by the operator, and the patient’s eyes should be protected during the polishing procedure.
The second polishing method is with the use of an air polisher. An abrasive agent, sodium bicarbonate, is mixed with water to form a slurry propelled by air against the tooth. The tip of the nozzle is kept at a distance of approximately 4 mm from the tooth surface. To prevent sloughing of soft tissues, the nozzle must never be directed toward the gingiva or into the sulcus or pocket. Air polishing may be quicker and has been determined to be as effective as rubber cup polishing. However, the procedure is messy, and problems of clogging have plagued the equipment.
PERIODONTAL SURGERY
A grading system has been created to categorize periodontal disease that helps to provide generalizations for appropriate treatment (Box 32-7). Grade I periodontal disease refers to inflammatory changes confined to the gingiva (gingivitis), which is an easily reversible sign suggesting the need for a routine dental cleaning. Grade II periodontal disease is an early form of periodontitis where evidence of attachment loss is present, and root débridement or subgingival curettage may be required. Grade III periodontal disease is considered moderate periodontitis where 25% to 50% of the attachment structures of the tooth have been lost; root débridement, gingival curettage, and periodontal surgery are often required. Grade III teeth have a fair to guarded prognosis. Grade IV periodontal disease is considered severe periodontitis. With attachment loss of 50% or greater, these teeth often require extraction.
Deep periodontal pockets may warrant involved periodontal surgery. One technique for dealing with unexpected periodontal pocketing in the context of a busy private practice is staging of the procedure into two visits. Visit one involves baseline charting, radiographs, cleaning, and polishing along with closed root planing, gingival curettage, and placement of a doxycycline gel, with a return visit for more involved periodontal surgery to be scheduled 1 to 2 months later. Doxycycline gel may be placed into a freshly débrided periodontal pocket provided the pocket is 4 mm or deeper to allow for retention of the product. The product labeled for use in dogs carries the trade name Doxirobe, which is a doxycycline gel mixed with a slowly absorbable polymer. The polymer allows for delivery of the product in gel form, and once placed in the sulcus, spraying the product with water causes the polymer to harden, allowing for compaction of the product into the pocket. This provides a number of beneficial effects. Doxycycline is an antimicrobial with good spectrum against a number of periodontal pathogens. Doxycycline has antiinflammatory effects, which are beneficial in decreasing the damage to periodontal tissues that may be mediated by the immune system’s response to periodontal pathogens. Third, the space-occupying effect of the polymer prevents the treated pocket from filling with food and debris immediately after the procedure, allowing the site to heal from the most apical aspect coronally.
When the patient returns in 1 to 2 months, pocket depth should be gently probed once the patient is under general anesthesia. If the pocket depth is normal, no further treatment is necessary, and home care can be continued with routine checkups and periodontal débridement as necessary. If the abnormal pocket depth is still 5 mm or greater in dogs or 3 mm or greater in cats, periodontal surgery is indicated if the client would like to save the affected tooth. A variety of periodontal surgical procedures have been documented, with each technique appropriate in different situations. Creation of a flap and open root planing is usually necessary in cases of pocket depths of 5 mm or greater. In the past, periodontal disease was considered to be irreversible. Now, with advances in surgical technique and materials, periodontal disease may be considered to be reversible if dealt with before severe damage to the periodontium, but without proper postoperative home care, the condition will invariably recur. Pets with advanced periodontal disease may require periodontal débridement every 3 to 4 months until the disease is showing evidence that it is controlled.
Vertical and horizontal bone loss represent two different challenges in periodontal surgery. Vertical bone loss occurs along the long axis of the tooth root and is easier to deal with than widespread horizontal bone loss where multiple furcations are exposed. After débridement of the vertical infrabony defect, an osteoconductive or osteoinductive material may be placed in the defect. Osteoconductive materials will not induce new bone, but will act as scaffolding for new bone cells to traverse the defect. In contrast, osteoinductive materials stimulate progenitor cells of osteoblasts to differentiate and form new bone in an area. Multiple products exist in the human dental market. In veterinary dentistry, an example of an osteoconductive product is Consil (Nutramax Laboratories). An example of an osteoinductive material is Osteoallograft (Veterinary Transplant Services). These products generally require a means of retention, which may be an absorbable or nonabsorbable membrane or a flap that is repositioned in a coronal location to contain the material once placed. Any foreign material may act as a nidus for continued infection, so the placement site must be able to be adequately débrided before considering placement of these products. The surgery site may be lavaged with 0.12% chlorhexidine followed by lactated Ringer’s solution to minimize the cytotoxic effects of chlorhexidine. The flap is closed with 4-0 or 5-0 absorbable monofilament suture material placed interdentally in a simple interrupted pattern, and digital pressure is applied to the gingiva for 60 seconds. Occasionally a sling suture may be used to provide a purse-string effect to encourage the gingival portion of the flap to reattach. The patient should be placed on a soft-food diet with no hard toys or treats for 2 weeks, and antibacterial mouth rinses (0.12% chlorhexidine) may be prescribed. The owner should start brushing the teeth 1 week postoperatively using the modified Stillman technique at the surgery site (Figure 32-48, A).
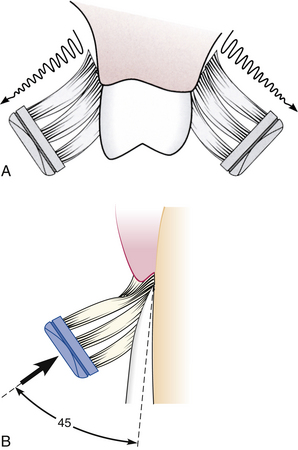
FIGURE 32-48 A, The modified Stillman brushing technique of placing the sides of the bristles along the tooth and gums and moving in a coronal direction provides gingival stimulation without traumatizing a periodontal surgery site. B, The 45-degree angle of the toothbrush in the Bass technique aims the soft bristles toward the gingival margin and into the sulcus. Use short back-and-forth motions without dislodging the bristles from the sulcus. The gentle pressure should elicit blanching of the gingival tissues. In the modified Bass technique, the Bass method is followed with a gentle rolling of the bristles over the coronal portion of the teeth. (From Newman MG, Takei H, Klokkevold PR et al: Carranza’s clinical periodontology, ed 10, St Louis, 2006, Saunders.)
TECHNICIAN NOTE
Attempts to save teeth with advanced periodontal surgery should not be performed unless the client is able to perform daily brushing.
Recently a periodontal vaccine has been developed as an additional tool in prevention of periodontal disease in dogs. The vaccine is a bacterin of three Porphyromonas species. The vaccine is not expected to replace proper home care, dental diets, and routine cleanings, but is rather considered another tool in the armamentarium of the practitioner in the prevention of periodontal disease. Results of large-scale efficacy trials in dogs are pending.
HOME CARE
Client communication regarding dental home care is an important role of the veterinary technician. The technician will spend time with the client to demonstrate brushing techniques and provide recommendations for various diets and products that can be used at the patient’s home to reduce accumulations of plaque and calculus. Reduction of bacteria in the mouth can be accomplished through brushing, diets, and use of toys.
The mechanical cleansing provided by daily toothbrushing provides the most thorough method of plaque control for pets. Several methods are used; the most widely accepted is the Bass technique that concentrates the bristles along the gingival margin and in the sulcus (Figure 32-48, B). Using a soft toothbrush, the bristles are directed at a 45-degree angle toward the gingival margin so that some of the bristles enter the sulcus while other bristles are resting on the tooth adjacent to the margin. Pressing lightly, use short back-and-forth strokes while maintaining the 45-degree angle for 5 to 10 seconds before repositioning the brush along the next group of teeth. Veterinary patients are reluctant to keep their mouth open, so it is best to brush while the mouth is closed with access to the teeth made by a gentle lifting of the lips. Perform this brushing technique with the bristles rinsed in water rather than covered with a veterinary dentifrice. Once the dentifrice is placed into the mouth, it is more difficult to brush because the patient tries to eat the flavored paste. When brushing with water is completed, the dentifrice can be applied into the mouth as a treat and to provide enzymatic or antiseptic benefits. Human toothpastes may cause stomach upset if swallowed and should not be used. Instruct the client to prioritize brushing in areas that collect the heaviest debris (usually the buccal surfaces of the caudal teeth) in case the patient becomes uncooperative before the task is completed. Brushing should be initiated at a young age to allow the patient to become accustomed to oral care. Before introducing a toothbrush, the puppy or kitten should have gum massages to gain experience of having their mouths manipulated. The modified Stillman technique is sometimes used in areas of periodontal surgery to minimize plaque accumulation while preventing trauma to the reattaching gingival tissue (see Figure 32-48, A). This technique involves placement of the bristles apical to the gingival margin with a gentle sweeping motion in the coronal direction against the gingiva and crown of the tooth without placement of bristles into the healing sulcus.
TECHNICIAN NOTE
The Bass technique of toothbrushing places the bristles of the brush at a 45-degree angle against the tooth along the gingival margin to enable some bristles to slide into the sulcus. The Stillman technique is used in areas of periodontal surgery, where bristles apical to the gingival margin are moved with a gentle sweeping motion in the coronal direction against the gingiva without placement of bristles into the healing sulcus.
Feeding a diet of soft food that adheres to teeth surfaces will contribute to periodontal disease. Plaque control can be augmented by feeding a hard dental diet that has been manufactured and tested to reduce accumulations. The Veterinary Oral Health Council (VOHC) was established in 1997 by veterinary dentists and researchers to recognize products that have been shown to meet predetermined standards of plaque and calculus retardation. The VOHC seal of acceptance is issued to products that have proven to reduce plaque and/or calculus based on generally accepted protocols. For a complete list of VOHC-approved products, visit their website at www.VOHC.org.
Diets reduce accumulations by either mechanical or chemical action. The first dental diet was created taking advantage of mechanical cleansing. Long fibers within large pieces of kibble oriented in one direction help to keep the biscuit from crumbling readily when a dog or cat bites into it. This design allows the biscuit to mechanically scrape the sides of the teeth clean as the teeth penetrate the biscuit. An example of a chemical used to provide anticalculus effects is hexametaphosphate (HMP), which works by sequestering the calcium in plaque fluids to reduce calculus formation by preventing mineralization of plaque. Unfortunately, use of dental diets alone is not as effective as toothbrushing. A regimen combining special diets and toothbrushing is recommended for optimal plaque control.
Many home-care products are available, including treats, rinses, and water additives. However, the technician should research products before offering recommendations. During home-care instructions, the technician should also offer counseling regarding which types of toys may be harmful to the pet’s teeth. Rawhide has an excellent cleansing action. However, the size and shape of the product must be correctly matched with the chewing habits of the dog. Rawhide should be taken away following 20 to 30 minutes of gnawing to decrease the likelihood of gastrointestinal problems from ingestion of a large piece. Allowing the rawhide to dry overnight and repeating the process will minimize chances of the pet encountering gastrointestinal or choking problems associated with ingestion of a large piece of rawhide.
Many toys found in pet stores are harmful to teeth, including cow hooves, hard nylon bones, and natural sterilized bones; each is capable of causing dental fractures. Aggressive chewing of tennis balls causes abrasion of teeth, especially when dirt and sand becomes incorporated within the felt of the ball. Instruct clients to always monitor their pets when providing chew toys.
RESTORATIVE DENTISTRY
Restorative dentistry is the subspecialty of dentistry that restores or maintains a tooth’s structure and function. No restorative material is as strong as the original tooth structure, so an attempt is always made to preserve as much of the original tooth as possible. Indications for restorative dentistry include teeth with dental caries (cavities), fractured teeth, and endodontically treated teeth.
Fractured teeth are frequently restored to function while maintaining periodontal health. The cheek teeth (premolars and molars) have a natural design called the dental bulge that deflects food away from the gingival sulcus. When the teeth lose this proper contour, they can become predisposed to periodontal disease. Fractured teeth can be restored with restorative materials alone or in combination with retention pins or posts or both. Pins and posts do not add strength to the restoration, but aid in retention of the restoration.
Crowns are placed on teeth with fractured crowns to protect the tooth, especially in working dogs or in cases where repeated tooth trauma is expected. Metal crowns made of semiprecious metals are more common than porcelain crowns because of their greater strength and requirements for less tooth removal than with crowns that have a porcelain exterior fused to metal. Crowns are most commonly placed in dogs on the canine and maxillary fourth premolar teeth (Figure 32-49).
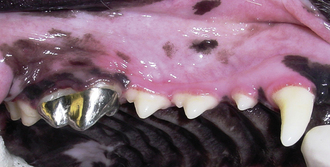
ENDODONTICS
Endodontics deals with the study and treatment of the inside of the tooth (pulp) and periapical tissues. The periapical tissue is located around the tip (apex) of the tooth root. The tooth pulp consists of nerves, blood vessels, lymphatics, and connective tissue. The pulp tissue is found in the pulp chamber (crown) and root canal (root) of the tooth and enters the tooth through numerous small openings in the apex of the tooth root called the apical delta.
The dental pulp is important to the development of the tooth in a young animal. It supplies the nutrients needed by the odontoblasts to deposit secondary dentin. This makes the walls of the root and crown thicker, so the tooth is stronger. Once the dog or cat is 10 to 18 months of age, the root apex should be closed. As the animal continues to age, the pulp chamber and canal will become smaller because the odontoblasts will continue to produce secondary dentin, which makes the tooth stronger (Figure 32-50, A, B).
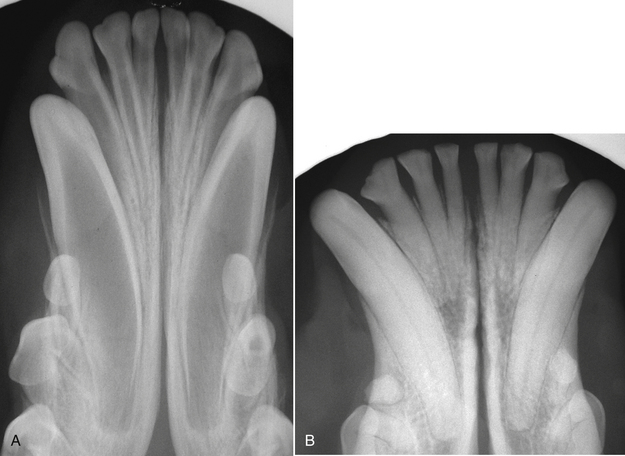
FIGURE 32-50 Radiographs of (A) immature permanent teeth of a 6-month-old dog, and (B) permanent teeth of a 6-year-old dog. Note the secondary dentin that has been produced in the older dog that has strengthened the tooth and caused the pulp chamber and root canal to become narrowed.
The treatment options for teeth with endodontic disease will depend on the age of the animal, duration of endodontic disease, and anatomy of the tooth. Conventional root canal therapy is usually performed on dogs and cats 12 months of age and older with endodontic disease. Treatment involves removing the dead or dying pulp tissue from the tooth, disinfecting and shaping the root canal, and filling the canal (obturation) with an appropriate material to seal the apex from the periapical tissues. Radiographs are necessary to ensure that a proper apical seal has been achieved. A detailed discussion of this procedure will follow later.
Box 32-8 lists equipment and supplies needed for conventional root canal therapy. These items should be ready for use before the root canal treatment is started. A preoperative radiograph is taken to evaluate the tooth root and periapical region. The veterinarian will make the appropriate access to the root canal through the crown of the tooth with a dental bur. The canal may have partially necrotic pulp that will require removal with a barbed broach (Figure 32-51). The broach is placed in the canal and rotated to ensnare the pulp. The broach and pulp tissue are removed from the canal. This step is repeated until all pulp has been removed. Many teeth will not have any visible pulp tissue remaining (necrotic pulp), and the barbed broaches will not be needed. When a barbed broach is used, it is important to avoid binding of the broach in the walls of the canal because the broach may break off in the canal. The canal is cleaned with files and irrigant to sterilize the canal, and the files are also used to shape the canal to allow for proper obturation. There are several types and sizes of files. Hedström (H) and Kerr (K) files are the most commonly used hand files (Figure 32-52). H-files have a sharper edge and can remove dentin faster than K-files. They are used in a push-pull motion. H-files are more susceptible to file breakage than K-files. K-files are inserted to the apical extent of the canal, turned one-quarter turn, and removed, allowing for shaping of the apical portion of the canal. The edges of K-files are less sharp, so dentin removal is less efficient than with H-files. K-files are structurally more sound and less likely to fracture in the canal. The files are available in a number of different lengths and diameters. The smallest diameter file is a number 6 ( of a millimeter at the tip). They increase in diameter by even number increments from 6 to 10, and then they increase by increments of 5. For instance, the following diameters exist: 6, 8, 10, 15, 20, 25, 30, 35, 40, and so on until file 60, at which point the diameter increases by 10. The largest diameter file is a 140. Files made for human root canals are made in lengths of 21 mm, 25 mm, or 31 mm. Special veterinary files are available for teeth in which human files would not reach the apex (Figure 32-53). This variation in length is necessary so that the apex of the tooth root can be reached in long teeth (canines). The variation in diameter is necessary so that the narrow canals of old and/or small animals and the large canals of young or large animals can be properly filed.
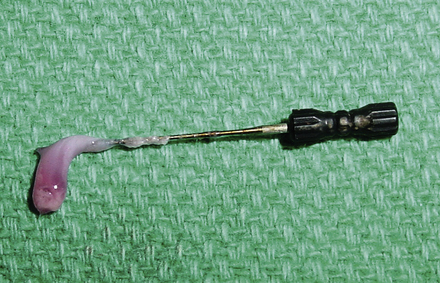
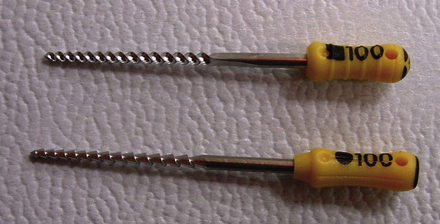
FIGURE 32-52 H- and K-endodontic files: H-files (lower file) are designed to be used in a push-pull manner, whereas K-files (upper file) are used to shape the apical canal with quarter-turn advances.
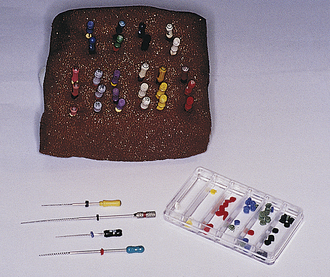
FIGURE 32-53 Endodontic files are made in human and veterinary lengths. Files should be arranged by size for easy identification. Endodontic stops (right) are placed on each file to determine and maintain working length.
TECHNICIAN NOTE
H-files are used in a push-pull motion and are more susceptible to file breakage than K-files. K-files are inserted to the apical extent of the canal, turned one-quarter turn, and removed, allowing for shaping of the apical portion of the canal.
Files should be removed from the package and placed in an organized manner. Files of similar lengths may be placed in a piece of autoclavable foam in order of increasing diameter. The files can be autoclaved, and when the veterinarian is ready to perform the root canal, the files will be sterile and in an organized manner. Preoperative attention to detail is helpful in minimizing anesthesia time because root canal procedures can be long procedures.
Endodontic stops are small pieces of rubber that go around the file to mark a specific length (see Figure 32-53). The file is placed in the root canal, and a radiograph is taken to make sure that the file goes all the way to the apical extent of the root canal system (Figure 32-54). The distance from the endodontic stop to the file tip is called the working length. The rest of the files are set to this length to ensure that the root canal is filed to the proper depth. Measuring gauges are available that allow quick adjustment of the endodontic stop to the proper working length (Figure 32-55).

FIGURE 32-54 An endodontic file is placed to the apex and a radiograph is taken to determine the working length.
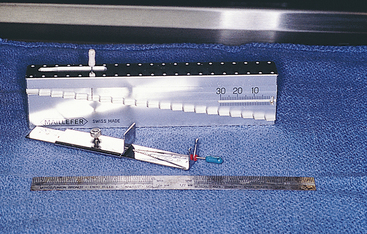
FIGURE 32-55 Measuring gauges and rulers are used to measure the working length of the root from the access site to the apex.
Canal lubricants are used to soften the dentinal walls to ease filing and help prevent file breakage. An irrigant is used between file sizes to rinse the canal of dentinal shavings and other debris. The most common irrigant is sodium hypochlorite because of its excellent disinfecting properties and ability to break down organic debris (pulp). Endodontic irrigation needles are placed on the syringe that contains the irrigant. These needles have a blunt end with a side opening to prevent forcing noxious irrigant periapically (Figure 32-56).
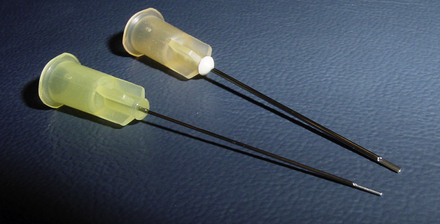
FIGURE 32-56 Endodontic needles are open on the side of the tip to prevent inadvertent forcing of sodium hypochlorite through the apical delta.
TECHNICIAN NOTE
Sodium hypochlorite is irritating to soft tissue. Contact with the oral soft tissues should be avoided, and forceful irrigation of the canal should be avoided to prevent periapical migration of the irrigant.
After the canal has been properly cleaned and shaped by the files, it is then ready for obturation. Obturation refers to filling the canal with a material that will seal it from the periapical area. The canal should have a final rinse of sterile water, and then it is dried with sterile paper points. Successive paper points are inserted and removed until the points come out of the canal dry. An endodontic sealer is then applied to the canal walls. Sealer application can be done with a sterile paper point, K-file, or spiral paste filler on a slow-speed handpiece (Figure 32-57). Gutta percha should make up the bulk of the filling agent. It is a radiopaque rubberlike material that can be vertically and laterally condensed to adapt to the shape of the root canal. The material can be heated to allow it to flow into the canal and adapt to the canal shape easier. Vertical and lateral condensation is performed with pluggers and spreaders, and additional gutta percha is added as needed to fill the entire canal. Pluggers have a blunt end that pushes the gutta percha vertically in an apical direction. Spreaders have a pointed tip and push the gutta percha laterally to create room for more gutta percha for a solid fill. Spreaders and pluggers come in a variety of lengths and diameters (Figure 32-58). Extra long veterinary length spreaders and pluggers are available.
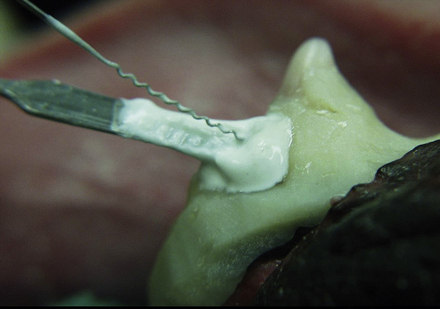
FIGURE 32-57 Lentulo spiral paste filler for delivery of cement. A spatula loaded with cement is placed near the spiral filler, which pushes the cement apically. Care should be taken to use a contraangle with a reduction gear to decrease chances of the filler breaking in the canal. A composite splint is seen at the gingival margin resulting from a healing jaw fracture in the area of the canine tooth.
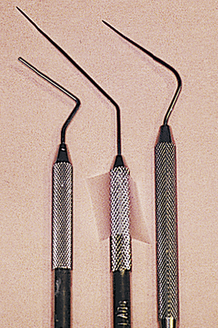
FIGURE 32-58 An endodontic plugger and endodontic spreaders. Spreaders have a pointed tip and are used for lateral compaction. Pluggers have a flat tip and are used for vertical compaction.
Once obturation of the canal has been accomplished, the restorative filling material is placed. This can be done with a single filling material or in two layers with an intermediate and final filling material used. Composite fillings cannot be placed next to eugenol because eugenol interferes with the hardening of the composite. Glass ionomers are a commonly used intermediate filling material. A light-cured composite filling material is often used as the final restorative at the surface of the access site and fracture site.
Teeth that have undergone pulp death become more brittle over time because of the lack of hydration that was originally provided by the pulp tissue. A good history should always be taken to try to determine how the pet fractured the tooth. If inappropriate chew toys are in the environment, these should be removed. A metal crown may be indicated to help prevent fracture of the tooth in the future.
EXODONTICS
Although attempts should be made to save teeth whenever possible, extraction (exodontics) is necessary when the prognosis for saving the tooth is grave and when financial constraints or medical conditions prevent multiple anesthetic episodes that may be necessary to save the tooth. Extraction of a tooth with severe periodontal disease may be easy if much of the attachment structures of the tooth have already been lost, but as a result of their large root surface area, extraction of canine or feline teeth can be challenging.
Serious complications can arise from extraction. Possible complications should be discussed with the owner before the procedure. Complications include those associated with anesthesia, hemorrhage, ocular trauma, jaw fracture, and displacement of a root into an inaccessible area, such as the nasal passage. Iatrogenic jaw fracture can easily occur when extracting diseased mandibular first molars or mandibular canine teeth in cats or small-breed dogs, especially when significant periodontal disease already exists.
TECHNICIAN NOTE
Never extract a tooth without the permission of the client. Therefore always obtain a contact number to discuss any unexpected findings.
The extraction process begins with placement of a regional nerve block to decrease inhalant anesthesia requirements. The local anesthetic of choice in oral surgery is 0.5% bupivacaine because of its ability to provide not only intraoperative but also postoperative pain relief of 6 to 10 hours duration. Common regional nerve blocks are the maxillary or infraorbital block for the upper jaw and the inferior alveolar or mental nerve block for the lower jaw (Figure 32-59).
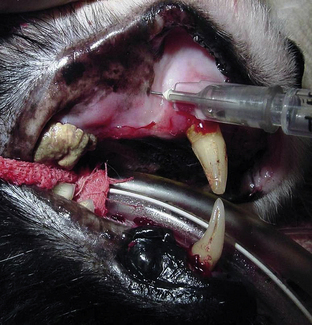
TECHNICIAN NOTE
Regional nerve blocks not only lower inhalant requirements, but also provide postoperative pain relief.
CLOSED EXTRACTIONS
While the regional block is taking effect, a preextraction radiograph should be taken of the tooth to assess for evidence of root pathologic conditions that may affect the surgical approach. A closed technique is best reserved for single-rooted teeth or teeth that have severe periodontal disease. Once the regional nerve block is placed, the gingival attachments around the tooth are separated with either a periosteal elevator (Figure 32-60), dental luxator, or scalpel blade. After the soft tissue attachments have been severed, a dental elevator of appropriate size and shape (Figure 32-61, A, B) is placed in the periodontal space on the mesial or distal surface of the crown. Once placed in the space, gentle pressure is placed to seat the elevator within the tooth and alveolar bone, and the handle of the elevator is rotated slightly to stretch the periodontal ligament fibers. If elevation is done correctly, the tooth will be observed to move slightly when the elevator is rotated. Pressure is held for 10 seconds, and then the elevator is advanced apically and rotated against the root in the opposite direction to create pressure and hold again. The goal is to fatigue the periodontal ligament and prevent tooth root fracture. Larger elevators are used as the periodontal ligament breaks down and allows more room to place a larger instrument. The temptation to wiggle the elevator in an attempt to obtain a deeper position in the periodontal space should be avoided because this will often cause breakdown of the alveolar bone and loss of leverage. The elevator may also be placed on the palatal or lingual surface and the vestibular surface within the periodontal space to stretch the periodontal ligament fibers around the entire circumference of the tooth. Elevators come in a variety of shapes and sizes, and it is important to have access to different sizes for different situations. When grasping a dental elevator, the handle should rest securely in the palm of the hand. The index finger should be extended so that if the elevator slips, the index finger will help to stop the advancing of the elevator into deeper structures (Figure 32-62). Ocular and brain trauma have been documented in cases where dental elevators have slipped during extraction procedures. To prevent this, forces used must be well controlled and should be generated in the lateral or medial direction rather than in the apical direction. The gingival tissue is apposed to close the extraction site with 4-0 or 5-0 monofilament absorbable suture in a simple interrupted pattern. Sterile extraction packs containing necessary instruments may be wrapped and prepared for use (Box 32-9).
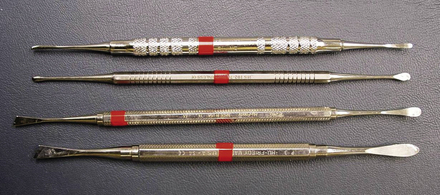
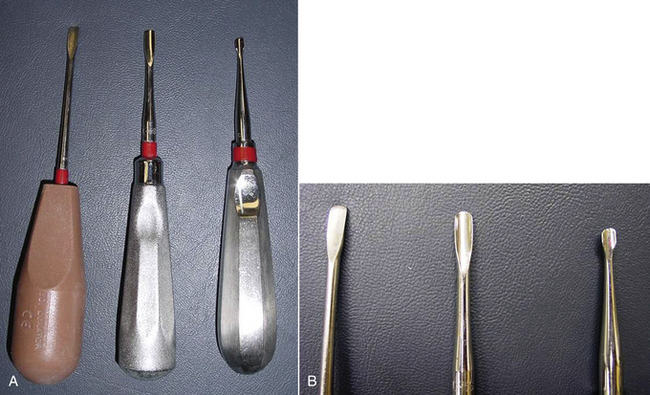
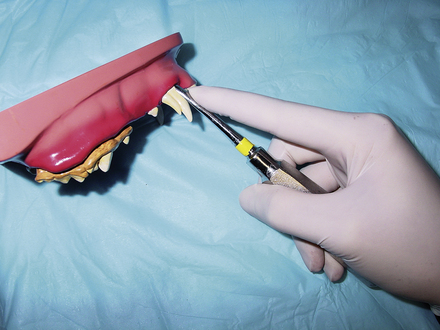
SURGICAL EXTRACTIONS
As a result of the large surface area and multirooted nature of carnivore teeth, surgical extraction is often a less traumatic option than attempts of removing a firmly rooted tooth by closed extraction. As with closed extractions, the gingival attachments are separated from the tooth crown with a periosteal elevator, dental luxator, or scalpel blade. A flap is created, depending on the location and underlying root structure. A flap with no releasing incisions is called an envelope flap. A flap with one releasing incision is a triangle flap, and a flap with two releasing incisions is called a pedicle flap. Each situation should be assessed individually to decide which type of flap is necessary to provide the optimal access and tension-free tissue closure while inflicting the minimum amount of soft tissue trauma. Pedicle flaps are created with a broad base to ensure good blood supply and adequate tissue for closure. Once the flap is raised, a round carbide bur is used in a water-cooled, high-speed handpiece to create a window in the buccal bone of roots to be extracted. Multirooted teeth are separated with a tapered fissure bur. Once the window is created and roots are sectioned, minimal force is necessary to gently pry the roots and attached crown segments from their sockets. Once the roots are removed in their entirety, rough bone edges are smoothed with a large round diamond bur. The alveolus of each root is curetted and lavaged with sterile isotonic solution or 0.12% chlorhexidine. The periosteum is separated from the mucosa to provide adequate tension-free tissue to close the defect. The flap is closed with 4-0 or 5-0 absorbable monofilament suture in a simple interrupted pattern. Occasionally, osteoconductive or osteoinductive products may be placed in the alveolus before closure if it is suspected that the product will not act as a nidus and will help to prevent significant bone loss in the area of the extraction. A postextraction radiograph should be taken to document complete removal of the roots in cases where the roots were not retrieved easily.
When a root fractures, additional instruments will be needed to retrieve the retained tooth root. Root tip elevators and root tip forceps are valuable tools in root tip retrieval (Figure 32-63). Care should be taken to prevent dislodging the root tip into the nasal passage or mandibular canal. Cotton-tip applicators are helpful to control hemorrhage in the alveolar socket to visualize the root tip. Avoid blowing air from an air or water syringe into the socket. Although this may help visualize the root, a fatal air embolism may occur. The pet should be given no hard food or treats for 14 days postoperatively. Postoperative antibiotics are generally not necessary following extraction procedures. The AVDC has developed a position statement regarding the use of antibiotics in dental patients (Box 32-10).
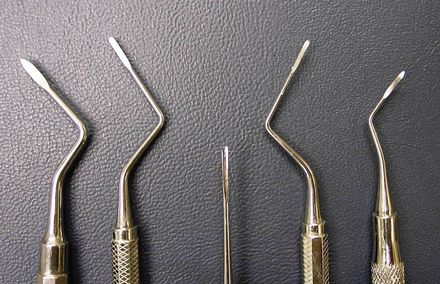
COMMON DENTAL PROBLEMS IN DOGS AND CATS
Tooth resorption is common in cats and rare in dogs. Prevalence studies have found that 20% to 70% of cats are affected by this problem, depending on the population of cats and the investigative methods employed. The lesions are usually appreciated clinically at the cervical portion of the tooth (the junction of where the crown meets the root, sometimes referred to as the “neck” of the tooth), which is often hidden by the gingiva. However, recent histologic studies have found that these lesions begin on the root surface, and radiographic changes can often be seen before a clinical lesion is obvious. When a lesion develops at the gingival margin, the adjacent gingiva often covers these lesions with a combination of hyperplastic gingiva and granulation tissue (Figure 32-64, A).

FIGURE 32-64 A, Photograph of a mandibular third premolar affected by idiopathic feline resorption (arrow). B, Radiograph of the left mandible using the paralleling technique. The mandibular left third premolar has undergone significant root replacement resorption, as seen by decreased root density and loss of periodontal space.
TECHNICIAN NOTE
The cause of feline tooth resorption is still unknown, but recent research suggests that vitamin D levels in commercial cat food may play a role (see Recommended Reading).
A fine explorer should be used to check for irregularities, as described earlier in this chapter. In the past, restorations have been placed in lesions, but follow-up studies have shown poor long-term results with restoration. Therefore extraction is the treatment of choice. Dental radiographs of these teeth are necessary to evaluate the severity of resorption and to guide treatment.
Sometimes it is not possible to perform a complete tooth extraction because of severe root resorption where a portion of the root has been replaced by a reparative bone-cementum material. When this occurs, the tooth root becomes incorporated into the adjacent alveolar bone. Radiographic evidence of this is seen by loss of periodontal ligament space and decreased root density, approximating that of the surrounding bone density (Figure 32-64, B). When this radiographic appearance is seen, in the absence of periodontal or endodontic disease, it is possible to perform a crown amputation where hard tissue with characteristics of tooth root is removed and resorbed root that has been replaced by bone is not removed. The tooth crown and coronal root segment are removed with a dental bur and high-speed handpiece. The crestal alveolar bone is smoothed with a dental bur, and the gingiva is closed with absorbable suture over the crown amputation site.
ORTHODONTIC PROBLEMS
There are four classes of malocclusions that are used. Class I malocclusion (Figure 32-65) occurs when the maxillary and mandibular jaw lengths are normal but one or more teeth are in an abnormal position. Class I malocclusions (also referred to as neutroclusion) are the most common type of malocclusion receiving orthodontic correction in pets. Common examples of Class I malocclusions are lingually displaced (base-narrow and/or instanding) mandibular canines anterior crossbite and lance canine teeth. When the mandibular canines are displaced lingually, they often cause occlusal trauma to palatal mucosa and/or gingiva because of their long crown height. Severe cases can result in complete penetration of the palatine process of the maxillary bone and/or incisive bone, resulting in an oronasal fistula.
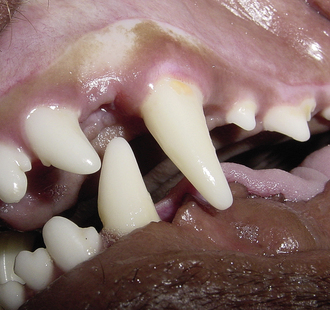
FIGURE 32-65 Class I malocclusion: no jaw length discrepancies exist, but the left mandibular canine tooth is occluding abnormally.
A rostral crossbite (referred to as anterior crossbite in humans) occurs when closed-mouth examination reveals one or more maxillary incisors are positioned lingual to the mandibular incisors. A caudal (called posterior crossbite in humans) crossbite occurs when one or more maxillary premolar or molar teeth are positioned lingual to the opposing mandibular premolar or molar (Figure 32-66).
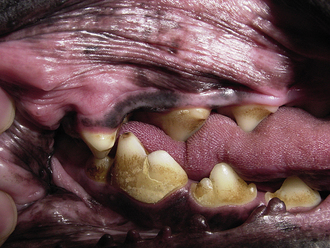
FIGURE 32-66 Caudal crossbite, also referred to as posterior crossbite. The mandibular first molar is buccal, or vestibular, to the maxillary fourth premolar. This may result in abnormal accumulation of plaque and calculus on the buccal surface of the mandibular molars, increasing the need for brushing of this area.
It is important to evaluate the entire dentition and jaw length relationships if proper classification is to be made because clinical presentations similar to those described earlier can occur as a result of abnormalities in jaw length rather than abnormalities of tooth position. The remaining classes refer to skeletal malocclusions associated with jaw length discrepancies. A Class II malocclusion is also referred to as distoclusion, overjet, overshot, and sometimes incorrectly referred to as an overbite (Figure 32-67). In a Class II malocclusion, the mandible is relatively shorter than the maxilla, which can be a result of an abnormally long maxilla (maxillary prognathism) or an abnormally short mandible (mandibular brachygnathism).
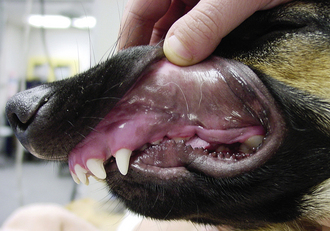
FIGURE 32-67 Class II malocclusion. The mandible is relatively shorter than the maxilla, which results in palatal trauma from the mandibular canine and sometimes mandibular incisor teeth.
A Class III malocclusion is also referred to as mesioclusion, underjet, undershot, and sometimes incorrectly referred to as an underbite (Figure 32-68). In a Class III malocclusion, the maxilla is relatively shorter than the mandible, which can be a result of an abnormally long mandible (mandibular prognathism) or an abnormally short maxilla (maxillary brachygnathism).
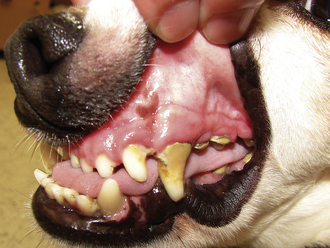
FIGURE 32-68 Class III malocclusion. The maxilla is relatively shorter than the mandible, which may result in attrition of the teeth or trauma to the mandibular mucosa beneath the tongue.
The terms brachygnathic and prognathic should always be used with a preceding descriptive adjective to identify the upper or lower jaw (e.g., maxillary brachygnathism). Sometimes it is difficult to determine if malocclusion is a result of one jaw that is longer than normal or the opposing jaw that is shorter than normal. In general, brachygnathism is considered to be a more common cause of malocclusion than prognathism. Maxillary brachygnathism is an accepted breed standard of some breeds, including boxers, Boston terriers, bulldogs, and pugs. Therefore brachycephalic breeds are referred to as a normal Class III occlusion. Some clues can be gathered on oral examination to determine if malocclusion is a result of brachygnathism or prognathism. When a jaw does not grow to its full length, crowding and rotation of the teeth will occur. When prognathism occurs, increased interdental spaces will be seen. A general understanding of these terms allows veterinary professionals and personnel to communicate with breeders and pet owners who may use either lay or scientific terms to describe a malocclusion. A detailed study of occlusion is necessary before considering orthodontic treatment for pets or counseling breeders on the role of genetics in malocclusions. Although the genetics of malocclusion in dogs and cats have not been fully elucidated, skeletal malocclusions (Class II to IV) are considered to be of genetic origin, and some Class I malocclusions (such as lance canines in Shetland sheepdogs) are considered to have a genetic component.
The shape of a dog’s or cat’s skull must also be evaluated when performing a dental occlusion evaluation. We recognize three types of skulls: brachycephalic, mesocephalic (or mesaticephalic), and dolichocephalic. Brachycephalic breeds have a wide skull with a short maxilla. Examples of these breeds are boxers, bulldogs, and Persian cats. Mesocephalic breeds have a well-proportioned skull width and maxillary length. Examples include beagles, Labrador retrievers, and German shepherd dogs. The dolichocephalic breeds have a narrow skull and long maxilla, and some examples are the sight hounds (greyhound, whippet) and Siamese cats.
Wry malocclusion is a condition where one segment of the jaw is disproportionate to the other segment (e.g., the left mandible is longer than the right mandible). The disproportionate jaw length can occur in either the maxilla or mandible, resulting in what appears to be a curvature of the jaw toward the shorter side. When it affects the mandible, wry malocclusion may also result in changes in the horizontal plane of the affected jaw, with the affected side seeming ventrally deviated compared with the opposite side.
Impressions and Models
Impressions and models are important in treatment planning of orthodontic disease and in creation of orthodontic devices and restorations. Veterinary technicians and dental assistants often play an important role in obtaining impressions and pouring stone models. Stone dental models also serve as a part of the medical record for documentation of the starting point and treatment progress.
Alginate is the material that records the imprint of the teeth when doing a full-mouth impression. The teeth should be cleaned before the impression is made. The appropriate size dental impression tray is selected for the patient. The area of interest must fit into the tray without touching the sides of the tray, and the tray must completely cover the teeth. Impression trays for dogs and cats can be purchased or fabricated.
The jar of alginate should be agitated (fluffed) with the top on before use and should be allowed to sit for at least 5 minutes after agitation so that the dust will settle. Alternatively a dustless alginate product is available. Level scoops contained within the jar of alginate are placed in a rubber mixing bowl. A proper scoop of alginate will be level on the surface and will not contain filling voids. Gently tap the scoop of alginate to eliminate any voids, and then level the surface with the blade of the alginate spatula (Figure 32-69).
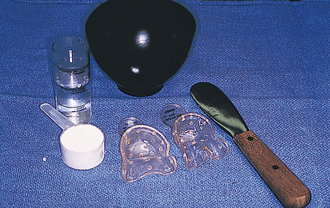
FIGURE 32-69 Materials and equipment used to take an alginate impression: rubber mixing bowl, spatula, impression trays, alginate scoop, and water-measuring cylinder.
Alginate spatulas have a wide blade that is used to blend the alginate powder with the water. A cylinder comes with the alginate to measure out the proper amount of water. The amount of alginate used is based on the size of the impression tray, with 8 to 12 scoops usually necessary for a full-mouth impression of the maxilla or mandible. The water is added to the alginate all at once, and the spatula is used in a stirring action to wet the powder. Once the powder is wet, the wide blade is used to start spatulating. The bowl is held in the palm of the hand while the dominant hand works the spatula, smearing the alginate from one side of the bowl to the other in a back-and-forth motion. Once the alginate is mixed to the consistency of cake frosting, it is loaded into the impression tray with the spatula. The lips of the animal are held away from the teeth, and the tray is placed over the teeth. The tray should be held steady while the material sets. This takes about 5 minutes from the start of the mix. Cold water will increase the set time, and warm water will shorten the set time. The extra alginate around the rim of the impression tray can be touched periodically to determine when it is set. Once the material sets, it is similar to rubber and will not stick to the finger when touched. The impression tray and alginate are then removed from the teeth in one quick pulling motion in the direction of the long axis of the teeth.
Once removed from the teeth, the impression should be inspected to be sure that the area of interest was adequately recorded (Figure 32-70). The material should then be rinsed off and a moist paper towel placed on it until the stone can be poured into it. The sooner the stone is poured, the more accurate the impression will be because alginate is susceptible to desiccation and overhydration. Most technicians pour the stone as soon as the animal is recovered from anesthesia or sooner.
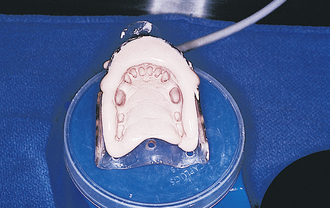
FIGURE 32-70 Alginate impression of the rostral maxilla is inspected and prepared for pouring of dental stone.
Dental stone is used to make the positive image of the mouth. The stone comes in a powder form and is mixed with water. The powder can be weighed out and mixed with a specified volume of water. Experienced technicians can determine the approximate amount of water and stone powder by the thickness of the mix. A good mix will slowly run off the mixing blade when held above the bowl.
Once the stone is mixed, the bowl containing the stone is placed on the vibrator until all visible air bubbles have been released from the mixture. The alginate impression should be cleared of excess water by gently tapping or shaking it. The impression is then held on a laboratory vibrator while small amounts of stone are placed on the impression and allowed to run into the teeth. This step is critical because if an air bubble gets trapped in the teeth, the stone model will be missing part of the tooth. The vibrator serves two purposes. First, it helps to remove bubbles from the stone, and second, it causes the stone to flow into the teeth. Once the teeth have been filled with stone, the rest of the stone can be added at a faster rate because this step is less critical. The stone mix can then be made thicker by adding more powder. This portion can be placed on the top of the model to give it a strong base. Optimal working time for the stone is about 10 minutes. Complete set of the stone takes about 1 to 2 hours.
The model should be removed from the alginate impression after the stone has had 45 to 60 minutes to set. An exothermic reaction will occur, causing the model to feel warm. The model can be separated once the stone has cooled. Do not wait several hours because the alginate will dry and stick to the stone model. The model should be carefully pulled from the alginate and inspected to make sure that all teeth are adequately recorded. If a portion of a tooth is missing, this could be a result of an air bubble or the tooth could have broken off and still remains in the impression. The canine teeth are particularly susceptible to fracture because of their long curved anatomy. If a tooth from the stone model breaks, it can be glued back on the model. The model should then be labeled with the pet’s name and the date.
Interceptive Orthodontics
Interceptive orthodontics involves the extraction of persistent deciduous or adult teeth that are causing or will cause problems associated with malocclusion (Figure 32-71). Interceptive orthodontics can be extremely beneficial, and many abnormally erupting permanent teeth will correct spontaneously after extraction of the retained deciduous teeth. The most important factor determining success with this treatment is early detection of the problem. Many puppies and kittens have completed their vaccination series by the time they reach this mixed dentition stage and will not be seen again before spay or neuter unless a dental examination can be scheduled to ensure that early orthodontic problems do not go undetected.
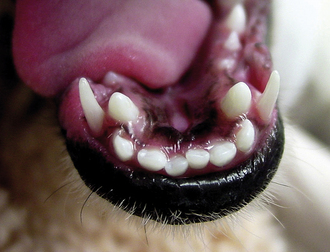
FIGURE 32-71 Persistent deciduous teeth may contribute to orthodontic (base-narrow and instanding permanent canine teeth) and periodontal problems.
Persistent deciduous teeth can occur in any breed of dog or cat, but they are most commonly seen in small-breed dogs, such as Yorkshire terriers, poodles, and dachshunds. Deciduous teeth should be shed before eruption of their permanent counterpart. When persistent (previously and mistakenly referred to as “retained”) deciduous teeth are identified, they should be extracted before they cause malalignment of their permanent counterparts. Most permanent teeth will erupt lingual or palatal to the retained deciduous teeth with one exception. Maxillary canine teeth erupt mesial to the persistent deciduous teeth. This is noteworthy because malalignment will decrease the space between the maxillary canine and third incisor tooth where the mandibular canine occludes. When this space is too narrow, the mandibular canine tooth will have interference with either one or both maxillary teeth, and tooth wear (attrition) can occur.
Extraction of persistent deciduous teeth is a challenge because of their long, thin roots that can fracture easily. The goal is to remove the entire tooth root to provide space for the permanent tooth to move into. The immature jaw contains numerous developing permanent tooth buds that can be damaged by dental elevators. Clients need to be cautioned of the possibility of permanent tooth damage or discoloration during the extraction of deciduous teeth. A skilled veterinary dental surgeon can significantly minimize these complications.
Base-Narrow or Instanding Mandibular Canine Teeth
Lingually displaced mandibular canine teeth may be a result of deciduous teeth that do not exfoliate properly, but other aspects may play a role, such as genetics responsible for development of normal mandibular width. These malocclusions can be corrected by orthodontics in most cases, but clients must be willing to invest time and expense necessary to clean the oral appliance and return for rechecks as needed. Orthodontic treatment generally costs more than tooth extraction and involves more anesthetic procedures. Orthodontics can be an important treatment option when considering alternatives to extraction of large teeth, such as the canine teeth.
Crown height reduction, partial pulpectomy, and direct pulp capping under sterile conditions may be an option for animals with malocclusions. This procedure entails shortening the tooth to remove the interference it is causing with another tooth or surrounding soft tissue. This method is less invasive than extraction, removes the animal’s source of discomfort, and achieves results more rapidly than orthodontic movement. However, it does permanently alter the appearance and, to some degree, function of the tooth. The pulp chamber is exposed when the crown is reduced, and a small percentage of these teeth may become nonvital after this procedure.
DENTAL TRAUMA
Dogs and cats can generate large amounts of biting, pulling, and grinding forces, and their teeth are often the recipients of dental trauma. This trauma can be exhibited as wear (attrition or abrasion), uncomplicated tooth fracture (no pulp exposure), or complicated fracture (pulp exposure).
Many dogs will cause severe abrasion of their teeth by chewing on inappropriate objects, such as rocks or fences. The teeth most commonly fractured are the canines and maxillary fourth premolar teeth (see Figure 32-22, A). Attrition and abrasion usually occur on the incisors and canines, but can be seen on the premolars and molars. If the dental wear occurs slowly, odontoblasts will deposit tertiary (reparative) dentin within exposed dentinal tubules to prevent pulp exposure as enamel and dentin are lost. Tertiary dentin may be seen on the surface of worn teeth as a brown or black dot (see Figure 32-22, B). A dental explorer should be run over the tooth surface to make sure the pulp tissue is not exposed. When the pulp tissue is exposed, the tip of the dental explorer will fall into the pulp chamber as it crosses the surface of the tooth, whereas tertiary dentin feels smooth as glass with the explorer.
In acute fractures with pulp exposure, the tooth may bleed from the exposed pulp surface. If the tooth is treated within the first 48 hours, vital pulp therapy may be successful. This procedure involves removing the coronal pulp tissue (the pulp tissue in the tooth root remains), covering the pulp tissue with a medicament, and sealing the coronal exposure site with appropriate dental restorative materials.
All teeth with exposed pulp tissue should be treated either by endodontic treatment (conventional root canal, vital pulp therapy) or by extraction. If left untreated, infection from the exposure site will spread to the periapical tissues, and a periapical abscess will develop with time. The client may notice ipsilateral facial swelling or a draining tract just below the medial canthus of their pet’s eye (Figure 32-72, A, B). The majority of periapical abscesses will not form a fistula through the skin, which means that unless the teeth of these pets are examined for endodontic disease, many abscesses go untreated. These abscesses can be painful and are a source of infection, which can spread to other areas of the body.
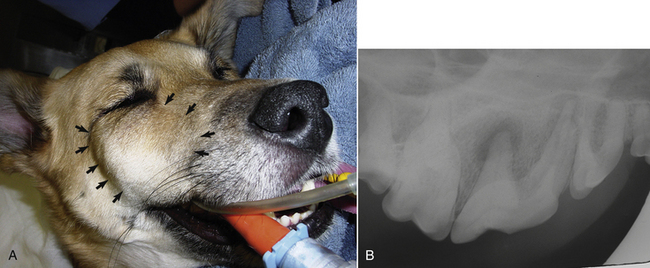
FIGURE 32-72 A, Facial swelling associated with a periapical abscess of the right maxillary fourth premolar tooth (arrows). B, Radiograph showing severe periapical lucencies (bone loss at root tips as a result of infection).
TECHNICIAN NOTE
A tooth with pulp exposure requires either endodontic treatment or extraction. A “wait and see” approach is not appropriate because dogs and cats disguise their level of discomfort.
Discoloration is another sign of endodontic disease, commonly seen as a result of prior trauma to the pulp resulting in pulpitis (Figure 32-73). Ninety-two percent of discolored teeth show evidence of partial or complete pulp necrosis on exploratory pulpotomy. Because dogs and cats do not articulate their discomfort, evidence of pulpitis warrants endodontic or exodontic therapy to relieve possible pain in a tooth affected by pulpitis.
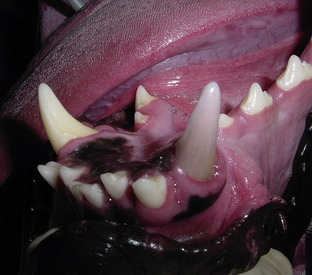
ORAL NEOPLASIA
Oral tumors account for only 6% of all neoplasia in dogs and 3% to 12% in cats, these tumors are often aggressive, and prognosis depends on early detection. The most common oral tumor in cats is squamous cell carcinoma (SCC), which accounts for approximately 70% of all oral tumors in cats (Figure 32-74). To be able to provide a cure for SCC, early detection is particularly important in smaller patients (cats and small dogs) because of the need to obtain clean surgical margins while still maintaining adequate function.
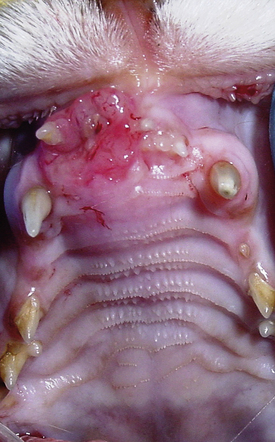
FIGURE 32-74 SCC of the maxilla in a cat. SCC accounts for approximately 70% of oral tumors in cats.
In dogs, tumors may be benign or malignant. The most common benign tumor in dogs is a gingival tumor that in the past has been referred to as an epulis (plural: epulides). The epulides were categorized as fibromatous, ossifying, and acanthomatous; the latter is the most locally invasive. A change in the terminology of these tumors has been made to more accurately reflect their histologic appearance. Fibromatous and ossifying epulides are now categorized together as “peripheral odontogenic fibromas.” Acanthomatous epulis is now referred to as canine acanthomatous ameloblastoma. Peripheral odontogenic fibromas do not typically invade bone and usually do not recur if the tooth of origin and its periodontal ligament are removed (Figure 32-75, A). Canine acanthomatous ameloblastoma requires removal of the tumor with a minimum of 1 cm of normal tissue in all directions to prevent recurrence (Figure 32-75, B). Most oral tumors are not responsive to chemotherapy or radiation, but canine acanthomatous ameloblastoma does respond to radiation. Surgery (mandibulectomy or maxillectomy) is often the treatment of choice, however, because development of malignant tumors at the site of radiation has been reported with this tumor type.
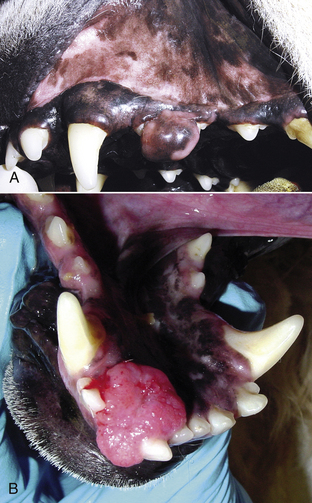
FIGURE 32-75 A, Peripheral odontogenic fibroma (previously referred to as an ossifying epulis) in a dog. B, Acanthomatous ameloblastoma in a dog (previously referred to as acanthomatous epulis). Acanthomatous ameloblastoma is locally invasive, but does not metastasize, making these patients good candidates for surgery if margins are attainable.
The most common malignant tumors in dogs are malignant melanoma, SCC, fibrosarcoma, and osteosarcoma. These tumors are locally invasive and have the potential to metastasize to regional lymph nodes or to the lungs. After staging the patient to determine the extent of disease, surgery or radiation is usually recommended to deal with the primary tumor, and metastases are dealt with by either chemotherapy, radiation of metastatic nodes, or immunotherapy. Malignant melanoma may be pigmented or amelanotic. A vaccine has recently been developed for treatment of dogs with malignant melanoma, which has shown promise in increasing survival times.
Dogs and cats that undergo radical maxillectomy and mandibulectomy for removal of an oral tumor generally function well postoperatively, and the majority of clients are pleased with long-term quality of life and appearance. Cats recover more slowly from maxillectomy and mandibulectomy and often require placement of a feeding tube (usually an esophagostomy tube) during the recovery period, whereas dogs usually eat and drink within 24 hours after surgery.
STOMATITIS
Diffuse inflammation of the entire oral cavity is seen commonly in cats and occasionally in dogs. When inflammation is confined to the gingiva, it is referred to as gingivitis. When the inflammation extends beyond the mucogingival junction, it is called stomatitis (Figure 32-76). Stomatitis may be due to a variety of causes, including ingestion of a caustic substance, uremia, viral exposure, plant foreign bodies, allergic response to drugs, or most commonly immune-mediated causes. Cats are often affected by a type of stomatitis referred to as lymphocytic-plasmacytic stomatitis, which can involve gingiva, alveolar mucosa, buccal mucosa, sublingual mucosa, and even the mucosa of the caudal oral cavity lateral to the palatoglossal folds. Cats often have decreased appetite or anorexia, halitosis, dehydration, and blood-tinged saliva.
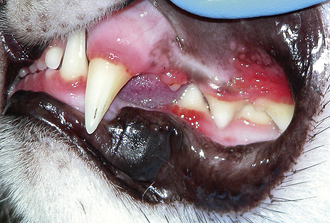
FIGURE 32-76 LPS in a cat. Inflammation is often most severe near the teeth because of the role of plaque accumulation in cats with stomatitis.
The cause of LPS is not clear, but it appears that cats develop inappropriate inflammation in the presence of even small amounts of plaque accumulation. Many cats with LPS concurrently shed both herpesvirus and calicivirus. These viruses may have an effect on the immune system, resulting in an overzealous or deficient immune response to plaque. Therefore plaque control in the form of frequent dental cleanings and home care is important. Unfortunately, many LPS cats are so painful that home care is not feasible. Immunosuppressive agents, such as corticosteroids and cyclosporine, help in many cases, but when medical therapy fails or causes unacceptable side effects, full-mouth extractions or nearly full-mouth extractions have been shown to provide resolution of oral discomfort in approximately 80% of cases. When seen in dogs, stomatitis may be due to autoimmune diseases, such as pemphigus vulgaris or bullous pemphigoid.
MASTICATORY MUSCLE MYOSITIS
Masticatory muscle myositis is an immune-mediated disease where the immune system forms antibodies toward a specific component of myosin found only in muscles of mastication. Patients affected by this disease may be seen either in the acute phase of the disease, which is painful, or in the chronic phase of the disease, where much scarring has already taken place. Patients in the acute phase will often have the complaint of pain upon opening the mouth, decreased appetite, or dropping of food. These patients often have swelling of the temporal, masseter, and/or pterygoid muscles, which may occasionally also cause exophthalmus. Patients in the chronic phase often have severe temporal and masseter muscle atrophy and inability to open their mouth as a result of severe scar tissue formation. The goal is to diagnose the disease before these chronic changes occur because it is difficult to deal with in the chronic phase. Diagnosis is made by sending serum and muscle biopsies to the comparative neuromuscular laboratory at the University of California, San Diego. Treatment of the acute phase involves a long, slow taper of oral corticosteroids, beginning at an immunosuppressive dose of 1 mg/kg twice daily. Some patients need to be on some level of steroids for life to prevent recurrence.
JAW FRACTURES
Jaw fractures are common in dogs and cats with motor vehicle trauma, high-rise syndrome, or severe periodontal disease resulting in a pathologic fracture. Most jaw fractures benefit from some type of rigid fixation. One of the most common types of jaw trauma is a symphyseal separation, where the right and left mandibles separate at their rostral fibrous union called the symphysis. A cerclage wire placed behind the canine teeth for no more than 4 weeks allows for stability while the symphysis heals (Figure 32-77, A, B).
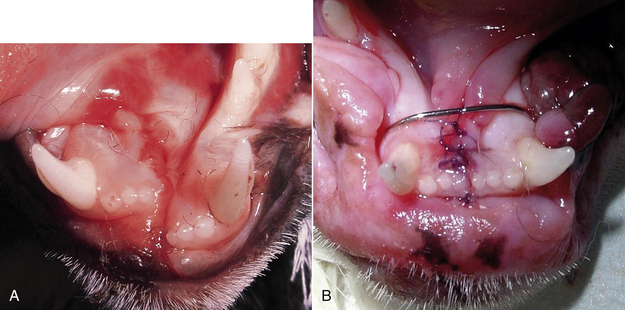
FIGURE 32-77 A, Photograph of a symphyseal separation in a cat. B, Radiograph after repair with cerclage wire.
More involved jaw fractures may be repaired by use of interdental wire and acrylic composite, transosseous wiring, miniplates, external fixation, or maxillomandibular fixation. Sometimes teeth along the fracture line may be able to be used as anchor points, but teeth affected by severe periodontal disease should be removed because the fracture will likely not heal when the diseased tooth acts as a nidus for infection.
Patients presenting acutely with a mandibular fracture may benefit from placement of a tape muzzle (Figure 32-78) to stabilize the fracture until surgical treatment is performed. The tape muzzle is created using one piece of tape (adhesive side outward) around the muzzle itself, which is attached to a second piece that wraps around the head below the ears. The muzzle should be tight enough to minimize motion, but loose enough to prevent irritation of the soft tissue and to allow the tongue to move between the incisor teeth to allow for drinking and eating food of a slurry consistency. Tape muzzles are sometimes considered the definitive treatment of choice in young patients where rigid fixation may adversely affect growth of the healing mandible.
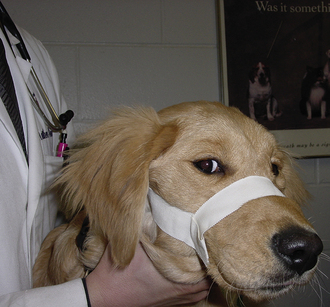
EQUINE DENTISTRY
Horses have 24 deciduous teeth and 36 to 44 permanent teeth, depending on the presence or absence of canine and first premolar teeth. At eruption, the occlusal surfaces of equine teeth are fully covered by cementum, compared with dogs and cats that have cementum covering only the root. Beneath the crown cementum, a thin layer of crown enamel is present. Both of these layers get worn away, exposing an intricate, wavy combination of cementum, dentin, and enamel on the occlusal surface. Equine mandibular incisor teeth develop features of their occlusal surface that have been traditionally used to estimate age. Because much variation is seen in the rate of tooth wear based on breed, nature and quality of food, and environment, aging horses by this technique should be considered an approximate estimate. Eruption times are the most accurate method of determining age, but this can only be used in horses that have not erupted their complete permanent dentition. Of all the changes on the occlusal surface of the incisors, the appearance of the dental star is one of the more reliable features. The dental star is composed of dentin, and the position of the star moves from the lingual edge of the occlusal surface to the center as the horse ages. Galvayne’s groove, a groove that appears on the labial surface of the third incisor in some horses over the age of 10, was once considered to be an excellent method of aging horses between 10 to 30 years of age. It has since been determined that its presence is inconsistent and is of little value in determining the age of a horse.
The canine teeth are usually absent or rudimentary in female horses, but males typically have four permanent canine teeth that erupt at 4 to 6 years of age in the diastema between the incisors and the cheek teeth. The permanent first premolars are referred to as “wolf teeth,” and are much smaller and located rostral to the other premolars. The first premolar has no deciduous precursor. Wolf teeth are present in 24.4% of females and 14.9% of male horses. Wolf teeth occur more commonly on the maxilla. These teeth are often extracted because of concerns for causing oral discomfort, especially when the bit contacts this tooth. The premolars and molars are collectively referred to as the “cheek teeth.” Not including the wolf teeth, each quadrant should contain six cheek teeth (second, third, and fourth premolars and first, second, and third molars). A numbering system has been developed for equine teeth based on the Triadan system (Figure 32-79, A, B). The cheek teeth are closely arranged with no spaces in between them, so the six teeth in one quadrant function as a single unit. The occlusal surfaces of the cheek teeth have many grooves and ridges composed of enamel, cementum, and dentin, which provide varied surfaces for grinding of food material. The upper jaw is wider than the lower jaw, a term referred to as anisognathism. The occlusal surface is normally angled at 10 degrees to 15 degrees in a downward slope toward the buccal aspect of the teeth. In horses with painful dental disease or when fed an inappropriate diet (too little forage), this angle may be increased, resulting in a more vertical angulation of the occlusal surface. This condition is termed “shear mouth.”
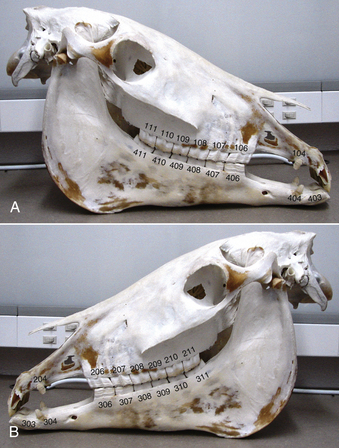
FIGURE 32-79 Skull of a horse showing the Triadan tooth numbering system. A, Right side. B, Left side. Wolf teeth, when present, end in the numbers “05.”
In horses, the left and right mandibles are not separated by a symphysis as in dogs and cats. The mandibles fuse at the midline at approximately 3 months of age in the horse. In contrast to carnivores, the TMJ is designed for horizontal movement, and the muscles necessary to provide this movement are more developed. Dogs and cats have large temporal muscles on the top of their head that allow for strength in vertical movement of the mandible, whereas horses have well-developed masseter and pterygoid muscles to allow for horizontal grinding movement. Horses have well-developed muscles of the lips that allow them to prehend food, and the commissure of the lips is positioned rostrally, making examination of the caudal cheek teeth challenging.
DENTAL EXAMINATION AND IMAGING
Common presenting problems of horses with severe dental disease include weight loss, dropping of food (quidding), head shaking, and tilting of the head during mastication. Routine oral examinations are helpful to detect dental abnormalities in their early stages. Dental disease interferes with normal mastication, resulting in larger feed particle size at the time of deglutition. This may predispose horses and donkeys to impaction colic or esophageal choke. Dental disease may also contribute to systemic infection as a result of hematogenous spread of periodontal pathogens.
Extraoral examination should include observation for evidence of facial swelling, atrophy of masticatory muscles, and presence of ocular, nasal, or oral discharge. The patient’s stable floor should be evaluated for evidence of quidding, such as dropped grain and partially chewed boluses. Feces should be evaluated for particle size because large stems of hay and whole grain indicate incomplete mastication. Young horses between 2.5 and 4 years old will have symmetrical, nonpainful bony enlargement of the mandible and/or maxilla associated with eruption of the permanent cheek teeth. Sharp points of the buccal surface of the maxillary teeth may be palpable extraorally. Palpation may cause the horse to resist if points are present. They should be removed before placement of a full-mouth speculum because the cheeks will be pushed tightly against the points once the mouth is opened. Observe the lips for evidence of ulcers, tumors, or bit injuries, especially in the area of the commissure.
Thorough examination of the oral cavity of the horse requires sedation. A self-supporting mouth speculum, a strong light source, a dental mirror, and long-handled dental picks are helpful to assess hard and soft tissue structures and remove food material from areas of interest. Intraoral cameras are available to provide visualization and magnification of difficult areas. Skull radiographs are helpful to diagnose subgingival abnormalities (Figure 32-80). Various views may be necessary, including lateral, lateral oblique, dorsoventral, open- and closed-mouth views. Use of a radiopaque object (such as a needle or gutta percha point) placed in the center of a facial swelling or draining tract before taking a radiograph may help to determine the tooth of origin.
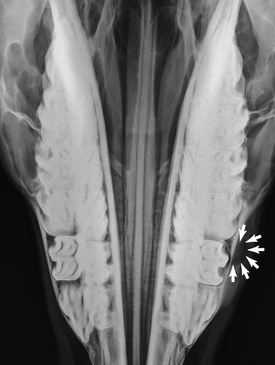
FIGURE 32-80 Radiograph of a horse with facial swelling caused by a periapical abscess. Arrows point to bone loss associated with an infected maxillary third premolar.
As a result of the large patient size, small film size, and limited intraoral access, intraoral dental radiography is limited to use in imaging of the incisor teeth. If skull radiographs do not show obvious pathologic conditions in a case where dental disease is suspected, other imaging techniques, including nuclear scintigraphy, computed tomography (CT), and magnetic resonance imaging (MRI), may be an option.
COMMON DENTAL PROBLEMS OF HORSES
Endodontic abnormalities occur as a result of disease of the inner chamber of the tooth, which is most commonly seen in the form of a tooth root abscess. Tooth root abscesses occur as a result of exposure of the pulp to the oral environment or death of a tooth with hematogenous spread of bacteria to the compromised site. Pulp exposure may occur as a result of tooth fracture, excessive wear, or decay. Tooth root abscesses may cause a large swelling of the surrounding bone and soft tissue.
The caudal maxillary tooth roots (fourth premolar, first, second, and third molar) are located just ventral to the maxillary sinus, so infection of any of these teeth may result in sinusitis and chronic unilateral nasal discharge. Infection as a result of tooth root abscesses will not permanently resolve with administration of antibiotics, although antibiotics may provide temporary improvement. Extraction or endodontic therapy is necessary for long-term success. Extraction is often difficult because of limited access and the large amount of subgingival tooth structure. Cheek teeth often are approached from an extraoral technique. Although incisors, wolf teeth, and canines can usually be extracted via an intraoral technique, cheek teeth usually need to be approached by buccotomy or repulsion.
Orthodontic abnormalities refer to those abnormalities of occlusion (the normal spatial relationship of teeth and jaws), either as a result of abnormal development, eruption, or wear. Maxillary brachygnathism (or mandibular prognathism) is a developmental disorder where the lower jaw is relatively shorter than the upper jaw. A common term for this condition is “parrot mouth.” One goal of treatment is to prevent or minimize the degree of abnormal tooth wear that can occur from malocclusion. Orthodontic procedures can be performed to prevent or correct ventral deviation of the incisive bone and upper incisors and to attempt to overcome the jaw length discrepancy early in life while growth is still occurring. The opposite of parrot mouth is referred to as “monkey mouth,” which occurs when the maxilla is relatively shorter than the mandible (resulting from maxillary brachygnathism or mandibular prognathism). This condition is seen most commonly in miniature horses.
Horses with jaw length discrepancies require more frequent occlusal adjustments, but any horse should be evaluated at least yearly for abnormal wear patterns. Floating is the term used to describe the process of mechanically adjusting the occlusal surfaces of the teeth. Flat files (floats), which come in hand and electrically driven versions, are used to remove raised areas, such as hooks, ramps, or points (Figure 32-81). Removal or loss of a tooth can result in drift of adjacent teeth into the vacancy, resulting in abnormal occlusion patterns. Similarly the tooth from the opposing arcade may overgrow into this void as a result of lack of normal wear. Patients with these problems will require more frequent examinations and occlusal equilibrations as necessary (Box 32-11).
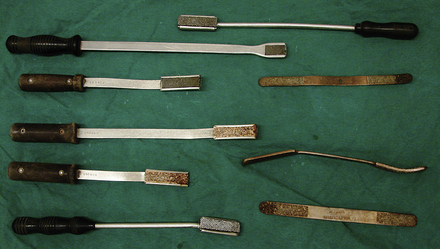
Another orthodontic problem seen in foals is wry nose. Wry nose is a deviation of the incisive bone, maxilla, and nasal septum laterally from the midline. Affected foals may have difficulty suckling or prehending forage, and dyspnea resulting from deviation of the nasal septum can be so severe that a tracheostomy may be necessary. It is believed to be a hereditary condition most commonly seen in Arabians and miniature horses. Orthognathic surgical correction often requires two separate surgeries and is usually attempted between 5 and 7 months of age.
Periodontal abnormalities refer to loss of or damage to the attachment structures of the teeth, which consist of the periodontal ligament, cementum, alveolar bone, and gingival connective tissue. Gingivitis is one of the earliest signs of periodontal disease, where the gingiva may appear hyperemic, edematous, and bleeding more readily than normal. Gingival recession may be seen, or alternatively, loss of periodontal ligament attachment may result in development of a periodontal pocket. Although the cause of periodontal disease in horses is similar to that described for dogs and cats earlier in this chapter, treatment is challenging because of limited accessibility of the cheek teeth of horses. The tooth-cleansing process associated with mastication of abrasive substances is an important part of keeping teeth periodontally sound. Therefore any dental pathologic condition, such as abnormal wear and oral ulceration, should be corrected to prevent preferential use of certain teeth and disuse of others. Depending on their accessibility, deep periodontal pockets may be débrided and lavaged. Off-label use of a canine doxycycline gel (Doxirobe) has been described to deal with periodontally affected teeth that have not lost enough attachment to require extraction. Teeth with severe attachment loss and mobility require extraction.
Cemental hypoplasia is a developmental abnormality that can occur in all equine teeth and may predispose maxillary cheek teeth to endodontic disease, tooth fracture, abnormal occlusal patterns, and caries. Caries is the medical term that describes “cavities” caused by tooth decay associated with acids created by bacterial fermentation. When a carious lesion occurs within the infundibulum (the infoldings of the occlusal surface of incisors and cheek teeth) of a tooth, it is referred to as infundibular decay. Restoration of these lesions with composite filling material has been advocated by some equine dentists.
Baker, G.J., Easley, J. Equine dentistry, ed 2. Philadelphia: Elsevier; 2005.
Beckman, B., Legendre, L. Regional nerve blocks for oral surgery in companion animals. Compendium Continuing Educ Practicing Vet. 2002;24(6):439–442.
Ehrlich, A., et al. Essentials of dental assisting, ed 2. Philadelphia: WB Saunders; 1996.
Harvey, C.E., Emily, P.P. Small animal dentistry. Philadelphia: Mosby; 1993.
Holmstrom, S.E. Veterinary dentistry for the technician & office staff. Philadelphia: WB Saunders; 2000.
Mulligan, T.W., Aller, M.S., Williams, C.A. Atlas of canine & feline dental radiography. Yardley, Pa: Veterinary Learning Systems; 1998.
Nield-Gehrig, J.S. Fundamentals of periodontal instrumentation, ed 6. Baltimore: Lippincott Williams & Wilkins; 2008.
Reiter, A.R., Lewis, J.R., Okuda, A. Update on the etiology of tooth resorption in the domestic cat, Vet Clin North Am. Small Anim Prac. 2005;35(4):913–942.
Verstraete, F.J.M. Self-assessment colour review of veterinary dentistry. London: Manson Publishing; 1999.
Wiggs, R.B., Lobprise, H.B. Veterinary dentistry: principles and practice. Philadelphia: Lippincott-Raven; 1997.