Wound Healing, Wound Management, and Bandaging
When you have completed this chapter, you will be able to:
1 Describe the process of wound healing.
2 List and describe the factors that affect wound healing.
3 Discuss initial management of wounds in small and large animals.
4 Describe procedures for lavage and débridement of wounds in small and large animals.
5 Differentiate between first intention, second intention, and third intention healing.
6 Discuss indications for bandaging of wounds and describe the general structure of bandages.
7 Describe common types of bandages, slings, splints, and casts used for small and large animals and provide indications for their use.
8 Describe procedures for monitoring of animals with casts, bandages, splints, or slings.
9 Discuss considerations for bandaging of abrasions, lacerations, puncture wounds, and degloving injuries.
10 Describe classifications of burns and discuss management of burn patients.
WOUND HEALING
A wound is created when an insult, either purposeful, such as a surgical incision, or incidental, such as a traumatic injury, disrupts the normal integrity of the tissue. Wound healing is a complex biologic event that is well characterized at the microscopic level, but its regulation at the molecular level is only just beginning to be understood. The process of wound healing begins immediately after the insult and is described in four physical phases: the inflammatory, débridement, repair, and maturation phases (Figure 34-1 and Box 34-1). Wound healing is a dynamic process, and more than one phase of wound healing is usually occurring at any time.
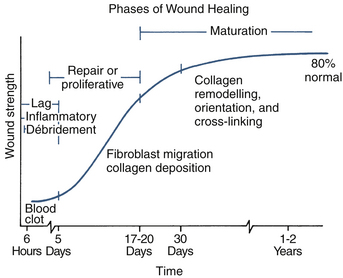
FIGURE 34-1 Schematic representation of the phases of wound healing and associated changes in wound strength.
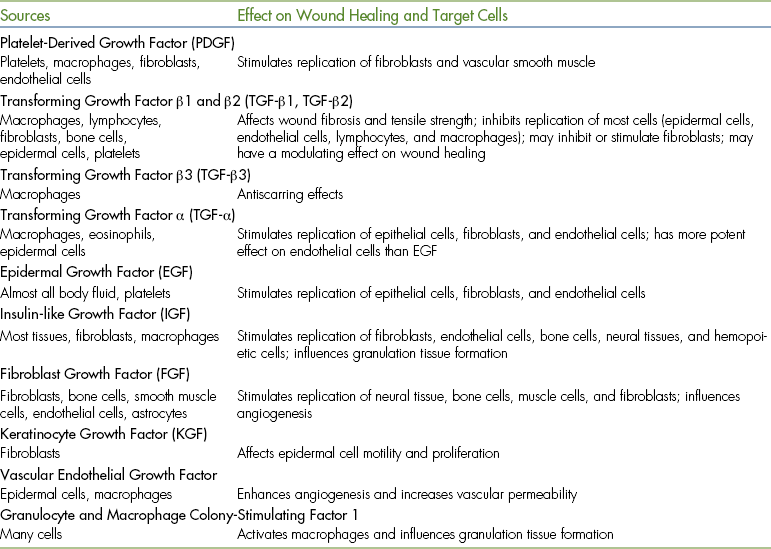
Peptide growth factors appear to play a key role in initiating and sustaining the phases of wound healing (Table 34-1). The platelet appears to initiate the wound healing process through the release of growth factors; the process is then amplified or sustained by wound macrophages, endothelial cells, and fibroblasts. The inflammatory phase begins immediately after injury. Blood fills the wound and cleans the wound surface. The blood vessels constrict immediately to slow hemorrhage, but vasoconstriction lasts only 5 to 10 minutes. The blood vessels then dilate and leak fluid containing clotting elements into the wound. This fluid, combined with blood, causes a blood clot to form. The blood clot stabilizes the wound edges, and fibrin within the clot provides the limited wound strength of this phase. In a sutured wound, the sutures will also provide wound strength at this time. The blood clot will dry and form a scab, which protects the wound, prevents further hemorrhage, and allows healing to progress under its surface. The scab does not provide any wound strength. The blood vessels also leak white blood cells into the wound. This marks the beginning of the débridement phase.
The débridement phase begins approximately 6 hours after injury when white blood cells, namely neutrophils and monocytes, appear in the wound. These cells remove necrotic tissue, bacteria, and foreign material from the wound. The white blood cells in combination with the fluid that has leaked into the wound form the exudate commonly associated with wounds.
 TECHNICIAN NOTE
During the first 3 to 5 days of wound healing, known as the lag phase, wound strength is minimal.
The repair phase begins after the blood clot has formed and necrotic tissue and foreign material have been removed from the wound. The repair phase, which is usually active by 3 to 5 days after injury, is associated with invasion of fibroblasts into the wound. The fibroblasts produce collagen that will mature into fibrous or scar tissue. The repair phase is characterized by a significant increase in wound strength. In contrast, the first 3 to 5 days after injury are associated with a minimal increase in wound strength. Consequently the first 3 to 5 days are also known as the “lag phase” of wound healing.
Capillaries appear in the wound at the same time fibroblasts appear. The combination of new capillaries, fibroblasts, and fibrous tissue forms the characteristic red, fleshy granulation tissue that fills the wound, often lying underneath the scab.
Granulation tissue characteristically appears in the wound after 3 to 5 days. Poor granulation tissue is white and has a high fibrous tissue content with fewer capillaries. Granulation tissue is important in wound healing because it fills the tissue defect, protects the wound, provides a barrier to infection, provides a surface for new epithelial cells to form across, and provides a source of special fibroblasts called myofibroblasts, which are responsible for wound contraction.
The formation of new epithelium on the wound surface (epithelialization) occurs during the repair phase and begins once an adequate granulation tissue bed has formed. New epithelium is usually visible on a wound in 4 to 5 days. In an incised wound that is sutured, in which the skin edges are close together, epithelialization can occur almost immediately (as early as 24 to 48 hours after injury) because there is no defect that needs to be filled with granulation tissue. The normal epithelial cells at the edge of the wound divide and produce new cells that migrate across the granulation tissue. Some hair follicles and sweat glands may also regenerate, depending on the extent of damage. The new epithelium is only one cell layer thick initially and is fragile, but it gradually thickens over time as more cell layers form.
Wound contraction helps to reduce the size of the wound, but occurs independently of epithelialization. No new skin is formed during contraction. Wound contraction is a result of contraction of the myofibroblasts in the granulation tissue, which pulls the full-thickness skin edges inward. If the skin around the wound is tight and under tension, wound contraction will be limited. Visible wound contraction usually occurs 5 to 9 days after injury.
The maturation phase is the final phase of wound healing, during which the wound strength increases to its maximal level because of changes in the scar. Remodeling of the collagen fibers in the fibrous tissue, with alteration of their orientation and increased cross-linking, improves wound strength. The number of capillaries in the fibrous tissue gradually decreases, causing the scar to become paler. The maturation phase begins once collagen has been adequately deposited in the wound and may continue for several years. The wound never regains the strength of normal tissue.
FACTORS AFFECTING WOUND HEALING
Many factors affect wound healing, including host factors, such as the health of the animal and the characteristics of the wound, and external factors, such as the type of wound management and treatment.
HOST FACTORS
Old animals tend to heal slowly, probably because they are often debilitated and have other ongoing health problems. Animals that are malnourished or have a disease causing low serum protein concentrations below 2g/dl (e.g., liver disease with poor protein production or kidney disease with excessive loss of protein) will have delayed wound healing and decreased wound strength. In addition, the lag phase of wound healing will be prolonged in these animals.
Wound healing is delayed by certain diseases, such as hyperadrenocorticism or Cushing’s disease, in which there is an excess of circulating corticosteroids. Corticosteroids delay all phases of wound healing.
Animals with diabetes mellitus have delayed wound healing and a predisposition to wound infection. Animals with liver disease may have clotting factor deficits in addition to low serum protein concentrations.
WOUND CHARACTERISTICS
Foreign material in the wound, such as sutures, surgical implants, drains, or extraneous material, can cause an intense inflammatory reaction that interferes with normal wound healing. Soil particles can contain specific infection-enhancing factors.
Compared with a sharp surgical incision, the incision created with an electroscalpel or electrocoagulation during surgery causes more necrosis at the wound margin, increases the chance of wound infection, and results in a slower gain in early wound strength.
Contaminated tissue becomes infected if the bacteria multiply to a critical number of 105 organisms per gram of tissue and then invade the tissue. Whether this occurs depends on the degree of tissue trauma, the amount of foreign material present, the delay between injury and treatment, and the effectiveness of host defenses. Infection stops the repair phase.
Bacterial toxins and associated inflammation directly damage the cells. The wound exudate produced during inflammation can accumulate and separate the tissue, leading to wound infection and delayed wound healing.
The blood supply to the wound is obviously important for wound healing and is responsible for delivering oxygen and metabolic substrates to the cells. Damage to the blood supply during surgical treatment should be avoided. Tight bandages that compromise the wound’s blood supply should not be used. Movement in a healing wound is also detrimental because it disturbs the fine cellular structures of the healing tissue. Movement across a wound should be limited. It may be necessary to apply a bandage to the affected limb to reduce movement.
EXTERNAL FACTORS
Certain drugs and radiation therapy delay wound healing. Corticosteroids depress all phases of wound healing and increase the chance of infection. Antiinflammatory drugs (aspirin, phenylbutazone, ibuprofen) have little effect on wound strength, but will suppress early inflammation. Prolonged aspirin therapy may delay blood clotting. Chemotherapeutic drugs can have an adverse effect on wound healing, depending on their mechanism of action and the time of administration in relation to the time of injury. Radiation can have a profound adverse effect on wound healing, depending on dose and time of exposure in relation to time of injury.
WOUND MANAGEMENT
The wound should be covered with a clean, dry bandage as soon as possible after injury to prevent further contamination and reduce hemorrhage. The bandage should remain in place until definitive treatment is initiated. Water-soluble antibiotic ointments may be applied and may be useful in keeping the wound moist and reducing the microorganism load that is initially contaminating the wound. Antibiotic creams or powders act as foreign bodies and delay wound healing and thus should not be applied. Novel topical agents, such as sugar and honey (Manuka Honey, SummerGlow Apiaries Ltd., Hamilton, New Zealand; Medihoney, Medihoney Pty Ltd., Richlands, Australia), may be indicated at this time. They are hypertonic and hence bactericidal, promote natural débridement by drawing exudate and debris from the wound, and keep the wound surface moist. They may also reduce edema and inflammation. Honey has inherent, additional bactericidal properties over sugar.
Once the animal is stabilized and other, life-threatening injuries have been treated, the wound can be prepared for treatment. The bandage is removed, and the wound is packed with sterile gauze or filled with a sterile water-soluble lubricant, such as K-Y Jelly (Johnson & Johnson, Arlington, Tex.), or temporarily closed with sutures, towel clamps, or Michel clips (Figure 34-2). This allows skin around the wound to be clipped and prepared for aseptic surgery without the introduction of hair into the wound.
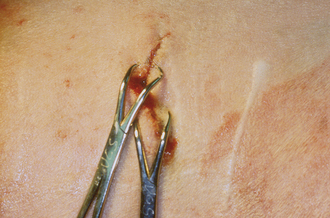
FIGURE 34-2 The wound is temporarily closed with towel clamps to allow aseptic preparation of the surrounding skin.
Hair from the edges of the wound can be removed with scissors dipped in mineral oil to prevent it from falling into the wound. Once the skin has been prepared, the lubricant can be flushed out or the sponges can be removed from the wound.
WOUND LAVAGE
Wound lavage is necessary to remove debris and loose particles and tissue from the wound. It also reduces the number of bacteria in the wound. If infection is suspected, a piece of tissue should be sampled for bacterial culture before lavage. Large volumes of warm, sterile, balanced electrolyte solution are preferred for lavage.
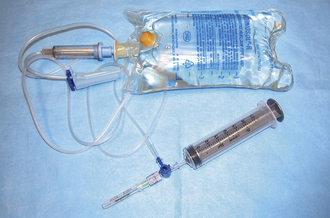
Antibiotics should not be added to the fluid. Soaps, detergents, and antiseptic solutions should not be used because they damage the tissue. The mechanical action of the lavage is the most important factor for successful lavage. Moderate pressure (7 psi) can be generated with a 35-ml syringe and 19-gauge needle; this method is more effective than pouring fluid over a wound. The syringe can be connected to a bag of fluid with a three-way stopcock to facilitate refilling of the syringe (Figure 34-3). A pulsating, high-pressure (70 psi) stream can be generated by means of a Waterpik (Teledyne, Fort Collins, Colo.), which is even more effective in reducing the bacterial population and removing necrotic tissue and foreign material from heavily contaminated wounds.
WOUND DÉBRIDEMENT
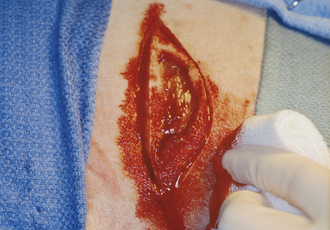
Wound débridement is necessary to remove all contaminated, devitalized, or necrotic tissue and foreign material from the wound (Box 34-2). This can be performed surgically by excising the affected tissue in layers, beginning at the surface and progressing to the wound depths. Alternatively the entire wound can be excised en bloc if there is sufficient healthy tissue surrounding the wound and vital structures can be preserved (Figure 34-4). Enzymatic débridement with a commercial solution containing trypsin (e.g., Granulex, SmithKline Beecham, Pittsburgh) can be used for wounds that are not suitable for surgical débridement. Enzymatic débridement is slower and may damage normal tissue. Application of hypertonic solutions to the wound surface (e.g., honey, sugar) or commercial dressings containing 20% sodium chloride (CURASALT Sodium Chloride Dressing, Tyco Healthcare/Kendall, Mansfield, Mass.) can facilitate the natural débridement process of a wound by drawing fluid and debris to the wound surface. They are indicated in contaminated and some infected wounds because the hypertonicity is also antimicrobial. They are best used in early wound management before a healthy granulation tissue bed has developed.
WOUND CLOSURE
Selection of one of the four methods of wound closure depends on the nature of the wound (Box 34-3). Primary wound closure results in healing by first intention. First intention healing, also known as appositional healing, is achieved by suturing or grafting a wound soon after injury (Figure 34-5). Primary wound closure is indicated in fresh, clean, sharply incised wounds with minimal trauma and minimal contamination that are seen within hours of injury. Wounds treated within 6 to 8 hours of injury are treated within the “golden period” (i.e., bacteria contaminating the wound have not multiplied to the critical number of 105 organisms per gram of tissue, and the tissue has not become infected). Wounds treated after the golden period should not be closed unless they can be completely excised (en bloc débridement) because infection is likely.
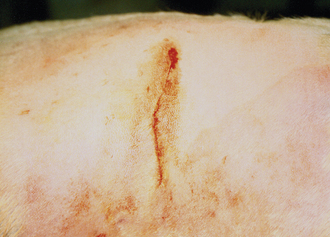
FIGURE 34-5 A fresh laceration or a surgical wound created after en bloc débridement is closed primarily to allow first intention healing.
TECHNICIAN NOTE
Primary closure of a wound is indicated in fresh, minimally traumatized wounds or after complete excision (en bloc débridement) of the wound.
Delayed primary closure is primary closure of a wound 1 to 3 days after injury before granulation tissue has appeared in the wound. It is indicated for mildly contaminated, minimally traumatized wounds that require some cleansing and débridement or for relatively clean wounds seen 6 to 8 hours after injury. This method allows any local contamination or infection to be controlled before closure.
Healing by contraction and epithelialization is also known as second intention healing and is indicated for dirty, contaminated, traumatized wounds when cleansing and débridement are necessary and when closure may be difficult. Adequate, loose skin surrounding the wound is necessary to allow contraction. Closure by second intention may not always be desirable because the new epithelium is fragile and easily abraded. In addition, contraction may impede normal function, depending on the location of the wound (Figure 34-6).

FIGURE 34-6 A, A degloving injury on the antebrachium of a dog. After surgical (layered) débridement and open wound management, the wound healed by second intention with contraction and epithelialization. B, After several weeks, the wound is completely closed. Note the hairless, shiny new epithelium and the reduced outline of the wound caused by contraction. The epithelium will thicken over time, but will always remain fragile. The pink color will become reduced as the wound remodels underneath the epithelium, and the vascular granulation tissue becomes organized fibrous tissue.
Secondary closure results in third intention healing (Figure 34-7). The wound is sutured at least 3 to 5 days after injury. Granulation tissue will be present in the wound by the time of closure. The granulation tissue helps to control infection in the wound and fills in the tissue defect. Secondary closure is indicated when (1) the wound is severely contaminated or traumatized, (2) epithelialization and contraction will not completely close the wound, or (3) second intention healing is undesirable.
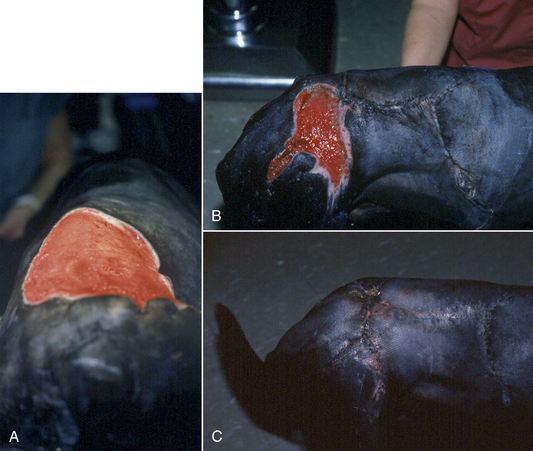
FIGURE 34-7 A, A healthy granulation tissue wound bed on the dorsum of a dog after open wound management of a thermal burn injury (the dog’s head is toward the top). B, Staged, partial closure of the wound over the granulation tissue allows third intention healing of the wound (the dog’s head is to the right). C, Closure of the remaining portion of the wound.
The decision whether to treat a wound primarily or to have it remain open initially and follow up with delayed closure, second intention healing, or secondary closure depends on the: (1) time lapse since injury; wounds greater than 6 to 8 hours old should be kept open initially; (2) degree of contamination; wounds obviously contaminated should be kept open initially and thoroughly cleansed; (3) amount of tissue damage; wounds with substantial tissue damage have reduced host defenses, are more likely to become infected, and consequently should remain open initially; (4) thoroughness of débridement; if the initial débridement was conservative, the wound should remain open until definitive débridement is performed; (5) blood supply to the wound; a wound with questionable blood supply should remain open until the extent of nonviable tissue is determined; (6) animal’s health; if the animal is unable to endure prolonged surgical débridement, the wound should be kept open and possibly undergo enzymatic débridement until the animal can withstand surgery; (7) closure without tension or dead space; if excessive tension or dead space is present, the wound should be allowed to remain open because dead space allows accumulation of fluid, separation of tissues, and formation of seromas, which may predispose to infection and delay wound healing; and (8) location of the wound; certain locations may not be amenable to closure (e.g., a large wound on a limb) (Box 34-4).
WOUND BANDAGING
Bandages promote wound healing by protecting the wound from additional trauma and contamination, by preventing wound desiccation, by preventing hematoma and seroma formation through compression to obliterate dead space, and by immobilizing the wound to prevent cellular and capillary disruption. Bandages minimize postoperative edema around incisions and minimize exuberant granulation tissue formation in open wounds on the lower limb region (below the carpus or tarsus) of horses. In addition, the bandage can absorb wound exudate and lift away foreign material and loose tissue that has adhered to the bandage as it is removed. Covering a wound with a bandage promotes an acid environment at the wound surface by preventing carbon dioxide loss and absorbing ammonia produced by bacteria. An acid environment increases oxygen dissociation from hemoglobin and subsequently increases oxygen availability in the wound. The bandage also keeps the wound warm. Higher temperatures improve wound healing and facilitate oxygen dissociation (Box 34-5). Leaving a wound open to dry and form a scab is never indicated.
A bandage usually consists of three layers: the primary or contact layer, the secondary or padded conforming layer, and the tertiary or holding and protective layer (Table 34-2). The primary bandage layer has direct contact with the wound surface (if present) and may be adherent or nonadherent. Adherent primary bandage layers are no longer recommended. The recent consensus among wound care professionals is that moist wound care is the most important management principle. This involves the use of nonadherent primary bandage layers that act to keep the wound surface moist. Nonadherent primary layers that facilitate moist wound care usually include a hydrophilic layer. Moist wound care enhances epithelialization, particularly in partial-thickness skin wounds or abrasions. Moist wound care also enhances natural débridement within the wound by drawing the exudate from the wound and allowing the wound to “bathe” in this cytokine- and macrophage-rich material. Moist wound care results in less inflammation and less wound disruption compared with dry or adherent bandages. Allowing wounds to be exposed and the use of drying techniques, such as dry-to-dry (application of dry gauze sponges) or wet-to-dry (application of wet sponges that later dry out) bandages are no longer acceptable as standard care practices.
TABLE 34-2
Characteristics of Primary, Secondary, and Tertiary Bandage Layers
∗Tyco Healthcare/Kendall, Mansfield, Mass.
†Johnson & Johnson Medical, Arlington, Tex.
‡Johnson & Johnson Orthopaedics, Rayham, Mass.
§3M Animal Products, St. Paul.
The nonadherent primary bandage layer is either occlusive or semiocclusive. An occlusive primary bandage layer is impermeable to moisture, but allows some air transfer, whereas a semiocclusive primary bandage layer allows air and moisture vapor to move through the dressing. A semiocclusive primary bandage layer is indicated for wounds with moderate to copious exudate and must be changed frequently (daily to every third day, depending on the volume of exudate production) to prevent maceration of the surrounding normal tissue and skin. An occlusive primary bandage layer is indicated for minimally exudative wounds and is particularly useful for wounds in which promoting epithelialization is the goal (e.g., a partial-thickness abrasion or a wound with healthy granulation tissue). Occlusive bandages require changing less frequently (every 4 to 7 days, depending on exudate production) and will accelerate epithelialization considerably, up to 50% compared with an exposed wound. The occlusive primary bandage layer can also be used as a protective layer for new epithelium, preventing desiccation and abrasion of the fragile tissue. Although the occlusive bandage is nonadherent at the wound surface, some products will adhere to the surrounding local skin. Examples of nonadherent occlusive products that do not include a hydrophilic material include OpSite (Smith and Nephew, Largo, Fla.), Tegaderm Transparent Dressing (3M Medical, St. Paul), and BIOCLUSIVE Transparent Dressing (Johnson & Johnson Medical, Arlington, Tex.). Examples of nonadherent occlusive products that include a hydrophilic material are NU-GEL (hydrogel) Wound Dressing (Johnson & Johnson Medical) and Hydrocol (hydrocolloid) Dressing (Bertek Pharmaceuticals Inc., Morgantown, W.Va.).
Nonadherent, semiocclusive hydrophilic bandage layers include hydrogel, hydrocolloid, and absorbent foam bandages. Hydrogel bandages (Curagel, Tyco Healthcare/Kendall, Mansfield, Mass.) have a thin layer of hydrogel adhered to a fine synthetic fiber mesh that is semiocclusive. Hydrogel also comes as a water-based paste (CURAFIL Gel Wound Dressing, Tyco Healthcare/Kendall, Mansfield, Mass.). The hydrogel layer absorbs the wound exudate, which keeps the wound moist. As the wound exudate is absorbed, particulate matter and microorganisms are also removed, facilitating wound débridement. Hydrocolloid bandages (Ultec Hydrocolloid Dressing, Tyco Healthcare/Kendall, Mansfield, Mass.) are starch polymers in an adhesive matrix with semiocclusive polyurethane backing. Hydrocolloid bandages are indicated for granulating wounds. The hydrocolloid becomes gel-like after contact with a moist surface and forms a protective layer at the wound surface. Hydrophilic bandage layers are indicated for most wounds. Bandage layers with gel may be preferred for minimally exudative wounds, whereas dry hydrophilic colloid bandage layers and hydrophilic absorbent sponge bandage layers are preferred for moderately to copious exudative wounds. Hydrogel can be added to dry wounds under a semiocclusive or occlusive bandage layer to provide exogenous moisture, which will promote wound healing. Hydrophilic colloids are also available as powders, flakes, beads, and sponges. These materials can be placed in wounds with large defects and act to absorb exudate and remove debris. They are usually covered by a semiocclusive polyurethane film (Polyskin II Transparent Dressing, Tyco Healthcare/Kendall, Mansfield, Mass.).
Polyurethane film is a semiocclusive, transparent bandage layer that can be used to cover hydrophilic dressings or used alone as a primary bandage layer on partial-thickness skin wounds if they incorporate a nonadhesive pad (e.g., Tegaderm Transparent Dressing). They are indicated for moderately exudative wounds in which the amount of wound exudate is declining. The polyurethane film is adhesive to the surrounding tissue and, if left on too long, can lead to maceration of the surrounding tissue and damage to the epithelium on removal.
Some nonadherent products have no occlusive properties (i.e., nonhydrophilic) and include products, such as petrolatum-impregnated gauze (e.g., Adaptic, Johnson & Johnson Medical) and Teflon- or rayon-based bandages (e.g., Telfa Pads, Johnson & Johnson Medical). These products do not keep an open wound moist as the fluid moves quickly into the secondary layer. These products are best used on closed wounds where a protective bandage is required, such as a surgical site or a recently epithelialized wound that is still friable.
The secondary bandage layer is an absorbent, padded, conforming layer of cast padding (e.g., Specialist Cast Padding, Johnson & Johnson Orthopaedics) or roll cotton that covers the primary contact layer and supports the wound. The tertiary layer is the holding and protective layer, which includes some form of gauze (e.g., Kling, Johnson & Johnson Medical) and elastic (3M Vetrap Bandage Tape, 3M Animal Care Products) or adhesive tape (Elasticon, Johnson & Johnson) to hold the bandage in place. The tertiary layer should be nonocclusive to allow air transfer. However, nonocclusive layers will allow moisture to enter or exit the wound through this layer. When the outer tertiary layer becomes wet, known as strike-through, the wound is at risk for contamination from the environment because bacteria can wick through the moist bandage material. Once the tertiary layer is wet, the bandage must be changed. Although use of an occlusive, water-resistant tertiary layer, such as waterproof tape or plastic wrap, would prevent this, such materials do not allow air transfer to the wound. Occlusive tertiary layers also trap excessive amounts of fluid at the wound surface, resulting in tissue maceration. For these reasons, occlusive tertiary bandages are contraindicated.
Specific bandages and their indications for use in small animal practice are described in the following sections. The standard procedure for application of any bandage to a limb requires: (1) application of anchoring tape strips (stirrups) to the distal portion of the limb; (2) application of a primary bandage layer over the wound; (3) application of the padded secondary layer over the stirrups; (4) application of the gauze tertiary layer; (5) application of the splint; (6) reflection and twisting of the stirrups to adhere to the gauze layer; and (7) application of the protective tertiary layer of tape (Box 34-6). The middle two toes of the bandaged limb should always be exposed to allow for assessment of color, warmth, and swelling. A stockinette can be applied under the secondary layer to help keep the bandage from slipping. Other modifications are also acceptable.
WOUND BANDAGING IN SMALL ANIMALS
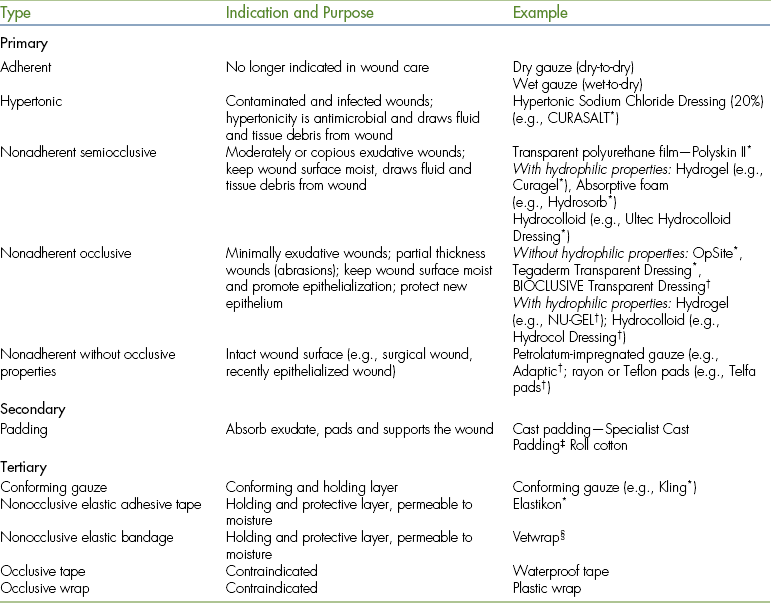
Fiberglass cast materials (Delta-Lite S, Johnson & Johnson Orthopaedics, Arlington, Tex.) are currently used almost routinely because of their light weight, extreme rigidity, rapid setting time, and ventilation and waterproof properties. Casts are indicated for stabilization of certain fractures distal to the elbow or stifle and for immobilization of limbs to protect ligament or tendon repairs. The cast must extend one joint above and below any fracture or structure to be immobilized; hence a cast is unsuitable for a humeral or femoral fracture. The cast material is applied instead of a tertiary layer; however, minimal padding is suggested to prevent cast loosening and movement and excessive compression (Figure 34-8). Animals with casts should be monitored at least weekly.
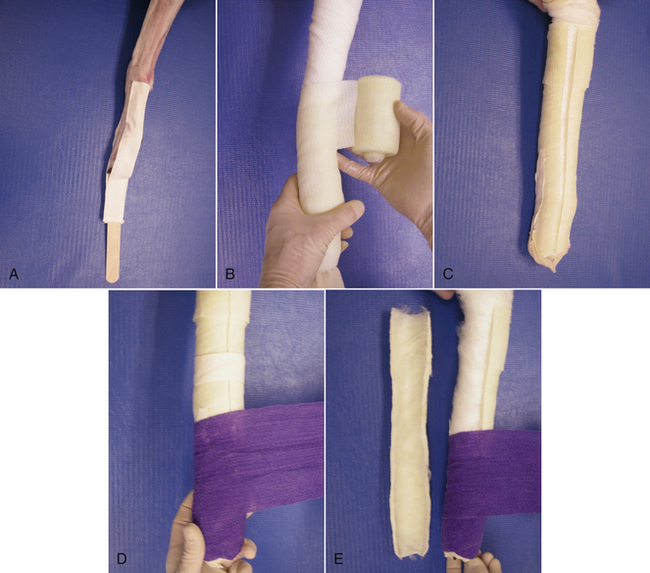
FIGURE 34-8 Cast. A, Tape stirrups are placed on the lateral aspects of the limb. A tongue depressor is placed between them to prevent adherence of the stirrups to each other. B, A stockinette is applied over the limb, and a lightly padded, secondary layer is then applied firmly around the leg. The fiberglass casting material is applied firmly but not tightly to the leg, with care taken to avoid compression of the cast material with the fingers. C, The cast can be bivalved by cutting it lengthwise. This reduces the risk of excessive compression of the leg. D, The two halves are taped together, the stockinette ends are reflected over the cast, and the tape stirrups are reflected onto the cast. Protective tape is applied over the cast. E, The caudal half of the cast can be used alone as a custom-fitted splint (see Figure 34-12).
BANDAGES AND SPLINTS
The Robert Jones bandage is most commonly used for temporary immobilization of fractures distal to the elbow or stifle before surgery. The bandage must extend one joint above and below any fracture or structure to be immobilized; hence, it is unsuitable for humeral or femoral fractures. It is a large, bulky bandage that provides rigid stabilization because of the extreme compression of the thick cotton secondary layer (Figure 34-9).
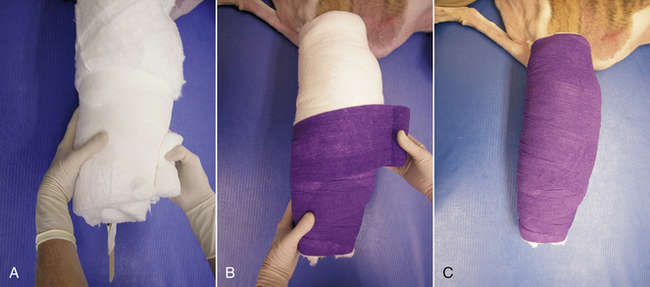
FIGURE 34-9 Robert Jones bandage. A, Tape stirrups are applied, and the limb is wrapped in a secondary layer of roll cotton that extends beyond the joints above and below the fracture or injury. The roll cotton is compressed tightly with a conforming gauze layer. Excessive twisting of the leg should be avoided as the gauze layer is tightened. B, The stirrups are reflected on top of the gauze. Protective tape (nonocclusive) is then firmly applied. C, The completed bandage should feel solid, and a “ping” should be heard on percussion.
The modified Robert Jones bandage, or simple padded bandage, is a less bulky bandage and is used to reduce postoperative swelling of limbs (Figure 34-10). It provides little or no splinting of the limbs. Less padding is used in the secondary layer, and cast padding is used instead of roll cotton.
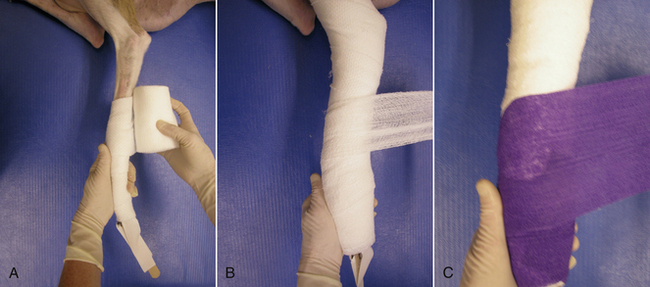
FIGURE 34-10 Modified Robert Jones or simple padded bandage. A, Tape stirrups and a padded secondary layer are applied to the limb. B, This is followed by application of a gauze tertiary layer. C, The stirrups are reflected to adhere to the gauze, and the bandage is covered by protective tape.
A chest or abdominal bandage is applied in the standard three layers. These bandages should be applied firmly, but without constricting the chest or abdomen (Figure 34-11). If an abdominal bandage is used to control abdominal bleeding, the layers are applied more firmly. A rolled towel can be used to reinforce the bandage along the midline, and it is applied before application of the protective tape. The effectiveness of a compression bandage lasts for only 1 to 2 hours, and it should not remain in place longer than 4 hours.
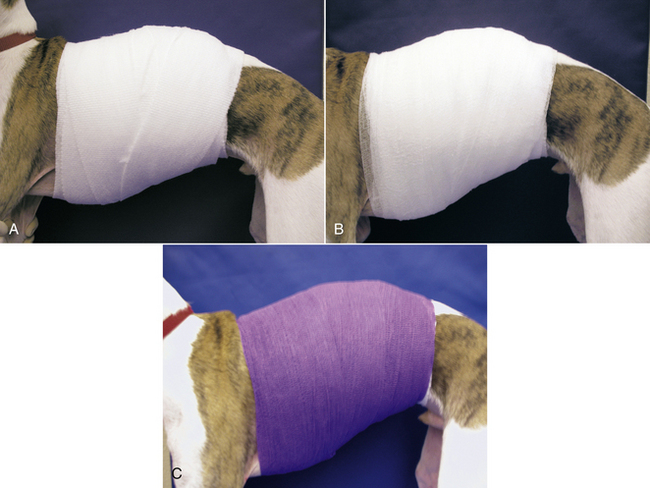
FIGURE 34-11 Abdominal or chest bandage. A, After a primary layer is placed on the wound, the padded secondary layer is applied. B, This is followed by application of a gauze tertiary layer. C, Protective tape is then applied.
Distal limb splints can be made with tongue depressors for small animals—or with aluminum splints, cast material, or thermoplastics (Figure 34-12). They are indicated for temporary immobilization or definitive stabilization of certain fractures of the distal radius and ulna, carpus, tarsus, metacarpals and metatarsals, and phalanges. They can also be used to support a traumatized distal limb. The limb should be well padded to prevent the development of pressure points. The splint should always be placed on the caudal aspect of the limb.
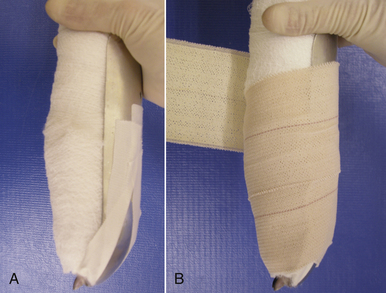
FIGURE 34-12 Splint. A, After application of a modified Robert Jones or simple padded bandage (see Figure 34-10), the splint is applied to the caudal aspect of the limb, and the stirrups are reflected onto the splint. B, Protective tape is then applied to hold the splint in place.
SLINGS
The Ehmer sling is used specifically to immobilize a hind limb after reduction of craniodorsal coxofemoral luxation and to prevent weight bearing after surgery on the pelvis. Correct application results in internal rotation and adduction of the coxofemoral joint (Figure 34-13). Minimal padding is suggested, and the sling is usually applied with adhesive tape alone to prevent slippage.
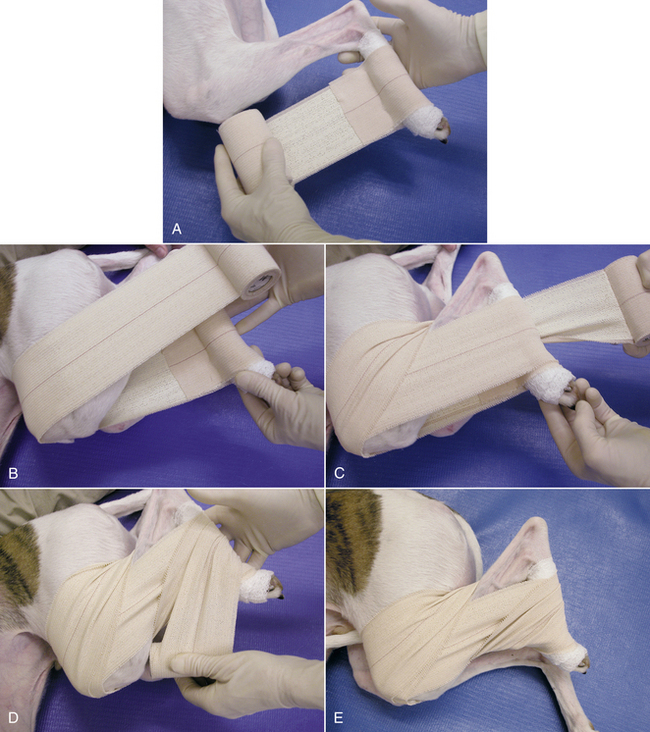
FIGURE 34-13 Ehmer sling. A, After minimal padding has been applied to the tarsus, a sling of adhesive tape is passed along the medial aspect of the limb. B, The tape is then wrapped around the hind limb with the stifle and hock held in maximal flexion for one or two passes. C, On the third pass, the tape is brought over the flank and twisted behind the hock. D, The tape is then passed over the front of the metatarsus. E, This wrapping is repeated for three or four passes.
The 90-90 flexion sling is applied with the stifle and hock placed in 90-degree flexion, and no attempt is made to adduct and internally rotate the coxofemoral joint (Figure 34-14). The 90-90 flexion sling is used to prevent stifle joint stiffness and hyperextension caused by quadriceps muscle contracture after distal femoral fracture repair in young animals. It can also be used as a non–weight-bearing sling to protect other surgical procedures on the hind limb.
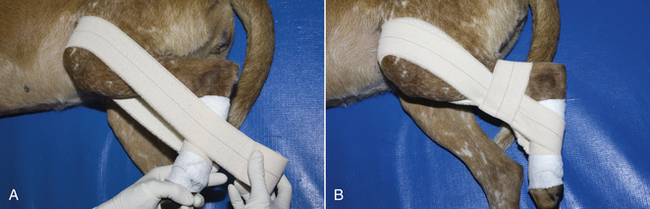
FIGURE 34-14 A 90-90 flexion sling. After minimal padding has been applied to the tarsus, a sling of adhesive tape is passed along the medial aspect of the limb (see Figure 34-13, A). A, The tape is then wrapped around the hind limb with the stifle and hock held in 90-degree flexion. B, A second layer of tape is passed horizontally around the tibia to hold the previous layer in place.
TECHNICIAN NOTE
The 90-90 flexion sling is critical in preventing quadriceps contracture after distal femoral fracture repair in young animals.
The Velpeau’s sling holds the flexed forelimb against the chest and prevents movement in all joints (Figure 34-15). It is used as a non–weight-bearing sling for the forelimb. The Velpeau’s sling is indicated after reduction of scapulohumeral joint luxation or for immobilization of scapular fractures.
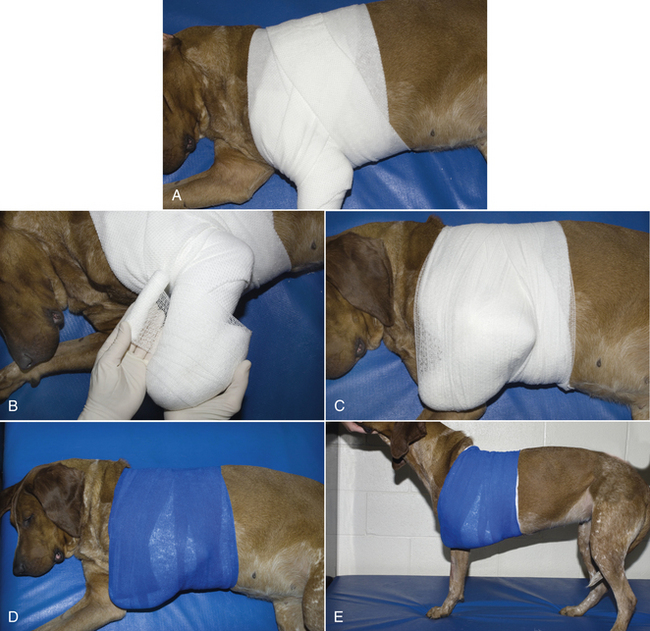
FIGURE 34-15 Velpeau’s sling. A, Stirrups are applied to the forelimb. The entire forelimb and chest are covered with a light padded bandage. B, The carpus is then flexed and covered with an additional layer of a light padded bandage. C, The flexed carpus and foreleg are then compressed against the chest and held in place with a conforming gauze layer. D, E, The entire leg and chest area are then covered by protective (nonocclusive tape).
The carpal flexion sling is a non–weight-bearing forelimb sling (Figure 34-16). The carpal flexion sling is primarily used to force the animal to carry the limb. For example, after a complicated orthopedic repair of a humeral fracture, restricting weight bearing may be important in the early postoperative period to prevent excessive stress on the repair. The carpal flexion sling can also be used to protect repair of tendons on the caudal aspect of the carpus since the flexed angled of the carpus reduces tension on the tendons. The degree of carpal flexion can be reduced by partially cutting the crisscross of tape formed at the caudal aspect of the carpus.
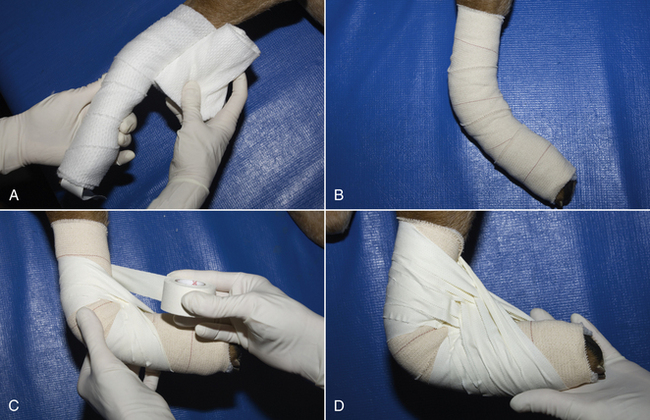
FIGURE 34-16 Carpal flexion sling. A, Stirrups are applied. With the limb in flexion, a lightly padded bandage is applied. B, The stirrups are reflected, and protective (nonocclusive) tape is applied. C, D, One-inch tape is then applied in a figure-eight fashion around the carpus to support it. The tape starts at the middle of the carpus and then extends proximally and distally, forming a web of tape behind the carpus.
Hobbles can be applied to the hind limbs to prevent excessive abduction of the limbs. They are specifically indicated after reduction of ventral coxofemoral luxation and to prevent excessive tension in the inguinal region. They can be used to prevent excessive activity after pelvic fracture repair or for nonsurgical, conservative management of pelvic fractures (Figure 34-17).
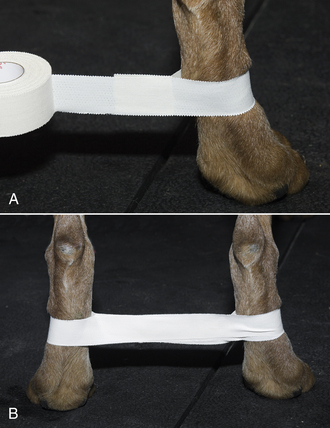
FIGURE 34-17 Hobbles. A, Adhesive tape wide enough to cover half of the metatarsal region is placed loosely around the metatarsal region. B, The tape is then adhered together between the legs and placed around the opposite metatarsus. The hind limbs are positioned apart at a distance equal to the width of the pelvis.
SPECIFIC BANDAGES
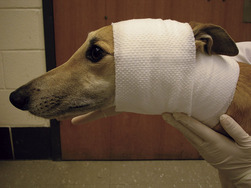
Bandaging to the ear may be indicated in the treatment of aural hematomas, after ear surgery, or after traumatic injury to the pinna. Bandage of the ear to the head, toward the neck, will protect the ear, absorb any drainage from a wound site or protect a surgically implanted drain, and immobilize the ear, which increases the comfort to the animal. The bandage is applied in three layers as described with the primary layer appropriate for the wound covered (Figure 34-18). In animals with ear or skin disease, the area underneath the bandage can become excessively moist quickly. Frequent inspection of the bandage and changing if necessary is required for a bandage in this location. Considerable care must be taken in removing bandages covering the ear to avoid inadvertently cutting the pinna with scissors. Attempts at bandaging the ear alone usually fail and will not stop the animal from shaking the pinna, which is detrimental to wound healing.

FIGURE 34-18 Application of an ear bandage. The injured right ear is bandaged on top of the head, first with cast padding (A) then covered by conforming gauze bandage (B). The healthy left ear is left out of the bandage. The bandage is held in place by the tertiary layer (C). It is important that the bandage goes in front and behind the ears to hold it in place and does not rub the eye (D).
Bandaging the tail may be required to protect an amputation site or trauma to the tip. The bandage is applied in three layers as described with the primary layer appropriate for the wound covered (Figure 34-19). Using a sticky adhesive bandage (Elasticon, Johnson & Johnson) for the tertiary layer and having it extend beyond the secondary layer so that it adheres to the skin is best to ensure that the bandage stays in place. Excessive padding is avoided. Inclusion of a protective tip made from plastic tubing or cast material may offer additional protection. This can be applied to the outside of the bandage.
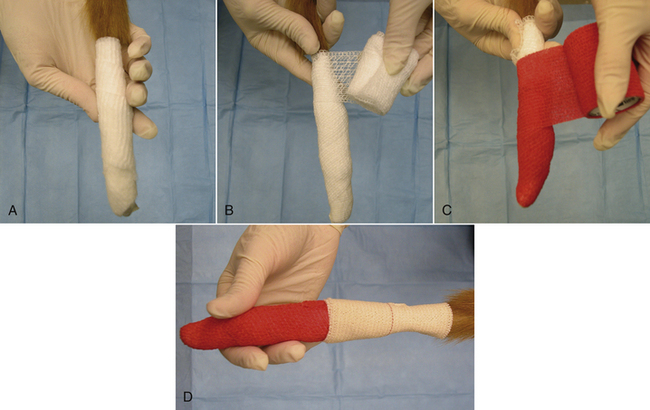
FIGURE 34-19 Application of a tail bandage. The tail is bandaged in three layers with any primary layer covered by a small amount of cast padding (A), followed by conforming gauze (B), and finally a tertiary layer (C). A sticky adhesive bandage can be used as the tertiary layer or on top, extending onto the intact skin to ensure that the bandage stays in place (D).
AFTERCARE OF CASTS, BANDAGES, SPLINTS, AND SLINGS
Close monitoring of animals with casts, bandages, splints, or slings is extremely important and should be performed daily for inpatients and at least weekly for outpatients. Client education for outpatients is essential. The toes should be monitored daily for warmth, color, and swelling. Abnormal findings indicate a tight cast. Monitoring the bandage for a foul odor that would indicate tissue damage is necessary. Observation for areas of chafing from the cast is important. The animal should be restrained from chewing at the bandage (e.g., by means of an Elizabethan collar), and exercise should be restricted to brief leash walks. While the animal is outside, the bandage should be protected from dirt and moisture by application of a plastic bag or other waterproof material. The plastic covering should not remain on for more than 30 minutes because it prevents the bandage from “breathing” and allows the underlying tissue to become moist and macerated.
SPECIFIC WOUND MANAGEMENT
Characteristics of certain wounds may influence the type of wound management performed. The characteristics of certain wounds and management indications are listed in the following sections.
ABRASIONS
Abrasions are partial-thickness wounds of the epidermis with exposure of the deep dermis. Abrasions can be painful. Abrasions are associated with minimal bleeding and develop minimal exudate. Abrasions heal by reepithelialization. Healing of abrasions will be enhanced by keeping the wound surface moist and protected rather than allowing a scab to dry on the surface. Application of a nonadhesive, semiocclusive primary layer with a minimal amount of padding and a nonocclusive tertiary layer is indicated. Hydrophilic primary layers are ideal for these wounds because they promote epithelialization. Bandages can be changed every 3 to 4 days, and an abrasion should be kept bandaged until the surface has completely resurfaced with new epithelium.
LACERATIONS
Lacerations are characterized by sharply incised edges with minimal tissue trauma. They may be superficial (skin) or deep (tendons, muscle). If tissue is torn away, the wound is called an avulsion. Lacerations presented within 12 hours of injury are amenable to minimal débridement of the tissue edges, lavage of the wound, and primary closure. Lacerations seen later than 12 hours after injury may be best treated by en bloc débridement of the wound and primary closure. Although uncommon, heavily contaminated lacerations or old lacerations may be best treated by débridement, lavage, and delayed primary or tertiary closure.
BURNS
Burns are classified by degree of tissue injury (Box 34-7).
The most common causes of burns in companion animals are fire, cage dryers, prolonged contact with heating pads, heat lamps, spillage of hot liquid, and contact with electrical cords. Unfortunately, these causes often result in fourth-degree burns characterized by extensive tissue damage. Animals with more than 50% of the body surface burned rarely survive.
Animals with fourth-degree burns require intensive management. The large surface area of tissue damage and the extent of the deep tissue damage result in large volumes of fluid, electrolyte, and protein loss through the wound surface. Burn wounds are prone to infection because of the extensive tissue damage, the large surface area exposed to the environment (contamination), and the compromised condition of the animal.
Treatment of an animal with severe burns requires intravenous crystalloid and colloid fluid administration, antibiotic administration, nutritional support, and intensive wound management. Nutritional support is extremely important because the metabolic requirements of the animal may increase up to 200%. The animal is unlikely to take in adequate nutrition voluntarily. Force feeding or enteral feeding through a pharyngostomy, esophagostomy, or gastrostomy tube is indicated.
The wounds must be débrided and managed as open wounds. Any dead skin (eschar) must be removed. Débridement may have to be repeated, particularly for fourth-degree wounds, because the extent of the tissue damage may not be evident initially. Burn wounds tend to produce copious, often viscous exudate. Use of hydrophilic primary bandage layers will keep the wound moist yet absorb the exudate and facilitate removal of any tissue debris. A padded bandage to absorb the exudate with a nonocclusive tertiary layer is required. Ideally, sterile bandage material should be used. Bandages should be changed as often as required to prevent strike-through of the bandage by exudate from the wound. Once healthy granulation tissue is apparent in the wound, application of a semiocclusive, nonadherent primary bandage layer is indicated. Coating the wound with salves or lotions is contraindicated because they can be occlusive and prevent oxygen transfer to the wound. In addition, they trap wound exudate over the normal margins of the wound, which may macerate the tissue. After a healthy granulation tissue wound bed has developed, the wounds are then amenable to tertiary closure or skin grafting.
PUNCTURE WOUNDS
Puncture wounds are characterized by small skin openings with often extensive deep tissue damage. Penetrating injuries caused by sharp objects (e.g., sticks), gunshots, bite wounds, and insect stings are all types of puncture wounds. Foreign material and bacteria are carried deep into the wound. Puncture wounds should be treated by exploration, débridement, lavage, and primary closure if all the damaged contaminated tissue and all foreign material can be removed from the wound. If the wound remains contaminated or if there is a large amount of deep tissue damage with resultant dead space in the wound, a drain may be placed. Ideally a closed suction wound drain that connects to a closed reservoir should be used to reduce contamination of the wound from the environment via the drain. A closed drain also allows the volume and nature of the drainage to be monitored.
DEGLOVING INJURIES
Degloving injuries are commonly seen in small animals and are typically the result of being hit by a car and dragged over the road surface. An anatomic degloving injury results in skin and varying amounts of deep tissue (muscle, tendon, ligament, bone) torn off a limb. A physiologic degloving injury is characterized by an intact skin surface with disruption of the skin attachment and neurovascular supply at the deep fascial level. Necrosis of the detached skin becomes apparent 3 to 5 days after injury.
Degloving injuries require intensive management over a prolonged period. Initial débridement, lavage, and management of the open wound are required. It may take several weeks before the wound is covered by a healthy granulation tissue bed. At this time, skin grafting is indicated. Some degloving injuries will completely heal by second intention, although the tension on the skin of the distal extremities can be a limiting factor. In addition, the resultant skin contracture and friable new epithelium may not always be a desirable outcome.
DECUBITUS ULCERS
Decubitus ulcers are the result of compression of soft tissues and skin between a bony prominence and the surface on which an animal is lying. Thin, debilitated animals that are recumbent for long periods are at risk in addition to the naturally
CASE PRESENTATION 34-1
A 14-year-old male, neutered, basset hound underwent resection for a 3 cm in diameter, grade 3 mast cell tumor on the left caudal abdomen. A large resection was performed with closure of the defect using an advancement skin flap. The dog was seen 7 days after surgery with full-thickness necrosis of the corner of the flap (Figure 1). Note the black, triangular section of necrotic skin with a thick eschar (E).
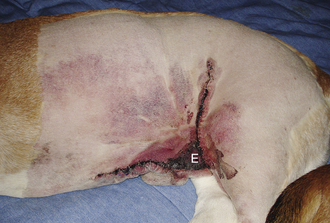
FIGURE 1
The eschar was elevated and then removed. The underlying wound consisted of poor granulation tissue covered by a film of wound exudate. The wound was packed with a hypertonic saline dressing (CURASALT∗), indicated in a contaminated or infected wound where natural débridement is required (Figure 2).

FIGURE 2
The bandage was removed 2 days later (day 9). There was minimal wound exudate, and the granulation tissue was redder and more abundant. The wound was covered by a hydrogel dressing (Curagel∗), indicated in a granulating wound with minimal exudate since the hydrogel will keep the wound moist (Figure 3).
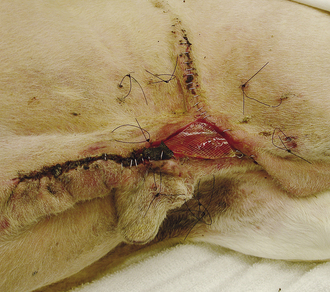
FIGURE 3
Bandage changes continued every 3 to 4 days. The same dressing was used. By day 19, the wound showed considerable wound contraction and new epithelium (e) at the margins of the wound. The granulation tissue (gt) was vascular, evident by bleeding during bandage change (Figure 4).
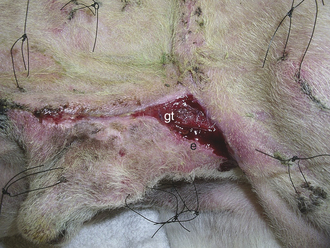
FIGURE 4
By day 24, the wound showed more contraction and epithelialization (e) (Figure 5). There was minimal to no wound exudate. The defect was filled with granulation tissue (gt). A layer of hydrogel (Curafil Gel Wound Dressing∗) was applied over the wound surface, and the wound was covered with a nonadherent, occlusive dressing (OpSite∗), indicated in a dry, granulating wound to provide a moist environment for reepithelialization.

FIGURE 5
The wound was completely reepithelialized by day 42 (Figure 6).
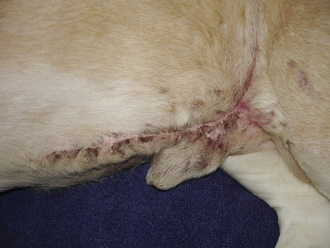
FIGURE 6
∗Tyco Healthcare/Kendall, Mansfield, Mass.
thin breeds (e.g., Afghan hounds, greyhounds, whippets). The soft tissue and underlying bone of decubitus ulcers may become secondarily infected by environmental microorganisms.
Prevention is the key to management. Adequate soft bedding (water beds) is essential for an at-risk animal. The animal’s position should be changed frequently throughout the day. Likely pressure points should be examined daily. Physical therapy and hydrotherapy three or four times per day help to keep the skin clean and promote peripheral circulation. The bedding should be kept clean, dry, and free of excreta. Vulnerable sites can be padded. Maintaining the animal on a high nutritional plane (high-protein, high-carbohydrate diet) is essential.
Closure of existing decubitus ulcers is desirable. Minimal débridement is usually required. Closures often fail because the line of wound closure also overlies a pressure point, and tension is often apparent on the wound edges. In some instances, skin flaps may be preferred.
LARGE ANIMAL WOUND MANAGEMENT
Basic wound management is no different in large animals than in small companion animals. However, the size and nature of the animal and the location of the injury may dictate the way a wound is approached. Thus some additional points are briefly discussed.
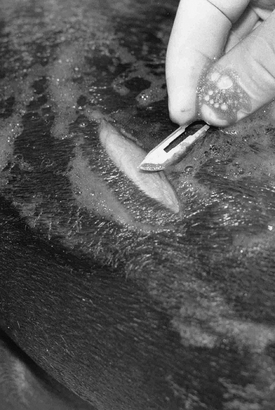
When a wound on a horse is prepared, a water-soluble lubricant or saline solution-soaked gauze can be used to fill the depths of the wound. Electric clippers are usually used to remove the hair from around the edges of the wound. However, if clippers are not available, the wound edges can be lathered with antiseptic scrub, and a straightedge razor or No. 22 scalpel blade can be used to shave the hair (Figure 34-20).
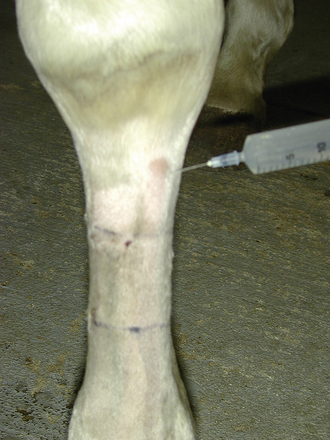
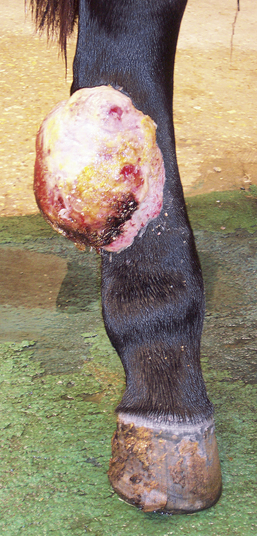
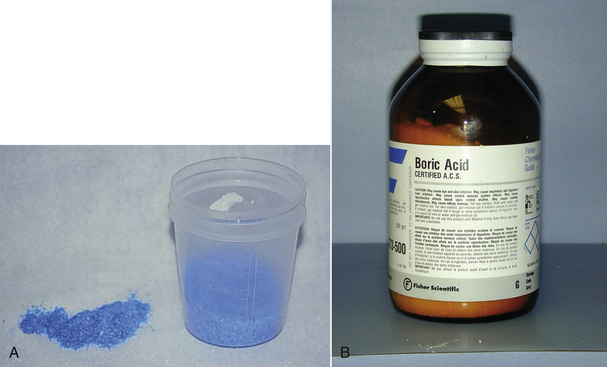
Methods used to lavage a wound are similar to those described for small companion animals earlier in this chapter. If the wound is to be closed, local anesthesia with tranquilization or general anesthesia may be needed before a fresh wound can be properly treated. If tranquilization is used, local or regional anesthetic is necessary for débridement and closure of the wound. Local infiltration is performed by injecting a local anesthetic, mepivacaine or lidocaine, approximately 1 cm from the wound edge, subcutaneously around the entire wound. A 22-gauge hypodermic needle is used in most situations and is reinserted repeatedly through the skin, each time at the end of the bleb formed by the preceding injection of local anesthetic (Figure 34-21). In this way, the patient will not react to the successive injections. If the wound is located on the distal portion of a limb, a ring block or nerve block (e.g., a palmar nerve block) can be applied, and the portion of the limb distal to the block will be anesthetized (Figure 34-22). If a wound is to be sutured, the same considerations for wound closure in small companion animals apply to large animals. It is important to remember that open wounds on the distal aspect of the limb (below the carpus or tarsus) of the horse are notorious for developing exuberant granulation tissue. Exuberant granulation tissue, commonly referred to as “proud flesh,” can form rapidly in horses. Various measures must be undertaken to keep exuberant granulation tissue in check, or it can become excessive (Figure 34-23). Methods of controlling granulation tissue include immobilizing the limb (as with a cast); wound bandaging; surgical excision; caustic agents, such as equal parts of copper sulfate and boric acid powder (Figure 34-24); cryotherapy; electrocautery; and topical corticosteroids. Regardless of the decision to allow a wound on the limb of a large animal to heal by first or second intention, a bandage should be placed on the limb.
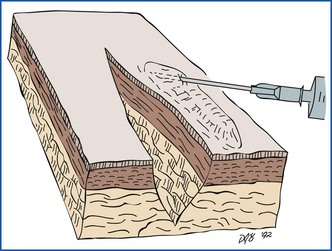
FIGURE 34-21 Proper technique for infiltration of a wound edge with a local anesthetic. The needle should enter through the skin at the point of the last injection.
BANDAGING AND CAST APPLICATION TECHNIQUES FOR HORSES
Bandages and casts serve many purposes and are named for the location and purpose that they cover and serve, respectively. Various materials are available for use in a bandage or cast, but the important aspect is their proper application and function. Development of good bandaging and cast application skills is important to ensure proper function of the bandage or cast. The application and purpose of the different types used on horses are discussed.
BANDAGES
A lower limb wound bandage covers a wound on a limb distal to the carpus or tarsus. When the wound is traumatic, after it has been cleaned and débrided, a topical medication is usually applied if it is left unsutured. A nonadherent dressing is then placed directly over the wound. The wound dressing is secured to the limb with rolled conforming gauze. The conforming gauze is wrapped around the limb with light pressure, overlapping, and without wrinkles to prevent formation of pressure lines, which may cause skin sloughing if applied too tightly. It is wrapped proximal and distal to the wound edges approximately 2 to 4 cm (Figure 34-25).
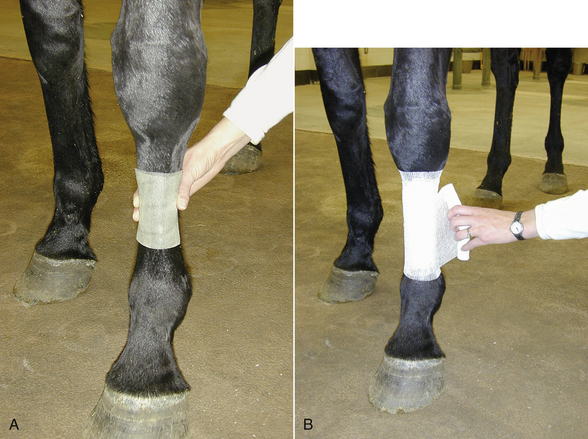
FIGURE 34-25 Application of wound dressing on the distal region of the limb of a horse. A, Nonadherent dressing is applied directly over the wound. B, Conforming gauze is applied to maintain a nonadherent dressing over the wound.
The padded layer is applied next. Combine cotton sheets cut from a roll, rolled cotton, layered cotton sheets, quilted leg wraps, or a military field bandage can be used (Figure 34-26). If cotton sheets are available, five are used, folded in half, and neatly rolled. The fifth sheet is folded in the opposite direction to the other sheets to conceal the edges. The padded layer is secured to the limb with a roll of conforming gauze. Pressure is applied during wrapping to compress and conform the padding to the limb. The outer shell of the bandage is finished with elastic wrap (3M Vetrap Bandage Tape or an Ace bandage), adhesive elastic tape (Elasticon, Johnson & Johnson), or a flannel track wrap. If an Ace bandage or track wrap is used, it is secured with white tape cut into strips or placed around the bandage in a “barber pole” fashion (Figure 34-27). Elasticon is placed around the top and bottom of the bandage, with half of the tape sticking to the wrap and half to the skin, to prevent slippage and to keep debris (e.g., bedding shavings) from getting inside the bandage (Figure 34-28).
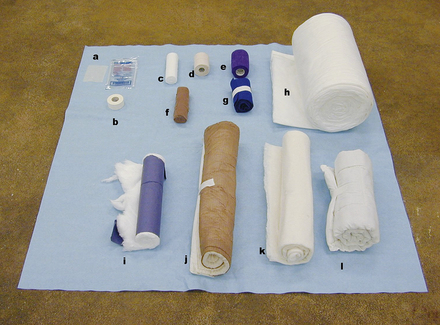
FIGURE 36-26 Various materials can be used in a leg bandage for large animals. Nonadherent wound dressing (a), white tape (b), white roll gauze (c), Elasticon (d), 3M Vetrap Bandage Tape (e), brown gauze (f), track wrap (g), cotton combine (h), rolled cotton (i), military field bandage (j), layered cotton sheets (k), quilted leg wraps (l).
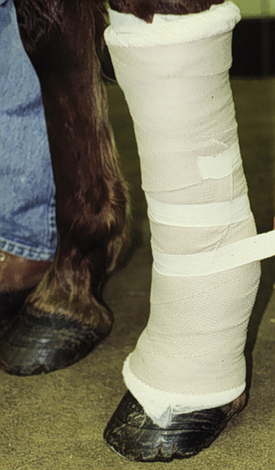
FIGURE 34-27 If white medical tape is used to secure the outer layer of the bandage on a horse’s limb, it is secured in a barber-pole fashion to reduce the changes of a tourniquet effect.
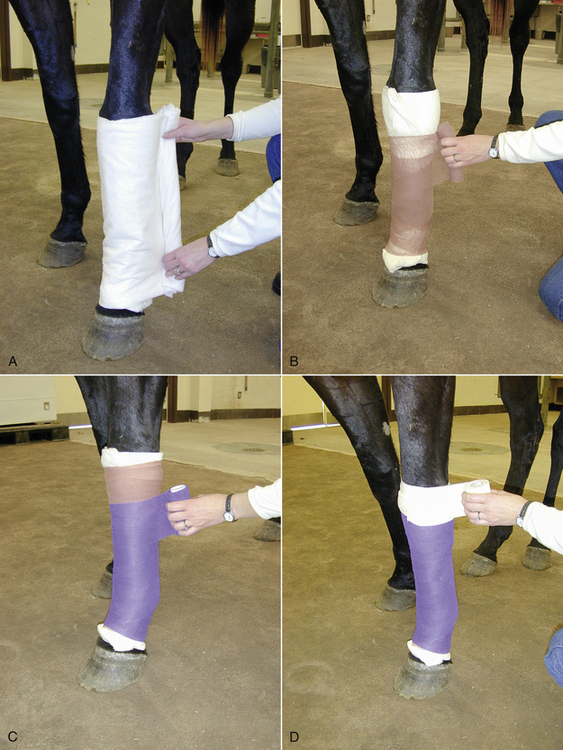
FIGURE 34-28 Application of padded layer of a wound bandage. A, Cotton wrap is applied snugly around the limb. B, Conforming gauze is used to secure the padded layer to the limb. C, 3M Vetrap Bandage Tape is applied as the outer shell of the bandage. D, Wide adhesive tape is used to provide a seal between the skin and bandage.
Lower Limb Support Bandage
A lower limb support bandage is used to provide support for the soft tissues (e.g., ligaments, tendons) of the limb contralateral to the injured leg, which is bearing excessive weight because of decreased weight bearing on the injured limb. The bandage also minimizes static limb edema in a confined, inactive horse. A support bandage is placed on the lower limb just like the lower limb wound bandage described previously except that the underlying wound dressing and inner conforming gauze layer are not used. It is also unnecessary to place wide adhesive elastic tape around the top and bottom.
SPLINT APPLICATION
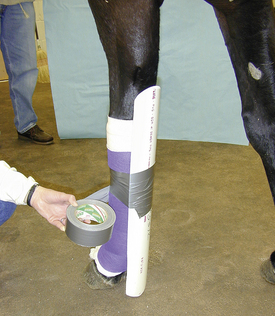
A splint is an addition of a rigid material to a limb bandage to reinforce immobilization of a particular part of a limb. Various materials can be used as the reinforcement, including wooden slats, metal bars, low-temperature thermoplastic, and casting material. However, the most common material used is polyvinyl chloride (PVC) pipe because of its light weight and strength. The pipe used is 10 cm in diameter and is split in thirds. It can be bent by heating with a cutting torch to conform to the fetlock angulation. The length and width of the splint vary with the size of the leg and the area splinted. Depending on the amount of immobilization required, splints can be placed the full length of the forelimb or from just below the carpus or tarsus all the way to the ground surface. In most situations, they are placed on the flexor surface of the limb. Splints are used in situations such as cases of extensor or flexor tendon lacerations and flexure deformities in foals or as needed limb support (as in radial nerve paresis).
A thick bandage is first placed on the limb. It should be long enough to cover the limb above and below the ends of the splint. This will prevent the development of pressure sores. Once the bandage is in place, the splint is secured to the limb with adhesive tape (Figure 34-29). Splints should be reset frequently (at least once per day) in foals.
CAST APPLICATION
A cast is the most frequently used external coaptation to manage various orthopedic injuries or problems when maximum support and immobilization are required. Casts are commonly used for lower limb problems; however, full-limb application is sometimes indicated in large animals. Indications for use of a cast include lower limb fractures, tendon lacerations, support of the lower limb during recovery from orthopedic surgery, heel bulb lacerations, and luxations of the tarsus, fetlock, or pastern. A cast may also be used as an adjunct to internal fixation.
For optimal effectiveness in immobilization, a cast must immobilize the joint proximal and distal to the injury. Full-limb casts must extend up to the elbow or stifle as far as possible. The most frequently used material today is fiberglass. Fiberglass (e.g., Delta-Lite, Johnson & Johnson) is appealing because it is lightweight, strong, and relatively easy to apply. However, some veterinarians prefer to use an initial layer of the traditional plaster of Paris under the fiberglass. Plaster conforms well to the contour of the limb, reducing the risk of pressure sores.
Before cast application is begun, several things must be considered. A limb cast must be applied properly, or serious problems, such as pressure necrosis, can occur. It is also important to remember that applying excessive padding under a cast can result in compression of the padding and loosening of the cast, resulting in the development of cast sores. Because of its importance, application of a limb cast is described here in detail.
TECHNICIAN NOTE
Excessive padding under a cast can result in compression of the padding and loosening of the cast, resulting in the development of cast sores.
Before the procedure is begun, all the materials needed should be collected: orthopedic stockinette (3-inch), orthopedic felt, towel clamps, white tape (1-inch), wire (approximately 30 cm),  -inch drill bit and hand drill, broom handle, hoof-trimming equipment (hoof rasp, trimmers, hoof knife), bandage scissors, and cast material (Figure 34-30). Proper application of a cast is essential, especially if it is to remain on the limb for a prolonged period (4 to 6 weeks).
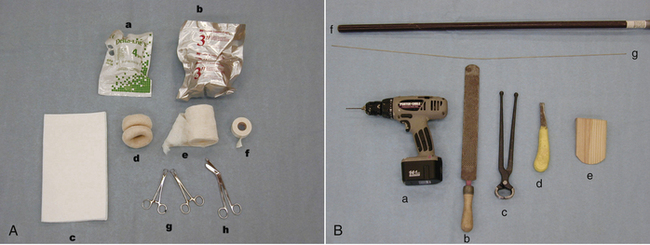
FIGURE 34-30 Materials needed to apply a limb cast on a large animal. A, Cast material (a), support foam (b), orthopedic felt (c), orthopedic stockinette (3 inch) (d), cast padding (e), white tape (1 inch) (f), towel clamps (g), and bandage scissors (h). B, -inch drill bit and hand drill (a), hoof rasp (b), shoe pullers (c), hoof knife (d), wooden wedge block (e), broom handle (f), and wire (approximately 30 cm) (g).
In general, it is best to apply the cast with the horse under general anesthesia. The horse is positioned in lateral recumbency so that the limb to which the cast will be applied is uppermost. Debris is cleaned from the sole, the horseshoe is removed, and the hoof is trimmed. The limb is placed in an extended position perpendicular to the body. Effective support of the leg to maintain the limb in alignment is essential. Traction achieved by using wire looped through holes drilled in the hoof can be helpful. Two holes are drilled in the hoof wall, 5 cm apart near the toe, in the same direction as that in which a horseshoe nail is driven. The ends of the wire are twisted together to form a loop through which a broom handle is placed to apply traction (Figure 34-31).
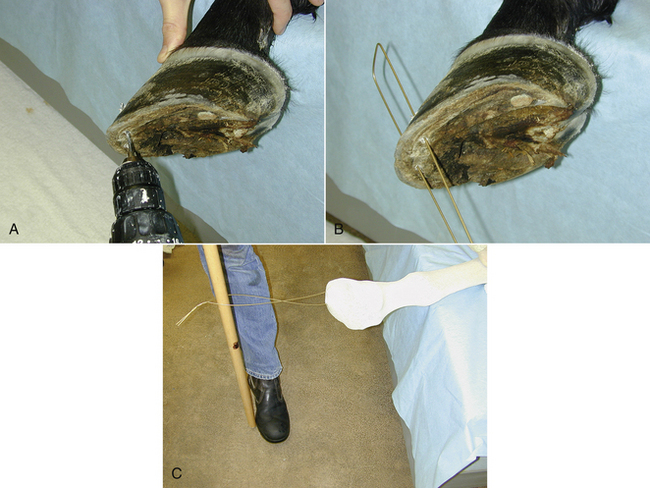
FIGURE 34-31 Traction can be applied to a limb before cast application by drilling two holes in the toe of the hoof (A) and threading a loop of wire through the holes (B) with a broomstick placed in the loop to apply traction (C).
The frog (the central soft tissue of the hoof) can be packed with povidone-iodine, especially if thrush is present. If a wound is present, a three-layer bandage consisting of a nonadherent dressing, conforming gauze, and adherent elastic tape is used to cover it. The skin must be clean and dry. It can be powdered with talcum or boric acid to help keep the area under the cast dry. The limb is then covered with a double layer of stockinette. The length of the region that the cast will cover is measured, then doubled, and approximately 20 cm is added to this to determine the length of stockinette needed. One end is rolled outward and the other is rolled inward until they meet at the midpoint of the stockinette (Figure 34-32).
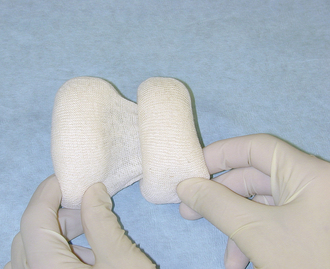
FIGURE 34-32 Orthopedic stockinette used under a cast is prerolled. One end is rolled outward and the other end is rolled inward until they meet at the midpoint of the stockinette.
The traction wire is threaded through the opening in the stockinette. A broom handle is placed through the wire loop, and traction is applied. The outward roll is first unrolled up the leg. A twist is placed in the stockinette just beneath the toe, and the inward roll is unrolled up the leg (Figure 34-33). Any wrinkles are smoothed out, and towel clamps are used to secure the stockinette to the medial and lateral aspects of the limb above the area to which the cast will be applied (Figure 34-34).
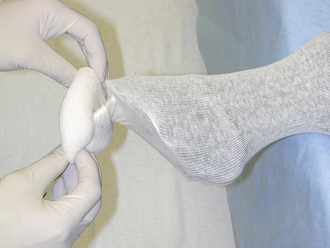
FIGURE 34-33 A twist is placed in the stockinette just beneath the toe, and the inward roll is unrolled up the leg.
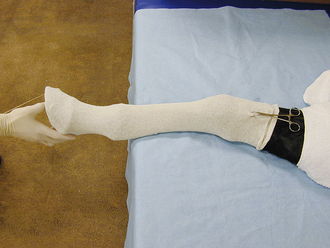
FIGURE 34-34 Before cast material is applied, the orthopedic stockinette is secured with towel clamps to the medial and lateral aspects of the limb above the area to which the cast will be applied.
A strip of orthopedic felt (5 to 7 cm wide) is placed around the leg at the most proximal limit of the cast. This is held in place with 1-inch white tape (Figure 34-35). When a full-limb cast is used, a doughnut pad cut from orthopedic felt is placed over the accessory carpal bone of the forelimb. A thin strip of orthopedic felt is placed over the gastrocnemius tendon and the point of the hock of the hind limb to prevent the development of pressure sores. A roll of support foam can be applied next. It is applied over the stockinette, and its purpose is to provide padding under a cast to reduce the development of pressure sores (Figure 34-36). Additional padding on the leg should be avoided because this can become compressed, thus allowing the leg to move within the cast and cause sores.
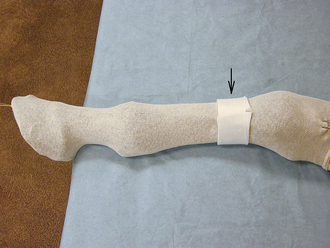
FIGURE 34-35 A strip of orthopedic felt (5 to 7 cm wide) (arrow) is placed around the leg at the most proximal limit of cast. The ends are held in place with 1-inch white tape.
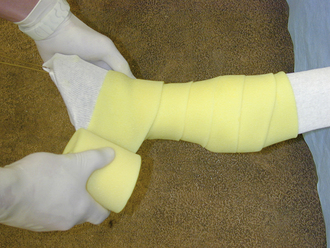
FIGURE 34-36 A roll of support foam can be applied over the stockinette to provide padding under the cast to prevent formation of pressure sores.
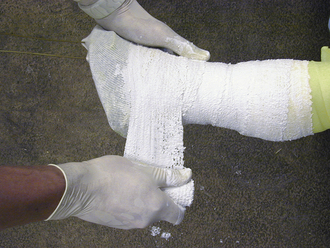
Two layers of 3-inch plaster material are first carefully and snugly applied to the limb. These layers should be applied without wrinkles to prevent development of pressure sores. Application of the cast material is usually started at either the proximal or distal aspect of the limb. (The authors prefer to start distally [Figure 34-37]). A roll of plaster is started at the level of the fetlock and worked distally and then proximally. Approximately 1 cm of the orthopedic felt is left exposed above the top of the cast to prevent formation of a sore.
TECHNICIAN NOTE
It is important that the initial layer of casting material be applied to the limb without wrinkles or finger imprints, which may create pressure sores.
Gloves should be worn when the casting material is applied. To save time in identifying the end on a wetted plaster roll, unroll 2 to 3 inches of the plaster material and hold onto it while wetting the roll in a bucket of warm water (Figure 34-38). The excess water is removed by shaking and squeezing the roll. Do not squeeze excessively, or much of the plaster will be lost. Fiberglass material is held in a bucket of clean water until it is thoroughly wet, and the excess water is shaken out.

FIGURE 34-38 The end of plaster of Paris cast material is held away from the roll while it is moistened.
Next, the fiberglass cast material is applied. Usually, it is easier to begin with 3-inch material because it conforms to the limb better. The cast material is overlapped by one third to one half. As the fiberglass casting material is worked toward the foot, the traction wires are cut, and an assistant holds the leg out at the upper limb region or by resting it on the palms of his or her hands, which are placed under the metacarpus or metatarsus region. It is imperative to prevent formation of finger imprints in the cast because they could cause pressure sores to develop (Figure 34-39).
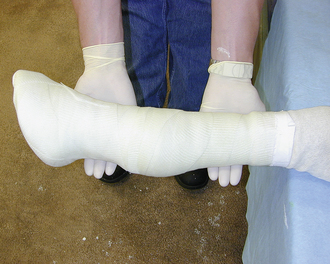
FIGURE 34-39 As the fiberglass cast material is applied, an assistant holds the leg out by resting it on the palms of his or her hands under the metacarpus or metatarsus region. This method prevents finger impressions in the uncured cast material.
More pressure is applied to the succeeding layers of fiberglass. This will allow them to laminate better. Generally, two layers (3 to 4 rolls) of 3-inch fiberglass cast material are applied, followed by two or three layers (3 to 4 rolls) of 4- or 5-inch fiberglass. At the time the last roll of cast material is applied, the stockinette is unclamped and the excess is cut off, leaving approximately 4 cm. This 4-cm excess is turned down over the top of the cast and incorporated in the last layer (Figure 34-40). A wooden wedge block or a 3-inch roll of wet plaster cast material is placed underneath the heel and also incorporated with the last layer (Figure 34-41). A heel wedge allows the horse to walk more easily while wearing a cast because it decreases the breakover force, reduces pressure on the dorsal proximal limits of the cast at the metacarpus or metatarsus, and allows more even axial weight bearing down through the cast.
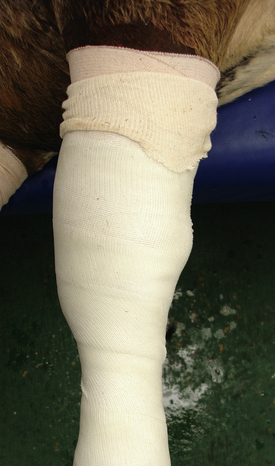
FIGURE 34-40 Approximately 4 cm of orthopedic stockinette left exposed on top of a cast is pulled down over the cast top and incorporated in the last layers of the cast.
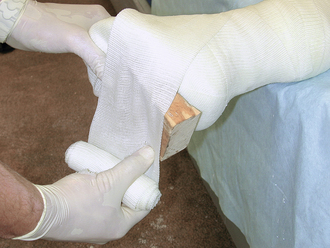
FIGURE 34-41 A wooden wedge block is placed underneath the heel and incorporated with the last layers of cast material.
When application of the cast is completed, the outer layer is smoothed by running wetted, gloved hands up and down the cast. The bottom of the cast is protected from wear by capping it with hard acrylic (e.g., Technovit, Jorgensen Laboratories, Loveland, Colo.) (Figure 34-42). Finally, elastic adhesive tape is placed around the top of the cast and attached to the skin (Figure 34-43), or a piece of stockinette is pulled over the top and taped to the cast and the limb above the cast to prevent debris (wood shavings) from getting inside the cast.
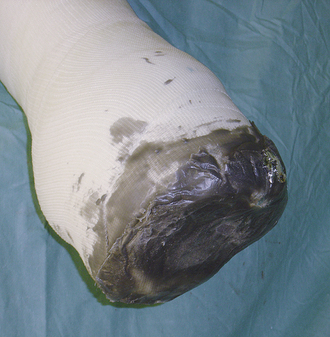
FIGURE 34-42 The bottom of the cast is protected from wear by capping it with hard acrylic (Technovit, Jorgensen Laboratories).
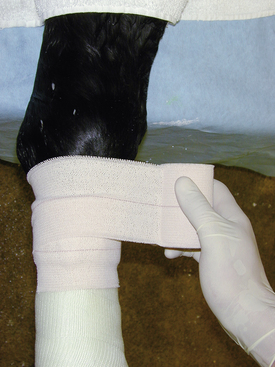
FIGURE 34-43 Elastic adhesive tape is placed on top of the cast to form a seal between the skin and cast that prevents debris from getting inside the cast.
Stall confinement is mandatory after cast application. The patient must be monitored daily. Indications for cast change or removal include breakage, increased lameness, swelling, or exudates coming out of the top of the cast. Horses vary in their reaction and tolerance to a cast. If there is any doubt, a cast should be removed, and the limb should be evaluated.
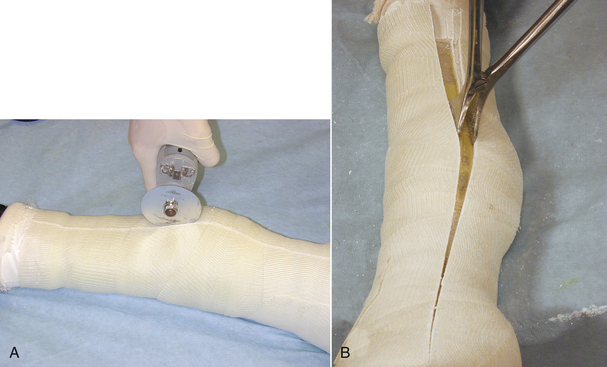
CAST REMOVAL
Removal of a cast is best performed with the animal standing unless another cast is to be reapplied. If cast removal is performed under general anesthesia, there is a risk of reinjury to the limb when the animal is trying to recover from anesthesia. However, general anesthesia is used if the cast is changed. The cast is split on the medial and lateral surfaces, and the cut is continued under the foot with a Stryker saw (Figure 34-44, A). With this approach, injury to the flexor and extensor tendons with the cast saw can be prevented. When cutting over bony prominences, one should be careful to avoid lacerating the skin. Once the cast is completely cut, the two halves are separated with cast spreaders (Figure 34-44, B). A support wrap is then placed on the limb.
BANDAGING AND CAST APPLICATION TECHNIQUES FOR CATTLE
The principles applied to limb bandaging and cast application are the same in cattle as in horses, but there are specific techniques for cattle. Cattle are often not as cooperative as horses, and more restraint is required.
With cattle, a cast can be applied directly over the dewclaws without causing major problems. However, sores caused by motion of the cast can occur in this area because of the inability to closely fit the cast. This can be remedied by placing a pad of orthopedic felt with holes cut out for the dewclaws between the dewclaws (Figure 34-45).
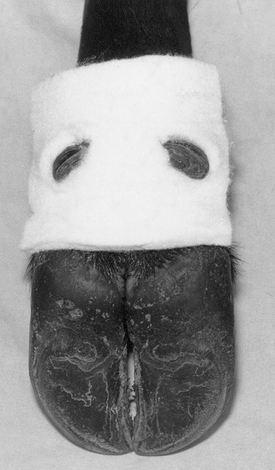
FIGURE 34-45 A piece of orthopedic felt with holes cut out can be placed between the dewclaws to reduce the motion under a cast and help prevent development of pressure sores.
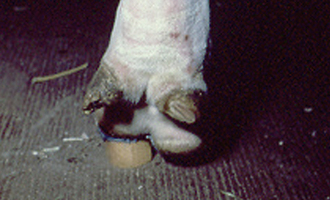
APPLICATION OF A CLAW BLOCK
A wooden block is applied to an unaffected claw for various reasons: to alleviate weight bearing on an adjacent claw if it is fractured or injured or to protect a postsurgical area by raising it higher off the ground (e.g., after amputation of an adjacent claw). The block is usually made from a piece of wood 5 cm thick and cut to the shape of the sole surface of the claw. Grooves are cut in the ground surface for traction (Figure 34-46).

FIGURE 34-46 A claw block made from wood. Grooves are cut on both sides of the block to improve traction and bonding.
The claw is first trimmed, and debris is removed by means of an electric sander or rasp. This is an important step for effective bonding of the acrylic to the claw. The block is then bonded to the horny surface of the claw with acrylic cement, such as Technovit (Jorgensen Laboratories) or a polyurethane hoof cement (Vettec, Vettec Hoof Care Products, Oxnard, Calif.) (Figure 34-47).
MODIFIED THOMAS SPLINT
Despite advances in external and internal skeletal fixation, modified Thomas splints are still often used in cattle and small ruminants as a means of external skeletal fixation. The modified Thomas splint is often used in combination with internal fixation or a cast. The indications for its use include fractures of the tibia or radius and ligamentous injuries of the stifle. Pressure sores in the inguinal or axillary region are a problem when a Thomas splint is used, despite padding of the metal ring part of the splint that fits in that area.
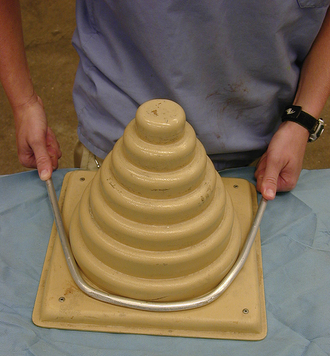
Application of a modified Thomas splint in large ruminants does require special equipment, such as a conduit bender, to bend the round rod iron used to construct the splint. For small farm animals, a beehive and aluminum rod is used (Figure 34-48). The design of the splint varies somewhat among clinicians, but the purpose is the same, which is to apply traction and maintain alignment of the limb.
The animal is first placed in lateral recumbency with the affected leg uppermost. A template to fit the individual animal, devised from a nasogastric tube or other similar flexible tubing, is used to construct the ring that will encircle the proximal part of the leg (Figure 34-49). The ring should be large enough so as not to impinge on any bony prominences. The rod is bent in a ring the same size as the template (Figure 34-50). The variation in design occurs with the extensions that come off the ring to support the animal’s limb.
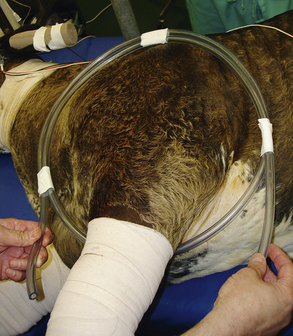
FIGURE 34-49 A template, devised from a nasogastric tube or other similar flexible tubing, is used to construct the metal ring that will encircle the proximal part of the leg of a modified Thomas splint.
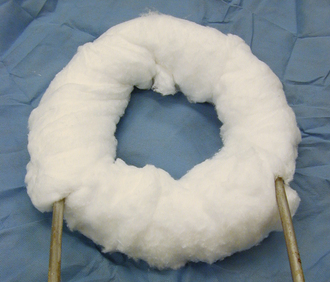
FIGURE 34-50 Metal rod is bent into a ring to construct the proximal part of a modified Thomas splint. Once the ring is constructed, it is padded with cotton.
One design has the extensions coming off the ring cranially and caudally to the leg (Figure 34-51). The extensions of the splint must be shaped to conform to the angles of the hock and stifle. For the front limb, the extensions are kept straight and not bent in any shape (Figure 34-51, A).These extensions are also bent away (lateral) from the flat plane of the ring to allow the ventral part of the ring to fit into the axillary or inguinal region (Figure 34-51, B). Another design has the extensions coming off the ventral aspect of the ring. The ring is then bent so that the extensions are positioned medial to the limb and so that the ring itself fits the contour of the upper limb (Figure 34-52). This design is used for large-sized animals.
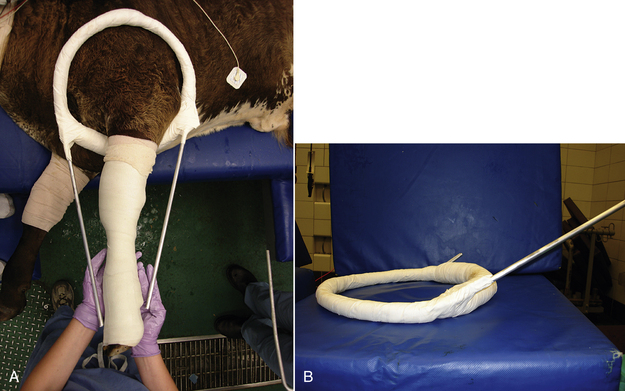
FIGURE 34-51 A modified Thomas splint. A, Extensions of the splint come off the edge of the ring and are positioned cranial and caudal to the limb. B, The extensions come off the ring at an angle to allow the ring to properly fit under the axillary or inguinal region.
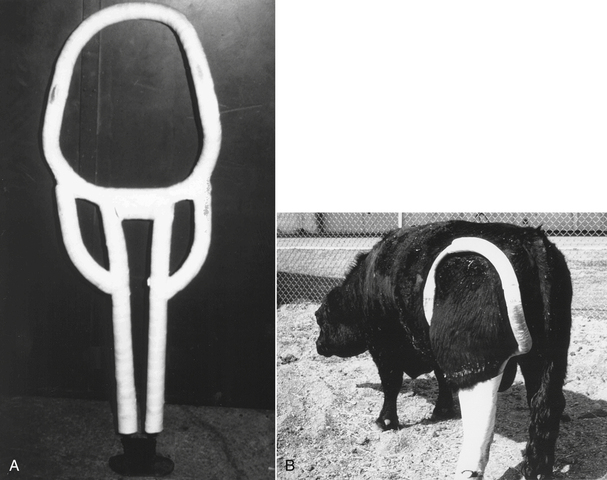
FIGURE 34-52 A modified Thomas splint. This design has the extensions coming off the ventral aspect of the ring. The ring is then bent so that the extensions are positioned medial to the limb and so that the ring itself fits the contour of the upper limb. This design is used for large-sized animals. (Photograph courtesy Dr. Dwight F. Wolfe.)
The next portion of the splint to be constructed is the distal part of the splint (footplate). A footplate can be constructed in various ways. In one method, two threaded rods are attached to the extensions of the splint. This splint is devised with these types of extensions so that the length of the splint can be adjusted. This design is most useful in large ruminants. Another construct has a piece of metal rod that is bent in a flat U shape, positioned under the foot, and connected to the ends of the extensions of the splint with a combination of twisted wire loops and lots of tape (Figure 34-53, footplate). This type of design is used in small farm animals. The ring is then padded with cotton (see Figure 34-50). This is important to reduce pressure sores in the axillary or inguinal region. Next holes are drilled into the hoof walls near the toes and wired to the bottom of the splint (Figure 34-54). A slight amount of traction is placed on the limb as the splint is applied. Traction should be minimal within the splint so as not to create excessive pressure in the axillary or inguinal regions, which could interfere with venous drainage or distract the fracture fragments.

FIGURE 34-53 The footplate in this design of a modified Thomas splint is constructed from a piece of metal rod that is bent in a flat U shape, (A) positioned under the foot, and connected to the ends of the extensions of the splint with a combination of twisted wire loops and lots of tape (B).
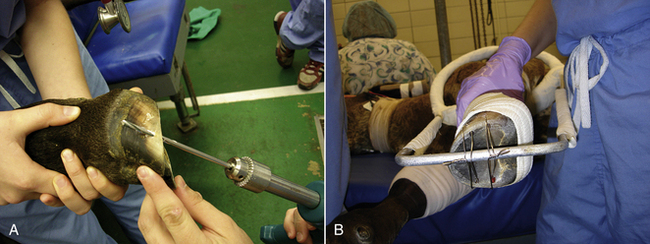
FIGURE 34-54 A, Holes are drilled into the hoof walls near the toes and wired to the bottom of the splint (B) when applying a modified Thomas splint.
TECHNICIAN NOTE
When the hoof is secured to a modified Thomas splint, it is important not to apply excess fraction because this will create too much pressure in the axillary or inguinal region, which could interfere with venous drainage or distract the fracture fragments.
Once the splint is in position, the limb and splint are then covered with layers of cast material (Figure 34-55). The casting tape is applied by “weaving” the material around the limb and extensions of the splint by using a figure-eight pattern (Figure 34-56, A). The casting tape is twisted 180 degrees with each passage of the material (Figure 34-56, B). The cast material should be applied as proximal as possible (Figure 34-57). The bottom of the splint is protected from wear by applying a polyurethane hoof-bonding material (Figure 34-58).

FIGURE 34-55 The limb and modified Thomas splint are covered with layers of cast material to stabilize the limb.
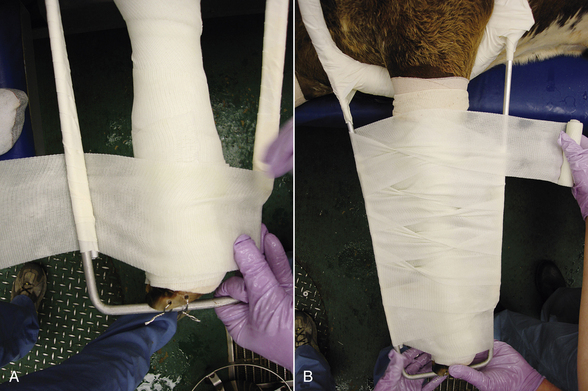
FIGURE 34-56 A, A modified Thomas splint is secured to the limb by “weaving” casting tape around the limb and extensions of the splint by using a figure-eight pattern. B, The casting tape is twisted 180 degrees with each passage of the material.
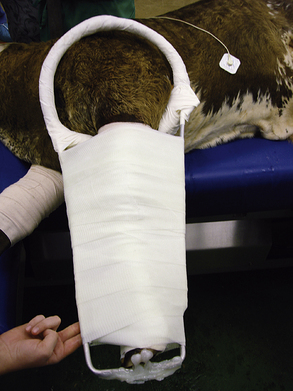
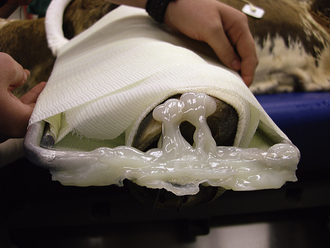
Campbell, B.G. Dressings, bandages, and splints for wound management in dogs and cats. Vet Clin North Am Sm Anim Pract. 2006;36:759–791.
DeCamp, C. External coaptation. In Slatter D., ed.: Textbook of small animal surgery, ed 3, St Louis: Saunders, 2003.
Dernell, W.S. Initial wound management. Vet Clin North Am Sm Anim Pract. 2006;36:713–738.
Hosgood, G. Stages of wound healing and their clinical relevance. Vet Clin North Am Sm Anim Pract. 2006;36:667–685.
Krahwinkel, D.J., Boothe, H.W., Jr. Topical and systemic medications for wounds. Vet Clin North Am Sm Anim Pract. 2006;36:739–757.
Pavletic, M.M., Trout, N.J. Bullet, bite, and burn wounds in dogs and cats. Vet Clin North Am Sm Anim Pract. 2006;36:873–893.
Pope, E.R. Head and facial wounds in dogs and cats. Vet Clin North Am Sm Anim Pract. 2006;36:793–817.
White, R.A. Management of specific skin wounds. Vet Clin North Am Sm Anim Pract. 2006;36:895–912.
Adams, S.B., Fessler, J.F. Treatment of radial-ulnar and tibial fractures in cattle, using a modified Thomas splint-cast combination. J Am Vet Assoc. 1983;183:430.
Auer, J.A. Drainings, bandages, and external coaptation. In Auer J.A., Stick J.A., eds.: Equine surgery, ed 3, St Louis: Saunders, 2006.
Hendrickson, D.A. Wound care for the equine practitioner,. Jackson: Wyo; 2005. Teton NewMedia
Stashak, T.S. Bandaging and casting techniques. In: Stashak T.S., ed. Equine wound management. Philadelphia: Lea & Febiger, 1991.