Basic Necropsy Procedures
When you have completed this chapter, you will be able to:
1 Define the term necropsy. List indications for performing a necropsy.
2 Describe the methods for evaluating and recording the results of necropsy.
3 List the types of fixatives used for the preservation of tissues. Describe their specific uses.
4 List the equipment needed to perform a typical necropsy.
5 Describe the procedure for collecting tissue samples intended for bacteriologic, parasitologic, and toxicologic evaluation.
6 Describe the procedure for collecting segments of intestine and other tissues for virus isolation.
7 Describe the procedure for collection of tissue samples from rabies suspects.
8 Discuss methods for shipping tissue samples.
9 List the steps performed during the necropsy of small mammals.
10 Describe how these steps are varied during necropsies of large animals, laboratory animals, and birds.
11 Describe methods for handling fetal and placental samples.
Before beginning our discussion of the necropsy, it is important to understand the meaning of terms that are used frequently in this chapter. Pathology, for example, is the science and study of disease, especially the causes and development of abnormal conditions. Gross pathology refers to pathologic changes in tissue that are visible with the unaided eye, whereas histopathology refers to pathologic changes in tissue that are microscopic and can be seen with the use of a microscope. Lesions are alterations or abnormalities in a tissue (pathologic changes), and the pathogenesis is the sequence of events that leads to or underlies a disease.
Necropsies are done for a variety of reasons. A necropsy is often done on an animal for the following reasons:
• To determine the disease process or processes that led to the animal’s death
• To determine the accuracy of the clinical diagnosis
• To evaluate the positive and negative effects of therapeutic measures
In situations in which more than one animal is at risk, such as in multiple-animal households, farms, and laboratory animal facilities, the necropsy is also helpful in determining whether other animals are at risk for infection, inherited conditions, or injury caused by toxins or environmental hazards.
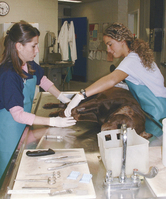
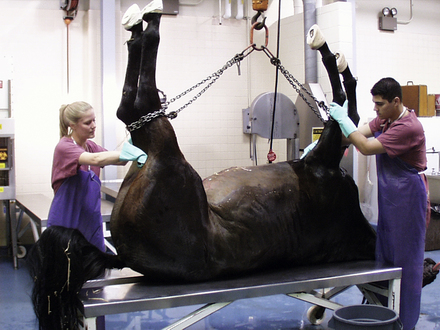
Successful performance of a necropsy requires knowledge of anatomy and gross pathology and a systematic technique for examination of the animal’s body. Well-trained technicians, working with appropriate supervision, perform necropsies in many diagnostic laboratories and in most laboratory animal facilities (Figures 39-1 and 39-2). In practice situations, technicians trained in necropsy techniques and supervised by a veterinarian familiar with the case can and should perform necropsies. Necropsies should be performed frequently enough so that the techniques are familiar to the technician and the supervising veterinarian. In the necropsy, all abnormalities and disease processes should be exposed and described. If necessary, appropriate samples are collected for histopathology, cytology, bacteriology, virology, parasitology, and toxicology. Descriptions of the gross findings should be recorded and included in a report together with the animal’s species, age, sex, and breed (signalment); the history; and the clinical findings. Samples that are submitted to the laboratory for further testing should be packaged with a copy of the report. In addition, the report should be added to the animal’s record together with the histopathology and other reports. Digital photos of lesions are also helpful and can be sent to the lab along with the reports or as a separate electronic file by e-mail.
 TECHNICIAN NOTE
The owner’s permission for the necropsy must be obtained, and the animal for necropsy must be correctly identified.

Before we begin describing the necropsy procedure, several important things must be considered. First, be sure that the owner’s permission is obtained before the necropsy is performed. Second, make sure that the animal for necropsy is correctly identified. The species, breed, sex, age, and identifying tags or tattoos should be carefully matched with the information on the owner’s permission form and the medical record. This step is critical to prevent performing the necropsy on the wrong animal. If the animal has a radio frequency identification device (RFID aka microchip), it can be collected for verification. In addition, the owner’s preference for disposition of the body (e.g., cremation, private cremation, burial) should also be determined before the necropsy, if possible. It is also important to perform the necropsy as soon as possible after the animal’s death to avoid decomposition (autolysis). If the necropsy must be delayed, the body should be refrigerated as soon as possible. Small animals should be placed in thin plastic bags with identification tags secured on both the body and the outside of the bag. Decomposition occurs most rapidly in large, obese animals at high temperatures. It is particularly troublesome in large animals that rely on gut fermentation for their nutrients because the rumen continues to generate heat long after the animal’s death. The body should not be frozen because freezing and subsequent thawing cause many postmortem artifacts.
TECHNICIAN NOTE
If the necropsy must be delayed, the body should be refrigerated as soon as possible. The body should not be frozen because freezing and subsequent thawing cause many postmortem artifacts.
The signalment, history, and clinical findings should be reviewed before the necropsy is started. The record should include the owner’s name, address, and telephone numbers; names of other veterinarians involved with the case; the animal’s species, breed, age, sex, and name or identification; and the hospital record number. The history should include vaccination history, owner’s observations of the clinical signs, length of illness, and a list of other animals at risk. The clinical findings should include results of the physical examination and clinical tests (e.g., complete blood count [CBC], clinical chemistries, radiographs), surgical procedures, and the date and time of death or euthanasia.
NECROPSY REPORTS
While the necropsy is performed, all abnormalities should be described and recorded. A report in which the findings are described should be written after the necropsy has been completed. Tentative conclusions (diagnoses) may be made at the end of the report (Box 39-1).
All lesions are described and recorded by using the following criteria (examples are given in parentheses):
• Location (caudal dorsal left lung lobe, left ventricle, cornea)
• Color (red, green, yellow-tan)
• Size (either measurements, such as 3 × 5 × 4 cm, or weights for liver and heart)
• Shape (round, flat, spherical, stellate)
• Distribution (focal, multifocal, diffuse)
The findings are usually recorded in the order in which they were encountered in the necropsy. Either the present or past tense should be used (not both), and the descriptions should be as specific as possible without drawing conclusions. For example, “there are multiple dark red 1- to 4-mm-diameter soft nodules in all lung lobes” rather than “hemangiosarcoma.” On the basis of the descriptions, the veterinarian formulates a morphologic diagnosis, which includes severity, time, distribution, lesion, and anatomic site. An example of a diagnosis might be “severe acute multifocal interstitial pneumonia.”
FIXATIVES
Ten percent buffered formalin is the most widely used fixative for the preservation of tissues. Slices of tissue (generally, no thicker than 1 cm) should be placed in large volumes of formalin. Generally, there should be 10 times as much formalin solution as tissue (by volume). This solution may be purchased from a variety of sources and is also easily prepared. It is made by mixing nine parts of water with one part of commercially available formaldehyde solution (37% to 40% HCHO). The addition of 6.5 g of dibasic anhydrous sodium phosphate and 4 g of monobasic sodium phosphate per 1000 ml of solution creates neutral buffered 10% formalin. This is an excellent general purpose fixative, which is somewhat more desirable than plain (acidic) 10% formalin. The addition of buffers is important because it eliminates the formation of undesirable hematin pigment in tissue sections. Formalin (and all fixatives) should be handled with care. Formalin is a contact irritant and a carcinogen. Protective plastic gloves, preferably of nitrile composition, should always be worn when fixatives or fixed tissues are handled. Containers with fixatives should be kept closed except when placing tissues in them, and fixatives should be handled and used in a well-ventilated space.
TECHNICIAN NOTE
Ten percent buffered formalin is the most widely used fixative for the preservation of tissues. Tissues should be placed in large volumes of formalin (10:1, formalin to tissue ratio).
For the preservation of whole brains, intact spinal cords, and bones, 50% formalin, made by mixing one part 10% buffered formalin with one part of commercial formaldehyde (37% to 40% HCHO), is superior to the 10% solutions. The stronger 50% solution penetrates and fixes the large tissue mass more rapidly and more thoroughly than 10% formalin. Formalin fixation is usually complete within 24 hours (large brains may take 48 hours). Tissues fixed in 10% formalin are traditionally stored in 10% formalin, but storage in 70% alcohol is superior.
Bouin’s fixative is less widely used than 10% formalin, but it is preferred in some instances because it produces less tissue shrinkage and better preservation of cellular detail. Fetal tissues, intestinal epithelium, eyes, testes, endocrine glands, and the inclusion bodies associated with several important diseases are particularly well preserved with this fixative. Bouin’s fixative may be purchased from a variety of sources.
FACILITIES AND INSTRUMENTS
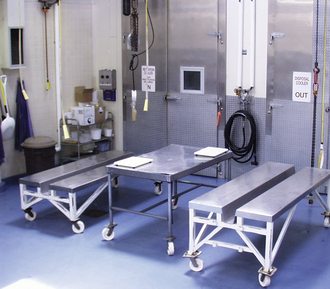
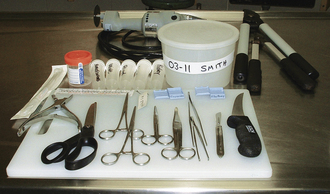
Necropsies should be performed in a well-lit, well-ventilated space, ideally outside the usual surgical and treatment areas. The area should be easy to clean and disinfect, have adequate drainage for fluids and water, and be large enough to comfortably move around in (Figure 39-3). When necropsies are performed in the field (outdoors), the appropriate disposal of tissues and the inadvertent spread of disease become particular concerns.
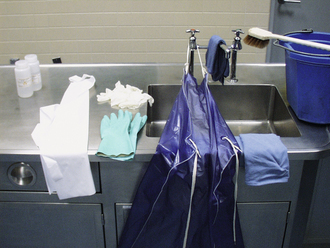
The person performing the necropsy (called the prosector) should wear protective clothing, such as a plastic apron, laboratory coat, or scrubs, which can be removed and either discarded or cleaned after the necropsy (Figure 39-4). Latex or other protective plastic gloves should be worn at all times. In addition, a surgical mask should be worn when dealing with animals that have died from infectious diseases that can be spread through aerosolization. Protective footwear (boots or booties) is appropriate when dealing with larger animals.
Necropsies do not require specialized equipment or instruments. Most instruments can be obtained from surgical suppliers and hardware stores (Figures 39-5 and 39-6). The following instruments are used in a typical necropsy:
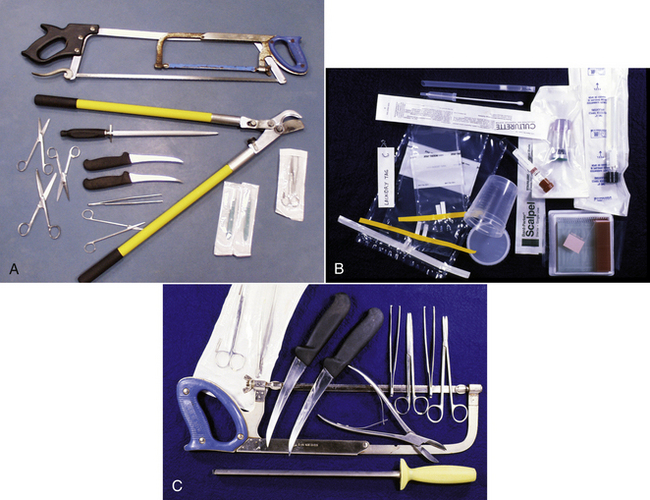
FIGURE 39-5 A-B, Instruments commonly used in a large animal necropsy. C, Equipment commonly used in a large animal necropsy.
• Necropsy knives (sturdy ones that can be sharpened) and honing steel
• Scissors (large and small operating, Mayo, or Metzenbaum scissors work well)
• Forceps (large- and small-toothed)
• Serrated, all-purpose, plastic-handled utility scissors
• Hacksaw, meat saw, or Stryker saw (for brain removal)
• Lopping (pruning) shears for cutting ribs and bones
• String or hemostats for closing off bowel ends
• Labeled plastic buckets or screw-top plastic containers containing formalin
• Tissue cassettes (for small tissues) and clip-on laundry tags for identifying tissues
• Labeled, sealable, plastic bags and plastic vials or bottles for refrigerated and frozen samples
ANCILLARY PROCEDURES
Before samples are collected for examination in the microbiology, parasitology, and toxicology departments, the diagnostic laboratory should be contacted for specific advice on which samples should be collected, how they should be collected, and how they should be packaged and submitted. This minimizes potential errors and provides the laboratory with the best possible specimens.
Tissues and specimens for bacteriology, mycology, and mycoplasma cultivation are collected aseptically, placed in either Culturettes or sterile containers without preservatives, and submitted to the laboratory without delay. Frozen specimens should not be submitted. Sterilized instruments should be used to collect samples for microbiologic testing. If the surface of the tissue is contaminated, it can be seared with a flamed spatula, the surface can be cut with a sterile blade, and a Culturette or needle attached to a sterile syringe can be inserted to swab or aspirate the tissue for testing.
Specimens collected for microbiology include the primary site of disease and its regional lymph nodes. Other samples may include heart, blood, lung, liver, spleen, stomach contents of aborted fetuses, placenta, exudates, synovia, bone marrow, cerebrospinal fluid, brain, and small intestine. When intestine is submitted, a 10-cm segment of intestine is tied off at each end to prevent excessive contamination by the internal contents. The instruments used to do this are heavily contaminated by the microbes exposed at the cut ends. For this reason, intestine should be collected last and placed in a separate container to prevent contamination of other tissue samples. Tissue sections of 2 × 3 × 1 cm and fluid specimens of 3 to 5 ml are desirable.
TECHNICIAN NOTE
Contact the diagnostic laboratory for specific advice on which samples should be collected, how they should be collected, and how they should be packaged and submitted.
Tissues for virus isolation are collected aseptically and either refrigerated in a sterile container or immersed in sterile 50% buffered glycerol in sterile containers and preserved by freezing. Fresh, refrigerated tissue immersed in virus transport medium (available from the virology laboratory) is the preferred method of tissue submission. Lung, liver, spleen, kidney, and brain are prime specimens. Sections need to be 5 × 5 × 10 mm. Contact the virology laboratory for the appropriate technique.
For toxicology, blood, liver, stomach contents, kidney, fat, brain, and urine may be saved. Blocks of tissues 10 × 5 × 4 cm (approximately 200 g), 10 to 20 ml of blood, and 50 to 100 ml of fluid are desirable. They may be frozen.
If rabies is suspected, the animal’s head should be sent to the appropriate laboratory for testing according to the guidelines and laws of the state (Box 39-2). In cases in which rabies is suspected, decapitation or other necropsy procedures should not be attempted unless the technician has been specifically trained to perform this procedure. A necropsy should only be performed on the rest of the carcass if a rabies test result for the brain is negative.
For cytologic examination, smears are made (after gentle blotting on absorbent paper) by either scraping the cut surface of the specimen with a new scalpel blade and then spreading the scraped material onto a slide or lightly pressing small pieces of tissue against the surface of a clean slide. Several impressions are made across the slide. They are generally submitted unstained to the laboratory, or they can be stained and examined at the time of the necropsy.
SHIPPING DIAGNOSTIC SPECIMENS
The rules for shipping diagnostic samples, technically referred to as “clinical specimens,” have changed in recent years. Senders can be fined if containers break or specimens leak during normal transit conditions. Correct labeling is important, and a special packaging symbol (UN 3373) might be required. A computer search of the web will reveal many helpful sites (i.e., www.fedex.com/us/services/pdf/PKG_Pointers_Specimens.pdf). Many courier companies abide by International Air Transportation Association (IATA) rules, which impose the highest packaging and labeling standards. The simplest advice is to contact the courier to request their packaging requirements.
In general, all clinical specimens must be in rigid primary containers that cannot leak. Excess formalin can be removed if the specimen has been fixed. The primary container is enclosed by a secondary container, usually a sturdy sealable plastic bag. Label primary and secondary containers. The plastic bag should contain absorbent material in case the primary container leaks. This package then goes inside a rigid shipping box. Cushion the contents of the shipping box. Styrofoam shipping boxes with outer cardboard shells are ideal. Formalin-fixed material does not need refrigeration, but bacterial cultures and fresh or frozen tissues might need freezer packs. Never use ice. Submission forms should not be placed next to primary containers, and if condensation is likely, the submission form should be in its own plastic bag.
NECROPSY PROCEDURE FOR A SMALL MAMMAL
The following procedure is appropriate for dogs, cats, ferrets, rodents, and rabbits. A brief outline of this procedure is in Box 39-3.
TISSUE COLLECTION
Tissues collected for histologic examination must be handled carefully before fixation and must be properly labeled for identification. Tissue sections should not be squeezed, stretched, or rinsed with water, and epithelial surfaces should not be rinsed or rubbed with fingers or instruments before samples are obtained for histopathologic examination. Tissues become rigid with fixation, so if there is a need to retain the flatness of the tissue (such as a nerve or section of skin), it can be placed on a piece of cardboard. The tissue will remain adhered to the cardboard after immersion in formalin.
Sections from paired organs may be trimmed differently from one another to distinguish them from one another. For example, the left kidney may be sectioned longitudinally, and the right kidney may be cut transversely. In addition, sections can be labeled with clip-on laundry tags to identify them. If there is any possibility that a section of tissue may lose its identity (i.e., be difficult to distinguish) when mixed with other specimens, the sections should be tagged with clip-on laundry tags. If tissue samples are small, they may also be placed in separate labeled containers, such as tissue cassettes. The pituitary gland of a small animal, for example, is well differentiated from other tissues when placed in a small tissue cassette.
TECHNICIAN NOTE
Tissues collected for histologic examination must be handled carefully before fixation and must be properly marked for identification.
In all cases, it is desirable to save sections of critical tissues for histopathologic examination. These include lung, myocardium, liver, spleen, pancreas, stomach, small intestine, kidneys, lymph nodes, whole brain, endocrine organs, urinary bladder, colon, and muscle.
DISSECTION
The method of dissection described here is a standard technique that can be applied to all mammalian species and is based on the following two precepts:
1. In stepwise fashion, each part of the carcass is examined in situ (as it first appears in the carcass); it is then isolated from the carcass and examined as a whole; finally, it is dissected and examined.
2. Once a part has been taken from the body, it is dissected to completion (exceptions include tissues from the gastrointestinal tract, brain, spinal cord, and eyes). Sections for histologic or laboratory examination are collected before further dissection is undertaken.
This method is the opposite of those that call for evisceration now and dissection later, methods that disrupt the entire carcass all at once, and that lead to forgotten or lost tissues. The immediate complete dissection of one part at a time reduces the possibility of lost or forgotten parts and leaves the remainder of the carcass intact. In this way, if the findings in one organ suggest that another part or parts of the carcass should be explored in situ, this is still possible and has not been precluded by previous dissection.
PRELIMINARY OBSERVATIONS
Before the necropsy begins, the prosector should review the signalment (species, breed, color, sex, age, weight, animal identification), the clinical history, and the laboratory data available. It is important that the time of death and time of necropsy be recorded. The animal should then be weighed, and the weight should be recorded in grams or kilograms. All organs that are abnormal in size or shape should be measured and/or weighed.
EXTERNAL EXAMINATION
The exterior of the animal is examined: body conformation, hair coat, skin, nose, mouth (lips, cheeks, gums, teeth, tongue), eyes (eyelids, conjunctiva, cornea, sclera, anterior chamber, iris, lens), ears, mammae, penis, prepuce, scrotum, vulva, anus, and feet. Because the retina undergoes rapid decomposition after death, dissection begins with the eyes. The upper and lower eyelids are examined and excised. The membrana nictitans is grasped with tissue forceps, the globe is lifted, and the soft tissue attachments to the bony orbit are incised with scissors or a scalpel in a 360-degree arc. As the globe is freed from the orbit, care must be taken to avoid application of excessive tension to the optic nerve. The optic nerve is carefully severed at the optic canal. The excised globe is examined, and then extraocular muscles, fascia, fat, conjunctiva, and membrana nictitans are dissected from the globe. The interior of the eye can be examined by immersing the globe in clear, cool water. The sclera is examined, and the unopened globe is immersed in Bouin’s fixative or formalin.
REFLECTION OF SKIN AND LIMBS AND EXAMINATION OF SUPERFICIAL ORGANS AND BODY CAVITIES
The animal is placed in left lateral recumbency (left side down). A midline incision is made beginning at the right axilla and extending cranially to the mandibular symphysis (Figure 39-7). The incision is continued in the opposite direction caudally as a median or paramedian incision, passing between the mammae and around the penis, prepuce, and scrotum to the perineum (Figure 39-8). The upper forelimbs are reflected by dissection between the scapula and the ribs. Fat, fascia, and superficial muscles are reflected back together with the skin. Skin of the ventral aspect of the neck and throat is reflected. Abdominal skin is reflected, and the hind limbs are reflected by extending the incision into the coxofemoral (hip) joints. The animal is now placed in dorsal recumbency (on its back) (Figure 39-9).
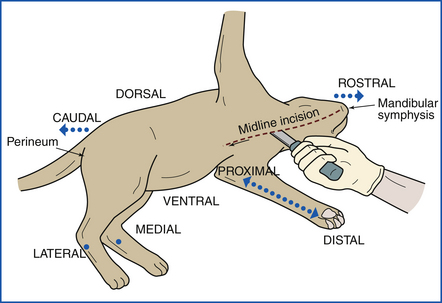
FIGURE 39-7 The necropsy begins with the animal placed on its left side. A midline incision is made from the mandibular symphysis.
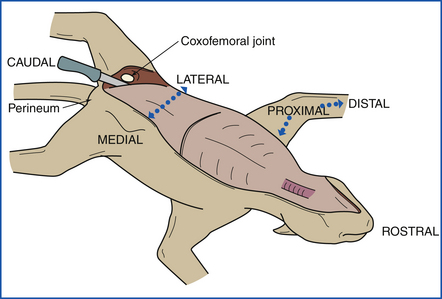
FIGURE 39-8 The front limbs are reflected by making incisions between the ribs and the scapulas. The hind legs are reflected by incising the coxofemoral (hip) joints.
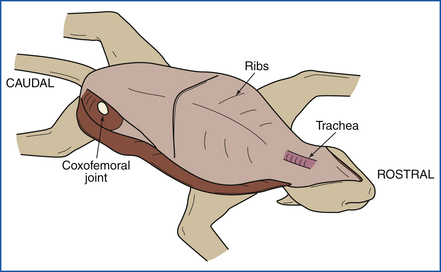
FIGURE 39-9 After all four limbs have been reflected, the animal is positioned in dorsal recumbency (on its back).
Skin incisions are extended down the cranial medial aspects of both rear legs, and the skin is reflected. As they are exposed in the dissection, superficial organs are examined and samples from these organs are collected: lymph nodes (mandibular, superficial cervical, prescapular, axillary, inguinal, popliteal), mammary glands, testes, and skin.
In all necropsy examinations, several joints are examined before the body cavities are opened. The coxofemoral joints are opened and examined during the initial incision. The scapulohumeral and stifle joints are also examined during all routine necropsies. The atlantooccipital joint will be examined when the head is removed.
Samples of the sciatic nerve, synovium with patella, and skeletal muscle are collected. Bone marrow samples for impression smears or histopathologic examination should be collected at this time. Generally, marrow is obtained by cracking the upper midshaft femur with pruning shears.
You should, at this point, have already collected the following: eyes, lymph nodes, testes or mammary glands, skin, synovium, sciatic nerve, skeletal muscle, and bone marrow.
Next the three major body cavities (peritoneal, pleural, pericardial) are opened. All organs are examined in situ, and any abnormalities are noted. The abdomen is opened by making a midline incision from the sternum to the symphysis pubis and making incisions laterally from the sternum along both caudal costal margins. The abdominal wall is then reflected laterally to expose the abdominal cavity (Figure 39-10).
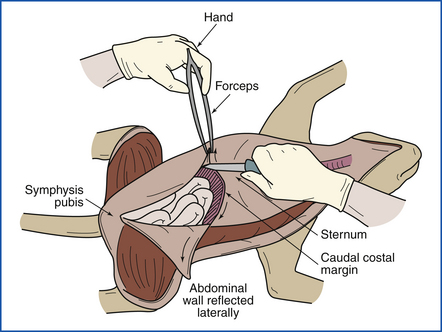
FIGURE 39-10 The abdominal wall is incised with a midline incision. The right and left halves of the abdominal wall are reflected laterally by making incisions from the sternum along both right and left caudal costal margins.
The diaphragm is now punctured to check for negative pleural pressure (Figure 39-11), and the diaphragm is cut away from the ventral and lateral rib cage. The ventral rib cage is removed by cutting the ribs bilaterally (on both sides) midway between the costochondral junction and the vertebral column (Figure 39-12). This should be done with utility scissors or pruning shears. Examine the pleural surface of the rib cage. In young animals, the costochondral growth plate may be examined and saved for histopathologic examination. Next the pericardial sac is opened, and the exterior of the heart is examined.
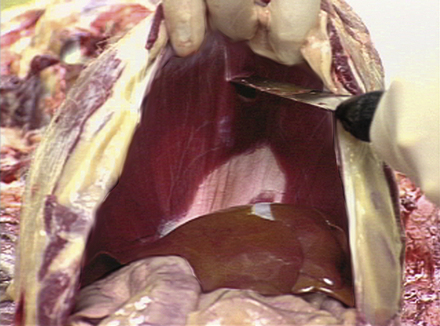
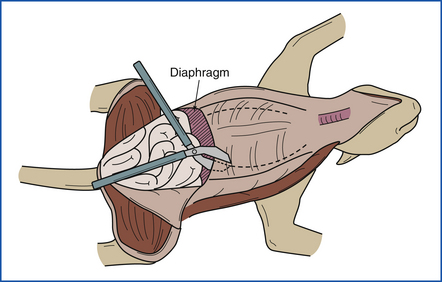
FIGURE 39-12 The ventral portion of the rib cage is removed by cutting the ribs bilaterally (on both sides) with heavy pruning shears.
TECHNICIAN NOTE
The history and preliminary findings are reviewed with the clinician after all body cavities have been opened.
The thyroid, parathyroids, and thymus should be identified at this time and removed. The adrenal glands should then be identified and removed. The adrenal glands are sectioned, and the corticomedullary ratio is noted. The mandibular salivary glands, parotid salivary glands, parotid lymph nodes, jugular veins, and parapharyngeal and retropharyngeal lymph nodes are examined.
EXAMINATION OF SKULL AND BRAIN
Remove the tongue from the oral cavity, and reflect the tongue, tonsils, larynx, and esophagus caudally (Figure 39-13). An incision is made through the intermandibular muscles, along the medial surface of the ramus of each mandible, from the angle to the symphysis. The frenulum of the tongue is incised, and the tongue is pulled (or pushed) ventrally between the rami. The tongue is used as a handle, and right and left paramedian incisions are extended from the larynx to the thoracic inlet, exposing the length of the trachea and esophagus. It is necessary to cut or disarticulate the hyoid bones dorsal to the pharynx to free the tongue, larynx, pharynx, trachea, and esophagus as a unit.
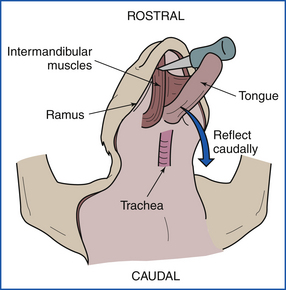
FIGURE 39-13 Examination of the tongue, tonsils, larynx, and esophagus. These are reflected caudally after the intermandibular muscles have been incised.
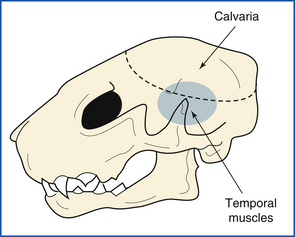
The spinal cord is transected by an incision into the ventral atlantooccipital joint. Atlantooccipital membranes, ligaments, and joint capsule are transected, disarticulating the head from the vertebral column (Figure 39-14, A and B). The skin is removed from the head by leaving it attached to the skin of the body and peeling the head forward out of the skin. The superficial muscles of the head are removed. External ears are opened and examined. Temporal muscles are removed, exposing the calvaria (skull cap) (Figure 39-15).
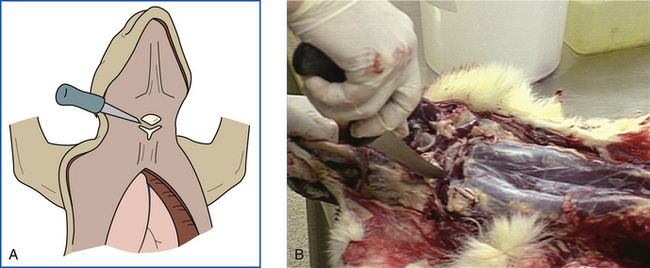
FIGURE 39-14 A-B, The spinal cord is transected ventrally by first making an incision into the atlantooccipital joint. The head is disarticulated from the vertebral column.
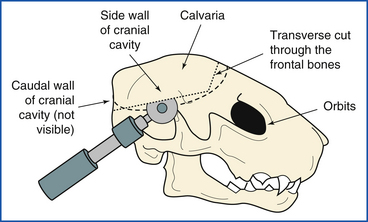
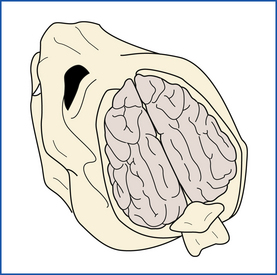
The calvaria and caudal wall of the cranial cavity are removed from the skull as a unit, exposing the dorsum of the brain. Three cuts are made with a Stryker saw, hacksaw, or meat saw to accomplish this. The first is a transverse cut through the frontal bones. This cut is usually made immediately caudal to the orbits. Care is taken to make the cut just deep enough to transect bone, but not deep enough to engage the brain beneath.
The second and third cuts are made through the side walls and caudal wall of the cranial cavity. At 45-degree angles to the longitudinal axis of the skull, they extend from the lateral ends of the transverse cut to the medial faces of the occipital condyles (Figure 39-16). In small animals, the bone may be broken away piecemeal, progressing cranial from the foramen magnum with scissors, bone-cutting forceps, or postmortem shears. The calvaria and caudal wall as a unit are pried loose from surrounding bones and removed. The meninges (the three membranes that cover the brain) and the surface of the brain are examined in situ (Figure 39-17).
For removal of the brain, the dorsal meninges are removed and the cranial nerves are transected, progressing rostrally from the foramen magnum. The brain is examined, tagged, and then immersed in 50% formalin. Brain slicing is postponed until after the brain has been thoroughly fixed in formalin.
The pituitary gland is removed from its fossa with the brain and examined. The middle ears (tympanic bullae) are opened ventrally by using rongeurs. For examination of the nasal septum, turbinates, and frontal or maxillary sinuses, the skull is sectioned longitudinally with a saw. The oral cavity is examined.
DISSECTION AND EXAMINATION OF THE NECK AND THORACIC VISCERA
The cervical and thoracic viscera are removed from the body and examined. The trachea and esophagus are used as a handle, and the thoracic organs are removed from the body by cutting between the dorsal mediastinum and the vertebral column from the thoracic inlet back to the diaphragm. The dorsal incision is carried above the aorta. At the diaphragm, the aorta, postcava, and esophagus are transected, and the throat, neck, and thoracic viscera are removed as a unit. This unit is dissected and examined from tongue to aorta. The tongue is examined and sliced transversely. The pharynx is opened middorsally with scissors, and the pharynx and tonsils are examined. The esophagus is opened longitudinally by a middorsal incision. The larynx is opened middorsally with utility scissors or a knife, and the incision is extended through the trachea to the lungs. The lungs are examined and palpated (for fine fixation, the lung may be “inflated” with 10% formalin, gravity fed into the trachea or bronchi).
The right side of the heart and pulmonary arteries are examined before the lungs are cut. The heart is held so that the right side is on the prosector’s left and the left side is on the right. The right auricle is incised, and the incision is extended away from the prosector to the far end of the right atrium (Figure 39-18, A). The incision is then directed downward through the right atrioventricular (AV) valve and along the interventricular septum to the apex of the right ventricle. The incision is continued up along the interventricular septum through the pulmonic valve into the pulmonary artery (Figure 39-18, B). The right free wall of the heart is reflected, and the valves and endocardial surfaces are examined. The pulmonary arteries are opened into each lung lobe (Figure 39-18, C). Air passages and transected lung tissue are examined. Sections of lung are squeezed gently to assess fluid content. Bronchial lymph nodes are examined and sliced longitudinally.
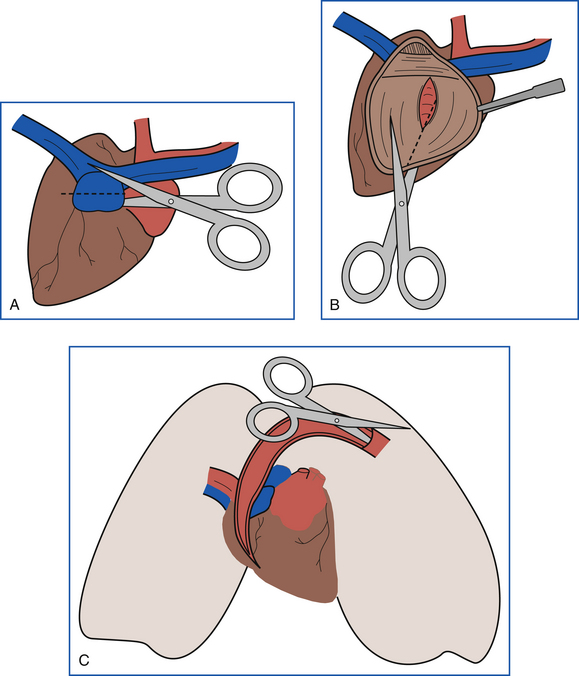
FIGURE 39-18 A, Dissection of the heart begins with an incision into the right auricle. B, The heart is incised through the right atrium and ventricle following the interventricular septum. The incision is then continued into the pulmonary artery. C, The pulmonary artery is incised, and the incision is continued into each lung lobe.
The heart and major vessels are then removed from the lungs. The heart is again held so that the right side is on the prosector’s left and the left side is to the right. The left auricle is incised, and the incision is extended away from the prosector to the far end of the left atrium (Figure 39-19, A). The incision is then directed downward through the left AV valve and along the center of the left ventricular free wall to the apex of the left ventricle (Figure 39-19, B). The aortic valve and aorta are examined by cutting up through the septal leaflet of the left AV valve and into the aorta (Figure 39-19, C). The valves, endocardium, and endothelial surfaces are then examined. The heart may then be weighed after all major vessels have been removed at the base of the heart. Next the myocardium is sliced longitudinally for examination, and samples are collected. Small hearts should be fixed whole after they have been opened.
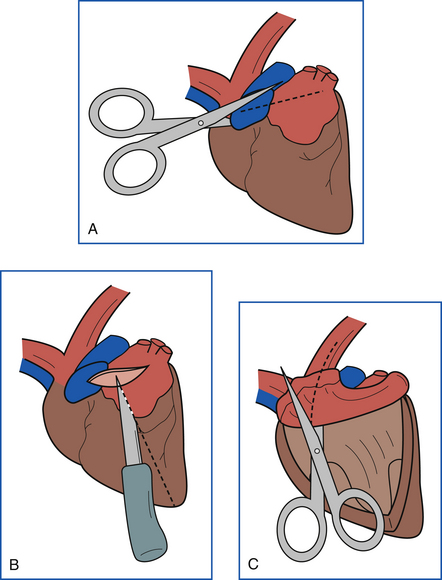
FIGURE 39-19 A, The second half of the heart is dissected by incising the left auricle and continuing the incision into the left atrium. B, From the left atrium, the incision is continued through the left AV valve into the left ventricle to the apex. C, The incision is then continued into the aorta.
DISSECTION AND EXAMINATION OF THE ABDOMINAL CAVITY
Examination of the abdominal cavity begins with examination of the portal vein as it enters the liver and removal of the intestinal tract. The intestine is removed by stripping the mesentery from the small intestine and colon. The duodenum is clamped or tied and transected distal to the tail of the pancreas. The colon is transected at the pelvic inlet, and the intestinal tract is removed and set aside for later examination. If the animal is thought to have intestinal disease, the intestines are examined at this time.
The stomach, liver, spleen, pancreas, and duodenum are removed by cutting the attachments between these organs, the diaphragm, and ventral body wall. The spleen is examined and sectioned. The stomach is opened along the greater curvature, and the duodenum is opened. The gallbladder is squeezed to determine patency of the bile duct, the gallbladder is opened, and the stomach, duodenum, and pancreas are dissected from the liver, examined, and sectioned. A section of the right side of the pancreas is collected with the duodenum, and a section of the left side is collected separately. The liver is then examined and sectioned. Multiple slices (approximately 1 cm apart) are made in the liver, and samples are collected from each lobe.
DISSECTION AND EXAMINATION OF THE FEMALE REPRODUCTIVE TRACT, URINARY TRACT, AND ACCESSORY MALE REPRODUCTIVE ORGANS
The floor of the pelvis should be removed to facilitate examination and removal of the urogenital tract. This is accomplished by making paramedian cuts through the obturator foramina on the floor of the pelvis. The mesovarium, mesosalpinx, and mesometrium are examined. Ovaries, oviducts, and uterus are freed from mesentery and reflected toward the pelvis.
The left kidney is dissected free from the abdominal wall, but remains attached to the ureter. It is sliced longitudinally, and the capsule is peeled from one half of the kidney (Figure 39-20). The surface, cortex, medulla, and pelvis are examined. The ureters are examined and palpated. If the ureters or renal pelvis is dilated, the ureters are opened from kidney to bladder with a scissors. The ureter is cut near the bladder, and the kidney is removed. Sections are taken from the middle of both halves, one with the capsule intact and one with the capsule removed. Samples are also collected from any other renal lesions. The right kidney is then examined in the same manner.
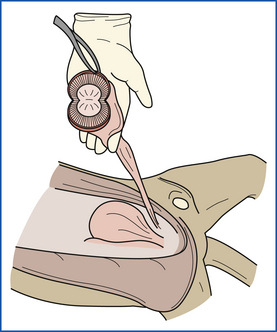
FIGURE 39-20 The kidney is dissected with a longitudinal incision. The renal capsule is then peeled away to reveal the renal surfaces.
The urinary bladder is incised and opened (Figure 39-21). Serosa, mucosa, and cut surfaces are examined. Care should be taken not to rub mucosal surfaces. The urethra is opened and examined, and the prostate is examined and sectioned.

FIGURE 39-21 The urinary bladder is incised and opened in situ, and the incision is continued through the prostate and urethra.
Ovaries, oviducts, uterus, cervix, vagina, and vulva are removed from the carcass as a unit. Large ovaries are sliced longitudinally, oviducts are examined and palpated, and uterus, cervix, vagina, and vulva are opened with scissors or a knife. Serosa, contents of the uterus, endometrium, cut surfaces, cervical folds, and luminal surface of vagina and vulva are examined.
DISSECTION AND EXAMINATION OF THE INTESTINAL TRACT
The intestinal tract is examined by laying it out on the table and examining the serosal surface. The tract is then opened from the duodenum through the colon by using scissors. The mucosa is examined, and sections are taken from the jejunum, ileum, and colon, including lesions. The mucosa should be handled carefully to prevent creation of artifacts. Once sections have been taken, the mucosa can be gently rinsed with water to reveal mucosal details.
DISSECTION AND EXAMINATION OF THE ABDOMINAL AORTA, RECTUM, AND ANAL GLANDS
The abdominal aorta is opened longitudinally and examined, and a section is taken for histologic examination. The rectum is opened, and the anal sacs are examined.
DISSECTION AND EXAMINATION OF THE VERTEBRAL COLUMN AND SPINAL CORD
The manner and extent to which the vertebral column is dissected will depend on the history and size of the animal. For more extensive examination of the vertebral column and spinal cord, the remaining rib cage, the four limbs, and most of the dorsal spinal musculature are removed from the vertebral column and pelvis. A dorsal laminectomy is performed to demonstrate ventral or lateral impingements on the spinal cord of small animals. The spinal cord is covered dorsally by the vertebral arches; each arch consists of a right and left lamina, which unite to form the dorsal spinous process (spine). Beginning at the atlas, the right and left laminae of each vertebra are cut with bone shears or, in larger specimens, with the Stryker saw. The laminae of atlas and axis are broad and difficult to cut, but the remainder of the vertebrae present little difficulty. Once several dorsal arches have been freed, the connected arches are held as a handle and used to reflect succeeding arches dorsally and caudally. When the entire roof of the vertebral canal has been removed, meninges, spinal cord, and vertebrae are examined in situ. Spinal cord and meninges are removed by cutting spinal nerve roots, and the floor of the vertebral canal and the intervertebral disks are examined.
NECROPSY VARIATIONS
The following sections describe variations on the basic small mammal necropsy procedure that are useful in dealing with ruminants, horses, pigs, fetal farm animals, birds, and laboratory animals.
RUMINANTS
Necropsy of a ruminant is done with the animal in left lateral recumbency. This positions the rumen on the down side, which facilitates removal of the abdominal organs (Figure 39-22).The right inguinal area is incised, and the coxofemoral joint is penetrated. Muscles near the pelvis are severed, and the right hind limb is reflected away from the body. Each mammary gland is undermined at its body wall attachment and retracted caudally. The mammary glands should remain attached to the body by the perineal skin so that gland position can be maintained when they are serially sectioned. The right axilla is incised so that the entire forelimb can be reflected away from the body. The upper half of the trunk is then skinned.
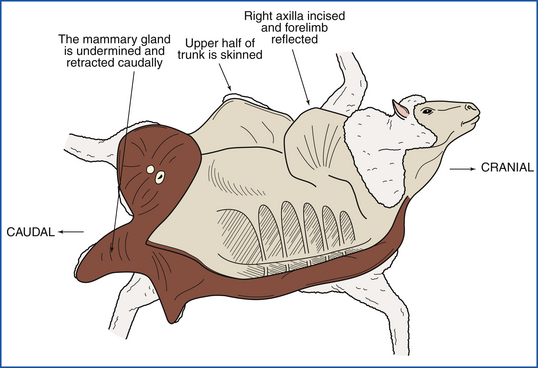
FIGURE 39-22 The ruminant is positioned in left lateral recumbency, which positions the rumen on the “down side.” This facilitates access to the abdominal organs.
Entry into the abdomen is initiated by cutting the body wall behind the last rib. Cuts along the midline and upper flank permit exposure of the cavity (Figure 39-23). After an in situ inspection, the omentum is stripped from the forestomachs; double-string ligatures are placed on the duodenum (near the pylorus) and rectum, and a single ligature is placed around the esophagus near the reticulum. This prevents excessive leakage of contents. If the rumen is severely distended with gas, a tiny nick in the wall will release the gas without excessive contamination. The entire intestinal tract is removed by severing the mesenteric root, and the intestines are opened, examined, and sampled while still attached to the mesentery (Figure 39-24). The dorsal attachments to the rumen are cut, and the forestomachs and abomasum are rolled onto the floor. Ruminoreticular contents should be examined for foreign objects or undesirable plant material.
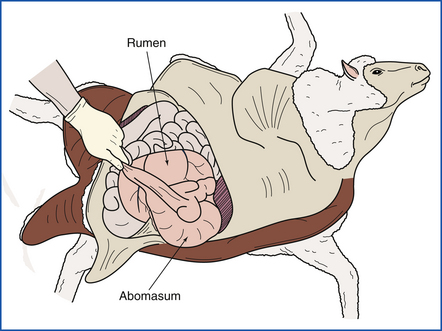
FIGURE 39-23 Access to the abdominal cavity is achieved by making an incision along the midline, followed by cuts along the last ribs.
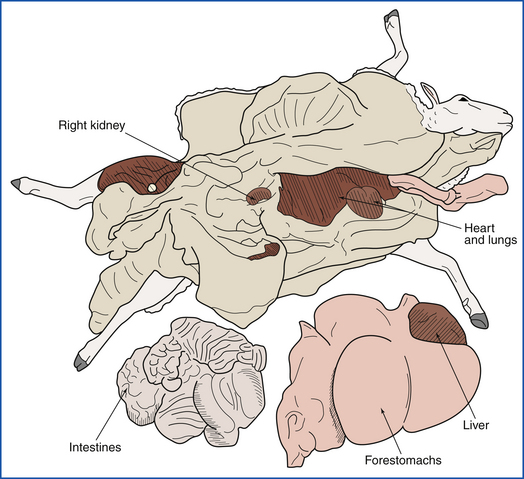
FIGURE 39-24 After the omentum is examined in situ, it is stripped from the forestomachs. The duodenum, rectum, and esophagus are ligated, and the entire intestinal tract is removed by severing the mesenteric root.
Because of the size of the chest cavity and difficulty in cutting the ribs in mature animals, the thoracic contents are usually removed via the abdominal cavity. The right side of the rib cage is easily removed with lopping shears in young animals. The diaphragm is incised along its costal attachment, and the ventral mediastinal attachments are severed. The tongue, larynx, and trachea are freed of their attachments and threaded into the thoracic inlet. The entire unit is pulled into the abdomen.
The remainder of the necropsy is similar to that described for the small mammal.
HORSE
Left lateral recumbency is the preferred body position for necropsy of a horse. Reflect the right forelimb and right hind limb as described for the ruminant. Skin the trunk, and enter the abdomen. The intestines are removed in the following multistep process:
1. Retract and drape the free portion of the large colon over the horse’s body to ease access to the abdominal viscera.
2. Sever the ileum at the ileocecal junction, and remove the small intestine by cutting along the mesenteric insertion.
3. Cut the duodenum where it wraps around the mesenteric root; a string ligature here will reduce contamination by digesta.
4. Next remove the small intestine mesentery.
5. Sever the small colon near the pelvic inlet and detach along the mesocolon.
6. With careful blunt dissection, peel the soft connective tissue and pancreas adhering to the large colon near the mesenteric root. When your hand can encircle the mesenteric root, advance the knife to cut as close to the aorta as possible.
7. Obtain samples from the large colon and cecum and empty them of their contents. Rinse and examine the mucosal surfaces.
The remainder of the necropsy is similar to the procedure done on ruminants and small mammals. Special attention should be given to the guttural pouches and jugular veins.
All joints of the appendicular skeleton should be opened. Joints are best approached from the medial and cranial aspects after the skin has been reflected. The coffin joint is the most difficult joint to access, but access is easier if the foot can be split (with a saw). Splitting the foot also facilitates examination of the hoof wall lamina. Spinal cord removal is extremely tedious without access to a meat cutter’s band saw. Alternatively the cervical cord can be extracted by disarticulating the cervical vertebrae, one by one. Remove as much muscle as possible before disarticulating at the facets and annulus fibrosus. Sever the nerve roots by advancing a pair of thin, long-handled scissors along the wall of the spinal canal.
PIG
For necropsy of a pig, small mammal procedures apply. Because enteric disease is a frequent reason for necropsy, attention should be focused on collecting the freshest possible gut tissues. It is customary to examine the nasal turbinates of market-weight pigs. This is accomplished with a transverse saw cut of the snout at the level of the second and third premolars. Mature swine have sinus bone covering much of the calvaria. Brain removal is best accomplished by hemisectioning the head.
FETUS
Fetuses are often severely autolyzed, sometimes mummified, because of in utero retention after death. Nevertheless, sample collection is justified. Fetal membranes (placenta) should be carefully examined, and all abnormal-appearing sites should be sampled. Equine fetal membranes areexamined for completeness. Fetuses from cattle and horses are measured (weighed if possible) to estimate gestational age. Standardized charts are available in many veterinary textbooks. Crown-to-rump length (the distance from the poll to the tail base along the dorsum) is determined with a flexible tape measure.
The fetus is placed in right lateral recumbency because fetal abdominal organs are most easily sampled from the left side. The left limbs are removed, and the body wall is skinned. The abdominal wall is incised behind the rib, and the incision is extended along the ribs, sublumbar flank, and midline without touching the underlying viscera or allowing the body wall to drop onto the viscera. The left hemidiaphragm and costosternal cartilage are cut with the tip of the knife, and, similar to the abdominal approach, the rib cage is retracted without touching the underlying tissues. The ribs usually break along the vertebral column.
Organs are sampled in situ with sterile tools and aseptic technique. The organs of greatest interest for viral cultures are lungs, liver, kidneys, and lymphoid tissue (e.g., spleen and thymus). Samples for bacterial culture are usually taken from stomach fluid, lungs, and liver. The body can now be routinely examined for anatomic correctness, and samples can be obtained for histologic examination. The umbilical stump and brain should always be examined and collected.
BIRDS
Birds suspected of having infectious or zoonotic diseases (psittacosis) should be submitted to a diagnostic laboratory for necropsy. If avian necropsies are done, the prosector should wear protective clothing, gloves, and a mask. The carcass should be wetted by immersing it in warm soapy water or disinfectant to decrease the spread of infectious agents and reduce the amount of irritating, aerosolized dander and feathers. After the external examination, the bird is placed in dorsal recumbency, and the feathers are parted along the ventral midline. For small birds, one wing may be pinned to a corkboard or cardboard for easier dissection. A skin incision extending from the beak to the vent is made, and the skin is reflected. The legs are reflected laterally by cutting into and exposing the coxofemoral joint. The abdomen is opened as in the small mammal necropsy technique, and the sternum and lateral ribs are removed by cutting through the sternum, ribs, coracoid bones, and clavicles with scissors, utility scissors, poultry shears, or pruning shears, depending on the size of the bird. Air sacs and abdominal and thoracic contents are examined, and samples are taken for examination by a microbiologist if necessary.
TECHNICIAN NOTE
Birds suspected of having infectious or zoonotic diseases (psittacosis) should be submitted to a diagnostic laboratory for necropsy.
For small birds (e.g., hummingbirds or finches), the entire carcass can be fixed after the body cavities have been opened. For larger birds, the joints, nerves, muscles, eyes, brain, and spinal cord can be examined as in the small mammal necropsy technique. The spinal cord in small birds is difficult to remove without damaging it. The entire vertebral column with the spinal cord inside should be collected and fixed after the limbs, head, and muscles surrounding the vertebral column have been removed. The vertebral column and spinal cord can be submitted whole and decalcified and trimmed by the pathology laboratory.
In larger birds, the thyroid and parathyroid glands, located at the thoracic inlet adjacent to the carotid arteries, are removed. The heart is removed and examined. The entire gastrointestinal tract, liver, pancreas, and spleen are removed, beginning with the esophagus. The spleen, liver, and gastrointestinal tract are examined, and specimens are collected as in the small mammal necropsy. The tongue, trachea, and lungs are then removed and examined, and samples are collected. The gonads (only the left ovary is present in birds) and adrenal glands are removed and fixed whole in small birds, and then the kidneys are removed, examined, and sampled.
LABORATORY ANIMALS
The necropsy technique for small mammals can be used for most laboratory animals including rodents; however, for evaluation of the health status of laboratory animal colonies, more extensive testing is required. Complete health monitoring includes serology, bacteriology, parasitology, and genetic monitoring in addition to gross pathology and histopathology. It is beyond the scope of this chapter to include techniques for blood collection for serology, bacteriologic sampling techniques, techniques for ectoparasite and endoparasite examination, and genetic monitoring. Many laboratories provide complete diagnostic services and health monitoring for laboratory animals, and such laboratories should be contacted before specimens (either live animals or samples from necropsies) are submitted to them.
TECHNICIAN NOTE
The necropsy technique for small mammals can be used for most laboratory animals. However, for evaluation of the health status of laboratory animal colonies, more extensive testing is required.
The technique for small mammals is followed except for the following variations for small rodents. An entire hind limb can be removed at the coxofemoral joint, the skin can be removed, and the limb can be fixed whole for bone, bone marrow, synovium, nerve, and skeletal muscle samples. For small rodents (e.g., mice, hamsters, gerbils), the lungs should be inflated with formalin after the thorax has been opened but before the lungs and heart are removed from the thorax. A 5- to 10-ml syringe with a small- to medium-bore needle is filled with formalin. The needle is threaded caudally for a few millimeters from the middle of the trachea, and the trachea is clamped with a hemostat rostral to the needle insertion site. The lungs are gently inflated until they fill the thorax. The trachea is then clamped or tied below the needle insertion site, and the lungs and heart are removed from the chest as described on p. 1353. The heart is often too small to open easily, and before fixation, it can be cut longitudinally through the middle of the right and left ventricles.
The intestinal tract can be opened in a few places and then infused with formalin by using a 5-ml syringe and a small-bore needle, or the entire tract can be opened up and pinned to cardboard before fixation. The kidney and adrenal gland on each side can be removed as a unit and left together for fixation after the kidney has been incised longitudinally to evaluate the pelvis for hydronephrosis. The uterus and ovaries or the testes and seminal vesicles and coagulating gland can be removed along with the urinary bladder and fixed whole without sectioning.
The spinal cord in small animals is difficult to remove without damaging it. The entire vertebral column with the spinal cord inside should be collected and fixed after the limbs, head, and muscles surrounding the vertebral column have been removed. The vertebral column and spinal cord can be submitted whole and decalcified and trimmed by the pathology laboratory.
COSMETIC NECROPSIES
Cosmetic necropsies, although of more limited value than complete necropsies, can be performed when the disease processes are limited to the abdomen and chest. A midline incision is made in the ventral abdomen from the xiphoid to the pubis. The abdominal organs are examined in situ, and the diaphragm is cut away from the ventral rib cage. The colon and urethra are tied off at the pelvic inlet and transected caudal to the tie. By reaching up through the diaphragm, the prosector can grasp and transect the trachea and esophagus at the thoracic inlet. The thoracic and abdominal contents are removed as a unit and dissected and described as in a noncosmetic necropsy. The body cavities are examined. The cavities are filled with paper towels, and the ventral abdominal incision is sutured.