Surgical Assisting—Duties during Surgery
After completion of this chapter, the reader will be able to:
• Describe the procedure for performing an instrument count.
• Describe the procedure for performing a sponge count.
• Discuss the correct method of loading and passing a scalpel blade and handle.
• Describe the techniques used to pass various types of surgical instruments safely to the surgeon.
• Discuss the role of the sterile surgical assistant as related to care of the surgical field.
• Discuss the desired method of handling tissue to avoid trauma.
• Describe the various methods of maintaining hemostasis on the operative field.
• Describe the correct procedure for draping a surgical patient.
• Discuss the various options for administering/introducing drugs onto the operative field and surgical site.
Instrument Handling and Passing
Accepting sterile packs and equipment from a circulating nurse is a critical responsibility of the assistant. For a double-wrapped pack, the outer wrap should be properly unfolded by the circulating nurse and then offered to the assistant. Care must be taken so that the assistant does not contaminate himself/herself when taking the pack. When taking a peel packed item from the circulating nurse, it is equally important that the assistant be aware of the nonsterile portions of the packaging and avoid touching those areas. It bears saying that the assistant needs to be attentive to the situation when taking any sterile item from the circulating nurse. Miscommunication, a quick movement, or not securely grabbing the item can result in disaster. Either dropping the equipment or contaminating the equipment/supply would mandate a flash sterilization procedure. Worse yet, dropping the equipment/supply and having it break or be damaged as it hits the floor are a catastrophe in the operating room. The surgical assistant is responsible for properly passing the instruments to the surgeon, maintaining the instrument (or back) table, and ensuring the working order of the instrumentation throughout the procedure. Setting up and managing the instrument table allows the technician to assist the surgeon more efficiently. An organized table makes it easier for the technician to find the requested instrument quickly. Instruments should be laid out so that the ring handles (or shafts) of the instruments are closest to the assistant. Where the technician stands in relation to the table and patient dictates which direction the instruments should face.
Some technicians scrub into a procedure with the sole responsibility of managing the instrument table (e.g., for cardiovascular procedures, total hip replacements). Procedures involving extensive instrumentation and equipment greatly benefit from having a technician “run the table.” At other times the technician may be required to scrub in to assist the surgeon with the procedure.
Properly passing the instruments to the surgeon is a skill that must be mastered not only for efficiency in movement but for safety as well. The shape and purpose of the instrument determines the method used to pass it safely and properly to the surgeon.
Scalpel Blades and Handles
Scalpel blades should be handled with the greatest respect. Needle holders are the only instrument that should be used to place the blade onto and to remove the blade from the scalpel handle. The use of any other instrument or device (e.g., hemostat, finger) is inappropriate and can be dangerous. Needle holders are designed to hold metal and therefore can withstand the stress of clamping a metal blade and then placing it on the handle. Hemostat tips are designed to grasp tissue or vessels and will be damaged if used to place a blade on a scalpel handle.
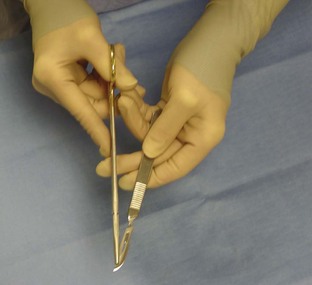
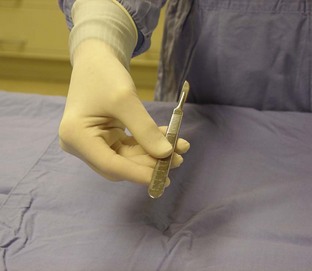
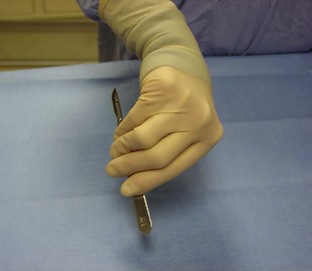
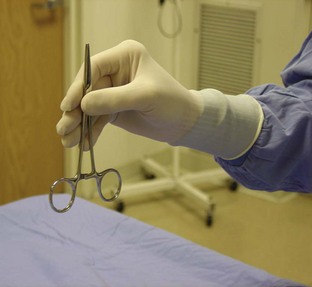
To load a handle with a scalpel blade, the needle holder should firmly grasp the blade on the noncutting edge and slip it onto the handle (Figure 6-1). Once loaded, the handle and blade should be passed to the surgeon in a specific manner. The technician should hold the scalpel handle with the blade facing away from the hand, with the point toward the technician (Figure 6-2). The thumb and index finger should be holding the handle with the hand in a supinated position. Pronation of the technician’s hand follows as the handle is passed into the waiting hand of the surgeon (Figure 6-3). As the surgeon grasps the handle, the technician should maintain the forward momentum of the hand so as not to contact the cutting edge of the blade. This method of passing the instrument allows the cutting edge of the blade to face away from the assistant as well as the surgeon for optimal safety and handling.
Threading Eyed Needles
The needle holder should be placed at about two-thirds into the needle’s curve for secure and controlled handling. The suture to be passed through the eye of the needle should pass from the inside of the needle’s curve to the outside. This orientation in the eye allows the short end of the suture to fall away from the outside curve of the needle, reducing the chance that the suture will pull out of the needle. When loading a needle holder with a needle and suture, whether threaded or swaged, the assistant must remember which hand is the surgeon’s dominant hand. The needle and suture should be placed in the needle holder so that the surgeon can use it immediately without having to adjust the needle’s position. For a right-handed surgeon, the point of the needle should face to the left, whereas for a left-handed surgeon, the needle point should face to the right (Figure 6-4). Suture used with eyed needles is most often cut from a reel or cassette. Careful technique must be used in order to avoid any contamination of the sterile field. To begin the process, the circulating nurse removes the cap from the cassette. He/she then grabs the exposed suture and pulls it straight up, exposing approximately 6 inches of suture. Care must be taken to avoid contaminating the suture by touching the inside of the cassette stopper lip. The sterile assistant or surgeon then grasps the suture below the level that was initially exposed. The sterile person, using a sterile operating scissors, then cuts the suture close to the hand, between his/her hand and the circulating nurse’s hand. This act then allows the circulating nurse to remove the originally exposed/contaminated suture from the area. The sterile person, using a hand-over-hand motion, then pulls up as much suture as is needed. The sterile person then cuts the suture close to the cassette without contaminating the scissors.
Passing Ring-Handled and Other Instruments
When passing an instrument to the surgeon, it is important to remember to place the instrument firmly in the palm of the waiting hand to decrease the chance that the instrument will be dropped. The surgeon must know that the instrument is in hand without having to look up from the field.
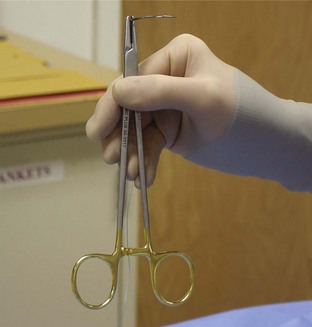
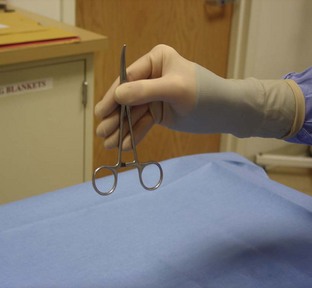
The first ratchet of a ring-handled instrument should be closed before the instrument is passed. The ring handles should be facing the floor, and the tip of the instrument facing the ceiling. The box lock should be held between the assistant’s thumb and index finger, with the shaft of the instrument stabilized by the remaining fingers of the delivering hand (Figure 6-5).
The technician should hold an instrument with a curved tip with the curve facing the thumb holding the instrument (Figure 6-6). When held in this fashion, after being passed to the surgeon, the instrument is positioned for immediate placement on the tissue.
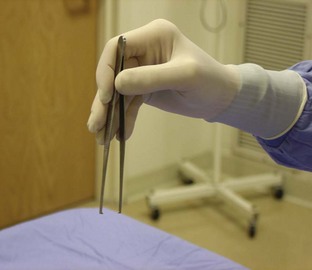
When passing an instrument without ring handles, such as a thumb tissue forceps, the technician should hold it with the tips facing the floor. The other end of the instrument should be held firmly with the thumb and index finger while the remaining fingers stabilize the instrument (Figure 6-7). When held in this manner, once placed in the hand of the surgeon, the instrument is ready to be used.
Tissue Handling
The careful handling of tissue in the surgical field is an extremely important responsibility of the surgical assistant. Healthy tissue needs to be handled appropriately so as not to cause trauma. Unhealthy tissue requires extreme care in handling so as not to compromise its viability further. The surgical assistant must be aware of the status of the tissue in the field and must be familiar with appropriate methods of tissue retraction. Healthy tissue may withstand the pressure of a handheld retractor, but too much pressure may cause vascular tissue damage. If too little retraction is provided, however, the surgeon will not be able to see clearly, and the procedure may be compromised. “Finding a happy medium” is the job of the surgical assistant.
When a self-retaining retractor (e.g., Balfour retractor for abdomen, Finochietto retractor for chest) is used, a moist lap pad is generally placed between the blades of the retractor and the tissue. The lap pad acts as a cushion to alleviate excessive pressure on the tissue and helps keep the tissues moist. For some situations the surgeon may choose to place stay sutures in an organ to facilitate retraction or manipulation of the organ. Assistants holding stay sutures must be careful not to hold them too firmly because of the risk of ripping the suture from the tissue.
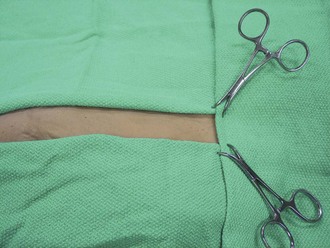
Another situation that requires careful tissue handling is during an enterotomy or anastomosis. Often the surgeon has the assistant use his/her fingers as “clamps.” After milking as much intestinal content away from the proposed intestinal incision site, the assistant will use the index and middle fingers to clamp the tissue. Care must be taken to provide adequate stabilization of the tissue without putting excessive pressure on the delicate structure.
Keeping Tissues Moist
Another important duty of the surgical assistant is to keep the exposed tissues moist. Systemic hydration should be achieved and maintained through the infusion of intravenous (IV) fluids, but the tissue must be kept moist topically as well. Generally, an isotonic solution such as lactated Ringer’s solution or 0.9% normal saline is used as a lavage fluid. Depending on the surgical procedure, an antibiotic may be added to the solution for topical application.
One of the most important guidelines in surgical assisting states that “moist tissue is happy tissue.” If the tissues are kept moist, rather than allowed to dry out, the circulation is less compromised and tissue function remains intact. The heat from lights and exposure to room air makes tissue vulnerable to adverse conditions.
A bowl on the sterile field can be filled with warm isotonic solution. A single gauze square can be soaked in this lavage solution, and then squeezed while suspended above the exposed tissues to drip the lavage solution onto the tissues. It is important to avoid wiping or rubbing the gauze sponge on the tissue directly. The friction created even with gentle wiping or rubbing irritates the tissue and promotes the formation of adhesions between the irritated surface of the affected tissue and other abdominal organs or body tissues. Adhesions may become problematic for the patient, requiring more surgery later to correct. The bowl containing the warm lavage solution should be kept at the back of the instrument table, preferably on a separate tray, so that if spillage does occur, there is no contamination of the sterile field. Any spilled solution remains on the tray and does not soak the covering on the table.
Maintaining Hemostasis
Maintaining hemostasis on the surgical field is also an important duty of the scrubbed-in surgical assistant. If vessels are cut, the assistant should be ready to pass the necessary hemostat. Blotting the hemorrhaging site before the surgeon places the hemostat helps the surgeon place the clamp on the vessel without including excessive tissue in the hemostat. It is important to remember that bleeding tissue should be blotted, not wiped, when trying to achieve hemostasis. Wiping with a sponge may cause coagulation already initiated to be wiped away. Firm, but not excessive, pressure blotting is more effective. The blood-soaked sponge count can serve as an estimate of blood loss. A 3 × 3–inch sponge holds approximately 6 mL of blood. A 4 × 4–inch sponge holds approximately 10 mL of blood. Ideally, only radiopaque sponges should be included in surgical packs. Less expensive, nonradiopaque sponges can be used for routine external use.
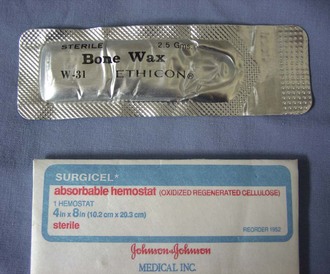
Other items available for controlling hemostasis are products such as absorbable gelatin or cellulose sponge (Gelfoam, Pfizer, New York; Surgicel, Johnson & Johnson Ethicon, Somerville, NJ) and bone wax (Figure 6-8). Gelfoam is gelatin sponge material that is absorbent and, when placed in a tissue defect (e.g., a punch biopsy site on the liver), encourages hemostasis by swelling to fill the defect. Surgicel is a cellulose product that, when laid on a tissue surface, promotes hemostasis by enhancing clot formation. Although Surgicel is absorbable, some sources suggest its removal after achievement of hemostasis because the product may inhibit callus formation and encourage infection. Bone wax, as the name implies, is a hemostatic agent made of beeswax and a softening agent that is used on a cut bone surface to assist with hemorrhage control. It is a poorly absorbed product and thus should be used sparingly.
Hemostasis can also be achieved by the use of electrocautery. The assistant, at the direction of the surgeon, may cauterize tissue or a vessel or may elevate the hemostat that is on the vessel so that the surgeon can activate the cautery.
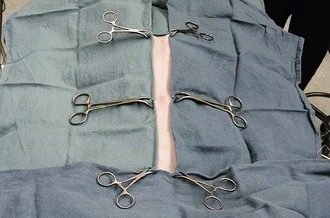
Equipment Count
The first duty that the surgical assistant should perform is an instrument count. An instrument count documents how many instruments are present at the outset of the procedure. Before the surgical site is closed, a second count of the instruments should be done. Most anesthesia logs have a space to record the initial surgical instrument count and the instrument and “sharps” count at closure. The circulating nurse helps the surgical assistant keep track of how many instruments (if any) were removed from the sterile field and how many sharps were used.
Sponge Count
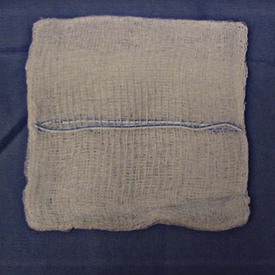
Next, the assistant should perform a sponge count. Only radiopaque sponges should be used in surgical situations (Figure 6-9). These gauze sponges have a radiopaque string woven into the fiber that is visible on a radiograph if a sponge is inadvertently left in a patient.
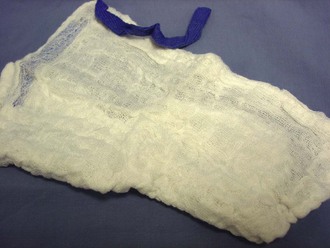
The initial quantity of sponges in the pack is counted before any sponges are used. As the sponges are used, they should be discarded in a dedicated sponge bowl or kick bucket. The sponge bowl should be a basin located off the sterile field or a back table. As the sponges are discarded, the circulating nurse can unfold and count each sponge. It is important to unfold the sponges in case two or more sponges are stuck together. All sponges, whether gauze squares or laparotomy (“lap”) pads (Figure 6-10), subsequently added to the sterile field must be accounted for as well.
Before the surgical site is closed, the sponges on the sterile field must be counted (by the surgical assistant) and the number of discarded sponges counted (by the circulating nurse), then totaled. The sum of these two groups of sponges must equal the number of sponges documented as entering the sterile field. If the numbers do not agree, the hunt for the missing sponge(s) begins. First, other trash receptacles in the room should be checked to see whether a sponge was discarded in an inappropriate place. If the missing sponge is not found there, the sterile team should evaluate the surgical field. Sponges may accidentally become tucked between the folds of the drapes. If the missing sponge is still not recovered, an intraoperative radiograph should be taken. If radiology is not an option, the wound should be closed and a radiograph taken in the immediate postoperative period. Using only radiopaque sponges intraoperatively aids in identifying sponges left in the patient. The incident must be thoroughly documented in the medical record in the event the sponge(s) is not recovered.
Draping—Basic Principles
Assistants are often involved with draping the patient, if not entirely responsible for this task. Draping materials can be quite varied. Some practices use cloth hand towels as the ground drape, or first layer, when draping a patient. Other larger top sheets can also be made of cloth or paper. Fenestrated drapes can be of the cloth variety or paper, but the paper option requires the surgeon to make the fenestration once the drape is opened on the sterile field. The use of ground drapes (towels) and then four top sheets is highly preferable to the use of a fenestrated drape. Linen drapes are advantageous because they can assist with patient thermal regulation better than the lightweight paper drapes. Linen drapes require laundering and refolding, a service that can be provided by an outside company or completed by the veterinary technician assistants in the practice. Paper drapes are available on bulk rolls and can be cut to custom fit the patient. Commercially prepared paper or paper/plastic combination drapes are also available. Regardless of the manufacturer, paper drapes are intended to be used as disposable, one-time-use items and should not be cleaned/laundered and reused. The type of procedure to be performed as well as the surgeon’s preference influences the choice of cloth or paper. Surgical procedures expected to be very messy (cesarean section, enterotomy, etc.) may be better served by the use of disposable paper drapes.
Foundational principles regarding draping can be applied to most surgical procedures. The edges where hands are holding ground drapes should be turned over to protect sterile gloves from being contaminated by the patient’s skin or hair. Sterile personnel placing drapes must also be careful to not contaminate gown sleeves or the front of the gown on the surgical table or anesthesia equipment/cables that may be near the patient. Ground towels, if used, should be placed on the patient in a specific order. The first drape is placed on the side of the patient that is closest (nearest) to the person draping. The drape for the opposite side of the patient should be placed second. A sterile person must never reach across a nonsterile field; therefore, the second drape can be placed after the sterile person walks to the other side of the table. After the two lateral drapes are placed, the cranial drape is placed. Placement of the drapes in relationship to the proposed incision site depends on the veterinarian’s preference and the procedure being performed. A general rule of thumb is to place the edge of the drape  to
to  inch from the incision line.
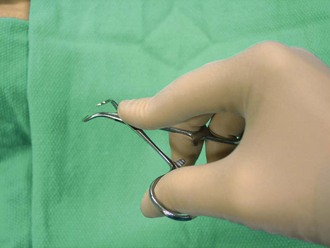
Once the cranial drape is in place, penetrating towel clamps must be used to secure the towels (Figure 6-11). Proper use and handling of the surgical instrument is imperative. The assistant’s ring finger and thumb should be placed in the ring handle of the instrument. This position allows the index finger to be extended to stabilize the box lock, thereby easing the task of placing the towel clamp properly (Figure 6-12). Penetrating towel clamps are designed to pierce the skin and secure the drapes to the patient (Figure 6-13). Care must be taken to ensure that the towel clamp points have penetrated through the drape material and into the patient’s skin. Towel clamps should be placed close to the intersecting corner of the two towels in order to avoid “bunching” of the drape. The fourth and final ground drape, the caudal drape, can be placed once the other three towels are secured. When placing cranial and caudal towels, in most cases, the person performing the draping must stand on the long side of the surgical table and rotate the waist and shoulder to place the towel. The habit of draping from the short end of the table should be avoided because often access to that end is blocked by equipment (e.g., anesthesia machine) or the instrument table.
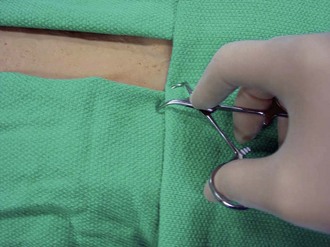
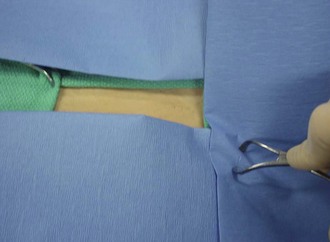
After the ground drapes have been secured, the top drape(s) should be placed. There are two options at this point for continuing the draping process. If a single fenestrated paper drape is to be used, the fenestration must be created before the drape is laid on the patient. Once the drape touches the patient, the underside is considered nonsterile and should not be manipulated. It is impossible to cut the fenestration after the drape is on the patient without contaminating the sterile field. To avoid this scenario, the fenestration should be cut, based on the basis of size of the opening created by the ground towels, before the drape is opened and placed on the patient. Once the drape (paper or linen) is on the patient, nonpenetrating towel clamps are used to secure the paper/top drape to the towels underneath. Nonpenetrating towel clamps should clamp around the neck of the penetrating towel clamp located under the paper drape (Figure 6-14). The second option for top drapes is to use four paper or linen large drapes and place them on the patient in exactly the same order the ground towels were placed. As with the fenestrated drape, these top sheets are secured to the towels underneath with the nonpenetrating towel clamps (Figure 6-15). The margins for draping a patient depend on the procedure being performed, the surgeon’s preference, and the potential for extended incisions or alternate surgical sites. Communication between the assistant and the surgeon is imperative to guarantee a properly draped patient.
Drug Administration
Administration of systemic drugs is not usually a task that is handled by the surgical assistant. A nonsterile member of the team, such as the circulating nurse or the anesthetist, is usually responsible for this task. Addition analgesics, antibiotics, and cardiac medications are all examples of types of drugs that could be administered intraoperatively. A surgical assistant may be involved with drug administration if it is a medication that needs to be administered via the surgical site. Infusion of a local anesthetic and addition of an antibiotic to lavage fluid are examples of intraoperative drug administration. If a medication is to be administered by syringe and needle in the sterile field, the circulating technician must aseptically open the desired size of syringe and needle onto the sterile field. The circulating nurse then holds the bottle of medication upside down. A sterile member of the team then takes the assembled sterile syringe and needle and inserts it into the bottle. After the sterile member withdraws the desired amount of medication, it is a good idea to recap the needle, have the circulating nurse take that needle off the syringe, and open another sterile needle to be used.
Suture-Related Responsibilities
In addition to loading the needle holder, as described earlier, there are other suture-related responsibilities for the surgical assistant. One responsibility is cutting the sutures once the veterinarian has completed the suture placement. Depending on the type of sutures used (absorbable versus nonabsorbable), the length to cut the sutures varies. Absorbable sutures are generally cut quite short, leaving only  to
to  inch of suture beyond the knot. Minimal amounts of absorbable suture are left in the patient to reduce the possibility of complications. Nonabsorbable suture is generally cut so that the suture ends extend about
  inch beyond the knot. Suitable length is necessary to facilitate suture removal in 10 to 14 days.
Another suture-related responsibility is “running” the suture when the surgeon is placing a continuous pattern. The technician’s responsibility is to keep the suture out of the incision and out of the way of the surgeon. If the path is clear, all the surgeon needs to do is place the stitches. Running the suture significantly reduces anesthesia time because the surgeon can suture much faster.
The third responsibility involving suture is recognizing suture patterns. Although closing wounds and placing sutures is not typically a skill that veterinary technicians need to master, some state Practice Acts do allow technicians to perform suturing. It is, however, essential that veterinary technicians are qualified to recognize suture patterns for various reasons. The technician must not only know what a suture line should look like but also be able to identify whether or not a suture line has been compromised (loosened sutures, missing sutures, etc.). It is also important to know the different suture patterns to appropriately remove the suture once the wound has healed.
Common Suture Patterns
Suture patterns are categorized by either the way they appose tissue edges (appositional, everting, inverting) or by the tissue layer where they are placed (subcutaneous, subcuticular, skin). Suture patterns are also named by the method of placement (interrupted or continuous).
Subcuticular versus Subcutaneous
A subcutaneous suture pattern is placed in the subcutaneous tissue layer. This pattern brings the skin edges into apposition but generally does not appropriately close the skin. This pattern is often used to decrease dead space in a wound, with skin sutures still being needed.
A subcuticular suture pattern is placed in the subcuticular space just under the skin. Often subcuticular patterns are placed to eliminate the need for skin sutures. The skin edges are close enough in apposition that further external sutures are unnecessary. This pattern may be used with canine castration incisions or cesarean section incisions or for animals that may chew at skin sutures. Most often these two patterns are placed in a continuous manner, but sometimes an interrupted pattern is indicated.
Continuous Patterns
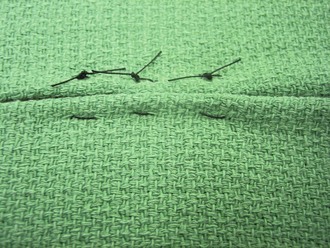
The most frequently used continuous pattern is a simple continuous. Figure 6-16 shows an example of a simple continuous pattern. There is a knot at either end of the suture line and continuous suture in between. Simple continuous patterns can be employed in subcutaneous space, subcuticularly, as a skin suture on muscle layers on the linea alba or any other area where a relatively air-tight/fluid-tight apposition is needed.

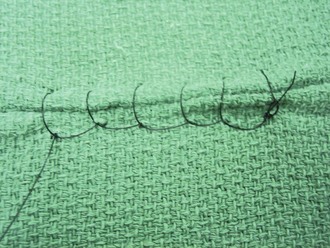
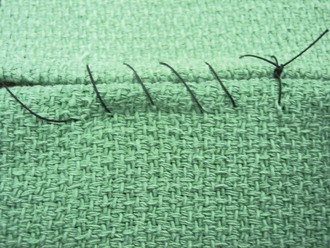
The Ford interlocking pattern (Figure 6-17) is another continuous pattern. Though not used as frequently in small animal surgery as it is in large animal surgery, it creates a very strong suture line.
Other types of continuous patterns are Lembert, Connell, Cushing, and horizontal mattress. A Lembert pattern is an inverting pattern generally used to close a hollow organ (stomach, urinary bladder, intestine, etc.). A Connell or Cushing pattern historically was used to close hollow organs but is not used very frequently anymore. These patterns can be placed to appose tissue edges but if pulled more tightly create an inverting pattern. The differentiating factor between the two patterns is how the stitches are placed and whether or not they enter the lumen of the organ. A continuous horizontal mattress pattern can be placed in a continuous pattern but is more frequently used in an interrupted fashion.
Interrupted Patterns
The simple interrupted pattern is probably the most frequently used suture pattern in veterinary surgery (Figure 6-18). It is an easy, quick, and versatile pattern to place. It is frequently used to close the skin, linea alba, muscle layers, subcutaneous space, and so on. It is also the pattern used to secure implants such as Penrose drains. The simple interrupted pattern results in appositional tissue edges unless excessive tension is used, in which case it results in an inverting pattern. Wound healing is poor with an inverting pattern, so care must be taken to ensure that the edges remain in apposition. The disadvantage to using the simple interrupted pattern is that it is time consuming to place as well as results in having more foreign material (suture) in the wound.
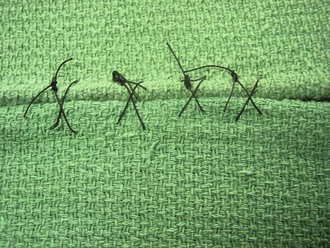
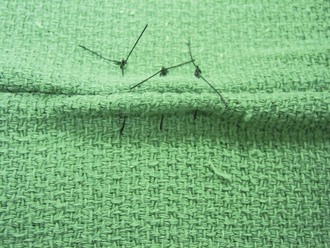
Another interrupted pattern in the horizontal mattress, seen in Figure 6-19. The horizontal mattress pattern is time consuming to place but is ideal in areas of tension. If pulled too tightly it will result in an everting pattern, so care must be used to keep the tissue edges appositional if that is the intention. A cruciate pattern (Figure 6-20) is a modification of the horizontal mattress. Once placed it results in an “X” over the wound edges.
A vertical mattress pattern (also called “far-far, near-near” because of how the needle is passed through the tissue) is a stronger suture pattern in areas of tension but is also time consuming to place. Its advantage over the horizontal mattress is that there are fewer incidences of unintentional everting of wound edges (Figure 6-21).
Suture Removal
When removing suture from a wound, the following instruments should be employed: a suture (stitch) removal scissors and a thumb tissue forceps. Some people like using a hemostat instead of a thumb tissue forceps, but because hemostats are intended for holding vessels, it is an inappropriate use of the instrument to have it grab suture. However, if the hemostat is not used in a surgical situation and is labeled as such (“exam room only”), then its use is permitted for suture removal. Sutures are generally removed 10 to 14 days postoperatively. If any medication has been administered that may delay healing, the suture removal date will need to be delayed. Before removal of any sutures, the incision must be inspected to ensure that healing has occurred. There should be no gaps in the incision, nor any drainage, redness or swelling.
When removing the suture from an interrupted pattern, use the thumb tissue forceps to grab one of the suture ends (tags) and gently apply tension away from the wound. Then place the hooked blade of the suture removal scissors beside the knot. With one quick motion, cut the suture and pull it out of the skin. This same method is employed until all sutures have been removed. If there is some scabbing on the wound, there will be increased discomfort for the patient. Also, if sutures have been allowed to remain in place longer than the recommended 10 to 14 days, the skin can begin to grow over the suture and bury the stitch. Removal of these sutures can be very uncomfortable for the patient and, depending on the amount of over growth, may require sedation of the patient.
For a continuous pattern, the removal process begins in the same fashion. Using a thumb tissue forceps, grab the free end of the suture at one end of the suture line and, using the hook blade of the suture removal scissors, cut the suture just next to the knot. It is unwise to pull the entire suture line through the wound because it may introduce bacteria to the entire wound. Therefore, every third or fourth stitch of the continuous pattern should be snipped, and then the shorter piece of suture pulled out. This method is also less uncomfortable for the patient. When the entire line of suture has been removed, the final stitch of the continuous pattern needs to be removed like an interrupted stitch.
Key Points
1. It is the usually the surgical assistant’s responsibility to perform both an instrument count and a sponge count before the procedure begins and again before the incision is closed.
2. Proper technique, for safety and efficiency reasons, must be used when passing various types of surgical instruments to the surgeon.
3. Tissue handling is a delicate process and must be properly performed by the surgical assistant.
4. Keeping exposed tissues moist intraoperatively is an essential task of the surgical assistant.
5. Effectively assisting the surgeon includes providing hemostasis on the surgical field.
6. The use of ground drapes and then four top sheets is highly preferable to the use of a fenestrated drape.
7. The edges of ground drapes where the hands are holding them should be turned over to protect the sterile gloves from being contaminated by the patient’s skin or hair.
8. A sterile person must never reach across a nonsterile field; therefore, the second drape can be placed after the sterile person walks to the other side of the table.
9. Proper use and handling of the surgical instrument are imperative.
10. Communication between the assistant and the surgeon is imperative to guarantee a properly draped patient.
11. If a medication is to be administered by syringe and needle in the sterile field, the circulating nurse must aseptically open the desired size of syringe and needle onto the sterile field.
12. The technician’s responsibility is to keep the suture out of the incision and out of the way of the surgeon.
13. Suture patterns are categorized by either the way they appose tissue edges or by the tissue layer where they are placed.
14. Sutures are generally removed 10 to 14 days postoperatively.
1. Why is it important to perform an instrument count and a sponge count at the beginning and end of the procedure?
2. Which of the following methods should be used to place a scalpel blade on a scalpel handle?
a. Thumb and index finger of the assistant’s nondominant hand.
3. True or False: When passing ring-handled instruments to the surgeon, the assistant should firmly place the rings into the surgeon’s palm.
4. True or False: Rubbing or wiping a “bleeder” with a gauze square is the best means of maintaining hemostasis.
5. Why is it important to know the approximate volume of blood a sponge can absorb?
6. True or False: The best drape material is 200–thread count linen.
7. The first ground drape placed for four corner draping is on which side of the patient?
8. True or False: Penetrating towel clamps are used to secure drapes to the patients.
9. What does it mean when a drape is fenestrated?
10. All of the following are interrupted suture patterns except:
1. If the numbers at the end of the procedure do not match the number of instruments and sponges at the beginning, it is possible that an instrument or sponge was accidentally left in the patient’s body cavity and needs to be removed before closure is completed.
5. To estimate the amount of blood volume the patient lost intraoperatively.
6. False. There is no best drape material.
9. That there is a hole or an opening in the drape that will be place over the proposed incision site.