Ophthalmic Procedures
Definition
Entropion refers to a “rolling in” of the eyelid. This can mean the upper lid only, lower lid only, or both lids. Different regions of the eyelid may be involved: the medial aspect, the lateral aspect, or the entire lid.
Indications
The primary indication for an entropion surgery is to alleviate ocular irritation caused by the eyelid or by the facial hairs adjacent to it, which come in contact with the conjunctiva and cornea.
Clinical Signs
Clinical signs of entropion may include lacrimation (tearing), blepharospasm (squinting, blinking), photophobia (sensitivity to light), enophthalmos (pulling back of the eye and a secondary, raised third eyelid), conjunctivitis (inflammation of the conjunctiva), keratitis (inflammation of the cornea) with or without corneal ulceration, and self-trauma (pawing at the eye). Decreased vision may also result from constant eyelid closure or from corneal scarring caused by the constant irritation.
Developmental entropion, or conformational entropion, is the most common form seen in small animals, mostly dogs. It is believed to be inherited. The most common breeds presented with developmental entropion are the Chinese Shar-Pei, chow chow, Saint Bernard, Rottweiler, Great Dane, bull mastiff, Labrador retriever, and English bulldog. Dogs with conformational entropion may have both eyes affected at the same time, but occasionally only one eye is affected.
Spastic entropion occurs secondary to ocular pain, which may result from a corneal foreign body, uveitis (intraocular inflammation), corneal ulceration, or chronic conjunctivitis. The painful eye is pulled back, causing the eyelid to roll inward. In cases of spastic entropion, the primary problem must be addressed and resolved. Application of a topical anesthetic usually temporarily resolves a spastic entropion. Dogs with developmental (conformational) entropion still have rolling in of the eyelid even after application of topical anesthetic.
Patient Positioning
The patient is placed in sternal or lateral recumbency for entropion surgery; several sandbags can be used to help position the head.
Patient Draping
Often a specialized eye drape is used for the patient undergoing entropion repair. The drape is secured with towel clamps.
Patient Preparation
Cleanliness and sterility of the surgical area are important in the patient with entropion. Shaving or clipping of the surgical area and the surrounding skin is done first. Baby shampoo diluted (1 : 3) with water is both effective and safe in cleansing the shaved area. Gauze squares soaked in the diluted baby shampoo are used to gently wipe away stray hairs and debris. Then, a very dilute (1 : 50) povidone-iodine (Betadine) solution is used in the same manner. To achieve asepsis, the dilute povidone-iodine solution should be in contact with the skin for approximately 1 minute. The area is gently wiped with gauze squares soaked in sterile saline to remove the solution. If necessary, the eye is flushed with saline to remove any dirt, particles, or mucus that may be trapped under the lids or within the surrounding conjunctiva.
Special Instruments
Because of the delicacy of eye procedures such as entropion repair, specialized instruments are often required. Appropriate care and handling of the following ophthalmic instruments are important:
Half-curved tissue forceps is a smaller forceps used for handling eyelid and conjunctival tissue (Figure 7-66). The forceps may be straight or curved with teeth structure that allows tissue to be manipulated without causing trauma.

FIGURE 7-66 Half-curved tissue forceps. Small forceps with fine jaws; the teeth of the forceps are structured to allow for tissue pickup without trauma. (From Sonsthagen TF: Veterinary instruments and equipment, ed 2, St Louis, Mosby, 2011.)
Chalazion forceps provide tissue stabilization and hemostasis (Figure 7-67).
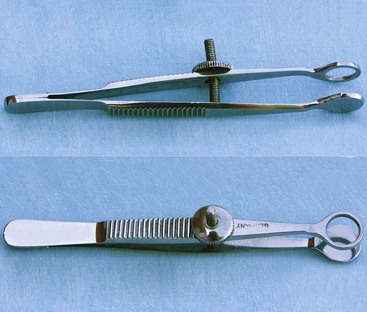
FIGURE 7-67 Chalazion forceps. The ends may be circular or oval, with round, smooth edges. (From Sonsthagen TF: Veterinary instruments and equipment, ed 2, St Louis, 2011, Mosby.)
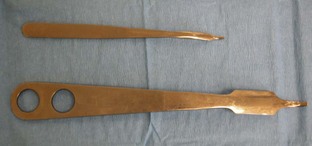
The Jaeger lid plate has flat, curved ends that are placed under the eyelid to provide a firm surface when making an incision (Figure 7-68).

Tenotomy scissors have short, blunt, narrowed tips for dividing and dissecting the muscles and tendons of the eye during recession and resection for strabismus surgery (Figure 7-69).
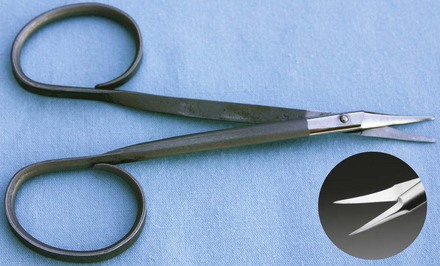
FIGURE 7-69 Tenotomy scissors. (From Sonsthagen TF: Veterinary instruments and equipment, ed 2, St Louis, 2011, Mosby.)
Needle holders are used for handling delicate suture needles needed for placing sutures in an eye and performing neurosurgery; fine needles are held by jaws attached to spring-loaded handles that catch or release with gentle pressure (Figure 7-70).

Surgical Options
Eyelid tacking: Eyelid tacking is performed in young animals to roll out the eyelid temporarily (Figure 7-71). Young puppies (usually up to 16-20 weeks) with conformational entropion are candidates for temporary placement of sutures or staples. The Chinese Shar-Pei is a breed that commonly benefits from eyelid tacking. Even though eyelid tacking is a relatively simple procedure, standard postoperative care is important. The animal should wear an Elizabethan collar until the sutures or staples are removed. In some cases, a repeat procedure may be necessary. Permanent correction is usually delayed until the animal reaches its adult conformation.
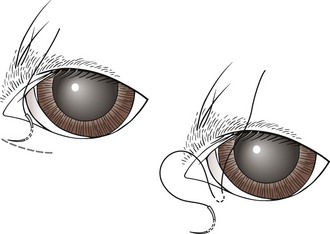
FIGURE 7-71 Eyelid tacking for entropion; sutures are placed to temporarily evert the eyelid margin. A few drops of surgical glue may be placed within the created furrow to minimize the tension on the sutures and prevent removal if the patient rubs his/her eye. (From Fossum TW, Hedlund CS, Hulse DA, et al: Small animal surgery, ed 3, St Louis, 2007, Mosby.)
In cases of spastic entropion, temporary eyelid tacking, in addition to treatment of the underlying cause, may result in resolution of the problem.
Holtz-Celsus procedure: Several techniques are described to correct conformational entropion. The Holtz-Celsus procedure is a widely used approach that involves excision of a crescent-shaped section of skin and muscle (a “smile”) from the affected portion of the eyelid (Figure 7-72). Eversion of the eyelid is accomplished by suturing the resulting skin defect.
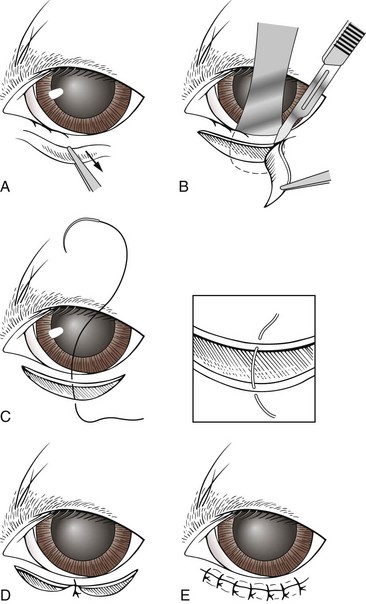
FIGURE 7-72 A, Holtz-Celsus procedure for entropion repair. B, Note the use of the Jaeger eyelid plate to stabilize the eyelid during skin incision. C-E, The surgeon then closes the defect. (From Fossum TW, Hedlund CS, Hulse DA, et al: Small animal surgery, ed 3, St Louis, 2007, Mosby.)
Subcutaneous sutures are usually not necessary with the Holtz-Celsus procedure. Skin sutures are placed approximately 1 to 2 mm apart in a simple interrupted pattern. Common sutures used are silk, gut, and polyglactin 910 (Vicryl). Small sutures are preferred, usually 5-0 or 6-0, because they have a better cosmetic result.
Complications with the Holtz-Celsus procedure may result from making the initial incision too far from the eyelid margin or placing the sutures too far apart.
Postoperative Considerations
A patient is often discharged the day of entropion surgery. Tissue swelling may occur, although it should resolve within a few days. The owner may apply warm compresses to the area to help with any swelling. Sutures are left in place for about 10 to 14 days. Nonabsorbable sutures are most frequently used. Absorbable sutures can also be used, especially if removing the sutures will be difficult because of an aggressive or uncooperative animal. A topical ophthalmic antibiotic is usually sent home with the owner to be used two or three times a day for 10 to 14 days after surgery.
The animal should wear an Elizabethan collar until the sutures are removed, to prevent them from being rubbed out before healing has been completed. The awkwardness of the Elizabethan collar, especially in large dogs, often requires restriction of activity until the collar is removed.
A recheck examination is recommended 10 to 14 days after surgery, or sooner if there are any problems. Box 7-16 shows an example of a surgery report for entropion repair.
Eyelid Mass (Neoplasm) Removal
Incidence and Differential Diagnosis
Eyelid masses are found in both dogs and cats. Breeds of dogs that are more predisposed to eyelid masses include poodles, Labrador retrievers, and mixed breeds. Generally, eyelid masses are seen in older dogs.
Canine eyelid masses are usually benign and may be differentiated based on their clinical appearance, but they should always be examined histologically as well.
Feline eyelid neoplasms are usually malignant and can rarely be differentiated from one another solely on the basis of their clinical appearance.
Eyelid neoplasms may be raised, alopecic (having hair loss), and pigmented or nonpigmented, and may or may not become ulcerated. Cytologic examination, specifically by fine-needle aspiration and biopsy samples of eyelid masses, may be helpful.
Canine eyelid neoplasms: A meibomian (sebaceous) adenoma is the most common eyelid neoplasm in dogs. It arises from the meibomian gland and is found near the meibomian orifice. Other, less common benign neoplastic masses are melanoma, papilloma, and histiocytoma. Malignant neoplastic masses, which occur less often in dogs, include mast cell tumors, adenocarcinomas, basal cell carcinomas, squamous cell carcinomas, hemangiosarcomas, and fibrosarcomas.
Indications for Surgery
An eyelid mass should be removed if (1) the mass becomes too large, (2) there is concern about malignancy, (3) corneal or conjunctival irritation is present, or (4) the patient is traumatizing the mass, with or without bleeding. In some cases the owner may request removal of the mass to achieve an improved cosmetic appearance. Generally, the smaller the mass to be removed, the easier it is to reconstruct the lid, therefore preserving normal eyelid function. When the eyelid mass becomes too large (greater than one-third of the length of the eyelid), skin flaps may be necessary for eyelid reconstruction. If the eyelid mass is not completely removed, it may recur.
Patient Positioning
The patient is placed in sternal or lateral recumbency for eyelid mass removal; several sandbags can be used to help position the head.
Patient Draping
Often a specialized eye drape is used. An eye drape has a precut hole that is placed directly over the eye. The drape is secured with towel clamps.
Surgical Options
Eyelid mass removal and subsequent eyelid repair involve careful apposition of the conjunctiva, eyelid margin, and the surrounding skin for cosmetic healing and optimal function of the eyelid. The alignment of the eyelid margin, both horizontally and vertically, is critical.
Wedge resection: A wedge resection of the eyelid mass and adjacent eyelid is a simple, common procedure (Figure 7-73). A chalazion forceps or a Jaeger lid plate may be used for stabilization. A full-thickness “house-shaped” incision is made with sharp dissection. The incision is closed in two layers. Subcutaneous sutures are placed in a simple interrupted pattern using 5-0 Vicryl. Skin sutures are placed using a figure-of-8 pattern for apposition of the eyelid margin, and a few simple interrupted sutures are placed for the remainder of the incision using 6-0 Vicryl.
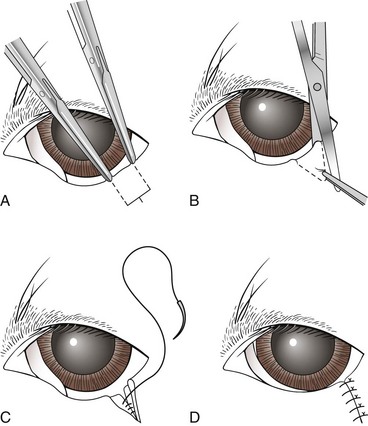
FIGURE 7-73 Wedge resection for ectropion correction. (From Fossum TW, Hedlund CS, Hulse DA, et al: Small animal surgery, ed 3, St Louis, 2007, Mosby.)
The mass is routinely biopsied and submitted for histopathology to confirm the diagnosis. Box 7-17 shows an example of a surgery report for wedge resection of an eyelid mass.
Protrusion (Prolapse) of the Gland of the Third Eyelid
Protrusion of the gland of the third eyelid is also known as glandular hypertrophy, glandular hyperplasia, “cherry eye,” and prolapse of third eyelid gland.
Third Eyelid Anatomy and Function
The third eyelid, also known as the “nictitating membrane,” serves as added protection for the globe. It rises up from the ventromedial aspect of the orbit (part closest to nose) and over the globe to protect it when the animal pulls its globe back into the orbit, for whatever reason. Movement of the third eyelid also aids in removal of dirt and particles from the eye. On the underside of the third eyelid is a small gland that secretes and distributes approximately 30% of the tear production. Because the gland significantly contributes to the precorneal tear film, it should not be removed. Clinical studies have confirmed extensive clinical experience that keratoconjunctivitis (KCS, “dry eye”) is frequently seen in such animals, often years later, especially in breeds susceptible to prolapse of the gland.
Mechanism of Prolapse
Prolapse of the third eyelid gland is the most common primary disorder of the third eyelid. A prolapse may result from a weakness in the connective tissue attachment between the ventral aspect of the third eyelid and the periorbital tissues; therefore the gland becomes everted while remaining attached to the cartilage of the third eyelid. This weakness allows the gland, which is normally found ventrally, to flip up dorsally, where it then becomes enlarged and inflamed because of chronic exposure. Abrasions and drying of the exposed gland may result in secondary inflammation and swelling. If the gland becomes severely infected, preoperative treatment with topical antibiotics is recommended.
Occasionally, in the early stages of prolapse, the gland returns to its normal position on its own or with manipulation. Unfortunately, prolapse of the gland usually recurs. Surgical intervention is the definitive treatment.
Clinical Signs
Common clinical signs of third eyelid gland prolapse include ocular discharge, conjunctivitis, and the pink, swollen mass on the third eyelid seen by owners. Tear production may be affected in some patients and may decrease.
Incidence
Protrusion of the gland of the third eyelid is usually seen in puppies and dogs younger than 2 years. It can occur in one or both eyes. Breeds predisposed to this disorder are the Cocker Spaniel, English Bulldog, Boston Terrier, Great Dane, and Pug.
Patient Positioning
The patient is placed in sternal or lateral recumbency for third eyelid gland surgery; several sandbags can be used to help position the head.
Patient Draping
Often a specialized eye drape is used. An eye drape has a precut hole that is placed directly over the eye. The drape is secured with towel clamps.
Special Instruments
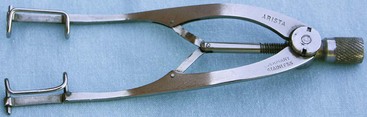
Because of the delicacy of eye procedures, specialized instruments are often required. Appropriate care and handling of ophthalmic instruments are important. In addition to those instruments listed in the section on entropion repair, an eyelid speculum is useful for surgical correction of third eyelid gland prolapse; it is used to retract the eyelids without putting pressure on the eye itself (Figure 7-74).
Surgical Options
For years, surgical removal of the third eyelid gland was the treatment of choice for third eyelid protrusion. As the importance of the third eyelid gland in tear production became more apparent, however, surgical repositioning of the gland became widely recommended. Therefore, removing the third eyelid gland should be avoided, because this may and probably will predispose the eye to develop KCS (dry eye).
Numerous techniques are currently available for correcting prolapse of the third eyelid gland (Figures 7-75 and 7-76), with some achieving greater success than others. The choice is usually the surgeon’s preference. A simple, common procedure is discussed next.
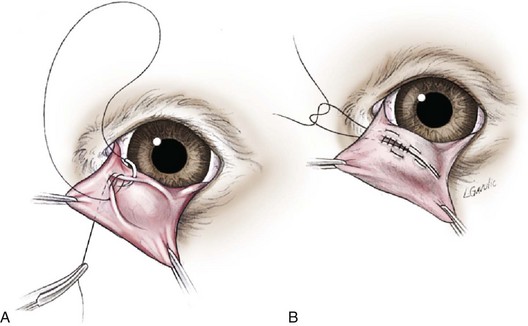
FIGURE 7-75 Morgan pocket technique for repair of a prolapsed gland of the third eyelid (TE). This method involves securing the TE gland into a conjunctival pocket formed on the posterior surface of the TE. When the conjunctival margins are sutured, openings are left on either end to allow drainage of secretions. Suturing begins by oversewing and burying the knot (subcuticular pattern), then runs continuously through the conjunctiva from side to side, and finally is tied on the anterior ventral surface of the TE. This method of suturing prevents corneal irritation from the suture knots. (From Maggs D: Slatter’s fundamentals of veterinary ophthalmology, ed 4, St Louis, 2008, Saunders.)
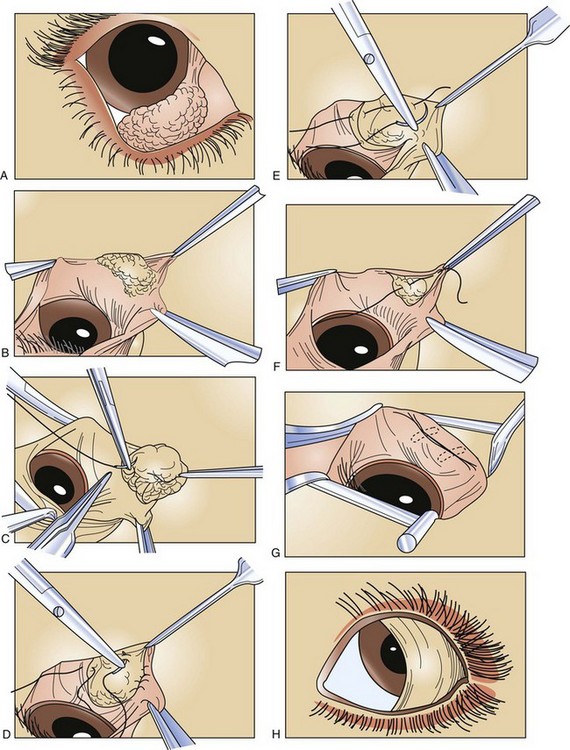
FIGURE 7-76 A, Typical appearance of a prolapsed third eyelid gland. B, Elliptical incision. C, Initial anchor suture. D, Initial suture carried to the opposite side of the gland. E, Placement of a second suture. F, The initial suture is drawn together and tied. G, Inversion of prolapsed tissue. Dotted lines indicate that the suture and knots lie under the conjunctiva. H, Appearance of third eyelid immediately after surgery.
Morgan pocket technique: The Morgan pocket technique involves creating a conjunctival pocket where the third eyelid gland is secured. The third eyelid is grasped and suspended with forceps on the nasal and temporal sides. Two 1-cm parallel incisions are made on the posterior surface of the third eyelid. The incisions are arched toward each other, with one incision made above the third eyelid gland and the second made below it. Apposition of the two outermost incisions, with gentle downward pressure applied to the gland, results in burial of the gland being in the conjunctival pocket. Care must be taken that the suture ends do not contact the cornea and therefore cause irritation.
Postoperative Considerations
Inadequate positioning of the third eyelid gland may result in re-prolapse. Usually a second attempt and possibly a third attempt to resecure the gland are made, typically using a different approach. Box 7-18 shows an example of a surgery report for correction of a prolapsed third eyelid gland.
Orthopedic Procedures
Orthopedic surgery is a branch of surgery dealing with the preservation and restoration of the function of the skeletal system and its articulation and association with its related structures (Figure 7-77).
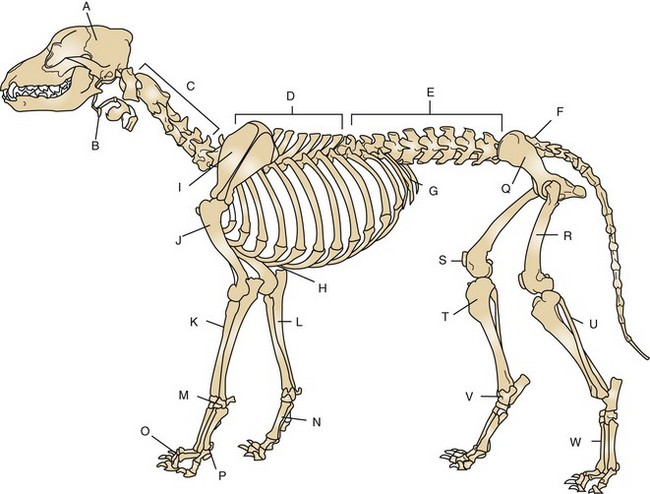
FIGURE 7-77 Skeleton of the male dog. A, Skull; B, hyoid apparatus; C, cervical spine; D, thoracic spine; E, lumbar spine; F, sacrum; G, ribs; H, sternum; I, scapula; J, humerus; K, radius; L, ulna; M, carpal bones; N, metacarpal bones; O, phalanges; P, sesamoid bone; Q, pelvis; R, femur; S, patella; T, tibia; U, fibula; V, tarsal bones; W, metatarsal bones. (From Evans H, deLahunta A: Guide to the dissection of the dog, ed 7, St Louis, 2010, Saunders.)
Technician’s Responsibilities
The purpose of this section is to familiarize the surgical technician with the basic presentation of fractures, with fracture evaluation, and with the types of repair available for the stabilization of different fractures. Understanding fracture management and repair will make the technician an asset to any veterinary practice. Being able to triage, evaluate, and either refer or prepare the patient for orthopedic surgery are all responsibilities that may fall on the technician. Box 7-19 introduces orthopedic terms and abbreviations.
Orthopedic fracture repair is a broad and highly specialized subject; readers wanting more in-depth coverage can supplement this chapter’s discussion with additional reading (see Bibliography). Orthopedic surgery requires expensive specialized instruments and equipment along with an experienced orthopedic surgeon.
Orthopedic problems are usually not life-threatening situations. These cases can be considered life-threatening emergencies, however, if the skull or spine is involved or if the patient has lost large amounts of blood because of a long-bone fracture. Other cases that can be considered nonelective but are not life threatening are open fracture or open dislocation repairs. All these cases need to be fully evaluated, and the patient should be stabilized (e.g., open airway, controlled bleeding, stable vital signs, and managed pain) before further evaluation or surgery can occur. Elective orthopedic surgical cases that may be presented to the hospital include cranial cruciate or anterior cruciate ligament rupture, medial or lateral patellar luxation, hip dysplasia, or osteochondritis dissecans. These cases also need to be properly evaluated before surgery, but they are considered elective.
Patients that are presented with fractures can be assumed to be in significant pain and need strong analgesics. It is the technician’s responsibility to see that the fracture patient receives adequate pain management as directed by the veterinarian. Any fracture noted on examination should be immobilized and bandaged accordingly. External coaptation (application of external appliance, such as a splint or cast) is important to reduce further disruption or damage to the fracture or fragments and the surrounding soft tissue and to prevent further blood loss at the fracture site. Stabilization of fractures also greatly enhances pain management and the animal’s comfort level.
Types of bandages used to stabilize a fracture include the Robert Jones bandage (any long-bone fracture) (Figure 7-78) and modified Robert Jones with metal or plastic splint (carpal, metacarpal, tarsal, metatarsal, and phalangeal fractures). A fiberglass cast with adequate padding can also be used for these same types of fractures. Fiberglass applied as a cast and not as a splint can make maintenance and changes technically difficult. Other bandages used for preoperative and postoperative support are the Ehmer sling (hip luxation) (Figure 7-79), spica splint (humeral or femoral fractures) (Figure 7-80), and Velpeau sling (scapular fractures) (Figure 7-81). All these bandages, except for the Robert Jones, can be used as external coaptation if surgery is not an option.
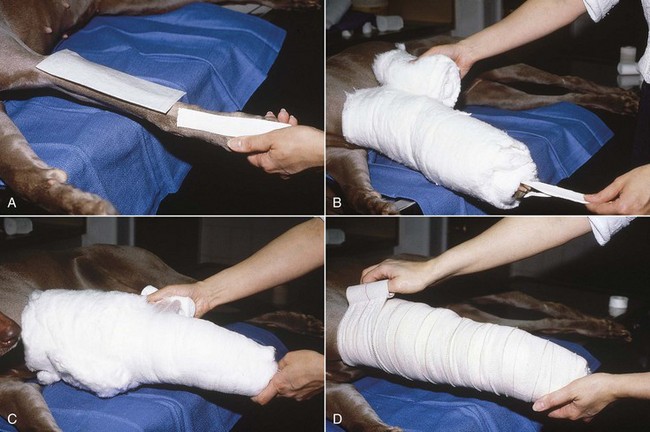
FIGURE 7-78 A, When applying a Robert Jones bandage, place adhesive tape stirrups on the cranial and caudal surfaces of the foot from the carpus (tarsus) to 6 inches beyond the toes. Cover any wounds with a nonadhesive pad. B, Then wrap 3 to 6 inches of cotton padding around the limb. C, After applying tape stirrups and cotton padding on the limb, wrap elastic gauze firmly over the cotton to compress it. D, Then apply elastic tape to the outer surface of the bandage. (From Fossum TW, Hedlund CS, Hulse DA, et al: Small animal surgery, ed 3, St Louis, 2007, Mosby.)
FIGURE 7-79 Ehmer sling. A, After minimal padding has been applied to the tarsus, a sling of adhesive tape is passed along the medial aspect of the limb. B, The tape is then wrapped around the hindlimb with the stifle and hock held in maximal flexion for one or two passes. C, On the third pass, the tape is brought over the flank and twisted behind the hock. D, The tape is then passed over the front of the metatarsus. E, This wrapping is repeated for three or four passes. (From Bassert JM, McCurnin DM, editors: McCurnin’s clinical textbook for veterinary technicians, ed 7, St Louis, 2010, Elsevier.)
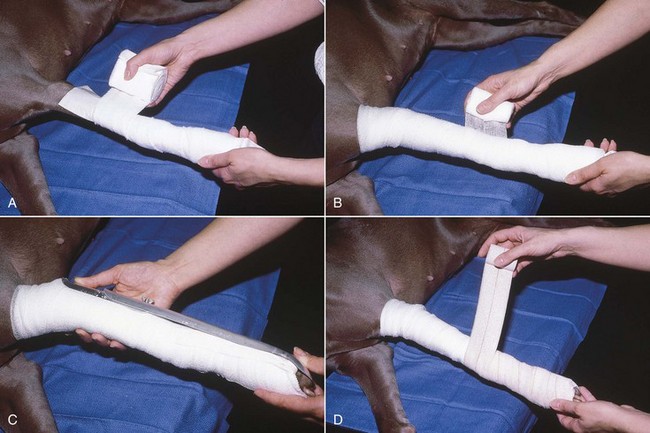
FIGURE 7-80 A, When placing a spoon splint on a limb, firmly apply cast padding around the limb in a spiral fashion with a 50% overlap. B, Wrap elastic gauze firmly over the cast padding. C, Place the padded limb in an appropriate-sized splint. D, Secure the splint to the limb with Vetrap (3M, St Paul, MN) or elastic adhesive tape. (From Fossum TW, Hedlund CS, Hulse DA, et al: Small animal surgery, ed 3, St Louis, 2007, Mosby.)
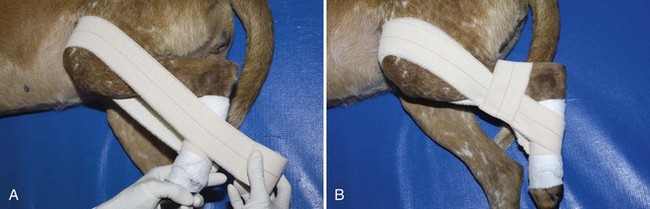
FIGURE 7-81 A 90-90 flexion sling. After minimal padding has been applied to the tarsus, a sling of adhesive tape is passed along the medial aspect of the limb (see Figure 7-78A). A, The tape is then wrapped around the hind limb with the stifle and hock held in 90-degree flexion. B, A second layer of tape is passed horizontally around the tibia to hold the previous layer in place. (From Bassert JM, McCurnin DM, editors: McCurnin’s clinical textbook for veterinary technicians, ed 7, St Louis, 2010, Elsevier.)
Owners must always be informed of bandage and fracture complications associated with splinting or slinging. A bandage should be checked three or four times a day for signs of swelling, slippage, moisture, or soiling. If any of these scenarios occurs, the bandage should be changed.
Preoperative Considerations for Fractures
The patient history can provide pertinent information to help determine whether a patient is a good candidate for surgery and what type of fixation is best suited for a positive outcome. How old is the patient? How large and active is the animal? What is the overall health status of the patient? What is the temperament of the patient?
The patient’s age is significant in terms of how much more the bones need to grow and how active the animal is. Generally, the younger the patient, the faster is the healing time; however, there is also a greater risk of angular limb deformities if the growth plates are still open and have been traumatized. Also, younger patients are more active and are more difficult to confine for long periods. The older the patient, the slower is the healing time. This can contribute to an increased chance of complications because of the longer recovery time. Older patients tend to be more sedentary and to have more difficulty recovering after long periods of inactivity and muscle loss.
The animal’s size and weight can affect recovery times and success. Any animal that is overweight has an increased risk of failure for any type of orthopedic repair. Too much force placed on any orthopedic repair too soon can cause premature loosening of the fixation and possible failure of the repair. Some large-breed dogs and overweight dogs and cats are often too weak after orthopedic surgery to lift or support their own weight and may need assistance to rise and walk.
The importance of the orthopedic surgery patient’s overall health should never be underestimated. Preoperative consideration of any preexisting conditions that would increase the patient’s risk during anesthesia or for delayed healing need to be addressed. Problems with other joints or bones can contribute to poor comfort levels and increase the length of recovery.
Owner compliance is a major consideration in any orthopedic case. The animal’s temperament influences how successful owners can be at following postoperative care instructions at home. Owner compliance is probably the most underestimated component of any orthopedic patient’s recovery and outcome. An animal that is aggressive, difficult to handle, or difficult for the owner to treat has a lower chance for a successful recovery than the easily handled, stoic animal. If the owners are incapable of handling and treating the patient correctly postoperatively or cannot return for follow-up examinations, the consequences can be catastrophic.
Fracture Assessment
Fractures can be classified or described by the following factors:
1. Bone location (e.g., humerus, femur, tibia).
2. Open or closed fracture (open fractures have penetrated through the skin; the skin is intact in closed fractures).
3. Location of fracture on the bone (e.g., midshaft, articular).
To assess any fracture completely, radiographs should be taken after a thorough physical examination. Some sedation is usually necessary to achieve complete relaxation and compliance of the patient for the radiographic views needed. In animals that are a sedation risk, radiographs can be taken through the bandage or splint. When radiographs are taken of any long-bone fracture, the joints above and below the fracture site should be included on the film. Articular fractures should be centered on the film using the least amount of manipulation necessary. Standard anterior-posterior (anteroposterior, AP) and ventral-dorsal (ventrodorsal, VD) views are suggested for proper fracture evaluation. Radiographs should also be taken postoperatively to confirm proper alignment and repair. X-ray films also serve as a point of reference for follow-up radiographs.
Radiographs and a thorough physical examination should suffice in determining whether the fracture or fractures are open or closed. An open fracture is a fracture in which the skin and the soft tissue covering the bone were punctured, usually by the sharp ends of the fractured bone, creating a path for external contaminants to come in contact with the bone. The fracture is then considered to be “open” (no longer closed) to the external environment. If possible, open fractures should be cultured before cleaning and antibiotic therapy. Open fractures can be classified or labeled according to the mechanism of puncture and the severity of the soft tissue damage, as follows:
Grade I open fractures have a small puncture hole in the skin around the location of the fracture. The bone broke through the skin and was exposed to external factors but is no longer visible. Soft tissue damage is minimal.
Grade II open fractures have a larger puncture or tear in the skin around the location of the fracture, and more soft tissue damage associated with the external trauma is evident.
Grade III open fractures have large tears and in some cases, loss of skin at the area of impact. Soft tissue damage is extensive and usually caused by severe bone fragmentation along with the force of the external impact. Grade III open fractures can also be described as shearing injuries. The patients usually have lost so much soft tissue that the bone is exposed, and in some cases, the bone is sheared away or even missing.
Complications tend to be worse and more life threatening with open fractures than with closed fractures. Complications associated with open fractures include skin necrosis and infection leading to bone death. With both open and closed fractures, bleeding, soft tissue damage, and swelling are concerns. With any open fracture, contamination and vascular compromise are of great concern and play a large part in determining what type of repair is best suited for the condition.
A closed fracture is a fracture that at the time of impact did not puncture or tear the skin at or around the location of the fracture. Soft tissue damage and swelling can range from mild to severe. Figure 7-82 shows the anatomy of a long bone, and Figure 7-83 illustrates bone planes of a femur.
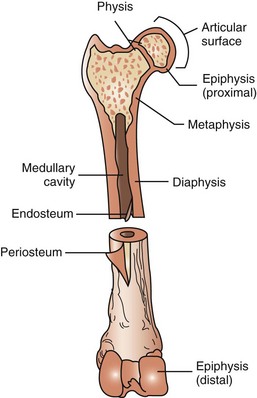
FIGURE 7-82 Anatomy of a long bone (femur). Diaphysis: long shaft or body of bone. Epiphysis (proximal/distal): ends of bone, usually wider than shaft, and either entirely cartilaginous or separated from shaft by cartilaginous disk. Metaphysis: wider end of shaft of the bone adjacent to epiphysis. Periosteum: fibrous covering around bone that is not covered by articular cartilage. This layer is important for bone growth, repair, nutrition, and attachment for ligaments and tendons. Articular surface: smooth layer of hyaline cartilage covering epiphysis where one bone forms a joint with another bone. Medullary cavity: space in diaphysis containing bone marrow. Endosteum: fibrous tissue lining medullary cavity of bone. Physis: growth plate.
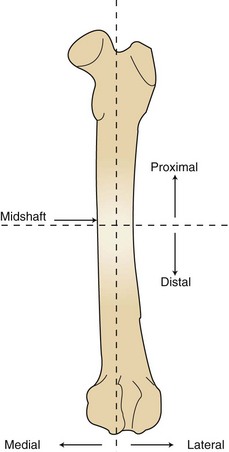
FIGURE 7-83 Bone planes (femur). Proximal: area closest to the body or point of origin. Distal: area farthest from the body or point of origin. Midshaft: center of shaft, or toward median plane. Lateral: farther from medial plane. Medial: toward median plane (inside or middle).
Types of Fractures
Five types of common fractures are shown in Figure 7-84.
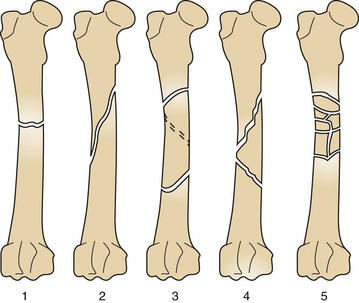
FIGURE 7-84 Types of fractures. 1, Transverse: extending from side to side at right angle to long axis. 2, Oblique: being on an incline or slanting. 3, Spiral: curving around a center point or axis. 4, Comminuted reducible: broken or crushed into numerous fragments but able to be placed or aligned with opposite end of fracture. 5, Comminuted nonreducible: broken or crushed into numerous fragments and unable to be placed or aligned together with opposite end of fracture.
Articular fractures: Articular fractures, better known as physeal fractures, always involve the joint. These fractures are frequently seen in young, growing animals and are referred to as Salter-Harris fractures. Any fracture involving the physis or growth plate in early stages of bone development can be detrimental to development and may cause angular limb deformities. Physeal fractures can involve the physis itself or the physis and the bone above and below it. Salter-Harris fractures are identified according to the location of the fracture line and what areas of the bone are involved (Figure 7-85).
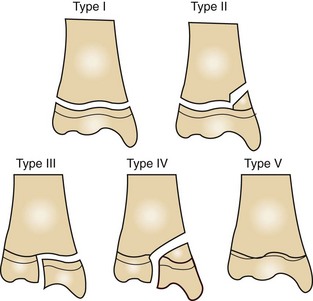
FIGURE 7-85 Salter-Harris fractures. Type I fracture runs through the physis. Type II fracture runs through the metaphysis and physis. Type III fracture runs through the physis and epiphysis. Type IV fracture runs through the metaphysis, physis, and epiphysis. Type V fracture is a crushing injury to the physis; may not always be detected initially by radiographs.
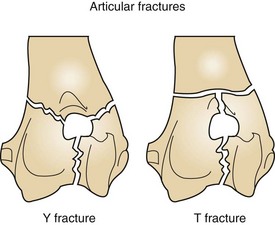
Y fractures and T fractures are types of articular fractures that involve the distal aspect of the humerus (Figure 7-86). The fracture lines run ventrodorsally through the humeral condyle and run in transverse or oblique configurations through the medial and lateral epicondyles.
Surgical Options for Fracture Repair
Surgical options for fracture repair are initially basic but can become very detailed. In general, the purpose for any fracture fixation is to bring the opposing ends of the fracture and joints back into alignment. After reduction of the fracture, the bone is restabilized and supported by internal or external fixation. Once the bone has been properly immobilized, the healing process and callus formation begin. Internal fixation is a form of rigid fixation placed under the skin and muscle directly on or in the bone surface or medullary cavity to regain stability. External fixation is a form of fixation applied through the exterior surface (skin and muscle) of the limb to the interior area (bone and medullary cavity) to help with stability.
Bone is the deepest tissue within the limb and therefore is afforded poor drainage in the event of infection. Bone infections (osteomyelitis) are serious and difficult to treat. Great care must be taken when preparing any patient for orthopedic surgery. A broad-spectrum antibacterial, antimicrobial, and antifungal scrub and final prep should be used before surgery, with adherence to strict sterile technique throughout the procedure to prevent contamination.
Internal Fixation
Internal fixation devices include bone plates and screws (Figures 7-87 to 7-90), interlocking nails, intramedullary pins, Kirschner wires, and cerclage wire.
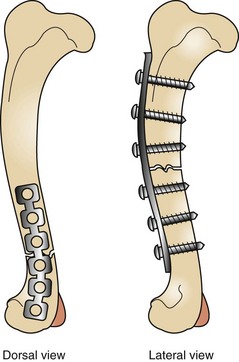
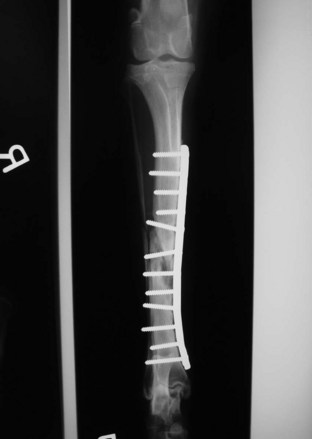
FIGURE 7-88 Radiograph (dorsal view) of a tibial fracture repair. An internal plate and screws were used for fixation.
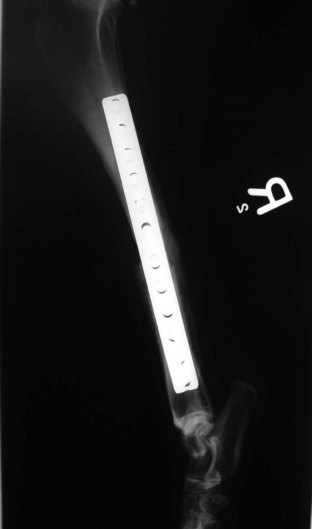
FIGURE 7-89 Radiograph (lateral view) of tibial fracture repair. An internal plate and screws were used for fixation.
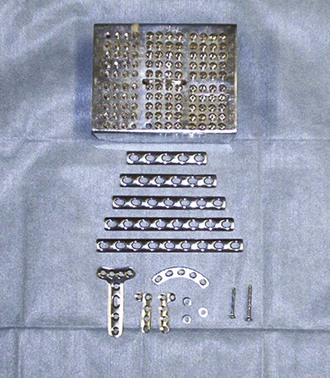
Bone plates come in a variety of shapes, sizes, and lengths. They are designed to be used with various sizes of screw. The plates are made of titanium or stainless steel and are used with screws of the same material. Soft tissue and muscle dissection is necessary to gain adequate exposure of the fracture and to afford successful reduction of the fracture.
Interlocking nails are driven into the medullary cavity and secured in position by screws that engage the bone and the nail at its proximal and distal aspects. This type of fixation provides stabilization without extensive soft tissue dissection and muscle manipulation to expose and reconstruct the fracture (Figures 7-91 to 7-93).
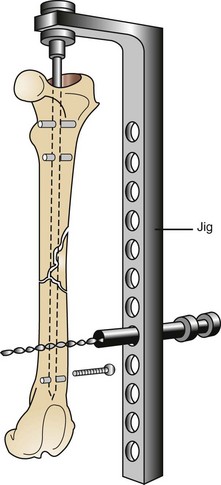
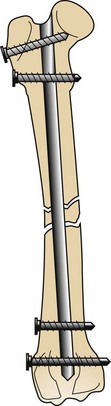
FIGURE 7-92 Completed interlocking nail fracture repair. Note the two screws at proximal and distal ends of the bone used for securing the nail.
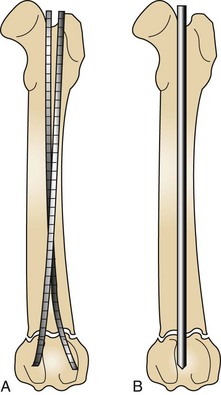
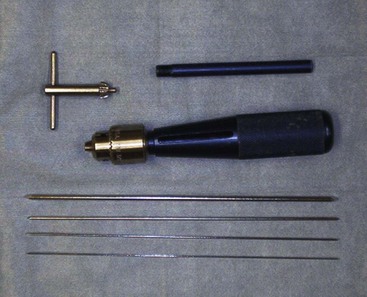
Intramedullary (IM) pins are driven through the bone and into the medullary cavity with a Jacob’s chuck . Their placement can be approached as an open surgical technique or a closed pinning technique (Figures 7-94 and 7-95). IM pins can be used alone (single IM pin driven into medullary canal) or stacked (multiple IM pins driven into medullary canal). Intramedullary pinning is inexpensive compared with all other types of internal fixation but does not provide very rigid stability. Pins tend to migrate, and removal of the implant may become necessary.
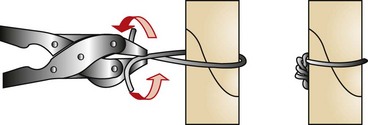
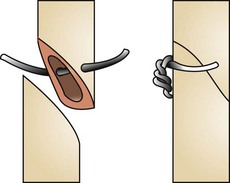
Orthopedic wires (Kirschner or cerclage) can be used alone or combined with other fixation devices to achieve proper fixation. Cerclage wire comes in different diameters ranging from 0.4 to 1.5 mm and is used in fracture fixation for the reduction of fragments and the protection of fissures. Cerclage wires can be applied by being passed either completely around the bone (full cerclage; Figure 7-96) or wire through a predrilled hole placed through the bone (hemicerclage; Figure 7-97).
Kirschner wires, or K-wires, are small sections of precut wire that have pointed ends (trocar) for drilling through the bone. They come in multiple diameters for stiffness and can be used in combination with cerclage wire for interfragmentary reduction.
Postoperative care: Postoperative care for internal fixation is strict confinement for 6 to 8 weeks. The patient is rechecked at suture removal, usually 10 to 14 days after surgery. Follow-up radiographs are taken every 4 to 6 weeks postoperatively to monitor bone healing. Young animals may need to be followed more closely because of the rate of bone healing and increased risk of angular complications. Internal fixation is not routinely removed unless the complications involve the implant.
External Fixation
External fixation used as primary repair includes casts, rigid splints, SK fixation, Kirschner-Ehmer (KE) fixation, and ring fixation (Figures 7-98 to 7-101). As with internal fixation, external fixation requires specialized equipment and has many more applications beyond the scope of this chapter.
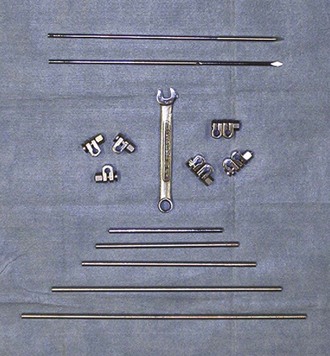
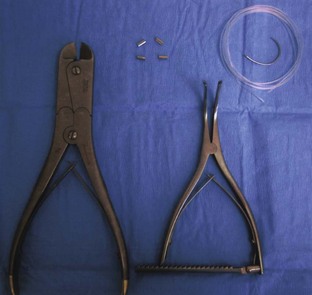
FIGURE 7-98 Kirschner-Ehmer (KE) bars, clamps, and wrench (for adjustment of clamps) used for external fixation.
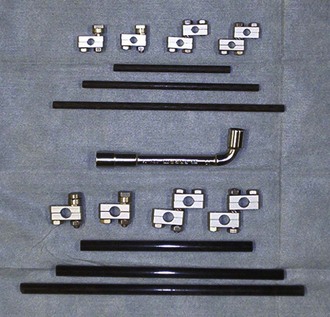
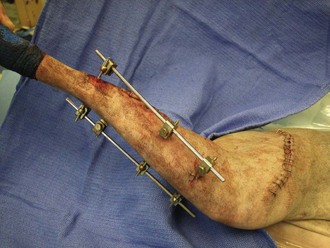
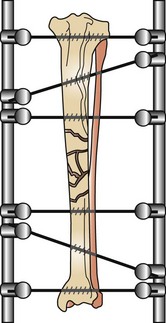
External fixation devices stabilize the bones or fracture from the exterior of the limb. These devices use threaded cross-pins that are drilled into the bone, then attached to bars with clamps, nuts and bolts, or aluminum rings to make an external tension device. This will provide rigid stability until the fracture has time to heal. Once the fracture has closed, external fixation is removed. With any external fixation device, weekly to biweekly appointments are needed for fixator adjustments, cleaning of pin tracks, and bandage changes. External fixators are an affordable treatment option for long-bone fractures or temporary joint immobilization. They are not appropriate for fractures that may involve the pelvis or pelvic joints. External fixation devices can be created that best suit the fracture types and locations. The devices can be continually modified or changed throughout the healing period.
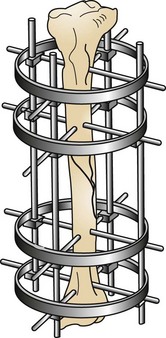
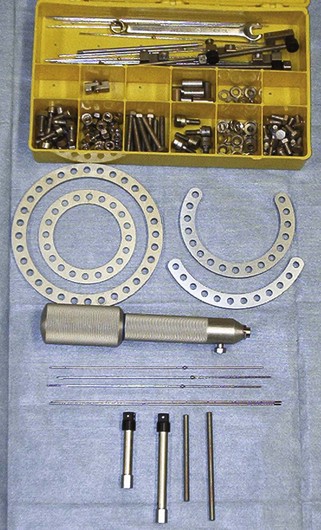
The ring fixator, or circular fixator, is a type of external fixator that uses different-sized rings (usually three or four) and various types of pins (Figures 7-102 and 7-103). These pins are drilled through the bone and attached to the ring using clamps. The pin is then put under tension to pull the fracture back into alignment and is secured to the ring frame. Ring fixators have many uses in orthopedic surgery (see other texts).
Postoperative care: Postoperative care for external fixators and ring fixators includes periodic visits for cleaning of pin tracts and tightening of clamps. In most cases the external bars or rings need to be padded and wrapped to prevent trauma to the patient and to reduce the risk that the fixator will be caught on objects (e.g., bedding material, crate, furniture). Radiographs should be taken postoperatively and then every 4 weeks until the fixator is removed. Activity should be restricted for the first 4 weeks, then left to the veterinarian’s discretion.
Complications with Fixation
The following complications may occur with internal or external fixation:
Casts and Splints
Casts and splints are other external coaptation devices available for closed reduction of fractures at low cost and requiring no surgery. Anesthesia is necessary to sedate and relax the animal so that the fracture can be reduced, then splinted or cast. A radiograph is essential to ensure proper alignment before and after coaptation is applied. Splints work well on small, young, fast-healing animals. Splints are best suited for injuries that are distal to the elbow or stifle.
When fiberglass or plaster cast material is used, periodic changes can be difficult. A cast cutter or oscillating saw is needed to cut the cast, and specialized cast spreaders are needed to remove the cast easily from the limb. Most patients require sedation for cast and splint changes. They need to be still and pain free during the procedure. A sedated or anesthetized animal is less likely to react to the loud noises associated with the oscillating saw. Most casts require additional support (walking bar) to prevent normal damage to the cast from walking. Casts need to be checked at least every 1 to 2 weeks.
Splints used as primary coaptation devices are easier to manage and change than casts. As with casts, however, splints are suited only for fractures that are distal to the elbow and stifle. Any animal with a splint should have the bandage changed and the fracture rechecked once a week.
Casts and splints require similar care. They must be kept clean and dry and checked for slippage and mutilation by the animal. Any swelling in the toes or signs of malodor should also be noted. If observed, these changes need to be addressed immediately. Radiographs must be taken more often to confirm that fracture alignment and orientation have not changed. Any animal with a cast or splint must be confined to a crate or small room, with no opportunity to run, jump, play, climb stairs, or have free access to the outside until the fracture is healed.
Amputation
Amputation involves the complete removal of a limb from the body. Common indications for amputation include trauma resulting in severe soft tissue damage or irreparable fractures and neurologic injuries (e.g., brachial plexus avulsion). Other indications are neoplasia, ischemic necrosis, unmanageable arthritis, and severe congenital deformities. Both hindlimb and forelimb amputations are considered major surgeries and should be performed only with a thorough knowledge of the patient’s physical status. Preanesthetic blood tests, including complete blood count (CBC), chemistry panel, electrolyte status, and blood type and crossmatch, should be obtained before surgery whenever possible. The patient’s preoperative condition is extremely important because a large amount of fluid, electrolytes, and blood is lost when the limb is removed. Patients should be stabilized before surgery with appropriate fluid, electrolyte, and blood replacement therapy. A balanced electrolyte solution should also be administered throughout the procedure to help maintain hydration and blood pressure.
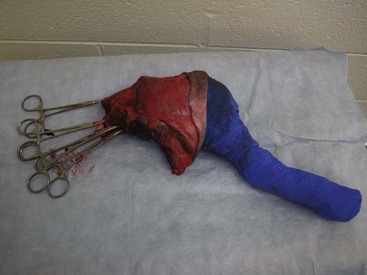
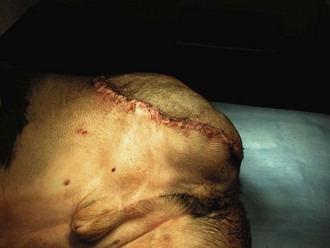
A variety of techniques exist for removal of the forelimb and hindlimb. Forelimb amputation can be achieved by disarticulation of the shoulder joint or by removal of the scapula. Scapular removal is faster, easier and allows for a more cosmetically favorable result than shoulder disarticulation. Hindlimb amputation involves either midshaft femoral amputation or disarticulation of the coxofemoral joint. Midshaft amputation is considerably easier to perform than hip disarticulation. All techniques involve severing the muscles at their origins or insertions or directly through the muscle belly (Figure 7-104). Major nerves are then isolated and directly injected with a local anesthetic (Figure 7-105) before they are transected (Figure 7-106). Local nerve blocks contribute significantly to postoperative pain control. Arteries and veins are isolated from surrounding tissues. Arteries are usually ligated first, thus allowing blood to drain through the venous system. In patients with neoplasia, however, veins are ligated first to limit the dissemination of tumor cells. Figures 7-107 and 7-108 show an amputated limb and the postoperative appearance of a disarticulated coxofemoral joint.

FIGURE 7-104 Dissection through the sartorius muscle belly of the medial hindlimb using electrocautery during a hindlimb amputation.
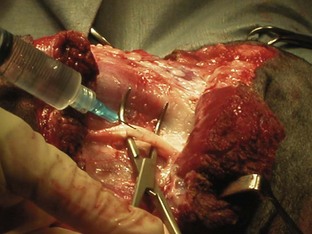
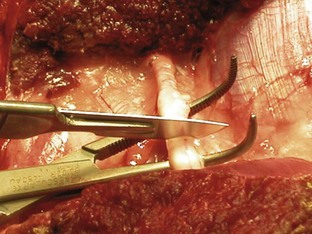
Pain management is critical for amputation patients. A variety of analgesic protocols is currently available and is often used in combination for effective prevention of postoperative discomfort. Epidural anesthesia should be performed preoperatively and can be achieved with various drugs; morphine is often used in forelimb amputations, and an opioid and local anesthetic are frequently used in hindlimb amputations. Epidural anesthesia with both an opioid and a local anesthetic is extremely effective in controlling postoperative pain. As mentioned, intraoperative visualization of the nerves allows direct injection of local anesthetic before transection. Systemic injections of opioids and nonsteroidal anti-inflammatory drugs (NSAIDs) are often administered postoperatively. Transdermal fentanyl patches are also recommended as part of the postoperative pain management program. These patches allow a slow, continuous administration of fentanyl over 72 hours. The patch is applied to a clipped area of the animal’s skin immediately after surgery.
Cranial Cruciate Repair
Cranial cruciate ligament (CCL) ruptures are also referred to as anterior cruciate ligament (ACL) injury or “football player’s knee” in human patients. CCL surgical repair should be performed for a partial or complete rupture of the ligament. Both the cranial and the caudal cruciate ligaments act as major stabilizing structures in the knee. The cruciate ligaments originate on either side of the femoral condyle, then course across the intercondylar fossa and attach on opposite sides of the tibia (Figure 7-109). These ligaments function as the primary check against hyperextension of the stifle joint and limit internal rotation of the tibia. Rupture of the CCL causes instability of the stifle, which leads to degenerative changes in the joint, including synovitis, degeneration of articular cartilage, osteophyte formation, and capsular fibrosis. The medial meniscus usually is also damaged in dogs with CCL rupture. The meniscus is a fibrocartilaginous structure between the femur and tibia that functions to cushion and center the joint. CCL rupture most often causes a bucket-handle type of tear in the medial meniscus.
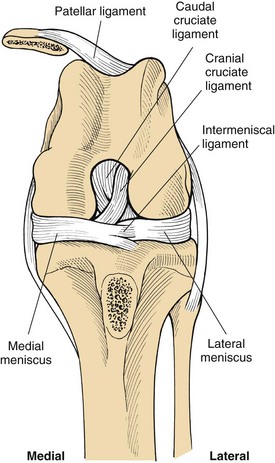
FIGURE 7-109 Orientation of the cruciate ligaments and menisci. (From Fossum TW, Hedlund CS, Hulse DA, et al: Small animal surgery, ed 3, St Louis, 2007, Mosby.)
Rupture of the CCL is the most common cause of hindlimb lameness in the dog. Ligament failure can result from both traumatic (acute) and degenerative (chronic) causes. Currently, degenerative causes are the most common reason for CCL rupture. Osteoarthritic changes act as a precursor to CCL weakening and rupture. Reports also indicate that 37% of dogs with a unilateral CCL tear will rupture the contralateral ligament within 2 years, indicating that degenerative processes often occur in both stifle joints.
Traumatic rupture results from hyperextension of the stifle joint or excessive internal rotation of the tibia. The CCL becomes tightly twisted, and the excessive mechanical forces cause the ligament to tear. Dogs are often presented with a history of running and catching the leg in a hole, trapping the leg in a fence or gate, or jumping to catch an object (e.g., Frisbee). Traumatic injuries account for approximately 20% of CCL ruptures.
Dogs that have sustained an acute rupture present with significant hindlimb lameness. However, the degree of lameness varies widely with the increasing chronicity of the injury. The hind leg is usually carried in flexion, and occasionally at rest the toe may touch the ground. Dogs may resist manipulation of the stifle joint because of the pain from acute inflammation. Joint effusion may also be palpable adjacent to the patellar tendon.
The major diagnostic tests for CCL injury include palpation, the tibial compression test, and the cranial drawer test (Figure 7-110). Palpation of the affected leg often reveals muscle atrophy, pain, joint effusion, and asymmetry. Flexion and extension of the stifle joint may result in an audible click associated with displacement of the medial meniscus. Examination of the affected joint reveals a positive cranial drawer sign (cranial displacement of the tibia) and increased internal rotation of the tibia with joint flexion.
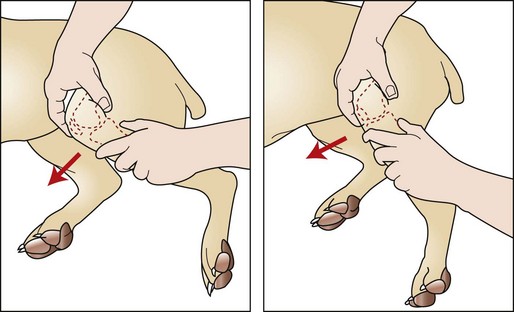
FIGURE 7-110 Cranial drawer test. To examine for cruciate ligament injury, place the thumb of one hand over the lateral fabella and the index finger over the patella. Stabilize the femur with this hand. Place the thumb of the opposite hand caudal to the fibular head with the index finger on the tibial tuberosity. With the stifle flexed and then extended, attempt to move the tibia cranially and distally to the femur. (From Fossum TW, Hedlund CS, Hulse DA, et al: Small animal surgery, ed 3, St Louis, 2007, Mosby.)
Special Instruments
A variety of retractors are typically used for CCL surgery. Hohmann retractors allow inspection of the internal surfaces of the joint (Figure 7-111). Steinmann pins and a Jacob’s chuck are used to drill holes in the tibia. Cruciate needles allow the passage of suture through dense tendons and tissues. SECUROS currently offers a crimping system that is used for extracapsular repairs (Figure 7-112). Both 40- and 80-lb-test nylon is available. A distractor is used to place tension on the suture loop and can be locked to check cranial drawer. Crimp tubes are then placed and crimped (with a special crimping tool) to hold the suture in place.
Patient Positioning
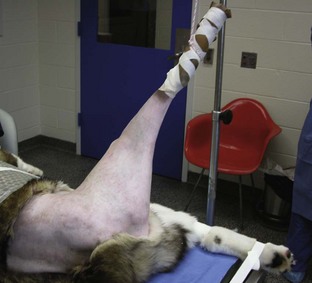
The patient may be placed in dorsal or lateral recumbency with the affected leg up for CCL repair. The leg should be clipped from the hip to the tarsus. An examination glove should be placed on the foot to cover the unshaven area. The leg should be suspended while it is scrubbed to ensure complete and circumferential sterility. It is important to prepare the limb in this suspended position to allow the greatest amount of manipulation during surgery (Figure 7-113).
Patient Draping
The surgeon should grasp the suspended leg in a sterile manner, and the foot and tarsus should be covered with an appropriately sized stockinette. The leg is held suspended, and a three-cornered draping technique is used at the hip.
Cranial Cruciate Ligament Repair
A variety of surgical techniques have been designed to restore stability to the stifle and limit secondary degenerative joint disease. It is recommended that the joint capsule be opened with each technique to allow visualization and removal of the damaged ligament and menisci.
Intracapsular techniques involve replacement or reconstruction of the CCL using various materials, including biologic tissues (patellar tendon and fascia lata) and synthetic suture material. The joint is approached laterally (Figure 7-114), and a graft of tissue is isolated. A tunnel is then drilled through the cranial surface of the tibia. The graft is fed through the tunnel and over the top of the lateral condyle, thereby reconstructing the CCL.
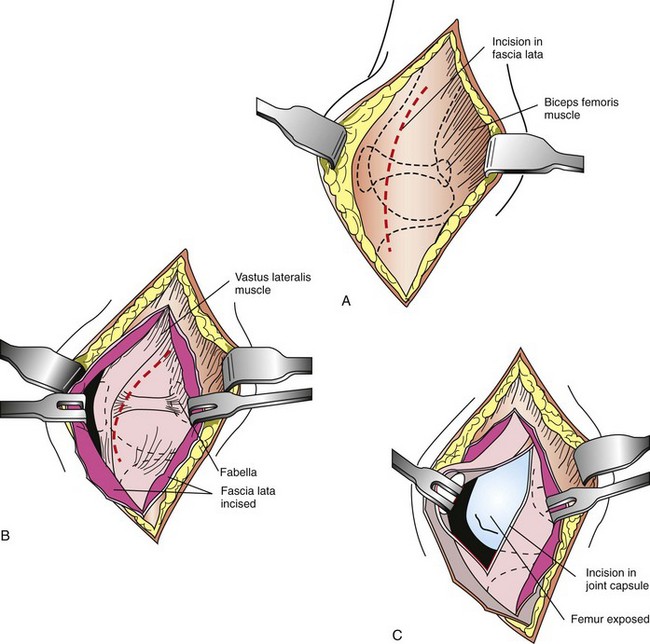
FIGURE 7-114 Lateral approach to the stifle joint. A, Make a craniolateral skin incision centered over the patella. Incise the subcutaneous tissues along the same line to visualize the septum between the superficial leaf of the fascia lata and the biceps femoris muscle proximally and then the lateral retinaculum distally. B, Make an incision through the fascia lata proximally, and carry the incision through the fascia lata and lateral retinaculum distally. C, Incise the joint capsule and continue the incision proximally, adjacent to the patellar tendon. Then incise along the border of the vastus lateralis toward the fabella. Displace the patella medially to expose the cranial surface of the joint. (From Fossum TW, Hedlund CS, Hulse DA, et al: Small animal surgery, ed 3, St Louis, 2007, Mosby.)
Extracapsular techniques are usually faster and easier to perform than intracapsular repairs. Extracapsular repairs involve placement of sutures outside the stifle joint. The joint is approached laterally, and the appropriate suture (e.g., monofilament nylon, nylon fishing line) is loaded onto a properly sized cruciate needle. The needle is passed around the fabella, then through the patellar ligament. A hole is drilled through the tibial crest with a Steinmann pin, and the suture is passed through the hole (Figure 7-115). The stifle is then flexed into a normal standing position, and the cranial drawer test is performed. Once the suture is under the appropriate tension, it is tied or crimped into place. The retinaculum should be closed with a vertical mattress pattern to provide appropriate imbrication of the joint capsule.
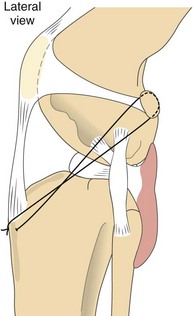
FIGURE 7-115 Extracapsular reconstruction using a heavy, nonabsorbable suture. The suture passes through the deep fascia surrounding the fabella and through a predrilled hole in the tibial crest. Tying or crimping the suture eliminates the cranial drawer. (From Fossum TW, Hedlund CS, Hulse DA, et al: Small animal surgery, ed 3, St Louis, 2007, Mosby.)
Both intracapsular and extracapsular reconstruction techniques rely on a recreation of the passive constraints of the stifle joint. In recent years a technique has been developed that recreates joint stability by altering the active constraints of the joint. CCL rupture causes the tibia to slide forward and the femur to fall back, creating a shear force referred to as cranial tibial thrust. The tibial plateau–leveling osteotomy (TPLO) functions to change the angle of the tibia, thereby directly altering joint mechanics and creating a new plateau that eliminates cranial tibial thrust. Currently, surgeons must be certified to perform the TPLO technique.
Postoperative Considerations and Instructions
A soft bandage should be placed on the limb for 48 hours after CCL repair to protect the surgical site and reduce swelling. The patient should return in 14 days for a recheck and suture removal.
The most important postoperative consideration is exercise restriction. Dogs should be restricted to short leash walks for at least 6 weeks after surgery. Activity can then be gradually increased over a 12-week period. Owners are discouraged from allowing their animals to run free, jump, climb stairs, and play rambunctiously with other animals. Failure to comply with strict exercise restriction may result in repair failure and the need for a second surgery.
Because CCL repairs are considered moderately painful, pain management is a major focus during the recovery period. Perioperative pain control involves injection of a local anesthetic directly into the joint. Animals are often treated immediately postoperatively with a variety of injectable pain medications, including opioids and NSAIDs. Animals are then often sent home with instructions for the owner to administer an oral NSAID (e.g., carprofen) for several days after surgery.
In recent years a rigorous rehabilitation program has been advocated as part of the standard postoperative care for patients with CCL repair. Rehabilitation programs promote wound healing and decrease muscle spasm, adhesion formation, and edema while increasing muscle strength and joint range of motion (ROM). Typical programs include low-impact exercises (e.g., swimming), passive ROM exercises, heat, and whirlpool therapy.
Box 7-20 shows an example of a surgery report for a cranial cruciate ligament repair.
Minimally Invasive Surgery
Biopsy and removal of a mass are important procedures in veterinary medicine. A biopsy is often recommended before mass removal. The biopsy is used to gather important information on the biologic and clinical behavior of the mass, allowing the formulation of an appropriate plan and prognosis. Current biopsy techniques include fine-needle aspiration, impression smear, punch, bone, excisional, and incisional biopsies.
Fine-Needle Aspiration Biopsy
Fine-needle aspiration (FNA) represents one of the simplest methods for cytologic evaluation of a mass. The technique is easy to perform, has minimal morbidity, and usually does not require sedation; however, FNA biopsy typically has a low diagnostic yield (Box 7-21).
Impression Smears
Impression smears are as simple to perform as FNA biopsy. This technique is especially useful for ulcerated surface tumors and is often performed on freshly cut surfaces. Impression smears of excised masses can also be easily made before the samples are placed into formalin (Box 7-22).
Needle Punch Biopsy
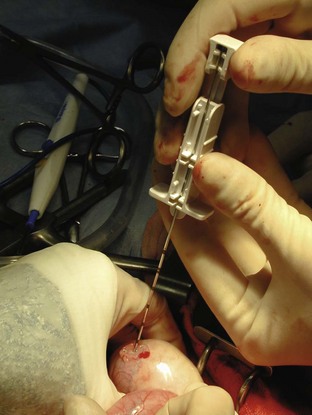
Needle punch biopsy instruments are currently manufactured by a variety of companies. Instruments are equipped with either a cutting or a core biopsy needle and are available as manual and automatic devices (Figure 7-116). These devices take a small piece of tissue (approximately the size of pencil lead) for histologic examination (Figures 7-117 and 7-118). These procedures are minimally invasive and generally are performed on sedated patients. Ultrasound-guided needle punch biopsies of various internal organs, including the liver, spleen, and prostate, are also common procedures (Box 7-23).
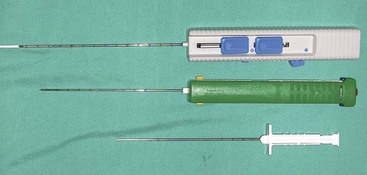

FIGURE 7-117 Use of the manual biopsy needle requires both hands and can be awkward, resulting in more discomfort for the patient and samples of lower quality. A, The tip of needle is inserted just into the tumor. B, The inner needle is advanced without advancing outer needle. C, Tissue from the tumor drops into the trough of the inner needle, and the outer needle is advanced to cover the inner needle, thereby cutting tissue within the trough free from the main mass. D, With the inner needle still completely within the outer needle, thus protecting the sample, the entire unit is removed. E, The inner needle is advanced beyond the end of the outer needle to allow the sample to be removed from the trough of the inner needle. (Modified from Mehler SJ, Bennet A: Surgical oncology of exotic animals. Vet Clin Exotic Anim Pract 7:783-805, 2004.)
Punch Biopsy
The punch biopsy technique is used primarily for external skin and oral masses. It has the advantage of providing a larger surface sample; however, it does not penetrate deeply into the mass (Figure 7-119). Patients are generally placed under general anesthesia to undergo this procedure (Box 7-24).
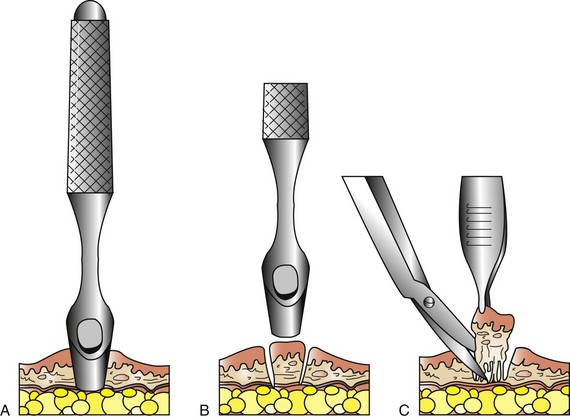
FIGURE 7-119 Mechanism of punch biopsy. A, The punch is rotated back and forth over the suspect lesion until sufficient depth has been attained. B, The punch is removed or angled across the base to sever deep attachments. C, The specimen may be gently grasped with thumb forceps and cut off deeply. (From Withrow SJ, MacEwen EG: Withrow and MacEwen’s small animal clinical oncology, ed 4, St Louis, 2007, Saunders.)
Bone Biopsy
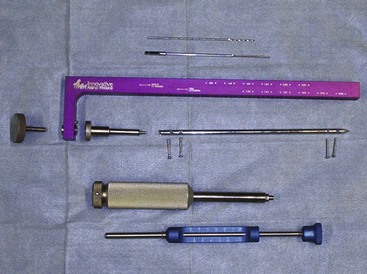
The most common instruments used to obtain bone biopsy samples are the Michele trephine (Figure 7-120) and Jamshidi bone biopsy needle (Figure 7-121). Bone biopsies are often painful and therefore are usually performed with the patient under general anesthesia. The Jamshidi needle biopsy is less invasive but provides a smaller sample size than other methods (Figure 7-122). The Michele trephine technique removes a larger sample of bone, increasing the diagnostic yield, but it also increases the likelihood of a pathologic fracture at the biopsy site (Box 7-25).
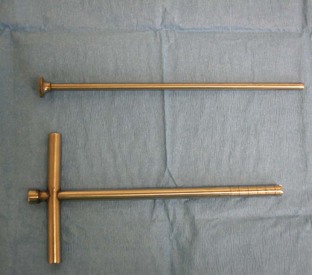
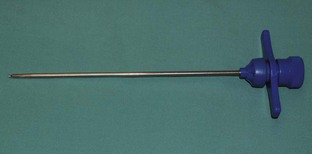
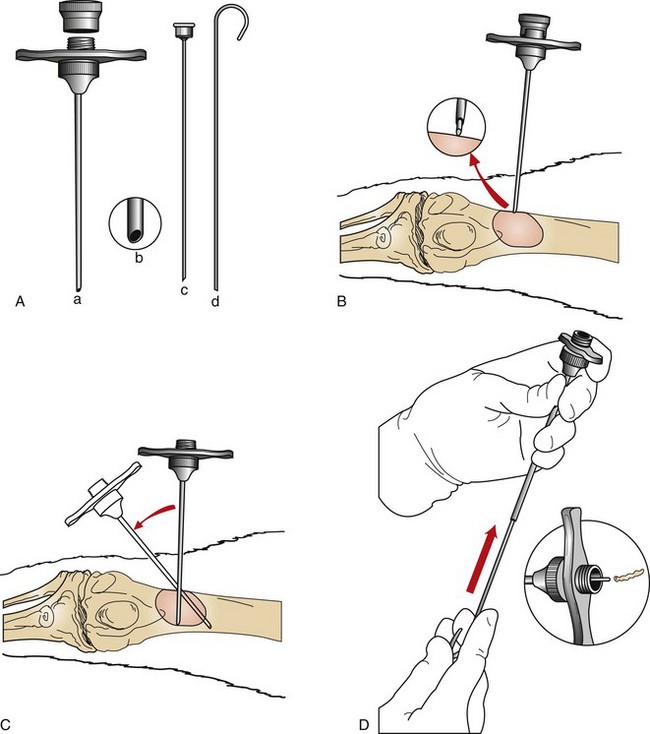
FIGURE 7-122 A, Jamshidi bone biopsy needle: cannula and screw-on cap (a), tapered point (b), pointed stylet to advance cannula through soft tissues (c), and probe to expel specimen from cannula (d). B, With the stylet locked in place, the cannula is advanced through the soft tissue until bone is reached; inset, Close-up view showing stylet against bone cortex. C, The stylet is removed, and the bone cortex is penetrated with cannula. The cannula is withdrawn, and the procedure is repeated with redirection of the instrument to obtain multiple core samples. D, The robe is then inserted retrograde into the tip of the cannula to expel the specimen through the base (inset). (From Powers BE, LaRue SM, Withrow SJ, et al: Jamshidi needle biopsy for diagnosis of bone lesions in small animals. J Am Vet Med Assoc 193:206, 1988.)
Incisional Biopsy
Incisional biopsies are generally used only after cytology or needle core biopsies have failed to provide a diagnostic sample. A small wedge of the tumor is removed from the mass and submitted for histopathology (Figure 7-123).
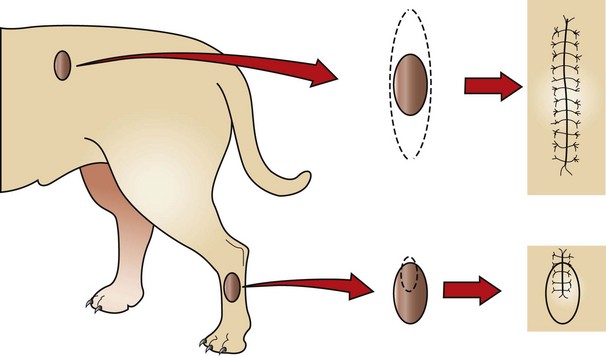
FIGURE 7-123 Excisional biopsy (top) contrasted with incisional biopsy (bottom). The top tumor may be as easy to remove as to biopsy, and removal may not negatively influence other possible treatments (e.g., additional surgery, irradiation). The bottom tumor, however, requires knowledge of the tumor type before excision, because inappropriate removal could compromise a subsequent aggressive excision (short of amputation). Note that the biopsy incision is in a plane that would be included in a subsequent resection. (From Withrow SJ, MacEwen EG: Withrow and MacEwen’s small animal clinical oncology, ed 4, St Louis, 2007, Saunders.)
Excisional Biopsy
An excisional biopsy involves the complete removal of a mass (see Figure 7-123). Excisional biopsies are generally performed only on benign skin tumors or when the removal of the organ is indicated.
Biopsy Sample Handling and Fixation
It is imperative that tissue samples are handled gently at all times. Improper handling can ruin the diagnostic value of the sample. Impression smears should always be made before the sample is placed into fixative. It is often important to mark the margins of the surgical excision; this can be done by painting the outer edges of the excised mass with India ink or Alcian blue. The sample should then be allowed to dry for at least 20 minutes before it is placed into fixative.
All biopsy samples should be placed into a fixative before shipping. The most widely used fixative is 10% neutral buffered formalin. Proper fixation requires a ratio of 1 part tissue to 10 parts formalin. Tissue samples greater than 1 cm in thickness will not fix entirely; therefore, large masses should be sliced like a loaf of bread before they are placed into formalin. Multiple representative samples from a large mass can also be taken and preserved in the appropriate proportion of formalin. When multiple lesions or sites are sampled, each sample should be placed in a separate and appropriately labeled container.
All sample containers must be properly labeled. Important identification information includes the date, the patient’s last name (and hospital ID number if applicable), and the site from which the sample was obtained. All cytology slides should be properly labeled with pencil or ink that will not smear when the slide is moistened. All appropriate documentation must be completed and should include history, signalment, clinical findings, and tentative diagnosis.
Laser Surgery
This section discusses the role of laser surgery in veterinary medicine, laser safety, and the advantages and disadvantages of using lasers as an alternative to traditional surgery.
How Does the Laser Work?
The word laser is used as an acronym for “light amplification by stimulated emission of radiation.” Lasers are able to create light at distinct wavelengths and distinct delivery parameters. Laser light wavelength and frequency determine the color of the laser light and the way the laser light interacts with its target surface. When laser light hits its target, it may be reflected, absorbed, scattered, or transmitted through the tissues, depending on the type of laser light being used. The types of lasers most often used in veterinary medicine are the carbon dioxide (CO2) laser, diode laser, and neodymium:yttrium-aluminum-garnet (Nd:YAG) laser. The CO2 and diode lasers are discussed here.
The clinical functions of the CO2 and diode lasers consist of ablation, incision, and excision of soft tissue. Both the CO2 and the diode lasers operate through photothermal laser-tissue interaction. This means that the laser light is absorbed and transformed into heat within the tissue. Water, hemoglobin, melanin, and some proteins absorb different wavelengths of light, causing the tissue to heat. For example, the CO2 laser is highly absorbed by water. The diode laser is highly absorbed by melanin and hemoglobin.
Heating of the tissue at different temperatures causes certain changes in the tissue. At 42° to 45° C, blood vessels are destroyed, resulting in necrosis of tissue. As tissue temperatures reach 50° to 100° C, proteins denature and coagulation occurs, causing irreversible tissue damage. Once tissue temperature surpasses 100° C, solid tissue becomes gaseous vapor and smoke plume. Increased heating of tissue can cause burning, resulting in carbonization of the tissue. This carbonization is called char. Charring occurs when tissue absorbs heat faster than it can be released. Heating to this extent results in damage to the surrounding tissue. Carbonization of the tissue also acts as a foreign substance and can hinder wound healing as well as cause inflammation at the site.
CO2 Lasers versus Diode Lasers
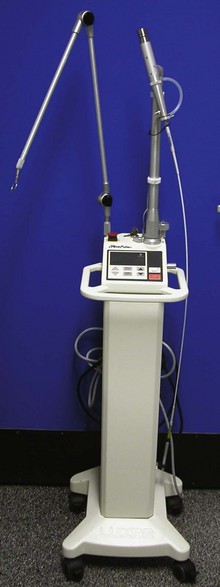
CO2 lasers are available at a wavelength of 10,600 nanometers (nm) (Figure 7-124). The CO2 laser comes equipped with a selection of hand pieces and tips. Tips come in a variety of sizes (0.3-1.4 mm), and specific tips are used for specific surgical procedures. The CO2 laser is considered a class IV laser system, as are most medical lasers. Lasers are separated into classes I to IV according to the degree of possible safety hazards to patients and users. The CO2 laser is used predominantly to create surgical incisions, to excise after incision, or for ablation of tissue. Most CO2 lasers use a noncontact mode in which the laser tip never comes in contact with the tissue.
The 10,600-nm wavelength of the CO2 laser is perfect for incising and vaporization because it is highly absorbed by water. Because most tissues have high water content, the laser energy is absorbed very close to the surface. The effect of the laser energy on tissue is determined by the laser wavelength, target tissue, spot size, power, and exposure (including exposure duration). Because laser wavelength (10,600 nm) and presumably the target tissue are known, the surgeon must choose the settings for the spot size, power, and exposure. Spot size refers to the diameter of the aperture. The distance of the tip from the tissue determines the exact spot size on the target tissue. Moving the tip away from the target tissue increases the spot size. Moving the tip closer to the target tissue decreases the spot size. The size of the tip also determines the spot size on the target tissue. Power settings are in watts (W), and the surgeon selects the appropriate wattage for a specific procedure. Power density depends on the set power, the spot size, and the distance of the tip from the tissue. The exposure refers to the duration of the laser beam, or how long the tissue is exposed to the laser beam. The clinician uses spot size, power, and exposure to control the interaction of the CO2 laser beam and its effects on the tissue.
Available wavelengths for diode lasers in veterinary medicine range from 805 to 980 nm (Figure 7-125). The diode laser is also considered a class IV laser. Diode lasers are small, compact units that emit wavelengths that are easily transmitted through small, flexible optical fibers, allowing their use with most flexible and rigid endoscopes. Diode lasers also come equipped with a variety of hand pieces and tips. The diode laser can reach its target tissue using a contact mode or a noncontact mode, whereas most CO2 lasers use a noncontact mode of light transmission. Noncontact fibers are available in squared, cleaved, or polished tips and are more appropriate for ablation procedures. Contact fibers tend to be sculpted and are more appropriate for incisional purposes. Diode laser light has better absorption in hemoglobin and melanin, whereas the CO2 laser light has better absorption in water. More collateral thermal damage may occur with the diode laser because of the deeper penetration, unlike the absorption of water closer to the surface with the CO2 laser. Because of the enhanced absorption of hemoglobin, the diode laser may provide more proficient incisions and better hemostasis, especially of larger vessels.

The CO2 and diode lasers can be used in a continuous mode or a pulse mode. The mode, tip size, and settings chosen by the clinician vary according to the type of procedure performed. When using either the CO2 or the diode laser, the clinician should start with low power settings and a short duration of exposure until becoming familiar with the effects of the laser on the target tissue. Also, the laser energy should be delivered perpendicularly from the hand piece to the target tissue. When incising tissue, the clinician should apply lateral tension perpendicular to the incision. This maneuver helps reduce the formation of char. A record or log should be kept of each procedure performed as well as the power and duration settings. This task will most likely be the technician’s responsibility. A log of procedures will help the surgeon choose settings to use for future procedures.
Laser Procedures in Veterinary Medicine
Lasers may be used for surgical procedures ranging from minor elective procedures (e.g., feline declaw, lump removal) to more extensive procedures (e.g., celiotomy, thoracotomy). Other laser procedures include canine and feline castration, dewclaw removal, amputation, cystotomy, soft palate resection, oncologic procedures (e.g., neoplasia removal), and ophthalmic procedures. Whether to use laser energy or traditional surgery is ultimately the surgeon’s decision. (See Box 7-26 for a list of advantages and disadvantages of laser surgery.)
Laser Safety
Laser safety may be the technician’s most important responsibility when assisting with laser surgery. It is imperative that precautions be taken to protect the clinical staff as well as the patient from the array of hazards associated with laser surgery. Many hospitals assign a laser safety officer, often the technician. The safety officer is responsible for following safety guidelines established by the manufacturer of the laser machine or by the American National Standards Institute (Standards ANSI Z136.3-1988 and Z136.1-1993). These guidelines give specific instructions to follow for laser safety and laser use. Most laser companies also provide user and safety training when a hospital purchases a laser machine. Laser surgery should never be performed by anyone who has not had proper training or education about laser use and safety. The ANSI Standards recommend that prospective laser users become knowledgeable about policies and procedures, review clinical literature, attend courses for a certain number of hours, consult with an experienced operator of laser surgery, and receive training on specific equipment before operating laser machines.
Laser Hazards
Laser warning signs should be posted in the surgery room as well as on all doors entering it. Figure 7-126 shows the warning sign for class IV lasers.
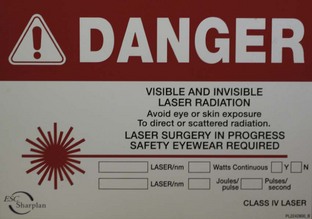
FIGURE 7-126 Laser warning signs should be posted on the doors to the surgery room as well as within the surgery room.
Dangers associated with class IV lasers include eye, skin, fire, and smoke plume hazards.
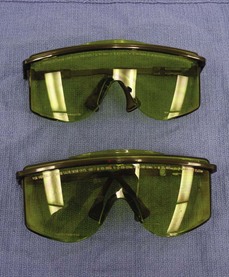
Eye hazards: Everyone in the laser surgery room must wear the eye protection goggles specific for the particular laser light (Figure 7-127). Different lasers emit different wavelengths, and the protection worn must coincide with the laser wavelength. Scattered reflections from the laser beam can cause serious corneal or retinal damage. The eyes of the patient should also be protected from scattered laser light. When a CO2 laser is used, moistened sponges can be placed over the eyes for protection because the CO2 laser beam is absorbed by water. Patient eye shields are also available.
Skin hazards: Skin hazards may occur from direct or scattered laser beams. It may be in the clinician’s best interest to wear gloves and a gown for added protection.
Fire hazards: Possible fire hazards include the surgical drapes, anesthetic agents, oxygen, animal’s fur, alcohol products used in surgical preparation, and methane from flatulence. With the CO2 laser, wet sponges can be placed around the surgical area for protection of drapes. Any exposed fur around the surgical region can also be moistened with water. A nonalcohol surgical prep (e.g., chlorhexidine or povidone-iodine preparation) should always be used for all laser procedures. The anesthetist should always make sure the cuff of the endotracheal (ET) tube is inflated properly to decrease the chance that gaseous vapor or oxygen will escape. Standard polyvinyl chloride (PVC) tubes may be at risk for damage and ignition during a laser procedure. Laser-safe ET tubes can be purchased for procedures within the oral cavity. Another alternative is to lay moistened sponges around the standard ET tube to prevent a possible fire hazard when CO2 lasers are used. Because methane is considered another possible source for fire ignition, moistened sponges can be placed within the rectum of the patient during perianal surgical procedures with the CO2 laser. Fire extinguishers should be readily available in any laser surgery room in the event of unexpected ignition.
Smoke plume hazards: The smoke plume emitted from laser contact with tissue contains toxic and carcinogenic chemicals as well as bacteria and viral particles. An evacuator is usually purchased with the laser machines. Laser procedure should never be performed without an evacuation system. The smoke evacuator should be within 1 to 2 inches of the smoke’s origin. Laser surgical masks are also available. Regular surgery room masks may not filter all toxic or infectious particles.
Laparoscopy
A laparoscopy is a minimally invasive abdominal procedure performed for the purpose of examining the peritoneal cavity and its viscera. A type of endoscope, called a laparoscope, is placed through a small midline incision or opening into the abdominal wall for inspection of the abdominal contents. Other incisions can be made into the abdominal wall (lateral to midline) for the insertion of laparoscopic instruments. These specialized instruments can be used for biopsy purposes as well as to perform specific procedures (e.g., spay, gastropexy) within the abdominal cavity. In many cases, laparoscopy can take the place of a full abdominal surgical procedure. In most cases, the procedure affords the patient a swift recovery with less potential for complications (Box 7-27).This section describes the equipment and procedures associated with laparoscopy.
Laparoscopic Equipment
The necessary equipment to perform a laparoscopy includes the laparoscope or telescope, trocar-cannula units, fiberoptic light cable, light source, Veress insufflation needle, gas insufflator, and camera/video system (optional).
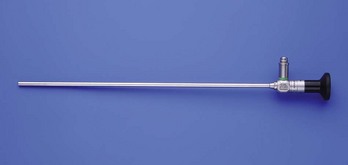
Laparoscopes: Laparoscopes for small animals range in size from 1.7 to 10 mm in diameter. The most common size tends to be the 5-mm-diameter scope for dogs and cats (Figure 7-128). Laparoscopes are also designed with varying telescope angles. The scope with a 0-degree field of view allows the surgeon to observe the field precisely in front of the scope. Other angled scopes include the 30-degree and 45-degree fields of view. These angled telescopes enable the operator to look over the top of organs and examine small areas. Laparoscopes with an offset eyepiece that contains a channel for the introduction of accessory instruments are called operating laparoscopes. Trocar-cannula units are not needed with this type of scope.
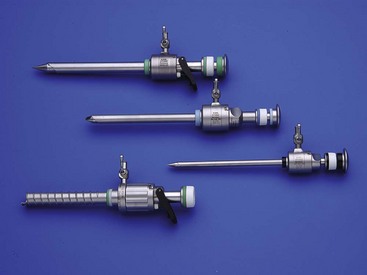
Trocar-cannula units: Trocar-cannula units contain a trocar for puncturing through the abdominal wall and a cannula for the insertion of a telescope or laparoscopic instrument. These instruments are produced as threaded cannulas or smooth cannulas (Figure 7-129). The threaded cannulas screw into the abdominal wall, allowing for better gripping of the cannula. Threaded cannulas are less likely to slip or fall out of the abdomen. Laparoscopic cannulas also contain a trumpet valve that thwarts the escape of gas from the abdomen.
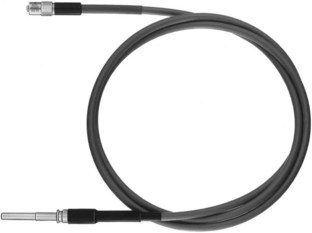
Fiberoptic light cable and light source: A fiberoptic cable emits light from the light source to the scope (Figure 7-130). The light from the scope illuminates the abdomen so that the operator can see the organs clearly. Light cables come in an assortment of diameters. A 4-mm to 5.5-mm cable is recommended for general use in dogs and cats.
Veress insufflation needle: The Veress insufflation needle is used for the original insufflation of the peritoneal cavity (Figure 7-131). This needle is composed of a sharp outer trocar and a blunt inner stylet. The stylet consists of a small opening to allow gas to insufflate into the abdomen. The outer trocar functions to puncture through the abdominal wall into the abdominal cavity. The trocar is then retracted, and the inner stylet with the small opening is exposed. Gas is then insufflated through the opening.

Gas insufflator: Gas insufflators are also referred to as laparoflators. Tubing is connected from the gas insufflator to the Veress needle. The gas insufflator pushes gas through the tube to the needle to inflate the abdomen. This inflation lifts the abdominal wall away from the abdominal viscera, allowing the surgeon to view the abdominal organs as well as to perform biopsies or surgical procedures. Gas insufflators include CO2, nitrous oxide, and room air. CO2 is recommended because of its rapid rate of absorption. The laparoflators allow the operator to control the volume of gas being emitted and regulate the intra-abdominal pressure. Excessive intra-abdominal pressure decreases venous return to the heart and reduces the ability to ventilate. Excessive pressure can also interfere with excursions of the diaphragm. The abdominal pressures should not exceed 15 mm Hg.
Camera/video system: A camera attached to a video system and monitor is mounted on top of the laparoscope (Figures 7-132 and 7-133). This system enables everyone in the surgery room to view the internal abdominal cavity on a monitor.
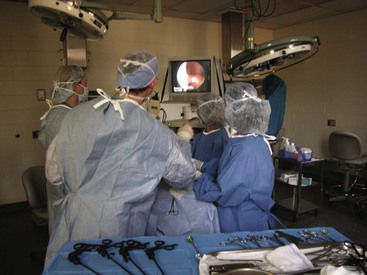
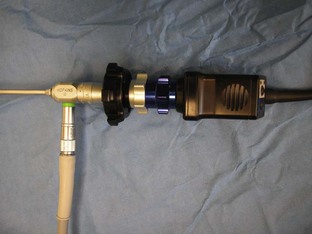
Special instruments: A general use soft tissue instrument pack should be available for laparoscopic procedures. The surgeon will require scalpel handles, blades, mosquito forceps, thumb forceps, needle holders, suture scissors, suture, and a bowl for saline. Laparoscopic instruments that should be available include biopsy instruments, cutting instruments, and palpation probe (Figures 7-134 and 7-135). These instruments can be passed through cannulas of accessory ports to aid in biopsy retrieval or to perform surgical procedures. Most laparoscopic instruments are insulated so that they can be used with electrocoagulation units.


Patient Positioning
A patient undergoing a laparoscopy should be fasted for 12 hours to prevent regurgitation during anesthesia and to keep the stomach from being distended. The bladder should be expressed before the patient enters the surgery room. An increased risk of traumatic puncture is present when these organs are distended. Distended organs can also make visualization of the target organs difficult. Most laparoscopic procedures are done with the patient under general anesthesia. The patient’s abdomen should be clipped from the xiphoid process to the pubis as for any abdominal procedure. The clip should extend wide laterally for the placement of accessory ports. The animal may be placed in dorsal or left or right lateral recumbency. The positioning of the patient depends on the procedure. For purposes of this discussion, it is assumed that the patient has been placed in dorsal recumbency. The abdomen should be prepared routinely.
Patient Draping
A four-quarter draping method should be considered for laparoscopic procedures. Single fenestrated drapes are specifically not appropriate for this procedure.
Laparoscopic Procedure
Once the patient has been draped, the laparoscopic setup can begin. The surgeon should put on an extra pair of gloves for removing the scope and light cable from the glutaraldehyde solution in which it is stored after cleaning. A nonsterile technician pours sterile saline over the scope and light cable for rinsing purposes. The items should be rinsed thoroughly to remove all the glutaraldehyde from the cable and scope. The items should then be dried by a member of the sterile scrub team with a sterile towel, and the extra gloves removed. Next, a sterile sleeve is used to cover the camera, and the scope is placed on the head of the camera. The camera shows the images of the abdominal contents on a monitor to allow visualization of the abdomen by everyone in the surgery room. One end of the insufflation tubing is passed to a nonsterile technician and attached to the insufflator. The other end remains sterile and will be placed on the Veress needle.
The surgeon makes a 2 mm to 3 mm skin incision into the abdominal skin at midline for entry of the Veress needle. Once the Veress needle is placed, a drop of saline can be introduced at the hub of the needle. This will help the surgeon know when the abdominal cavity has been penetrated, because negative pressure in the abdominal cavity will draw the saline into the needle. Proper placement of the Veress needle is important. Subcutaneous emphysema can occur if the needle is placed between the muscle and subcutaneous tissue. Once proper placement is achieved, the outer trocar of the needle is retracted, and the blunt stylet with opening is uncovered. The insufflation tubing can then be connected to the needle, and insufflation can begin. Remember: Insufflation of the abdomen should never exceed 15 mm Hg. The insufflator or laparoflator can be regulated to stop at 15 mm Hg. If pressure in the abdomen should decrease, the insufflator will increase the volume of gas being released.
Once insufflation of the abdomen has been achieved, a trocar-cannula can be placed. A skin incision is made through the skin in the region of the Veress needle. The trocar aspect of the unit will puncture through the abdominal wall for introduction of the cannula (Figure 7-136). When the cannula has been sufficiently placed, the trocar is removed and the telescope (with camera) can be introduced through the cannula (Figure 7-137). The scrub team should now be able to view the abdominal contents on the monitor. In many cases the picture appears foggy at first because of the heat from the abdomen. The scope can be removed and wiped with a warm, moistened, sterile gauze sponge. The scope can then reenter the abdominal cavity through the cannula port.

FIGURE 7-136 After removal of the Veress needle, an 8-mm trocar-cannula unit is introduced at midline. The laparoscope will be introduced into the abdomen through this cannula. Note the attached tubing for insufflation of the abdomen.

If a surgical procedure or biopsy is to be performed, the introduction of a second and a third cannula may be required for instrumentation purposes. The same technique can be used as for the telescope cannula. These cannulas will most likely be placed lateral to midline (Figure 7-138). Placement of the cannulas will depend on the location of the organ requiring biopsy; Figure 7-139 shows an intraoperative laparoscopic liver biopsy. Box 7-28 shows an example of a surgery report for a laparoscopic procedure.
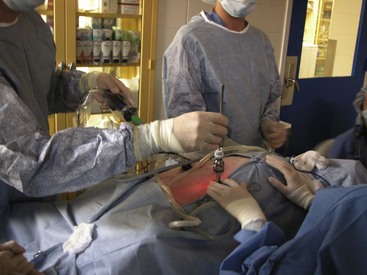
FIGURE 7-138 An accessory cannula has been introduced on the right side of this dog’s abdomen. A blunt probing instrument has been inserted through the cannula to allow for manipulation of the abdominal organs.
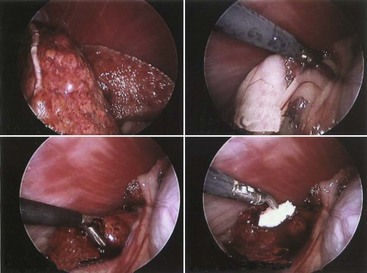
FIGURE 7-139 Intraoperative laparoscopic liver biopsy. Top left, Laparoscopic view of diseased liver lobes. Note the many diffuse nodules throughout the liver lobes. Top right, A grasping instrument is placed through an accessory port to remove omentum away from the proposed biopsy site. Bottom left, A biopsy forceps is used to collect a piece of liver for diagnostic purposes. Bottom right, An absorbable gelatin sponge is placed at the biopsy site to control hemorrhage. This will stay in place and be absorbed by the body.
Endoscopy
Endoscopy is the technique of examining internal body structures using specialized optical instruments. Endoscopy is generally considered a high-yield and noninvasive or minimally invasive procedure. It is high yield in that it often results in diagnostic and therapeutic benefits for the patient. The body is entered (“invaded”), usually through an orifice (e.g., mouth, anus), but no incision (noninvasive) or a small incision (minimally invasive) is required to enter the body. In the diagnostic evaluation of most cases, noninvasive tests (e.g., radiography, ultrasonography, some endoscopic procedures) are performed before minimally invasive procedures (e.g., other endoscopic procedures), which are performed before invasive procedures (e.g., exploratory celiotomy) (Box 7-29).
Endoscopy allows the clinician to examine tissues directly, obtain biopsy samples, and perform therapeutic procedures, such as the removal of foreign bodies. General anesthesia and proper fasting are required for all endoscopic procedures. For each procedure that requires passing the endoscope through the mouth, the patient should be intubated with an ET tube, and a mouth speculum should be used to prevent any damage to the endoscope. The cuffed ET tube will aid in preventing aspiration of reflux or regurgitated material from the oropharynx during the procedure.
Endoscope Selection
Endoscopy equipment is now affordable for private practices and not only for referral centers and educational institutions. When purchasing endoscopy equipment, veterinarians should primarily consider (1) the probable frequency of use and the equipment’s versatility, (2) the quality of the optical system, and (3) the ease of maneuvering the endoscope. Purchase price is important with many veterinarians, but purchasing a cheaper, low-quality endoscope instead of a higher quality scope can be a costly mistake; a thorough examination may be compromised by such an instrument, and a definitive diagnosis may not be achieved. High-quality endoscopes benefit hospitals because their cost can usually be recovered after 2 years, and if maintained properly, the endoscopes provide many more years of service than lower-quality models.
A standard flexible endoscope with a diameter of 8 to 11 mm and a working length of 100 cm is usually adequate for feline and canine upper GI examinations and colonoscopies (Figure 7-140). A new endoscope should have these features and capabilities: (1) a four-way distal tip deflection with at least 180 degrees of upward deflection (for retroflexion), (2) water flushing, (3) air insufflation, (4) suctioning, (5) locking deflection controls, (6) an accessory channel with a diameter of 1.8 to 2.4 mm, and (7) forward-viewing optics.
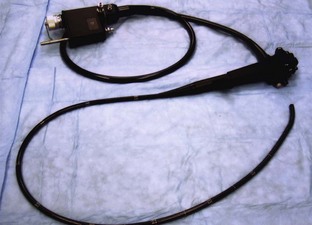
Flexible Endoscopes
Because they are long and pliable, flexible endoscopes are better than rigid endoscopes for procedures that require bending or flexibility to examine areas such as the stomach, duodenum, and colon. Flexible endoscopes are used for noninvasive procedures and are available with either a two-way (up/down) or a four-way (up/down and left/right) distal tip deflection. The deflections are controlled by an angulation knob mounted on the control section of the endoscope. Older endoscopes have a maximum upward tip deflection of 180 degrees, whereas newer endoscopes have an upward tip deflection of 210 degrees (Figure 7-141). Endoscopes range in length from 50 cm to 170 cm, with insertion tube diameters ranging from 1 mm to 15 mm.
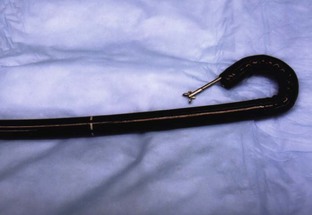
FIGURE 7-141 Example of endoscope with the ability to retroflex 210 degrees. (Courtesy MJR-VHUP, Philadelphia.)
There are two types of flexible endoscopes: fiberoptic (Figure 7-142) and video (Figure 7-143).
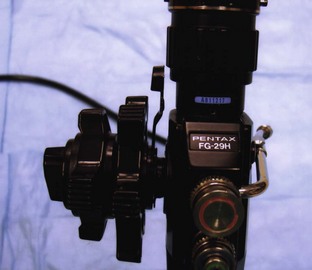
FIGURE 7-142 Control section for a Pentax fiberoptic endoscope. The angulation system is on the right side of the endoscope (right side of endoscope appears on left side of figure). The large inner knob deflects up and down, and the small outer knob deflects right and left. The top valve is for suctioning, and the bottom valve is for air insufflation and flushing water to clean a dirty lens. If any images are to be taken, a camera head can be attached from the eyepiece on the endoscope to the endoscopy unit. (Courtesy MJR-VHUP, Philadelphia.)
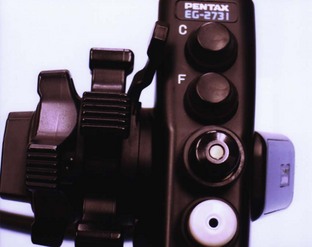
FIGURE 7-143 Control section for Pentax video endoscope. The angulation knobs and valves are the same as for the fiberoptic endoscope, except that images can be directly taken from the endoscope. The “F” button is to freeze an image, and the “C” button is to capture an image so it can be printed and stored in a computer. (Courtesy MJR-VHUP, Philadelphia.)
Fiberoptic endoscope: With a fiberoptic endoscope, a light cable carries light by fiberoptic bundles from an external light source through the control section and to the insertion tube. The control section is protected by hard plastic and contains the viewing lens, angulation control knobs, biopsy ports, white balance, and camera controls. The control section also has an eyepiece. The insertion tube houses the fiberoptic light strands and channels for air insufflation and water flushing, biopsy and retrieval instruments, and suction. When the air/water valve is compressed, water flushes and rinses the lens on the distal tip of the endoscope. When the air/water valve port is covered, insufflation occurs and can be regulated (Figure 7-144).

FIGURE 7-144 Components of a typical fiberoptic endoscope. (From Stasi K, Melendez L: Care and cleaning of the endoscope. Vet Clin North Am Small Anim Pract 31:589, 2001.)
The biopsy channel port is located at the base of the control section at the junction with the insertion tube. The insertion tube itself is protected by a waterproof sleeve. Although the endoscope has three distinct sections (light guide plug, umbilical or universal cord, and control section), it is a one-piece unit that is sealed and watertight.
The distal tip of the insertion tube can bend more easily than the rest of the endoscope because a rubber insert covers the last few inches. Tip deflections can be fixed in any position by using the lock mechanisms situated next to the angulation knobs. This construction allows the endoscopist to control and maneuver the endoscope with ease. The umbilical cable or universal cord connects the light guide plug to the control section of the endoscope. The light guide plug inserts into the light source. The plug has ports for the air/water and suction channels.
The fiberoptic endoscope is a direct viewing system. Fiberoptic bundles composed of thousands of individual fibers transmit light from the light guide plug to the distal tip of the insertion tube. The fibers’ flexibility allows light to bend around corners and curves. Fiberoptic endoscopes also use a fiber bundle to transmit images from the objective lens at the distal tip, through the eyepiece, and to the endoscopist’s eyes. The image guide bundles are set up so that each fiber carries a portion of the image and is in the same place at both ends of the bundle. Video cameras can be attached to the eyepiece of fiberoptic endoscopes to display images on a monitor. The final image is made up of the many small pieces of the whole image, so if a fiber breaks, a black or gray dot appears on the image.
The automatic brightness system in some fiberoptic endoscopes controls the light level. Illumination decreases as the object in view draws closer, and brightness increases as the object recedes farther away. The color, texture, and reflectivity of the tissue in view all affect the intensity of brightness. The auto-brightness control compensates for these differences.
Video endoscope: Video endoscopes are similar in construction to fiberoptic endoscopes, except they do not have a direct viewing lens aided by an eyepiece. Images are seen on a video screen. The image bundle in a fiberoptic endoscope is replaced in a video endoscope with a camera unit consisting of a lens assembly and an electronic chip known as a “charged coupled device” (CCD). The CCD chip is housed in the distal end of the insertion tube. The CCD chip is connected to an external video processor by approximately 16 small wires. The external video processor assembles the image and transmits it to a video monitor (Figure 7-145).
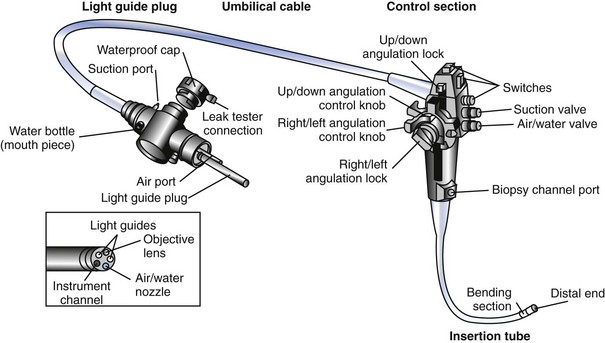
FIGURE 7-145 Components of a typical video endoscope. (From Schumway R, Broussard J: Maintenance of gastrointestinal endoscopes. Clin Tech Small Anim Pract 18:254, 2003.)
The automatic brightness system can control the light level in all video endoscopes as in some fiberoptic endoscopes. Video endoscope systems have the capability to freeze and capture images from recording-device buttons in the control section. Other media, such as videotapes, computer files, and prints, can aid in capturing information. The light guide plug in a video endoscope is heavier than that in a fiberoptic endoscope and needs to be handled with care. The terminals in the light guide plug are not waterproof and must be covered by soaking caps (supplied with the endoscope) before being immersed in solutions for cleaning.
Rigid Endoscopes
Rigid endoscopes are better than flexible endoscopes for procedures involving a direct pathway that are better viewed with a straight or a direct line of sight. Such areas include the ears, nose, urinary bladder, joint spaces, and abdominal or thoracic viscera. Rigid endoscopes are used for noninvasive to moderately invasive procedures that involve tissues that lie relatively close to the body surface and can be visualized with a straight line of sight. Procedures using rigid endoscopes include otoscopy and rhinoscopy. Some procedures, such as arthroscopy, laparoscopy, and thoracoscopy, require small incisions to allow access of the object lens into the specific area to be examined. (For more information on rigid endoscopy, see Bibliography and the previous section on laparoscopy.)
Endoscopy Preparation
A technician who works with the veterinarian performing endoscopy should also have the necessary training to assist with patient preparation, equipment setup, patient monitoring, obtaining biopsy specimens, freezing/capturing and storing images, equipment breakdown, equipment cleaning, performing file backups, maintaining order of the endoscopy room, and ordering supplies.
The endoscopy technician is responsible for preparing and setting up the procedures. The endoscope of choice should be hooked up to the endoscopy machine with appropriate valves and biopsy channel covers. Before the procedure, the patient data should be ready in the computer. The machine is turned on when the endoscope is attached, and the light source is checked. The endoscope should be tested while the machine is warming up. First, the technician should confirm that an adequate amount of distilled water is available for flushing; the water valve can then be depressed to confirm that water comes out of the distal end. Water flushing is done to rinse off a soiled lens on the distal tip of the endoscope. Second, the air/water valve should be gently covered, and the distal end of the insertion tube submerged in a bowl of water to check for bubbles; this is a test for insufflation. Third, the tip is left submerged in a bowl of water and tested for suctioning. Any necessary accessory instruments or items, such as biopsy forceps, oral speculum, pathology request forms, water-soluble lubricant gel, gauze pads, and formalin cups or slides, should all be available and ready for use.
Endoscopy Work Area
The endoscopy room should be large enough to accommodate the cart or tower for the endoscopy unit (light source/suction unit, video printer/monitor, computer, keyboard), patient, anesthesia machine, endoscopy equipment (endoscopes, accessory instruments), a designated area to clean the endoscopy equipment, shelves and cabinets for miscellaneous storage needs, counter space, and a sink. Having the endoscope unit on a cart is convenient and allows portability to different areas of a hospital (Figures 7-146 and 7-147).
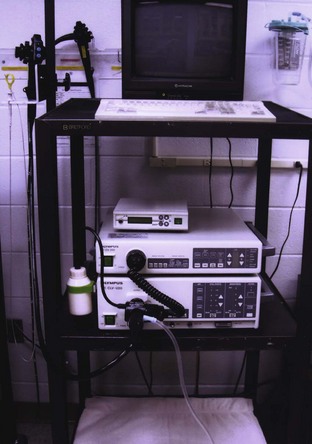
FIGURE 7-146 Cart setup with Olympus endoscopy equipment (units for light source, air/suction/flushing, and brightness control), water bottle, TV monitor, biopsy forceps, and video endoscope (hanging on cart pole mount), with appropriate valves and biopsy channel cover. (Olympus America, Inc., Center Valley, PA.) (Courtesy MJR-VHUP, Philadelphia.)
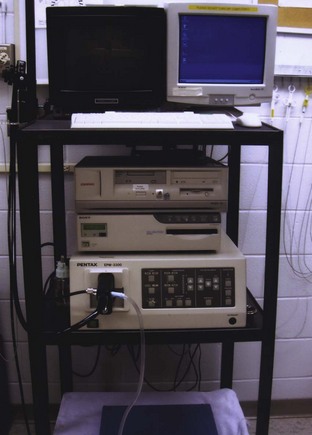
FIGURE 7-147 Cart setup with Pentax endoscopy equipment (units for light source, air/suction/flushing, and brightness control), water bottle, TV monitor, computer (to store patient data and images), digital printer, biopsy forceps, and video endoscope (hanging on cart pole mount), with appropriate valves and biopsy channel cover. (Courtesy MJR-VHUP, Philadelphia.)
Ideally, a well-ventilated storage cabinet will be available in the endoscopy room to protect and store the endoscopes (Figure 7-148). If a cabinet is not available, wall mounts or cart pole mounts are acceptable (Figure 7-149). Storing endoscopes in their original custom-padded cases is not recommended; the hanging position rather than the coiled position is strongly advised. Also, endoscopes should never be placed on a flat surface (not even temporarily) because they could fall off or be knocked onto the floor, resulting in costly repair. After cleaning, endoscopes should be hung to dry either in a hanging storage cabinet or on a wall or cart pole mount, where they remain until required for another procedure. Hanging endoscopes allows any residual droplets of moisture in the insertion tube to drain. Residual moisture in the accessory channel may promote growth of bacteria and fungi and clogging of the air/water channel. This is why endoscopes should not be stored in their custom-padded case; if they are encased in a coiled fashion air cannot circulate through the channels, and problems are more likely to develop.
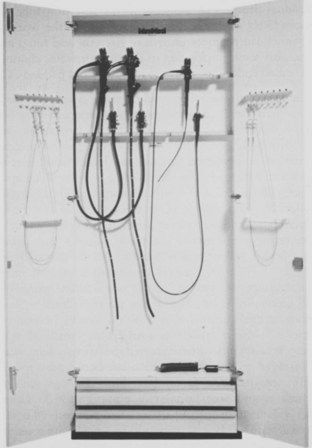
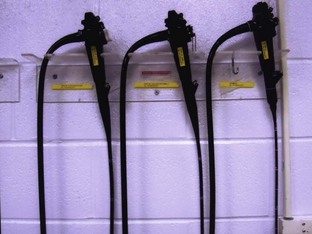
Handling the Endoscope
The control section of a flexible endoscope is the only area designed to bear its weight. During transport of an endoscope, one hand should hold the control section while the other hand holds the ends of the insertion tube and umbilical cable. The optics at the tip of the insertion tube are delicate, so extra care should be taken to protect them from damage.
There are basically two ways to hold the control section during endoscopy, described as the “two-finger grip” (Figure 7-150) and the “three-finger grip” (Figure 7-151). The straighter the endoscope can be maintained throughout a procedure, the more precisely it can be controlled and maneuvered. Practice and patience are required to obtain efficient and valuable endoscopic capabilities.
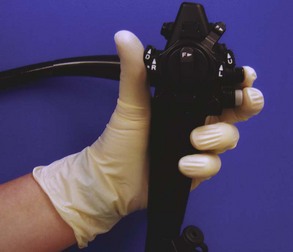
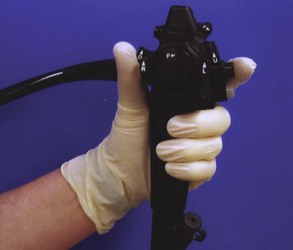
Biopsy Sampling
Endoscopic biopsy samples are obtained with flexible forceps. Samples obtained using forceps with a 1.8-mm cup are usually sufficient for diagnostic histopathology, but cups of 2.4 mm or larger are always better because samples retrieved are substantially larger and deeper. The correct cup size is determined by the size of the endoscope’s biopsy channel. Biopsy tissue samples obtained with flexible endoscopes may not always be deep enough to allow diagnosis of submucosal lesions, whereas using rigid endoscopes usually yields diagnostically sufficient amounts of tissue. It is ideal, but not always possible, to visualize the biopsy site. Depending on the difficulty in advancing the endoscope through areas of narrowing, such as the pyloric sphincter and ileocolic junction to obtain biopsies of the duodenum and ileum, respectively, the clinician may blindly lead the tip of the insertion tube to the site and carefully obtain “blind” tissue samples.
Any biopsy sample, especially an intestinal or gastric mucosa sample, must be handled carefully to minimize artifacts and distortion. If possible, tissue samples should be carefully removed from the biopsy forceps with a 25-gauge needle (Figure 7-152). Cytology can assist in making or confirming a diagnosis, but unremarkable cytology findings do not rule out specific disorders.
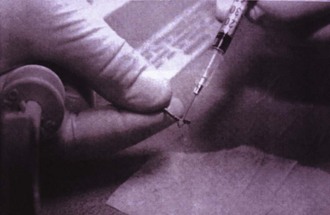
FIGURE 7-152 A biopsy sample is carefully removed with a small-gauge needle. (From Tams T: Small animal endoscopy, ed 2, St Louis, 1999, Mosby.)
It is important that tissue samples from different locations be placed in different vials of formalin and properly labeled so the pathologist can correctly identify the area sampled. Tissue samples should not be allowed to dry out or be damaged before placement in formalin.
Tissue samples that are too small and samples that have excessive artifact are common problems with endoscopy. For example, a lymphoma can be submucosal, and a superficial biopsy sample may only contain reactive cells above the tumor and may miss the neoplastic cells from the tumor. This finding could be misinterpreted as a diagnosis for inflammatory bowel disease. Three to five full-thickness biopsy samples are usually sufficient, but obtaining six to eight may be more helpful, especially with both mucosal and submucosal samples. The clinician should follow up with the pathologist to determine whether the quality of the tissue samples was adequate and whether the histologic findings are consistent with the patient’s clinical signs.
Even though endoscopy is considered a minimally invasive procedure, one rare but significant complication is perforation. Therefore, when biopsy samples are obtained from diseased areas, extra caution and care should be taken to avoid applying too much force against mucosal walls.
Instrumentation
Many flexible instruments are available for use with endoscopes that have an accessory channel. Both flexible and rigid endoscopes can accommodate flexible instruments. Basic instrumentation includes biopsy forceps (e.g., oval/ellipsoid cups, serrated cups, alligator cups, serrated/nonserrated bayonets), instruments for grasping foreign bodies (e.g., “rat tooth” forceps, wired snares, wired baskets, meshed nets, two- or three-pronged grasping forceps), cytology brushes, aspiration tubes, injection needles, and coagulating electrodes (Figure 7-153).
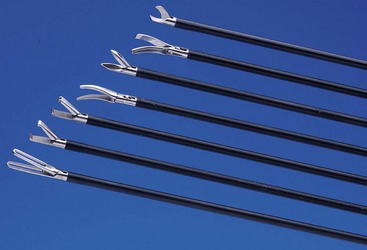
FIGURE 7-153 Examples of biopsy forceps graspers and retrievers. (From Tams TR: Small animal endoscopy, ed 3, St Louis, 2012, Mosby.)
Foreign bodies should not be retrieved through the accessory channel. Once the object has been visualized and firmly secured, the entire endoscope should be removed from the patient. Following this recommendation prevents costly damage to the accessory channel of the flexible endoscope. When removed, foreign bodies should be cleaned off as well as possible and placed in a secure bag or container for the animal’s owner.
Disposable sheathed cytology brushes are recommended for obtaining brush samples, such as a gastric or duodenal mass or intestinal mucus. One cytology brush should be used per patient because cells from one sample may be transferred to the cytologic sample of another patient if the brush is used on more than one patient. This transfer can happen because cytology brushes are difficult to clean thoroughly. Polyethylene tubing can be used to perform a duodenal wash through the endoscope to examine for evidence of giardiasis or to collect intestinal fluid for identification or quantification of bacteria.
Esophagoscopy
Esophagoscopy is the endoscopic technique of examining the esophagus. Esophagoscopy is a useful tool in the diagnosis and treatment of esophageal disease and is indicated for the evaluation of animals with signs of esophageal disease. These signs may include (but are not limited to) regurgitation, dysphagia, odynophagia, ptyalism, change in appetite, and weight loss. Esophagoscopy is the method of choice for diagnosing disorders that affect the mucosa or alterations affecting the lumen of the esophagus (Figure 7-154).
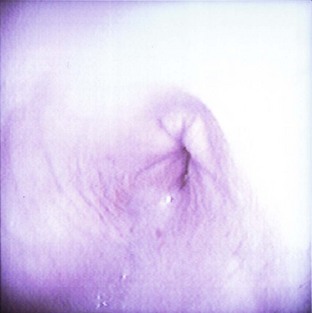
Esophageal foreign bodies, inflammation (esophagitis; Figures 7-155 and 7-156), esophageal strictures, ulcers, and neoplasia are conditions affecting the esophageal mucosa or lumen that can be definitively diagnosed by esophagoscopy. However, contrast radiography is more useful than esophagoscopy in diagnosing megaesophagus, hiatal hernias, vascular ring anomalies, and gastroesophageal intussusception. Whenever an esophagoscopy is performed, it is important for the endoscope to enter the stomach and for the surgeon to retroflex the scope’s tip to view the gastroesophageal sphincter area to detect leiomyomas or other easily missed lesions (Box 7-30).
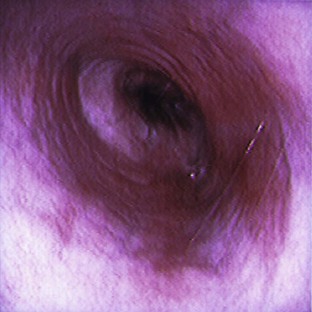
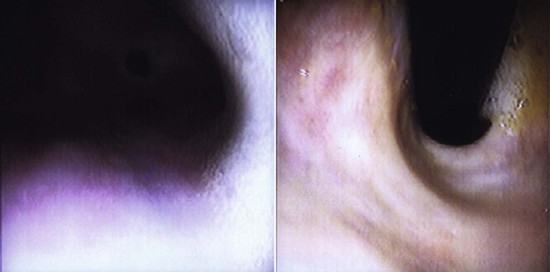
FIGURE 7-156 Left, Mild reflux esophagitis in 10-year-old male German Shepherd Dog. Right, Retroflexed view of gastroesophageal sphincter and cardia. (Courtesy MJR-VHUP, Philadelphia.)
Canine mucosa differs from feline esophageal mucosa. A dog’s esophageal mucosa is normally pale pink or grayish, and the surface is smooth and glistening. In dog breeds such as the Chow Chow and Shar-Pei, patches of pigmented mucosa may be observed. A cat’s esophageal mucosa differs from that of a dog because of the presence of submucosal vessels and circular rings formed by circumferential mucosal folds, creating a characteristic pattern in the distal third of the cat’s esophagus (Figures 7-157 and 7-158).
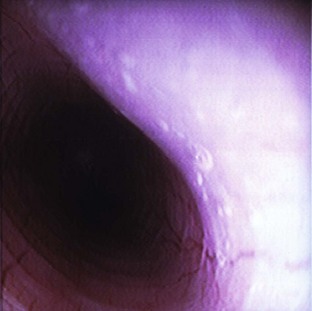
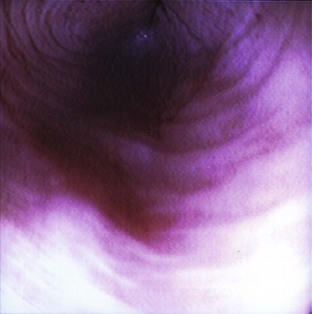
Gastroscopy
Gastroscopy is the endoscopic technique of examining the stomach. Gastroscopy is indicated for the evaluation of animals with signs of gastric disease. The signs may include (but are not limited to) nausea, salivation, vomiting, hematemesis, melena, unexplained abnormal changes in breathing, and anorexia. Gastroscopy identifies abnormalities of the mucosa and reveals distortion of the stomach’s normal anatomic relationship to other abdominal organs by displacement or extrinsic compression. Many consider gastroscopy to be a more valuable diagnostic tool than radiography for disorders affecting the stomach.
The following conditions can be definitively diagnosed by gastroscopy or a combination of gastroscopy and associated diagnostic tests (cytology, histology): chronic inflammation (with or without overgrowth of Helicobacter organisms), superficial erosions, foreign bodies, motility disorders, ulcerations, and neoplasia. Gastroscopy can also be a therapeutic intervention when used to remove foreign bodies (Figures 7-159 to 7-161) and place feeding tubes (gastrostomy tubes and percutaneous endoscopy–guided [PEG] gastrostomy tubes).
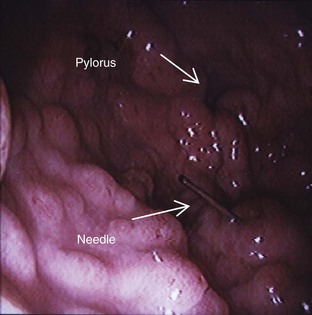
FIGURE 7-159 Needle located in the pylorus of a  -year-old male Labrador; it was retrieved without complications. (Courtesy MJR-VHUP, Philadelphia.)
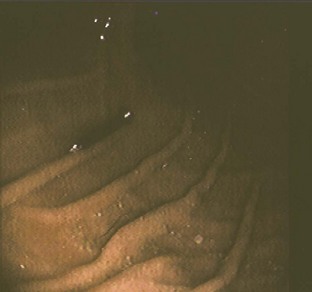
FIGURE 7-160 Steel nail in the stomach of a 6-month-old male Vizsla; it was retrieved without complications. (Courtesy MJR-VHUP, Philadelphia.)

FIGURE 7-161 Left, Article of clothing wedged in the pyloric sphincter of a 9-year-old female Alaskan Malamute. Right, Inflammation and swelling after minor complications in retrieving object. (Courtesy MJR-VHUP, Philadelphia.)
Gastric biopsy is currently required for a diagnosis of Helicobacter infection. The bacteria are not uniformly distributed throughout the stomach; therefore, obtaining samples from various areas (body, fundus, antrum) is recommended. Helicobacter may be diagnosed by cytologic evaluation of the gastric mucosa or by examination for gastric mucosal urease activity (Box 7-31).
Biopsy sampling: Six to 10 gastric biopsy specimens should be collected even if the gastric mucosa appears normal (Figure 7-162). This is important because some patients with a histologic diagnosis of mild to moderate gastritis have no gross mucosal lesions; and patients with gastric motility disorders may have mucosal erythema but no histologic abnormalities. The gastric rugal folds are the best areas from which to obtain biopsy samples because they are easy to grasp with forceps. Biopsy specimens should be taken at various sites of the stomach, including the cardia, fundus, angulus, antrum, and pylorus (Figures 7-163 to 7-166).
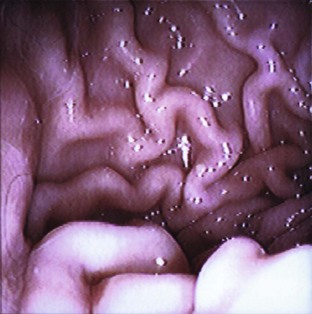
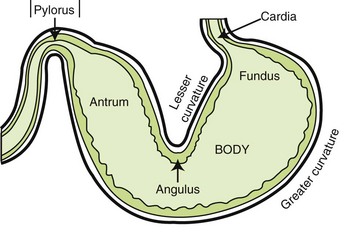
FIGURE 7-163 Five basic regions of the stomach. The areas indicated with arrows are the three most important landmarks for a gastroscopy. (From Tams T: Small animal endoscopy, ed 3, St Louis, 2011, Mosby.)
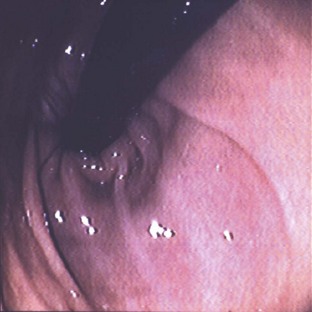
FIGURE 7-164 View of the gastroesophageal sphincter and cardia via retroflexion ( J maneuver) of the endoscope. (Courtesy MJR-VHUP, Philadelphia.)
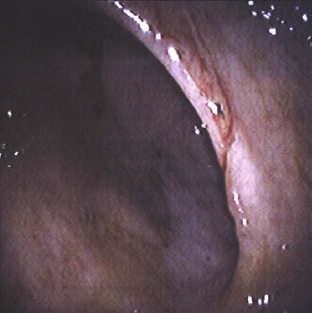
FIGURE 7-165 View of the angulus, which separates the body of the stomach from the antrum. (Courtesy MJR-VHUP, Philadelphia.)
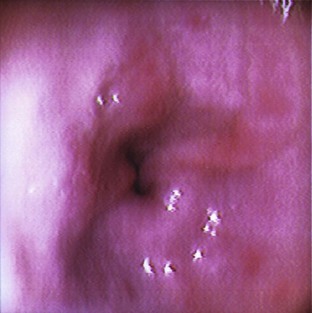
FIGURE 7-166 View of the pyloric sphincter. Once the sphincter opens, the duodenum can be entered by the endoscope. (Courtesy MJR-VHUP, Philadelphia.)
If erosive or ulcerative lesions are present in the stomach, the biopsy samples should be collected from the upper wall where the lesions merge with the normal-appearing mucosa (Figures 7-167 and 7-168). Caution should be used in maneuvering the endoscope around the pit of an ulcer, because perforation could otherwise result. Obtaining biopsy specimens of superficial erosions is usually safer.
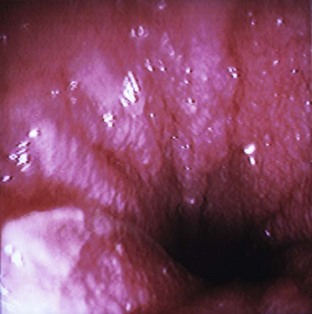
FIGURE 7-167 Ulcerated pylorus with irregular mucosa from a 9-year-old male Labrador. This dog was diagnosed with chronic gastritis and chronic duodenitis. (Courtesy MJR-VHUP, Philadelphia.)
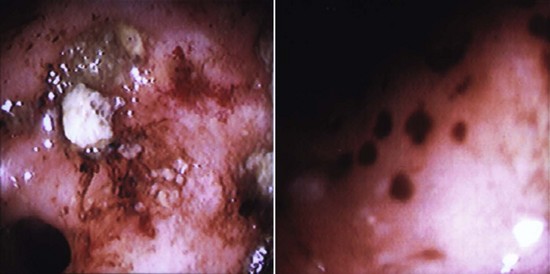
FIGURE 7-168 Small gastric erosions from a 3-year-old female Australian Cattle Dog. (Courtesy MJR-VHUP, Philadelphia.)
Biopsy samples from gastric masses should be taken as deeply as possible (Figure 7-169). If the samples are too superficial, fibrous or granulomatous tissue may be retrieved. Lymphosarcoma and benign gastric polyps can usually be diagnosed on biopsy. However, to diagnose adenocarcinoma and other neoplastic masses, deeper tissue samples are required.
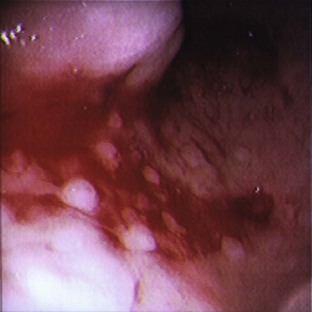
Duodenoscopy
Duodenoscopy is the endoscopic technique of examining the duodenum. Duodenoscopy aids in the diagnosis and treatment of small intestine disease. Clinical signs of such disease may include (but are not limited to) vomiting, hematemesis, diarrhea, melena, change in appetite, and weight loss. Duodenoscopy identifies abnormalities of the mucosa and reveals distortion of the small intestine’s normal anatomic relationships by displacement or extrinsic compression.
The following diagnoses and conditions can be identified with the use of duodenoscopy: intestinal parasites, inflammation (inflammatory bowel disease; Figures 7-170 to 7-172), lymphangiectasia, ulcerations, and neoplasia. Intestinal parasites (generally ascarids) are occasionally encountered on direct examination. These parasites can be easily removed, but biopsy specimens should still be obtained. If Giardia is suspected, a saline lavage can be performed to retrieve trophozoites. Partial-thickness specimens obtained by duodenoscopy may be preferable to full-thickness specimens obtained by abdominal exploratory surgery for patients in a protein-losing enteropathy. Duodenoscopy is preferred in hypoproteinemic patients, especially if the total protein value is 3.5 g/dL or less, because rate of healing is delayed once total protein falls to that level. The most common causes of protein-losing enteropathy in dogs are inflammatory bowel disease, lymphoma, and lymphangiectasia. Lymphoma is the most common intestinal neoplasia and is believed to be more common in cats than in dogs (Box 7-32).
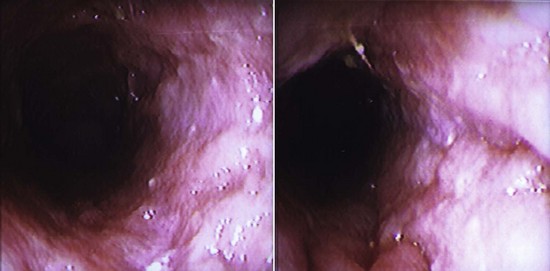
FIGURE 7-170 Significant duodenal inflammation with mild ulceration from a 2-year-old female German Shepherd. This dog was diagnosed with a moderate form of chronic lymphoplasmacytic and neutrophilic enteritis. (Courtesy MJR-VHUP, Philadelphia.)
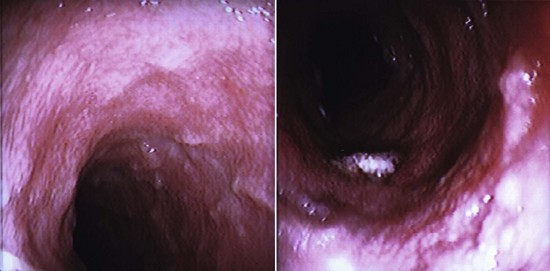
FIGURE 7-171 Edematous duodenum with dilated lacteals and pinpoint ulcerations from an  -year-old Bichon Frise. This dog was diagnosed with chronic duodenitis. (Courtesy MJR-VHUP, Philadelphia.)
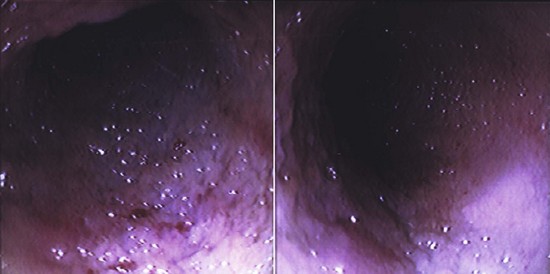
FIGURE 7-172 Friable, “cobblestone” duodenum with small, ulcerated areas from a 4-year-old male domestic short-hair cat. This cat was diagnosed with severe, chronic duodenitis. (Courtesy MJR-VHUP, Philadelphia.)
Biopsy sampling: It is best to obtain biopsy samples when the sites to be sampled can be visualized at the end of the endoscope. However, this may not be possible for collection of specimens from the small intestine, and samples may need to be collected “blindly.” It is also important to note that the intestinal mucosa is more friable than the gastric mucosa. There are ways to obtain “blind” intestinal biopsy samples from the farthest regions of the small intestine (i.e., jejunum). However, some veterinarians are not comfortable with obtaining blind biopsy samples and attempt the same technique used for gastric biopsy.
Small intestinal biopsy samples can vary in size. Biopsy samples tend to be small with normal mucosa but invariably larger when the mucosa is compromised by some disorder. For example, a linear strip of tissue up to 1 inch long can be obtained with marked inflammatory disease because the mucosal and submucosal integrity is altered.
Colonoscopy
Colonoscopy is the endoscopic technique used to examine the rectum, large intestine, and cecum. Colonoscopy aids in the diagnosis and treatment of large bowel disease. Clinical signs may include (but are not limited to) diarrhea, hematochezia, fecal mucus, tenesmus, dyschezia, constipation, and chronic vomiting (especially in cats). Hematochezia, fecal mucus, and tenesmus are signs of diarrhea in large bowel disease, and patients with these signs usually have self-limiting disease or a disorder that can be resolved with symptomatic treatment and supportive care. Chronic vomiting is usually more common in upper GI disease, although in cats this may indicate inflammation of the ascending colon or ileum, which is why every attempt should be made to enter the ileum during colonoscopy.
Colonoscopy should be performed when clinical or laboratory findings (e.g., significant weight loss, hypoalbuminemia) suggest that a patient has a serious disorder (e.g., intussusception, histoplasmosis, adenocarcinoma) or when the clinical signs and symptoms of colonic disease do not respond to specific therapeutic trials. However, patients who have diarrhea with large bowel disease but are otherwise healthy should be tested for parasitic disease, dietary allergy or intolerance, fiber-responsive diarrhea, and clostridial colitis before colonoscopy is considered.
The most frequently diagnosed disorders include a variety of mucosal inflammatory disorders, with lymphocytic plasmacytic colitis the most common (Figures 7-173 and 7-174), and rectal polyps. Colonoscopy is much more accurate than contrast radiography in diagnosing large intestine disorders. Most patients with idiopathic colitis have grossly normal mucosa, so it is imperative that the colon be properly prepared for obtaining high-quality biopsy samples at various levels of the colon.
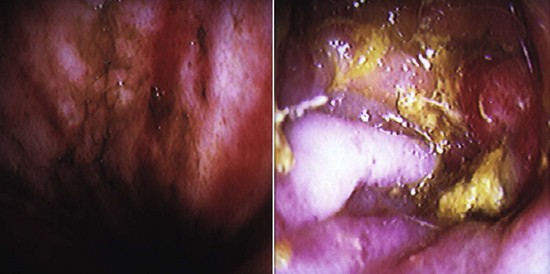
FIGURE 7-173 Left, Moderately to severely inflamed duodenum with mild ulcerative areas. Right, Moderately inflamed ileocolic valve from a 2-year-old female German Shepherd. This dog was diagnosed with moderate to severe lymphoplasmacytic, neutrophilic, and erosive colitis. This dog was also diagnosed with enteritis (Courtesy MJR-VHUP, Philadelphia.)
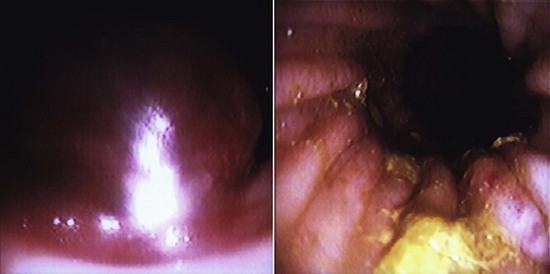
FIGURE 7-174 Left, Rectal mass from 2-year-old male Brittany Spaniel. Right, Moderately inflamed colon from same patient. This dog was diagnosed with rectal papillary adenocarcinoma and moderate lymphoplasmacytic colitis. (Courtesy MJR-VHUP, Philadelphia.)
Strictured areas with relatively normal mucosa usually result from a submucosal lesion. In these cases, biopsying must be aggressive enough to ensure that submucosal tissue is obtained. Cytologic studies are sensitive in detecting histoplasmosis (Histoplasma capsulatum infection) and protothecosis (Prototheca infection) and may be useful in detecting some neoplasms and eosinophilic colitis.
Patient preparation: Fecal examinations for parasites and ova (e.g., whipworms, Giardia), cultures for pathogens (e.g., Salmonella, Campylobacter), fecal cytology (e.g., for Clostridium spores), and assays (e.g., for Clostridium perfringens enterotoxin) should be done before enemas or lavage solutions are administered.
The patient should be fasted for 24 to 36 hours. The colon needs to be as thoroughly cleaned as possible. Lavage solutions are best for removing food and feces from the alimentary canal. These solutions are isosmotic (same osmotic pressure) and produce an osmotic diarrhea that washes particulate matter out of the colon. One example of a lavage solution is GoLYTELY (Braintree Laboratories, Inc,. Braintree, MA), which is administered through a gastric or nasoesophageal tube if the patient does not consume the solution orally. GoLYTELY is a concentrated solution of polyethylene glycol and electrolytes that results in virtually no net absorption or excretions of ions or water. GoLYTELY can usually clean a bowel within 4 hours, although some patients may require more than one dosing. Large volumes can be given without causing significant changes in water or electrolyte balance. In addition to lavage solutions, an osmotic cathartic such as magnesium citrate may be used. This combination results in the best colonic preparation and minimizes artifacts induced by enema tubes.
Problems associated with lavage solutions include (1) they are more expensive than enemas, (2) large volumes are needed for some patients, and (3) orogastric intubation administration can be difficult in aggressive animals.
Colonic lavages such as a warm-water enema are helpful but may need to be repeated multiple times. Improper technique can easily result in an inadequately prepared patient with possible mucosal artifacts. For this reason, it is best to fast a patient for 36 hours rather than 24 hours. When performing an enema with a well-lubricated enema tube, the tube should not be forced if resistance is encountered because traumatic mucosal hemorrhages will likely occur. If the colon has been lavaged properly, clear water should be evacuated after the last enema. Enemas are helpful for cleaning the descending colon but are inadequate for cleaning the ascending and transverse colon and the ileocolic valve (Box 7-33).
Biopsy sampling: Biopsy samples from the ileum, cecum, ascending colon, transverse colon, and descending colon should all be obtained if possible, regardless of how normal the tissues appear. These mucosal biopsy samples are for histopathologic evaluation. However, Salmonella organisms sometimes can be cultured from tissue samples if none can be grown from feces.
Attempting to put more distance between the distal tip of the endoscope and the ileocolic valve allows a panoramic view of structures rather than a close-up view. Having the distal tip of the endoscope withdrawn into the descending colon and then re-inserted into the ascending colon allows visualization of the ileocolic valve (Figure 7-175). With this technique, flexible biopsy forceps can be passed through the valve, and blind ileal samples obtained.
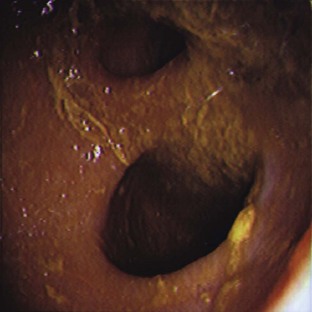
FIGURE 7-175 View of the ileocolic valve (top opening), but dilated; bottom opening is the cecocolic valve. (Courtesy MJR-VHUP, Philadelphia.)
It is often helpful for the colonic lumen to be partially collapsed before the mucosa is grasped with biopsy forceps. This maneuver allows the forceps to take a larger, deeper sample that should include the submucosa. It is safe to re-inflate the colon after biopsy samples are obtained with flexible forceps. The risk of perforation with flexible biopsy instruments is much less than with rigid instruments.
1. To be a competent surgical assistant, the veterinary technician must have proficient knowledge of the surgical procedure, surgical instruments, and aseptic and sterile technique.
2. The intraoperative duties of the surgical assistant include retraction of tissue, bone reduction, wound sponging, suction of the surgical site, and providing hemostasis. Responsibilities also include anticipation of the surgeon’s needs and sponge counts before surgery and before closure of the cavity.
3. Preoperative blood tests should be performed for any animal undergoing anesthesia and surgery. An animal more than 5 years old should have a more extensive blood analysis (CBC and chemistry) than a younger patient (CBC).
4. The patient’s bladder should be expressed before it enters the surgery room.
5. The bladder of a traumatic injury patient should not be expressed before it enters the sugery room.
6. Patients undergoing abdominal procedures should be clipped from the xiphoid process to the pubis. This allows the surgeon to extend the incision as needed.
7. The use of Balfour retractors during abdominal surgical procedures allows for enhanced exposure to the abdominal cavity.
8. Laparotomy (lap) sponges should be used to isolate organs during hollow-organ surgery. The use of laparotomy sponges helps reduce contaminants that may enter the abdominal cavity.
9. Lap sponges can also be used to keep exteriorized tissue moist and protected during surgery.
10. Stay sutures should be placed during hollow-organ surgeries (e.g., cystotomy, gastrotomy) to allow for manipulation of the organ as well as to prevent leakage of contaminants within the abdominal cavity. The sterile surgical assistant should also take care when handling the exposed viscera; gloves or sponges used should be moistened to reduce tissue damage.
11. Abdominal lavage with warm sterile saline before closure of the abdomen helps dilute any pollutants and to warm the patient.
12. A barium contrast study should never be performed if perforations of the gastrointestinal tract are suspected.
13. During an enterotomy procedure, Doyen clamps or the fingers of an assistant should be used to occlude the intestines to avoid leakage of chyme within the abdomen.
14. Abdominal incisions should be monitored daily for swelling, discharge, or malodor. Many postoperative complications are related to the incision site.
15. Patients with gastric dilatation and volvulus (GDV) are considered true surgical emergencies. The immediate treatment includes decompression of the stomach, correction of fluid and electrolyte imbalances, treatment for shock, and surgery to derotate the stomach and gastropexy.
16. An orogastric tube should never be forced down the esophagus during placement. Gentle placement is necessary to avoid damage to the esophagus.
17. A roll of hospital tape can be placed between the upper and lower jaws of the patient receiving an orogastric tube. The tube can be placed through the hole in the roll of tape. This will keep the jaws of the animal from biting down on the tube or the assistant’s hand during placement.
18. The stomach of a dog with a GDV generally rotates in a clockwise direction.
19. Animals should be spayed before their first ovarian cycle to decrease the incidence of mammary tumors.
20. The most common complication reported after an ovariohysterectomy is hemorrhage.
21. Pyometra is a potentially life-threatening condition. A complete ovariohysterectomy should be performed to remove the uterus; medical management is not recommended.
22. Care should be taken when removing an infected uterus. The organ is damaged and in many cases friable; purulent contents could leak out into the peritoneal cavity, leading to an increased chance of peritonitis.
23. Indications for performing a feline or canine castration include eliminating reproductive function, preventing roaming, preventing urine spraying, treating scrotal neoplasia, and treating endocrine abnormalities.
24. Before placing a dog or cat under anesthesia for castration, the testicles are examined to be sure both have descended into the scrotum. If they have not, an inguinal or abdominal procedure may be necessary for testicle retrieval.
25. For cats undergoing castration, the hair of the scrotum should be gently plucked before it enters the surgery room.
26. Scrotal bleeding is the most common complication associated with canine and feline castration.
27. Lateral ear canal resection involves lateralization and exposure of the horizontal ear canal for drainage purposes, generally in patients with chronic ear infections. Medical management is usually required even after resection.
28. Entropion refers to “rolling in” of the eyelid. Surgery is usually done to alleviate ocular irritation.
29. A meibomian (sebaceous) adenoma is the most common eyelid neoplasm in the dog.
30. Squamous cell carcinoma is the most common feline eyelid tumor and is often found in cats with white or pink eyelids.
31. A wedge resection procedure is the most common procedure performed for eyelid neoplasia.
32. Orthopedics involves injuries or diseases of the skeletal system.
33. Orthopedic injuries are usually not considered life threatening unless they involve the skull or spine or unless a long-bone fracture has resulted in great loss of blood.
34. Fracture assessment should include a history, thorough physical examination, and radiographs.
35. When radiographs of a long-bone fracture are taken, the joint below and above the fracture site should be included in the film.
36. Open fractures are classified according to mechanism of puncture and the severity of the soft tissue damage.
37. Surgical options for fracture repair include internal fixation and external fixation. Internal fixation includes plates, screws, nails, pins, and wire. External fixation includes casts, rigid splints, and custom-made devices.
38. Casts and splints must be kept dry and clean and should be observed for slippage, self-mutilation, and toe swelling.
39. Hindlimb and forelimb amputations are considered major procedures and should be performed only with a thorough knowledge of the patient’s physical status.
40. Local nerve blocks contribute significantly to postoperative pain control in amputation patients.
41. Cranial cruciate ligament (CCL) ruptures are also referred to as anterior cruciate ligament (ACL) injury or “football player’s knee” in humans.
42. The major diagnostic tests for CCL injury include the cranial drawer test and the tibial compression test. Palpation of the affected leg often reveals muscle atrophy, pain, joint effusion, and asymmetry.
43. Biopsy techniques for diagnostic purposes include fine-needle aspiration, impression smears, needle punch, punch, bone, incisional, and excisional.
44. Minimally invasive procedures include laser surgery, laparoscopy, and endoscopy.
45. The technician’s most important role in laser surgery is laser safety. Most practices using laser surgery appoint a laser safety officer, most likely the technician.
46. Many hazards are associated with laser surgery, including eye, skin, fire, and smoke plume hazards. All safety steps should be taken to avoid potential hazards.
47. Advantages to laser surgery over traditional surgery include more rapid healing time of tissue, less risk of postoperative infection, reduced postoperative pain and swelling, and decreased surgery time.
48. Laparoscopic procedures are performed to examine and obtain biopsy specimens of the internal organs or tumors of the abdominal cavity. Laparoscopy can also be used to perform specific surgical procedures, such as a spay and gastropexy.
49. Some advantages to laparoscopic procedures include improved patient recovery, smaller surgical sites, lower postoperative infection rate, and decreased postoperative pain.
50. The patient undergoing laparoscopy should be fasted for 12 hours and the bladder should be expressed before it enters the surgery room.
51. When performing endoscopy, an insertion tube should always be handled carefully. Sharp bends, tight coiling, and striking of the tube against hard surfaces should be avoided.
52. Maintaining endoscopes involves proper cleaning and disinfection, leak testing and inspection, microbial monitoring, and storage.
53. In dogs and cats, gastric and duodenal disorders are more common than esophageal disorders. Because clinical signs of these diseases can overlap, endoscopic examination of the esophagus should extend to the stomach and duodenum for a thorough upper gastrointestinal examination.
54. Patient preparation for colonoscopies is crucial because the whole colon needs to be visualized, and it is more difficult to clean the ileocolic valve area than the descending colon. Also, large debris cannot be aspirated as well with flexible scopes as with rigid scopes.
55. Narcotics (fentanyl, morphine, hydromorphone) should not be used for gastroduodenoscopies because they may cause spasms, and entering the duodenum will be more difficult because of an increase in pyloric tone.
56. Appropriate analgesics should be administered for every surgical patient postoperatively.
57. A surgical patient may need to be sent home with Elizabethan collars if the pet attempts to mutilate the incision site.
1. What position is the patient placed in for an abdominal exploratory surgery?
2. Which of the following are considered abdominal surgical procedures?
3. What is the primary indication for an ovariohysterectomy?
4. Why is it beneficial to spay a dog before her first heat cycle?
a. To decrease the chance of unwanted litters.
b. To decrease the chance of the development of mammary gland tumors.
5. Which of the following breeds of dogs have an increased risk of dystocia?
6. During which of the following procedures is the uterus removed?
7. Which of the following is an indication for abdominal exploratory surgery?
8. Which of the following retractors is routinely used in abdominal exploratory surgeries?
9. Which of the following procedures involves making an incision into the stomach?
10. Which of the following intestinal surgeries involves removing a piece of the intestine and suturing the ends of the remaining intestines back together?
11. True or False: Sterile saline can be injected into the surgical site to check for any leakage after the anastomosis site has been closed.
12. Which of the following should be performed before closing the abdomen if peritonitis is suspected?
13. Which of the following refers to surgically attaching the stomach to the body wall?
14. True or False: A gastropexy procedure prevents further bloat occurrences.
15. True or False: A patient that needs to have an abdominal exploratory for internal hemorrhage resulting after having been hit by a car (HBC), should have his/her bladder expressed before being moved into the surgery room.
16. Which of the following terms refers to a joint?
17. True or False: Neonatal kittens should be placed with the dam to allow nursing as soon as possible.
18. True or False: Purulent discharge from the vulva is present in all cases of pyometra.
19. Which term refers to a fracture that is on an incline or slanting in relation to the long axis of the bone?
20. Which term refers to a fracture that curves around a center point or axis?
21. Which of the following are devices used in internal fixation of fractured bones?
22. Which of the following devices are used in external fixation of fractured bones?
23. Which of the following are possible complications associated with internal fixation of fracture repair?
24. True or False: Splints are appropriate only for fractures that are distal to the elbow and stifle.
25. Which of the following diagnostic tests may aid in diagnosing a torn cranial cruciate ligament?
26. Which of the following diagnostic tests used to evaluate masses does not usually require sedation or anesthesia, is easy to perform, has minimal morbidity associated with it, but has a low diagnostic yield?
27. For what condition is a lateral ear canal resection indicated?
28. True or False: Baby shampoo diluted 1 : 3 with water is both effective and safe in cleansing the periocular area before ophthalmic surgery.
29. Which of the following breeds are predisposed to protrusion of the gland of the third eyelid, also known as “cherry eye”?
30. Which of the following procedures is/are considered minimally invasive?
31. What are some of the workplace hazards associated with laser surgery?
32. What advantage does laparoscopy have over traditional laparotomy?
a. None; the procedures are essentially the same.
b. Smaller surgical incisions.
33. True or False: A flexible endoscope with a diameter of 8 to 11 mm and a working length of 100 cm is usually adequate for most feline and canine upper gastrointestinal examinations and colonoscopies.
34. True or False: When the endoscope is not being used, it should be set on the examination table.
35. Which of the following can be diagnosed by gastroscopy?
36. How long should a patient be fasted before gastroscopy?
a. 12-hour to 18-hour food fast, 4-hour water fast.
b. 6-hour to 8-hour food fast, 4-hour water fast.
c. 24-hour to 36-hour food fast, 8-hour water fast.
37. True or False: Duodenoscopy aids in the diagnosis and treatment of small intestine disease.
38. True or False: Lymphoma is the most common intestinal neoplasia.
39. Colonoscopy refers to the endoscopic technique of examining the:
40. Which of the following applies to the patient about to undergo colonoscopy?
41. In addition to rendering a male cat unable to reproduce, which of the following is an indication for castrating a male cat?
American National Standards Institute: Safe Use of Lasers. (ANSI Z136.1-1993.) New York, 1993.
Bassert JM, McCurnin DM, eds. McCurnin’s Clinical textbook for veterinary technicians, ed 7, St Louis: Elsevier, 2010.
Bessler, M, et al. Is immune function better preserved after laparoscopic versus open colon resection? Surg Endosc. 1994;8:881.
Bjorab, MJ, Ellison, GW, Slocum, B. Current techniques in small animal surgery. Philadelphia: Williams & Wilkins; 1998.
Blood, DC, Studdert, VP. Saunders comprehensive veterinary dictionary, ed 3. London: Saunders; 2007.
Brockman, DJ, Washabau, RJ, Drobatz, KJ. Canine gastric dilatation/volvulus syndrome in a veterinary critical care unit: 295 cases (1986-1992). J Am Vet Med Assoc. 1995;207:460.
Burrows, CF, Bright, RM, Spencer, CP. Influence of dietary composition on gastric emptying and motility in dogs: potential involvement in acute gastric dilatation. Am J Vet Res. 1985;46:2609.
Darvelid, AW, Linde-Forsberg, C. Dystocia in the bitch. J Small Anim Pract. 1994;35:402.
Doverspike, M, et al. Contralateral cranial cruciate ligament rupture: incidence in 114 dogs. J Am Anim Hosp Assoc. 1993;29:275.
Flanders, JA, Harvey, HJ. Results of tube gastrostomy as treatment for gastric torsion in the dog. J Am Vet Med Assoc. 1984;185:74.
Fossum, TW, Hedlund, CS, Hulse, DA, et al. Small animal surgery, ed 3. St Louis: Mosby; 2007.
Gaudet, DA. Retrospective study of 128 cases of canine dystocia. J Small Anim Pract. 1985;21:813.
Gelatt, KN. Essentials of veterinary ophthalmology. Philadelphia: Lippincott Williams & Wilkins; 2000.
Glickman, LT, Lantz, GC, Schellenberg, DB, et al. Analysis of risk factors for gastric dilatation and dilatation volvulus in dogs: a practitioner/owner case-control study. J Am Anim Hosp Assoc. 1997;34:253–259.
Glickman, LT, Glickman, NW, Schellenberg, DB, et al. Multiple risk factors for the gastric dilatation-volvulus syndrome in dogs. J Am Vet Med Assoc. 2000;216:40.
Gross, ME, Jones, BD, Bergstresser, DR, et al. Effects of abdominal insufflation with nitrous oxide on cardiorespiratory measurements in spontaneously breathing isoflurane-anesthetized dogs. Am J Vet Res. 1993;54:1352.
Gualtieri, M. Esophagoscopy. Vet Clin North Am Small Anim Pract. 2001;31:605.
Harvey, CE. The ear and nose. In: Harvey CE, Newton CD, Schwartz A, et al, eds. Small animal surgery. Philadelphia: Lippincott, 1990.
Hitz, CB, An overview of laser technology. Understanding laser technology: an intuitive introduction to basic and advanced laser concepts, ed 2. Tulsa, OK: Pennwell, 1991.
Holt, TL, Mann, FA. Soft tissue applications of lasers. Vet Clin North Am. 2002;32:569.
Jacques, SL. Laser-tissue interactions: photochemical, photothermal, and photomechanical. Surg Clin North Am. 1992;72:531.
Johanningmeier, JP. TPLO repair method for CCL tears. Vet Tech. October 2003:682.
Johnson, JA, Austin, C, Bruer, GJ. Incidence of appendicular musculoskeletal disorders in veterinary teaching hospitals from 1980-1989. Vet Comp Orthop Trauma. 1994;7:56.
Johnson, JM, Johnson, AL. Cranial cruciate ligament rupture: pathogenesis, diagnosis and postoperative rehabilitation. Vet Clin North Am. 1993;23:717.
Katzir, A. Medical lasers. In: Lasers and optical fibers in medicine. San Diego: Academic Press; 1993.
Katzir, A. Single optical fibers. In: Lasers and optical fibers in medicine. San Diego: Academic Press; 1993.
Lettow, E. Laparoscopic examinations in liver diseases in dogs. Vet Med Rev. 1972;2:159.
Leib, MS, Konde, LJ, Wingfield, WE, et al. Circumcostal gastropexy for preventing recurrence of gastric dilatation-volvulus in the dog: an evaluation of 30 cases. J Am Vet Med Assoc. 1985;187:245.
Lucroy, MD, Bartels, KE. Using biomedical lasers in veterinary practice. Vet Med. 2000;95:4.
2002. Lumenis LX-20SP NovaPulse Laser System Operator’s Manual. Lumenis: Santa Clara, CA, 2002.
Macoy, DM, et al. A gastropexy technique for permanent fixation of the pyloric antrum. J Am Anim Hosp Assoc. 1982;18:763.
Maggs, D. Fundamentals of veterinary ophthalmology, ed 4. Philadelphia: Saunders; 2008.
Magne, ML, Tams, TR. Laparoscopy: instrumentation and technique. In Tams TR, ed.: Small animal endoscopy, ed 3, St Louis: Mosby, 2011.
Marsolais, GS, Dvorak, G, Conzemius, MG. Effects of postoperative rehabilitation on limb function after cranial cruciate ligament repair in dogs. J Am Vet Med Assoc. 2002;220:1325.
Matthiesen, DT. Partial gastrectomy as treatment for gastric volvulus. Vet Surg. 1985;14:185.
Mehler, SJ, Bennett, A. Surgical oncology of exotic animals. Vet Clin Exotic Anim Pract. 2004;7:783–805.
Monnet, E, Twedt, DC. Laparoscopy. Vet Clin North Am. 2003;33:1147.
Moore, CP, Constantinescu, GM. Surgery of the adnexa. Vet Clin North Am. 1997;27:1011.
Moore, KW, Read, RA. Rupture of the cranial cruciate ligament in dogs. Compend Contin Educ Pract Vet. 1996;18:223.
Morrison, WB. Cancer in dogs and cats. Baltimore: Williams & Wilkins; 1998.
Muir, WW. Gastric dilatation-volvulus in the dog, with emphasis on cardiac arrhythmias. J Am Vet Med Assoc. 1982;180:739.
Nelson, R, Couto, C. Small animal internal medicine, ed 4. St Louis: Mosby; 2009.
Osborne, CA, et al. Analysis of 77,000 canine uroliths. Vet Clin North Am Small Anim Pract. 1999;29:1.
Pearce, J, Thomsen, R. Rate process analysis of thermal damage. In: Welch AJ, van Gamert MJC, eds. Optical-thermal response of laser irradiated tissue. New York: Plenum, 1995.
Pearson, H. The complications of ovariohysterectomy in the bitch. J Small Anim Pract. 1973;14:257.
Phillips, BS. Bladder tumors in dogs and cats. Compend Contin Educ Pract Vet. 1999;21:540.
Piermattie, DL, Flo, GL, DeCam, CE. Brinker, Piermattei and Flo’s handbook of small animal orthopedics and fracture repair, ed 4. St Louis: Elsevier; 2006.
Richter, KP. Laparoscopy in dogs and cats. Vet Clin North Am. 2001;31:707.
Robben, JR, Stokhof, AA, van Sluisjs, FJ. Arrhythmias after surgery of gastric dilatation volvulus in dogs. Tijdschr Diergenneeskd. 1993;118(Suppl):67S.
Roberts, SM, Severin, GA, Lavach, JD. Prevalence and treatment of palpebral neoplasms in the dog: 200 cases (1975-1983). J Am Vet Med Assoc. 1986;189:1355.
Rothuizen, J. Laparoscopy in small animal medicine. Vet Q. 1985;3:225.
Sammarco, JL, et al. Postoperative analgesia for stifle surgery: a comparison of intraarticular bupivacaine, morphine or saline. Vet Surg. 1996;25:59.
Schneider, R, et al. Factors influencing canine mammary cancer development and post surgical survival. J Natl Cancer Inst. 1969;43:1249.
Schumway, R, Broussard, J. Maintenance of gastrointestinal endoscopes. Clin Tech Small Anim Pract. 2003;18:254.
Sirois, M. Principles and practice of veterinary technology, ed 3. St Louis: Mosby; 2011.
Slatter, D. Textbook of small animal surgery, ed 3. Philadelphia: Saunders; 2003.
Smeak, DD. The Chinese finger trap suture technique for fastening tubes and catheters. J Am Anim Hosp Assoc. 1990;26:215.
Smith, GK, Torg, JS. Fibula head transposition for repair of cruciate-deficient stifle in the dog. J Am Vet Med Assoc. 1985;187:375.
Stasi, K, Melendez, L. Care and cleaning of the endoscope. Vet Clin North Am Small Anim Pract. 2001;31:589.
Sullins, KE. Diode laser and endoscopic laser surgery. Vet Clin North Am. 2002;32:639.
Tams, T. Handbook of small animal gastroenterology, ed 2. St Louis: Saunders; 2003.
Tams T, ed. Small animal endoscopy, ed 3, St Louis: Mosby, 2011.
Theran, P. Early-age neutering of dogs and cats. J Am Vet Med Assoc. 1993;202:914.
Tobias, KM, Johnston, SA. Veterinary surgery: small animal. St Louis: Saunders; 2012.
Troncy, E, et al. Results of preemptive epidural administration of morphine with or without bupivacaine in dogs and cats undergoing surgery: 265 cases (1997-1999). J Am Vet Med Assoc. 2002;221:666.
Welch, AJ, van Gemert, MJC. Introduction to medical applications. In: Welch AJ, van Gamert MJC, eds. Optical-thermal response of laser irradiated tissue. New York: Plenum, 1995.
Welch, AJ, et al. Definitions and overview of tissue optics. In: Welch AJ, van Gamert MJC, eds. Optical-thermal response of laser irradiated tissue. New York: Plenum, 1995.
Whittick, WG. Canine orthopedics, ed 2. Philadelphia: Lea & Febiger; 1990.
Willard, MD. Small animal clinical diagnosis by laboratory methods. St Louis: Saunders; 2004.
Withrow, SJ, MacEwen, EG. Withrow and MacEwen’s Small animal clinical oncology, ed 4. St Louis: Saunders; 2007.
Withrow, SJ, Postorino, NC, Straw, RC. Tumors of the gastrointestinal system. In: Clinical veterinary oncology. Philadelphia: Lippincott; 1989.
Witney, WO, et al. Belt-loop gastropexy: technique and surgical results in 20 dogs. J Am Anim Hosp Assoc. 1989;25:75.
Young, WP. Feline onychectomy and elective procedures. Vet Clin North Am. 2002;32:601.
Zepp, CP. Surgical technique to establish drainage of the external ear canal and correction of hematoma of the dog and cat. J Am Vet Med Assoc. 1949;115:91.