Clinical and surgical techniques
Simrit Malhi, Angus C Cameron and Rebecca Eggers
Extraction of teeth in children
The removal of teeth in children can be one of the most stressful procedures for both the operator and patient. While a tooth may be totally anaesthetized, the pressure felt during the extraction can be extremely upsetting and uncomfortable. As one of the most important aspects of clinical practice, dentists need to be skilled, efficient and sensitive in the removal of teeth in children. Teeth should be removed gently with good surgical technique rather than excessive force that may fracture roots or upset the patient.
General principles of tooth extraction in children
Preoperative assessment
• Thorough medical history and informed consent for the procedure.
• Evaluate the tooth to be extracted both clinically and radiographically.
• Identify potentially difficult root anatomy and the proximity of other important structures prior to extraction. Be aware of implications for the permanent successor.
• Clearly identify the tooth to be extracted and confirm again prior to extraction.
• Profound local anaesthesia is vital. Explain the feeling of ‘numbness’ and the sensation associated with luxation of the tooth prior to commencing the procedure.
• If the child will be unable to cope with the extraction(s) then sedation or general anaesthesia should be considered. Ideally, the decision to sedate a child should be made at the assessment appointment NOT once the child has become upset during the procedure.
Other principles
• Primary teeth do not require a ‘primary drive’ that is often recommended for permanent teeth.
• Children tolerate the use of luxators or elevators much better than application of forceps. The alveolar bone in children is soft and teeth can be elevated easily to a high degree of mobility prior to a final delivery with forceps.
• If small apical root fragments remain after an extraction, they may be left to resorb, as attempted removal may damage the permanent successor.
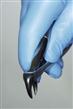
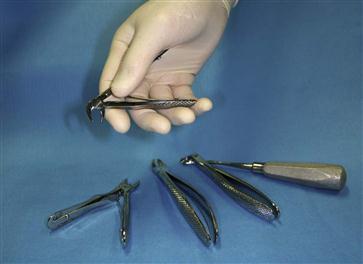
• Choose a pair of extraction forceps suited to the required procedure. A wide range of forceps designed for primary teeth is available (Figure 8.1).
Anterior teeth
• Primary incisors, especially if there is a fracture present, should be gently luxated rather than elevated to avoid damage to the permanent incisor.
• Single rooted teeth should be delivered with forceps utilizing a rotational movement (Figure 8.2).
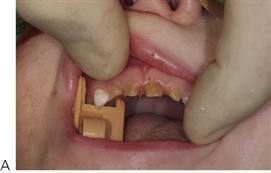
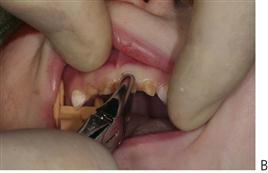
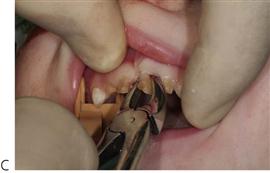
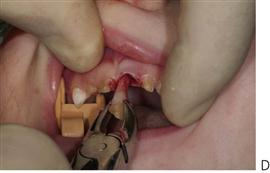
Figure 8.2 Extraction of primary anterior teeth. (A) The alveolus is supported and the upper lip retracted. (B) The beaks of the forceps engage the tooth root, not the crown. Notice the blanching of the attached gingiva. (C,D) The tooth should be delivered with a rotation movement and with minimal apical force that might damage the permanent tooth germ.
Premolars
• The removal of premolars is usually required for orthodontic reasons and may be the first dental intervention for some children. Extraction of the upper first premolar should be addressed with great care as the root apices may be fine and easily fractured. Surgical removal of a retained root fragment usually involves loss of bone, and will have implications for orthodontic treatment and the ability to move adjacent teeth into this space.
• The use of a 3 mm luxator is invaluable to expand the socket and avoid excessive bone damage prior to application of the forceps.
• Delivery with forceps should be made with gentle movements, avoiding excessive buccal forces that might fracture the buccal bone or fine root tips.
Molars
• Extractions should be clean and atraumatic.
• Avoid gingival injuries by freeing the gingival margin with a flat plastic, luxator or elevator (Figure 8.3).
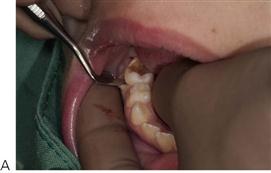
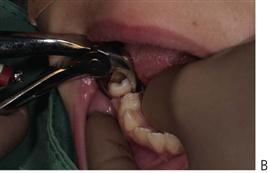
Figure 8.3 (A) When extracting primary posterior teeth it is useful to free the gingiva from the tooth with a flat plastic or a similar blunt instrument to protect it from tearing. (B) Avoid excessive buccal movement that will damage the thin, buccal, cortical plate and the attached gingiva when delivering these teeth.
• Second primary molars are often difficult to remove due to the divergent spread of the roots. Sectioning the tooth vertically can facilitate extraction if the crown is considerably damaged or the roots encircle the crown of the underlying permanent tooth.
• Luxation/elevation is essential, however first permanent molars can be difficult to elevate when the adjacent mesial tooth (a second premolar or primary molar) is absent.
• Support the alveolus on either side with fingers.
• Multi-rooted permanent teeth can be extracted by using alternating, slow, buccal and palatal/lingual force or a ‘figure of 8’ motion in order to expand the alveolar bone. While many oral surgery texts recommend the buccal delivery of lower molars, the most dense bone is found on the buccal aspect and excessive movement of a lower permanent molar buccally may result in root fracture, particularly in teeth missing significant amounts of coronal structure.
• ‘Cow-horn’ pattern forceps are extremely useful in removing either upper or lower permanent molars, especially those with little or no crown remaining on the lingual aspect (Figure 8.5).
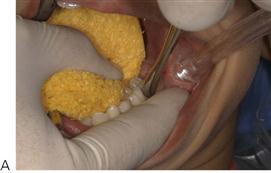

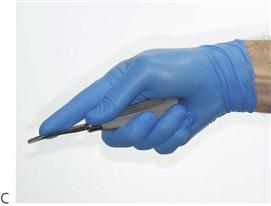
Figure 8.4 (A) Luxators are delicate and sharp instruments, designed to shear the periodontal attachment and enlarge the tooth socket. The application of the luxator should be vertical along the long axis of the roots. (B) Elevators should be used similarly to a screwdriver, so their application on the tooth root is more horizontal between the embrasure. (C) The index finger should run along the blade and serves to protect the patient if the instrument slips.

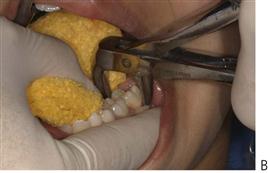


Figure 8.5 (A) ‘Cowhorn’ pattern forceps engage the bifurcation of a molar tooth (B). (C) As pressure is applied, the beaks are worked further apically and the tooth will rise out of the socket, usually with minimal rotation or buccal movements. These forceps are very useful for badly broken-down molars. While fractures of the crown may occur, the level of the fracture is more coronal and tends to section the tooth, allowing easy delivery of the roots with an elevator. Note the finger support of either side of the alveolus. (D) The beaks of the forceps engage the furcation.
Avoiding and managing root fractures
• Avoid root fractures by first luxating or elevating the tooth to a high degree of mobility prior to application of forceps (Figure 8.4).
• If the delivery of the tooth becomes difficult during the extraction – STOP and reassess rather than applying more force that may break the roots.
• Always assess where a permanent tooth germ is positioned prior to elevating roots of primary teeth. If a root is fractured when extracting an ankylosed primary molar, this can usually be left in situ, especially if it is below the interseptal bone.
• Cryer elevators are used to remove interseptal bone between mandibular permanent molar roots to gain access to the roots. Care is required during removal of interseptal bone surrounding primary molar roots so as to avoid damage to the permanent successor.
• If it appears impossible to deliver a tooth without a root fracture, then the procedure should be performed as a surgical removal. Ideally this assessment should be made prior to starting the procedure.
Postoperative instructions following extractions for children
Always give clear and lucid instructions to the child and caregiver:
• Allow the blood clot to stabilize by avoiding rinsing on the day of extraction.
• The next day, the mouth may be gently rinsed with water. There is little evidence that warm saline or antiseptic mouthwashes are of any real benefit following tooth extraction in children, but good oral hygiene is essential and gentle toothbrushing can start the day after the extraction. Parents should be advised that halitosis often occurs following extraction or oral surgery.
• Prescribe appropriate analgesics and antibiotics, if required.
• Warn that there should be no sport or excessive play for the remainder of the day.
Repair and suturing of soft tissue injuries
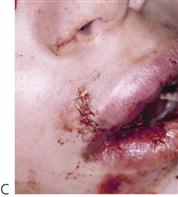
Generally, soft tissue wounds should be closed within 24 h. Good closure of wounds allows for more rapid healing by primary intention. Suturing may reduce the sequestration of displaced bony fragments and may prevent bacterial contamination of the gingival sulcus. Furthermore, there is much less pain from the wound if exposed bony defects are well covered with periosteum and gingival tissues. Deeper lacerations of the lip will involve the muscle layer and it is important to close this as a separate layer to prevent formation of a ‘dead space’ will easily become infected (Figure 8.6). It is essential that the wound is properly debrided and free of contamination from foreign bodies or bony spicules prior to apposition of tissues. Any wound involving skin, including those crossing the vermillion border of the lip, require precise and expert skill to facilitate the best possible result. Often, this requires timely referral to an appropriate surgeon.
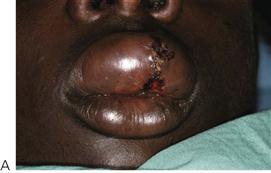
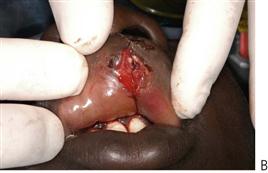
Figure 8.6 (A) When closing any wound, it is essential not to leave a dead space. This laceration to the upper lip was closed only superficially, leaving the muscle layers open. A large abscess developed within 12 h, requiring reopening of the wound, drainage and debridement and reclosure including the muscle and the mucosa (B).
Cyanoacrylate (tissue glue) is now commonly used for closure of smaller soft tissue wounds on the face and scalp in children without having to give local anaesthetic. Currently, the literature is equivocal as to whether suturing or gluing produces better outcomes, although it is clear that gluing is far less traumatic for the child and much faster.
Choice of material (Table 8.1)
The choice of suture material and needle will depend on:
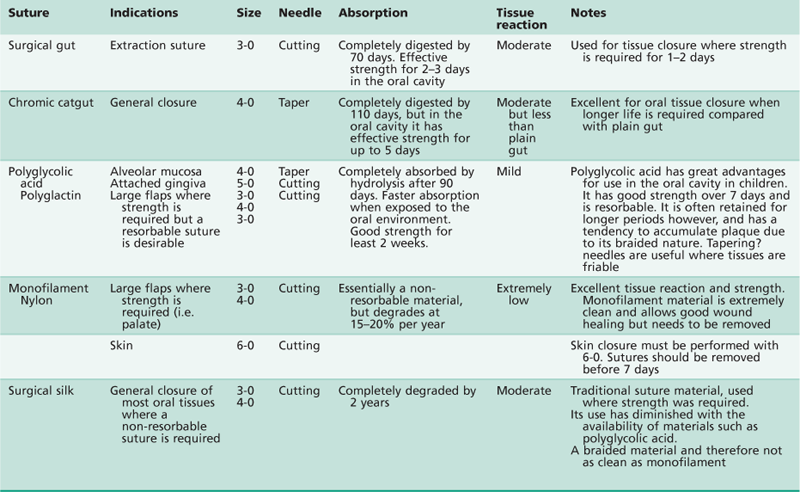
The type and location of the wound to be closed
• Reverse cutting edge needles should be used in sites involving keratinized gingiva.
• Tapering needles are suitable for non-keratinized gingiva.
• Monofilament materials such as nylon must be used for skin to minimize tissue reaction (Figure 8.7A).
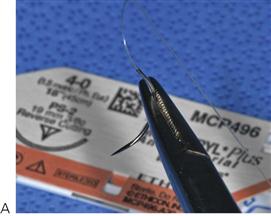
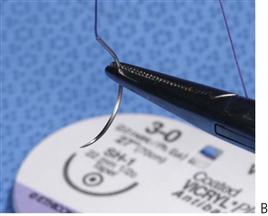
Figure 8.7 (A) Surgical nylon 4-0 on a reverse cutting needle. This monofilament suture material has excellent tissue reaction and strength. The reverse cutting needle has its cutting edge on the convex surface, which avoids tearing. Cutting needles are used for thick, keratinized tissue such as attached gingiva or palatal mucosa. (B) Polyglactin is a resorbable, braided material. They also have good tissue reaction but tend to accumulate plaque and can become quite dirty in the mouth prior to their loss after 2 weeks. The taper needle is excellent for friable or thin alveolar mucosa.
• Internal (muscle) closure must be resorbable.
• Suturing of torn or lacerated gingival tissues should be conducted using a fine suture, such as a 4-0 or 5-0 resorbable suture (Dexon/Vicryl). Polyglactin or polyglycolic acid sutures have good traction strength for at least 3 weeks and have far less tissue reaction than catgut. They are resorbable but because they comprise braided material, they are not nearly as clean as monofilament sutures. Where strength is required, and removal of the sutures is not an issue, monofilament nylon is preferable.
Whether the material needs to be removed – resorbable or non-resorbable
• Resorbable sutures such as polyglactin/polyglycolic acid (4-0 or 3-0) are preferable for use in young children or where behavioural issues are a concern (Figure 8.7B).
Instruments
While each surgeon will have their own individual preference of surgical instrumentation, the following instruments are those commonly used in many oral surgical suturing situations.
Needle holders
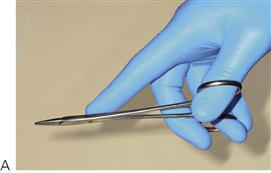
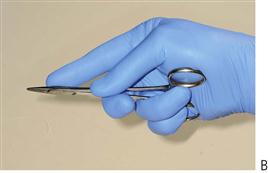
Many different patterns of needle holders are available. The most convenient holders are around 15 cm in length with tungsten carbide beaks and a locking, ratchet handle. For very fine suturing, iridectomy-type (microsurgical) needle holders may be useful. Needle holders can be held in a scissors or a palm grip, but in either case, the index finger should support the blades (Figure 8.8).
Toothed tissue forceps
Always use toothed forceps to hold tissue that would otherwise be crushed with a non-tooth pattern. A straight pattern such as Gillies or McIndoe is sufficient for most procedures, but for fine procedures, a smaller Adson-type is used. Tissue forceps are held in a pen grip.
Fine suture scissors
Almost all scissors are made for use in the right hand and any surgical assistant will be aware of how difficult it is to cut sutures using the left hand. Good suture scissors must be of adequate length to reach into the mouth and while the blades can be short, they must be sharp and maintained.
Skin hooks
The use of skin hooks is usually confined to extra-oral work but are invaluable for mobilizing and everting flap and tissue margins.
Suturing techniques
• Simple interrupted – This is the most common suture used in the oral cavity. It is used for interdental suturing of flaps and relieving incisions (Figure 8.9).
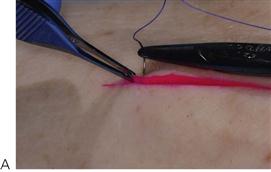
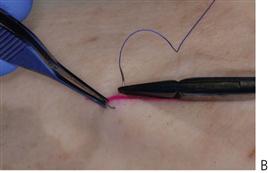
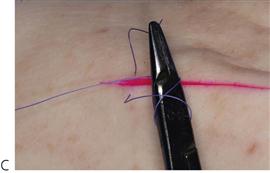
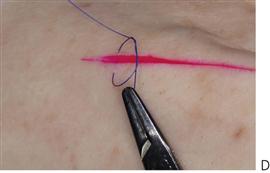
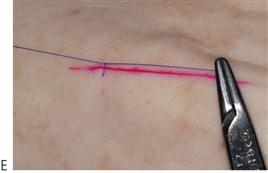
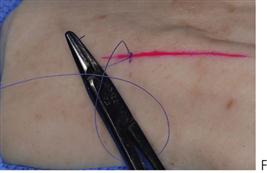
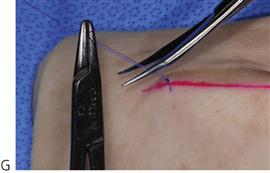
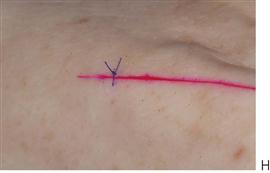
Figure 8.9 Technique for simple interrupted suture. (A,B) Each side of the flap is held and everted with toothed tissue forceps as the needle is passed in an arc from one side of the wound to the other. (C,D) A double throw knot is made and is tightened and locked by pulling on the long (or needle) end of the suture (E). Avoid pulling on the short end (held by the needle holder), as this will create a long tag end. (F) A reverse throw knot is made and the suture is cut short with fine scissors (G). (H) Note that the knot is sitting on tissue and not overlying the wound.
• Horizontal mattress – The horizontal mattress suture applies force across the wound margin and can be placed across an extraction site. It can also be used to evert wound margins (Figure 8.10).
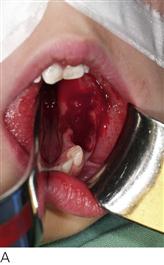
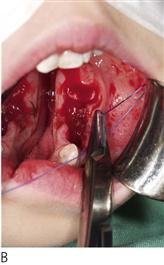
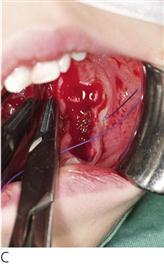
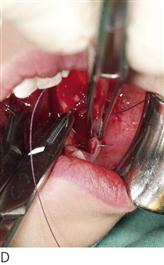
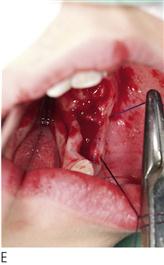
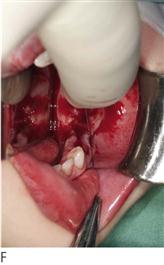
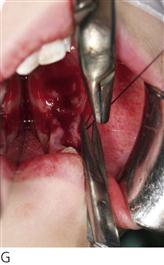
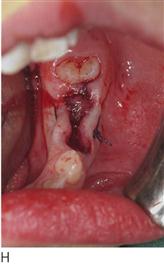
Figure 8.10 Horizontal mattress suture. (A) A large wound is left following the extraction of teeth 74 and 75. (B) The suture needle is passed through the interdental papilla on the buccal through to the lingual side (C). Approaching from the lingual, the needle is then passed back to the buccal through the more mesial papilla (D). (E,F) The suture is tied on the buccal side and cut leaving short tag ends (G). The final appearance showing good repositioning of the flaps and compression of the socket (H).
• Vertical mattress – This is frequently used to evert skin margins or in deep muscle closure in the lip.
• Haemostatic – This suture crosses over the tooth socket and can help retain packs for haemorrhage control.
• Continuous – An interlocking continuous suture is used for long wounds, particularly in the buccal vestibule. It has the disadvantage that if there is a break at any point, then the whole wound may open.
• Subcuticular – This is a form of running suture where a skin closure is hidden below the epidermis.
Clinical Hints
• Prior to suturing a site, examine it thoroughly for tooth fragments. If in any doubt, radiograph the site.
• Remove any jagged, damaged and necrotic soft tissues tags and freshen up old wound margins with a scalpel.
• Suture with adequate stress and tension achieving complete haemostasis.
• Leave suture ends short if using resorbable materials, but longer if the material is to be removed. Very short tag ends often become buried and are difficult to remove.
• Remove skin sutures on the face within 5 days to prevent scarring of puncture sites (Figure 8.11).
Surgical removal of supernumerary teeth or impacted canines
Identification of the tooth
• Identify the tooth indicated for removal prior to surgery. It is good practice to confirm with the surgical assistant which teeth are to be removed by noting them on the radiographs and then on the patient.
• Most maxillary supernumeraries lie in the palate or in the midline between the central incisors. Midline inverted, conical supernumeraries often lie adjacent to the anterior nasal spine and are best removed via a labial approach. Tuberculate teeth are commonly palatal and inferior to the central incisor.
• Supernumeraries in the premolar region lie lingual and inferior to the premolars.
• Canines may be impacted buccally or palatally, although invariably, the root apex lies in close approximation to the floor of the sinus.
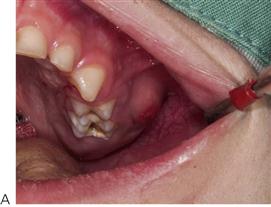
Surgical technique
Anaesthesia
• Good anaesthesia is essential (Figure 8.12A). Many younger children will be managed under general anaesthesia; however, perioperative local anaesthesia is still required. A local anaesthetic with a vasoconstrictor will aid haemorrhage control at the surgical site.
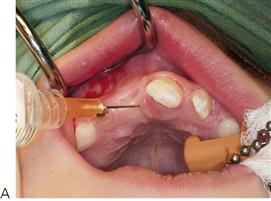
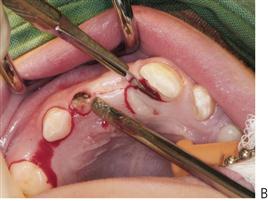
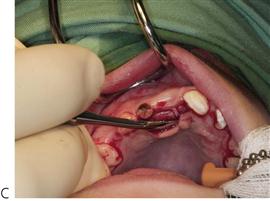

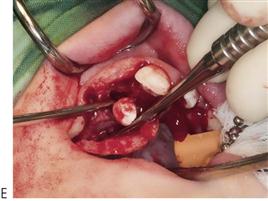
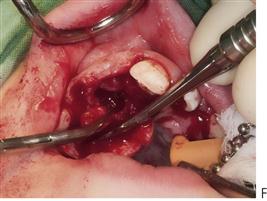
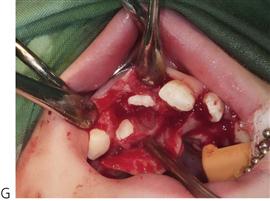
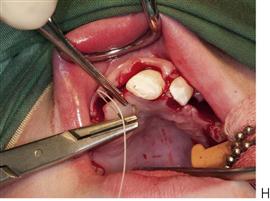
Figure 8.12 Surgical removal of a maxillary supernumerary tooth (A) Labial and palatal anaesthesia. (B) Crestal incision from at least the distal of the canine to the contralateral side. (C) Elevation of a full-thickness mucoperiosteal flap. (D) Removal of bone with bur. Note how the flap is protected by the periosteal elevator. (E) Exposure of the supernumerary and elevation with a Warwick James elevator. (F) Removal of the supernumerary tooth follicle with a pair of haemostats.(G) The socket is thoroughly irrigated and in this case, bone overlying the impacted upper right central incisor is removed to encourage eruption. (H) Closure of the flap with a resorbable suture.
Mucoperiosteal flaps
• A large flap will heal in the same amount of time as a small flap. Therefore an appropriate sized flap should be raised to ensure adequate access to remove the tooth (Figure 8.12B).
• When removing a palatal supernumerary tooth, a full thickness palatal flap should be raised at least from the distal of the canine and beyond the midline (Figure 8.12C). Preserve the architecture of the palatal interdental papillae. The neurovascular bundle should be retained if possible, but if division is necessary to extend the flap, then a haemostat can be applied and the nerve bundle sectioned proximal to the forceps.
• When the tooth is labially impacted, a labial or buccal approach is indicated. A crevicular incision preserving the interdental papilla will be aided by the use of a relieving incision to reflect the flap.
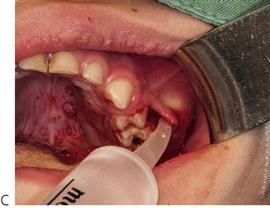
Bone removal
• Access to the tooth can be made with hand instruments such as a 3 mm bone chisel or surgical drills (Figure 8.12D). The overlying bone is normally removed with a round bur and then the crown is more fully exposed by guttering around the crown to enable the application of an elevator.
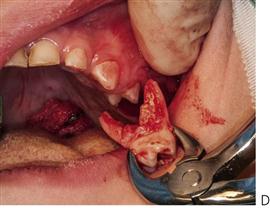
Tooth removal
• Apply an appropriate elevator to the root to deliver the tooth (Figure 8.12E). The tooth should be luxated without placing any additional force on the adjacent teeth. Surgeon’s fingers should support the adjacent teeth.
• Occasionally, sectioning of the tooth may be required to facilitate removal. Never attempt to section a tooth without first elevating and establishing some movement within the socket.
• Remove the dental follicle carefully with a pair of haemostats or gentle curette with Mitchell’s trimmer (Figure 8.12F).
Closure
• Irrigate the socket and operating site copiously, checking for any bony spicules or jagged margins (Figure 8.12G).
• Smooth off the bony margins with a bone file or bone rongeurs.
• Close the flap with an appropriate suture material (see above). Ensure complete haemostasis is achieved (Figure 8.12H).
Postoperative care
• Provide adequate analgesia perioperatively and postoperatively. Depending on the amount of bone removal and the size of the bony defect, postoperative antibiotics are often not required. If antibiotics are required, a single perioperative administration is preferable.
Incision and drainage of abscess
Any collection of pus requires drainage (Figure 8.13). Fortunately, children usually attend the dentist (or doctor) early with odontogenic infections that have spread to involve the fascial planes of the face and typically, these present as a cellulitis. When treated inappropriately with repeated antibiotics and without removal of the cause (i.e. extraction of the offending tooth), or with particularly virulent organisms, then an abscess may develop. An abscess is a collection of pus within a cavity. An abscess will not resolve by itself and pus will track to the most dependent point and in the case of head and neck infections; extraorally or between tissue planes.
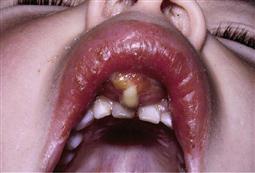
Figure 8.13 Any collection of pus requires drainage, whether that occurs spontaneously or surgically.
This may be life-threatening and any posterior spread of pus from a tooth in the upper arch may spread from the canine fossa to the antrum, the pterygopalatine fossa, the orbit, the cavernous sinus and the brain. A submandibular abscess may spread to the floor of mouth, the buccal spaces, the pterygomandibular space, the parapharyngeal spaces and neck and ultimately the mediastinum.
The following cases represent surgical emergencies and require urgent and immediate care and/or referral:
• A floor of mouth swelling, particularly those that have crossed the midline.
• Dysphagia or respiratory obstruction.
• A fluctuant enlarging swelling in the head and neck.
• A enlarging swelling associated with acute fever, particularly a spiking temperature.
Clinical presentation
Surgical technique
Remember that such infections are serious and potentially life-threatening and prompt referral to an experienced surgeon is warranted.
Anaesthesia
Obtaining adequate anaesthesia may be difficult, so block injections are preferable. Where there is a significant swelling either intra-orally or extra-orally, general anaesthesia will be required to adequately manage and protect the airway and to undertake the procedure.
Intra-oral (Figure 8.14)
• Protect the airway with gauze from pus or irrigating solutions that may go down the throat.
• Raise a flap and allow drainage of subperiosteal pus.
• An incision into the buccal or labial sulcus may also be required to establish drainage of any pus above periosteum.
• Irrigate with copious sterile saline or a 50:50 mixture of povidine iodine and water?
• Suturing a drain through the incision may be required to maintain drainage.

Extra-oral (Figure 8.15)
Extra-oral drainage is typically only required for mandibular swellings.
• Incise over the most dependent point of the abscess with the No.15 blade. Hilton’s method is used to incise into the abscess along any skin folds and along a line inferior to (if possible) the lower border of mandible. The incision must avoid the marginal branch of the facial nerve, the facial artery and the lower lobe of the parotid gland.
• Enter the abscess cavity with a pair of haemostats, opening the beaks of the forceps to bluntly dissect and establish a flow of pus. It may be necessary to investigate other tissue spaces such as the sublingual, submasseteric or pterygomandibular spaces.
• Take a sample of pus for culture and antibiotic sensitivity testing.
• Copiously irrigate the cavity.
• Suture a drain into the depth of the cavity and place a dressing over the skin.

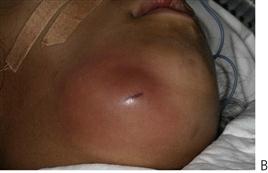
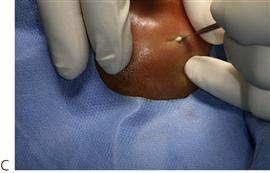
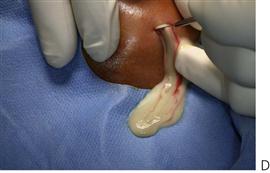
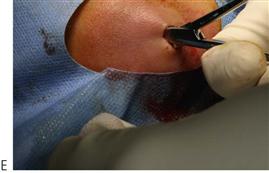
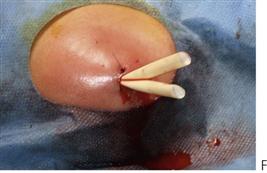
Figure 8.15 Drainage of large extra-oral abscess. (A) This child is acutely unwell and has a large collection of pus in the submandibular space with dysphagia. (B,C) The swelling is fluctuant and an incision is made into the abscess. (D,E) Drainage is established with a pair of haemostats opening into the cavity and exploring the tissue space. (F) The cavity is kept patent with a flexible drain.
Lingual frenotomy (Figure 8.16)
A lingual frenotomy (simple cutting of the frenulum) is a procedure indicated in those infants where a significant tongue-tie is affecting breast-feeding. A lactation consultant or speech pathologist must assess attachment and feeding practices in order to determine the need for a frenotomy. It is normally performed on babies from birth to 4 months of age. Local anaesthesia is usually not required.
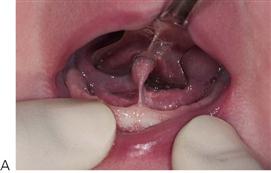
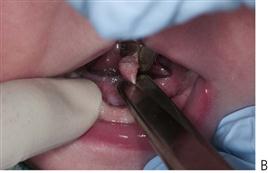
Figure 8.16 Lingual frenotomy. (A) The tongue is retracted. (B) An incision is made in the frenum with blunt-ended dissecting scissors. (C) There is minimal bleeding and the infant can commence breast-feeding immediately.
Breast-feeding problems associated with ankyloglossia include:
Bottle-feeding problems associated with ankyloglossia include:
• Clicking sounds made by the tongue during feeding.
• Poor saliva control and drooling.
A lingual frenotomy is simple and quick with few complications. The frenum is usually a very fine translucent tissue in babies, although clinicians should be aware of the risk of a small amount of bleeding and possible postoperative infection. To minimize the risk of infection, parents are advised to sterilize/disinfect any nipple shields, pacifiers and bottles adequately.
Clinical procedure
• The infant is wrapped (swaddled) to minimize movement.
• A Lorenz retractor/grooved director is used to retract the ventral surface of the tongue and to stretch the lingual frenulum.
• Blunt-ended scissors are used to release the lingual frenulum taking care not to injure the submandibular ducts or the ventral surface of the tongue. The cut is made superior to Wharton’s (submandibular) duct extending posteriorly but NOT involving muscle. The frenum may also be released using a soft tissue laser.
• Once the frenum is released, the baby is immediately placed on the breast/bottle to begin feeding. Postoperative feeding helps to comfort the baby and assists in haemostasis.
Reports indicate that this simple procedure leads to successful breast-feeding in most cases.
Lingual frenectomy (Figure 8.17)
A frenectomy is normally carried out under local anaesthesia in older children and under general anaesthesia in younger children. Frenectomy involves the surgical incision of the frenum, establishing haemostasis and suturing of the wound. In cases where there is a very short frenum and the floor of the mouth is shallow, a Z-plasty is performed sometimes.
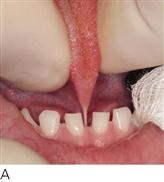

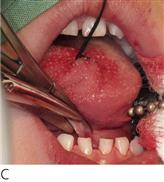
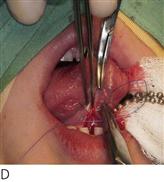
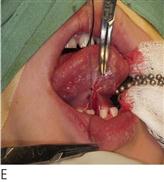

Figure 8.17 Lingual frenectomy. (A) A severe tongue tie with the insertion of a short frenum into the tongue tip. (B) A stay suture stabilizes the tongue and a haemostat is placed from the insertion of the frenum to a point in the floor of the mouth superior to the submandibular duct orifice. (C) The frenum is cut using the haemostat as a guide. (D,E) Closure of the wound with a 4-0 resorbable suture. (F) Haemostasis and final closure.
Clinical procedure
• Local anaesthesia is administered into the tip of the tongue and the floor of the mouth on either side of the frenum.
• The tongue may be secured with a large stay suture through the dorsal surface to mobilize, retract and control the tongue.
• A small curved haemostat is clamped parallel to the tongue from the insertion of the lingual frenulum at the tongue tip to a point at the greatest depth and most inferior aspect of the tongue. Iris scissors are used to cut along the jaws of the haemostat, releasing the frenum. A small transverse (horizontal) incision at the base of the haemostat allows for an extension of the incision and lengthening of the base of the tongue.
• The haemostat is then removed and the surgical site is closed with 4-0 resorbable sutures on the ventral surface of the tongue. Do not place sutures in the floor of the mouth as it leads to scarring.
• Postoperative instructions should include analgesia if required. Tongue-tie exercises as prescribed by the speech pathologist are commenced 2–3 days postoperatively.
Biopsy of soft tissue lesions (Figures 8.18, 8.19)
A definitive diagnosis of soft tissue lesions can only be made following histopathological examination, however biopsy procedures in children are not without potential complications. Consideration must therefore be given as to how the procedure is to be performed, with younger children usually requiring general anaesthesia. There is a risk of damage to adjacent structures, possible scarring and the excessive removal of tissue. Fortunately, life-threatening pathology in the oral cavity of children is rare and there may be little benefit to the patient in removing tissue, simply to confirm the diagnosis of a benign condition. Therefore if a malignancy or other serious condition is suspected, then the child must be referred to a clinician who is able to manage or treat the patient appropriately.
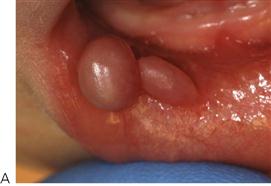
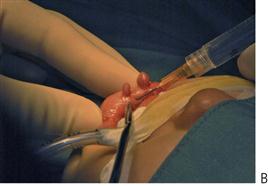
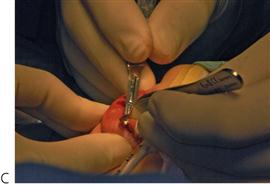
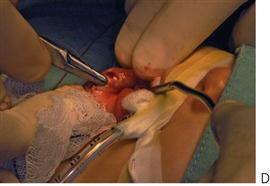

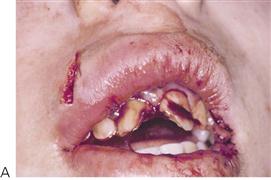
Figure 8.18 Excisional biopsy of exophytic lesions. (A) Multiple fibrous epulides in a 3 month-old infant. (B) Administration of local anaesthesia for pain and haemostasis. (C) Excision of the lesion with a border of normal tissue. (D,E) Wound closure with a fine resorbable suture.
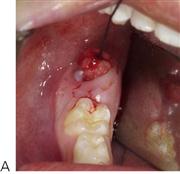
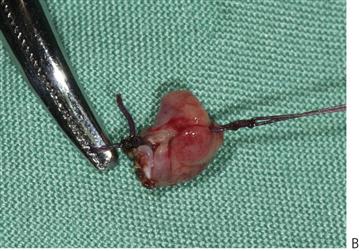
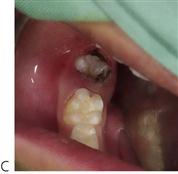
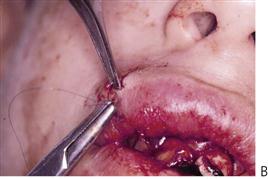
Figure 8.19 (A) In this case, a suture has been placed through the lesion to mobilize it and another (B) around the base in case of haemorrhage. The excised lesion is then sent for histopathological examination. (C) The operculum overlying the erupting 46 tooth has been removed and haemorrhage has been controlled with diathermy.
• An excisional biopsy is recommended for small lesions to completely excise the lesion and to confirm the diagnosis. The biopsy must include a border of normal tissue.
• An incisional biopsy is performed on larger lesions prior to complete resection. Incisional biopsies must include the most representative areas of the lesion together with a border of normal tissue to allow study of the margins.
Surgical procedure
• Adequate anaesthesia is essential. While block anaesthesia may be beneficial, infiltration around the lesion aids haemostasis and provides a dry operating field.
• Elliptical incisions surrounding the lesion and tapering to meet at a point under the lesion are placed using a scalpel and No.15 blade.
• Tissue is carefully dissected out and placed in an appropriate reagent, usually buffered formalin, for transfer to the pathology lab.
• Primary closure is preferred and the biopsy site is sutured with a 4/0 resorbable suture.
• It is essential that the histopathological report is reviewed and the patient followed-up with appropriate treatment.
Placement of a rubber dam (Figures 8.20, 8.21)
The use of a rubber dam in restorative procedures is invaluable in restorative dentistry. While there is reluctance by many clinicians to use a rubber dam, once the technique has been mastered, it becomes a simple and time-saving procedure.
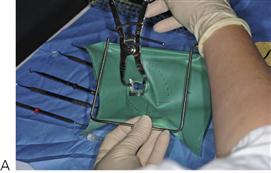

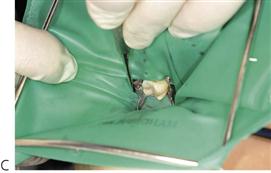
Figure 8.20 Placement of a rubber dam over a single tooth. (A) The rubber dam, frame, a winged clamp and clamp forceps are arranged and placed over the tooth in one step (B). (C) The rubber is then lifted from the wings with a flat plastic instrument to seal the tooth.
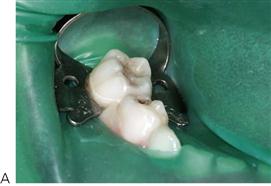
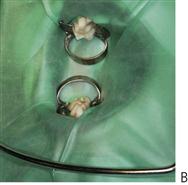
Figure 8.21 (A) The split dam technique where a large hole (or two holes joined together) is stretched from the most distal clamped tooth to the mesial of the canine. (B) In the operating room, often two arches can be isolated in this manner.
Advantages
• Protection of the airway from aspiration of instruments, materials or medicaments.
Improves efficiency due to maintenance of a dry field
Modern adhesive restorative materials do not tolerate moisture contamination and stainless steel crowns can be easily aspirated or ingested by accident in a reclining child patient.
Procedure
When applying a rubber dam, it can be referred to as a ‘raincoat for the tooth’. Clamps can be called a ‘tooth ring’ and introduce the idea that ‘it hugs the tooth tightly’. It is important not to place the clamp on the gingiva, as this often causes bleeding and unnecessary discomfort.
Clamps
• Remember to always secure the clamps with dental floss in order to minimize the risk of ingestion/aspiration.
• The No.13A clamp is ideal for quadrant 1 and 3 (odd numbered quadrants) and the No.12A for quadrants 2 and 4. A No. 9 anterior clamp is perfect for anterior strip crowns.
• The larger circumference of the clamp should be directed towards the buccal aspect. Place the clamp on the tooth surface and guide it down the tooth until it is well seated below the bulbosity of the crown. Winged clamps are useful if the rubber dam, clamp and frame are to be placed in one step.
Placement (Figure 8.20)
• Local anaesthesia is generally required when the clamp is placed below the gingival margin sits below the gingival margin or the beaks of the clamp impinge into the interdental papilla. A standard buccal infiltration, supplemented with an intra-papillary injection is usually sufficient.
• A split-dam technique is frequently used in children using one hole that extends from the second molar (or first permanent molar) to the mesial of the canine. This can be achieved by placing three adjoining holes in the rubber dam sheet and allows quadrant dentistry to be completed with ease (Figure 8.21A).
• Alternatively, cut one hole for each tooth to be isolated and then stretch the rubber dam sheet over the clamp and individual teeth. Dental floss can be used to guide the rubber through the contact point. Rubber strips or tubes can aid with retention when dealing with open contacts. Finally, stretch the rubber dam onto a frame.
• The whole rubber dam apparatus can be removed by removing the clamp.
• For procedures under general anaesthesia, the double-dam technique is ideal as it reduces the treatment time (Figure 8.21B).