Cranial Nerves
The Eye 2 – Fundi
BACKGROUND
The ophthalmoscope provides a light source and an optical system to allow examination of the fundus (Fig. 8.1).
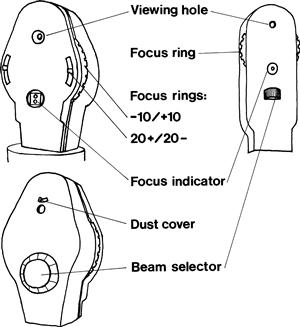
Its moving parts are:
The focus ring is used to correct (1) for your vision and (2) for the patient's vision.
1. If you are short- or near-sighted (myopic) and not using glasses or contact lenses, you will have to turn the focus dial anticlockwise to focus to look at a normal eye; turn it clockwise if you are long- or far-sighted (hypermetropic). Establish what correction you need before approaching the patient.
2. If the patient is myopic, turn the ring anticlockwise; if hypermetropic, clockwise.
 TIP
TIP
An oblique view of the patient with his spectacles on tells you if he is long- or short-sighted and gives an idea of severity. If his face is smaller through his glasses, he is myopic; if his face is larger, he is hypermetropic. The degree indicates severity.
Beam selector choices are:
WHAT TO DO
• Turn off the lights or draw the curtains.
• Check the focus is set at zero, and that the light works and is on the correct beam.
• Ask the patient to look at a particular point in the distance at his eye level (e.g. a light switch, a spot on the wall).
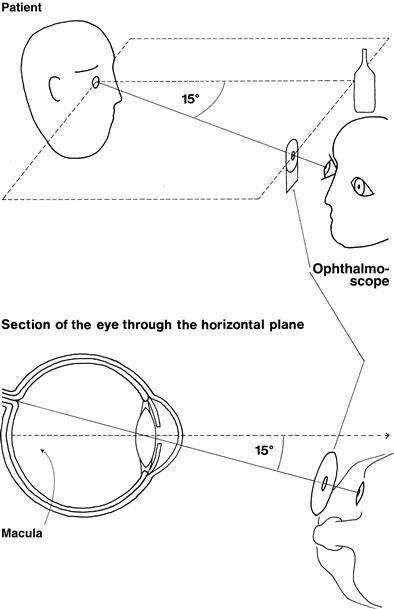
To examine the right eye (Fig. 8.2):
• Take the ophthalmoscope in your right hand.
• Approach the patient's right side.
• Look at his right eye from about 30 cm away with the ophthalmoscope in the same horizontal plane as his eye, about 15 degrees from the line of fixation. Aim at the centre of the back of his head. Keep out of the line of sight of the other eye.
• The pupil should appear pink, as in bad flash photographs. This is the red reflex.
• Opacities in the eye, notably cataracts and floaters, appear as silhouettes. Cataracts usually have a fine web-like appearance.
• Gradually move in towards the eye.
• Stay in the same horizontal plane, aiming at the back of the patient's head. This should bring you in at about 15 degrees to his line of fixation.
• Encourage the patient to keep looking at the distant point and not at the light.
• Bring the ophthalmoscope to within 1–2 cm of the eye.
• Keep the ophthalmoscope at the same level as the patient's eye and the fixation point.
If the eye is approached as described, the optic disc should be in view. If it is not, focus on a blood vessel and follow it. The acute angles of the branches and convergence of artery and vein indicate the direction to follow. Alternatively, start again.
TIP
It is essential to keep the patient's eye, the point of fixation and the ophthalmoscope in the same plane.
To examine the left eye:
Hold the ophthalmoscope in the left hand and use your left eye. If you use your right eye to look at the patient's left eye, you will end up rubbing noses with the patient. Most people find this part of the examination difficult at first so you must persevere.
2 Look at the blood vessels
Arteries (light-coloured) should be two-thirds the diameter of veins (burgundy-coloured).
• Look at the diameter of the arteries.
• Look at arteriovenous junctions.
• Look at the pattern of vessels.
• Look at the retinal veins as they turn into the optic disc and see if they pulsate, going from convex to concave. This is best appreciated as you look along the length of a vein as it runs into the optic cup.
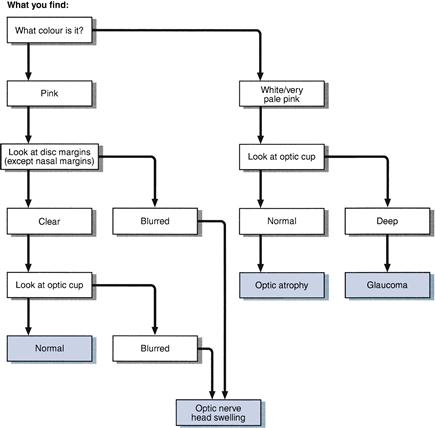
WHAT YOU FIND
1 Optic disc
See Figures 8.3 and 8.4.
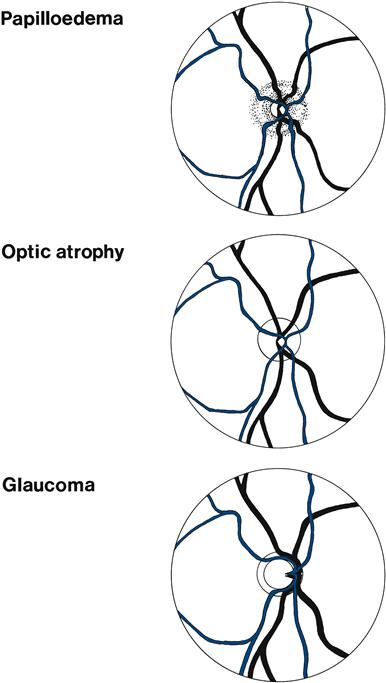
The optic cup is slightly on the nasal side of the centre of the optic disc. Its diameter is normally less than 50% of the disc (Figs 8.5A and 8.6).
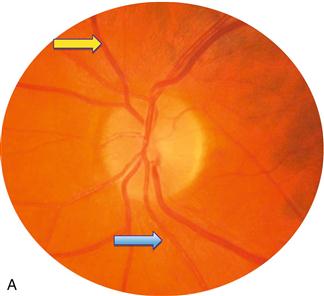
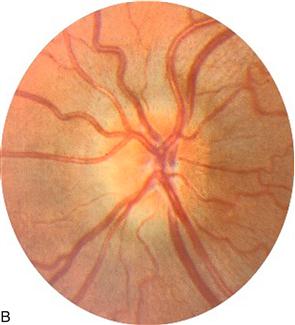

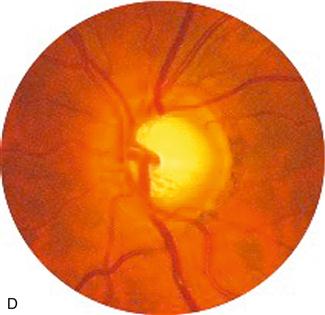
Figure 8.5 A. Normal disc, Blue arrow = artery; yellow arrow = vein; B. Papilloedema; C. Optic atrophy, note pale disc; D. Glaucoma, note wide optic cup.
The optic nerve head is swollen (Fig. 8.5B). This can be caused by papilloedema or papillitis. Papilloedema usually produces more swelling, with humping of the disc margins—not usually associated with visual disturbance (may enlarge blind spot). Papillitis is associated with visual loss, especially central scotomas.
A swollen optic disc is often difficult to find, the vessels disappearing without an obvious optic disc.
The difference between papilloedema and papillitis can be remembered as follows:
• You see nothing (cannot find the disc) + patient sees everything (normal vision) = papilloedema.
• You see nothing + patient sees nothing (severe visual loss) = papillitis.
• You see everything (normal-looking disc) + patient sees nothing = retrobulbar neuritis.
The optic nerve head is very pale—optic atrophy (Fig. 8.5C). The optic cup is markedly enlarged, taking up most of the disc - glaucoma (Fig. 8.5D).
2 Blood vessels
• Arteriovenous nipping: the vein narrows markedly as it is crossed by the artery.
• Neovascularisation: new vessels appear as fine frond-like vessels, often near the disc, frequently coming off the plane of the retina—and therefore may be out of focus.
• Bright yellow object within lumen of artery: cholesterol embolus.
• Retinal vein seen to pulsate = retinal venous pulsation present.
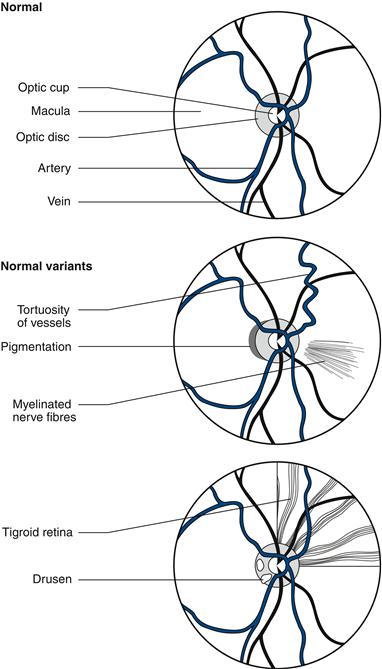
3 Retinal background (Fig. 8.7)
General background
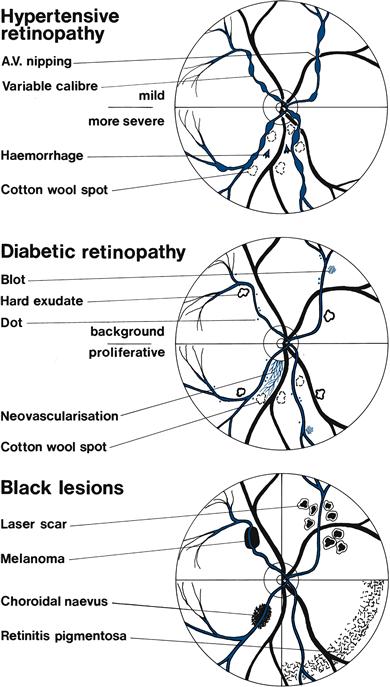
Red lesions
• Dot haemorrhages: microaneurysms seen adjacent to blood vessels.
• Blot haemorrhages: bleeds in the deep layer of the retina from microaneurysms. Dots and blots are seen in diabetic retinopathy.
• Flame haemorrhages: superficial bleed shaped by nerve fibres into a fan with point towards the disc. Seen in hypertensive retinopathy; florid haemorrhages are seen in retinal venous thrombosis—may be in only one-quarter or half of the retina.
• Subhyaloid haemorrhages: irregular superficial haemorrhages usually with a flat top. Seen in subarachnoid haemorrhages.
White/yellow lesions
• Hard exudates: yellowish sharp-edged lesions. May form a ring around the macula: macular star. Seen in diabetes and hypertension.
• Cotton wool spots: white fluffy spots, sometimes also called soft exudates, caused by retinal infarcts. Seen in diabetes, systemic lupus erythematosus and acquired immunodeficiency syndrome (AIDS).
WHAT IT MEANS
1 Optic disc
• Retinal venous pulsation present: indicates normal intracranial pressure, so when it is seen it is very helpful. Retinal venous pulsation is absent in 15% of normal people, so an absence may be normal or reflect raised intracranial pressure.
• Papilloedema. Common cause: raised intracranial pressure (N.B. Absence does not exclude this). Rarer causes: malignant hypertension, hypercapnia.
• Papillitis. Common causes: multiple sclerosis, idiopathic.
– Primary. Common causes: multiple sclerosis, optic nerve compression, optic nerve ischaemia. Rarely: nutritional deficiencies, B12, B1, hereditary.
2 Blood vessels and retinal background
• Hypertensive retinopathy (Figs 8.7 and 8.8A&B):
– Stage I: arteriolar narrowing and vessel irregularity.
– Stage II: arteriovenous nipping.
– Stage III: flame-shaped haemorrhages, hard exudates and cotton wool spots.
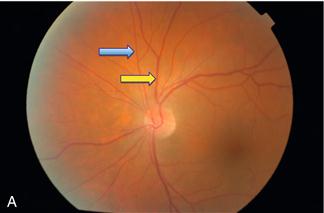
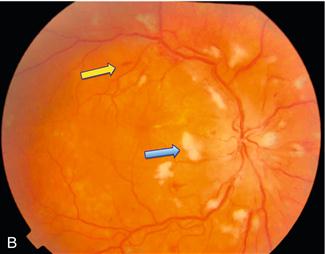
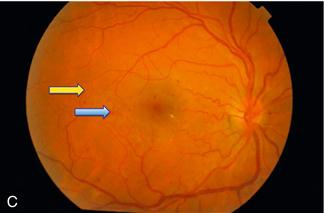
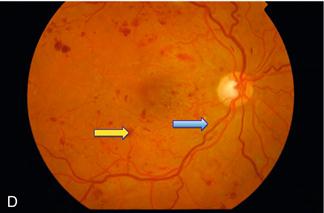
Figure 8.8 A. Normal retina: blue arrow = artery; yellow arrow = vein
B. Severe hypertensive retinopathy: blue arrow = cotton wool spot; yellow arrow = flame haemorrhage
C. Background diabetic retinopathy: blue arrow = blot haemorrhage; yellow arrow = dot haemorrhage
D. Severe diabetic retinopathy: blue arrow = hard exudate; yellow arrow = blot haemorrhage
• Diabetic retinopathy (Figs 8.7 and 8.8C&D):
– Background: microaneurysms, dot and blot haemorrhages, hard exudates.
– Proliferative: cotton wool spots and neovascularisation.
• Cholesterol emboli: unilateral proximal atherosclerotic lesion—usually internal carotid or common carotid stenosis.