Excellence in finishing
Proper finishing is of critical importance in achieving an excellent occlusal result after orthodontic appliance removal, and it has been widely recognized for many years. Stability of the orthodontic treatment result has been a topic of great interest to the profession since the inception of our specialty. The improvements in the position of teeth achieved after great deal of effort may be lost to varying degrees after the removal of orthodontic appliances. Sometimes, changes in tooth positions are noticed even during the period when the patient is using retention appliances.1 It has been recognized for many years that the stability of orthodontic treatment results at least partially depends on the way cases have been finished.2 Orthodontic finishing still remains a continual challenge for the orthodontist. Toward the end of the nineteenth century, the great evolutionary process in orthodontics began. A clearer conception of orthodontic problems was gained principally through the careful application of fundamental principles by such interested workers as Farrar, Guildford, Jackson, Case and Angle. Angle's final achievement, the edgewise appliance, was the culmination of many years of effort and many different appliance designs attempting to place the teeth according to his ‘line of occlusion’. The basic mechanical component was a metal bracket with a rectangular slot, and the original size of the slot was 0.022” × 0.028”. Due to the limitations of this appliance system and the existing treatment philosophy, most often the cases were undertreated, exhibiting lack of torque in upper incisors and absence of true Class I molar relationship. This all resulted into occlusion that had the appearance of a ‘nice orthodontic result’ that looked ‘artificial’ and compromised long-term stability of the result. Over the years, many changes and modifications have been made by various clinicians in the basic appliance itself. Preadjusted edgewise appliances in their current variations probably represent the biggest step up the orthodontic evolutionary ladder and provide great benefits to orthodontists in all stages of treatment, especially during finishing and detailing. However, in some clinical situations, it requires a great deal of effort and skill to achieve an excellent occlusal result after appliance removal.
This chapter deals with defining finishing goals and achieving them with the appropriate treatment mechanics for optimal aesthetics, function and stability. It highlights certain occlusal (static and dynamic), periodontal and aesthetic parameters that provide useful guidelines for finishing in both the adolescent and adult orthodontic patients. It is author's belief that the orthodontic finishing begins with diagnosis and treatment planning. With advances in treatment mechanics, there is hardly an abrupt stage of complicated wire bending to fine-tune the tooth positions; rather, it is a gradual progression toward finishing. In the management of a routine orthodontic case, it is extremely important for a clinician to define finishing goals at the beginning of treatment and continue to focus on them till the finishing stage in order to achieve them with appropriate treatment mechanics. The commonly accepted orthodontic treatment goals are as follows:1–3
1. Normal static occlusal relationships – Class I occlusion with ‘six keys’,4 3 mm of overjet and overbite
2. Normal functional movements – a mutually protected occlusion
3. Condyles in a seated position – in centric relation
The intent of this chapter is to inform the orthodontic clinician of the importance of occlusal, periodontal and aesthetic parameters to finish orthodontic cases to the highest standards. The American Board of Orthodontics (ABO) established guidelines and objective grading system for scoring dental casts and panoramic radiographs containing eight parameters. These include alignment, marginal ridges, buccolingual inclination, occlusal relationships, occlusal contacts, overjet, interproximal contacts and root angulation.5
To achieve these goals, precision wire bending and archwire configurations are required during a clearly defined finishing stage of treatment when standard edgewise appliances are used. However, in contemporary orthodontics, with the use of the built-in features of preadjusted appliance and precise bracket placement, moving teeth to their final position begins as soon as the initial archwires are placed. There is a gradual and a progressive movement of teeth toward finishing rather than a well-defined ‘finishing stage’.1,3 The entire discussion of orthodontic finishing with redefined finishing goals and the appropriate treatment mechanics to achieve the same can be outlined as follows:
Occlusal Parameters
Achieving proper occlusal relationship of maxillary and mandibular teeth at the conclusion of orthodontic treatment has been a fundamental objective of any orthodontic treatment plan. It was generally assumed that when the teeth were aligned properly and orthodontic appliances were taken off, they would settle into good intercuspation and good function would follow. Unfortunately, this was not always the case, as teeth never settled into maximum interdigitation and some instances of excessive wearing of teeth and temporomandibular dysfunction were noted. Therefore, it is extremely important to define finishing goals with respect to occlusal relationships of teeth based on optimal aesthetics, function and long-term stability and achieve them with the appropriate treatment mechanics before the removal of appliances. The occlusal parameters can be described as follows:
• Static occlusal goals – as observed on dental casts or intraorally
• Functional occlusion goals – as observed during various mandibular movements
Static occlusal parameters
Angle6 proposed his most famous key to occlusion as a guide to orthodontic diagnosis and treatment planning. It was based on the relationship of the upper first permanent molar to the lower first permanent molar. Andrews7 proposed his six keys to occlusion, which gave a well-delineated prescription for an ideal intercuspation of the teeth. These all constitute only a static relationship.
Alignment
Proper alignment of teeth has been generally acknowledged to be the fundamental objective of any orthodontic treatment plan. The predebonding evaluation must contain an assessment of tooth alignment in the anterior and posterior segments of maxillary and mandibular dental arches. In assessing the tooth alignment, it is essential to identify the determinants of anterior and posterior tooth alignment.
The ABO5 further clarified and quantified the static occlusal goals by providing a grading system for study casts and panoramic radiographs. In the maxillary anterior segment, the incisal edges and lingual surfaces of incisors and canines are used to establish anterior alignment. This is based on the fact that these surfaces are the functioning surfaces, and when aligned properly, the anteriors appear to be in their best aesthetic relationship (Fig 13.1B). In the maxillary posterior segment, mesiodistal central grooves of the premolars and molars are used to attain optimal alignment. Again, these areas are used since they represent the functioning surfaces of the maxillary posterior teeth and are easy to observe intraorally (Fig 13.1B).
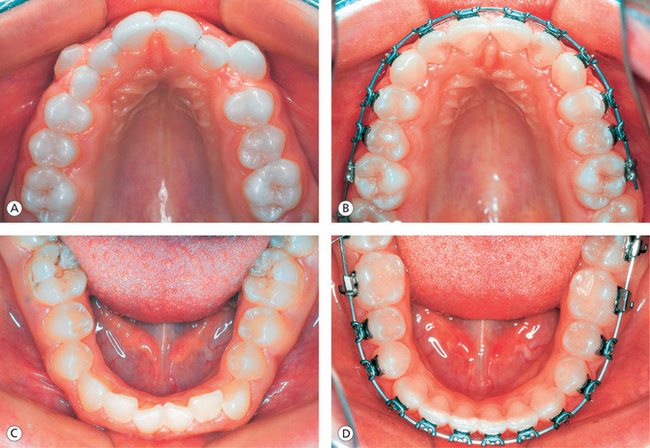
Figure 13.1 Achieving proper alignment of teeth. (A) Pretreatment maxillary arch showing crowding and high labially placed canines. (B) Proper alignment of anterior and posterior segment teeth with full-size archwire in place. (C) Pretreatment mandibular arch showing anterior crowding and rolled-in first molars. (D) Well-aligned anterior teeth and uprighted, properly positioned first molars.
In the mandibular arch, the labioincisal edges of the incisors and canines are the determinants of anterior alignment (Fig 13.1D). In the mandibular posterior segment, the buccal cusps of premolars and molars represent the functioning surfaces, and they are easy to visualize intraorally. Therefore, these landmarks are used to establish the proper alignment in the posterior teeth within the patient's acceptable archform (Fig 13.1D).
The alignment of teeth, irrespective of the treatment technique, is carried out during the initial phase of treatment before correction of major elements of malocclusion. It is not considered to be complete until finishing archwires become passive in the brackets. The degree of rotational control of teeth is dependant on the mesiodistal width of the bracket. The greater the width the greater the rotational control. This is achieved, however, at the expense of reducing the interbracket distance that has implications during the subsequent stages of treatment.
Archform coordination
It has been recognized for many years that by the finishing stage of treatment, the maxillary and mandibular archforms should be accurately established with the rectangular archwires. It is a good practise to coordinate the upper and lower arch widths to the patient's original archforms right from the beginning of treatment through the transitional phase to avoid extra efforts and time required to adjust them during the finishing stage. Broomell8 in 1902 wrote that ‘… the teeth are arranged in the jaws in the form of two parabolic curves, the superior arch describing the segment of a larger circle than the inferior, as a result of which the upper teeth slightly overhang the lower’. Most clinicians have acknowledged that there are extensive variations in the size and shape of human archform. Chuck9 noted the variation in human archform and suggested that archforms had been referred to as square, round, oval, tapering etc. He further stated that while the Bonwill–Hawley9 archform was not suitable for every patient, it could be used as a template for the construction of individualized archforms. Over the years, the majority of edgewise appliance users used the Bonwill–Hawley10 archform as a beginning template for the construction of the edgewise archwire. White11 compared the accuracy of various standardized arch designs with 24 untreated ideal adult occlusions.
• The catenary curve6 showed a good fit with 27% of the cases, a moderately good fit with 46% of the cases and a poor fit with 27% of the cases.
• The Bonwill–Hawley9 archform had a good fit with 8% of the cases, a moderately good fit with 40% of the cases and a poor fit with 52% of the cases
• The Brader12 archform had a good fit with 12% of the cases, a moderately good fit with 44% of the cases and a poor fit with 44% of the cases
From these research studies, it is evident that there are extensive variations in human archforms and there is no single archform that can be used for all orthodontic cases. However, it is universally accepted that there are three basic types of archforms. They are ovoid, tapered and square.
Felton et al13 evaluated a wide range of manufactured archwires from orthodontic companies. It was observed that the archforms were quite close to ovoid, tapered and square groups. When these archforms are superimposed, they vary mainly in the intercanine width, having a range of approximately 6 mm.
Components of archform: In order to select the specific archform for a patient and modify it to coordinate well to the patient's original archform, it is essential to identify the different components of archform. Understanding various parts of archform would provide a basis for the design of a preformed archwire system and the need for minor adjustments to make it individualized. The components of archform (Fig 13.2A) are as follows:

Figure 13.2 Archform coordination. (A) Components of archform: (1) anterior curvature, (2) posterior curvature, (3) intercanine width and (4) intermolar width. (B) Mandibular archform during finishing stage. (C) Maxillary and mandibular archwires should be coordinated by keeping even separation of 3 mm when superimposed.
The anterior curvature This component of the archform is a smooth curve in the anterior segment extending from canine to canine. Since the labiolingual thickness of the maxillary lateral incisor is less, the labial surface of lateral incisors is more lingually placed when compared with central incisors and canines. The greater labiolingual dimension of the cuspid places its labial surfaces more labially than the central and lateral incisors. However, in a well-finished case, the lingual surfaces of these teeth in the maxillary arch should describe a smooth curve (Fig 13.2A1). When the intercanine width is narrow, this component of the archform is more tapered; and when the intercanine width is wide, it is more square or flattened.
The posterior curvature The posterior curvature of the archform extends from the cuspids posteriorly to the second molars. This component exhibits a straight line in the Bonwill–Hawley archform and a significant curvature in the Brader archform. There seems to be an universal acceptance favoring a gradual curvature between canines and second molars. However, it is author's observation that this part of the archform exhibits a gradual curvature from the canine to the mesiobuccal cusp of the first molar and another gradual curvature from this point to the distobuccal cusp of the second molar (Fig 13.2A2). This is because the mesiobuccal cusp of the maxillary first molar is the most prominent part of the posterior segment, and the buccal surface is also substantially angled, with the distal buccal surface more lingual than the mesiobuccal allowing the distobuccal cusp to occlude properly with the lower first molar.
The intercanine width This is the distance between the two canines on the maxillary and mandibular archforms (Fig 13.2A3). This component of the archform is considered to be the most critical, and the strict adherence to the patient's original dimension is highly recommended since significant relapse occurs if this component is altered. In most of the archform system, the intercanine width varies by 6 mm.
Burke et al14 used the meta-analysis technique to review 26 previous studies of mandibular intercanine width. They concluded that ‘regardless of patient's diagnostic and treatment modalities, mandibular intercanine width tends to expand or increase during treatment in the order of about one to two millimetres, and to contract postretention to approximately the same dimension’.
Intermolar width This component of the archform, across the molar region, (Fig 13.2A4) can be altered during treatment depending on the patient's requirement. This is because the treatment changes in this area appear to be more stable than the changes in intercanine width. If the maxillary arch has been expanded, earlier in the treatment, the expansion needs to be maintained during the finishing stage either by expanding the chosen archform in the molar region or by using the square archform.
Archwire coordination: Once the archform has been selected as per the patient's original archform, the maxillary and mandibular archforms should be coordinated throughout the treatment. Whatever changes are done during the initial and transitional stages of treatment, they should be maintained during the finishing stage. Before making any alterations in the chosen archform for desired treatment changes, it is critical to identify the areas for potential relapse. Gardner15 studied intercanine, interfirst premolar, intersecond premolar and interfirst molar widths, as well as arch length changes in 103 cases. In all, 74 were nonextraction, and 29 were treated with extraction of four first premolars. He concluded that intercanine width increased during treatment but had a strong tendency to return to its original pretreatment width in both nonextraction and extraction cases. Interfirst premolar width showed the greatest treatment increase, with only a minimal amount of posttreatment width decrease. Second premolar width in nonextraction cases showed a significant amount of increase, with a slight tendency for postretention decrease. Second premolar width in extraction cases showed a decrease during treatment and a slight continued decrease postretention. The intermolar width in nonextraction cases showed a significant increase in width during treatment, but the extraction cases showed a significant decrease during treatment. However, there were no changes in intermolar width in either extraction or nonextraction cases postretention. The incisor to intermolar distance decreased with treatment and had a slight tendency to continue to decrease postretention. Archform templates can be used to coordinate maxillary and mandibular finishing archwires. When superimposed, the maxillary archwire should be approximately 3 mm wider outside of the mandibular archwire (Fig 13.2C).
Establishing marginal ridge relationships
The marginal ridges are used as a key to achieve relative vertical positioning of the maxillary and mandibular posterior teeth. During the finishing stage, it is important to make sure that the marginal ridges of adjacent posterior teeth are positioned at the same level (Fig 13.3A and B). The leveled marginal ridges will position the cusps and fossae of the teeth at the same level, thereby promoting proper occlusal contacts. According to Casko et al,5 once the marginal ridges of the posterior teeth are positioned at the same relative level, then the cementoenamel junctions are also at the same relative level. This will lead to the bone levels between the adjacent teeth being flat, producing a much healthier periodontal situation for the patient. The precise bracket placement, especially in the vertical plane, has been generally acknowledged to be the critical element in establishing marginal ridge relationships. The vertical bracket height affects the torque and in–out and height of the tooth and, therefore, holds the key to proper vertical crown positioning, marginal ridge relationships and contact points.16 If there is an error in vertical bracket placement, it will be expressed as abnormal crown position after the initial leveling. At this stage, the bracket should be precisely repositioned to level marginal ridges and to ensure better stability. If this is not performed during the initial phase of treatment, these corrections can be done during the finishing stage of treatment by incorporating some bends in the finishing archwire.
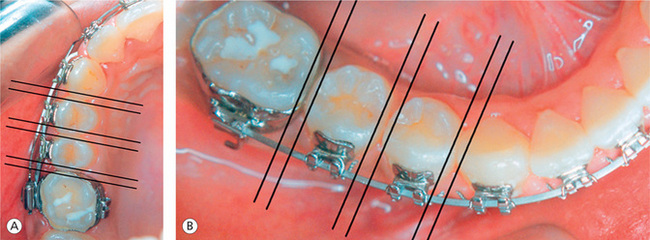
Figure 13.3 Establishing marginal ridge relationships. Proper positioning of marginal ridges in the maxillary right posterior segment (A) and in the mandibular right posterior segment (B).
The ABO5 noted that the most common mistakes in marginal ridge alignment were between the maxillary first and the second molars and between the mandibular first and the second molars. The difficulty in the positioning of posterior attachments due to limited visibility, gingival hypertrophy, variable clinical crown height and delayed eruption of teeth may lead to these errors.17 The lack of distal root tip in the maxillary second bicuspids, expressed during the finishing stage, leads to discrepancy in the marginal ridge matching between these teeth and the first molar. This also leads to a lack of occlusal contact in the posteriors.
The leveled marginal ridges are not a good indicator of relative posterior vertical tooth position in a periodontally compromised adult patient. In such clinical situations, it is appropriate to rely on the bone levels between the teeth to determine the proper vertical position of teeth.18
Contact points
The importance of proper contact points between the teeth in preventing food impaction and stability of the dental arches after orthodontic treatment has been well understood by all specialists. Interproximal contacts are also used to determine if all spaces within the dental arch have been closed. During the finishing stage, three-dimensional control of the teeth positions and their relationship with the adjacent teeth are essential to establish the correct location of interproximal contact points. In order to get the proper perspective of their positioning, the contact points should be observed from two aspects: the labial or buccal aspect and the incisal or occlusal aspect. These views will demonstrate the relative positions of the contact points cervicoocclusally, labiolingually or buccolingually.
Contact points or contact surfaces of teeth are generally located in the occlusal one-third of the proximal walls, slightly buccal to the central fossa in the molar and premolar areas with the exception of the maxillary first and second molars19,20 (Fig 13.4A–C). The position of contact points in the maxillary anterior segment, when viewed from front, seems to progress from the incisal to the cervical and from the central incisors to the canine (Fig 13.4A). When viewed from the occlusal aspect, the contact points in the maxillary anterior teeth are centred labiolingually. In the mandibular anterior segment, the contact points are located at the incisal third of the crowns and seem to move toward cervical region from anterior to posterior teeth. Since the molars become progressively shorter from the first to the third, the centres of the contact areas drop cervically when viewed from the buccal aspect (Fig 13.4C). The contact points in the mandibular anterior and posterior segments are centred labiolingually or buccolingually, when viewed from the occlusal aspect.
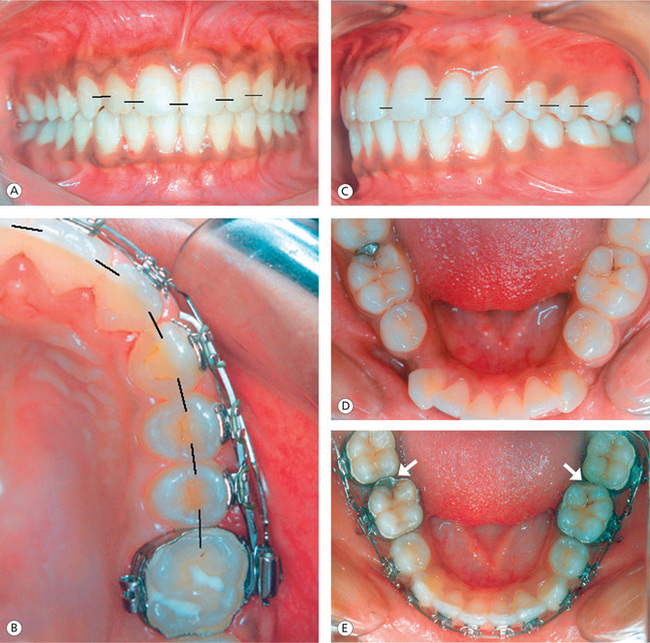
Figure 13.4 Proper location of contact points. (A) Contact points in the maxillary anterior teeth progress from incisal to cervical and from central incisor to canine. (B) Contact points in the maxillary posterior segment when viewed from the occlusal aspect. (C) Contact points when viewed from the buccal aspect. (D) Another patient showing normal contact relationship between the mandibular first and second molars pretreatment. (E) Abnormal position of contact points between the first and second molars due to built-in offsets in the first molar attachments.
During the finishing stage of treatment, it is important to make sure that the teeth are properly vertically positioned, the rotations are corrected, and the interproximal spaces are closed and maintained to optimally position the contact points. The distal offsets incorporated in the mandibular first molar attachments found in some appliance prescriptions lead to inappropriate or broken contacts between first and second molars.21 This offset rotates first or second molars to the mesial or can displace the second molars to the lingual creating abnormalities in marginal ridge relationships and contact points (Fig 13.4E). These discrepancies of treatment must be carefully evaluated and addressed during the finishing stage in order to promote proper proximal contacts, marginal ridges and alignment.
Occlusal relationship
Optimal interarch relationship of maxillary and mandibular teeth at the conclusion of treatment is the prime objective of any orthodontic treatment plan. In order to achieve accuracy in this relationship, each individual tooth should be assessed in anteroposterior, transverse and vertical planes and positioned into its best fit, both anatomically and functionally. Andrews once said that ‘We (orthodontists) tend to look at teeth collectively rather than individually’. It is therefore essential to define goals for each individual tooth and achieve them with appropriate treatment mechanics before the removal of orthodontic appliances.
Molar position: At the conclusion of orthodontic treatment, the maxillary permanent first molar should be positioned in such a way that its mesiobuccal cusp occludes in a groove between the mesial and the middle cusps of the mandibular permanent first molar.22 It should have sufficient distal rotation, mesioaxial inclination and buccal root torque, so as to fit the mesiolingual cusp in the central fossa of the mandibular first molar and its distal marginal ridge occluding with the mesial marginal ridge of the mandibular second molar (Fig 13.5A). Insufficient thickness of maxillary second bicuspid causes first molar to rotate mesially upon initial wire engagement, leading to an increase in Class II tendency and buccal movement of second bicuspid (Fig 13.5B).
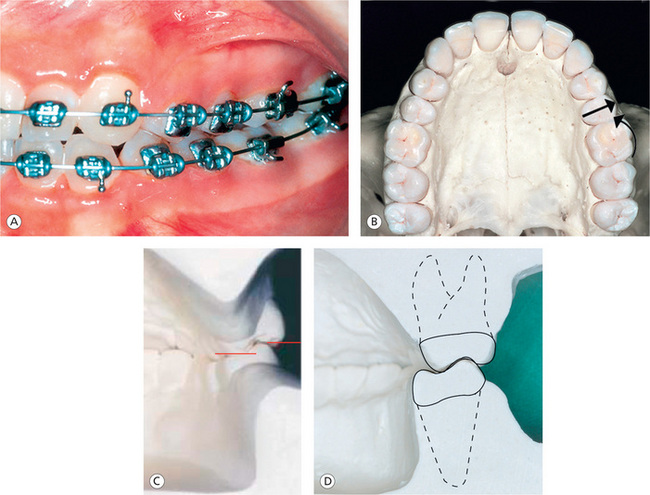
Figure 13.5 Molar position. (A) Proper position of maxillary and mandibular first molars with optimal mesioaxial inclination and buccal root torque. (B) Insufficient thickness of maxillary second bicuspid causes first molar to rotate mesially and buccal movement of second bicuspid upon initial wire engagement. (C) Limited amount of maxillary posterior buccal root torque and the extreme amount of mandibular posterior buccal root torque, leading to improper interdigitation, increased buccal overjet and balancing interferences. (D) Improved buccolingual relationship of posterior teeth by reducing the lower posterior torque and by increasing the upper posterior torque.
During the finishing stage, it is of paramount importance to evaluate the buccolingual inclination of the posterior teeth to achieve good intercuspation and prevent interferences during mandibular movements. This should be assessed by evaluating the relationship between the buccal and the lingual cusps of the maxillary and mandibular premolars and molars – called the curve of Wilson. In normal situation, the lingual cusp should be at the same level or within a millimetre of the same level as the mandibular buccal cusps.5
This relationship makes the occlusal tables of posterior teeth relatively flat, therefore promoting better contact of the maxillary lingual cusps and the fossae of the mandibular posterior teeth (Fig 13.5D). The extreme amount of mandibular posterior lingual crown torque found in many preadjusted appliance prescriptions results in ‘rolled-in’ mandibular posterior teeth as a result of expressed torque (Fig 13.5C).23,24 The mandibular molars should be uprighted and progressively torqued with no rotations and spaces.
Bicuspid position: The buccal cusps of the maxillary premolars should be positioned to have a cusp–embrasure relationship with the mandibular premolars (Fig 13.6A), and the lingual cusps of the maxillary premolars should exhibit a cusp–fossa relationship with the mandibular premolars. Ricketts25 pointed out that the contact position of the maxillary second premolar is the key to a properly treated malocclusion. The maxillary second bicuspid should have a normal contact relation with the mesial incline of the lower first molar, which produces an interlocking into the corresponding interspaces of the lower premolars (Fig 13.6D). This relationship causes the tip of the mesiobuccal cusp of the upper first molar to be slightly distal to the mesiobuccal groove of the lower first molar. According to Ricketts, this is the most efficient, self-cleansing and self-preserving relationship in accordance with nature's plan. The maxillary bicuspids should have mesioaxial angulation with the second bicuspid exhibiting distal root tip to promote marginal ridge matching between these teeth and the first molar and for better interocclusal contact (Fig 13.6F). The lower bicuspids should have their normal mesioaxial angulation with proper contact points and leveled marginal ridges.
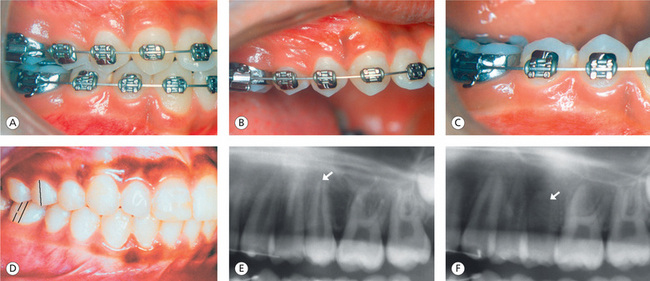
Figure 13.6 Bicuspid position. (A) Sagittal, transverse and vertical positioning of maxillary and mandibular bicuspids leading to good intercuspal relationship. (B) Maxillary right segment bicuspids. (C) Mandibular right segment bicuspids. (D) Position of maxillary second bicuspid – a key to a properly treated malocclusion. (E) Lack of distal root tip in the maxillary second bicuspid. (F) Distal root tip expressed during the finishing stage promotes better marginal ridge relationship and interocclusal contact.
Canine position: The maxillary canine has a cusp–embrasure relationship with the mandibular canine and first premolar. It should exhibit normal contact relationship with the lateral and the first bicuspid, mesioaxial angulation and optimal length for cuspid guidance. The mandibular cuspid crown should have mesioaxial angulation, proper mesiodistal contact relationship and the cusp tip 1 mm higher than the incisal edges of the mandibular incisors (Fig 13.7A and B). It is interesting to note that the torque values for the maxillary canine in various appliance prescriptions range from −7° of Andrews-influenced prescriptions to +7° of bioprogressive. Excessive lingual crown torque of the maxillary canine produces lingual displacement compared with that of the other anterior teeth.21 A similar situation exists in case of mandibular canines, where the torque values exhibit extreme range from −11° of Andrew's prescriptions to +7° of bioprogressive-based prescriptions.

Figure 13.7 Canine position. (A) Cusp–embrasure relationship of maxillary and mandibular cuspids. (B) Proper position of maxillary and mandibular canines and their relationship with adjacent teeth.
McLaughlin et al24 recommended no canine torque for canines that are prominently positioned in the pretreatment archform. This also helps in maintaining the roots within the cancellous bone during retraction mechanics. During the finishing stage, the maxillary and mandibular cuspid positions should be evaluated to make sure that they exhibit mesioaxial angulation, proper proximal contacts and optimal vertical and horizontal overlap for good function.
Incisor position: The position of incisors has long been a focal point of orthodontic diagnosis and treatment planning. It has been recognized by many orthodontists that the cornerstone of a stable dentition is the proper positioning of maxillary and mandibular incisors. A single ideal position that fits every clinical situation may never be found because of the extreme variations in skeletal and muscular patterns. The search for the ideal position has been almost endless, and even so there is little agreement among orthodontists as to what position is best. Optimal positioning of maxillary and mandibular incisors at the conclusion of treatment is the prime objective of any orthodontic treatment plan. The control of undesirable movement inherent with the routine orthodontic treatment mechanics would reduce the amount of fine tuning of incisor position during the finishing stage. AlQabandi et al26 reported 6−7° of lower incisor flaring when simply leveling the curve of Spee with fixed appliances. Reports have described the limitations of controlling the labial proclination of lower incisors during leveling, even with rectangular wires, especially when using Class II elastics.26,27
The lower incisor flaring, if not controlled during the initial stage of treatment, would require increased labial crown torque of the maxillary incisors to maintain appropriate overjet and overbite. This results into bimaxillary protrusion impairing the facial aesthetics. The overall inclination of the maxillary and mandibular anterior teeth is best evaluated with a lateral cephalometric radiograph. The interincisal angle plays an important role in aesthetics, function and stability and should not be based on averages. Growth direction, aesthetics and overbite should also be considered in determining ideal torque in the maxillary and mandibular arch.28
The maxillary central and lateral incisors in their final positions should have no more than 0.5 mm height differential and 5° and 9° mesioaxial inclination, respectively, and they should be adequately torqued (Fig 13.8A–C). The incisal edges should be 2–2.5 mm below the lip embrasure of the upper and lower lips, when the lips are closed with no lip strain. Raleigh Williams29 suggested certain guidelines to optimally position mandibular incisors and canines for long-term stability. The mandibular incisors should be aligned contact point–to–contact point with the roots in the same labiolingual plane (Fig 13.8D). The lower incisor root apices should be spread distally to the crowns, and the apices of the lower lateral incisor must be spread more than those of the central incisors (Fig 13.8E). They should be positioned at the cephalometric goal of +1 to A-Po. The maxillary and mandibular incisors should have approximately 2.5 mm overjet–overbite relationship; however, it should be proportional to the height of cusps of posterior teeth.
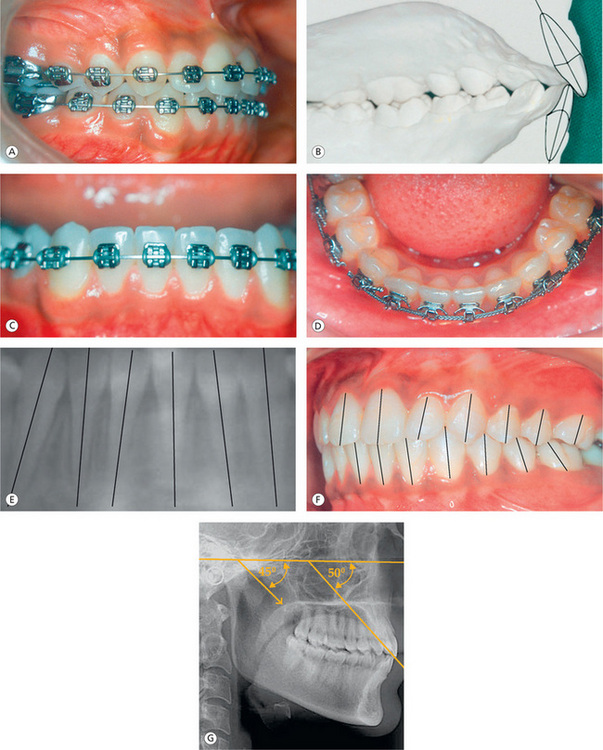
Figure 13.8 Incisor position. (A) Normal overjet and overbite relationship. (B) Optimal interincisal angle. (C) Normal vertical positioning of incisors and their relationship with canines. (D) Labiolingual position of mandibular incisors. (E) Optimal lower i ncisor positioning with progressive distal root spread. (F) Normal interincisal relationship, overjet and overbite achieved by optimal incisor torque control. (G) The ideal angle of disclusion in protrusive is thought to be 5° greater than the condylar disclusive angle.
Occlusal contact relationship
After the resolution of malocclusion, the teeth need to be individually settled into their final positions before appliance removal. In the posterior segment, teeth are generally held away from one another in vertical plane due to full-size rectangular steel finishing archwires. The vertical settling of maxillary and mandibular teeth to achieve maximum intercuspation is done by using different configurations of vertical elastics (Fig 13.9A and B). The more precise the placement of brackets and tubes, the easier it is to settle the teeth and the less elastics need to be used in this way. The adequacy of posterior teeth interdigitation is evaluated by assessing the contact relationship between the cusps and the fossae of the molars and premolars. Ricketts25 suggested that without third molars, 16–24 occlusal stops or centric stops on each side are adequate for a good balanced occlusion (Fig 13.9C).
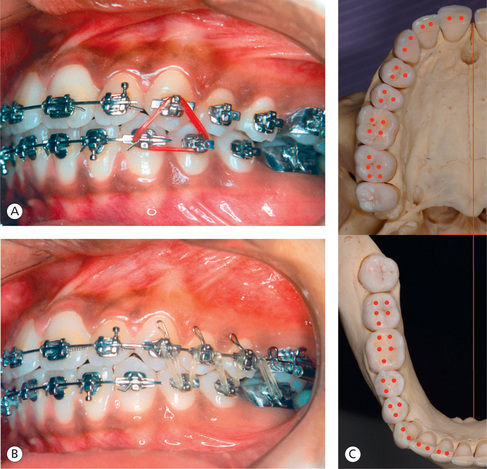
Figure 13.9 Occlusal contact relationship. (A and B) Use of different configurations of vertical elastics to settle the posterior teeth into maximum intercuspation. (C) Location and the number of occlusal stops or centric stops on each side of arches.
The lingual cusps of the maxillary premolars and molars should be in contact with the marginal ridges or the fossae of the mandibular premolars and molars.5 In addition, the buccal cusps of the mandibular premolars and molars should contact the fossae or marginal ridges of the maxillary molars and premolars.5 Due to lack of an adequate occlusal table, the lingual cusps of the maxillary first premolars may not establish contact with the mandibular first premolar. In the maxillary buccal segments, the palatal cusps of the first and second molars are generally slightly longer and extend slightly more occlusal than the buccal cusp. With the common use of expansion treatment often using overexpanded, commercial arch blanks or limited amount of maxillary posterior expressed buccal root torque, palatal cusps extend occlusally beyond their normal limits. This leads to inappropriate interdigitation between maxillary and mandibular posterior teeth.17
Therefore, the buccolingual relationship of posterior teeth should be improved to achieve maximum intercuspation by flattening the curve of Wilson, minimizing or eliminating the discrepancies in the posterior overjet and avoiding the prominence of palatal cusps by reducing the lower posterior torque and by increasing the upper posterior torque.
Vertical dimension
The control of vertical dimension of occlusion is one of the greatest problems faced by orthodontists while treating variety of clinical situations. Quite often, orthodontic treatment mechanics has a tendency to extrude posterior teeth and encourage excess vertical alveolar growth leading to what is termed a molar fulcrum. 30 This promotes the development of anterior open bite through the bicuspids and a tongue–thrust swallow. The temporomandibular joint (TMJ) clicking and tightness or stiffness of the mandibular musculature, often associated with pain or discomfort of any combination of mandibular muscles, are some of the common symptoms of this disorder.30 Also, during various mandibular excursions, the patient may not be able to execute smooth gliding movement without any interference. Any extrusive treatment mechanics like prolonged use of Class II elastics, overexpansion of the maxillary arch that facilitates overhanging palatal cusps and distal driving of molars in cases with a short ramus or short posterior facial height should be avoided to maintain the vertical dimension.
Dynamic occlusal parameters
In addition to achieving the static occlusal relationships as suggested by Angle6 and the ‘six keys to occlusion’ by Andrews,22 other researchers like Williamson,31 Aubrey,32 Ricketts33 and Roth30 have all expanded the area of knowledge in occlusion to include the neuromuscular and bony structures of the TMJ in establishing orthodontic treatment objectives. In dealing with the various elements of functional occlusion as one of the finishing goals, it is important to achieve stable centric relation of the mandible with maximum intercuspation of the teeth at this position. In the intercuspal position and retruded contact position, the mandible should be situated in the same sagittal plane, the distance between the two positions being less than 1 mm. All the teeth must occlude in maximum intercuspation when the mandible is in the centric relation. The anterior teeth must be positioned to provide separation (disclusion) of the posterior teeth immediately when the mandible leaves its centric relation position to move anteriorly or laterally. When these relationships are achieved, the teeth will not interfere with condylar movement, and no neuromuscular avoidance mechanism will be necessary. Therefore, as the patient nears the end of fixed appliance therapy, the checklist should include careful consideration of three aspects of functional occlusion: centric relation, anterior guidance and stability of posterior tooth arrangement. The occlusal scheme that is most successful in preventing occlusal problems in patients over a long period of time is the mutually protected occlusion.34
Anterior guidance
Ideally in the protrusive excursion of the mandible, there should be harmonious glide path of anterior teeth. These teeth should work against one another to separate or disclude the posterior teeth as soon as the mandible moves out of centric closure. Since the incisors are the teeth farthest from the muscles moving the mandible, they can be expected to receive the least stress. The proper overbite and overjet established after orthodontic treatment should allow for a gentle glide path (Fig 13.10J–L). The optimal position of maxillary and mandibular incisors and their relationship with each other after orthodontic treatment are the key elements of anterior guidance. According to McHorris,35,36 in the optimal functional occlusion, the anteriors are in very close approximation but do not touch when molars are in occlusion. The lower anteriors engage the lingual incline of the opposing upper anteriors immediately with mandibular movement. The lingual discluding surface of the upper anteriors seems to reflect the anatomical angle or the discluding pathway of the mandibular condyles. The ideal anterior disclusion angle is greater than or equal to 5° than the condylar disclusion angle (Fig 13.11). The common mistake to achieve anterior guidance is to place insufficient labial crown torque in the maxillary incisors, lack of adequate time for the torque to be sufficiently expressed or treating to an end–to–end incisor position in the conviction that the case is ‘overtreated’. All too often, the case stays ‘overtreated’, and the patient has many posterior interferences. An occlusal interference on the anterior teeth, identified during unforced closure of the mandible, sometimes associated with a distalizing effect in condylar position has been termed anterior interference.37 The axial inclinations of maxillary and mandibular anteriors and the subsequent interincisal angle should be proper in order to avoid anterior interferences after orthodontic treatment.
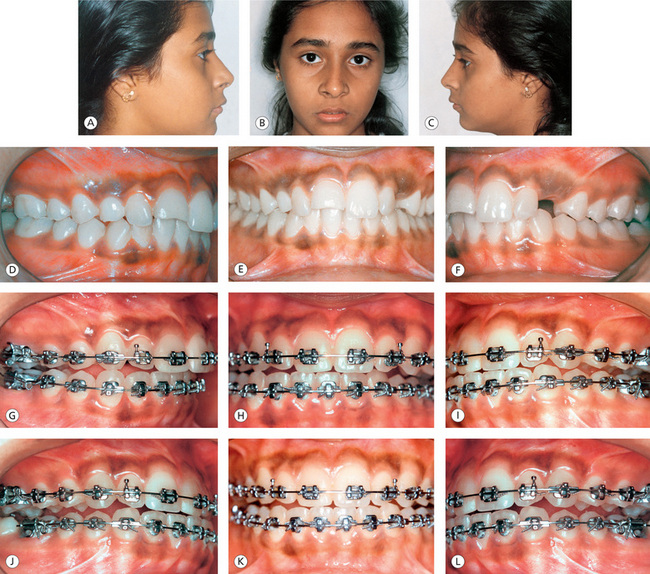
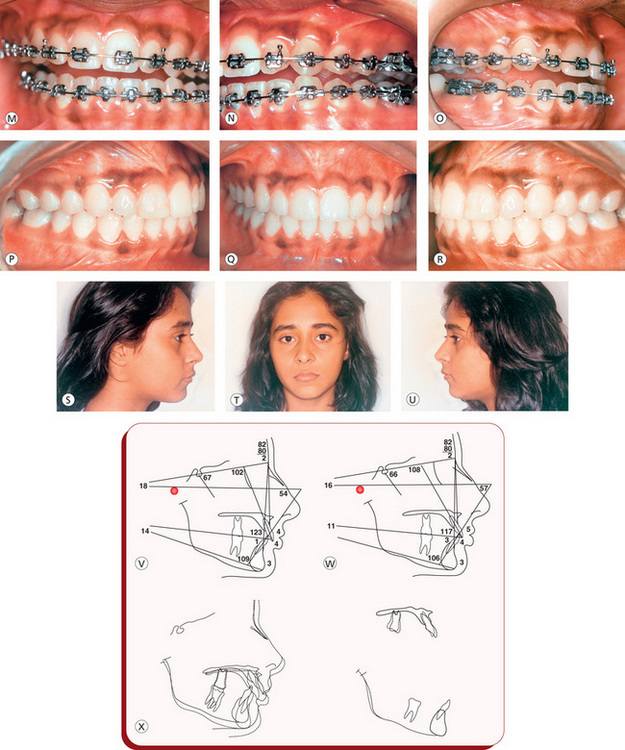
Figure 13.10 Establishing functional occlusal goals. (A–C) Pretreatment extraoral pictures showing normal facial proportions and orthognathic profile. (D–F) Pretreatment intraoral pictures showing over-retained maxillary right deciduous canine, unerupted permanent canines and fractured maxillary right central incisor. (G–I) Mandibular right lateral excursion. (J–L) Protrusive mandibular movement. (M–O) Mandibular left lateral excursion. (P–R) Posttreatment intraoral pictures showing static occlusal goals. (S–U) Posttreatment extraoral pictures showing orthognathic profile and normal facial proportions. (V) Pretreatment lateral cephalometric tracing. (W) Posttreatment lateral cephalometric tracing. (X) Pretreatment and posttreatment cephalometric superimpositions.
Lateral excursions
The key tooth in lateral mandibular movements is the mandibular cuspid. It has the best anatomy and is in the best position to provide the main gliding inclines for lateral excursions, with no interferences on the balancing side (Fig 13.10G–I and M–O). Ideally, it should be the posterior teeth working against the maxillary cuspid, but under certain situations when maxillary cuspid is missing, it can be made to work satisfactorily with a maxillary bicuspid. If more teeth than the mandibular cuspid on working side are allowed to contact in lateral excursions, uneven wear is likely to occur because each tooth is at different distance from the rotating condyle and therefore moves on a different arc.38 Therefore, during the finishing stage of treatment, maxillary and mandibular canine positions should be checked to provide gentle lateral lift during the mandibular lateral excursion. Excessive lateral stress on the cuspids should also be avoided as this may cause lingual movement of the lower cuspids and resultant lower anterior crowding or labial movement of the maxillary cuspids.
To achieve these goals, it is necessary to have three-dimensional tooth control during orthodontic treatment and position each individual tooth as per the static occlusal parameters. It is essential to bond second molars whenever possible so that they may be properly positioned. Occlusal interference involving these teeth can be most damaging because they are located closest to the muscle forces that move the mandible.
Periodontal Factors
One of the finishing goals of orthodontic treatment is to achieve optimal periodontal health. As Schweitzer39 suggested that ‘the single goal agreed to by all concepts and theories of occlusion is the preservation, in good health, of the whole masticatory system for the life span of the individual. This includes minimum deterioration of hard and soft tissues, good function and pleasing aesthetics’. Therefore, during the course of orthodontic treatment and as a part of predebonding evaluation, it is important to check the bone level between adjacent teeth, the parallelism of roots, the morphology of the roots and the health of the supporting soft tissues (Fig 13.12). In adolescent patients, the bone levels between the adjacent teeth are not a matter of concern, as they generally do not exhibit a periodontal disease that leads to bone destruction. However, in adult patients who have lost bone on individual teeth, the involved tooth should be relieved from occlusion and erupted orthodontically. This controlled, slow forced eruption improves the bone level and crown–to–root ratio.40 In adult orthodontic patient with interproximal bone loss, the incisal edges or marginal ridges should not be used as a guide for vertical positioning of adjacent teeth.18 In such a situation, it is advisable to align the bone levels rather than the adjacent teeth.
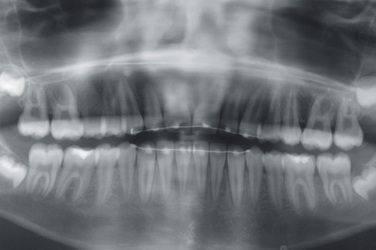
Figure 13.12 Posttreatment radiograph showing even root spacing and optimal bone levels between the adjacent teeth.
Another factor that needs to be evaluated during the finishing stage is the position of the roots of adjacent teeth that should be parallel to one another. Other factors being normal, if the roots are parallel to one another, there will be sufficient bone between the roots of teeth. It is considered that more interproximal bone will provide greater resistance to periodontal bone loss if the patient develops periodontal disease in the future. During the finishing stage, if the teeth are not properly uprighted, especially when the second bicuspids or first molars are extracted or missing and the posterior teeth are drifted into that space, then the marginal ridges will not be level and proximal contacts will be faulty, with angular bony defects on the proximal aspect of the teeth (Fig 13.13). In extraction cases, it is important to maintain the closure of extraction spaces during the finishing stage of treatment with the roots of the adjacent teeth parallel to each other. This eliminates the troublesome problem of spaces reopening postretention (Figure 13.14 shows tipping of adjacent teeth into the extraction site and uneven root spacing, with the potential of extraction spaces reopening postretention).
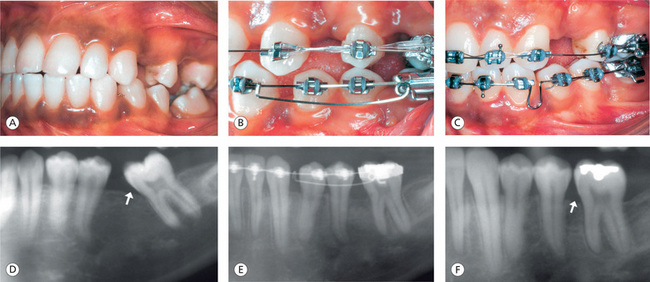
Figure 13.13 Mesially drifted molars. (A) Mandibular left first molar is missing, and the second molar is mesially drifted. (B) Molar uprighting mechanics. (C) Optimal molar position. (D) Radiograph showing angular bony defect on the mesial aspect of mesially tipped molar. (E) Molar is being uprighted. (F) Posttreatment molar position and elimination of bony defect on the mesial aspect of molar.

Figure 13.14 Poor orthodontic finish. (A and B) Teeth adjacent to the extraction site are not uprighted. (C) Radiograph showing tipping of teeth into the extraction site and uneven root spacing.
Another clinical situation that demands parallelism of roots of the adjacent teeth is when the maxillary lateral incisor is missing. If the maxillary lateral incisor is missing and the treatment plan involves sufficient opening of lateral incisor space and subsequent restoration with an osseointe-grated implant, then it is important to evaluate the position of the roots of adjacent teeth radiographically. The roots of the central incisor and canine should be parallel to each other with adequate space between the roots for implant placement (Fig 13.15).

Figure 13.15 Space gaining for single tooth implant. (A) Maxillary right lateral incisor missing and deficient space for restoration. (B) Space opened for single tooth implant. Note the parallelism of adjacent roots.
All these finishing procedures should be performed with minimum deterioration of supporting hard and soft tissues. The root resorption has been described in the orthodontic literature as an inevitable pathological outcome of orthodontic tooth movement.41 The aetiology of the external root resorption phenomenon is multifactoral.42 It can be detected even in the early leveling stages of orthodontic treatment with an increased risk for long, narrow and deviated roots.43 Intrusion is a critical type of orthodontic tooth movement in relation to external root resorption, and the research has shown that the root resorption is directly proportional to the magnitude of the intrusive force applied41 (Fig 13.16A and B). Even though force magnitude and orthodontic biomechanics are not the sole factors that can lead to external root resorption, heavy forces during intrusion should be used cautiously, especially if this procedure will be carried out over a long period of time. More resorption measured by volumetric analysis is associated with heavy force levels, and it is seen more on the buccal cervical and lingual apical regions of root surfaces than on other regions, suggesting that high-pressure zones are more susceptible to resorption.44
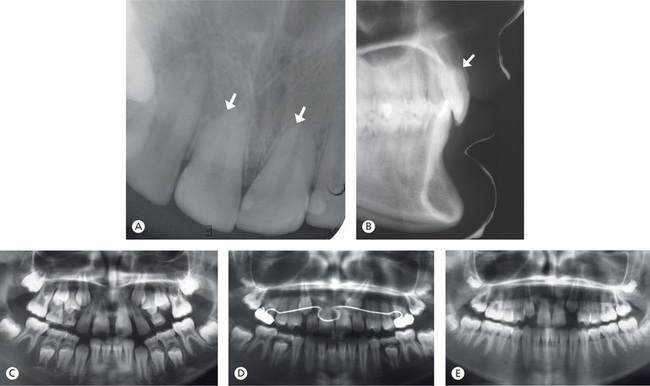
Figure 13.16 Iatrogenic root resorption. (A and B) External root resorption of maxillary central incisors following their i ntrusion. (C) Another patient during mixed dentition stage showing maxillary canines exerting pressure on the roots of lateral i ncisors. (D) Poor treatment planning and mechanics leading to severe root resorption of lateral incisors. (E) Lateral incisors were ultimately extracted.
Aesthetic Parameters
Achievement of optimal dentofacial aesthetics is the primary goal of orthodontic treatment. Pretreatment evaluation of facial aesthetics and the projections concerning the desired goal of treatment should be done prior to the beginning of treatment. Its evaluation should be the ongoing process during the stages of orthodontic treatment. Though orthodontists enjoy a high level of patient appreciation, partly because of the impact of aesthetic improvement, quite often, the finished result is short of the finest possible aesthetic result. This is probably because of disproportions in the crown width, length and abnormal shape of anterior teeth; abnormal gingival architecture; etc.
Crown width discrepancy
Size of the teeth is one of the most important elements of anterior dental aesthetics. Orthodontists are often faced with disproportionate widths of anterior teeth during treatment. This tooth size discrepancy is commonly found in patients with peg-shaped lateral incisors. Even after getting the teeth perfectly aligned and the archforms properly established with orthodontic treatment, the abnormal shape and smaller size of lateral incisor pose aesthetic problems. Such clinical situations require sufficient space provided by orthodontic treatment to restore the normal width of lateral incisor. If a lateral incisor is of normal shape but only slightly narrower than normal, and the discrepancy is bilateral, it may not be necessary to create space to restore normal widths of lateral incisors. If the discrepancy in the widths of lateral incisors is minimal, the influence on the anterior occlusion and the impact on aesthetics may not be distinguishable.45 However, if the tooth size discrepancy is unilateral, or if it is quite significant, it affects the anterior occlusion and aesthetics.46,47 It is therefore imperative to restore the size of the malformed lateral incisors after the completion of orthodontic treatment for overall good treatment result. In doing so, it is best advisable to follow the principle of golden proportion, which can be called the building blocks of nature itself. This ratio is an ideal ratio that can be mathematically defined as 1:1.618 (Fig 13.17F). It has been observed that when the rule of golden proportion is followed, the result is something that is naturally attractive and pleasing to the eye. Smiles can be made attractive by following these mathematical rules of nature to create harmony, symmetry and proportion.20,48 The width of maxillary central incisor is in golden proportion to the lateral incisor width, which in turn is in proportion with the mesial width of the canine.49 During the finishing stage of orthodontic treatment, if excessive space exists in the anterior segment, it should be redistributed to restore the proper crown width (Fig 13.17B and C). If insufficient space exists to restore these teeth, an adequate space should be gained, which will permit the restoration of proper crown width. To determine the space required to restore the crown width, during the treatment planning stage, construction of a diagnostic wax-up is an important step to visualize the final result. After removal of the fixed orthodontic appliances, provisional restorations should be given before final restorations to avoid relapse. When gaining space orthodontically, where should the maxillary lateral incisor be positioned in all three planes of space? Vincent Kokich50 provided certain guidelines to optimally position malformed lateral incisors for best results. One must remember that the contour of the mesial surfaces of lateral and central incisors is relatively flat. If the lateral incisor is positioned too close to the canine, its mesial surface should be overcontoured to establish normal crown width. Therefore, as far as the mesiodistal position of peg-shaped lateral incisor is concerned, it should be positioned nearer the central incisor for optimal aesthetic result (Fig 13.17B).
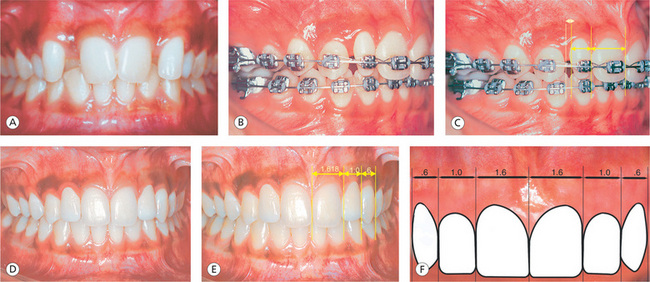
Figure 13.17 Crown width discrepancy. (A) Class I malocclusion with disproportionate crown widths of anteriors due to peg-shaped laterals. (B and C) Proper distribution of anterior spaces to restore normal widths of lateral incisors. (D and E) Peg-shaped laterals are restored with ceramic veneers in a golden proportion with adjacent teeth. (F) The golden proportion – an ideal ratio can be mathematically defined as 1:1.618.
The labiolingual position of the malformed lateral incisor will depend on the type of the subsequent permanent restoration used to restore the appropriate crown width. This restoration could be either a porcelain crown or a porcelain veneer. If it is a porcelain crown, the orthodontic treatment should be directed to position the peg-shaped lateral incisor in the centre of the alveolar ridge labiolingually, with approximately 0.50–0.75 mm overjet. This will eliminate the need for additional tooth preparation on the lingual aspect of the l ateral. However, if the subsequent restoration is going to be the porcelain veneer, the malformed lateral incisor should be positioned lingually to be in contact with the mandibular incisors. This lingual position should be in proportion with the thickness of the porcelain veneer. During the finishing stage of treatment, it is important to evaluate the gingivoincisal position of the lateral incisor. Ideally, the incisal edges and the gingival margins should be aligned with the contralateral lateral incisor. Orthodontic intrusion or forced eruption will position the peg-shaped lateral incisor at the appropriate level, which in turn will help restore proper length of the tooth.
Role of ‘Illusion’
The size and shape of anterior teeth, particularly their length and width, as a result of disproportion, may appear aesthetically compromised. If this disproportion is not very severe, it can be addressed by using optical concepts to create optical illusions of size and shape.20 As a general rule, visual perception is possible because of the contrast in shape, lines and colour of objects. Therefore, the perception of size and shape is dependant on the reflection or deflection of light from different surface areas of objects. By controlling the phenomenon of light reflection and by altering the surface of a tooth, it is possible to establish proportions because ‘our vision is often fooled by optical illusive effects’.51
These optical principles can be summarized as follows:20
• Increased light reflection increases visibility.
The key factor here is to control the light reflection or deflection by contouring the tooth surface. Tooth contouring should be limited to mesial and distal inclines, incisal edges, gingival inclines, natural grooves, angles etc. In case of a wider tooth mesiodistally, proportions can be re-established by applying the principles of narrowing illusion. This can be accomplished by adjusting the lateral prominences toward the centre, increasing the curvature of the central prominence mesiodistally, and moderately increasing the length of the central prominence (Figs 13.18 and 13.19).
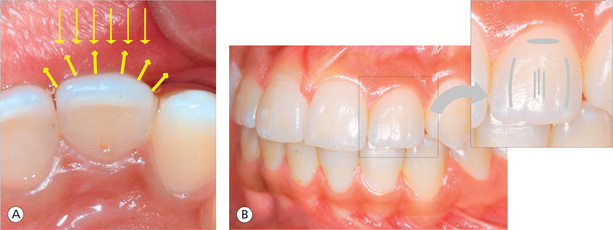
Figure 13.18 Narrowing illusion. (A) Increasing the curvature of labial surface (central prominence). (B) Adjusting the lateral prominences toward the centre.
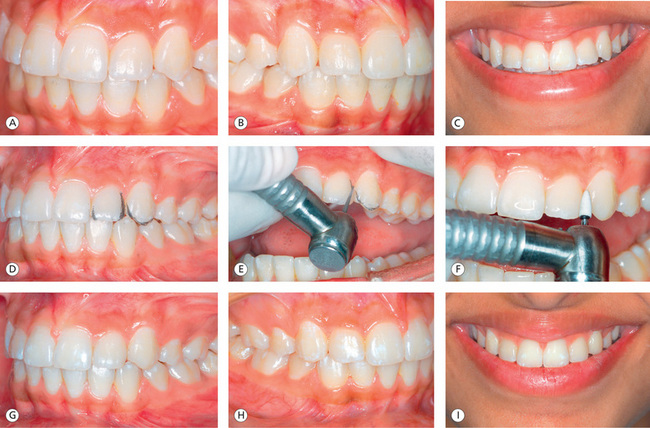
Figure 13.19 Step-by-step procedure for applying the principles of illusion. (A–C) Disproportionate (larger size) of maxillary lateral incisors. (D–F) Sequential recontouring procedure. (G–I) Proportionate width (altered visual perception) of maxillary lateral incisors. Note that the contact points between laterals and centrals and laterals and canines are not disturbed.
Aesthetic recontouring
Fine-tuning the position of anterior teeth, both individually and collectively, that leads to proper incisor display upon smile is one of the keys to achieve optimal aesthetics. However, certain abnormalities of teeth like irregular incisal edges, abnormal tooth morphology or attrided anterior teeth interfere with the aesthetic outcome of orthodontic treatment. Dental recontouring or reshaping, also called odontoplasty or enameloplasty, is a procedure in which small amounts of tooth enamel are removed in order to change the length, shape or surface contours of a tooth. The goal of aesthetic recontouring is to enhance the aesthetic component of orthodontic result by selectively remodeling anterior teeth to correct minor anterior tooth imperfections. However, it should be remembered that it should not be used as a substitute for incomplete orthodontic treatment. Before performing aesthetic recontouring procedure, the clinician should review the incisor display upon smile to decide on the guidelines that are specific to the feminine and masculine smiles.52 The characteristic features of youthful, feminine smiles are rounded incisal edges, open incisal and facial embrasures and softened facial line angles. However, the masculine smile is typically characterized by more closed incisal embrasures and prominent incisal angles. Therefore, the morphology and architecture of the maxillary anterior teeth enhanced by aesthetic contouring procedure determined by these principles greatly contribute to the composition of an individual smile. Prior to this procedure, the clinician should review the aesthetic goals of treatment to determine if the finished orthodontic treatment result could be enhanced with recontouring. Once the goals are defined, the procedure should be outlined and sequenced to adequately and conservatively prepare the teeth. The basic tenet of the contouring procedure is to achieve natural, anatomic forms of anterior teeth. The selective remodeling of anterior teeth is done by using high-speed handpiece with intermittent brush strokes, adequate water supply and proper illumination followed by enamel polishing and fluoride application.52
It is the author's experience that the proper positioning of anterior teeth with orthodontic treatment combined with intentional changes in tooth morphology by recontouring to correct minor imperfections significantly enhances the final result.
Postdebonding restoration of original enamel surface
Achievement of treatment goals with proper positioning of teeth during the finishing stage of orthodontic treatment is followed by debonding procedure. It involves the proper removal of various orthodontic attachments and the residual composite from the teeth. Incomplete removal of the residual adhesive from the tooth surface after debonding leads to staining and plaque accumulation, demineralization or caries formation and gingival inflammation from contact with rough surface. To enhance the positive impact of orthodontic treatment result, it is essential to establish the pretreatment enamel surface qualities by using proper techniques of debonding and residual composite removal with no introgenic damage to the enamel. It is in fact quite difficult to remove the residual adhesive due to its colour similarity with the enamel. Therefore, choosing the best method of residual composite removal after debonding is a common problem faced by most clinicians. The important step is to identify the residual adhesive sites by drying the tooth to visualize the dull opaque resin remnants on the tooth or by using a probe or an explorer to feel the rough surface as opposed to a smooth enamel finish. The ultrafine diamond bur is the most efficient in the removal of composite remnants, but it produces very rough finished enamel surface.53 The preferred method is to use dome-tapered tungsten carbide bur in a contra-angle handpiece at approximately 30,000 rpm.54 Use of water cooling for bulk removal of composite is recommended; however, it should not be used while removing the last traces of adhesive as it reduces the contrast with enamel. The author uses the combination of composite removing pliers and high-speed tungsten carbide bur with water cooling for the bulk removal, low-speed tungsten carbide bur with no water and aluminum oxide polishing points and rubber cups for the removal of last traces, followed by enamel polishing with pumice as the best way to restore the enamel surface to its pretreatment surface quality.
Enamel decalcification
The presence of white spots or areas of enamel demineralization of varying degrees due to noncompliance with oral hygiene instructions has been the problem of great concern to many clinicians. Almost half of the patients undergoing orthodontic treatment with multibonded appliances exhibit the areas of enamel decalcification, with the highest incidence in the maxillary incisors, especially the laterals.55 These lesions significantly compromise the aesthetic component of orthodontic result, prompting the orthodontist to establish and reinforce the preventive program. In addition to proper tooth-brushing, daily rinsing with dilute (0.05%) sodium fluoride solution along with a regular use of a fluoride dentifrice is recommended as a routine procedure for orthodontic patients.56 A single application of a fluoride varnish, which is a viscous liquid consisting of 5% sodium fluoride in a base of natural colophony, has been shown to reduce decalcification in vitro by 50%.57 In comparison with fluoride rinses and dentifrices, fluoride varnish demonstrates a more sustained release of fluoride ions over a longer period of direct contact with the enamel.58,59 Unlike many other methods of fluoride application, fluoride varnishes do not depend on patient cooperation for their effectiveness in reducing enamel decalcification.
After normal prophylaxis, acid-etching and bonding of brackets, cheek retractors are left in place and teeth are airdried prior to varnish application. A thin layer of varnish is then painted onto enamel surfaces adjacent to the brackets with a sponge applicator or minibrush. The enamel surface between the bracket and the gingival margin on each tooth must be painted with a varnish. The fluoride varnish then sets into yellow-brown waterproof coating after contact with saliva. After the fluoride varnish application, the patient is instructed not to brush for 4–5 h. The discolouration usually abrades away after several weeks of normal brushing and function.
Teeth whitening: The finishing touch to beautiful, straight teeth
Teeth whitening is one of the simplest methods yet can make most dramatic changes to patient's appearance. People feel better about themselves with whiter and brighter teeth, and it has been recognized that people respond to a dazzling, healthy smile in a more positive manner. The majority of the patients are concerned about aesthetics, and they want the best possible smile. Patients who are interested in straight teeth are interested in straight, white teeth.
The orthodontic treatment result, which essentially constitutes straight teeth and good occlusion, can be enhanced by teeth whitening to obtain a brilliantly white smile. Tooth bleaching or whitening that can be performed externally is called vital tooth bleaching and that can be done intracoronally in root-filled teeth is called nonvital tooth bleaching. It can be performed at-home and in-office. At home, method of tooth whitening is done using custom-fitted trays and diluted concentration of a whitening gel, usually 10% carbamide peroxide. Although this method works well, it is very time consuming and takes a great deal of patience and compliance. However, in-office bleaching technique involves the use of higher concentrations of whitening gel, usually 35% hydrogen peroxide, which in the presence of strong light source, makes a profound difference in discolored teeth in a shorter time. Tooth sensitivity is a common side effect of external tooth bleaching.60 Higher incidence of tooth sensitivity from 67 to 78% of the patients was reported after in-office bleaching with hydrogen peroxide in combination with heat.61 Tooth sensitivity normally persists for up to 4 days after the cessation of bleaching treatment.
It is important to explain to the patient that tooth whitening will last an average of approximately 2 years with periodic at-home touchups. This duration of whitening effect also depends on the patient's personal habits. Smoking, dark foods and drink will diminish the results more quickly.
Replacement of missing laterals with implants
Dental agenesis occurs quite frequently, especially of the maxillary lateral incisors, and it presents a true challenge to an aesthetic solution. For a long time, many clinicians had suggested an alternative treatment approach by moving the entire lateral segment mesially to position the cuspid in the lateral incisor position. However, this approach ends up with compromised results that do not fulfill the aesthetic requirements of good orthodontic treatment. This is because the cuspid has a very different crown and root shape to that of the lateral incisor, and it has a darker shade. When missing lateral incisor space is closed by moving the entire lateral segment mesially, lateral excursions are made using bicuspids, which have shorter, thinner roots; thus, functional requirements are also not fulfilled either.
If restoration is the treatment of choice, it requires reshaping neighboring teeth, with consequent removal of varying amounts of enamel, and eventual risk of gingival recession, caries etc. The osseointegrated implant is the most conservative and biological method since the missing tooth can be replaced without damaging the adjacent teeth. If the use of implants is the part of treatment plan for the missing lateral incisors, it is necessary to decide the exact placement of implants and evaluate the smile line and gingival contour. When the lateral incisors are missing, there is usually no adequate space to restore them due to drifting of the adjacent teeth (Fig 13.20A and B). In such cases, it is essential to gain adequate space with orthodontics for the placement of implant and for the crown restoration for optimal aesthetic result (Fig 13.20I and J). The exact amount of the space created should be according to the proposed size of lateral incisors, which should be proportionate to the width of the central incisors. After opening up of sufficient space, acrylic teeth may be selected closer to the shade of the patient's teeth, bracketed and attached to the archwire for aesthetic purpose. Before the orthodontic appliances are removed, it is important to evaluate the position of the roots of adjacent teeth radiographically. The roots of the central incisors and canines on either side, in case of bilaterally missing laterals, should be parallel to each other with adequate space between the roots for implant placement (Fig 13.20F). Before removal of orthodontic appliances, quite often, there is adequate space for the prosthesis and inadequate space between the roots of the adjacent teeth for an implant. This usually occurs due to tipping movement of adjacent teeth, which requires proper uprighting of the roots during the finishing stage of orthodontic treatment. The minimum space of 6.5 mm between adjacent roots is required to place a standard implant of 3 mm width.
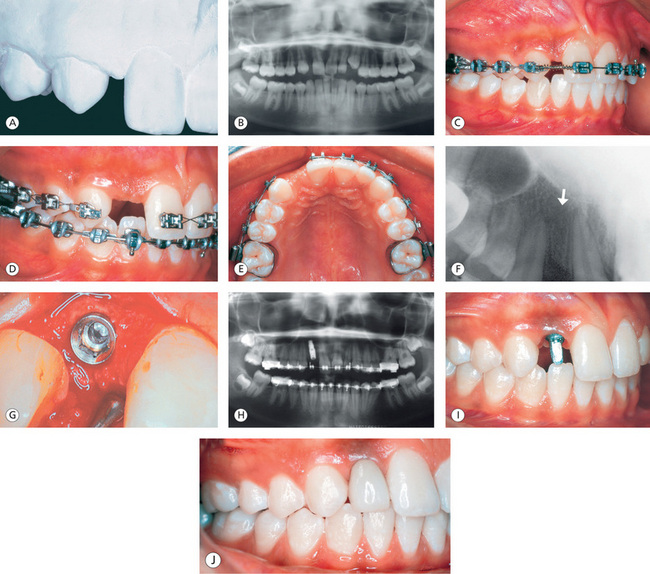
Figure 13.20 Replacement of missing laterals with implants. (A) Maxillary lateral incisor is missing, and the adjacent teeth are drifted into the space. (B) Inadequate space between the roots of central incisor and canine. (C) Orthodontic mechanics to open the space. (D and E) Optimal space gained for restoration. (F) Intraoral periapical radiograph shows adequate space between the roots of the central incisor and the canine. Note the parallelism of roots of the adjacent teeth. (G) Osseointegrated implant placement in the lateral incisor region. (H and I) Single tooth implant in place with abutment. (J) Final restoration.
Gingival architecture
Colour, contour and health of the gingival tissues provide the framework and backdrop for the pleasing smile. Even if the case is well finished with orthodontic treatment, abnormality of the gingiva either in the form of loss of papilla, asymmetrical pattern or excessive display upon smile leads to a poor result.1 It is therefore essential to have proper gingival architecture and display to achieve a maximum aesthetic result. In normal situation, the gingival tissue blends into tooth embrasure that is totally filled from buccal to lingual. The presence of a papilla between the maxillary central incisors is a key element in anterior aesthetics.45,62 While evaluating the aesthetics related to gingival tissues, it is important to consider two key factors: (1) gingival levels and (2) gingival contour or gingival zenith.
As a general rule, a line drawn at the level of the free gingival margin of the anterior segment will show the free gingival margin of the central incisors and the cuspids to be at the same height and that of the lateral incisors to be slightly coronal (Fig 13.21C1). The gingival papillary tip should be halfway between the incisal edge and the labial gingival height of contour over the centre of each anterior tooth. The contour of the margins of gingiva should mimic the cementoenamel junctions. The most apical point of the labial gingival contour, called the gingival zenith, is located just distal of the long axis of the central incisors and cuspids, whereas the gingival zenith for the lateral incisors coincides with their long axis20,63 (Fig 13.21C2). In other words, the height of the gum line across the face of the tooth should be centred on the lateral incisors and positioned in the distal one-third of the face of the tooth for the centrals and canines. This gives the gingiva a semicircular appearance for lateral incisors and an elliptical appearance for central incisors and canines.
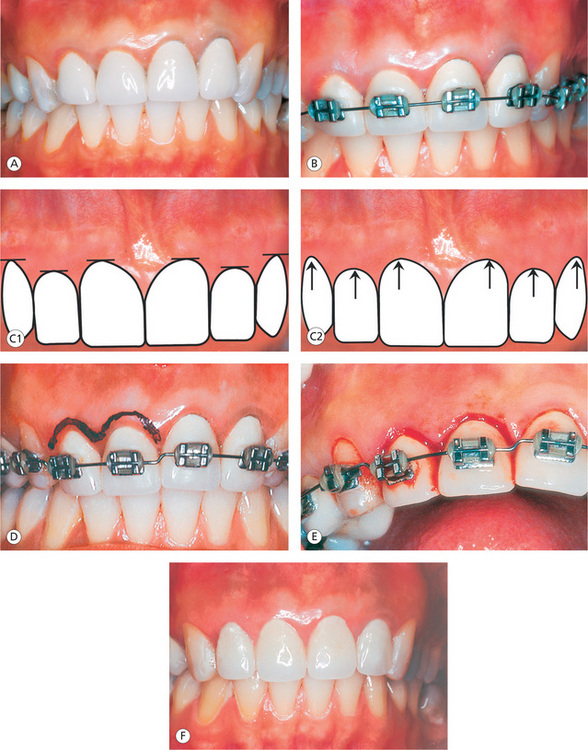
Figure 13.21 Gingival architecture. (A) Faulty maxillary anterior restoration violating the biologic width and discrepancy in gingival margins and gingival zenith. (B) Forced eruption. (C1 and C2) Normal gingival architecture. (D) After the differential forced eruption of incisors, the crown extension procedure has been planned on upper right central and lateral incisors to resolve the residual gingival discrepancy. (E) Crown extension procedure. (F) The combined orthodontic and restorative treatment exhibiting normal gingival architecture with physiologic positioning of finishing margins of anterior restoration.
During the process of eruption, the whole periodontal apparatus is carried with the erupting tooth. When there is asymmetric eruption of the teeth, it will also result in discrepancies in heights of the underlying crestal bone. This, in turn, results into asymmetries in gingival heights from one side of the arch to the other. This type of a clinical situation can be managed orthodontically by intrusion or extrusion of teeth (Fig 13.21B).
Anterior aesthetic gingival depigmentation
Exposure of maxillary gingiva of approximately 1–2 mm upon smile is generally considered part of the aesthetic smile. Excessive gingival display ‘gummy smile’ is one of the major concerns for large number of patients seeking orthodontic treatment. This problem is aggravated in patients with gingival hyperpigmentation, expressed as ‘dark gums’ leading to compromised gingival aesthetics (Fig 13.22A and B). Aesthetic periodontal plastic surgery ‘depigmentation’ is rewarding in such patients with compromised aesthetics. Therefore, maxillary gingiva of normal colour and maxillary gingiva display of approximately 1–2 mm upon smile should be the goal that should be achieved at the conclusion of orthodontic treatment (Fig 13.22C and D).
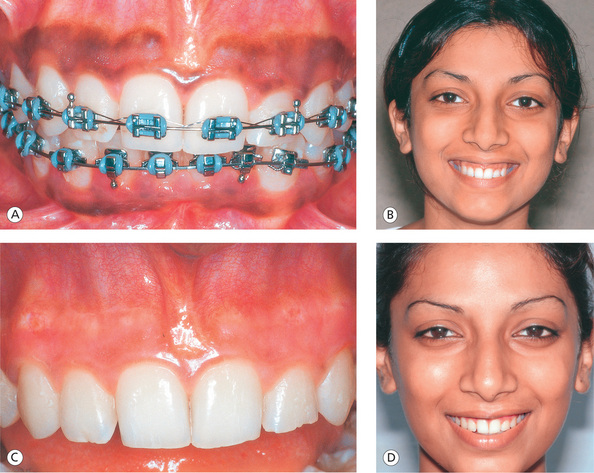
Figure 13.22 Gingival depigmentation. (A) Melanin pigmentation expressed as ‘dark gums’. (B) Gummy smile with gingival hyperpigmentation. (C) Restoration of normal pink gingival colour after depigmentation procedure. (D) Smile after gingivoplasty and depigmentation procedure.
Melanin, a brown pigment, is the most common cause of endogenous pigmentation of gingiva.64,65 Gingival depigmentation is essentially a periodontal plastic surgical procedure carried out to eliminate or reduce the gingival hyperpigmentation. Gingival depigmentation procedure using scalpels involves surgical removal of gingival epithelium along with a layer of the underlying connective tissue to heal by secondary intention. The newly formed epithelium is devoid of melanin pigmentation. Laser depigmentation technique has recently become quite popular and is even preferred over scalpel technique by clinicians. Selection of a specific technique is based on clinical experience and individual preferences. The documented advantages of lasers in periodontal surgery include less bleeding66 and reduced postoperative pain.
Gingival depigmentation procedure offers a practical solution to dramatically improve patient's smile in case of a display of dark gums due to hyperpigmentation.
Smile
Smile is one of the most effective means by which people convey their emotions.67 There is no universal ‘ideal’ smile. One of the most important aesthetic goals of orthodontic treatment is to achieve a ‘balanced smile,’ which can be described as an appropriate positioning of the teeth and normal gingival architecture within the dynamic display zone.68
A balanced smile is an expression of the laws of nature, which can be interpreted in the form of mathematical proportions20 and visual judgment – falls within the inaccurate purview of evaluator's interpretation.
When viewed from the frontal aspect, the smile begins at the corners of the mouth, extend laterally. The lips may remain at contact except with people having a short upper lip. As smile expands and approaches laughter, the lips separate, the corners of the mouth curve upward and the teeth are exposed to view. Some people show only the maxillary teeth, others show the mandibular teeth and some show both. As the angles of the mouth extend and the lips separate, the mesial half of the maxillary first molars and the mandibular second premolars may be exposed. The maxillary gingival display of approximately 1–2 mm upon smile is considered part of the aesthetic smile. As the smile approaches a laugh, the jaws separate and a dark space develops between the maxillary and mandibular teeth. This well-formed dark space, called the negative space, lends attractiveness to the smile and enhances the appearance of the oral region.46
The perfect smile occurs when the maxillary anterior dentition is in line with the curvature of the lower lip, the corners of the lips are elevated to the same height (symmetry), and bilateral negative spaces separate the teeth from the corners of the lips.69
Anatomy of the smile
The upper and lower lips frame the display zone of the smile consisting of the teeth and the gingival scaffold as the main components. The soft tissue determinants of the display zone are lip thickness, intercommissure widths, interlabial gap, smile index (width and height) and the gingival architecture. To get adequate information on dentofacial midline, alignment, right – left symmetry of canine and premolar torque, the patient's smile should be observed directly from the frontal view (Fig 13.23).
What is smile line?
A patient's smile line is determined by the position of the lips during a natural unforced smile. The maxillary teeth follow the contour of the lower lip. This convex curve, known as the incisal curve, produces a radiating symmetry.70 Lombardi46 suggested the application of the golden proportion in dentistry. Snow71 considered a bilateral analysis of apparent individual tooth width as a percentage of the total apparent width of the six anterior teeth. He proposed the golden percentage, wherein the proportional width of each tooth should be: canine 10%, lateral 15%, central 25%, central 25%, lateral 15% and canine 10% of the total distance across the anterior segment in order to achieve an aesthetically pleasing smile.
The anterior and lateral negative spaces act as a border to the dental elements, while the lips represent the frame. The anterior negative space is evident during speech and laughter, while the bilateral space can be observed in a broad smile and provides a cohesiveness to the dentofacial composition.72 Assessing incisal edge position in both vertical and anteroposterior directions is a fundamental part of the aesthetic diagnosis. Its location can significantly affect aesthetics and function. It is also an important marker to achieve both. Vertical position can be identified with the help of dentolabial phonetics, amount of incisal exposure during speech (ideally 2 mm) and smile line. Anteroposterior position can be evaluated with the help of overjet and overbite and facial profile of the patient. Amount of teeth and gingiva exposed during an active smile would determine the extent of corrections required with a broad smile requiring more aesthetic consideration.
Sarver73 stresses on the importance of gingival shape and gingival contour in the final aesthetic outcome of orthodontic patients. Gingival shape refers to curvature of the gingival margin of the tooth. For the mandibular incisors and the maxillary laterals, it is a symmetrical curve, while for the maxillary centrals and canines, it is more elliptical. Thus, the gingival zenith (the most apical point of the gingival margin) is located distal to the longitudinal axis of the maxillary centrals and canines. The gingival zenith of the maxillary laterals and mandibular incisors should coincide with their longitudinal axis.20
Conclusion
Modern orthodontic treatment is aimed at creating the best possible occlusal relationships within the framework of acceptable facial aesthetics and stability of the occlusal result. It is extremely important for a clinician to defi ne finishing goals at the beginning of treatment and continue to focus on them till the fi nishing stage, in order to achieve them with appropriate treatment mechanics.
This chapter has provided certain occlusal (static and dynamic), periodontal and aesthetic parameters that outline useful guidelines for fi nishing in both the adolescent and adult orthodontic patients. Also, in patients requiring interdisciplinary treatment, choosing the best possible treatment options from other specialties and combining them as a part of the optimal treatment plan based on scientific rationale should be the aim for the highest standards of orthodontic case finishing.
References
1. Ashok, Karad. Excellence in finishing: current concepts, goals and mechanics. J Ind Orthod Soc. 2006;39:126–138.
2. Ronald, H.Roth. Functional occlusion for the orthodontist. JCO. 1981;1:32–50.
3. McLaughlin, Richard P., Bennett, John C. Finishing with the preadjusted orthodontic appliance. Semin Orthod. 2003;9:165–183.
4. Andrews, L.F. Straight wire – the concept and the appliance. In: Valleau J., Olfe J.T., eds. Straight wire. Los Angeles: Wells; 1989:32–33.
5. Casko, J., Vaden, J., Kokich, V., et al. American Board of Orthodontics objective grading system for dental casts and panoramic radiographs. Am J Orthod Dentofacial Orthop. 2000;114:530–532.
6. Angle, E.H. Malocclusion of the teeth, 7, Philadelphia: S.S. White, 1907.
7. Andrews, L.F. The six keys to normal occlusion. Am J Orthod. 1972;63:296–309.
8. Broomell, I.N. Anatomy and physiology of the mouth and teeth, 2, Philadelphia: P. Blakiston's Son; 1902:99.
9. Chuck, G.C. Ideal archform. Angle Orthod. 1934;4:312–327.
10. Hawley, C.A. Determination of the normal arch and its application to orthodontia. Dental Cosmos. 1905;47:541–552.
11. White, L.W. Individualized ideal arches. J Clin Ortho. 1978;12:779–787.
12. Brader, A.C. Dental arch form related to intraoral forces: PR=C. Am J Orthod. 1972;61:541–561.
13. Felton, M.J., Sinclair, P.M., Jones, D.L., et al. A computerized analysis of the shape and stability of mandibular archform. Am J Orthod. 1987;92:478–483.
14. Burke, S.P., Silveira, A.M., Goldsmith, L.J., et al. Meta-analysis of mandibular intercanine width in treatment and postretention. Angle Orthod. 1998;68(1):53–60.
15. Gardner, S.D. Posttreatment and postretention changes following orthodontic therapy. Angle Orthod. 1976;46:151–161.
16. McLaughlin, Richard P., Bennett, John C. Finishing with the preadjusted orthodontic appliance. Semin Orthod. 2003;9:165–183.
17. Bowman, S.J. Addressing concerns for finished cases: the development of the Butterfly bracket system. J Ind Orthod Soc. 2003;36:73–75.
18. Kokich, V.G. The role of orthodontics as an adjunct to periodontal therapy. In: Newman M.G., Carranza F.A., Takei H., eds. Carranza's clinical periodontology. 9. Philadelphia: WB Saunders; 2002:704–718. [chap. 53].
19. Wheeler, R.C. Dental anatomy, physiology and occlusion. Philadelphia: WB Saunders, 1984.
20. Rufenacht, Claude R. Fundamentals of esthetics. Chicago: Quintessence publishing, 1990;117–120.
21. Sondhi, A. An analysis of orthodontic prescriptions: their strengths and weaknesses. 103rd AAO session. 2003. [Honolulu, HI; 6 May].
22. Andrews, L.F. The six keys to normal occlusion. Am J Orthod. 1972;63:296–309.
23. Ricketts, R.M. Bioprogressive therapy. Denver: Rocky Mountain Orthodontics, 1979.
24. Mc Laughlin, R.P., Bennett, J.C., Trevisi, H.J. Systematized orthodontic treatment mechanics. St. Louis: Mosby, 2001.
25. Ricketts, Robert M. Occlusion – the medium of dentistry. J Pros Dent. 1969;1:39–60.
26. AlQabandi, A., Sadowsky, C., BeGole, E. A comparison of the effects of rectangular and round archwires in leveling the curve of spee. Am J Orthod Dentofac Orthop. 1999;116:522–529.
27. Tahir, E., Sadowsky, c., Schneider, B.J. An assessment of treatment outcome in American Board of Orthodontics cases. Am J Orthod Dentofac Orthop. 1997;111:335–342.
28. Hilgers, James J. BIOS … A bracket evolution, a systems revolution. Clin Impressions (ORMCO). 1996;5(4):8–14.
29. Raleigh, Williams. Eliminating lower retention. JCO. 1985;5:342–349.
30. Roth, R.H. Functional occlusion for the Orthodontist, part III. J Clin Orthod. 1981;15:174–198.
31. Williamson, E.H. Occlusion – understanding or misunderstanding. Angle Orthod. 1976;46:86–93.
32. Aubrey, R.B. Occlusal objectives in orthodontic treatment. Am J Orthod. 1978;74:162–175.
33. Ricketts, R.M. Early treatment (JCO interview). J Clin Orthod. 1979;13:181–199.
34. Stallard, H. Organic Occlusion. In: Pavone B.W., ed. Oral rehabilitation and occlusion. San Francisco: Univ. California, 1972. [Section II, topic 9.].
35. Mc Horris, W. Occlusion, part I. J Clin Orthod. 1979;13:606–620.
36. Mc Horris, W. Occlusion, part II. J Clin Orthod. 1979;13:684–702.
37. Anup, Sondhi. Anterior interferences: their impact on anterior inclination and orthodontic finishing procedures. Semin Orthod. 2003;9:204–215.
38. Huffman, R.W., Regenos, T.W. Principles of occlusion. London: H and R press, 1973.
39. Schweitzer, J. Dental occlusion – a pragmatic approach. DCNA. 1969;13:701–724.
40. Ingber, J.S. Forced eruption: part I. A method of treating isolated one and two wall infrabony osseous defects – rationale and case report. J Periodontol. 1974;45:199.
41. Harris, D.A., Jones, A.S., Darendeliler, M.A. Physical properties of root cementum: part VIII. Volumetric analysis of root resorption craters after application of controlled intrusive light and heavy orthodontic forces: a microcomputed tomography scan study. Am J Orthod Dentofacial Orthop. 2006;130:639–647.
42. Reitan, K. Initial tissue behavior during apical root resorption. Angle Orthod. 1974;44:68–82.
43. Smale, I., Artun, J., Behbehani, F., et al. Apical root resorption 6 months after initiation of fixed orthodontic appliance therapy. Am J Orthod Dentofacial Orthop. 2005;128:57–67.
44. Eugene, Chan, Ali, Darendeliler. Physical properties of root cementum: part V. Volumetric analysis of root resorption craters after application of light and heavy orthodontic forces. Am J Orthod Dentofacial Orthop. 2005;127:186–195.
45. Kokich, V.O., Kiyak, A., Shapiro, P.A. Comparing the perception of dentists and lay people to altered dental esthetics. J Esthet Dent. 1999;11:311–324.
46. Lombardi, R. The principles of visual perception and their clinical application to denture esthetics. J Prosthet Dent. 1973;29:358.
47. Chiche, G., Pinault, A. Replacement of deficient crowns. In: Pinault A., Chiche G., eds. Esthetics of fixed prosthodontics. Chicago: Quintessence; 1994:53–73.
48. Gillen, R.J., Schwartz, R.S., Hilton, T.J., Evans, D.B. An analysis of selected normative tooth proportions. Int J Prosthodont. 1994;7(5):410.
49. Bragger, U., Lauchenauer, D., Lang, N.P. Surgical lengthening of the clinical crown. J Clin Periodontol. 1992;19(1):58–63.
50. Kokich, Vincent G. Excellence in finishing: modifications for the perio-restorative patient. Semin Orthod. 2003;9:184–203.
51. Goldstein, R.E. Esthetics in dentistry. Philadelphia: JB Lippincott, 1976.
52. Epstein, M.B., Mantzikos, T., Shamus, I.L. Esthetic recontouring. A team approach. NY State Dent J. 1997;63(10):35–40.
53. Hong, Y.H., Lew, K.K.K. Quantitative and qualitative assessment of enamel surface following five composite removal methods after bracket debonding. Eur J Orthod. 1995;17(2):121–128.
54. Zachrisson, B.U., Artun, J. Enamel surface appearance after various debonding techniques. Am J Orthod. 1979;75:121.
55. Gorelick, L., Geiger, A.M., Gwinnett, A.J. Incidence of white spot formation after bonding and banding. Am J Orthod. 1982;81:93.
56. Zachrisson, B.U. Fluoride application procedures in orthodontic practice: current concepts. Angle Orthod. 1975;44:72.
57. Todd, M.A., Staley, R.N., Kanellis, M.J., et al. Effect of fluoride varnish on demineralization adjacent to orthodontic brackets. Am J Orthod. 1999;116(2):159–167.
58. Arends, J., Schuthof, J. Fluoride content in human enamel after fluoride application and washing: an in vitro study. Caries Res. 1975;9(5):363–372.
59. Petersson, L.G. Fluoride gradients in outermost surface enamel after various forms of topical applications of fluorides in vivo. Odont. Revy. 1976;27:25–50.
60. Haywood, V.B., Leonard, R.H., Nelson, C.F., et al. Effectiveness, side effects and long-term status of night guard vital bleaching. J Am Dent Assoc. 1994;125(9):1219–1226.
61. Cohen, S.C., Chase, C. Human pulpal response to bleaching procedures on vital teeth. J Endod. 1979;5:134–138.
62. Kokich, V. Anterior dental esthetics: an orthodontic perspective: part I. Crown length. J Esthet Dent. 1993;5:19–23.
63. Sanavi, F., Weisgold, A.S., Rose, L.F. Biologic width and its relation to periodontal biotypes. J Estheic Dent. 1998;10(3):157.
64. Patsakas, A., Demetriou, N., Angelopoulos, A. Melanin pigmentation and inflammation in human gingiva. J. Periodontol. 1981;52(11):701–704.
65. Cicek, Y., Ertas, U. The normal and pathological pigmentation of oral mucous membrane: a review. J Contemp Dent Pract. 2003;4(3):76–86.
66. Pick, R.M., Pecaro, B.C., Silberman, C.J. The laser gingivectomy. The use of the CO2 laser for the removal of phenytoin hyperplasia. J. Periodontol. 1985;56:492–496.
67. Hulsey, C.M. An esthetic evaluation of lip-teeth relationships present in the smile. Am J Orthod. 1970;57:132–144.
68. Janzen, E. A balanced smile: a most important treatment objective. Am J Orthod. 1977;72:359–372.
69. Irfan, A. Geometric considerations in anterior dental esthetics: restorative principles. PPAD. 1998;10(7):813–822.
70. Fradeani, M. Evaluation of dentolabial parameters as part of a comprehensive esthetic analysis. EJED. 2006;1(1):62–70.
71. Snow, S.R. Esthetic smile analysis of anterior tooth width: the golden percentage. J Esthet Dent. 1999;11:177–184.
72. Levin, E.I. Dental esthetics and the golden proportion. J Prosthet Dent. 1978;40:244–252.
73. Sarver, D.M. Principles of cosmetic dentistry in orthodontics: part I Shape and proportionality of anterior teeth. Am J Orthod Dentofacial Orthop. 2004;126:749–753.
