Testing the Muscles of the Neck*
CAPITAL EXTENSION
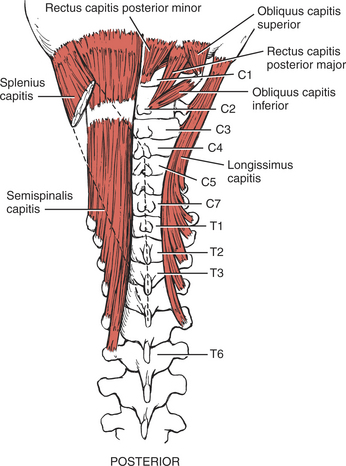
FIGURE 2-1
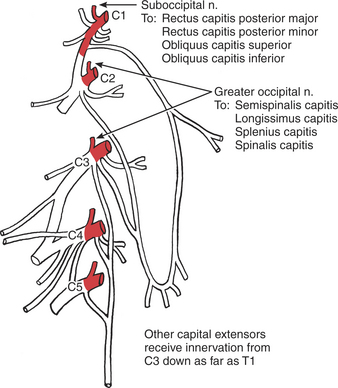
FIGURE 2-2
Grade 5 (Normal) and Grade 4 (Good): Position of Patient: Prone with head off end of table. Arms at sides.
Position of Therapist: Standing at side of patient next to the head. One hand provides resistance over the occiput (Figure 2-3). The other hand is placed beneath the overhanging head, prepared to support the head should it give way with resistance, which is applied directly opposite to the movement of the head.
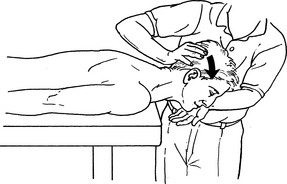
FIGURE 2-3
Test: Patient extends head by tilting chin upward in a nodding motion. (Cervical spine is not extended.)
Instructions to Patient: “Look at the wall. Hold it. Don’t let me tilt your head down.”.
Grading: Grade 5 (Normal): Patient completes available range of motion without substituting cervical extension. Tolerates maximum resistance. (This is a strong muscle group.)
Grade 4 (Good): Patient completes available range of motion without substituting cervical extension. Tolerates strong to moderate resistance.
Grade 3 (Fair): Position of Patient: Prone with head off end of table and supported by therapist. Arms at sides.
Position of Therapist: Standing at side of patient’s head. One hand should remain under the head to catch it should the muscles fail to hold position (Figure 2-4).
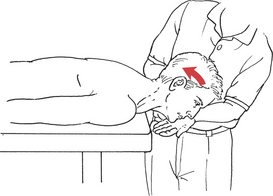
FIGURE 2-4
Instructions to Patient: “Look at the wall.”
Test: Patient completes available range of motion with no resistance.
Grade 2 (Poor), Grade 1 (Trace), and Grade 0 (Zero): Position of Patient: Supine with head on table. Arms at sides. Note: The gravity-minimized position (sidelying) is not recommended for any of the tests of the neck for Grades 2 (Poor) and below because test artifacts are created by the examiner in attempting to support the head without providing assistance to the motion.
Position of Therapist: Standing at end of table facing patient. Head is supported with two hands under the occiput. Fingers should be placed just at the base of the occiput lateral to the vertebral column to attempt to palpate the capital extensors (Figure 2-5). Head may be slightly lifted off table to reduce friction.
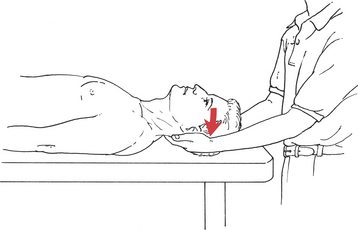
FIGURE 2-5
Test: Patient attempts to look back toward examiner without lifting the head from the table.
Instructions to Patient: “Tilt your chin up.” Alternate instructions: “Look back at me. Don’t lift your head.”.
Grading: Grade 2 (Poor): Patient completes limited range of motion.
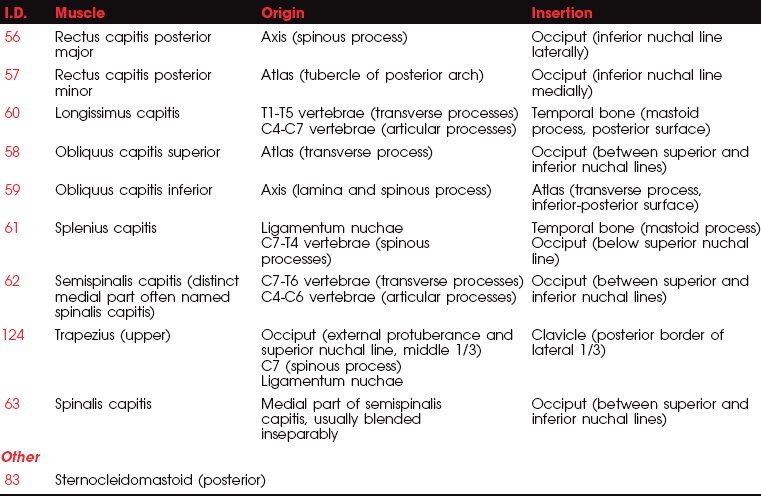
Grade 1 (Trace) and Grade 0 (Zero): Palpation of the capital extensors at the base of the occiput just lateral to the spine may be difficult; the splenius capitis lies most lateral and the recti lie just next to the spinous process.
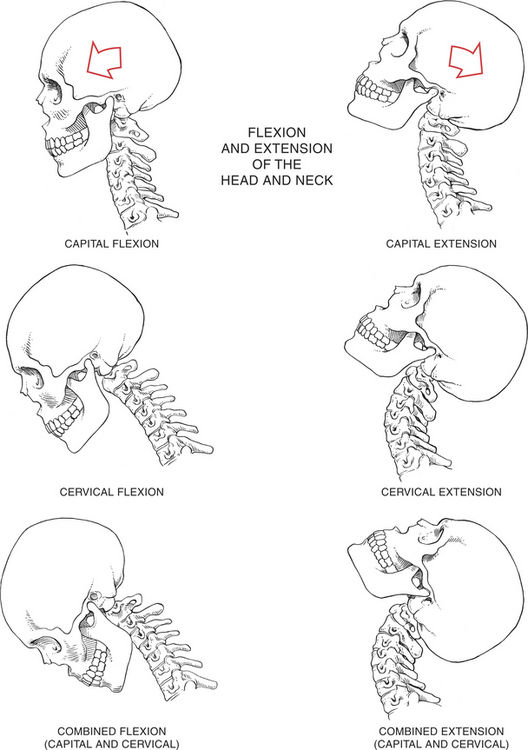
PLATE 1
CERVICAL EXTENSION
FIGURE 2-6
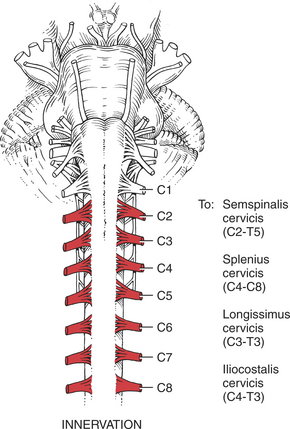
FIGURE 2-7
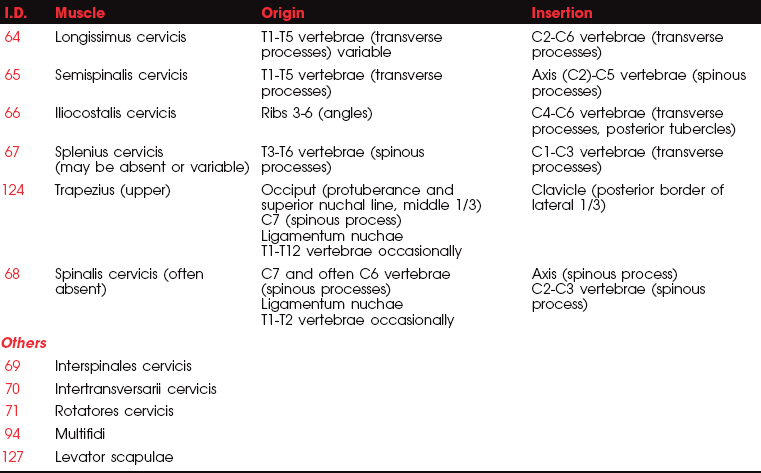
The cervical extensor muscles are limited to those that act only on the cervical spine with motion centered in the lower cervical spine.2,3
Grade 5 (Normal) and Grade 4 (Good): Position of Patient: Prone with head off end of table. Arms at sides.
Position of Therapist: Standing next to patient’s head. One hand is placed over the parieto-occipital area for resistance (Figure 2-8). The other hand is placed below the chin, ready to catch the head if it gives way suddenly during resistance.
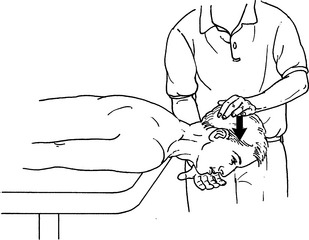
FIGURE 2-8
Test: Patient extends neck without tilting chin.
Instructions to Patient: “Push up on my hand but keep looking at the floor. Hold it. Don’t let me push it down.”
Grading: Grade 5 (Normal): Patient completes full range of motion and holds against maximum resistance. Examiner must use clinical caution because these muscles are not strong, and their maximal effort will not tolerate much resistance.
Grade 4 (Good): Patient completes full range of motion against moderate resistance.
Grade 3 (Fair): Position of Patient: Prone with head off end of table. Arms at sides.
Position of Therapist: Standing next to patient’s head with one hand supporting (or ready to support) the forehead (Figure 2-9).
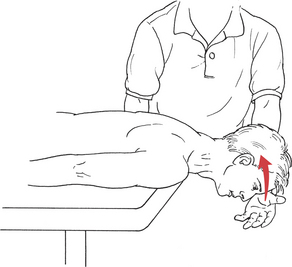
FIGURE 2-9
Test: Patient extends neck without looking up or tilting chin.
Instructions to Patient: “Lift your forehead from my hand and keep looking at the floor.”
Grading: Grade 3 (Fair): Patient completes range of motion but takes no resistance.
Alternate Test for Grade 3: This test should be used if there is known or suspected trunk extensor weakness. The examiner should always have an assistant participate to provide protective guarding under the patient’s forehead. This test is identical to the preceding Grade 3 test except that stabilization is provided by the therapist if needed to accommodate trunk weakness. Stabilization is provided to the upper back by the forearm placed over the upper back with the hand cupped over the shoulder (Figure 2-10).
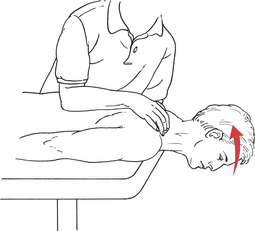
FIGURE 2-10
Grade 2 (Poor), Grade 1 (Trace), and Grade 0 (Zero): Position of Patient: Supine with head fully supported by table. Arms at sides.
Position of Therapist: Standing at head end of table facing the patient. Both hands are placed under the head. Fingers are distal to the occiput at the level of the cervical vertebrae for palpation (Figure 2-11).
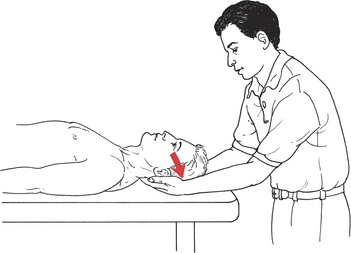
FIGURE 2-11
Test: Patient attempts to extend neck into table.
Instructions to Patient: “Try to push your head down into my hands.”
COMBINED NECK EXTENSION
Grade 5 (Normal) and Grade 4 (Good): Position of Patient: Prone with head off end of table. Arms at sides.
Position of Therapist: Standing next to patient’s head. One hand is placed over the parieto-occipital area to give resistance, which is directed both down and forward (Figure 2-12). The other hand is below the chin, ready to catch the head if muscles give way during resistance.
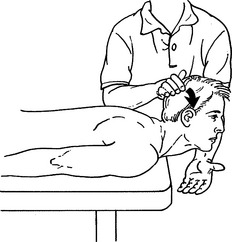
FIGURE 2-12
Test: Patient extends head and neck through available range of motion by lifting head and looking up.
Instructions to Patient: “Lift your head and look at the ceiling. Hold it. Don’t let me push your head down.”
Grade 3 (Fair): Position of Patient: Patient prone with head off end of table. Arms at sides.
Position of Therapist: Standing next to patient’s head.
Test: Patient extends head and neck by raising head and looking up (Figure 2-13).
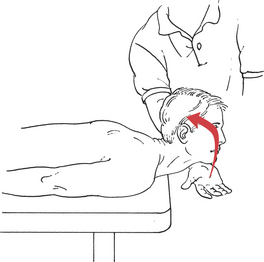
FIGURE 2-13
Instructions to Patient: “Raise your head from my hand and look up to the ceiling.”
Grading: Grade 3 (Fair): Patient completes available range of motion without resistance except that of gravity.
Alternate Test for Grade 3: This test is used when the patient has trunk or hip extensor weakness. The test is identical to the previous test except that stabilization of the upper back is provided by the therapist (Figure 2-14).
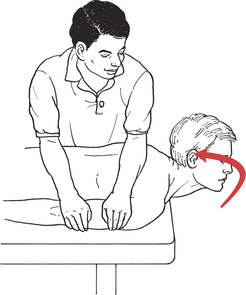
FIGURE 2-14
Grade 2 (Poor), Grade 1 (Trace), and Grade 0 (Zero): Position of Patient: Patient prone with head fully supported on table. Arms at sides.
Position of Therapist: Standing next to patient’s upper trunk. Both hands on cervical region and base of occiput for palpation.
Test: Patient attempts to raise head and look up.
Instructions to Patient: “Try to raise your head off the table and look at the ceiling.”.
CAPITAL FLEXION
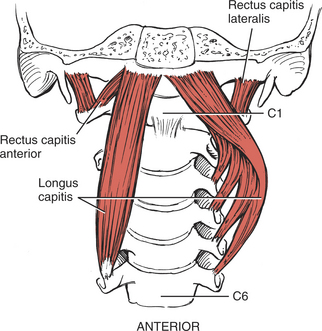
FIGURE 2-15
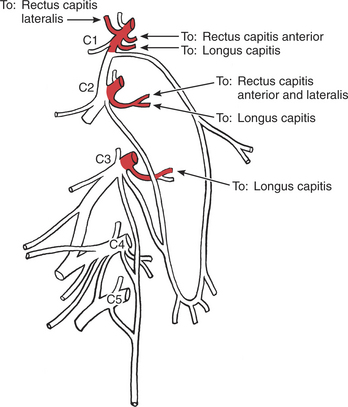
FIGURE 2-16
All muscles that act on the head are inserted on the skull. Those that are anterior to the coronal midline are termed capital flexors. Their center of motion is in the atlanto-occipital or atlantoaxial joints.2,3
Starting Position of Patient: In all capital, cervical, and combined flexion tests, the patient is supine with head supported on table and arms at sides (Figure 2-17). See Position of Patient and Helpful Hints (p. 16).
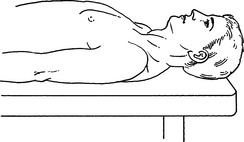
FIGURE 2-17
Grade 5 (Normal) and Grade 4 (Good): Position of Patient: Supine with head on table. Arms at sides.
Position of Therapist: Standing at head of table facing patient. Both hands are cupped under the mandible to give resistance in an upward and backward direction (Figure 2-18).
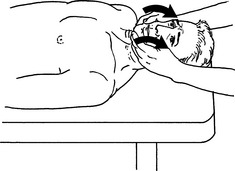
FIGURE 2-18
Test: Patient tucks chin into neck without raising head from table. No motion should occur at the cervical spine. This is the downward motion of nodding.
Instructions to Patient: “Tuck your chin. Don’t lift your head from the table. Hold it. Don’t let me lift up your chin.”.
Grade 3 (Fair): Position of Patient: Supine with head supported on table. Arms at sides.
Position of Therapist: Standing at head of table facing patient.
Test: Patient tucks chin without lifting head from table (Figure 2-19).
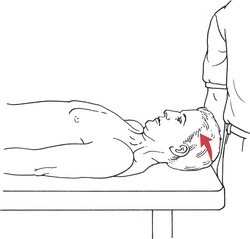
FIGURE 2-19
Instructions to Patient: “Tuck your chin into your neck. Do not raise your head from the table.”
Grade 2 (Poor), Grade 1 (Trace), and Grade 0 (Zero): Position of Patient: Supine with head supported on table. Arms at sides.
Position of Therapist: Standing at head of table facing patient.
Test: Patient attempts to tuck chin (Figure 2-20).
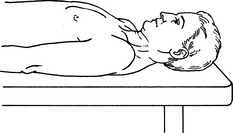
FIGURE 2-20
Instructions to Patient: “Try to tuck your chin into your neck.”
CERVICAL FLEXION

FIGURE 2-21
FIGURE 2-22
The muscles of cervical flexion act only on the cervical spine with the center of motion in the lower cervical spine.2,3
Grade 5 (Normal) and Grade 4 (Good): Position of Patient: Refer to starting position for all flexion tests. Supine with arms at side. Head supported on table.
Position of Therapist: Standing next to patient’s head. Hand for resistance is placed on patient’s forehead. Use two fingers only (Figure 2-23). Other hand may be placed on chest, but stabilization is needed only when the trunk is weak.
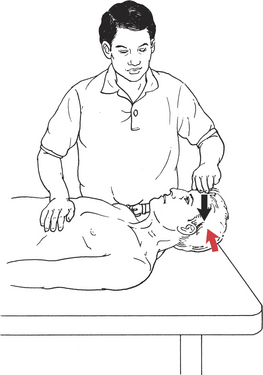
FIGURE 2-23
Test: Patient flexes neck by lifting head straight up from the table without tucking the chin. This is a weak muscle group.
Instructions to Patient: “Lift your head from the table; keep looking at the ceiling. Do not lift your shoulders off the table. Hold it. Don’t let me push your head down.”
Grade 3 (Fair): Positions of Patient and Therapist: Same as for previous test. No resistance is used on the forehead.
Test: Patient flexes neck, keeping eyes on the ceiling (Figure 2-24).

FIGURE 2-24
Instructions to Patient: “Bring your head off the table, keeping your eyes on the ceiling. Keep your shoulders completely on the table.”
Grade 2 (Poor), Grade 1 (Trace), and Grade 0 (Zero): Position of Patient: Supine with head supported on table. Arms at sides.
Position of Therapist: Standing at head of table facing patient. Fingers of both hands (or just the index finger) are placed over the sternocleidomastoid muscles to palpate them during test (Figure 2-25).
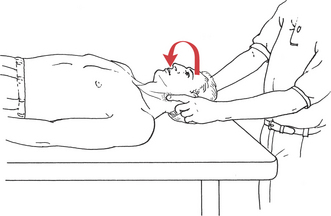
FIGURE 2-25
Test: Patient rolls head from side to side, keeping head supported on table.
Instructions to Patient: “Roll your head to the left and then to the right.”.
Grading: Grade 2 (Poor): Patient completes partial range of motion. The right sternocleidomastoid produces the roll to the left side and vice versa.
Grade 1 (Trace): No motion occurs, but contractile activity in one or both muscles can be detected.
Grade 0 (Zero): No motion and no contractile activity detected.
COMBINED CERVICAL FLEXION
Grade 5 (Normal) and Grade 4 (Good): Position of Patient: Supine with head supported on table. Arms at sides.
Position of Therapist: Standing at side of table at level of shoulder. Hand placed on forehead of patient to give resistance (Figure 2-26). One arm may be used to provide stabilization of the thorax if there is trunk weakness. In such cases, the forearm is placed across the chest at the distal margin of the ribs. Although this arm does not offer resistance, considerable force may be required to maintain the trunk in a stable position. In a large patient, both arms may be required to provide such stabilization, the lower arm anchoring the pelvis. Examiner must use caution and not place too much weight or force over vulnerable nonbony areas like the abdomen.
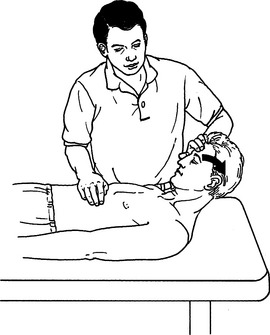
FIGURE 2-26
Test: Patient flexes head and neck, bringing chin to chest.
Instructions to Patient: “Bring your head up until your chin is on your chest, and don’t raise your shoulders. Hold it. Don’t let me push it down.”
Grade 3 (Fair): Position of Patient: Supine with head supported on table. Arms at sides.
Position of Therapist: Standing at side of table at about chest level. No resistance is given to the head motion. In the presence of trunk weakness, the thorax is stabilized.
Test: Patient flexes neck with chin tucked until the available range is completed (Figure 2-27).
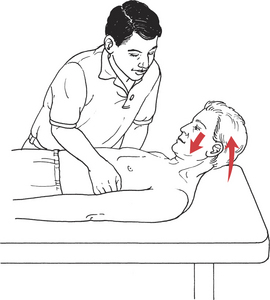
FIGURE 2-27
Instructions to Patient: “Bring your chin up on your chest. Don’t raise your shoulders.”
Grade 2 (Poor), Grade 1 (Trace), and Grade 0 (Zero): Position of Patient: Supine with head fully supported on table. Arms at sides.
Position of Therapist: Standing at head of table facing the patient. Fingers of both hands, or preferably just the index finger, should be used to palpate the sternocleidomastoid muscles bilaterally.
Test: Patient attempts to roll the head from side to side. The sternocleidomastoid on one side rotates the head to the opposite side. Most of the capital flexors rotate the head to the same side.
Instructions to Patient: “Try to roll your head to the right and then back and all the way to the left.”
Grading: Grade 2 (Poor): Patient completes partial range of motion.
Grade 1 (Trace): Muscle contractile activity palpated, but no motion occurs. Use considerable caution when palpating anterior neck.
Grade 0 (Zero): No palpable contractile activity.
This test should be performed when there is suspected or known asymmetry of strength in these neck flexor muscles.
COMBINED FLEXION TO ISOLATE A SINGLE STERNOCLEIDOMASTOID
This test should be performed when there is suspected or known asymmetry of strength in these neck flexor muscles.
Grade 5 (Normal), Grade 4 (Good), and Grade 3 (Fair): Position of Patient: Supine with head supported on table and turned to the left (to test right sternocleidomastoid).
Position of Therapist: Standing at head of table facing patient. One hand is placed on the temporal area above the ear for resistance (Figure 2-28).
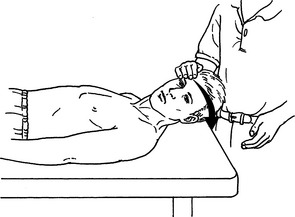
FIGURE 2-28
Test: Patient raises head from table.
Instructions to Patient: “Lift up your head, keeping your head turned.”
Grading: Grade 5 (Normal): Patient completes available range of motion and takes strong resistance. This is usually a very strong muscle group.
Grade 4 (Good): Patient completes available range of motion and takes moderate resistance.
Grade 3 (Fair): Patient completes available range of motion with no resistance (Figure 2-29).
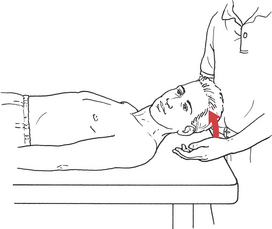
FIGURE 2-29
Grade 2 (Poor), Grade 1 (Trace), and Grade 0 (Zero): Position of Patient: Supine with head supported on table.
Position of Therapist: Standing at head of table facing patient. Fingers are placed along the side of the head and neck so that they (or just the index finger) can palpate the sternocleidomastoid (see Figure 2-25).
Test: Patient attempts to roll head from side to side.
Instructions to Patient: “Roll your head to the right and then to the left.”
Grade 5 (Normal), Grade 4 (Good), and Grade 3 (Fair): Position of Patient: Supine with cervical spine in neutral (flexion and extension). Head supported on table with face turned as far to one side as possible. Sitting is an alternative position for all tests.
Position of Therapist: Standing at head of table facing patient. Hand for resistance is placed over the side of head above ear (Grades 5 and 4 only).
Test: Patient rotates head to neutral against maximal resistance. This is a strong muscle group. Repeat for rotators on the opposite side. Alternatively, have patient rotate from left side of face on table to right side of face on table.
Instructions to Patient: “Turn your head and face the ceiling. Hold it. Do not let me turn your head back.”
Grading: Grade 5 (Normal): Patient rotates head through full available range of motion to both right and left against maximal resistance.
Grade 4 (Good): Patient rotates head through full available range of motion to both right and left against moderate resistance.
Grade 3 (Fair): Patient rotates head through full available range of motion to both right and left without resistance.
Grade 2 (Poor), Grade 1 (Trace), and Grade 0 (Zero): Position of Patient: Sitting. Trunk and head may be supported against a high-back chair. Head posture neutral.
Position of Therapist: Standing directly in front of patient.
Test: Patient tries to rotate head from side to side, keeping the neck in neutral (chin neither down nor up).
Instructions to Patient: “Turn your head as far to the left as you can. Keep your chin level.” Repeat for turn to right.
REFERENCES
1. Perry, J, Nickel, VL. Total cervical spine fusion for neck paralysis. J Bone Joint Surg Am. 1959;41:37–60.
2. Fielding, JW. Cineroentgenography of the normal cervical spine. J Bone Joint Surg Am. 1957;39:1280–1288.
3. Ferlic, D. The range of motion of the “normal” cervical spine. Johns Hopkins Hosp Bull. 1962;110:59.
Buford, JA, Yoder, SM, Heiss, DG, Chidley, JV. Actions of the scalene muscles for rotation of the cervical spine in macaque and human. J Orthop Sports Phys Ther. 2002;32:488–496.
Eriksson, PO, Zafar, H, Nordh, E. Concomitant mandibular and head-neck movements during jaw opening-closing in man. J Oral Rehabil. 1998;25:859–870.
Falla, D, Jull, G, Dall’Alba, P, Rainoldi, A, Merletti, R. An electromyographic analysis of the deep cervical flexor muscles in performance of craniocervical flexion. Phys Ther. 2003;83:899–906.
Takebe, K, Vitti, M, Basmajian, JV. The functions of semispinalis capitis and splenius capitis muscles: An electromyographic study. Anat Rec. 1974;179:477–480.
Zafar, H, Nordh, E, Eriksson, PO. Temporal coordination between mandibular and head-neck movements during jaw opening-closing tasks in man. Arch Oral Biol. 2000;45:675–682.
*Note: This section of the book on testing the neck muscles is divided into tests for capital and cervical extension and flexion and their combination. This distinction was first described by Perry and Nickel as a necessary and effective way of managing nuchal weakness or paralysis.1 All muscles acting on the head are inserted on the skull. Those muscles that lie behind the coronal midline are termed capital extensors. Motion is centered at the atlanto-occipital and atlantoaxial joints.2,3.