Positioning, prepping, and draping the patient
After studying this chapter, the learner will be able to:
• Identify the safety hazards associated with moving a patient from one surface to another.
• List the anatomic considerations for positioning.
• Describe the effects of positioning on the patient’s body systems.
• Identify key elements of preoperative skin preparation of patients.
• Discuss the implications of chemical and mechanical actions of prepping the patient.
Move away from the body.
Move toward the body.
In front of.
Topical cleansing chemical used to decrease the microbial count on the skin surface.
Generalized physiologic configuration of the patient’s size, weight, and shape.
Toward the foot of the patient.
Toward the head of the patient.
Rotate a joint in a circumferential axis (usually a ball joint).
The surface area of the patient’s skin that encompasses a limb or other rounded tissue area.
Below the surface layers.
Away from the core.
Back of a part.
Flatten a joint (zero-degree flexion).
Bend at a normal joint, close the angle of the joint.
Move away from the body in a line more than a safe 90-degree angle.
Move toward the body, crossing over the neutral plane of the body.
Move beyond the normal flattening of a joint axis.
Below or beneath.
Toward the side of the patient.
Toward the midline.
Behind.
Face down.
Closer to the core.
Reverse Trendelenburg’s position
Head-elevated position.
On the surface.
Above.
Face up.
Head-down position.
Front surface.
 Website
Preliminary considerations
Positioning for a surgical procedure is important to the patient’s outcome. Proper positioning facilitates preoperative skin preparation and appropriate draping with sterile drapes. Positioning requires a detailed knowledge of anatomy and physiologic principles and familiarity with the necessary equipment. Safety is a prime consideration.
Patient position and skin preparation are determined by the procedure to be performed, with consideration given to the surgeon’s choice of surgical approach and the technique of anesthetic administration. Factors such as age, height, weight, cardiopulmonary status, and preexisting disease condition (e.g., arthritis, allergies) also should be incorporated into the plan of care. Preoperatively, the patient should be assessed for alterations in skin integrity, for joint mobility, and for the presence of joint or vascular prostheses. The expected outcome is that the patient will not be harmed by positioning, prepping, or draping for the surgical procedure.
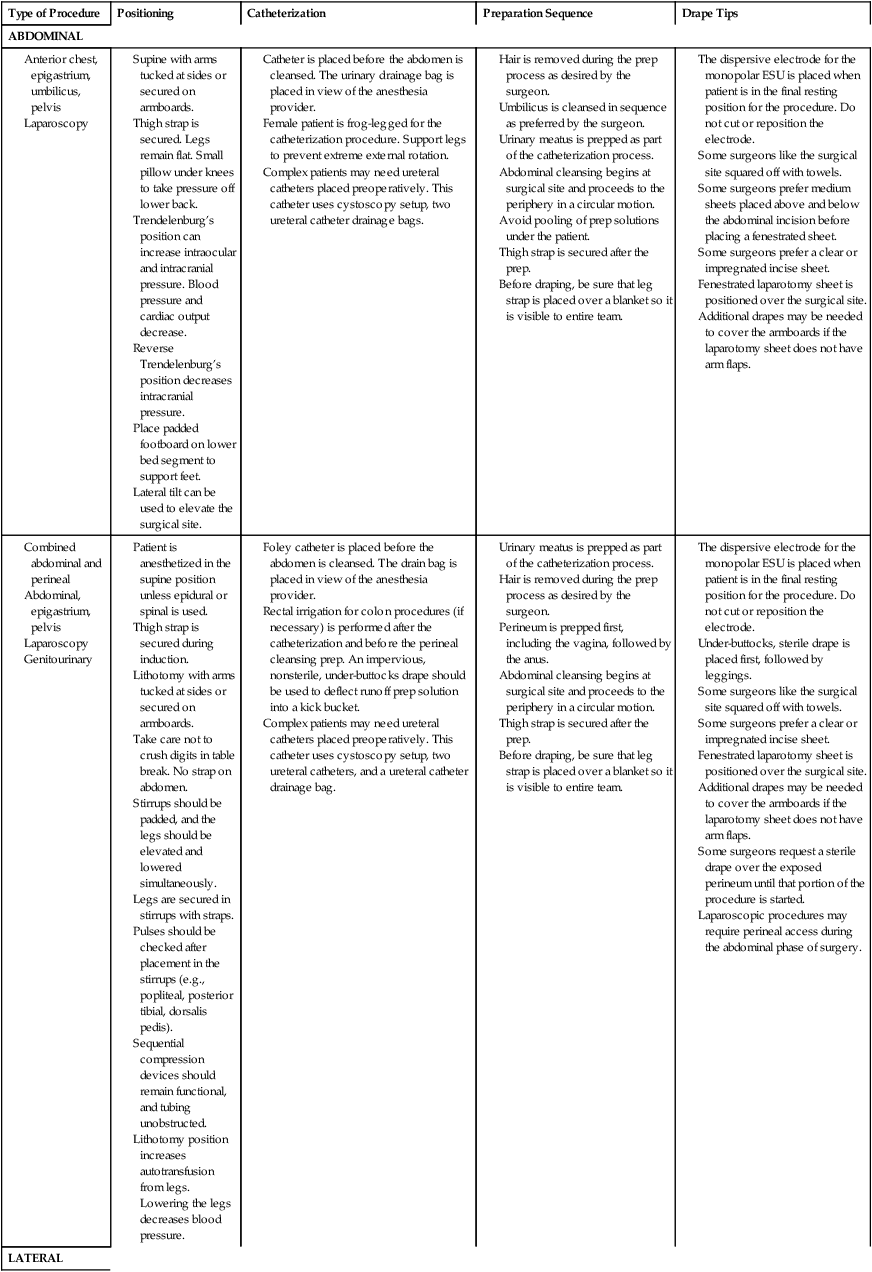
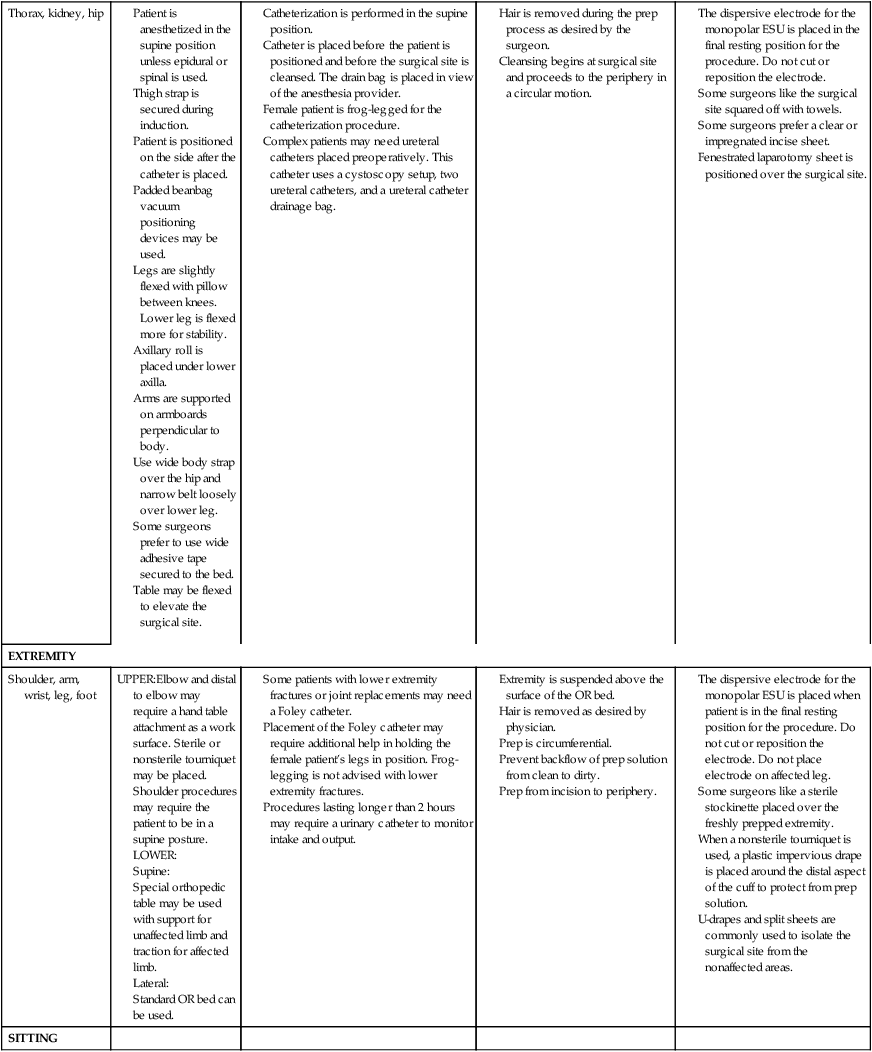
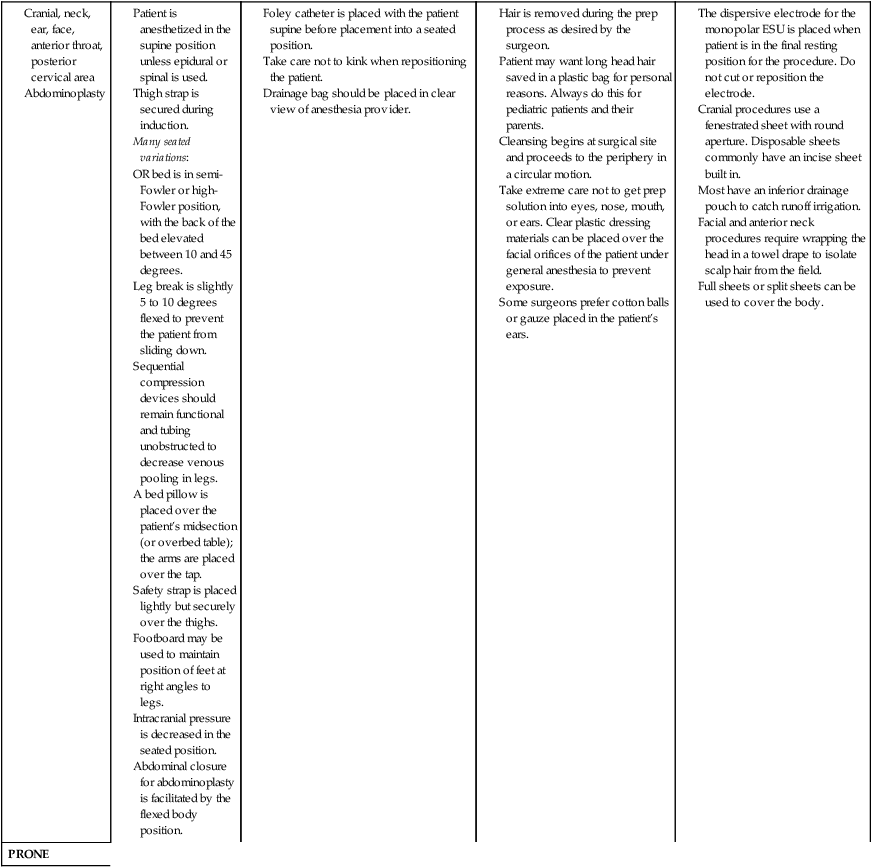
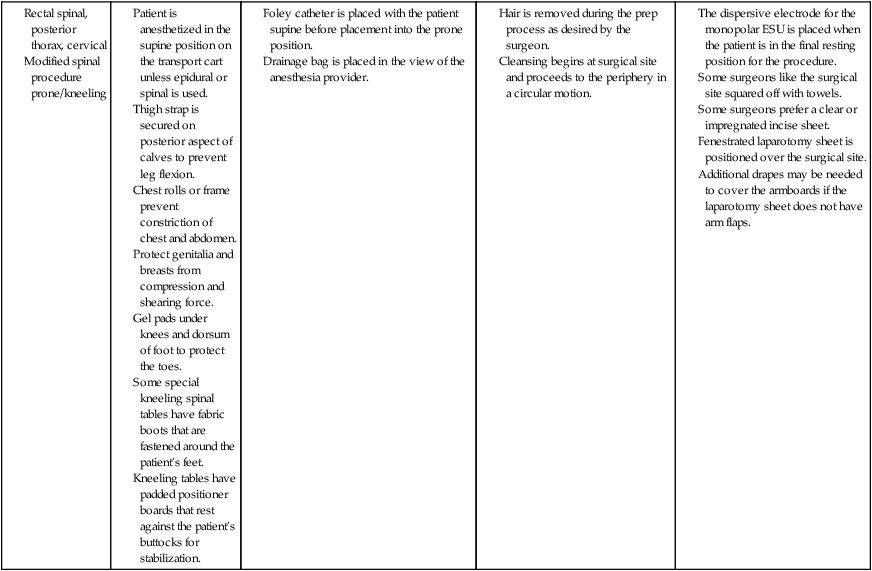
Efficiency of the patient preparation process can be attained by organizing activities in a logical sequence. Table 26-1 illustrates how to coordinate and organize patient preparation activities.
TABLE 26-1
Planning the Organization of Patient Positioning, Prepping, and Draping
The main objectives for any surgical or procedural positioning are as follows:
• Optimize surgical-site exposure for the surgeon.
• Minimize the risk for adverse physiologic effects.
• Facilitate physiologic monitoring by the anesthesia provider.
Responsibility for patient positioning
The selection of the surgical position is made by the surgeon in consultation with the anesthesia provider. Adjustments are made as necessary for the administration and monitoring of anesthetic and for maintenance of the patient’s physiologic status. The circulating nurse or first assistant may be responsible for placing the patient in a surgical position, with guidance from the anesthesia provider and the surgeon. In essence, patient positioning is a shared responsibility among all team members. The anesthesia provider has the final word on positioning when the patient’s physiologic status and monitoring are in question.
In cases of complex positioning or positioning patients who are obese, the plan of care includes the need for additional help in lifting or positioning. Special devices or positioning aids may be necessary. The weight tolerance of the mechanism and balance of the OR bed should be considered. Manufacturer recommendations should be consulted for guidance in selecting the appropriate bed. To avoid questions or confusion, the weight tolerance should be clearly labeled on every OR bed.
Timing of patient positioning and anesthetic administration
Moving the patient from the transport cart to the OR bed or vice versa requires that both surfaces are securely locked and stable. Someone should be stationed on the far side of the receiving surface to prevent the patient from tumbling off the edge. For any patient under the influence of an anesthetic agent or narcotic medication, personnel should be at the head, foot, and both sides of the patient to prevent dependent parts from sliding off the table. The neck of the patient’s gown should be untied to prevent entanglement and choking as the patient moves or is moved from one surface to another.
After transfer from the transport cart to the OR bed, the patient is usually supine (face up on the back; a few exceptions apply and are explained subsequently in this chapter). Privacy is maintained with a warm cotton blanket, and the thigh strap is positioned in clear sight of the entire team. The patient may be anesthetized in a supine position and then repositioned for the surgical procedure.
Some patients are positioned and then anesthetized if their physiologic status requires special care. If patients undergo a procedure in a prone position and with general anesthesia, they are anesthetized and intubated on the transport cart. A minimum of four people is required to place the patient safely in the prone position on the OR bed. Commonly, more personnel are needed for a safe transfer between surfaces when the patient is fully under anesthesia.
Several factors influence the time at which the patient is positioned: the site of the surgical procedure; the age and size of the patient; the technique of anesthetic administration; whether the patient is conscious; and in pain on moving. The patient is not moved, positioned, or prepped until the anesthesia provider indicates it is safe to do so.
Preparations for positioning
Before the patient is brought into the OR, the circulating nurse should do the following:
1. Review the proposed position by referring to the procedure book and the surgeon’s preference card in comparison with the scheduled procedure.
2. Ask the surgeon for assistance if unsure how to position the patient.
3. Assess for any patient-specific positioning needs.
4. Check the working parts of the OR bed before bringing the patient into the room.3
5. Assemble and test all table attachments and protective pads anticipated for the surgical procedure and have them immediately available for use. Box 26-1 lists areas that may need specific attention during padding.
Safety measures
Safety measures, including the following, are observed while transferring, moving, and positioning of patients:
1. The patient is properly identified before being transferred to the OR bed, and the surgical site is confirmed according to facility policy. The surgeon is required to label the correct site.
2. The patient is assessed for mobility status, which includes determination of the patient’s ability to transfer between the transport cart and the OR bed. Do not plan to have patients move themselves toward an affected limb or toward the blinded eye.
3. The OR bed and transport vehicle are securely locked in position, with the mattress stabilized during transfer to and from the OR bed. Untie the ties of the patient’s gown, and take care not to allow the patient’s gown or blanket to become lodged between the two surfaces or under the bottom of a moving patient. Velcro strips or other means should be used to maintain the stability of the mattresses of the two surfaces.
4. Two people should assist an awake patient with the transfer by positioning themselves on each side of the patient’s transfer path. The person on the side of the transport cart assists the patient in moving toward the OR bed. The person on the opposite side prevents the patient from falling over the edge of the OR bed.
5. Adequate assistance in lifting unconscious, anesthetized, obese, or weak patients is necessary to prevent injury. A minimum of four people is recommended, and transfer devices and lifters may be used. The patient is moved on the count of three, with the anesthesia provider giving the signal. Sliding or pulling the patient may cause dermal abrasion or injury to soft tissues. Dependent limbs can create a counterbalance and cause the patient to fall to the floor. Examination gloves should be worn if the patient is incontinent or offers other risk of exposure to blood and body substances.
6. The anesthesia provider guards the head of the anesthetized patient at all times and supports it during movement. The head should be kept in a neutral axis and turned as little as possible to maintain the airway and cerebral circulation.
7. The physician assumes responsibility for protecting an unsplinted fracture during movement.
8. The anesthetized patient is not moved without permission of the anesthesia provider.
9. The anesthetized patient is moved slowly and gently to allow the circulatory system to adjust and to control the body during movement.
10. No body part should extend beyond the edges of the OR bed or contact metal parts or unpadded surfaces.
11. Body exposure should be minimal to prevent hypothermia and preserve dignity.
12. Movement and positioning should not obstruct or dislodge catheters, intravenous (IV) infusion tubing, oxygen cannulas, and monitors.
13. The armboard is protected to avoid hyperextending the arm or dislodging the IV cannula. The surface of the armboard pad and the mattress of the OR bed should be of equal height. Hyperabduction is avoided to prevent brachial plexus stretch.6-8,11
14. When the patient is supine (on the back), the ankles and legs must not be crossed. Crossing of the ankles and legs creates occlusive pressure on blood vessels and nerves, and pressure necrosis may occur. The patient is then at risk for deep vein thrombosis (DVT).
15. When the patient is prone (on the abdomen), the thorax is relieved of pressure by using chest rolls (subclavicle to iliac crest) to facilitate chest expansion with respiration.4 The chest rolls should be adequately secured to the table to prevent shifting.
The abdomen should remain dependent to decrease abdominal venous pressure. Padding should be placed at the dorsum of the feet to prevent pressure on the toes. In the event of cardiac arrest, a transport cart should be available for immediate emergency repositioning into the supine position and for subsequent resuscitation.
16. When the patient is positioned lateral (on the side), a pillow is placed lengthwise between the legs to prevent pressure on bony prominences, blood vessels, and nerves. This positioning also relieves pressure on the superior hip.10 Pressure reduction padding is placed beneath the axilla on the unaffected side to protect the arm from body weight.
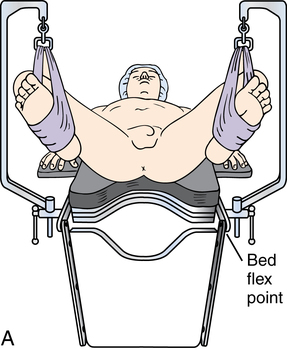
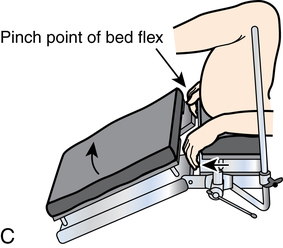
17. During articulation of the OR bed, the patient is protected from crush injury at the flex points of the OR bed.
18. When the OR bed is elevated, the patient’s feet and protuberant parts are protected from compression by overbed tables, Mayo stands, and retractor frames. An adequate clearance of 2 to 3 inches is maintained.
19. Surfaces should not create pressure on any body part. Alternating or pressure-relieving surfaces should be used. Rolled blankets and towels can create pressure because they do not allow for relief of compression at the contact surface. A gel pad or other alternating pressure pad should be used. Figure 26-1 depicts the tissue layers as they are compressed against a bony prominence.

Anatomic and physiologic considerations
A patient’s tolerance of the stresses of the surgical procedure depends greatly on normal functioning of the vital systems. The patient’s physical condition is considered, and proper body alignment is important. Criteria are met for physiologic positioning to prevent injury from pressure, crushing, pinching, obstruction, and stretching. Each body system is considered when planning the patient’s position for the surgical procedure. Complications of positioning are listed in Box 26-2.
Respiratory considerations
Unhindered diaphragmatic movement and a patent airway are essential for maintaining respiratory function, preventing hypoxia, and facilitating induction by inhalation anesthesia. Chest excursion is a concern because inspiration expands the chest anteriorly. Some positions limit the amount of mechanical excursion of the chest. Some hypoxia is always present in a horizontal position because the anteroposterior diameter of the ribcage and abdomen decreases.
The tidal volume, the functional residual capacity of air moved by a single breath, is reduced by as much as one third when a patient lies down because the diaphragm shifts cephalad. Therefore, there should be no constriction around the chest or neck.
The patient’s arms should be at his or her side, on armboards, or otherwise supported—not crossed on the chest, unless absolutely necessary for the procedure. Patients have additional respiratory compromise if they are obese, smoke, or have pulmonary disease.
Circulatory considerations
Adequate arterial circulation is necessary for maintaining blood pressure, perfusing tissues with oxygen, facilitating venous return, and preventing thrombus formation. Occlusion and pressure on the peripheral blood vessels are avoided. Body support and restraining straps must not be fastened too tightly. Anesthetic agents alter normal body circulatory mechanisms, such as blood pressure. Some drugs cause constriction or dilation of the blood vessels, which is further complicated by positioning.
Peripheral nerve considerations
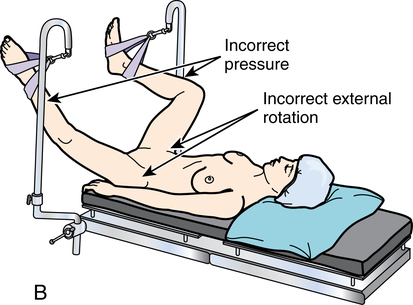
Prolonged pressure on or stretching of the peripheral nerves can result in injuries that range from sensory and motor loss to paralysis and muscle wasting.11 The extremities, and the body, should be well supported at all times. The most common sites of injury in the upper body are the divisions of the brachial plexus and the ulnar, radial, peroneal, and facial nerves; the axons may be stretched or disrupted. Extremes of position of the head and arm greater than 90 degrees can easily injure the brachial plexus.
Peripheral nerve injury of the lower body can involve the sciatic, ilioinguinal, and peroneal nerves. If the patient is improperly positioned, the ulnar, radial, and peroneal nerves may be compressed against bone, stirrups, upright retractor posts, or the OR bed.
Arthroscopy leg holders and tourniquets can cause crushed or transected nerve injury. Femoral nerve injury can be caused by retractors during pelvic procedures. Sciatic nerve injury may be caused by tissue retraction or manipulation during hip surgery or extremes of lithotomy position. Facial nerve injury may result from a head strap that is too tight or from manually elevating the mandible too vigorously to maintain the airway.
Musculoskeletal considerations
A strain on muscle groups results in injury or needless postoperative discomfort. A patient who is anesthetized lacks protective muscle tone. If the head is extended for a prolonged time, the patient may have more pain from the resulting stiff neck than from the surgical wound. Care is taken not to hyperextend a joint, which not only causes postoperative pain but also may contribute to permanent injury to an extremity. Elderly or debilitated patients with osteoporosis or other bone disease may suffer fractures.
When turning a patient, always keep the spine in alignment by grasping the shoulder girdle and hip in a logrolling fashion. Do not turn or elevate a patient by grasping only a hip or shoulder and twisting the spine. Proper body alignment is maintained.
Soft tissue considerations
Body weight is distributed unevenly when the patient lies on the OR bed. Weight that is concentrated over bony prominences can cause skin pressure ulcers and deep tissue injury. These areas should be protected from constant external pressure against hard surfaces, particularly in patients who are thin or underweight. In addition, tissue that is subjected to prolonged mechanical pressure (e.g., a fold in the skin under an obese or malnourished patient) is not adequately perfused.
Wrinkled sheets and the edges of a positioning or other device under the patient can cause pressure on the skin. Foam pads are not adequate to relieve pressure because they compress and do not alternate pressure. Towels and sheet rolls do not relieve pressure because they are unyielding to the patient’s body weight. Gel pads are preferred. According to the Association of periOperative Registered Nurses (AORN) Standards and Recommended Practices (2011), positioning devices should maintain normal capillary interface pressure of 23 to 32 mm Hg or less to prevent pressure injuries. Blood flow and tissue perfusion are restricted at higher pressures.
Pressure injuries are more common after surgical procedures that last 1 hour or longer. During lengthy procedures, the head and other body parts should be repositioned if possible. Patients who are debilitated, poorly nourished, or diabetic are at particularly high risk for pressure ulcers and alopecia (permanent bald spots from pressure).
Accessibility for anesthetic administration
The anesthesia provider should be able to attach monitoring electrodes, administer the anesthetic and observe its effects, and maintain IV access. The patient’s airway is of prime concern and must be patent and accessible at all times. The anesthesia provider needs to continuously assess urinary output, blood loss, and irrigation use. Consideration for visibility of measuring devices and drainage bags should be incorporated in the plan for positioning.
Individual positioning considerations
If patients are extremely obese (e.g., the torso occupies the width of the OR bed), their arms may be placed on armboards. Heavy-duty OR beds are available with side extenders to accommodate wide patients. Patients with arthritis or previous joint surgery may need special individualized care because of limited range of motion in their joints. A patient who has cardiac problems or is obese may experience orthopnea or dyspnea when lying flat.
Pediatric patients, especially infants, need less OR bed length. Some surgeons like the foot portion of the bed lowered to decrease the length of the working surface for accessibility.
Equipment for positioning
OR bed
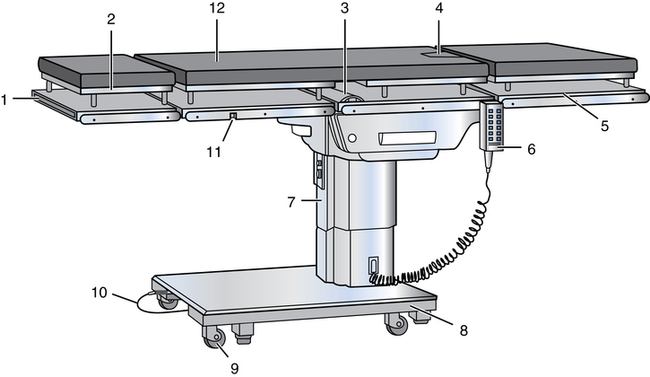
Many different OR beds with suitable attachments are available, and practice is necessary to master the adjustments. OR beds are versatile and adaptable to a number of diversified positions for many surgical specialties; orthopedic, urologic, and fluoroscopic tables are often used for specialized procedures. Figure 26-2 depicts a typical general-purpose OR bed.
The patient’s body habitus may necessitate the use of a specialty OR bed with an increased weight limit. Manufacturer recommendations should be consulted for the operation of each model of OR bed.
Most OR beds consist of a rectangular metal top that measures 79 to 89 inches long by 20 to 24 inches wide (201 to 225 cm × 51 to 61 cm) and rests on an electric or hydraulic lift base. Some models have interchangeable radiopaque tops for various specialties.
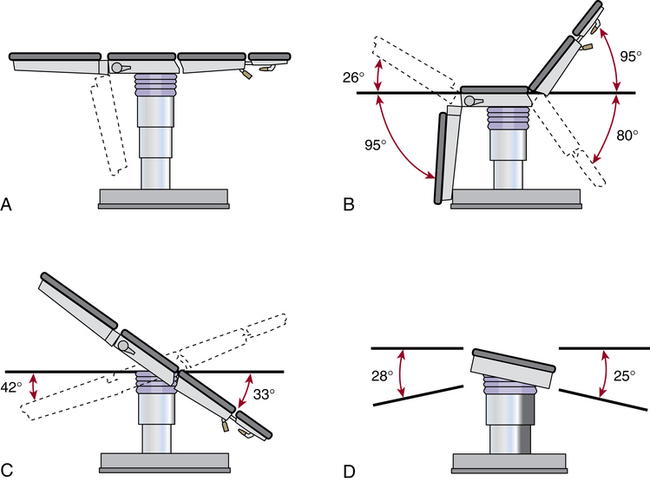
The surface of the OR bed is divided into three or more hinged sections: the head, the body, and the leg sections. The joints of the OR bed are referred to as breaks. Each hinged section can be manipulated, flexed, or extended to the desired position in a procedure called breaking the OR bed. Figure 26-3 shows the range of flexibility of an average general-purpose OR bed.
Some OR beds have a metal body elevator plate between the two upper sections that may be raised up to 5½ inches (14 cm) to elevate an area for a gallbladder or kidney procedure. Care is taken when using this elevator because it can decrease the ability of the chest to expand during ventilation.
The head section is removable, which permits the insertion of special headrests for cranial procedures. An extension may be inserted at the foot of the OR bed to accommodate an exceptionally tall patient. A radiopaque cassette loading top extends the length of the bed and permits the insertion of an x-ray cassette holder at any area. A self-adhering, sectional, conductive rubber mattress (at least 3 inches [8 cm] thick) covers the surface of the OR bed. Gel-filled alternating surface mattress and pads are commercially available to cover the surface of the OR bed.
Standard OR beds have controls for manipulation into desired positions. Some beds are electrically controlled by either remote hand-control or foot-control switches or a lever-operated electrohydraulic system; older OR beds are controlled with manual hand cranks. Most electric styles have a rechargeable battery that can be used for several weeks without recharging.
The desired sections of the OR bed surface can be articulated by setting the selector control on “back,” “side,” “foot,” or “flex.” By activating other selector controls, the surface of the OR bed may be tilted laterally up to 28 degrees from side to side and raised or lowered in its entirety. A tiltometer indicates the degree of tilt between horizontal and vertical for variations in Trendelenburg’s position. Most styles offer between 30 and 40 degrees of Trendelenburg’s position full-table tilt down or up. All OR beds have a brake or floor lock for stabilization in all positions.
Special equipment and bed attachments
The equipment used in positioning is designed to stabilize the patient in the desired position and thus permit optimal exposure of the surgical site. All devices are clean, free of sharp edges, and padded to prevent trauma or abrasion. Each OR bed has attachments for specific purposes. Many positioning devices to protect pressure points and joints are commercially available. If the devices are reusable, they are washable; some may be terminally sterilized for asepsis between uses.
Safety belt (thigh strap).
For restraint of leg movement during surgical procedures, a sturdy, wide strap of durable material (e.g., nylon webbing, conductive rubber) is placed and fastened over the thighs, above the knees, and around the surface of the OR bed. Placement in this location prevents the large muscle groups of the legs from flexing and causing the patient to fall from the OR bed.
Some straps are attached at each side of the bed and fastened together at the center. This belt should be secure but not so tight that it impairs circulation; the circulating nurse should be able to pass two fingers between the strap and the patient. Placement of the belt depends on body position. For prevention of injury to underlying tissue, padding (e.g., a blanket) should be placed between the skin and the belt. The strap should be placed over, not under, this blanket for easy visualization before prepping and draping.
The safety belt is used during surgical procedures except for certain positions (e.g., lithotomy and seated). Belting across the patient’s abdomen during the lithotomy position can cause compression of the abdominal structures.2 The safety belt is used before and after the procedure, when the patient’s legs are in the down position.
Anesthesia screen.
A metal bar attaches to the head of the OR bed and holds the drapes from the patient’s face. It is placed after the induction of anesthesia and the positioning of the patient and is used to separate the nonsterile from the sterile area at the head of the bed. The bar is adjustable and allows rotation or angling. Some facilities use two IV poles to secure the drapes at the head of the bed.
Special procedures may require the use of an overbed table that mounts in the same fashion as an anesthesia screen. The socket attachments are secured to the side rail of the bed and are locked onto the frame of this table (Fig. 26-4).

Lift sheet (drawsheet).
A double-layer sheet is placed horizontally across the top of a clean sheet on the OR bed. After patients are transferred to the OR bed, their arms are enclosed in the lower flaps of this sheet, with the palms against the sides in a natural position and the fingers extended along the length of the body. The upper flaps are brought down over the arms and tucked under the patient’s sides. The sheet should not be tucked under the sides of the mattress because the combined weight of the mattress and the patient’s torso may impair circulation or cause nerve torsion. The full length of each arm is supported at the patient’s side, protected from injury, and secured. The hands should not extend into the flex point of the bed or a crush injury may ensue. In addition, a plastic curved shield, referred to as a sled, can be used to protect and secure the arms from injury (Fig. 26-5).
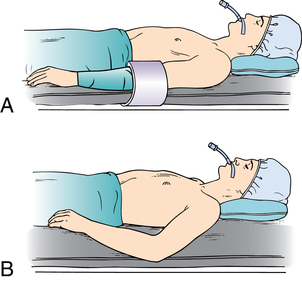
Tucking of the patient’s arms and use of a sled help to prevent inadvertent pressure from upright bars of anesthesia screens, table attachments, and stationary retractor poles (Fig. 26-6).
Patients should be told that these methods are used to support the arms when they are anesthetized and relaxed. The word restraint is avoided. At the end of the surgical procedure, this sheet, if not soiled or wet, may be used to lift the patient from the OR bed.
Armboard.
Armboards are used to support the arms if IV fluids are being infused, if the arm or hand is the site of the surgical procedure, if the arm at the side would interfere with access to the surgical area, if space is inadequate on the OR bed for the arm to rest beside the body (as with an obese patient), and if the arm requires support (as in the lateral position).
The armboard is padded to a height that is level with the OR bed. To minimize the risk for ulnar nerve pressure and abnormal shoulder rotation, the patient’s arm is placed palm up (supinated), except when the patient is in the prone position.
The armboard has adjustable angles, but the arm is never abducted beyond an angle of 90 degrees from the shoulder or brachial nerve plexus injury may occur from hyperabduction (Fig. 26-7). A self-locking type of armboard is safest to prevent displacement.

Double armboard.
With a double armboard, both arms are supported, with one directly above the other in lateral position. This type of armboard resembles the wings of a biplane and is sometimes called an airplane support or overbed arm support. Both levels of the armboard are padded (Fig. 26-8).

Upper extremity table.
For a surgical procedure on an arm or hand, an adjustable extremity table may be attached to the side of the OR bed and used in lieu of an armboard. This attachment is sometimes referred to as a hand table. Some types of extremity tables slip under the mattress proximal to the surgical site and extend perpendicular to the patient’s trunk, with the distal end supported by a metal leg. Some models attach directly to the OR bed and require no additional floor support.
A solution drain pan may fit into some extremity tables. After skin preparation or irrigation, the pan is removed and the top panel is reinserted to cover the opening. A firm foam-rubber pad equal to the height of the mattress is placed on the table and draped to receive the arm, which is then draped. The upper extremity table provides a large firm surface for the surgical procedure. The surgeon and sterile team usually sit for these types of procedures. The level of the patient determines the level of the sterile field. If one team member sits, the entire team should sit to maintain the level of the sterile field.
Shoulder bridge (thyroid elevator).
When a shoulder bridge is used, the head section is temporarily removed and a metal bar is slipped under the mattress between the head and body sections of the OR bed. The bridge can be raised to hyperextend the shoulder or thyroid area for surgical accessibility. This position can be achieved also by placing a towel or blanket roll transversely under the shoulders, which causes the neck to hyperextend. A perpendicular towel roll can be placed between the shoulders to cause the shoulders to fall back bilaterally, which elevates the sternum.
Shoulder braces or supports.
Adjustable well-padded concave metal supports are occasionally used to prevent the patient from slipping when the head of the OR bed is tilted down, such as in the Trendelenburg’s position. Braces should be placed equidistant from the head of the OR bed, with a ½-inch (13-mm) space between the shoulders and the braces to eliminate pressure against the shoulders. The braces are placed over the acromion processes, not over the muscles and soft tissues near the neck.
To avoid nerve compression, a shoulder brace is not used when the arm is extended on an armboard; in such cases, ankle straps may be used to stabilize the patient. Many surgeons have modified positioning routines to avoid the use of shoulder braces because of inadvertent nerve injury.
Body rests and braces.
Body rests and braces are made of metal and have a foam-rubber or gel pad covered with conductive waterproof fabric. These devices are placed in metal clamps on the side of the OR bed and are slipped in from the edge of the OR bed against the body at various points to stabilize it in a lateral position.
Lateral positioner (kidney rests).
Kidney rests are concave metal pieces with grooved notches at the base; they are placed under the mattress on the body elevator flexion of the OR bed. They are slipped in from the edge of the OR bed and placed snugly against the body for lateral stability in the side-lying kidney position.
Although the kidney rest is padded, care should be taken so that the upper edge of the rest does not press too tightly against the body. Some OR beds have built-in kidney rests that are raised and lowered electrically or with a hand crank.
Anteroposterior positioner frames attach to the bed in the socket attachments for use during spinal endoscopy. All other aspects of positioning should be considered, such as arms, legs, neck, and head (Fig. 26-9).

Body (hip) restraint strap.
With a body restraint strap, a wide belt with a padded center portion (to protect the skin) is placed over the patient’s hips and secured with hooks to the sides of the OR bed. This strap helps to hold the patient securely in the lateral position. Some surgeons prefer to use 2-inch- to 3-inch-wide bands of adhesive tape to secure the shoulders and hips of patients in the lateral position. A towel can be placed over the patient’s skin before the tape is applied. The ends of the long strips of tape are secured to the underside of the OR bed. Care is taken not to cause compression, stretching, or folding of the skin under the tape.
Positioning for anal procedures with adhesive tape.
For anal procedures, the patient is placed in a prone position (Kraske position). To separate and retract the buttocks, a piece of 3-inch (7.5-cm) adhesive tape is placed on each buttock, 4 inches (10 cm) lateral to the surgical site. For greater security of tape adhesion, benzoin or adhesive liquid is applied to each buttock before the tape strips are applied. Each end of the tape is fastened to the frame of the OR bed.
Adjustable arched spinal frame.
An adjustable arched spinal frame consists of two padded arches mounted on a frame that is attached to the OR bed. The patient is placed in the prone position with the abdomen over this device (referred to as a Wilson frame). The pads extend from the shoulders to the thighs, with the abdomen hanging dependently between the arches. The desired degree of flexion for spinal procedures is achieved by adjusting the height of the arch by means of a crank. Other types of prone positioning frames are available (Fig. 26-10).


Stirrups.
Metal stirrup posts are placed in holders, one on each side rail of the OR bed, to support the legs and feet in the lithotomy position. The feet are supported with canvas or fabric loops that suspend the legs at a right angle to the feet. These stirrups are sometimes called candy cane or sling stirrups (Fig. 26-11).
During extensive surgery, special leg holders may be used to support the lower legs and feet (e.g., Allen or Yellow Fin). Also available are metal or high-impact-plastic knee-crutch stirrups that can be adjusted for knee flexion and extension. Even if well padded, these stirrups may create some pressure on the back of the knees and lower extremities and may jeopardize the popliteal vessels and nerves. Gel and foam pads are available for patient protection when stirrups are used (Fig. 26-12).


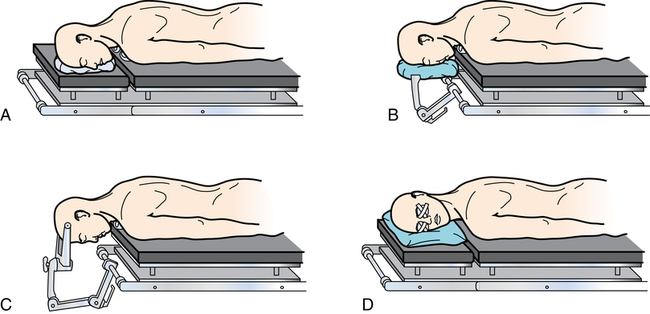
Headrests.
Padded headrests are used with supine, prone, sitting, and lateral positions. They attach to the OR bed to support and expose the occiput and cervical vertebrae. The head is held securely but without the pressure that could cause pressure injury to the ears or optic nerve ischemic blindness.
Headrests can be shaped like a donut or horseshoe for head and neck procedures; other styles are flat or concave to stabilize the head and neck in alignment. Nonpadded metal headrests have sterile skull pins that are inserted into the patient’s head for neurologic procedures (Fig. 26-13).
Accessories.
Various sizes and shapes of pads, pillows, and beanbags that fit various anatomic structures are used to protect, support, and immobilize body parts. Foam rubber, polymer pads, silicone gel pads, vacuum-shaped bags, and other accessories are covered with washable materials unless designed for single-patient use.
A donut (a ring-shaped foam-rubber or silicone gel pad) may be used during procedures on the head or face to keep the surgical area in a horizontal plane. Donuts are used also to protect pressure points such as the ear, knee, heel, and elbow. Protectors made of foam rubber, polymers, silicone gel, or other material also may be used to protect the joints from pressure. Many other types of protectors are available.
Bolsters are used to elevate a specific part of the body (e.g., Kraske pillow to elevate the buttocks for anal procedures). Solid rolls of blankets or firm foam under each side of a patient’s chest, referred to as chest rolls, raise the chest off the OR bed to facilitate respiration. Large gel rolls also can be used for this purpose and for axillary elevation during lateral positioning. Commercially available bolsters and elevating pads are commonly used. Because patients may have a latex sensitivity, the manufacturer’s literature should be checked for latex content (Fig. 26-14).

Pressure-minimizing mattress.
To minimize pressure on bony prominences, peripheral blood vessels, and nerves during prolonged surgical procedures (more than 2 hours for the average patient, less for a debilitated patient), an alternating pressure mattress is put over the mattress on the OR bed before the patient arrives. This mattress may be a positive-pressure air mattress, a circulating-water thermal mattress, a foam-rubber mattress (with indentations similar to an egg crate), a gel pad, or a dry polymer pad.
Unless designed to be placed next to a patient’s skin, pressure reduction mattresses and thermal blankets used to induce hypothermia or hyperthermia should be covered with an absorbent sheet or thin pad. Folds and creases in the covering should be avoided to prevent pressure indentations in the skin. Manufacturer instructions should be followed when using these devices.
Surgical vacuum positioning system.
With the surgical vacuum positioning system, soft pads filled with tiny plastic beads (i.e., beanbags) are placed under or around the body part to be supported. Suction is attached to the vacuum port on the pad; as air is withdrawn, the pad becomes firm and molds to the patient’s body. The suction is then disconnected. A vacuum is created inside the pad, which causes the beads to press together. Friction between the beads prevents them from moving and creates a solid mass that keeps its molded shape. Adequate pressure reduction padding should be placed between the patient’s skin and the bean bag.
Various sizes and shapes of pads provide firm support while relieving pressure points. To change the patient’s position during the surgical procedure, the valve on the pad is squeezed until the pad is slightly soft. The patient is repositioned, and suction is reapplied to remold the pad.
Surgical positions
Many positions are used for surgical procedures; the most commonly used positions are discussed in the following sections. If IV fluids are infused in the arm during the surgical procedure, the arm is placed on an armboard. This fact is assumed in the following discussion because IV fluids are usually given. If electrosurgery is used, the patient return electrode should be placed after the patient is in position for the surgical procedure and the electrode should not be moved, shifted, or cut to size. Take care not to kink catheter tubing or dislodge monitoring devices during positioning.
Supine (dorsal) position
Figure 26-15 shows the patient in the supine position—the most natural position for the body at rest. The patient lies flat on the back with the arms secured at the sides with the lift sheet; the palms extend along the side of the body in their natural resting position. The elbows may be protected with plastic sleds. The legs are straight and parallel and are in line with the head and spine; the hips are parallel with the spine. A safety belt is placed across the thighs 2 inches above the knees.

Small positioning pads may be placed under the head and popliteal area to relieve pressure on the spine as needed. The heels are protected from pressure with a pillow, gel pad, or donut. The feet must not be in prolonged plantar flexion or nerve stretch injury could result. To prevent footdrop, the soles may be supported by a pillow or padded footboard.
The supine position is used for procedures on the anterior surface of the body, such as abdominal, abdominothoracic, and some lower extremity procedures. Modifications of the supine position are used for specific body areas:
• Procedures on the face or neck: The neck may be slightly hyperextended by lowering the head section of the OR bed or by placing a shoulder roll. With the patient in the supine position, the head may be supported in a headrest or donut or turned toward the unaffected side.
The eyes are protected from injury, laser light, and irritating solutions with shields, goggles, or nonallergenic tape. During skin preparation and the surgical procedure, contact lenses should be removed, and the eyes should be lubricated with sterile ophthalmic gel and secured with eye pads taped in place. The eyes should be inspected periodically by the anesthesia provider during the case and at the end of the surgical procedure.
• Shoulder or anterolateral procedures: With the patient in the supine position, a small sandbag, water bag, roll, or pad is placed under the affected side to elevate the shoulder off the OR bed for exposure. The length of the body is stabilized to prevent the spine from rolling or twisting. Hips and shoulders should be kept in a straight plane. The OR bed also can be tilted laterally to elevate the affected part.
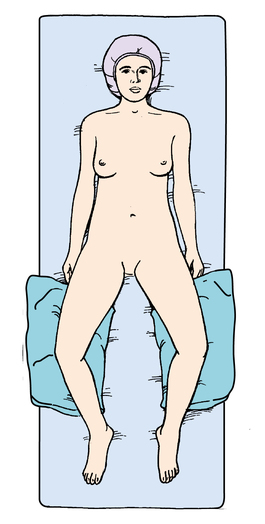
• Dorsal recumbent and modified recumbent position: For some vaginal or perineal procedures, the patient is in the supine position except that the knees are flexed upward (frog-legged) and the thighs are slightly externally rotated. The soles of the feet rest on the OR bed. Pillows or foam wedges may be placed under the knees for support and prevention of external rotation of the hip (Fig. 26-16). The thighs are widely externally rotated, and the soles of the feet face each other. The blanket is placed over the lower legs, and the safety strap is placed anterior to the shins to secure the legs from sliding forward.
• Arm extension: For surgical procedures of the breast, axilla, upper extremity, and hand, the patient is placed in the supine position; the arm on the affected side is placed on an armboard or upper extremity table extension that locks into position at a right angle to the body. The affected side of the body is close to the edge of the OR bed for access to the surgical area.
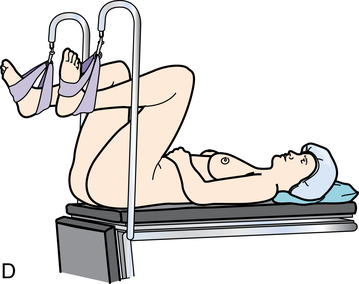
Trendelenburg’s position
With the Trendelenburg’s position, patients lie on their back in the supine position with the knees over the lower break of the OR bed (Fig. 26-17). The knees must bend with the break of the OR bed to prevent pressure on the peroneal nerves and veins in the legs. The entire OR bed is tilted approximately 40 degrees downward at the head, depending on the surgeon’s preference. The foot of the OR bed is lowered to the desired angle.
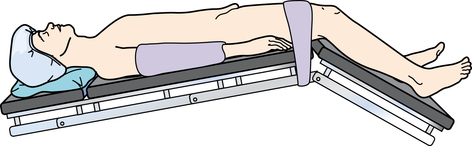
Trendelenburg’s position is used for procedures in the lower abdomen or pelvis when shifting the abdominal viscera away from the pelvic area for better exposure. Although surgical accessibility is increased, lung volume is decreased and the heart is mechanically compressed by the pressure of the organs against the diaphragm. Intracranial pressure is increased.5 Therefore, the patient remains in this position for as short a time as possible. When returning the patient to a horizontal position, the leg section should be raised first and slowly while venous stasis in the legs is reversed. The entire OR bed is then leveled.
A modification of this position may be used for patients in hypovolemic shock. Many anesthesia providers prefer to keep the trunk level and to elevate the legs by raising the lower part of the OR bed at the break under the hips. Others prefer to tilt the entire OR bed downward toward the head. Either position reduces venous stasis in the lower extremities and promotes venous return.
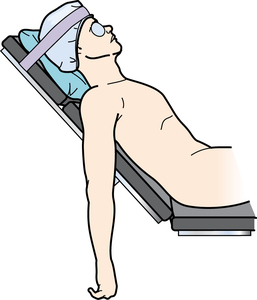
Reverse trendelenburg’s position
With reverse Trendelenburg’s position, patients lie on their back in the supine position (Fig. 26-18). The entire OR bed is tilted 30 to 40 degrees so the head is higher than the feet; a padded footboard is used to prevent the patient from sliding toward the tilt. The thigh safety belt is positioned 2 inches above the knees. Small pillows may be placed under the knees. A small pillow or donut is used to stabilize the head.

This position is used for thyroidectomy to facilitate breathing and to decrease blood supply to the surgical site (blood pools caudally). It is also used for laparoscopic gallbladder, biliary tract, and stomach procedures to allow the abdominal viscera to fall away from the epigastrium, providing access to the upper abdomen.
Venous stasis can cause complications, and prevention of deep vein thrombosis is an important consideration. The use of sequential compression devices, antiembolic stockings, or foot pumps is suggested to improve venous return.
Semi-fowler position
With the semi-Fowler position, the patient is supine with the buttocks at the flex in the OR bed and the knees over the lower break. The foot of the OR bed is lowered slightly, flexing the knees. The body section is raised 45 degrees and thereby becomes the backrest. Arms may rest on armboards parallel to the OR bed or on a large soft pillow on the lap. Care is taken that the arms do not fall dependent from the body during the procedure. The safety belt is secured 2 inches above the knees. The entire OR bed is tilted slightly with the head end downward to prevent the patient from slipping toward the foot of the OR bed. Feet should rest on the padded footboard to prevent footdrop. For cranial procedures, the head is supported in a headrest.
In this position, the OR bed looks like a modified armchair. This position may be used for shoulder, nasopharyngeal, facial, and breast reconstruction procedures (Fig. 26-19). Complications of this position include air embolus into the venous system, pelvic pooling or venous stasis, hypotension, positional orthopedic injury, and tissue pressure injury and necrosis.
If an air embolus should enter the patient’s right atrium, the patient is immediately repositioned in the left lateral position and the bed is lowered into steep Trendelenburg’s position. This emergent posture is referred to the Durant position or Durant maneuver. This immediate action causes the air embolus to move from the right ventricular outflow tract. The anesthesia provider places a central venous catheter into the right atrium to aspirate the trapped air bubble and restore cardiac function.
Sitting position
With the sitting position, the patient is placed in the Fowler’s position except that the torso is completely in an upright position. The shoulders and torso should be supported with body straps but not so tightly that respiration and circulation are impeded. Pressure points (especially ischial tuberosities) are padded to reduce the risk of sciatic nerve damage.
The flexed arms rest on a large pillow on the lap or on a pillow on an adjustable table in front of the patient (see Fig. 26-4; this table attachment can be secured in the bed sockets in front of the patient as a padded armrest).
The head is seated forward in a cranial headrest for neurosurgical procedures. A padded footboard may be placed to maintain the patient’s feet in an upright position and deter sliding down on the bed.
This position is used on occasion for some otorhinologic and neurosurgical procedures. Air embolism is a potential complication and is treated in the same manner as described for the semi-Fowler position. Antiembolic stockings or sequential compression devices are used to counteract postural hypotension and decrease venous pooling in the extremities and pelvis.9
Beach chair or modified sitting position
With the beach chair or modified sitting position, the patient is supine with the back and legs slightly elevated. The entire spine is somewhat contoured, with the angle of flexion at the hip decreased. Both the head and the feet are elevated 10 to 20 degrees above the level of the heart. The arms are placed across the abdomen, and the safety belt is secured over the thighs. This position is used for several nose and throat procedures.
Abdominoplasty and lower abdominal TRAM (trans rectus abdominis muscle used for breast reconstruction) closure is performed using this position to bring the skin edges closer together after resection of a large abdominal skin flap. The xiphoid-pubic distance is shortened. The arms can be secured with the lift sheet if the hands are not at risk for crush injury at the bed flexion points (Fig. 26-20).

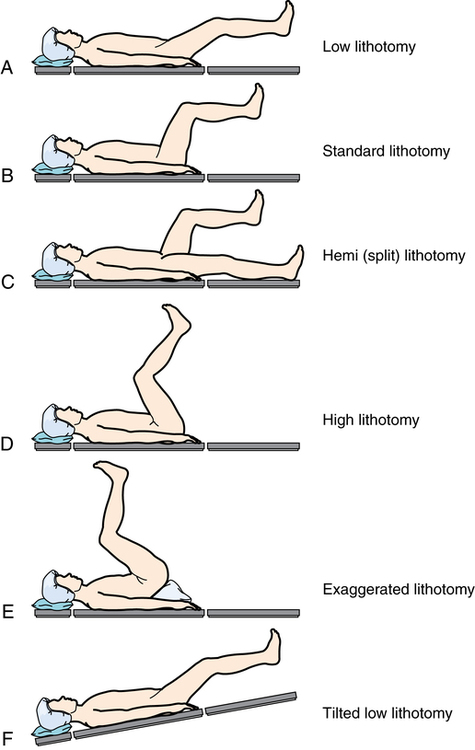
Lithotomy position
The lithotomy position is used for perineal, vaginal, urologic, and rectal procedures. The patient’s buttocks rest along the break between the body and the leg sections of the OR bed. A padded metal footboard is used as an OR bed extension so the patient’s legs do not extend over the foot of the OR bed before the legs are placed in the upright position.
Stirrups are secured in sockets on each side of the OR bed rail at the level of the patient’s upper thighs. They are adjusted at equal height on both sides and at an appropriate height for the length of the patient’s legs to maintain symmetry when the patient is positioned.1,2 After the patient is anesthetized, the safety belt is removed and the patient’s legs are raised simultaneously by two people (Fig. 26-21).
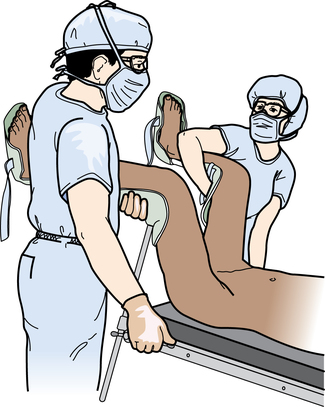
Each person grasps the sole of a foot in one hand and supports the calf at the knee area with the other. The knees are flexed, and the legs and feet are placed inside the stirrups. Avoid overflexing the hip toward the abdomen to prevent ilioinguinal nerve compression. For sling or candy cane stirrups, the feet are placed in the fabric slings of the stirrups at a 90-degree angle to the abdomen. One padded loop encircles the sole; the other padded loop goes around the ankle.
Simultaneous movement as the knees are flexed is essential to avoid straining the lower back. If the patient’s legs are properly placed, undue abduction and external rotation are avoided. The leg or ankle must not touch the metal stirrup. Padding is placed as necessary. If the legs are put in stirrups before the induction of anesthesia, the patient can identify discomfort and pressure on the back or legs. The positioning procedure is similar for other types of stirrups. The level of the lithotomy position needed for the surgical procedure is determined by the surgeon (Fig. 26-22).
After the patient’s legs are placed in the stirrups, the lower section of mattress is removed and the bottom section of the OR bed is lowered. The buttocks must not extend beyond the edge of the OR bed, which would strain the lumbosacral muscles and ligaments as the weight of the body rests on the sacrum.
The hands should not extend beyond the buttocks if tucked alongside the patient. Hands have been crushed in the break as the leg section of the OR bed was raised at the conclusion of the surgical procedure. Arms may be placed on armboards or loosely cradled over the lower abdomen and secured by the lower end of the blanket. Arms must not rest directly on the chest, which could impede respiration. Lung compliance is decreased by pressure of the thighs on the abdomen, which hinders the descent of the diaphragm.
Blood pools in the lumbar region of the torso, especially during prolonged surgical procedures in lithotomy. Antiembolic stockings may be worn, or legs may be wrapped in sequential compression devices or foot pumps during the surgical procedure to prevent the formation of thrombi or emboli. The legs should be checked periodically for distal pulses, skin color, and evidence of edema. In the lithotomy position, nerve damage or compartment syndrome can occur from direct pressure or ischemia of the muscles, which compromises the viability of tissues.
At the conclusion of the surgical procedure, the leg section of the OR bed is raised and the lower section of the mattress is replaced. The patient’s legs are removed simultaneously from the stirrups and lowered slowly to prevent hypotension as blood reenters the legs and leaves the torso. To prevent external rotation of the hips, the legs are fully extended and brought together as they are lifted from the stirrups. The blanket and safety belt should be reapplied over the thighs during the patient’s emergence from anesthesia.
Prone position
Prone position is used for all procedures with a dorsal or posterior approach (Fig. 26-23). When the prone position is used, the patient is anesthetized and intubated in the supine position on the locked transport cart. The patient’s arms are along his or her sides. When the anesthesia provider gives permission, the patient is slowly and cautiously shifted toward the OR bed in the supine position and then turned onto the abdomen onto the OR bed. The patient’s body is rotated as if rolling a log; a team of at least four to six people is needed to maintain body alignment during this transfer. The anesthesia provider calls the count. The anesthesia provider controls the patient’s head and airway while the rest of the patient’s body is moved by the team.
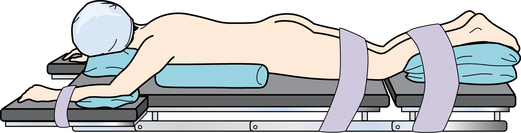
Chest rolls or bolsters under the axillae and along the sides of the chest from the clavicles to the iliac crests raise the weight of the body from the abdomen and thorax. The weight of the abdomen falls away from the diaphragm and keeps pressure off the vena cava and abdominal aorta. This facilitates respiration, although vital capacity and cardiac index are reduced. To ensure cardiac filling and to reduce hypotension, venous return from the femoral veins and inferior vena cava is uninterrupted. Female breasts should be moved laterally to reduce pressure on them. Male genitalia should be free from pressure. Pendulous skinfolds should not be crimped under the patient in any manner.
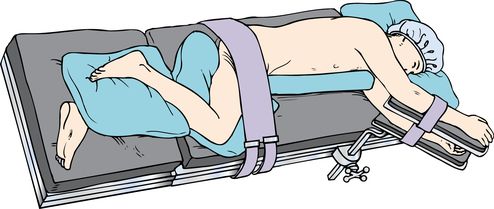
The arms may lie supported along the sides of the body, with the palms up or inward toward the body. An alternate position is to place the arms into a diver’s pose by lowering them toward the floor and rotating (circumducting) them upward in a natural range of motion. Care is taken not to dislocate the shoulders.4 The armboards are reversed on the table, pointing toward the anesthesia provider. The elbows are padded and are slightly flexed to prevent overextension, and the palms are down. The arms may extend beyond the head, but not so far as to cause brachial plexus compression or stretch.
The head can be turned to one side or positioned face down on a padded donut to prevent pressure on the ear, eye, and face. Clearance of the airway must be ensured. A serious complication of the prone position is blindness caused by ischemia of the vascular system of the eye.4,5
A pillow or padding under the anterior aspect of the ankles and the dorsa of the feet prevents pressure on the toes and elevates the feet to aid venous return. Do not permit the patient’s toes to extend beyond the foot of the bed. Donuts under the knees prevent pressure on the patellae. The safety belt is placed over the calves to prevent flexion of the lower legs. Care is taken not to compress the lower legs. An additional belt can be positioned over the posterior thighs as an added precaution.
Modified prone positions
For surgical procedures on the spine, the mattress on the OR bed is adjusted so the hips are over the break between the body and leg sections. A large soft pillow is placed under the abdomen at the lower pelvis. The upper break of the OR bed is flexed, and the OR bed is tilted so the surgical area is horizontal. Some surgeons prefer a special assembly for the orthopedic OR bed, such as an adjustable arch (Wilson frame), a Hastings frame, or an Andrews frame for spinal surgery.
After the administration of anesthesia, the patient is carefully lifted and properly positioned on a special table or frame. The patient may be placed in a prone extreme forward-sitting or kneeling position with the torso at a right angle to the thighs. The lower legs, at right angles at the knees, rest on the foot extension, which is at a 90-degree angle. The midsection of the abdomen is allowed to hang free. This allows the anesthesia provider to use the hypotensive anesthetic technique for hemostasis.
For neurosurgical procedures, the head rests in a cranial headrest to expose the occiput and cervical vertebrae. The eyes are protected; ophthalmic ointment is applied to protect the corneas and to keep the lids closed before turning the patient onto the headrest. The ears are protected with foam support. When the patient is face down on a headrest, the head should be raised periodically to prevent pressure necrosis of the cheeks and forehead.
Kraske (jackknife) position
With the Kraske position, the patient remains supine until anesthetized and is then turned onto the abdomen (prone position) via rotation. The hips are positioned over the center break of the OR bed between the body and leg sections. Chest rolls or bolsters are placed to raise the chest if the patient is under general anesthesia.
The arms are extended on angled armboards with the elbows flexed and the palms down. The head is to the side and is supported on a donut or pillow. The dorsa of the feet and toes rest on a pillow. The safety belt is placed below the knees. The leg section of the OR bed is lowered the desired amount (usually about 90 degrees), and the entire OR bed is tilted head downward to elevate the hips above the rest of the body.
The patient is well balanced on the OR bed (Fig. 26-24). For procedures in the rectal area (e.g., pilonidal sinus, hemorrhoidectomy), the buttocks are retracted with wide tape strips. Because of the dependent position, venous pooling occurs cephalad (toward the head) and caudad (toward the feet). It is important to slowly return the patient to horizontal from this unnatural position.

Knee-chest position
The knee-chest position is used for sigmoidoscopy or culdoscopy. For this position, an extension is attached to the foot section. The OR bed is flexed at the center break, and the lower section is broken until it is at a right angle to the OR bed. The patient kneels on the lower section; the knees are thus flexed at a right angle to the body.
The upper portion of the OR bed may be raised slightly to support the head, which is turned to the side. The arms are placed around the head with the elbows flexed, and a large soft pillow is placed beneath them. The chest rests on the OR bed, and the safety belt is placed above the knees. The entire OR bed is tilted head downward so the hips and pelvis are at the highest point—a modified jackknife position.
Lateral positions
For lateral positioning, the OR bed remains flat. The patient is anesthetized and intubated in the supine position and then turned to the unaffected side. In the right lateral position, the patient lies on the right side with the left side up (for a left-sided procedure); the left lateral position exposes the right side (Fig. 26-25).
The patient is turned by no fewer than four people to maintain body alignment and achieve stability. The patient’s back is drawn to the edge of the OR bed. The knee of the lower leg is flexed slightly to provide stabilization, and the upper leg is flexed to provide counterbalance. The flexed knees may require padding to prevent pressure and shearing force. In addition, a large soft pillow is placed lengthwise between the legs to take pressure off the upper hip and lower leg and therefore prevent circulatory complications and pressure on the peroneal nerve.
The ankle and foot of the upper leg should be supported to prevent footdrop. Bony prominences are padded. For added stability, a safety belt or a 3-inch (7.5-cm)-wide tape is placed over the hip.
The patient’s arms may be placed on a padded double armboard, with the lower arm palm up and the upper arm slightly flexed with the palm down. Blood pressure should be measured from the lower arm. As an alternative, the upper arm can be positioned on a padded Mayo stand. A water bag or pressure reduction pad under the axilla protects neurovascular structures. The shoulders should be in alignment.
The patient’s head is in cervical alignment with the spine. The head should be supported on a small pillow between the shoulder and neck to prevent stretching the neck and brachial plexus and to maintain a patent airway (Fig. 26-26).

Referred to synonymously as the lateral, lateral decubitus, or lateral recumbent, this position is used for access to the hemithorax, kidney, and retroperitoneal space. This position contributes to physiologic alterations. Respiration is affected by differing gas exchange ratios in the lungs. Because of gravity, the lower lung receives more blood from the right side of the heart; the lower lung therefore has increased perfusion but less residual air because of mediastinal compression and the weight of the abdominal contents on the diaphragm. Positive pressure to both lungs helps control respiratory changes. Circulation is also compromised by pressure on the abdominal vessels. In the right lateral position, compression of the vena cava impairs venous return.
Sims’ recumbent position
With the Sims’ recumbent position (a modified left lateral recumbent position), the patient lies on the left side with the upper leg flexed at the hip and knee; the lower leg is straight. The lower arm is extended along the patient’s back, with the weight of the chest on the OR bed. The upper arm rests in a flexed position on the OR bed. This position may be preferred for an endoscopic examination performed via the anus in obese or geriatric patients.
Kidney position
With the kidney position, the flank region is positioned over the kidney elevator on the OR bed when the patient is turned onto the unaffected side (Fig. 26-27). The short kidney rest is attached to the body elevator at the patient’s back. The longer rest is placed in front at a level beneath the iliac crest to minimize pressure on the abdominal organs. Both rests are well padded. In an obese patient, folds of abdominal tissue may extend over the end of the anterior rest and be bruised if caution is not taken. The OR bed is flexed slightly at the level of the iliac crest so the body elevator can be raised as desired to increase space between the lower ribs and iliac crest.

A body strap or wide adhesive tape is placed over the hip to stabilize the patient after the OR bed is flexed and the elevator is raised. The entire OR bed is tilted slightly downward toward the head until the surgical area is horizontal; the upper shoulder and hip should be in a straight line. The upper arm is supported in a double airplane-style armboard. A gel pad is used to support the chest and protect the breasts. An axillary roll may be placed to take body weight off the deltoid muscle in the shoulder. Before closure, the OR bed is straightened to allow better approximation of tissues.
The term kidney position is used to designate the lateral flexion used to elevate the surgical site. Documentation should clearly state either right or left to indicate which kidney is elevated for the procedure. The kidney position is used for procedures on the kidney and ureter; this position is not well tolerated. Skin and underlying tissue can be damaged by excessive pressure during flexion of the OR bed. OR bed flexion combined with use of the kidney elevator may cause cardiovascular responses. Blood tends to pool in the lower arm and leg. Circulation is further compromised by increased pressure on the abdominal vessels when the kidney elevator is raised. The spine is stressed in a lateral flexed position and can cause strain on the vertebral structures.
Lateral chest (thoracotomy) position
Modifications of the lateral position are used for unilateral transthoracic procedures with a lateral approach. After the patient is turned onto the unaffected side and positioned as described for the lateral position, a second strap may be placed over the shoulder for stability, unless doing so would interfere with skin preparation. The arms may be extended on a double armboard, or the lower arm is extended on an armboard with the palm up while the upper arm is brought forward and down over a pad to draw the scapula from the surgical area. Position depends on site and length of the chest incision. A gel pad under the axilla elevates the surgical site and relieves pressure on the lower arm.
One lateral body rest is placed at the lumbar area to facilitate respiratory movements and provide support. Another body rest is placed along the chest at the axillary level. This body rest is well padded to avoid bruising the breasts. Vacuum positioning devices or bolsters may be used instead of body rests. The shoulders and hips should be level. Slight lowering the head of the OR bed assists postural drainage during the surgical procedure. This position is restrictive to the cardiopulmonary system, especially if used for a prolonged period.
Anterior chest position
For thoracoabdominal procedures with an anterior approach, the positioning is more supine than for the lateral chest position. After the patient is anesthetized, a water bag or gel pad is placed under the lower axilla; another pillow or wedge is placed behind the buttocks and spine to support the torso. The upper knee is flexed slightly, and a large soft pillow is placed beneath it to relieve strain on the abdominal muscles and upper hip.
The OR bed can be tilted laterally to raise the surgical site. A safety belt is placed across the hip, and another above the knees. The lower arm on the unaffected side is supported at the side by an armboard. The upper arm on the affected side is padded well and bandaged loosely to the anesthesia screen above the patient’s head with a Kerlix roll. To avoid injury to the brachial plexus, the arm must not be hyperextended or hyperabducted. The head of the OR bed is lowered slightly for postural drainage.
Modifications for individual patient needs
Anomalies and physical defects are accommodated according to each patient’s needs. Whether the patient is unconscious or conscious, the avoidance of unnecessary exposure is an essential consideration for all patients. The patient’s position should be observed objectively before skin preparation and draping to see that it adheres to physiologic principles.
Protective devices, positioning aids, and padded areas should be reassessed before draping because they could have shifted during the skin preparation procedure or during insertion of an indwelling urinary catheter. Careful observation of patient protection and positioning facilitates the expected outcome.
Documentation
The circulating nurse should document any preoperative limitations in the patient’s range of motion, the condition of the skin before and after the surgical procedure, and the position in which the patient was positioned during the surgical procedure, including the use of special equipment. Personnel performing the positioning should be listed by name, role, and title.
Physical preparation and draping of the surgical site
The type of surgical procedure to be performed, the age and condition of the patient, and the preferences of the surgeon determine specific procedures to be carried out before the incision is made. Consideration must be given to control of urinary drainage, to skin antisepsis, and to establishment of a sterile draped field around the surgical site.
Urinary catheterization
The patient should void to empty the urinary bladder just before transfer to the OR suite unless the procedure requires the bladder to be full, such as for special bladder tone testing procedures. If the patient’s bladder is not empty or the surgeon wishes to prevent bladder distention during a long procedure or after the surgical procedure, urinary catheterization may be necessary after the patient is anesthetized.
An indwelling Foley catheter may be inserted by a member of the team. This retention catheter maintains bladder decompression to avoid trauma during a lower abdominal or pelvic procedure, to permit accurate measurement of output during or after the surgical procedure, and to facilitate output and healing after a surgical procedure on genitourinary tract structures. Catheterization is performed after anesthesia is administered and before the patient is positioned for the surgical procedure, except for a patient who will remain in the lithotomy position.
The Foley catheter should be inserted before the vaginal or abdominal skin preparation to prevent perineal splash to the surgical site. The vagina can be prepped immediately after the Foley catheter is placed. Gloves should be changed and a new prep set used for the abdominal skin prep.
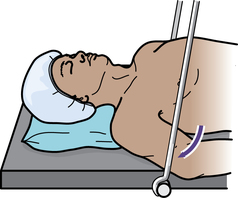
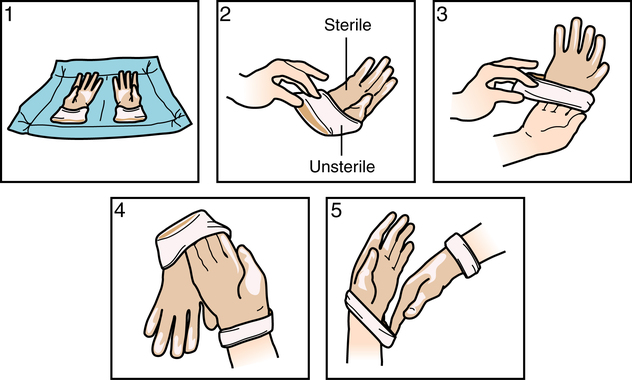
Urinary tract infection can be caused by contamination or trauma to structures during urinary catheterization. Sterile technique must be maintained. A sterile disposable catheterization tray is used unless the patient is being prepared for a surgical procedure in the perineal or genital area. For these latter procedures, a sterile catheter and lubricant may be added to the perineal skin preparation setup. For other surgical procedures, the perineal and meatal areas should be cleansed with an antiseptic agent to reduce microbial flora and remove gross contaminants before the catheterization procedure. Sterile gloves are donned using the open glove technique (Fig. 26-28).
The catheter should be small enough to minimize trauma to the urethra and prevent necrosis of the meatus; usually a size 16-Fr or 14-Fr catheter is inserted in a woman, and a 16-Fr or 18-Fr catheter is inserted in a man. Care is taken to note whether the patient is sensitive to latex. Many Foley catheters are composed of latex and could cause a reaction in susceptible patients. Silicone catheters are commercially available. Some manufacturers incorporate silver in the catheter as an antimicrobial agent.
The balloon size may be 5 or 30 mL (5 mL is used most frequently in adults); 10 mL of sterile water is needed to properly expand a 5-mL balloon, to compensate for volume required by the expansion channel. Foley catheters have a Luer-Lok valve over the lumen to the expansion channel that is filled using a Luer-Lok syringe. Foley catheter manufacturers do not recommend testing the balloon before insertion. They maintain that doing so causes the balloon to weaken and the small folds of the balloon may cause urethral irritation that could lead to a urinary tract infection. The balloon is tested in the factory at the time of manufacture.
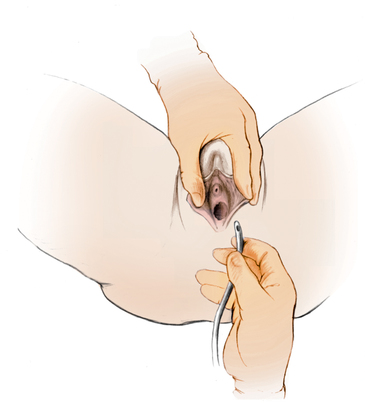
The hand used to spread the labia or stabilize the penis is considered contaminated and should not be used to handle the catheter or prep sponges (Fig. 26-29). To facilitate insertion and minimize trauma, the tip of the catheter is lubricated with a sterile water-soluble lubricant. Urine starts to flow when the catheter has passed into the bladder. The balloon of a Foley catheter is expanded with sterile water only after urine is seen in the tubing, and the bladder is allowed to drain.
If difficulty is encountered during catheter insertion, especially in a geriatric male patient with an enlarged prostate, the catheter should not be forced into the urethra. Stop the catheterization procedure and request help from the surgeon. A flexible catheter stylet of plastic or stainless steel may be needed to pass the catheter through the prostatic segment of the urethra to minimize trauma to the structures.
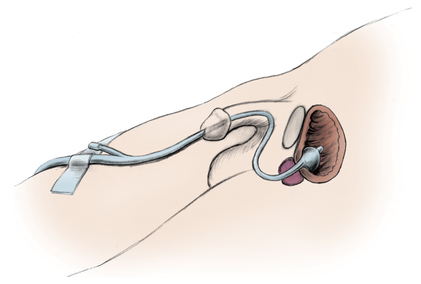
The catheter is attached to a sterile drainage system, and the drainage bag is positioned in the direct view of the anesthesia provider. The tubing is later attached to the patient’s leg, with enough slack in it to prevent tension or pull on the penis or urethra at the conclusion of the case (Fig. 26-30).
Attention is paid to the catheter and tubing during positioning of the patient for the surgical procedure to prevent compression or kinking. Dependent loops of tubing should not be permitted to hang on the floor because this could cause a trip hazard. If the container must be raised above the level of the bladder during positioning, the tubing is clamped or kinked until the container can be lowered and secured under the OR bed to avoid contamination by retrograde or backward flow of urine.
If the catheter is to be removed at the end of the surgical procedure, don examination gloves and use a syringe to withdraw and measure the solution from the Foley balloon expansion port. Cutting the end off with scissors may cause the inflation port to collapse, trapping fluid within the expanded balloon. The urethra can be damaged by withdrawing the expanded balloon.
Principles of patient skin preparation
The purpose of skin preparation is to render the surgical site as free as possible from transient and resident microorganisms, dirt, and skin oil so that the incision can be made through the skin with minimal danger of infection from this source.
Many surgeons prefer to have patients bathe with antimicrobial soap the morning of the surgical procedure. The patient should be advised to avoid the use of body emollients, oils, creams, and lotions after washing. Some products decrease the efficacy of antimicrobial soap, and other products prevent adherence of the return electrode and electrocardiographic (ECG) electrodes to the skin.
The perioperative nurse should assess the patient’s skin before, during, and after the prepping process. Documentation of the condition of the patient’s skin with notation of lesions or other pertinent markings is important. Abnormal skin irritation, infection, or abrasion on or near the surgical site might be a contraindication to the surgical procedure and is reported to the surgeon.
Patients who have been involved in accidents or injured during the commission of a crime may bear physical marks or materials important to the investigation. Objective description of injuries that may include sketches on the record is part of the chain of evidence. Photographs may be taken for the record. Any material on the patient’s person could be evidence and should be handled according to facility policy.
Preliminary preparation of the patient’s skin
Hair removal.
Hair removal can injure skin, and many surgeons no longer request hair removal. Hair that surrounds the surgical site may be so thick that removal is necessary. Hair may be removed with clippers or by shaving with a razor. Hair may interfere with exposure, closure, or the surgical site dressing. It may also prevent adequate skin contact with patient return electrodes or ECG leads.
Hair removal is carried out per the surgeon’s order as close to the scheduled time for the surgical procedure as possible. The patient is covered to expose only the area to be shaved. Bath blankets are useful for preventing unnecessary exposure and prevent excess body heat loss during the procedure. The patient may be shaved in the OR after the anesthetic has been administered. Care is taken to not let stray hair remain in the surgical field. A wide piece of adhesive tape can be used to collect stray hair.
Electric clippers with fine teeth cut hair close to the skin. The short stubble, usually about a millimeter in length, does not interfere with skin antisepsis or exposure of the surgical site. Clipping can be done using short strokes against the direction of hair growth. The blade lies flat against the skin surface. After use, a reusable blade assembly is disassembled, cleaned, and terminally sterilized. The clipper handle is cleaned and disinfected. Cordless handles with rechargeable batteries are available. Disposable clipper heads are preferred over reusable styles for sharpness and optimal function.
Shaving should be performed as near the time of incision as possible if this method is used. Avoid making nicks and cuts in the skin. Gloves should be worn to prevent blood exposure if a nick should occur. Nicks made immediately before the surgical procedure (i.e., up to 30 minutes) are considered clean wounds. However, nicks and abrasions made several hours before the procedure may present as inflamed wounds at the time of surgical incision. The surgeon should be notified if the skin is not intact at the surgical site. This could be cause for cancellation of the surgical procedure. The time lapse between the preoperative shave and the surgical procedure may increase the risk of postoperative infection.
Wet shaving is preferable to dry shaving, which can leave the skin abraded. Soaking hair in lather allows keratin to absorb water, which makes hair softer and easier to remove. A sharp clean razor blade should be used. The skin is held taut and is shaved by stroking in the direction of hair growth. Blades are discarded in the appropriate sharps container. If disposable razors are not used, the razor, minus the blade, is decontaminated and terminally sterilized between uses.
Skin degreasing.
The skin surface is composed of cornified epithelium with a coating of secretions that include perspiration, oils, and desquamated epithelium. These surface sebaceous lubricants are insoluble in water. Therefore, a skin degreaser or fat solvent may be used to enhance adhesion of ECG or other electrodes. It also may be used before skin preparation to improve adhesion of self-adhering drapes or to prevent smudging of skin markings. Isopropyl alcohol and acetone are effective fat solvents. A fat-solvent emollient is incorporated into some antiseptic agents. Some solvents, such as alcohol, are flammable and must be allowed to completely dry before draping. Vapors can become a fire hazard if trapped beneath surgical drapes.
Surgical skin cleansing fundamentals
Before beginning the positioning and prepping sequence, ask the patient to verbally state the location for the procedure and to point to and touch the site if possible. The correct site should have been marked with indelible ink before the patient was brought to the OR, as part of the identification process. Before amputation of an extremity, expose the opposite limb also for comparison. Check with the surgeon, the permit, and the notes in the chart. Confirm that the correct area is identified by the surgery schedule as well. Double-check the radiographs to be sure they have not been hung in the view box backward.
After the patient is anesthetized and positioned on the OR bed, the skin at the surgical site and an extensive area surrounding it is exposed and cleansed with an antiseptic agent immediately before draping. The person performing the prep must wear personal protective equipment (PPE) to prevent a splash to the eyes.
Towels should be tucked in at the patient’s sides to catch any runoff. The two-step skin prep employing scrub soap and paint is performed wearing sterile gloves. The one-step skin prep is essentially a layer of alcohol-based solution performed while wearing nonsterile examination gloves. The end result of antisepsis of the skin is essentially the same. Keep in mind that skin is never sterile regardless of surgical cleansing method used.
Care is taken when prepping areas of the body that may be delicate or potentially harmful to the patient, such as carotid arteries, occluded vessels, tumor masses, distended abdomens, traumatic wounds, eyes, ears, trachea, and questionably stable tissues. Never rub a tumor or infectious mass. Areas marked by the surgeon preoperatively should be gently cleansed, so as not to wash off the markings. Some surgeons use surgical marking pens or surgical dyes, such as methylene blue, brilliant green, or alcohol-based gentian violet. Others may use heavy-duty black markers to delineate the surgical site.
Setup and procedure for a two-step skin prep.
Some disposable skin preparation trays include gloves, disposable towels, prep sponges, and cotton-tipped applicators. Some disposable trays have containers of premeasured antiseptic cleansing solution (Fig. 26-31). Disposable trays without antiseptic agents can be packaged sterile or unsterile. These are referred to as dry trays and require the addition of the antiseptic cleansing solution of choice. If prepackaged disposable trays are not used, a sterile table is prepared by the scrub person with the following sterile items:

• Small table drape to create the sterile field.
• Two absorbent towels used to prevent pooling under body parts along the sides of the area and to define the upper and lower limits of the area to be prepped.
• Two or three small basins for solutions (antiseptic scrub detergent, antiseptic paint solution, and sterile water or alcohol if requested by the surgeon). About 1 or 2 ounces of solution in each basin usually is sufficient.
• Gauze sponges (nonradiopaque). The number varies according the size of the area intended for the surgical procedure. These are not counted sponges from the instrument table and should be discarded in a trash container separate from the sponge bucket. Textured foam sponges may be preferred.
The antiseptic solutions are poured into each of the basins. Do not preheat the prep solutions because the fluid portion can evaporate and cause concentration of the antiseptic chemical. One-half ounce of warm sterile water is added to the scrub soap basin to allow sudsing action of the agent. Do not pour the remainder of the water into a basin on the sterile field because once the water is poured, the lip is considered contaminated. The water can be recapped and used for cleaning the patient’s skin at the end of the surgical procedure before tape is applied.
Sterile gloves are donned by the person doing the prep using the open glove method for the two-step prep. A sterile prep setup is commonly used. Studies have shown that a clean but unsterile setup may be used for intact skin without compromising antimicrobial activity. Skin is mechanically cleansed and chemically decontaminated to reduce skin flora.
The surgical site is bordered by sterile towels after donning the sterile gloves. The sides of the patient are protected by towels to prevent runoff of excess solution. The cotton-tipped applicators are dipped into the soapy solution and used to cleanse the umbilicus if the umbilicus is part of the surgical site. The soiled applicators are discarded into the trash. Several sponges are placed into the soapy solution, and several are placed into the paint solution. A few sponges are reserved for use at the end of the prep if the surgeon incorporates an alcohol rinse. Each sponge is squeezed into the corresponding basin as to not soak the patient and the surrounding bed linens.
The soapy antiseptic sponges are used to mechanically and chemically cleanse the skin in a circular or linear motion from the incisional site to the periphery (Fig. 26-32). The soap decreases the surface tension of the skin and permits the sponge to pick up and remove dirt and microbes from the skin. The sponge should not backtrack over the already prepped area. Each sponge is discarded in the trash after use and not placed in the sponge bucket. A towel is used to blot the soap from the site. It is fully opened and placed over the site and carefully lifted off without rubbing or dragging the fabric over the cleansed area.

The paint-style antiseptic solution is applied in the same manner, with a circular motion from the incisional site to the periphery. This solution is not blotted or wiped off. It should be allowed to dry. If the surgeon prefers, an alcohol sponge is sometimes used to complete the skin prep procedure. If alcohol is used, it is allowed to dry completely before drapes are applied, to minimize the risk of fire from trapped vapors.
Setup and procedure for a one-step skin prep.
A one-step skin prep is a self-contained unit that is constructed of a sponge applicator tip (like a shoe polish dauber) and a chamber that contains antiseptic solution (Fig. 26-33). The unit is packed in a blister pack with two cotton-tipped applicators. A pack of sterile towels is opened and used to tuck in at the patient’s sides and periphery of the surgical site. When taken from the package, the applicator is not handled under sterile conditions. Users wear nonsterile examination gloves to prevent the solution from getting on their hands. The product should not be permitted to come into contact with reusable equipment such as basins because it does not readily wash off.

To apply the prep solution, the unit is compressed at the working end to break the seal of the inner chamber and allow the solution to saturate the applicator tip. The cotton-tipped applicators are dipped into the saturated sponge and used to clean the umbilicus; these cotton-tipped applicators are then discarded. The sponge end is inverted and allowed to become the applicator end.
The area to be prepped is painted in the same stroke direction as for a two-step skin prep. These one-step prep antiseptics have a thicker texture, dry like shellac, and are not blotted off in any manner after application. The risk of pooling is minimized with these products because of their consistency. They mechanically hold cells in place over the skin surface and chemically kill microorganisms.
The manufacturer recommends not removing the product after the procedure but, instead, allowing it to wear off over time to provide a lasting antisepsis for up to 3 days. Alcohol can be used to remove the product if necessary, or remover solution is commercially available. A package insert includes patient take-home instructions about the product and the purpose for its presence on the skin.
The chemical action is the actual antiseptic agent (iodophor or chlorhexidine) in combination with an alcohol base. The alcohol base can pose a fire hazard if not permitted to dry completely before draping. These items should not be heated in any way. They contain an ampule that can pressurize and explode in the presence of heat. Prepackaged antiseptic prep sponges are available without alcohol for sensitive areas such as the face or perineum. These one-step prep sponges are used in urology rooms.
Preparing areas considered contaminated
Umbilicus.
Although the umbilicus is considered a contaminated area, prepping this central area of the abdomen after the surgical site can cause contamination. Most surgeons prefer the umbilicus to be cleaned with cotton-tipped swabs before the main abdominal incision is prepped to prevent debris from the contaminated site splashing on the freshly prepped incision. This is a logical conclusion.
Stoma.
Intestinal stomas are contaminated with fecal material and intestinal flora. The stoma should be isolated with a sterile clear plastic adhesive dressing and prepped last. If the stoma is to be incorporated with the surgical incision, it is prepped and dried last and covered with a sterile clear plastic adhesive dressing to prevent fecal material from entering the wound. Some surgeons pack the open end of the stoma with a Betadine-soaked radiopaque sponge. This sponge should be accounted for in the count tally at the end of the procedure. A nonradiopaque gauze sponge should not be used as stoma packing in the sterile field because it could become misplaced and be unaccounted for in the procedure.
Other contaminated areas.
Other areas such as draining sinuses, skin ulcers, the vagina, and the anus are considered contaminated areas also. In all of these areas, the general rule of scrubbing the most contaminated area last with separate sponges applies. Use logic when determining the sequence for surgical skin prep.
Foreign substances.
Adhesive, grease, tar, and similar foreign materials are removed from skin before the area is mechanically cleansed with an antiseptic agent. A nonirritating solvent should be used to cleanse the skin. The solvent should be nonflammable and nontoxic. Do not allow the solution to collect underneath the patient. Take care that the foreign substance in itself is not hazardous or flammable. Some chemicals can ignite when exposed to water or moisture.
Traumatic wounds.
In the preparation of an area in which the skin is not intact because of a traumatic injury, wound irrigation may be part of the skin preparation procedure. The wound may be packed or covered with sterile gauze while the area around it is thoroughly scrubbed and shaved if necessary. The extent and type of injury determine the appropriate procedure. Protective gloves, eyewear, and a mask should be worn during the irrigation.
Solutions that are irritating to a denuded area must not be used. Small areas may be irrigated with warm sterile normal saline solution with a bulb syringe. When a bulb syringe is used, care must be taken not to force debris and microorganisms deeper into the wound. The wound is irrigated gently to dislodge debris and flush it out. Soft nylon brushes are sometimes used. This is useful for industrial injuries and motorcycle accidents.
Copious amounts of warm sterile solution may be needed to flush out a large wound. A container of warm sterile normal saline or Ringer’s lactate solution attached to IV tubing can be hung on an IV pole near the area to be copiously irrigated. If the area is on an extremity, a sterile irrigating pan with a wire screen fitted over the top is placed under the extremity. During irrigation, solution runs from the wound into the pan. A piece of tubing connected to an outlet on the pan carries the irrigating solution into a kick bucket on the floor near the OR bed or to a suction canister.
Dry towels or sheets may be necessary under the patient if the area has not been protected during irrigation. A moisture-proof pad placed under the wound before irrigation helps channel solutions into a drainage pan.
Debridement of the wound (excision of all devitalized tissue) usually follows irrigation. The surgeon may request to have sterile tissue forceps and scissors on the prep table for removal of nonviable tissue.
Areas prepared for grafts.
Separate setups are necessary for skin preparation of recipient and donor sites before skin, bone, or vascular grafting procedures. The donor site is usually scrubbed first.
The donor site for a skin graft should be scrubbed with a colorless antiseptic agent so that the surgeon can properly evaluate the vascularity of the graft postoperatively. The recipient site for skin grafts is usually more or less contaminated (e.g., after a burn or other traumatic injury). Items used in preparation of the recipient site must not be permitted to contaminate the donor site. Also, microorganisms on the skin of the donor site must not be transferred to a denuded recipient site.
Antiseptic solutions
The infection control committee usually determines the chemical antiseptic or antimicrobial agents to be used in the OR for skin preparation. Products selected by the OR committee are commonly the same ones selected for use as hand and skin antisepsis of the sterile team. The maximum concentration of a germicidal agent that can be used on skin and mucous membranes is limited by the agent’s toxicity for these tissues. The ideal antiseptic skin cleansing agent should have the following qualities:
• It has broad-spectrum antimicrobial action and rapidly decreases the microbial count. It should be virucidal and active against protozoa and yeasts.
• It can be quickly applied and remains effective against microorganisms.
• It can be safely used without skin irritation or sensitization. It should be nontoxic.
• It effectively remains active in the presence of alcohol, organic matter, soap, and detergent.
• It should be nonflammable when dried for use with laser, electrosurgical, and other high-energy devices.
Chlorhexidine gluconate.
Chlorhexidine gluconate was discovered in 1950 in England. A solution of 2% to 4% chlorhexidine gluconate is used as an antiseptic skin cleansing soap preoperatively. A tincture of 0.5% chlorhexidine gluconate in 70% isopropyl alcohol (Hibitane) is sometimes used. A broad-spectrum, rapid-acting antimicrobial agent, it binds to negative charges on microbial cell walls to produce irreversible damage and death. It has minimal activity against yeasts, spores, and tuberculosis. It is effective against most viruses.
Activity is adversely affected by traces of soap and is reduced in the presence of organic matter. If chlorhexidine is used in combination with personal soaps and shampoos for preoperative bathing, it is inactivated. The patient should be instructed to shampoo the hair with personal shampoo and thoroughly rinse before applying chlorhexidine as a body wash. Body lotion should not be applied after bathing because this nullifies the residual bacteriostatic properties of the compound. The patient should be instructed to keep chlorhexidine out of the eyes and ears.
This agent is not absorbed through intact skin but binds with mucous membranes. It significantly reduces and maintains a reduction of microbial flora, such as bacteria and yeasts, for at least 4 hours. The prolonged effect is inhibited if chlorhexidine is combined with iodine preparations. Its activity increases at elevated temperature because it binds with the stratum corneum. It is available either tinted for color demarcation of the skin area being prepped or nontinted if the surgeon needs to observe the skin color. Because it is an irritant to the eyes and ototoxic, it is contraindicated for facial antisepsis. If chlorhexidine gets on clothing, chlorine bleach is avoided because it permanently stains the fabric. Clothing should be rinsed with cold water until all traces of the product have been removed.
Iodine and iodophors.
Discovered in 1812, iodine was first used in wound care in 1839. A solution of 1% or 2% iodine in water or in 70% alcohol is an excellent antiseptic. However, potential hazards of skin irritations and burns led to a decline in its use. If used, iodine should dry and then be rinsed off with 70% alcohol to neutralize the damaging effect.
Iodophors are iodine compounds that may be combined with detergents. Povidone-iodine has a surfactant, a wetting and dispersive agent, in an aqueous solution such as Betadine surgical scrub, a commonly used detergent form of iodophor. The detergent form should be rinsed off. Iodophor solution without detergent can be used for rinsing. Iodophor in 70% alcohol also is available. Iodophors are excellent cleansing agents that remove debris from skin surfaces while slowly releasing iodine. They are broad-spectrum antimicrobial agents that have some virucidal and sporicidal activity. Iodophors are relatively nontoxic and virtually nonirritating to skin or mucous membranes.
The brown film left on the skin after application of the solution clearly defines the area of application. This should not be wiped off because microbial activity is sustained by the release of free iodine as the agent dries and color fades from the skin. The solution should remain on the skin for at least 2 minutes. To hasten drying of the skin, alcohol may be painted on the area without friction before a self-adhering drape is applied. The alcohol must not be permitted to pool and must be completely dry before draping.
Iodophors are used with caution to prep the skin of patients who are sensitive or allergic to iodine. Shellfish, for example, contains iodine. The association with an actual allergy is more an issue with systemic problems as opposed to topical sensitivity. Studies have shown that seafood allergy is associated with fish protein and not iodine.a
The type of preparation, concentration of iodine, and presence of surfactants affect the microbial activity of products. Povidone-iodine complexes are available in solution, spray, and gel forms. Tinctures are in solution. Manufacturer instructions are strictly followed for the product in use. The concentration of povidone-iodine may be altered via evaporation if the solution is warmed. Skin irritation may be caused by an increase in iodine concentration. Manufacturer recommendations should be followed.
Alcohol.
Isopropyl and ethyl alcohols are broad-spectrum agents that denature proteins in cells. A 70% concentration with continuous contact for several minutes is satisfactory for skin antisepsis if the surgeon prefers a colorless solution that permits observation of true skin color. Because alcohol coagulates protein, it is not applied to mucous membranes or used on an open wound. Isopropyl alcohol is a more effective fat solvent than is ethyl alcohol. Both are volatile and flammable. They must not pool around or under the patient, especially if an electrosurgical unit (ESU) or laser will be used. Vapors can accumulate under the drapes and become a fire or explosion hazard.
Triclosan.
A solution of 0.25% to 3% triclosan is a broad-spectrum antimicrobial agent that can be used for surgical antisepsis. Triclosan is chemically related to hexachlorophene and is pregnancy category C. It interferes with the enzymes needed for fatty-acid synthesis in bacterial cells.
Triclosan is incorporated into many over-the-counter products used by consumers, such as deodorants and bath soaps. It is blended with oils and lanolin in a mild detergent. Cumulative suppressive action develops slowly only with prolonged routine use. It is considered nontoxic and safe for use on the face, but do not allow the solution to enter the eyes or other denuded tissues. Studies are under way to determine the efficacy of triclosan in dentifrice preparations as a plaque-control agent. Triclosan-containing agents include Septisol 0.25% triclosan manufactured by STERIS and Dial Liquid Gold 3% triclosan from the Dial Corporation, a subsidiary of the Henkel Group.
Parachlorometaxylenol.
Originally developed in 1948 in Europe as a hair conditioner, parachlorometaxylenol (PCMX) has bactericidal properties useful for skin antisepsis. It is effective against some fungi, tuberculosis, and viruses. PCMX has residual properties with repeated use. It is nontoxic to the skin, eyes, and ears.
Skin preparation for specific anatomic areas
Head and neck
1. The eyebrows are never shaved or removed unless the surgeon deems this essential. Eyebrows do not grow back completely or evenly.
2. The eyelashes may be trimmed, if ordered by the surgeon, with fine iris scissors coated with sterile water-soluble lubricant to catch the lashes.
3. The eyelids and periorbital areas are cleansed with a nonirritating antiseptic agent, commonly triclosan detergent, and then rinsed with warm sterile water.
The prep starts centrally and extends to the periphery (i.e., from the center of the lid to the brow and cheek).
4. The conjunctival sac is flushed with a nontoxic agent, such as sterile normal saline solution, with a bulb syringe. Some surgeons use a dilute iodophor solution (not the detergent or alcohol form). The patient’s head is turned slightly to the affected side. The solution is contained with sponges or an absorbent towel. Care must be taken to prevent prep solution from entering the patient’s eyes or ears.
Chlorhexidine is contraindicated for facial preps. Iodophors are used with caution around the eyes. Chlorhexidine gluconate can cause corneal damage if accidentally introduced into the eyes and can cause sensorineural deafness if the agent enters the inner ear (e.g., through a perforated tympanic membrane).
1. Usually, defining the area with towels is not easy. As much of the surrounding area is included as is feasible and consistent with aseptic technique. Skin surfaces should be cleansed at least to the hairline.
2. Cotton applicators are used for cleansing the nostrils and external ear canals.
3. Protect the eyes with a piece of sterile plastic sheeting. If the patient is awake, ask that the eyes be kept closed during the prep. Cotton balls or nonradiopaque gauze should be placed in the ears to prevent runoff. Cotton balls may leave small fibers in the ear that can cause irritation.
1. One sterile towel is folded under the edge of the blanket and gown, which are turned down almost to the nipple line.
2. The area includes the neck laterally to the table line and up to the mandible, tops of the shoulders, and chest almost to the nipple line.
3. For combined head and neck surgical procedures, include the face to the eyes; the shaved areas of the head, ears, and posterior neck; and the area over the shoulders.
Chest and trunk
1. The gown is removed. The blanket is turned down well below the lower limit of the area to be prepared. A towel is folded under the edge of the blanket.
2. The arm is held up during the prep.
3. Beginning at the site of incision, the area may include the axilla, chest, and abdomen from the neck to the iliac crest. For a surgical procedure in the region of the kidney, it extends up to the axilla and down to the pubis. The area also extends beyond midlines, anteriorly and posteriorly, and may include the arm to the elbow (Fig. 26-34).

1. The anesthesia provider turns the patient’s face toward the unaffected side.
2. One towel is folded under the blanket edge, just above the pubis. Another is placed on the OR bed under the shoulder and side.
3. The arm on the affected side is held up by grasping the hand and raising the shoulder and axilla slightly from the OR bed.
4. The area includes the shoulder, upper arm down to the elbow, axilla, and chest wall to the table line and beyond the sternum to the opposite shoulder (Fig. 26-35).

1. The anesthesia provider turns the patient’s face toward the opposite side.
2. A towel is placed under the shoulder and axilla.
3. The arm is held up by grasping the hand and elevating the shoulder slightly from the OR bed.
4. The area includes the circumference of the upper arm to below the elbow, from the base of the neck over the shoulder, scapula, and chest to the midline.
1. With the patient in the lithotomy position, a moisture-proof pad is placed under the buttocks and extends to the kick bucket that receives solutions and discarded sponges.
2. The area includes the pubis, external genitalia, perineum and anus, and inner aspects of the thighs (Fig. 26-36).

3. Begin the scrub over the pubic area, scrubbing downward over the genitalia and perineum. Discard the sponge.
4. The inner aspects of the upper third of both thighs are scrubbed with separate sponges, working from groin to distal aspect of thigh.
6. The rectoperineal area is prepped before the abdomen, using a separate prep set and gloves if an abdominal approach is planned.
1. Sponge forceps should be included on the preparation table for a vaginal prep because a portion of the prep is done internally. A disposable vaginal prep tray, with sponge sticks included, is available.
2. With the patient in the lithotomy position, a moisture-proof pad is placed under the buttocks and extends to the kick bucket that receives solutions and discarded sponges.
3. A towel is folded above the pubis.
4. Urinary catheterization is performed if indicated. Vaginal and anal flora should not be permitted to enter the sterile environment of the urinary bladder.
5. The external area includes the pubis, vulva, labia, perineum, anus, and adjacent area, including inner aspects of the upper third of the thighs (see Fig. 26-36).
6. Begin over the pubic area, scrubbing downward over the vulva and perineum. The inner aspects of the thighs are scrubbed with separate sponges from the labia majora outward.
7. The vagina and cervix are cleansed with sponges on sponge forceps or disposable sponge sticks. The cleansing agent should be applied generously in the vagina because vaginal mucosa has many folds and crevices that are not easily cleansed.
8. After thorough cleansing of the vagina, wipe it out with a dry sponge to prevent the possibility of the fluid entering the peritoneal cavity during the surgical procedure on pelvic organs.
9. The anus is prepped last to prevent intestinal florae from entering the vaginal vault.
Extremities
1. A moisture-proof pad should be placed on the OR bed under an extremity to retain runoff solution. This is removed after the prep so that the bed is dry under the surgical site. The extremity is supported by personnel wearing sterile gloves and remains elevated until sterile drapes are applied under and around the prepped area.
2. A full extremity prep may be done in two stages to provide adequate support to joints and to ensure that all areas are scrubbed. It may include the foot for hip, thigh, knee, and lower leg procedures.
3. Caution must be taken to prevent solution from pooling under a tourniquet. The padding absorbs the solution and could cause tissue maceration. If a nonsterile pneumatic tourniquet is used, it is positioned before the prep and protected with a sterile clear plastic drape. A towel tucked around the tourniquet cuff absorbs excess solution. This is removed before the tourniquet is inflated.
1. Towels may be omitted. The anatomy of the hand furnishes sufficient landmarks to define the area, and towels are apt to slip over the scrubbed area.
2. The arm must be held up by a gloved person supporting it above the elbow so that the entire circumference can be scrubbed.
3. The area includes the hand and arm to 3 inches (7.5 cm) above the elbow.
1. One towel is placed under the thigh on the OR bed. Another towel is placed on the abdomen and folded under the edge of the gown, just above the umbilicus.
2. The leg on the affected side is held up by supporting it just below the knee.
3. The area includes the abdomen on the affected side, the thigh to the knee, the buttocks to the table line, the groin, and the pubis (Fig. 26-37).

1. One towel is placed under the thigh on the OR bed. Another towel is placed on the abdomen and folded under the edge of the gown, just below the umbilicus.
2. The leg is held up by supporting the foot and ankle.
3. The area includes the entire circumference of the thigh and leg to the ankle, over the hip and buttocks to the table line, the groin, and the pubis. Take care not to allow the solution to pool under the patient’s buttocks.
1. A towel is placed over the groin.
2. The leg is held up by supporting it at the foot.
3. The area includes the entire circumference of the leg and extends from the foot to the upper part of the thigh (Fig. 26-38).

Documentation
Details of the preoperative skin condition and preparation should be documented in the patient’s intraoperative record. These should include, but are not limited to, the following:
• The condition of the skin around the surgical site and placement sites of the return electrodes
• Hair removal, if done, including the method and location, and areas for attachment of monitors or electrodes
• Antiseptic solutions, fat solvents, irrigating solutions, and any other agents used
Draping
Draping is the procedure of covering the patient and surrounding areas with a sterile barrier to create and maintain an adequate sterile field. An effective barrier eliminates or minimizes passage of microorganisms between nonsterile and sterile areas. Criteria to be met in establishing an effective barrier are that the material must be:
• Blood and fluid resistant to keep drapes dry and prevent migration of microorganisms. Material should be impermeable to moist microbial penetration (i.e., resistant to strike-through). Resistant to tearing, puncture, or abrasion that causes fiber breakdown and thus permits microbial penetration.
• Lint-free to reduce airborne contaminants and shedding into the surgical site. Cellulose and cotton fibers can cause granulomatous peritonitis or embolize arteries.
• Antistatic to eliminate risk of a spark from static electricity. Material must meet standards of the National Fire Protection Association (NFPA).
• Sufficiently porous to eliminate heat buildup so as to maintain an isothermic environment appropriate for the patient’s body temperature.
• Drapable to fit around contours of the patient, furniture, and equipment.
• Dull and nonglaring to minimize color distortion from reflected light.
• Free of toxic ingredients, such as laundry residues and nonfast dyes.
• Flame resistant to self-extinguish rapidly on removal of an ignition source. This is a concern with use of lasers, ESUs, and other high-energy devices that provide an ignition source at the sterile field. Drapes become fuel for a fire. Some materials are more flammable than others; some are fire-retardant.
Draping materials
Self-adhering sheeting.
Sterile, waterproof, antistatic, and transparent or translucent plastic sheeting may be applied to dry skin.
The entire clear plastic drape has an adhesive backing that is applied to skin. This may be applied separately, or the sheeting may be incorporated into the drape sheet. The skin incision is made through the plastic.
Antimicrobial incise drapes have an antimicrobial agent impregnated in the adhesive or the polymeric film. A film coated with an iodophor-containing adhesive, for example, slowly releases active iodine during the surgical procedure to effectively inhibit proliferation of organisms from the patient’s skin. The antimicrobial may be triclosan or another agent that does not contain iodine. The skin may be prepped with alcohol and allowed to dry before the drape is applied. Time is a factor in microbial accumulation from resident bacteria. Antimicrobial incise drapes are used to sustain suppression, particularly for procedures that last more than 3 hours.
A nonwoven towel drape has a band of adhesive along one edge. Used as a draping towel, it remains fixed on skin without towel clips. This is advantageous when clips might obscure the view of a part exposed to x-rays during the surgical procedure. It also is used to wall off a contaminated area, such as a stoma, from the clean skin area to prevent spilling contents and causing infection or chemical irritation.
Adhesive surrounds a fenestration (opening) in the plastic sheeting. This secures the drape to the skin around the surgical site, such as an eye or ear. Caution is used in applying this type of drape around the face of a patient who is awake. The patient must have breathing space. Some patients experience claustrophobia. Fabric towels may not feel as confining.
Advantages of self-adhering drape material
• Resident microbial flora from skin pores, sebaceous glands, and hair follicles cannot migrate laterally to the incision.
• Microorganisms do not penetrate the impermeable material.
• Landmarks and skin tones are visible through the transparent plastic.
• Inert adhesive holds drapes securely, eliminating the need for towel clips and possible puncture of the patient’s skin.
• Plastic sheeting conforms to body contours and has elasticity to stretch without breaking its adhesion to skin.
Some self-adhering drapes have sufficient moisture-vapor permeability to reduce excessive moisture buildup that could macerate the skin or loosen adhesive. A nonporous material should not cover more than 10% of the body surface because it may interfere with the patient’s thermal regulatory mechanism of perspiration evaporation. The heat-retaining property of plastic causes the patient to perspire excessively, but its nonporous nature prevents evaporation.
This material is used in the following manner:
1. The usual skin preparation is done.
2. The scrubbed area must be dry. It may dry via evaporation, or excess solution may be blotted or wiped off with a sterile sponge or towel. Alcohol may be applied after an iodophor scrub to hasten drying via evaporation.
3. Transparent plastic material is applied firmly to the skin, with the initial contact along the proposed line of incision. The drape is smoothed away from the incision area.
4. Regular fabric drapes are applied over the plastic sheeting unless plastic is incorporated into the fenestrated area of the drape.
Nonwoven disposable drapes.
Most nonwoven disposable materials are compressed layers of synthetic fibers (i.e., rayon, nylon, or polyester) combined with cellulose (wood pulp) and bonded together chemically or mechanically without knitting, tufting, or weaving. This material may be either nonabsorbent or absorbent. Polypropylene and foil also are used in some types. Those fabrics that comply with criteria for establishing an effective barrier have the following advantages as disposable drapes:
• They are moisture-repellant; they retard blood and aqueous fluid moisture strike-through to prevent contamination. Not all nonwoven fabrics have this characteristic; only nonabsorbent materials or those laminated with plastic are impermeable to moisture.
• They are lightweight, yet strong enough to resist tears.
• They are lint-free unless cellulose fibers are torn or cut.
• Contaminants are disposed of along with drapes.
• They are antistatic and flame-retardant for OR use.
• They are prepackaged and sterilized by the manufacturer, which eliminates washing, mending, folding, and sterilizing processes.
Some drapes have a reinforced area of multiple layers that surrounds the fenestration. The outer layer absorbs fluids, but the underneath layer is impermeable to strike-through. An antimicrobial may be incorporated into this reinforced area. Other drapes have an impermeable layer around the fenestration. Drapes that are completely laminated with a plastic layer may be used for an extremity or for instrument table covers. They are not used over the entire body of the patient because of their heat retention property.
Many nonwoven drapes have pouches or troughs incorporated close to the fenestration or along the sides of the drape to collect fluids, such as amniotic fluid. The pouch may have drainage ports, or fluid may be suctioned out. Some drapes also have pockets, skid-resistant instrument pads, or devices for holding cords incorporated in them (Fig. 26-39).

An aluminum-coated plastic body cover reflects radiant body heat back to the patient to reduce intraoperative heat loss. A sterile, nonconductive, radiolucent thermal drape may be used as the final drape. The patient may be wrapped in nonsterile reflective covers (thermadrape in the preoperative holding area. These may remain in place through the surgical procedure under standard sterile drapes and during postoperative recovery in the postanesthesia care unit (PACU). A reflective blanket or thermal drape is recommended when more than 60% of the body surface can be covered and when the surgical procedure will last more than 2 hours.
Nonwoven, disposable drapes are supplied prepackaged and presterilized by the manufacturer. A sterile package may contain a single drape, or it may have all of the drapes needed for a procedure, including towels, a Mayo stand and instrument table covers, and gowns. Unused disposable drapes and gowns should not be resterilized.
Woven textile fabrics.
The thread count and finish of woven natural fibers determine the integrity and porosity of reusable fabrics. Tightly woven textile fabrics may inhibit migration of microorganisms. Cotton fibers swell when they become wet. This swelling action closes pores or interstices so that liquid cannot diffuse through tightly woven fibers. The fabric can be treated to further repel fluids (i.e., be impermeable to moisture strike-through).
Reusable drapes may be made of 270–thread-count or 280–thread-count pima cotton with a Quarpel finish. This fluorochemical finish combined with phenazopyridine or a melanin hydrophobe produces a durable water-resistant fabric. However, this fabric has essentially the same heat-retaining qualities as plastic lamination, so it cannot be used for complete patient draping. This treated material can be used as reinforcement around fenestrations in otherwise untreated drapes.
Tightly woven 100% polyester reusable fabrics are hydrophobic (repel water droplets) but allow vapor permeation. Other reusable fabrics with different construction but similar barrier properties may be used.
The following points about reusable woven textile drapes should be considered:
• Material must be steam-penetrable and must withstand multiple sterilization cycles.
• When packaged for sterilization, drapes must be properly folded and arranged in sequence of use. Drapes may be fan-folded or rolled.
• Material must be free from holes and tears. The person who folds the drape is responsible for inspecting it for holes. Those detected may be covered with heat-seal patches. Tears or punctures (e.g., from towel clips or sharp instruments) compromise the barrier qualities of drapes.
• Drapes should be sufficiently impermeable to prevent moisture from soaking through them. Moisture has a wicking action that can cause migration of microorganisms.
• Reusable fabrics must maintain barrier qualities through multiple launderings. Densely woven, treated cotton becomes moisture permeable after about 75 washings; untreated cotton becomes moisture permeable after as few as 30 washings. Repeated drying, ironing, and steam sterilizing also alter fabric structure. The number of uses, washings, and sterilizing cycles should be recorded, and drapes that are no longer effective as barriers should be taken out of use.
Styles/types of drapes
Towels.
Disposable or reusable sterile towels may be used to outline, or square off, the surgical site after prepping the skin. The folded edge of each towel is placed toward the line of incision to square it off. Towels are usually packaged in groups of four by the in-house laundry and can be secured with nonperforating towel clips or may be sutured or stapled to skin.
Radiopaque towels in counted packages are commercially available. Some disposable types have adhesive strips to hold them in place.
Surgical towels are traditionally used as draping material and therefore are not routinely considered counted items. However, if a surgical towel is placed in the surgical incision, it becomes an item that must be accounted for and is listed using the same mechanism that is in place to track any other counted items.
The scrub person reports to the circulating nurse that a towel has been placed in the incision. The circulating nurse writes down the number of towels placed inside the patient on the count tally sheet or wipe-off board. At the conclusion of the surgical procedure, the scrub person reports how many towels have been removed and the number is validated by the circulating nurse during the final count. Counts are documented as correct or incorrect per facility policy.
The literature is replete with horror stories about surgical towels that carelessly become retained foreign objects when the team fails to account for them. Anything that becomes part of the incisional packing is considered a counted item.
Fenestrated sheets.
The drape sheet has an opening (fenestration) that is placed to expose the anatomic area where the incision will be made. Many styles of disposable nonwoven or reusable woven fabrics are available for specific uses. The size, direction, and shape of the fenestration vary to give adequate exposure of the surgical site. The sheet is long enough to cover the anesthesia screen at the head and extend down over the foot of the OR bed. Fenestrated sheets are usually marked to indicate the direction in which they should be unfolded. This may be an arrow or label designating the top or head, bottom or foot. It is wide enough to cover one or two armboards.
Reinforcement around the fenestration (see Fig. 26-39) for both nonwoven and woven fabrics provides an extra thickness to minimize the passage of microorganisms by capillary action to the sterile field. The reinforced area is usually 24 inches (60 cm) wide.
The drapes described are basic styles of fenestrated sheets.
The laparotomy sheet is often referred to as a lap sheet; the longitudinal fenestration is placed over the surgical site on the abdomen, back, or comparable area (see Fig. 26-37). The opening is large enough to give adequate exposure in the usual laparotomy. The sheet is at least 108 × 72 inches (274 × 183 cm).
Separate sheets.
Although fenestrated sheets are used for most surgical procedures, they are not always practical. The openings may be much too large for small incisions, such as specimens for biopsies or procedures on the hands or feet. Smaller separate sheets may be used for these purposes to leave exposed only the small surgical area or to provide additional drapes on the surgical field. Many of these are disposable.
The split sheet is the same size as a laparotomy sheet. Rather than the sheet being fenestrated, one end is cut longitudinally up the middle at least one third the length of the sheet to form two free ends (tails). The upper end of this split may be in the shape of a U. Adhesive strips on each tail approximately 8 inches (20 cm) from the end of the split adhere together to snug the drape around an extremity or head. Shorter styles have adhesive strips the full length of the inner aspect of the tails for circumferential wrapping.
The single sheet is 108 × 72 inches (274 × 183 cm). Folded lengthwise, it is placed above the sterile field to shield off the anesthesia provider and anesthesia machine or other equipment near the patient’s head or sterile field. A single sheet also is used to cover the patient and OR bed below the surgical area around the face.
Stockinette is a tubular drape used to cover an extremity. This seamless tubing of stretchable woven material contours snugly to the skin. The material is porous and absorbent, so it is not a microbial barrier. Therefore, when used as a drape, it may be covered with a layer of plastic.
A two-ply tubular disposable drape is available that has an inner layer of stockinette and an outer layer of vinyl. An opening is cut through the material over the line of incision. Edges may be secured with a plastic incise drape before the incision is made, or it may be clipped to the wound edges after the incision. Rolled elastic ACE or Coban bandage is sometimes used for this purpose. Care is taken to use nonlatex materials for patients sensitive to latex.
Principles of draping
The entire team should be familiar with the draping procedure because draping is an important step in the preparation of the patient for a surgical procedure. The scrub person should be knowledgeable and ready to assist with draping. The scrub person is responsible for seeing that necessary articles are arranged in proper sequence on the instrument table.
The person responsible for draping the patient may vary, as do materials and styles of drapes used to create a sterile field. The surgeon or assistant usually places the self-adhering incise drape or towels and towel clips to outline the surgical site. The scrub person assists with placing the remainder of the drapes.
During any draping procedure, the circulating nurse should stand by to direct the scrub person as necessary and to watch carefully for breaks in technique. A contaminated drape or exposure of a nonsterile area is a potential source of infection for the patient.
Basic principles regarding draping are as follows:
1. Place drapes on a dry area. The area around or under the patient may become damp from solutions used for skin preparation. The circulating nurse removes damp items or covers the area to provide a dry field on which to lay sterile drapes.
2. Allow sufficient time to permit careful application.
3. Allow sufficient space to observe sterile technique. Do not reach across a nonsterile surface.
4. Handle drapes as little as possible.
5. Never reach across the OR bed to drape the opposite side; go around it.
6. Take towels and towel clips, if used, to the side of the OR bed from which the surgeon is going to apply them before handing them up.
7. Carry folded drapes to the OR bed. Watch the front of the sterile gown; it may bulge and touch the nonsterile OR bed or blanket on the patient. Stand well back from the nonsterile OR bed.
a. Hold drapes high enough to avoid touching nonsterile areas, but avoid touching the overhead operating light.
b. Hold a drape high until it is directly over the proper area, and then lay it down where it is to remain. Once a sheet is placed, do not adjust it. Be careful not to slide the sheet out of place when opening the folds.
c. Protect gloved hands by cuffing the end of the sheet over them. Do not let gloved hands touch the skin of the patient.
8. In unfolding a sheet from the prepped area toward the foot or head of the OR bed, protect the gloved hand by enclosing it in a turned-back cuff of sheet provided for this purpose. Keep hands at table level.
9. If a drape becomes contaminated, do not handle it further. Discard it without contaminating gloves or other items.
a. If the end of a sheet falls below waist level, do not handle it further. Drop it, and use another.
b. If in doubt as to its sterility, consider a drape contaminated.
c. If a drape is incorrectly placed, discard it. The circulating nurse peels it from the OR bed without contaminating other drapes or the prepped area.
10. A towel clip that has been fastened through a drape has its points contaminated. Remove it only if absolutely necessary, and then discard it from the sterile setup without touching the points. Cover the area from which it was removed with another piece of sterile draping material.
Unusual circumstances considered potentially contaminated
1. If a hole is found in a drape after it is laid down, the hole must be covered with another piece of draping material (or OpSite or the entire drape discarded. Use judgment concerning whether covering or discarding the drape is appropriate. Discarding the drape is the ideal if at all possible.
2. A hair found on a drape must be removed, and the area covered immediately. The source of a hair is usually unknown when it is found on a sterile drape. The hair would cause a foreign body tissue reaction in a patient if it got into the wound. Remove the hair with a hemostat, and hand the instrument off the sterile field; cover the area with a towel or another piece of draping material. Ideally the drape should be discarded and replaced.
Procedures for draping the patient
Draping procedures establish the sterile field. Standardized methods of application should be practiced using adequate draping materials. The most common procedures are discussed here merely to elaborate the principles. The following section details procedures that use only absorbent woven draping materials because establishing a microbial barrier with them is more complex. The draping procedure is simplified when single-thickness impermeable materials are used. A procedure book should be consulted for specific draping procedures.
Laparotomy.
The term laparotomy refers to an incision through the abdominal wall into the abdominal cavity. All flat smooth areas are draped in the same manner as the abdomen. These areas include the neck, chest, flank, and back. The draping procedure is as follows:
1. Hand up four towels and towel clips (if the surgeon uses them). With practice, these can be held in the hands at the same time and separated one by one as the surgeon takes them. Go to the side of the OR bed on which the surgeon is draping to avoid reaching over the nonsterile table. The surgeon places these towels within the prepped area, leaving only the surgical area exposed.
2. Hand one end of a fan-folded medium sheet across the OR bed to the assistant, supporting the folds, keeping the sheet high, and holding it taut until it is opened; then lay it down. Place this medium sheet below the surgical site with the edge of it at the skin edge, covering the draping towel.
This sheet provides an extra thickness of material under the area from the Mayo stand to the incision, where instruments and sponges are placed, and closes some of the opening in the laparotomy sheet if necessary. This sheet may be eliminated if a self-adhering incise drape or impermeable drapes are used.
3. Place a laparotomy sheet with the opening directly over the prepped area outlined by the towels, in the direction indicated for the foot or head of the OR bed (Fig. 26-40). Drop the folds over the sides of the table. However, if an armboard is in place, hold the folds at table level until the sheet is opened all the way. Open it downward over the patient’s feet first and then upward over the anesthesia screen (Fig. 26-41). Sheets with appropriate fenestrations are used to expose the surgical site.
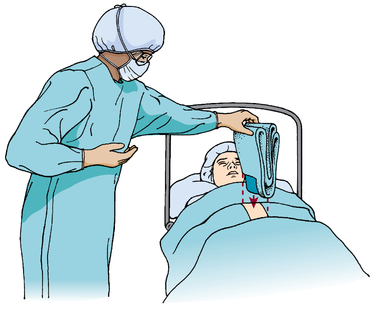
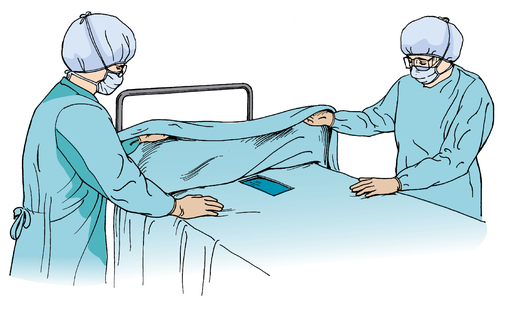
a. For the neck, use a thyroid sheet.
b. For the chest, with the patient in either the supine or lateral position, use a breast sheet.
c. For the flank, with the patient in the kidney position for transverse incision, use a kidney sheet.
d. For the back, use a laparotomy sheet, the same as for the abdomen.
4. Place a large single sheet crosswise on the OR bed above the fenestrated site. This sheet provides an extra thickness above the area and closes some of the opening in the laparotomy sheet if necessary. It also covers the armboard if one is in use. A single sheet may be needed for this latter purpose even if an impermeable laparotomy sheet is used.
Head.
An overhead instrument table may be positioned over the patient for neurologic procedures. The table drape is extended down over the patient’s shoulders to create a continuous sterile field between the instrument table and the surgical site. The draping procedure is as follows:
1. The surgeon places four towels around the head and secures them with towel clips or affixes them in place with sutures or skin staples. Towel clips and staples are not used if x-rays will be taken during the surgical procedure.
2. Hand one end of a fan-folded medium sheet to the assistant. Holding it taut, unfold and secure it over the head end of the OR bed below the surgical site at the skin edge of the draping towel.
3. Place a fenestrated sheet with the opening over the exposed skin area of the head. Unfold the sheet across the front edge of the overhead table, and secure it before allowing the remainder of the drape to drop over the head of the OR bed toward the floor. Some disposable fenestrated head sheets have transparent plastic adhesive incise sheeting to cover the incisional site. The incise sheet may be impregnated with iodophor for additional wound protection during the procedure.
Face.
Even if the surgical site is unilateral, the surgeon may want the entire face exposed for comparison of skin lines. The draping procedure is as follows:
1. The surgeon places a drape under the head while the circulating nurse or assistant elevates the head. This drape consists of an open towel placed on a medium sheet. The center of the towel edge is 2 inches (5 cm) in from the center of the sheet edge. The towel is drawn up on each side of the face, over the forehead or at the hairline, and fastened with a small nonperforating towel clip. This leaves the desired amount of the face exposed.
2. Hand up three additional towels and four towel clips. These towels frame the surgical site.
3. Place a medium sheet just below the site. This sheet must overlap the one under the head.
4. A fenestrated drape may be placed to complete draping.
5. Cover the remainder of the foot of the OR bed, as necessary, with a single sheet.
If the patient is receiving inhalation anesthesia, use a minor sheet instead of a towel on a medium sheet for the first drape under the head. A minor sheet is large enough to draw up on each side of the face and to enclose the endotracheal tube and oropharyngeal monitoring probes from the anesthesia machine for a considerable distance, thus keeping them from contaminating the sterile field.
If the surgical procedure on the face is unilateral, the anesthesia provider may sit along the unaffected side, near the patient’s head, with the anesthesia screen placed on the same side of the OR bed.
Skin staples or sutures may be used to affix towels around the contours of the face and neck of the patient under general anesthesia. Each staple or stitch overlaps the skin and edge of the drape.
Eye.
After skin preparation, the unaffected eye is protected by covering it with a sterile eye pad before draping the patient. The draping procedure is as follows:
1. The surgeon places two towels and a medium sheet under the head while the circulating nurse holds the head up, as described for a face drape. One towel is drawn up around the head, exposing only the eyebrow and affected eye, and fastened with a clip without pressure on the eyes.
2. Hand up four towels and towel clips to isolate the affected eye. Some surgeons prefer a self-adhering aperture drape.
3. Cover the patient and remainder of the OR bed below the surgical area with a single sheet.
If local anesthetic will be administered, the drapes are raised off of the patient’s nose and mouth to permit free breathing. A Mayo stand or anesthesia screen positioned over the lower face before the draping is one method used to elevate the drapes. Oxygen, 6 to 8 L/min, can be supplied under the drapes via tube or nasal cannula. Take extreme caution that oxygen does not build up under the drapes. An ignition source such as a cautery or laser could spark a fire beneath the drapes.
For a microsurgical procedure, a sterile, padded, U-shaped steel wrist rest for the surgeon and assistant is fastened to the head of the OR bed. Towels are put around the patient’s head before the rest of the facial and body draping is completed.
If irrigation will be used, a plastic fenestrated drape is placed over the four towels to keep them dry if an aperture drape is not preferred.
Ear.
The basic draping procedure is the same as for draping a face or eye, except that only the affected ear is exposed. The head is turned toward the unaffected side. Oxygen can be supplied under the drapes, as previously described. The anesthesia provider is usually positioned at the side of the OR bed near the patient’s face.
Chest and breast.
While the arm is still being held up by the assistant after skin preparation:
1. Place a minor sheet on an armboard, under the patient’s arm, extending the sheet under the side of the chest and shoulder. The prepped arm is lowered to the sterile draped armboard. The distal portion of the arm may be encased in sterile stockinette so that the arm can be manipulated during the surgical procedure.
2. The patient’s body is draped with a sterile medium sheet.
3. Hand up towels and towel clips; five or six are necessary.
4. Apply a breast sheet so that the axilla is exposed for anticipated axillary dissection.
Shoulder.
While the arm is still being held up by the assistant after skin preparation:
1. Place medium sheets over the chest and under the arm.
2. Place a minor sheet under the shoulder and side of the chest.
3. The surgeon outlines the surgical site with towels and secures them with clips.
4. Place a minor sheet over the patient’s chest, covering the neck. Keep this sheet even with the edge of the towel that borders the surgical site laterally.
5. Wrap the arm in a minor sheet or encase it in a sterile stockinette, and secure it with a sterile gauze or elastic bandage. At this point, a sterile team member relieves the unsterile person who has been holding the arm.
6. Place a medium sheet above the area, and secure these sheets together with towel clips.
7. A laparotomy or breast sheet may be used. Pull the arm through the opening. Or a single sheet may be placed above the area, and the foot of the OR bed is covered with a medium sheet.
Elbow.
While the arm is still being held up by the unsterile assistant after skin preparation:
1. Place a sterile medium sheet across the chest and under the arm, up to the axilla.
2. The surgeon defines the surgical area on the upper (proximal) arm by placing a towel around the upper arm and securing it with a towel clip.
3. Wrap the hand in a sterile towel. At this point, a sterile team member relieves the unsterile person who has been holding the arm by grasping the wrapped hand, maintaining the arm in an elevated position.
4. The hand is grasped with a sterile stockinette, which is pulled down over the entire arm toward the axilla, over the surgical site. An elastic bandage is wrapped around the arm starting at the distal end (hand) to the proximal area (axilla).
5. Place a medium sheet across the chest, on top of the arm, even with the towel on the upper arm and covering it. Secure this sheet around the arm with a towel clip.
6. An extremity sheet is drawn over the hand and the arm. The extremity sheet is opened in its entirety across the patient’s body.
Hand.
While the arm and hand are still being held up after skin preparation:
1. Place an impervious minor sheet, folded in half, on the extremity table.
2. The surgeon places a towel around the lower arm, limiting the exposed area to the affected hand, and secures it with a towel clip.
3. Pull a stockinette over the hand and up over the length of the arm. At this stage in draping, the unsterile person is relieved of holding the arm. The draped arm is laid on the draped extremity table.
4. Place a minor sheet across the extremity table just above the surgical site.
5. Place an extremity sheet over the hand. Do not drop folds below the level of the armboard. Open the sheet across the patient’s body toward the feet first. Attach the top end to the IV poles at the head of the bed.
Perineum.
With the patient in the lithotomy position for a genital, vaginal, or rectal procedure:
1. Place a medium sheet under the buttocks. The circulating nurse can grasp the underside and assist in placement. With the patient’s legs elevated in stirrups, this drape hangs below the level of the OR bed and covers the lowered section of the OR bed.
2. Slide leggings over each leg, protecting the gloved hands in the folded cuffs.
3. The anus is covered if it is not part of the surgical site. An adhesive towel drape may be used for this purpose.
4. Place a medium sheet across the abdomen, from the level of the pubis, extending over the anesthesia screen or attached to IV poles at the head of the bed.
5. A fenestrated perineal sheet may be used rather than a medium sheet over the abdomen. To use a perineal sheet with built-in leggings, hand one end of the sheet to the assistant, opening out folds, and draw the leggings over the feet and legs simultaneously. The hands are kept on the outside of the sheet to avoid contaminating the gloves and gown.
Hip.
The patient is in a lateral position. If the leg will be manipulated during the surgical procedure, while the leg is still being held up after skin preparation:
1. Place a medium sheet on the OR bed under the leg, up to the buttock.
2. Place another medium sheet on the OR bed, overlapping the first one, to cover the unaffected leg. Some surgeons prefer to use an incise sheet or a lower extremity stockinette.
3. The surgeon wraps the foot and leg with an elastic bandage, covering the stockinette. The leg, held up to this point, is laid on the OR bed.
4. Place a minor sheet lengthwise of the OR bed on each side of the exposed area, even with the skin. The sheets under the leg and above the site do not overlap. Some surgeons prefer to draw the leg through the opening of a hip sheet or place a split sheet under the leg with the tails crossed over it toward the patient’s head.
5. Place a medium sheet above the exposed area. Secure these last three sheets with towel clips.
6. Place a single sheet above the surgical area and over the anesthesia screen.
If manipulation of the leg is not necessary during the surgical procedure, drape the same as for a laparotomy, using a hip sheet instead of a laparotomy sheet.
Knee.
While the leg is still being held up after skin preparation:
1. Place a medium sheet lengthwise on the OR bed, under the leg, up to the buttock. Take care not to contaminate sterile gloves on the unsterile tourniquet if used.
2. Place another medium sheet on the OR bed, overlapping the first sheet, to cover the unaffected leg.
3. The surgeon limits the sterile field above the knee by placing a towel around the leg and securing it with a towel clip.
4. Lay a minor sheet on the sterile sheets under the leg. The person who has been holding the leg lays it on this minor sheet. The surgeon wraps the leg in the minor sheet and secures it with a sterile bandage. Stockinette may be preferred for this step.
5. Place a medium sheet above the exposed area, at the skin edge, over the draping towel, and fasten it with a towel clip.
6. Place a laparotomy or extremity sheet, with the opening on the foot and the longer part of the sheet toward the head of the OR bed. Open it, and draw the leg through the opening. A split sheet may be used.
Lower leg and ankle.
While the leg is still being held up after skin preparation:
1. Place a medium sheet under the leg and over the unaffected leg to above the knees.
2. The surgeon limits the sterile field by placing a towel around the leg above the area of the intended surgical site and securing it with a towel clip.
3. Put a stockinette over the foot and draw it up over the leg to above the skin edge of the towel. The person who has been holding the leg is relieved, and the leg is held by a sterile team member.
4. Place a medium sheet above the surgical area, and secure it around the leg with a towel clip.
5. Place a laparotomy, extremity, or split sheet with the leg drawn through the opening.
6. Cover the remainder of the OR bed over the anesthesia screen with a single sheet as necessary.
Foot.
The general method of draping a foot is the same as that for the hand. While the foot is still being held up after skin preparation:
1. Place a medium sheet on the OR bed under the foot.
2. The surgeon limits the exposed area to the foot by placing a towel around the ankle and securing it with a towel clip.
3. Enclose the foot in a stockinette. A sterile team member relieves the unsterile person who has been holding the leg.
4. Place a medium sheet above the foot, and secure it around the ankle with a towel clip.
5. Place a laparotomy or extremity sheet with the opening over the foot and longer part of the sheet toward the head of the OR bed.
Draping of equipment
A pneumatic tourniquet frequently is used to control bleeding during surgical procedures on the upper and lower extremities. A nonsterile tourniquet cuff is placed around the extremity before skin preparation and is covered with the draping material. An impervious towel that delineates the upper limit of the surgical area is placed around the extremity below the tourniquet cuff.
Equipment that is brought into the sterile field but cannot be sterilized must be draped before it is handled by sterile team members. The following applies to draping of equipment:
1. Tailored, disposable, clear plastic drapes are available to cover equipment, such as the operating microscope and the C-arm, so that they can be manipulated in the sterile field by the sterile team.
2. If radiographs are to be taken during the surgical procedure, a cassette holder may be placed on the OR bed, under the mattress, before the patient is positioned, prepped, and draped. The circulating nurse raises the edge of the sterile drape for the radiology technician to place and remove the x-ray cassette. The cassette may be covered with a sterile Mayo stand cover or specially designed disposable cover and placed on sterile drapes when a lateral view is needed.
3. Cords, cables, attachments, and tubing that are not sterile are inserted into sterile plastic sleeves before they are placed on the sterile field.
Nonsterile equipment that must stand near the sterile field is isolated from the sterile area with a barrier drape. IV poles frequently are used to attach drapes to shield off power-generating sources of mechanical and electrical equipment, such as electrosurgical and cryosurgical units, fiberoptic lighting units, and air-powered or electrical instruments. The drape over the patient or a separate single sheet is extended from the OR bed upward in front of or over the nonsterile equipment. The circulating nurse fastens the drape to IV poles on each side of the equipment that stands above the level of the sterile field or near it.
Heat-generating equipment must have adequate ventilation to dissipate heat. Impermeable, heat-retaining materials cannot completely encase these units. Ends of fiberoptic light cables should not make prolonged contact with drapes, or a fire may result.
Some nonsterile equipment, of necessity, is moved over the sterile field. The sterile field is protected using additional draping material as follows:
1. Sterile disposable drapes are available to cover radiograph equipment and image intensifiers.
2. When ready to move an x-ray tube or image intensifier over the sterile field, cover the field with a sterile minor sheet. The circulating nurse discards this sheet after use because it is considered contaminated.
3. Photographic equipment and video cameras should be draped as much as feasible when used over the sterile field. Some video cameras fit directly into the headlamp of the surgeon and require no special draping.
Plastic isolator.
A plastic isolator (a clear plastic shield on one side of or completely over the OR bed) may be used to exclude microorganisms from the environment immediately surrounding the patient. It may isolate a patient who is highly susceptible to infection, such as a patient with burns or immunosuppression, or it may isolate a patient with a gross infection and provide protection for others. In the OR, plastic isolators are used to isolate the sterile field from both room air and the OR team and thus exclude microorganisms normally in the OR environment.
The portable, lightweight, optically transparent surgical isolator forms a bubble over the patient when inflated. This surgical isolation bubble system (SIBS) has two elements: a filter/blower unit and a prepackaged sterile disposable bubble. Its floor provides a sterile drape that adheres to prepped skin around the incision site. Built into the sides are ports (armholes) through which the team works and a port for passing sterile supplies from the circulating nurse (Fig. 26-42).
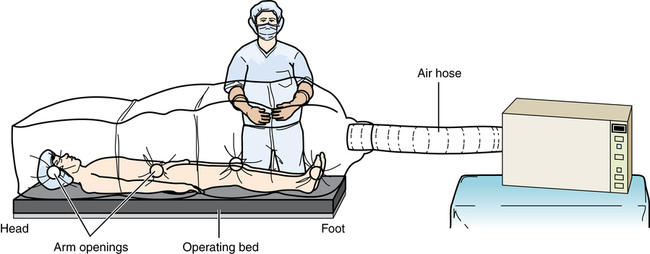
A patient isolation drape may be used that is a modification of the total isolator. It isolates the sterile field from equipment, such as the C-arm image intensifier used for hip procedures. The drape is suspended from a steel frame on one side of the special orthopedic table but does not enclose the patient. The drape may have an incise portion that may be impregnated with a timed-release iodophor. Storage holsters and irrigation pouches are commonly incorporated into the side. Care is taken not to perforate through the plastic surface when placing items in the pouches.