Common Invasive Procedures
1. Understand the indications for common procedures performed in the neonatal intensive care unit (NICU), such as endotracheal tube (ETT) intubation and suctioning, vascular access methods, blood sampling methods, bladder catheterization, bladder aspiration, thoracentesis, and lumbar puncture.
2. Know the equipment and supplies needed to perform common fundamental and advanced invasive procedures in the neonate.
3. Identify pertinent anatomic landmarks for commonly performed invasive procedures in the NICU.
4. Describe the precautions and contraindications for each invasive procedure.
5. Describe potential complications associated with each invasive procedure.
Approximately 250,000 to 350,000 newborn infants are admitted into the NICU in the United States annually and undergo hundreds of diagnostic and/or therapeutic procedures during their hospitalization. This chapter incorporates many of the diagnostic and therapeutic interventions that are commonly performed in the NICU. These procedures are crucial to the infant’s survival; however, they expose the infant to pain and stress that can result in harmful long-term consequences. Therefore, pain management is essential when performing interventions in the NICU.
In many NICUs today, qualified registered nurses or advanced practice nurses, rather than physicians, perform many invasive procedures. Prior to performing any procedure, it is essential that one have knowledge of the indications, precautions, and complications associated with each procedure. Infants are extremely vulnerable; therefore, the ability to perform the procedure proficiently is a major requirement to prevent harm.
The details pertaining to each of the covered procedures comprise this chapter. Aspects that are common to each include the crucial issues listed below.
■ Know your institution’s protocols about the qualifications needed to perform any procedure.
■ Know your institution’s protocols about any specific ways in which procedures differ from the descriptions included here.
■ Obtain informed consent whenever required for an invasive procedure. Discussion with family is key, even if signed informed consent is not required.
■ Always use standard infection control precautions and implement aseptic technique whenever indicated.
■ Provide for pain and comfort control before, during, and after the procedure.
■ Monitor the patient’s clinical status during the procedure. Minimally, monitoring will include oxygenation, ventilation, temperature, and reaction to the procedure, including pertinent vital signs.
■ Make written documentation about pertinent aspects of the procedure and enter this into the medical record.
■ Perform time out before procedure to ensure patient safety.
AIRWAY PROCEDURES
Endotracheal Tube Suctioning: Fundamental Procedure
1. Facilitate oxygenation and ventilation.
2. Maintain patent airway.
3. Clearance of tracheobronchial secretions.
4. Obtain tracheal aspirate specimens.
B. Contraindications.
1. Recent surgical procedure to area.
2. Recent surfactant administration.
3. Pulmonary hemorrhage—suction only if needed to maintain tube patency.
C. Precautions.
1. Suctioning should be done only when the infant needs it and not on a routine schedule.
2. Maintain aseptic technique.
3. Monitor vital signs and for adverse responses to procedure, such as bradycardia and oxygen desaturations.
4. Avoid hyperoxygenation, hyperinflation, and hyperventilation techniques if possible. Hyperoxygenation in preterm neonates is discouraged owing to risk of retinopathy of prematurity (ROP). If the infant easily becomes hypoxic or oxygenation status is critical, oxygen can be increased by 10% to 20% above baseline to maintain adequate oxygenation. Hyperinflation should be avoided as this places the neonate at risk for air leaks. The effect of hyperventilation alone in neonates is unclear and therefore discouraged (Davis and Rosenfeld, 2005).
5. Loss of lung volume can occur with suctioning. Increased loss of lung volume and hypoxia are associated with open catheters versus closed “in-line” catheters (Tingay et al., 2007).
6. Keep infant’s head midline during suctioning to prevent jugular vein distention, which can increase intracranial pressure (ICP).
7. Pulmonary hemorrhage may be exacerbated by suctioning. However, suctioning may be needed to clear the blood from the airway or tube.
8. Always suction ETT before suctioning mouth.
9. When feasible, use two caregivers to perform endotracheal suctioning if the closed (in-line) system is not in use. This may minimize adverse responses and shorten procedure time.
D. Equipment and supplies.
2. Choose the appropriate-sized catheter. Catheter should be no larger than half the inside diameter of the ETT.
b. Use 6 F for ETT less than 3.5 mm.
3. Resuscitation bag with 100% oxygen source and oxygen blender.
4. Suction source with vacuum control setting.
5. Manometer.
6. Stethoscope.
7. Specimen trap (if applicable).
E. Procedure.
1. Determine the need to suction and suction only when indicated. Suctioning should be individualized based on changes in the patient’s physical assessment and not on a routine schedule (Gardner et al., 2011). The following situations may warrant suctioning:
a. Falling oxygen saturations.
b. Increasing oxygen requirements.
c. Diminished breath sounds.
d. Changes in vital signs.
e. Changes in blood gases.
f. Changes in respiratory rate and pattern.
g. Agitation.
h. Visible secretions in ETT.
i. Pattern change in ventilator graphics.
j. Loss of or poor chest wall excursion with ventilator breaths.
2. Wash hands and ensure that equipment is in working order.
3. Shallow suctioning technique is the preferred method. Deep suctioning should be avoided as this has been shown to cause tissue damage and inflammation.
a. Determine suction catheter insertion depth by summing the length of the ETT and its adapter. The catheter should not be inserted more than 1 cm beyond the total distance determined (Hagler and Traver, 1994).
4. Gather supplies.
a. Commercially prepared suction catheter kit or sterile suction catheter and sterile gloves. Closed-system (in-line) suction catheter kits are available that remain attached to the ETT adapter and should be used per manufacturer’s recommendations. The closed-system suction technique is preferred as it allows the infant to be suctioned without being removed from the ventilator. Closed-system suction devices may decrease respiratory contamination and pulmonary infections and have been shown to have decreased physiologic consequences such as bradycardia and desaturation (Choong et al., 2003; Kalyn et al., 2003; Tan et al., 2005).
b. Appropriate-sized suction catheter with measurement markings.
c. If using a commercially prepared suction kit, open package and maintain sterility of contents. Remove and don sterile gloves, then remove catheter. If using separate gloves and catheter supplies, open suction catheter package, maintaining sterility of catheter, then open and don gloves. Continue to maintain aseptic technique and remove catheter from package.
5. While maintaining aseptic procedure, attach suction catheter to suction tubing with nondominant hand (now considered contaminated). With sterile dominant hand, hold suction catheter and maintain sterility of catheter.
6. Release suction tubing from nondominant hand and remove infant from ventilator. Provide oxygen and ventilation at necessary levels to maintain the heart rate and provide adequate oxygen saturation. Infant may be ventilated by hand or by providing manual breaths from ventilator. If manual breaths are provided by the ventilator, use caution to avoid hyperinflation and to allow adequate exhalation times.
7. Suction at 60 to 100 mm Hg or with just enough suction to extract secretions through catheter.
8. Advance catheter only to a predetermined distance. If a cough reflex is initiated, catheter distance is too far.
9. Apply suction only when withdrawing catheter and limit suction duration to 5 to 10 seconds. Allow patient to recover between suction passes while monitoring vital signs, oxygen saturation, and chest wall movement.
10. Routine normal saline (NS) irrigation is not recommended as this may dislodge viable bacteria from colonized ETT into the lower airway (Gardner et al., 2011).
11. Limit the number of suction passes. Suction until secretions are removed or infant shows signs of intolerance. Clear suction catheter with NS between suction passes. Most secretions can be cleared in one or two passes.
12. If obtaining tracheal specimen, attach sterile specimen trap to suction catheter and suction tubing for specimen prior to general suctioning.
13. Return infant to previous oxygen requirement as tolerated, if applicable.
14. Label and send tracheal specimen to laboratory, if applicable.
15. Document patient’s tolerance, character of secretions (amount, color, and consistency), and breath sounds.
16. If using a closed-system (in-line) catheter device, change per manufacturer’s recommendation or per institution’s policy if sooner.
F. Complications.
2. Bradycardia.
3. Apnea.
4. Accidental extubation or malpositioning of tube.
5. Trauma to trachea or bronchi.
6. Hemorrhage.
7. Loss of lung volume.
8. Atelectasis.
9. Infection/pneumonia.
10. Pneumothorax.
11. Increased ICP.
12. Granular tissue formation.
13. Bronchial stenosis.
14. Tracheal laceration.
Oral Endotracheal Intubation: Advanced Practice Procedure
2. Bag-and-mask ventilation is ineffective or undesirable.
3. Need for mechanical ventilation.
4. Tracheal suctioning or lavage is required, such as to remove meconium from the trachea.
5. To obtain sterile tracheal aspirate specimen.
6. Protection of the airway is required.
7. Diaphragmatic hernia is present.
8. Administration of exogenous surfactant.
9. To relieve critical upper airway obstruction.
B. Precautions.
1. Patient’s heart rate and oxygen saturation should be monitored continuously during the procedure and stabilized with bag-and-mask ventilation if possible prior to intubation.
2. Hypoxia during the procedure should be minimized.
3. Use free-flow oxygen held near the mouth and nose of any infant with respiratory effort, to maximize oxygenation during the procedure.
4. Limit intubation attempts to 20 seconds. The infant’s condition should be stabilized with bag-and-mask ventilation between attempts.
5. Have all equipment necessary for intubation prepared and in working order prior to initiating procedure.
6. For nonemergent intubations, infant pain management is recommended prior to procedure using institutional protocol (Allen, 2012).
7. Maintain thermal homeostasis and developmental care.
C. Equipment and supplies.
1. Pediatric laryngoscope handle.
2. Laryngoscope blade with functioning secure bulb.
a. Size 00 blade for preterm infants weighing less than 1000 g.
b. Size 0 blade for infants weighing 1000 to 3000 g. Most infants weighing 3000 to 4000 g can be successfully intubated with a size 0 blade. However, if unable to visualize landmarks, a size 1 blade may be necessary.
c. Size 1 blade for infants weighing more than 4000 to 5000 g.
d. Types of blades:
(2) Macintosh curved blade.
3. ETT size:
a. Internal diameter (ID) 2.5 mm for infants weighing less than 1000 g or less than 28 weeks of gestation.
b. ID 3 mm for 1000- to 2000-g infants or infants with a gestational age of 28 to 34 weeks.
c. ID 3.5 mm for 2000- to 3000-g infants or infants with a gestational age of 34 to 38 weeks.
d. ID 3.5 to 4 mm for infants weighing more than 3000 g or greater than 38 weeks of gestation.
4. Stylet (though use is optional, it should be available).
5. Suction catheters (size 5 F to 10 F) and suction source set at 60 to 100 mm Hg of negative pressure.
6. Resuscitation bag and mask of appropriate sizes. Alternatively, availability of infant ventilation device, such as a T-piece resuscitator (i.e., NeoPuff).
7. 100% oxygen source with blender providing an appropriate FiO2 for the patient, minimally at a flow rate of 5 to 10 L/min, with attached manometer.
8. Tape and other supplies to secure ETT according to hospital policy.
9. Cardiorespiratory monitor and oxygen saturation monitor.
10. Stethoscope.
11. Meconium aspirator, if applicable.
12. End-tidal CO2 (EtCO2) detector, colorimetric device such as the Pedi-Cap to confirm intubation.
a. Limitations of neonatal colorimetric EtCO2 detection devices (DeBoer and Seaver, 2004).
(1) Decreased peripheral perfusion—adapter may not change color quickly, if at all, when the neonate has little to no perfusion.
(2) False-positive readings—verify ETT placement after at least 6 breaths have been given via ETT with attached EtCO2 device.
(3) Detector contamination—detector may be contaminated with bodily fluids or medication and limit ability to display color change. False-positive color change has been reported with atropine, epinephrine, calfactant (Infasurf), and naloxone (Narcan) (Hughes et al., 2007).
(4) Limited time accuracy—sufficient exhalation time must be allowed for device to detect CO2 and display color change (may take up to six ventilations with a resuscitation bag), device is good for up to 24 hours of intermittent use or 2 hours of continuous use.
13. Devices for difficult intubation—ideally, a difficult airway should be identified prior to intubation. The following devices should only be used by personnel with extensive training and experience, such as a neonatologist, otolaryngologist, or anesthesiologist. If this is not possible, arrangements should be made for transfer to a center where personnel and equipment are available (Kumar et al. and Committee on Fetus and Newborn, Section on Anesthesiology and Pain Medicine, 2010).
a. Laryngeal mask airway (LMA) should be available at all intubations in the event intubation is unsuccessful (Kumar et al. and Committee on Fetus and Newborn, Section on Anesthesiology and Pain Medicine, 2010).
(1) All personnel who are trained in neonatal intubation should also be trained in the use of LMA.
(2) This is not an acceptable long-term airway; however, it may be used while preparations are made for a secure airway.
b. Specialized stylets such as lighted and fiberoptic stylets, intubating introducers such as the gum elastic bougie, and fiberoptic flexible bronchoscopes.
c. Indirect rigid laryngoscopes.
d. Video laryngoscopes.
D. Procedure.
1. Gather ancillary personnel and ensure that all equipment is in working order (i.e., stethoscope, bag, and mask at bedside; suction on and functioning; laryngoscope with secured working light source; etc.).
2. Wash hands and verify patient and procedure to be performed.
3. It is recommended that an analgesic be given prior to all nonemergent intubation, and use of a vagolytic be considered. Premedication can decrease adverse effects of intubation, such as bradycardia, hypoxia, and increased intracranial pressure, by treating pain and calming a patient during an uncomfortable procedure (Kumar et al. and Committee on Fetus and Newborn, Section on Anesthesiology and Pain Medicine, 2010). When writing a unit policy for preintubation medications, consider use of agents that are rapid onset with the shortest possible duration of action. See Table 15-1 for common medications used in intubation (adapted from Allen, 2012; Kumar et al. and Committee on Fetus and Newborn, Section on Anesthesiology and Pain Medicine, 2010):
a. Analgesics: Preferred American Academy of Pediatrics (AAP) analgesic is fentanyl, with morphine and remifentanil listed as acceptable.
b. Sedative–hypnotic (optional): Due to limited data and side effect profile, there are no AAP-preferred sedative–hypnotic agents. Acceptable agents are thiopental and propofol in preterm and term infants, and midazolam is acceptable in term infants. A sedative alone without analgesia should not be used (Kumar et al. and Committee on Fetus and Newborn, Section on Anesthesiology and Pain Medicine, 2010).
c. Neuromuscular blocking agents (optional): Muscle relaxants are contraindicated in situations where intubation may be difficult, such as micrognathia and cleft lip/palate or with health care providers with limited neonatal intubations. Sensation remains intact with neuromuscular blockade, and thus, analgesia must be used in combination.
d. Vagolytics: These drugs may help prevent reflex bradycardia during intubation. Atropine is the AAP-preferred vagolytic, but glycopyrrolate may be used as a second option.
TABLE 15-1
Medications for Use With Intubation
| Medication | Onset of Action | Duration of Action | Dose | Considerations |
| ANALGESICS | ||||
| Fentanyl (preferred) | Almost immediate IV, 7 to 15 minutes IM | 30 to 60 minutes IV, 1 to 2 hours IM | 1 to 4 mcg/kg IV or IM | Give slowly (over 1 to 2 minutes minimally) as rapid infusion may cause thoracic and skeletal muscle rigidity. May cause apnea, hypotension, and CNS depression; reversed with naloxone. |
| Remifentanil | Almost immediate | 3 to 10 minutes | 1 to 3 mcg/kg IV | Give slowly (over 1 to 2 minutes minimally) as rapid infusion may cause thoracic and skeletal muscle rigidity. May cause apnea, hypotension, and CNS depression. |
| Morphine | 5 to 15 minutes IV, 10 to 30 minutes IM | 3 to 5 hours IV or IM | 0.1 to 0.3 mg/kg IV or IM | May cause apnea, hypotension, and CNS depression; reversed with naloxone. |
| SEDATIVE–HYPNOTIC | ||||
| Thiopental | 30 to 60 seconds | 5 to 30 minutes | 2 to 6 mg/kg IV | May cause apnea, hypotension, and bronchospasm. |
| Propofol | Within 30 seconds | 3 to 10 minutes | 1 to 2.5 mg/kg | May cause apnea, hypotension, bronchospasm, bradycardia, and pain at injection site. |
| Midazolam | 1 to 5 minutes IV, 5 to 15 minutes IM | 20 to 30 minutes IV, 1 to 6 hours IM | 0.05 to 0.1 mg/kg IV or IM | Has not been established as safe for use in very preterm infants due to risk of benzyl alcohol toxicity. May cause apnea, hypotension, and CNS depression. Effects reversed with flumazenil. |
| NEUROMUSCULAR BLOCKING AGENTS | ||||
| Succinylcholine | 30 to 60 seconds IV, 2 to 3 minutes IM | 4 to 6 minutes IV, 10 to 30 minutes IM | 1 to 2 mg/kg IV, 2 mg/kg IM | Do not use in neonates with hyperkalemia, suspicion of muscular dystrophy, increased ICP, or a family history of malignant hyperthermia; monitor for bradycardia (pretreatment with atropine minimizes bradycardia). |
| Vecuronium | 2 to 3 minutes | 30 to 40 minutes | 0.05 to 0.10 mg/kg IV | Minimal cardiovascular side effects; however, decrease in heart rate and blood pressure has been observed when used concurrently with narcotics. Reversed with neostigmine and atropine. |
| Rocuronium | 1 to 2 minutes | 20 to 30 minutes | 0.5 mg/kg IV | May cause hyper- or hypotension, tachycardia, arrhythmias, and bronchospasm. |
| Pancuronium | 1 to 3 minutes | 40 to 60 minutes | 0.05 to 0.10 mg/kg IV | May cause hypertension, tachycardia, bronchospasm, and excessive salivation; reversible with atropine and neostigmine. |
| VAGOLYTICS | ||||
| Atropine | 1 to 2 minutes | 0.5 to 2 hours | 10 to 20 mcg/kg IV or IM | May cause tachycardia and dry skin. |
| Glycopyrrolate | 1 to 10 minutes | ~ 6 hours | 5 mcg/kg IM | May cause tachycardia, arrhythmias, and bronchospasm. |
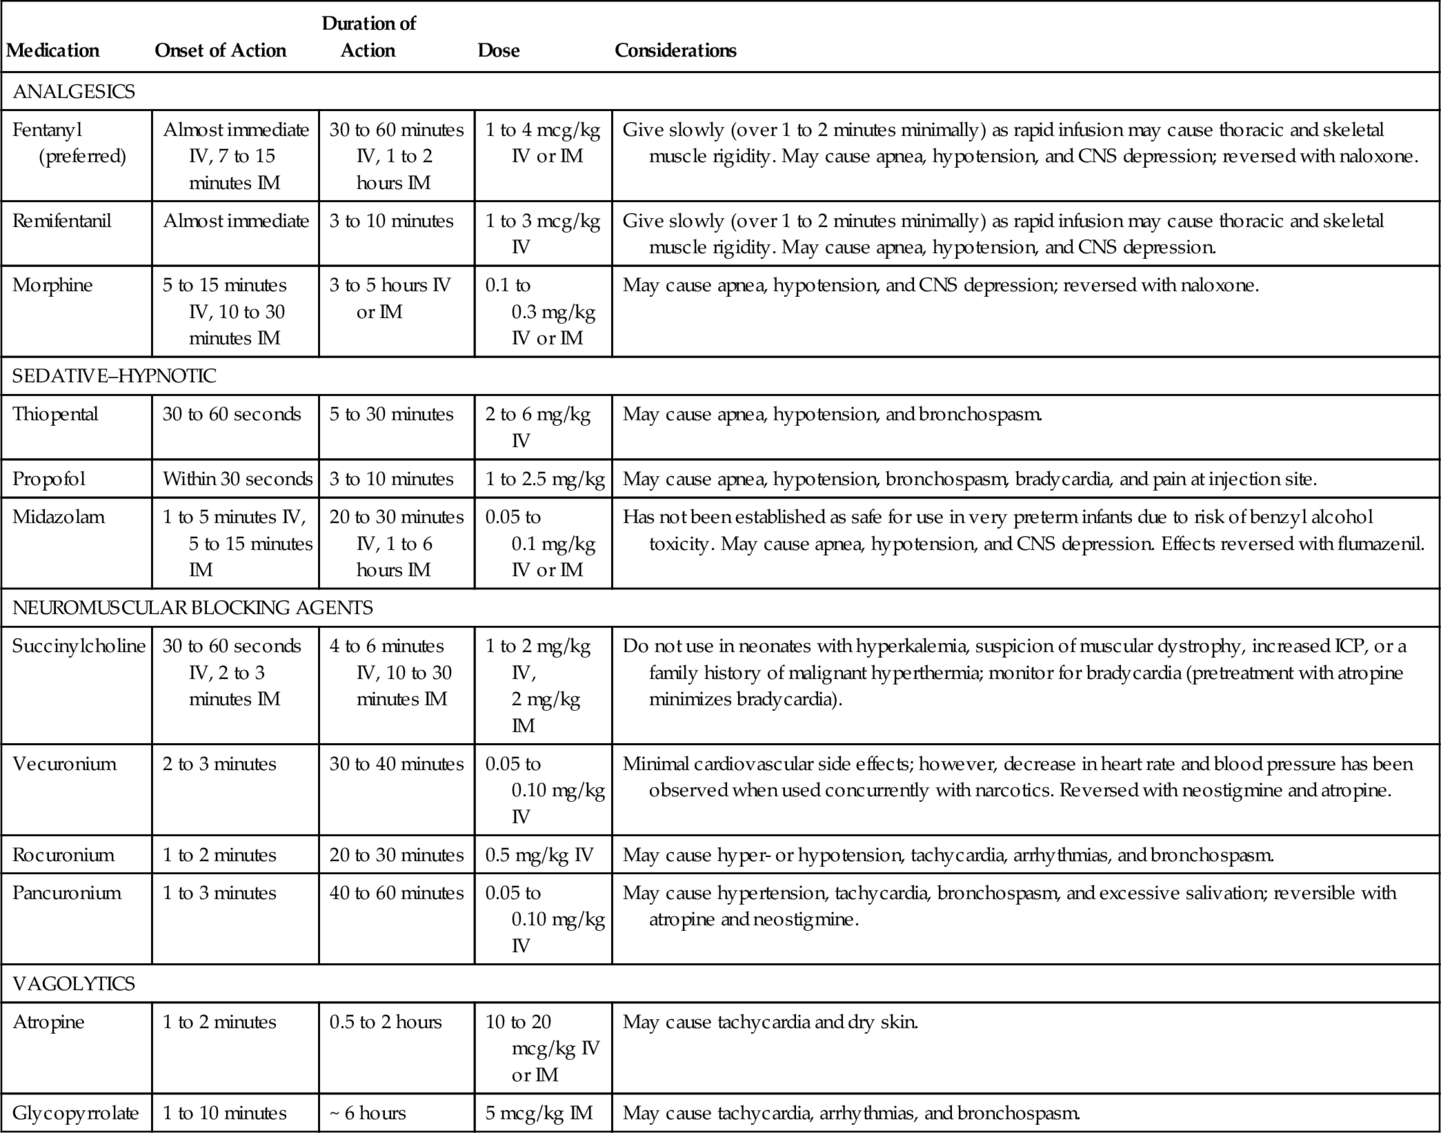
CNS, Central nervous system; ICP, intracranial pressure; IM, intramuscularly; IV, intravenously.
4. Select ETT of the appropriate size.
5. Insert stylet (optional) and shape the ETT as desired. The stylet must be secured so that its tip does not extend below the tip of the ETT and also so the stylet cannot advance during the procedure. Keep the tube and stylet as clean as possible.
6. Determine ETT insertion depth. A variety of methods has been reported for predicting insertional length such as nasal–tragus length, sternal length, foot length, and weight. The American Heart Association (AHA) Neonatal Resuscitation Program use the 7-8-9 Rule (AAP and AHA, 2011).
a. 6 plus the weight in kilograms (e.g., in a 2-kg neonate, the ETT should be inserted to the 8-cm marking: 2 kg + 6 = 8 cm)
(1) The 7-8-9 Rule has been associated with overestimated depth insertion in infants weighing less than 750 g (Peterson et al., 2006).
7. Aspirate gastric contents and suction the oropharynx.
8. Position the patient supine on a flat surface, with the head midline and the neck slightly extended (optional: place a soft flat roll under neck) in a “sniffing” position. The person performing intubation must have easy access to the airway and equipment while positioned at the patient’s head.
9. Hold the laryngoscope in the left hand between the thumb and first finger, with the blade pointing away. The laryngoscope is designed to be held with the left hand only.
10. Open the patient’s mouth with the fingers of the right hand and gently slide the blade into the right side of the mouth.
11. Stabilize the left hand against the left side of the patient’s face, advance the blade tip to the base of the tongue, and move the blade to the midline, pushing the tongue to the left.
12. Expose the pharynx by lifting the entire blade upward in the direction in which the handle is pointing. Do not rock the tip of the blade upward or use the upper gum as a fulcrum.
13. If unable to see the glottis, apply gentle external tracheal pressure (cricoid pressure) with the fifth finger of the left hand or have an assistant perform this and withdraw the blade slowly until the glottis is visible.
14. Remove any secretions that interfere with visualization by suctioning. Direct suctioning under laryngoscopy is ideal.
15. Identify anatomic landmarks.
b. Glottis is anterior, with vocal cords closing side to side.
c. Esophagus is posterior.
16. After identifying the vocal cords, and with the cords in clear view, place the ETT into the right side of the patient’s mouth with the right hand.
17. Keeping the cords in view, pass the ETT between the cords 1 to 2 cm into the trachea on inhalation (level of the vocal cord guide mark on the ETT). This should position the tip of the tube midway between the thoracic inlet and the carina, approximately at the second and third thoracic vertebrae. If the vocal cords are closed or will not open, wait for spontaneous breath, or stimulate a breath by stroking the soles of the feet.
18. With the right index finger, firmly hold the ETT against the roof of the mouth, stabilize the right hand against the patient’s face, and carefully remove the laryngoscope with the left hand.
19. Carefully remove the stylet, if used, from the ETT.
20. Attach the resuscitation bag and EtCO2 detector if applicable and assess tube placement.
a. Auscultate both sides of the chest for the presence and intensity of breath sounds.
b. Assess chest movement with inflationary breaths.
c. Auscultate over the epigastrium and visually assess for distention.
d. Check for condensation in tube during exhalation.
e. Check for color change on CO2 detector, if available.
21. Following confirmation of successful intubation, attach ETT to bag or special ventilation device such as a T-piece resuscitator and deliver breaths.
22. If the tube is in too far and placed in a right or left mainstem bronchus, auscultation may reveal unilateral or unequal breath sounds. The tube should be withdrawn very gradually and assessed until equal bilateral breath sounds are auscultated. If the tube is in the esophagus:
a. Air may be heard entering the stomach with inflationary breaths.
b. The stomach may become distended.
c. A strong cry or cough may be noted.
d. No breath sounds will be heard on auscultation of the chest during inflationary breaths, though air movement may be heard, especially over the lower portion of the chest.
e. No color change with EtCO2 detector.
f. Remove the ETT and discard it and hand ventilate with bag and appropriate-sized mask.
23. In very small infants, breath sounds may seem audible even with an ETT in the esophagus.
24. When the tube is assessed to be in good position, note the markings and secure the tube according to hospital policy.
25. Position of the tube must be confirmed by chest radiograph.
a. Obtain chest x-ray in anterior–posterior (AP) view with head midline and not in a flexed position.
b. Tip of ETT should lie approximately 0.5 to 1 cm above the carina.
26. After confirming tube placement by chest radiograph, any length of tube that extends more than 4 cm beyond the lip should be cut off to limit dead space and to prevent kinking.
27. Document according to hospital policy: date, time, ETT size, centimeter marking at lip, EtCO2 results, chest radiograph, and patient’s tolerance of procedure. Medications given, if any, should also be documented.
E. Complications.
b. Due to misplacement of tube.
2. Bradycardia.
b. Due to vagal stimulation from the laryngoscope, ETT, or suction catheter.
3. Infection.
4. Perforation of esophagus or trachea.
5. Trauma/edema to oropharyngeal and laryngeal tissues.
6. Vocal cord injury.
7. Subglottic stenosis associated with long-term (> 3 to 4 weeks) intubation.
8. Palatal grooves from prolonged intubation.
9. Misplacement of tube into esophagus or bronchus.
10. Interference of oral development caused by oral ETT.
11. Abnormal dentition.
12. Ingestion/aspiration of laryngoscope bulb.
13. Tube obstruction or kinking.
14. Pain, agitation, or discomfort.
Thoracentesis: Advanced Practice Procedure
1. Emergency evacuation of pneumothorax.
2. Emergency evacuation of pleural fluid.
B. Equipment and supplies.
1. Skin antiseptics according to hospital policy.
2. Large-bore over-the-needle intravenous (IV) catheter (14 to 22 gauge).
3. Three-way stopcock.
4. Syringe, 20 to 35 mL.
5. Local anesthetic, tuberculin (TB) syringe with small-bore needle, if medical condition permits.
C. Procedure.
1. Position the infant supine and restrain limbs if necessary.
2. Provide pharmacologic pain management if medical condition permits.
3. Identify entry site. Use second or third intercostal space along the midclavicular line.
4. Prepare skin with antiseptic as per hospital policy.
5. Infiltrate the area with 1 mL of local anesthetic using a TB syringe and 25- to 27-gauge needle.
6. Puncture skin at 45-degree angle, angling over third or fourth rib, and advance needle/catheter at a 90-degree angle. Inserting the catheter over the top of the rib will avoid blood vessels and nerves that run along the bottom of the rib. If thoracentesis is being done because of pleural fluid or effusion, the thorax should be punctured between the fifth and sixth intercostal spaces, midaxilla.
7. Remove needle from IV catheter while sliding the catheter into the pleural space.
8. Attach catheter hub to stopcock and syringe. The stopcock allows for aspiration of free air or fluid into the syringe and emptying of the syringe while maintaining a closed system.
9. When free air or fluid is obtained, stabilize the catheter and continue to aspirate until preparation for chest tube insertion is complete, or until the air leak or fluid accumulation is evacuated.
10. Document according to hospital policy: date, time, catheter size, location, amount of air/fluid evacuated, patient’s tolerance of procedure. Pharmacologic interventions performed should also be documented.
D. Complications.
2. Infection.
3. Needle injury to lung or adjacent structures.
4. Damage to breast tissue.
5. Pain.
CIRCULATORY ACCESS PROCEDURES
Peripheral Intravenous Line Placement: Fundamental Procedure
1. Administration of medications.
2. Administration of fluids, volume expanders, or blood products.
3. Administration of parenteral nutrition.
B. Precautions.
1. Avoid areas of infection or loss of skin integrity near selected puncture site.
2. Use caution in infants with coagulation disorders, which may result in bleeding into surrounding tissues.
3. Padded armboard is to be used only if necessary to maintain line placement and must be of an appropriate size for gestational age.
4. Choose an access site based on patient’s condition, prescribed therapy, and inserter’s experience (Alexander and Infusion Nurses Society (INS), 2011).
a. Consider conserving areas that may later be needed for central line placement, such as the basilic, cubital, cephalic, and saphenous veins.
b. The inserter should be familiar with anatomic characteristics and acceptable venipuncture sites.
c. Recommended for short-term IV therapy (< 1 week).
d. Avoid infusion of hyperosmolar fluids (< 600 mOsm/L) and acidotic (pH < 5) or alkalotic (pH > 9) fluids because of the risk of injury.
C. Equipment and supplies.
1. 22- to 24-gauge over-the-needle safety catheter.
2. Tape and dressing supplies as per hospital policy.
a. Catheter stabilization device if available.
b. Transparent semipermeable membrane to allow visualization of insertion site.
3. Skin antiseptics as per hospital policy.
4. Tourniquet (a sanitized rubber band will suffice).
5. NS flush solution in a 3-mL syringe.
6. Transilluminator, if necessary to visualize vessels.
7. Small scissors or safety razor, if necessary.
8. Appropriately sized padded armboard, if necessary.
9. Nonsterile gloves.
10. Additional tubing and infusate as indicated per hospital policy.
11. Pain/developmental management: pacifier, sucrose pacifier, blankets for developmental swaddling, eye protection from bright lights.
D. Procedure.
1. Verify order from licensed health care provider for placement of a vascular access device.
2. Gather supplies, use hand hygiene as indicated by hospital policy, and don gloves.
3. Provide pain management such as pacifier for nonnutritive sucking, sucrose pacifier, and/or developmental care with facilitated tucking or swaddling. Shield eyes from bright lights.
4. Flush connecting tubing with NS flush solution.
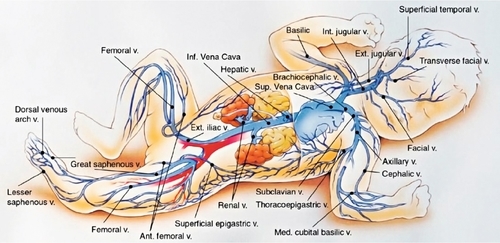
5. Determine vein for cannulation (Fig. 15-1). Accomplish distention of the vessel by applying a gentle tourniquet proximal to the selected insertion site. Alternatively, an assistant may encircle the proximal extremity with hand/fingers and apply direct pressure for the same effect.
a. Transilluminate to locate vein, if necessary (use caution to avoid skin burns from heated device).
b. Apply warm compress for 5 minutes if needed to help dilate veins and make them more visible.
c. If a scalp vein will be cannulated, trim hair with scissors rather than shaving to help visualize and secure IV tubing.
6. Choose appropriate-sized catheter for patient’s size and vein.
7. Prepare skin at selected puncture site with antiseptic as per hospital policy, using aseptic technique.
8. Position and stabilize puncture site, keeping skin taut.
9. Beginning a few millimeters distal to the anticipated site of the vessel puncture, insert the needle bevel-up, at a 10- to 20-degree angle, depending on location of vein. Puncture skin in the direction of blood flow and advance needle in 1- to 2-mm increments.
10. If resistance is met or vein is not punctured, withdraw needle slowly to just below the level of the skin, relocate vein, and advance the needle again.
11. If a hematoma develops or bleeding occurs, occlude the vessel with pressure just proximal to the puncture site, remove tourniquet, withdraw the needle or catheter, and apply pressure until hemostasis has occurred.
12. If cannulation appears to be successful (i.e., flashback of blood in hub), remove the tourniquet and catheter needle (if using over-the-needle catheter), connect the tubing to the catheter hub, and inject some of the flush solution gently to evaluate patency of the catheter. If flush solution infiltrates the tissues surrounding the catheter tip, occlude the vessel with pressure just proximal to the puncture site, withdraw the needle or catheter, and apply pressure until hemostasis has occurred.
13. Each inserter should attempt access no more than two times to limit damage to future access sites and patient pain (Alexander and INS, 2011). Access attempts should be limited with considerable thought given to alternative treatments or access should attempts continue to be unsuccessful.
14. If cannulation was successful and flush solution infuses without complications, connect T-connector and IV tubing with appropriate fluid to catheter, if applicable.
15. Tape catheter in position that is developmentally appropriate and per hospital policy. Tape, dressing, and restraint must allow for easy inspection of insertion site, circulation of the distal extremity, and patency of the IV tubing. Avoid occlusion of the IV tubing with the tape or dressing.
16. Activate safety device upon removal of needle and dispose of needle(s) in appropriate sharps container.
17. Document date, time, catheter size, site location, and patient’s tolerance of procedure, according to hospital guidelines. Pain management interventions should also be documented.
18. Monitor for tissue infiltration or device dislodgment. If signs of infiltration are present, stop infusion immediately. Adverse signs may include the following:
a. Redness, blanching, or discoloration at or near IV insertion site.
b. Edema or swelling of extremity.
c. Blistering at site.
d. Pain with flushing.
e. Resistance with flushing.
f. Leaking at site.
g. Coolness of skin around insertion site/extremity.
19. Treatment for infiltration/extravasation (Fox, 2011; Sawatzky-Dickson and Bodnaryk, 2006; Thigpen, 2007):
a. Immediately stop all infusion of fluids and/or medications.
b. Remove any constricting bands that may interfere with blood flow.
c. Consider elevation of affected extremity.
d. Use of cold or warm compresses is controversial; further evidence is needed to demonstrate benefit.
e. Notify physician or advanced practice nurse immediately.
f. Assess and document appearance of infiltrated area, including size, areas of blanching or erythema, pulses, perfusion, and estimated amount of infusate. Determine stage of extravasation (Sawatzky-Dickson and Bodnaryk, 2006; Thigpen, 2007):
(1) Stage 1: IV difficult to flush, pain at site without redness or swelling.
(2) Stage 2: Slight swelling and redness at site, pain, good pulse and normal perfusion below site.
(3) Stage 3: Moderate swelling and blanching at site, pain, good pulse and normal perfusion below site, skin cool to touch.
(4) Stage 4: Severe swelling and blanching at site, pain, decreased pulse and prolonged or absent capillary refill below site, skin cool to touch with evidence of breakdown or necrosis.
g. Pharmacologic intervention:
(1) Hyaluronidase (Vitrase)—indicated for the treatment of Stage 3 and 4 injuries. For best results, use hyaluronidase within 1 hour of infiltration but may be given up to 3 hours after infiltration. Reconstitute product with NS. The recommended dose is 15 units/mL. After cleaning the area with an antimicrobial agent, inject five 0.2-mL injections subcutaneously around the periphery of the infiltration (do not inject directly into affected area), using a different 25- to 27-gauge needle for each injection. Not recommended for IV use.
(2) Phentolamine (Regitine)—indicated for treatment of infiltration of α-adrenergic drugs such as dopamine, epinephrine, norepinephrine, and phenylephrine. For best results, use within 12 hours of infiltration. Dilute the available 5-mg/mL product to a concentration of 0.5 mg/mL. Inject subcutaneously into the area of infiltration using multiple small injections of 0.2 mL with a 25- to 27-gauge needle, changing the needle between each skin entry. Use cautiously in hemodynamically unstable infants. Monitor for hypotension.
(3) Nitroglycerin 2%—apply 4 mm/kg to affected area. Use with caution in neonates ≤ 34 weeks' postmenstrual age who are not greater than 21 days of age because of enhanced absorption through the thin immature skin, which may put them at risk for overdosage and toxicity. Apply only to intact skin. Monitor heart rate and blood pressure as it may cause tachycardia and hypotension.
h. Multiple puncture technique.
(1) To be used to express fluid in extreme infiltrations (stage 4) to reduce pressure and prevent skin necrosis.
(2) Prepare skin at site with antiseptic technique as per hospital policy.
(3) Provide pain management with swaddling, sucrose pacifier, and/or pain medication.
(4) Use a large-bore (18-gauge) sterile needle and make multiple perforations over the greatest area of swelling with strict aseptic technique.
(5) Allow for free flow of infiltrated fluid. May gently massage affected area.
(6) Cover skin with room-temperature saline-soaked dressing and elevate affected extremity.
E. Complications.
2. Infection.
3. Air, clot, or particle embolus.
4. Tissue injury (phlebitis, infiltration) and possible necrosis after infiltration of infused solutions and/or medications.
5. Injury to extremity from restraint.
6. Compromised distal circulation.
7. Pressure necrosis over bony areas.
8. Limb deformity after prolonged immobilization.
9. Pressure injury of peripheral nerves.
10. Inadvertent arterial line placement.
11. Blood loss from inadvertent catheter or tubing dislodgment.
12. Pain from infiltration or ruptured blood vessel from unsuccessful cannulation.
Peripherally Inserted Central Catheter and Midline Catheter: Advanced Practice Procedure
A midline catheter (MLC) is a peripherally inserted catheter that dwells deeper in the vein than those used for standard peripheral IV therapy but never enters the abdominal–thoracic cavity. Midline catheters are a form of intermediate IV therapy and should not be used in infants who require the use of a peripherally inserted central catheter (PICC). The Centers for Disease Control and Prevention (CDC) recommends insertion of an MLC or PICC if IV therapy is expected to exceed 6 days (CDC, 2011). Insertion of an MLC is the same as for a PICC (i.e., equipment, use of strict aseptic technique, need for continuous heparinized carrier fluid); however, their use is strictly that of a peripheral IV device. An MLC can remain in place for 2 to 4 weeks. MLC studies in neonates have reported MLC mean dwell times from 4 to 11 days (Leike-Rude and Haney, 2006; Pettit and Wyckoff, 2007; Wyckoff, 1999). The longer MLC dwell time therefore minimizes the frequent painful IV insertions associated with standard peripheral IV lines. It is important to note that, while MLCs have established safety, there are indications that catheters that dwell in near-central veins, past the head of the humerus or femur, have significantly higher rates of complications (Colacchio et al., 2012; Jain et al., 2013). These veins include the subclavian, internal jugular, axillary, and common iliac veins. The cephalic vein diameter may be too small to adequately accommodate an MLC (Alexander and INS, 2011). If a central placement is not possible, the catheter should be retracted and position confirmed outside the abdominal–thoracic cavity.
NOTE: Catheters with a stylet are available. A stylet may make advancing a catheter easier, and there is no evidence to support concerns that the stylet will damage or perforate vessels when used with care (Paulson and Miller, 2008). Hospital stock choice of catheter size, lumen, and manufacturer should be based on the evidence, patient population need, and cost-effectiveness. The stylet should not extend past the tip of the catheter, and should never be trimmed. Follow manufacturer's recommendations regarding trimming and flushing catheters with stylets prior to insertion.
1. Intermediate or long-term IV therapy (> 6 days).
2. Parenteral nutrition (strongly consider use of PICC, especially if anticipated dextrose or osmolarity requires central placement).
3. Antibiotic or other medicinal therapy.
4. Difficult venous access.
5. Irritating drug therapy (strongly consider central placement).
6. Strongly consider use of PICC in very low birth weight infant (< 1500 g).
B. Contraindications.
1. Active bacteremia or sepsis; however, this is controversial. Consider deferring placement for at least 24 to 48 hours after antibiotic dosing is started.
2. Inadequate vessel for cannulation.
3. Anatomic irregularities in infant’s extremities or chest that could interfere with proper insertion.
4. Avoid insertion in the right arm of infants with congenital heart defects resulting in decreased blood flow to the subclavian artery.
5. The infant can be adequately treated with a peripheral IV access.
6. Parental refusal.
C. Precautions.
1. Avoid areas of infection or loss of skin integrity near selected puncture site.
2. Avoid placement of a PICC in an extremity with inadequate or poor circulation.
3. Obtain parental informed consent for PICC insertion prior to the procedure per institutional policy.
4. Use caution in infants with coagulation disorders.
5. Use caution with high-frequency ventilation as pressure changes within the chest may lead to catheter migration, particularly with upper body insertions.
6. Do not measure blood pressure or perform venipuncture on the extremity containing the PICC/MLC.
7. Use aseptic technique during insertion and care of PICC/MLC.
8. Ensure attention to pain management, developmental care, and thermal homeostasis.
9. Infuse medication via medication infusion pump; avoid “pushes.”
10. Use larger-bore syringes (> 10 mL) that generate less pressure.
11. Avoid tension on catheter and tubing.
12. Never pull the catheter back through hollow needle introducer because of the risk of damage or shearing of catheter.
13. Monitor for bradycardia and hypoxia during procedure.
14. Follow manufacturer's recommendations regarding infusion of blood products or obtaining blood specimens from PICC or MLC.
15. When infusing fluids via MLC, follow the same precautions as with peripheral IV to avoid damage to noncentral vessels.
D. Equipment and supplies.
1. Commercially prepared catheter insertion kit, or the following:
a. Antiseptic per hospital policy. Chlorhexidine gluconate is recommended by the CDC; however, it is only approved by the U.S. Food and Drug Administration for use in infants over 2 months of age due to lack of evidence on absorption and safety. In infants under 2 months of age, use of povidone–iodine is still the best practice (Alexander and INS, 2011; Chapman et al., 2012). If institutional policy, use with care in premature infants or infants under 2 months of age as these products may cause irritation or chemical burns (U.S. Food and Drug Administration, 2012).
b. Nontoothed forceps.
c. Sterile measuring tape.
d. Sterile gown and gloves, mask, and surgical cap.
e. Sterile flush solution per institutional policy.
f. Sterile gauze pads.
g. Sterile drapes and towels.
h. Sterile tourniquet (optional with preterm infants).
(1) Sterile 5- to 10-mL syringes, as recommended by manufacturer.
i. Transparent, semipermeable dressing.
j. Sterile adhesive strips.
k. Extension set per hospital policy.
l. Select a neonatal percutaneous catheter of appropriate size. Catheter sizes include single-lumen 1.2 F and single- or double-lumen 1.9 F to 5 F (Alexander and INS, 2011). Usually lumens up to 3 Fr. are used in neonates.
m. Select an introducer of appropriate size to accommodate catheter.
(1) Different types of catheter introducers are available, depending on manufacturer:
(a) Breakaway needle—the vessel is cannulated and the catheter advanced through the needle to the premeasured distance. The needle is then retracted and broken along its longitudinal axis and discarded. These needles may be smaller in diameter than introducer-type devices, yet catheter shearing or damage may occur if the catheter is retracted through the needle.
(b) Peel-away plastic cannula—the vessel is punctured and the needle is removed, leaving the plastic cannula in the vessel for catheter insertion. Advance the catheter to the premeasured distance, then retract the plastic cannula from the vessel and pull the catheter apart along its longitudinal axis and discard.
(c) A device with a safety needle retractor should be used to avoid needle-stick injury.
n. Catheter trimming device per manufacturer’s recommendation.
E. Procedure.
2. Check to ensure informed consent is obtained per institutional policy.
3. Gather equipment and supplies.
4. Provide pain management (Pettit and Wyckoff, 2007).
a. Developmentally supportive positioning, swaddling, and pacifier use.
b. Consider premedication with an analgesic and sedative.
c. Consider use of topical lidocaine cream if appropriate.
5. Maintain thermoregulation, provide environmental support by protecting infant’s eyes from bright lights.
6. Select vein (see Fig. 15-1). Most common sites for neonates include the cephalic, basilic, and greater saphenous. A right-sided basilic or cephalic approach is preferred because of the shorter distance between the insertion site and the superior vena cava. Other sites include popliteal, temporal, and axillary veins.
7. Position infant so selected vein is accessible. Restrain infant if necessary to prevent contamination of sterile field.
8. Measure length of catheter to be inserted.
a. For PICC (central venous access) insertion (Pettit and Wyckoff, 2007):
(1) Upper body insertion: Tip should be in the superior vena cava.
(a) Measure from insertion site along the course of the vein to the third intercostal space, with the arm at a 90-degree angle for upper extremity placement.
(2) Lower body insertion: Tip should be in the inferior vena cava above the L4-L5 vertebrae or iliac crest and below the right atrium.
(a) Measure from insertion site to xiphoid process for lower extremity placement.
b. For MLC (peripheral venous access) insertion:
(1) Upper body insertion: Tip should end in the upper arm, distal to the head of the humerus.
(a) Measure from the insertion site to the desired site of catheter tip.
(2) Lower body insertion: Tip should end in the upper leg distal to the head of the femur.
(a) Measure from the insertion site to the desired site of catheter tip.
9. Don mask and cap and perform a 3-minute scrub.
10. Don sterile gown and gloves. Set up sterile field and open catheter kit, maintaining sterility of contents. Assemble equipment using an aseptic technique.
11. Trim catheter to predetermined length per manufacturer’s recommendations and institution’s policy.
12. Attach flush-syringe and prime catheter.
13. Prepare insertion site with antiseptic per hospital policy and allow to dry.
14. Change into new sterile gloves if contamination occurs.
15. Drape infant with sterile towels.
16. Apply sterile tourniquet (optional) and stabilize vein.
17. Take introducer and puncture vessel at an approximately 5- to 15-degree angle for shallow veins and approximately 15 to 30 degrees for deeper veins. After skin puncture, pause and let infant relax to prevent vasoconstriction. Entry into the vessel is signaled by blood leaking from puncture site or from the introducer needle/cannula.
18. Loosen tourniquet (if applicable) after advancing catheter a short distance. Remove needle, leaving peel-away plastic cannula in place if using this method.
19. Advance flushed catheter with forceps in 0.5- to 1-cm increments to predetermined distance. Catheter should advance smoothly and slowly to avoid vasospasm.
20. Once catheter is advanced 7 to 8 cm or to the predetermined distance, remove introducer. Catheter may be pulled out slightly during splitting technique and may need to be advanced slightly when complete. Gentle pressure with finger distal to puncture site may reduce blood loss.
21. Remove stylet (if present) slowly.
22. Aspirate on catheter to confirm blood return. If blood is obtained, flush catheter.
23. Temporarily secure catheter with sterile adhesive strips and obtain chest radiograph for catheter placement while maintaining sterile field and aseptic technique.
24. Radiographically confirming placement is central prior to any infusions. Pull back or advance catheter, if necessary, to appropriate distance. Check for blood return and obtain another chest radiograph to confirm satisfactory position.
25. If a lower extremity PICC is placed, consider performing a lateral abdominal radiograph in addition to AP view to verify that the catheter is in the inferior vena cava and not the ascending lumbar vein. As an alternative, 0.3 mL of contrast medium may be injected into the catheter with the AP view to verify central venous placement and avoid an additional radiograph (Sharpe et al., 2013; Trotter, 2009).
26. Remove antiseptic from surrounding skin with sterile water.
27. Secure and dress catheter per hospital policy.
a. Use of skin closure or Steri-Strips over the body of the catheter is contraindicated, due to risk of catheter shearing (Sharpe et al., 2013).
b. INS recommends a product-specific catheter securement device, if available (Alexander and INS, 2011).
28. Document procedure, including:
b. Parental education and consent.
c. Site preparation.
d. Catheter size, manufacturer, and lot number.
e. Catheter length if trimmed.
f. Presence of stylet.
g. Location and insertion distance.
h. Location of catheter tip on radiograph.
i. Pain management provided and patient tolerance.
j. Complications.
k. Type of dressing.
l. Name of clinician.
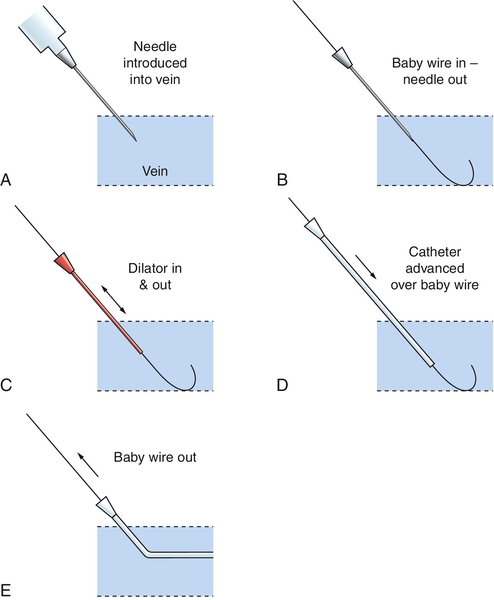
F. Modified Seldinger technique—this technique provides for central catheter placement using a peripheral IV catheter of smaller gauge than a standard PICC introducer (Fig. 15-2). Use of a smaller gauge may allow the inserter to access a smaller vessel, and minimizes vessel and surrounding nervous tissue trauma and hematoma formation. This procedure is now standard of practice in adult and pediatric patients, recommended by the INS to minimize damage to vessels (Alexander and INS, 2011; Pettit, 2007).
a. All supplies previously described for PICC insertions.
b. 24-gauge peripheral IV catheter.
c. Guidewire:
(2) 15 to 20 cm.
d. No. 11 scalpel blade or straight needle.
2. Procedure.
a. Identify vessel, trim catheter, and prepare the insertion site as previously described for PICC insertion.
b. Apply tourniquet as needed.
c. Perform venipuncture with 24-gauge peripheral IV catheter.
d. When flashback of blood is noted, advance catheter into vein and remove inner needle.
e. Thread guidewire through catheter into the vein, approximately 3 cm beyond the tip of the catheter.
(1) Take caution to advance gently; do not apply force, as this may perforate the vessel.
(2) Do not advance the guidewire past the infant's shoulder if placed in the arm.
f. Remove the IV catheter while holding the guidewire in place. Take care to firmly stabilize the guidewire to prevent removal or embolization.
g. Enlarge the insertion site by 1 to 2 mm.
(1) Consider use of 1% lidocaine injected intradermally or topical lidocaine cream, or a systemic analgesic such as fentanyl.
(2) Use forceps to gently dilate the insertion site, or
(3) Thread a 20-gauge needle over the guidewire, and move side to side in the insertion site, or
(4) Use a scalpel blade to make a dermatotomy, or small nick in the insertion site, taking care to avoid damaging the vessel.
h. Slowly thread a plastic peel-away PICC introducer over the guidewire past the insertion site into the vessel. If the introducer cannot be advanced into the vein, the insertion site may need to be further dilated.
i. Remove the guidewire, leaving the introducer in the vein.
j. Remove tourniquet if applicable.
k. Thread the catheter into the vein as previously described, to premeasured depth.
l. Follow steps described for PICC placement above to verify blood return, assess proper placement of catheter, and apply dressing.
m. Document procedure, including method of insertion, any additional steps taken, catheter length, patient tolerance, and any complications.
G. Complications.
2. Pericardial effusion with cardiac tamponade.
3. Atrial perforation with cardiac tamponade.
4. Intravascular catheter shearing, followed by embolization of catheter fragment.
5. Thrombus formation.
6. Infection, local or systemic.
7. Nerve damage.
8. Air embolism.
9. Rupture of catheter from using excessive infusion pressure (e.g., from using small-bore syringes).
10. Infiltration/extravasation for MLC.
11. Hemorrhage.
12. Vascular perforation.
H. Catheter maintenance.
1. INS recommends an evidence-based catheter care policy to include all aspects of insertion, care, and infusion (Alexander and INS, 2011). This may reduce infection rate and improve patient safety.
2. Change dressing no more than weekly, or whenever damp, soiled, or nonocclusive.
a. If gauze is used in the dressing, it must be changed every 48 hours.
3. Monitor for infiltration or extravasation:
b. Edema.
c. Difficulty with flushing or fluid infusion.
Removal of Peripherally Inserted Central Catheter: Fundamental Procedure
1. No longer needed or indicated.
2. Septicemia, especially fungal.
3. Malfunctioning.
B. Precautions.
2. Venospasm (if resistance is met, do not force catheter; apply warm compress for 20 to 30 minutes and reattempt).
C. Equipment and supplies.
2. Measuring tape.
3. Transparent dressing.
4. Nonsterile gloves.
D. Procedure.
2. Wash hands and don gloves.
3. Remove securing tape and dressing carefully to avoid skin trauma.
4. Change gloves.
5. Cleanse site with povidone–iodine or antiseptic per hospital policy and allow to dry.
6. Slowly and carefully retract catheter 1 cm at a time, grasping the catheter near the insertion site until the catheter has been removed. Do not apply pressure over insertion site during catheter removal.
7. Apply sterile gauze over insertion site as withdrawal is complete.
8. Continue to apply pressure if needed with gauze until hemostasis is obtained. Once hemostasis is confirmed, cover site with transparent dressing. Dressing should remain in place for at least 24 hours.
9. Measure and inspect removed catheter and compare that distance with the recorded insertion depth.
a. If any part has broken off during removal or the length of the catheter differs from the recorded insertion length, place a tourniquet on the affected extremity above the insertion site, such as upper arm or upper leg, to prevent advancement of the catheter piece into the right atrium. Check for pulses. If no pulse or the extremity is dusky, loosen the tourniquet. Immediately notify health care provider as catheter embolization is an emergency and may require removal via cardiac catheterization or via surgery.
10. Document date, time, site location, measurement of catheter removed in comparison to recorded insertion depth, patient’s tolerance of procedure, and any complications according to hospital guidelines.
E. Complications.
1. Shearing of catheter inside patient, before complete removal.
2. Dislodgment of thrombus from tip.
Umbilical Vessel Catheterization: Advanced Practice Procedure
a. Frequent arterial blood sampling.
b. Continuous arterial blood gas monitoring.
c. Continuous arterial blood pressure monitoring.
d. Vascular access for IV fluids when other sites are not available or suitable.
e. Exchange transfusion.
f. Cardiac catheterization.
2. Venous catheterization.
a. Emergency administration of drugs.
b. Emergency measurement of PCO2 and pH.
c. Fluid administration (hypertonic solutions or inadequate peripheral access).
d. Exchange transfusion.
e. Central venous pressure monitoring.
f. Blood sampling.
B. Contraindications.
2. Necrotizing enterocolitis (controversial).
3. Vascular compromise below level of umbilicus.
4. Omphalitis.
5. Peritonitis.
C. Precautions.
1. Maintain thermal homeostasis.
2. Monitor heart rate and oxygen saturation throughout the procedure.
3. Maintain aseptic technique.
4. Dilate artery before attempting vessel cannulation.
5. Do not force catheter past obstruction.
D. Equipment and supplies.
1. Commercially prepackaged sterile umbilical catheter tray or sterile instrument tray for umbilical catheterization to include the following:
b. Sterile drapes.
c. Small container for antiseptic solution.
d. Scissors.
e. Umbilical tape.
f. Measuring tape.
g. Syringes, 10 mL.
h. No. 11 scalpel with handle.
i. Mosquito hemostats (2).
j. Curved, nontoothed iris forceps (2).
k. Toothed iris forceps (1).
l. Needle holder.
m. Umbilical catheter of either polyurethane or silicone material. Silicone catheters may be more difficult to insert owing to their lack of rigidity.
n. Determine appropriate-sized catheter with either a single, double, or triple lumen or as desired by medical staff. Various sizes of catheters are available ranging from 2.5 F to 8 F. Generally, the following guidelines apply.
(1) Size 3.5 F for infants weighing less than 1500 g.
(2) Size 3.5 F, 4.0 F, or 5.0 F for infants weighing more than 1500 g.
(3) A 2.5 F polyurethane catheter is available for use in the extremely premature infant.
o. 3-0 silk suture.
p. 4-0 silk suture with curved needle.
q. Three-way Luer-Lok stopcock.
r. Dressings for securing (clear occlusive dressing and a hydrocolloid skin barrier).
s. Sterile heparin-flush solution (1 unit/mL).
2. Sterile antiseptic solution.
3. Mask, surgical cap, and sterile gown and gloves.
4. Standardized premeasurement graph or access to a formula to determine insertion depth.
E. Procedure.
Umbilical Artery Catheterization
NOTE: Low position, catheter tip placed between the third and fourth lumbar vertebrae (L3-L4). High position, catheter tip placed between the sixth and 10th thoracic vertebrae (T6-T10). Either position is accepted practice currently. Consult your institution’s guidelines for desired positioning of umbilical artery catheters (UACs).
1. Inspect lower extremities for bruising and palpate pulses.
2. Assess umbilical cord to rule out umbilical anomaly, such as a small omphalocele.
3. Place infant supine and restrain limbs.
4. Calculate insertion depth.
a. Measure shoulder-to-umbilical distance (adding length of umbilicus stump) and multiply by 0.66 to arrive at insertion depth for a “low” placement (L3-L4), or
b. 2.5 times body weight in kilograms plus 9.7 cm (2.5 × weight + 9.7) for a “high” placement (T6-T10).
5. Don mask and cap and perform a 3- to 5-minute scrub.
6. Don sterile gown and gloves.
7. Have assistant hold heparin-flush vial and draw up flush into sterile syringe.
8. Prepare catheter by attaching Luer-Lok stopcock to catheter and connect flush-filled syringe to stopcock and flush catheter.
9. Turn stopcock off to catheter.
10. Have assistant hold umbilical cord up and out of procedure area while cord is prepped with antiseptic solution. Scrub in a circular manner, moving from the cord to approximately 5 cm in radius on surrounding abdomen. Do not let antiseptic drip down infant’s side or pool on abdomen because this may cause skin damage, especially in extremely premature infants.
11. Drape procedure area with sterile towels.
12. Tie umbilical tape using a single-hand knot tight enough to prevent bleeding at base of cord, not on the skin. Umbilical tape may have to be loosened to advance catheter or tightened to control bleeding.
13. Using a scalpel, cut through the umbilical cord 1 to 1.5 cm from skin.
14. Identify cord vessels.
a. Arteries: two small, thick-walled, and white constricted vessels that may stick out slightly and are typically located at the 4 and 8 o’clock positions.
b. Vein: single, large, thin-walled vessel, often open and typically located at the 12 o’clock position.
15. Stabilize cord stump.
a. Grasp portion of cut edge of cord with hemostat and apply gentle traction.
b. Apply hemostats to opposite sides of the cord and roll them away from each other, causing the arteries to protrude from the cut surface of the cord.
16. Dilate artery.
a. Insert one tip of curved iris forceps into selected artery and probe gently to a depth of about 0.5 cm; withdraw forceps tip.
b. With tips of forceps together again, gently probe artery to a depth of about 0.5 cm.
c. Gently spread forceps apart, and then slowly withdraw forceps from artery, dilating lumen as forceps is withdrawn.
d. Continue to dilate lumen (approximately 15 to 60 seconds) until forceps can easily be inserted to a depth of about 1 cm.
17. Insert catheter.
a. Insert catheter into dilated artery.
b. Thread catheter to predetermined depth.
c. If resistance is met, do not force catheter. Apply gentle, steady pressure to catheter while applying gentle traction on cord.
d. If catheter cannot be advanced to the desired distance, discontinue attempts and catheterize second artery.
e. Observe for blanching of legs, toes, and/or buttocks.
18. Aspirate blood to ensure placement in vessel after catheter advanced approximately 5 cm. If blood is obtained, clear catheter by injecting 0.5 mL flush solution. If blood cannot be aspirated, remove catheter and attempt catheterization of second artery.
19. Obtain radiograph to confirm catheter position.
a. If the catheter tip is too high, pull the catheter back to its proper position and obtain another radiograph.
b. If the catheter tip is too low for “high position,” pull back to “low position,” if your institutional guidelines allow this.
c. If catheter tip is too low for “low position,” it should be adjusted to an acceptable position. Keep in mind that a catheter that is no longer sterile should not be advanced.
20. Suture catheter in place.
a. Place purse-string suture around cord. Avoid piercing the vessels and catheters. Secure to umbilical skin or cord depending on your institution’s guidelines.
b. Knot suture securely in cord close to catheter per manufacturer’s recommendations.
c. If suture is around catheter, it must be tight to prevent catheter from sliding, but not so tight that flow through catheter is obstructed.
21. Loosen umbilical tape.
22. Remove antiseptic as soon as possible from the skin to prevent irritation or breakdown.
23. Secure catheter per hospital policy. The following are various securing techniques used to secure catheters:
a. Commercially manufactured securing devices.
b. “Bridge” or “goalpost” taping technique.
c. Hydrocolloid skin barrier applied to umbilical area with clear occlusive dressing.
24. Document procedure according to hospital policy, noting type of catheter, catheter size, distance catheter threaded, location of catheter tip on radiograph, adjustments made to catheter to correct malpositioned catheter, and assessment of color, pulses, and perfusion to lower extremities.
Umbilical Vein Catheterization
NOTE: Equipment for umbilical vein catheterization is the same as that for UAC insertion with the exception that an 8 F catheter may occasionally be used for infants weighing greater than 3500 g.
1. Maintain aseptic technique.
2. Prepare cord as for UAC and identify the thin-walled vein.
3. Grasp the base of the cord with curved hemostats or toothed forceps, hold upright, and dilate vessel with the tip of iris forceps.
4. Insert the catheter to predetermined distance.
a. Emergency placement (temporary catheter, “low position"): Insert 2 to 3 cm into vessel until blood is obtained. Once emergency medications and fluids have been administered and the infant is stabilized, remove the catheter.
b. Indwelling umbilical venous catheter:
(1) Measure shoulder-to-umbilical distance and multiply by 0.75 to arrive at insertion depth, or
(2) Calculate insertion depth with the formula 1.5 times body weight in kilograms plus 5.6 cm (1.5 × weight + 5.6).
5. If resistance is met, withdraw the catheter 2 to 3 cm and attempt to reinsert. If cannulation remains unsuccessful, remove the catheter.
6. If cannulation is successful, connect and secure catheter and confirm position by radiograph. Correct radiographic position is 0.5 to 1 cm above the diaphragm.
7. Secure catheter per hospital policy.
8. Document procedure according to hospital policy, noting type of catheter, catheter size, distance catheter threaded, location of catheter tip on radiograph, and adjustments made to catheter to correct malpositioned catheter.
F. Complications of using umbilical catheters.
1. Vasospasm, embolism, thrombosis, and distal ischemia:
a. Blanching, cyanosis, and mottling of skin.
b. Sloughing of skin.
c. Necrosis of extremities, possibly leading to loss of toes.
d. Paraplegia.
e. Intestinal necrosis and perforation.
2. Infection.
3. Mechanical complications:
b. Perforation of peritoneum.
c. False aneurysm.
d. Knot in catheter or breaking of catheter.
4. Malpositioned catheter:
b. Pericardial effusion.
c. Cardiac tamponade.
d. Hydrothorax.
5. Necrotizing enterocolitis (controversial).
6. Perforation of colon.
7. Hepatic necrosis.
8. Skin burns from antiseptics.
9. Hemorrhage, exsanguination.
10. Portal hypertension.
11. Death.
Radial Artery Catheterization: Advanced Practice Procedure
1. Need for frequent blood sampling and umbilical artery catheterization cannot be done or UAC has been removed.
2. Need for continuous blood pressure monitoring.
B. Precautions.
1. Avoid areas of skin breakdown or infection.
2. Use caution in infants with coagulopathy, who may bleed excessively.
3. Inadequate ulnar artery blood flow.
4. Limb malformation.
C. Equipment and supplies.
1. 22- to 27-gauge over-the-needle IV catheter.
2. Antiseptic solution per institution policy.
3. 0.25 to 0.5 NS flush.
4. Occlusive dressing and tape per institution policy.
5. Transilluminator if needed.
6. Appropriately sized padded armboard.
7. Arterial pressure transducer and extension tubing per institution policy.
8. Nonsterile gloves.
9. 4-0 sutures if needed per institution policy.
10. T-connector as needed per institution policy.
11. Pain/developmental management: pacifier, sucrose pacifier, blankets for swaddling, and eye protection from bright lights.
D. Procedure.
1. Select site for catheterization:
a. Palpate radial artery pulse.
b. Transillumination may assist in identifying vessel.
2. Take care not to hyperextend wrist, as this will occlude arterial flow.
3. Perform modified Allen test to ensure adequate collateral circulation:
b. Occlude both radial and ulnar arteries.
c. Massage the palm toward wrist to blanch hand.
d. Release pressure on the ulnar artery.
e. Perfusion to hand should return in less than 10 seconds; if longer than 15 seconds, do not puncture artery.
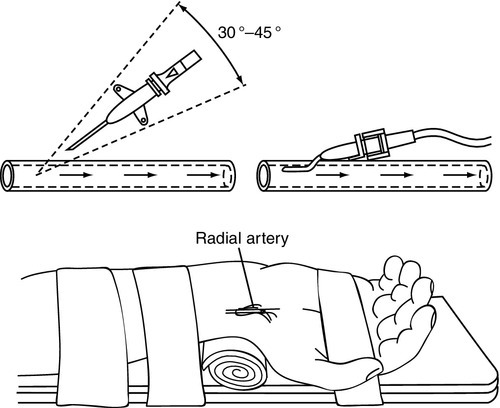
4. Position and secure wrist as shown in Figure 15-3.
5. Provide pain management and developmental support.
6. Prepare site with antiseptic solution per institution policy.
7. Puncture the skin proximal to the wrist crease with the needle at a 30- to 45-degree angle (a deeper angle may be needed for larger babies).
8. Cannulate the artery using one of the following methods:
a. Puncture both walls of the artery with the needle bevel up (blood return may be delayed). Remove the stylet and withdraw the catheter until blood return is noted. When blood return is seen, advance the catheter into the artery and flush. Flushing while advancing may stabilize the catheter and make advancing easier.
b. Puncture the anterior wall of the artery until blood return is seen; at this point the catheter is in the artery. Advance the catheter while simultaneously withdrawing the stylet and flush.
9. Secure cannula with sutures or tape per institution policy.
10. Attach T-connector per institution policy and flush line. Luer-lock connections are preferred if they do not interfere with patency of the catheter.
11. Secure line with armboard and dressing per institution policy. Ensure visibility of insertion site and all fingers.
12. Attach pressure transducer and extension tubing per institution policy and ensure unobstructed flow of fluids by pump. Secure all connection sites to avoid backflow of blood into line.
13. Maintain patency of catheter with heparinized fluids.
14. Dispose of needle in designated sharps container.
15. Document date, time, location, catheter size, distal perfusion, and pain response to placement of catheter.
16. Monitor site for extravasation or leakage of fluids and/or blood.
17. Monitor fingers for adequate perfusion of all digits.
E. Complications.
2. Infection.
3. Extravasation of fluids.
4. Hematoma or hemorrhage.
5. Embolism or thrombus formation leading to tissue ischemia or necrosis and possible loss of hand or digits.
6. Damage to surrounding tissues or structures.
BLOOD SAMPLING PROCEDURES
Choice of Method for Blood Sampling
1. Capillary sampling is indicated for small amounts of blood, generally less than 1 mL.
2. It may be easier to obtain large amounts of blood (> 2 mL) from an arterial puncture.
B. Type of testing indicated.
1. Newborn metabolic screens are primarily drawn via heel stick.
2. Some laboratory results may be affected by hemolysis, clotting, or clumping of the blood, and a large-volume free-flowing specimen may be easier to obtain by venipuncture or arterial puncture (Folk 2007; Milcic, 2010).
b. Platelet levels.
c. Hematocrit.
d. Coagulation studies.
3. Collection of blood for cultures requires sterile technique and blood should be collected via venous or arterial puncture (Folk, 2007).
4. Blood gas values will differ based on arterial, capillary, or venous sources. As exchange of oxygen for CO2 occurs in peripheral tissues, CO2 levels will be lowest in arterial blood, and highest in venous blood, and oxygen levels will be highest in arterial blood and lowest in venous blood. Blood pH will also vary, being lower in arterial and higher in venous sources. An arterial sample may be helpful to ascertain accurate pH, PaO2, and PaCO2 levels.
C. Pain of procedures.
1. Studies have shown venipuncture to be less painful than other sampling methods when drawn by a skilled phlebotomist (Folk, 2007). However, consideration should be given to preserving future IV sites in sick infants.
2. Laboratory samples should be drawn with as few invasive procedures as possible to minimize pain. Consider the total volume of blood needed when choosing a sampling method, and try to cluster laboratory draws to avoid multiple punctures. For infants needing frequent blood draws, consider placement of an arterial catheter.
Capillary Blood Sampling: Fundamental Procedure
1. Small amount of blood collection is needed (< 1 mL) (Folk, 2007).
2. Venous or arterial blood sample is not possible or necessary.
3. Collection of blood specimen for blood gas sampling, routine laboratory sampling, state newborn metabolic screens.
B. Contraindications.
1. Impaired circulation in selected limb or at puncture site.
2. Infection near puncture site.
C. Precautions.
1. Consider venipuncture if impaired skin integrity noted at selected puncture site (edema, bruising, multiple puncture marks).
2. Consider venipuncture as an alternative to capillary sampling in term neonates, as it may be less painful (Shah and Ohlsson, 2007).
3. Hyperviscous blood may render sampling difficult. Consider venipuncture in infants with polycythemia.
4. Use caution in infants with coagulation disorders.
5. Do not puncture the back of the heel; this may cause damage to the calcaneus bone.
6. Avoid finger, great toe, and earlobe sticks.
7. Avoid excessive squeezing that may cause hemolysis.
D. Equipment and supplies.
1. Sterile alcohol swabs or other antiseptic, as per institutional guideline.
2. Automated heel-lancing incision device based on infant size.
3. Sterile gauze pad.
4. Warm compress. Recent studies have shown that warming the heels may not be needed (Folk 2007). When warming heels, use a warm compress manufactured for use with infants, no warmer than 40° C.
5. Nonsterile gloves.
6. Appropriate specimen collection containers.
7. Pain management: pacifier, sucrose pacifier, and blankets for developmental swaddling.
E. Procedure.
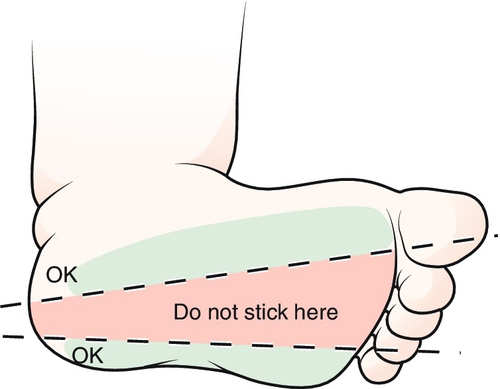
1. Select puncture site on the lateral or medial aspect of the heel. Avoid other areas because of the possibility of nerve damage or osteomyelitis (Fig. 15-4).
2. Warm heel with compress for 5 to 10 minutes if desired.
3. Provide pain management:
a. Pacifier for nonnutritive sucking.
b. Consider 24% sucrose solution applied to pacifier or nipple 2 minutes prior to procedure, if patient age and status allow (Folk, 2007).
c. Dim and quiet environment.
d. Skin-to-skin holding, and/or blanket swaddling with selected extremity exposed.
4. Gather supplies, wash hands, and don gloves.
5. Prepare area selected for skin puncture with antiseptic or alcohol and allow to dry.
6. Puncture heel perpendicular to the skin.
7. Wipe away first drop of blood with sterile gauze pad.
8. Collect specimen from free-flowing drops at puncture site.
a. Blood flow is increased if the puncture site is dependent relative to the extremity.
b. Gentle “pumping” of the extremity above the puncture site may encourage blood flow.
9. After specimen is collected, elevate foot and apply pressure with sterile gauze pad until hemostasis has occurred.
10. Dispose of lancet in appropriate sharps container.
11. Label specimen per institutional policy.
12. Document the heel-stick procedure, specimen obtained, date and time, pain management, and patient’s tolerance.
F. Complications.
1. Bruising or loss of skin integrity.
2. Infection.
3. Scarring.
4. Calcified nodules.
5. Cellulitis.
6. Osteomyelitis.
7. Nerve damage (Folk, 2007).
8. Pain.
9. Erroneous laboratory values may result from the following:
a. Contamination of specimen with tissue fluid.
b. Contamination of specimen with alcohol.
c. Inadequate warming or poor circulation at puncture site.
d. Hemolysis of specimen.
Venipuncture (Phlebotomy): Fundamental Procedure
1. Large quantity of blood required.
2. Arterial sample not possible or necessary.
3. Capillary sample not possible or sufficient.
4. Sterile collection for blood culture.
5. Specific laboratory tests requiring venous sampling.
B. Contraindications.
1. Inadequate or impaired circulation in selected limb.
2. Infection or loss of skin integrity near selected venipuncture site.
C. Precautions.
1. Use caution in infants with coagulation disorders.
2. Avoid sites that may be needed for possible central venous cannulation.
3. Differentiate between arteries and veins.
D. Equipment and supplies.
1. Antiseptic skin preparation per hospital policy.
2. 23- to 25-gauge butterfly needle or hypodermic needle attached to syringe.
3. Syringe(s) for specimen collection.
4. Appropriate specimen collection tubes.
5. Sterile gauze pad.
6. Tourniquet or rubber band.
7. Nonsterile gloves.
8. Pain management: pacifier, sucrose pacifier, blankets for swaddling leaving venipuncture site accessible, and/or cloth to protect eyes from bright lights.
E. Procedure.
1. Gather supplies, wash hands, and don gloves.
2. Choose vein to be used. Accomplish distention of the vessel by applying a gentle tourniquet proximal to the selected insertion site. Alternatively, an assistant may encircle the proximal extremity with his or her hand or fingers and apply direct pressure for the same effect.
3. Provide pain-relieving measures and developmentally position/swaddle infant with selected venipuncture site accessible.
4. Stabilize and position the selected puncture site to allow puncture in direction of blood flow.
5. Prepare skin at selected puncture site with antiseptic per hospital policy.
6. Puncture skin at a 15- to 45-degree angle, with needle bevel up, just distal to anticipated vessel entry site, using shallow angle for smaller infants or superficial vessels.
7. Advance needle until blood appears in the tubing.
a. If resistance is met or vessel is not punctured, withdraw needle slowly to just below level of the skin, relocate vessel, and advance the needle again.
b. If a hematoma develops or bleeding occurs, occlude the vessel with pressure just proximal to the puncture site, remove tourniquet, and withdraw needle. Apply pressure until hemostasis has occurred.
8. On entrance of blood into tubing, attach syringe and gently aspirate to obtain specimen. If a hypodermic needle with an intact hub was used, blood specimen may drip into laboratory collection container.
9. After specimen is obtained, using a gauze pad just proximal to puncture site, occlude vessel with pressure over entry site while removing tourniquet and withdrawing needle.
10. Apply pressure to site until hemostasis has occurred.
11. Dispose of needle in appropriate sharps container.
12. Label specimens per institution policy.
13. Document date, time, site location, specimen collected, amount of blood removed, nonpharmacologic interventions, patient’s tolerance of the procedure, and any complications.
F. Complications.
2. Infection.
3. Hemorrhage.
4. Needle injury to adjacent structures.
5. Pain.
Radial Artery Puncture: Advanced Practice Procedure
1. Venous and/or capillary sites are not satisfactory.
2. Other arterial line is unavailable for sampling.
3. Arterial blood gas sampling.
4. Need to sample large quantities of blood.
B. Precautions.
1. Avoid area of infection or loss of skin integrity near selected puncture site.
2. Use caution in infants with coagulation defects.
3. Avoid puncture in extremity with inadequate or impaired circulation.
4. Consider need to preserve arterial site for possible cannulation.
5. Avoid extremity with inadequate collateral circulation distal to the selected puncture site.
6. Use of small-gauge needle reduces potential complications.
C. Equipment and supplies.
1. Antiseptic supplies to prepare for arterial puncture per hospital policy.
2. 23- to 25-gauge butterfly needle or 23- to 25-gauge needle attached to a 3-mL syringe.
3. Extra syringes.
4. Sterile gauze pad.
5. Arterial blood gas syringe, other applicable laboratory specimen containers.
6. Transilluminator (optional).
D. Procedure.
a. Transillumination may assist in vessel location.
b. Extend wrist; do not hyperextend, which may occlude vessel.
c. Palpate artery at distal crease of wrist.
2. Perform modified Allen test to assess collateral circulation.
b. Apply pressure to occlude both radial and ulnar arteries.
c. Massage the palm to blanch hand.
d. Release pressure on ulnar artery.
e. If color returns to hand in less than 10 seconds, adequate collateral circulation is suggested. If color returns in greater than 15 seconds, do not puncture artery because of poor collateral circulation.
f. Doppler-flow evaluation of ulnar, radial, and palmar circulation can also help determine adequacy of collateral flow.
3. Provide pain management such as pacifier for nonnutritive sucking, sucrose pacifier, and/or developmental care with facilitated tucking or blanket swaddling.
4. Position and stabilize extended wrist to allow puncture against direction of arterial flow.
5. Prepare area with antiseptic for skin puncture (middle to outer third of wrist) per hospital policy.
6. Puncture skin with needle (bevel up) at a 15- to 45-degree angle, using shallower angle for smaller infants or more superficial arteries.
7. Advance needle slowly to puncture artery.
a. If resistance is met or blood is not obtained, withdraw needle slowly to just below skin level, palpate artery, and advance needle again in the direction of the artery.
b. If hematoma or bleeding develops, occlude artery with gauze and pressure just proximal to the puncture site, withdraw needle, and apply pressure until hemostasis has occurred (approximately 5 minutes of direct pressure).
8. If arterial cannulation is successful, when blood enters the butterfly tubing, attach syringe and aspirate gently to obtain sample.
9. Apply firm, but not occlusive, pressure to artery with gauze just proximal to puncture site and withdraw needle. Apply pressure to site for 5 minutes or until hemostasis has occurred.
10. Ensure distal circulation after puncture.
a. Evaluate color and temperature.
b. Check capillary refill time.
c. Palpate arterial pulse.
11. Document the following: date, time, site location, Allen test result prior to procedure, pain management interventions, tolerance to procedure, specimen obtained, amount of blood drawn, hemostasis, distal circulation, and any complications if encountered.
E. Complications.
2. Hemorrhage.
3. Infection.
4. Thrombosis, embolism.
5. Arteriospasm, tissue necrosis, possibly leading to loss of hand.
6. Needle injury to adjacent structures.
7. Pain.
MISCELLANEOUS PROCEDURES
Bladder Catheterization: Fundamental Procedure
1. To obtain urine specimen/culture.
2. To monitor urinary output.
3. To monitor bladder residuals.
4. To relieve urinary retention.
5. To accomplish genitourinary testing such as cystogram or voiding cystourethrogram.
B. Contraindications.
C. Precautions.
1. Use caution in infants with coagulation disorders.
2. Maintain an aseptic technique.
3. Do not force the catheter, as this may lead to trauma to the urethra and bladder.
4. Remove catheter as soon as possible to minimize infection.
5. Use the smallest-diameter catheter to avoid trauma.
D. Equipment and supplies. NOTE: All equipment is sterile and is available in commercially prepared kits.
a. Size 3.5 F urinary catheter for infants weighing less than 1000 g may be used.
b. Size 5 F urinary catheter for infants weighing greater than 1000 g may be used.
2. Urinary catheter tray.
b. Povidone–iodine solution swabs.
c. Sterile drapes.
d. Lubricant.
e. Sterile specimen container or closed urinary drainage system.
E. Procedure.
Male Catheterization
1. Place infant supine and restrain legs or have assistant hold legs.
2. Don sterile gloves.
3. Clean penis:
a. Hold the penis perpendicular to the body with the nondominant hand (which is now considered contaminated).
b. Starting at the meatus and moving down the penis, clean with povidone–iodine solution swabs three times, using a new swab each time.
4. Drape sterile towels across infant’s lower abdomen and across legs.
5. Apply sterile lubricant to appropriately sized catheter tip with the sterile dominant hand.
6. Place the catheter (held by the still-sterile dominant hand) into the meatus while maintaining perpendicular position of the penis with the nondominant hand. Advance catheter along the urethra until urine appears. Slight resistance may be felt as the catheter passes through the external bladder sphincter. Steady, gentle pressure is usually needed to pass beyond this area; however, never force the catheter (Fig. 15-5).
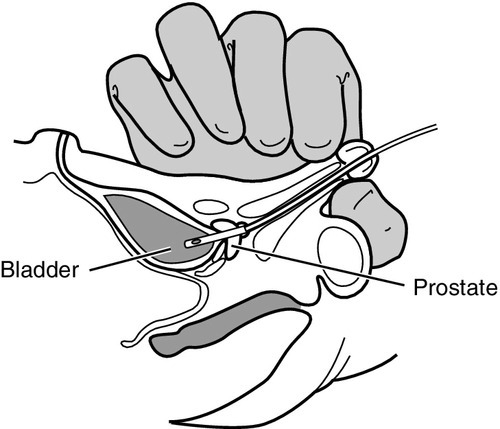
7. Advance catheter slightly past the point where urine flow began. Inflate the balloon per hospital policy and manufacturer’s recommendations, if applicable. Usually the catheter will function satisfactorily if simply taped in place. Balloon inflation may injure the urethra if the catheter is not properly positioned in the bladder.
8. If catheter is to remain indwelling, tape it to lower abdomen or to penile shaft.
9. Collect urine specimen in the sterile container and send to the laboratory or attach to a closed urinary drainage system.
10. Document procedure, catheter type and size, patient’s tolerance, quantity and characteristics of sample obtained, and any difficulties encountered.
Female Catheterization
1. Place infant on back and secure legs in frog-leg position. You may secure with restraints or have an assistant hold the legs.
2. Don sterile gloves.
3. Separate the labia with the nondominant hand (which is no longer sterile). With the sterile dominant hand, clean the area around the meatus with the povidone–iodine solution swabs, using front-to-back strokes, repeating with three separate swabs.
4. Drape sterile towels across infant’s lower abdomen and across legs.
5. Spread the labia and identify the meatus and urethra (Fig. 15-6).
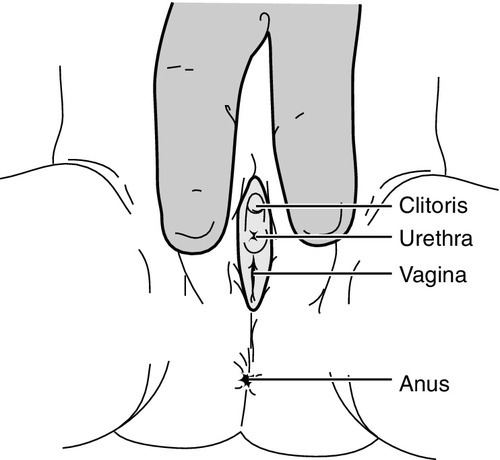
6. Apply sterile lubricant to an appropriately sized catheter tip using the sterile dominant hand.
7. Insert the catheter into the urethra and advance until urine appears.
8. Advance catheter slightly past the point where urine flow began. Inflate balloon per hospital policy and manufacturer’s recommendations, if applicable. Usually the catheter will function satisfactorily if simply taped in place. Balloon inflation may injure the urethra if the catheter is not properly positioned in the bladder.
9. If catheter is to remain indwelling, secure to inner thigh.
10. Collect urine specimen in the sterile container and send to the laboratory or attach to a closed urinary drainage system.
11. Document procedure, catheter type and size, patient’s tolerance, quantity and characteristics of sample obtained, and any difficulties encountered.
F. Complications.
2. Hematuria.
3. Trauma to urethra.
4. Stricture of urethra or at meatus.
5. Possible knotting of catheter.
6. Pain.
Lumbar Puncture: Advanced Practice Procedure
1. To obtain cerebrospinal fluid (CSF) to diagnose central nervous system (CNS) disorders such as infections or subarachnoid hemorrhage.
2. To monitor the efficacy of antibiotic therapy in the presence of CNS infection (rare).
3. To drain CSF in communicating hydrocephalus associated with intracranial hemorrhage.
4. To administer medication.
5. To assist in the diagnosis of certain metabolic disorders.
B. Contraindications.
1. Evidence of increased ICP. Performance of the procedure could cause herniation.
2. Lumbosacral anomalies.
3. Infants with uncorrected thrombocytopenia or coagulopathies.
4. Severe cardiorespiratory instability.
C. Precautions.
1. Avoid areas of infection or loss of skin integrity at puncture site.
2. Monitor for and be prepared to respond to cardiorespiratory instability.
3. Avoid flexion of the neck and ensure that a patent airway is maintained.
4. Always maintain aseptic technique.
5. Always use a needle with a stylet to avoid development of intraspinal epidermoid tumor.
6. To prevent traumatic tap caused by overpenetration, insert the needle slowly while removing the stylet at frequent intervals to detect CSF as soon as the subdural space is entered.
7. Never aspirate CSF with a syringe. Even a small amount of negative pressure can increase the risk of subdural hemorrhage or herniation.
8. Palpate landmarks accurately to prevent puncture above the L4 interspace.
D. Equipment and supplies.
1. Prepackaged lumbar puncture kit.
2. If a prepackaged kit is not available, gather the following supplies:
a. Sterile gloves and gown, mask, and surgical cap.
b. Sterile cup with povidone–iodine.
c. Sterile gauze pads.
d. Sterile towels or transparent aperture drape.
e. Spinal needle with short bevel and stylet (22-gauge needle).
f. Three or more sterile specimen tubes with caps.
g. Adhesive bandage.
3. Cardiorespiratory monitor and pulse oximeter and emergency equipment such as suction and oxygen source.
4. Analgesic agents and/or sedatives.
5. Pressure-monitoring equipment, if planning to obtain CSF pressures.
E. Procedure.
1. Obtain informed consent per institution’s policy.
2. Gather equipment and supplies.
3. Provide anxiety/pain management by considering the following:
a. Oral sucrose solution to minimize pain (Leef, 2006).
b. Topical anesthetics such as EMLA, Ametop, or LMX4 over puncture site in term newborns per institution’s policy and manufacturer’s recommendations (Kaur et al., 2003; O’Brien et al., 2005). Use of topical local anesthetic has been shown to increase success rates (Baxter et al., 2006).
c. Nonnarcotic relief such as acetaminophen.
d. Local anesthesia: 1% lidocaine drawn up in a 1-mL syringe with a 27- to 25-gauge needle for injection.
e. Opioid (fentanyl or morphine) or a benzodiazepine (Versed not recommended in premature infants).
4. Examine and determine puncture site:
a. Grasp both iliac crests at their highest points and, following an imaginary line (that passes across the level of the fifth lumbar vertebra), palpate the interspace of the spinous process that falls immediately above or below the imaginary line drawn between the iliac crests (Fig. 15-7).
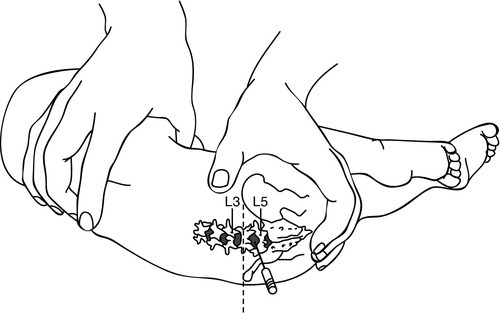
b. The preferred puncture site is between L3-L4 and L4-L5 (MacDonald and Ramasethu, 2013).
c. The puncture site can be marked by making a small nail print impression or using a surgical marker.
5. Don mask and cap and perform a 3-minute scrub, and then don gown and sterile gloves.
6. Have an assistant open tray while maintaining the sterility of its contents.
7. Have assistant restrain the infant with hips flexed and back arched in the lateral decubitus (knee–chest) or sitting position, with spine flexed. An intubated infant must be positioned in the lateral decubitus position. Avoid flexion of the neck and ensure that a patent airway is maintained.
8. Clean the lumbar area 3 times with antiseptic using a new swab each time.
a. Begin at the desired interspace, using a circular motion from puncture site outward to up and over the iliac crests.
b. Allow antiseptic to dry.
9. If used, inject a wheal of local anesthetic at the puncture site. After several minutes, infiltrate the deeper tissues also.
10. Place one sterile drape under the infant and another that covers the infant, with the exception of the puncture site and the infant’s face. Transparent aperture drapes are available and recommended because they permit better observation of the infant.
11. Relocate the desired interspace and insert the needle in the midline.
a. Angle slightly cephalad to avoid the vertebral bodies.
b. If resistance is met, withdraw the needle slightly and redirect more cephalad.
c. Hold a finger on the vertebral process above or below the interspace to aid in locating the puncture site if the infant moves.
12. Advance the needle slowly to a depth of approximately 1.0 to 1.5 cm depending on infant’s size, in small increments (2 to 3 mm) to avoid puncture of posterior wall.
a. Remove the stylet frequently to observe the needle hub for fluid. Always replace the stylet before readvancing the needle.
b. A pop may be felt when the ligamentum flavum and dura are penetrated. Penetration of the dura may also be detected when a loss of resistance is met.
c. Once fluid is noted in the needle hub, patiently wait for CSF, which may be slow.
13. Obtain pressure measurement reading, if desired.
a. Opening pressure measurements are difficult and often unreliable, but possible in a quiet infant in the lateral decubitus position. If measuring pressure, attach the manometer and wait for the fluid oscillations to stabilize in the tube before recording the pressure. Normal mean lumbar CSF pressures in neonates and preterm infants are 100 and 95 mm H2O, respectively (Marra et al., 2004).
14. Allow CSF to collect dropwise into the collection tubes; never aspirate with a syringe.
15. If no fluid is obtained, try gently rotating the needle. If no fluid is obtained after repositioning the needle, replace the stylet, remove the needle, and try one interspace above or below, using a new needle for each attempt.
16. Allow the CSF to drop from the needle hub to collect 0.5- to 1-mL aliquots of CSF in three or four of the specimen tubes for the following diagnostic studies:
a. Tube 1: culture, Gram stain, and sensitivity studies.
b. Tube 2: protein and glucose.
c. Tube 3: cell count and differential.
d. Tube 4: other diagnostic studies such as Venereal Disease Research Laboratory (VDRL) and/or viral studies.
e. NOTE: If a traumatic (bloody) tap was performed, send the clearest specimen for cell count and differential. Bloody CSF can be differentiated from venous blood by dropping a sample onto filter paper. Bloody CSF will form a “water ring” around a central patch of erythrocytes.
17. Once specimens have been obtained, replace stylet and remove needle–stylet unit in a single outward motion to prevent injury to the spinal cord and nerves.
18. Apply local pressure to the puncture site for 3 to 5 minutes to minimize the risk of CSF leakage. Then place an adhesive bandage over the puncture site.
19. Remove the surrounding antiseptic with sterile water to avoid skin injury.
20. Document procedure according to hospital policy, noting position of the patient during procedure, needle size used, complications or difficulties encountered, CSF characteristics, pain management interventions, patient’s tolerance, and specimens sent to laboratory for analysis.
F. Complications.
1. Infection from nonsterile conditions:
a. Use of poor sterile technique.
b. Bacteremia if blood vessel punctures during procedure, having passed through infected CSF.
2. Intraspinal epidermoid tumor from lack of stylet use.
3. Spinal cord and/or nerve damage if puncture performed above L4.
4. Cerebral herniation.
5. Apnea and/or bradycardia.
6. Hypoxia.
7. Spinal cord or epidural abscess.
8. Spinal or intracranial subdural hematoma.
9. Spinal or intracranial subarachnoid hematoma.
10. Spinal fluid leakage into epidural space.
11. Vertebral body osteomyelitis.
12. Persistent bleeding, especially in patients with an underlying coagulopathy.
13. Pain.
SIMULATION
In the high-risk environment of the NICU, there are many delicate procedures that require proficiency, precision, and great skill. Opportunities for training in these skills are essential, as competence is critical to the survival of the tiny patients they serve (see Chapter 18).