The Flap Technique for Pocket Therapy
Several techniques can be used for the treatment of periodontal pockets. The periodontal flap is one of the most frequently employed procedures, particularly for moderate and deep pockets in posterior areas (see Chapter 57).
Overview
Flaps are used for pocket therapy to accomplish the following:
1. Increase accessibility to root deposits for scaling and root planing
2. Eliminate or reduce pocket depth via resection of the pocket wall
3. Gain access for osseous resective surgery, if necessary
4. Expose the area for the performance of regenerative methods
To fulfill these purposes, several flap techniques are available and in current use.
Technique for Access and Pocket Depth Reduction or Elimination
The three different categories of flap techniques used in periodontal flap surgery are as follows: (1) the modified Widman flap; (2) the undisplaced flap; and (3) the apically displaced flap.
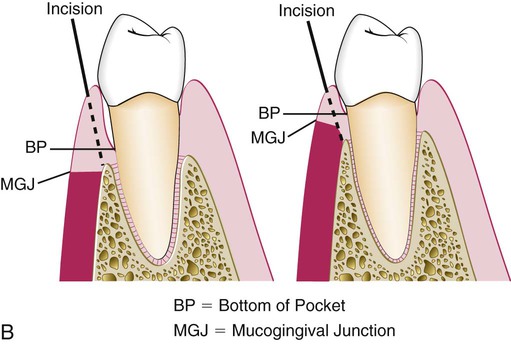
The modified Widman flap facilitates instrumentation for root therapy. It does not attempt to reduce the pocket depth, but it does eliminate the pocket lining. The original intent of the surgery was to access the root surface for scaling and root planing. The objectives for the other two flap procedures—the undisplaced flap and the apically displaced flap—include root surface access and the reduction or elimination of the pocket depth. The choice of which procedure to use depends on two important anatomic landmarks: the pocket depth and the location of the mucogingival junction. These landmarks establish the presence and width of the attached gingiva, which is the basis for the decision.
The modified Widman flap has been described for exposing the root surfaces for meticulous instrumentation and for the removal of the pocket lining.6 Again, it is not intended to eliminate or reduce pocket depth, except for the reduction that occurs during healing as a result of tissue shrinkage.
The undisplaced (unrepositioned) flap improves accessibility for instrumentation, but it also removes the pocket wall, thereby reducing or eliminating the pocket. This is essentially an excisional procedure of the gingiva.
The apically displaced flap provides accessibility and eliminates the pocket, but it does the latter by apically positioning the soft-tissue wall of the pocket.2 Therefore, it preserves or increases the width of the attached gingiva by transforming the previously unattached keratinized pocket wall into attached tissue. This increase in the width of the attached gingiva is based on the apical shift of the mucogingival junction, which may include the apical displacement of the muscle attachments. A study made before and 18 years after the use of apically displaced flaps failed to show a permanent relocation of the mucogingival junction.1
Incisions
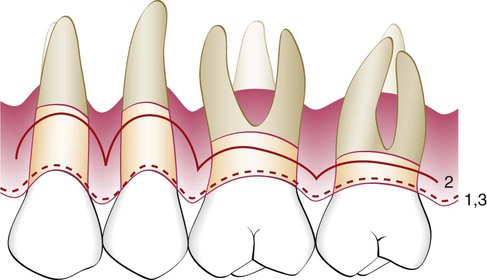
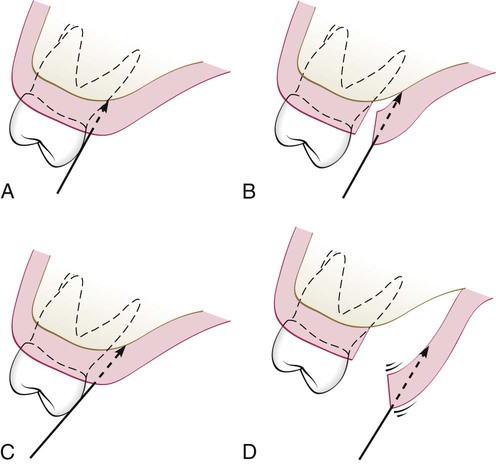
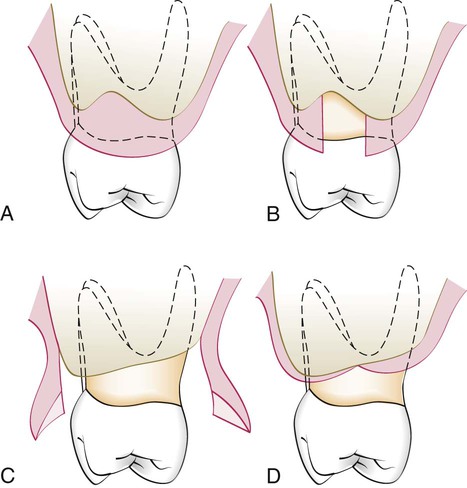
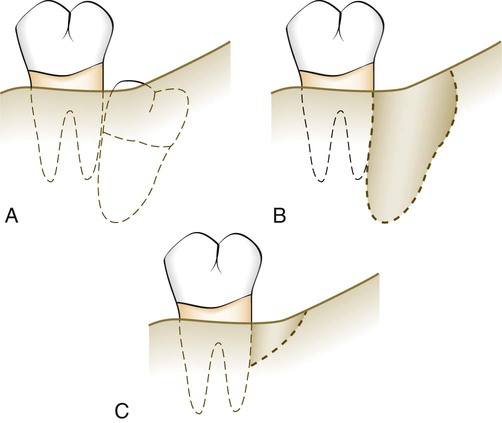
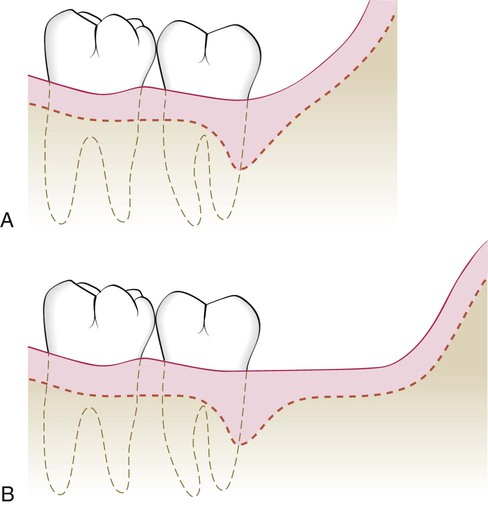
All three flap techniques that were just discussed involve the use of the basic incisions described in Chapter 57: the internal bevel incision, the crevicular incision, and the interdental incision. However, there are important variations in the way these incisions are performed for the different types of flaps (Figures 59-1 and 59-2). The internal beveled incision for the modified Widman flap closely follows the scalloped outline of the dentition to minimize the loss of the attached keratinized gingiva. This incision is made 1 mm to 2 mm from the teeth. The gingival margin is removed, and the flap is reflected to gain access for root therapy.

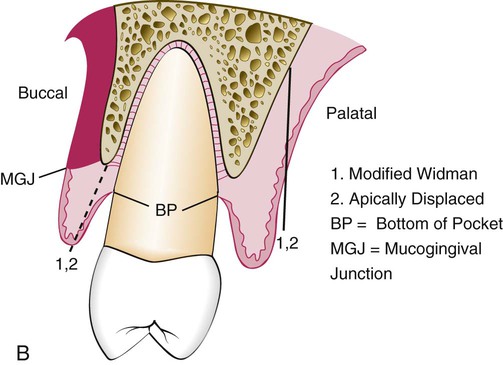
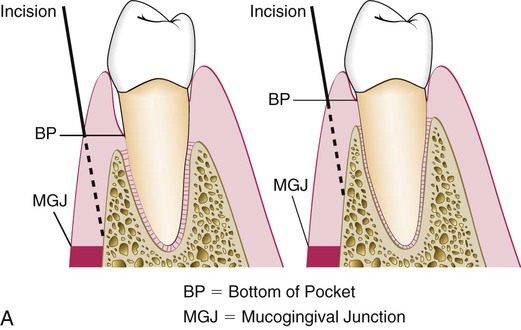
The apically displaced flap technique is selected for cases that present a minimal amount of keratinized, attached gingiva. For this reason, the internal bevel incision should be made as close to the tooth as possible (i.e., 0.5 mm to 1.0 mm) (see Figure 59-1). There is no need to determine where the bottom of the pocket is in relation to the incision for the apically displaced flap as one would for the undisplaced flap. The flap is placed at the tooth–bone junction by apically displacing the flap. Its final position is not determined by the placement of the first incision.
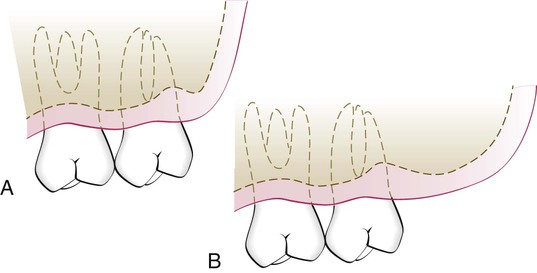
For the undisplaced flap, the internal bevel incision is initiated at or near a point just coronal to where the bottom of the pocket is projected on the outer surface of the gingiva (see Figure 59-1). This incision can be accomplished only if sufficient attached gingiva remains apical to the incision. Therefore, the two anatomic landmarks—the pocket depth and the location of the mucogingival junction—must be considered to evaluate the amount of attached gingiva that will remain after the surgery has been completed. Because the pocket wall is not displaced apically, the initial incision should eliminate the pocket wall. Thus, an incision should not be made too close to the tooth, because it will not eliminate the pocket wall, and it may result in the re-creation of the soft-tissue pocket. If the tissue is too thick, the flap margin should be thinned with the initial incision. The proper placement of the flap margin at the tooth–bone junction during closure is important to prevent either recurrence of the pocket or the exposure of bone. The internal bevel incision should be scalloped into the interdental area to preserve the interdental papilla (see Figure 59-2). This will allow better coverage of the bone at both the radicular and interdental areas.
If the surgeon contemplates osseous surgery, the first incision should be placed in such a way to compensate for the removal of the bone tissue so that the flap can be placed at the tooth–bone junction.
Reconstructive Techniques
The techniques that are used to achieve reconstructive and regenerative objectives are the papilla preservation flap8 and the conventional flap, which involve only crevicular or pocket incisions. This will allow the clinician to retain the maximum amount of gingival tissue, including the papilla, which is essential for graft or membrane coverage.
Modified Widman Flap
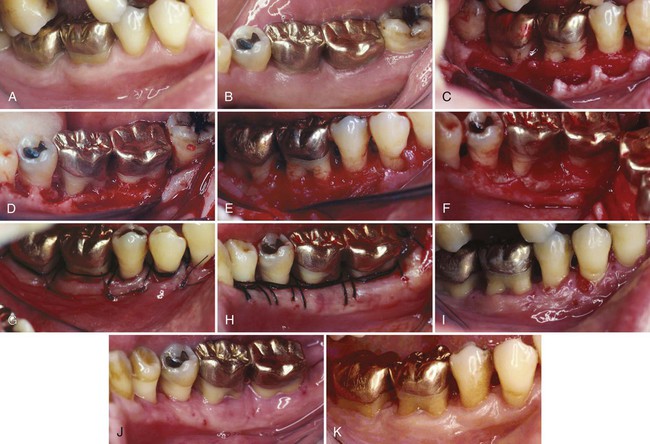
In 1965, Morris4 revived a technique described early during the twentieth century in the periodontal literature; he called it the “unrepositioned mucoperiosteal flap.” Essentially, the same procedure was presented in 1974 by Ramfjord and Nissle,6 who called it the “modified Widman flap” (Figure 59-3). This technique offers the possibility of establishing an intimate postoperative adaptation of healthy collagenous connective tissue to tooth surfaces,2,3,5,6 and it provides access for adequate instrumentation of the root surfaces and immediate closure of the area. The following steps outline the modified Widman flap technique.
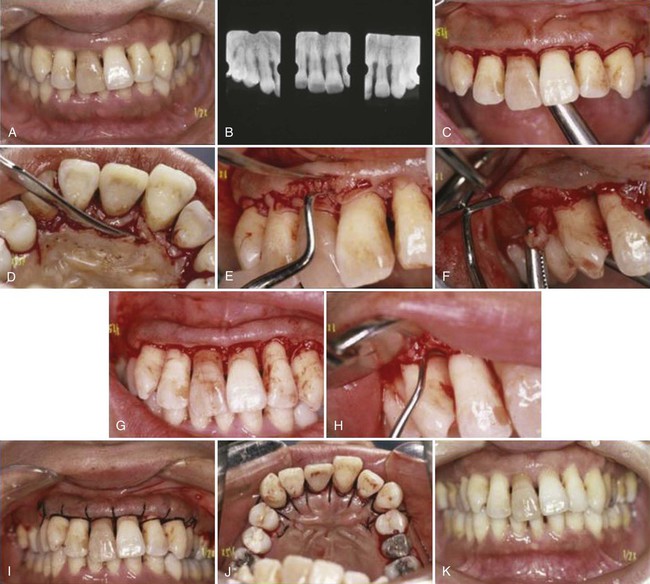
Step 1: The initial incision is an internal bevel incision to the alveolar crest starting 0.5 mm to 1 mm away from the gingival margin (Figure 59-3, C). Scalloping follows the gingival margin. Care should be taken to insert the blade in such a way that the papilla is left with a thickness similar to that of the remaining facial flap. Vertical relaxing incisions are usually not needed.
Step 2: The gingiva is reflected with a periosteal elevator (Figure 59-3, D).
Step 3: A crevicular incision is made from the bottom of the pocket to the bone in such a way that it circumscribes the triangular wedge of tissue that contains the pocket lining.
Step 4: After the flap is reflected, a third incision is made in the interdental spaces coronal to the bone with a curette or an interproximal knife, and the gingival collar is removed (Figure 59-3, E and F).
Step 5: Tissue tags and granulation tissue are removed with a curette. The root surfaces are checked and then scaled and planed, if needed (Figure 59-3, G and H). Residual periodontal fibers attached to the tooth surface should not be disturbed.
Step 6: Bone architecture is not corrected unless it prevents good tissue adaptation to the necks of the teeth. Every effort is made to adapt the facial and lingual interproximal tissue adjacent to each other in such a way that no interproximal bone remains exposed at the time of suturing. The flaps may be thinned to allow for close adaptation of the gingiva around the entire circumference of the tooth and to each other interproximally.
Step 7: Continuous, independent sling sutures are placed in both the facial and palatal areas (Figure 59-3, I and J) and covered with a periodontal surgical pack.
Ramfjord and Nissle6 performed an extensive longitudinal study that compared the Widman procedure (as modified by them) with the curettage technique and the pocket elimination methods, which include bone contouring when needed. The patients were assigned randomly to one of the techniques, and results were analyzed yearly for up to 7 years after therapy. The researchers reported similar results for each of the three methods tested. Pocket depth was initially similar for all methods, but it was maintained at shallower levels with the Widman flap; the attachment level remained higher with the Widman flap.
Undisplaced Flap
Currently, the undisplaced flap may be the most frequently performed type of periodontal surgery. It differs from the modified Widman flap in that the soft-tissue pocket wall is removed with the initial incision; thus, it may be considered an “internal bevel gingivectomy.” The undisplaced flap and the gingivectomy are the two techniques that surgically remove the pocket wall. To perform this technique without creating a mucogingival problem, the clinician should determine that enough attached gingiva will remain after removal of the pocket wall. The following steps outline the undisplaced flap technique.
Step 1: The pockets are measured with the periodontal probe, and a bleeding point is produced on the outer surface of the gingiva to mark the pocket bottom.
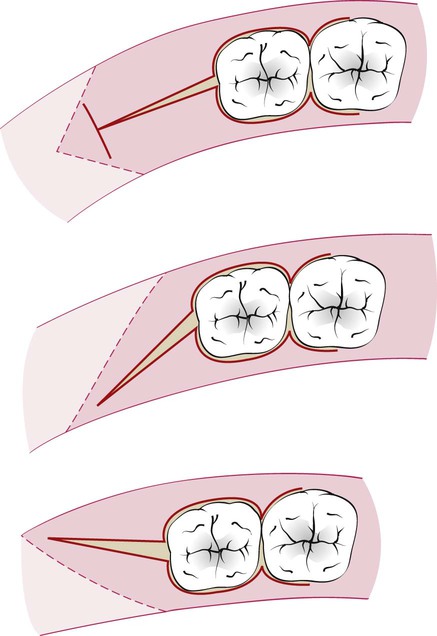
Step 2: The initial or internal bevel incision is made (Figure 59-4) after scalloping the bleeding marks on the gingiva (Figure 59-5). The incision is usually carried to a point apical to the alveolar crest, depending on the thickness of the tissue. The thicker the tissue is, the more apical the ending point of the incision (see Figure 59-4). In addition, thinning of the flap should be performed with the initial incision, because it is easier to accomplish at this time than it is later with a loose, reflected flap that is difficult to manage. (The use of this technique in palatal areas is considered in the discussion that follows this list.)
Step 3: The second or crevicular incision is made from the bottom of the pocket to the bone to detach the connective tissue from the bone.
Step 4: The flap is reflected with a periosteal elevator (blunt dissection) from the internal bevel incision. Usually there is no need for vertical incisions, because the flap is not displaced apically.
Step 5: The third or interdental incision is made with an interdental knife to separate the connective tissue from the bone.
Step 6: The triangular wedge of tissue created by the three incisions is removed with a curette.
Step 7: The area is debrided to remove all tissue tags and granulation tissue with the use of sharp curettes.
Step 8: After the necessary scaling and root planing, the flap edge should rest on the root–bone junction. If this is not the case as a result of the improper location of the initial incision or the unexpected need for osseous surgery, the edge of the flap is scalloped again and trimmed to allow the flap edge to end at the root–bone junction.
Step 9: A continuous sling suture is used to secure the facial and lingual or palatal flaps. This type of suture, which makes use of the tooth as an anchor, is advantageous to position and hold the flap edges at the root–bone junction. The area is covered with a periodontal pack.
Palatal Flap
The surgical approach to the palatal area differs from that used for other areas as a result of the character of the palatal tissue and the anatomy of the area. The palatal tissue is all attached, keratinized tissue and has none of the elastic properties associated with other gingival tissues. Therefore, the palatal tissue cannot be apically displaced, and a partial-thickness (split-thickness) flap cannot be accomplished.
The initial incision for the palatal flap should allow the flap, when sutured, to be precisely adapted at the root–bone junction. The flap cannot be moved apically or coronally to adapt to the root–bone junction, as can be done with the flaps in other areas. Therefore, the location of the initial incision is important for the final placement of the flap.
The palatal tissue may be thin or thick, and it may or may not have osseous defects. The palatal vault may be high or low. These anatomic variations may require changes in the location, angle, and design of the incision.
The initial incision for a flap varies with the anatomic situation. As shown in Figure 59-6, the initial incision may be the usual internal bevel incision, which will then be followed by crevicular and interdental incisions. If the tissue is thick, a horizontal gingivectomy incision may be made, and this may be followed by an internal bevel incision that starts at the edge of this incision and ends on the lateral surface of the underlying bone. The placement of the internal bevel incision must be done in such a way that the flap fits around the tooth without exposing the bone.
Before the flap is reflected to the final position for scaling and management of the osseous lesions, its thickness must be checked. Flaps should be thin to adapt to the underlying osseous tissue and provide a thin, knifelike gingival margin. Flaps—particularly palatal flaps—are often too thick; they may have a propensity to separate from the tooth, which may delay and complicate healing. It is best to thin the flaps before their complete reflection, because a free, mobile flap is difficult to hold for thinning (Figure 59-7). A sharp, thin papilla positioned properly around the interdental areas at the tooth–bone junction is essential to prevent the recurrence of soft-tissue pockets.
The purpose of the palatal flap should be considered before the incision is made. If the intent of the surgery is debridement, the internal bevel incision is planned so that the flap adapts at the root–bone junction when sutured. If osseous resection is necessary, the incision should be planned to compensate for the lowered level of the bone when the flap is closed. Probing and sounding of the osseous level and the depth of the intrabony pocket should be used to determine the position of the incision.
The apical portion of the scalloping should be narrower than the line–angle area, because the palatal root tapers apically. A rounded scallop results in a palatal flap that does not fit snugly around the root. This procedure should be done before the complete reflection of the palatal flap, because a loose flap is difficult to grasp and stabilize for dissection.
It is sometimes necessary to thin the palatal flap after it has been reflected. This can be accomplished by holding the inner portion of the flap with a mosquito hemostat or Adson forceps as the inner connective tissue is carefully dissected away with a sharp no. 15 scalpel blade. Care must be taken to not perforate or overthin the flap. The edge of the flap should be thinner than the base; therefore, the blade should be angled toward the lateral surface of the palatal bone. The dissected inner connective tissue is removed with a hemostat. As with any flap, the triangular papilla portion should be thin enough to fit snugly against the bone and into the interdental area (Figure 59-8).
The principles for the use of vertical releasing incisions are similar to those for using other incisions. Care must be exercised so that the length of the incision is minimal to avoid the numerous vessels located in the palate.
Apically Displaced Flap
With some variants, the apically displaced flap technique can be used for pocket eradication, widening the zone of attached gingiva, or both. Depending on the purpose, the apically displaced flap can be a full-thickness (mucoperiosteal) flap or a split-thickness (mucosal) flap. The split-thickness flap requires more precision and time as well as a gingival tissue that is thick enough to split, but it can be more accurately positioned and sutured in an apical position with the use of a periosteal suturing technique, as follows.
Step 1: An internal bevel incision is made (Figure 59-9). To preserve as much of the keratinized and attached gingiva as possible, it should be no more than about 1 mm from the crest of the gingiva and directed to the crest of the bone (see Figure 59-1). The incision is made after the existing scalloping, and there is no need to mark the bottom of the pocket in the external gingival surface, because the incision is unrelated to pocket depth. It is also not necessary to accentuate the scallop interdentally, because the flap is displaced apically and not placed interdentally.
Step 2: Crevicular incisions are made, and this is followed by the initial elevation of the flap. Interdental incisions are then performed, and the wedge of tissue that contains the pocket wall is removed.
Step 3: Vertical incisions are made extending beyond the mucogingival junction. If the objective is a full-thickness flap, it is elevated by blunt dissection with a periosteal elevator. If a split-thickness flap is required, it is elevated via sharp dissection with the use of a Bard–Parker knife to split it. This leaves a layer of connective tissue, including the periosteum, on the bone.
Step 4: After the removal of all granulation tissue, scaling and root planing, and osseous surgery if needed, the flap is displaced apically. It is important that the vertical incisions—and therefore the flap elevation—reach past the mucogingival junction to provide adequate mobility to the flap for its apical displacement.
Step 5: If a full-thickness flap was created, a sling suture around the tooth prevents the flap from sliding to a position more apical than what is desired, and the periodontal dressing can avoid its movement in a coronal direction. A partial-thickness flap is sutured to the periosteum with the use of a direct loop suture or a combination of loop and anchor suture. A dry foil is placed over the flap before it is covered with the dressing to prevent the introduction of pack under the flap.
After 1 week, dressings and sutures are removed. The area is usually repacked for another week, after which the patient is instructed to use chlorhexidine mouthrinse or to apply chlorhexidine topically with cotton-tipped applicators for another 2 or 3 weeks.
Flaps for Reconstructive Surgery
In current reconstructive therapy, bone grafts, membranes, or a combination of these—with or without other agents—are used for a successful outcome (see Chapter 61). The flap design should therefore be set up so that the maximum amount of gingival tissue and papilla are retained to cover the material placed in the pocket.
Two flap designs are available for reconstructive surgery: the papilla preservation flap and the conventional flap with only crevicular incisions. The flap design of choice is the papilla preservation flap, which retains the entire papilla covering the lesion. However, to use this flap, there must be adequate interdental space to allow the intact papilla to be reflected with the facial or lingual/palatal flap. When the interdental space is very narrow, thereby making it impossible to perform a papilla preservation flap, a conventional flap with only crevicular incisions is made.
Papilla Preservation Flap
The technique for employing a papilla preservation flap (Figures 59-10 and 59-11) is as follows:
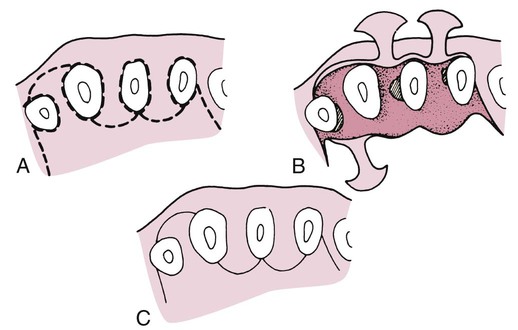
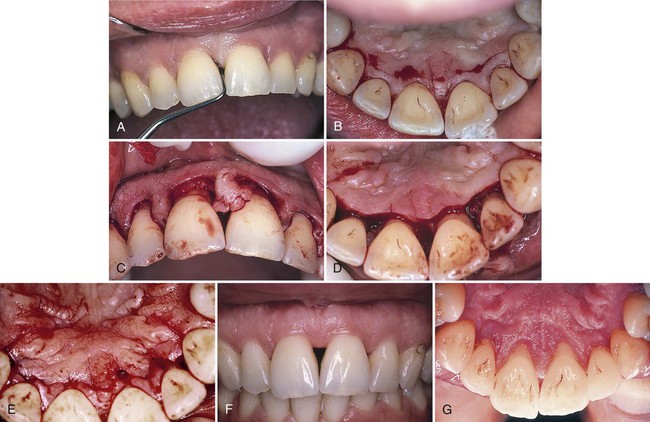
Step 1: A crevicular incision is made around each tooth, with no incisions across the interdental papilla.
Step 2: The preserved papilla can be incorporated into the facial or lingual/palatal flap, although it is most often integrated into the facial flap. In these cases, the lingual or palatal incision consists of a semilunar incision across the interdental papilla in its palatal or lingual aspect; this incision dips apically from the line angles of the tooth so that the papillary incision is at least 5 mm from the crest of the papilla.
Step 3: An Orban knife is then introduced into this incision to sever half to two thirds of the base of the interdental papilla. The papilla is then dissected from the lingual or palatal aspect and elevated intact with the facial flap.
Conventional Flap
The technique for employing a conventional flap for reconstructive surgery is as follows:
Step 1: With the use of a no. 12 blade, incise the tissue at the bottom of the pocket and to the crest of the bone to split the papilla below the contact point. Every effort should be made to retain as much tissue as possible to protect the area subsequently.
Step 2: Reflect the flap; keep it as thick as possible, and do not attempt to thin it as is done for resective surgery. The maintenance of a thick flap is necessary to prevent exposure of the graft or the membrane, which results from necrosis of the flap margins.
Distal Molar Surgery
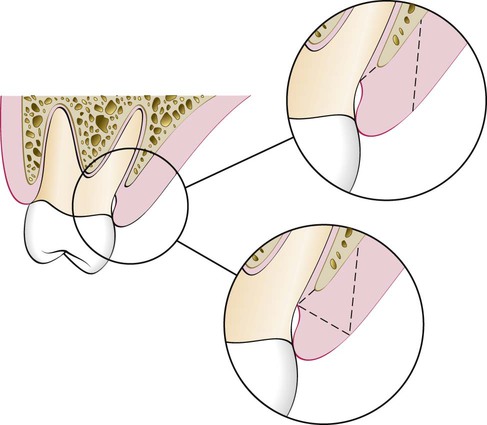
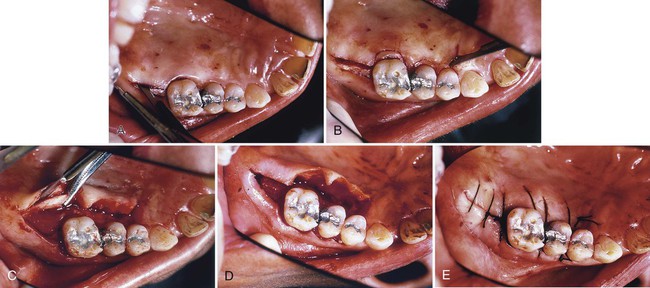
The treatment of periodontal pockets on the distal surface of terminal molars is often complicated by the presence of bulbous fibrous tissue over the maxillary tuberosity or prominent retromolar pads in the mandible. Deep vertical defects are also often present in conjunction with the redundant fibrous tissue. Some of these osseous lesions may result from incomplete repair after the extraction of impacted third molars (Figure 59-12).
The gingivectomy incision is the most direct approach to the treatment of distal pockets that have adequate attached gingiva and no osseous lesions. However, the flap approach is less traumatic postsurgically, because it produces a primary closure wound rather than the open secondary wound left by a gingivectomy incision. In addition, it results in attached gingiva. It also provides access for examination and, if needed, correction of the osseous defect. Procedures for this purpose were described by Robinson7 and Braden2 and modified by several other investigators. Some representative procedures are discussed in the following sections.
Maxillary Molars
The treatment of distal pockets on the maxillary arch is usually simpler than the treatment of a similar lesion on the mandibular arch, because the tuberosity presents a greater amount of fibrous attached gingiva than does the area of the retromolar pad. In addition, the anatomy of the tuberosity that extends distally is more adaptable to pocket elimination than is that of the mandibular molar arch, where the tissue extends coronally. However, the lack of a broad area of attached gingiva and the abruptly ascending tuberosity sometimes complicate therapy (Figure 59-13).
The following considerations determine the location of the incision for distal molar surgery: accessibility, amount of attached gingiva, pocket depth, and available distance from the distal aspect of the tooth to the end of the tuberosity or retromolar pad.
Technique.
Two parallel incisions that begin at the distal portion of the tooth and extend to the mucogingival junction distal to the tuberosity or retromolar pad are made (Figure 59-14). The faciolingual distance between these two incisions depends on the depth of the pocket and the amount of fibrous tissue involved. The deeper the pocket, the greater is the distance between the two parallel incisions. It is important to note that, when the tissue between the two incisions is removed and the flaps are thinned, the two flap edges must approximate each other at a new apical position without overlapping.
When the depth of the pocket cannot be easily estimated, it is better to err on the conservative side to leave overlapping flaps rather than flaps that are too short and that result in the exposure of bone. When the two flaps overlap after the surgery is completed, they should be placed one over the other. The overlapping portion of one of them is grabbed with a hemostat, and a sharp knife or scissors is then used to cut the excess.
A transversal incision is made at the distal end of the two parallel incisions so that a long, rectangular piece of tissue can be removed. These incisions are usually interconnected with the incisions for the remainder of the surgery in the quadrant involved. The parallel distal incisions should be confined to the attached gingiva, because bleeding and flap management become problems when the incision is extended into the alveolar mucosa. If access is difficult—especially if the distance from the distal aspect of the tooth to the mucogingival junction is short—then a vertical incision can be made at the end of the parallel incisions.
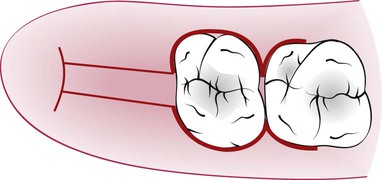
When treating the tuberosity area, the two distal incisions are usually made at the midline of the tuberosity (Figure 59-15). In most cases, no attempt is made to undermine the underlying tissue at this time. These incisions are made straight down into the underlying bone, where access is difficult. A no. 12B blade is generally used. It is easier to dissect out the underlying redundant tissue when the flap is partially reflected. When the distal flaps are placed back on the bone, the two flap margins should closely approximate each other.
Mandibular Molars
Incisions for the mandibular arch differ from those used for the tuberosity as a result of differences in the anatomy and histologic features of the areas. The retromolar pad area does not usually present as much fibrous attached gingiva. The keratinized gingiva, if present, may not be found directly distal to the molar. The greatest amount may be distolingual or distofacial, and it may not be over the bony crest. The ascending ramus of the mandible may also create a short, horizontal area distal to the terminal molar (Figure 59-16). The shorter this area, the more difficult it is to treat any deep distal lesion around the terminal molar.
The two incisions distal to the molar should follow the area with the greatest amount of attached gingiva (Figure 59-17). Therefore, the incisions could be directed distolingually or distofacially, depending on which area has more attached gingiva. Before the flap is completely reflected, it is thinned with a no. 15 blade. It is easier to thin the flap before it is completely free and mobile. After the reflection of the flap and the removal of the redundant fibrous tissue, any necessary osseous surgery is performed. The flaps are approximated similarly to those in the maxillary tuberosity area.
Conclusion
Periodontal flap procedures for pocket therapy include flaps that are created solely for access to root surfaces and bone margins, flaps for the precise processes of osseous surgery, and flaps for periodontal regeneration. All of these approaches have specific flap designs and step-by-step elements, and all of them include calculus removal and root planing as part of the essential treatment protocol. Flaps should allow for adequate access, and they should be reflected so that at least 3 mm of crestal bone is exposed. If the flaps are to be positioned apically, flap mobility is obtained by extending the facial and lingual flap elevation beyond the mucogingival junction, which enables the elasticity of the mucosa to be applied. Palatal flaps are much less mobile; thus, inverse bevel incisions are used to remove marginal gingival tissues so that, at the time of suturing, the flap margin is positioned apically, if so indicated.
Papilla preservation techniques with various modifications are applied to those areas in which gingival recession needs to be minimized. For some aesthetic locations, nonsurgical therapy may be more appropriate than flap surgery.
Adjacent edentulous areas are incorporated into the flap design with the use of wedge incisions that enable access to adjacent root surfaces for complete root planing and that allow clinicians to visualize and treat the associated bone defects. Postoperative plaque control is essential for successful outcomes. Clinicians should ensure that patients have demonstrated adequate oral hygiene during the presurgical phase, and they should emphasize that this must continue this after surgery.