Vital Signs
Objectives
1. Discuss the importance of accurate assessment of vital signs.
2. Identify the guidelines for vital signs measurement.
3. Accurately assess oral, rectal, axillary, and tympanic temperatures.
4. List the various sites for pulse measurement.
5. Accurately assess an apical pulse, a radial pulse, and a pulse deficit.
6. Describe the procedure for determining the respiratory rate.
7. Accurately assess the blood pressure.
8. State the normal limits of each vital sign.
9. List the factors that affect vital signs readings.
10. Accurately assess the height and weight measurements.
11. Discuss optimal frequency of vital signs measurement.
12. Discuss methods by which the nurse can ensure accurate measurement of vital signs.
13. Identify the rationale for each step of the vital signs procedures.
14. Describe the benefits of and the precautions to follow for self-measurement of blood pressure.
Key Terms
http://evolve.elsevier.com/Cooper/foundations/
Vital signs include temperature, pulse, respirations, and blood pressure. The ability to obtain accurate measurements of vital signs is critical. Because vital signs are an indication of basic body functioning, it is appropriate to begin the physical assessment by obtaining these data. These data are called vital signs because of their importance.
The skills required to measure vital signs are simple, but the simplicity should never reduce the critical value of the task. Vital signs and other physiologic measurements often provide the basis for problem solving. Careful technique ensures accurate findings.
Many facilities have begun using a fifth vital sign: pain level or comfort level (see Chapter 18; Figure 18-3 provides an example of a pain assessment guide). Nurses use a more descriptive format for documentation in their notes.
Assessment of vital signs enables the identification of nursing diagnoses, implementation of planned interventions, and evaluation of success when vital signs have returned to acceptable values (see Health Promotion box).
 Health Promotion
Vital Signs
• Demonstrate measurement of vital signs on self or a family member. (Demonstrating on the patient prevents the patient from being able to observe entire procedure.)
• Explain rationale for each step during demonstration.
• Instruct patient and family in proper cleaning and storage of the thermometer in the home.
• Instruct patient not to take temperature after smoking or eating hot or cold foods for 15 to 30 minutes (Altman, 2010).
• Instruct patient or primary caregiver to use fingertips, never thumbs, for counting the pulse. (The thumb has its own pulse.)
• Instruct in use of gentle pressure; reinforce not to press hard over the pulses because this obliterates the pulse.
• Instruct in use of a watch with a second hand to assess pulses.
• Patients who demonstrate decreased ventilation often benefit from being taught deep-breathing and coughing exercises.
• Advise family member to count patient's respiratory rate when patient is unaware of being observed. (If patient is aware of the assessment, respiratory rate is sometimes altered.)
• Instruct family member to notify health care provider if unusual fluctuations in respiratory rate occur.
• Educate patient about risks for hypertension. People with family history of hypertension are at significant risk. Obesity, cigarette smoking, heavy alcohol consumption, high blood cholesterol levels, and continued exposure to stress are factors linked to hypertension.
• Patients with hypertension should learn about blood pressure values, long-term follow-up care and therapy, the usual lack of symptoms that is responsible for hypertension's being called the silent killer (it cannot be felt), therapy's ability to control but not cure it, and the benefits of a consistently followed treatment plan.
• Patients often learn to take their own blood pressure.
• Instruct patient or primary caregiver to take blood pressure at the same time each day and after patient has had a brief rest. The blood pressure should be taken with the patient sitting or lying down; use same position and arm each time pressure is taken. (Advise patient not to cross legs.)
• Positioning and selection of arm site are potential causes of inaccurate readings.
• Place arm on a table or desk that is raised to the level of the heart.
• Instruct caregiver that if the pressure is difficult to hear, the cuff may be too loose, not big enough, or too narrow; the stethoscope may be misplaced; the cuff may have been deflated too quickly or too slowly; or the cuff may not have been pumped high enough for systolic readings. Wait 5 minutes and try again.
• Teach patient risk factors for hypothermia and frostbite: fatigue; malnutrition; hypoxemia; cold, wet clothing; and alcohol intoxication.
• Teach patient risk factors for heat stroke: strenuous exercise in hot, humid weather; tight-fitting clothing in hot environments; exercising in poorly ventilated areas; sudden exposure to hot climates; and poor fluid intake before, during, and after exercise.
• Patients undergoing cardiac rehabilitation should learn to assess their own pulse rates to determine their response to exercise. Pulses should be taken before, during, and after exercise.
• Instruct patients on the importance of appropriate size and placement of blood pressure cuff for home use.
• Teach patient signs and symptoms of hypoxemia: headache, somnolence, confusion, dusky color, shortness of breath, and dyspnea.
• Teach patient effect of high-risk behaviors such as cigarette smoking on oxygen saturation.
A cultural assessment should be included in the overall assessment for all patients. This provides a better understanding of each patient as an individual and thus assists with administering appropriate nursing care to the patient. See Chapters 6 and 12 for a more thorough discussion (see Cultural Considerations box).
 Cultural Considerations
Vital Signs
• Many cultures believe that certain substances protect one's health.
• Some Italians, Greeks, and Native Americans believe that garlic or onions eaten raw or worn on the body prevents an illness such as high blood pressure.
• Provide privacy when taking the apical pulse, especially for female patients of Asian, Middle Eastern, Hispanic, and African cultures and their elders.
• Use same-sex providers or family members to take rectal temperatures and touch the patient's chest.
• Procedures that are normally noninvasive can produce anxiety because of cultural variables regarding touch, privacy, and gender.
• Consult the health care provider and the family decision maker regarding giving information to the patient about abnormal vital signs.
• Collectivistic cultures (e.g., Hispanics, Africans, and Asians) demonstrate their caring for ill members by protecting them from bad news about their health and well-being.
• Document in the patient's chart what information is given.
• Communicate the family decision to the health care provider.
• Determine the patient's understanding of new procedures being performed.
• Use an interpreter if needed, and demonstrate the procedure to promote patient's understanding.
Data from Rosdahl CB, Kowalski MT: Textbook of basic nursing, ed 10, 2012, Philadelphia, Wolters Kluwer Health/Lippincott Williams & Wilkins.
Guidelines for Obtaining Vital Signs
Vital signs are a part of the database obtained during assessment. The procedure for assessing vital signs is not routine. Part of the nurse's task is to individualize the procedure to each patient's needs and condition. Nurses must ensure their skills include all of the following:
• Measuring vital signs correctly
• Understanding and interpret the values
Whether and how frequently vital signs are measured (Box 11-1) depend on the nurse's judgment of the need, the patient's condition, and the orders of the health care provider.
If a possibility of contact with body secretions exists, gloves should be worn while obtaining vital signs.
When to Assess Vital Signs
Although this chapter presents temperature, pulse, respiration, and blood pressure as separate procedures, they are usually all assessed at the same time and at set intervals. A set of vital signs is taken when a patient is admitted to a facility, and then as prescribed by the health care provider or as policy dictates (e.g., every 4 hours, once a shift, or even weekly in some extended-care facilities) (Box 11-2).
The more ill the patient, the more frequently the nurse takes vital signs. The nurse must use judgment in cases in which the patient's condition worsens, at which time it is necessary to obtain vital signs more frequently. Vital sign readings are interrelated. A rise in temperature of 1° F has potential to cause an increase in pulse rate of 4 beats per minute. Respiratory rate and blood pressure readings likewise increase with a rise in temperature; however, when blood pressure falls because of hemorrhage, the pulse and respirations increase and the temperature usually decreases. Age-related differences in vital signs are also important to recognize (Table 11-1 and Home Care Considerations and Life Span Considerations for Older Adults boxes).
 Home Care Considerations
Vital Signs
• Assess temperature and ventilation of environment to determine existence of any conditions that have the potential to influence patient's temperature.
• Assess home noise level to determine the room that provides the quietest environment for assessing pulse and blood pressure (BP).
• Assess family's financial ability to afford a sphygmomanometer for performing BP evaluation on a regular basis.
• Consider an electronic BP cuff with large digital display for home if patient or caregiver has hearing or vision difficulties.
• It is wise for patients taking certain prescribed cardiotonic or antidysrhythmic medications to learn to assess their own pulse rates to detect side effects of medications.
• Assess for environmental factors in the home that have the potential to influence patient's respiratory rate, such as secondhand smoke, inadequate ventilation, or gas fumes.
• Instruct patients who are using mercury-in-glass thermometers at home on their proper use, safety factors, and hazards (see Box 11-8).
• Monitor the effectiveness of home oxygen therapy with the noninvasive method of pulse oximetry.
 Life Span Considerations
Older Adults
Taking Vital Signs
• An active older adult generally maintains a core body temperature within the accepted norms for younger adults. After age 75 years, core temperature averages 97.2° F (36° C).
• Older adults often have a baseline temperature that is not typical of the adult patient, so knowledge of each patient's baseline is important.
• Environmental temperature has more of an effect on body temperature in older than in younger adults and is more likely to contribute to hypothermia and hyperthermia.
• Older adults often have occlusive amounts of earwax in one or both ear canals. Consider this when assessing an older adult's tympanic temperature reading.
• The older adult with an infection is often afebrile. In fact, do not assume that an infection in an older adult will cause an elevated temperature. Be aware of other signs and symptoms of infection in the older adult.
• Manifestations of delayed or diminished febrile response to infection are subtle and variable and very difficult to assess. Be especially attentive to subtle temperature changes and other manifestations of fever in this population, such as tachypnea, anorexia, falls, delirium, and overall functional decline.
• The older adult has a decreased heart rate at rest.
• Once elevated, the pulse rate of an older adult takes longer to return to normal resting rate.
• Pulses can be easily occluded in older adults; therefore, apply only gentle pressure.
• Pulse irregularities are more commonly seen in older adults. Apical pulses should be auscultated as part of a thorough assessment.
• When assessing older women with sagging breasts, the breast tissue is gently lifted and the stethoscope placed at the fifth intercostal space (ICS) or the lower edge of the breast.
• Heart sounds are often muffled or difficult to hear in older adults because of an increase in air space in the lungs.
• With aging, depth of respirations typically decreases. Respiratory rate often increases to compensate.
• Decreased efficiency of respiratory muscles results in breathlessness at low exercise levels.
• Responses to hypoxia are reduced 50% in older adults as compared with the young, which limits the ability of older adults to respond to hypoxia with respiratory changes.
• Often a standard adult cuff is too large for an older individual who has lost upper arm mass. Incorrect cuff sizing potentially results in significant errors.
• The skin of an older adult is more fragile and susceptible to cuff pressure when blood pressure measurements are frequent, as during the use of repeated electronic measurement. Perform more frequent assessment of the skin area under the cuff or increase rotation of blood pressure sites.
• Accurate measurement of blood pressure is essential for older adults receiving antihypertensive medication.
• Orthostatic hypotension (a sudden drop in blood pressure with positional change) is commonly observed in inactive older adults, particularly when rising after a period of bed rest.
• Closely monitor older adults receiving antihypertensives and vasodilators for orthostatic hypotension.
• An older adult's blood pressure often elevates with age. Do not consider such elevations a normal aspect of aging, but monitor minor elevations.
• Older adults have an increase in systolic pressure related to decreased vessel elasticity. The diastolic pressure remains the same, resulting in a wider pulse pressure.
• Older adults are instructed to change position slowly and wait after each change to avoid postural hypotension and prevent injuries.
• Identification of an acceptable pulse oximeter probe site on older adults is often difficult because of the possible presence of peripheral vascular disease, decreased cardiac output, cold-induced vasoconstriction, and anemia. Alternate pulse oximetry sites include the earlobe and toes.
Table 11-1
Age-Related Variations in Vital Signs
| AGE GROUP | HEART RATE (PER MINUTE) | RESPIRATORY RATE (PER MINUTE) | BLOOD PRESSURE (mm Hg)* |
| Neonate | 120–160 | 36–60 | Systolic 20–60 |
| Infant | 125–135 | 40–46 | Systolic 70–80 |
| Toddler | 90–120 | 20–30 | Systolic 80–100 |
| School-age (6–10 yr) | 65–105 | 22–24 | Systolic 90–100 Diastolic 60–64 |
| Adolescent (10–18 yr) | 65–100 | 16–22 | Systolic 100–120 Diastolic 70–80 |
| Adult | 60–100 | 12–20 | Systolic 100–120 Diastolic 70–80 |
| Older adult | 60–100 | 12–18 | Systolic 130–140 Diastolic 90–95 |

* A blood pressure reading of 120/80 mm Hg is now considered prehypertension.
Recording Vital Signs
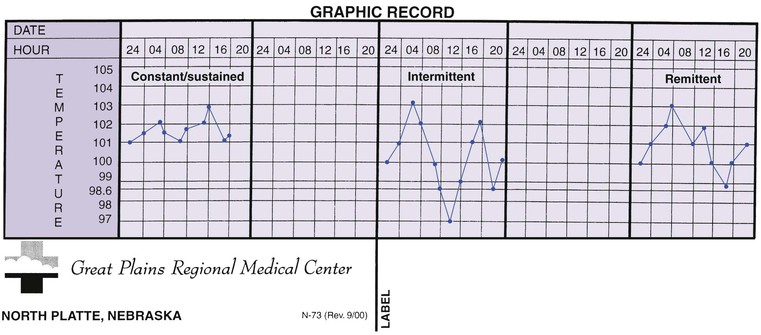
Accuracy in documentation is important. Most facilities have graphic flow sheets for charting vital signs; Figure 11-1 shows an example. In some facilities, a rectal temperature is indicated with a small circled R, and axillary temperature with a small circled Ax (see Figure 11-1) next to the reading. The blood pressure is always written with the systolic first and the diastolic beneath: 120/80 mm Hg. A final /0 may be added (120/80/0) if the beat is clearly heard until the end. All abnormal findings must be immediately reported to the nurse manager or health care provider. In addition to actual vital signs values, any accompanying or precipitating signs and symptoms such as chest pain, vertigo, shortness of breath, flushing, and diaphoresis should be noted in the nurse's notes. Any interventions initiated as a result of vital signs measurement, such as tepid sponging (for temperature elevation), should also be documented.

Temperature
The Body's Regulation of Temperature
The body strives to maintain a temperature (a relative measure of sensible heat or cold) of 98.6° F (37° C) (Box 11-3) that is considered normal. Variations from 97° to 99.6° F (36.1° to 37.5° C) are considered to be within normal range. Many factors have the potential to cause body temperature variances, including the environment, the time of day, the patient's state of health and activity levels, and the stage of the patient's monthly menstrual cycle (Box 11-4).
Box 11-3
Normal Body Temperatures According to Measurement Sites
| Oral | Rectal | Axillary | Tympanic/Temporal | |
| Fahrenheit (F) | 98.6° F | 99.5° F | 97.6° F | 98.6° F |
| Centigrade (C) | 37.0° C | 37.5° C | 36.4° C | 37.0° C |

When it is necessary to convert temperature readings, formulas are available to use. To convert Fahrenheit to centigrade, subtract 32° from the Fahrenheit reading and multiply the results by 5/9: (98.6 − 32) × 5/9 = 37. To convert centigrade to Fahrenheit, multiply the centigrade reading by 9/5 and add 32° to the reading: 37 × 9/5 + 32 = 98.6.
Regulation of body temperature is the job of the hypothalamus, which is located in the brain and forms the floor and part of the lateral wall of the third ventricle. The hypothalamus helps maintain a balance between heat lost and heat produced by the body. A rise in metabolism, as occurs with exercise and digestion, is the primary mechanism the body uses to generate heat. Constriction of peripheral vessels prevents loss of heat through the skin surface and thus helps conserve heat.
Body temperature falls into two categories: core temperature, which is the temperature of the deep tissues of the body, and surface temperature, which is the temperature of the skin. Apart from pathologic disturbances, core temperature remains relatively constant unless a person is exposed to severe extremes in environmental temperature. Surface temperature, on the other hand, often varies a great deal in response to the environment.
Temperature elevations are frequently the first sign of illness (Box 11-5). The terms pyrexia, febrile, and hyperthermia are used to describe the condition of having above-normal body temperature. Fever is actually a body defense. Elevated body temperature destroys invading bacteria. Temperatures exceeding 105° F (40.5° C) also have the potential to damage normal body cells, and therefore, intervention is often necessary (Box 11-6).
Fevers are classified as constant, intermittent, or remittent. Constant fevers remain elevated consistently and fluctuate very little. Intermittent fevers rise and fall; for example, temperature is normal or subnormal in the morning and “spikes” (is elevated) in the afternoon. Remittent fevers are similar to intermittent fevers except the temperature does not return to normal at all until the patient becomes well (Figure 11-2).
When the body temperature is abnormally low, the condition is called hypothermia. Death is a risk when the body temperature falls below 93.2° F (34° C). Cases of people surviving with much lower temperatures have been documented. Patients may be intentionally placed in hypothermia for a surgical procedure. Certain conditions, such as hypothyroidism, produce a subnormal temperature.
Obtaining Temperature Measurements
Temperature measurements are obtained by several methods (Skill 11-1). When a patient has a normal body temperature, a peripheral temperature gives a good estimate of core temperature. Touch the patient's skin and observe its moisture and warmth. For an actual reading of surface temperature, the use of heat-sensitive patches is one method (Figure 11-3, A). Place the patch on an area of skin, such as the forehead; the color change on the patch indicates the temperature.
Skill 11-1
Measuring Body Temperature


Nursing Action (Rationale)
1. Perform hand hygiene. (Reduces spread of microorganisms.)
2. Assess for signs and symptoms of temperature alterations and for factors that influence body temperature. (Enables the nurse to more accurately assess nature of variations.)
3. Introduce self to patient. (Decreases patient's anxiety.)
4. Identify patient by identification band. (Ensures correct patient for procedure.)
5. Explain the procedure to patient: site of temperature reading and importance of maintaining proper position until reading is complete. (Gains patient's cooperation.)
a. Assemble the thermometer, soft disposable tissues, lubricant (for rectal temperature only), pen and note pad, disposable gloves, plastic sleeve, or disposable probe cover. (Promotes an efficiently completed procedure.)
b. Provide for patient privacy. (Decreases anxiety level.)
c. Determine whether patient has consumed hot or cold beverages or food or has been smoking; if so, wait 20 to 30 minutes before measuring oral temperature. (Ensures accuracy.)
7. Obtaining an oral temperature reading with an electronic thermometer.
b. Perform hand hygiene and don disposable gloves (optional). (Reduces spread of microorganisms.)
c. Remove thermometer pack from charging unit. (Adds maneuverability; battery power is available.) Remove probe from storage well of recording unit. Grasp top of stem, being careful not to apply pressure to eject button. (Ensures proper working order.)
d. Insert probe snugly into probe cover: red probe for rectal readings, blue probe for oral and axillary readings (see Figure 11-3). (Using probe cover helps reduce spread of microorganisms.)
e. Inspect digital display. (Ensures that unit is ready for use.)
f. Request patient to open the mouth; gently insert probe into the posterior sublingual pocket. Request patient to hold thermometer in place with lips closed. (Ensures an accurate reading.)

g. Wait for audible signal. (Indicates temperature reading is complete.)
h. Remove probe from patient's mouth and remove probe cover by pressing the eject button, directing probe cover into trash receptacle. (Reduces spread of microorganisms.)
i. Provide for patient comfort.
j. Read and write down reading from digital display before reinserting probe into holder. (Ensures accurate recording.)
k. Perform hand hygiene. (Reduces spread of microorganisms.) Return electronic unit to charger. (Maintains battery charge.)
l. Complete procedure by following Step 12, a through d.
8. Measuring rectal temperature with an electronic thermometer. Caution: If unable to insert thermometer adequately into the rectum, remove thermometer and consider alternative method for obtaining temperature. Never force thermometer.
b. Don gloves. (Maintains standard precautions.)
c. Assist patient to the Sims position with upper leg flexed. Move aside the bed linens to expose only the rectal area. (Ensures correct thermometer placement and prevents unnecessary exposure of patient.)
d. Remove thermometer pack from charging unit. Be certain rectal (red) probe is attached to the unit and slide disposable plastic cover over thermometer probe until it locks into place. (Reduces spread of microorganisms.)
e. With thermometer in probe cover, lubricate 1 inch of tip. (Eases insertion.)
f. For an adult, with patient in the Sims position, gently spread buttocks and insert thermometer probe 1.5 inches into rectum. Hold onto thermometer throughout procedure. (Ensures safety.)

g. Hold electronic probe until audible signal occurs; only then read temperature on digital display (keep probe in place until signal occurs). (Ensures accurate reading.)
h. Carefully remove probe from rectum; push eject button to remove probe cover and dispose into appropriate receptacle. (Reduces spread of microorganisms.)
i. Return probe to storage unit, and later return the unit to its charging device. (Prevents damage to the unit and ensures accurate working for the next assessment.)
j. Clean anal area of lubricant and possible feces. Remove and dispose of gloves and perform hand hygiene. (Provides comfort and hygiene and reduces the spread of microorganisms.)
k. Assist patient to position of comfort. (Restores self-esteem.)
l. Write down reading for later documentation. (Ensures accurate recording.)
m. Complete procedure by following Step 12, a through d.
9. Measuring axillary temperature with an electronic thermometer.
b. Don gloves. (Maintains standard precautions.)
c. Assist patient to supine or sitting position. (Provides easy access to axilla.)
d. Expose axilla; be certain the area is clean and dry. (Ensures accurate reading.)
e. Prepare electronic thermometer following Step 7, c through e.
f. Insert probe into center of axilla; lower arm over thermometer, placing arm across patient's chest. In an infant or young child, it is sometimes necessary to hold the arm against the child's side when using the axillary method. If infant is in a side-lying position, the lower axilla records the higher temperature. (Maintains proper positioning of temperature probe.)

g. Hold electronic probe until audible signal occurs. Reading appears on digital display. (Probe must stay in place for accurate reading to occur.)

h. Remove probe from patient's axilla. Push eject button to remove probe cover and dispose into trash container. (Reduces spread of microorganisms.)
i. Return electric probe to storage well of recording unit. (Prevents damage to unit.)
j. Assist patient to regown and position for comfort. (Restores a sense of well-being.)
k. Remove and dispose of gloves in proper receptacle, and perform hand hygiene. (Reduces spread of microorganisms.)
l. Return thermometer to charger base. (Maintains battery charge.)
m. Write down reading for later documentation. (Ensures accurate recording.)
n. Complete procedure by following Step 12, a through d.
10. Measuring tympanic temperature with an electronic thermometer.
b. Assist patient to a comfortable position with head turned toward the side, away from you. (Ensures comfort and exposes auditory canal for accurate temperature reading.)
c. Remove thermometer handheld unit from charging base. (Provides easy access to thermometer.)
d. Slide disposable plastic speculum cover over otoscope-like tip until it locks into place. (Prepares the unit to measure temperature; the plastic speculum reduces spread of microorganisms.)
e. Follow manufacturer's instructions for tympanic probe positioning.
(1) Gently tug ear pinna upward and back for an adult, down and back for a child. (Difference is because of age-related anatomic differences).
(2) Gently insert thermometer into ear. (Ensures correct placement.)
(3) Fit ear probe snugly into canal. Do not allow further movement. (Ensures correct reading.)
(4) Point digital readout toward you, following manufacturer's positioning recommendations. (Steps [1] through [4] ensure correct positioning of the probe with respect to ear canal; the ear tug straightens the external auditory canal, allowing maximum exposure of the tympanic membrane.)
f. Depress scan button on handheld unit and read assessment. Temperature reading appears on digital display.
g. Carefully remove sensor from ear and push release button to eject plastic speculum cover; discard into proper receptacle. (Reduces spread of microorganisms.)
h. Return handheld unit to charging base. (Maintains battery charge.)
i. Assist patient to a comfortable position. (Restores sense of well-being.)
j. Perform hand hygiene. Dispose of gloves, if worn, into proper receptacle. (Reduces spread of microorganisms.)
k. Write down reading (for documentation later).
l. Complete procedure by following Step 12, a through d.
11. Measuring temporal artery temperature. (This skill can be delegated to unlicensed assistive personnel who are knowledgeable in the procedure, but it is the nurse's responsibility to assess the significance of the findings.)
b. Ensure that forehead is dry. (Decreases chance of moisture interfering with temperature measurement.)
c. Place probe flush on patient's forehead. (Prevents measuring ambient temperature by mistake.)
d. Press the scan button. (Continuous scanning for the highest temperature occurs until you release the scan button.)
e. Keeping the probe flush on the skin, slowly brush the thermometer straight across forehead. (Promotes accuracy in measurement.)
f. Keeping the scan button pressed, sweep the probe across the forehead and continue to just behind the earlobe.
g. The thermometer makes a clicking sound when highest temperature is reached. Read and document temperature.
h. Wipe probe with alcohol, or remove and dispose of probe cover.
i. Complete procedure by following Step 12, a through d.
12. Complete the procedure for body temperature measurement.
a. Compare temperature findings with baseline and normal temperature range for patient's age group. (Comparison reveals presence of abnormalities.)
b. If temperature is abnormal, repeat procedure. If indicated, choose an alternate site or instrument. (Second reading confirms initial findings of abnormal body temperature.)
c. Record temperature on vital sign flow sheet, graphic flow sheet, or nurse's notes and report abnormal findings to nurse in charge or health care provider (see Figure 11-1 and Box 11-5). (Recording promptly prevents omissions from the record. Abnormalities often necessitate immediate therapy.) When recording an axillary temperature, write Ax above your documentation. When recording a rectal temperature, write R above the reading.
d. Do patient teaching (see patient teaching in Health Promotion box on Vital Signs).
Figures from Potter PA, Perry AG, Stockert PA, et al.: Fundamentals of nursing, ed 8, St. Louis, 2012, Mosby.
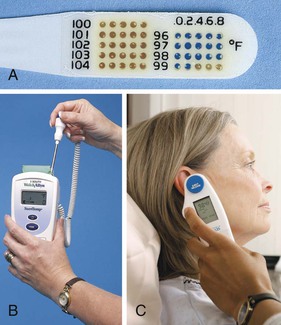
If the patient's temperature is rising or falling rapidly, the body's thermoregulatory system affects peripheral sites, and temperatures can significantly lag behind true core temperature. This should be kept in mind with use of one of the various types of thermometers to assess a patient's core temperature (Box 11-7). Remember that experts no longer recommend the use of mercury-containing thermometers (Box 11-8). Electronic thermometers (Figure 11-3, B) consist of a rechargeable battery-powered display unit, a thin wire cord, and a temperature-processing probe that should only be used with a disposable cover. Separate probes are available for oral temperature measurement (blue tip) and rectal temperature measurement (red tip). Specially designated electronic thermometers are used to obtain the tympanic (membranous “eardrum”) temperature (Figure 11-3, C).
Tympanic thermometers have been available for many years and are now widely accepted. They are very likely more accurate than traditional thermometers, when placed correctly, because measurement is from an enclosed cavity unaffected by the environmental temperatures. The tympanic membrane shares its blood supply with the hypothalamus, the body's temperature control center, and thus is a good source for obtaining core-temperature readings. To obtain the reading, place the sensor probe on the tympanic thermometer in the external ear; the sensor measures infrared heat. These thermometers boast many advantages: they are easy to use and produce readings in a few seconds; they are suitable for patients of all ages, except infants less than 6 months old; they virtually eliminate the risk of cross contamination; and they are cost-effective (see Skill 11-1). In contrast to rectal and oral measurement, they necessitate neither the exposure of the patient nor the patient's active participation. An additional means of measuring core temperature is the temporal artery method, which provides a reliable noninvasive measurement. It makes use of an infrared sensor that is brushed over the temporal artery (see Skill 11-1). The handheld scanner then displays a measurement of the temperature of temporal artery cutaneous blood flow (Altman, 2010).
An assessment of the patient guides the choice of method to measure the temperature (Table 11-2). The method chosen to check the temperature must be documented along with the reading. Obtaining an oral temperature should not be attempted in the comatose or the disoriented patient, or in small infants, because this method requires the patient's cooperation. Rectal measurements are contraindicated for patients with recent rectal surgery or certain conditions of the perineum. Axillary measurement is considered the least accurate method and is used less frequently since the advent of the tympanic thermometer (see Skill 11-1). Rectal readings are normally 1° F higher, and axillary readings 1° F lower, than oral readings. When obtaining an oral or a tympanic reading, privacy for the patient is not usually necessary. Use of the temporal artery scanner is appropriate in virtually all situations. If the patient has diaphoresis, to increase the accuracy of the measurement, brush the scanner all the way across the forehead through to behind the ear.
Table 11-2
Selection of Sites for Temperature Measurement
| ADVANTAGES | DISADVANTAGES AND LIMITATIONS |
| Oral | |
| Most accessible site; comfortable for patient; necessitates no position change | Do not use for patients who could be injured by thermometer, who are unable to hold thermometer properly, or who might bite down on thermometer (glass thermometer); infants or small children; disoriented or unconscious patients; patients who have had oral surgery; patients with trauma to face or mouth; patients experiencing oral pain; patients who breathe only with mouth open; patients with history of convulsions; or patients experiencing a shaking chill. |
| Rectal | |
| Argued to be more reliable when oral temperature cannot be obtained | Use sensitivity because use is embarrassing. Do not use for patients after rectal surgery; patients who have a rectal disorder, such as tumor or hemorrhoids; or patients who cannot be positioned for proper thermometer placement, such as those in traction. There is a risk of body fluid exposure, and lubrication is required. |
| Axilla | |
| Safe method because noninvasive | This is the least accurate method. |
| Tympanic | |
| Noninvasive, accurate, safe; provides core reading | Excessive cerumen (earwax) has the possibility to interfere with accurate reading; continuous measurement of temperature is not possible; new disposable probe cover is necessary for each patient, which raises the cost; patients must remove hearing aid in the ear that temperature is being measured. |
| Temporal Artery | |
| Provides core temperature; rapid, noninvasive method; tolerated well by children; lessens need to handle newborns, which aids in preventing heat loss | Diaphoresis and airflow across the face may affect the accuracy; possible for any bandages or dressings on the face or head to prevent measurement with the device. |
Auscultating with the Stethoscope
A stethoscope (an instrument that is placed against the patient's chest or back to hear heart and lung sounds) (Figure 11-4) is used to measure the apical rate of the heart (see definitions of apical and radial in the following section on the pulse). The major parts of the stethoscope are the earpieces, the binaurals, the tubing, and the chest piece.
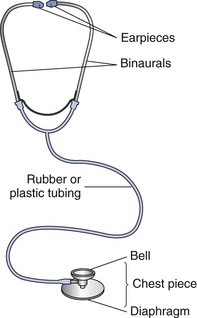
The plastic or rubber earpieces should fit snugly and comfortably in the ears. If the fit is proper, the binaurals are angled and strong enough that the earpieces stay firmly in the ears without causing discomfort. For the best reception of sound, the earpieces follow the contour of the ear canal, pointing toward the user's face when the stethoscope is in place.
The proper polyvinyl tubing is flexible and 12 to 18 inches (30 to 40 cm) long. Longer tubing decreases the transmission of sound waves. The tubing is thick walled and moderately rigid to eliminate transmission of environmental noise and prevent the tubing from kinking, which distorts sound wave transmission. Some stethoscopes have single tubes, and some have dual tubes.
The chest piece consists of a bell and a diaphragm. According to which is chosen for use, the bell or the diaphragm is rotated into proper position on the chest piece so the sounds are heard through the stethoscope. To test, lightly tap to determine which side is functioning.
The diaphragm is the circular, flat-surfaced portion of the chest piece covered with a thin plastic disk (see Figure 11-4). It transmits the high-pitched sounds created by the high-velocity movement of air and blood. Auscultate (listen for sounds within the body to evaluate the condition of heart, lungs, pleura, intestines, or other organs or to detect fetal heart tones) bowel, lung, and heart sounds with the diaphragm. Position the diaphragm to make a tight seal against the patient's skin. Exert enough pressure to leave a temporary red ring on the patient's skin when the diaphragm is removed.
The bell is the bowl-shaped chest piece, usually surrounded by a rubber ring (see Figure 11-4). The ring prevents the cold metal from chilling the patient's skin. The bell transmits low-pitched sounds created by the low-velocity movement of blood. Auscultate heart and vascular sounds using the bell. Apply the bell lightly, resting the chest piece on the skin. Compressing the bell against the skin reduces low-pitched sound amplification and creates a “diaphragm of skin.”
When listening through the stethoscope, a position should be maintained that allows the tubing to extend straight and hang free. Movement creates the potential for tubing to rub or bump objects, creating extraneous sounds. Kinked tubing muffles sounds. When using the stethoscope, both the nurse and the patient should remain quiet.
The stethoscope is a delicate instrument and requires proper care for optimal function. Remove the earpieces regularly and clean them of cerumen (earwax). Clean the bell and diaphragm of dust, lint, and body oils after each patient contact for infection control purposes. Keep the tubing away from your body oils. Do not drape the stethoscope around your neck next to the skin. Cleaning the tubing or head with alcohol can dry and crack the material and is not recommended. Mild soap and water are preferred.
 Pulse
Pulse
The Body's Regulation of Pulse
A pulse is a rhythmic beating or vibrating movement. In the body, it signifies the regular, recurrent expansion and contraction of an artery produced by the waves of pressure that are caused by the ejection of blood from the left ventricle of the heart as it contracts. Each pulse beat corresponds to a contraction of the heart. The adult pulse rate is normally between 60 and 100 beats per minute, with the approximate average being 80.
The condition of the heart and the patient's age, gender, emotional state, size, temperature, and amount of physical activity can influence the pulse rate. If the pulse is faster than 100 beats per minute, the adult patient has tachycardia; if it is slower than 60 beats per minute, the patient has bradycardia. Tachycardia has many potential causes: shock, hemorrhage leading to hypovolemia (an abnormally low circulating blood volume), exercise, fever, medication or substance abuse, and acute pain. Some drugs, such as epinephrine, also increase the pulse rate. One cause of bradycardia is unrelieved severe pain. Pain stimulates the parasympathetic nervous system, which slows the heart rate. Some drugs, such as beta blockers, lower the heart rate. Resting in a supine position also has the potential to decrease the heart rate, as does the cardiac condition called heart block (Box 11-9).
If the amount of time between beats varies, there is an irregular pulse or dysrhythmia (any disturbance or abnormality in a normal rhythmic pattern, specifically, irregularity in the normal rhythm of the heart). In the normal pulse, the amount of time between beats is even.
The volume of the pulse refers to the amount of blood pushing against the artery wall with each beat. A weak pulse is difficult to palpate; a bounding pulse is easily felt with light palpation. A pulse that you are unable to feel at all is imperceptible. Another means to communicate the volume of the pulse is by the use of numbers (Table 11-3). Follow agency policy when describing the pulse.
Table 11-3
Pulse Volume Variations
| NUMBER | TYPE | DESCRIPTION |
| 0 | Absent pulse | None felt |
| 1+ | Thready pulse | Difficult to feel; not palpable when only slight pressure applied |
| 2+ | Weak pulse | Somewhat stronger than a thready pulse but not palpable when light pressure applied |
| 3+ | Normal pulse | Easily felt but not palpable when moderate pressure applied |
| 4+ | Bounding pulse | Feels full and spring-like even under moderate pressure |
 Obtaining Pulse Measurements
When taking the pulse, note the rate, the rhythm, and the volume, or strength, of the pulse. Palpate pulses using the pads of the index and middle fingers (Skill 11-2). Only apply slight pressure over the artery to avoid obliterating the pulse (by occluding blood flow). Assess pulses on both sides of the peripheral vascular system. Assess both radial pulses, for example, to compare the characteristics of each and compare the left with the right pulse. In many disease states (e.g., thrombus [clot] formation, aberrant [abnormal] blood vessels, cervical rib syndrome, or aortic dissection), a pulse in one extremity is unequal in strength or absent. Assessment of all symmetric pulses simultaneously is acceptable, except for the carotid pulse. Never measure both carotid pulses simultaneously because excessive pressure has potential to occlude blood supply to the brain. Do not reach across the patient's neck to count the carotid pulse (the patient's airway can be occluded with the pressure of your arm). Measure the carotid pulse in the patient's neck on the side facing you.
Skill 11-2
Obtaining a Pulse Rate
Nursing Action (Rationale)
1. Perform hand hygiene. (Decreases spread of microorganisms.)
2. Introduce self to patient. (Decreases patient's anxiety.)
3. Identify patient by identification band. (Verifies correct patient for procedure.)
4. Explain procedure. (Seeks cooperation and assistance from the patient and decreases patient's anxiety.)
5. Prepare for procedure by doing the following:
a. Assemble all necessary supplies, including a wristwatch with second hand. (Organizes procedure.)
b. Provide privacy for the patient if necessary. (Decreases patient's anxiety.)
6. Implement procedure: Count pulse for 60 seconds.
(1) For radial pulse, lightly place tips of first and second fingers in groove formed along radial side of forearm, lateral to flexor tendon of wrist. (Pulse is relatively superficial and should not require deep palpation.)

(2) For ulnar pulse, place fingertips along ulnar side of forearm. (Palpated when arterial insufficiency to hand is expected or when nurse assesses effects radial occlusion might have on circulation to hand.)

(3) For brachial pulse, locate groove between biceps and triceps muscles above elbow at antecubital fossa. Place tips of first three fingers in muscle groove. (Artery runs along medial side of extended arm, requiring moderate palpation.)

(4) For femoral pulse, with patient supine, place first three fingers over inguinal area below inguinal ligament, midway between pubic symphysis and anterosuperior iliac spine. (Supine position prevents flexion in groin area, which interferes with artery access.)

(5) For popliteal pulse, instruct patient to slightly flex knee with foot resting on table or bed. Instruct patient to keep leg muscles relaxed. Palpate deeply into popliteal fossa with fingers of both hands placed just lateral to midline. It is also possible for patient to lie prone to achieve exposure of artery. (Flexion of knee and muscle relaxation improve accessibility of artery. Popliteal pulse is one of the more difficult pulses to palpate.)

(6) For dorsalis pedis pulse, instruct patient to lie supine with feet relaxed. Gently place fingertips between great and first toes and slowly move them along groove between extensor tendons of great and first toes, until pulse is palpable. (Artery lies superficially and does not require deep palpation. Pulse is sometimes congenitally absent in healthy adults.)

(7) For posterior tibial pulse, instruct patient to relax and slightly extend feet. Place fingertips behind and below medial malleolus (ankle bone). (Artery is easily palpable with foot relaxed.)

b. Determine strength of the pulse. Note thrust of vessel against fingertips. Strength equals volume of blood ejected against arterial wall with each heart contraction.
7. Write down radial pulse rate (for documentation later).
8. Perform hand hygiene. (Reduces spread of microorganisms.)
9. Document rate on graphic flow sheet (see Figure 11-1). (Records procedure.)
10. Follow up by reporting any abnormal pulse rates. (Rate sometimes has to be reassessed.)
11. Do patient teaching (see patient teaching in Health Promotion box on Vital Signs and Skill 11-1).
Steps 6a(1) through 6a(4), and 6a(6): Figures from Jarvis C: Physical examination and health assessment, ed 6, St. Louis, 2012, Saunders.
Any artery can be assessed for pulse rate, but the radial and carotid arteries are the most easily palpated peripheral pulse sites (Figure 11-5). People learning to monitor their own heart rates, such as athletes, often use these sites. When a patient's condition suddenly deteriorates (Box 11-10), the carotid site is the best for finding a pulse quickly. The heart continues delivering blood through the carotid artery to the brain as long as possible. When cardiac output declines significantly, peripheral pulses weaken and are difficult to palpate. (See Chapter 12 for further identification of the pulse sites.)

The radial pulse rate is obtained at the radial artery, which is located on the thumb side of the inner wrist. On initial assessment, all major pulses should be palpated and the apical rate should be auscultated. Major pulses include temporal, facial, carotid, brachial, radial, femoral, popliteal, posterior tibial, and dorsalis pedis (see Figure 11-5); the pulses provide both general and specific information. A pulse palpated at the dorsalis pedis, for example, indicates blood flow to the foot.
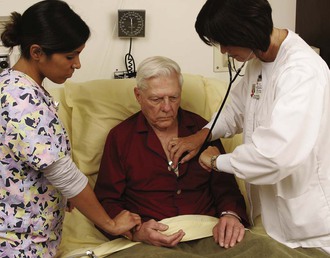
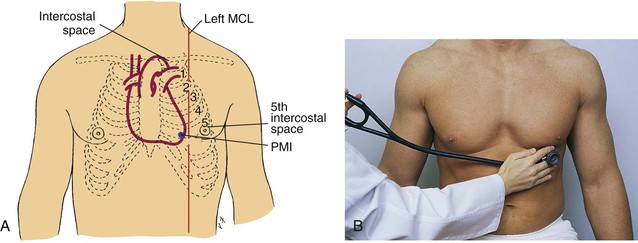
Auscultation of the apical rate is essential on all cardiac patients, and when the radial pulse is irregular or is difficult to palpate or when certain medications such as digoxin (Lanoxin) make this necessary (Skill 11-3). Apical refers to apex (the tip, the end, or the top of a structure) of the heart. The apical pulse represents the actual beating of the heart. The apical pulse site is the best site to use when taking the pulse rate of an infant. When auscultating the apical rate, the “lub-dub” that is heard represents one cardiac cycle, or heartbeat (Figures 11-6 and 11-7).
Skill 11-3
Obtaining an Apical Pulse Rate
Nursing Action (Rationale)
1. Perform hand hygiene. (Reduces spread of microorganisms.)
2. Introduce self to patient. (Decreases patient's anxiety.)
3. Identify patient by identification band. (Ensures correct patient for procedure.)
4. Explain procedure. (Seeks cooperation and assistance from patient and decreases patient's anxiety.)
5. Prepare for procedure by doing the following:
a. Assembling all necessary supplies: stethoscope and watch with second hand. (Organizes procedure.)
b. Providing privacy for patient if necessary. (Decreases patient's anxiety.)
a. Clean earpiece and diaphragm of stethoscope with alcohol swab as necessary. (Ensures instrument is clean and promotes auscultation.)
b. With patient in supine or sitting position, expose sternum and left side of chest. (Exposes portion of chest wall for selection of auscultation site.)
c. Palpate angle of Louis, located just below suprasternal notch at point where horizontal ridge is felt along body of sternum. Place index finger just to right (patient's left) of sternum and palpate second intercostal space. Place next finger in intercostal space below, and proceed downward until fifth intercostal space is located. Move index finger horizontally along fifth intercostal space to left midclavicular line. Palpate point of maximal impulse (PMI), also called the apical area. (Use of anatomic landmarks allows correct placement of stethoscope over apex of heart. Position enhances ability to hear heart sounds clearly. PMI is over apex of heart.)
d. Place bell or diaphragm of stethoscope over PMI (apical area).
(1) Count pulse rate for 60 seconds. (Ensures accuracy.)
(2) Assist patient to dress. (Provides for patient's comfort.)

7. Write down pulse rate (for later documentation).
8. Perform hand hygiene. (Reduces spread of microorganisms.)
9. Document pulse rate on graphic flow sheet (see Figure 11-1).
10. Follow up by reporting an abnormal pulse rate (see Box 11-9).
11. Do patient teaching (see patient teaching in Health Promotion box on Vital Signs).
At times, a difference is found between the radial and the apical rates. This is called a pulse deficit. A pulse deficit is confirmed by one nurse listening to the apical rate, and a second nurse palpating the radial pulse at the same time, using the same watch for 1 full minute. A deficit exists when the radial rate is less than the apical rate. For example, an apical rate of 92 beats per minute and a radial rate of 88 beats per minute means there is a pulse deficit of 4. A pulse deficit signifies that the pumping action of the heart is faulty or there is a peripheral vascular issue. This is often seen in atrial fibrillation.
Respiration
Respiratory Function
Respiration (the taking in of oxygen, its utilization in the tissues, and the giving off of carbon dioxide; the act of breathing [i.e., inhaling and exhaling]) is both internal and external. Internal respiration refers to the exchange of gas at the tissue level caused by the process of cellular oxidation (any process in which the oxygen content of a compound is increased), and the gas exchange that occurs in the alveoli of the lungs. The breathing movements of the patient that are observed are called external respirations. The cycle of external respirations has two parts: inspiration and expiration. Inspiration is inhaling air with oxygen into the lungs, and expiration is exhaling air with carbon dioxide out of the lungs. The rate of respiration is controlled by the medulla oblongata in the brain.
Any activity that increases metabolism (the aggregate of all chemical processes that take place in living organisms resulting in growth, generation of energy, elimination of wastes, and other bodily functions as they relate to the distribution of nutrients in the body after digestion) increases the need for oxygen by the body and increases respiratory rate.
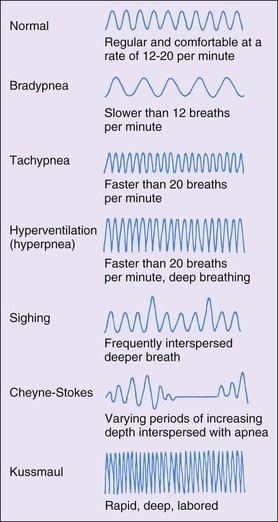
The normal respiratory rate for an adult is between 12 and 20 respirations per minute (Boxes 11-11 and 11-12). A rapid respiratory rate is called tachypnea. Exercise and fever increase respiratory rate. A slow respiratory rate, below 10 per minute, is called bradypnea. The depth of respiration is determined by the amount of air taken in with inhalation. Normally, 500 mL of air is inspired with each breath. The diaphragm (a dome-shaped musculofibrous partition that separates the thoracic and abdominal cavities) aids respirations by moving down during inspiration and moving up during expiration. The proper rhythm of respiration is regular and uninterrupted. Occasional sighing is normal and allows all alveoli (plural for alveolus, an air cell of the lungs where gases are exchanged in respirations) to be aerated. Normal respirations are not audible except with the aid of a stethoscope.
Assessment of Respiration
In assessing respirations, note the rate, the depth, the quality, and the rhythm (Skill 11-4). Assessment of the depth of respirations is completed by observing the movement by the diaphragm and the intercostal muscles. Shallow respirations make ventilation difficult to observe, and only a small amount of air is exchanged in the lungs. Dyspnea is breathing with difficulty. The patient may be laboring to get enough oxygen, with pursed lips, flared nostrils, and clavicular and costal retractions (the visible sinking-in of the soft tissues of the chest between and around the firmer tissues of the cartilaginous and body ribs, as occurs with increased inspiratory effort).
Skill 11-4
Obtaining a Respiratory Rate
Nursing Action (Rationale)
1. Perform hand hygiene. (Reduces spread of microorganisms.)
2. Introduce self to patient. (Decreases patient's anxiety.)
3. Identify patient by identification band. (Verifies correct patient for procedure.)
4. Explain procedure. (Seeks cooperation and assistance from patient and decreases patient's anxiety.)
a. Assemble all necessary supplies, including a wristwatch with a second hand. (Organizes procedure efficiently.)
b. Provide privacy for patient if necessary. (Decreases patient's anxiety.)
c. If patient has been active, wait 5 to 10 minutes. (Exercise increases respiratory rate and depth.)
d. Be certain patient is in a position of comfort, preferably sitting or lying supine with the head of the bed elevated 45 to 60 degrees, if patient can tolerate it. (Discomfort causes the patient to breathe more rapidly. The erect, sitting position promotes full ventilation.)
a. Place fingertip as if to obtain a radial pulse (see illustration). Because patients sometimes unconsciously alter the respiratory rate when being observed, it is best to obtain the respiratory rate at the same time as the radial pulse reading.

b. Observe respiratory rate for 60 seconds. (Ensures accuracy.) Count each rise of the chest wall. One inhalation and exhalation = one respiration.
c. Provide for patient comfort. (Promotes patient's self-esteem.)
7. Write down rate (for documentation later).
8. Perform hand hygiene. (Reduces spread of microorganisms.)
9. Document the rate on the graphic flow sheet (see Figure 11-1).
10. Follow up by reporting any abnormal respiratory rates (see Box 11-11). (Rate sometimes has to be reassessed.)
11. Do patient teaching (see patient teaching in Health Promotion box on Vital Signs).
Assessing patterns of breathing is another part of checking the respiratory status (Figure 11-8). Apnea is a lack of spontaneous respirations. Cheyne-Stokes respirations are an abnormal pattern of respiration characterized by alternating periods of apnea and deep rapid breathing. The periods of apnea increase as time goes on. Cheyne-Stokes respirations are noted in the critically or terminally ill patient. Hyperventilation is when the rate of ventilation exceeds normal metabolic requirements for exchange of respiratory gases, such as during emotional trauma. Volume and depth of respirations increase. Hypoventilation occurs when the rate of ventilation entering the lungs is insufficient for metabolic needs. Respiratory rate is below normal, and depth of ventilation is depressed. A patient may experience hypoventilation after certain surgical procedures such as a cholecystectomy. In these cases, deep breathing results in discomfort.
The best time to assess respirations is immediately after counting a radial or an apical pulse. The patient is unaware you are doing so and is less likely to consciously alter respirations.
Blood Pressure
Factors That Determine Blood Pressure
The blood pressure is the pressure exerted by the circulating volume of blood on the arterial walls, the veins, and the chambers of the heart. Blood pressure is measured in millimeters of mercury (mm Hg). Two pressures are actually elements of what we call blood pressure. The systolic pressure is the higher number and represents the ventricles contracting, forcing blood into the aorta and the pulmonary arteries. The occurrence of systole is indicated by the first sound heard on auscultation. The lower number of the blood pressure reading, the second pressure, is the diastolic pressure. It represents the pressure within the artery between beats, that is, between contractions of the atria or the ventricles, when blood enters the relaxed chambers from the systemic circulation and the lungs. The difference between the two readings is called the pulse pressure. A reading of 120/80 mm Hg reveals a pulse pressure of 40, which is a normal pulse pressure. Pulse pressure is an indication of cardiac function.
Blood pressure reflects cardiac output (the amount of blood discharged from the left or right ventricle per minute), the quality of the arteries, the blood volume, and blood viscosity. When blood is pumped by the heart into the arteries, the pressure within the arteries rises. The greater the amount of blood pumped by the heart, the greater the pressure.
Likewise, if the blood volume is increased, the pressure within the artery increases. When the arteries' lumens (channels within the arteries) narrow and become less flexible, blood pressure rises because there is less space for the blood to enter. Increased viscosity (thickness) of the blood causes a slower flow of blood in the capillaries, which causes backup pressure in the larger vessels. See Box 11-13 and Table 11-4 for factors that influence blood pressure. Table 11-5 provides recommendations for a follow-up on blood pressure readings.
Table 11-4
Classification of Blood Pressure for Adults Ages 18 Years and Older

* Treatment based on highest category.
Data from WebMD. (2012). Hypertension/high blood pressure health center. Retrieved from www.webmd.com/hypertension-high-blood-pressure/guide.
Table 11-5
Recommendations for Blood Pressure Follow-Up
| INITIAL BLOOD PRESSURE | FOLLOW-UP RECOMMENDED* |
| Normal | Recheck in 2 yr |
| Prehypertension | Recheck in 1 yr† |
| Stage 1 hypertension | Confirm within 2 mo† |
| Stage 2 hypertension | Evaluate or refer to source of care within 1 mo. For those with higher pressure (e.g., >180/110 mm Hg), evaluate and treat immediately or within 1 wk, depending on clinical situation and presence of complications. |
* Modify the scheduling of follow-up according to reliable information about past blood pressure measurements, other cardiovascular risk factors, and target organ damage.
† Provide advice about lifestyle modifications.
Data from WebMD. (2012). Hypertension/high blood pressure health center. Retrieved from www.webmd.com/hypertension-high-blood-pressure/guide.
The optimal blood pressure reading for a healthy middle-aged adult is less than 120/80 mm Hg. Values of 120-139/80-89 mm Hg are considered prehypertensive. Hypertension occurs when the elevated pressure is sustained above 140/90 mm Hg. The diagnosis of hypertension in adults is not made with only one random elevated reading. For this diagnosis, an average of 90 mm Hg or higher of two or more diastolic readings on at least two subsequent visits is necessary, or an average higher than 140 mm Hg of two or more systolic readings on at least two visits. Primary, or essential, hypertension is the most common form. The cause is unknown. Risk factors also contribute; consider their significance when doing patient teaching. These risk factors include family history of hypertension, obesity, smoking, heavy alcohol consumption, elevated blood cholesterol level, and continued exposure to stress.
A blood pressure below normal is hypotension. A low blood pressure is considered healthy, provided there are no ill effects, such as vertigo (dizziness) or syncope (fainting). Orthostatic hypotension (a drop of 25 mm Hg in systolic pressure and a drop of 10 mm Hg in diastolic pressure when a person moves from a lying to a sitting or from a sitting to a standing position) occurs when a person rises too quickly, usually from a supine position. The patient frequently feels lightheaded and unstable. Advise the patient to rise slowly from lying to sitting to standing, thus preventing blood volume from shifting suddenly (Box 11-14). Hypotension resulting from shock or massive hemorrhage is very serious and necessitates immediate medical intervention. See Table 11-6 for conditions that cause alterations in blood pressure.
Table 11-6
Conditions That Cause Alterations in Blood Pressure
| CONDITION | EFFECT | CAUSE |
| Hemorrhage | Lowers pressure | Decreased blood volume |
| Increased intracranial pressure | Raises pressure | Disturbance of cardiovascular control mechanisms in brainstem resulting from pressure exerted on the medulla oblongata |
| Acute pain | Raises pressure | Increased vasomotor tone and peripheral vascular resistance as a result of sympathetic stimulation |
| End-stage renal disease | Raises pressure | Increased blood volume resulting from increased retention of sodium and water; release of renin, a vasopressor that increases peripheral vascular resistance |
| Primary essential hypertension | Raises pressure | Increased peripheral vascular resistance resulting from progressive thickening of arterial walls |
| General anesthesia | Lowers pressure | Decreased vasomotor tone resulting from depression of vasomotor center in brainstem |
| Exercise | Raises pressure | Increased cardiac output |
| Postural change | Lowers pressure | Decreased blood volume as person moves from lying to sitting or standing position; normally, variations are minimal |
| Smoking | Raises pressure | Increased vasoconstriction |
Obtaining Blood Pressure Measurements
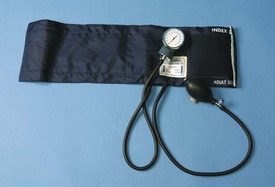
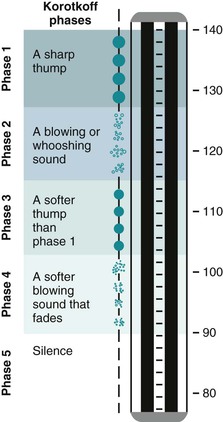
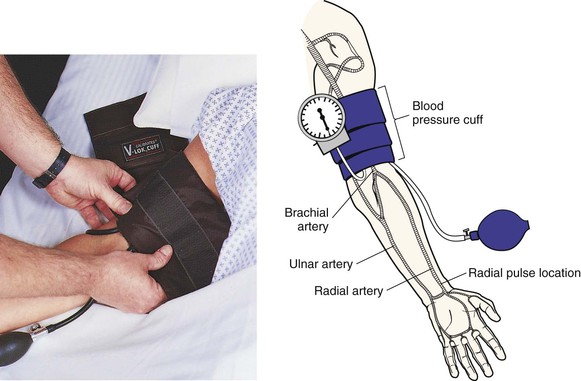
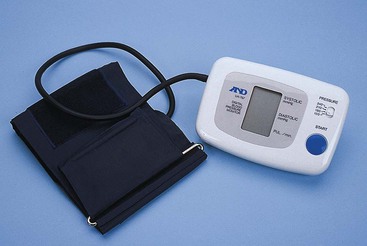
Blood pressure readings are taken with a sphygmomanometer and a stethoscope. A sphygmomanometer (a device for measuring the arterial blood pressure) consists of an inflatable cuff and a gauge. The gauge is aneroid (use of mercury-calibrated manometers is no longer advised) (see Box 11-8 and Figures 11-9 and 11-10). Inflate the cuff around the patient's arm to compress the artery, which occludes blood flow; then, slowly deflate it, which allows blood flow to resume (see the Evidence-Based Practice box). While doing this, listen at the brachial artery with the stethoscope to hear pulsating sounds. These are called Korotkoff sounds. The sounds go through five phases (Figure 11-11). At the first audible sound, make a mental note of the point on the sphygmomanometer gauge at which it occurs, and note again the point at which the sound disappears. That first point is the systolic pressure, and the second is the diastolic pressure.
As the pressure is lowered, the Korotkoff sounds sometimes seem to disappear temporarily. In this case, listen for a subtle difference in the quality of what you hear as the manometer approaches the diastolic reading. In patients with hypertension, the sounds usually heard over the brachial artery disappear as pressure is reduced and then reappear at a lower level. This temporary disappearance of sound is the auscultatory gap. It typically occurs between the first and the second Korotkoff sounds. The gap in sound sometimes covers a range of 40 mm Hg and thus has the potential to cause an underestimation of systolic pressure or overestimation of diastolic pressure. Be certain to inflate the cuff enough to hear the true systolic pressure before the auscultatory gap. Palpation of the radial artery helps determine how high to inflate the cuff. Inflate the cuff 30 mm Hg above the pressure at which the radial pulse was palpated and disappeared. The range of pressures in which the auscultatory gap occurs is recorded (e.g., “blood pressure 190/94, with an auscultatory gap from 190 to 160”).
 Evidence-Based Practice
Forearm versus Upper Arm Blood Pressure Measurements
Evidence Summary
Blood pressure measurement is an important factor in determination of the diagnosis of hypertension and evaluation of therapies. Because hypertension leads to serious complications, eliminating errors in measuring blood pressure is important. When the upper arm is not accessible or when the blood pressure (BP) cuff does not fit the patient's upper arm, the forearm has been used for BP measurement. In this research study, BP measurements taken on the forearm and the upper arm were compared when patients were supine and when the head of the bed was elevated at 45 degrees. The researchers wanted to know whether placement of the BP cuff affected systolic and diastolic BP. The BP of 221 medical surgical inpatients was measured at both arm locations in the supine and head-elevated positions. Researchers selected cuff size based on forearm and upper arm circumference. Results indicated a significant difference between upper arm and forearm blood pressures in both positions. Both systolic and diastolic blood pressure differed as much as 33 mm Hg.
Application to Nursing Practice
• A consistent approach to the placement of upper extremity blood pressure cuff allows accurate assessment of a change in condition.
• Appropriate cuff size is essential for accurate measurement.
• Forearm BP measurements cannot be substituted for upper arm blood pressure measurements and be considered accurate.
Data from Altman GB: Fundamental and advanced nursing skills, ed 3, New York, 2010, Delmar Cengage; and Schrauf CM: Monitoring blood pressure: Do method and body location matter? Nephrol Nurs J 39(6):502-512, 2012.
If sounds are heard immediately after inflation of the cuff and the beginning of listening, the pressure should immediately and completely be released. After 60 seconds, the cuff may then be reinflated to a point 30 mm Hg above where the sounds were heard the first time. Reinflation of a partially deflated cuff is uncomfortable for the patient and often yields an inaccurate reading.
If sounds cannot be auscultated because of a weakened arterial pulse, use of a Doppler ultrasonic stethoscope may be possible. This stethoscope allows low-frequency sounds to be heard and is commonly used with adults who have very weak blood pressure and with infants and children (Figure 11-12).

For the blood pressure reading to be accurate, the environment must be quiet, the equipment should be in good working order, and the cuff must fit correctly on the arm and be at the level of the heart. The gauge needs to be in plain view, not off to the side of the arm. The patient should be lying down or sitting up with both feet flat on the floor (legs not crossed) (Skill 11-5). See Box 11-15 for nursing interventions for the patient with abnormal blood pressure reading. See Box 11-16 for assessment of blood pressure in both arms.
Skill 11-5
Obtaining a Blood Pressure Reading
Nursing Action (Rationale)
1. Perform hand hygiene. (Reduces spread of microorganisms.)
2. Introduce self. (Decreases patient's anxiety.)
3. Identify patient by identification band. (Verifies correct patient for procedure.)
4. Explain procedure. (Seeks cooperation and assistance from patient and decreases patient's anxiety.)
5. Determine whether patient has ingested caffeine or has been smoking. (If so, wait 30 minutes before assessment, because caffeine and smoking can cause false elevations.)
a. Assemble all necessary supplies, sphygmomanometer, and stethoscope. (Organizes procedure efficiently.) Determine the correct cuff size. (An improper size gives an inaccurate reading.) The cuff should be approximately 40% of the circumference of the extremity on which the cuff is to be used. (A higher, inaccurate reading is obtained if too small a cuff is used; a lower, inaccurate reading is obtained if too large a cuff is used.)
b. Provide privacy. (Decreases patient's anxiety.)
c. Request that patient assume sitting or lying position. Be certain room is quiet and warm. (Maintains comfort.)
d. Determine site for blood pressure measurement. Do not apply cuff to arm when in the following situations: (Applying the cuff complicates these preexisting conditions.)
(1) Catheter is in antecubital fossa and fluids are infusing.
(2) Arteriovenous shunt is in place.
(3) Breast or axillary surgery has been performed on that side.
(4) An arm or hand has been traumatized or is diseased.
(5) A lower arm cast or bulky bandage is in place.
a. Apply cuff to bare arm with patient's palm facing upward. Do not hyperextend. The cuff is applied 1 to 2 inches above the antecubital space. The cuff is centered over the brachial artery. The patient's upper arm is held at the level of the heart, and the lower arm is rested on a firm surface. (Ensures accuracy of procedure.)
b. Palpate radial artery (see illustration in Skill 11-2).
c. Inflate cuff. Note the point on the manometer gauge when the radial pulse is obliterated. (This is the approximate systolic pressure.)
d. Deflate the cuff. (Deflating the cuff allows congestion to leave the arm, preventing a false-high reading.) Rest arm for 1 minute.
e. Palpate the brachial artery and place the bell or the diaphragm of the stethoscope over it.
f. Reinflate cuff to 30 mm Hg above point at which radial artery was obliterated. (Avoids the auscultatory gap.) Estimating prevents false low readings that possibly result from the presence of this auscultatory gap (inaudible sounds below the systolic pressure). This phenomenon occurs in about 5% of adults and is prevalent in individuals with hypertension.
g. Slowly deflate cuff. Cuff is deflated at a rate of 2 mm Hg per second. Note the point at which the pulse is heard. (This is the systolic pressure.) Note the point at which no pulse is heard. (This is the diastolic pressure.)
h. When the Korotkoff sounds are no longer audible, continue to listen for another 10 to 20 mm Hg. (Confirms blood pressure reading. Too-rapid deflation often causes a measurement error.)
i. Completely deflate and remove the cuff.
j. Assist the patient to dress. (Provides patient comfort.)
8. Write down reading (for documentation later).
9. Perform hand hygiene. (Reduces spread of microorganisms.)
10. Document reading on graphic flow sheet (e.g., blood pressure 120/80 mm Hg; see Figure 11-1).
11. Follow up by reporting abnormal readings immediately (see Box 11-16 for assessment of blood pressure in both arms and Box 11-14 for assessment of orthostatic blood pressure). (Reading sometimes has to be reassessed.)
12. Do patient teaching (see patient teaching in Health Promotion box on Vital Signs).
Assessment of Blood Pressure in the Lower Extremities
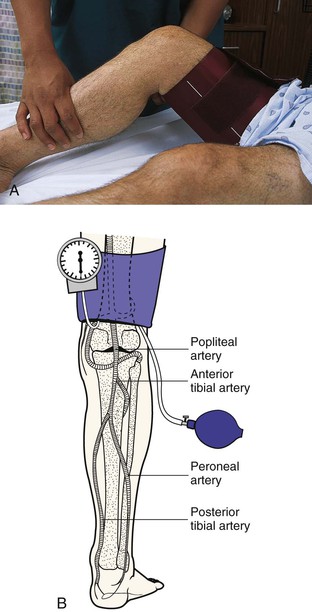
Occasionally, dressings, casts, intravenous catheters, or other devices make the upper extremities inaccessible, so you have to measure blood pressure in the lower extremities. Also, in patients with certain circulatory abnormalities, a comparison of blood pressure in the upper extremities with that in the legs is helpful. The popliteal artery, located behind the knee in the popliteal space, is the site for auscultation. With a cuff that is wide and long enough to allow for the larger girth of the thigh, position the cuff with the bladder over the posterior aspect of the mid-thigh. Placing the patient in a prone position is best. If such a position is impossible, ask the patient to flex the knee slightly for easier access to the artery. The procedure is the same as that for brachial artery auscultation. Systolic pressure in the lower extremities is usually higher by 10 to 40 mm Hg than in the brachial artery, but the diastolic pressure is essentially the same (Figure 11-13, A and B).
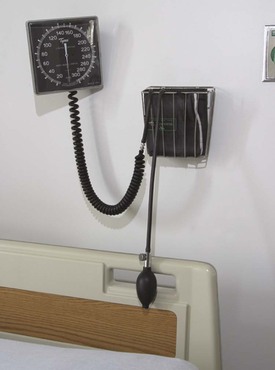
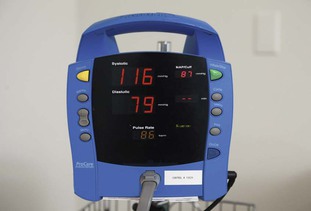
Electronic Measurement Devices
Many electronic devices determine blood pressure automatically (Figures 11-14 and 11-15). The devices may be programmed to check blood pressure continuously or at set intervals. On medical-surgical floors and in operating rooms, postanesthesia care units, intensive care units, and postpartum units (see Coordinated Care box), their use is now frequent.
 Coordinated Care
Supervision
Vital Signs
The skill of vital signs measurement can be delegated to unlicensed assistive personnel (UAP). The nurse is responsible for assessing the effect of changes in the body's vital signs.
• Inform UAP of appropriate route and device to measure temperature.
• Inform UAP of specific factors related to patient that can falsely raise or lower temperature.
• Inform UAP of the frequency of temperature measurement for specific patient.
• Inform UAP of any factors that will affect the positioning of a patient when measuring a rectal temperature.
• Inform UAP of patient's history or risk of irregular pulse.
• Inform UAP of frequency of pulse measurement for specific patient.
• Inform UAP of the proper positioning of the patient when measuring the apical pulse.
• Inform UAP of patient history or risk for increased or decreased respiratory rate or irregular respirations.
• Inform UAP of frequency of respiration measurement for specific patient.
• Inform UAP if patient has alterations that affect the appropriate limb for blood pressure measurement.
• Inform UAP of appropriate-size blood pressure cuff for designated extremity.
• Inform UAP of frequency of blood pressure measurement for specific patient.
• Inform UAP before blood pressure measurement if the patient is at risk for experiencing orthostatic hypotension.
• Determine that UAP is aware of the usual values of each vital sign for patient.
• Inform UAP of abnormalities of each vital sign that should be reported and reconfirmed by the nurse.
• The UAP is not responsible for using the Doppler. This is a skill for the registered nurse (RN) or licensed practical/vocational nurse (LPN/LVN) to perform.
• Explain which weight device to use for specific patient.
• Observe for patient's intolerance and report information back to the nurse.
Once the cuff is applied, the device can be programmed to obtain and record blood pressure readings at preset intervals. Alarm limits can also be programmed to alert the nurse if the blood pressure measurement is outside desired parameters. The system includes either a microphone or a pressure sensor built into the inflatable cuff. The microphone or acoustic system picks up Korotkoff sounds and registers systolic and diastolic readings. The pressure sensor or the ultrasonic system responds to the pressure waves generated by the movement of blood through the artery.
The advantages of automatic devices are the ease of use and efficiency when repeated or frequent measurements are needed. The automatic blood pressure cuff is also useful for home use if the patient or caregiver has hearing difficulties. The ability to use a stethoscope is not required. Automatic devices are sensitive to outside interference and are susceptible to error. For proper function, the microphone or the pressure sensor must be positioned directly over the artery. Patient movements, vibration, or outside noise may interfere with the microphone or the sensor signal. Most automatic blood pressure devices are unable to process sounds or vibrations of low blood pressure (Box 11-17). In addition, the range of device quality sometimes makes comparing blood pressure measurements difficult.
The use of automatic blood pressure devices permits assessment of blood pressure during interpersonal interactions. Nonetheless, avoid speaking to the patient for at least a minute before initiating a blood pressure recording. Talking to a patient when the blood pressure is being assessed has the potential to increase readings.
Self-Measurement
More people today measure their own blood pressure, thanks to improved technology in home monitoring devices and a greater interest in health promotion. Two of the more common types of devices the general public uses are portable home devices and stationary automated machines.
The portable home devices include the aneroid sphygmomanometer (see Figure 11-9) and electronic digital readout devices that do not require use of a stethoscope. The electronic devices inflate and deflate cuffs with the push of a button (see Figure 11-15). Although the electronic devices are often easier to manipulate, there are some disadvantages. They easily become inaccurate and require recalibration more than once a year. Because of their sensitivity, improper cuff placement or movement of the arm frequently causes electronic devices to give incorrect readings. A useful blood pressure device that overcomes these difficulties fits around the wrist, does not require a stethoscope, is easy to use, and is well adapted for home use. This device also inflates and deflates at the push of a button.
Stationary automated machines are often located in public places such as grocery stores, pharmacies, fitness clubs, banks, airports, and work sites. Users simply rest the arm within the machine's inflatable cuff, which contains a pressure sensor. The cuff fits over the clothing. A visual display tells users their blood pressure within 60 to 90 seconds. The reliability of the stationary machines is limited. Blood pressure values sometimes vary by 5 to 10 mm Hg or more (for both the systolic and diastolic values) compared with the pressures taken with a manual sphygmomanometer.
If they have the information that they need to perform the procedure correctly, and if they know when to seek medical attention, consumers can learn to use self-measurement devices to their benefit. Patients should be advised of possible inaccuracies in the machines, how to understand the meaning and implications of readings, and the proper measurement techniques.
Height and Weight
With the initial measurement of vital signs, the patient's height (the vertical measurement of a structure, organ, or other object from bottom to top, when it is placed or projected in an upright position) and weight (the force exerted on a body by the gravity of the earth; normal weight depends on the frame of the individual) should be measured. Height and weight determination is important because it helps assess normal growth and development, aids in proper drug dosage calculation, and is often used to assess the effectiveness of drug therapy, such as diuretics. Only in cases of extreme illness is it acceptable to delay obtaining these valuable assessments. A stated height and weight should not be relied on because of the importance placed on these in the treatment process. Malnourished patients, patients who are undergoing diuretic therapy, and patients who have diseases that increase fluid retention, such as heart, liver, and kidney disease, may need to be weighed frequently (such as weekly or daily).
Obtaining Weight Measurements
Patients are weighed to give the health care provider information for prescribing medication dosages and to determine nutritional status and water balance. Because 1 L of fluid equals 1 kg (2.2 lb), a weight change of 1 kg (2.2 lb) often reflects a loss or gain of 1 L of body fluids. A significant loss of weight frequently points to an underlying disease.
Patients should be weighed at the same time of day, on the same scale, and in the same type or amount of clothing to allow an objective comparison of subsequent weighings. An ideal time to weigh patients is in the morning after voiding and before breakfast.
Various types of weighing scales are available to meet the patients' needs. Patients capable of bearing their own weight use a standing scale (Skill 11-6). The patient must stand on the scale platform and remain still. Manual scales are calibrated by setting the weight at zero and noting whether the balance beam registers in the middle of the mark. To obtain the patient's weight, slowly adjust the scale weight on the balance beam until the tip of the beam registers in the middle of the mark. Scales with a digital display must read zero before each use. Digital scale readouts display weight in a matter of seconds.
Skill 11-6
Measuring Height and Weight
Nursing Action (Rationale)
1. Perform hand hygiene. (Reduces spread of microorganisms.)
2. Introduce self. (Decreases patient's anxiety.)
3. Identify patient by identification band. (Verifies correct patient for procedure.)
4. Explain procedure to patient. (Gains cooperation and assistance and decreases patient's anxiety.)
a. Assemble supplies, including scale: standing, chair, or bed type. (Organizes procedure efficiently.)
b. Provide privacy. (Decreases patient's anxiety.)
a. Balance scale at zero. (Ensures accurate reading.)
b. Place paper towel over base of scale where patient will stand, if patient is barefoot. (Promotes medical asepsis.)
c. Have patient step onto scale. Patient should be weighed in same amount of clothing each time—preferably gown; slippers are optional. (Promotes an accurate comparison.)
d. Measure height with patient standing upright, if patient can tolerate this. (Promotes accurate measurement.)
e. Measure weight. (Provides accurate measurement.)
f. Assist patient off scale by having patient step to side. (Safer than stepping backward.)
g. Assist to bed or chair to provide for patient's comfort. (Promotes patient's self-esteem.)
7. Write down measurement (for documentation later.)
8. Perform hand hygiene. (Reduces spread of microorganisms.)
9. Document measurements (e.g., height: 64 inches, weight: 136 lb) (see Figure 11-1).
10. Follow up by reporting measurement. (Reading often varies and has to be reassessed.)
Chair and sling scales are available for patients unable to bear weight (Figure 11-16). The sling is placed under the patient and connected to the arms of the scale, the patient is lifted above the bed by a hydraulic device, and the weight is measured on a balance beam or digital display. Caution must be used to promote patient safety when transferring patients to and from the scales.
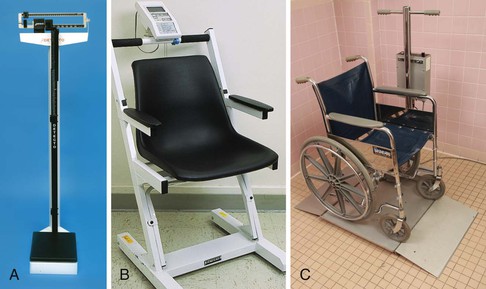
To facilitate weighing very ill patients, bed scales are available in some agencies. The bed is zeroed before the patient is placed in the bed. The patient is weighed in the bed with only what was on the bed when zeroed for accuracy (Medical Expo, 2013).
Obtaining Height Measurements
For patients who are able to stand, ascertain height by using the metal rod attached to the back of the standing scale, which swings out and over the top of the head. A measuring stick or tape attached vertically to the wall is also possible to use. Ask patients to remove their shoes, step onto the platform or against the wall, and stand erect, exercising good posture. After obtaining the measurement, help the patient to carefully step off the scales and return to chair or bed as needed. Cleanse the scale with appropriate disinfectant (Altman, 2010).
 Nursing Process
The role of the LPN/LVN in the nursing process as stated is that the LPN/LVN will:
• Participate in planning care for patients based on patient needs
• Review patient's plan of care and recommend revisions as needed
• Review and follow defined prioritization for patient care
• Use clinical pathways, care maps, or care plans to guide and review patient care
 Assessment
At initial contact with a patient, a baseline measurement of vital signs is routinely obtained to provide a means for comparison with subsequent vital signs values. These findings aid in determining whether more thorough assessment of specific body systems is necessary. For example, after assessment of an abnormal respiratory rate, the lung sounds should also be auscultated. In certain situations, the assessment of vital signs may be limited to measurement of a single vital sign for the purpose of reviewing a specific aspect of a patient's condition. For example, after the administration of an antihypertensive medication, measurement of the patient's blood pressure to evaluate the medication's effects is essential. Part of a nurse's clinical judgment involves deciding which vital signs to assess and measure and when and how frequently.
This assessment includes the following:
• Factors likely to interfere with accuracy of vital signs reading
• Medications that have potential to influence vital signs
• Factors that influence vital signs
• Conditions that precipitate fever, such as infections
• Previous baseline vital signs from patient's record; baseline information provides basis for comparison and assists in assessment of current status
Nursing Diagnosis
A review of all data gathered during assessment is required to determine the nursing diagnosis. Defining characteristics, when clustered, reveal this diagnosis. The following are possible nursing diagnoses related to vital signs:
Expected Outcomes and Planning
The appropriate focus for the plan of care is on those nursing interventions that identify abnormalities and restore homeostasis (a relative constancy in the internal environment of the body; naturally maintained by adaptive responses that promote healthy survival).
A possible patient-centered goal is often “patient's vital signs will be within normal range” or, for patients with chronic diseases that alter vital signs, such as chronic obstructive pulmonary disease (COPD), “baseline will be established.”
Expected outcomes often include the following:
Implementation
The severity of an alteration in a vital sign influences the priorities in the care of the patient.
What procedures the health care team uses to intervene and treat an abnormal vital sign depends on the cause, any adverse effects, and the strength and intensity of the abnormal vital signs and how long the abnormality persists. Direct interventions toward providing comfort to the patient and to keeping complications to a minimum (see Boxes 11-6, 11-10, 11-12, and 11-15).
Evaluation
Evaluate all nursing interventions by comparing the patient's actual responses with the outcome of the care plan. An example follows: