Delivering Dental Care
Electronic Resources
 Additional information related to content in Chapter 33 can be found on the companion Evolve Web site.
• Labeling Exercises: Identify the Zones of the Clock for a Right-Handed Operator; Identify the Zones of the Clock for a Left-Handed Operator
• Procedure Sequencing Exercises: Admitting and Seating of the Patient; Transferring Instruments with the Single-Handed Technique; Transferring Instruments with the Two-Handed Technique; Using the Dental Mirror Intraorally; Using an Instrument Intraorally
Learning Outcomes
On completion of this chapter, the student will be able to achieve the following objectives:
1. Pronounce, define, and spell the Key Terms.
2. Discuss how to prepare for a patient appointment, including:
• Describe how to prepare the dental treatment area for a patient's arrival.
• Discuss the importance of preparing a dental treatment room for a procedure.
3. Discuss the concept of team dentistry, and the principles of team positioning, including:
• Describe how the operator is positioned during treatment.
• Describe how the assistant is positioned during treatment.
4. Explain the classification of motions.
5. Define each of the operating zones.
6. Explain instrument transfer, including:
• Specify three grasps used by the operator.
• Specify four items that have to be transferred differently because of design or use.
• Discuss the differences between one-handed and two-handed instrument transfer techniques.
7. Identify five areas in which the assistant must have competency when practicing expanded functions.
Performance Outcomes
On completion of this chapter, the student will be able to meet competency standards in the following skills:
The manner in which dental care is provided is one of the most important responsibilities of the dental team. For a typical day to run smoothly and for the best patient care to be provided, the business assistant, clinical assistant, dental hygienist, and dentist must follow a specific routine.
With advance preparation in reviewing the patient record, knowledge of the upcoming procedure, and by being ready with the needed supplies and equipment, the dental healthcare professional can prevent the daily routine of clinical care from being hectic and can ensure that the flow of patient care is maintained throughout the day. Failure to meet these standards can result in loss of production for the dentist, inconvenience or discomfort for the patient, and unnecessary stress for everyone.
Knowing Your Patients
Once a patient enters the reception area, it is essential that his or her presence be acknowledged immediately. One of the best ways to know your patients and to be better prepared for the day ahead is to have a brief meeting or overview of the day before your patients arrive. Topics that should be discussed among the dental team during this meeting can include:
• Change in schedule or procedure
• A patient's health or age that could alter dental treatment
• Additional supplies or equipment that may be needed for a procedure
• Preparation for an apprehensive patient in the form of scheduling more time, using premedication, or preparing the setup for the use of nitrous oxide during the procedure
Reviewing the Patient Record
Several sections of a patient record are reviewed at each patient visit. The business staff will discuss any changes in the patient's personal information, such as address or phone number change, and make corrections as needed. The clinical staff will discuss any medical alerts or changes in medical status and update the health history form. The clinical assistant refers to progress notes for the planned treatment of the day.
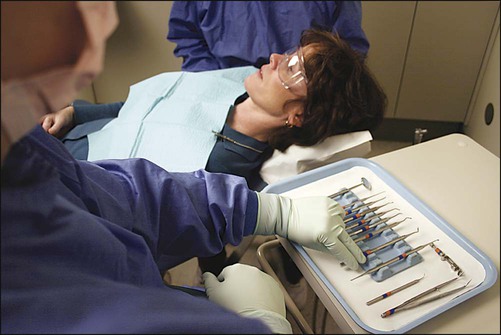
Preparing the Treatment Area
A treatment room preparation checklist should be completed before the patient is seated:
• Is the treatment room clean, disinfected, and ready for the next patient?
• Are the patient's record, radiographs, and laboratory case in place?
• Are the appropriate sterile preset tray and other supplies in place and ready for use?
• Is the dental chair positioned to allow seating of the patient?
• Has additional equipment been moved out of the path of entry for the patient and dental team members?
Greeting and Seating the Patient
As the clinical assistant, you will enter the reception area to greet and escort your patient to the designated clinical area. Address the patient using his or her title (Mr., Mrs., or Ms.) and last name. Remember that patients must be greeted in a courteous way. When you call out to your patient, make sure to establish eye contact, smile, and introduce yourself.
Procedure 33-1 reviews admitting and seating of the patient.
Team Dentistry
Team dentistry, also referred to as four-handed dentistry, is a concept that describes the way the dentist and the dental assistant work together to perform clinical procedures in an ergonomically structured environment. The main goal of this concept is to deliver the best and most effective care to patients by increasing productivity and reducing fatigue and stress during the completion of dental procedures.
Team dentistry is a standard of performance that has been taught to dental students and dental-assisting students over the past 40 years. Basic goals of this type of coordination include the following:
• To use ergonomically correct dental equipment
• To use preset trays during dental procedures
• To minimize stress and fatigue during performance of dental procedures by ensuring specific, ergonomically correct positioning of the patient, dentist, and assistant (see Chapter 25)
• To follow the principles of motion economy during the transfer of instruments and dental materials
• To use appropriate moisture control techniques to enhance visualization of the working field in the mouth (see Chapter 36)
• To delegate expanded functions of practice as legally defined within the state
 1
1 Principles of Team Positioning
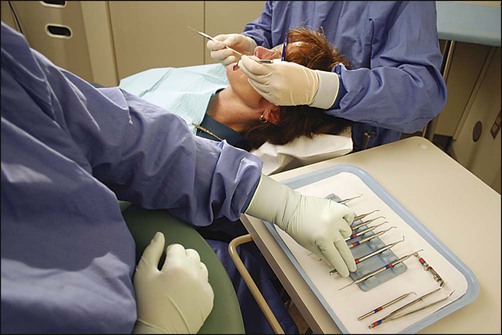
Correct positioning of the dental team within the clinical area is essential. The dentist and the dental assistant should develop positioning habits that allow access to and visualization of all areas of the oral cavity, while maintaining a position that provides optimal comfort and support (Fig. 33-1).
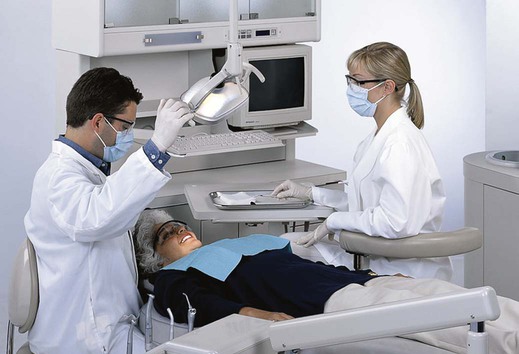
Whenever the dentist and the assistant must stretch to reach for an instrument or gain access to an area of the mouth, stress is placed on the body. If this occurs daily, the accumulated strain contributes to lower back pain, circulatory problems, and muscle aches and pain. (Refer to Chapter 25 for more information on ergonomics.)
Positioning the Patient
After the patient has been escorted to the treatment area and seated, he or she is then lowered to the supine position. The patient is asked to slide up in the chair until the top of the head is even with the top of the headrest. The operator then asks the patient to turn his or her head to the right or the left to allow easier access to a specific area of the mouth.
The operator makes final adjustments to the chair to establish proper working distance. The distance between the patient's face and the operator's face should be approximately 12 to 14 inches (Fig. 33-2). When working in the mandibular area, the back of the chair is raised to a slightly more upright position for better visualization.

Positioning the Operator
Access and visualization are the most essential qualities for the operator. Chapter 32 describes the unique features of the operator's stool. The positioning of the operator on the stool is important for ensuring comfort and support (Fig. 33-3).
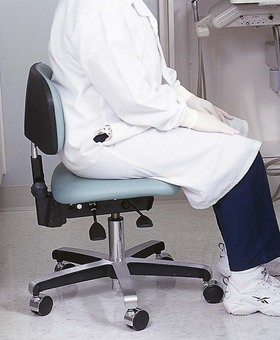
The operator should practice the following guidelines:
• Seated as far back as possible, with front edge of stool just touching the backs of the knees
• Thighs parallel to floor, or knees slightly lower than hips
• Feet kept flat on the floor and not crossed
• Backrest of chair positioned to support lower portion or small of the back
• Height of chair maintained to keep operator's forearms parallel to the floor when bent at the elbow
Positioning the Dental Assistant
When assisting the dentist, the dental assistant will anticipate what is needed throughout the procedure and must have access to the area of the mouth during the procedure (Fig. 33-4). Chapter 32 describes positioning features that are important in ensuring the dental assistant's comfort and support.
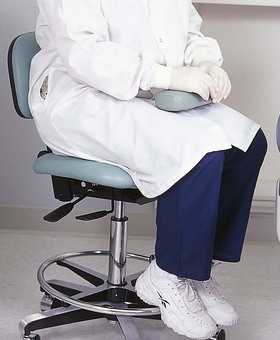
The assistant should practice the following guidelines regarding correct positioning on the stool:
Motion Economy
If you ask members of the dental team in the business or clinical area what part of the body is most fatigued by the end of the day, they would most likely comment about their lower back. This is because of too much reaching, twisting, and turning while seated in their work position.
Classification of Motions
Motions are classified into five categories according to extent of movement. By understanding early in your preclinical studies the need to eliminate or reduce Class IV and V motions, you will develop better habits and will truly benefit ergonomically in the long run.
Class I: Movement of fingers only. Examples include picking up an instrument or a single object from a flat surface, or picking up a pencil or a pen to write with.
Class II: Movement of fingers and wrist. Examples include transferring an instrument with the use of a pen grasp, or mixing a dental material; as the business assistant, typing on a keyboard or using the computer mouse.
Class III: Movement of fingers, wrist, and elbow. Examples include using the slow-speed handpiece when performing coronal polishing and, as the business assistant, answering the telephone.
Class IV: Use of the entire arm and shoulder. Examples include reaching for items within the mobile unit, moving the radiography unit, and filing patient records.
Class V: Use of the entire upper torso. Examples include bending over to see intraorally, retrieving dental materials from a tub or drawer, and reaching to hand patients a form to complete.
Operating Zones
Operating zones are based on a “clock concept” and describe the best way to identify the working position of the dental team, the dental equipment, and the supplies needed to perform a procedure. This basic concept is used in the practice of efficient and comfortable clinical dentistry and can be applied to any dental procedure.
To understand the concept, visualize a circle placed over the dental chair. The patient's face is in the center of the circle, and the top of the patient's head is toward the 12 o'clock position. The face of the clock is divided into four zones. The location of the zones changes according to whether the operator is right-handed or left-handed. The operator's position varies within that zone, depending on the treatment to be delivered (Figs. 33-5 and 33-6).
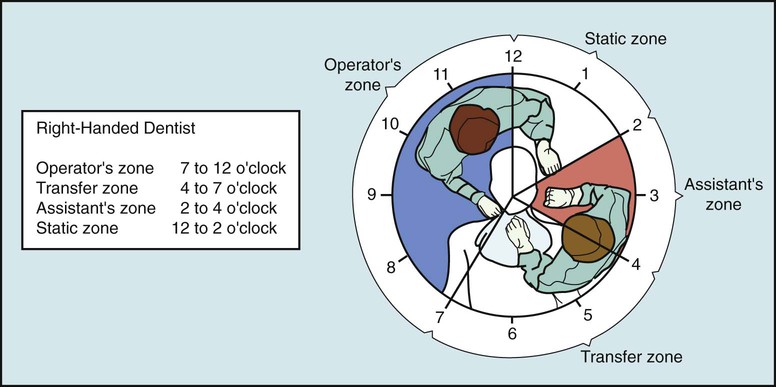
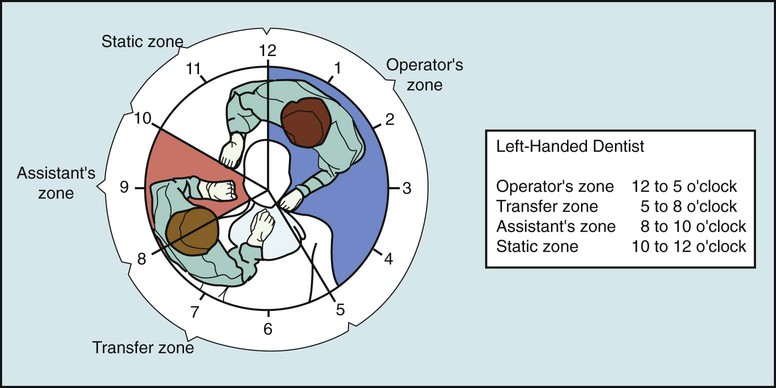
Operator's Zone
The operator's zone (right-handed—7 o'clock to 12 o'clock; left-handed—12 o'clock to 5 o'clock) is the area where the person who completes the procedure is seated. Most often, the dentist is the operator. However, the dental assistant or the dental hygienist can be referred to as the operator when working individually directly inside the oral cavity.
Transfer Zone
The transfer zone (right-handed—4 o'clock to 7 o'clock; left-handed—5 o'clock to 8 o'clock) is the area where instruments and dental materials are exchanged between the dental assistant and the dentist. This zone is located directly over the patient's chest. In front delivery, the dental unit is located in the transfer zone within easy reach of the dentist and the assistant.
Assistant's Zone
The assistant's zone (right-handed—2 o'clock to 4 o'clock; left-handed—8 o'clock to 10 o'clock) is the area where the dental assistant is positioned. The assistant's mobile cabinet or rear delivery countertop can also be positioned within this zone. To minimize motion, a movable countertop can be positioned over the assistant's lap; this can hold the instrument tray, paper products, and dental materials.
Static Zone
The static zone (right-handed—12 o'clock to 2 o'clock; left-handed—10 o'clock to 12 o'clock) is located directly behind the patient. If the dental unit has rear delivery, the handpieces, the air-water syringe, and additional countertop space are positioned within the static zone. Portable equipment such as the nitrous oxide unit may also be positioned in the static zone.
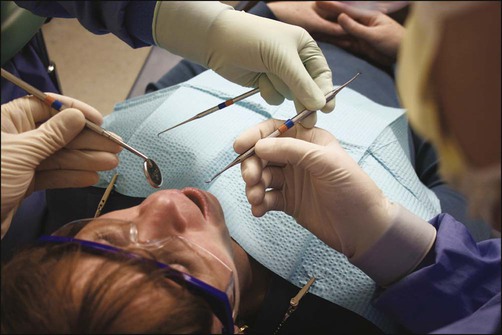
Instrument Transfer
Four-handed dentistry is based on the concept that a qualified chairside dental assistant is seated across from the dentist, and they work as a team. Throughout the procedure, the dentist relies on the clinical assistant to have the supplies, instruments, and dental materials ready for transfer into the dentist's hands. The smooth, efficient transfer of instruments and materials reflects a team effort that requires coordination, communication, and practice between the dentist and the dental assistant.
Objectives of Efficient Instrument Transfer
• For the dental assistant to understand the sequence of the procedure
• For the dental assistant to anticipate when instrument transfer will be required
• For the dental assistant to transfer dental instruments, dental handpieces, and dental materials with the left hand. The right hand is kept free to suction and to ready the next materials and instruments.
• To transfer instruments with the use of only Class I, Class II, and Class III motions involving only the fingers, wrist, and elbow
• To transfer instruments in the position of use, which refers to directing the working end of the instrument downward for the mandibular arch and upward for the maxillary arch. This is instilled so the dentist does not need to reposition the instrument in his or her hand before use.
• To transfer an instrument so that the dentist can grasp the instrument for its appropriate use
• To position an instrument in the dentist's hand firmly, so the dentist can receive it without moving his or her eyes from the field of operation
Grasping an Instrument
The manner in which the operator grasps and holds an instrument for use varies with the type of instrument, how the instrument is used, and which area of the mouth is being treated. An understanding of instrument grasp is essential to smooth instrument transfer and exchange of instruments. The three basic grasps are as follows:
• Pen grasp, in which the instrument is held in the same manner as a pen (Fig. 33-7, A)
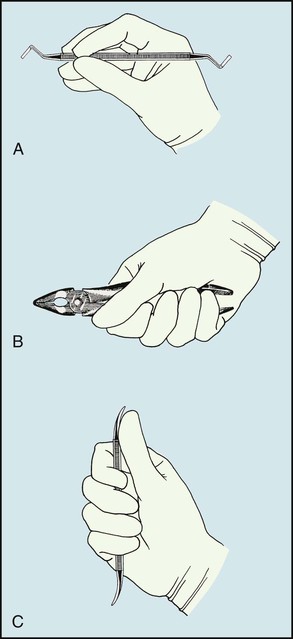
• Palm grasp, in which the instrument is held securely within the palm of the hand (Fig. 33-7, B)
• Palm-thumb grasp, in which the instrument is held in the palm, and the thumb is used to stabilize and guide the instrument (Fig. 33-7, C)
Transfer Technique
When transferring instruments during a procedure, the assistant uses a specific single-handed technique for efficiency. This single-handed transfer technique applies to hand instruments, dental handpieces, and air-water syringes (see Procedure 33-2).
Variations in Instrument Exchange
Specific items and instruments have to be transferred differently because of their design or use.
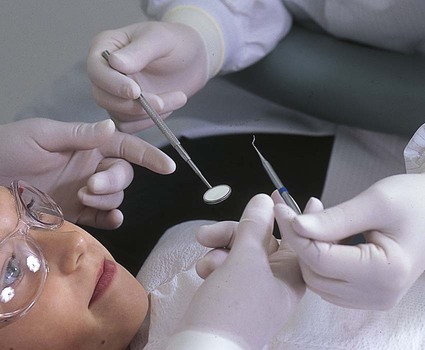
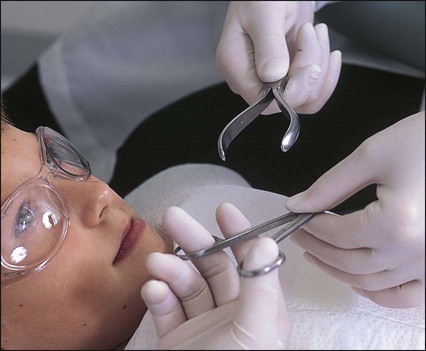
Mirror and Explorer
When beginning a procedure, the dentist will immediately use the mouth mirror and the explorer to inspect the area to be treated. The dentist will signal to the assistant by placing one hand on each side of the patient's mouth in a position that indicates readiness to receive the instruments.
The dental assistant delivers the mirror and the explorer simultaneously, using a two-handed exchange. For the right-handed operator, the explorer is transferred with the left hand, and the mirror with the right hand (Fig. 33-8).
Cotton Pliers
When cotton pliers are used to transfer small items to and from the oral cavity, a modification in the single-handed technique must be made. The assistant delivers the pliers to the dentist while pinching together the “beaks” to avoid dropping the item held by the pliers (Fig. 33-9). Grasping the working end of the pliers makes retrieval of the cotton pliers easier. This grasp also prevents the contents of the forceps from slipping out.

Handpiece
The handpiece can be exchanged for an instrument through the same technique used when two instruments are transferred (Fig. 33-10). When you are exchanging the handpiece, take precautions to avoid tangling the hoses during the transfer.

Instruments with Hinges
Instruments with hinges are designed to have an open/closed use. The most common hinged instruments are the rubber dam forceps, surgical forceps, orthodontic pliers, and scissors.
These instruments are held at their hinges and are transferred by directing their handles into the dentist's palm. The handles of scissors are positioned over the dentist's fingers (Fig. 33-11). Because hinged instruments are heavier than single instruments and a steadier hand may be needed, a two-handed transfer technique can be used (see Procedure 33-3).

Expanded Functions
Expanded function is the term used to refer to a specific intraoral skill that is completed as a procedure or as part of a procedure by the clinical dental assistant. The dentist delegates expanded functions to the dental assistant.
The expanded function concept allows dentists to use their time more effectively and efficiently. When legal expanded functions are delegated, studies have shown the following results:
• Productivity increases in the dental office.
• Less stress is placed on the dentist.
• The dentist has more available time and can see more patients.
• Each member of the dental team can focus on specific tasks.
Dental Supervision
The dentist is the person who is ultimately responsible for the patient's care and well-being, even if a dental function is delegated to the EFDA/RDA. The Dental Practice Act for each state dictates whether the expanded function must be directly or indirectly supervised by the dentist.
With direct supervision, the dentist must be in the same treatment area as the EFDA/RDA for the assistant to perform the function. With indirect supervision, the dentist must be in the dental office area but not necessarily present in the same treatment room as the EFDA/RDA; the dentist must be available to evaluate the assistant's procedure.
Working as the Operator
An Expanded-Function Dental Assistant (EFDA) is a clinical dental assistant who has acquired advanced training in clinical functions that have been approved by the Dental Practice Act within the state they are practicing, provided that she or he has met state requirements for these functions.
A Registered Dental Assistant (RDA) is a licensed credential. An RDA must graduate from an ADA accredited dental assisting program, pass a comprehensive written and clinical exam, and maintain their license.
Many states require evidence of additional education for advanced functions and mandate completion of a written or clinical examination that is given by the state licensing agency. (See the classification of state by state of legal functions on Evolve.)
A dental assistant who carries out an expanded function assumes the role of the operator. When this transition occurs, it is important for the dental assistant to be prepared and knowledgeable in specific areas such as operator positioning, mirror skills, use of a fulcrum, dental anatomy, cavity preparations, adaptation of instruments, and application of dental materials.
Expanded-function procedures that are most commonly delegated to the dental assistant are presented in their respective chapters throughout Modern Dental Assisting. The descriptions of these procedures are designed in a way that allows you to follow the sequence from laboratory to clinical situations. Remember to acquire the appropriate knowledge and skill before you begin the task.
Operator Positioning
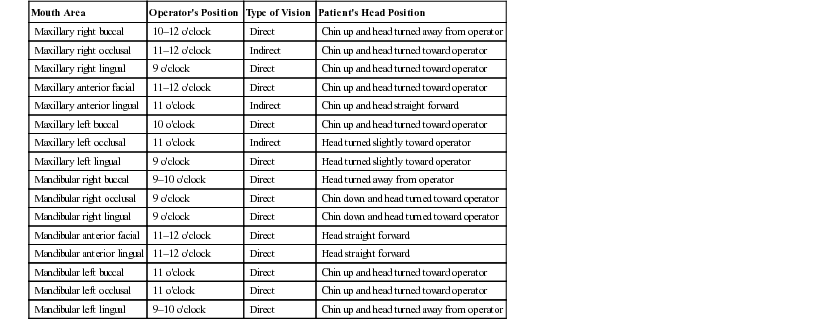
When working intraorally, it is important to follow the guidelines on positioning of the operator, as listed earlier in this chapter. Continued neglect of your own positioning will cause physical problems. Avoid positions that create unnecessary curvature of the spinal column or slumping of the shoulders. Table 33-1 provides information on suggested positioning of the operator when working in different areas of the mouth.
TABLE 33-1
Suggested Positioning of the Operator and the Patient According to Areas of the Mouth Being Treated
| Mouth Area | Operator's Position | Type of Vision | Patient's Head Position |
| Maxillary right buccal | 10–12 o'clock | Direct | Chin up and head turned away from operator |
| Maxillary right occlusal | 11–12 o'clock | Indirect | Chin up and head turned toward operator |
| Maxillary right lingual | 9 o'clock | Direct | Chin up and head turned toward operator |
| Maxillary anterior facial | 11–12 o'clock | Direct | Chin up and head turned toward operator |
| Maxillary anterior lingual | 11 o'clock | Indirect | Chin up and head straight forward |
| Maxillary left buccal | 10 o'clock | Direct | Chin up and head turned toward operator |
| Maxillary left occlusal | 11 o'clock | Indirect | Head turned slightly toward operator |
| Maxillary left lingual | 9 o'clock | Direct | Head turned slightly toward operator |
| Mandibular right buccal | 9–10 o'clock | Direct | Head turned away from operator |
| Mandibular right occlusal | 9 o'clock | Direct | Chin down and head turned toward operator |
| Mandibular right lingual | 9 o'clock | Direct | Chin down and head turned toward operator |
| Mandibular anterior facial | 11–12 o'clock | Direct | Head straight forward |
| Mandibular anterior lingual | 11–12 o'clock | Direct | Head straight forward |
| Mandibular left buccal | 11 o'clock | Direct | Chin up and head turned toward operator |
| Mandibular left occlusal | 11 o'clock | Direct | Chin up and head turned toward operator |
| Mandibular left lingual | 9–10 o'clock | Direct | Chin up and head turned away from operator |
Developing Mirror Skills
The mouth mirror is a vital instrument that is used when performing specific intraoral expanded functions. Chapter 34 provides a review of the mouth mirror and its uses.
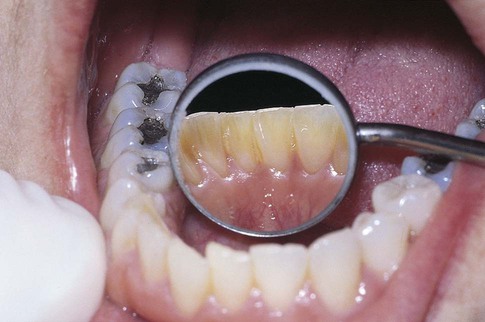
When the mouth mirror is used for indirect vision, it is critical to maintain posture, reduce eyestrain, and complete specific functions. Indirect vision describes viewing an object through the use of a mirror (Fig. 33-12). Much trial and error is involved in learning to use a mirror for indirect vision because the object is viewed in reverse (mirror image).
Establish a Working Position.
As the operator, you want to position yourself to gain a “straight-on” visual effect. Once you are positioned, have the patient slightly tip the head back, so the mandibular incisors are perpendicular to the floor. This allows you to position the mirror appropriately in relation to the tooth.
When you and the patient are situated properly, position the light. For the light to be used effectively for indirect vision, it should be placed from your nondominant shoulder; that is, if you are right-handed, position the light from your left side.
Establish Preferred Mirror-to-Tooth Position.
The mirror must be kept parallel to the working surface. Remember that you are looking at a mirror reflection, and any angle involved in use of the mirror will create distortion.
To create this parallel position, grasp the distal half of the mirror handle with the thumb, index finger, and middle finger. The farther away you hold the mirror, the more movement will become available for you to position yourself properly (see Procedure 33-4).
Using a Fulcrum
The operator will require more than just a proper grasp when using an instrument or a handpiece within the mouth. When you begin to use specific instruments intraorally, you will discover the importance of stabilizing your hand.
A fulcrum is a “finger rest” that stabilizes the hand (Fig. 33-13). Stabilizing the hand reduces the possibility that slipping or traumatizing of tissues in the mouth will occur. A good fulcrum should provide a stable resting area for the hand and should allow the operator to use wrist-forearm movement.
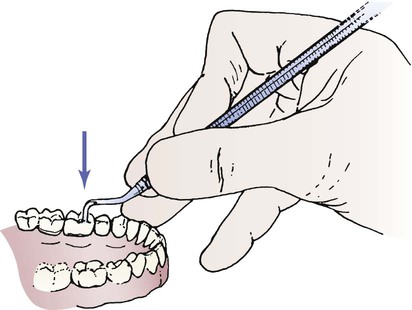
A fulcrum that is established within the mouth is referred to as an intraoral fulcrum. Whenever possible, the fulcrum should be positioned on the same arch on which you are working, preferably in the same quadrant. The preferred way to position your finger or hand is with the use of an intraoral fulcrum as close to the working area as possible. Examples of functions that require proper use of a fulcrum are:
Understanding Dental Anatomy
Knowledge of dental anatomy must be attained if you are to gain an understanding of a dental procedure and a delegated function. (See Chapter 12 for a review of tooth morphology.) The dental assistant must have in-depth knowledge of the following:
Understanding Cavity Preparations
Several expanded functions delegated to dental assistants are associated with operative dentistry and restoration of teeth. To know where to place a dental material and how to apply a matrix band and wedge, it is important for the assistant to understand specific cavity terms and classifications (see Chapter 28).
Adapting Instrumentation
When performing an expanded function, the EFDA/RDA uses instruments to complete the function. When working with instruments, you must be able to adapt the working end of the instrument to the tooth surface, and then to go one step farther by correctly moving the instrument.
Moving an instrument can be accomplished in two ways: (1) moving the hand, wrist, and forearm as a single unit for enhanced strength, and (2) moving the fingers back and forth in a more confined or precise area (see Procedure 33-5).
Applying Dental Materials
As a dental assistant, you have the skill to mix dental materials, and you know the materials that should appear before application. When you take on the function of placing a dental material into the mouth or cavity preparation, you also need to know the application process.
Each dental material is unique in how it is used and where it is placed in the mouth. See Chapters 43 through 47, which discuss specific dental materials and review the assistant's role in their application.
Evaluation of Expanded Functions
An important aspect of acquiring additional responsibilities as an EFDA/RDA is that you are accountable for your skills. It is important that the dentist and the dental assistant have the same expectations and goals in the evaluation process of delegated expanded functions.
You must attain the knowledge and skill needed for an expanded function not only through mastery of course material, but also by talking with the dentist with whom you practice. The dentist will use specific ways to make a temporary tooth, remove a matrix band, or place etchant. To learn the dentist's preferences, engage in open communication with the dentist when new expanded functions are delegated.
Procedure 33-1 Admitting and Seating of the Patient
Procedural Steps
1. Pleasantly greet the patient by name in the reception area. Introduce yourself, and request that the patient follow you to the treatment area.
2. Place the patient's personal items, such as a jacket or a handbag, in a safe place away from the procedure.
Note: Always keep personal items in patient's view for safe keeping.
3. Initiate conversation with the patient.
Purpose: Chatting about things other than the treatment may help the patient feel more comfortable and relaxed.
4. Ask if the patient has any questions that you can answer about treatment for the day. If you do not know the answer, say so and offer to discuss this with the dentist.
Purpose: Patients frequently ask the assistant questions about treatment that they are reluctant to ask the dentist. Your willingness to answer these questions helps to reassure the patient.
5. Ask the patient to sit on the side of the dental chair and then to swing his or her legs onto the base of the chair.

6. Lower or slide the chair arm into position.

7. Place the disposable patient napkin over the patient's chest, and clasp the corners using a napkin chain.

8. Inform the patient before you adjust the chair. Make adjustments slowly until the patient and the chair are in proper position for the planned procedure.
Note: Remember that the most common position for dental procedures is the supine position.
9. Position the operating light over the patient's chest, and turn it on.

10. Review once again that all treatment room preparations are organized and set out.
11. Wash hands, and put on personal protective equipment.
12. You are now ready to position yourself and begin the procedure.
Procedure 33-2  Transferring Instruments with the Single-Handed Technique

Procedural Steps
1. Pick up the instrument from the tray setup using the thumb, index finger, and middle finger of your left hand.
2. Grasp the instrument at the end of the handle or opposite the working end.
Note: Most instruments have two ends (double-ended instruments).
3. Transfer the instrument from the tray into the transfer zone, ensuring that the instrument is parallel to the instrument in the dentist's hand.
4. Using the last two fingers of your left hand, retrieve the used instrument from the dentist, tucking in the instrument toward the palm.

5. Position the new instrument firmly into the operator's fingers.
Note: When placing the instrument, make sure the working end is positioned correctly for the specific arch.
6. Place the used instrument back on the tray setup in its correct position of use.
Procedure 33-3 Transferring Instruments with the Two-Handed Technique
Procedural Steps
1. Using your right hand, grasp the instrument on the tray setup closer to the working end with your thumb and first two fingers.
2. With your left hand, retrieve the used instrument from the dentist, using the reverse palm grasp to hold the instrument before placing it back on the tray.
3. Deliver the new instrument to the dentist so that it is oriented with the working end in the appropriate position.
4. Return the used instrument to its proper position on the tray.
Procedure 33-4 Using the Dental Mirror Intraorally
Procedural Steps
1. Seat and position the patient in the dental chair in a supine position.
2. Turn on and position the dental light. Keep the light at arm's length away from the oral cavity, and have it coming slightly from your nondominant shoulder.
Purpose: The light is designed to illuminate the oral cavity. If the light is too close, it will not be as effective.
3. Position yourself as the operator.
Note: Remember to follow the guidelines for the operator when seated.
4. Grasp the dental mirror in your left hand (for a right-handed operator) using a pen grasp.

5. Position the dental mirror for indirect vision of the lingual aspect of the maxillary central incisors.

6. Position the dental mirror for light illumination on the lingual aspect of the mandibular central incisors.
7. Position the dental mirror for retraction to obtain better visualization.

Procedure 33-5 Using an Instrument Intraorally (Expanded Function) 
Procedural Steps
1. Seat and place the patient in the supine position.
2. Position yourself as the operator.
3. Adjust the dental light to illuminate the oral cavity.
4. Using a pen grasp, pick up the mirror with your nondominant hand and the explorer with your dominant hand.
Note: If you are right-handed, use your right hand to grasp the explorer.
5. Instruct your patient to open his or her mouth and turn toward or away from you, depending on the location of the mouth.
6. Establish a fulcrum close to the area that you will be exploring with your instrument.
7. Adapt the explorer to the most posterior tooth in the upper-right quadrant.
Note: A well-adapted instrument prevents damage to the tooth and surrounding tissue.
8. Follow around the tooth with the mirror and explorer, and examine all surfaces through visualization and touch.
Pageburst Integrated Resources
As part of your Pageburst Digital Book, you can access the following Integrated Resources:
Identify the Zones of the Clock for a Right-Handed Operator
Identify the Zones of the Clock for a Left-Handed Operator
Procedure Sequencing Exercises
Admitting and Seating of the Patient
Transferring Instruments with the Single-Handed Technique
Transferring Instruments with the Two-Handed Technique
Using the Dental Mirror Intraorally
Using an Instrument Intraorally
Transferring Instruments (Single-Handed)
Video Review Questions and Answers
Transferring Instruments (Single-Handed)
Video Scripts in English and Spanish
Transferring Instruments (Single-Handed)
Video with English and Spanish Subtitles
