Dental Hand Instruments
Electronic Resources
 Additional information related to content in Chapter 34 can be found on the companion Evolve Web site.
Learning Outcomes
On completion of this chapter, the student will be able to achieve the following objectives:
1. Pronounce, define, and spell the Key Terms.
2. Explain how to identify hand instruments, including:
• Describe the three parts of a dental hand instrument.
• Describe the instrument formula designed by G.V. Black.
3. Discuss the classification of instruments, including:
• Discuss the theory of placing an instrument in a specific sequence.
• List the examination instruments and their uses.
• List the types of hand (manual) cutting instruments and their uses.
• List the types of restorative instruments and their uses.
• Describe additional accessory instruments and items used in general dentistry.
• Describe the use of preset trays, tubs, and color-coding systems in dentistry.
Performance Outcomes
On completion of this chapter, the student will be able to meet competency standards in the following skills:
A wide variety of dental instruments are used in dentistry today. This chapter describes the design and purpose of dental instruments that are most commonly used by dentists for general restorative procedures.
Dental supply companies manufacture many variations of instruments for the purpose of accommodating personal preferences. As you study the instruments in this chapter, you will learn that each instrument is designed for a specific area of a tooth, for a specific type of dental material, and for the specific needs of the dentist.
Identifying Hand Instruments
Each type of dental instrument has a definite purpose in a dental procedure. Knowledge of each instrument is the responsibility of the clinical assistant when setting up for a procedure. The assistant will set up the instruments on the tray in a precise order of use and is expected to transfer from the tray setup when the operator signals for a new instrument.
Instruments are made of stainless steel, carbon steel, plastic, or a specialized metal. Because instruments withstand constant use, they must be able to endure sterilization procedures, as described in Chapter 21.
Instrument Number
The dental manufacturer assigns a number to most instruments (Fig. 34-1). This number is a universal representation of that instrument. The dentist will often refer to pliers and forceps by their number, rather than by their name. When studying the accessory instruments, orthodontic pliers and surgical forceps, it will be advantageous to learn both the number and the name.

Instrument Design
Hand instruments are designed with three specific parts: the handle, the shank, and the working end (Fig. 34-2).
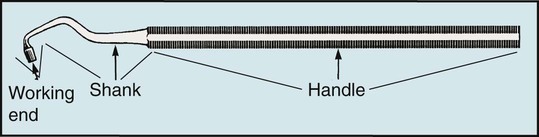
Handle
The handle portion of the instrument is where the operator grasps or holds the instrument. Handles are manufactured in various shapes and sizes; some handles are round, and others are hexagonal. They may be smooth or may have a grooved pattern for a better grasp. Instruments are now designed to have a larger handle in circumference, as well as padding for a better grip. As seen in writing instruments, this new padding provides the operator with greater control of the instrument and causes less fatigue on the fingers and the hand muscles.
Shank
The shank refers to the part of the instrument that attaches the working end to the handle. The bends or angles in the shank are designed so that an instrument can reach specific areas of the tooth. For example, instruments used interproximally have more angles in their shanks, whereas instruments used on the facial or buccal surface of a tooth have a straight shank.
The thickness and strength of the shank dictate the amount of pressure that can be applied to the instrument without breakage.
Working End
The working end refers to the portion of the instrument with a specific function. This end can have a point, blade, or nib. If the instrument has a nib, the area may be smooth or serrated.
Hand instruments are single or double ended. The double-ended instrument has a shank and a working end at both ends of the handle. Often, double-ended instruments are mirror images (reverse angles) of each other, allowing adaptation to all surfaces of the tooth. These are referred to as left and right instruments.
Black's Instrument Formula
As you have learned in previous chapters, G.V. Black played a significant role in developing many aspects of the way dentistry is practiced today. Black designed a formula that describes the angulations and dimensions of the working end of a hand instrument (Fig. 34-3). Hand cutting and scaling instruments have three sets of numbers that identify the blade's width, length, and angle. Table 34-1 presents the numbers and formulas used in the design of an instrument.
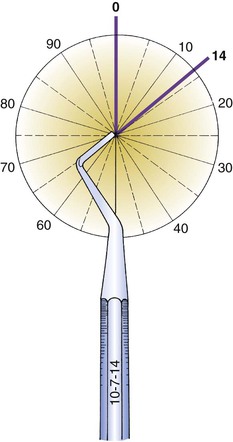
TABLE 34-1
Numbers in G.V. Black's Instrument Formula
| Sequence | Description |
| First number | Width of the blade in tenths of millimeters (e.g., if the number is 10, the width is 1 mm) |
| Second number | Length of the blade in millimeters (e.g., if the number is 7, the length is 7 mm) |
| Third number | Angle of blade in degrees in relation to the handle (e.g., if the number is 90, the working tip [blade] is at a 90-degree angle [right angle] to the handle) |
Instrument Classification
The instruments used in restorative dental procedures are classified into four categories: examination, hand cutting, restorative, and accessory. By learning the instruments by their classification, it will be easier to learn their names, uses, and sequencing for a procedure:
• Examination instruments allow the operator to thoroughly examine the health status of the oral cavity.
• Hand cutting instruments allow the operator to remove decay manually and to smooth, finish, and prepare the tooth structure for its final restoration.
• Restorative instruments allow the operator to “restore” a tooth by placing, condensing, and carving a dental material to the original anatomy of the tooth structure.
• Accessory instruments are miscellaneous instruments and items that are used to complete a procedure.
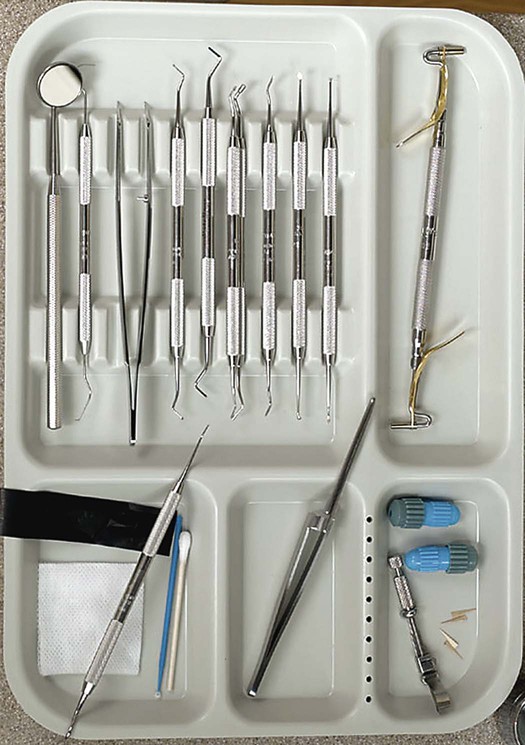
Instrument Sequence
A procedure tray is set up from left to right. This sequencing is based on how instruments are transferred and used throughout a dental procedure. Remember that the clinical assistant uses the left hand when transferring instruments. Therefore, the most frequently used instruments should be placed closer to the dentist for ready availability.
Again, the basic setup will be first on the tray, followed by additional examination instruments, then hand cutting instruments, and finally restorative instruments. Any accessory items will be situated on the tray or countertop in an organized and sequenced manner (Fig. 34-4).
Examination Instruments
Examination instruments are the most often utilized instruments on the tray. They can be used in procedures ranging from the dentist's checking a specific problem, to providing a thorough oral examination, to evaluating a restored tooth. Table 34-2 describes the examination instruments and their uses.
TABLE 34-2
Examination Instruments
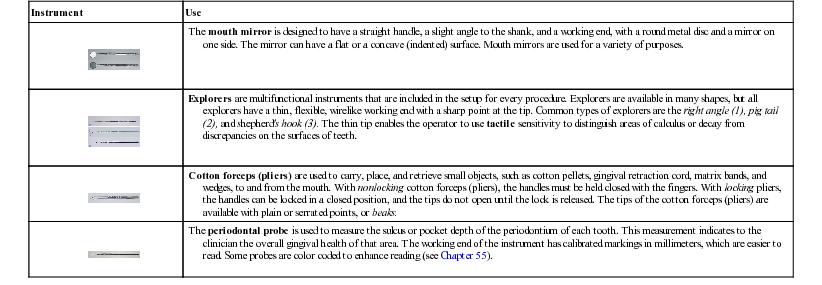
| Instrument | Use |
 | The mouth mirror is designed to have a straight handle, a slight angle to the shank, and a working end, with a round metal disc and a mirror on one side. The mirror can have a flat or a concave (indented) surface. Mouth mirrors are used for a variety of purposes. |
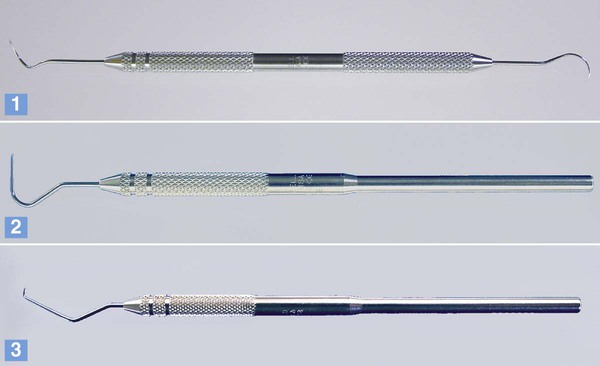 | Explorers are multifunctional instruments that are included in the setup for every procedure. Explorers are available in many shapes, but all explorers have a thin, flexible, wirelike working end with a sharp point at the tip. Common types of explorers are the right angle (1), pig tail (2), and shepherd's hook (3). The thin tip enables the operator to use tactile sensitivity to distinguish areas of calculus or decay from discrepancies on the surfaces of teeth. |
 | Cotton forceps (pliers) are used to carry, place, and retrieve small objects, such as cotton pellets, gingival retraction cord, matrix bands, and wedges, to and from the mouth. With nonlocking cotton forceps (pliers), the handles must be held closed with the fingers. With locking pliers, the handles can be locked in a closed position, and the tips do not open until the lock is released. The tips of the cotton forceps (pliers) are available with plain or serrated points, or beaks. |
 | The periodontal probe is used to measure the sulcus or pocket depth of the periodontium of each tooth. This measurement indicates to the clinician the overall gingival health of that area. The working end of the instrument has calibrated markings in millimeters, which are easier to read. Some probes are color coded to enhance reading (see Chapter 55). |
Photos from Boyd LRB: Dental instruments: a pocket guide, ed 5, St Louis, 2015, Saunders.
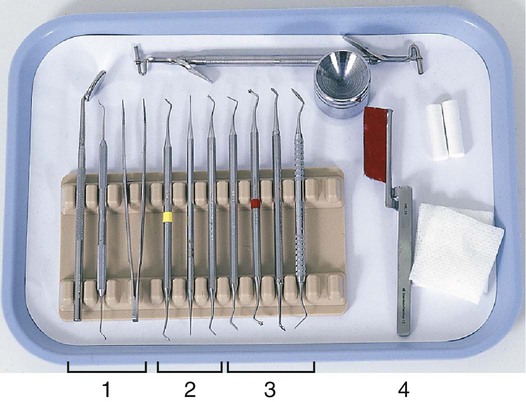
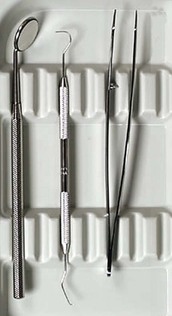
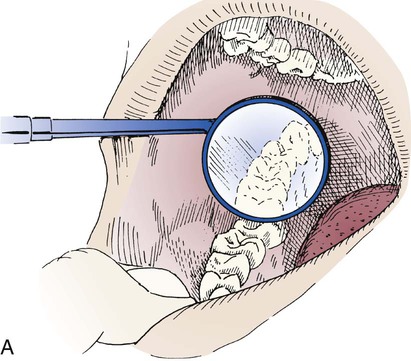
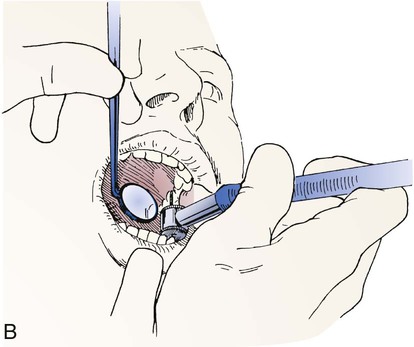
Basic Setup
The mouth mirror, the explorer, and cotton forceps (pliers) are to be “set out” for every procedure. These instruments are referred to as the basic setup (Fig. 34-5). Fig. 34-6 provides descriptions of the four major uses of the mouth mirror. When the tray setup is prepared from left to right, the mirror, the explorer, and the cotton forceps (pliers) are the first three instruments.
The mirror and the explorer are to be transferred simultaneously with the use of a two-handed transfer. It is best to position the explorer first and the mirror second on the tray. This setup prevents crossover of your hands when you are transferring the two instruments to the dentist (Fig. 34-7).

Procedure 34-1 reviews steps to be followed in identifying examination instruments.
 3 What classification of instruments is used to remove decay manually?
4. What are the four uses of the mouth mirror?
5. Describe the main feature of the working end of an explorer.
6. What three instruments make up the basic setup?
7. Give the name of the instrument that is used to measure the sulcus of a tooth.
Hand Cutting Instruments
Hand cutting instruments represent the next group of instruments placed on the tray setup after the examination instruments. These instruments allow the dentist to manually remove decayed tooth structure, to smooth cavity walls and floors of the preparation, and to place any bevels or retention grooves to hold the dental material within the tooth. Table 34-3 shows the excavator, hoe, chisel, hatchet, and gingival margin trimmer and their uses.
TABLE 34-3
Hand (Manual) Cutting Instruments
| Instrument | Instrument in Use | Use |
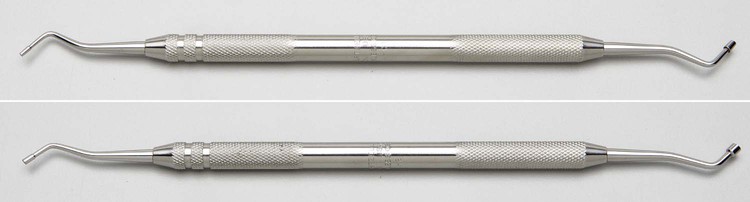
 |  | The excavator is one of the most versatile instruments on the tray setup. Excavators have a working end that is circular or elongated. The two most commonly used excavators are the spoon excavator and the black spoon. The spoon excavator (1) is used for removal of soft dentin, debris, and decay from the tooth; the black spoon (2) has a flat appearance but is used for the same purposes. |
 |  | The hoe is similar in appearance to the garden tool. The blade is almost perpendicular to the handle. The hoe is used to prepare the tooth and to plane the walls and floors of the tooth preparation with a push-pull action. |
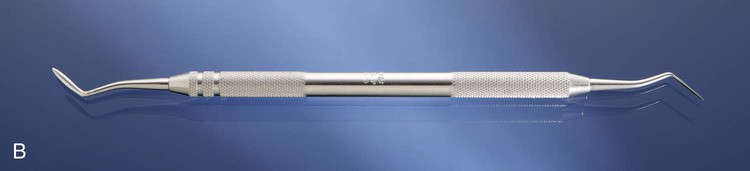
    |  | The chisel has a straight or angled shank and a single-beveled cutting edge. Common types include the straight chisel (A), the bin-angle chisel (B), the Wedelstaedt chisel (C), and the angle-former chisel (D). Chisels are used most often to break down the enamel margin of the tooth preparation, to form sharp lines and point angles, and to place retention grooves. |
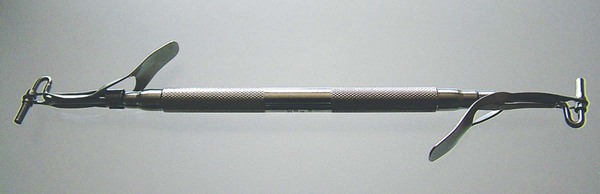
 |  | Hatchets are similar in appearance to wood hatchets. The cutting edge is parallel to the long axis of the handle. Hatchets are used to cut enamel and to smooth the walls and floors of the tooth preparation. |
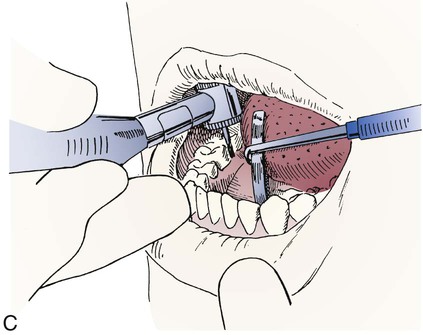
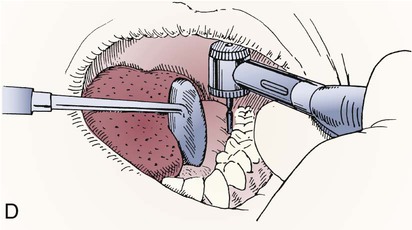
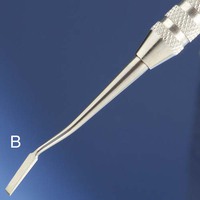
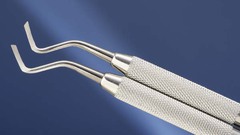 |  | The gingival margin trimmer is a type of chisel that has been modified so that the blade is curved slightly for mesial or distal access into the preparation. Gingival margin trimmers are used to cut enamel and to place bevels along the gingival enamel margins of the preparation. |
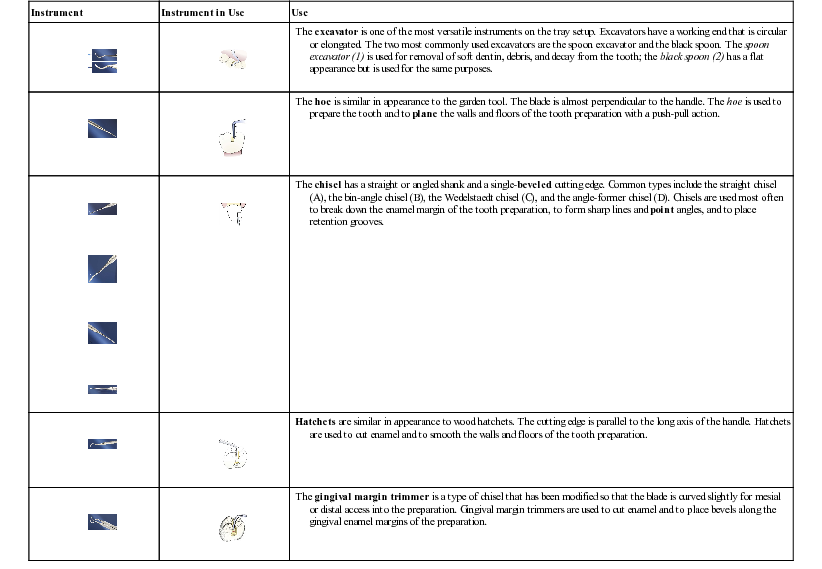
Photos from Boyd LRB: Dental instruments: a pocket guide, ed 5, St Louis, 2015, Saunders; drawings from Baum L, Phillips RW, Lund MR: Textbook of operative dentistry, ed 3, Philadelphia, 1995, Saunders.
Dentists will have a specific preference as to what instruments they want included in this section. The dentist will use a combination of rotary instruments and manual cutting instruments interchangeably throughout a procedure.
Procedure 34-2 reviews steps to be followed in identifying hand cutting instruments.
Restorative Instruments
Restorative instruments are used to place, condense, and carve the restorative dental materials back to reflect the normal anatomy of that tooth. Table 34-4 describes the restorative instruments most commonly used. Most dentists use these instruments in a specific sequence. Instruments selected for the tray setup vary with the dentist's preferences and the type of dental materials selected for the procedure.
TABLE 34-4
Restorative Instruments
| Instrument | Use |
 | Amalgam carrier is a double-ended instrument designed with wells on either end that is used to pack freshly mixed amalgam and carry it to the prepared tooth. Most amalgam carriers are designed to hold a large increment of amalgam at one end and a smaller increment at the opposite end. The dental assistant uses the amalgam carrier to carry an increment of amalgam, then transfers the carrier to the dentist or directly places the amalgam into the prepared tooth. |
 | Condensers have a flat working end that can be smooth or serrated; they come in varying sizes to accommodate the size of the preparation. To enable the operator to reach all areas of the preparation, the shank of the instrument is angled. The amalgam condenser, also known as a plugger, is used to condense (pack down) freshly placed amalgam into the preparation. |
   | A burnisher is an instrument with a smooth working end. The rounded working end is available in many shapes to accomplish different tasks. Common types include the football (A), ball (B), acorn (C), T-ball (D), and Beavertail (E). Burnishers are routinely used to smooth the surface of a freshly placed amalgam restoration. |
   | Carvers are designed with a sharp edge on the working end to remove excess material, to contour surfaces, and to carve anatomy back into the amalgam or intermediate restoration before it hardens. Various styles of carvers are available: A, discoid-cleoid carver is especially useful for carving of the occlusal surfaces. B, Hollenback carver is used to contour or remove excess material interproximally. C, amalgam knife is designed with a sharp edge for the removal of excess restorative material along the margin where the material and the tooth structure meet. The knife has several angles in the shank and working end that enable the operator to reach specific areas of a tooth, most often interproximal areas. |
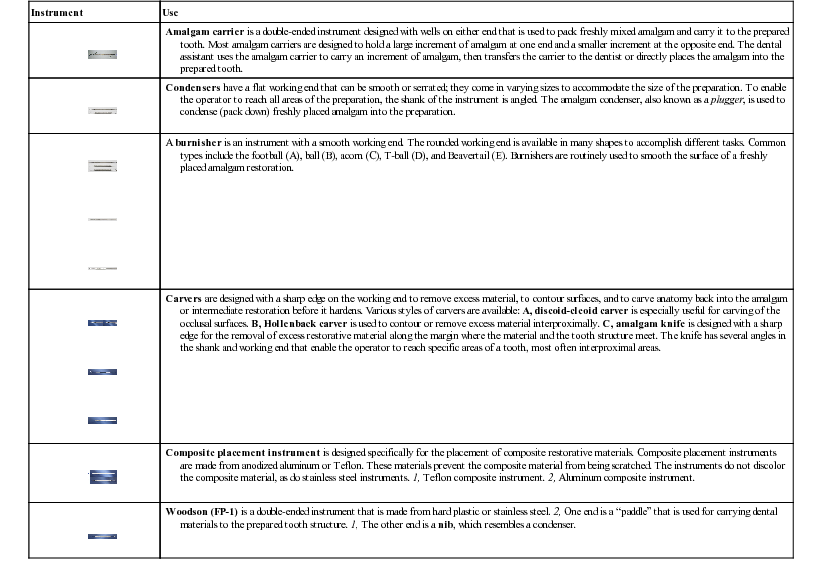
 | Composite placement instrument is designed specifically for the placement of composite restorative materials. Composite placement instruments are made from anodized aluminum or Teflon. These materials prevent the composite material from being scratched. The instruments do not discolor the composite material, as do stainless steel instruments. 1, Teflon composite instrument. 2, Aluminum composite instrument. |
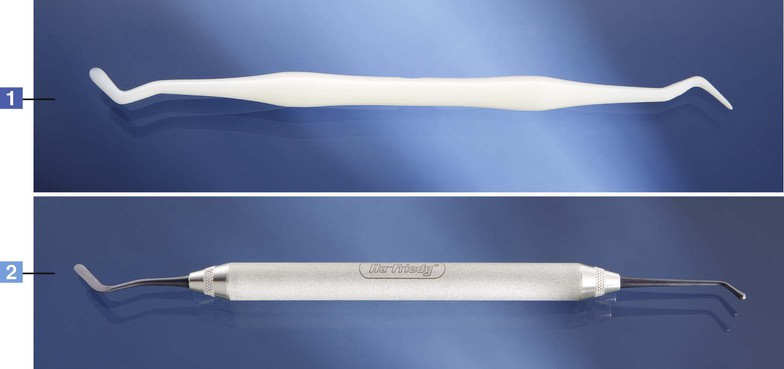
 | Woodson (FP-1) is a double-ended instrument that is made from hard plastic or stainless steel. 2, One end is a “paddle” that is used for carrying dental materials to the prepared tooth structure. 1, The other end is a nib, which resembles a condenser. |
Photos from Boyd LRB: Dental instruments: a pocket guide, ed 5, St Louis, 2015, Saunders.
Procedure 34-3 reviews steps to be followed in identifying restorative instruments.
Accessory Instruments and Items
Accessory items are not necessarily included in the tray setup but can be “pulled” from the dental cabinets or tub to be used for many procedures. Remember that when additional items are used for a procedure, you must follow proper infection control guidelines regarding disinfection or sterilization of the item before you place it back into the cabinet.
Table 34-5 introduces various accessory instruments most commonly used in a restorative procedure.
TABLE 34-5
Accessory Instruments and Items
| Instrument/Item | Use |
 | Spatulas are used for most procedures in which a dental material is involved. Flexible mixing spatula is single-ended, made of stainless steel, comes in two sizes (#15, #24), and is used to mix liners, bases, and cements. |
 | Scissors most often associated with restorative dental procedures are crown and bridge scissors, which are available with curved or straight blades. They are useful for many tasks, such as cutting dental dam material, retraction cord, and stainless steel crowns. |
 | Amalgam well is made of metal and is weighted with a nonskid base. The newly mixed amalgam is placed in the well; it is then picked up in the carrier for transfer to the dentist. |
 | Howe pliers, also referred to as 110 pliers, are versatile pliers that can be used in many procedures for many tasks. Their design is straight and includes beaks that have a flat rounded end, making them useful for holding items. Howe pliers are useful for carrying cotton products to and from the oral cavity, for removing the matrix band, and for placing and removing the wedge. |
 | Articulating paper holder is used to hold and carry articulating paper to the mouth. This carbon paper material varies in thickness and color and is used to check a patient's “bite” following placement of a new restoration, crown, bridge, or denture. This mark must appear equal in distribution across the occlusal surface of the tooth. If one area appears lighter or darker, the patient's bite is incorrect and will need to be adjusted. |
Photos from Boyd LRB: Dental instruments: a pocket guide, ed 5, St Louis, 2015, Saunders; Courtesy Hu-Friedy Manufacturing Co., LLC, Chicago, IL.
Procedure 34-4 reviews steps to be followed in identifying accessory instruments and items.
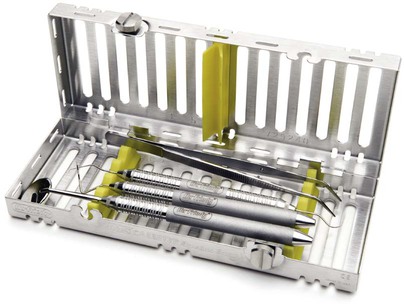
Preset Cassettes (Trays)
The way to maintain organization and be prepared for a procedure is to have hand instruments in a preset cassette (Fig. 34-8). A dental practice will have sterilized cassettes prepared for most procedures; examples would include restorative, preventive, crown and bridge, surgical. The sterile cassette is taken to the treatment area for preparation before the patient is seated.
If instruments are sterilized and maintained in either pouches or packages, they will need to be set out and organized in a tray for a procedure. Trays are fabricated in metal or plastic and are to be cleaned and disinfected after each use (Fig. 34-9).
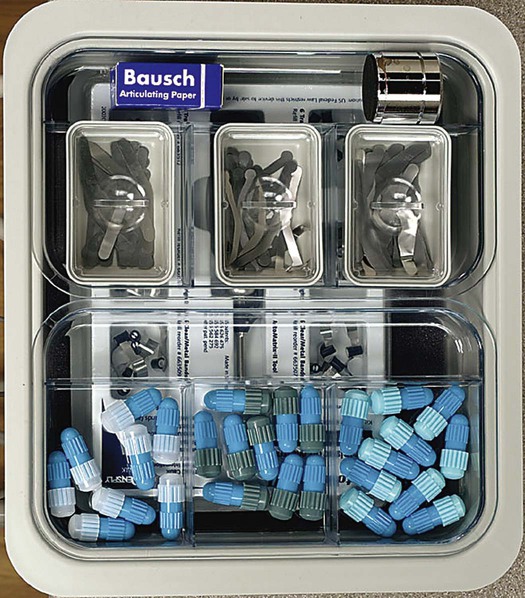
Storage Tubs
Supplies and dental materials for specific procedures can be stored in a covered plastic tub within each operatory (Fig. 34-10). The combination is known as the tub and tray system.
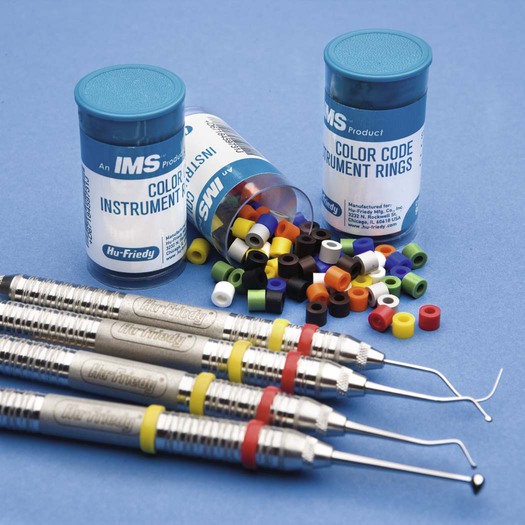
Color-Coding Systems
Color coding is one of the most convenient and efficient ways to organize instruments and supplies for specific procedures. The ways in which color coding can be used are limited only by the user's creativity.
The instrument tray and the tub of related materials can be used to indicate the procedure. For example, if yellow is the color chosen to indicate amalgam restorations, each of the instruments has a yellow band, the tray has a yellow label, and a yellow tub is used to transport related materials (Fig. 34-11).
Procedure 34-1 Identifying Examination Instruments 
Equipment and Supplies
See Table 34-2 for examples of instruments.
Procedure 34-2 Identifying Hand (Manual) Cutting Instruments
Equipment and Supplies
See Table 34-3 for examples of instruments.
Procedure 34-3 Identifying Restorative Instruments
Equipment and Supplies
See Table 34-4 for examples of instruments.
Procedure 34-4 Identifying Accessory Instruments and Items
Equipment and Supplies
See Table 34-5 for examples of instruments.
Pageburst Integrated Resources
As part of your Pageburst Digital Book, you can access the following Integrated Resources:
Procedure Sequencing Exercises
Identifying Examination Instruments
Identifying Hand (Manual) Cutting Instruments
Identifying Restorative Instruments
