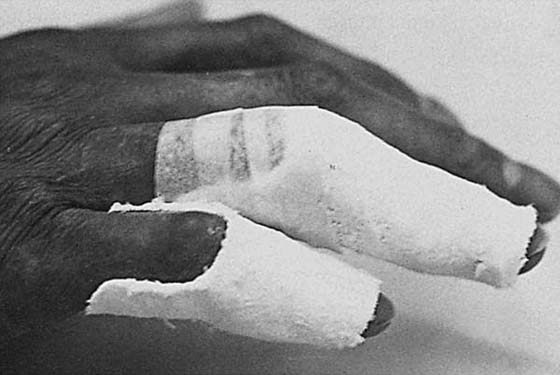
Figure 125-1 Progressive casting of index IP joint into extension.
PATHOMECHANICS: INEVITABILITY OF GRADUALNESS
INDICATIONS FOR SERIAL PLASTER CASTING OR ORTHOTIC POSITIONING
ADVANTAGES OF CASTING FOR TISSUE REMODELING
PLASTER CASTING FOR DORSAL PIP JOINT WOUNDS OR WEBBED FINGERS
CASTING FOR CORRECTION OF MORE THAN ONE JOINT IN TWO PLANES OF MOVEMENT: FLEXION AND EXTENSION
CASTING FOR DYNAMIC TRANSFER OF MOMENT
CASTING OF OTHER JOINTS AND MUSCLE-TENDON UNITS
The technique of gentle extension, unfolding, and holding of tissues at the “ends of their elastic limit”—not stretching—results in “new growth” for soft tissue remodeling.
Contracted joints and soft tissues can be remodeled and contractures corrected through the serial application of plaster casts or orthoses that hold the shortened tissue or joint at the end of its available length or range of motion (ROM) for a prolonged period of time. Through serial reapplication of the plaster cast or orthosis the tissue gradually elongates, resulting in correction of joint and soft tissue contractures and/or muscle-tendon unit tightness.1,2
Serial plaster orthotic positioning or casting for contracted joints or soft tissues began with Paul Brand in his use of plaster casting of clubfeet in children. He began to understand that the initial benefits of forceful correction with “wedge casting” were often undone by deep tissue scarring and later tissue contraction, and was sure that there must be a way of correcting a joint deformity without such damaging force on the tissues and on the child. Once Brand relocated from medical school in England to India, he observed there that adults with clubfeet that had never been corrected still had supple joints.
Under Brand’s direction, an infant with a clubfoot deformity was put to nursing while plaster of Paris was placed in single layers directly on the foot to be corrected. The foot was gradually moved into a corrective position while the plaster was setting until the child turned his or her eyes and “looked.” Correction of the foot always would stop before the point at which the child would begin to cry signaling distress. The foot would be held in this position gently but firmly, and the plaster allowed to set. Frequent successive recasting using the same procedure resulted in correction of the deformity—and a healthy joint! The method was so successful that the idea was applied to the interphalangeal (IP) joints of severely clawed hands found in patients with Hansen’s disease (leprosy) at The New Life Center established by Brand, in Vellore, India.2-4 The technique met with equal success in these patients, who were thought beyond hope from medical intervention. The technique has continued to be successful for any small or large contracted joint or soft tissue. It works to lengthen the skin and contracted soft tissue, including vessels and nerves, and muscle-tendon units, for single or multiple joints. Plaster’s conforming properties make it ideal for orthotic positioning, since it distributes forces throughout the length of the cast, eliminating points of pressure under the cast.
The serial casting/positioning technique described by Brand is not one of progressive “stretching” but of “growth of tissue.” Forceful stretching of soft tissue can cause tissue damage resulting in inflammation and later scar formation. The remodeling process, in contrast, takes time, thus the contracted joint or tissue must be held in a lengthened position for a period of time. The contracted tissues are stimulated to gradually elongate by being held at the maximum possible length. Each day or every other day, the cast or orthosis is removed and the joint or soft tissue can then be repositioned at a greater length. Through this serial casting or positioning method, the joint, soft tissue or muscle-tendon unit contracture may be gradually corrected over a period of days or weeks. In support of this approach, Eppenstein et al.5 documented research demonstrating that low-load, long-duration tension is optimal in reducing the risk of tearing soft tissue, increasing residual elongation, and providing more permanent realignment of collagen fibers into a more parallel orientation.
Steve Kolumban,6,7 a therapist working with Brand at the Christian Medical College and Hospital in Vellore, India, compared night orthotic positioning with regular physiotherapy technique in 24 outpatients with contractures of the IP joints. Regular physiotherapy consisted of wax baths, oil massage, and exercise (passive and active-assistive). At the end of the study the group with the orthotic positioning had significantly superior results. The percentage of degrees straightened from the total possible number was 45.7% with orthotic positioning and 0.9% without it. Of the 25 fingers in the group without orthotic positioning, 12 joints ended with a greater contracture than that with which they began.
Later Kolumban8 compared cylinder serial plaster casting with dynamic orthotic positioning. The study matched fingers from both groups into pairs of six variables: age, contracture angle, joint resiliency, length of the finger, length of orthotic positioning, and applied straightening force. A straightening force of 250 g was applied in both methods of positioning. At the end of the study the results showed a strong indication that the casting was superior to dynamic positioning. Of 26 patients with 52 contracted IP joints, the percentage of degrees straightened from the total possible with serial cylinder plaster casting was 47.8% and with dynamic orthotic positioning, 34.9%. Important to note is that there were no injuries to the involved tissues (many of the patients had anesthetic hands) resulting from the plaster casting, and there were seven injuries with dynamic orthotic positioning.
The technique was adopted by hand surgeons in England and used for joint and tendon contractures after war injuries.9 Brand brought the technique to the United States in the treatment of patients with Hansen’s disease when he relocated to the U.S. Public Health Service Hospital in Carville, Louisiana, and in his worldwide tours and lectures. Under his direction in 1973, I used the serial cylinder casting technique for IP joints of the hand, and adapted it to be removable at the New Orleans U.S. Public Health Service Hospital for seamen. In 1976, having relocated to the Center, I introduced the casting techniques to the Philadelphia Hand Center, Ltd., in Pennsylvania, for patients with a wide variety of conditions resulting in joint contractures of the hand. Conditions in which the casting has been used successfully to reduce finger contractures include arthritis, reflex sympathetic dystrophy, Dupuytren’s contracture, congenital contractures, joint dislocations, burns, boutonnière deformities, swan-neck deformities, and contractures after fractures and tendon repairs.
Brand and Kolumban, as well as Eppenstein et al., emphasized the importance of pre- and postcasting measurements, with fixed repeatable positions for measurement. If active and passive finger extension is recorded before casting with the wrist in neutral, the same position should be used postcasting. In assessing finger stiffness and contracture, Brand used passive controlled tension measurements with the wrist in flexion, neutral, and extension to differentiate joint tightness, versus muscle-tendon unit tightness. Before using serial casting or orthotic positioning, a therapist should determine the underlying cause of the limitation, whether joint contracture, muscle contracture, nerve injury, or spasticity.
The use of serial plaster casting or orthotic positioning for progressive tissue remodeling works on large joints and on muscle-tendon units, and is particularly suited to small joint contractures, where other forms of positioning often fail. Most therapists know that if a full range of motion (ROM) can be achieved by active exercises alone, then there is no reason for an orthosis. A skilled therapist can use specific exercise and positioning, or teach the patient to use these to maintain or restore active movement and balance to the joints. For patients with mild contractures, often a simple augmentation to therapy using night orthoses or dynamic mobilization orthoses is all that is necessary. But for more significant contractures, serial plaster casting usually works better than other forms of orthotic positioning, because tension in the tissues is maintained over 24 hours to effect a change in length of the tissue.
Unless there is a bony block or joint dislocation, serial casting can be successful in the treatment of some old fixed deformities where other orthotic positioning is not. In fact, it is indicated when the use of dynamic traction fails. Dynamic mobilization orthotic positioning may come out of adjustment and has to be continually checked to ensure that traction is at the angle and the specific gram traction desired. Rubber bands used for traction fatigue quickly and must be changed frequently. Even with controlled slow traction, the tissues often will not tolerate enough traction to overcome long-standing contracture or recurrence of joint stiffness.
Swelling is never increased by the plaster cast and is often decreased because the cast keeps the joint still for periods of rest. In contrast, dynamic mobilization orthotic positioning can cause an increase in swelling when the force is too high or the finger cuff or straps are too tight. Because casting does not forcefully stretch the tissue, pain is not increased by serial casting and is often decreased. This is particularly important in patients with complex regional pain syndrome, in whom even a slight increase in pain is a step in the wrong direction. Cylinder casting can be used over lacerations and ulcers. The technique has been found useful with insensitive fingers in particular, so that they can heal without further trauma. Plaster allows the skin underneath to breathe and does not macerate the skin if applied directly, and may be better tolerated than other positioning materials. The plaster allows some air to the wound and absorbs tissue exudates.
Used correctly, casting is a nontraumatic way of gaining additional flexion or extension range. Circulation of the finger is always checked after cast application to make sure the vascular supply is not compromised. The patient is always instructed to remove the cast later if it appears too tight, but this is rarely necessary.
Plaster of Paris (amorphous anhydride calcium sulfate) is readily available and cost-effective, making it adaptable to a variety of circumstances including hospital wards and intensive care units. When water is added to the plaster it can be conformed precisely to the target joint or tissue in the desired position. Once it hardens the plaster orthosis or cast maintains the position securely. Johnson & Johnson developed the Specialist Plaster Bandage, which is recommended due to its fast setting and ease of casting (Johnson & Johnson, Smith & Nephew Rolyan, and Carpace and Lohmann).10 The types of plaster of Paris used are fast-setting (5–8 minutes) and extra-fast-setting (2–4 minutes). Gypsona was used by Brand and still liked by many clinicians; however, its product literature warns against direct application to the skin due to heat produced during setting. The clinician needs to carefully read all product literature and follow instructions for safe use of any material.11-13
One needs to be aware of the thermal effect of plaster during setting. The temperature of the water used for wetting the plaster should be cool, since hot water can increase temperature on setting of the plaster.11,13 Generally temperature peaks between 5 to 15 minutes after application. Heat produced is somewhat relative to the number of layers used, thus very thin layers can usually be applied directly to the skin. For finger casts, no more than one to two layers in what Brand called “eggshell casting” are needed.2 For wrist and forearm casts, six to eight layers, slightly padded, are usually sufficient.5,14 Strength can be improved by additional accordion-type folds or layers added specifically at the wrist or thumb. While allergic reactions are relatively rare, the clinician needs to be mindful of the possibility from plaster or any material placed in contact with the skin. During and after casting one should routinely monitor the skin for possible irritation.12
Serial cylinder casting can be used to increase joint ROM in either flexion or extension and is most commonly applied to the proximal IP (PIP) joint. Optimally the cast is changed every other day (Fig. 125-1). It is important to mobilize joints briefly during cast changes. Paraffin wax or other thermal modalities can be used, followed by a brief session of manual exercise and mobilization before the cast is reapplied. It is expected that with each cast change the involved tissues or joint(s) can be positioned further in the desired direction of flexion or extension.
The method of application depends upon the joint being treated. Only two layers of plaster are needed for a finger joint if made circumferential, and one layer combined with a volar or dorsal orthosis in two stages. A single 1-inch strip of plaster about 1 foot long is all that is needed for most fingers. Padding is not used or is limited to a wisp of cotton over an area of concern of pressure. It is desirable that the plaster sticks slightly to the skin, as this keeps the skin from moving under the cast and causing shear, and distributes pressure along the length of the cast, rather than joint prominences.
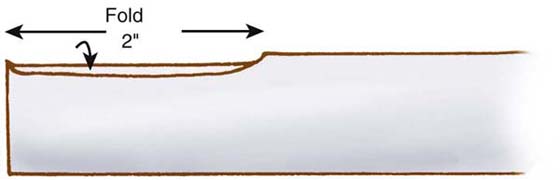
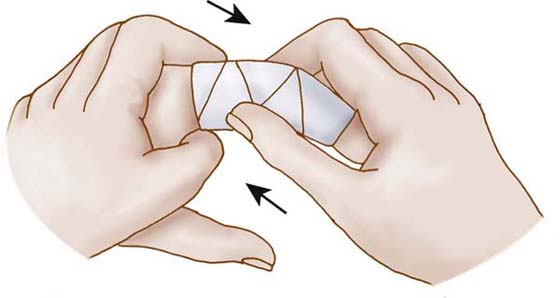
Non-gypsona plaster of desired length is dipped in water (usually room temperature) and dried on a paper towel slightly. This will remove excess water, makes it easier to handle and wrap, and minimizes drip. The cast can be made all in one piece wrapped distally from the base to the tip of the finger, or in two pieces cut from the 1-inch-wide plaster in 12- to 15-inch lengths. Start with folding the gauze plaster edge that will first be in contact with the finger about the width of the finger (Fig. 125-2). Begin wrapping from the base of the finger, in an overlapping fashion (Fig. 125-3A and B). Then reverse, fold the gauze plaster edge the width of a finger, and start the second wrapping from the tip of the finger to just beyond the level of the IP joint. In this way the last bit of cast material can often be placed just under the IP joint for a little extra support (while not making the cast too thick). If it is desirable to be able to remove the cast, the very tip of the cast can be left open. In either method, just before the strip of plaster is applied to the hand, a slight fold on the edge of the plaster strip will make a smooth rather than a rough edge against the finger web and volar distal edge of the cast. This slight fold can be made wherever there will be an edge to the cast.
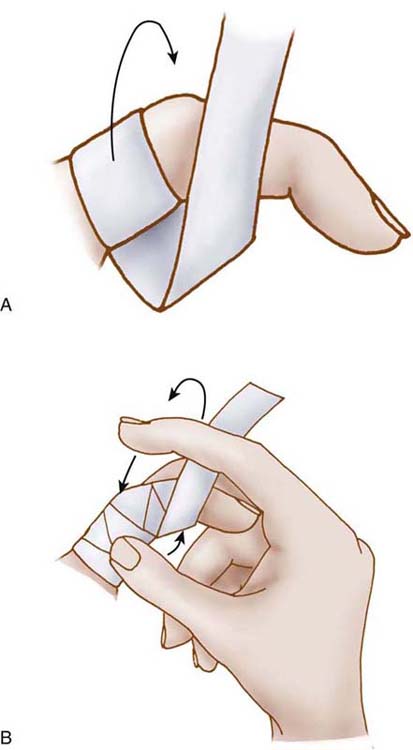
Figure 125-3 A, Wrapping of plaster from proximal to distal. Finger may be wrapped distal to proximal if desired, but this is usually not necessary because plaster is for positioning of the joint only and wrapping should not compress tissue. B, Wrapping of finger while it is being supported in position.
The plaster is wrapped just proximal to the distal IP (DIP) joint crease if later DIP joint movement is desired, and it is wrapped past the DIP joint crease in the following cases:
The profundus tendon is tight when casting for extension.
The extensor mechanism is tight when casting for flexion.
The improvement in ROM is also desired at the DIP joint.
When the plaster starts to become warm it is beginning to set. At this point the plaster should not be moved, but allowed to set.
While wrapping the cast, the joint or joints are moved gently into the corrected position. While the plaster sets, the position is held and the plaster smoothed with a continuous motion of the fingers, which helps to avoid pressure areas in the cast. The finger is supported in extension while wrapping if the cast is being used to increase extension, and in flexion while wrapping if the goal is to increase IP joint flexion. A useful technique after the cast is wrapped is to maintain a corrective tension on the joint as the cast sets. This is accomplished by stabilizing the metacarpophalangeal (MCP) joint in 90-degree flexion, while the other hand lightly pinches the tip of the finger being casted. In this way, one can effectively apply a distraction to straighten the PIP joint. This distraction is enough to gently elongate the finger (Fig. 125-4).
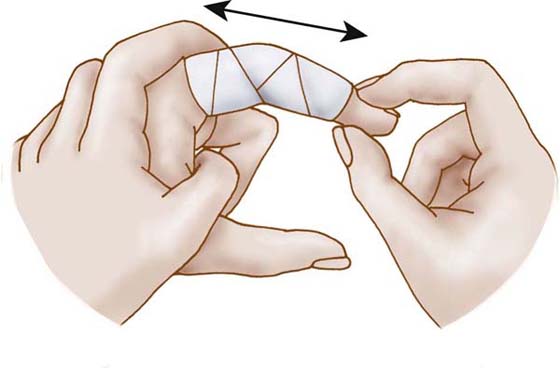
Figure 125-4 Positioning of finger for traction. Care should be taken to avoid point pressure on the plaster.
If one applies force to the joint during casting, joint and skin irritation may result and potentially more joint stiffness. So it is better to start with only a very mild elongation of the tissue, and gently increase tension with successive casts once the tissue tolerance is determined.
The most damaging force to skin is not from direct pressure but from shear force when the skin moves in a lateral direction relative to an edge or normal pressure. Plaster that is not padded will conform and adhere slightly to the skin, preventing shear force under the cast when the fingers are moved. Wounds are covered very lightly.
If irritation has developed over the IP joint, casting technique should be examined. A small, thin fluff of cotton may be placed over the dorsum of the joint before it is recasted, and this slightly relieves the cast in this area. Occasionally, when the dorsal skin over the IP joint is fragile, a small amount of padding is required for successful casting. For patients with fragile skin, small, thin fluffs of cotton also may be added at the distal and proximal volar edges of the cast when the finger is casted.
The casting is most effective if it is left on continually and changed every other day. It must be changed at least twice a week and the joints exercised to maintain their full mobility. After exercise, a new cast can be applied in what will probably be a few degrees more in the desired direction of either flexion or extension. The casting procedure may be continued as long as improvement is noted, and discontinued when measurements plateau.
Cylinder casts can easily be removed by immersing the hand in water, finding the edge, and unwrapping, or by squeezing the cast from side to side. Alternatively, the cast that has not been soaked can be cut along its dorsal surface with thin blunt-tipped scissors. Suture scissors or wire snips (with blunted tips) work well to remove the cast.
Occasions arise when it is desirable to make the serial cylinder casts removable by the patient for exercise. The most obvious cases are those in which it is most important to move tendons frequently to prevent adhesions, for example, following tendon repair or when the patient can attend therapy only infrequently.15,16 By making the cylinder casts removable, one can often improve flexion ROM by exercise during cast change, while using the technique for casting of the finger into extension.
A cast can be made removable if removed and replaced immediately after it is firmly set. After the cast is firm, one should grasp along the length of the cast and gently loosen and remove it from the finger. It is important to note that the cast must be removed at this point if it is going to be removable for exercise of the joint (Fig. 125-5). The finger and cast should be continually checked for points of pressure. If necessary, the edge of the cast can be trimmed slightly for clearance of MCP or DIP joint flexion. The examiner should clean the excess plaster off the finger, optionally apply a light coat of lanolin to the finger, and replace, or allow the patient to replace the cast.
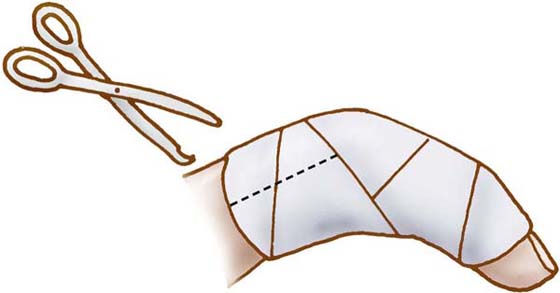
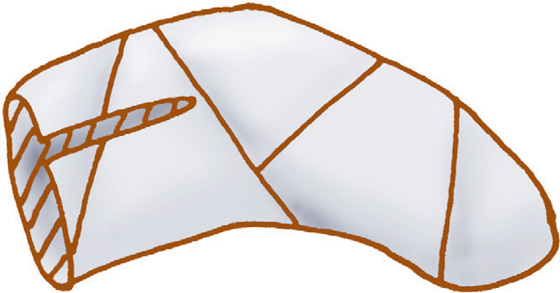
If the IP joint is too swollen to allow easy removal of the cast, a small cut can be made in the dorsal radial portion of the cast at the proximal phalanx. This cut is extended toward the IP joint until the cast can be removed (Fig. 125-6). After the cast is removed, the cut edges can be trimmed slightly and the cast replaced without the finger joint losing correction (Fig. 125-7).
If the finger joint is in a position of too much flexion to allow removal of the cast, one can make a window in the cast with scissors by first making cuts in the dorsoradial and dorsoulnar sides of the cast at the proximal phalanx. The flap is lifted, and the cast is removed (Fig. 125-8A-D). The flap is trimmed with scissors, and the cast can then be replaced and secured at the proximal phalanx with a small strip of paper tape (Fig. 125-9).
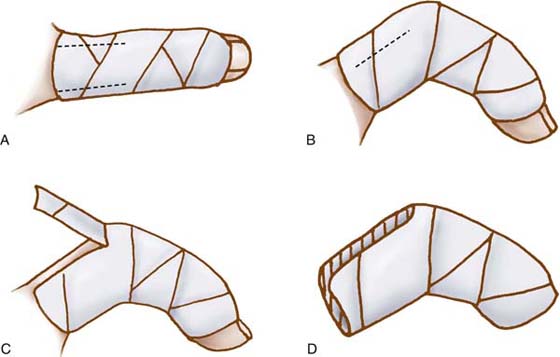
Figure 125-8 Cast removal for severely flexed IP joint. A, Dorsal view; B, lateral view; C, flap; D, cast.
The removable cast can be made to last an indefinite time by being coated with lacquer or fingernail polish after the plaster is dry. After joint correction is achieved, the final removable cast can be worn as a retainer at night until after that period of time when joint contracture tends to recur. Thermoplastic can be used as a final cast but is not as conforming as plaster.
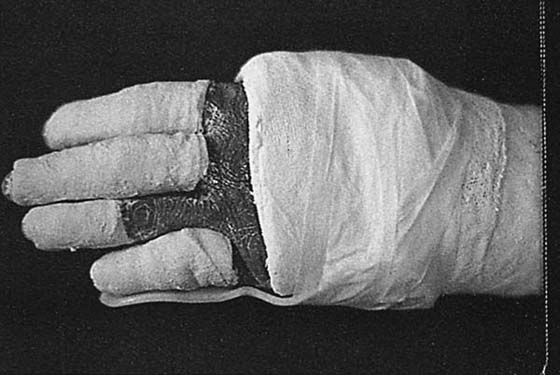
An alternative casting method with a hand-based extension was developed by Brand for increased stability of the PIP joint when needed for casting a dorsal PIP joint wound, or casting for improved ROM when the fingers are webbed. When there is a wound over the PIP joint, casting may add additional pressure on the dorsum of the PIP joint if the cast migrates forward. This happens because the wound is usually dressed, and the plaster contact with the skin is decreased, allowing padding and the plaster cast to shift and cause shear pressure when the fingers are used. Webbed fingers decrease the length of the proximal phalanx that can be casted, and sometimes the proximal portion of the cast is not long enough to keep it from rotating forward on the finger, causing additional pressure over the DIP joint. A plaster or thermoplastic volar extension including the volar MCP joint will increase support and prevent dorsal PIP joint pressure (Fig. 125-10).
After dressing the wound lightly, a volar extension strip made of six layers of plaster is added along the length of the finger, extending to the proximal palmar crease. The plaster will stick to the finger and dressing. This is desirable because it helps ensure that pressure is evenly distributed. After the plaster is set, a cylinder of plaster can be made around the finger including the slab in the same wrapping fashion as for cylinder casting. Care should be taken to ensure that the proximal edge of the plaster does not dig into the palm when the fingers are flexed. If pressure is a problem, an additional extension that encompasses the palm and inhibits MCP joint flexion can be made before the cylinder cast to limit or prevent flexion at the MCP joint. This additional extension, or palmar support, can be made of plaster or thermoplastic external to the cast and, if attached to the plaster while hot, will often stick to the plaster, eliminating pressure in the palm.
This palmar extension method of casting is particularly well suited to IP joint wounds, including for those patients with dorsal PIP joint burns (often involving the extensor mechanism dorsal hood), because the volar slab can be made to be left in place when the cylinder cast is removed and replaced, limiting movement at the PIP joint. The slab can stay in place because the cylinder cast, which is applied after the slab has set, can be cut and peeled off the slab. When used for wounds such as burns, the casting is used to maintain rather than increase ROM and to limit movement of the joint except when absolutely necessary.
Plaster casting can be coordinated with other conventional forms of orthotic positioning (Fig. 125-11), and this is particularly helpful in the treatment of fingers that require correction at more than one joint and in two planes of movement, such as fingers with swan-neck deformities, boutonnière deformities, and IP joint flexion contractures as seen after nerve injuries and with complex regional pain syndrome (Fig. 125-12A and B)
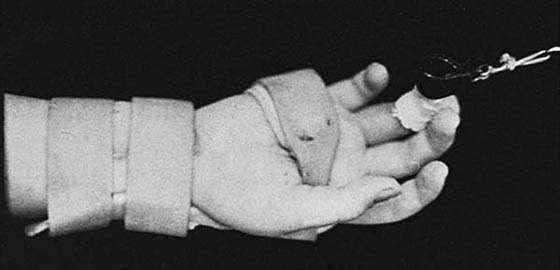
Figure 125-11 Casting to increase extension of the DIP joint and traction to increase extension of the PIP joint in a patient with residual flexion contracture 8 weeks after second-stage flexor tendon graft.

Figure 125-12 A, Limited ROM in a stiff hand demonstrating maximum extension of IP joints and maximum flexion of MCP joints in a patient with complex regional pain syndrome. B, Same patient as in A progressively casted into extension of the IP joints and as placed into flexion traction at the MCP joints.
Casting a swan-neck deformity into extension at the DIP joint permits the PIP joint to be more easily casted into flexion in a second stage, with the added advantage that there is no examiner finger or orthosis pressure at the dorsal IP joint during casting. (The DIP joint is already protected in a cast, which now can be safely held by the examiner during the second stage of casting [Fig. 125-13A and B].) In the case of a boutonnière deformity, the PIP joint is casted in maximum extension, which results in the lateral bands becoming slightly relaxed, allowing increased flexion of the DIP joint for casting in a second stage. (The PIP joint is already protected in a cast, which now can be safely held by the examiner during the second stage of casting.) Flexibility in application is needed and is tailored to individual situations. When the PIP joint of the finger is casted for extension, the DIP joint is often included in the cast. But the DIP joint can be left out intentionally, to allow DIP joint flexion exercises if desirable (see Fig. 125-1).
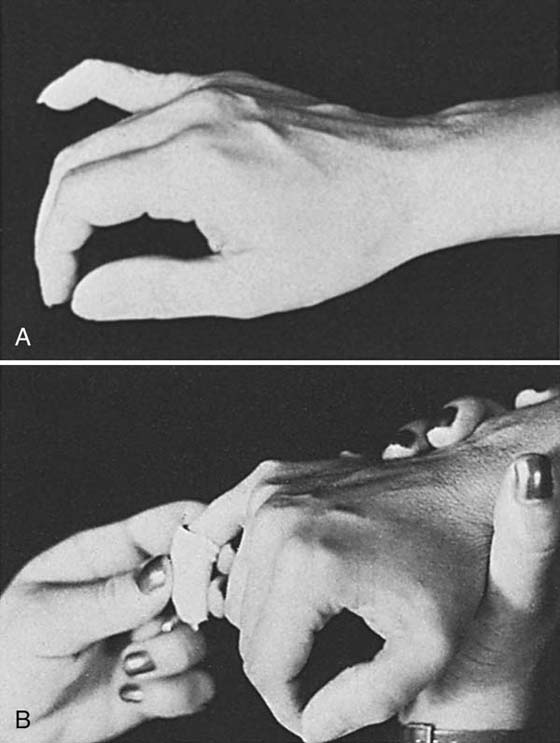
Figure 125-13 A, Swan-neck deformity of left fifth digit with fixed hyperextension of the IP joint. B, Technique of casting for correction in two planes. After the DIP joint is casted into maximum possible extension, the PIP joint is flexed and casted into maximum possible flexion with the cast extending over the casted DIP joint.
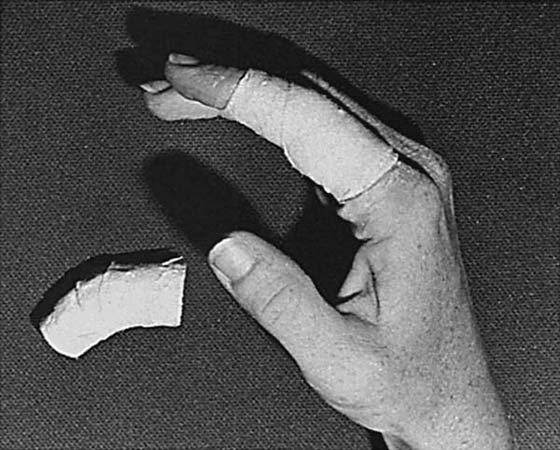
Brand also described the use of casting to block motion or transfer motion to other joints in the same or another plane of movement.2,16,17 An immobilization orthosis is thus not always “static” in effect. It can “dynamically” function to shift motion to joints adjacent to the casted joint during hand movement. For example, casting only the DIP joint for a stiff PIP joint allows the full power of the flexor digitorum profundus to be able to act on the PIP joint and enhance efforts at PIP joint flexion (Fig. 125-14).
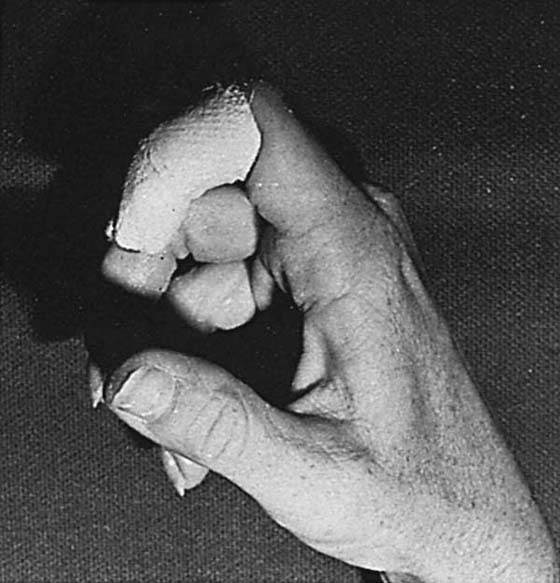
Figure 125-14 Casting of DIP joint to transfer power of the profundus flexion to the stiff PIP joint.
Following intrinsic replacement transfers the patient often will demonstrate undesired flexion at the IP joints with early attempts at activating the transfers. Casting and restricting IP joint motion will enhance tendon transfer training and MCP joint flexion (Fig. 125-15).
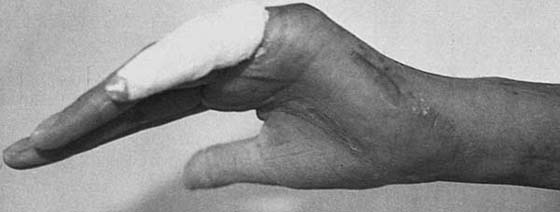
Figure 125-15 Casting for dynamic transfer of moment. Flexion moment at the IP joints is transferred more proximally to the MCP joint. In an intrinsic-minus hand, cast extension of the IP joints also limits hyperextension at the MCP joint, eliminating the need for other orthotic positioning.
Casting of only the PIP joint is necessary in the postoperative phase of a boutonnière deformity repair or reconstruction. The cast protects the repair or reconstruction by limiting PIP joint flexion. The DIP joint is left free, allowing DIP joint flexion exercise, which promotes early limited gliding of the reconstructed or repaired extensor mechanism (see Fig. 125-1).
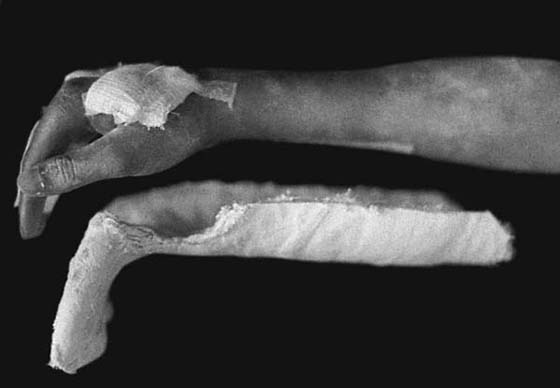
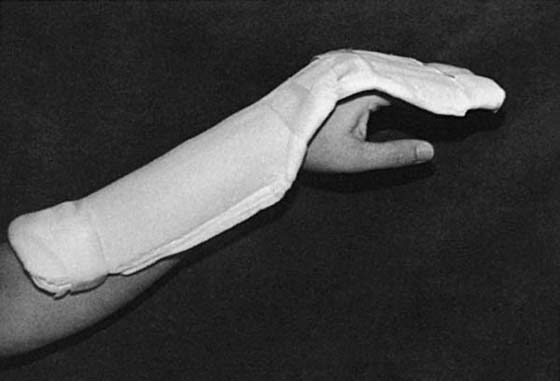
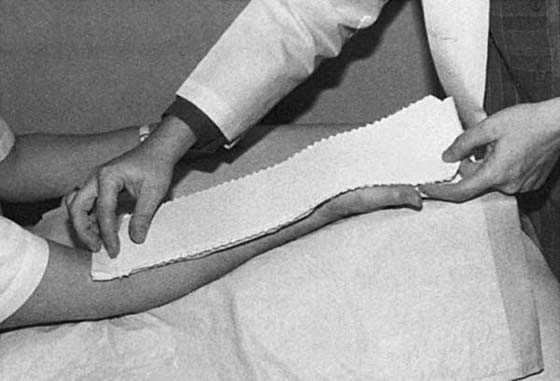
The technique of plaster casting described in the serial cylinder casting section for PIP joint contractures can be used on any joint, muscle-tendon unit, or other soft tissue contractures. Muscle-tendon unit contractures usually require slab casting to incorporate the full length of the muscle-tendon unit in the cast. For example, casts to lengthen finger flexor muscle-tendon unit shortening are made in two stages; a volar slab (six to eight layers), and once set and cooled, followed with a circumferential cast (one to two layers). The plaster slab for the volar wrist and forearm is generally applied over light padding and/or stockinette. The plaster used to secure the volar slab is applied circumferentially about the dorsal aspect of the forearm and is left unpadded. Just as in the serial cylinder finger casting technique, the sticking of the cast to the skin is desired to distribute point pressures, and hold the position exactly for tissue remodeling to occur.
A volar plaster slab can be used immediately after surgery for tendon transfers to serially adjust the positioning of the fingers and wrist for optimum mechanical advantage. For example, adjustments are made to address transfers that are initially too tight by serially repositioning the joints crossed by the transfer to reduce the tightness (Fig. 125-16).
Improvement in soft tissue mobility and joint ROM for all joints can be quantified by ROM and torque angle measurements before the application of the plaster cast or orthosis. Each time the cast is removed, measurements are recorded before application of the next cast. In this way, changes in ROM are documented and treatment efficacy can be evaluated.2,4,8,18
Serial-static plaster orthoses have many applications in the management of complex hand injuries. Volar plaster slabs are used to reduce extrinsic flexor tendon tightness, and dorsal plaster slabs for extrinsic extensor tendon tightness (Fig. 125-17).2,19 Either volar or dorsal slabs can be used for MCP and wrist joint tightness depending on the direction of tightness. For example, with a limitation in wrist extension secondary to a volar wrist scar contracture, a volar slab is used with the wrist positioned in maximum extension. With limited MCP joint flexion a dorsal slab can be used with the MCP joints positioned in maximum flexion. When tightness of the intrinsic muscle-tendon units is apparent, a plaster orthosis that positions the MCP joints in extension and the PIP and DIP joints in flexion can be used. Thumb webspace contractures can similarly be corrected by serially casting the thumb webspace.
Materials include 4- by 12- to 15-inch slabs of fast-setting or extra-fast-setting plaster, cast padding or stockinette, paper towels, and water between 20° and 30°C. Paper tape or other finishing material is optional.
Six to eight strips of plaster are cut to the width of the hand and forearm either from plaster gauze packaged in slabs or rolls (rolls are rolled out and made into a slab). The slab should include the hand and two thirds of the forearm (Fig. 125-18). If needed for a large arm, two sets of plaster strips can be overlapped for desired width. If the thumb is included, a 3- to 4-inch by 2-inch section of plaster gauze can be interspersed in the layers of plaster before it is wet. The corners of the slab can be rounded at the fingers and thumb, or a cut-out area made for the base of the thumb if not to be included in the slab. Any sharp or pointy edge is to be eliminated by folding or cutting the plaster. Stockinette or cast padding is best applied to the arm before molding so it becomes incorporated into the plaster slab on molding (Fig. 125-19). Padding added later is used with great care as it adds bulk to the plaster, and can become a source of pressure (Fig. 125-20). Silastic gel or elastomer padding sometimes works incorporated into a cast, but it occludes air. Silastic gel pads for insoles are readily available at most pharmacies (Fig. 125-21).
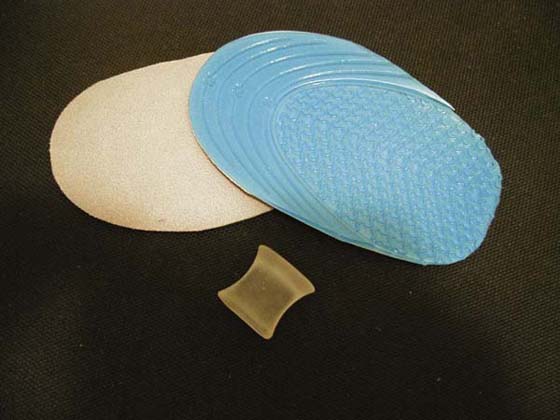
Figure 125-21 Silastic gel pads for insoles have ridges that help skin breathe and can be trimmed to any shape for padding or use with spacers.
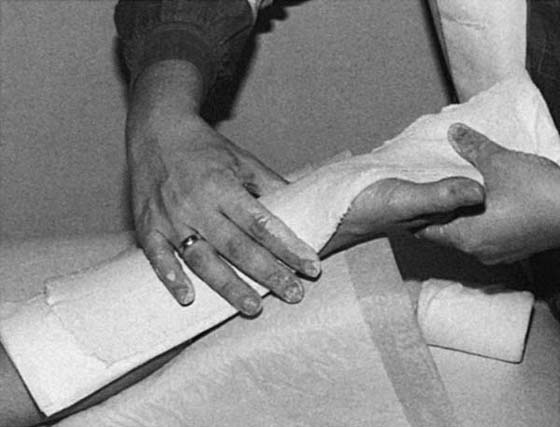
The plaster slab is immersed in water for 5 to 10 seconds, then removed and lightly squeezed, or dried slightly on a paper towel to remove the excess water. The plaster is smoothed while unfolding it and shaping. Once wet, the six or more layers of plaster will become one unit. The plaster is molded and shaped to the arm while maintaining the desired position with attention paid to the arches of the hand and webspaces if included in the orthosis or cast. The plaster is allowed to conform around bony prominences, with care taken to not add any finger point pressure, which can later cause tissue irritation. The wrist is positioned first, then the fingers. It is important to apply uniform pressure and maintain the position of the wrist and fingers during molding and setting of the plaster. A gentle tension is applied until the plaster is set. Rough edges are trimmed, and the cast padding or stockinette is overlapped over the plaster. If tape is used, it must adhere back onto itself, as it does not stick to wet plaster. Thin Elastoplast (Beirsdorf-Jobst Inc., Rutherford College, North Carolina) is sometimes used to finish edges.
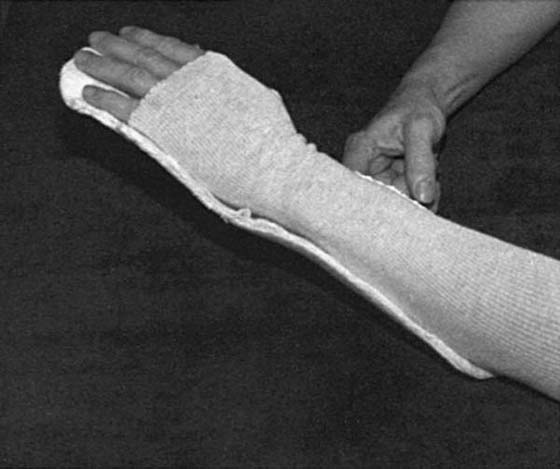
The plaster slab is secured with a roll of thin plaster, an elastic bandage, or bias-cut stockinette. The tips of the fingers should be left visible to observe circulation. The slab is changed every 2 to 3 days, or at least once a week.
When serially casting for finger flexor muscle-tendon unit tightness, the wrist should initially be held (casted) in slight flexion or neutral, with extension directed toward the metacarpal and IP joints. Only when full extension of the digits is obtained is increased positioning into extension directed to the wrist. The severity of muscle-tendon unit tightness is often unappreciated, and if both the wrist and fingers are initially casted together into extension, too much stress is easily applied. Without careful observation, flexor tendon tightness can create a large magnitude of pressure at the volar fingertips and decrease or eliminate circulation resulting in pressure sores.
Slabs that position the wrist in flexion should be used with caution, because this position can compromise circulation and median nerve function. Prolonged wrist hyperflexion positioning is not generally recommended.
Cast cutters and cast spreaders are not usually needed for cast removal because of the technique of application. Removal of a circular or two-stage cast can be accomplished by cutting the thin layer of circular plaster, or having the patient soak the casted hand in warm water to soften the cast, and then unwrapping it or cutting it with scissors.
Since the technique described can be used for any joint or soft tissue contracture, applications vary widely and can be considered as indicated by need. For example, the MCP joints can be casted into flexion by a modified circular casting technique (Fig. 125-22).19
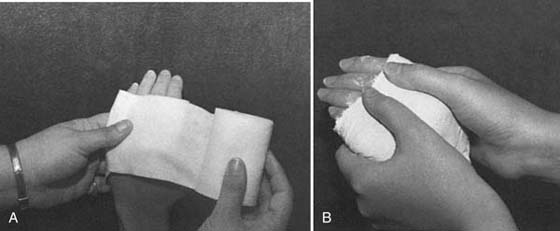
Figure 125-22 A, Application of cast padding for circumfrential MCP casting. B, Applying tension during molding phase; keep fingers moving to avoid point pressure in the cast.
Plaster casting for tissue remodeling is a relatively safe, cost-efficient, but effective method of treating joint and tissue contractures. Documentation of improvement can be made in more ways than joint angle improvement alone. The technique is often beneficial as an adjunct to other therapies, in combination with mobilization orthotic positioning, or to achieve correction before surgical tendon transfers to lessen resistance to new transfers, and rebalance mechanics of the hand. More studies are needed to document the efficacy of this form of correction as compared with thermoplastic orthoses. Single-case design studies are recommended where improvement can be linked to periods of casting, and less or no lasting improvement with ROM exercise, or other corrective technique for joint and soft tissue contracture.
The technique of serial plaster casting or orthotic positioning is an effective method for the correction of joint, muscle-tendon unit, and other soft tissue contractures. Remodeling occurs in response to positioning of the involved joint or tissues at their maximum length for a prolonged period of time. The response of the tissue is to lengthen or “grow” longer, and another cast or orthosis can then be applied, taking up this new length to achieve further correction. Plaster is inexpensive and easily obtained, and can be easily applied. Special attention must be paid during the application of the plaster orthosis or cast to avoid pressure points while positioning the joint or joints in the desired position. Measurements of the change in the tissue length or joint ROM with each successive cast or orthosis change is essential to evaluate the efficacy of the technique and to determine further treatment.
1. Brand PW, Beach RB, Thompson DE. Relative tension and potential excursion of muscles in the forearm and hand. J Hand Surg. 1981;6:209–219.
2. Brand PW, Hollister A. Clinical Mechanics of the Hand. 2nd ed St Louis: Mosby; 1993.
3. Brand PW. The reconstruction of the hand in leprosy. Ann R Coll Surg Engl. 1952;11:350–361.
4. Brandsma JW, Brand PW. Quantification and analysis of joint stiffness. Proceedings of the International Conference on Biomechanics and Clinical Kinesiology of Hand and Foot, IIT Madras, India, Dec 1986.
5. Eppenstein P, Hill J, Philip P, et al. Casting Protocols for the Upper and Lower Extremities. Gaithersburg, Md: Aspen; 1999.
6. Kolumban SL. The use of dynamic and static splints in straightening contracted proximal interphalangeal joints in leprosy patients: a comparative study. Paper read at the forty-seventh annual conference of the American Physical Therapy Association, Washington, DC, 1960.
7. Kolumban SL. Master’s thesis, New York University, 1967.
8. Kolumban SL. The role of static and dynamic splints, physiotherapy techniques and time in straightening contractures of the interphalangeal joints. Lep in India. 1969;Oct:323-328.
9. Parry W. Rehabilitation of the Hand. 4th ed London: Butterworth; 1981.
10. Johnson & Johnson. Plaster of Paris Bandages, their Composition, Manufacture and Modes of Application. New Brunswick, NJ: Johnson & Johnson; 1927.
11. Lavalette R, Pope M, Dickerstein H. Setting temperatures of plaster casts: the influence of technical variables. J Bone Joint Surg. 1982;64A:907–911.
12. Staniforth P. Allergy to benzalkonium chloride in plaster of Paris after sensitization to centrimede. J Bone Joint Surg. 1980;62B:500–501.
13. Wehbe M. Plaster uses and misuses. Clin Orthop. 1982 Jul;167:242–249.
14. Brentall E, Murtagh J. Preparation of a volar arm plaster splint. Aust Fam Med. 1992;21:8–1165.
15. Bell JA. Plaster casting of contractures of the interphalangeal joints. In: Hunter JM, Schneider LH, Mackin EJ, Bell JA, eds. Rehabilitation of the Hand. 1978:644–651. 59
16. Bell JA. Plaster casting in the remodeling of soft tissue. In: Fess EE, Philips CA, eds. Hand Splinting: Principles and Methods. 2nd ed St. Louis: Mosby; 1987.
17. Bell Krotoski JA. Plaster cylinder casting for contractures of the interphalangeal joints. In: Mackin EJ, Callahan AD, Skirven TM, eds., et al. Rehabilitation of the Hand and Upper Extremity. 5th ed St. Louis: Mosby; 2002:1826–1837.
18. Flowers KR, Pheasant SD. The use of torque angle curves in the assessment of digital joint stiffness. J Hand Ther. 1988;1:69–75.
19. Tribuzzi SM. Serial plaster splinting. In: Mackin EJ, Callahan AD, Skirven TM, eds., et al. Rehabilitation of the Hand and Upper Extremity. 5th ed St. Louis: Mosby; 2002:1828–1837.