chapter 9 Fundamentals of Laparoscopic and Robotic Urologic Surgery
More than 100 years ago the “father of modern medicine,” Sir William Osler, challenged surgeons to perpetually refine their craft, stating, “Diseases that harm require treatments that harm less.” In pursuit of this noble goal the urologists of the 20th century brought us great achievements in our field, but it has been over the past 25 years, in particular, that the specialty of minimally invasive urology has become predominant. The earliest techniques that laid the foundation for modern laparoscopic and robotic urologic procedures were developed at academic institutions throughout the world and have continuously been validated and improved. Subsequently, an increasing number of multi-institutional studies have emerged comparing laparoscopic and robotic procedures to their open surgical counterparts and showing equivalent efficacy, acceptable efficiency, as well as the distinct advantages of decreased postoperative pain, better cosmesis, faster recovery, a shorter hospital stay, and, in many cases, less cost. Indeed, it has become increasingly clear that the objectives of many open urologic surgeries, be it of the adrenal gland, kidney, ureter, bladder, prostate, or lymph nodes, can now be achieved with minimally invasive surgery with less patient injury and suffering. Therefore, whereas open surgery has had a steadily diminishing role in the treatment of urologic diseases, laparoscopic and robotic surgery have moved into the mainstream of urologic surgery and knowledge of the required principles and techniques is essential for the practicing urologist. This chapter is intended to provide a basic fund of knowledge on which the aspiring minimally invasive urologist can build.
Preoperative Patient Management
Patient Selection and Contraindications
Careful patient selection and identification of possible relative and absolute contraindications are vital to a successful outcome of laparoscopic and robotic procedures. To this end, a meticulous past history, focusing on prior surgeries, and physical examination, detailing the location and extent of all abdominal scars, are the initial steps in patient evaluation for possible minimally invasive surgery.
Age- and health-based laboratory studies, an electrocardiogram, and a chest radiograph should be obtained according to the same criteria established for any other significant surgical procedure that is undertaken with general anesthesia.
In patients presenting with severe chronic obstructive pulmonary disease (COPD), further studies (i.e., arterial blood gases and pulmonary function tests) are required. In patients with severe COPD, helium as an alternative insufflant should be considered and available at the time of the procedure. Cardiac arrhythmias should be evaluated and treated preoperatively because hypercarbia and the resulting acidosis may have adverse effects on the myocardium, thereby exacerbating any preexisting myocardial instability.
Contraindications to laparoscopic surgery include uncorrectable coagulopathy, intestinal obstruction unless intention to treat, significant abdominal wall infection, massive hemoperitoneum or hemoretroperitoneum, generalized peritonitis, and suspected malignant ascites. Select circumstances in which laparoscopy is being contemplated necessitate careful risk-benefit analysis and detailed and specific informed consent with the patient. The following conditions may portend potential difficulties with a laparoscopic approach.
Morbid Obesity
Laparoscopic procedures in morbidly obese patients are technically challenging. Difficulties may include inadequate length of instruments, decreased range of motion of trocars and instruments, need for higher pneumoperitoneum pressures to elevate the abdominal wall, and poor anatomic orientation owing to excessive amounts of adipose tissue. Traditionally, these difficulties translated into a higher rate of associated complications; in a multi-institutional review of laparoscopy in 125 morbidly obese individuals, one or more intraoperative or postoperative complications occurred in 30% (Mendoza et al, 1996). In comparison to open surgery, however, it has been found that the laparoscopic approach to renal and adrenal procedures actually has a lower complication rate than the open approach. In a comparison of major laparoscopic renal and adrenal procedures (N = 21) versus similar open procedures (N = 21) in obese patients (body mass index [BMI] ≥ 30), although operative time was longer in the former group (210 minutes vs. 185 minutes; P = .16), the laparoscopic group had significantly superior outcomes regarding blood loss (100 mL vs. 350 mL; P = .001), resumption of oral intake and ambulation (<1 day vs. 5 days; P = .001), narcotic analgesic requirements (12 mg vs. 279 mg; P = .001), median hospital stay (<1 day vs. 5 days; P = .001), and convalescence (3 weeks vs. 9 weeks; P = .001). The overall complication rate in the laparoscopic group was 29% (19% major, 10% minor) versus 67% in the open group (33% major, 33% minor) (P = .16) (Fazeli-Matin et al, 1999). These findings have been further confirmed at several other centers (Fugita et al, 2004; Kapoor et al, 2004) even for complicated procedures such as partial nephrectomy (Colombo et al, 2007; Romero et al, 2008) and nephroureterectomy (Brown et al, 2008).
With regard to laparoscopic and robotic radical prostatectomy in obese men, it has been found that although the operation can be performed without compromising pathologic outcomes, obese patients have a greater risk of perioperative complications (26% vs. 5%) (Ahlering et al, 2005). Obese patients had a higher rate of deep vein thrombosis and pulmonary embolism (10%). Additionally, obese patients were less likely to achieve continence and more likely to have higher urinary bother scores at 3-, 6-, and 9-month follow-up.
Extensive Prior Abdominal or Pelvic Surgery
When extensive intra-abdominal or pelvic adhesions are suspected, careful consideration must be given to the possible site of Veress needle insertion as well as to obtaining open access with a Hasson-style cannula. The surgeon needs to understand the five potential points of Veress needle access to the abdomen (umbilicus and at the Palmer point—midclavicular line subcostal on either side, and just off the iliac crest—two fingerbreadths up and two fingerbreadths medial) as well as have knowledge regarding open (e.g., Hasson type) access. Alternatively, in these patients a retroperitoneal approach may be preferable to a transperitoneal approach or the procedure can be initiated retroperitoneally and the peritoneum then entered (Cadeddu et al, 1999).
A patient history of prior retroperitoneal surgery increases the difficulty of reentering the retroperitoneal space and therefore should be approached with caution. Subsequent attempts at extraperitoneoscopy or retroperitoneoscopy should only be ventured by individuals with considerable experience and comfort with this approach. In the authors’ experience, prior percutaneous renal procedures do not necessarily constitute a contraindication to subsequent retroperitoneoscopy, provided that entry is away from the area of the prior nephrostomy tube placement.
Pelvic Fibrosis
Pelvic fibrosis owing to previous peritonitis, pelvic surgery, or extensive endometriosis may constitute a severe technical challenge to the laparoscopic surgeon when surgery of the lower urinary tract is indicated. Similar problems may be encountered when trying to perform pelvic lymph node dissection in patients who have a hip prosthesis; leakage of the polymethylmethacrylate cement can create a dense inflammatory reaction and fibrosis in the adjacent pelvis (Cooper et al, 1997).
Organomegaly
Known or preoperatively diagnosed organomegaly necessitates a cautious approach when obtaining the pneumoperitoneum. The site of Veress needle insertion must be chosen at a safe distance from any enlarged organs. Alternatively, open access with the Hasson cannula may be considered. Open access should be considered in cases of marked hepatomegaly or splenomegaly.
Ascites: Benign Etiology
Patients with severe ascites are under increased risk of injury to the bowel owing to closer proximity of bowel loops to the anterior peritoneum. In addition, a watertight wound closure is required and a firm wound dressing should be applied to prevent prolonged postoperative leakage.
Pregnancy
Initial access to the abdomen must be obtained at a safe distance from the fundus of the gravid uterus. As such, trocar placement is usually performed more cephalad on the abdominal wall, depending on the fundus of the uterus. The left or right upper quadrant in the subcostal midclavicular line (i.e., at Palmer point) is often the preferred site of access. Prolonged intra-abdominal pressures of 15 mm Hg or greater may result in hypotension, owing to significantly reduced venous return because the vena cava is already mechanically compromised by the enlarged uterus. Prolonged CO2 pneumoperitoneum, which may result in maternal hypercarbia and acidosis with subsequent adverse effects on the fetus, should be avoided. Accordingly, a working pneumoperitoneum of 10 mm Hg is recommended in the pregnant patient. The second trimester is a preferred time for necessary surgery given the completion of fetal organogenesis and less chance of inducing labor.
As pregnancy progresses beyond the 20th week the technical possibility of performing laparoscopic procedures decreases significantly, correlating with the increasing size of the gravid uterus. Both laparoscopic nephrectomy and adrenalectomy have been successfully accomplished in the pregnant female (Nezhat et al, 1997; O’Connor, et al, 2004; Sainsbury et al, 2004).
Hernia
A diaphragmatic hernia may result in leakage of a significant amount of CO2 into the mediastinum, which, although rarely noted, may eventually result in clinical problems such as respiratory compromise or cardiac tamponade (e.g., pneumopericardium) (Knos et al, 1991).
Any evidence of uncorrected or surgically corrected umbilical hernia or abdominal wall hernia should rule out these sites for obtaining a pneumoperitoneum.
Iliac or Aortic Aneurysm
Significant aneurysms warrant evaluation by the vascular surgeon. If the aneurysm does not require immediate surgical correction, insertion of the Veress needle should be performed in the left upper quadrant to stay well away from the area of the aneurysm. Of course, open access with the Hasson technique can be employed. Insertion of accessory trocars must be done under strict endoscopic control to avoid the area of the aneurysm.
Informed Consent
Although laparoscopic/robotic surgery is generally associated with decreased pain and morbidity, it should be remembered that there is considerable potential for serious complications, similar to that associated with standard open incisional surgery. It is essential for the patient to understand the inherent risk with all minimally invasive procedures such that the procedure may need to be converted to open surgery owing to hemorrhage, bowel injury, failure to progress, or other complications at any point during the intraoperative or postoperative course. Alternatively, in select cases, with less emergent complications, conversion to a completely open approach may be avoided by first switching to a hand-assisted approach and only going to an open approach if the hand-assisted approach fails to provide the necessary control of the situation.
All alternative forms of surgical or nonsurgical treatment (if applicable), with their known advantages and disadvantages, must be discussed. The patient needs to be aware of both complications unique to laparoscopy and robotic surgery (e.g., fatal gas embolism, problems owing to hypercarbia, postoperative crepitus, pneumothorax, electrosurgical bowel injury, or robotic mechanical failure), and procedure-specific complications (e.g., damage of obturator nerve in pelvic lymphadenectomy).
Time spent obtaining informed consent is well invested. It is both the patient’s right and the physician’s responsibility. A good beginning augurs a good end.
Bowel Preparation
For extraperitoneoscopy and retroperitoneoscopy, no bowel preparation is necessary, but it may help with postoperative constipation. For transperitoneal laparoscopic/robotic procedures not involving the use of bowel segments for urinary tract reconstruction, a light mechanical bowel preparation can be given in an effort to decompress the bowel. A traditional example of such a prep would consist of a clear liquid diet and a Dulcolax suppository or half a bottle of magnesium citrate the day before the procedure. More recently, emphasis has been placed on “fast tracking” patients in an effort to streamline care and decrease length of hospital stay. Breda and associates (2007) found that a modified bowel prep and avoidance of narcotic analgesics postoperatively (with routine administration of ketorolac) was instrumental in achieving a hospital stay of 1.1 days for patients undergoing laparoscopic donor nephrectomy. The bowel prep consists of clear liquids for 2 days before surgery, two bottles of magnesium citrate the day before surgery, an enema the night before surgery, and nothing to eat after midnight (Breda et al, 2007).
The need for a full mechanical (e.g., GoLYTELY, 2 to 4 L, or 3 ounces of Fleet Phospho-Soda followed by a clear liquid diet and Fleet enema) and antibiotic (e.g., neomycin, 1 g by mouth, and metronidazole, 500 mg by mouth; three doses of each the day before surgery, plus 1 g of intravenous cefotetan on call to the operating room) bowel preparation is subject to question and becomes an issue only if one anticipates encountering dense intra-abdominal adhesions or if the surgery involves entering the bowel (e.g., enteric augmentation of the bladder or enteric conduit formation).
Preparation of Blood Products
Serum type and screen are sufficient for diagnostic laparoscopy or procedures associated with a low chance of major hemorrhage. More extensive laparoscopic/robotic procedures (e.g., nephrectomy, partial nephrectomy, adrenalectomy), especially early in one’s experience, should be managed like any other major open surgical procedure, with packed red blood cells available before surgery. This is most important during one’s initial major laparoscopic/robotic cases; with experience, a “type and hold” suffices because the need for transfusion among patients undergoing major procedures, such as radical nephrectomy or radical nephroureterectomy, is quite low (3% to 12%), with an estimated average blood loss in the range of 106 to 255 mL (Ono 1999; Dunn et al, 2000; Jeschke et al, 2000; Shalhav et al, 2000). Similarly, the transfusion rate with laparoscopic/robotic radical prostatectomy is low (2.5% at experienced centers) such that a “type and hold” is sufficient (Guillonneau and Vallancien 2000; Ahlering et al, 2004).
Optional Preoperative Endourologic and Radiologic Procedures
Preoperative computed tomography (CT), spiral angiographic CT with 3D reconstruction, and magnetic resonance imaging (MRI) are helpful in depicting the anatomic relationship of the operative site to adjacent organs and/or blood vessels. Of course, the necessary studies required as part of a routine metastatic workup for cancer are mandatory. For partial nephrectomy or in the patient with ureteropelvic junction obstruction, preoperative spiral CT angiography with 3D reconstruction can be helpful. These studies may help to clearly define the renal vasculature and in the case of a renal mass can clearly delineate the optimal plane and depth of dissection. For the latter situation, coronal and sagittal views may be requested. When nephrectomy is performed for large malignant renal tumors (i.e., >10 cm), preoperative embolization of the renal artery may be considered immediately before the laparoscopic surgery; this procedure allows the surgeon to secure and divide the renal vein earlier in the transperitoneal procedure (i.e., before taking the renal artery) and may help to decompress collateral veins. In other disease states, preoperative placement of a ureteral catheter or a percutaneous drainage catheter can be quite helpful because intraoperative filling (e.g., with indigo carmine–stained saline) and drainage of the surgical site can aid in its identification and subsequent treatment (e.g., pyeloplasty, lymphocele or intrarenal cyst, calyceal diverticulum). Conversely, removal of an indwelling stent before a ureteral reconstructive procedure is recommended by some to enable the surgeon to work with a noninflamed ureter, thus facilitating the creation of a noninflamed anastomosis and subsequent healing.
A variety of catheters, both opaque and light bearing, can be placed in the ureter to facilitate ureteral identification and dissection in nephrectomy, pyeloplasty, nephroureterectomy, ureterolysis, ureterolithotomy, and retroperitoneal lymph node dissection. The need for preplacement of a ureteral stent is dependent on the pathologic process and the surgeon’s prior laparoscopic/robotic experience.
In the Operating Room
Setup of the Operating Room
The operating room has to provide enough space to accommodate all necessary personnel and the equipment required by both the surgeon and the anesthesiologist. Positioning of equipment, surgeon, assistants, nurses, anesthesiologist, and other support staff should be clearly defined and established for each laparoscopic or robotic case. All equipment must be fully functional and in operating condition before any laparoscopic procedure is started (Table 9–1). A separate tray with open laparotomy instruments must be ready for immediate use in the event of complications or problems necessitating emergent open incisional surgery.
Table 9–1 Instrumentation Checklist for Making a Skin Incision for Obtaining the Pneumoperitoneum
Patient Positioning and Draping
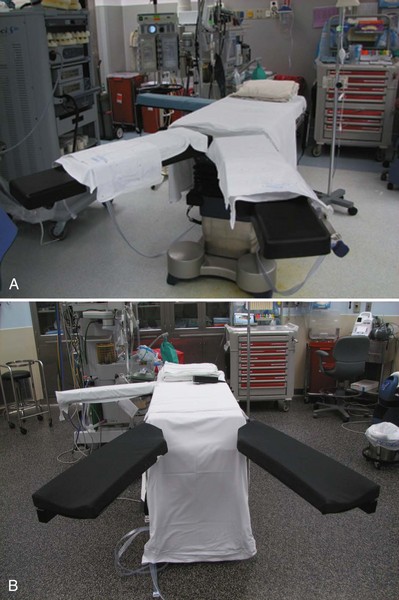
Positioning of the patient depends primarily on the procedure to be performed. In the supine position the arms can be tucked snugly at the sides or rest on specially designed sleds. In the Trendelenburg or lateral position, tape and security belts applied across the chest and thighs provide safe and stable positioning of the patient; shoulder braces should not be used because of a risk of brachial plexus injury. In the lateral position, all bony prominences in contact with the table must be carefully padded; likewise, the point of contact between any of the positioning straps and the hip or shoulder should be padded. In the lateral position, the bottom leg is flexed approximately 45 degrees while the upper leg is kept straight; pillows are placed between the legs as a cushion and also to elevate the upper leg so that it lies level with the flank, thereby obviating any undue stretch on the sciatic nerve. Pads should be placed between the table and the knee and ankle of the lower leg because these are high pressure areas. In the lateral decubitus position an axillary roll should be used. Application of an active warming system may prevent hypothermia, should a lengthy laparoscopic procedure be anticipated.
A host of new advances in padding and table mounted accessories are now available but none has been conclusively demonstrated to significantly reduce pressure on the patient’s flank in the lateral position. Researchers at the University of California, Irvine, showed that women have significantly lower interface pressures than men (Deane et al, 2008). A BMI greater than or equal to 25, use of a kidney rest, and full table flexion as opposed to half-table flexion were all associated with increases in interface pressures; of these, use of the kidney rest was believed to be the most detrimental and its use beyond 20 to 30 minutes was disparaged. Therefore, male patients with a BMI of 25 or higher undergoing laparoscopic surgery in the lateral position with the kidney rest elevated and the table completely flexed are at highest risk of developing rhabdomyolysis from flank pressure. In this study the unaugmented operating table mattress was superior to egg crate or gel padding as an augmenting surface material; of note, egg crate padding was equal or superior to the more expensive gel padding.
Table-mounted accessories for all major commercial operating room tables now exist that aid in safely and effectively positioning patients in the lateral decubitus position and in the prone position. Specifically, for lateral decubitus positioning the buttock and upper back can be supported by padded reinforced stabilizer bars that mount on the side rails of the table. The entire bed and especially the kidney rest can also be padded and the upper arm can be supported on a table-mounted adjustable armboard. Special head supports for the lateral decubitus position are also available. For laparoscopic or robotic procedures on the pelvis, the patient can be placed in Trendelenburg position with the legs on split-leg positioners. Shoulder supports or braces should never be used in this position owing to the risk of brachial nerve injury. Allen stirrups have fallen out of favor because of the risk of calf neuropraxia. Split-leg positioners are available as built-in table features (Fig. 9–1A on the Expert Consult website ) or as optional add-on features that can be used with any table (see Fig. 9–1B on the Expert Consult website).
The full extent of the abdominal wall should be prepared and draped from nipples to pubis. In some procedures, it is advantageous to extend the preparation to the knees and to drape the external genitalia into the surgical field. For example, gently pulling on the testis may help identify the intrapelvic location of the vas deferens and spermatic vessels, transvaginal palpation facilitates identification of the cervical cuff and posterior bladder junction, and free access to the urethral meatus enables the performance of auxiliary procedures such as flexible cystoscopy or manipulation of ureteral catheters during nephroureterectomy or for stent placement during pyeloplasty.
Before laparoscopic or retroperitoneoscopic procedures, placement of a nasogastric/orogastric tube and a Foley catheter should be performed to decompress the stomach and bladder, respectively, thereby decreasing the chance of injury of abdominal contents during surgery. Pneumatic compression stockings are applied for antiembolic prophylaxis. The administration of 5000 units of subcutaneous heparin preoperatively is also an option in higher-risk patients, such as the morbidly obese.
Strategic Placement of Operative Team and Equipment
Standard Laparoscopic Carts
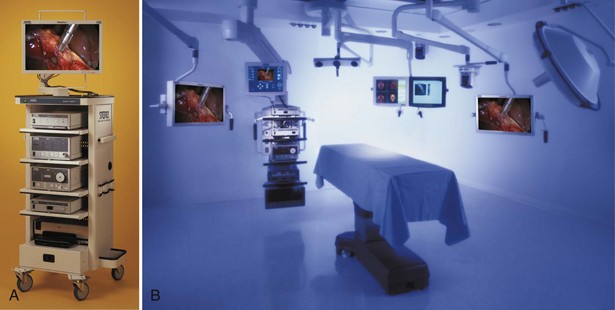
Traditionally, the mandatory hardware for laparoscopic procedures (monitor, light source, insufflator) is located on carts or “towers” that can be rolled around the operating room and be adapted to various types of surgical procedures and approaches (Fig. 9–2A on the Expert Consult website). If only one monitor is used (as in intrapelvic procedures), it is typically placed at the foot of the table or between the legs if the patient is in stirrups or on split-leg positioners. If two monitors are used, they are positioned on both sides of the table to allow an unobstructed view for all key operative team staff.
The main laparoscopic cart should contain the insufflator, placed at the surgeon’s eye level to allow continuous monitoring of the CO2 pressure. The light source, camera controls, and any recording device are usually also on the cart. Placement of a sterile plastic sheet over the front of this cart enables the surgical team to directly control the intensity of the light as well as the pneumoperitoneum pressure with these controls on the equipment.
Integrated Endoscopy Systems
More recently, most major manufacturers of endoscopy equipment offer “integrated” systems that consist of flat panel displays and equipment towers that are mounted on adjustable ceiling booms (see Fig. 9–2B on the Expert Consult website). Thus, the display monitors can be suspended over the patient and placed directly in front of the surgeon at any height or angle. This feature may reduce eye and body strain. Furthermore, the tower containing the light source, camera system, and insufflator can be placed in any area around the patient depending on the operation at hand. The more sophisticated systems are frequently controlled by a touch screen display used by the surgeon or a nurse, or by voice command, or by using the controls on the camera head instead of manually adjusting instruments at the tower level. In addition to the laparoscopic equipment, other aspects of the operating room environment can be controlled from the touch screen or by voice, such as the room lighting, input from digital radiology systems, and recording devices. Although they are not a necessity, these types of systems offer unique advantages with regard to operating room efficiency and may further improve the ergonomics for the operating surgeon and staff.
Robotic Systems
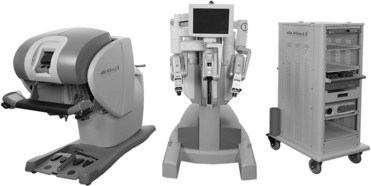
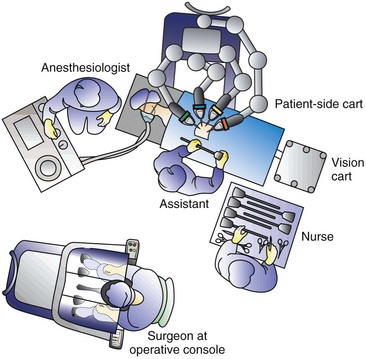
Currently, the only robotic surgical system in widespread use for laparoscopic surgery is the da Vinci Robotic System (Intuitive Surgical, Sunnyvale, CA). In its current state this system can be used in almost any modern operating room. The three major components of the system are the robotic tower to which the instruments attach and are mechanically manipulated within the patient, a surgeon’s console that is the workstation at which the surgeon sits to manipulate the robotic instruments, and finally the ancillary vision cart that supports a flat screen monitor, an insufflator, light source, and components of the camera system (Fig. 9–3 on the Expert Consult website). Additional monitors (either standard or boom-mounted flat screen) can be linked with the robotic system and used for the assistant and support staff image viewing.
Placement of the Operative Team for Laparoscopic Procedures
Transperitoneal Procedures in the Upper Abdomen
For laparoscopic procedures such as nephrectomy the patient is positioned in a modified lateral decubitus position for transperitoneal laparoscopic renal surgery procedures. This is at approximately a 30-degree angle to the table and allows for more effective lateral retraction of the kidney and exposure of the renal vessels during the hilar dissection. The kidney rest may be elevated at the outset and the table slightly flexed if necessary to provide adequate exposure for port placement; after port placement, the kidney rest should be completely lowered. The surgeon and assistant usually stand opposite the area of surgical interest (i.e., for a left nephrectomy the surgeon and assistant stand on the patient’s right side). The instrument table and the scrub nurse are best located on the opposite side of the patient such that instruments can be handed to the surgeon over the table (Fig. 9–4). Incoming lines from insufflators, suction/irrigation, and electrosurgical devices enter from the contralateral side of the table. Optional technology (e.g., harmonic scalpel, argon beam coagulator) must be arranged in an orderly fashion using either preexisting or improvised pockets of the surgical drape. Again, these lines ideally should enter the field from the contralateral side of the table or from the ipsilateral head of the table. Additional technology (e.g., laparoscopic ultrasound probe) may be moved to the operating table depending on the surgeon’s needs as well as on the availability of space.
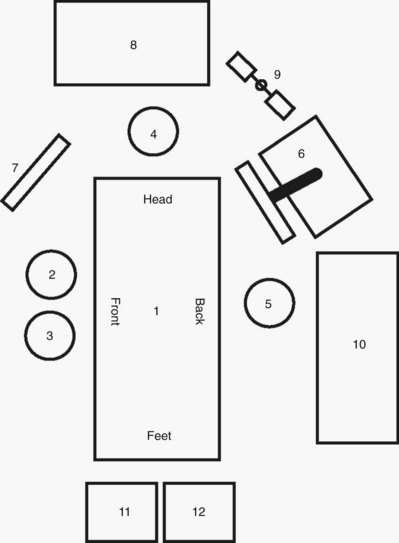
Figure 9–4 Placement of the operative team for transperitoneal procedures in the upper abdomen: 1, operating table; 2, surgeon; 3, assistant; 4, anesthesiologist; 5, scrub assistant; 6, laparoscopic cart/tower; 7, auxiliary video monitor; 8, anesthesia equipment; 9, suction/irrigation unit; 10, scrub assistant’s instrument table; 11, electrocautery unit #1; and 12, electrocautery unit #2.
To provide more comfortable positioning of the surgeon’s arms, a 6 × 4-foot, 6-inch lift can be used, because most operating tables designed before widespread use of laparoscopy cannot be lowered sufficiently to allow the surgeon to hold the laparoscopic instruments with his or her elbows held comfortably at the side rather than extended laterally. This is most important during suturing. Several newer tables recently on the market, however, can be set at very low elevations (e.g., 60 cm) for the Maquet Alphamaxx (Getinge USA, Rochester, NY) so that platforms are not necessary.
Retroperitoneal Upper Abdominal Procedures
For retroperitoneal procedures the patient is placed in the true, 90-degree lateral decubitus position with the body at a right angle to the table. All of the proper steps for padding in this position should be followed (see earlier). The table is angled at the hip to accentuate and increase the distance between the 12th rib and the iliac crest. Maximizing this distance is paramount with regard to port placement. If necessary, the kidney rest can be raised; however, the surgeon must keep in mind that this causes increased pressure on the tableside hip and may increase the risk of pressure necrosis if left elevated for prolonged periods of time. Most experts recommend lowering the kidney rest except when it is needed for key portions of a case. The operative field should include the space between the costal margin and the iliac crest and from the umbilicus to the spine. Both the primary surgeon and the camera assistant stand facing the patient’s back (Fig. 9–5). The scrub nurse/technician stands facing the patient’s front, and instruments are handed across the patient accordingly.
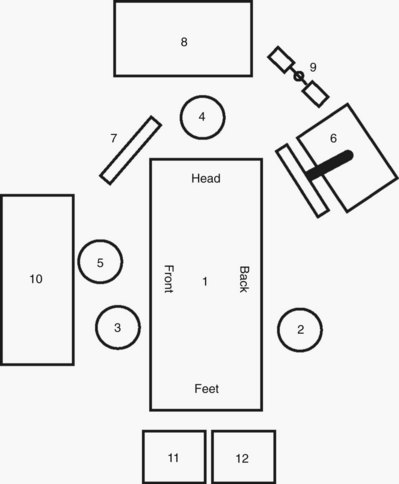
Figure 9–5 Placement of the operative team for retroperitoneal procedures in the upper abdomen: 1, operating table; 2, surgeon; 3, assistant; 4, anesthesiologist; 5, scrub assistant; 6, laparoscopic cart/tower; 7, auxiliary video monitor; 8, anesthesia equipment; 9, suction/irrigation unit; 10, scrub assistant’s instrument table; 11, electrocautery unit #1; and 12, electrocautery unit #2.
Transperitoneal and Extraperitoneal Pelvic Procedures
The patient is positioned in the supine position with the legs on split-leg positioners or elevated in stirrups that have knee and leg supports to avoid perineal nerve injury. The table is angled (flexed) slightly at the hip to accentuate the pelvis. The patient’s arms are tucked at the sides; plastic sleds can be used to support the arms. Adequate padding should be applied to the arms and legs. A slightly snug chest strap should be placed directly across the patient’s chest. The table is placed in the 30-degree Trendelenburg position. Genitalia are draped into the operative field, which extends from the mid chest to thighs and from midaxillary line to midaxillary line. The surgeon stands on the side of the table where he or she is comfortable, and the assistant stands on the side of the table opposite the surgeon (Fig. 9–6).
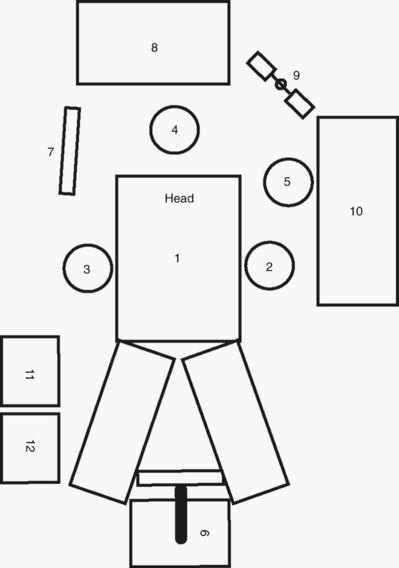
Figure 9–6 Placement of the operative team for pelvic surgery: 1, operating table; 2, surgeon; 3, assistant; 4, anesthesiologist; 5, scrub assistant; 6, laparoscopic cart/tower; 7, auxiliary video monitor; 8, anesthesia equipment; 9, suction/irrigation unit; 10, scrub assistant’s instrument table; 11, electrocautery unit #1; and 12, electrocautery unit #2.
Robotic Surgery
For robotic procedures involving the kidney and adrenal gland the patient is positioned exactly as described for transperitoneal upper abdominal surgery as described earlier. The surgeon and assistant stand on the side opposite the pathologic process. The robotic tower is positioned on the ipsilateral side of the pathology such that the robotic arms stretch over the patient and can then be docked to the preplaced ports. In general it is best to angle the robot slightly such that the lens is pointing directly toward the site of interest (Fig. 9–7 on the Expert Consult website). Following this the surgeon ungowns and takes his or her place at the surgeon’s console while the assistant remains on the side of the table opposite the robotic tower.
For robotic procedures on the pelvis the patient is positioned exactly as described earlier for laparoscopic pelvic procedures. After port placement the robotic tower is placed between the patient’s legs and the assistant can remain on either side of the table depending on surgeon preference. The scrub nurse/technician can be positioned on the same side as the assistant to facilitate passing instruments because passing instruments across the robotic arms can be cumbersome.
Performing the Procedure
Before the Initial Incision
A checklist ensuring that all essential equipment is present and operational should be completed just before initiating the pneumoperitoneum (see Table 9–1). For laparoscopic surgery this list should include (1) light cable on the table, connected to the light source and operational; (2) laparoscope connected to the light cable and to the camera, with an image that has been white balanced and focused using a white gauze sponge; (3) operational irrigator/aspirator; (4) insufflator tubing connected to the insufflator, which is turned on to allow the surgeon to see that there is proper flow of CO2 through the tubing; kinking of the tubing should result in an immediate increase in the pressure recorded by the insufflator, with concomitant cessation of CO2 flow; (5) an extra tank of CO2 in the room; and (6) a Veress needle, checked to ensure that its tip retracts properly and that, when it is connected to the insufflator tubing, the pressure recorded with 2 L/min CO2 flow through the needle is less than 2 mm Hg.
Additional items to check when utilizing the da Vinci Robotic System would include ensuring that all plugs for the console, vision cart, and surgical cart are plugged into different circuits and that all cables connecting these carts are connected properly. The system should be turned on and the self test and homing routine should be complete. The 3D camera and endoscopes should be calibrated, the image black/white balanced, and target alignment should be performed according to the manufacturer’s instructions. The surgical cart should be draped and ready.
Achieving Transperitoneal Access
Pneumoperitoneum
The insufflant system (i.e., insufflator, tubing, and chosen gas) is essential for establishing a pneumoperitoneum. This is brought into use after either closed (i.e., Veress needle) or open (i.e., Hasson cannula or hand-assist device) access to the peritoneal cavity is established. If hand-assisted or single-port access laparoscopy is to be performed, the pneumoperitoneum can be established directly after placement of the port.
Most commonly, CO2 is used as the insufflant because it does not support combustion and is very soluble in blood (LD50 for CO2 is 1750 mL) (air = 357 mL) (Bordelon and Hunter, 1994). However, in patients with chronic respiratory disease, CO2 may accumulate in the bloodstream to dangerous levels. Accordingly, in these patients, helium may be used for insufflation once the initial pneumoperitoneum has been established with CO2 (Leighton et al, 1993). The drawback of helium is that it is much less soluble in blood than CO2; however, its use precludes problems of hypercarbia. For this reason, even in patients with chronic respiratory disease, the procedure is initiated with CO2 and then the change is made during the case to helium if necessary. Other gases that were once used as insufflants (room air, oxygen, nitrous oxide) are no longer routinely used because of their potential side effects (e.g., air embolus, intra-abdominal explosion, potential to support combustion). “Noble gases” such as xenon or argon are inert and nonflammable but are not routinely used for insufflation because of their high cost and poor solubility in blood.
Closed Technique: Veress Needle
Sites for Needle Passage
Disposable (70- or 120-mm, 14-gauge, and 2-mm outer diameter) as well as nondisposable (metal) Veress needles can be used. Proper needle function is ensured before the procedure. The blunt tip of the needle is tested to make sure it retracts easily; also, the needle is connected to the CO2 line to ensure that there is no resistance to gas inflow (i.e., at 2-L/min flow, pressure remains at ≤2 mm). Lastly, saline is flushed through the needle with the tip manually occluded to make sure there is no leakage at the juncture between the shaft and the hub of the needle.
With the patient in the supine position, the head of the bed is lowered 10 to 20 degrees; insertion of the Veress needle is commonly accomplished at the superior border of the umbilicus (Fig. 9–8). There are certain advantages to choosing the umbilical area as the site for initial trocar placement: the abdominal wall is thinnest, and postoperative cosmesis is excellent. However, this point of entry is fraught with the potential for injury to a major vessel, in particular the left common iliac vessels, aorta, or vena cava.
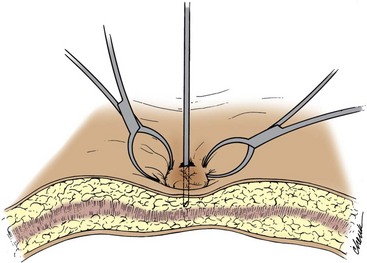
Figure 9–8 Insertion of Veress needle at umbilicus. The towel clips stabilize the abdominal wall as the needle is advanced.
(From Clayman RV, McDougall EM, editors. Laparoscopic urology. St. Louis: Quality Medical Publishing; 1993.)
Another important factor with regard to passing the Veress needle is body habitus; in obese patients, the umbilicus tends to migrate inferiorly. In nonobese patients the umbilicus lies in its commonly described position, directly above the bifurcation of the aorta and vena cava. Thus, for umbilical access in nonobese patients the Veress needle should be passed through the abdominal wall angled toward the pelvis to avoid injury to the bowel and great vessels that lie directly beneath. In more obese patients, because the umbilicus lies more caudad, less angulation is needed and the Veress needle should be passed perpendicular to the umbilical incision (Loffer and Pent, 1976). In addition, it has also been found that pneumoperitoneum pressure and volume as well as the ease of trocar or needle insertion is not significantly affected by body habitus. In a combined human and porcine study, McDougall and associates (1994) prospectively performed pressure-volume analysis on 41 individuals undergoing transperitoneal laparoscopic procedures and found that 94% of the maximal intraperitoneal volume is achieved with an insufflation pressure of 15 mm Hg. Additional pressure (up to 30 mm Hg) did not significantly increase volume. Furthermore, in the porcine component of the study, elevation of the pneumoperitoneum pressure above 15 mm Hg did not significantly ease bladed trocar insertion. Therefore the pneumoperitoneum pressure need never be raised above 15 mm Hg unless it is done so in the setting of a vascular venous injury to control bleeding (a discussion of this technique is outlined later).
If the patient is in a lateral decubitus position, then the Veress needle is passed 2 fingerbreadths medial and 2 fingerbreadths superior to the anterior superior iliac spine. Just before insertion of the Veress needle a 12-mm incision is made in the previously described area, in anticipation of placing a 10- to 12-mm trocar. The subcutaneous tissues are spread with a Kelly clamp, and the anterior fascia is secured with an Allis clamp. The abdominal wall is stabilized, but not lifted, with the Allis clamp. The Veress needle is grasped at midshaft and is passed perpendicularly through the 12-mm incision using a gentle, steady pressure; two points of resistance are traversed: the abdominal wall fascia and the peritoneum. With this approach, the only organ at risk is the bowel; neither a vascular organ nor a major vessel can be injured using this insertion site.
Other potential insertion sites when the patient is either supine or in a lateral decubitus position are at the Palmer point (i.e., subcostal in the midclavicular line on the right side) and at the corresponding site on the left side. In this instance, stabilization or even a slight upward tension on the Allis clamps is essential; the needle if inserted too deeply will potentially hit the liver on either side or, rarely, the spleen, so care must be exercised. Chung and coworkers (2003) applied this method of laparoscopic access and trocar placement in 622 consecutive cases. Prior abdominal surgery had been performed in 192 patients (31%), and the BMI was 30 or greater in 98 patients. Blind Veress needle placement was successful in 579 (93%), and outcome was not associated with laterality, type of surgery, or prior surgery. In 34 cases (5%), a minor laceration to the liver was managed conservatively without sequelae; and in 21 cases (3%) the omentum or falciform ligament was traversed without significant injury. No major complications, such as vascular or hollow-organ perforation, were caused by either the Veress needle or trocar. Neither the spleen nor bowel was ever injured. No patient developed an incisional hernia at the upper quadrant trocar site (Chung et al, 2003).
Aspiration/Irrigation/Aspiration
With the use of a 10-mL syringe containing 5 mL of saline, the Veress needle is aspirated to check for blood or bowel contents. If this test result is negative, then the saline is injected into the abdominal cavity; this should occur without any resistance. Next, the plunger of the syringe is again withdrawn; no fluid should return into the barrel of the syringe. An additional injection of 2 to 3 mL of saline will help to expel any omentum that may have been sucked into the needle tip with the original aspiration technique. Lastly, the syringe is detached from the Veress needle and any fluid left in the hub of the needle should fall swiftly into the peritoneal cavity (i.e., the “drop” test).
Advancement Test
If the needle has truly just entered the peritoneal cavity, then the surgeon ought to be able to advance the needle 1 cm deeper without the tip meeting any resistance. Resistance at this stage usually means the needle is still in the preperitoneal space and needs to be advanced through the remaining peritoneum.
Once proper needle placement is verified, insufflation is started at 2 L/min with the abdominal pressure set at 10 mm Hg. If free flow of CO2 is noted (i.e., intra-abdominal pressure remains <10 mm Hg), then after 0.5 L has entered the abdomen the flow can be increased to maximal capacity of 9 L/min (however, no more than 2 L/min flow can be achieved through a 14-gauge needle) and the abdominal pressure set at 15 mm Hg. As soon as the preset limit of 15 mm Hg of intra-abdominal pressure is reached, free flow stops.
In a previously operated abdomen, Veress needle insertion should be performed in an unscarred quadrant of the abdomen. Alternatively, if there is no scar-free area, then an open technique (see later) should be used.
Open Access Techniques
The pneumoperitoneum can be more easily, and in one’s early experience, more safely established using an open technique; however, its use involves making a larger incision and increases the chances of port-site gas leakage during the procedure. The open technique is recommended specifically when extensive adhesions are anticipated. Studies in general surgery have shown the open technique to be as efficient as the closed approach and slightly more or equally as safe (Bonjer et al, 1997).
In the unscarred abdomen, a 2-cm semicircular incision is made at the lower edge or slightly below the umbilicus. The fascia and peritoneum are opened individually with a transverse incision, sufficient to accommodate the surgeon’s index finger. After visual and digital confirmation of entry into the peritoneal cavity, two 0 silk traction sutures are placed on either edge of the fascia. Next, the Hasson cannula is advanced through the incision with the blunt tip protruding (Fig. 9–9A). The funnel-shaped adapter of the Hasson cannula is advanced until it rests firmly in the incision, and it is then tightened onto the cannula with the attached screw; fixation to the abdominal wall is provided with the fascial sutures that are wrapped around the struts on the funnel-shaped adapter of the Hasson cannula, thereby anchoring it in place. After removal of the obturator, free flow of CO2 into the peritoneal cavity is achieved by attaching the CO2 tubing to the cannula. The insufflator can be set at maximum inflow, thereby creating the pneumoperitoneum quickly.
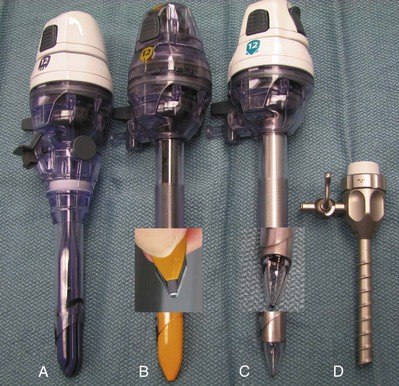
Figure 9–9 Various trocar designs showing (A) Hasson type, (B) bladed, (C) fascial dilating, and (D) screw-like designs. Enlarged images of the bladed and dilating tips are provided.
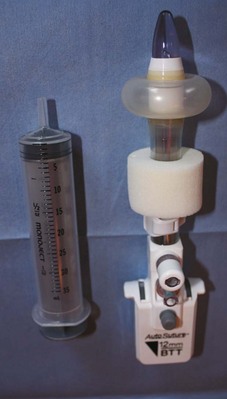
A far simpler type of open cannula is a balloon retention device (e.g., Blunt Tip Trocar With Balloon Tip, US Surgical, Norwalk, CT) (Fig. 9–10 on the Expert Consult website). Once the cannula is positioned in the abdominal cavity, the balloon is inflated; the cannula is pulled upward until the balloon is snug on the underside of the abdominal wall. Next, the soft foam collar on the outside surface of the cannula is slid downward until it is snug on the skin and locked in place. This process creates an excellent seal, precluding gas leakage as well as subcutaneous emphysema.
Closed Technique
Blind Trocar Insertion
Generally this technique is not considered basic and should be used by the experienced laparoscopist in patients who are very unlikely to have intra-abdominal adhesions. Indeed, although reports of its use have been very favorable in the gynecologic literature, the authors are unaware of any reports in the urologic literature; similarly, none of the authors has employed this method.
This method is performed by means of a subumbilical 12-mm transverse incision; the rectus sheath on either side of the incision is grasped with a towel clip, and a surgeon on either side lifts the abdominal wall upward. It is claimed that this creates a distance of 6 to 8 cm between the underside of the abdominal wall and the underlying viscera. A 5-mm incision is made in the elevated rectus sheath, and a 10- to 12-mm disposable shielded or optical view trocar is passed vertically. In a prospective randomized study, comprising 578 patients, the direct insertion technique was found to be associated with fewer complications (4.2%) than a standard Veress insertion (complications of 14.6%); also of note, entry failure occurred in only 0.7% of the direct trocar insertion patients versus 4.6% of the Veress needle group (Gunenc et al, 2005). However, this complication rate for the Veress needle is distinctly higher than cited in other major series or meta-analyses in which Veress needle–associated vascular or bowel injuries were noted in 0.8% and 0.8% of patients (Bonjer et al, 1997).
EndoTip Entry
For this technique the abdominal wall is not tented using towel clips. It is left flat. A 5-mm incision is made in the skin at an appropriate site for a 5-mm port. The EndoTip trocar (Storz, Germany) is a 5-mm trocar with a “corkscrew”-type self advancing and self-retaining entry system and a blunt tip (see Fig. 9–9D). The trocar can be advanced through the abdominal wall while a 5-mm, 0-degree lens is positioned inside the trocar 1 cm from the advancing tip. Once the abdominal wall muscle is engaged, the EndoTip can be lifted up slightly while continuing to rotate it through the tissues; this maneuver lifts the peritoneum, and one can watch as the blunt tip works its way through the peritoneum and into the abdominal cavity. Again, this technique should be used only in patients in whom intra-abdominal adhesions are unlikely.
Hand Port Access
If the hand port is going to be placed in the midline, then the midline should be marked before placing the patient in the 45-degree (modified) flank position. The pneumoperitoneum can be obtained before or after making the hand port incision, but if one wishes to ensure the minimum size of the skin incision then the incision should be made after obtaining the pneumoperitoneum because this places the skin more on stretch. However, if the surgeon has little experience with achieving a pneumoperitoneum, the safest maneuver is to place the hand port into a 7-cm open incision and then create the pneumoperitoneum through the hand port.
If one elects to obtain a pneumoperitoneum first, then the surgeon should carefully plan out the hand port entry site as well as the additional instrument and camera port sites. Every hand port device has a “footprint” that can be drawn on the abdominal wall; that footprint varies depending on the diameter of the external appliance. Care should be taken to plan out the additional trocar sites carefully to avoid interference between the hand port and the instrument ports; this is most easily done once the pneumoperitoneum has been established. After the footprint is traced, the hand port incision site is marked; the length of the incision should correspond to the surgeon’s glove size (i.e., 7 glove size = 7-cm incision). The skin is incised, and the fascia is divided. The peritoneum is entered, and the insufflation is temporarily stopped. The hand port device is then placed according to the manufacturer’s instructions. Additional 5-mm or 10- to 12-mm ports can be placed rapidly under manual control with the surgeon’s intra-abdominal hand being used to guide the additional trocars through the abdominal wall. Alternatively, a trocar can be placed through the hand port and the abdomen can be re-insufflated. A laparoscope can then be placed through the port and the rest of the trocars can be placed under direct vision.
Laparoendoscopic Single-Site Surgery (LESS) and Natural Orifice Transluminal Endoscopic Surgery (NOTES)
Recent advances in abdominal access technology combined with the development of curved and articulating laparoscopic instrumentation have made it possible to perform selected procedures through a single incision (typically 2.5 cm transumbilical); using three access ports through this incision, the laparoscope and two working instruments can be introduced.
Much the same as for hand port access the incision can be made before or after obtaining a pneumoperitoneum depending on surgeon preference. Typically, the incision is made periumbilically for cosmetic purposes. If large/intact specimen extraction is required for the procedure at hand (as in donor nephrectomy), the incision should be made just large enough to remove the specimen. If specimen removal is not necessary or the specimen is small, then the incision can be minimized to as little as 2.5 cm. Once the incision is made, several ports side by side or a single tri-port access device can be placed and a pneumoperitoneum is re-established at high flow. Thus far, LESS has been used for a variety of upper abdominal procedures including adrenalectomy (Hirano et al, 2005; Castellucci et al, 2008); renal biopsy (Kaouk et al, 2008b); renal cyst decortication; renal tumor cryoablation (Goel and Kaouk, 2008); pyeloplasty (Kaouk et al, 2008a); ileal ureter interposition; psoas hitch ureteroneocystostomy; simple, radical, and donor nephrectomy (Gill et al, 2008; Ponsky et al, 2008b; Raman et al, 2008); and partial nephrectomy (Kaouk et al, 2008b). Additionally, pelvic procedures have been performed including varicocelectomy (Kaouk and Palmer 2008), sacroculpopexy (Kaouk et al, 2008b), radical prostatectomy, and radical cystectomy with extended lymphadenectomy (Kaouk et al, 2008b).
The theoretical advantages of LESS over standard multi-incision laparoscopy are improved cosmesis, decreased pain, and faster recovery time. At the present time, however, there are insufficient data regarding LESS available to either support or refute these potential benefits (Raman et al, 2008). Research in this area is ongoing, and until well established methods and results are available surgeons are urged to approach LESS in a responsible and graduated fashion. Proper training through a combination of educational courses, hands-on laboratory training, case observation, and proctoring should be undertaken by surgeons who wish to start a successful program in LESS. One method of transitioning from standard laparoscopy to LESS for selected procedures is to gradually decrease the number of ports one uses until the procedure can be performed through a single incision. Conversely, when one is having difficulty performing a procedure using LESS, the surgeon should not hesitate to place one or more extra trocars at separate incision sites to improve triangulation and thereby ensure safety and a quality result.
Although the transgastric removal of an appendix in 2004 and the transvaginal removal of the gallbladder in 2007 have stimulated much interest in the realm of general surgery, natural orifice transluminal endoscopic surgery (NOTES) has remained an investigational laboratory procedure in urology. Using a transgastric and transvaginal approach, Ponsky and colleagues (2008b) have removed a porcine kidney whereas Lima and colleagues (2007) have used a transgastric and transvesical approach to excise, but not remove, the porcine kidney. These latest developments are built on the original work by Gettman and associates in 2002 in which transvaginal nephrectomies were accomplished in the pig. However, to date, there have been no NOTES procedures in clinical urology (Lima et al, 2006; Isariyawongse et al, 2008).
Instrumentation for Developing the Retroperitoneal Space
Balloon Dilation
Gradual distention of a balloon dilator in the retroperitoneal space atraumatically displaces the mobile fat and moves the peritoneum forward relative to the immobile body musculature. This device thus creates a working space equivalent to the size of the balloon.
Commercially Available Balloons
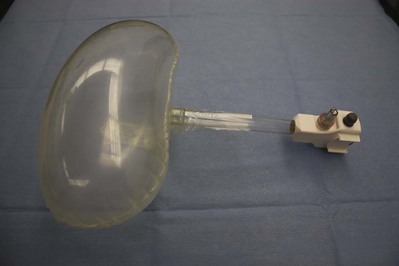
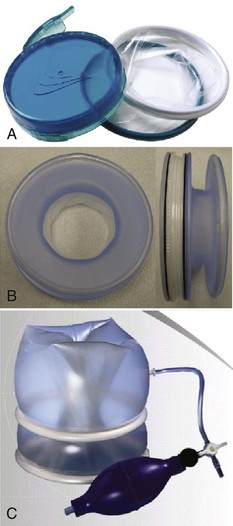
A commercially available trocar-mounted preperitoneal balloon dissector (PDB) (Covidien Ltd., Mansfield, MA) is commonly employed. The transparent, high-tensile strength silicone balloon is inflated with a sphygmomanometer bulb insufflator using room air (Fig. 9–11). The balloon has a maximum capacity of 800 mL (40 pumps of the inflating bulb). A primary advantage is that the balloon is affixed to the end of a stiff, hollow, transparent plastic shaft. The shaft allows precisely directed placement of the balloon dilator (see later). Furthermore, because the laparoscope can actually be inserted into the shaft of the balloon dilator during the inflation process it provides the capability for endoscopic confirmation of the proper positioning of the transparent balloon and of the adequacy of the controlled radial dilation of the extraperitoneal area. Balloon dilators are commercially available in two different shapes: a round balloon for dilation of the pelvic extraperitoneal space and a horizontally oriented, oblong-shaped balloon for dilation of the retroperitoneal space.
Self-Styled Dilators
Gaur’s original (1992) version of the balloon dilator was a size 7 surgeon’s glove mounted on a No. 8 red rubber catheter. The external end of the catheter was connected to a sphygmomanometer bulb insufflator, and the balloon was insufflated to 110 mm Hg. After this initial description, several other self-styled dilators were described: the middle finger of a size 7 to 8 glove, two fingers of a size 7 to 8 glove tied over each other for additional strength, a sterile condom, and the cot of an O’Connor-style drape mounted on a 16- or 18-Fr red rubber or whistle-tip catheter (Webb et al, 1993; Chiu et al, 1995). For the balloons made from the middle finger of a surgeon’s glove, the finger is affixed to the rubber catheter with two 0 silk sutures. These self-styled dilators were filled with saline rather than air. The device may be backloaded into a well-lubricated (i.e., K-Y jelly) 30-Fr Amplatz sheath to facilitate introduction through a laparoscopic port. Although it is economically advantageous, drawbacks of the self-styled balloon include the lack of a stiff shaft to manually direct the balloon into a specific location for precise dilation as well as the inability to endoscopically monitor the dilation process from within the balloon.
An ex-vivo laboratory study demonstrated that increasing volumes of saline induced gradual pressure increments within the middle finger of a surgeon’s glove. At a volume of 1000 mL, the average pressure was 15 mm Hg. Pressures remained 15 mm Hg at 1500 mL and increased to 17 mm Hg at 2000 mL (McDougall et al, 1994). In practice there is no need to exceed the 1000-mL limit. Also, latex balloons have less tensile strength than silicone balloons, making them more likely to rupture. Regardless, with either balloon setup, on the few occasions that either type of balloon has ruptured there has been no obvious complication. However, the latex balloon has a tendency to rupture into multiple pieces whereas the Silastic balloon usually leaves only one large fragment, making retrieval an easier task.
Complications associated with balloon dilation stem from improper balloon placement or balloon rupture. Intramuscular dilation may result in hernia formation, or inadvertent peritoneal disruptions may occur (Gaur, 1992; Adams et al, 1996).
Manual Dilation
Creation of a working space within the retroperitoneum may be achieved exclusively with a combination of digital and laparoscopic instrument dissection (Kerbl et al, 1993). After access to the extraperitoneal area is gained, to-and-fro movements of the laparoscope are performed to create a working space (McKernan, 1995). This technique has been employed to perform various simple and advanced procedures in the retroperitoneum (Rassweiler et al, 1998a; Abbou et al, 1999). Although it is effective, potential disadvantages of this technique include frequent cleaning of the laparoscope and the lack of clear landmarks initially due to the smaller, undeveloped working space.
Technique for Balloon Placement: Open (Hasson) Technique
This is the most commonly employed technique because it affords the greatest precision during development of the retroperitoneal space (Gill, 1998). Initial access is obtained through a 2.0- to 2.5-cm transverse incision in the midaxillary line, just below the tip of 12th rib. The wound is opened with a pair of S-retractors. Under direct vision, the posterior layer of the lumbodorsal fascia is incised and muscle fibers are split or divided. The retroperitoneal space is entered, under direct vision, by making a small incision in the anterior thoracolumbar fascia with an electrocautery blade or, less commonly, by bluntly piercing the fascia digitally or with a hemostat. Care should be taken that this fascial opening is snug around the index finger and no larger, so that intraoperative air leak is minimized. Index finger palpation of the belly of the psoas muscle posteriorly and the Gerota fascia–covered inferior pole of the kidney anteriorly confirms proper entry into the retroperitoneal space (Fig. 9–12A). The index finger is employed to digitally create a space in this precise location for placement of the balloon dilator; two inflations of the balloon are then done—one directed cephalad and the second directed caudad to fully dilate the retroperitoneal space (see Fig. 9–12B). Thus, balloon dilation is performed anterior to the psoas muscle and fascia and outside and posterior to the Gerota fascia. In cases involving definitive ureteric mobilization (e.g., retroperitoneoscopic donor nephrectomy, nephroureterectomy, ureterolithotomy, pyeloplasty), an additional balloon dilation may be performed more caudad to the primary site of dilation (Gill et al, 1995). Similarly, during a retroperitoneoscopic adrenalectomy, it is helpful after the initial balloon dilation to move the balloon up higher in the retroperitoneum and perform a second even more cephalic balloon dilation along the undersurface of the diaphragm (Sung and Gill, 2000).
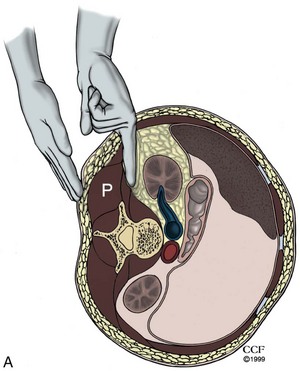
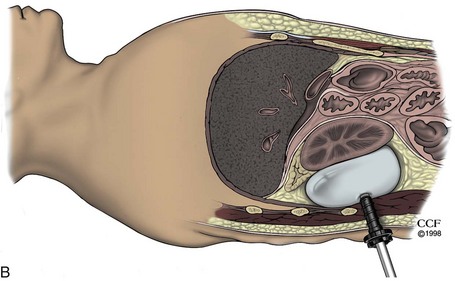
Figure 9–12 A, Access into the right retroperitoneum. Through the primary port incision at the tip of the lowest (12th) rib, open access is gained into the retroperitoneum after piercing the thoracolumbar fascia. Finger dissection is performed anterior to the psoas muscle and fascia to create a space for insertion of the balloon dilator. Confirmation that the finger dissection is indeed being performed in the proper plane is obtained by palpating the psoas and erector spinae muscles between the retroperitoneally located index finger and the fingertips of the opposite hand positioned on the patient’s back. The fat-covered lower pole of the kidney can be palpated in a cephalad direction by turning the finger clockwise in the retroperitoneum on the right side. B, Balloon dilation in the posterior pararenal space facilitates the creation of a working space for retroperitoneal laparoscopic nephrectomy (coronal view).
(Reprinted with permission, Cleveland Clinic Center for Medical Art & Photography © 1998-2011. All Rights Reserved.)
Instrumentation for Developing the Extraperitoneal Space
Open (Hasson) Technique
A 1.5- to 2-cm curvilinear incision is made along the inferior umbilical crease. The anterior rectus sheath is incised vertically for 1.5 cm, and the rectus muscle is separated in the midline to expose the posterior rectus sheath. With the surgeon’s index finger positioned posterior to the rectus muscle and anterior to the posterior rectus sheath, gentle tunneling motions are made in a caudal direction until the area of the symphysis pubis is reached. At this distal location, the fascia transversalis is punctured with the fingertip and gentle side-to-side digital dissection is performed in the prevesical space, posterior to the pubic bone. Into this predeveloped space, a balloon dilator (see earlier) is inserted and distended to create an adequate working space. Balloon dilation effectively displaces the prevesical fat and reflects the peritoneum cephalad. The balloon is initially inflated in the midline and then re-inflated on either side to further expand the working area (Meraney and Gill, 2001).
Caveat: The classic Hasson cannula requires the placement of two 0 silk sutures into the fascia that are then affixed to the cone-shaped portion of the cannula to effect a seal between the cannula and the fascia. This arrangement invariably results in a significant leakage of gas because the seal is rarely airtight. Indeed, in earlier studies of retroperitoneoscopy, excessive subcutaneous emphysema and higher carbon dioxide levels were the norm owing to use of the standard Hasson cannula (Wolf et al, 1995; Ng et al, 1999); this situation was rectified with the introduction of the open access blunt port, which has a balloon to secure it against the underside of the abdominal wall and a soft foam cuff to secure it to the outer abdominal wall, thereby effecting an airtight seal (Ng et al, 1999).
Access Technology: Trocars, Hand-Ports, and Single-Port Access
Trocars
Trocars enable the laparoscopist to introduce working instruments into the gas-filled abdomen or retroperitoneum. They also maintain or reestablish a pneumoperitoneum by conveying the insufflant and may serve as pathways for delivering small amounts of dissected tissue from the surgical area. Typically a trocar consists of an outer hollow sheath (also called a cannula or port) and an inner bladed obturator, which is removed as soon as the outer sheath has entered the peritoneal cavity.
A variety of nondisposable and disposable trocars are available. Standard models range from 3 to 20 mm in diameter and 5 to 20 cm in length. One-way valves within the trocar allow the surgeon to exchange instruments through the port without the escape of significant amounts of gas. Some older trocar models have trapdoor or flap valves. In such trocars it is necessary to depress the valve lever to open the valve widely during retrieval of tissue or needles. More recently, multi-seal type valves have become available for 10- and 12-mm trocars that accommodate the passage of 5 mm and larger instruments without any air leak occurring; if large amounts of tissue are to be withdrawn, removal of the outer seal or of the entire valve is necessary for this procedure. The outer seal/valve can then be replaced before reinserting instruments.
Initially, only sharp tipped/bladed trocars were available. On these trocars the sharp obturator incised the various layers of tissue as it entered the peritoneal cavity. To protect the underlying viscera from the sharp tip of these trocars, a plastic safety shield was later incorporated into the disposable trocars that would spring forward to shield the blade once the trocar entered the gas-filled abdomen (see Fig. 9–9B). However, bladed trocars should be only of historical interest because they have been superseded by safer noncutting dilating trocars, which no longer require a safety shield. These trocars enter the abdomen by spreading the abdominal wall musculature, rather than cutting it (see Fig. 9–9C). As such there is less chance of injuring an abdominal wall vessel and the resulting entry site is less prone to subsequent herniation; indeed, the risk of either of these complications is fivefold less than with blunt versus sharp trocars (Hashizume and Sugimachi, 1997; Thomas et al, 2003).
As with the older sharp trocars there are both disposable and nondisposable blunt trocar units. The Step Needle/Sleeve (Covidien Ltd., Mansfield, MA) is a disposable system that uses a needle port with an outer diameter of 2.1 mm (6.5 Fr) that incorporates a Veress needle introducer. After correct and successful puncture of the abdomen and establishment of the pneumoperitoneum, the Veress needle introducer is removed and the needlescopic port serves either as a camera-bearing sheath of a 1.9-mm needlescope or as a working port for needlescopic scissors or graspers used to perform needlescopic surgery. Alternatively, the needle can carry the initial port into the abdomen; this is an expandable port that in its collapsed state is 2.1 mm at the distal tip and 3.8 mm along the body of the trocar. This trocar can then be expanded by passage of a blunt-tipped obturator to expand the collapsed sheath to 5 mm, 10 mm, or 12 mm, depending on the surgeon’s needs. The port has an adjustable seal that allows introduction of laparoscopic instruments within a range of 4.4 to 12 mm in diameter. Thus, the tissues of the abdominal wall are stretched rather than incised, thereby precluding the need for placement of fascial sutures at the end of the procedure.
Other blunt-tipped trocars are produced by all of the major trocar manufacturers. These devices have a variety of tips that enable their placement by spreading the tissues; some also have a clear plastic tip such that the surgeon can pass an endoscope into the trocar to endoscopically monitor its passage through the abdominal wall and its entry into the gas-filled abdomen. One of the blunt-tipped disposable trocars incorporates a curved cutting blade that is trigger activated by the surgeon as the clear port is passed under endoscopic control (i.e., Visiport Plus RPF Single Use Optical Trocar with Versiport Plus RPF Converterless Trocar Sleeve, US Surgical, Norwalk, CT). This hybrid of a blunt and sharp trocar is used sparingly owing to the cutting blade, which can still injure vessels or viscera; also the port site created by passage of this trocar requires a sutured closure of the fascia.
The only reusable blunt-tip port, the EndoTip system (Karl Storz, Culver City, CA), is a screwlike device that has no sharp points or cutting edges (see Fig. 9–9D). It comes in 5-, 10-, and 12-mm designs; however, the 10- and 12-mm trocars require use of a cumbersome reducer system because they are not of a multiseal design (see earlier). It is introduced through the skin incision, by rotating the cannula in a clockwise manner until the gas-filled abdomen is entered; alternatively, an appropriately sized 0-degree lens laparoscope can be used to monitor the penetration of the various tissue layers. Indeed, this combination can be used in the situation when use of the Veress needle to obtain a pneumoperitoneum has failed; in this case, once the EndoTip engages the abdominal wall musculature the device is held upward while continuing to rotate it—in this manner the peritoneum is lifted upward and safely entered. Unlike the action of trocars with a sharp tip, the tissue is not cut but is only displaced and bluntly dilated, thereby preserving the closing mechanism of the overlying muscle and fascia. Because of its innovative design, this device reduces injury to the intra-abdominal organs, stays securely in place, and seals the point of entry against any inadvertent loss of gas.
On removal of any of the blunt-tip ports, the fascia does not need to be sutured, except when it is placed in a non-midline area. However, some surgeons do not place a suture even with midline placement provided that postoperative palpation of the entry site reveals a small defect (Siqueira et al, 2004).
All primary and some secondary trocars have sidearm insufflation line input valves and a small distal hole near the tip to prevent formation of a vacuum, which may suck viscera into the cannula when the cannula is removed. Some less expensive, smaller trocars do not have sidearm stopcocks and can be used only as secondary trocars.
Reducers allow downsizing of working channels in 10-mm or larger trocars to accommodate smaller, 5-mm working instruments without any leakage of CO2; however, the development of multiseal technology has resulted in valves that can accommodate 5- to 12-mm instruments without the need for a reducer. This development saves significant time during a long procedure.
Retention of the cannula at the port site is essential to decrease air leak and subcutaneous emphysema and facilitate the timely completion of a procedure. In the past it was necessary to affix a suture to the insufflation sideport and the skin to secure the trocar. At present, myriad retention mechanisms prevent dislocation of cannulas: threaded sleeves, adjustable threaded sleeves, expandable arms, and inflatable balloons. In this regard the older plastic devices used to affix a metal trocar to the abdominal wall should never be used; this combination can result in inadvertent capacitive coupling electrosurgical injury to the bowel or other viscera owing to the insulating effect of the plastic device.
Hand-Assist Devices
The first generation of hand port devices consisted of the Handport, Intromit, and Pneumosleeve. As with most first-generation laparoscopic devices, they were adequate with regard to functionality but each had its drawbacks (Stifelman and Nieder, 2002). These products have now been replaced by a second generation of improved devices: The Gelport (Applied Medical, Rancho Santa Margarita, CA), the Omniport (Advanced Surgical Concepts, Wicklow, Ireland), and the LapDisc (Ethicon Endosurgery, Cincinnati, OH).
The Gelport (Fig. 9–13A on the Expert Consult website) consists of a gel-like disc that easily admits the surgeon’s hand and then molds around the wrist and arm. The latest Gelport design has a 12-cm footprint. To set up the two-piece Gelport system the surgeon inserts the lubricated wound protector through a 7- to 8-cm incision and adjusts it to create a tight seal across the abdominal wall. A gel disc is then snapped on top of the wound protector and held in place with a small lever. The Gelport offers the advantages of never losing a pneumoperitoneum on hand exchange because it immediately seals after hand removal and it does not require adjustment to maintain a seal. Additional instruments can be passed alongside the surgeon’s hand, through the gel material, also without loss of the pneumoperitoneum.
The Lapdisc (see Fig. 9–13B on the Expert Consult website) is a one-piece unit that has an inner diaphragm that is used to anchor it across the abdominal wall and an outer appliance that dials down a thin plastic sheet, like a camera iris, around the surgeon’s wrist. Although this device has a low profile and small footprint (12 cm) it does result in loss of the pneumoperitoneum every time the hand is removed and reinserted and instruments cannot be passed parallel to the surgeon’s hand.
The Omniport (see Fig. 9–13C on the Expert Consult website) is a balloon-like device that anchors itself as one piece across the abdominal wall. The inflated device also creates a seal between itself and the surgeon’s wrist. The device has a smaller footprint (12 cm); however, it must be uninflated and reinflated each time a hand is exchanged, which results in loss of the pneumoperitoneum. Furthermore, no additional devices can be passed parallel to the surgeon’s hand through the device.
In a recent study, 130 urologists participating in a series of hand-assist courses evaluated the different devices for a variety of features. The overall scores in this study were 8.6, 7.4, and 7.3 on a scale of 10 (10 being best) for the Gelport, LapDisc, and OmniPort, respectively (Patel and Stifelman, 2004). Advantages of the Gelport included sturdiness, ease of hand exchange, maintenance of the pneumoperitoneum, as well as the ability to pass both a hand and a laparoscopic instrument simultaneously. Of note, the price to the surgeon of using a hand-assist device is not inconsequential. For the surgeon, pain and numbness of the hand/wrist/forearm and, to a lesser extent, overall fatigue are much greater when using a hand-assist device versus standard laparoscopy (Monga et al, 2004; Gofrit et al, 2008).
Access Devices and Techniques for LESS
There are two basic methods used to achieve intra-abdominal access for LESS. One technique is to make a 2.5-cm incision, typically periumbilical or transumbilical (although an alternate site may be necessary), through which a skin flap can be raised off of the abdominal wall fascia. Then, through this single incision several (two to four) standard 5-mm laparoscopic ports can be placed in close proximity to one another. A laparoscope and working instruments can then be placed through these ports. The size of the skin incision should correspond to the surgical task at hand. If the procedure does not require removal of a large intact specimen, then the incision should be minimized to as little as 2.5 cm. If the procedure requires large intact specimen removal (as in donor nephrectomy), then the incision should be large enough to extract the specimen.
Another technique is to use a commercially available single site surgery device. These devices currently require a single incision that is typically placed periumbilically or transumbilically unless the procedure dictates an alternate site. Currently there are three devices that are available for commercial use. The TriPort (Advanced Surgical Concepts, Bray, Ireland) is a two-piece system consisting of an inner diaphragm that works like a wound protector and an outer piece containing the ports (Fig. 9–14A). The wound protector component is adjustable and cinches down the outer attachment, creating a tight seal on the abdominal wall. The TriPort, which requires a 12- to 25-mm incision, has room for a 5-mm laparoscope and two 5-mm working instruments plus a separate insufflation valve. The same manufacturer also makes a four-port model called the QuadPort that contains two 12-mm and two 5-mm instrument insertion sites; it requires a 2.5- to 6.5-cm incision. The Uni-X (Pnavel Systems, Cleveland, OH) is a similar device that is anchored to the abdominal wall by preplaced facial sutures. It has three 5-mm insertion sites and can be placed through a 1.5-cm incision (Kaouk et al, 2008b).
The SILS port (Covidien Ltd., Mansfield, MA) can be placed into a 2-cm incision and can house three 5-mm ports or two 5-mm ports and a 5- to 10-mm port (see Fig. 9–14B).
These devices have been used successfully to perform single-site nephrectomy, adrenalectomy, pyeloplasty, renal cyst decortications, and renal cryoablation (Castellucci et al, 2008; Gill et al, 2008; Goel and Kaouk, 2008; Kaouk et al, 2008b; Ponsky et al, 2008b; Rane and Rao, 2008).
Placement of Initial Trocar
For pelvic procedures, the patient is usually positioned with the head slightly down and the intra-abdominal CO2 pressure is kept at 15 mm Hg. After establishment of a Veress needle pneumoperitoneum (i.e., closed technique), the edges of the wound and subcutaneous tissue are spread with a blunt forceps. Next, the trocar is held in the dominant hand with the middle finger extending along the shaft and the trocar is inserted using a twisting downward motion. If the surgical site is in the mid to upper abdomen, then the trocar is passed perpendicular to the umbilical incision; however, for pelvic procedures, the trocar is directed 70 degrees caudad. Proof of entering the gas-filled intraperitoneal cavity is the sound of CO2 escaping from the open sidearm. After the sidearm is closed, the obturator is removed and the CO2 insufflation line is connected to the side port of the trocar. If using a clear blunt port, a 0-degree laparoscopic lens is placed so the entire entry of the trocar is endoscopically monitored.
For procedures such as nephrectomy or nephroureterectomy the patient is placed in the modified flank (i.e., lateral decubitus) position and the pneumoperitoneum pressure is increased to 20 mm Hg. The initial incision is usually either 2 fingerbreadths medial and 2 fingerbreadths superior to the anterior-superior iliac spine or subcostal in the midclavicular line (e.g., at the Palmer point on the right). The trocar is passed perpendicular to the skin incision in the manner described for the transumbilical approach.
When an open technique is performed to obtain the pneumoperitoneum, the Hasson-style cannula used to obtain access to the abdomen also serves as the initial trocar.
Transperitoneal Approach: Abdominal Inspection
The sterile laparoscope is white balanced. If the laparoscope is a standard optical lens then it can be pre-warmed using a thermos with warm water. Although it is a minor extra expense, a dedicated fluid warmer to warm the shaft of the standard endoscope is a very useful adjunct. However, newer endoscopes that have electronics embedded in the tip of the shaft should not be submerged in water. A standard defogging agent may also be applied to the tip of the endoscope.
The entire abdomen is inspected systematically. Initially, abdominal inspection is performed to rule out any injury to the underlying viscera that may have occurred during access or placement of the initial trocar. The laparoscope is then introduced through a second port to “look back” at the initial port placement site. Then, if the patient is supine, the following pelvic anatomic landmarks are visualized: bladder, urachus, medial umbilical ligaments, and internal inguinal rings, followed by the appendix and the lower parts of the colon; in the male the vasa deferentia can sometimes be seen, whereas in the female the round ligaments, uterus, and ovaries are viewed. Next, turning toward the upper abdomen, the liver, gallbladder, spleen, stomach, omentum, and small bowel are visualized. However, abdominal inspection is usually limited to the superior ipsilateral half of the abdomen if the patient has undergone insufflation and port placement in the lateral decubitus position.
Hand-Assist Placement
The hand-assist device can be placed either as an initial “port” or as a secondary port depending on the surgeon’s preference. The former approach is easier because the procedure then begins with making a standard midline (for right or left renal surgery) or right lower quadrant (i.e., for right renal surgery) 6.5- to 7.5-cm incision at the planned hand-assist site. The peritoneal cavity is entered in the standard open surgical fashion, following which the hand-assist device is placed. Next, a blunt cannula is passed through the hand-assist device and a pneumoperitoneum is established. Alternatively, a Veress or Hasson pneumoperitoneum may be initially established and the hand-assist device can then be placed under endoscopic monitoring. Before initiating a hand-assist procedure, the surgeon is advised to wrap the arm/glove seam on the hand that is to be used through the handport either with a 1010 drape or an Ioban (3M, St. Paul, MN) “sticky drape” to waterproof his or her arm; if a 1010 drape is used, the surgeon will need to place a second glove on the hand-port hand to prevent its dislodgment during the procedure.
Additional blunt ports can be rapidly and safely placed using the surgeon’s one hand to place the port while the intra-abdominal hand is used to palpate the tip of the trocar and hence guide its entry into the abdomen. Lastly, the use of a brown glove on the intra-abdominal hand is recommended because they do not reflect the light from the laparoscope and thus reduce glare (Wolf, 2005).
Secondary Trocar Placement
Transperitoneal Standard
Number, size, and exact location of secondary trocars depend largely on the intended laparoscopic procedure. Their configuration should be planned so that neither the tips nor handles of the cannulas cross or come into close contact with one another (a problem termed crossing swords and rollover, respectively) such that adequate working space is provided for all instruments to be used during a particular procedure and allowing for effective triangulation at the surgical site by the endoscope and two working ports. In general, it is reasonable to place the ports in a four-point diamond pattern such that the site of the operation is encircled within the diamond. This is particularly important when considering reconstructive renal procedures, because the angle between the horizontal plane and the needle drivers should be less than 55 degrees whereas the angle between the surgeon’s suturing instruments should be in the 25- to 45-degree range (Rassweiler and Frede, 2002).
Secondary trocars are placed under direct optical control. The 30-degree lens is ideal for this portion of the procedure because turning the lens 180 degrees away from the surgical site provides the surgeon with a panoramic view of the anterior abdominal wall. The operative lights are dimmed, and the tip of the laparoscope is moved upward toward the intended site of port placement, thereby, in the thin patient, transilluminating any superficial blood vessels that need to be avoided while passing the trocar. Using a No. 12 hook or No. 15 small blade, a skin incision is made just wide enough to accept the selected cannula. When placing secondary ports, it is of great importance to direct them toward the intended surgical field to provide tension-free maneuverability of the laparoscopic instruments. This is especially important in obese patients because the errant port will provide resistance to the surgeon throughout the rest of the procedure. Similar to placement of the initial port, all secondary ports are advanced through the abdominal wall using a slow, twisting motion and constant pressure. If necessary, the abdominal wall can be elevated by towel clips placed at the edges of the skin incision made for port entry, to facilitate safe advancement of trocars into the peritoneal cavity. Each secondary port is passed into the peritoneal cavity under meticulous endoscopic monitoring. After placement of the second port, a 5- or 10-mm laparoscope is advanced through this port to inspect the entry site of the first trocar into the peritoneal cavity to rule out any inadvertent injury to the bowel, underlying viscera, or an abdominal wall vessel. To prevent dislocation, ports that do not possess self-retaining mechanisms may be anchored to the skin using No. 2 nonabsorbable sutures. In this regard it is very important for the surgeon to never use a plastic retention sleeve with a metal cannula; this combination creates a situation in which stray electrosurgical current may injure the bowel or other structures adjacent to the cannula since the plastic sleeve insulates the abdominal wall, resulting in increased current density along the metal intra-abdominal portion of the cannula.
Transperitoneal: Hand-Assist
When the hand-assist device is in place, then secondary trocars can be placed with digital guidance. After inspection of the abdomen rules out any potentially interfering adhesions, the surgeon’s index finger is placed on the underside of the abdominal wall at the planned site of trocar placement. A skin incision is made over the surgeon’s index finger and the nonbladed trocar is passed with the other hand and guided by the surgeon’s finger into the abdominal cavity. This is a very rapid and safe way to place all of the secondary nonbladed trocars.
Retroperitoneoscopy Approach
After controlled balloon dilation of the retroperitoneum, the balloon dilator is replaced with a 10-mm Bluntport (US Surgical, Norwalk, CT). A feature unique to this port is the presence of an internal doughnut-shaped retention balloon and an external adjustable foam cuff, a combination that effectively creates an airtight seal at the location of the primary port site (see Fig. 9–10 on the Expert Consult website). Use of this device minimizes CO2 leakage around the 1.5-cm primary port incision, thus reducing the incidence of subcutaneous emphysema and hypercarbia. In our experience this is far superior to the reusable Hasson cannula; with this device efforts directed at minimizing gas leak, such as placing a deep mattress stay suture or placing petroleum jelly gauze around the cannula, were rarely effective.
For retroperitoneoscopy, several port arrangements are possible: a three-port (I distribution) approach can be employed (Gill, 1998; Hsu et al, 1999), the authors prefer a four-port approach (T distribution), whereas Abbou and colleagues (1999) described a five-port approach (W distribution). A 30-degree or flexible laparoscope is used, and all secondary nonbladed ports are introduced under laparoscopic or digital control. The posterior secondary port is placed at the lateral border of the paraspinal muscles along the inferior border of the lowermost (12th) rib, and an anterior port is placed at the anterior axillary line, subcostal; thus the three ports are all in a line, hence an I-shaped configuration (Fig. 9–15). A fourth port may be placed, in the middle axillary line, 2 to 3 fingerbreadths above the anterior-superior iliac spine near the Petit triangle thereby creating a T configuration. Placement of this anterior port any closer to the iliac crest limits the amount of cranial angulation of the cannula. A fifth port can be placed just lateral to the anterior axillary line and on the same level as the fourth port, creating a W configuration. Depending on the anticipated technical difficulty of the procedure, patient obesity, and tumor size, for the I configuration, two 12-mm secondary ports or one 5-mm port and one 12-mm secondary port are used. In either situation, a 12-mm port is routinely placed for the surgeon’s dominant hand to allow interchangeable use of various large-caliber instruments, including a 10-mm Endo Clip applier, a 12-mm Endo GIA stapler, a 10-mm right-angle dissector, and a 10-mm reusable expandable retractor. The two secondary ports should be inserted as far apart as possible to minimize the possibility of instrument tips clashing within the retroperitoneum. The additional two ports can be 5, 10, or 12 mm depending on the surgeon’s preference. Contrary to common conception, the occurrence of an inadvertent peritoneotomy during retroperitoneoscopy does not usually interfere with the subsequent steps of the procedure and conversion to a transperitoneal laparoscopic technique is not mandatory (Gill et al, 2000).
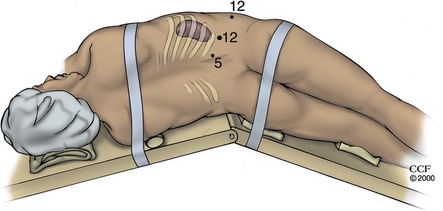
Figure 9–15 For retroperitoneal laparoscopy the patient is positioned in the standard full-flank position. The kidney rest is elevated, and the operating table is flexed to maximize the space between the iliac crest and the lowest rib. A three-port approach is employed. The primary 12-mm port is placed inferior to the tip of the 12th rib. An anterior 12-mm port is placed near the anterior axillary line 3 cm cephalad to the iliac crest. A posterior 5-mm port is placed at the junction of the lateral border of the paraspinal muscles and the 12th rib. (Note: After port placement, the kidney rest is lowered.)
(Reprinted with permission, Cleveland Clinic Center for Medical Art & Photography © 1998-2011. All Rights Reserved.)
Extraperitoneal Access to the Pelvis
After balloon dilation the Bluntport is inserted at the infraumbilical incision. The retention balloon is inflated, and the foam cuff is cinched down onto the abdomen. For robotic procedures a standard 12-mm trocar is placed in the extraperitoneal space and hence care should be taken not to create an incision larger than 12 mm (Esposito et al, 2008). The extraperitoneal space is insufflated with CO2 at a pressure of 12 to 15 mm Hg, and secondary ports are introduced under visual control. Depending on the procedure to be performed, three to four secondary ports are inserted in a triangle-, diamond-, fan-, or W-shaped configuration. Pneumoextraperitoneum is reduced to 10 to 12 mm Hg for the remainder of the procedure. Unlike with retroperitoneoscopy, the occurrence of a peritoneotomy during extraperitoneoscopy may interfere with the performance of subsequent extraperitoneal dissection and conversion to a transperitoneal technique may be required (Meraney and Gill, 2001).
Robotic Considerations
If a robotic procedure is planned, then the camera port is a 12-mm trocar site and the two (or three if the fourth arm is employed) auxiliary ports are 8 mm. All the ports need to be placed 8 to 10 cm apart to reduce the possibility of the robotic arms clashing with each other. In addition, if the patient is in a flank position, then the lowest port placement should not be inferior to the umbilicus or else the arm may be blocked from a full range of motion by the patient’s upside leg. An assistant’s port is placed on a line either caudal or inferior to the robotic arms; placement of the assistant’s port in between the arms of the robot makes it quite awkward for the assistant to work and limits the range of motion of the assistant’s instrument owing to clashing with the arms of the robot.
Laparoscopic Instrumentation
Instruments for Visualization
To create a laparoscopic image, four components are required: the laparoscope, light source, camera, and monitor. To record the image, video recorders, digital video disc, and video printers are available. Laparoscopes that are most commonly used have 0- or 30-degree lenses (range, 0 to 45 degrees) and are available in sizes from 2.7 to 10 mm (most commonly, 5 or 10 mm); however, newer deflectable laparoscopes now exist in which the tip of the endoscope can deflect in four directions up to 90 degrees (Olympus, Melville, NY). Another novel endoscope design is the EndoCAMeleon (Karl Storz, Tuttlingen, Germany). This scope maintains the familiar feel of a standard rigid laparoscope but has a variable-view swing prism that enables the surgeon to change viewing angles from 0 to 30, 45, 90, or 120 degrees. An advantage of the EndoCAMeleon is that it has a standard eyepiece, allowing it to be used with most camera systems.
With standard laparoscopes, image transmission employs an objective lens, a rod-lens system with or without an eyepiece, and a fiberoptic cable. From the eyepiece, the optical image is magnified and transferred to the camera and onto the monitor. Light is transmitted from the light source through the fiberoptic cable onto the light post of the laparoscope (Fig. 9–16A on the Expert Consult website). Some newer laparoscopes have a mini charge-coupled device (CCD) camera mounted at the tip (EndoEYE, Olympus, Melville, NY), which improves image quality and avoids the need for an external light chord that can sometimes impede the movement of other instruments (see Fig. 9–16B on the Expert Consult website). Historically the advantage of the larger laparoscopes is that they could provide a wider view, better optical resolution, and a brighter image. However, today, many of the 5-mm laparoscopes provide an image that rivals traditional 10-mm scopes. These 5-mm laparoscopes, especially those designed with a low profile handle and a deflectable tip, are particularly of use for LESS procedures.
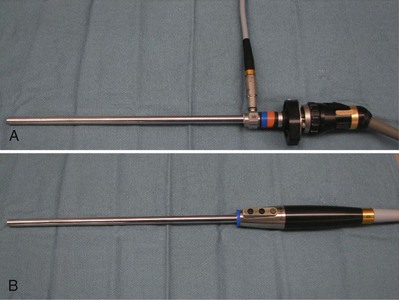
Figure 9–16 A, Standard rod/lens laparoscope and camera. B, Laparoscope with a mini-CCD camera mounted at the tip.
A special variant is the offset “working laparoscope,” which includes a working channel for passage of basic laparoscopic instrumentation; use of this type of laparoscope enables the surgeon to work in a direct line with the image and may allow a reduction in the number of trocars needed to accomplish a particular procedure. However, the working channel occupies space that would otherwise be used for the optical system; thus the resulting image is usually of lesser quality compared with that of laparoscopes without this feature.
The camera system consists of a camera and a video monitor. All currently made cameras can be gas or liquid sterilized, thereby facilitating their use and limiting possible intraoperative contamination. For standard laparoscopes the camera is attached directly to the end of the laparoscope and transfers the view of the surgical field through a cable to the camera box unit. After reconstruction of the optical information the image is displayed on one or two video monitors.
A wide variety of cameras are currently available: single-chip, single-chip/digitized, three-chip, three-chip/digitized, interchangeable fixed-focus lenses, zoom lenses, beam splitter, and direct coupler. Three-chip cameras are superior to single-chip cameras in that they provide a higher-quality image with superior color resolution. Again, some endoscopes have the added advantage of having the chip directly at the tip of the laparoscope such that the images are directly processed without interruption thus greatly improving image quality (EndoEYE, Olympus, Melville, NY). This allows the entire system to be built into the handle such that the endoscope connects directly to the camera box; as such, a better image is obtained and the handle has a very low profile (see Fig. 9–16B on the Expert Consult website). To obtain a “true” upright image of the surgical field on the monitor, the camera’s orientation mark must be placed at the 12-o’clock position. With 0-degree laparoscopes the camera is locked to the eyepiece in the “true” position. In contrast, with the 30-degree laparoscope the camera is loosely attached to the eyepiece of the laparoscope so the laparoscope can be rotated. Accordingly, the assistant must hold the camera in the “true” upright position with one hand while rotating the laparoscope through a 360-degree arc to peer over and around vascular and other intra-abdominal structures; the 30-degree lens thus provides the surgeon with a more complete view of the surgical field than does a 0-degree lens. A more recent advancement in laparoscope technology is the four-way deflectable endoscope (EndoEYE Deflectable Tip Video Laparoscope, Olympus, Melville, NY), which offers many potential angles from which to view a structure but requires an adept assistant.
Three-Dimensional (3D) Laparoscopic Systems
3D laparoscopic systems offer the surgeon the distinct advantage of depth perception. Optimal 3D laparoscopy is performed with a two-lens system that duplicates the two-eye perception of 3D. In this way binocular vision is maintained. The most commonly used 3D vision system currently in use is the InSite Vision System (Intuitive Surgical, Sunnyvale, CA), which provides vision for the da Vinci Robotic System. The laparoscope and high definition camera are heavy (4 lb for the standard scope and camera head and 5.5 lb for the high-definition scope and camera head) but are controlled by a robotic arm that is under direct control of the surgeon from the ergonomic console. The surgeon maintains a steady, magnified 3D view of the surgical field. Zero- and 30-degree lenses are currently available.
Handheld 3D laparoscopic systems are also available but currently require the surgeon to wear headgear with miniature video screens to display the 3D image (EndoSite 3Di Digital Vision System, Viking Systems Inc., La Jolla, CA). With these systems it is often useful to employ the use of a mechanical or robotic camera manipulator because the slight movements associated with handheld camera manipulation can be distracting when displayed in 3D.
The most vexing problem with any laparoscope is fogging of the lens. To prevent fogging of the laparoscope after insertion into the warm intraperitoneal cavity it is advisable to initially warm the laparoscope in a container holding warm saline before it is passed into the abdomen. The most efficient way to warm the laparoscope is to use a dedicated solution warming basin that is long enough to accommodate the laparoscope; alternatively a warming thermos can be used (Applied Medical, Rancho Santa Margarita, CA). In addition, wiping the tip with a commercial defogging fluid or with povidone-iodine solution is also recommended. Should moisture buildup occur between the eyepiece and the camera both components must be disconnected and carefully cleansed with a dry gauze pad; this is not a problem with the digital endoscopes because the only connection is from the endoscope directly into the display box. Again, digital endoscopes that house electronic components at the tip of the instrument should NOT be submerged in water.
Video monitors are available in various sizes ranging from 15 to 26 inches and come in the form of standard cathode ray tube (CRT) monitors or newer flat panel displays. With standard CRT monitors, a larger monitor does not produce a better picture; indeed, given the same number of lines on both monitors, a higher-resolution image is obtained with a smaller screen. To obtain a better image, more lines of resolution are needed. High-resolution monitors have 1125 lines of resolution but must be matched with a camera system of similar capability. Flat panel video monitors are becoming more popular; one advantage is that these screens are usually mounted on a ceiling boom that allows the surgeon to obtain a clear view of both the monitor and the surgical field with the patient in any position. In addition, the flat screen can be lowered and angled close to the surgical site, thereby placing the surgeon’s line of sight and the actual operating field in a truer alignment. Flat panel displays are available in standard and high-definition resolution.
Light sources use high-intensity halogen, mercury, or xenon vapor bulbs with an output of 250 to 300 watts. In addition to manual control of brightness, some units have automatic adjustment capabilities to prevent too much illumination, which may result in a “washed-out” image. Any breakage of fibers in the fiberoptic cable, which may occur during sterilization and/or improper handling, results in decreased light transfer from the light source to the laparoscope. Newer light cables are transparent, allowing the surgeon to actually see when light-bearing cables have been damaged. In the event of bulb failure, an extra bulb (or light source) should always be available.
Videocassette recorders, digital video recorders, and video printers serve for documentation of laparoscopic procedures. Videocassette recorders are very reliable for taping procedures but are very cumbersome when it comes to storing, viewing, and editing for replay. Newer systems that use digital tapes, compact discs, or digital video discs are much more compact and easier to use when it comes to replaying and editing for video production. With regard to still images, the newer digital recorders have the advantage of storing thousands of images and maintain the ability to print paper copies of the desired images.
Instrumentation for Grasping and Blunt Dissection
Most graspers and dissectors are used in their 5-mm size but are available in a range from 3 to 12 mm, in predominantly reusable forms. Grasping instruments have either single-action (only one jaw moves during opening) or double-action (both jaws move) tip design.
Wide variations exist with regard to configuration of tip, surface characteristics of jaws, handle design, and possible electrosurgical properties. Tip designs include blunt-coarse, pointed (dolphin), straight (duck bill), curved (Maryland), and angled. The surface of the jaws may be atraumatic or traumatic. Serrated or smooth surfaces allow gentle tissue manipulation in atraumatic graspers (e.g., bowel forceps with a 3-cm long grasping jaw). Traumatic graspers have toothed or clawed surfaces on their jaws to allow them to grasp and hold tissues firmly. In addition, each of these instruments may be equipped with tip-rotation and/or articulating features. Both reusable and disposable instruments are available.
Depending on the design of the handle, grasping instruments may be locking or nonlocking. Most nonlocking forceps have a scissor-type handle. Different designs allow for locking capabilities; in particular, bar-type and spring-loaded locking handles are convenient when prolonged grasping of tissue is required. Some newer dissectors in addition to grip and rotation actually offer additional degrees of freedom by means of an articulating joint activated through wrist movements of the surgeon (RealHand, Novare Surgical, Cupertino, CA; Autonomy Lapro-Angle, Cambridge Endoscopic Devices Inc., Framingham, MA) (Fig. 9–17). These instruments are most helpful if one is to perform a LESS procedure because the angulation of the shaft then provides the triangulation necessary for approaching the surgical field. In addition, the shafts of these instruments may be of variable length (i.e., 34, 45, or 75 cm), again allowing for less clashing of handles during a LESS procedure.
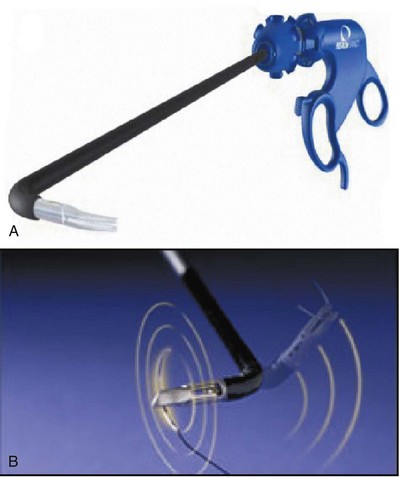
Figure 9–17 Examples of deflecting graspers. A, RealHand (Novare Surgical, Cupertino, CA). B, Autonomy Lapro-Angle
(Cambridge Endoscopic Devices Inc., Framingham, MA).
In addition to standard dissecting instruments, both the laparoscopic suction apparatus as well as the “heel” of the hook electrode can be used for effective and rapid blunt dissection. Along these same lines, the development of laparoscopic “peanuts” or Kittners (i.e., 5- and 10-mm gauze-tipped disposable dissectors) has been most helpful. These disposable blunt dissectors typically come with the usual absorbent material on the tip, in which case the device needs to be continually switched out for a fresh Kittner owing to absorption of fluid or blood during the procedure. A newer nonporous material has now been affixed to the 10-mm Kittners, allowing one device to suffice through an entire case (Vascular Technologies Inc., Nashua, NH). These dissectors can be twirled or moved side to side or up and down in an area of adipose tissue to rapidly tease away the fat surrounding vital structures such as the renal hilum or the adrenal gland. In addition, the device can be used to raise an entire “line” of tissue (e.g., pararenal fat), allowing for its rapid and safe division because neither the shaft nor tip of the Kittner will conduct electrosurgical current.
Water Jet Dissection
Water jet dissectors such as the Helix Hydro-Jet (ERBE, Tubingen, Germany) use an extremely thin, high-pressure laminar liquid jet to develop a cleavage plane in tissues. Pressures of 250 to 350 psi are sufficient for dissecting soft tissue while leaving vascular structures and nerves intact (Shekarriz et al, 2004). The device is activated using a foot pedal and the water jet is administered from a 5-mm wand. This device may have particular application in parenchymal transection as in partial nephrectomy or in nerve-sparing procedures such as during retroperitoneal lymph node dissection (Basting et al, 2000; Shekarriz et al, 2004). However, owing to fluid accumulation in the abdomen, changes in tissue turgor (i.e., fluid laden) and, in particular, splash back from the fluid stream that can foul the laparoscope lens, these devices have not come into widespread usage.
Instrumentation for Incising and Hemostasis
Laparoscopic scissors, scalpels, electrocautery, and lasers (CO2, neodymium:yttrium-aluminum-garnet [Nd:YAG], or potassium titanyl phosphate [KTP]) are used to incise or cut tissue during laparoscopic surgery.
Laparoscopic scissors are available in disposable and nondisposable forms. The blades of laparoscopic scissors are shorter than their open surgical counterparts. The configuration of the tip may be useful for selected situations: serrated tips for cutting fascia, hooked tips for cutting sutures, microscissors for spatulating the ureter during a pyeloplasty, and curved tips for dissection. Incision of the tissue is achieved using either an electrosurgical (“hot”) or a mechanical (“cold”) approach. The scissors may come with either permanent blades or with replaceable tips; the latter ensures “sharp” scissors for each procedure. In addition, the shaft of the scissors may rotate and, in some disposable scissors, even articulate up to 90 degrees. The latter feature is particularly helpful when spatulating the ureter during a pyeloplasty.
A laparoscopic scalpel is also available. It is of particular use for incision of the ureter during laparoscopic ureterolithotomy.
For electrosurgical incision of tissue, a selection of different electrodes is available: needle electrodes (Corson type) produce fine cuts that are useful in making peritoneal incisions, spatula electrodes are used in blunt dissection and cutting, and hook electrodes (J and L configurations) are of particular value during dissection of vessels because tissue can be pulled away from delicate structures before the cutting current is activated. The thinner the metal tip of the probe, the higher the density of the electrical current, and the greater the cutting power.
As with all insulated instruments, certain precautions must be followed during monopolar electrosurgery to avoid local or distant transmitted thermal injury. Consequently, the electrosurgical probe should not be activated unless the metal part is in complete view. The insulation of the electrosurgical instrument should be carefully checked for any damage. The probe should not be activated unless it is in direct contact with the tissue to be incised. Also, use of the monopolar electrosurgical instrument through a metal rather than a plastic cannula decreases the chances of inadvertent electrosurgical injury owing to capacitive coupling. In this regard, one should never use a metal trocar in conjunction with an outer plastic retaining ring because stray current can no longer be harmlessly dissipated through the metal cannula directly to the surrounding peritrocar abdominal wall and hence, any juxtaposed visceral structure may be damaged in an area remote to the laparoscopist’s vision. The same precautions apply with monopolar equipped grasping forceps, which might be used during a procedure to obtain hemostasis.
To avoid the potential dangers of stray current from use of monopolar electrosurgical equipment, the surgeon can use monopolar current in conjunction with active electrode monitoring (Encision Inc., Boulder, CO). This instrumentation is constructed such that there is ongoing feedback during activation of the electrosurgical current; as such, any break in the insulation of the shaft results in immediate deactivation of the instrument.
Floating Ball Electrode (Monopolar Device)
The Endo FB3.0 floating ball electrode (Salient Surgical Technologies, Dover, NH) is a saline cooled radiofrequency surface coagulator/sealer. Skimming a FB3.0 floating ball over a tissue surface in small circles seals the tissue, stopping the flow of blood and other fluids by effectively shrinking the natural collagen in the tissue. The wet energy from the FB3.0 cools tissue and keeps temperatures less than 100° C, preventing tissue charring and eschar formation. This device has been proven to be quite useful for coagulating the parenchymal bed after partial nephrectomy before application of a hemostatic agent and/or bolster (Stern et al, 2004; Urena et al, 2004).
Bipolar Electrosurgical Devices
The laparoscopic surgeon can also use bipolar electrosurgical devices that require less energy for performance than their monopolar counterparts. There is also a decreased likelihood of injury to surrounding tissue because the electrical current is passing only from one jaw to the other, thereby precluding the potential problems of capacitive coupling commonplace with monopolar electrosurgical current. With bipolar current, the extent of coagulative damage is less than with monopolar electrosurgery: 1 to 6 mm versus 5 to 7 mm with monopolar current (Landman et al, 2003).
The LigaSure vessel-sealing system (Valleylab, Boulder, CO) consists of a 5- or 10-mm grasper/dissector connected to a bipolar radiofrequency generator. When the vascular structure is grasped by the instrument the tissue is evaluated by a feedback-response system that subsequently delivers the optimal energy required to seal the vessel effectively. Because of the high-current and low-voltage output, the vascular structure enclosed by the jaws of the instrument degrades quickly and a protein-based seal is presumably created; this mechanism of electrical current delivery to the tissues results in less charring and less collateral thermal damage (1 to 3 mm) (Landman et al, 2003). Indeed, use of this instrument during partial nephrectomy does not compromise the ability of the pathologist to read the surgical margin (Phillips et al, 2008).
An audible signal alerts the surgeon that the sealing of the vessel is complete; the instrument has a trigger activated blade that the surgeon can then use to cut the sealed tissue. Vessels up to and including 7 mm appear to be effectively occluded with this device (Carbonell et al, 2003; Landman et al, 2003). Recent porcine studies have confirmed that the LigaSure effectively seals veins, arteries up to 9 mm in diameter, and ureters of a similar size to above normal physiologic pressures, but only with one LigaSure application to the structure as opposed to multiple applications. Indeed, multiple applications may weaken the seal (Truong et al, 2008).
Another simultaneous vessel sealing and cutting device is the EnSeal PTC. This is a 5-mm instrument that can also act as a grasper/dissector. The electrode design employs a temperature sensitive polymer that helps to limit current spread to surrounding tissues. The device has an I-beam–shaped blade that draws the jaws of the instrument together with increasing force as the blade is advanced through the tissue. Hence, the surgeon can control the rate of cutting by how quickly the instrument handle is squeezed. The device can be used to seal vessels up to 7 mm but is reported to require a longer vessel sealing time than the LigaSure V (Ethicon Endosurgery, Cincinnati, OH) (Lamberton et al, 2008).
Laser Instrumentation
Lasers (CO2, KTP, Nd:YAG, holmium) are most frequently used through the working channel of an operating laparoscope. The CO2 laser provides excellent cutting and vaporization of surface lesions; it requires a rigid hand piece and probe. In contrast, the 400- and 600-µm KTP fibers are flexible and allow for noncontact cutting and fulguration. Nd:YAG laser fibers are also flexible and allow noncontact fulguration and contact cutting. Holmium laser fibers are also flexible and are used in a contact mode for cutting. Fibers with sculpted tips provide more precise cutting. Laser-specific goggles must be worn during all laser-related procedures by every individual in the operating room, including the patient. Lasers are not used in urologic laparoscopy; likewise, in general surgery they have largely been supplanted by electrosurgical instruments. Only in gynecology is the CO2 laser used extensively, generally in the treatment of endometriosis.
Ultrasound Instrumentation
Ultrasonic technology is another option for cutting and hemostasis in endoscopic surgery. It provides an especially attractive alternative to monopolar electrosurgery when one is working around particularly delicate tissues or operating on patients with an implanted pacemaker/cardioverter defibrillator (Gossot et al, 1999; Strate et al, 1999). In ultrasonic surgery, electrical energy is transformed into mechanical energy by the use of a piezoelectric crystal system. Mechanical vibrations produced by this system in the tip of the instrument are capable of causing the following effects on tissue: cavitation, coaptation/coagulation, and cutting (Strate et al, 1999).
In the ultrasonically activated harmonic scalpel/shears, electrical energy is produced by a power-supply generator and transformed into mechanical vibration at the tip of the instrument through a piezoelectric crystal interface (Suzuki et al, 1995; Takeda et al, 1997; Gossot et al, 1999). Mechanical vibration with a tip excursion of 80 to 200 µm (at a frequency of 55.5 kHz) is subsequently transferred to the tip of the instrument. Multifunctionality (grasping, cutting, dissecting, and coagulation) is provided with the shears. In addition to the absent risk of local thermal damage and tissue charring because of a working temperature of less than 80° C, the depth of penetration is limited to the targeted tissue within a diameter of 1 mm (Landman et al, 2003). Reduced tissue charring may result in a reduced rate of postoperative adhesions (Amaral and Chrotstek, 1997). As with bipolar energy, use of ultrasonic energy during partial nephrectomy does not compromise the ability of the pathologist to read the surgical margin (Phillips et al, 2008). In addition, the harmonic scalpel eliminates other problems associated with monopolar electrosurgery, specifically, problems of remote site tissue damage owing to capacitive coupling, insulation defects in the instrumentation, and direct coupling. Potential disadvantages of the harmonic technology include slower vessel sealing (Lamberton et al, 2008) and the fact that the metal portion of the shears becomes quite hot during activation (often over 200° C compared with the bipolar energy–based devices which stay below 100° C) and must not come into direct contact with any bowel surrounding the area of dissection. In fact, the harmonic shears take roughly twice as long to cool to a “safe” temperature after firing (often up to 45 seconds) (Kim et al, 2008).
Other Instrumentation
The argon beam coagulator provides a noncontact form of electrocoagulation. Electrical current originating from a monopolar electrosurgical generator is conducted to the tissue through an ionized argon gas stream. The gas stream blows away blood from the tissue, resulting in better exposure of the bleeding site and, hence, more effective delivery of the electrosurgical current. Argon is a colorless, odorless, inert gas that clears the body within one respiratory cycle (Quinlan et al, 1992). Holding the handpiece at an oblique 60-degree angle within 1 cm of the surface of the target tissue provides optimal coagulation effects. During argon beam coagulation, the sidearm on one of the laparoscopic ports must be opened to prevent buildup of excessive intra-abdominal pressures. Because argon beam coagulation has its major advantage when hemostasis must be achieved over a diffusely bleeding surface, its most practical indication in laparoscopic urologic surgery is during partial nephrectomy, during wedge excision of a small renal tumor, or for control of small liver or spleen lacerations.
Surgical Pharmaceuticals
Recently, a vast array of topical hemostatic agents, sealants, and glues have entered the surgical realm. These agents, depending on their individual properties, can be used for a variety of surgical tasks and have become a valuable addition to the surgeon’s tray.
Fibrin-Based Glue
Fibrin glue has been used to promote hemostasis in parenchymal beds, in particular after partial nephrectomy or to seal a liver laceration. The two components of the fibrin glue, fibrinogen and thrombin, are delivered through separate channels and then combine at the tip of the delivery system during application to the tissue. Fibrin glue has an adhesive quality once dry where it essentially hardens into a rubbery coagulum. Tisseel VH Fibrin Sealant (Baxter, Glendale, CA) has the maximum concentration of human fibrinogen available (75 to 115 mg/mL). It can be delivered by means of a laparoscopic applicator in liquid form or in an aerosolized form. One disadvantage of Tisseel is that it requires a preparation time of 20 minutes before it can be applied by the surgeon. If the application at hand requires immediate application (bleeding) then fibrin glue is not a viable option unless it has been prepared in anticipation of possible hemorrhage. Once prepared, Tisseel VH has a shelf life of 36 hours.
Another fibrin-based sealant that can be delivered in a similar manner is Evicel (Johnson & Johnson, New Brunswick, NJ). This agent, which contains 40 to 60 mg/mL human fibrinogen, comes frozen and thus requires no reconstitution. It can be thawed in the hand in 5 minutes and available in another minute. Once thawed, Evicel has a shelf life of 1 month under refrigeration (Tredree et al, 2006). Another advantage is that it contains no bovine serum components (e.g., aprotinin) and hence can be used in individuals with allergies to bovine-derived products. This product can also be applied laparoscopically with an available applicator.
Although all types of fibrin glue use pooled human fibrinogen, the preparations are treated to inactivate viruses. As of 2006 there were no reported cases of viral transmission to a recipient (Tredree et al, 2006).
Non–Fibrin-Based Surgical Hemostats
In contrast to the fibrin-based glues, other hemostatic agents such as thrombin-soaked oxidized cellulose particles (FloSeal, Baxter, Glendale, CA; Surgifoam, Johnson & Johnson, Princeton, NJ) have no adhesive capability at all but are excellent hemostatic agents in the presence of active bleeding from parenchymal surfaces such as a partial nephrectomy bed, a liver/spleen laceration, or an oozing adrenal bed. This agent is also prepared by the scrub assistant and takes 2 minutes to prepare. It is applied through a tube applicator with a syringe. It is most effective when pressure is applied after its delivery; this can be done either with an instrument (e.g., 10-mm gauze-tipped dissector) or with a bolster.
Avitene Microfibrillar Collagen Hemostat (Davol, Cranston, RI) is an active collagen hemostat that accelerates clot formation by enhancing platelet aggregation and the release of fibrin. Similar to FloSeal, it has no tissue sealing capability but is useful for counteracting parenchymal bleeding. EndoAvitene is available in a preloaded endoscopic delivery system designed for use in endoscopic procedures. Developed to easily pass through standard trocars and cannulas, it is available in both 5- and 10-mm diameters.
Chemical-Based Sealants
BioGlue (CryoLife, Inc., Kennesaw, GA) is a two-component adhesive composed of purified bovine serum albumin and glutaraldehyde. The solutions are mixed during application from a controlled delivery system. The glutaraldehyde then crosslinks the BSA molecules to each other and then to the tissue protein at the site of use. Once applied, the agent polymerizes within 20 to 30 seconds and reaches its full bonding strength within 2 minutes. The delivery system comes ready for immediate use. BioGlue is a sealant and must be applied to a dry field and allowed to dry. Thus it cannot be used to counteract active bleeding but can be used to seal a raw, nonbleeding surface.
CoSeal (Baxter, Glendale, CA) is a completely synthetic product composed of two distinct polyethylene glycol polymers that chemically bond together to seal tissue surfaces, suture lines, and synthetic grafts. It does not require thawing, heating, or light activation and hence can be ready in 1 minute. It must be applied to a dry (non-bloody) surface because it does not interact with the clotting cascade and hence is not useful in the setting of active hemorrhage.
Now that the benefits of such substances have come into the spotlight in surgery it is important for the surgeon to be familiar with the properties of these various agents and thereby able to choose one that is most appropriate for the job at hand. A comparison of popular hemostatic agents is presented in Table 9–2.
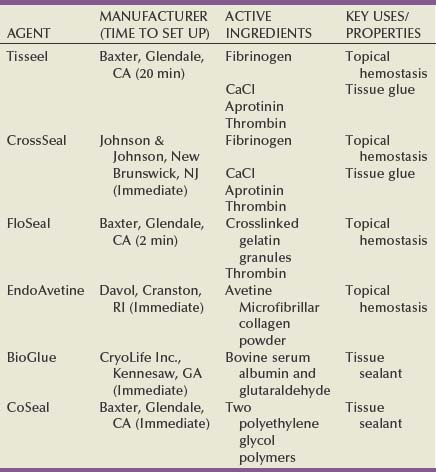
Instrumentation for Suturing and Tissue Anastomosis
Suturing and knot tying are among the most difficult tasks in laparoscopic surgery. A significant amount of practice is needed to achieve a sufficient level of proficiency. Laparoscopic needle holders have one fixed jaw and one jaw that opens by squeezing the spring-loaded handle of the instrument (Fig. 9–18). They all have a locking mechanism to secure the needle in their jaws; this is done with a ratchet, spring-loaded, or Castroviejo-type mechanism. Some needle holders also possess a feature that allows the jaws to rotate around the main axis relative to the handle. The handles may be straight or provide a pistol-type grip. In addition to standard rigid needle drivers some companies have recently developed articulating needle drivers that aid in obtaining more optimal suturing angles with the needle. The actuation of the articulation mechanism is controlled by the surgeon’s wrist motion (see Fig. 9–17) (Laparo-Angle, CambridgeEndo, Hopkinton, MA; RealHand, Novare Surgical, Cupertino, CA).
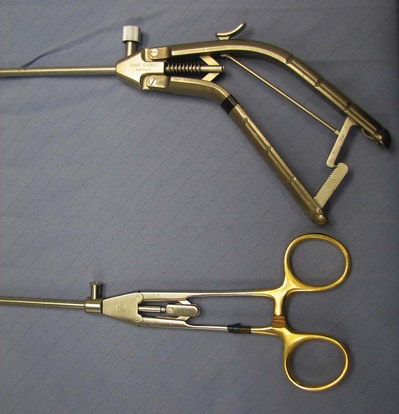
The Endo Stitch (Covidien Ltd., Mansfield, MA) device is an innovative, disposable, 10-mm instrument that facilitates laparoscopic suture placement and knot tying (Adams et al, 1995). The suture is secured to the center of a straight needle with two pointed ends, thereby allowing tissue penetration in either direction. The needle is shuttled back and forth between the jaws of the instrument after each passage through the tissue, applying a long-known principle used in sewing machines. In this way, passing the needle through the tissue and regrasping the needle after it has traversed the tissue become simple tasks because they are done by a one-handed squeeze of the handle and a flip of the needle-securing lever, respectively. Use of this sewing apparatus has had a major impact on decreasing operative times, especially in laparoscopic pyeloplasty (Chen et al, 1998). However, one drawback of suturing in this manner is that the site of needle passage is invariably larger than the needle itself (i.e., because the suture is passed alongside the needle each time); hence if used to close a cavotomy there is oozing along the needle tract that requires placement of either fibrin glue or thrombin-soaked oxidized cellulose. With experience with standard laparoscopic needle holders and especially with the advent of robotic-assisted procedures, use of the Endo Stitch has become less common.
Lapra-Ty clips (Ethicon Endo-Surgery, Somerville, NJ) are a very useful adjunct to suturing and knot tying. These 3.5-mm clips are made of absorbable polydioxanone and are designed to provide secure anchoring of sutures for up to 14 days in low-tension to mid-tension environments (Ames et al, 2005). According to the manufacturer, these suture anchors can be secured to the end of a single strand of polyglactin 910 (Vicryl) suture as fine as 4-0. Experimental models from two different laboratories have shown that these clips are least likely to fall off of polyglactin 910 sutures from size 1-0 to 3-0 (Ames et al, 2005; Weld et al, 2008). In the laboratory environment Lapra-Ty clips have been shown to be slip resistant with 2-0 Monocryl and PDS suture as well. In multiple test trials for each suture type, a percentage of monofilament sutures size 3-0 and smaller as well as 4-0 suture of any type did have slippage of the clip. Hence, it seems logical to avoid Lapra-Ty use with 4-0 suture and to avoid excessive tension when using these clips with 3-0 monofilament suture. The clip acts as a knot, thereby precluding time-consuming intracorporeal laparoscopic knot tying (Fig. 9–19). When they are used to secure a single suture, it is helpful if the suture has a pre-tied loop on its end; the needle is passed through the tissues to be secured and is then passed through the pre-tied loop. Next, the suture is pulled taut, thereby tightening its hold on the encircled tissue; the Lapra-Ty clip is then affixed to the suture material just as it exits the loop. For a running suture, the Lapra-Ty clip can be used both to anchor the end of the suture and to secure the suture on completion of the run. It has also been found to be useful for anchoring bolsters during renorrhaphy for laparoscopic partial nephrectomy (Orvieto et al, 2004).
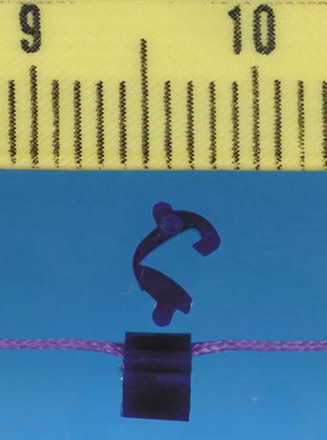
Instrumentation for Stapling and Clipping
Stapling Devices
Various stapling devices are available for tissue occlusion and division (Fig. 9–20). The Endo GIA Universal 12-mm stapler/linear cutting device (Covidien Ltd., Mansfield, MA) requires a 12-mm port and delivers two triple-staggered rows of staples and simultaneously cuts in between the rows. The universal stapler can be loaded with a variety of 30-, 45-, or 60-mm loads and fired any number of times. Similarly, the ETS-Flex 45 stapler (Ethicon, Somerville, NJ) also requires a 12-mm port and delivers two triple rows of staples while cutting between rows 3 and 4. This stapler has a maximum fire limit of 8 staple loads. Articulating/roticulating staplers are available from both companies, which enable the surgeon to properly align the instrument with the tissue to be occluded and divided. Each staple load cartridge is color coded depending on the size of the staples: 2.0-mm staples (gray) or 2.5-mm staples (white) are preferred for vascular (renal vein or renal artery) stapling, whereas 3.8-mm (blue) and 4.8-mm (green) staples are used in thicker tissues (ureter, bowel, bladder). In addition, for laparoscopic live donor nephrectomy, a single Endo-TA (linear noncutting) stapler can be used to secure the patient’s side of the renal vein, thereby providing a longer donor renal vein, because there is no need to trim staples from the vessels before anastomosis in the recipient (Meng et al, 2003). Linear noncutting staplers deliver either three or four staple rows, 30 or 60 mm long. These staplers can also be used to close an enterotomy after a side-to-side bowel anastomosis. When using laparoscopic staplers, special attention must be paid to the markers on the cartridge to ensure that all the targeted tissue is properly situated proximal to the markers before the cartridge is fired. The stapler should not be fired across any previously placed clips because this is thought to possibly cause stapler malfunction. Indeed, in a 9-year review of stapler use (1992–2001), Brown and Woo (2004) noted U.S. Food and Drug Administration–recorded reports of 112 mortalities and 2180 injuries attributed to use of the stapler; overall, malfunctions were reported 22,804 times.
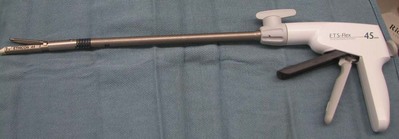
Clipping Devices
Disposable and nondisposable clip appliers are available from different manufacturers. Generally they contain occlusive clips ranging in size from 6 to 11 mm; they require either 5-, 10-, or 12-mm laparoscopic ports. Disposable clip appliers possess a rotating shaft and multifire, self-reloading features, whereas nondisposable instruments have to be reloaded for each clip to be deployed at the site of surgery and often do not have a rotating shaft. A right-angle clip applier that fits through a 10-mm trocar and deploys an 8-mm titanium clip is also available (US Surgical, Norwalk, CT).
Electrocoagulation must be avoided in the vicinity of clips placed for occlusion of vessels to prevent conductive tissue necrosis and subsequent clip dislocation. To ensure reliable function, the closed ends of the occlusive clips must be seen extending slightly beyond the targeted vessel and should be placed perpendicular to the longitudinal axis of the vessel.
In addition to the metal “crush” type clips, polymer clips that completely encircle and lock down around a vessel are available (Hem-o-Lok polymer ligation clip system Weck Closure Systems, Research Triangle Park, NC). They are available in four sizes (M, ML, L, and XL). Up to 10 mm of tissue can be ligated through a 5-mm trocar, and up to 16 mm of tissue can be ligated through a 10-mm trocar. Of note, because of results from a survey put forth by the American Society of Transplant Surgeons, in which use of these clips was associated with hemorrhage from the renal artery stump, the company producing the clips put fourth a statement contraindicating their use for securing the renal artery during laparoscopic live donor nephrectomies (Friedman et al, 2006). Subsequently, a multi-institutional study of 1695 patients from nine different institutions undergoing laparoscopic donor nephrectomy with ligation of the renal artery with Hem-o-Lok clips concluded that the clips were safe to use because in their review there were no adverse bleeding events (Ponsky et al, 2008a). The authors did acknowledge, however, that proper technique of application must be strictly adhered to, including application of at least two clips on the stump of the artery and that a 2-mm cuff of artery should be left distal to the clips (Table 9–3). Removal of a Hem-o-Lok clip is possible using the removal instrument provided by the company should a structure be clipped in error.
Table 9–3 Basic Principles of Hem-o-Lok Clip Placement
From Ponsky L, Cherullo E, Moinzadeh A, et al. The Hem-o-Lok clip is safe for laparoscopic nephrectomy: a multi-institutional review. Urology 2008;71(4):593–6.
Instrumentation for Specimen Entrapment
Various organ entrapment and retrieval systems are available. Depending on the size of the tissue and on whether in-situ morcellation or intact organ retrieval is planned, the laparoscopic surgeon is able to choose among different-sized sacks, materials, and designs. Studies have been conducted to test organ retrieval bags for permeability to tumor cells and bacteria before and after morcellation, as well as for stability during morcellation and resistance to tearing forces (Urban et al, 1993; Rassweiler et al, 1998b). The originally designed (1990) LapSac (Cook Urological, Spencer, IN), which is made of nylon with a polyurethane inner coating and a polypropylene drawstring, is the least susceptible entrapment sack to tearing (Eichel et al, 2004) or leakage of cells. However, deployment of the LapSac and subsequent organ entrapment remain challenging endeavors. To aid in the opening of the LapSac, the neck of the sack can be modified at the time of surgery by the surgeon; using a nitinol guidewire a double wrap (every other hole) of the guidewire is placed around the neck of the sack, such that both ends of the guidewire exit the sack similar to the drawstring (Sundaram et al, 2002). The outward expansion of the nitinol guidewire serves to “open” the neck of the sack. The drawstring is then cut and removed. The sack is loaded onto a nondisposable two tine LapSac introducer (i.e., Cook Urological, Spencer, IN). For a right kidney, the sack is rolled from top to bottom in a clockwise manner, whereas for a left kidney it is rolled from top to bottom in a counterclockwise manner; the handles of the two tine introducer and the ends of the nitinol guidewire should all be on the same side. This ensures that as the sack is unwound in the abdomen, the bottom of the sack remains caudal to the neck of the sack thereby facilitating its complete expansion in the abdomen. If this is not done, then the bottom of the sack lies cephalad to the body of the sack and the surgeon needs to expend additional energy and time to move the bottom of the sack caudal. As a rule, it is easiest to deploy the LapSac through the umbilical or supraumbilical 12-mm port site with the laparoscope placed in the subcostal midclavicular 12-mm port; if an 8 × 10-inch sack is being used (i.e., the largest available sack) the cannula is removed and the LapSac is passed under endoscopic guidance through the 12-mm incision site. Once the sack is completely in the abdomen it is then unwound and the introducer is removed; the 12-mm port is replaced. Atraumatic grasping forceps are then used to unfurl the sack. The sack is further expanded by passing the laparoscope into it and moving the endoscope in an ever-widening circle as it is being withdrawn; the nitinol guidewire at the neck of the sack further aids the opening of the sack. The specimen is moved cephalad until it lies on the surface of the liver or spleen before the entrapment sack is inserted. The three tabs of the mouth of the sack can be secured with locking grasping forceps, thereby opening the sack as though it were a tent. The base of the sack is then moved to a position beneath the edge of the liver or spleen; the specimen can then be moved into the sack. Up to a 2-kg specimen can be secured within the LapSac.
Other entrapment sacks offer marked advantages when the only goal is organ entrapment and intact removal, rather than morcellation. These sacks have spring wires that, when activated by the surgeon, deploy the bag after its introduction into the abdomen; this facilitates tissue entrapment because the broad wire supports stabilize the opened sack, thereby allowing the surgeon to literally scoop the specimen into the sack (Fig. 9–21). The entrapped specimen can easily be withdrawn through a hand-assist site or by enlarging a laparoscopic port site, usually to 5 to 7 cm for most specimens.
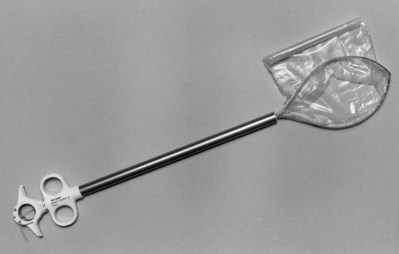
Instrumentation for Morcellation
Various techniques of tissue morcellation have been used in laparoscopic surgery. The simplest method for fragmentation of tissue within the entrapment sack is use of the index finger or ring forceps. The first mechanical morcellation devices worked by punching out pieces of tissue (i.e., serrated-edge macro-morcellators) (Semm, 1991). They were designed for removing relatively small amounts of tissue. The advent of laparoscopic nephrectomy resulted in the development of a foot-activated, aspirating, electrical morcellator for tissue fragmentation and evacuation (Cook Urological, Spencer, IN) (Clayman et al, 1992). However, this instrument is no longer available, having been removed from the market in 2001. Traditionally, ring forceps or a large Kelly clamp have been used. Recently, however, it has been shown that ring forceps are the preferred instrument for manual morcellation because they are less likely to puncture the entrapment sack (Eichel et al, 2004). A larger type of ring forceps that has proved helpful in this regard is the Sopher forceps that are commonly used in obstetrics and gynecology; the sturdy jaws of the Sopher forceps are 14 × 45 mm versus only 12 × 22 for the usual ring forceps. If morcellation is performed intracorporeally, the entrapment sack should be a LapSac; however, a variation recently reported by Landman and colleagues for morcellation uses one of the plastic entrapment sacks. In this method, the morcellation is performed above the abdominal wall, by extending the extraction site incision to 3 cm in length. All tissue is fragmented and removed under direct vision above the abdominal surface; at no time is the morcellating instrument out of the direct vision of the surgeon. With this approach, specimens could be morcellated rapidly, with the entire entrapment and morcellation process taking only 13 minutes for clinical specimens as large as 700 g; also fragment size increased from 1.5 to 4.5 g, which might afford better tissue assessment with regard to capsular, vascular, or renal sinus fat invasion (Landman et al, 2003).
When morcellating a renal malignancy, the neck of the sack is triply draped to preclude any contamination: a towel drape, sticky drape (Ioban, 3M, St. Paul, MN) and nephrostomy drape are commonly used. At the end of the morcellation procedure, the morcellating surgeon and assistants re-gown and re-glove. The extraction site can be bathed in povidone-iodine in an effort to further reduce the chance of any wound seeding. Indeed, there has been only one noted wound seeding with morcellation in a LapSac (Fentie et al, 2000); however, with intact specimen extraction without entrapment there has also been a wound seed reported (Iwamura et al, 2004). Indeed, in a multi-institutional study, comprising 2064 radical nephrectomies among which 826 were removed by entrapment and morcellation, there was no instance of a wound seeding with tumor (Micali et al, 2004).
Instrumentation for Aspiration and Irrigation
Available as disposable and nondisposable devices, a combination of aspiration and irrigation abilities in one instrument is most practical. The aspirator, which is connected to a suction system, consists of a 5- or 10-mm metal tube, with suction controlled by either a one-way stopcock or a spring-controlled trumpet valve. The irrigation channel is also operated by either a one-way stopcock or a trumpet valve. The irrigation fluid is pressurized to allow for effective delivery of the irrigant and flushing of any bleeding site for accurate hemostasis. Usually, saline or lactated Ringer solution is used as the irrigation fluid. Heparin (5000 units/L) may be added to prevent blood clots from forming, should there be any intraoperative bleeding.
Instrumentation for Retraction
Retractors greatly facilitate laparoscopic surgery. They help expose the area of surgical interest by holding away tissue and organs (e.g., fat, liver, bowel). Sometimes they also facilitate vascular dissection by putting tissue and/or organs closely associated with the vascular structures on stretch. Many varieties of retractors with different features are available. The simplest retractor is a metal bar with an atraumatic tip or a curved saddle shape; the latter is helpful for retracting a vessel during lymph node dissection. Similarly, the disposable laparoscopic “peanut,” in either its 5- or 10-mm rendition, is very helpful because it can both dissect and atraumatically retract tissue.
However, the most useful retractors are the expanding types: fan retractors with three or four atraumatic finger-like extensions, fan retractors with V-hinge joints, balloon retractors, and kite-style instruments (e.g., PEER retractors) (Jarit, Hawthorne, NY) (Brooks, 1993). The 5-mm kite style retractor provides a 2 × 3-cm retracting area, whereas the 10-mm instrument doubles the area of direct retraction to 4 × 3 cm (Fig. 9–22 on the Expert Consult website); this type of retractor is very helpful for firm retraction, such as on the kidney to put the renal hilum on stretch.
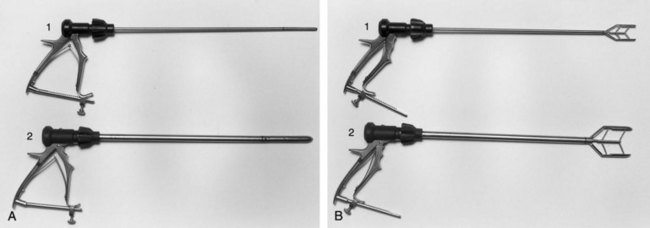
Another type of retractor is malleable and thus can be shaped to the needs of the surgeon. The Diamond-Flex angled 80-mm triangular retractor (Snowden Pencer, Tucker, GA) can be adapted to many different angles, curves, and shapes, and the surgeon can lock in its particular configuration. This feature is of particular value when retraction of a delicate organ such as the liver is required. This instrument forms a broad retracting surface 8 cm in length.
Retraction of tube-like structures (e.g., vessels, ureter) can also be achieved by placing a suture, a vessel loop, or an umbilical tape around the tissue and applying traction either with a grasper inside the abdomen or by pulling the ends of the retraction loop out of the abdomen through a small stab incision using a Carter-Thomason device (Carter, 1994) or by encircling the structure with a suture affixed to a Keith needle, which can be passed across the abdominal wall, around the structure to be retracted and then back out the abdominal wall (see later under Exiting the Abdomen). The retraction loop can then be secured under slight tension on the surface of the abdomen with a small hemostat. Care should be taken during the use of this technique because excessive tension may injure the structure being retracted.
Also, for blunt retraction, the surgeon’s hand, placed into a hand-assist device, is most helpful. In this regard, two key aspects for retraction are of note. First is the concept that the hand should be deployed such that the palm faces the laparoscope as much as possible. In this manner, tissue is brought by the hand toward the laparoscope. It is helpful to use a brown glove that will not reflect the light as much as the standard glove. A second helpful maneuver is the C configuration, as described by Strup, to dissect the renal hilum (Strup et al, 2005). In this maneuver the forearm is passed through the hand-assist device parallel to the aorta/cava while the palm faces laterally. The wrist is flexed to 45 to 90 degrees to allow the fingers to lift the kidney while the thumb pushes inferomedial to retract the tissues overlying the renal hilum. Accordingly, excellent traction and countertraction are achieved, which may speed a safe hilar dissection (Wolf, 2005).
Mechanical Assistants
External mechanical devices such as the EndoHolder (Codman, Raynham, MA) or the LaproStat (Civco, Kalona, IA) can be used to keep grasping forceps or locking retractors in position, thereby taking the place of a tableside assistant. This device is usually mounted on the side of the table opposite the surgeon; the malleable free arm of it is then affixed to the shaft of a grasping forceps or laparoscopic retractor. When the surgeon has employed the retractor to its given purpose, the malleable arm of the external mechanical device is locked in place, thereby providing reliable, continued traction. The advantage of the EndoHolder is that it has no disposables associated with it; however, it is constructed with a gooseneck configuration that requires the scrub nurse to unscrew it and reaffix it each time the retractor needs to be moved. In contrast, the LaproStat, once locked, can still be moved without having to unlock it; however, this device requires use of a new sterile plastic disposable drape for each case (cost: $10.00 US).
Robotic Instrumentation
For the da Vinci Robotic System (Intuitive Surgical, Sunnyvale, CA) the camera lens fits through a variety of standard 12-mm disposable trocars. The 8- and 5-mm instruments fit through proprietary reusable 8- and 5-mm trocars that couple directly with the robotic arms. These reusable metal trocars have disposable valves that must be changed with each new case. Similarly, a wide variety of articulating instruments are available. The proprietary Endowrist technology offers articulation at the tip of the instruments with 7 degrees of freedom, mimicking the wrist movements of the surgeon at the robotic console (Fig. 9–23). A full line of 8-mm scissors, dissectors, bipolar dissectors, electrocautery cutting devices, needle drivers, clip appliers, retractors, as well as an ultrasonic scalpel are available. The 5-mm line of instruments is slightly more limited but still offers a relatively complete line of instruments. It should be noted, however, that the 5-mm robotic laparoscope offers a two-dimensional (2D) not 3D image. All robotic instruments for the da Vinci Surgical System (except the laparoscopes) have a 10-case limit before they must be replaced. The number of “lives” left on each instrument should be recorded with each case. An additional safety feature on all robotic grasping devices is a small Allen bolt that can manually open the jaws of the instrument in the case of a robotic arm malfunction or loss of power in which the grasper is locked on to tissue or a needle at the time of failure. Of note, robot failure is quite rare; in the series from the University of Chicago, a robot failure was recorded in less than 1% of cases; half of these problems (e.g., failure to power up, optical malfunction) were discovered before the patient entered the operating room. In addition, in the few instances in which there was a system malfunction (e.g., loss of 3D vision, robotic arm failure) during the case (0.4%) the procedure could still be completed without converting to an open option (Zorn et al, 2007).

Instrumentation for LESS
A detailed description of abdominal access and access devices for LESS such as the TriPort and Uni-X has previously been presented in this chapter. By definition, in LESS, all of the instrumentation for the case including a camera/lens for visualization as well as working instruments to perform the procedure must be placed though a single incision. This creates ergonomic challenges with regard to instrument collisions inside and outside the abdominal cavity. Furthermore, the typical trocar arrangement for laparoscopy that affords one the ability to “triangulate” is largely lost with LESS. Much of the emphasis on instrumentation for LESS therefore centers on minimizing instrument collisions outside the abdominal cavity and re-creating the “triangulation” necessary to approach the surgical site safely (Fig. 9–24).
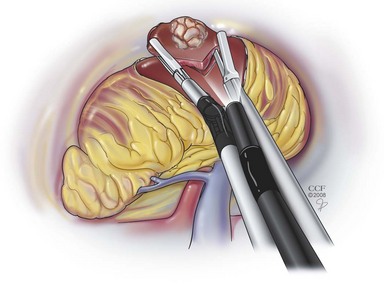
Figure 9–24 Deflecting laparoscopic instrumentation can be used to maintain triangulation during LESS.
(Reprinted with permission, Cleveland Clinic Center for Medical Art & Photography © 1998-2011. All Rights Reserved.)
With regard to endoscope choice, one issue encountered is that the light cord often attaches to the telescope at a 90-degree angle and can thus hinder the movement of the lens or other instruments (see Fig. 9–16A on the Expert Consult website). To avoid this problem one can use an endoscope that has the light cord attached end-on from the back directly into the endoscope (Karl Storz, Tuttlingen, Germany) or a one-piece endoscope that already has an end-on integrated light cord (Olympus, Orangeburg, NY) (see Fig. 9–16B on the Expert Consult website). Alternatively an extra-long laparoscopic lens can be used to keep the light cord away from the shorter standard working laparoscopic instruments. Similarly, using laparoscopic instruments of different lengths can help keep the handles from clashing with one another.
With regard to overcoming the parallel nature of the instrument paths and reestablishing a triangular arrangement of instrumentation, several technologic advances have been developed so far. At the very least an angled lens (30- or 45-degree fixed angle) should be used. Preferably, a laparoscope with a deflecting tip (Olympus EndoEYE) or adjustable angle tip (Karl Storz EndoCAMeleon) should be used because these telescope designs offer the greatest adjustability for optimal viewing.
Additionally, the use of articulating instrumentation is essential to avoid instrument collision outside the abdomen and to achieve proper triangulation for tissue retraction, exposure, and dissection. Disposable articulating instruments are available from Real Hand (Novare Surgical Systems, Cupertino, CA) and from Autonomy Laparo-angle (Cambridge Endo, Framingham, MA) (see Fig. 9–17). In the near future, curved laparoscopic instrumentation (not yet commercially available) will likely be quite helpful and may provide a nondisposable alternative to the current articulating instruments, which are all one-time-use items.
Finally, the use of the robot for LESS procedures has been introduced in the laboratory, originally by Box and colleagues (2008) to perform a transumbilical and transvaginal nephrectomy. Subsequently using the robot arms on both the transumbilical navel port system and on a transvaginal port, Haber and associates (2008) successfully performed a series of pyeloplasties, partial nephrectomies, and total nephrectomies. To be sure, the ability of the robotic arms to articulate is a major plus and one can envision that LESS will follow the path of standard laparoscopy into the robotic age.
Instrumentation for Natural Orifice Transluminal Endoscopic Surgery (NOTES)
The concept of NOTES is not truly new; indeed, the first NOTES procedure would have been Philipp Bozzini’s cystoscopy in 1804. What is new is the use of flexible endoscopic technology to perform procedures heretofore unthinkable with a transgastric (e.g., appendectomy in 2004 by Rao and Reddy) or transvaginal approach (e.g., appendectomy in 2004 and cholecystectomy in 2007 independently by Bressler and then Marescaux). Over time these increasingly complex endoscopes have developed from purely diagnostic instruments for visualization of intraluminal surfaces to highly functional endoscopes capable of carrying therapeutic tools that can be used to treat visualized problems. Recently, further advances in this type of technology have led to the development of endoscopes specifically for transluminal surgery. The potential advantages of transluminal endoscopic surgery are better cosmesis, less pain, elimination of the risk for wound infection, hernias, and a reduction in adhesions (Swanstrom et al, 2008a, 2008b).
There are several prototype endoscopes currently under evaluation for NOTES. Generally these endoscopes offer larger working channels than standard endoscopes and allow larger instrumentation. Some endoscopes such as the Transport (USGI Medical, San Juan Capistrano, CA) are designed with a guideable locking overtube through which other instruments can be placed; within the 20-mm overtube there are four ports (7 mm, 6 mm, 4 mm, and 4 mm) to accommodate the endoscope and up to three additional instruments. One of the working channels houses a standard 6-mm endoscope for vision, and the other working channels are for instrumentation (Fig. 9–25A on the Expert Consult website). Some endoscopes offer triangulating instrumentation. Major hurdles still exist in terms of developing better and more effective instrumentation and especially devices for suturing and enterotomy closure. The Transport, for instance, can be used to perform enterotomy closure using special suture anchors (g-Cath, USGI Medical, San Juan Capistrano, CA) (see Fig. 9–25B).
Figure 9–25 B, Special suture anchors for enterotomy closure (g-Cath, USGI Medical, San Juan Capistrano, CA).
Thus far, in urologic practice, NOTES is still in an experimental phase, albeit the seminal paper on this topic being Gettman and associates’ porcine transvaginal nephrectomies in 2002. Case reports of NOTES transgastric and transvaginal nephrectomy (Isariyawongse et al, 2008), transgastric and transvesical (Lima et al, 2007) and transvaginal and transumbilical (actually NOTES assisted) nephrectomy with the Transport system (Box et al, 2008) in swine have been reported; however, NOTES has not been applied clinically as of the end of 2008.
Exiting the Abdomen
Port Removal
Port removal and fascial closure are key elements of the procedure that, if not performed in a step-by-step, organized fashion, can result in major, possibly fatal, complications. Herniation, possible bowel incarceration, and postoperative hemorrhage are the results of a poorly performed or haphazard, overly rapid exiting of the abdomen.
Before port removal is initiated, the operative site and the intra-abdominal entry sites of each cannula must be carefully inspected with the intra-abdominal pressure lowered to 5 mm Hg. After achieving perfect hemostasis, the surgical site is irrigated with the option of leaving behind 500 to 1000 mL of irrigation fluid, which contains cefazolin, 1 g/L, and heparin, 5000 U/L. Whether this maneuver truly results in a lower incidence of postoperative adhesions or in less infection is undetermined. To avoid any possible acute herniation of intra-abdominal contents into the previous port sites, removal of all laparoscopic ports must be undertaken strictly under laparoscopic visual control.
In the rare case in which bladed trocars are used, after inspection at 5 mm Hg, the first 10- or 12-mm port is removed and the fascia at the entry site is secured with 0-0 Vicryl. This is most efficiently accomplished using a commercially available dual-channeled cone and a suture-passing device such as a Carter-Thomason suture passer (see later) (Inlet Medical, Eden Prairie, MN). This suture is not tied at the time of placement, but instead a 10-mm plastic introducer rod is passed back into the abdominal cavity through the port site incision. The 10-mm cannula is then slid over the 10-mm plastic introducer and the plastic introducer is removed. In this manner, the ports can continue to be used for the passage of the 10-mm laparoscope and the passage of a grasping forceps to facilitate the closure of each 10-mm port site. Accordingly, all fascial sutures are placed under direct endoscopic control as the 10-mm laparoscope is moved from port to port to visualize the placement of each suture. After all fascial sutures have been placed, each 5-mm port is removed under endoscopic control at 5 mm Hg pressure; 5-mm ports are not closed in the adult but are closed in the pediatric patient (there is also a 5-mm cone to aid closure of the 5-mm port with a needle-nosed suture passer). Then each of the non–endoscope-bearing 10-mm ports can be removed under endoscopic control and the fascial suture can be tied and the closure inspected endoscopically. The final 10-mm port is removed with the endoscope in place to assess for any bleeding along the tract; however, the hemostasis of this port site should have been ensured at the time of placement of the fascial closure suture. In this manner, each port is visually assessed for any bleeding at 5 mm Hg, thereby precluding the possibility of removing a port and missing an injured vessel. After removal of all ports, the CO2 is allowed to pass out passively through the 5-mm port sites.
Presently, with the shift away from bladed to nonbladed trocars, the need for port closure for even 12 mm ports has come into question. Reports by Shalhav have shown that 12-mm ports regardless of site (i.e., midline vs. transmuscular) do not require fascial closure (Siqueira et al, 2004). In the literature, the switch from bladed to blunt trocars has resulted in a marked decrease in abdominal wall bleeding (from 0.83% to only 0.16%) and in port site hernia formation (1.83% to 0.19%) (Hashizume and Sugimachi, 1997; Thomas et al, 2003).
With regard to the hand-assist device, it should be removed before removal of the other port sites. The hand-assist device wound is closed as one would close a typical abdominal wound; however, recent data support an interrupted closure with nonabsorbable suture (Troxel and Das, 2005) because complications from the hand-port site (11%, see later) exceed what would be expected with a standard laparoscopic approach by almost fourfold overall. Indeed, wound infection, hernia or dehiscence at the hand-port site has been noted in 6.8%, 3.5%, and 0.5% of patients, respectively, in the series from the University of Michigan (Montgomery et al, 2005). After closure, the pneumoperitoneum is reestablished and the other port sites are closed as previously described. Proceeding in this fashion precludes the chance of injuring the bowel or omentum beneath the hand-port site and ensures an airtight closure.
Instrumentation for Port Site Closure
Several possibilities for closure of port sites exist. The simplest method is retracting the skin with Senn retractors, grasping the fascia with Kocher clamps, and suturing it with absorbable 0-0 suture. However, in any patient with a BMI greater than 30, securely accessing the fascia is very difficult to accomplish.
Fortunately, several devices for complete en bloc closure of fascia, muscle, and peritoneum under direct vision have been developed (Carter 1994; Monk et al, 1994; Garzotto et al, 1995; Elashry et al, 1996). These work well in patients of all sizes.
The Carter-Thomason needlepoint suture passer (Inlet Medical, Eden Prairie, MN) consists of a 5-, 10-, or 12-mm cone that has two integrated, hollow, angled, cylindrical passages located 180 degrees opposite each other (Fig. 9–26). With the sharp-needlepoint, single-action grasper, the 0-0 Vicryl suture is inserted through one of the cylinders in the metal or plastic cone, thereby traversing muscle, fascia, and peritoneal layers in an ever-widening angle; the end of the suture is grasped with a 5-mm grasper through one of the other ports. The needlepoint grasper is reintroduced through the other cylinder of the cone, and the intra-peritoneal end of the suture is grasped by the needlepoint grasper and pulled out of the abdomen. The cone is slid off both ends of the suture. Subsequently, closure of the fascia, muscle layer, and peritoneum is accomplished by tying the suture. The Carter-Thomason needlepoint device not only is helpful for wound closure but also can be used as a fifth port during nephrectomy to help hold the sack open or to encircle the ureter with a vessel loop through a small stab incision.
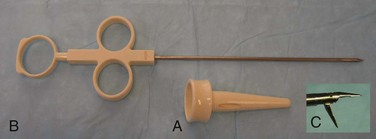
Figure 9–26 Carter-Thomason device. Cone (A); needle-point, single-action grasper (B); and tip of grasper in open condition (C).
The disposable Endo Close suture carrier (Covidien Ltd., Mansfield, MA) is a device with a spring-loaded suture carrier at its tip. Loaded with a suture, the device traverses fascia, muscle, and peritoneum alongside the port. After reinsertion on the opposite side of port entry, it is reloaded with the suture, aided by a 5-mm grasper, and is pulled out again under optical control so that the suture can then be tied.
A far simpler, less expensive, homemade solution is available to all surgeons for closing ports in a large patient. This angiocatheter technique applies the previously described principles. A 14-gauge, sheathed needle is passed alongside the port through the abdominal layers. After removal of the needle, a 0-0 Vicryl suture is inserted through the angiocatheter sheath until it is deep inside the peritoneal cavity. After the sheath is removed, the same maneuver is repeated on the opposite side, but this time a 30-inch 0-0 Prolene suture folded in half is passed into the peritoneal cavity through the sheath to act as a retrieving loop. A 5-mm grasper passed through another port is then passed through the loop of 0-0 Prolene suture and used to grasp the end of the 0-0 Vicryl suture. The 0-0 Vicryl suture is pulled through the Prolene loop and released. By pulling the Prolene loop upward through the angiocatheter sheath, the entrapped 0-0 Vicryl suture is then retrieved from the abdomen. After the angiocatheter sheath is removed, the two ends of the suture can be tied or the cannula replaced until all of the designated port sites have been properly sutured (see later).
Closure of the Skin
The skin of all 10-mm port sites is closed with subcuticular 4-0 absorbable suture. Adhesive strips are applied to all port sites to close (for incisions <10 mm) or to further approximate (for incisions ≥10 mm) the skin. As an alternative, the skin can be closed using octylcyanoacrylate glue. This has been found to speed closure time and provide an equivalent cosmetic result compared with suturing (Sebesta and Bishoff, 2004).
Postoperative Patient Management
Limited laparoscopic procedures (e.g., laparoscopic varicocelectomy, diagnostic laparoscopy) may allow discharge of patients the same day on an outpatient basis. More extensive procedures may require several days of hospitalization.
After a routine major laparoscopic or robotic procedure emphasis can be placed on “fast tracking” the patient. Fast tracking actually starts preoperatively (as mentioned earlier in this chapter) during which time the patient is premedicated with an antiemetic agent, a non-narcotic pain reliever such as ketorolac (if not a renal failure patient), and an antacid. All incision cites are infiltrated with 1% lidocaine before making the incision to minimize postoperative pain. To avoid postoperative ileus and constipation, patients without renal insufficiency can be administered ketorolac every 6 hours for a total of four doses to avoid narcotic analgesic use. Routine use of a nonsedating antiemetic agent for the first 24 hours is also advisable.
The patient is usually given clear liquids on returning to the outpatient area or the hospital floor. A regular diet is provided either the evening of surgery or the morning thereafter.
Ambulation depends on the type of procedure performed as well as the overall health status and morbidity of the patient before surgery. The healthy patient after a laparoscopic/robotic procedure is encouraged to ambulate as soon as possible after the procedure. Pneumatic compression stockings for prophylaxis against deep venous thrombosis are left on until the patient is fully ambulatory. The use of subcutaneous heparin injection for deep venous thrombosis prophylaxis should be used at the discretion of the surgeon (a full discussion of this topic is provided later in this chapter).
For procedures not involving the bladder, the Foley catheter is removed either while the patient is still in the operating room (pneumoperitoneum <2 hours) or the following morning (pneumoperitoneum >2 hours). Indwelling Foley time will vary after procedures involving the bladder. A good rule of thumb is to leave the catheter for 7 days after a procedure in which the bladder was opened. For procedures involving the bladder in a previously irradiated field it may be necessary to allow additional time for healing. Nasogastric tubes are removed in the operating room immediately on completion of the procedure for most procedures but may be left in longer if bowel is used for urinary diversion or augmentation depending on surgeon preference.
Antibiotics are usually discontinued after 24 hours unless the risk of infection is high as in the case of nephrectomy for xanthogranulomatous pyelonephritis. Laboratory values are obtained in a standardized manner (hemoglobin, hematocrit, sodium, bicarbonate, chloride, potassium, creatinine) postoperatively and the next morning as needed. In general, for a healthy patient undergoing an uneventful laparoscopic procedure, no laboratory studies are needed. However, after a major procedure or for high-risk patients, postoperative and 24-hour laboratory studies are warranted. This is especially important in the patient with pulmonary disease because the greatest risk of hypercarbia may occur 2 to 3 hours after the procedure. After an uncomplicated laparoscopic procedure, a postoperative chest radiograph is no longer recommended (Simon et al, 2005).
Parenteral analgesia (e.g., morphine, ketorolac) is given on the day of surgery and is usually replaced by oral pain medication on the first postoperative day. By using the previously stated or similar methods to “fast track” patients after laparoscopic nephrectomy there has been a significant reduction in nausea, improved pain control, and shortened hospital stay (Recart et al, 2005).
Physiologic Considerations in the Adult
The rapidly expanding number of newly developed laparoscopic and robotic procedures in operative urology has resulted in an increasing need for urologists, as well as anesthesiologists, to familiarize themselves with both the physiology and the potential complications related to the pneumoperitoneum and patient positioning.
Choice of Insufflant
Carbon Dioxide
CO2 is the insufflant most commonly used for laparoscopic surgery. Owing to its properties (colorless, noncombustible, and inexpensive), it is favored by most laparoscopists. Prolonged postoperative distention of the abdomen does not occur because CO2 is quickly absorbed (Wolf and Stoller, 1994). It is highly soluble in water and easily diffuses in body tissues. Because of its high diffusion coefficient relative to oxygen and other respiratory gases, it readily moves out of the peritoneal cavity, owing to a high diffusion gradient caused by the difference in concentration of CO2 between the intraperitoneal space and the surrounding components (e.g., blood). However, the characteristic of rapid absorption, which lessens the chance of a CO2 gas embolus, may also lead to potential problems (e.g., hypercapnia, hypercarbia, associated cardiac arrhythmias). In particular, patients with COPD may not be able to compensate for the absorbed CO2 by increased ventilation; this may result in dangerously elevated levels of CO2 in these patients, thereby necessitating the direct testing of arterial blood gases during laparoscopy in the pulmonary compromised patient population. Carbon dioxide also stimulates the sympathetic nervous system, which results in an increase in heart rate, cardiac contractility, and vascular resistance. Lastly, CO2 is also stored in various body compartments (e.g., viscera, bones, muscles). After prolonged laparoscopic procedures it may take hours before the patient has eliminated the extra CO2 that has accumulated in these storage areas; again, this is more often the case and a problem in patients with pulmonary compromise (Lewis et al, 1972; Puri and Singh, 1992; Tolksdorf et al, 1992; Wolf and Stoller, 1994). Therefore, as previously noted, all patients, and in particular those with pulmonary disease, must be closely monitored after a lengthy laparoscopic procedure for possible signs or symptoms of hypercarbia; indeed, their greatest chance of compromise due to hypercarbia may occur after extubation in the postanesthesia recovery room.
Alternative Gases
Nitrous oxide is less irritating to the peritoneum and causes fewer acid-base changes and cardiovascular adverse effects (e.g., arrhythmias) compared with CO2 (Scott and Julian, 1972; El-Minawi et al, 1981; Minoli et al, 1982; Sharp et al, 1982). However, some studies have shown that nitrous oxide insufflation reduces cardiac output and increases mean arterial pressure, heart rate, and central venous pressure (Marshall et al, 1972; Shulman and Aronson, 1984). Because nitrous oxide supports combustion it can be used only during laparoscopic procedures that do not involve the use of electrosurgical instruments.
Helium is an inert and noncombustible insufflant. Initial studies performed in various animal models showed favorable effects on arterial partial pressure of CO2 and pH with no evidence of hypercarbia (Fitzgerald et al, 1992; Leighton et al, 1993; Rademaker et al, 1995). These results were corroborated by clinical studies (Bongard et al, 1991; Fitzgerald et al, 1992; Leighton et al, 1993; Neuberger et al, 1994; Rademaker et al, 1995; Jacobi et al, 1997). As such, helium is particularly useful for the patient with pulmonary disease in whom hypercarbia would be poorly tolerated. In a recent study from Johns Hopkins University, 10 patients at high risk for hypercarbia underwent laparoscopic renal surgery with helium insufflation. These patients were successfully managed, with only one patient developing an end-tidal CO2 over 45 mm Hg (Makarov et al, 2007). Likewise, if hypercarbia develops during a laparoscopic procedure with CO2, rather than aborting the procedure or converting to an open approach the surgeon can change the insufflant to helium and usually salvage the case (Brackman et al, 2003). There is also evidence that the use of helium may cause a decrease in tumor cell growth and inflammatory reactions within the peritoneal cavity (Jacobi et al, 1997, 1999; Dahn et al, 2005). It has also been demonstrated that helium insufflation can be used for laparoscopic procedures (e.g., cholecystectomy, appendectomy, hernia repair) performed under local and regional anesthesia in high-risk patients, not only because of its favorable metabolic features but also because of its lack of peritoneal irritation and its association with decreased postoperative pain (Crabtree and Fishman, 1999). However, laparoscopists have to bear in mind that helium may be associated with a higher risk of gas embolism because of its lower blood solubility. When helium is going to be used, it is advised to initially obtain the pneumoperitoneum with CO2 and then change to helium, thereby lowering the chances of a helium gas embolus. Also, helium is significantly more expensive than CO2 ($45 vs. $11 per tank). Lastly, when using helium a separate “yoke” (i.e., line from the gas tank to the insufflator) is needed; accordingly, one needs to make sure that a “helium yoke” is available in the operating room or make arrangements to have one provided when performing laparoscopy on patients with severe pulmonary compromise. In practice, the use of helium may be quite difficult; however, argon may also be used in circumstances when hypercarbia occurs. Indeed, the gas from the argon beam coagulator can be used to maintain the pneumoperitoneum. With argon being an inert gas, like helium, the same precautions, however, apply (Badger et al, 2008).
Other insufflants (e.g., room air, oxygen) have been used to establish a pneumoperitoneum in the past. However, possible serious side effects (e.g., air embolus, intra-abdominal explosion, combustion with oxygen and room air) have terminated their clinical use. Other options for insufflants include some of the other noble gases (e.g., xenon and krypton), which are inert and nonflammable; however, their widespread clinical use has not been adopted.
Choice of Pneumoperitoneum Pressure
Overall, the most commonly selected pressure for performing laparoscopy is 15 mm Hg. However, McDougall and colleagues (1994) showed a marked reduction in oliguria when working at 10 mm Hg. In contrast, Kavoussi preferred a pressure of 20 mm Hg, noting increased insufflant filling volume of 22% and possibly less venous bleeding during the procedure (Adams, et al, 1999). In contrast, McDougall and colleagues (1994) noted that, despite the increased volume, there was only a very small increase in abdominal girth at higher pressures. Indeed, recent studies support a pressure of 12 mm Hg, as this results in no perturbations in cardiac parameters (i.e., no change in stroke volume) versus a pressure of 15 mm Hg (Mertens zur Borg et al, 2004). Working at lower pneumoperitoneum pressures has also been found to reduce postoperative pain (Sarli et al, 2000).
Various cardiovascular, renal, and respiratory effects seen during different intra-abdominal pressures in the supine state are summarized in Table 9–4. It is of note that these physiologic parameters may be further altered (i.e., overridden or reversed) owing to the health of the individual patient and to changes in the patient’s position.
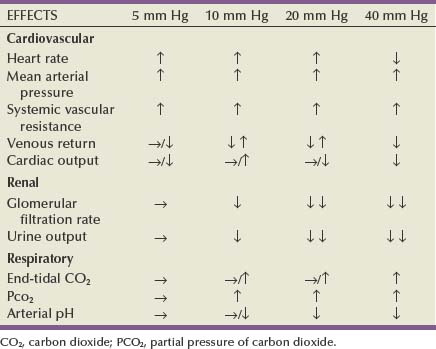
Cardiovascular Effects of the Pneumoperitoneum
Venous Flow
Animal studies have shown that the effects of the pneumoperitoneum on venous return depend on atrial pressures, which, in turn, are a reflection of the hydration state of the subject (Ivankovich et al, 1975; Diamant et al, 1978; Kashtan et al, 1981). If atrial pressures are low (normal or hypovolemic state), then, during a pneumoperitoneum of up to 20 mm Hg, venous return is reduced owing to increased compression of the vena cava from the pneumoperitoneum. If atrial pressures are high (hypervolemic state), the vena cava resists elevated intra-abdominal pressure and venous return is actually enhanced. However, these principles apply only to an intra-abdominal pressure of up to 20 mm Hg. By further increasing pneumoperitoneum pressures, especially to 40 mm Hg and above, capacitance vessels are collapsed, vascular resistance increases, blood flow decreases markedly, and venous return is significantly reduced. Lower extremity venous return is also reduced by elevated intra-abdominal pressures. Reduced venous blood flow in the lower extremities could facilitate deep vein thrombosis; however, this remains a rare clinical complication of laparoscopy (Jorgensen et al, 1993).
These pathophysiologic insights, gained through animal experiments, have been corroborated by clinical studies (Kelman et al, 1972; Motew et al, 1973; Lee, 1975; Jorgensen et al, 1993).
As a result of these trials, intra-abdominal pressures during laparoscopy should not be allowed to exceed 20 mm Hg over extended periods (Arthur, 1970; Seed et al, 1970; Lee, 1975), and a working pressure of 10 to 12 mm Hg is recommended.
Cardiac Arrhythmias
Tachycardia and ventricular extrasystoles may be seen as results of hypercapnia (Scott and Julian, 1972). Peritoneal irritation may lead to vagal stimulation and subsequently to bradyarrhythmias (Doyle and Mark, 1989). Also, dysrhythmias can serve as clinical warning signs for the occurrence of pneumothorax, hypoxia, and gas embolism (Wolf and Stoller, 1994).
Unreliability of Central Venous Pressure Readings
As previously noted, intravenous pressures may actually rise with low intra-abdominal pressures. In addition, increasing intra-abdominal pressures may artificially elevate central venous pressure readings owing to an increase in intrathoracic pressure. Therefore, it is important for the anesthetist not to rely on central venous pressure readings for any clinical decision making. If information regarding vascular volume and central venous pressure is needed, a Swan-Ganz catheter should be placed.
Respiratory Effects of the Pneumoperitoneum
Pressure-Mediated Effects
Owing to increased intra-abdominal pressure, diaphragmatic motion is limited. Pulmonary dead space remains unchanged, but functional reserve capacity decreases (Wolf and Stoller, 1994). The average peak airway pressure needed to keep up a constant tidal volume increases parallel to the increasing intra-abdominal pressure (Alexander et al, 1969; Motew et al, 1973; Wolf and Stoller, 1994).
Although usually not of great clinical importance in a healthy patient population, it is advisable to use positive end-expiratory pressure techniques when patients with lung disease undergo general anesthesia for a laparoscopic procedure (Ekman et al, 1988; Wolf and Stoller, 1994; Hazebroek et al, 2002).
Non–Pressure-Related Respiratory Effects
The head-down position has an adverse effect on respiration. It elevates the diaphragm and decreases vital capacity. It can also lead to a dislocation of the endotracheal tube that, in turn, may cause right main bronchus intubation. Although of little clinical significance in healthy patients, the head-down position may cause pulmonary edema in patients with increased left-sided heart pressures (Prentice and Martin, 1987). Also, during lengthy procedures performed in the head-down position it is useful to limit fluid administration if possible because it will minimize facial swelling postoperatively.
Renal and Other Visceral Effects of the Pneumoperitoneum
Oliguria
Increased intra-abdominal pressure was found to be associated with a significant decrease in urinary output. A number of investigators, with the oldest study dating back to 1923, have observed oliguria and anuria associated with an ongoing increase in intra-abdominal pressure (Thorington and Schmidt, 1923; Harmann et al, 1982; Richards et al, 1983). Decreased renal vein blood flow and direct renal parenchymal compression, rather than marked hormonal changes or ureteral compression, have been shown to be the likely reasons for the oliguric state (Chiu et al, 1994; McDougall et al, 1996). Of interest, renal cortical blood flow decreased with increasing intra-abdominal pressures, whereas renal medullary blood flow increased up to pressures of 20 mm Hg; above this level, medullary blood flow also decreased (Chiu et al, 1994). In a porcine study, neither application of dopamine nor insertion of ureteral catheters was able to improve oliguria owing to elevated intra-abdominal pressure (McDougall et al, 1996). These changes occurred regardless of intraperitoneal or extraperitoneal insufflation. Of note, oliguria was not a problem if a gasless, abdominal wall lift method was used to establish the working space in the abdomen. The decreased renal blood flow seen during pneumoperitoneum may be associated with changes in endothelin-1 (ET) and/or nitric oxide (NO). One recent study in a rat model showed that the effects of pneumoperitoneum can be accentuated using ET or NO blockers or avoided by using ET or NO potentiators (Abassi et al, 2008). There is also experimental evidence showing increased apoptosis in the renal cortex and medulla of rats that have undergone pneumoperitoneum compared with controls. The level of apoptosis appears to be pressure dependent, again supporting the use of lower insufflation pressures, as recommended (i.e., ≤12 mm Hg) (Khoury et al, 2008).
These experimental findings in animals have been corroborated in the clinical setting (Iwase et al, 1992; Chang et al, 1994; McDougall et al, 1996); however, at least one recent clinical study did show that low-dose dopamine (2 µg/kg/min) can prevent the dip in urine output associated with pneumoperitoneum (Perez et al, 2002). Whether antidiuretic hormone and plasma arginine vasopressin, both of which have been measured at increased levels by some investigators, play a major role in oliguria during clinical laparoscopic procedures remains unclear (Melville et al, 1985; Solis Herruzo et al, 1989). In general, if one desires to avoid an oliguric state during a laparoscopic procedure, a pressure of 10 mm Hg or less is recommended. In addition, clinically the use of furosemide (Lasix) (mg dose = 20 times the patient’s creatinine), mannitol (12.5 to 25 g), and dopamine at 2 µg/kg/min can help to overcome oliguria. With this regimen and judicious fluid administration, the patient can usually be maintained with a urine output in excess of 100 mL/hr. The key is to use these pharmaceutical modalities in lieu of excessive hydration and fluid boluses (Perez et al, 2002), which may lead to significant fluid overload and edema.
Effects on Mesenteric Blood Flow and Intestinal Motility
Decreased blood flow during laparoscopic procedures was found not only in the kidney but also in mesenteric vessels and other organs (e.g., liver, pancreas, stomach, spleen, small and large intestines) (Caldwell and Ricotta, 1987; Ishizaki et al, 1993; Hashikura et al, 1994). This may rarely lead to mesenteric thrombosis with catastrophic results. This complication may take days to develop (Schorr, 1998).
Open, incisional abdominal surgery usually results in some postoperative impairment of gastric and intestinal emptying owing to intestinal paralysis (physiologic ileus) (Kemen et al, 1991). Interestingly, clinical observation and studies undertaken during laparoscopic and open surgical cholecystectomy have shown that laparoscopic surgery causes less significant disturbances of the gastrointestinal motility pattern, therefore resulting in no or less postoperative physiologic ileus than occurs with open surgery (Sezeur et al, 1993; Halevy et al, 1994). The exact mechanisms responsible for this difference have yet to be defined; however, it is postulated that perhaps it is related to the hypercarbia (Aneman et al, 2000). Additionally, intestinal perfusion does not change significantly during prolonged pneumoperitoneum at a pressure of 15 mm Hg with CO2 or helium (Goitein et al. 2005); however, at least in the rat model, there does seem to be an increase in bacterial translocation that is proportional to the pneumoperitoneum pressure (Sukhotnik et al, 2006).
Also, despite the increased intra-abdominal pressures associated with laparoscopy, there has been no increased incidence of gastroesophageal reflux and regurgitation in patients undergoing laparoscopic procedures (Schippers et al, 1992).
Acid-Base Metabolic Effects of Pneumoperitoneum
Animal and human studies have demonstrated that prolonged laparoscopic procedures may result in hypercarbia and respiratory acidosis (Motew et al, 1973). Because there is no increase in ventilatory dead space during laparoscopy, the resulting respiratory acidosis has been attributed to transperitoneal absorption of CO2 during establishment and maintenance of the pneumoperitoneum (Motew et al, 1973; Leighton et al, 1993). Although the resulting mild respiratory acidosis does not adversely affect otherwise normal patients and can be corrected by increasing the minute ventilation, increased absorption of CO2 can become dangerous in patients with COPD owing to their impaired ability to release pulmonary CO2. To ensure proper monitoring of acid-base status, intermittent arterial blood gas sampling should be performed in patients with COPD and during any laparoscopic procedure that requires more than 1 hour of CO2 insufflation; also in the patients with COPD, arterial blood gas sampling should continue in the postanesthesia recovery area because after extubation these patients may be at risk of significant hypercarbia owing to subsequent mobilization of procedurally absorbed CO2.
Pneumoinsufflation with CO2 results in variable amounts of gas absorption, thereby raising the partial pressure of CO2 in the blood. Carbon dioxide is absorbed from the peritoneal membrane during transperitoneal laparoscopy and from preperitoneal adipose and connective tissue during retroperitoneoscopy and extraperitoneoscopy (Collins, 1981). Others have also implicated the disrupted microvascular and lymphatic channels for CO2 absorption during preperitoneal laparoscopy (Glascock et al, 1996). The potential for developing hypercarbia exists during both transperitoneal and preperitoneal laparoscopy. Conceivably, this assumes greater importance in patients with preexisting airway and cardiovascular compromise. Although transperitoneal and retroperitoneoscopic approaches are routinely employed safely at numerous centers worldwide, vigilant perioperative anesthetic management is essential to prevent the development of potential complications related to CO2 buildup.
End-tidal CO2 and O2 saturation are monitored intraoperatively using a capnometer. Furthermore, arterial blood gases are obtained during prolonged laparoscopic procedures and in patients with increased risk of developing hypercarbia (owing to airway disease, renal failure, congestive heart failure, or advanced age). A rise in end-tidal CO2 should prompt the anesthesiologist to adjust the respiratory rate and tidal volume to enhance CO2 elimination. Simultaneously, the surgeon should decrease the insufflation pressure of CO2 or, if necessary, desufflate the abdomen completely until the hypercarbia has been resolved. Several studies have demonstrated that CO2 absorption during either laparoscopic approach (transperitoneal or retroperitoneal) increases significantly during the initial 30 to 60 minutes of the procedure and reaches a steady-state plateau thereafter (Wolf et al, 1995; Ng et al, 1999). Which one of the two approaches is associated with greater CO2 absorption remains a debated issue. Although some studies have demonstrated greater absorption during transperitoneal laparoscopy (Giebler et al, 1997), others have demonstrated greater absorption during retroperitoneal laparoscopy using a standard Hasson cannula (Wolf et al, 1995). However, in another study, no significant clinical difference was seen (Ng et al, 1999), provided a blunt port type Hasson cannula was used that tightly sealed the site of entry in between the balloon and soft cuff carried on the shaft of the cannula.
Hemodynamic Effects Related to Patient Position and Type of Approach
Several animal and human studies have examined hemodynamic changes owing to different surgical positions (Kelman et al, 1972; Joris et al, 1993; Williams and Murr, 1993). In the supine position, cardiac output remains unchanged or decreases when intra-abdominal pressures are less than 15 mm Hg, whereas mean arterial pressure (MAP) and systemic vascular resistance increase (Pearle, 1996). If pneumoperitoneum pressures are increased beyond 20 mm Hg, cardiac output is reduced because of decreasing venous return and hence MAP decreases.
Changes in patient position have a marked impact on hemodynamic parameters. Specifically, in the head-up position, heart rate increases, MAP decreases, systemic vascular resistance increases, and cardiac output decreases; in contrast, in the head-down position, heart rate drops, MAP rises, systemic vascular resistance falls, and cardiac output increases (Pearle, 1996). These results have also been shown to hold true in steep Trendelenburg position used for laparoscopic and robotic radical prostatectomy (Falabella et al, 2007). The head-down position seems to be favorable for the laparoscopy patient owing to higher cardiac output caused by increased venous return. However, this beneficial effect is completely negated if pneumoperitoneum pressure is increased to 30 to 40 mm Hg; at pressures this high, the concomitant decrease in venous return results in a decrease in cardiac output.
There is some evidence that the extraperitoneal approach may be beneficial in this regard compared with transperitoneal laparoscopy. Giebler and coworkers (1997) demonstrated that transperitoneal laparoscopy was associated with more pronounced changes in cardiac output (P = .001), pulmonary artery pressure (P = .007), central venous pressure (P = .001), iliac venous pressure (P = .001), and inferior vena caval pressure gradient (P = .00001) as compared with retroperitoneal laparoscopy. With regard to pelvic laparoscopy, Meininger and associates (2004) compared the effects of prolonged intraperitoneal and extraperitoneal CO2 insufflation on hemodynamics and gas exchange. With both insufflation methods, arterial CO2 pressure increased rapidly, reaching higher levels with extraperitoneal insufflation. Therefore patients managed with extraperitoneal insufflation required a significantly higher minute ventilation. Heart rate and central venous pressure increased in both groups, whereas mean arterial blood pressure and pH decreased.
Hormonal and Metabolic Effects during Laparoscopic Surgery
As in other surgical procedures, several hormones (e.g., β-endorphin, cortisol, prolactin, epinephrine, norepinephrine, dopamine) have been noted to increase during laparoscopic surgery as a response to tissue manipulation, intraoperative trauma, and postoperative pain (Cooper et al, 1982; Lehtinen et al, 1987; Lefebvre et al, 1992). The clinical significance of increased serum arginine vasopressin levels seen in open surgery and in response to intraperitoneal insufflation during laparoscopy remains unexplained (Cochrane et al, 1981; Melville et al, 1985; Solis Herruzo et al, 1989).
Several adverse metabolic changes observed during open cholecystectomy are less pronounced with laparoscopic cholecystectomy: (1) reduced postoperative plasma glucose elevation, (2) less decrease in insulin sensitivity, and (3) reduced hepatic stress response (Thorell et al, 1993; Jakeways et al, 1994; Glerup et al, 1995).
One important feature of the catabolic response is a complex intra-organ shift of nitrogen; this reaction has been best characterized in the liver (Glerup et al, 1995). The conversion of amino acids to urea by the liver is much higher after open incisional cholecystectomy than it is after laparoscopic cholecystectomy; hence, the catabolic reaction of the body is decreased with a laparoscopic versus an open, incisional approach (Fischer, 1995). Indeed, in the laparoscopic patient, the reduced postoperative hepatic catabolic stress associated with reduced tissue loss of amino-nitrogen may, in some way, be responsible for the more rapid convalescence that is the hallmark of laparoscopy in general. Lastly, catabolic responses, in the form of released cytokines and opioids, owing to augmented neurohumoral stimuli resulting from incisional tissue trauma may also be lessened with a laparoscopic approach (Fischer, 1995).
Immunologic Effects of Laparoscopic Surgery
A number of animal and clinical studies measuring a wide spectrum of inflammatory response mediators (e.g., C-reactive protein, interleukin-6) and other markers of cellular immune functions (pan–T cells [CD3], helper T cells [CD4], suppressor cells [CD8], and natural killer cells [CD16]; delayed-type hypersensitivity skin tests; serial phytohemagglutinin-induced T cell proliferation) have suggested that laparoscopic procedures generally result in less immunosuppression than do their open surgical counterparts (Kloosterman et al, 1994; Trokel et al, 1994; Cristaldi et al, 1997; Karayiannakis et al, 1997; Nguyen et al, 1999; Bolla and Tuzzato, 2003). This may also play a role in hastening convalescence after laparoscopic procedures. Some data have also suggested that the CO2 pneumoperitoneum in and of itself, as opposed to exposure of tissues to room air, results in a more favorable immunologic state (Watson et al, 1995). Also, experimental evidence shows that less tumor cell growth occurs after laparoscopic procedures than after open procedures (Bouvy et al, 1997). Although these data are intriguing, further well-designed, prospectively randomized clinical studies are needed to compare immunologic responses after laparoscopic versus open surgical procedures for urologic cancer. Whether decrease in inflammatory response mediators and improved postlaparoscopic immune status will translate into a better long-term prognosis for patients with urologic cancers remains to be determined. Indeed, in a recent study by Landman and colleagues (2004) in patients undergoing open or transperitoneal laparoscopic radical/total nephrectomy for renal cancer there was no discernible difference in immunologic parameters; part of the explanation for this observation could well be secondary to the immunosuppressive effects of the tumor itself.