CHAPTER 57 The Periodontal Flap
Aperiodontal flap is a section of gingiva and/or mucosa surgically separated from the underlying tissues to provide visibility of and access to the bone and root surface. The flap also allows the gingiva to be displaced to a different location in patients with mucogingival involvement.
Classification of Flaps
Periodontal flaps can be classified based on the following:
Based on bone exposure after reflection, the flaps are classified as either full-thickness (mucoperiosteal) or partial-thickness (mucosal) flaps (Figure 57-1).
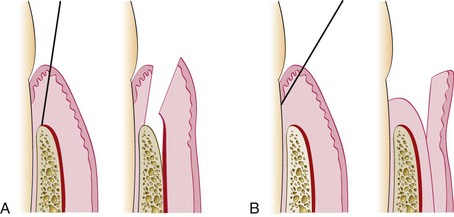
Figure 57-1 A, Diagram of the internal bevel incision (first incision) to reflect a full-thickness (mucoperiosteal) flap. Note that the incision ends on the bone to allow for the reflection of the entire flap. B, Diagram of the internal bevel incision to reflect a partial-thickness flap. Note that the incision ends on the root surface to preserve the periosteum on the bone.
In full-thickness flaps, all the soft tissue, including the periosteum, is reflected to expose the underlying bone. This complete exposure of and access to the underlying bone is indicated when resective osseous surgery is contemplated.
The partial-thickness flap includes only the epithelium and a layer of the underlying connective tissue. The bone remains covered by a layer of connective tissue, including the periosteum. This type of flap is also called the split-thickness flap. The partial-thickness flap is indicated when the flap is to be positioned apically or when the operator does not want to expose bone.
Conflicting data surround the advisability of uncovering the bone when this is not actually needed. When bone is stripped of its periosteum, a loss of marginal bone occurs, and this loss is prevented when the periosteum is left on the bone.4 Although usually not clinically significant,7 the differences may be significant in some cases (Figure 57-2). The partial-thickness flap may be necessary when the crestal bone margin is thin and exposed with an apically placed flap, or when dehiscences or fenestrations are present. The periosteum left on the bone may also be used for suturing the flap when it is displaced apically.
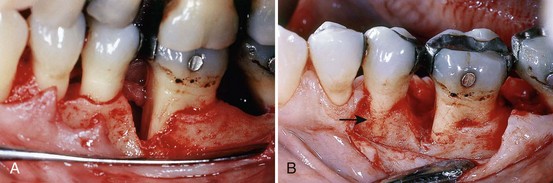
Figure 57-2 Loss of marginal bone as a result of uncovering the osseous crest. A, Mucoperiosteal flap elevated as part of a clinical study. B, Reentry performed 6 months later reveals loss of marginal bone facial to second premolar (arrow).
(Courtesy Dr. Silvia Oreamuno, San Jose, Costa Rica.)
Based on flap placement after surgery, flaps are classified as (1) nondisplaced flaps, when the flap is returned and sutured in its original position, or (2) displaced flaps, which are placed apically, coronally, or laterally to their original position. Both full-thickness and partial-thickness flaps can be displaced, but to do so, the attached gingiva must be totally separated from the underlying bone, thereby enabling the unattached portion of the gingiva to be movable. However, palatal flaps cannot be displaced because of the absence of unattached gingiva.
Apically displaced flaps have the important advantage of preserving the outer portion of the pocket wall and transforming it into attached gingiva. Therefore these flaps accomplish the double objective of eliminating the pocket and increasing the width of the attached gingiva.
Based on management of the papilla, flaps can be conventional or papilla preservation flaps. In the conventional flap, the interdental papilla is split beneath the contact point of the two approximating teeth to allow reflection of the buccal and lingual flaps. The incision is usually scalloped to maintain gingival morphology and retain as much papilla as possible. The conventional flap is used (1) when the interdental spaces are too narrow, thereby precluding the possibility of preserving the papilla and (2) when the flap is to be displaced.
Conventional flaps include the modified Widman flap, the undisplaced flap, the apically displaced flap, and the flap for reconstructive procedures. These techniques are described in detail in Chapter 59.
The papilla preservation flap incorporates the entire papilla in one of the flaps by means of crevicular interdental incisions to sever the connective tissue attachment and a horizontal incision at the base of the papilla, leaving it connected to one of the flaps.
Flap Design
The design of the flap is dictated by the surgical judgment of the operator and may depend on the objectives of the procedure. The necessary degree of access to the underlying bone and root surfaces and the final position of the flap must be considered in designing the flap. Preservation of good blood supply to the flap is also an important consideration.
Two basic flap designs are used. Depending on how the interdental papilla is managed, flaps can either split the papilla (conventional flap) or preserve it (papilla preservation flap).
In the conventional flap procedure, the incisions for the facial and the lingual or palatal flap reach the tip of the interdental papilla or its vicinity, thereby splitting the papilla into a facial half and a lingual or palatal half (Figures 57-3 and 57-4).

Figure 57-3 Flap design for conventional or traditional flap technique. A, Design of incisions: internal bevel incision, splitting the papilla, and vertical incisions are drawn in interrupted lines. B, The flap has been elevated, and the wedge of tissue next to the tooth is still in place. C, All marginal tissue has been removed, exposing the underlying bone (see defect in one space). D, Tissue returned to its original position. Proximal areas are not totally covered.

Figure 57-4 Flap design for sulcular incision flap. A, Design of incisions: sulcular incisions and vertical incisions are depicted by interrupted lines. B, The flap has been elevated, exposing the underlying bone (see defect in one space). C, Tissue returned to its original position covers the entire interdental spaces.
The entire surgical procedure should be planned in every detail before the procedure is initiated.. This should include the type of flap, exact location and type of incisions, management of the underlying bone, and final closure of the flap and sutures. Although some details may be modified during the actual performance of the procedure, detailed planning allows for a better clinical result.
Incisions
Periodontal flaps use horizontal and vertical incisions.
Horizontal Incisions
Horizontal incisions are directed along the margin of the gingiva in a mesial or a distal direction. Two types of horizontal incisions have been recommended: the internal bevel incision,6 which starts at a distance from the gingival margin and is aimed at the bone crest, and the crevicular incision, which starts at the bottom of the pocket and is directed to the bone margin. In addition, the interdental incision is performed after the flap is elevated.
The internal bevel incision is basic to most periodontal flap procedures. It is the incision from which the flap is reflected to expose the underlying bone and root. The internal bevel incision accomplishes three important objectives: (1) it removes the pocket lining; (2) it conserves the relatively uninvolved outer surface of the gingiva, which, if apically positioned, becomes attached gingiva; and (3) it produces a sharp, thin flap margin for adaptation to the bone-tooth junction. This incision has also been termed the first incision because it is the initial incision in the reflection of a periodontal flap, and the reverse bevel incision because its bevel is in reverse direction from that of the gingivectomy incision. The #15C or the #15 surgical blade is used most often to make this incision. That portion of the gingiva left around the tooth contains the epithelium of the pocket lining and the adjacent granulomatous tissue. It is discarded after the crevicular (second) and interdental (third) incisions are performed (Figure 57-5).
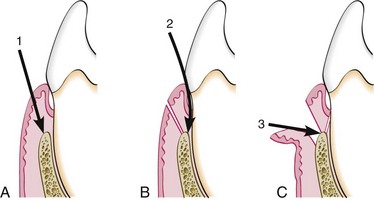
Figure 57-5 Three incisions necessary for flap surgery. A, First (internal bevel) incision; B, second (crevicular) incision; C, third (interdental) incision.
The internal bevel incision starts from a designated area on the gingiva and is directed to an area at or near the crest of the bone (Figure 57-6). The starting point on the gingiva is determined by whether the flap is apically displaced or not displaced (Figure 57-7).
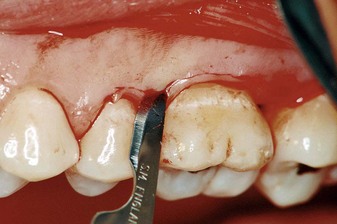
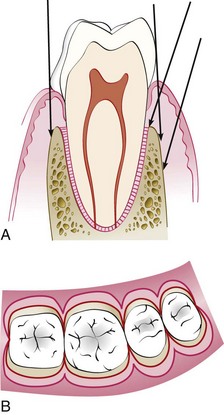
Figure 57-7 A, Internal bevel (first) incision can be made at varying locations and angles according to the different anatomic and pocket situations. B, Occlusal view of the different locations where the internal bevel incision can be made. Note the scalloped shape of the incisions.
The crevicular incision, also termed the second incision, is made from the base of the pocket to the crest of the bone (Figure 57-8). This incision, together with the initial reverse bevel incision, forms a V-shaped wedge ending at or near the crest of bone. This wedge of tissue contains most of the inflamed and granulomatous areas that constitute the lateral wall of the pocket, as well as the junctional epithelium and the connective tissue fibers that still persist between the bottom of the pocket and the crest of the bone. The incision is carried around the entire tooth. The beak-shaped #12D blade is usually used for this incision.

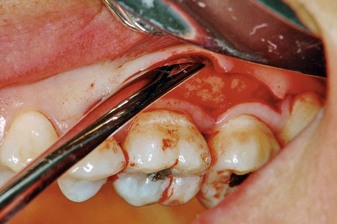
A periosteal elevator is inserted into the initial internal bevel incision, and the flap is separated from the bone. The most apical end of the internal bevel incision is exposed and visible. With this access, the surgeon is able to make the third incision, or interdental incision, to separate the collar of gingiva that is left around the tooth. The Orban knife is usually used for this incision. The incision is made not only around the facial and lingual radicular area but also interdentally, connecting the facial and lingual segments to free the gingiva completely around the tooth (Figure 57-9; see also Figure 57-5).
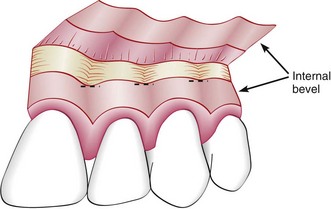
Figure 57-9 After the flap has been elevated, a wedge of tissue remains on the teeth, attached by the base of the papillae. An interdental (third) incision along the horizontal lines seen in the interdental spaces will sever these connections.
These three incisions allow the removal of the gingiva around the tooth (i.e., the pocket epithelium and the adjacent granulomatous tissue). A curette or a large scaler (U15/30) can be used for this purpose. After removal of the large pieces of tissue, the remaining connective tissue in the osseous lesion should be carefully curetted so that the entire root and the bone surface adjacent to the teeth can be observed.
Flaps can be reflected using only the horizontal incision if sufficient access can be obtained in this way and if apical, lateral, or coronal displacement of the flap is not anticipated. If vertical incisions are not made, the flap is called an envelope flap.
Vertical Incisions
Vertical or oblique releasing incisions can be used on one or both ends of the horizontal incision, depending on the design and purpose of the flap. Vertical incisions at both ends are necessary if the flap is to be apically displaced. Vertical incisions must extend beyond the mucogingival line, reaching the alveolar mucosa, to allow for the release of the flap to be displaced (see Chapter 59).
In general, vertical incisions in the lingual and palatal areas are avoided. Facial vertical incisions should not be made in the center of an interdental papilla or over the radicular surface of a tooth. Incisions should be made at the line angles of a tooth either to include the papilla in the flap or to avoid it completely (Figure 57-10). The vertical incision should also be designed to avoid short flaps (mesiodistal) with long, apically directed incisions because this could jeopardize the blood supply to the flap.
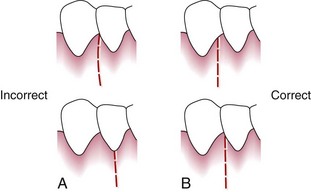
Figure 57-10 Incorrect (A) and correct (B) locations of a vertical incision. This incision should be made at the line angles to prevent splitting of a papilla or incising directly over a radicular surface.
Several investigators proposed the interdental denudation procedure, which consists of horizontal, internal bevel, nonscalloped incisions to remove the gingival papillae and denude the interdental space.1,2,11,12 This technique completely eliminates the inflamed interdental tissue. Healing is by secondary intention and results in excellent gingival contour. It is contraindicated when bone grafts are used for the graft material placed interdentally will not be covered.
Elevation of the Flap
When a full-thickness flap is desired, reflection of the flap is accomplished by blunt dissection. A periosteal elevator is used to separate the mucoperiosteum from the bone by moving it mesially, distally, and apically until the desired reflection is accomplished (Figure 57-11).
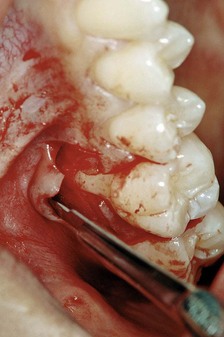
Sharp dissection is necessary to reflect a partial-thickness flap. A surgical scalpel (#15) is used (Figure 57-12).
A combination of full-thickness and partial-thickness flaps may be indicated to obtain the advantages of both. The flap is started as a full-thickness procedure, then a partial-thickness flap is made at the apical portion. In this way the coronal portion of the bone, which may be subject to osseous remodeling, is exposed while the remaining bone is protected by the periosteum.
Suturing Techniques
After all of the necessary procedures are completed, the area is reexamined, cleansed, and the flap is placed in the desired position. The flap should remain in this position without tension. It is convenient to keep the flap in place with light pressure using a piece of gauze to allow the blood clot to form.
The purpose of suturing is to maintain the flap in the desired position until healing has progressed to the point in which sutures are no longer needed.
There are many types of sutures, suture needles, and materials.5,10 Suture materials may be either nonresorbable or resorbable and may be further categorized as braided or monofilament (Box 57-1). The resorbable sutures have gained popularity because they enhance patient comfort and eliminate suture removal appointments.
The monofilament type of suture alleviates the “wicking effect” of braided sutures that may allow bacteria from the oral cavity to be drawn through the suture to the deeper areas of the wound.
The braided silk suture was the most common nonresorbable suture used in the past because of its ease of use and low cost. The expanded polytetrafluoroethylene, synthetic, monofilament suture is an excellent nonresorbable suture that is widely used today.
The most common resorbable sutures used today are the plain and the chromic gut sutures. Both are monofilaments and are processed from purified collagen of either sheep or cattle intestines. The chromic suture is a plain gut suture processed with chromic salts to make it resistant to enzymatic resorption, thereby increasing the resorption time. The synthetic resorbable sutures are also often used.
Technique
The needle is held with the needle holder and should enter the tissues at right angles and no less than 2 to 3 mm from the incision. The needle is then carried through the tissue, following the needle’s curvature. The knot should not be placed over the incision.
The periodontal flap is closed either with independent sutures or with continuous, independent sling sutures. The latter method eliminates the pulling of the buccal and lingual or palatal flaps together and instead uses the teeth as an anchor for the flaps. The flaps are less likely to buckle, and the forces on the flaps are better distributed.
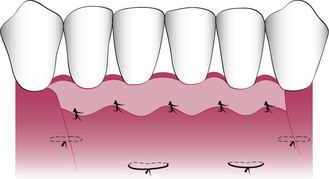
Sutures of any type placed in the interdental papillae should enter and exit the tissue at a point located below the imaginary line that forms the base of the triangle of the interdental papilla (Figure 57-13). The location of sutures for closure of a palatal flap depends on the extent of flap elevation that has been performed. The flap is divided in four quadrants, as depicted in Figure 57-14.
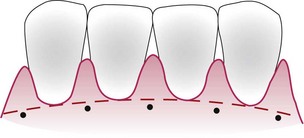
Figure 57-13 Placement of suture in the interdental space below the base of an imaginary triangle in the papilla.
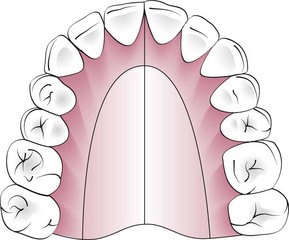
Figure 57-14 Placement of sutures for closing a palatal flap. For slightly or moderately elevated flaps, the sutures are placed in the shaded areas. For more substantial elevation of the flap, the sutures are placed in the central (unshaded) areas of the palate.
If the elevation of the flap is slight or moderate, the sutures can be placed in the quadrant closest to the teeth. If the flap elevation is substantial, the sutures should be placed in the central quadrants of the palate.
The clinician may or may not use periodontal dressings. When the flaps are not apically displaced, it is not necessary to use dressings other than for patient comfort.
Ligation
Interdental Ligation
Two types of interdental ligation can be used: the direct loop suture (Figure 57-15) and the figure-eight suture (Figure 57-16). In the figure-eight suture, there is thread between the two flaps. This suture is used when the flaps are not in close apposition because of apical flap position or nonscalloped incisions. It is simpler to perform than the direct ligation. The direct suture permits a better closure of the interdental papilla and should be performed when bone grafts are used or when close apposition of the scalloped incision is required.
Sling Ligation
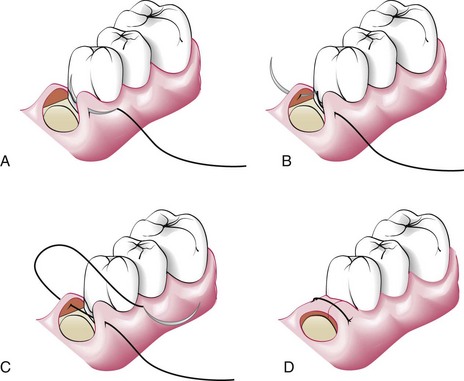
The sling ligation can be used for a flap on one surface of a tooth that involves two interdental spaces (Figure 57-17).
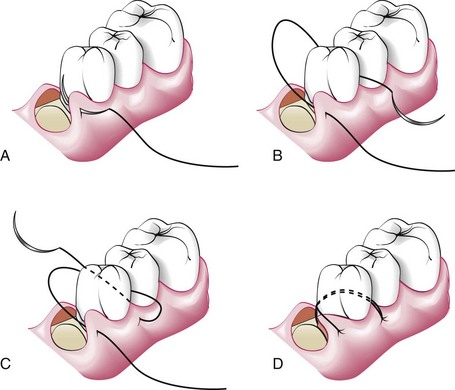
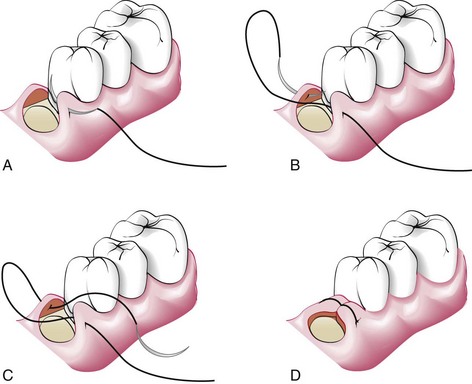
Figure 57-17 Single, interrupted sling suture is used to adapt the flap around the tooth. A, Needle engages the outer surface of the flap and encircles the tooth (B). C, Outer surface of the same flap of the adjacent interdental area is engaged. D, Suture is returned to the initial site and the knot tied.
Types of Sutures
Horizontal Mattress Suture
The horizontal mattress suture is often used for the interproximal areas of diastemata or for wide interdental spaces to adapt the interproximal papilla properly against the bone. Two sutures are often necessary. The horizontal mattress suture can be incorporated with the continuous, independent sling sutures, as shown in Figure 57-18.
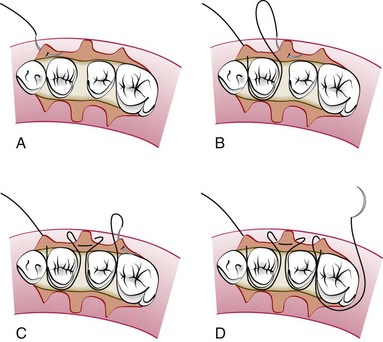
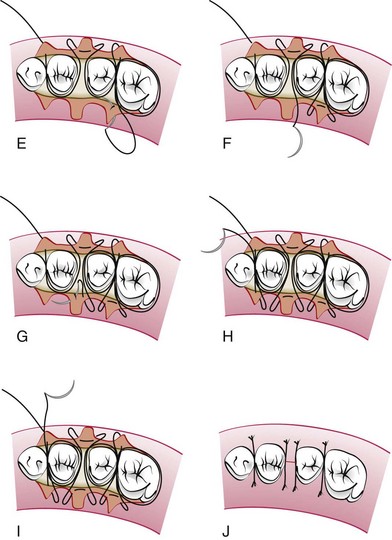
Figure 57-18 A, Continuous, independent sling suture using a horizontal mattress suture around diastemata or wide interdental areas (B and C). This mattress suture is used on both the buccal (D) and the lingual (E and F) surface. Continuation of suture on lingual surfaces (G, H, and I) and completed suture (J).
The penetration of the needle is performed in such a way that the mesial and distal edges of the papilla lie snugly against the bone. The needle enters the outer surface of the gingiva and crosses the undersurface of the gingiva horizontally. The mattress sutures should not be close together at the midpoint of the base of the papilla. The needle reappears on the outer surface at the other base of the papilla and continues around the tooth with the sling sutures.
Continuous, Independent Sling Suture
A sling suture is used when there is both a facial and a lingual flap involving many teeth. The continuous, independent sling suture is initiated on the facial papilla closest to the midline because this is the easiest place to position the final knot (Figure 57-19). A continuous sling suture is laced for each papilla on the facial surface. When the last tooth is reached, the suture is anchored around it to prevent any pulling of the facial sutures when the lingual flap is sutured around the teeth in a similar manner. The suture is again anchored around the last tooth before tying the final knot.
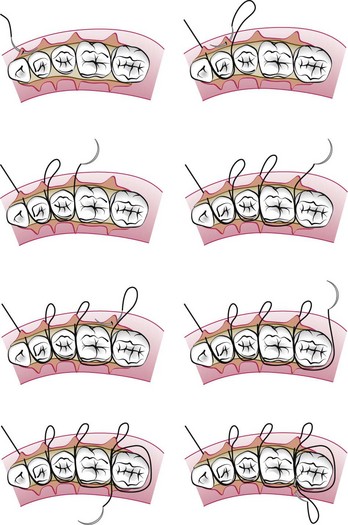
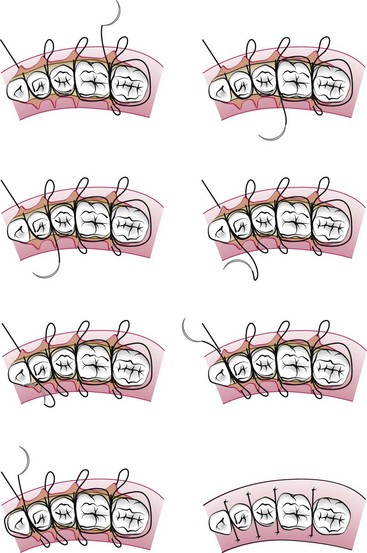
Figure 57-19 Continuous, independent sling suture is used to adapt the buccal and lingual flaps without tying the buccal flap to the lingual flap. The teeth are used to suspend each flap against the bone. It is important to anchor the suture on the two teeth at the beginning and end of the flap so that the suture will not pull the buccal flap to the lingual flap.
This type of suture does not pull on the lingual flap when this flap is sutured. The facial and lingual flaps are completely independent of each other because of the anchoring around both the initial and the final tooth. The flaps are tied to the teeth and not to each other because of the sling sutures.
Continuous, independent sling suturing is especially appropriate for the maxillary arch because the palatal gingiva is attached and fibrous, whereas the facial tissue is thinner and mobile.
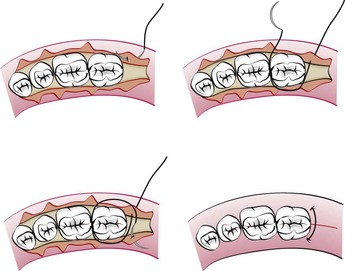
Anchor Suture
The closing of a flap mesial or distal to a tooth, as in the mesial or distal wedge procedures, is best accomplished by the anchor suture. This suture closes the facial and lingual flaps and adapts them tightly against the tooth. The needle is placed at the line-angle area of the facial or lingual flap adjacent to the tooth, anchored around the tooth, passed beneath the opposite flap, and tied. The anchor suture can be repeated for each area that requires it (Figure 57-20).
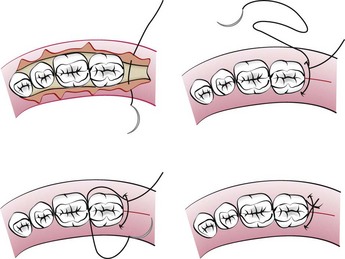
Closed-Anchor Suture
Another technique to close a flap located in an edentulous area mesial or distal to a tooth consists of tying a direct suture that closes the proximal flap, carrying one of the threads around the tooth to anchor the tissue against the tooth, and then tying the two threads (Figure 57-21).
Periosteal Suture
The periosteal suture is used to hold the apically displaced partial-thickness flaps on the periosteum. There are two types of periosteal sutures: the holding suture and the closing suture. The holding suture is a horizontal mattress suture placed at the base of the displaced flap to secure it into the new position. Closing sutures are used to secure the flap edges to the periosteum. Both types of periosteal sutures are shown in Figure 57-22.
Immediately after suturing (up to 24 hours), a connection between the flap and the tooth or bone surface is established by a blood clot, which consists of a fibrin reticulum with many polymorphonuclear leukocytes, erythrocytes, debris of injured cells, and capillaries at the edge of the wound.3 Bacteria and an exudate or transudate also result from tissue injury.
One to 3 days after flap surgery, the space between the flap and the tooth or bone is thinner and epithelial cells migrate over the border of the flap, usually contacting the tooth at this time. When the flap is closely adapted to the alveolar process, there is minimal inflammatory response.3
One week after surgery, an epithelial attachment to the root has been established by means of hemidesmosomes and a basal lamina. The blood clot is replaced by granulation tissue derived from the gingival connective tissue, the bone marrow, and the periodontal ligament.
Two weeks after surgery, collagen fibers begin to appear parallel to the tooth surface.3 Union of the flap to the tooth is still weak because of the presence of immature collagen fibers, although the clinical aspect may be almost normal.
One month after surgery, a fully epithelialized gingival crevice with a well-defined epithelial attachment is present. There is a beginning functional arrangement of the supracrestal fibers.
Full-thickness flaps, which denude the bone, result in a superficial bone necrosis at 1 to 3 days. Osteoclastic resorption follows and reaches a peak at 4 to 6 days, declining thereafter.13 This results in a loss of bone of about 1 mm3 and the bone loss is greater if the bone is thin.14,15
Osteoplasty (thinning of the buccal bone) using diamond burs, included as part of the surgical technique, results in areas of bone necrosis with reduction in bone height, which is later remodeled by new bone formation. Therefore, the final shape of the crest is determined more by osseous remodeling than by surgical reshaping.8
This may not be the case when osseous remodeling does not include excessive thinning of the radicular bone.9 Bone repair reaches its peak at 3 to 4 weeks.15
Loss of bone occurs in the initial healing stages both in radicular bone and in interdental bone areas. However, in interdental areas, which have cancellous bone, the subsequent repair stage results in total restitution without any loss of bone, whereas in radicular bone, particularly if thin and unsupported by cancellous bone, bone repair results in loss of marginal bone.15
 Science Transfer
Periodontal flaps are designed to preserve gingival integrity and to gain access to root surfaces for residual calculus removal and to thoroughly remove granulation tissue so bone defects can be visualized and treated. Gentle and efficient procedures result in optimum healing and minimal postoperative pain. When flaps need to be repositioned apically or less often, coronally, then the flaps must sit passively at the appropriate level before suturing. To ensure this, buccal and lingual flaps need to be elevated beyond the mucogingival junction so the elasticity of the mucosa allows for flap mobility. Sometimes it may be necessary to extend the flap elevation apically with a split incision approach to minimize the effect of the less elastic periosteum. Vertical incisions can aid in flap positioning by allowing the clinician to suture the flap at a different level to the adjacent untreated gingiva.
Palatal flaps are less mobile because of the absence of oral mucosa so that the apical position of the flap depends on how much marginal gingival tissue is discarded using a reverse bevel incision. The more apical positioning desired, the more extensive is the reverse bevel cut. Palatal flaps are more difficult to position coronally than buccal or lingual flaps and thus if it is required to position flaps coronally or even at their original levels, then a sulcular incision is used. In osseous periodontal surgery, flaps are apically positioned to minimize postoperative pocket depth. In regenerative periodontal surgery, soft tissue coverage of bony defects, graft materials, membranes, and biologic agents is important so sulcular incisions and tight suturing techniques are crucial.
The periodontal flap surgery is the most widely utilized surgical procedure to reduce the pocket depth and to access the subgingival root surfaces for scaling and root planing. The diagnosis of the periodontal lesion and the objective of the surgery will dictate the type of flap procedure which will be utilized to obtain the best result. The incisions, type of flap and the selection of suturing design must be planned and executed to fit the problem.
1 Barkann L. A conservative surgical technique for the eradication of pyorrhea pockets. J Am Dent Assoc. 1939;26:61.
2 Beube FE. Interdental tissue resection: an experimental study of a surgical technique which aids in repair of the periodontal tissues to their original contour and function. Oral Surg. 1947;33:497.
3 Caffesse RG, Ramfjord SP, Nasjleti CE. Reverse bevel periodontal flaps in monkeys. J Periodontol. 1968;39:219.
4 Carranza FAJr, Carraro JJ. Effect of removal of periosteum on postoperative result of mucogingival surgery. J Periodontol. 1963;34:223.
5 Dahlberg WH. Incisions and suturing: some basic considerations about each in periodontal flap surgery. Dent Clin North Am. 1969;113:149.
6 Friedman N. Mucogingival surgery: the apically repositioned flap. J Periodontol. 1962;33:328.
7 Hoag PM, Wood DL, Donnenfeld OW, et al. Alveolar crest reduction following full and partial thickness flaps. J Periodontol. 1972;43:141.
8 Lobene RR, Glickman I. The response of alveolar bone to grinding with rotary stones. J Periodontol. 1963;34:105.
9 Matherson DG. An evaluation of healing following periodontal osseous surgery in monkeys. Int J Periodont Restor Dent. 1988;8:9.
10 Morris ML. Suturing techniques in periodontal surgery. Periodontics. 1965;3:84.
11 Prichard JF. Present state of the interdental denudation procedure. J Periodontol. 1977;48:566.
12 Ratcliff PA, Raust GT. Interproximal denudation: a conservative approach to osseous surgery. Dent Clin North Am. 1964;8:121.
13 Staffileno H, Wentz FE, Orban BJ. Histologic study of healing of split thickness flap surgery in dogs. J Periodontol. 1962;33:56.
14 Wilderman MN. Exposure of bone in periodontal surgery. Dent Clin North Am. 1964;8:23.
15 Wilderman MN, Pennel BM, King K, et al. Histogenesis of repair following osseous surgery. J Periodontol. 1970;41:551.