Bandaging techniques
A well-produced bandage that does the job it is intended to do, does not slip off and does not cut off the circulation is a technique that can be achieved by regular practice. Although in many practices it is the nurse who is left to bandage the limb after you, the veterinary surgeon, have carried out the clinical procedure, it is important that you know how to bandage competently. A neat bandage that stays on will impress your clients – after all, this may be the only bit that they can see.
Bandages have a number of functions and the main ones are shown in Table 4.1.
Table 4.1
| Function | Comment |
| Protection | From infection and dirt and from the environment. Also prevents self mutilation. |
| Support | Applies to fractures, strains, sprains, dislocations. Adequate support helps to reduce pain and swelling and promotes more rapid healing. |
| Pressure | To stop haemorrhage and reduce swelling. |
| Immobilization | Restricting the movement of joints or surrounding soft tissues will reduce pain and make the animal more comfortable. |
| Security | To hold an intravenous catheter in place, preventing infection and interference. |
Bandaging rules
Before you start to bandage anything you should be aware of the following ‘rules’. If necessary, practice your technique in private on a soft toy or on a partner!
1. Action: Wash your hands thoroughly before you start.
Rationale: To prevent the introduction of infection. You may consider wearing gloves, but this may impede your dexterity.
2. Action: Collect all your equipment together and make sure that is it close at hand.
Rationale: This saves time; when dealing with an animal you cannot expect it to sit quietly on the table while you search for different bandages. Plan ahead – you will appear much more competent and will feel better about the procedure.
3. Action: If applicable, remove any soiled bandages and dispose of them in the clinical waste bin.
Rationale: To prevent the spread of infection the clinical waste will eventually be incinerated.
4. Action: When bandaging a lower limb, always include the foot.
Rationale: To reduce the risk of swelling and cutting off the circulation to the toes. This can result in sloughing off of the skin over the toes and in the worst case the complete loss of the toes.
5. Action: If the foot is included always place cottonwool pads between the toes (Fig. 4.1).
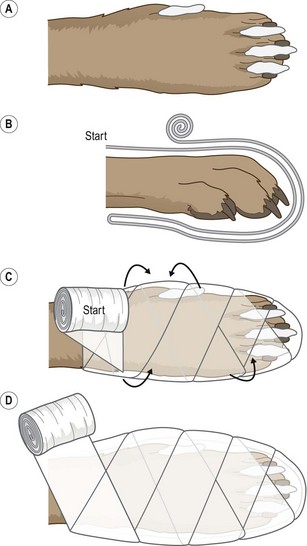
Figure 4.1 Limb bandage: (A) Pad the digits and pads with cottonwool. (B) Bandage over the toes. (C) Twist the bandage through 90°. (D) Continue winding the bandage up the limb.
Rationale: This absorbs sweat and prevents rubbing. (However, current thinking is moving away from this idea as the cottonwool may become soaked and cause rubbing rather than preventing it!)
6. Action: Keep the bandage rolled up and always have the roll on the top as you unwind (Fig. 4.1).
Rationale: This helps you to control the bandage and to maintain tension.
7. Action: Always overlap the layers of a bandage by half of its width.
Rationale: To prevent the development of gaps. This could let in infection or allow the patient to interfere with the area underneath. It may also cause swelling in the gaps.
8. Action: If bandaging tails or limbs always work from the distal to the proximal end of the area.
Rationale: There is a risk of trapping blood or fluid if you interfere with the venous return to the heart. Results in painful swelling.
9. Action: Never use safety pins to secure the ends – use sticky zinc tape instead, although this is not recommended.
Rationale: The patient may swallow a safety pin. Sticky tape such as zinc tape may cause skin irritation and is difficult to remove from the hair.
10. Action: When immobilizing a fracture, always include the joints above and below the area.
Rationale: To prevent movement of the area.
11. Action: On completion, check that the bandage is not too tight – you should be able to get two fingers under the layers.
Rationale: Bandages that are too tight will restrict blood flow to the area delaying healing, and causing pain and swelling and subsequently patient interference.
12. Action: On completion, check that the bandage is not too loose.
Rationale: Bandages that are too loose will not serve their correct purpose and may fall off or be pulled off by the patient.
Wound management
Surgical wounds, which are usually sutured and allowed to heal by first intention, are rarely bandaged, although you may need to consider the use of an Elizabethan collar to prevent interference. Chronic wounds (i.e. those that may involve loss of tissue and are deep or infected) will be left to heal by second intention and may be protected by bandaging.
Before applying the bandage the wound must be decontaminated:
1. Clip and clean the skin surrounding the wound – all hair must be removed to keep the wound clean and to promote rapid healing.
• Use disinfected, unchipped clipper blades to prevent dermatitis.
• Prevent hairs going into the wound by applying water soluble gel or by temporarily closing it with towel clips or a continuous suture, or by covering it with a sterile swab.
2. Lavage – wash the wound thoroughly with large volumes of sterile saline to remove any debris and to dilute any bacteria present. Do not be too vigorous as this will further damage the tissues.
• Avoid the use of tap water as it is not sterile although it may be used initially.
• Be aware that antiseptics will not stay in the wound for long enough to work.
• Detergents in some surgical scrubs may irritate the wound.
3. Debridement – this is the single most important step in promoting wound healing and is the removal of infected, necrotic or contaminated tissue from the wound that would otherwise delay healing. Tidy up the wound edges if surgical repair is to be attempted.
There are three main ways of debriding a wound:
• Surgical – under strict aseptic conditions, scrape away the necrotic or damaged tissue until the wound is clean.
• Dressings – apply dressings such as dry or saline-soaked swabs to the wound and leave on for no more than 24 hours. These provide an optimal environment for healing to start and when removed they strip off the necrotic tissue.
• Enzymatic – enzymes (available commercially) are applied to the wound and their action ceases when granulation tissue starts to form. Maggots (available in a sterile form) secrete enzymes that destroy necrotic tissue and allow granulation to begin.
Anatomy of a bandage
Most bandages consist of the following layers:
1. Wound dressings – this layer is in direct contact with the wound and the aim is to promote healing and to prevent further harm. Dressings provide an environment that is neither too wet nor too dry; the different types are summarized in Table 4.2.
Table 4.2
Types of wound-dressing materials
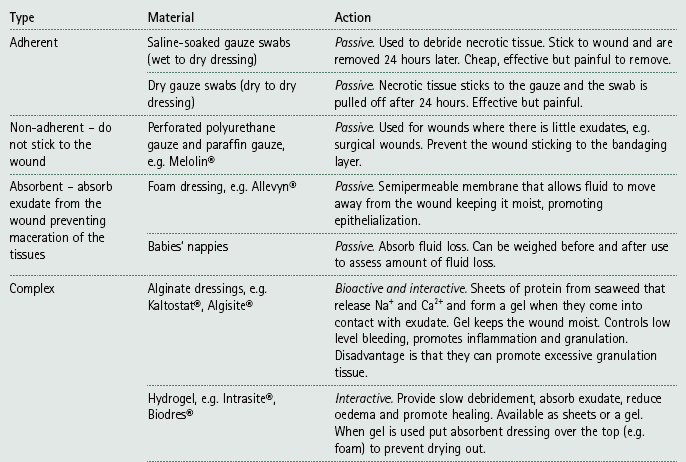
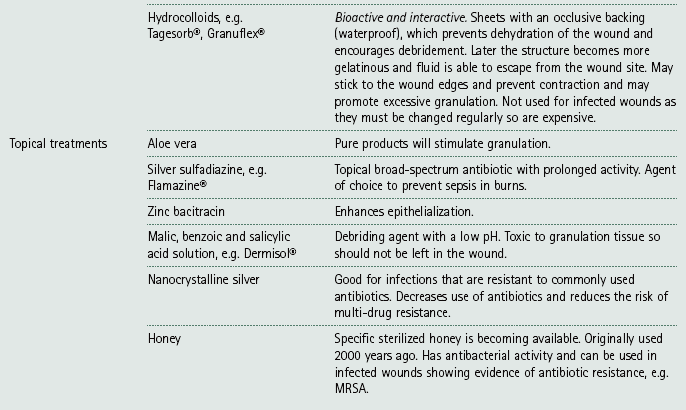
NB Passive – no actio n on the wound; Interactive – responds to wound environment in some way; Bioactive – has a biological effect on the wound.
2. Primary layer – this holds the dressing in place and absorbs any exudate. It also distributes the pressure evenly and provides padding to the wound. The most common materials are orthopaedic wool (e.g. Sofban®) and cottonwool sheets.
3. Secondary layer – the primary layer is stabilized using some form of conforming bandage that has a degree of stretch in it. It is important not to overstretch the material resulting in an overtight bandage, which will restrict blood supply to the area and could cause gangrene. Do not confuse firmness with tightness: the bandage must be firm but not too tight and you should be able to get two fingers under it.
4. Tertiary layer – this consists of an elastic cohesive bandage that protects the whole structure and prevents interference by the patient. This layer is very often coloured or may even have words printed on it, which is purely for the benefit of humans! At the top of the bandage the tertiary layer should not extend over the secondary layer as it may rub. Never use an adhesive tape to stick the bandage to the skin or fur as this will cause irritation and can be difficult to remove. If bandaging a lower limb always cover the foot. Increased protection from moisture and mud may be gained by covering the foot with a commercial canvas boot or by using an empty drip bag. Do not leave an impervious cover on the foot all the time as it restricts air and moisture flow and may lead to skin complications.
Care and maintenance of bandages
All bandages must be constantly monitored and the owners should be given written instructions at discharge. Poorly monitored bandages will delay healing and may result in sloughing of the skin.
1. Check the bandage every 4 hours for the first 24 hours.
2. Check twice daily for the duration of the bandage. This may be done by the owners, but the animal should be seen in the surgery every 4–5 days.
3. Make sure that the owners understand their responsibility to the patient and are aware of what to look for.
4. Exercise restriction is usually indicated, but this depends on the need for the bandage. In some cases exercise restriction may need to be enforced.
5. Monitor the bandage for the following: smell, wetness, swollen toes, cold toes, soiling, slippage and patient interference. Change the bandage if any of these have occurred.
6. If an open wound is present the bandage must be changed regularly – at least once a day. If no wound is present the bandage should be changed every 8–10 days.
7. Complications may include: maceration of the skin, swelling of the limb, wound contamination, dermatitis, necrosis of the skin and gangrene of the limb.
Types of bandage
Procedure: Limb bandage
This is used to support and protect wounds, reduce pain and swelling and prevent movement.
1. Action: Gather all your equipment together and arrange it within reach of the examination table.
Rationale: This enables you to complete the bandage quickly and efficiently.
2. Action: Place the animal on a stable examination table covered in a non-slip mat.
Rationale: If the animal feels secure it will be less likely to try and escape.
3. Action: Ask the owner or an assistant to restrain the animal appropriately so that you have access to the affected limb (see Ch. 1).
Rationale: The animal may try to move during the procedure. Correct restraint will allow you to work quickly and efficiently.
4. Action: Apply cottonwool padding between the digits of the affected limb (Fig. 4.1).
Rationale: This prevents rubbing and absorbs the sweat between the toes. (However, current practice is moving away from this idea and you will need to decide for yourself.)
5. Action: Apply an appropriate wound dressing to the affected area.
Rationale: For example this may be used to cover a cut footpad or after the removal of a dew claw. This will promote healing.
6. Action: Apply the primary padding layer. Start on the cranial aspect of the limb, run the bandage down over the toes to the caudal aspect of the limb and then go back again (Fig. 4.1).
Rationale: This holds the dressing in place, provides support and helps to absorb any exudate.
7. Action: Turn the bandage through 90° and, working from the distal to the proximal part of the limb, cover the toes in a figure-of-eight arrangement.
Rationale: This makes the bandage firm and protective.
8. Action: Work up the limb until you are over the joint above the injury.
Rationale: This helps to distribute the pressure of the bandage evenly.
9. Action: Apply a tertiary layer to the limb following the same pattern and working from distal to proximal.
Rationale: This will hold everything together and protect the limb from daily wear and tear.
10. Action: Check the tension on the bandage.
Rationale: If it is too loose the bandage will fall off very soon; it is too tight it may damage the underlying tissues.
Procedure: Tail bandage
This is used to protect the tail after traumatic injuries.
1. Action: Gather all your equipment together and arrange it within reach of the examination table.
Rationale: This enables you to complete the bandage quickly and efficiently.
2. Action: Place the animal on a stable examination table covered in a non-slip mat.
Rationale: If the animal feels secure it will be less likely to try and escape.
3. Action: Ask the owner or an assistant to restrain the animal in a standing position or sitting with the tail extended.
Rationale: This depends on the size and nature of the patient.
4. Action: Apply an appropriate dressing to the wound on the tail.
Rationale: This will promote healing.
5. Action: If the wound is on the end of the tail, cover the dressing with a large empty syringe case pierced with hole to provide ventilation.
Rationale: This provides a quick and easy method of covering and holding the dressing in place. Good ventilation is important for wound healing.
6. Action: If the wound is higher up the tail, then apply a layer of conforming bandage over the dressing.
Rationale: Even if the wound is on the proximal end of the tail, you should bandage the entire tail to prevent swelling towards the tip. In this area of the body there is no need to provide a layer of padding over the dressing.
7. Action: Cover either the syringe case or the conforming bandage with a layer of cohesive bandage, working from the caudal end to the proximal end of the tail.
Rationale: This will protect the inner layers of the bandage and will prevent swelling of the tail tip.
8. Action: As you progress proximally towards the top of the conforming bandage, start to work the animal’s tail hair into the cohesive bandage.
Rationale: This will help the bandage to stay in place. Tail bandages will slip off easily and you may have to use sticky tape to hold it to the hair.
9. Action: Check that the bandage is secure and not too tight.
Rationale: Overtight bandages cause tissue damage and eventual necrosis.
Procedure: Ear bandage
This may be used following an ear canal ablation or after treatment for an aural haematoma or a cut pinna.
1. Action: Gather all your equipment together and arrange it within reach of the examination table.
Rationale: This enables you to complete the bandage quickly and efficiently.
2. Action: Place the animal on a stable examination table covered in a non-slip mat.
Rationale: If the animal feels secure it will be less likely to try and escape.
3. Action: Ask the owner or an assistant to restrain the animal in a sitting position or in sternal recumbency.
Rationale: This depends on the patient’s comfort, but if you are short you will be able to reach over the head more easily if the animal is in sternal recumbency.
4. Action: Apply a dressing to the wound area.
Rationale: This is most likely to be on the pinna or over the external ear canal. The dressing will promote healing.
5. Action: Place a pad of cottonwool on the top of the head above the affected ear flap.
Rationale: This prevents the ear flap from rubbing on the top of the head. If both ears are affected then make the pad large enough to cover the entire top of the head.
6. Action: Fold the affected ear pinna up on to the pad and ask your assistant to hold it in place.
7. Action: Cover the ear pinna with another pad of cottonwool. Make sure that it is the same size as the ear pinna.
Rationale: The ear pinna is now lying between two pads of cottonwool, which prevent it rubbing on the top of the head.
8. Action: Apply a conforming bandage over the padding. Starting at the top of the head, run to the rostral side of the healthy ear, which will be hanging down, then down under the jaw and back up to the top of the head. Continue down again on the caudal side of the healthy ear flap under the jaw and back up again (Fig. 4.2). Continue in a figure-of-eight, going round and round, each time passing either side of the healthy ear until the affected ear and the cottonwool padding are neatly covered.
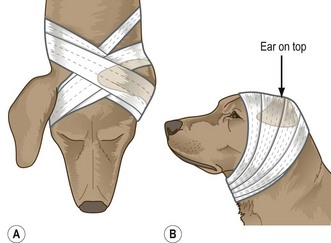
Figure 4.2 The figure-of-eight design for an ear bandage: (A) Wind the bandage around the head in a figure-of-eight. (B) Mark the position of the ear with an arrow.
Rationale: The aim is to produce a figure-of-eight bandage anchored around the healthy ear which hangs down. If the animal has pricked-up ears the technique is exactly the same, but the healthy ear may not hold the bandage in place quite as effectively.
9. Action: Check that the bandage is not too tight around the larynx and trachea.
Rationale: This could impede the animal’s breathing. You should be able to get two fingers between the bandage and the ventral part of the neck.
10. Action: Repeat the figure-of-eight technique using a cohesive bandage.
Rationale: This secures and protects the other layers.
11. Action: Tuck any bits of cottonwool or conforming bandage under the cohesive bandage.
Rationale: This makes the bandage look neat and tidy and is purely to impress the owners.
12. Action: On the outside of the cohesive bandage, draw the outline of the affected ear using a felt pen.
Rationale: If you use scissors to remove the bandage, these marks will tell you where the ear is so that you can avoid cutting into it.
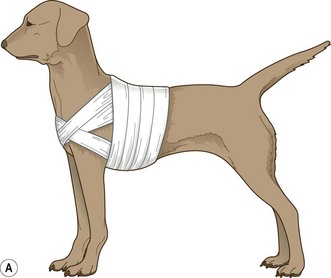
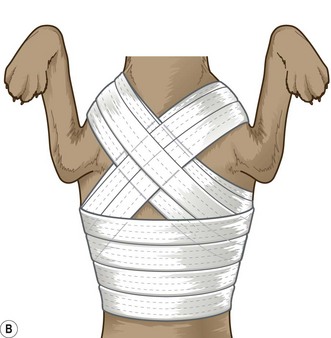
Procedure: Chest bandage
This is used to secure and cover a chest drain, or as a first aid measure in cases of thoracic injury or flail chests.
1. Action: Gather all your equipment together and arrange it within reach of the examination table.
Rationale: This enables you to complete the bandage quickly and efficiently.
2. Action: Place the animal on a stable examination table covered in a non-slip mat.
Rationale: If the animal feels secure it will be less likely to try and escape.
3. Action: Ask the owner or an assistant to restrain the animal in a standing position (Fig. 4.3).
Rationale: You must be able to wrap the bandage around the chest so you need complete access to the area.
4. Action: Apply a sterile wound dressing to any wounds.
Rationale: To maintain sterility and to promote healing.
5. Action: If dealing with a chest drain, it may be necessary to place sterile dressings around the point of insertion.
Rationale: To maintain sterility and to hold it in place.
6. Action: You can use either a synthetic padding bandage (e.g. Sofban®) or a conforming bandage. Start the bandage between the shoulder blades. Run over the cranial border of the right scapula, bringing the bandage down through the front legs and then run up towards the caudal border of the left scapula back to the starting point (Fig. 4.3).
Rationale: A padding layer will make the bandage comfortable, but in most cases you need only a conforming bandage as your base layer. Following this route creates half of a figure-of-eight.
7. Action: Continue to run the bandage over the caudal border of the right scapula, through the front legs and up over the cranial border of the left scapula back to the starting point.
Rationale: The figure-of-eight is now complete for the first time.
8. Action: Continue to follow this route several times, overlapping the bandage by half its width each time (Fig 4.3).
Rationale: The figure-of-eight arrangement ensures that the bandage does not slip backwards.
9. Action: Now wind the bandage around the chest until the desired coverage has been achieved.
Rationale: Take into account how frequently access may be needed to the chest drain and adjust the bandage appropriately.
10. Action: Check the tightness of the bandage.
Rationale: If the bandage is too tight it will impede respiration.
11. Action: Apply a cohesive layer in the same manner, continuing until the under layer is covered.
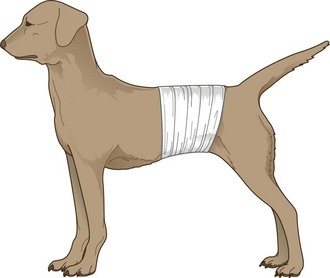
Procedure: Abdominal bandage
This is used to protect wounds following trauma or after surgery to support the ventral midline. May also be used as a pressure bandage.
1. Action: Gather all your equipment together and arrange it within reach of the examination table.
Rationale: This enables you to complete the bandage quickly and efficiently.
2. Action: Place the animal on a stable examination table covered in a non-slip mat.
Rationale: If the animal feels secure it will be less likely to try and escape.
3. Action: Ask the owner or an assistant to restrain the animal in a standing position (Fig. 4.4) or in lateral recumbency if the animal is still anaesthetized post surgery.
Rationale: You must be able to wrap the bandage around the abdomen so you need complete access to the area.
4. Action: Apply a sterile wound dressing to any wounds.
Rationale: To maintain sterility and to promote healing.
5. Action: Use a padding bandage such as Sofban® or cottonwool around the abdomen (Fig 4.4).
Rationale: This will prevent rubbing as the hair over the abdomen is usually thinner than in other areas of the body. In male dogs, do not cover the prepuce as the animal will be uncomfortable and the bandage will become urine soaked.
6. Action: Apply a layer of conforming bandage over the padding layer until the desired coverage has been achieved.
Rationale: This will hold the padding layer together. You may have to extend the bandage cranially to partially cover the thorax – this should prevent the bandage slipping towards the dog’s ‘waist’. Make sure that respiration is not impaired.
7. Action: Apply a layer of cohesive bandage.
Rationale: This will protect the bandage but may not always be necessary.
Rationale: If the bandage is too tight the animal will be uncomfortable.
Procedure: Robert Jones bandage
This is used to immobilize a limb fracture, control swelling and oedema and provide support to a limb postoperatively.
1. Action: Gather all your equipment together and arrange it within reach of the examination table.
Rationale: This enables you to complete the bandage quickly and efficiently.
2. Action: Place the animal on a stable examination table covered in a non-slip mat.
Rationale: If the animal feels secure it will be less likely to try and escape.
3. Action: Ask the owner or an assistant to restrain the animal in lateral recumbency with the relevant leg extended.
Rationale: At first the limb may be painful so restraint is important. As the supporting layers start to work the pain should diminish a little.
4. Action: Cut two strips of 2.5 cm wide zinc oxide tape approximately 20 cm long and attach them to the dorsal and palmar (or plantar if it is a hindleg) sides of the lower limb (Fig. 4.5).
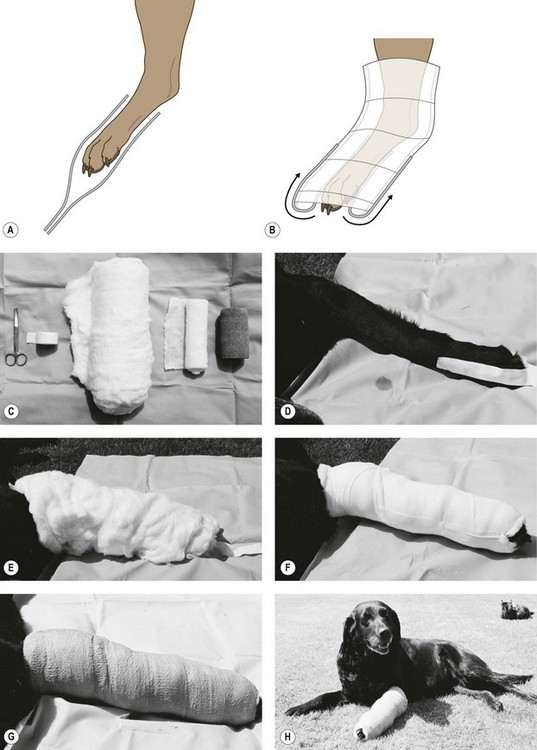
Figure 4.5 The Robert Jones bandage: (A) Stick the stirrups gently together. (B) Stick the stirrups to the conforming bandage. (C) Materials required for Robert Jones bandage. (D) Zinc oxide tapes are applied to the limb to act as ‘stirrups’. (E) Cotton wool is wrapped around the entire length of the limb. (F) Conforming bandage is wrapped over the cotton wool and the stirrups are twisted and stuck to the outside. (G) Cohesive bandage is applied as a protective layer. (H) Patient with a correctly applied Robert Jones bandage.
Rationale: These form the stirrups which hold the bandage together later on in the procedure.
5. Action: Allow 10 cm to extend beyond the toes and stick the two lengths of tape lightly together.
Rationale: This prevents them sticking to the other layers.
6. Action: Wrap cottonwool around the entire limb. Use at least three layers and try to make sure the bandage is of even thickness throughout. Pay attention to any bony prominences such as the elbow or hock and include all the joints as far up as the hip or the shoulder within the bandage.
Rationale: This layer provides support for the limb and this is increased by the number of layers of cottonwool.
7. Action: Make sure that at least two toes protrude from the end of the bandage.
Rationale: These are used to check that the blood supply to the distal limb is not impeded by the pressure of the bandage.
8. Action: Using conforming bandage of an appropriate width for the animal, compress the cottonwool layer. Starting distally and working towards the proximal part of the limb, continue winding the bandage until the cottonwool is under tension. Try to maintain the natural angles of the limb.
Rationale: The bandage should now be approximately three times the thickness of the animal’s leg and when ‘flicked’ with your finger should sound like a ripe melon.
Maintaining the angles of the limb prevents the bandaged limb from becoming longer than the unaffected one, and, because it will be more comfortable, the animal is more likely to walk on it.
9. Action: Separate the two zinc oxide tapes from each other. Twist each tape through 180° and stick it to the conforming layer.
Rationale: These stirrups will prevent the bandage from slipping down the limb.
10. Action: Apply an even layer of cohesive bandage over the conforming bandage (Fig. 4.5).
Rationale: This will protect the bandage.
11. Action: Check the toes at regular intervals.
Rationale: To assess temperature and sensation. Leaving the toes exposed may also encourage the animal to walk on the leg.
Procedure: Velpeau sling
This is used to support and immobilize the shoulder after luxation or surgery. It may also be used for conservative treatment for minimally displaced scapular fractures.
1. Action: Gather all your equipment together and arrange it within reach of the examination table.
Rationale: This enables you to complete the bandage quickly and efficiently.
2. Action: Place the animal on a stable examination table covered in a non-slip mat.
Rationale: If the animal feels secure it will be less likely to try and escape.
3. Action: The animal may still be anaesthetized, but if it is conscious it should be restrained in lateral recumbency.
Rationale: You need full access to the affected elbow.
4. Action: Apply a layer of cottonwool padding to the carpal and metacarpal areas of the affected limb.
Rationale: These joints are going to be flexed and require padding for the comfort of the animal.
5. Action: Apply several turns of conforming bandage to the limb just above the carpus (Fig. 4.6A).
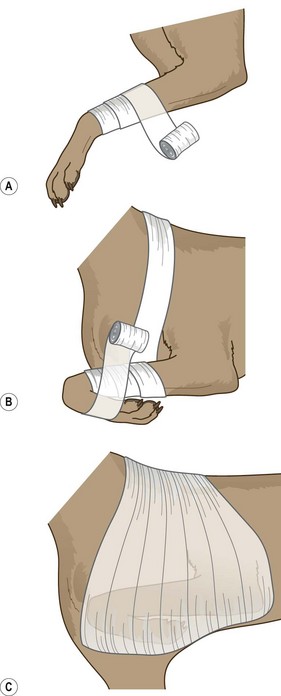
Figure 4.6 The Velpeau sling: (A) Wind the conforming bandage around the carpal. (B) Flex the carpus. (C) Apply a layer of cohesive bandage over the top.
Rationale: This secures the end of the bandage and provides a means of pulling the limb up into flexion.
6. Action: Flex the elbow and shoulder and at the same time run the conforming bandage up over the shoulder, down under the chest medial to the other limb and back to the carpus (Fig. 4.6B).
Rationale: This will hold the elbow and shoulder in flexion against the body.
7. Action: Flex the carpus and include this within the bandage. Continue up over the shoulder and under the chest as before.
Rationale: The entire limb is now held in flexion against the body.
8. Action: Continue winding the bandage until the whole limb is held securely.
Rationale: The animal should not be able to move the limb but check that respiration is not impeded.
9. Action: Apply a layer of cohesive bandage over the conforming bandage (Fig. 4.6C).
Procedure: Ehmer sling
This is used to support and immobilize the hip after luxation or surgery.
1. Action: Gather all your equipment together and arrange it within reach of the examination table.
Rationale: This enables you to complete the bandage quickly and efficiently.
2. Action: Place the animal on a stable examination table covered in a non-slip mat.
Rationale: If the animal feels secure it will be less likely to try and escape.
3. Action: The animal may still be anaesthetized but if it is conscious it should be restrained in lateral recumbency.
Rationale: You need full access to the affected limb.
4. Action: Apply a thin layer of padding to the metatarsal region of the affected limb (Fig. 4.7A).
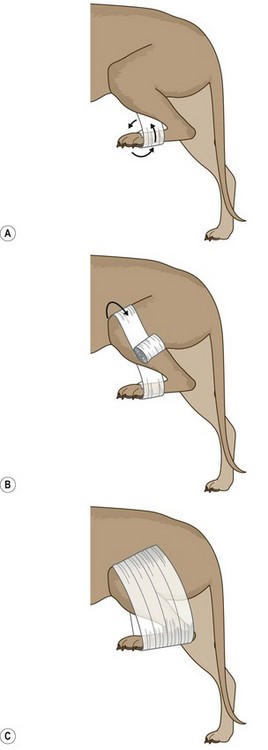
Figure 4.7 The Ehmer sling: (A) Wind the bandage around the metatarsal. (B) Bring the bandage over the lateral thigh. (C) Apply a layer of conforming bandage.
Rationale: This will prevent swelling of the area and make the animal more comfortable. If the layer is too thick it may encourage the bandage to slip.
5. Action: Apply a small amount of padding to the cranial aspect of the stifle.
Rationale: This will make the animal more comfortable, but this part of the bandage is optional.
6. Action: Apply a conforming bandage to the metatarsal region and wind it around several times passing from medial to lateral. Make sure that the last turn finishes on the lateral side
Rationale: This secures the start of the bandage.
7. Action: Flex the whole limb turning the foot inwards.
Rationale: This will turn the hock outwards and the stifle inwards, which ensures that the femoral head is pushed into the acetabulum.
8. Action: Bring the bandage up to the medial aspect of the stifle, then down over the padding to the lateral aspect of the thigh (Fig. 4.7B).
Rationale: The limb will be held in flexion and the bandage has described a figure of eight.
9. Action: Take the bandage down to the medial aspect of the metatarsals and around to the lateral aspect.
Rationale: You are now back to your starting point.
10. Action: Continue to follow this route several times until the whole limb is held securely in place.
Rationale: The limb should not be able to be moved at all.
11. Action: Apply a cohesive bandage over the conforming layer (Fig. 4.7C).
Rationale: This provides protection for the deeper layers. Conforming bandages tend to slip and the use of a cohesive layer will prevent this.
NB When applying an Ehmer sling to a short-legged dog or one that has large amounts of loose skin, the bandage can encircle the abdomen to prevent it slipping.
Procedure: Ring pad
This is used to protect an area that is rubbing e.g. bedsores and keeps the overlying bandage clear of the area. It may be placed around a protruding foreign body to prevent further penetration by the object. The pad is made on your own fingers and is then applied to the patient (Fig. 4.8). Commercially made pads are available.
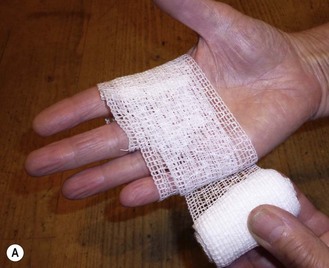
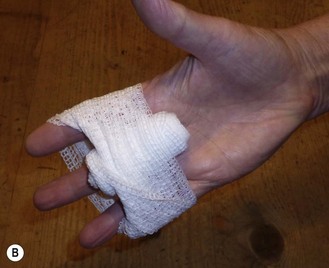
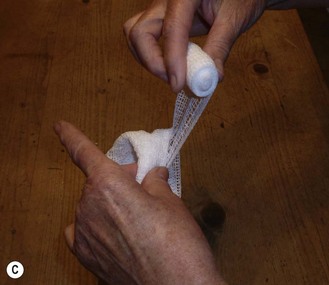
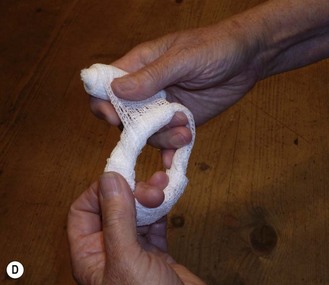
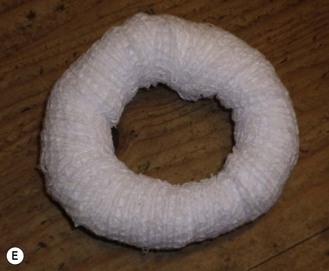
Figure 4.8 Making a ring pad: (A) Wind a conforming bandage around the palm of your hand. (B) Pass the bandage under the loop. (C) Carefully move the bandage from your hand. (D) Continue to wind the bandage around the ring until the desired shape and size is created. (E) The finished ring pad.
1. Action: Assuming that you are right handed, wrap several layers of conforming bandage around your left hand at the junction of your fingers to your palm (Fig. 4.8).
Rationale: This will form the basis of your ring pad.
2. Action: Do NOT cut the bandage. Carefully remove the ring of bandage from your hand and start to wind the remaining bandage around the ring.
Rationale: This holds the base of the bandage together and pads it out to form a ring.
3. Action: Continue to wind around the ring until the desired shape and size is created.
Rationale: This creates a firm ring-doughnut-shaped structure that can be placed over a penetrating foreign body or a bedsore.
NB If you are left handed, use your right hand!
Casts and splints
The use of casts and splints to repair fractures, which may be referred to as external coaptation, is less often used nowadays as modern internal and external fixation techniques are more effective and allow the animal to resume normal activity more quickly. However, the use of casts and splints is cheaper and is useful in the following instances:
• In young animals with relatively stable fractures (e.g. greenstick fractures)
• Simple closed fractures that are distal to the elbow or stifle and are non-articular – these allow sufficient immobilization to prevent twisting
• Fractures with a minimum of 50% contact
• Fractures in which healing should take place within a minimum of 4–6 weeks – these are more likely in younger animals.
The main use of casts and splints is as an adjunct to internal fixation to provide support and protection, which aids analgesia and reduces swelling. Their sole use is contraindicated where there is soft tissue swelling or in working animals.
Procedure: Applying a cast
Materials: traditional casting material was plaster of Paris, but this is irritant, messy, radiopaque and takes time to reach weight-bearing strength. Modern materials are based on polyurethane resins, which are activated by immersion in hot water. They reach weight-bearing strength within 40 minutes and are radiolucent, enabling follow-up radiography to be carried out without removing the cast. The disadvantage is cost and some are irritant to the skin – make sure that you use an underlying layer of bandage and wear gloves when applying the material.
1. Action: Gather all your equipment together and arrange it within easy reach.
Rationale: This enables you to complete the cast quickly and efficiently.
2. Action: The patient should be anaesthetized or heavily sedated.
Rationale: This provides adequate muscle relaxation to reduce the fracture and ensure the limb is in the correct position. It also provides a degree of analgesia.
3. Action: Clip the fur from the limb, making sure that the joints distal and proximal to the fracture are included.
Rationale: The fur will interfere with the application of the cast. The joints above and below the fracture must be immobilized within the cast to prevent twisting of the limb.
4. Action: Ensure that the whole limb is clean and dry.
Rationale: Any moisture will absorb into the gauze layer and predispose to rubbing and / or maceration of the skin.
5. Action: Reduce the fracture.
Rationale: This must be done prior to application of the cast as once it has hardened you cannot move the ends of the bone.
6. Action: Place the animal in lateral recumbency with the affected limb uppermost and held, by an assistant, in a weight-bearing position.
Rationale: This is the shape that the cast will set and it is important that it is comfy for the patient. If the leg is too long or too short it will affect the patient’s mobility.
7. Action: Cover the leg with tubular gauze appropriate to the animal’s size. Ensure that the joints above and below the fracture are covered.
Rationale: The gauze layer will prevent the cast material causing skin irritation. Enclosing the joints prevents subsequent twisting of the limb, which would mean that the fracture heals in an abnormal position.
8. Action: Apply a degree of tension to the gauze.
Rationale: To eliminate creases from the bandage, which may rub on the animal’s skin inside the cast.
9. Action: Allow 2 cm of extra gauze at either end.
Rationale: This will be folded back later to ensure a smooth and comfortable end.
10. Action: Apply a layer of synthetic padding in a spiral fashion running from the distal limb to the proximal limb. Overlap by 50% at each turn. Extend by approximately 2 cm at either end.
Rationale: This makes the cast more comfortable. Ensure that there is more padding over the joints and bony prominences, but make sure it is even. If there are any depressed areas on the limb, these can be filled in with padding to achieve a smoother outline to the final cast.
11. Action: Apply a layer of conforming bandage over the padding.
Rationale: This will compact the padding layer.
12. Action: Make sure that you follow the manufacturer’s instructions for handling and wetting the casting material.
Rationale: Different types of casting material vary as to how they are used.
13. Action: Put on a pair of disposable gloves.
Rationale: Some casting materials are irritant to the skin.
14. Action: Apply the casting material over the layers of bandage. Overlap each turn by 50%. Use 2–4 layers according to the instructions. Leave 1–2 cm of exposed padding at the proximal end of the cast.
Rationale: The exposed padding will act as a soft protective border to the cast and prevent rubbing.
15. Action: Increase the tension of the cast material proximal to the stifle or elbow.
Rationale: This makes a snug fit over the main muscle masses of the limb and prevents the cast loosening or slipping.
16. Action: Avoid making indentations in the cast with your fingers.
Rationale: This may press on the limb underneath and cause areas of rubbing.
17. Action: Allow time to dry.
Rationale: The material should be dry within 10 minutes, but must be supported until it is. Depending on the type of material the cast should be weight bearing within 40 minutes.
18. Action: While drying is occurring, roll back the gauze and any of the padding layer to cover the ends of the cast and secure with adhesive tape. The pads and nails of the longest digits should remain exposed.
Rationale: This creates a neat and tidy cast and prevents rubbing at the top and bottom. The digits, pads and nails can be used to monitor the health of the underlying tissues.
Maintenance of the cast
Owners should be given written instructions about the signs to look out for and their responsibilities towards their animal and the cast.
1. Check the cast every 4 hours in the first 24 hours.
2. The cast should be checked in the surgery at least once a week unless the owner is concerned. Casts on young animals may need more frequent monitoring.
3. The cast must not be allowed to become wet.
4. Exercise should be restricted.
5. The cast may be kept clean by placing a plastic bag, such as an old drip bag, over the foot while the animal is outside. This must be removed when the animal is inside.
6. If the animal is interfering with the cast consider the use of an Elizabethan collar. Try to find out the reason for the interference – the animal may be experiencing some discomfort and you may be able to alleviate it.
7. Monitor the cast for the following: swelling, coldness and discoloration of the toes or the proximal limb, skin damage to the toes or proximal limb, foul odour, loosening of the cast, change in angulation of the cast, chewing or any damage to the cast, change in weight bearing, signs of general ill health.
8. If any of these are seen, the cast must be removed and replaced as soon as possible.
9. Complications may include: skin maceration, swelling, moist dermatitis, pressure necrosis and sores and wound contamination. If the cast loosens or changes shape this will affect the healing process which may result in deterioration in the apposition of the bone ends and ultimately a non-union, malunion or delayed union. The associated joints may also become lax or stiff. Complications are more likely to be found in growing and obese animals and in chondrodystrophic breeds.
Procedure: Removal of a cast
1. Action: The animal may be conscious or lightly sedated depending on its demeanour.
Rationale: This is not a painful procedure, but some animals may object to it.
2. Action: Always take a radiograph of the fractured limb before making the decision to finally remove the cast.
Rationale: This will show the extent of the callus formation indicating how well the fracture has healed. Manual restraint of the patient for radiology should be kept to a minimum – a sedated patient may stay still for a short while.
3. Action: Ask an assistant to restrain the patient on a non-slip examination table in an appropriate position.
Rationale: If the animal feels comfortable and secure it will be less likely to try and escape.
4. Action: If possible use an oscillating circular saw to cut through the cast.
Rationale: Plaster scissors can be used, but they take time to cut through and require a degree of strength.
5. Action: Make an incision along the length of the cast on the medial and lateral sides being careful not to injure the underlying tissues.
Rationale: By making two cuts you can then more easily lift off the top part of the cast.
6. Action: Using cast spreaders, prise apart the two halves.
Rationale: The two parts of the cast may be stuck to the underlying bandage.
7. Action: Remove the underlying bandage with scissors or by gently unwinding it.
Rationale: To reveal the healed limb.
8. Action: Treat any damaged or sore areas of skin appropriately.
Rationale: If the cast has been applied and maintained correctly there should be little damage to the skin underneath.
9. Action: Institute a regimen of gently increasing controlled exercise and physiotherapy.
Rationale: The aim is to stimulate callus remodelling without damaging the fracture repair. Gentle physiotherapy such as passive joint mobilization and active therapeutic exercise may be used.
Splints
A splint is a piece of rigid material applied to one aspect of the limb. Splints are not usually considered to be rigid enough for the primary repair of fractures but may be used in a first-aid situation to provide temporary support and a means of reducing pain before a definitive repair is instituted. They may also be used to repair fractures in exotic and wildlife species where it may be necessary to be inventive. A fractured phalanx may be repaired by binding it to the next intact digit, which acts as a splint and provides stability.
Procedure: Applying a splint
Materials: there are many types of commercially available splints, although it is possible to make your own in an emergency.
1. Action: Gather all your equipment together and arrange it within easy reach.
Rationale: This enables you to complete the splint and bandage quickly and efficiently.
2. Action: The patient should be anaesthetized or heavily sedated.
Rationale: This provides adequate muscle relaxation to reduce the fracture and ensure the limb is in the correct position. It also provides a degree of analgesia.
3. Action: Apply two layers of synthetic padding to the affected limb working from the distal to the proximal part of the limb. Do not use too thick a layer of padding.
Rationale: This provides comfort and protects the limb from the splint itself; however, to be effective the splint must be in relative proximity to the limb to provide sufficient immobility. Some commercial splints are ready-padded so the amount of synthetic padding can be reduced.
4. Action: Cover both the joint above and the joint below the fracture.
Rationale: Both joints must be involved within the splinted area to prevent rotation of the bone ends.
5. Action: Make sure any bony prominences are well padded.
Rationale: To ensure that these areas do not become rubbed and sore.
6. Action: Apply the splint to the limb, making sure that it is long enough to immobilize the joints above and below the fracture.
Rationale: To prevent rotation of the fractured ends of the bone.
7. Action: Hold the splint in place at two or three sites with micropore tape.
This keeps the splint in place while you apply the next layer of bandage.
8. Action: Apply a layer of cohesive bandage over the splint.
This holds the splint firmly in place and protects the whole bandage.