CHAPTER 11 Vital Signs
 Assess temperature, pulse, respiration, and blood pressure, and record these vital signs measurements.
VITAL SIGNS
Temperature, pulse rate, respiration rate, and blood pressure, indicators of health status, are referred to as vital signs. Inspection, palpation, and auscultation (listening either directly or with a stethoscope for sounds produced in the body) are techniques used to determine vital signs. At the initial client appointment, vital signs help to identify undiagnosed medical problems or establish baseline measurements for comparison at future appointments (Box 11-1). Box 11-2 lists appropriate occasions for the dental hygienist to measure and record the client’s vital signs.
BOX 11-1 Vital Signs: Acceptable Ranges for Adults
Adapted from Potter PA, Perry AG: Fundamentals of nursing, ed 7, St Louis, 2009, Mosby.
BOX 11-2 When to Take Vital Signs
Vital signs outside an acceptable range may indicate health problems, undiagnosed conditions, the need for referral to a physician, or the need to terminate dental hygiene care. In addition to illness, age, gender, medications, the temperature of the environment, altitude, body position, physical exertion, diet, stress, improperly used equipment, unreliable equipment, and other factors can affect vital signs. Vital signs are analyzed to interpret their significance and make clinical decisions. If abnormal readings are obtained, the dental hygienist questions the client about possible causes and repeats the measurement. When readings that exceed normal limits are validated, the dental hygienist communicates them to the client, dentist, and physician of record. The following practice guidelines assist in obtaining accurate vital signs:
Use properly working equipment designed for the size and age of the client, e.g., an adult-size blood pressure cuff should not be used for a child or obese person. Know the client’s health and pharmacologic history; some illnesses, treatment, behaviors, and medications affect vital signs.BODY TEMPERATURE
Body temperature is regulated by the brain’s hypothalamic area, which acts as the body’s thermostat. The hypothalamus senses changes in temperature and sends impulses out to the body to correct them. On a hot day the hypothalamus detects a rise in body temperature and sends signals to the skin to perspire and lower its temperature. In cold weather the hypothalamus detects a lowering of the body’s temperature and signals the body to shiver, increasing body temperature.
No single temperature is normal for all people (Figure 11-1).The normal range for body temperature is 97.0° to 99.6° Fahrenheit (or 36.1° to 37.5° Celsius). As the body produces heat, it is also losing heat.
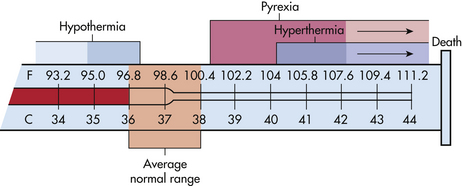
Figure 11-1 Ranges of normal temperature values and physiologic consequences of abnormal body temperature.
(From Potter PA, Perry AG: Fundamentals of nursing, ed 7, St Louis, 2009, Mosby.)

For body temperature to be maintained, there must be a balance between heat loss and heat production (see Figure 11-1). With aging, the normal temperature range gradually narrows because the mechanisms that control thermoregulation start to deteriorate. Table 11-1 lists factors that affect body temperature.
TABLE 11-1 Factors That Affect Body Temperature
| Factors | Effects |
|---|---|
| Exercise | Increases body temperature |
| Hormonal influences | Decrease or increase body temperature |
| Before ovulation | Body temperature decreased below baseline |
| During ovulation | Body temperature increased to baseline or higher |
| Menopause | Periodic increase in body temperature |
| Time of day variations: | |
| Early morning | Temperature is lowest |
| Daytime | Body temperature rises |
| Evening | Body temperature peaks by 0.5º-1º F (0.3º-0.6º C) |
| Stress (physical and emotional) | Increases body temperature |
| Warm environment | Increases body temperature |
| Cold environment | Decreases body temperature |
| Infection | Increases body temperature |
| Tachypnea (rapid breathing) | Decreases oral temperature |
| Age | For persons >70 years of age, average oral body temperature is 96.8º F (36º C) |
| Hot liquids | Increase oral temperature for about 15 minutes |
| Cold liquids | Decrease oral temperature for about 15 minutes |
| Smoking | Increases oral temperature for about 30 minutes |
Body Temperature Measurement Sites
The oral cavity (under the tongue) is the most common site for measuring body temperature. Caution should be taken to prevent inaccurate readings if hot or cold foods have been ingested (wait 20 to 30 minutes) or if the client has been smoking. Alternative sites such as the ear (tympanic membrane) or axilla (armpit) should be used when the client’s safety is a consideration. For example, unconscious clients, infants, small children, or cognitively challenged clients may have difficulty with the oral thermometer under the tongue or may bite the thermometer and break it.
Thermometers
Four types of thermometers are available for measuring body temperature (Table 11-2 and Figures 11-2 to 11-7). Disposable plastic sheaths are used over the probe end of the thermometer as a protective barrier for infection control. Electronic and the mercury-in-glass thermometers are commonly used at home and in professional practice. The mercury-in-glass thermometer (see Figure 11-2) must be handled carefully to avoid breakage and inadvertent spillage of the contents. If a mercury-in-glass thermometer is broken, it should be cleaned up immediately to prevent mercury contamination or poisoning (Box 11-3).
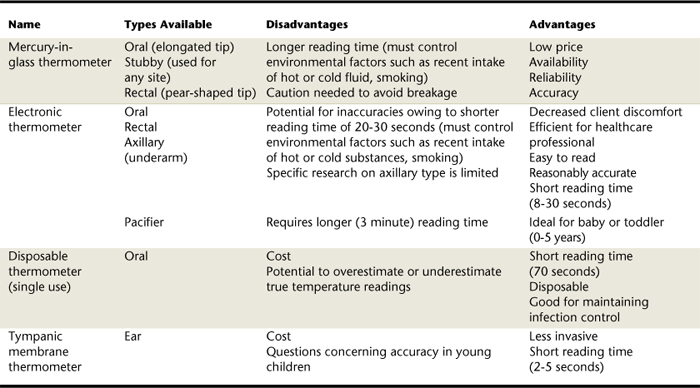
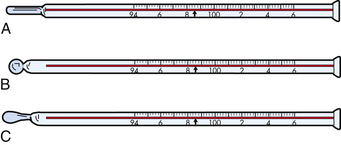
Figure 11-2 Types of mercury-in-glass thermometers. A, Oral. B, Oral, rectal, or axillary. C, Rectal.
(From Potter PA, Perry AG: Fundamentals of nursing, ed 7, St Louis, 2009, Mosby.)
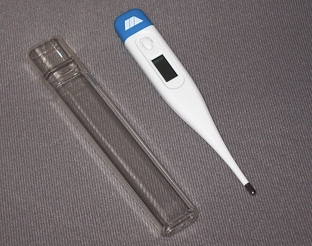
Figure 11-3 Electronic (digital) thermometer.
(Courtesy Sedation Resource, Lone Oak, Texas, www.sedationresource.com.)
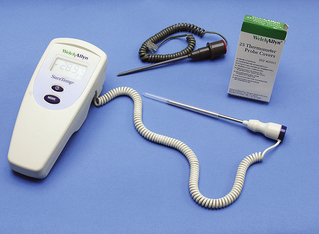
Figure 11-4 Electronic thermometer. Blue probe is for oral or axillary use. Red probe is for rectal use.
(From Potter PA, Perry AG: Fundamentals of nursing, ed 7, St Louis, 2009, Mosby.)
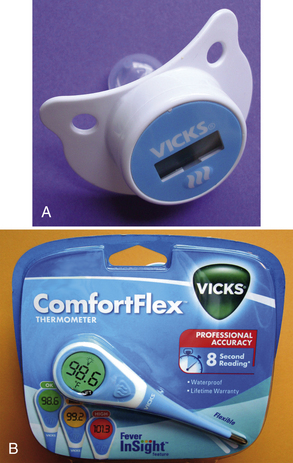
Figure 11-5 A, Electronic pacifier thermometer. B, Underarm (axillary), oral, and rectal electronic thermometer.

Figure 11-6 Tympanic membrane thermometer.
(From Potter PA, Perry AG: Fundamentals of nursing, ed 7, St Louis, 2009, Mosby.)
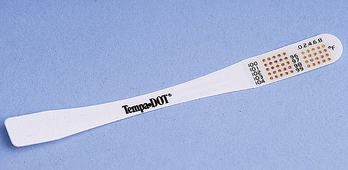
Figure 11-7 Disposable, single-use thermometer strip.
(From Potter PA, Perry AG: Fundamentals of nursing, ed 7, St Louis, 2009, Mosby.)
BOX 11-3 Steps to Take in the Event of a Mercury Spill
Adapted from Potter PA, Perry AG: Fundamentals of nursing, ed 7, St Louis, 2009, Mosby.
Note: Mercury clean-up kits can be purchased from dental supply companies.
Electronic (digital) thermometers consist of a probe attached to a digital readout (see Figures 11-3 and 11-4) to measure oral and axillary temperatures. A pacifier thermometer (see Figure 11-5), a type of electronic thermometer, obtains a reasonably accurate reading in younger children within 3 minutes. Underarm (axillary) electronic thermometers (see Figure 11-5), relatively new on the market, have a short reading time (8 to 30 seconds) and are easy to use in young children. Tympanic membrane (ear) thermometers (see Figure 11-6) are easy to use, less invasive, and achieve a reading within seconds. Oral and axillary disposable, single-use thermometers can indicate a client’s temperature within 70 seconds (see Figure 11-7). Disposable single-use thermometers are used mostly for oral temperature screening. See Procedures 11-1 and 11-2 for taking basal body temperature orally using two different types of thermometers. Temperature is recorded in degrees Fahrenheit.
Procedure 11-1 TAKING AN ORAL TEMPERATURE MEASUREMENT WITH A MERCURY-IN-GLASS THERMOMETER
Adapted from Potter PA, Perry AG: Fundamentals of nursing, ed 7, St Louis, 2009, Mosby.
STEPS
Procedure 11-2 TAKING AN ORAL TEMPERATURE MEASUREMENT WITH AN ELECTRONIC THERMOMETER
Adapted from Potter PA, Perry AG: Fundamentals of nursing, ed 7, St Louis, 2009, Mosby.
STEPS
Decision Making Based on Observed Temperature
Usually a high body temperature (known as fever or pyrexia) indicates that the body is fighting an infection. If the client’s temperature exceeds 99.6° degrees Fahrenheit (or 37.5° Celsius), the client should be evaluated for causative factors (see Table 11-1). If the client’s temperature is 104° Fahrenheit (or 40° Celsius) or higher and the infection is not dentally related, a physician’s referral is indicated. If pyrexia is due to a dental infection, then immediate dental treatment and antibiotic therapy may be indicated. A body temperature of 105.8° F (41° Celsius) indicates a medical emergency, so the EMS system would be activated. Low body temperature can occur with cold exposure, endocrine disorders, sepsis, alcohol intake, eating disorders, and neurologic and neuromuscular disorders.
PULSE
The pulse, an indicator of the integrity of the cardiovascular system, is the intermittent beat of the heart felt through the walls of an artery. Tachycardia (>110 beats per minute [BPM]) is an abnormally elevated heart rate; however, it is a normal response to stress or physical exercise. Bradycardia (<60) is an abnormally slow heart rate (Table 11-3). Athletes may be bradycardic at rest owing to physical conditioning. Table 11-4 describes factors that influence pulse rate.
TABLE 11-3 Acceptable Ranges of Heart (Pulse) Rate
| Age | Heart Rate (Beats per Minute) |
|---|---|
| Infant | 120-160 |
| Toddler | 90-140 |
| Preschooler | 80-110 |
| School-age child | 75-100 |
| Adolescent | 60-100 |
| Adult | 60-100 |
Adapted from Potter PA, Perry AG: Fundamentals of nursing, ed 7, St Louis, 2009, Mosby.
TABLE 11-4 Factors That Influence Heart (Pulse) Rate
| Factor | Increased Pulse Rate | Decreased Pulse Rate |
|---|---|---|
| Exercise | Short-term exercise | |
| Temperature | Fever and heat | Hypothermia |
| Emotions and stress | Acute pain and anxiety increase sympathetic stimulation, affecting heart rate | Unrelieved severe pain increases parasympathetic stimulation, affecting heart rate; relaxation |
| Medications | Positive chronotropic drugs, e.g., epinephrine | Negative chronotropic drugs, e.g., digitalis, beta and calcium blockers |
| Hemorrhage | Loss of blood increases sympathetic stimulation | |
| Postural changes | Standing or sitting | Lying down |
| Pulmonary conditions | Diseases causing poor oxygenation such as asthma, chronic obstructive pulmonary disease (COPD) |
From Potter PA, Perry AG: Fundamentals of nursing, ed 7, St Louis, 2009, Mosby.
Pulse Measurement Sites
Pulse points are body sites where the rhythmic beats of an artery can be felt. The most common site for assessing the radial pulse is the thumb side of the inner wrist where the radial artery can be felt (Figure 11-8, Procedure 11-3). The fingertips of the first two fingers are used to feel for the pulse (a throbbing sensation). (Note: Never use the thumb to feel for the pulse, because it has a pulse of its own that can be mistaken for the client’s.) If the radial pulse cannot be felt, the carotid pulse, located on the side of the neck over the carotid artery, is an alternative. In emergency situations the carotid pulse should be palpated because the body delivers blood to the brain for as long as possible, whereas peripheral blood supply can decline. The pulse is recorded in BPM. Heart rhythm (regular or irregular) and pulse quality (thready, strong, bounding, or weak) also are assessed when the pulse is measured.
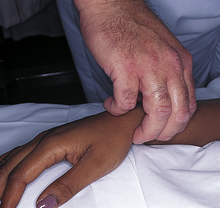
Figure 11-8 Position of the fingers in measuring the radial pulse.
(From Potter PA, Perry AG: Fundamentals of nursing, ed 7, St Louis, 2009, Mosby.)
Procedure 11-3 MEASURING THE RADIAL PULSE
Adapted from Potter PA, Perry AG: Fundamentals of nursing, ed 7, St Louis, 2009, Mosby.
STEPS
Decision Making Based on Observed Pulse Rate
If the adult client’s heart rate falls under 60 BPM or rises above 100 BPM, the client should be evaluated for causative factors or conditions. If no cause can be determined, a medical consultation with the client’s physician should be conducted.
A medical consultation is recommended in the following circumstances:
If a client with risk factors for coronary artery disease is experiencing five or more premature ventricular contractions (PVCs) per minute. A PVC is a break, or skip, in the normal rhythm, and the dental hygienist will detect an interruption in successive pulse waves. If the client is experiencing pulsus alternans, alternating strong and weak heartbeats, which may indicate ventricular failure, high blood pressure, or coronary heart disease.A full, bounding pulse may indicate high blood pressure. A weak, thready pulse usually is found in persons with hypotension and is a sign of shock.
RESPIRATION
Respiration rate is assessed by counting the rise and fall (inspiration and expiration) of the client’s chest and is recorded as respirations per minute (RPM). The dental hygienist makes this assessment without the client’s awareness to prevent the client from changing breathing patterns.
Respiration Measurement Site
Respiration rate may be measured before or after the client’s pulse rate is assessed. The dental hygienist’s hand remains on the client’s radial pulse while the hygienist inconspicuously counts the rise and fall of the client’s chest.
Normal adult range is 16 to 18 RPM. Children have a more rapid respiratory rate (20 to 30 RPM) than that of adults. Young children also tend to have a less regular breathing cycle. Advancing age produces an increase in the respiration rate. Steps for measuring respirations are shown in Procedure 11-4.
Procedure 11-4 MEASURING RESPIRATIONS
Adapted from Potter PA, Perry AG: Fundamentals of nursing, ed 7, St Louis, 2009, Mosby.
STEPS
Decision Making Based on Observed Respiration
If an abnormal respiratory rate is detected, the dental hygienist refers the client to the physician of record for a medical evaluation. Table 11-5 presents acceptable ranges of respiratory rates by age. Tachypnea (rapid shallow breathing) greater than 20 RPM may indicate restrictive lung disease or inflammation of the lungs. Hyperpnea (hyperventilation or rapid deep breathing) may be associated with physical exercise, anxiety, or metabolic acidosis. Bradypnea (slow breathing) may occur with diabetic coma. Obstructed breathing from narrowed airways may occur with asthma, chronic bronchitis, congestive heart disease, and chronic obstructive pulmonary disease.
TABLE 11-5 Acceptable Ranges of Respiratory Rate According to Age
| Age | Rate (Breaths per Minute) |
|---|---|
| Newborn | 30-60 |
| Infant (6 months) | 30-50 |
| Toddler (2 years) | 25-32 |
| Child | 18-30 |
| Adolescent | 12-19 |
| Adult | 12-20 |
From Potter PA, Perry AG: Fundamentals of nursing, ed 7, St Louis, 2009, Mosby.
BLOOD PRESSURE 1-4
Blood pressure, the force exerted by the blood against the arterial walls when the heart contracts, is an important indicator of current cardiovascular function and a risk indicator of future cardiovascular morbidity and mortality. Chronic hypertension causes thickening and loss of elasticity in the arterial walls, which can lead to heart attack, heart failure, stroke, and kidney disease. There are no adverse effects from hypotension (low blood pressure) unless the client is in a state of shock or is affected by a disorder or condition that may lower the blood pressure. In fact, the lower the blood pressure, the better the long-term prognosis for cardiovascular health. An acute change in blood pressure can indicate an emergency situation such as shock or rapid hemorrhaging.
Blood pressure is measured in millimeters of mercury (mm Hg). The two measurements taken for blood pressure are the systolic blood pressure and the diastolic blood pressure:
Systolic blood pressure measures the maximum pressure occurring in the blood vessels during cardiac ventricular contraction (systole) and is the number on the sphygmomanometer (blood pressure cuff) when the first sound is heard. Diastolic blood pressure measures the minimum pressure occurring against the arterial walls as a result of cardiac ventricular relaxation (diastole) and is the number on the sphygmomanometer when the last sound is heard.When documenting blood pressure, the dental hygienist records the date and arm used. Blood pressure is recorded as a fraction. The optimal systolic and diastolic measurements for adults 18 years of age and older is <120/80 mm Hg. The top number of a given blood pressure is the systolic measurement, and the bottom number is the diastolic measurement (“d for down”). A client has high blood pressure (hypertension) if the systolic blood pressure is 140 mm Hg or greater and the diastolic blood pressure is 90 mm Hg or greater. Table 11-6 presents average optimal blood pressure for different ages. Table 11-7 describes factors that influence blood pressure.
TABLE 11-6 Average Optimal Blood Pressure According to Age
| Age | Blood Pressure (mm Hg) |
|---|---|
| Newborn (3000 g [6.6 lb]) | 40 (mean) |
| 1 month | 85/54 |
| 6 years∗ | 105/65 |
| 10-13 years∗ | 110/65 |
| 14-17 years∗ | 120/75 |
| >18 | <120/80 |
∗ In children and adolescents, hypertension is defined as blood pressure that is, on repeated measurement, at the 95th percentile or higher, adjusted for age, height, and gender (NHBPEP, 1997).
Data from Chobanian AV, Bakris GL, Black HR The seventh report of the Joint National Committee on Detection, Evaluation, and Treatment of High Blood Pressure, JAMA 289:2560, 2003.
TABLE 11-7 Factors Influencing Blood Pressure
| Factors | Effects |
|---|---|
| Age | Blood pressure rises with age. Newborns have the lowest mean systolic blood pressure (75 mm Hg). As people age, elasticity in the arteries declines, producing an increase in blood pressure. Hypertension is common in the elderly (≥60 years). |
| Race | Prevalence of hypertension in African and Hispanic Americans is considerably higher than in the white population, and hypertension tends to appear earlier in life in these groups. |
| Weight | Blood pressure tends to be elevated in overweight and obese persons. Oversized blood pressure cuffs are necessary for accurate readings. |
| Gender | Hormonal variation causes females to have lower blood pressure after puberty than males; however, postmenopausal women tend to have higher blood pressure than men of similar age. Preeclampsia is abnormal hypertension experienced by some women during pregnancy. Postmenopausal women experience higher blood pressure. |
| Emotional stress | Stress stimulates the sympathetic nervous system, which in turn increases cardiac output and vasoconstriction. The outcome is elevated blood pressure. |
| Pain | Pain decreases blood pressure, and if severe can cause shock. |
| Oral contraceptives | These can increase blood pressure; however, the change is usually within normal limits. |
| Exercise | After exercise there is an increase in blood pressure for the first 30 minutes, followed by a decrease in blood pressure. |
| Eating | Older adults can have a 5– to 10–mm Hg fall in blood pressure 1 hour after eating. |
| Medications | Medications vary in their ability to increase and decrease blood pressure. Medications must be reviewed at each appointment to determine effects on blood pressure. |
| Diurnal variation | Blood pressure varies with metabolic rate. Pressure is lowest in the morning, then rises and peaks in the late afternoon or early evening. |
| Chronic disease | Diseases that affect cardiac output, blood volume, blood viscosity, or arterial elasticity will increase blood pressure. |
| Tobacco, alcohol, and caffeine use | Elevates blood pressure. |
| High fat and saturated fat intake | High blood cholesterol, especially high LDL cholesterol, and high triglycerides cause atherosclerosis, which in turn can cause an increase in blood pressure. |
| Dehydration | Accompanied by sudden changes in posture (lying to standing), can cause orthostatic or postural hypotension. |
| White-coat hypertension (isolated office hypertension) | Approximately 15%-20% of clients with stage 1 hypertension may have an elevated blood pressure in the presence of a healthcare worker, especially a physician.3 |
| Body position | Blood pressure is lower when a person is lying down |
Decision Making Based on Observed Blood Pressure
Hypertension is the major cause of stroke and is a contributing factor for myocardial infarction (heart attack). Although not a disease category, prehypertension identifies clients who should be counseled to adopt a healthier lifestyle to reduce blood pressure or prevent hypertension entirely. Clients who are prehypertensive are not candidates for drug therapy unless risk factors for hypertension (e.g., diabetes and kidney disease) are present and only after lifestyle modifications fail to reduce the blood pressure to <130/80 mm Hg.
A medical consultation is indicated for persons with abnormal blood pressure (Tables 11-8 and 11-9) before administration of dental or dental hygiene care.
TABLE 11-8 Classification of Blood Pressure for Adults
| Blood Pressure Classification | Systolic Blood Pressure∗ (mm Hg) | Diastolic Blood Pressure∗ (mm Hg) |
|---|---|---|
| Normal (routine dental treatment recommended) | <120 | and <80 |
| Prehypertension (routine dental treatment recommended) | 120-139 | or 80-89 |
| Stage 1 hypertension (routine dental treatment recommended; assess risk factors, refer for consultation with physician of record) | 140-159 | or 90-99 |
| Stage 2† hypertension (refer for consultation with physician of record) | ≥160 | or ≥100 |
National Institutes of Health (NIH): The seventh report of the Joint National Committee on Detection, Evaluation, and Treatment of High Blood Pressure, Bethesda, Md, 2004, NIH.
∗ Based on average of two or more properly measured, seated, blood pressure readings on each of two or more office visits.
† Note that if 160-179/100-109, routine dental care can be provided, but treatment should be delayed if care will be stressful or if client cannot handle stress. If local anesthesia is required, use 1:100,000 vasoconstrictor. If ≥180/≥110, delay treatment until blood pressure is controlled. If emergency dental care is needed, care should be provided in a hospital dental clinic where emergency life support personnel and equipment are located.
TABLE 11-9 Adult Blood Pressure Guidelines Used in the Dental Hygiene Process of Care
| Blood Pressure (mm Hg) | ASA Physical Status Classification∗ | Dental and Dental Hygiene Therapy Considerations and Interventions Recommended |
|---|---|---|
| <140 systolic and <90 diastolic | I | |
| 140-159 systolic and/or90-94 diastolic | II |
No unusual precautions related to client management based on blood pressure readings needed unless blood pressure remains above normal after three consecutive appointments
|
| 160-199 systolic and/or 95-114 diastolic | III |
Recheck blood pressure in 5 minutes; if still elevated, seek medical consultation before dental or dental hygiene therapy
|
| ≥200 systolic and/or ≥115 diastolic | IV |
∗ See Chapter 10 for an explanation of ASA Physical Status Classification.
† When the blood pressure is slightly above the cutoff for category IV and when anxiety is present, the use of inhalation sedation may diminish the blood pressure (via the elimination of stress) below the 200/115 level. The client should be advised that if the nitrous oxide and oxygen succeeds in decreasing the blood pressure below this level, the planned treatment can proceed. However, if the blood pressure remains elevated, the planned procedure must be postponed until the elevated blood pressure has been lowered to a more acceptable range.
Adapted from Malamed SF: Medical emergencies in the dental office, ed 6, St Louis, 2007, Mosby.
Blood Pressure Equipment and Measurement
Sphygmomanometer (Blood Pressure Cuff)
The sphygmomanometer consists of a pressure-measuring device called a manometer and an inflatable cuff that wraps around the arm or leg (Table 11-10). The mercury manometer (Figure 11-9) is an upright tube containing mercury. The column of mercury is moved upward by the pressure created by inflation of the bladder. The height of the mercury column is marked by millimeter calibration. When the cuff is deflated, the mercury must be at zero. Although mercury manometers are more accurate than aneroid manometers, mercury is a health hazard if not properly contained. Local regulations may prohibit the sale or use of mercury-containing devices.
TABLE 11-10 Main Types of Manometers Used in Blood Pressure Measurement
| Name | Advantages | Disadvantages |
|---|---|---|
| Mercury sphygmomanometer (see Figure 11-9) | Most accurate | |
| Aneroid sphygmomanometer (see Figure 11-9) | Needs to be recalibrated | |
| Electronic sphygmomanometer (see Figure 11-10) |
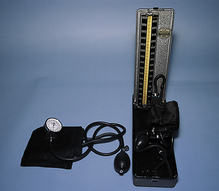
Figure 11-9 Portable sphygmomanometers. Mercury manometer (right). Aneroid manometer (left).
(From Potter PA, Perry AG: Fundamentals of nursing, ed 7, St Louis, 2009, Mosby.)
Portable and lightweight, the aneroid sphygmomanometer (see Figure 11-9) has a glass-enclosed circular gauge containing a needle that registers millimeter calibrations. Aneroid manometers require periodic biomedical calibration to ensure their accuracy. The electronic manometer is easy to use and determines blood pressure automatically (Figure 11-10) without the use of a stethoscope.
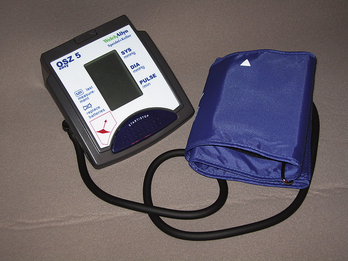
Figure 11-10 Automatic blood pressure cuff for home use.
(Courtesy Sedation Resource, Lone Oak, Texas, www.sedationresource.com.)
A baseline blood pressure should be obtained by using the auscultatory method before application of an automatic device because these devices are more susceptible to error. Error is due to the fact that electronic devices are sensitive to outside interference such as client movement or noise. Such factors interfere with the manometer’s sensor signal. An electronic manometer can easily become inaccurate and should be recalibrated more than once a year. An automatic device is not appropriate for clients with certain conditions (Box 11-4).
BOX 11-4 Client Conditions Not Appropriate for Electronic Blood Pressure Measurement
From Potter PA, Perry AG: Fundamentals of nursing, ed 7, St Louis, 2009, Mosby.
Parts of a manometer are similar regardless of the type and include an occlusive cloth cuff that encloses an inflatable rubber bladder and a pressure bulb with a release valve that inflates the bladder. Large adult cuffs, thigh cuffs, and pediatric sizes are also available.
Proper cuff size is necessary for accurate blood pressure readings. The cuff size selected is proportional to the circumference of the upper arm being assessed (Figure 11-11). The recommended cuff sizes are as follows4:
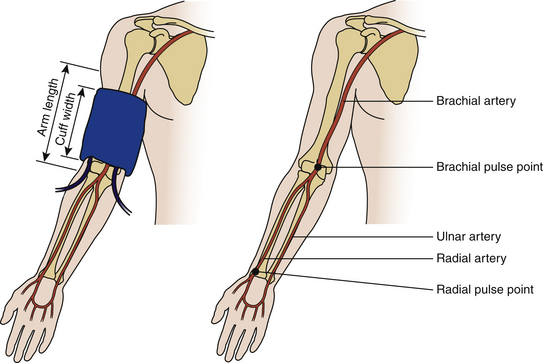
Figure 11-11 Guidelines for proper blood pressure cuff size. Cuff width = 20% more than upper arm diameter or 40% of circumference and two thirds of arm length.
In an adult the bladder within the cuff should encircle at least 80% of the arm, and it should circle the entire arm of a child. Clients with muscular arms that have prominent biceps or obese individuals require use of a large adult cuff. An arm circumference >41 cm requires the use of a thigh cuff (16 × 42 cm).2 Blood pressure for morbidly obese individuals with an arm circumference over 52 cm can be measured using an appropriate cuff over the forearm with the stethoscope placed over the radial artery.4 Although cuffs may be labeled newborn, infant, child, small adult, and large adult, the practitioner should not rely on client age as the basis for cuff selection. False high readings can occur if the cuff is too narrow; false low readings can occur if the cuff is too wide (Table 11-11).
TABLE 11-11 Common Mistakes in Blood Pressure Assessment
| Effect | Error |
|---|---|
| False high reading | |
| False low reading |
Stethoscope
The stethoscope, an instrument used to amplify sound, consists of two earpieces, plastic or rubber tubing, and a chestpiece. The chestpiece has two sides, the bell and the diaphragm (Figure 11-12).
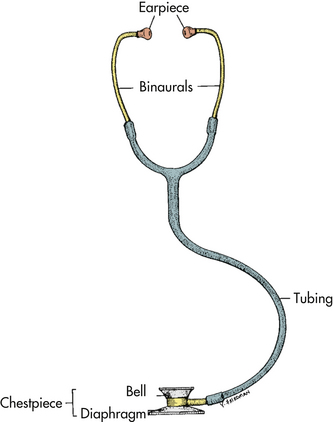
Figure 11-12 Parts of a stethoscope.
(From Potter PA, Perry AG: Fundamentals of nursing, ed 7, St Louis, 2009, Mosby.)
When the bladder within the occluding cuff is deflated, the blood begins to flow intermittently through the brachial artery (Figure 11-13), producing rhythmic, knocking sounds. These sounds are referred to as Korotkoff (ko-rot-kov) sounds. As the cuff is deflated further, the Korotkoff sounds become less audible, and the pulse eventually disappears. See Figure 11-14 for the five Korotkoff sounds described in phases.
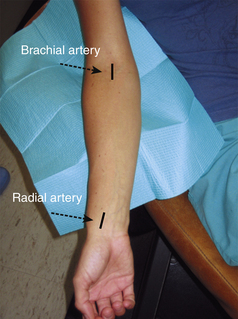
Figure 11-13 Location of the brachial and radial arteries. The brachial artery is located on the medial half of the antecubital fossa, whereas the radial artery is on the lateral volar aspect of the wrist.
(From Malamed SF: Medical emergencies in the dental office, ed 6, St Louis, 2007, Mosby.)
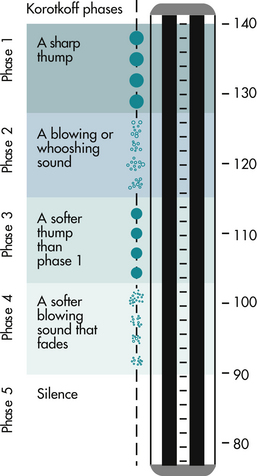
Figure 11-14 The sounds auscultated during blood pressure measurement can be differentiated into five Korotkoff phases. In this example, blood pressure is 140/90. Phase 1, The first clear, repetitive tapping sound; recorded as the systolic pressure. Phase 2, Brief period of soft, longer swishing, blowing, and whooshing sounds. Gap, Sound may disappear altogether in some people (auscultatory gap). Phase 3, The return of crisp, sharp, louder thumping sounds. Phase 4, The distinct muffling of the sounds, which become soft and blowing. Phase 5, The point of silence when all sounds disappear because the blood flow returns to normal; recorded as the diastolic pressure.
(From Potter PA, Perry AG: Fundamentals of nursing, ed 7, St Louis, 2009, Mosby.)
An auscultatory gap, a period of abnormal silence that occurs between the Korotkoff phases, is often present in hypertensive clients. This gap usually appears between the first and second systolic sounds. Failure to recognize the auscultatory gap will result in an underestimation of the systolic pressure. Therefore it is important that the dental hygienist assess the point at which the pulse is obliterated while increasing the pressure in the bladder before taking the blood pressure by auscultation. Moreover, the clinician should increase the bladder pressure 30 mm Hg higher than the point at which the pulse is obliterated when measuring blood pressure (Procedure 11-5). Once taken, blood pressure should be documented in writing and dated in the client’s chart under services rendered (e.g., “7/13/09—Blood pressure in right arm, 160/90 mm Hg with auscultatory gap between 160 and 120”).
Procedure 11-5 ASSESSING BLOOD PRESSURE BY AUSCULTATION
Adapted from Potter PA, Perry AG: Fundamental of nursing, ed 7 St Louis, 2009, Mosby.
STEPS
CLIENT EDUCATION TIPS
Educate client when abnormal vital signs are present; initiate proper physician referral when appropriate.LEGAL, ETHICAL, AND SAFETY ISSUES
Always record client’s vital signs on the treatment record and refer to client’s baseline readings for comparison. These should be routinely performed at continued care appointments and at each appointment when indicated by the client’s health and pharmacologic history. Refer client to the physician of record for medical consultation when vital signs exceed normal ranges. Include copies of the referral letter in the client’s chart for access and confirmation.KEY CONCEPTS
Abnormal vital signs can be due to client conditions, equipment failure, or operator error. The dental hygienist must take the vital signs accurately and control factors that contribute to errors. Blood pressure, pulse, and respiration for baseline measurements should be taken as a comparison for subsequent appointments. Temperature is not regularly taken; however, the dental hygienist should take the temperature if the client with signs or symptoms of a fever (pyrexia). Pulse rate is recorded in beats per minute (BPM). The pulse in the radial or carotid artery is often measured using the first two fingers of the clinician’s hand. Normal pulse rate for an adult at rest can range from 60 to 100 BPM. Children usually have a more rapid pulse rate than adults. If the client is experiencing five or more premature ventricular contractions (PVCs) per minute, a medical consultation should be considered. Respiration rate is determined by observing the rise and fall of the client’s chest and is recorded as respirations per minute (RPM). Normal adult range for respiration rate is 12 to 20 RPM. Children have a more rapid respiratory rate (20 to 30 RPM for a 6-year-old child) than adults. Two measurements taken for blood pressure are the systolic blood pressure and the diastolic blood pressure. Optimal systolic and diastolic measurements for adults 18 years of age and older are less than 120/80 mm Hg. Lifestyle changes are recommended for clients with prehypertension (120 to 139 mm Hg systolic and/or 80 to 89 mm Hg diastolic pressure) with the goal of reducing and/or preventing hypertension.CRITICAL THINKING EXERCISES
Refer to the Procedures Manual where rationales are provided for the steps outlined in the procedures presented in this chapter.
1. Chobanian A.V., Bakris G.L., Black H.R., et al. Department of Health and Human Services, National Institutes of Health, National Heart, Lung and Blood Institute, National High Blood Pressure Education Program. The seventh report of the Joint National Committee on Prevention, Detection, Evaluation, and Treatment of High Blood Pressure. Hypertension. 2003;42:1206.
2. Malamed S.F. Medical emergencies in the dental office, ed 6. St Louis: Mosby; 2007.
3. Pickering T.G., Hall J.E., Appel L.J., et al. Recommendations for blood pressure measurement in humans and experimental animals. Hypertension. 2005;45:49.
4. Potter P.A., Perry A.G. Fundamentals of nursing, ed 7. St Louis: Mosby; 2009.
Visit the  website at http://evolve.elsevier.com/Darby/Hygiene for competency forms, suggested readings, glossary, and related websites..