3 The lower limb
At the end of this chapter you should be able to:
1. Find, recognize the shape and position of the hip bone, femur, tibia, fibula, patella, tarsal, metatarsal bones and phalanges.
2. Recognize and palpate many of the bony features.
3. Name all the joints of the lower limb, recognizing the bones which form them.
4. Palpate and trace the lines of the joints, where possible, indicating their bony landmarks and surface markings.
5. Describe or carry out any accessory movements possible noting the ranges in which they are most obvious.
6. Note the ranges of each of the joints and indicate the factors limiting the movement.
7. Give the class and type of each joint, noting the axes of movement where possible.
8. Name and demonstrate the action of all the muscles palpable in the lower limb.
9. Indicate the shape of the muscle on the surface and palpate its contraction.
10. Palpate tendons and attachments where possible.
11. Name all the main nerves supplying the lower limb.
12. Demonstrate the course and distribution of each of the main nerves of the lower limb.
13. Name the main arteries of the lower limb, showing their course and giving their distribution.
14. Name the main veins of the lower limb, noting their drainage areas and course.
Bones
The hip region
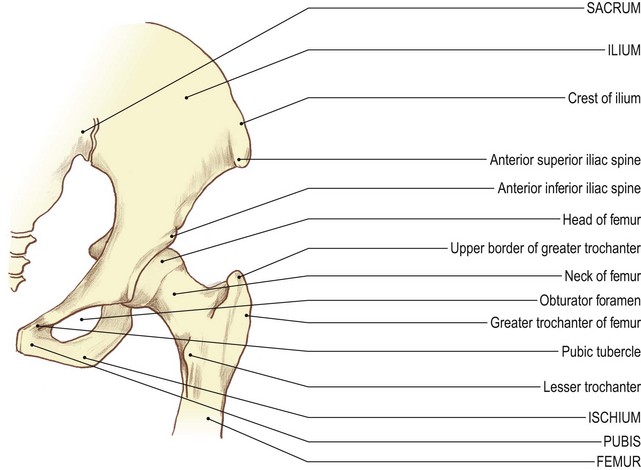
The two hip bones on either side and the sacrum, posteriorly, form the pelvic girdle. In its lower section it forms a complete ring (the true pelvis) with the two pubic bones joined at the pubic symphysis, whereas in its upper part (the false pelvis) the two blades of the ilium leave a large space anteriorly.
The hip or innominate bone [os innominatum (L) = bone without a name] comprises the ilium, the ischium and the pubis. They are united at the acetabulum, a deep rounded hollow situated on the lateral side of the bone on the constricted area between two blades. The bone above and posterior is the ilium; the bones below and anterior are the pubis and ischium. The ilium has an inner and outer surface. It has a broad crest above a narrow border at the front and back. The upper part of the sciatic notch lies inferiorly just posterior to the ilioischial junction. The lower blade presents a large foramen. Medial to this is the flattened bone of the body of the pubis. The pubis has a superior ramus above and an inferior ramus passing downwards and laterally. The ischium is situated below the acetabulum. It forms the lateral part of the obturator foramen with its ramus passing from below upwards to join the inferior ramus of the pubis.
The upper end of the femur comprises the head, neck, greater and lesser trochanters. The head lies medially and articulates in the acetabulum. The greater trochanter lies at the lateral end of the neck. The lesser trochanter projects medially and backwards from just below the junction of the neck with the shaft.
Palpation
• Preliminary note. Owing to the size and thickness of muscle and fascia, you will find this region much more difficult to palpate than the shoulder. It is often covered by a layer of fat which makes palpation even more difficult.
• For palpation in this region, the model should be in the standing position.
• The iliac [ilium (L) = the flank] crest. Place both hands around the model’s waist. Slide your hands downwards and identify a bony ridge on either side of the waist.
• Note 1. The iliac crest is convex laterally in its anterior two-thirds. It is broad and rounded, with inner and outer lips.
• Note 2. The posterior third of the iliac crest is concave laterally, less well defined and a little sharper on its superior border.
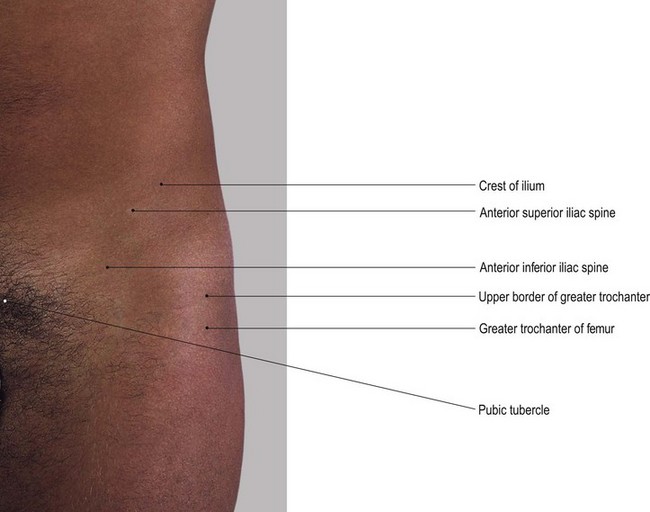
• The anterior superior iliac spine (ASIS) (Fig. 3.1). Trace each crest forwards until you identify a well-defined projection, the ASIS. Palpate the anterior superior iliac spines which are set approximately 30 cm apart (a little more in women), the abdomen usually protruding forwards between them.
• The posterior superior iliac spine (PSIS). Trace the iliac crest posteriorly to a small spine just prior to the bone angling downwards. This is the posterior superior iliac spine. In lean subjects the iliac crest is easily palpated from the ASIS to the PSIS.
• The tubercle of the iliac crest. Identify the tubercle of the iliac crest which lies approximately 5–7 cm posterior to the lateral lip of the ASIS.
• Note. The tubercle of the iliac crest gives attachment to the upper end of the iliotibial tract.
• The anterior inferior iliac spine (AIIS) (Fig. 3.1). From the ASIS, trace the sharp concave anterior border of the ilium downwards to another, less well-defined anterior projection, the AIIS. This lies approximately 2 cm above the rim of the acetablum.
• The anterior rim of the true pelvis (Fig. 3.1). Place the palm of your hand on the lower abdomen. Move it gently downwards where you will feel another ridge of bone approximately 4 cm above the genitalia. This is the anterior rim of the true pelvis.
• Note. This ridge is depressed centrally where the two pubic bones join: the pubic [pubes (L) = the growth of hair in the region in adulthood] symphysis. It is marked superiorly on either side by the pubic tubercles.
• The pubic tubercles. Palpate the pubic tubercles which lie approximately 1 cm on either side of the midline on the upper border of the pubis.
• Note 1. This area is quite tender on palpation.
• Note 2. It is frequently covered with a fatty pad of tissue which may make palpation of these tubercles difficult.
• The superior pubic ramus. Palpate the superior ramus of the pubis which is lateral to the pubic tubercles.
• Note. The superior pubic ramus gradually becomes hidden by muscle.
• The greater trochanter of the femur (Fig. 3.1). Trace a line along the pubic crest laterally beyond the region of the hip joint to the lateral aspect of the upper thigh. Palpate a hard, bony prominence. This is the greater trochanter of the femur. It lies approximately 10 cm below the most lateral aspect of the iliac crest.
• Note. The femoral trochanters are quadrilateral shape. Whilst they are surrounded by muscle, you should be able to identify them easily. They are the most lateral bony part of the hip region.
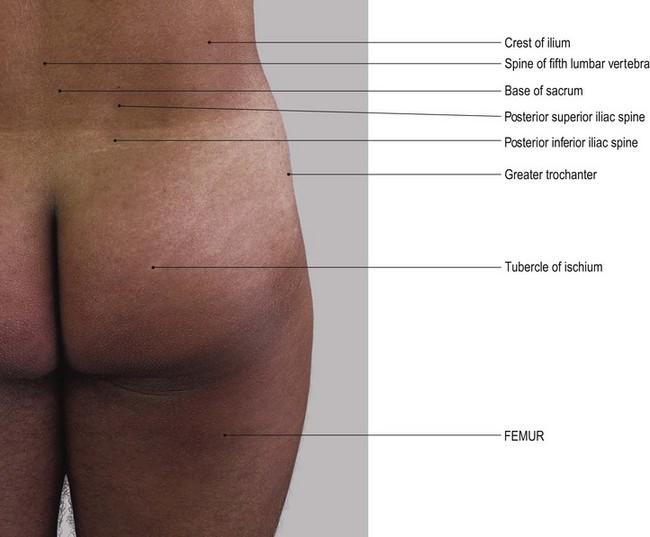
• From the back, the ease of palpation depends to a large extent on the build of the subject. The region is often covered with a thick layer of fat which may make it difficult to locate the bony points precisely.
• The posterior superior iliac spine (PSIS) (Fig. 3.2). Return to the iliac crest. Trace the iliac crest backwards and medially until you reach the posterior superior iliac spine. You may find that this is more difficult to palpate than the ASIS.
• Note. In women, the PSIS is often located in a small dimple characteristic of this region.
• The posterior inferior iliac spine (PIIS). From the PSIS follow the posterior border downwards and slightly medially. It is concave posteriorly and terminates approximately 2.5 cm below at the PIIS.
• Note. From here the posterior border passes forwards. It forms the upper boundary of the greater sciatic notch. The notch itself is difficult to identify, except in lean subjects.
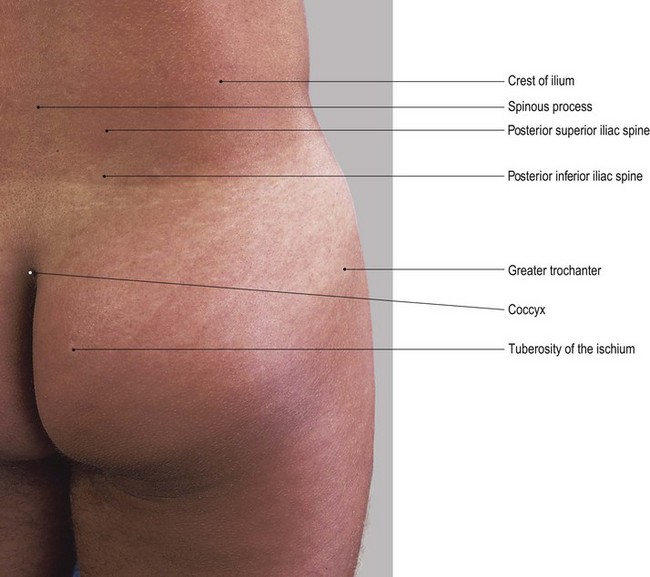
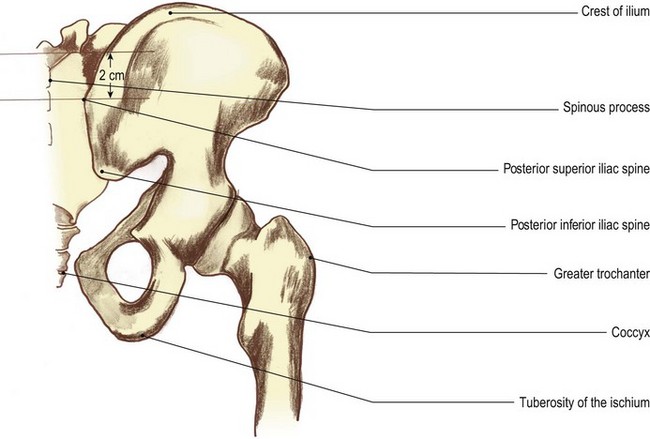
The sacrum [from sacer (L) = sacred], so-called because it is believed that this was the only bone to survive a sacrifice. Its lower lateral border (S4 and S5) forms the medial component of the sciatic notch. It can easily be identified running downwards and medially to the cleft between the buttocks and terminating at the coccyx, which is often tucked forwards towards the anal canal. The upper part of the sacrum is held between the two ilia posteriorly. Its upper border is on a line 2 cm above the level of the PSIS.
Palpation
• The sacral spinous processes (Fig. 3.2). Run your hand down the centre of the posterior surface of the sacrum. Palpate a series of up to five tubercles, gradually diminishing in size. The spinous processes lie in line with the spines of the lumbar vertebrae.
• The articular tubercles. Palpate the smaller tubercles which lie on either side of these spines. They are in line with the articular processes of the vertebrae above.
• Note. This area is often covered with a fatty pad of tissue which may make it difficult to identify these tubercles.
• The ischial tuberosity [ischion (Gk) = the socket in which the thigh bone turns] (Fig. 3.2). You will be able to palpate the ischial tuberosity when the model is in the standing or prone lying position. It is anterolateral to the lateral border of the sacrum and posteromedial to the greater trochanter of the femur. You will find it much easier to palpate the tuberosities if you ask the model to sit on your hands. Alternatively, ask the model to adopt the prone kneeling position. With the model in the sitting position, you will be able to feel large rounded processes carrying most of the weight of the trunk to the supporting surface. If you ask the model to move gently from side to side, you will be able to feel the transference of weight from one tuberosity to the other.
• Note 1. In sustained sitting on a hard surface, such as a wooden pew, these tuberosities become very tender and uncomfortable. The pressure is increased if the model sits upright, preventing the sacrum from sliding forward to take some of the weight.
• Note 2. The lower area of the tuberosities are covered partially by a bursa medially and the tendinous attachment of adductor magnus laterally. The bursa may become inflamed after long periods of sitting upright, causing acute pain over the area (bursitis).
Palpation on movement
Once the position and shape of the pelvis has been established by palpation it is useful to know how its position may change during movements. It is usual to consider the bony pelvis, i.e. the two hip bones and the sacrum, as one unit which moves as a whole.
• Forward tilting of the pelvis. Stand on the right side of the model. Place your right hand on the upper anterior part of the ilium and place your left hand on the sacrum. Now ask the model to drop the lower abdomen forwards by arching the lumbar spine. You will feel the pelvis tilting forwards.
• Backward tilting of the pelvis. Ask the model to pull in the lower abdomen and flatten the lumbar spine. You will feel the pelvis tilting backwards.
• Note. Both movements occur around a frontal axis running through the heads of both femora.
• Lateral tilting of the pelvis. Stand facing the model. Ask the model to stand on the right leg. Place one hand on the crest of both ilia. Ask the model to draw up the left side of the pelvis by using the left trunk side flexors of the same side and the hip abductors of the standing leg. If these muscles are then relaxed you will feel the pelvis drop on the left side.
• Note. This lateral tilting of the pelvis occurs around a sagittal axis through the right hip joint.
• Repeat the same procedure using the left leg as the standing leg.
• Rotation of the femoral trochanters. Stand behind the model. Place your fingers over the two greater trochanters. Ask the model to flex and extend the right hip rhythmically. Palpate the trochanter, rotating anticlockwise on flexion and clockwise on extension.
The knee region
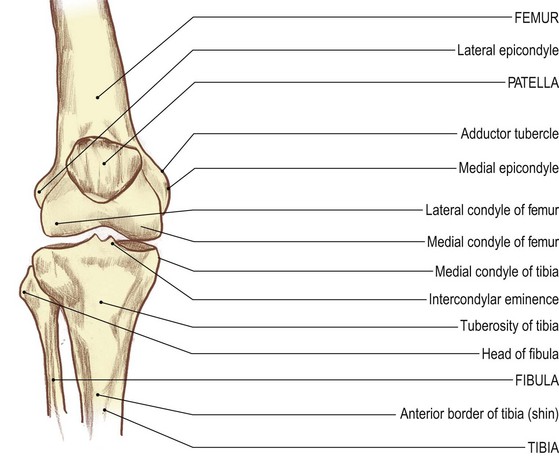
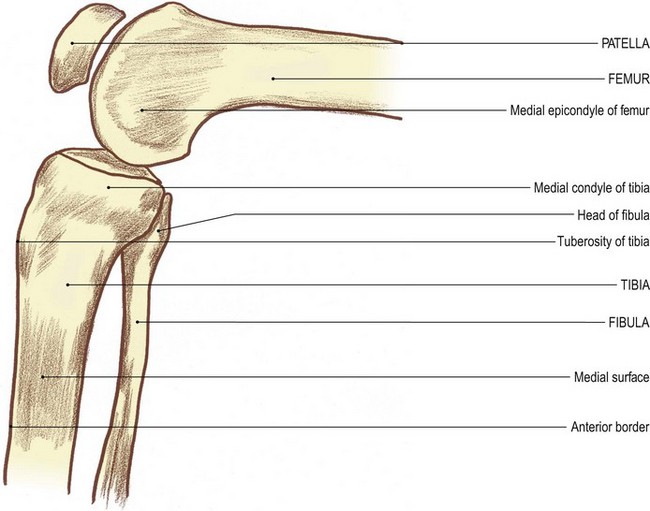
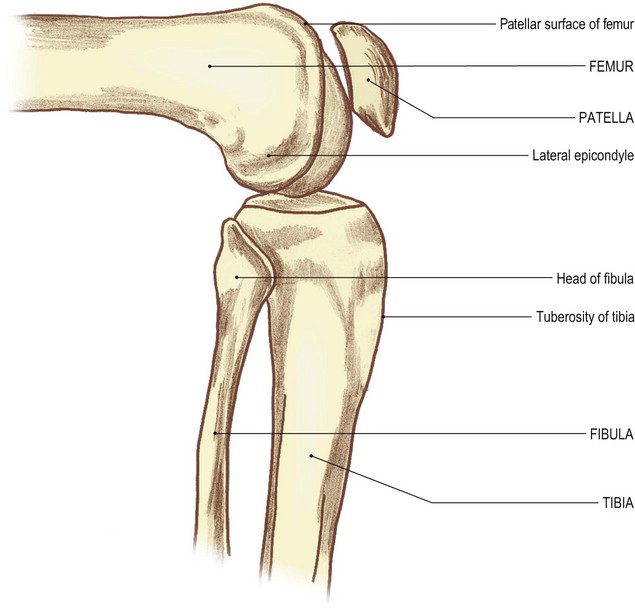
There are four bones that can be palpated in this region: the femur, the tibia, the fibula and the patella.
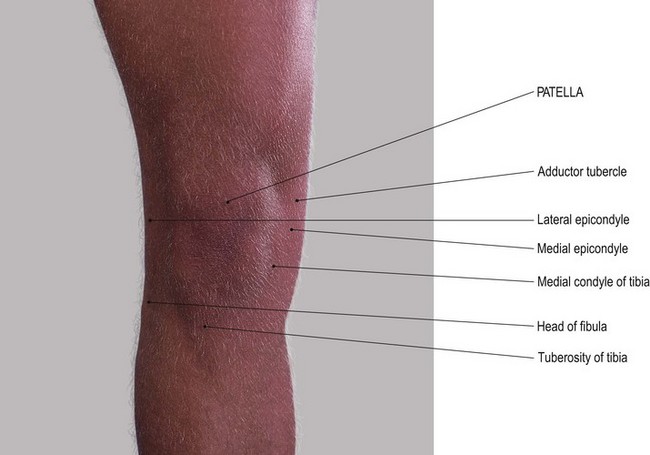
The femur [femur (L) = a thigh] is the longest and strongest bone in the human body. It takes the weight from the hip and transfers it through the knee joint to the tibia. It narrows in its middle half and becomes more or less cylindrical with a very broad posterior border: the linea aspera. The bone broadens in its lower half, forming two large condyles at its lower end. These project backwards and are separated from each other by the intercondylar notch. The lateral condyle is stouter than the medial, which is slightly longer from front to back. Both condyles are smooth on their posterior, inferior and anterior surfaces. They are covered by articular cartilage in the living body. The smooth surfaces meet anteriorly at a triangular, patella, surface. The lateral surface of the lateral condyle is roughened and is marked just below its centre by a tubercle: the lateral epicondyle. The medial condyle is also roughened on its medial side and marked just below its centre by a slightly larger tubercle: the medial epicondyle. Each condyle has a sharp border above: the medial and lateral supracondylar ridges. The medial supracondylar ridge presents a tubercle at its lower end: the adductor tubercle.
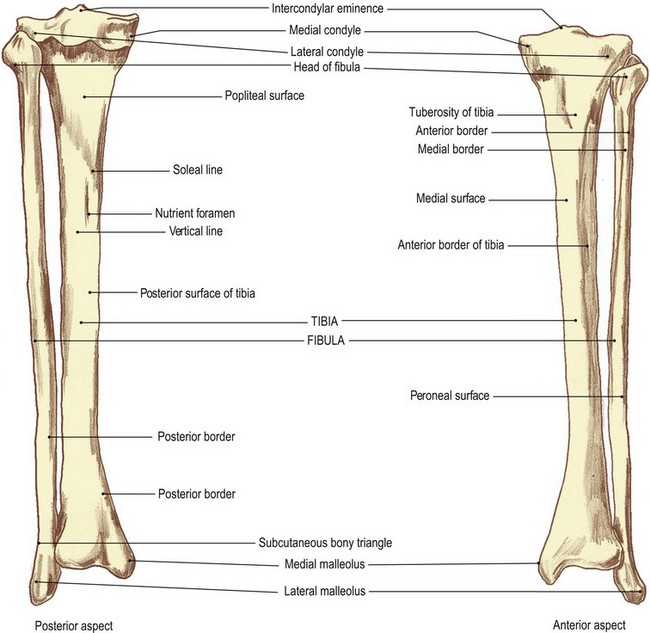
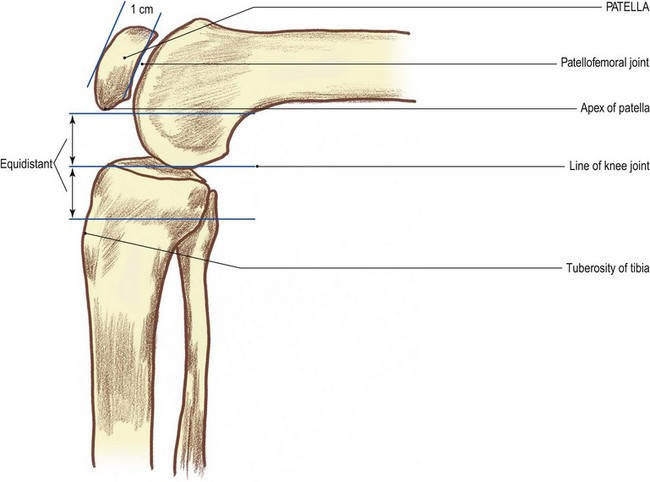
The tibia [tibia (L) = a flute] is also a very strong stout bone. It carries the body weight to the ankle joint and foot. It is broader above and has two large condyles. Both condyles are flattened superiorly and slightly depressed centrally. They are separated by the intercondylar eminence and a roughened area anteriorly and posteriorly. The shaft narrows as it descends. It presents a large tubercle anteriorly: the tibial tuberosity. This is situated just below the level of the knee joint. The sharp anterior border (shin) passes vertically down from this tubercle.
The patella [patella (L) = a small plate], as its name implies, is a small flat bone situated on the front of the knee. It is triangular in shape with the apex downwards. It has a roughened anterior surface and a smooth posterior surface. This is divided into two articular facets with the roughened apex below.
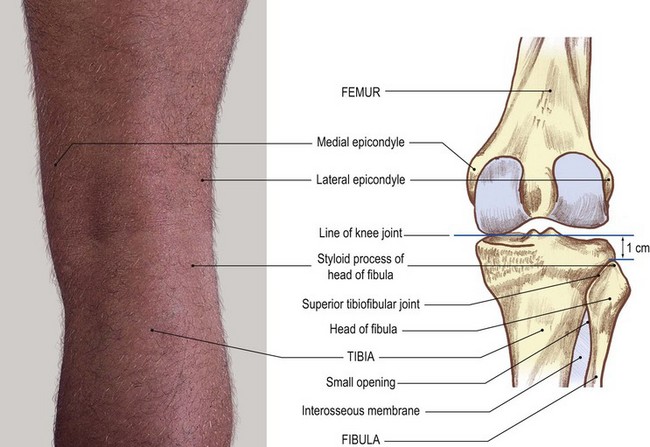
The fibula [fibula (L) = a pin] is a long, thin bone situated lateral to the tibia. It has complex surfaces and a border mainly produced by the muscles attaching to it. It is expanded above and below. The upper expansion, the head, articulates with the undersurface of the lateral condyle of the tibia. It takes no part in the knee joint. The lower expansion forms the lateral malleolus and takes part in the formation of the ankle joint.
Anterior aspect
Palpation
For palpation in this region the model is in the sitting position.
• The patella (1). Place your fingers on the anterior surface of the patella. Palpate its surfaces and borders.
• Note 1. The patella is broader superiorly. It narrows to a rounded point below where it is continuous with the ligamentum patellae.
• Note 2. The borders of the patella are rounded. The anterior surface, although appearing slippery due to the presence of the prepatellar bursa, has rough vertical ridges in line with the fibres of the tendon of quadriceps femoris.
• The patella (2). Ask the model to flex the knee 90°. This will make the patella much more prominent and therefore easier to palpate.
• The femoral condyles. Palpate the medial and lateral femoral condyles on either side of the patella and on which the patella sits.
• Note 1. Each femoral condyle is convex forwards and is palpable on either side of the patella. It is narrower superiorly and broader inferiorly due to the shape of the patella.
• Note 2. These condylar surfaces pass posteriorly into the knee joint itself.
• The tibial condyles. Palpate the medial and lateral tibial condyles below the femoral condyles. Palpate their flattened upper surfaces which are marked by a sharp circumference separating them from the more vertical surfaces of the shaft.
• The tibial tuberosity (Fig. 3.3). Palpate the large tibial tuberosity below and centrally from the patella.
• Note 1. The lower part is smooth and slippery, due to the presence of the superficial infrapatellar bursa.
• Note 2. The upper part gives attachment to the ligamentum patellae.
• Note 3. The tibial tuberosity is particularly noticeable when the knee is extended.
• The tibial condyles. Ask the model to flex the knees to 90°. Place your fingers in the small triangular fossae on either side of the ligamentum patellae. Palpate the upper surfaces of the tibial condyles below and the undersurface of the femoral condyles above. Between your fingers lies the ligamentum patellae.
• Note. Directly posteriorly is the cleft of the knee joint, with the medial and lateral menisci between.
• The menisci. These are not always palpable. Ask the model to flex the knee to 90° and then medially rotate the joint. You may now be able to palpate the anterior edge of the medial meniscus bulging forwards on medial rotation of the tibia. Now ask the model to laterally rotate the knee joint. You may now be able to palpate the anterior edge of the lateral meniscus on lateral tibial rotation.

Medial aspect
On the medial side of this region the large, elongated medial condyle of the femur sits on top of the flattened plateau of the medial tibial condyle. The centre of the medial surface of the femoral condyle is marked by a tubercle: the medial epicondyle. Vertically above this is the medial supracondylar line marked at its lower end by the adductor tubercle.
Below the femoral condyle the flattened medial tibial condyle continues downwards as the medial surface of the tibial shaft, bounded in front by its anterior border and marked at its upper end by the tibial tuberosity.
Palpation
• The medial surface of the femoral condyle (Fig. 3.3). Palpate the medial surface of the femoral condyle and the epicondyle projecting from its mid point.
• The adductor tubercle. Palpate the adductor tubercle, which is approximately 2 cm proximal to the medial epicondyle. You may find this difficult because it is hidden to a certain extent by the attachment of the tendinous part of adductor magnus.
• Note. This tubercle represents the most distal part of the medial supracondylar ridge, little of which can be palpated.
• The medial tibial condyle (Fig. 3.3c, d). Palpate the medial tibial condyle below the femoral condyle.
• Note. It appears to be larger than the lateral tibial condyle.
• The medial surface of the tibial shaft. From the medial tibial condyle, trace around the medial side and then downwards where the condyle becomes continuous with the medial surface of the shaft of the tibia.
• The anterior tibial border. Palpate the subcutaneous anterior tibial border (the shin) and follow it down as far as the medial malleolus.
Palpation on movement
• The patella. Ask the model to extend the knee. Place the fingers of one hand on the medial condyle of the femur. Place the fingers of the other hand on the medial border of the patella. Now ask the model to flex the knee. Palpate the patella, sliding downwards and backwards on the femoral condyle until it lies inferiorly. Ask the model to return to the extended position.
• The medial tibial condyle. Now move your fingers from the patella and place them on the upper part of the medial surface of the medial condyle of the tibia, close to the joint line. Ask the model to flex the knee. Palpate the tibial condyle, moving backwards and upwards on to the posterior aspect of the femoral condyle.
• Note. As in the case of the lateral condyles, in this position the anterior part of the tibial condyle appears to part from the femoral condyle. This is due to the smaller articular surface at the posterior part of the femoral condyle.
Lateral aspect
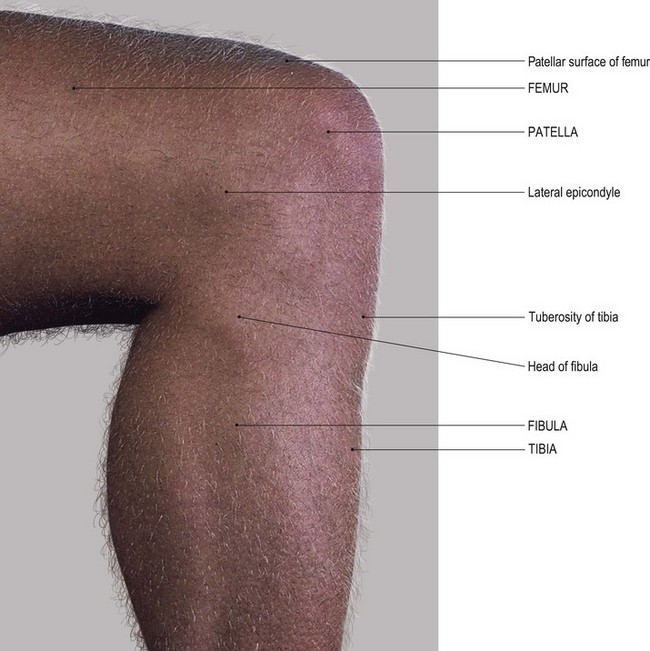
On the lateral side of this region the stout lateral condyle of the femur sits on top of the plateau of the lateral condyle of the tibia. Posteriorly, the two condyles are close together. Anteriorly, however, they diverge into a small hollow which is bounded at the front by the lower section of the patella and the ligamentum patellae. The head of the fibula lies below and posterior to the knee joint.
Palpation
• The lateral femoral condyle. Palpate the flat lateral surface of the lateral femoral condyle, lying posterior to the lateral border of the patella. It is marked by a tubercle at its centre (the lateral epicondyle).
• The lateral supracondylar ridge of the femur. Run your fingers upwards from the lateral epicondyle. You may be able to palpate the lateral supracondylar ridge running vertically upwards.
• Note. This is difficult to palpate as the iliotibial tract tends to follow the same line.
• The lateral tibial condyle. Palpate the upper border of the lateral tibial condyle which lies approximately 2 cm below the lateral epicondyle and the lower border of the lateral femoral condyle running horizontally and diverging anteriorly.
• The head of the fibula (Fig. 3.4). Palpate the head of the fibula situated approximately 1 cm below the rim of the tibia. Run the palm of your hand up the lateral aspect of the model’s leg.
• The styloid process of the fibula. Palpate the styloid process of the fibula projecting upwards from the head; the narrower neck lies just below the head.
• Note. The remainder of the upper end of the shaft of the fibula is surrounded by muscles and is therefore not palpable.

Palpation on movement
• Movements of the patella. Ask the model to extend the knee fully. Place the fingers of one hand on the lateral side of the patella and the fingers of the other hand on the lateral surface of the femoral condyle. Ask the model to flex the knee. Palpate the patella, sliding downwards and backwards under the condyle, finally ending up inferiorly. Ask the model to return to the extended position.
• Movements of the tibia. Place your fingers on the lateral condyle of the tibia close to the knee joint. Now ask the model to flex the knee. Palpate the tibia, gliding backwards and upwards on to the posterior surface of the femoral condyles.
• Note. At this position the anterior part of the tibial condyle appears to part from the femoral condyle. This is due to the posterior surface of the femoral condyle being smaller than that of the tibia.
Posterior aspect
Virtually no bony features can be palpated on the posterior aspect of the knee, either when it is flexed or extended. The posterior aspect of the sides of each femoral condyle and the medial surfaces of the tibia soon become hidden by the fascia and muscles at the back of the knee.
• The head of the fibula (Fig. 3.4). Palpate the head of the fibula on the lateral side of the popliteal fossa, with the tendon of biceps femoris attaching to its upper section.
• Note. Care must be taken when palpating in this area because the common peroneal nerve passes down the back of the head of the fibula en route to its passage around the lateral side of the neck.
• The patella. The model is in the supine lying position. Ask the model to extend the knee and relax the quadriceps femoris. Now move the patella from side to side.
• Note 1. This produces a knocking effect as the patella crosses either side of the grooved patellar surface of the femur.
• Note 2. This manoeuvre is classified as an accessory movement. It exposes a strip of the patellar surface of the femur on the side away from the direction of the movement. Hold the patella to one side. Now palpate the articular surface of the bone on that side for approximately 1 cm on its posterior surface.
The ankle region
Four bones participate in the formation of this area: the lower ends of the tibia and fibula, the talus and the calcaneus.
The lower end of the tibia
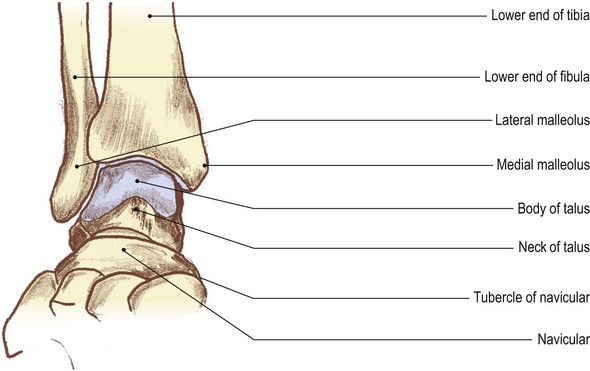
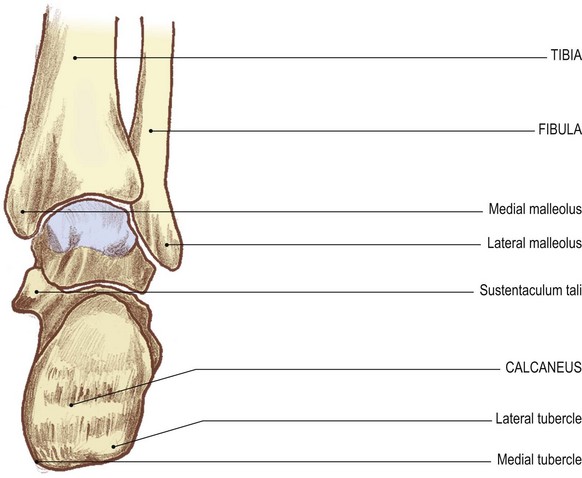
From its narrowest cross-section, two-thirds of the way down the shaft, the tibia expands to form part of the mortice for the formation of the ankle joint. Its medial side presents a large projection downwards: the medial malleolus. On its lateral side there is an elongated triangular area for the attachment of an extremely strong interosseous ligament which binds the two bones together. Its undersurface and the lateral side of the malleolus are smooth for articulation with the talus in the ankle joint.
The lower end of the fibula
The slender shaft of the fibula expands below to form the pointed lateral malleolus. This forms the lateral section of the mortice of the ankle joint. It is flattened from side to side. It has a smooth articular surface on its medial side and a roughened surface on its lateral, subcutaneous side.
The talus
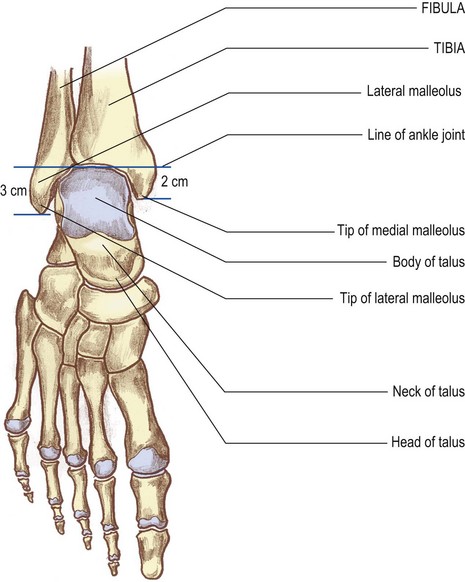
The talus comprises a body, a neck and a head. The body is narrower at the back and wider anteriorly. It is pulley-shaped superiorly and slightly concave inferiorly. It has smooth, articular surfaces on its superior, inferior, lateral and the upper part of its medial surface.
The neck passes forwards and medially to expand into the head, which articulates with the posterior surface of the navicular bone.
Palpation
At the ankle the muscles of the leg have become tendinous and thus the bones are easier to palpate and identify between and deep to the tendons and retinacula.
Anterior aspect
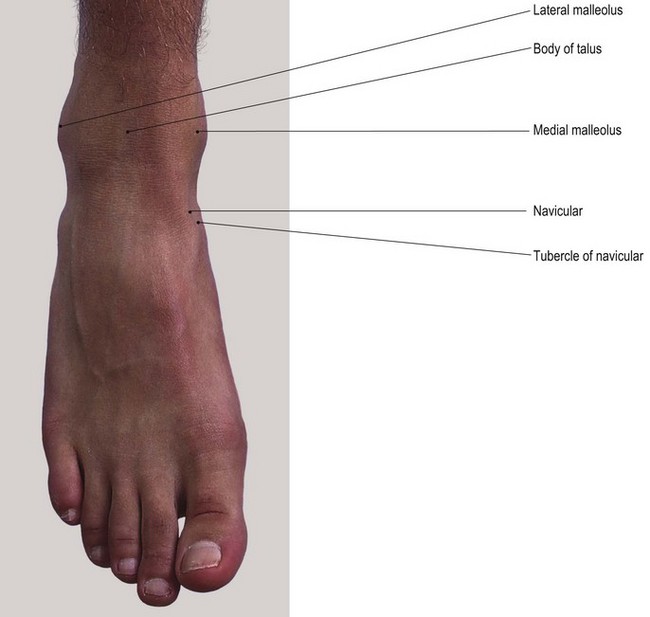
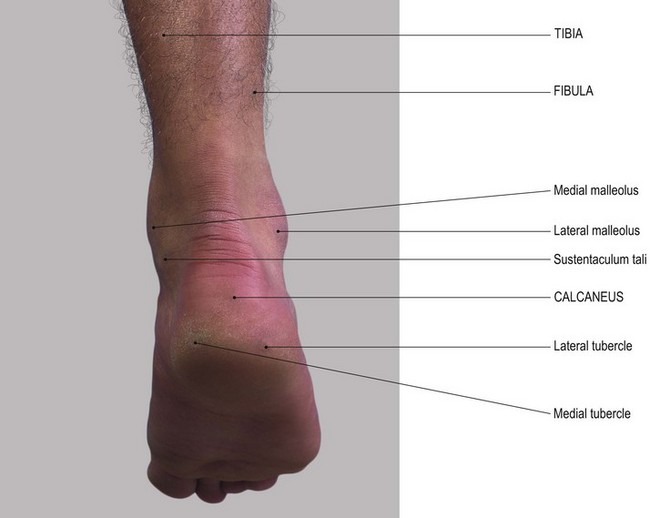
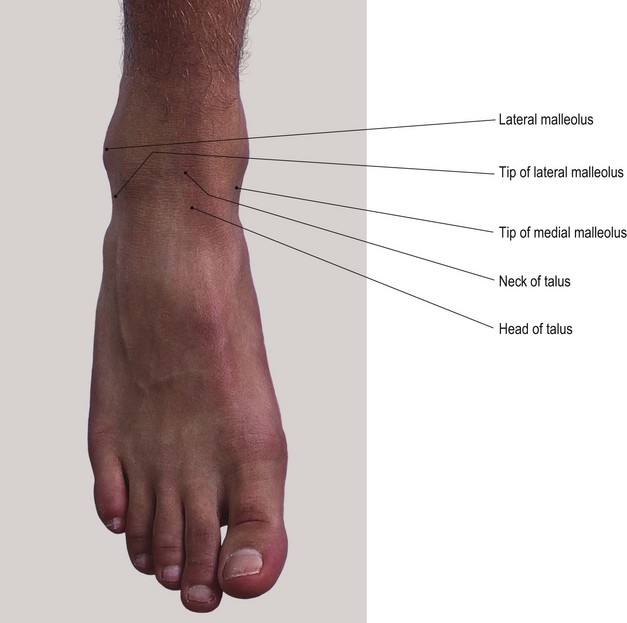
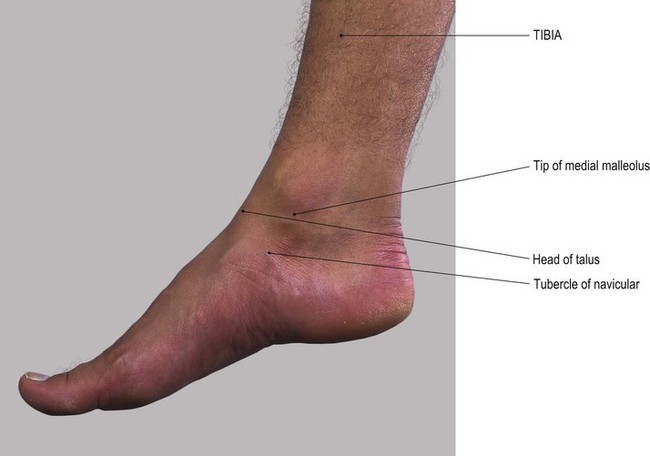
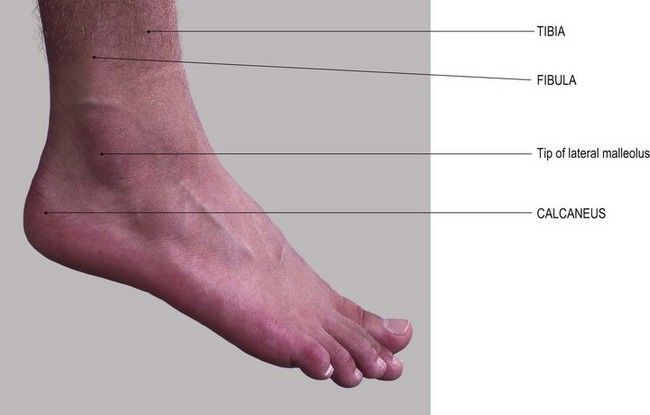
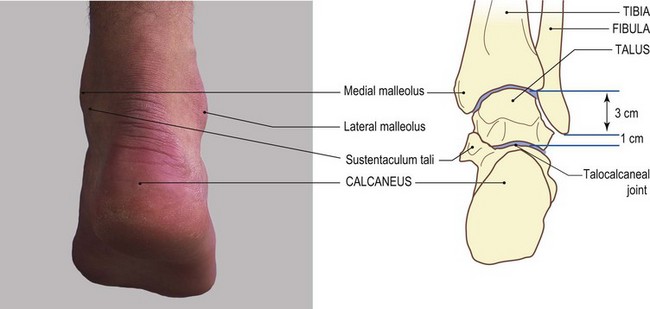
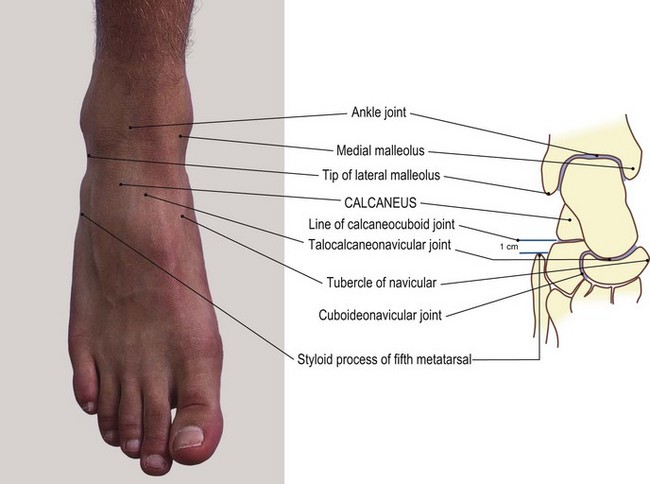
• The medial malleolus [malleolus (L) = a small hammer] (Fig. 3.5a, b). Place your hands on the subcutaneous medial surface of the tibia. Trace down the anterior border of the tibia (shin) which appears to form the anterior part of the malleolus. Palpate its anterior border and tip. The posterior border may be more difficult to palpate because it is partially hidden by tendons and the flexor retinaculum.
• Note. The anterior border of the malleolus continues upwards and laterally under the extensor tendons and extensor retinacula, marking the line of the ankle joint.
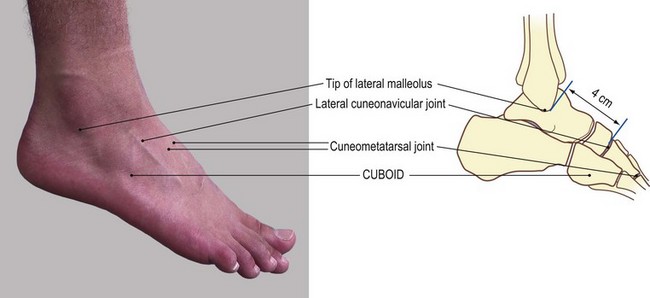
• The lateral malleolus (Figs 3.4e, f and 3.5). The lateral malleolus of the fibula is the most outstanding feature on the lateral side of the ankle.
• From the tip of the lateral malleolus, trace both the anterior and posterior borders upwards, encompassing the large prominence of the malleolus.
• Note. The tip of the lateral malleolus lies at a lower level than that of the medial malleolus.
• The shaft of the fibula. From just above the level of the ankle joint, at approximately 2.5 cm, palpate the fibula where it narrows to a triangular subcutaneous lateral surface. From here, trace the shaft upwards for approximately 15 cm.
• Note. At this point it becomes hidden by peroneus tertius anteriorly and peroneus brevis and the tendon of peroneus longus posteriorly.
• The head and neck of the talus [talus (L) = the ankle bone]. With your right hand over the front of the ankle region, place your index finger on the lateral malleolus and your thumb on the medial malleolus of the model’s left ankle. Draw your finger and thumb forward into a small hollow on either side. Between your thumb and finger you will feel the head of the talus. Now ask the model to plantarflex the foot. Palpate the neck of the talus.
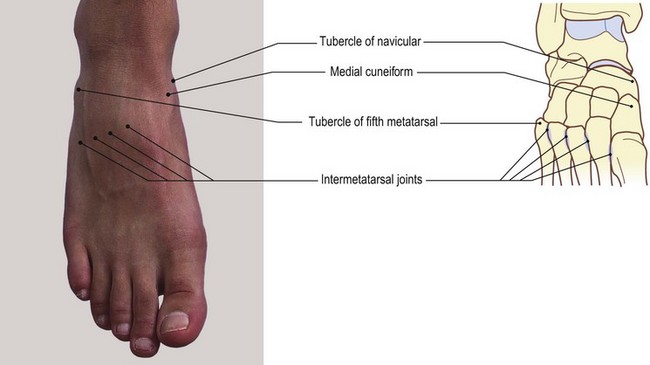
• The navicular. Immediately anterior to this point, palpate the narrow gap of the talonavicular joint and posterior part of the navicular with its prominent tubercle, medially.
• The upper surface of the calcaneus [calx (L) = a heel]. Ask the model to plantarflex the foot. Deep beneath the tip of your index finger, just lateral to the head of the talus, you will feel the anterior section of the upper surface of the calcaneus.
Posterior aspect
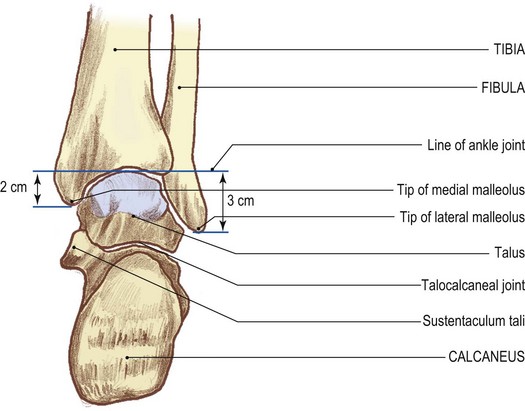
From the posterior aspect very little of the talus can be seen as the body has narrowed down to just two tubercles and a groove running downwards and medially. The mortice of the ankle joint is formed by the two malleoli and the inferior border of the tibia. Both the malleoli are marked posteriorly by a fossa for the attachment of ligaments.
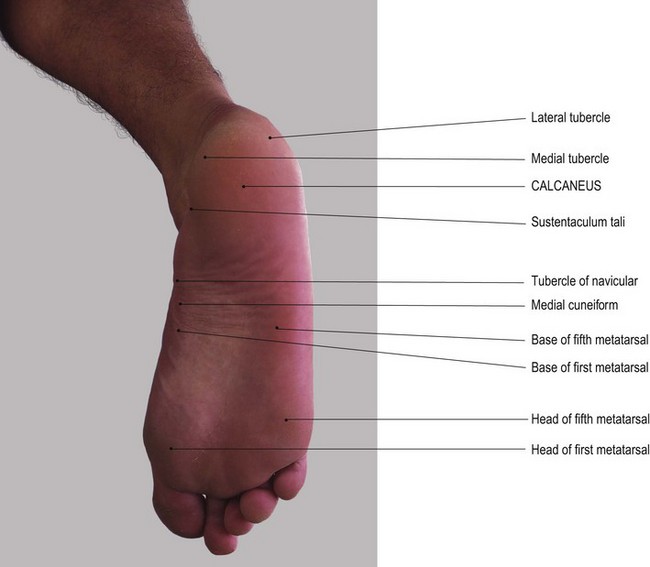
The calcaneus
This is the largest of the tarsal bones and is situated below the talus and behind the navicular and cuboid. It is oblong in shape, projecting forwards and backwards beyond the talus. The backward projection forms the heel. It has six surfaces:
• superior, marked by a smooth articular surface centrally
• medial, which is fairly smooth and converted into a hollow by the projection medially from its upper section of the sustentaculum tali
• lateral, which is roughened, presenting two tubercles
• posterior, which is rounded and roughened across its centre for the attachment of the tendo calcaneus
• inferior, which is slightly concave downwards and is roughened for the attachment of muscles and fascia. It is marked by three broad, rounded tubercles; two posteriorly and one anteriorly.
Palpation
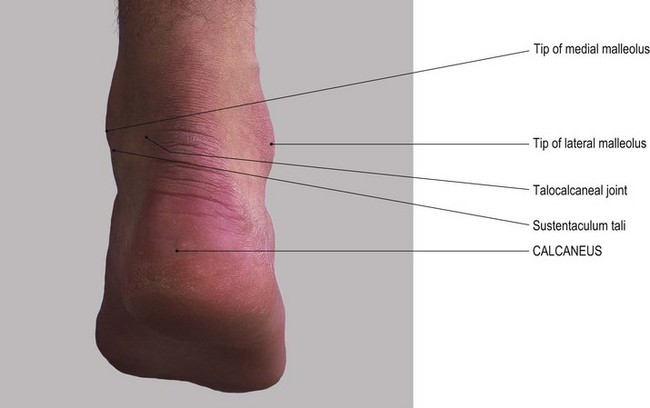
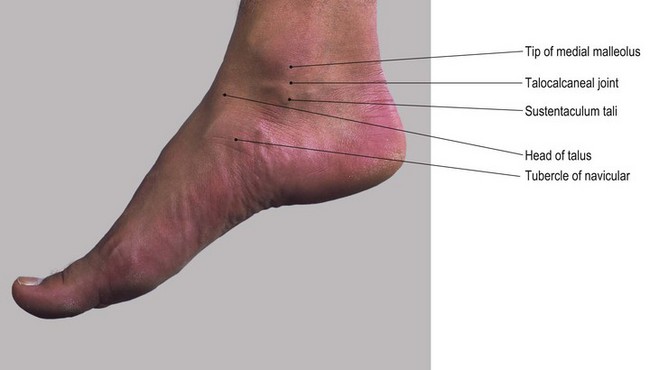
• The sustentaculum tali of the calcaneus. Ask the model to evert the foot. Place your hands at the tip of the medial malleolus. Move your fingers 1 cm down from this tip. You will feel the horizontal ridge of the sustentaculum tali. Trace the ridge as it runs for approximately 2–3 cm and is clearer anteriorly and posteriorly.
• The tubercle of the navicular. At the anterior end of this ridge identify a small gap. You will now be able to palpate the tubercle of the navicular.
• Note. This gap is spanned by the ‘spring ligament’.
• The malleolar fossae. You will find it difficult to identify many bony features posteriorly because the tendo calcaneus lies almost 2 cm clear of the ankle joint. If you pay particular attention to the posterior borders of the lateral and medial malleoli, you will be able to palpate small depressions. These are the malleolar fossae.
• Note. The posterior surface of the medial malleolus is continuous with the posterior border of the medial surface of the tibia (Fig. 3.5c, d).
Palpation on movement
• Movements of the talus 1. Stand facing the lateral side of the model’s ankle region. With your left hand, grip the two malleoli with your fingers on the medial and your thumb on the lateral. With your right hand, grip the anterior part of the body and neck of the talus with your fingers in the hollow just anterior to the medial malleolus and your thumb in the hollow just anterior to the lateral malleolus. Both sets of fingers and both thumbs should be close to each other. Starting from the fully plantarflexed position, ask the model to dorsiflex the foot. You will feel the anterior part of the body of the talus disappearing into the gap between the two malleoli. In fact, the fingers of your right hand will now be gripping the neck and head of the talus. At this point the ankle is in its close-packed position and no side-to-side movement is possible.
• Movements of the talus 2 – rocking. When the model fully plantarflexes from the dorsiflexed position the head and neck of the talus will move forwards and downwards and the anterior section of the body will reappear from within the mortice. At this point you can rock the head and neck of the talus from side to side. This is an accessory movement.
• Movements of the calcaneus 1. Ask the model to return the ankle to the mid position. Adopt the same procedure as described above. This time, move the fingers of your right hand to just below the tip of the medial malleolus. Identify the horizontal rim of the sustentaculum tali. Ask the model to plantar- and dorsiflex the ankle rhythmically. You will feel the sustentaculum tali moving forwards and backwards, describing a shallow arc around the medial malleolus.
• Movements of the calcaneus 2. Adopt the same position with your left hand. Place your right thumb on the two tubercles below the lateral malleolus. You will feel movement forwards and backwards around the malleolus when plantar- and dorsiflexion is performed.
• Movements of the calcaneus 3. Adopt the same position as described above. Grip the two malleoli with your left hand. Place your right hand under the heel with your fingers resting on the posterior aspect of the calcaneus on either side of the tendo calcaneus. Ask the model to dorsi- and plantarflex the ankle. You will feel the calcaneus moving forwards and backwards away and towards the posterior part of the tibia.
• Note. When the calcaneus passes downwards it is nearly impossible to move from side to side. This is because the anterior part of the talus moves into the mortice of the ankle joint.
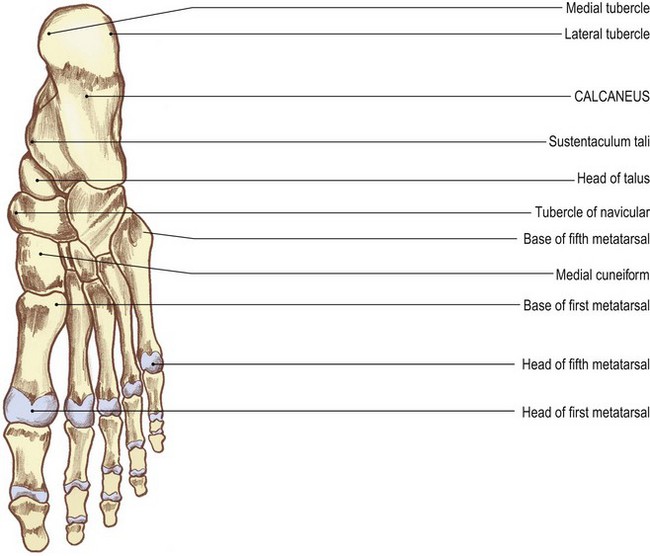
The foot
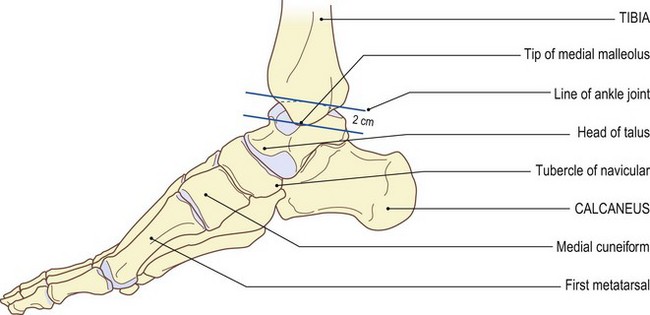
Three main groups of bones form the skeleton of the foot (Fig. 3.6).
• Posteriorly. The tarsus, comprises large irregular bones.
• Anteriorly. The phalanges: miniature long bones that form the toes.
• Linking the above groups are the metatarsals: also miniature long bones.
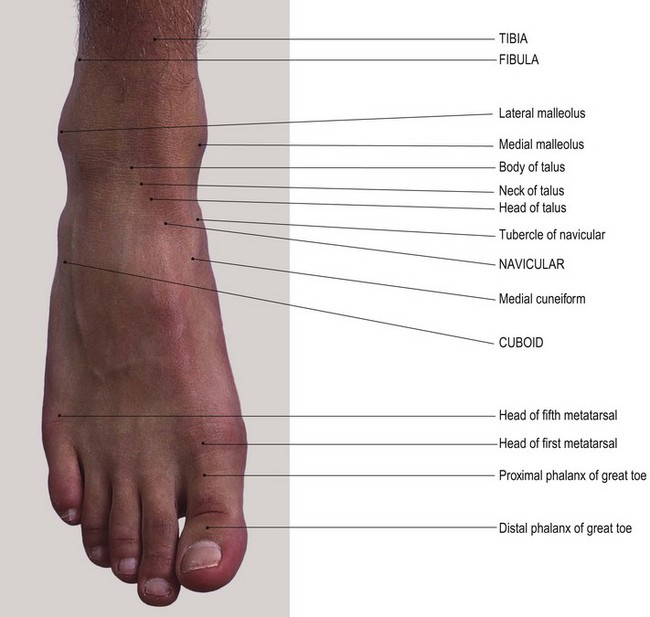
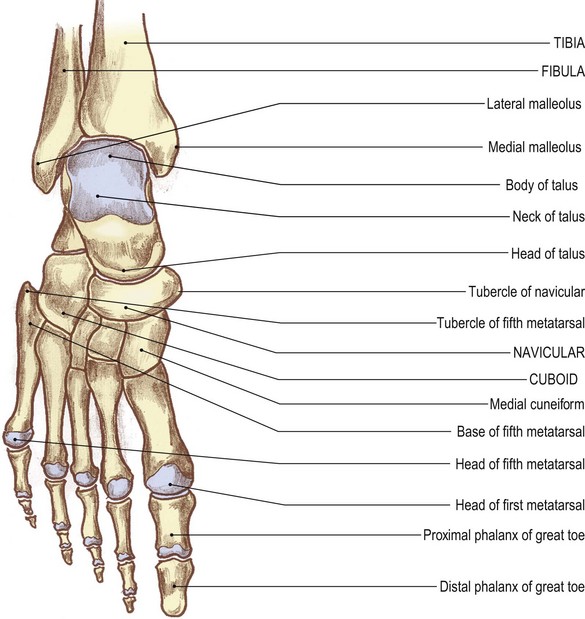
The calcaneus forms the heel. It is the largest and most posterior of the group of tarsal bones. In front and to the lateral side is the cuboid [kubgides (Gk) = cube shape]. Sitting on the middle section of the upper surface of the calcaneus is the body of the talus. Its neck and head passes forwards and medially, medial and slightly above the level of the cuboid. The navicular lies in front of the head of the talus. The three cuneiform bones [cuneus (L) = a wedge] are interposed between the anterior surfaces of the navicular and the three medial metatarsal bones. The two lateral metatarsals lie anterior to the cuboid.
Dorsal aspect
• The talocalcaneonavicular joint. Locate the medial and lateral malleoli. Run your index finger and thumb forwards until you can grip the head of the talus between them. Now palpate the upper part of the talocalcaneonavicular joint.
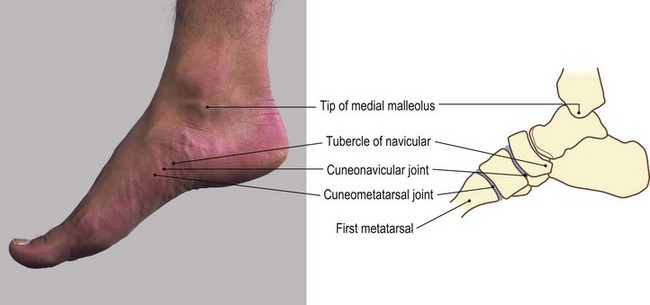
• The tuberosity of the navicular (Figs 3.5a, b, and 3.6). Trace the roughened dorsal surface of the navicular medially to its large tuberosity. This projects downwards and medially and is approximately 2.5 cm downwards and forwards from the tip of the medial malleolus.
• The medial cuneform bone. Immediately distal to the navicular, palpate the medial cuneiform bone which projects downwards.
• The middle and lateral cuneform bones. Identify the dorsal surfaces of the middle and lateral cuneiform bones on the dorsum of the foot which lie lateral to the medial cuneiform bone.
• The first metatarsal bone. You will find it easy to identify the base, shaft and head of the first metatarsal bone.
• Note. The first metatarsal bone is much stouter than the other four. In some individuals the head projects medially, carrying the base of the toe with it. This causes inflammation of the bursa on its medial side which is often accompanied by pain and swelling. Such medial deviation of the metatarsal head commonly progresses to a condition termed ‘hallux valgus’.
• The second, third, fourth and fifth metatarsal bones. Run the pads of your fingers carefully over the dorsum of the foot. Now palpate the base, shaft and head of each of the remaining metatarsal bones. You can trace the base of the second metatarsal further proximally than the others to the middle cuneiform, the third to the lateral cuneiform and the fourth and fifth to the cuboid (Fig. 3.6).
• Note. The base of the fifth metatarsal is more expanded than the rest. It has a tubercle, or styloid process, which projects proximally on its lateral side.
• The base of the fifth metatarsal bone. Trace backwards along the shaft of the fifth metatarsal. Palpate the large lateral projection which is elongated proximally and overlies the lateral side of the cuboid.
• The peroneal tubercle. Identify the peroneal tubercle on the lateral side of the calcaneus. It is 1 cm below and just anterior to the tip of the lateral malleolus. This tubercle is elongated downwards and forwards. Ask the model to evert the foot. Two tendons appear to pull clear.
• Note 1. The tendon above the tubercle is peroneus brevis; the one below is peroneus longus.
• Note 2. This tubercle must not be confused with that of the calcaneofibular ligament. This can be found if you carefully palpate just below and posterior to the tip of the lateral malleolus.
Plantar aspect
As in the palm of the hand, very few bony points are palpable in this region. This is due in part to the presence of overlying muscles and in part to the existence of a dense and thick layer of plantar fascia: the ‘plantar aponeurosis’.
Palpation
For palpation in this region, the model is in the supine lying position.
• The calcaneus. Identify the heel, which is the most posterior and inferior aspect of the calcaneus. Palpate the large, broad tubercles (medial and lateral) on either side of the bone.
• Note 1. The tubercles give attachment to the more superficial of the plantar muscles.
• Note 2. There is often a horizontal raised area on the posterior aspect of the heel to which the tendo calcaneus attaches (see Fig. 3.22b).
• Note 3. Below this the posterior surface of the calcaneus is covered with a pad of tough fibrous tissue and fat.
• The peroneal tubercle. Locate the area below and in front of the tip of the lateral malleolus. Palpate the elongated tubercle (the peroneal tubercle) on the calcaneus.
• Note. The tendon of peroneus brevis is above; the tendon of peroneus longus is below.
• The sustentaculum tali of the calcaneus. Palpate the horizontal ridge immediately below the tip of the medial malleolus: the sustentaculum tali.
• Note. This is slightly hidden by the tendon of flexor digitorum longus.
• The tuberosity of the navicular. Palpate the inferior surface of the navicular tuberosity on the medial side of the foot 3 cm anteroinferior to the tip of the medial malleolus.
• Note. The base of the fifth metatarsal and its tubercle are covered by the plantar fascia and muscles.
• The heads of the metatarsals (Fig. 3.7). You will find these relatively easy to identify.
• Note. The heads of the first and fifth metatarsals lie deep to a pad of harder skin at the broadest part of the foot on the medial and lateral side, respectively.
• The heads of the second, third and fourth metatarsals. You will find these are less easy to palpate. They lie on a well-formed anterior metatarsal arch. Palpation is facilitated if the arch is flattened. Grasp the model’s toe between your finger and thumb of one hand. Passively extend the joint. Now palpate the metatarsal head on the plantar surface proximal to the base of the toe. If you ask the model to flex the toe at the metatarsophalangeal joint, you will feel the metatarsal head on the dorsum of the foot, as the knuckles would in the hand.
• The phalanges. Identify the base of the proximal phalanx just beyond the corresponding metatarsal head.
• Note. The heads of the proximal phalanges, particularly those of the second, third and fourth, are often flexed and project dorsally. They are covered by hard skin and a bursa which often swells and becomes inflamed. If not treated, the inflamed bursa may lead to a condition known as ‘hammer toes’.
• The proximal interphalangeal joints (Fig. 3.7). Ask the model to extend the toes at the proximal interphalangeal joint. Now identify the small bicondylar head of the bone.
Palpation on movement
• The head of the talus. Adopt the same position and the same hand holds as for palpation on movement, anterior aspect (see p. 95). Ask the model to plantarflex the ankle and then move the foot into adduction and abduction. Palpate the head of the talus moving from side to side.
• Note. This will not occur in dorsiflexion due to the close-packed nature of the ankle joint.
• The tubercle of the navicular. Now move your hands down and grip the head of the talus in your left hand. With your right hand, grip the foot, with your fingers over the tubercle of the navicular and your thumb over the base of the fifth metatarsal bone. Ask the model to evert the foot. Feel the tubercle descending and the metatarsal rising. Now ask the model to invert the foot. Feel the tubercle rising and the metatarsal bone descending.
• Note. The navicular is rotating around an axis running through the neck and head of the talus.
• The metatarsophalangeal joints. Move your hands down to the base of the great toe. Grip the first metatarsal just proximal to the head with fingers and thumb of your left hand. Grip the proximal phalanx with fingers and thumb of your right hand. Ask the model to extend the toe. Palpate the head with the phalanx moving towards the dorsum of the head. Now ask the model to flex the toe. Palpate the phalanx, moving downwards around the head.
• Note. This movement can be observed in all the metatarsophalangeal joints, but to a lesser extent.
• The interphalangeal joints. You will be able to feel a similar movement in the interphalangeal joints. Ask the model to flex the toes. You will now be able to feel the head of the phalanx.
Joints
Although the joints of the lower limb are structurally similar to their counterparts in the upper limb, they tend to be more stable. Movement at the lower limb joints is more limited, with the weight transmitted across them being considerably more than in the upper limb. The sacroiliac joint and the pubic symphysis are really associated with the pelvis, but as this is the region from which the lower limb functions, they are included in this section.
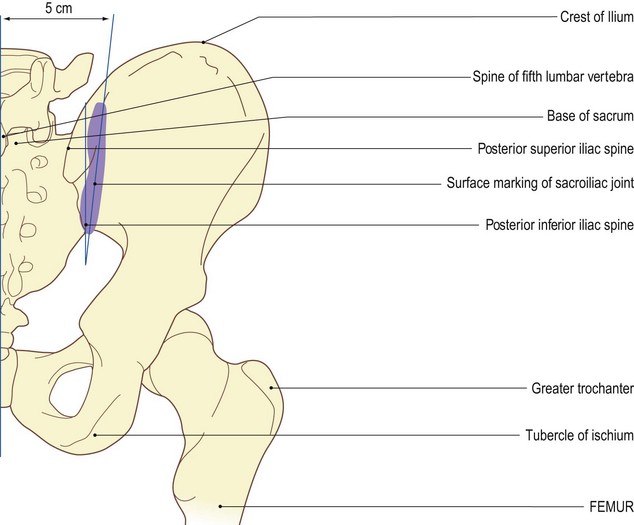
The sacroiliac joint
Structure
This joint is situated deep within the posterior aspect of the pelvis. It is formed by the auricular surface on the lateral side of the sacrum and the sacropelvic surface of the hip bone. It is a synovial joint surrounded by a capsule and lined with synovial membrane. The capsule is supported by anterior, posterior and interosseous ligaments. The joint is further supported by two accessory ligaments: the sacrotuberous and the sacrospinous ligaments.
Palpation
surface marking
For palpation in this region, the model is in the prone lying position.
The sacroiliac joint (Fig. 3.8) is set deeply at the back of the pelvis and is thus difficult to palpate. Nevertheless, certain landmarks can be identified, giving an accurate indication of its position.
• The joint line. Find the posterior superior and inferior iliac spines, as outlined above (see p. 88). Draw an oblique line passing downwards and medially from a point 5 cm lateral to the spine of the fifth lumbar vertebra to a point just lateral to the posterior inferior iliac spine.
• Note. The joint is, however, in a plane running forwards and laterally under the posterior part of the ilium. It reaches as far forward as the apex of the greater sciatic notch (Fig. 3.9b).
Accessory movements
There is much controversy concerning the movements that may occur at this joint. The fact that it is a synovial joint with plane, although irregular, articular surfaces suggests that it is designed for movement. The irregularity of the articular surface, together with the presence of extremely strong, short interosseous ligaments, means that in reality little movement is possible.
• Note 1. In young females, due to the laxity of the surrounding ligaments, some movement is possible; in elderly males, there is little or no movement.
• Note 2. The two joints on either side of the sacrum and the symphysis pubis anteriorly allow slight rotation and gapping movements to occur. This reduces the stresses imparted on the pelvis from the trunk and lower limbs.
Palpation
• Rotation of the sacrum. Slight rotation of the sacrum forwards and backwards around a frontal axis running through its interosseous ligament may be regarded as normal physiological movement. This movement is facilitated if you apply pressure alternately on the upper and lower aspects of its posterior surface, so rocking the sacrum between the ilia.
• Rotation of the ilium. The model is in the side lying position. Enhance the movement by using the femur as a lever and localize the movement of the joint with your other hand. Stand behind the model’s hip region. Take the upper femur into extension. Place your other hand on the posterior aspect of the iliac crest. Ask the model to hold the underneath knee up to the chest. This fixes the pelvis. Flex the femur on the pelvis. Feel the backward rotation of the ilium on the sacrum. To enhance the movement, ask the model to extend the alternate leg. Now apply pressure from the front on the anterior superior iliac spine.
• Gapping of the sacroiliac joint. The model is in the supine lying position. Ask the model to flex the hip and knee of the lower limb on the opposite side to which you are standing. Rotate the pelvis and the flexed lower limb towards you. Apply a downward and inward pressure on the femur, towards the hip. This produces a slight gapping of the posterior part of the sacroiliac joint.
• Note. Movements of the pubic symphysis. During the above movements, associated gapping and twisting occur at the pubic symphysis. For additional information consult the manipulation literature.
The hip joint (Fig. 3.9)
This is a large synovial ball-and-socket joint between the head of the femur and the acetabulum of the hip bone. It lies on the anterolateral aspect of the pelvis and affords a considerable amount of mobility to the lower limb. It is surrounded by a capsule which encloses a large part of the femoral neck, both lined with synovial membrane. The capsule is supported, externally, by the very powerful iliofemoral, ischiofemoral and pubofemoral ligaments. Further support is afforded internally by the ligament of the head of the femur deep inside the joint and the acetabular labrum. The labrum attaches to the rim of the acetabulum and transverse ligament, thus surrounding the head.

Palpation
surface marking
For palpation in this region, the model is in the supine lying position.
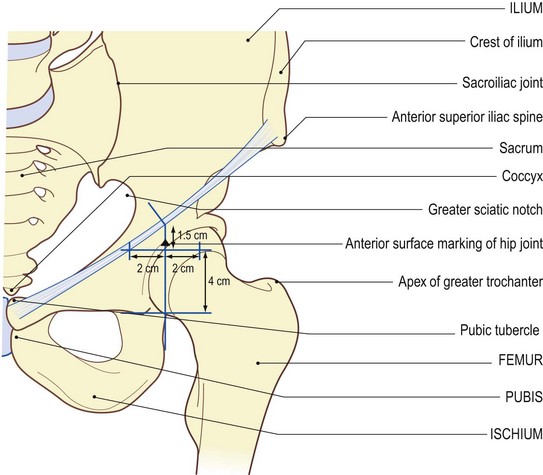
• The hip joint. Draw the joint line which lies in the groin some 1.5 cm below the mid point of the inguinal ligament, i.e. halfway between the anterior superior iliac spine and the pubic tubercle (see p. 81).
• Note. The acetabulum extends 4 cm vertically below this point deep to the head of the femur. Midway between the upper and lower limits, i.e. at the mid point of the joint, the acetabulum extends 2 cm either side of this vertical line (Fig. 3.9).
• Alternative method. Trace a line horizontally and medially from the upper border of the greater trochanter to a point below the mid point of the inguinal ligament. This identifies the centre of the joint. When viewed posteriorly, the centre of the hip joint lies 5 cm above and 3 cm lateral to the ischial tuberosity.
Palpation
Palpation of the joint from any aspect is virtually impossible because it is covered by thick muscle which crosses it, in particular, posteriorly and laterally. Only if the hip is fully extended can movement be detected and then only anteriorly.
Accessory movements
Palpation
The model is in the supine lying position.
• Note. Very little accessory movement is possible at this joint.
• Parting of the articular surface. Ask the model to flex the hip to approximately 30°. Kneel with your legs on either side of the model’s leg. Cup your hands around the upper calf and lean backwards. This will allow you to apply strong traction to the hip joint. This produces slight parting of the articular surfaces.
• Combinations of movement. By combining the three components of movement, i.e. flexion/extension, abduction/adduction and medial/lateral rotation, you can test the joint movement and function to extremes.
• Note. Testing these combined movements is often referred to as the ‘quadrants’. For further information consult the manipulation and mobilization literature (Maitland 1991).
The knee joint (Fig. 3.10)
The knee joint is a synovial composite joint. It comprises the bicondylar section between the condyles of femur and tibia and the plane joint between the patella and the patellar surface of the femur. The joint functions as a modified hinge. Its main movements are flexion and extension. Rotation can be produced in the semiflexed position and in the final few degrees of full extension.
The knee joint is the largest joint in the human body and perhaps the most complex (see Palastanga et al 2002).
The articular surfaces are covered with articular cartilage, but are not congruent. Those on the femur cover the superior, posterior, inferior and anterior surfaces of the large condyles. They come together anteriorly to form a triangular surface which is narrow at the top and is called the patellar surface. The articular surfaces of the tibia only cover the central section of the upper surface. Its outer sections are covered by two crescentic-shaped menisci.
The joint is supported on its posterior, lateral and medial side by a fibrous capsule. Anteriorly the capsule is formed by the lower section of the quadriceps femoris, the patella and the ligamentum patellae. The joint is lined by an extensive and complex synovial membrane. It is supported by numerous ligaments. Externally:
The joint also relies heavily on the powerful surrounding muscles for its stability.
The patellofemoral joint is anterior to the condylar section. This is between the posterior surface of the patella and the patellar surface of the femur. It is a synovial plane joint. Whilst it is separate from the knee joint, it shares the same joint space and synovial membrane.
The knee joint appears at first sight to be a very unstable joint with the two rounded condyles of the femur sitting on top of the two flattened surfaces of the tibia. This, however, is not so. This joint rarely dislocates and even then only under extreme force, such as a car or aeroplane crash. It is, however, subject to many stresses and strains, particularly in sport.
Palpation
surface marking
For palpation in this region, the model is in the sitting position with the leg dependent.
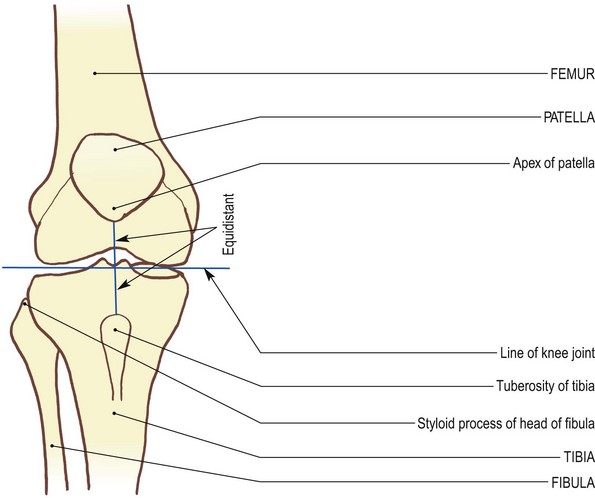
• The knee joint (Fig. 3.10b, d). Draw a line which bisects the ligamentum patellae horizontally halfway between the lower tip of the patella and the tibial tuberosity.
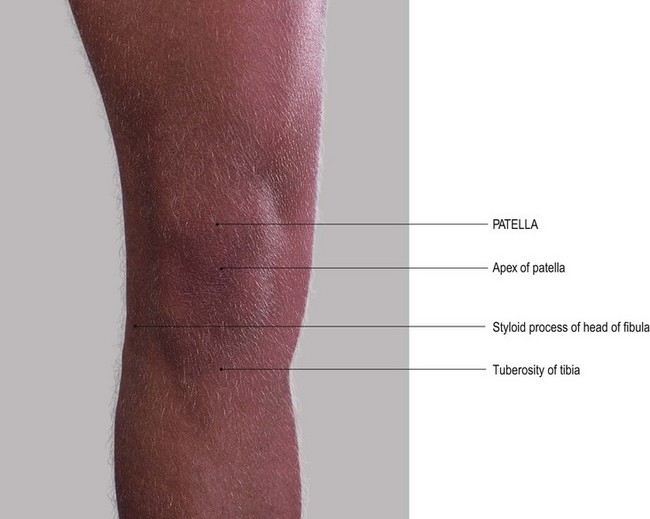
• Alternative method. Draw a line horizontally 1 cm above the tip of the styloid process of the fibula.
Palpation
• The menisci. Place your fingers on either side of the ligamentum patellae. Identify two triangular depressions. These are bounded by the tibia below, the femur above and the ligamentum patellae centrally. Locate the apex of the depression with the knee joint space running horizontally. Your fingers are now resting against the anterior aspect of the medial and lateral menisci. Ask the model to rotate the knee medially and laterally. Palpate the menisci moving forwards during rotation at the joint. The lateral meniscus moves on lateral rotation; the medial meniscus moves on medial rotation.
• Lateral aspect. Trace the joint posteriorly. Notice that the space becomes narrower until just behind the mid point, where it becomes hidden by the medial collateral ligament medially and the lateral part of the joint capsule laterally.
• Note 1. Posteriorly, the joint is impossible to palpate due to the presence of muscle, tendon and fascial coverings.
• Note 2 (Fig. 3.10f). The joint can be represented by a horizontal line drawn across the back of the popliteal fossa 1 cm above the tip of the styloid process of the head of the fibula.
Accessory movements
• Note. The knee joint becomes ‘close packed’ on full extension; therefore, accessory movements should only be performed avoiding the extreme of extension.
Palpation
For palpation in this region, the model is in the supine lying position.
• Anterior and posterior movement of the tibial condyles. Ask the model to flex the knee to 90° with the foot firmly fixed on the supporting surface. For stability, you may need to sit on the model’s foot. Place both hands around the knee with your thumbs resting on the tibial tuberosity. Draw the tibial condyles forwards (anterior draw test). Now push them backwards (posterior draw test). This produces a gliding movement of the tibial condyles on the femoral condyles.
• Note. There should be only a slight movement in either direction. Forward movement of the tibia is limited by the anterior cruciate ligament; posterior movement is limited by the posterior cruciate ligament.
• Side-to-side movement of the tibial condyles. Ask the model to flex the knee to 15°. Stabilize the undersurface of the model’s thigh with one hand and grasp the lower end of the leg just above the ankle with the other. Now produce a side-to-side movement.
• Distraction of the joint surfaces. The model is sitting on a high plinth with the leg dependent. Ask the model to take the joint to the mid position. Now pull downwards on the leg.
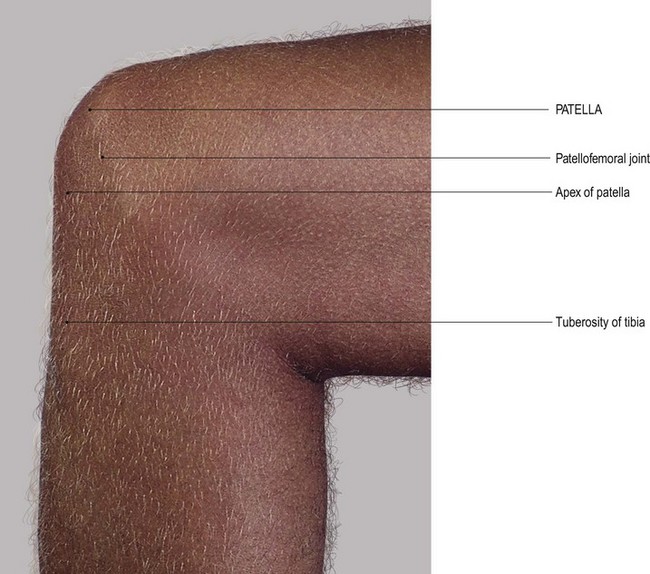
• The patellofemoral joint (Fig. 3.10c, d). The joint lies deep to the patella, between it and the patellar surface of the femur, 1 cm deep to its anterior surface. It shares the same joint space as the bicondylar articulation. It is easily marked by tracing around the perimeter of bone.
• Movements of the patella. The model is in the supine lying position with the knee in an extended and relaxed position. Move the patella from side to side across the patellar surface of the femur which results in a rocking effect. Now move the patella up and down as a gliding movement along the vertical groove of the femoral surface. If you move the patella laterally, you will be able to palpate the medial edge of the patellar surface of the femur. This is marked by a sharp ridge. In this position, you can also palpate the undersurface of the lateral edge of the patella. Conversely, if you move the patella medially, you will be able to palpate the lateral edge of the patellar surface of the femur and the medial undersurface of the patella.
Functional anatomy
Little stress is applied to the structural components of the knee joint, on which it relies for its stability during normal activities, such as walking, running, jumping, swimming, etc. Enormous tension is, however, applied to these components during sporting activities where the lower limbs are used for varied directional propulsion and kicking. Lateral or medial forces applied to the knee, particularly when the knee is in its extended ‘close-packed’ position, may cause strains, partial tears or even complete ruptures to medial or lateral ligaments. Violent over-extension of the knee may rupture the anterior cruciate ligament. The posterior cruciate ligament may rupture when enormous force is applied to the anterior aspect of the proximal end of the tibia. When the knee is over-rotated in a flexed position the menisci, especially the medial, sometimes get trapped between the rolling condyle of the femur on the tibia, producing a tear in the meniscus.
In addition to all the ligamentous problems, the very powerful muscle surrounding the joint, on which stability is also dependent, may be partially torn or even completely ruptured. On a violent extension force such as kicking a stationary object, or falling from a height on to the feet, the quadriceps femoris tendon may rupture, causing complete dysfunction of the joint.
Considering all the fractures that may occur through direct or indirect violence to the bones of the joint and the degeneration due to age and all the stresses applied by virtually the whole body weight being transferred through the joint during movement, it is hardly surprising that the knee joints are a source of much pain and suffering, for many, in their senior years.
(For detailed study of structure, stability, function, dysfunction, remedies, etc., see Palastanga et al 2002.)
The tibiofibular union
The tibia and fibula are united by two joints: the superior tibiofibular joint and the inferior tibiofibular joint, and an interosseous membrane. They unite the bones so tightly that very little movement occurs between the two.
The interosseous membrane is composed of strong fibrous tissue with its fibres passing downwards and laterally. There is a small opening above (see Fig. 3.10f), with an additional group of fibres passing in the opposite direction just below the superior tibiofibular joint.
The superior tibiofibular joint
This is a synovial joint, with its surfaces covered with articular cartilage. It is surrounded by a capsule lined with synovial membrane. The capsule is supported by the anterior and posterior tibiofibular ligaments.
Palpation
surface marking
For palpation in this region, the model is in the supine lying position.
• This joint can be represented, both anteriorly and posteriorly, by a line 1.5 cm in length running downwards and slightly medial to the head of the fibula (Fig. 3.11a, b).

Palpation
• Stand on the right side of the model just below the level of the knee. Place the index finger of your left hand on the styloid process of the head of the fibula. From that point your thumb can trace downwards and medially along the anterior aspect of the joint. Your middle finger is just behind the joint, and can also trace downwards and medially along the posterior joint line. This is a little more difficult to palpate as it is covered by the lateral head of gastrocnemius.
Accessory movements
Although the head of the fibula can be felt gliding up and down during dorsiflexion and plantarflexion of the ankle joint, accessory movement between the two bones is virtually impossible.
Palpation
• Movements of the head of the fibula. The model’s ankle joint should be plantarflexed. Direct pressure, applied by your thumb, on the head of the fibula can produce a slight backward gliding.
• Forward gliding can be achieved using the same technique but with the model in the prone lying position. Extreme care must be taken, when performing this procedure, to avoid the common peroneal nerve as it winds around the neck of the fibula.
The inferior tibiofibular joint
This joint is a fibrous syndesmosis [syndesmos (Gk) = a band] between the lower lateral rough triangular surface on the tibia and a similar surface on the lower medial side of the fibula. The surfaces are bound together by a very strong interosseous ligament which is a continuation downwards of the interosseous membrane. The joint is further supported by an anterior, posterior and transverse tibiofibular ligament, the latter forming part of the socket of the ankle joint.
Palpation
surface marking
For palpation in this region, the model is in the supine lying position.
• Draw a vertical line 2.5 cm long running superiorly from the line of the ankle joint (see p. 110) on the medial side of the lateral malleolus.
Palpation
Again this joint is difficult to palpate, except for its upper edge, as it is mostly covered by the superior extensor retinaculum and extensor digitorum longus tendons. Posteriorly, little can be palpated owing to the presence of the tendo calcaneus.
Accessory movements
Accessory movement of the inferior tibiofibular joint is not possible, except when diastasis (a parting of the inferior tibiofibular joint) has occurred. It is unwise to increase the unwanted movement in this injury, as this leads to even further instability of the ankle joint.
The fibrous interosseous ligament between the two bones holds the two bones together and is referred to by some as a fibrous syndesmosis.
The ankle joint (Fig. 3.12)
The ankle joint is a synovial hinge joint involving the distal ends of the tibia and fibula proximally and the body of the talus distally. The weight-bearing surfaces are the trochlear surfaces of the tibia and talus. The stabilizing surfaces are those of the medial and lateral malleoli, which grip the body of the talus. The articular surfaces are composed of, above, the inferior surface of the tibia, the medial surface of the lateral malleolus and lateral surface of the medial malleolus, and, below, the superior, lateral and upper part of the medial surface of the talus. The surfaces are covered with articular cartilage. The joint is surrounded by a capsule lined with synovial membrane and is supported by very powerful lateral and medial (deltoid) ligaments. These two ligaments are delta-shaped, being narrower above and broader below. Above they are attached to the anterior and posterior borders, tip and fossae of each malleolus. Below, the medial attaches to the navicular, calcaneonavicular ‘spring’ ligament, sustentaculum tali and medial tubercle of talus, with a deep section attaching to the medial surface of the talus. The lateral has three portions, the anterior and posterior attaching to the talus and the middle portion to the calcaneus. The transverse tibiofibular ligament which passes across the posterior of the ankle joint, forming part of its socket, attaches to both malleoli and the lower border of the tibia.
Palpation
surface marking
For palpation in this region, the model is in the supine lying position.
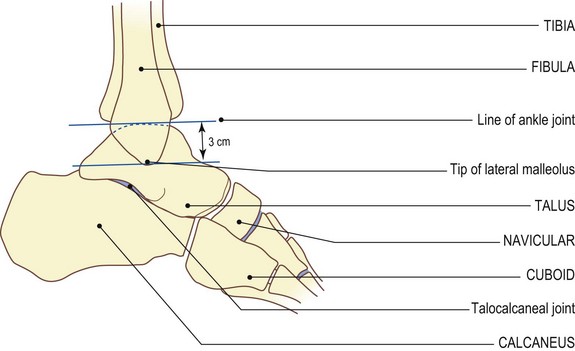
• Draw a horizontal line across the anterior surface of the ankle 2 cm above the tip of the medial and 3 cm above that of the lateral malleolus. This marks the superior limit of the joint. It is continued down the medial side of the lateral malleolus and the lateral side of the medial malleolus to their tips which completes the joint line (Fig. 3.12b, d, f).
• Anteriorly. With care, palpate between the extensor tendons in the region of the horizontal part of the joint line; this reveals the lower border of the tibia.
• Medially. Trace the joint line from the anterior border of the medial malleolus down to the tip.
• Posteriorly. Trace the joint line up the posterior border of the medial malleolus, above the malleolar fossa where it is hidden by tissue which lies between the tendo calcaneus and the joint.
• Laterally. Palpate the joint line between the talus and lateral malleolus anteriorly from where it can be traced down to the tip of the malleolus. As on the medial side, its posterior border can be traced upwards above the malleolar fossa until it too is lost under similar fascia.
• Ask the model to plantarflex the ankle. You can feel the body of the talus, i.e. its upper, lateral and medial surfaces, gliding forwards (Fig. 3.12c, d). Posteriorly the joint is hidden by tendons and fascia.
Accessory movements
The ankle joint allows the movements of dorsiflexion and plantarflexion. Side-to-side movement is limited by the presence of the two malleoli, there being no movement possible when the joint is dorsiflexed and ‘close packed’ as the body of the talus is gripped between the two malleoli.
Palpation
• Movements of the talus. Ask the model to plantarflex the ankle. Grip the foot with one hand and stabilize the leg with the other. You can now move the narrower part of the body of the talus from side to side and forwards and backwards.
• Note. The lateral (and less frequently the medial) malleolus is commonly fractured by a lateromedial or mediolateral force. Unless the malleolus is replaced exactly, the talus is able to move sideways and the joint becomes less stable. The same mechanical problem will occur if the two bones are parted at the inferior tibiofibular joint (diastasis – see p. 109).
The foot
The joints of the foot are divided into those between the tarsal bones (the intertarsal joints) and the tarsal and metatarsal bones (the tarsometatarsal joints); between the metatarsal bases (the intermetatarsal joints); between the metatarsals and phalanges (the metatarsophalangeal joints) and those between the phalanges (the interphalangeal joints). Most of the joints are readily identifiable on the dorsum of the foot as they are only covered by thin fascia and the tendons of the long extensor muscles, whereas the plantar aspect of the foot is covered by numerous intrinsic muscles, in four layers, and very thick layers (up to 80) of plantar fascia.
The talocalcaneal (subtalar) joint (Fig. 3.13)
The talocalcaneal joint lies below the talus and is often referred to as the subtalar joint. The surfaces participating in this joint are the inferior surface of the talus and the middle section of the superior surface of the calcaneus. Both surfaces are covered with articular cartilage and the joint is surrounded by a fibrous capsule lined with synovial membrane. The capsule is supported by medial, posterior, lateral and interosseous ligaments. The interosseous ligament lies anterior to the joint and separates it from the talocalcaneonavicular joint. There is also a short ligament which joins the neck of the talus to the sustentaculum tali at the lateral end of the sinus tarsi.

Palpation
surface marking
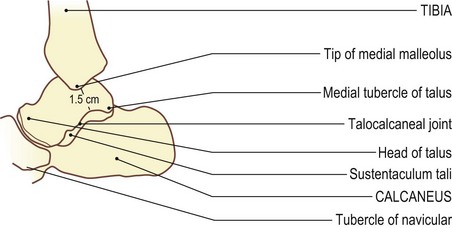
• Draw a line across the front of the joint running horizontally 1 cm below the tip of the lateral malleolus on the lateral side to a point 1.5 cm below the tip of the medial malleolus on the medial side (Fig. 3.13b).
Palpation
This is a very difficult joint to palpate due to the fact that the medial and lateral malleoli and the powerful ligaments tend to hide the joint.
• The anterior part of the lateral side of the joint. Find the tip of the lateral malleolus and move forward into the hollow. Below your finger you will feel the sharp edge of the upper border of the calcaneus. This is the anterior part of the lateral side of the joint.
• The medial side of the joint. On the medial side find the tip of the medial malleolus. Move down 2 cm and you will be able to palpate a horizontal ridge. This is the medial edge of the sustentaculum tali and its upper border is the lower boundary of the subtalar joint.
Accessory movements
Palpation
• Movements of the calcaneus. Stand to the lateral side of the right foot (similar to the position adopted for accessory movements of the ankle joint). With your left hand grip the neck of the talus with your fingers on the medial side and thumb laterally. Fit the model’s heel into the palm of your right hand. Wrap your fingers around the back of the calcaneus. You can now glide the calcaneus very slightly backwards and forwards. It can also be rocked from side to side, producing a slight gapping of the lateral and medial side of the joint alternately.
The talocalcaneonavicular joint (Fig. 3.14a–d)
This is a synovial, modified ball-and-socket joint between the head of the talus and a socket comprising the posterior surface of navicular, the superior surface of the sustentaculum tali of the calcaneus and the ‘spring’ ligament which joins the two (Fig. 3.14). It is surrounded by a capsule lined with synovial membrane and is supported by the talonavicular ligament dorsally, the medial band of the bifurcate (‘Y’-shaped) ligament laterally, the tibionavicular part of the deltoid ligament medially and posteroinferiorly, under the neck, by the anterior section of the interosseous ligament in the sinus tarsi. The plantar calcaneonavicular (spring) ligament is a fibroelastic ligament forming part of the socket and lies below the head of the talus, having articular cartilage on its superior surface.
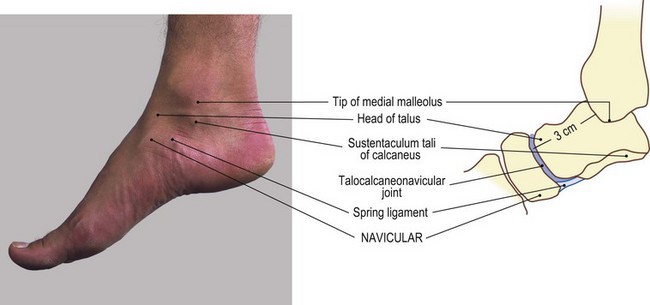
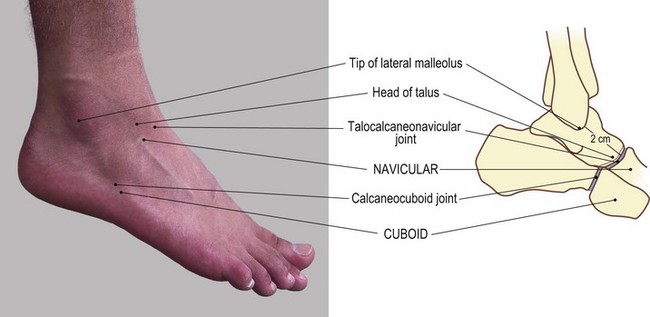
Fig. 3.14 (c, d) The talocalcaneonavicular and calcaneocuboid joints of the right foot (lateral aspect)
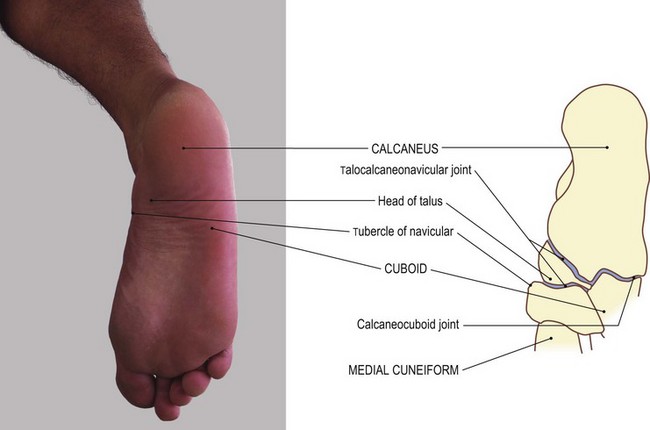
Fig. 3.14 (e, f) The talocalcaneonavicular and calcaneocuboid joint of the right foot (plantar aspect)
Palpation
surface marking
• Draw a line, convex distally, transversely across the medial half of the dorsum of the foot at the level of the tubercle of the navicular.
• As with nearly all the joints in the foot, palpation and identification is only possible on the dorsum. The plantar aspect is hidden as it lies deep by many layers of the plantar fascia, many short but powerful muscles and strong, dense ligaments.
Palpation
• The tubercle of the navicular. Palpate the tubercle, which is situated 2.5 cm anteroinferior to the tip of the medial malleolus. As it projects slightly backwards, it is in line with the joint.
• The head of the talus. Trace down the proximal side of the tubercle of the navicular to a small gap underneath, housing the ‘spring’ ligament.
• The sustentaculum tali of the calcaneus. Palpate the anterior section of the sustentaculum tali posterior to the gap.
• The joint line. Ask the model to hold the foot in slight plantarflexion with the muscles relaxed. You can now trace the joint across the dorsum of the foot almost to the mid point where the head of the talus and the navicular dip towards the bifurcate ligament.
• Note. The tendons of tibialis anterior and extensor hallucis longus may have to be moved to the side to follow the line clearly.
Accessory movements
Palpation
• Gliding. Stand on the lateral side of the model’s foot. With your proximal hand, stabilize the talus from the medial side with your fingers on the plantar and your thumb on the dorsal aspect. With your distal hand, grasp the forefoot as far backwards as the navicular, again with your fingers on the plantar and thumb on the dorsal aspect. You can now obtain slight up-and-down gliding of the navicular on the head of the talus.
• Rotation of the forefoot on the head of the talus. This is also possible using the same hand position as described above, but this movement normally occurs during inversion and eversion.
The calcaneocuboid joint (Fig. 3.14e, f)
This is a synovial, plane joint between the quadrilateral anterior surface of the calcaneus and the posterior surface of the cuboid. Both surfaces are covered with articular cartilage and the joint is surrounded by a capsule, lined with synovial membrane. It is supported by the lateral portion of the bifurcate ligament medially, by the dorsal calcaneocuboid ligament and by the plantar calcaneocuboid and long plantar ligaments inferiorly.
Palpation
This joint is difficult to identify, although certain landmarks can be palpated.
• The anterior border of the superior surface of the calcaneus. From the tip of the tubercle of the fifth metatarsal move dorsally 2 cm. Just proximal to your finger, you will feel the anterior border of the superior surface of the calcaneus. This is 2 cm anterior to the tip of the lateral malleolus. Trace the border medially until it dips towards the bifurcate ligament. Trace it laterally to the anterior border of the lateral surface almost down to the tubercle.
Accessory movements
This plane synovial joint allows slight upward movement during eversion and slight downward movement during inversion accompanying the rotation of the navicular on the head of the talus. This movement is physiological and its loss would severely interfere with the functional movement of the foot.
Palpation
• Upward and downward movement with rotation of the navicular on the head of the talus. Stand to the right of the model’s right foot. With your left hand, stabilize the talus and calcaneus by gripping below the two malleoli with your fingers on the inside and your thumb on the outside. With your right hand, grasp the cuboid with your thumb on the dorsum and your index and middle fingers underneath. Now move the cuboid up and down.
The cuboideonavicular joint (Fig. 3.14h)
This joint between the navicular and the cuboid is normally a syndesmosis. The articular surfaces are joined entirely by a strong fibrous interosseous ligament and this is further supported by dorsal and plantar ligaments. Sometimes it is replaced by a small synovial joint which is surrounded by a capsule, lined by synovial membrane and supported by dorsal and plantar ligaments.
The midtarsal joint (Fig. 3.14g, h)
This is a composite articulation of the talocalcaneonavicular joint medially and the calcaneocuboid joint laterally. The two proximal bones are firmly united by the interosseous ligament in the sinus tarsi; the two distal bones are firmly united by the cuboideonavicular syndesmosis. The two joints are therefore considered to move as one unit, particularly in inversion and eversion of the foot.
Palpation
surface marking
• The joint line can be marked across the dorsum of the foot by drawing a line from just proximal to the tuberosity of the navicular medially to a point 1 cm proximal to the tip of the tubercle of the fifth metatarsal laterally (Fig. 3.14g, h).
The cuneonavicular and intercuneiform joints (Figs 3.14i, j and 3.15c, d)
• The three cuneiform bones articulate proximally with the distal surface of the navicular by plane synovial joints. They are surrounded by a common capsule which is lined by synovial membrane and are supported by relatively weak dorsal and stronger plantar ligaments. The cuneiform bones are also bound together distally by interosseous ligaments.
Palpation
• The cuneonavicular joint. You can palpate this joint on its medial and dorsal aspects just distal to the navicular tuberosity and, with care, you can trace it across the foot between the extensor tendons, being slightly concave proximally (Fig. 3.14i, j).
• The joints between the cuneiforms themselves, and between the lateral cuneiform and the cuboid, are extremely difficult to palpate, although the joint lines can be determined by following proximally from the first, second and third metatarsal bones (Fig. 3.15a, b).
Accessory movements
The joints between the navicular and the cuneiforms, as well as those between the cuneiforms themselves, are all plane synovial joints but as they also possess interosseous ligaments which bind the adjacent surfaces together, they possess very little movement.
• Passive movements. Stabilize the most proximal component with the fingers and thumb of one hand. Now glide the distal component up and down with your other hand. The grip is similar to that used on the talocalcaneonavicular joint.
• Note. Although only slight gliding is present at these joints, loss of this movement can lead to complete dysfunction of the foot.
The cuneocuboid joint is a synovial plane joint but is also tightly bound together by an interosseous ligament, becoming, in part, a syndesmosis. Consequently, passive accessory movement between the two bones is virtually impossible.
The tarsometatarsal joints
The tarsometatarsal joints are between the bases of the metatarsals and the cuneiform and cuboid bones. The first metatarsal articulates with the medial cuneiform bone, the second fits in between the medial and lateral cuneiforms with its base articulating with the middle, shorter, cuneiform, and the third metatarsal articulates with the lateral cuneiform. The fourth and fifth articulate with the cuboid. They are all plane synovial joints surrounded by a capsule which is lined with synovial membrane and supported by dorsal and plantar tarsometatarsal ligaments. There are also two or possibly three interosseous ligaments, two to the base of the second metatarsal as it fits into this mortice and the other between the lateral cuneiform to the tip of fourth metatarsal.
Palpation
surface marking
• The joint between the first metatarsal and the medial cuneiform. This joint can be palpated 2 cm distal to the navicular tuberosity. It can also be identified by following the first metatarsal proximally to where its base is marked by an expanded area. Trace this line on to the dorsum of the foot, where it is crossed by the tendon of extensor hallucis longus (Fig. 3.14i, j).
• The joint between the second metatarsal and the middle cuneiform bone. This joint is extremely difficult to palpate as it is set more proximally between the medial and lateral cuneiforms.
• The joint between the third metatarsal and the lateral cuneiform. Identify this joint by following the line of the metatarsal to its base, which is slightly raised.
• The joints between the fourth and fifth metatarsals and the cuboid. Use the same procedure as above to identify these joints. Their surface is marked by a line running laterally and proximally towards the tip of the tubercle on the fifth metatarsal (Figs 3.15a, b and 3.17a, b).
Accessory movements
Palpation
• Movements of the metatarsal bones. Stand to the right of the model’s right foot. With the cleft between your thumb and fingers of your left hand, grip the cuneiform bones. Grip the first metatarsal bone with your right hand. Now produce up-and-down movements. You may be able to obtain a little rotation.
• Note. Little movement at these joints can be obtained when the metatarsals are moved on each other (see intermetatarsal joints, p. 124).
The intermetatarsal joints (Fig. 3.15c–f)
These are four small synovial joints between the adjacent sides of the bases of the second to fifth metatarsals. They are surrounded by a capsule lined with synovial membrane and their joint space is continuous with that of the tarsometatarsal joints. The capsule is supported by a dorsal and plantar ligament and an interosseous ligament at its distal end. The base of the first metatarsal is connected to the base of the second by an interosseous ligament only.
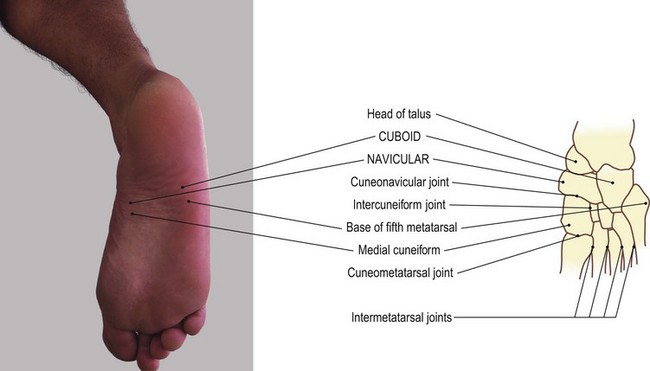
Fig. 3.15 (c, d) Joints of cuneiform bones and metatarsals of the right foot, plantar aspect (not palpable)
Palpation
• The intermetatarsal joints. Place your finger between the metatarsals on the dorsum of the foot and draw it proximally. The space between them gradually narrows, with the bones eventually coming into contact with each other. These small plane joints run anteroposteriorly for approximately 0.5 cm, as far proximally as the line drawn across the dorsum of the foot from the base of the first metatarsal and the tubercle on the lateral side of the base of the fifth. That between the second and third metatarsals is slightly smaller due to the arrangement of the cuneiforms (Fig. 3.15e, f).
• The interosseous ligament between the first and second metatarsals can be marked in a similar fashion.
Accessory movements
Movement between the metatarsal bases and either the cuneiforms or the cuboid is virtually non-existent. Only slight movements can be produced, even when the metatarsals are used as levers. Obviously this also results in a slight gliding movement at the intermetatarsal joints.
Palpation
• Gliding movement of the intermetatarsal joints. Stand distal to the model’s foot. Grip one metatarsal head between the fingers and thumb of one hand and the adjacent head with the other hand. Both your thumbs should be on the dorsum of the foot. Now apply downward pressure on one metatarsal head and upward pressure on the other. You will produce a small degree of movement at the intermetatarsal joint.
• Note. This small movement between the heads creates an even smaller, but definite, movement between the bases.
• Combined forward and backward movement of all metatarsal bones. Take the lateral metatarsal head in one hand and the metatarsal of the great toe in the other. Apply downward pressure on the medial metatarsal and upward pressure on the lateral metatarsal. This produces a considerable movement between all metatarsal bases.
• Note. Although there is no contact between the two metatarsal heads, they are joined to each other by the powerful deep transverse metatarsal ligament. Occasionally this may become shortened; movement of one metatarsal head against its neighbour will help to mobilize this region.
The metatarsophalangeal joints (Figs 3.16 and 3.17)
These joints exist between the smooth, rounded heads of the metatarsal bones and the shallow cavity on the base of the proximal phalanx. They are synovial condyloid joints, surrounded by a fairly loose capsule which is lined with synovial membrane. The articular surface on the head of the metatarsal extends onto its dorsal, distal and particularly plantar surfaces. The capsule is supported by cord-like collateral and strong plantar ligaments. A deep transverse metatarsal ligament joins all the plantar ligaments together, forming a strong link between the heads of the metatarsals while allowing some up-and-down movement to occur between them.
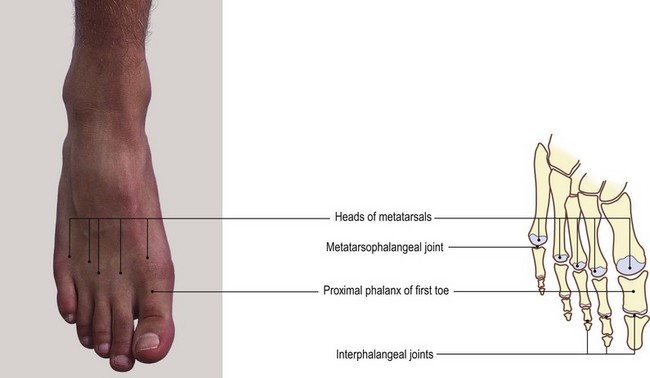
Fig. 3.16 (a, b) The metatarsophalangeal and interphalangeal joints of the right foot (dorsal aspect)
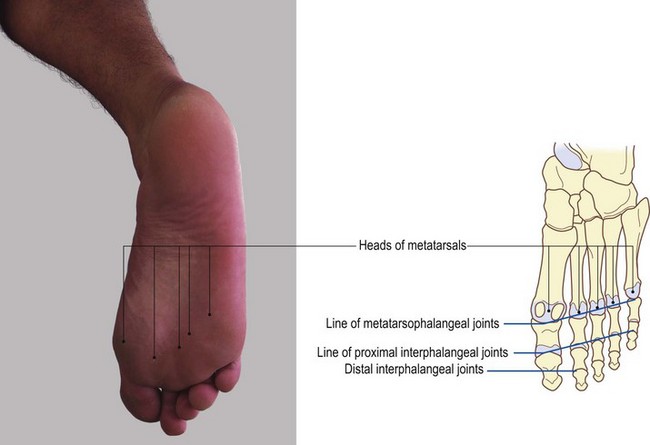
Fig. 3.16 (c, d) The metatarsophalangeal and interphalangeal joints of the right foot (plantar aspect)
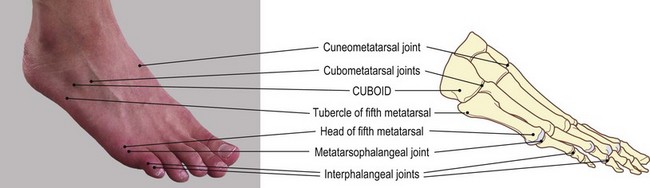
Fig. 3.17 (a, b) The metatarsophalangeal and interphalangeal joints of the right foot (lateral aspect)
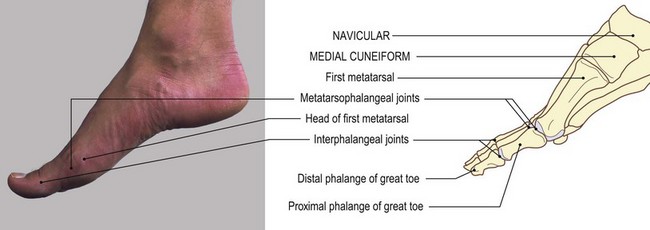
Fig. 3.17 (c, d) The metatarsophalangeal and interphalangeal joints of the right foot (medial aspect)
Palpation
• The joint space. Grip the head of the first metatarsal between your fingers and thumb. Let them slide slightly forwards. You can easily identify the joint space on the medial and dorsal aspect just distal to the head.
• The joint line. The undersurface of the head is masked by a thick pad of fascia, but you should be able to trace the joint line, although with some difficulty.
• The dorsal aspect. Ask the model to flex the lesser toes strongly. Palpate the heads of the metatarsals which protrude on the dorsum of the foot. With care you can palpate the joints just beyond these heads.
• Note. The tendons of extensor digitorum longus and brevis may have to be moved to the side.
• The joint of the fifth metatarsal. You can easily palpate this joint on its lateral side just beyond the head.
• The plantar aspect. Ask the model to extend the toes strongly. Now identify the joints from their plantar aspect; they are partially masked by the thick fascia which covers them.
• Gliding. Ask the model to flex and extend the toes rhythmically. Now palpate the proximal phalanges gliding over the heads of the metatarsals.
Accessory movements
Movement at the metatarsophalangeal joints is similar to that at the metacarpophalangeal joints of the hand, although a little more difficult to perform. These movements include rotation and a gliding of the proximal phalanx on the corresponding metatarsal head.
Palpation
• Movements of the toes. Grip the whole toe to be moved between the fingers and thumb of one hand; stabilize the remainder of the foot with the other. Now rotate the toe about its long axis; move it upwards, downwards and from side to side against the metatarsal head.
• Note. As in the case of many of the synovial joints which have comparatively loose capsules, these joints can also be distracted, although not as much as the metacarpophalangeal joints of the hand and certainly not enough to cause the ‘popping’ sound that can be produced sometimes in the hand.
• Traction. Stabilize the whole foot with one hand and grip the appropriate phalanx with the fingers and thumb of the other. Now just apply a traction force on the phalanx.
• Abduction and adduction. Although abduction and adduction are active movements at these joints, they are often quite difficult to perform actively. You will easily be able to obtain these movements by using the same technique as described above and moving the phalanges from side to side.
The interphalangeal joints (Figs 3.16 and 3.17)
These joints exist between the proximal and middle, and middle and distal phalanges of each of the lesser toes. As there are only two phalanges in the great toe, there is only one interphalangeal joint. These joints are synovial hinge joints surrounded by a capsule which is lined with synovial membrane and supported by strong collateral and thick plantar ligaments. The plantar ligaments are composed of fibrocartilage and form part of the joint capsule.
At the distal end of each distal phalanx the joint surface is replaced with the nail bed.
Palpation
• Dorsal aspect. On the second to fifth toes, the proximal interphalangeal joints are usually flexed so you will find it easy to palpate the head of the proximal phalanx.
• Note. In many subjects the second and third metatarsal head is marked by a small bursa on the dorsal aspect.
• The interphalangeal joints. Identify these joints as a faint horizontal line just beyond this bicondylar head of the proximal phalanx. Palpation is facilitated if you grip the middle phalanx between your finger and thumb and gently move it forwards and backwards.
• Plantar aspect. The joint is difficult to palpate on its plantar aspect. The distal interphalangeal joint is usually hyperextended and, although the joint itself is difficult to feel, the movement available clearly marks its line, particularly when palpated from the plantar aspect (Figs 3.16c, d, and 3.17).
• The interphalangeal joint of the great toe. Ask the model to flex the great toe. Palpate this joint just beyond the head of the proximal phalanx. Palpation is facilitated if you move the distal phalanx forwards and backwards using a similar technique to that described for the lesser toes (Fig. 3.16c, d).
Accessory movements
The interphalangeal joints are hinge joints. With the joint in slight flexion some side-to-side rocking of the joint can be produced.
• Side-to-side rocking. Grasp the proximal of the two phalanges between the finger and thumb of one hand; use a similar grip for the distal phalanx with your other hand. Now move the distal phalanx from side to side.
• Note 1. The joints of the foot are generally more difficult to mark and palpate. They are, however, all important in the functions of the foot, especially locomotion. Stiffness of just one small joint may lead to severe pain and dysfunction. It is therefore important to be able to locate and mobilize all joints, noting the direction of their articular surfaces and the resultant shape of the part as a whole.
• Note 2. Most feet react favourably to fairly strong manipulative techniques being performed on them, and these combined with the correct strengthening and mobilizing exercises can improve function dramatically.
• Note 3. All the joints of the foot, including the ankle, contribute to the overall position and shape of the foot. This will vary considerably according to its function at the time, i.e. weight-bearing or non-weight-bearing, mobile or stationary. It is therefore important to examine the structure in as many positions as possible.
In the standing position, weight transference through the foot is worthy of close examination. Body weight is transmitted through the tibia to the talus and then via the longitudinal and transverse arches to the ground. The shape and position of the foot depend on where this downward force is applied to the arches and how the weight is distributed through the forefoot and hindfoot to the ground. If the weight is applied too far to the medial side, the medial longitudinal arch becomes flattened, whereas if the weight is applied to the lateral side, the lateral longitudinal arch becomes flattened and the medial arch raised.
Muscles
The lateral and anterior aspect of the hip
Gluteus medius, gluteus minimus and tensor fasciae latae
Palpation
• Gluteus medius (Fig. 3.18a, b). Locate gluteus medius on the lateral aspect of the ilium. It is situated just anterior and deep to gluteus maximus, between the most lateral part of the iliac crest and the greater trochanter of the femur. Although it is covered by strong, thick fascia you should be able to feel it contracting and relaxing.
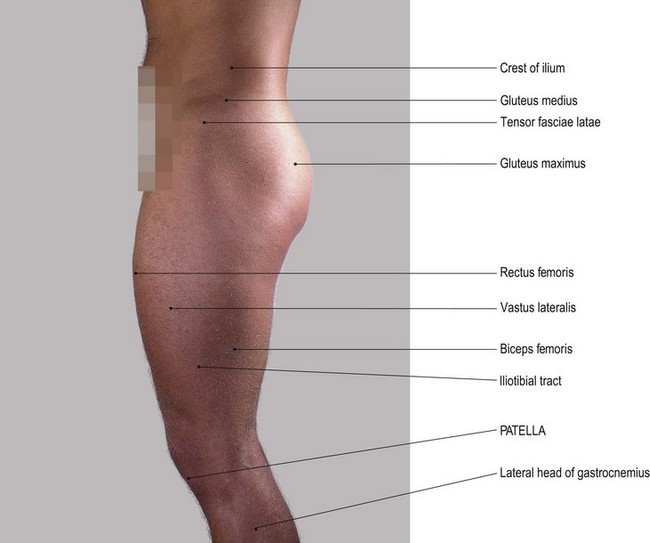
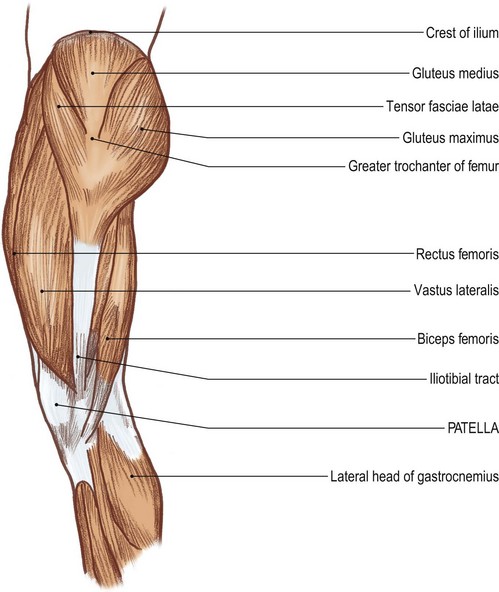
Action
• Position 1. The model is in the standing position. Place your fingers just below the level of the lateral side of the crest of the right ilium. Ask the model to raise the left leg from the ground. You will feel the contraction of the muscle preventing the pelvis from dropping to the left side.
• Position 2. The model is in the left-side lying position. Place your fingers just distal to the level of the iliac crest. Ask the model to raise and lower the right leg and palpate the muscle contraction.
Gluteus minimus (Fig. 3.18a, b). Gluteus minimus lies anterior to gluteus medius, covered by tensor fasciae lata.
Action
• The model is in the standing position. Place your fingers just below the anterior section of the iliac crest. Ask the model to medially rotate the lower limb. Palpate the muscle contraction between the anterior section of the iliac crest and the greater trochanter of the femur.
• Note 1. Gluteus medius, minimus and tensor fasciae latae come into action when the lower limb is medially rotated as in the weight-bearing phase of walking when the lower limb is moving into extension, just before the thrust phase produced by gastrocnemius.
• Note 2. It is important to practise the palpation of gluteus maximus, medius, minimus and tensor fasciae latae. Contraction of these muscles can be identified during walking. Much information can be gained from this region regarding the relationships of the bony structures and the power and timing of muscle contraction. As noted above, the gluteus medius should contract on the weight-bearing limb to prevent the pelvis from dropping to the opposite side when the foot is raised from the ground. Therefore, the distance between the iliac crest and the greater trochanter of the femur, on the weight-bearing limb, should remain the same or even decrease slightly.
• Note 3. It is also worth noting, through palpation of these muscles, that as the weight-bearing limb moves from the flexed to the extended position, the muscles appear to contract in sequence from posterior to anterior. As the heel comes in contact with the ground, the limb is in lateral rotation and the posterior section of gluteus medius and possibly gluteus maximus is contracted. As the hip moves forwards over the foot, the middle of gluteus medius can be felt contracting. As the limb moves into extension and medial rotation, the anterior section of gluteus medius, gluteus minimus and tensor fasciae latae is contracting. During this sequence, the pelvis will rotate forwards around the weight-bearing hip joint towards the weight-bearing side.
• Note 4. Finally, it is worth noting that immediately the limb is weight-bearing, the gluteus medius contracts. Dysfunction of the hip joint may upset the precise firing off of these muscles.
Iliopsoas and pectineus
The front of the hip joint is crossed by iliopsoas and pectineus. The former is a broad tendon and the latter a quadrilateral muscle. Because they are both covered by several layers of fascia, as well as the femoral sheath and its contents, they are difficult to palpate (see Fig. 3.20a, b).
Palpation
• Iliopsoas and pectineus. The model is in supine lying with both the hip and knee supported and flexed to 90°. Place your fingers on the anterior aspect of the hip joint 3.5 cm below the centre of the inguinal ligament. Ask the model to flex and extend the hip joint slowly. Now palpate the contraction of both iliopsoas laterally and pectineus medially.
The posterior aspect of the hip and thigh
Gluteus maximus
The extremely well-developed muscles around the hip joint are the gluteal muscles, especially the gluteus maximus, which is important in maintaining the upright posture. It is a large and powerful muscle, giving the gluteal region its rounded shape.
Palpation
• Gluteus maximus (Figs 3.18 and 3.19). The model is in the prone lying position. Ask the model to extend the lower limb. The muscle lies between the posterior part of the iliac crest superiorly, the anal cleft medially and the gluteal fold inferiorly. With care, you can trace its coarse fibres running downwards and laterally towards the greater trochanter of the femur. It is often possible, especially with the hip extended, to trace the more superficial fibres to their attachment into the fascia lata (iliotibial tract).
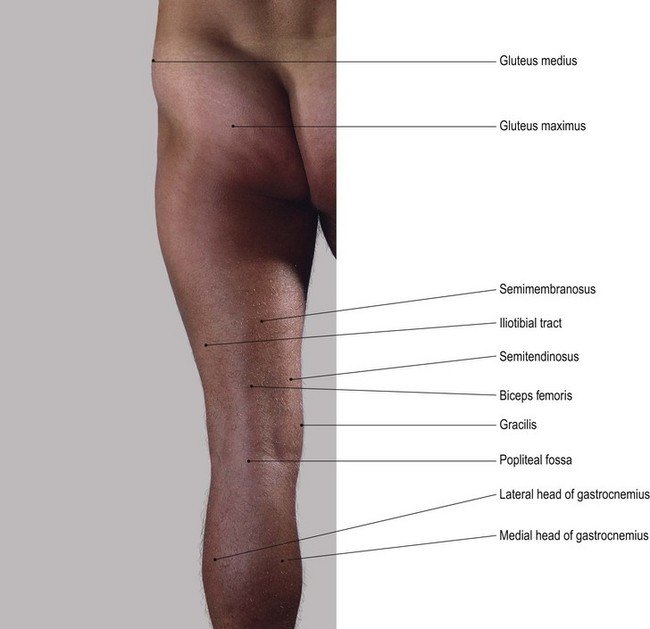
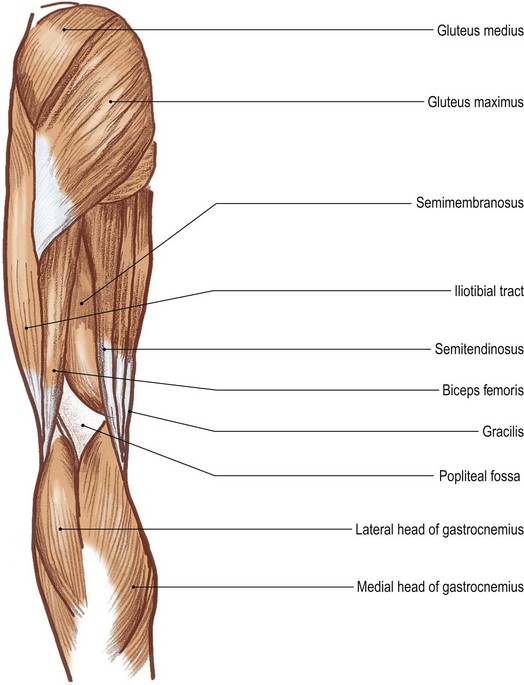
The hamstrings
• Below the gluteal fold the hamstrings are evident. These powerful muscles cover the whole of the back of the thigh.
• Semitendinosus and semimembranosus pass downwards and medially, with the biceps femoris crossing to lie laterally as it passes down to the knee. The muscle bellies of the hamstrings separate approximately two-thirds of the way down the thigh, giving rise to their tendons: semitendinosus and semimembranosus medially and biceps femoris laterally (Fig. 3.19).
Palpation
• The tendon of biceps femoris. The model is in the prone lying position. Ask the model to flex the knees and apply resistance to the movement. The tendon of biceps femoris stands clear on the posterolateral side of the knee which you can trace to its insertion to the head of the fibula.
• The belly of biceps femoris (Fig. 3.2). Proximally, you can follow the superficial fusiform muscle belly towards the ischial tuberosity. You can palpate the deeper fibres of biceps femoris on the medial side of the tendon in the upper part of the popliteal fossa.
• The tendon of semitendinosus. Palpate the tendon on the posteromedial side of the knee joint as it passes downwards to its attachment on the medial surface of the tibial condyle and shaft.
• The belly of semitendinosus. Proximally, its fusiform muscle belly joins that of biceps femoris near the gluteal fold.
• The tendon of gracilis. Identify the slightly thinner tendon of gracilis lying anteromedially. Trace its muscle belly up the medial side of the thigh as far as the body of the pubis. Palpation is easier if you ask the model to flex the knee and apply resistance to the movement.
• Semimembranosus. This muscle lies deep to semitendinosus just above the knee. It is difficult to palpate, even at its distal end, because it attaches, via a broad aponeurosis, to the postero-medial aspect of the medial condyle of the tibia. With the model’s knee supported in approximately 60° of flexion, press your fingertips and thumb into the space on either side of the semitendinosus tendon approximately 5 cm above the level of the knee joint. Ask the model to flex and extend the knee. Now palpate the muscle below, contracting and relaxing.
The anterior and medial aspects of the thigh
The adductors and quadriceps femoris
Palpation
• The adductor group of muscles. The model is in the supine lying position. Ask the model to adduct the thigh. The adductor group of muscles now comes into action. You can palpate the following:
• Note. It is difficult to identify the adductor muscles separately.
The quadriceps muscle forms the great bulk of muscle on the front of the thigh (Fig. 3.20). It comprises vastus medialis, vastus intermedius, vastus lateralis and rectus femoris.
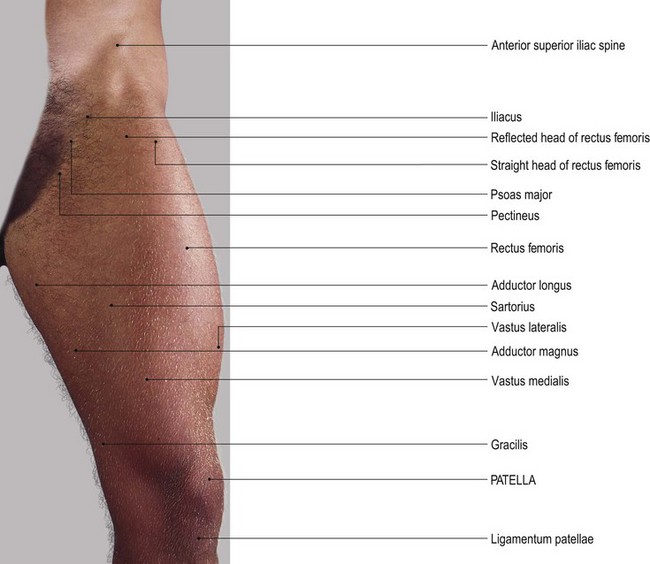
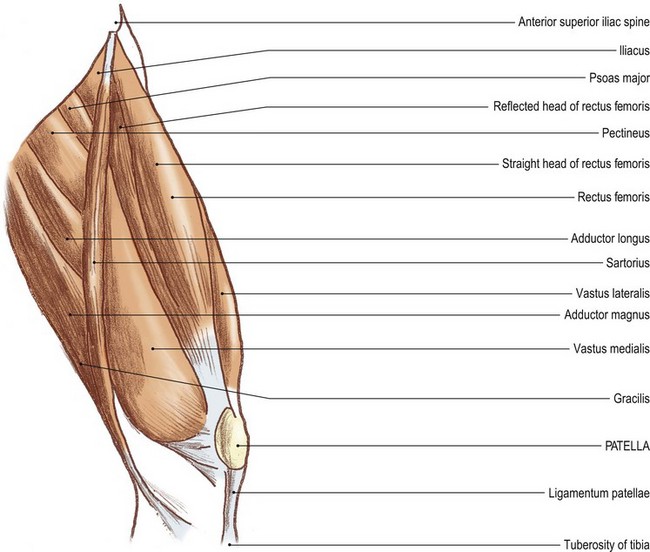
Palpation
• Quadriceps femoris. The model is in the sitting position. Ask the model to extend the knee and apply resistance to the movement. You can palpate three of the four bellies of quadriceps femoris.
• The belly of the vastus intermedius. This lies deep to the other three and is difficult to identify separately.
• Rectus femoris. The muscle passes straight down the front of the thigh from the anterior inferior iliac spine to the base of the patella. Palpate its proximal and distal tendons and its belly, which appears as a fusiform shape on the front of the thigh.
• The belly of vastus lateralis (Fig. 3.18). Palpate this muscle belly halfway down the lateral surface of the thigh, being flattened posteriorly by the fascia lata (iliotibial tract).
• Vastus medialis. Palpate this muscle on the medial side of the thigh just above the level of the patella. Trace its lowest fibres running almost horizontally and laterally to attach to the medial border of the patella.
• Note. This muscle varies considerably in size according to its use and is the first part of the quadriceps to show signs of weakness.
• The tendons of quadriceps. Palpate the tendons, particularly those of rectus femoris and vastus intermedius, attaching to the upper border of the patella.
• Note 1. There are often small depressions on its medial and lateral edges where it joins the expansion of vastus lateralis and vastus medialis.
• Note 2. The patella is a sesamoid bone and lies within the tendon of quadriceps femoris, the ligamentum patellae being a continuation of the quadriceps tendon (Fig. 3.20).
• The ligamentum patellae. Palpate this structure, which joins the apex of the patella to the upper part of the tibial tuberosity. It is approximately 5 cm long and 2 cm wide, with its central point level with the knee joint (see p. 107).
• The iliotibial tract (Fig. 3.21a, b). Ask the model to extend the knee fully. Now palpate the strong tendon-like structure lying lateral to the patella and running down to attach to the lateral tibial condyle. This is the lower part of the iliotibial tract. You can trace it superiorly along the lateral side of the thigh to the ilium.
• Sartorius (Fig. 3.20). The model is in the supine lying position. Ask the model to flex, laterally rotate and abduct the hip whilst also flexing the knee. Apply resistance to the movement at the heel. You can now palpate the long strap-like muscle crossing the thigh from the anterior superior iliac spine above to the medial condyle of the tibia below.
• Note. Its upper third appears to stand away from the groin region.
• ‘Tailor sitting’. The model is in the sitting position with the knees extended. Ask the model to flex both knees and hips simultaneously. This produces the ‘tailor sitting’ position. Sartorius [sartor (L) = tailor] can be observed and palpated during this action.
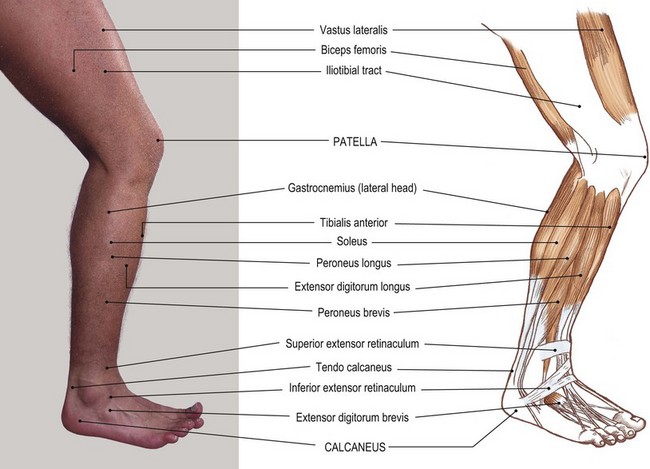
The anterior and lateral aspects of the leg and foot
The muscles in the anterior compartment of the leg are somewhat easier to identify than those in the corresponding aspect of the forearm. Even so, differentiation is easiest where the tendons pass over the front of the ankle joint. Consequently, palpation should begin here.
Palpation
• Tibialis anterior. The model is in the supine lying position with the foot dorsiflexed. Find the most medial tendon, that of tibialis anterior (Fig. 3.21). Although it lies deep to the superior and inferior extensor retinacula, you will find it easy to feel. Distally, trace it to its insertion on the medial cuneiform and base of the first metatarsal bones.
• Note. Proximally, the strong tendon gives way to a firm but narrow muscle which fills the space lateral to the anterior border of the tibia. The muscle is contained within strong fascia and becomes particularly hard on contraction. There is often a narrow space between the muscle and the tibia anteriorly.
• Extensor hallucis longus (Fig. 3.21c, d). Palpate the tendon which lies lateral to tibialis anterior. It stands clear of the joint and you can trace it across the medial side of the foot to the great toe. Ask the model to extend the toe and follow the tendon to its insertion into the base of the distal phalanx. Proximally, the tendon is soon lost between the other muscles. If you trace the line of the tendon to the middle of the fibula, however, you can feel the muscle contracting deep to extensor digitorum longus.
• Extensor digitorum longus (Fig. 3.21a–d). Identify the tendon where it lies lateral to the tendon of extensor hallucis longus. Palpate the tendon immediately distal to the ankle where it divides into four separate tendons. Trace these to the dorsal surface of the lateral four toes.
• Note. Occasionally, when the toes are flexed at the metatarsophalangeal joint, you can feel the tendons as they ‘bowstring’ across the joint. Proximally, the tendon soon becomes muscular, extending superiorly as far as the superior tibiofibular joint, lying between tibialis anterior medially and the fibula laterally.
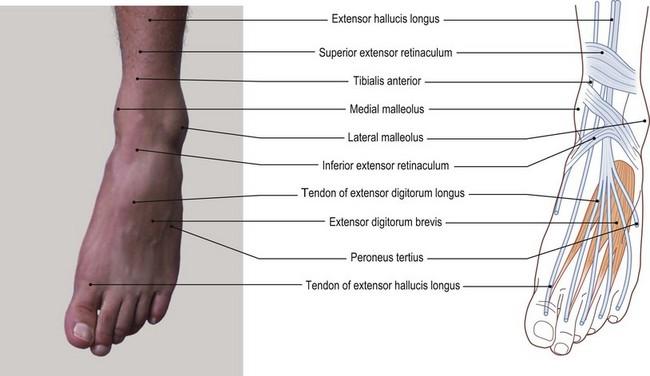
Peroneus tertius
Although this small muscle is named as one of the peroneal muscles, peroneus tertius is considered to be part of the extensor digitorum longus, in fact its fifth tendon. This is because it arises from the lower third of the fibula in line with, and passes under, the superior extensor retinaculum and through the loop of the inferior retinaculum, with, and lateral to, the extensor digitorum longus. Unlike extensor digitorum longus, however, it does not insert into the digits but into the medial side of the dorsal surface of the base of the fifth metatarsal. In a small percentage of subjects the muscle is absent.
Palpation
• Peroneus tertius. From the base of the fifth metatarsal, draw a line from its medial side towards the lower quarter of the shaft of the fibula. Ask the model to evert the foot. You will find it easier to palpate the tendon along this line.
• Extensor digitorum brevis (Fig. 3.21). Identify this muscle as a large swelling some 2 cm anterior to the lateral malleolus on the dorsolateral aspect of the foot. Palpate the four narrow tendons, leaving its distal aspect passing towards the medial four toes. In the second, third and fourth toes the tendons join those of extensor digitorum longus, while in the great toe the tendon passes to the lateral side of the proximal phalanx.
The posterior and plantar aspects of the leg and foot
Palpation
• Popliteus. This muscle lies deep within the popliteal fossa high up on the posterolateral aspect of the knee joint. You can, however, palpate its tendon as it passes below the lateral epicondyle of the femur. The model is sitting with the knee flexed to 90°. Place the tips of your fingers on the lateral surface of the femoral condyle just below and in front of the lateral epicondyle. Ask the model to rotate the leg medially at the knee joint. Now palpate the tendon of popliteus as it runs forwards, in a groove, towards its femoral attachment.
• Note. The belly of popliteus is difficult to palpate as it lies deep within the popliteal fossa.
Triceps surae (calf)
The posterior aspect of the leg is dominated by the calf muscles: gastrocnemius and soleus. Gastrocnemius is more superficial; soleus is deep. Together they are attached distally by the tendo calcaneus to the posterior surface of the calcaneus. The two muscles, however, arise from different bones. Gastrocnemius arises from the femur: its medial head from the upper part of the medial condyle and its lateral head from just above the lateral epicondyle. Soleus – whose name is believed to derive from a flat fish, the sole – arises below the knee joint from the posterior surfaces of the tibia, fibula and interosseous membrane.
Plantaris, when present, passes lateral to medial, from the upper part of the lateral condyle of the femur downwards, between gastrocnemius and soleus, to attach to the medial side of the tendo calcaneus.
Palpation
• The tendo calcaneus. The model is in the standing position. Begin at the posterior aspect of the heel, where you can easily palpate the broad tendo calcaneus, which attaches to the calcaneus. Follow the tendon upwards for some 8 cm as it narrows to a width of approximately 1 cm, after which it rapidly widens into an aponeurosis about 8 cm wide.
• The muscle fibres of gastrocnemius. Palpate these fibres attaching to the superficial surface of the aponeurosis.
• The bellies of gastrocnemius (Fig. 3.22). Palpate the two large bellies. The medial and longer belly stretches to the medial femoral condyle; the lateral belly stretches to the lateral femoral condyle. The two bellies are separated by a faint vertical line which you can easily palpate in a well-developed calf.

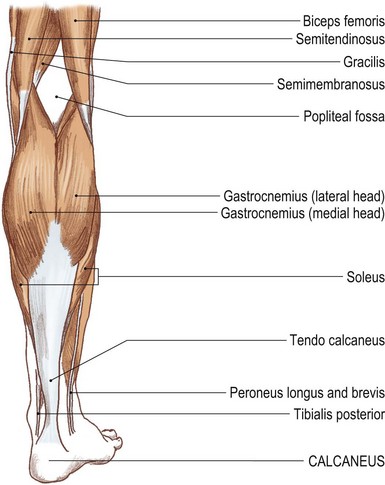
Soleus lies deep to gastrocnemius. Its fibres contribute to the deep surface of the tendo calcaneus. Its upper attachment is to the posterior aspect of the tibia (soleal line) and to the head and shaft of the fibula. The muscle belly is broad and thick.
Palpation
• Soleus (Fig. 3.22). As soleus is primarily a postural muscle, preventing the tibia from tilting forwards in the standing position, you will find it is easier to palpate when the model is in standing. First locate the broad aponeurosis of the tendo calcaneus where it joins the muscle fibres of gastrocnemius. Now run your fingers to the outer borders. Immediately adjacent is the muscle belly of soleus, bulging either side and deep to the aponeurosis.
• Gastrocnemius. Ask the model to raise the heel. Palpate the contracting muscle fibres of gastrocnemius.
• Soleus. The model is in the supine lying with the hip and knee flexed. Now ask the model to plantarflex the foot. Palpate the contraction of soleus while gastrocnemius remains relaxed.
• Note. This muscle remains relaxed because the upper (femoral) and lower (calcaneal) attachments of gastrocnemius are brought closer together, shortening the muscle and essentially preventing it from contracting. This is known as ‘muscle insufficiency’.
Tibialis posterior
This muscle is situated deep in the posterior aspect of the leg. It attaches, proximally, to the lateral section of the posterior surface of the tibia, the interosseous membrane and the medial section of the posterior surface of the fibula and the covering fascia. After passing downwards and medially it forms a tendon, which passes, in conjunction with that of flexor digitorum longus, in a groove behind the medial malleolus. The tendon then passes forwards and downwards to attach to the medial and undersurface of the tubercle of the navicular. From here, fibrous slips pass under the foot to attach to the plantar surface of many other bones.
The peronei: peroneus longus and brevis
These muscles are situated on the lateral aspect of the leg.
The upper attachment of peroneus longus is from the head and upper two-thirds of the lateral surface of the fibula. The upper attachment of peroneus brevis is to the lower two-thirds of the lateral surface of the fibula. The upper part overlaps, anteriorly, the lower third of the origin of peroneus longus. Each muscle also attaches to the surrounding intermuscular septa. Both tendons pass vertically downward to pass behind the lateral malleolus in a common sheath. Peroneus longus then passes forward to groove the under part of the peroneal trochlea (tubercle), being held in place by a fibrous sheath. The tendon then passes to the lateral side of the cuboid bone, grooving its lateral border. It changes direction to pass medially and forwards under the foot, finally attaching to the lateral side of the base of the first metacarpal and adjacent part of the medial cuneiform bone.
The tendon of peroneus brevis also passes behind the lateral malleolus downwards and forwards, grooving the upper part of the peroneal trochlea, being held in place by fibrous tissue. It finally attaches to the lateral side of the tubercle on the base of the fifth metatarsal.
Palpation
• The tendons of peroneus longus and brevis. Locate the posterior part of the lateral malleolus. Ask the model to evert the foot. You will easily be able to locate both tendons. Continue to trace downwards where the tendons can be identified, not quite as easily, passing forwards and downwards. Note that peroneus longus lies posterior and passes below the peroneal trochanter to the lateral side of the cuboid while peroneus brevis passes above the peroneal trochlea forwards and downwards to attach to the tubercle of the fifth metatarsal.
• The muscle bellies of peroneus longus and brevis. Now trace up the tendons to the lateral side of the fibula, where you can identify the bellies of both muscles.
• Note. The tendon of the peroneus longus cannot be palpated as it passes under the foot.
The plantar muscles (Fig. 3.23)
The plantar surface of the foot is covered centrally by a thick dense layer of fascia known as the plantar aponeurosis. This is triangular in shape. It is narrower posteriorly, where it attaches to the calcaneus, and broader anteriorly, where it splits to attach to either side of the proximal phalanx of each toe. It gives the central portion of the plantar aspect of the foot a pale appearance. The heel, lateral border and under the metatarsal heads are darker and covered with harder skin as a result of weight-bearing.
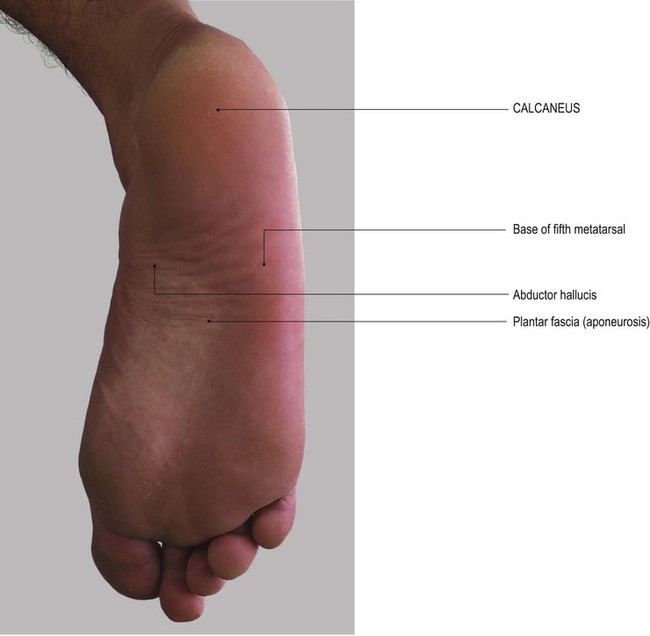
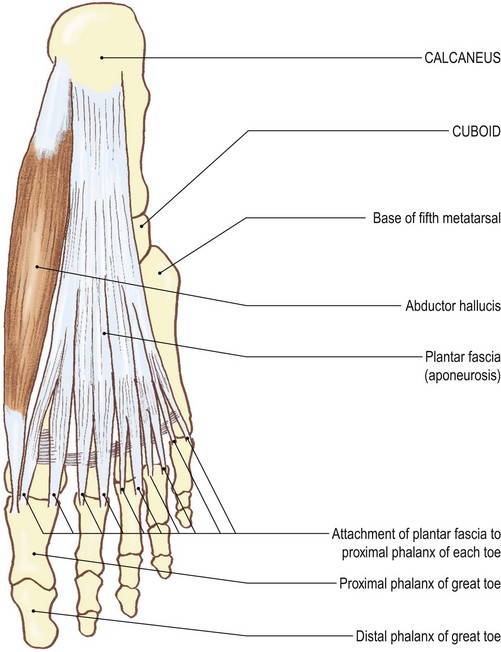
The plantar muscles are arranged in four layers deep to the plantar fascia and are relatively easily recognized on dissection. The deepest muscles are the shortest, whereas those just deep to the plantar aponeurosis are the longest. All of these muscles, except abductor hallucis, are impossible to palpate due to the thickness and tension of the fascia.
Palpation
• Abductor hallucis 1. Only abductor hallucis is easily recognizable on the medial side of the foot. Some subjects may be able to abduct the great toe. In this case, you can palpate the belly of abductor hallucis along the medial border of the foot. The broad fusiform-shaped muscle belly passes forwards from the medial tubercle of the calcaneus, continuing as a tendon to the medial side of the proximal phalanx of the great toe.
• Abductor hallucis 2. If abduction of the great toe proves difficult, ask the model to shorten the foot whilst in standing and weight-bearing position. This produces a powerful contraction of the muscle which you can palpate.
• Note. This is most probably the muscle’s main functional activity.
• Abductor hallucis 3. Palpate the bulk of the muscle in its posterior section, with the relatively thick tendon distinct in its anterior half inserting into the medial side of the base of the proximal phalanx of the great toe. Ask the model to extend the toe. Now palpate the medial edge of the plantar fascia as it is being stretched.
• Note 1. The use and type of footwear, if any, habitually worn, together with the activities and weight of the subject, will influence the structure and appearance of the foot. There is usually a thickening of the fascia and hardening of the skin over weight-bearing areas. These are normally over the heel, lateral border of the foot and heads of the metatarsals, particularly the first and fifth.
• Note 2. The amount of the sole of the foot which is in contact with the supporting surface is inversely proportional to the height of the plantar arches. The medial side of the foot is rarely in contact with the ground, except in subjects who have extremely flat feet. Anteriorly, the metatarsal heads are normally in contact with the ground. They may show a downward convexity which produces areas of hardened skin (callus) under the second, third and fourth metatarsal heads.
Nerves (Fig. 3.24)
The nerves of the lower limb are normally deep within the tissues and are thus extremely difficult to palpate. Nevertheless, it is important to be aware of their location and to be able to palpate those that venture close to the surface.

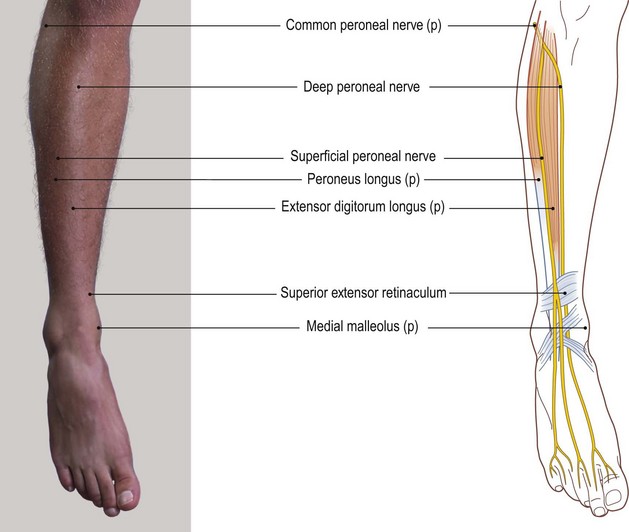
Fig. 3.24 (c, d) Branches of the common peroneal nerve of the right leg, anterior aspect (p, palpable)
The whole of the lower limb is supplied from the lumbar, sacral and coccygeal plexi. The lumbar plexus derives its fibres from T12, L1, L2, L3 and L4 roots. The sacral (lumbosacral) plexus derives its fibres from L4, L5, S1, S2, S3 and S4. The coccygeal (sacral) plexus derives its fibres from S4 and S5. These form a complex arrangement of nerves, most of which are not palpable, but nevertheless remain essential knowledge for the practitioner.
The nerves of the lumbar plexus lie deep within the abdominal cavity, passing into the pelvis, medial to the ilia. They pass into the thigh, mainly above the superior pubic ramus, supplying the muscles on the anterior and medial aspects of the thigh. They also supply the skin covering these areas. It is virtually impossible to palpate any of these nerves.
Palpation
surface marking
The sciatic nerve derives its fibres from the anterior primary rami of L4 and L5 through the lumbosacral trunk, and S1, S2 and S3. It is formed in front of piriformis in the posterior part of the pelvis. It emerges from the pelvis through the sciatic notch below piriformis and deep to the gluteus maximus. It is the largest peripheral nerve in the body.
• The sciatic nerve. Trace its course as it runs vertically down the back of the thigh, deep to biceps femoris, having emerged from below piriformis approximately halfway between the greater trochanter of the femur and the ischial tuberosity. About two-thirds of the way down the thigh, it splits into its terminal branches: the tibial and common peroneal nerves (Fig. 3.24a–d).
• Note. Although it is difficult to palpate the nerve directly, pressure applied over the area of its course can cause considerable discomfort.
• The tibial nerve (Fig. 3.24a, b) continues through the popliteal fossa to enter the calf deep to gastrocnemius and soleus where it lies between superficial and deep groups of muscles.
• Note. The tibial nerve is difficult to palpate in this region, although an unpleasant sensation can be produced if you apply excessive pressure. In the lower third of the leg the tibial nerve becomes medial to the tendo calcaneus and continues to the space behind the medial malleolus where you can palpate it. Trace it proximally into the leg and distally into the foot, where it almost immediately divides into the medial and lateral plantar nerves. These terminal branches soon become too deep to be palpated.
• The common peroneal nerve, the lateral terminal branch of the sciatic nerve, enters the popliteal fossa. It passes down the medial side of the tendon of biceps femoris. Here you can palpate it passing behind the head of the fibula and as it winds forwards around the neck (Fig. 3.24). It then splits into superficial and deep branches.
• The common peroneal nerve. The model is in the prone lying position. Ask the model to semiflex the knee. Now locate the tendon of biceps femoris as it passes down to the head of the fibula, posterolateral to the knee. You will find the common peroneal nerve below the level of the knee joint, just medial and deep to the tendon of biceps femoris, passing behind the head of the fibula and winding forwards around the neck (Fig. 3.24). It is easier to palpate posteriorly but more difficult anteriorly as it becomes covered by peroneus longus and tibialis anterior.
• The deep peroneal nerve. This nerve lies deep within the anterior compartment of the leg and is impossible to palpate until it crosses the anterior aspect of the ankle joint between the tendons of extensor hallucis longus and extensor digitorum longus. First find the anterior tibial pulse on the front of the ankle joint between extensor hallucis longus and extensor digitorum longus. The nerve runs just lateral to this, but it is difficult to find as it lies deep to the superior extensor retinaculum.
• The superficial peroneal nerve. You can palpate this nerve passing over the anterolateral aspect of the ankle, just medial to the anterior border of the lateral malleolus. Trace it proximally for approximately 5 cm to where it emerges from between peroneus brevis and extensor digitorum longus. Trace it distally on to the lateral side of the dorsum of the foot, dividing into fine terminal cutaneous branches (Fig. 3.24c, d).
Although the nerves to the skin are not palpable, the areas supplied are normally superficial to the muscles lying deep below. For further information, refer to Anatomy and Human Movement (Palastanga et al 2002).
Arteries (Fig. 3.25)
As in the upper limb, most of the large arteries are located deep within the tissues and are normally difficult to palpate.
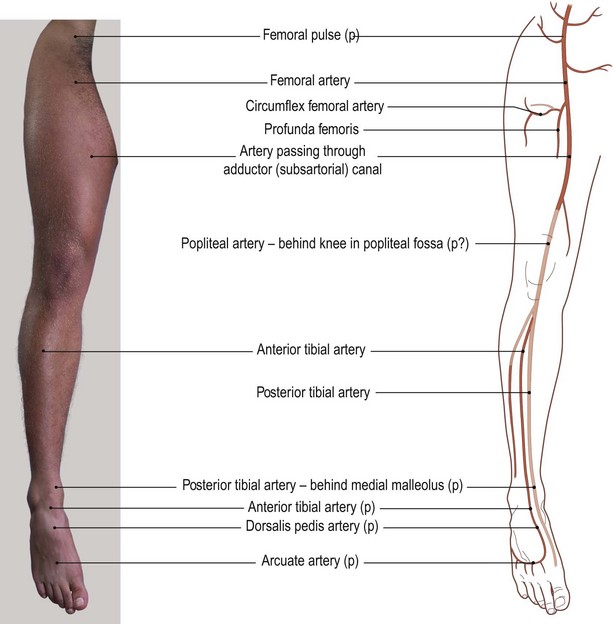
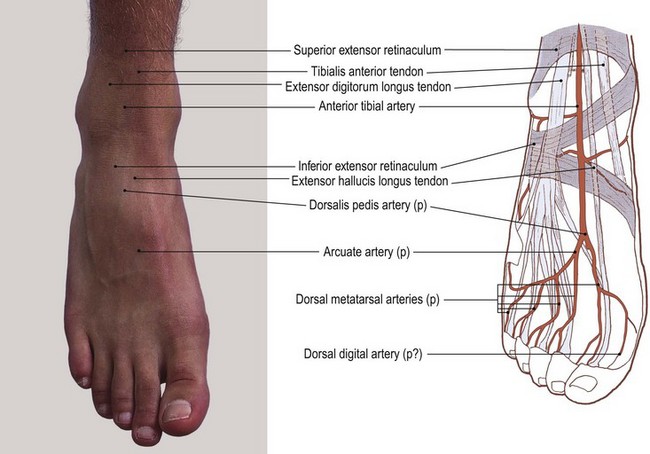
Palpation
• The pulsation of the femoral artery. The model is in the supine lying position. Palpate this artery in the groin just below the mid point (halfway between the anterior superior iliac spines and the pubic tubercle) below the inguinal ligament directly anterior to the head of the femur at the hip joint. Above, the vessel lies within the abdomen and below it is hidden by fascia as it lies in the femoral triangle on the proximal anteromedial aspect of the thigh.
• The popliteal artery. Just above the knee the femoral artery passes through the opening in adductor magnus (adductor hiatus) lying deep to sartorius in the adductor (subsartorial) canal to enter the popliteal fossa, becoming the popliteal artery. By applying deep, but sensitive pressure, you can palpate this artery as it crosses the back of the knee joint. You will find it easier to identify if tension of the superficial tissues is reduced by asking the model to bend the knee to about 45°.
• Note. Success in palpation is largely dependent on the amount of fat within the fossa and, in reality, it is extremely difficult to find. This is, therefore, a good region in which to practise the careful use of the fingers in palpation of pulses.
As the popliteal artery enters the calf, it divides into the anterior and posterior tibial arteries. The anterior tibial artery passes over the main section of the interosseous membrane and below the most superior fibres (see p. 109), into the anterior compartment of the leg, deep to the anterior tibial muscles. The posterior tibial artery passes down the back of the leg deep to gastrocnemius, soleus and plantaris (triceps surae).
• The anterior tibial artery. Palpate this artery as it crosses the anteromedial aspect of the ankle joint between the tendons of extensor hallucis longus and extensor digitorum longus where it lies medial to the deep branch of the common peroneal nerve. With care, you can trace it down to the space between the first and second metatarsals where it passes into the plantar aspect of the foot between the two bones.
• The dorsalis pedis artery (Fig. 3.25a–d). Beyond the extensor retinaculum the anterior tibial artery is called the dorsalis pedis and is commonly the point at which the arterial supply is checked. You must be careful not to palpate too distally as the artery will have already passed through to the plantar aspect of the foot.
• The arcuate artery. This is a continuation of the dorsalis pedis artery. You will be able to palpate this artery on the dorsum of the metatarsals if there is a good blood supply to the foot.
• The posterior tibial artery (Fig. 3.25a, b). This artery crosses the ankle joint behind the medial malleolus between the tendons of flexor digitorum longus and flexor hallucis longus, medial to the posterior tibial nerve. Although it is quite clear as it crosses the ankle joint, it is difficult to trace into the medial side of the foot and the lower part of the leg.
It is important to practise finding these arterial pulses, as they give a good indication of the competence of the blood supply to the lower limb.
Veins (Fig. 3.26)
The arrangement of veins in the lower limb is similar to that in the upper limb (see p. 66–68) There are two main systems: deep, accompanying the arteries; and superficial, contained within the superficial fascia. All veins of the lower limb possess valves which facilitate central venous return. The valves in the communicating vessels normally only permit blood to flow from the superficial to the deep system.
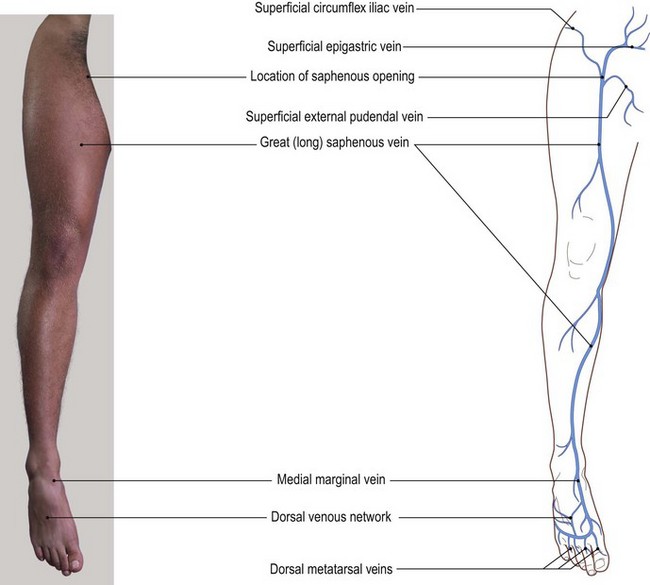
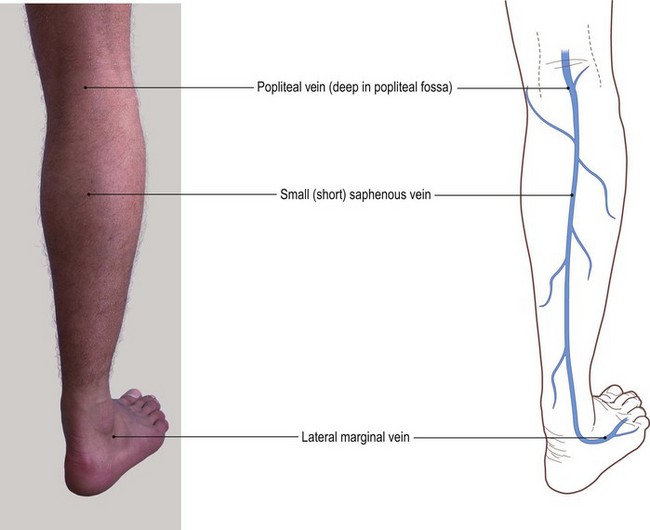
The deep veins
The smaller arteries are normally accompanied by two small veins (venae comitantes), one on either side of the artery. The larger arteries are usually accompanied by a single large vein of approximately the same diameter as the artery. None of the deep veins can be palpated.
The superficial veins
In normal subjects most veins are difficult to see or palpate, except in the distal part of the leg and on the dorsum of the foot.
Palpation
• The network of veins on the dorsum of the foot. The model is in the standing position. Note that the network of vessels on the dorsum of the foot appear blue and raised. You may have difficulty palpating them. One vein on either side of the network appears to be slightly larger than the rest; these are termed marginal veins.
The great or long saphenous vein (Fig. 3.26a, b) begins on the medial side of the dorsal venous network as a continuation of the medial marginal vein. It passes proximally in front of the medial malleolus, along the medial side of the calf and crosses the knee joint just posterior to the medial condyles of both the tibia and femur. The vein then ascends on the medial side of the thigh to join the deep system (femoral vein) after passing through the saphenous opening which lies below the mid point of the inguinal ligament immediately medial to the pulsations of the femoral artery (see Fig. 3.25a, b).
Palpation
• The great (long) saphenous vein. You will normally only be able to palpate the lower part of the vein as it lies deep within the superficial fascia. The model is in the standing position. Find the medial marginal vein (the major vessel on the medial aspect of the dorsum of the foot). Brushing the skin surface with your fingertips, move up anterior to the medial malleolus. Above this level, you can feel the vein passing up the medial aspect of the calf. Trace it posteromedial to the knee. Here, it soon disappears as it enters the thigh. In some individuals it can be seen in the thigh as a bluish line running upwards towards the mid point of the groin.
The small (short) saphenous vein. Beginning on the lateral side of the dorsal venous network as a continuation of the lateral marginal vein, the small or short saphenous vein passes behind the lateral malleolus and up the lateral side of the tendo calcaneus to the posterior aspect of the calf. It pierces the deep fascia in the lower part of the popliteal fossa to join the deep popliteal vein (Fig. 3.26c, d).
Palpation
• The small (short) saphenous vein. The lateral marginal vein is a little more difficult to recognize than the medial. You can trace it along the lateral side of the dorsum of the foot, but its continuation is difficult to palpate behind the lateral malleolus. The section between the lateral malleolus and the popliteal fossa may be difficult to palpate. After a long period of standing, however, it usually becomes quite visible and therefore more easily palpable.
• Note. In some individuals, particularly in elderly subjects, a network of vessels can be palpated on the medial side of the leg and thigh, which roughly follow the course of the great saphenous vein. Most of these join with the great saphenous vein along its length.