4 Extraction of teeth
ASSUMED KNOWLEDGE
It is assumed that at this stage you will have knowledge/competencies in the following areas:
If you think that you are not well equipped in these areas, revise them before reading this chapter or cross-check with texts on those subjects as you read.
INTENDED LEARNING OUTCOMES
At the end of this chapter you should be able to:
CLINICAL AND RADIOGRAPHIC ASSESSMENT
Not all extractions are straightforward; sometimes teeth fracture or there is risk of damage to adjacent structures during the process. It is important to attempt to evaluate, before the extraction, the likely degree of difficulty and the chances of adverse events. This maximizes the chance of things going according to plan.
History
A patient may give a history of previous difficult extractions, anxiety or wound healing problems. They may describe medical factors interfering with their fitness to undergo the procedure under local or general anaesthesia, such as severe ischaemic heart disease. Valvular heart disease and anticoagulation therapy require special precautions. Some medical factors indicate risks of local problems (e.g. leukaemia and risk of infection, or osteogenesis imperfecta and risk of fracture).
Clinical examination and radiographic assessment
Look for signs of limited access, as occurs with severe temporomandibular joint disease, burn scars around the lips or a restricted view due to abnormal tooth position or crowding. Teeth so displaced from the arch that forceps cannot be applied in the conventional way may be more difficult to remove. Incompletely erupted teeth require a transalveolar approach.
Increasing age is associated with more dense, inelastic bone, a greater risk of ankylosis and brittle teeth due to secondary dentine deposition. These increase the difficulty of tooth extraction.
A bulky alveolus and severe attrition (particularly of posterior teeth) are associated with difficult extractions. Cervical abrasion cavities, extensive restoration and clinically evident fractures all predispose to fracture during extraction. Extensive caries, especially at the site of application of the forceps beaks, also makes fracture more likely.
Radiographs may show extensive caries, large restorations, root-filled teeth (all of which may make fracture more likely) and also demonstrate bulbosity, curvature and other abnormalities of the root not visible clinically. The loss of bone due to periodontal disease, or increased density, influences ease of extraction. Also, if the tooth is likely to be in close relation to the inferior alveolar nerve or maxillary antrum it is important to assess that relation in advance.
Should you take a radiograph for every tooth to be extracted? No. But radiographs are indicated in the following circumstances:
Check that the extraction is appropriate
The consent of the patient must be obtained before any procedure, and it is usual to record this consent in writing. It is not possible for a patient to consent to a procedure unless they know what is being proposed and its likely implications. For this reason careful assessment, as outlined earlier, is essential. A clear diagnosis must be made.
Teeth may be taken out for a number of reasons:
Teeth should not be extracted unless, following appropriate clinical and radiographic investigation, a satisfactory diagnosis and treatment plan have been reached and agreed with the patient.
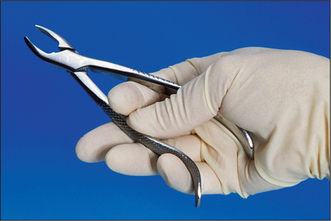
EXTRACTION FORCEPS: HOW THEY WORK AND HOW TO SELECT THEM
The application of fingers alone would not produce sufficient controlled force to remove teeth. Forceps enable the practitioner to grasp a tooth firmly and apply leverage to it in any direction.
The design of forceps has remained remarkably constant over many years: it is difficult to improve on the basic shapes. All forceps consist of two blades and handles joined at a hinge. The inner aspects of the blades are concave to fit the root accurately; they should not touch the crown of the tooth. The blades have sharp edges to cut periodontal ligament fibres and are wedge-shaped to dilate the socket. The blades are applied to the buccal and lingual aspects of the root. There are many designs, but for the purpose of this book we will restrict discussion to those most commonly used.
Forceps for upper teeth
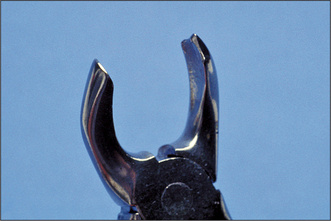
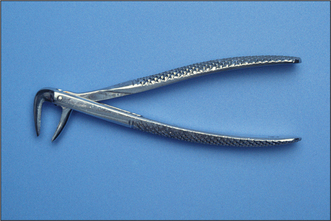
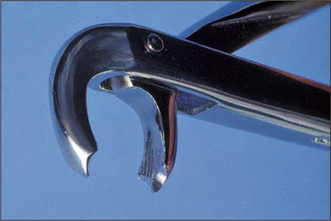
Forceps for extracting upper anterior teeth are of a simple design (Fig. 4.1). The handles are straight and 12–14 cm long, joined at a hinge to the beaks, which are 2–3 cm long. The handles are contoured on their outer surface to allow a good grip. The beaks are both concave on their inner aspect (Fig. 4.2), shaped to fit around the root of the tooth as closely as possible (Fig. 4.3) when the forceps are applied in the long axis of the tooth. The beaks are applied labially and palatally. All extraction forceps can be seen as modifications of this basic design.
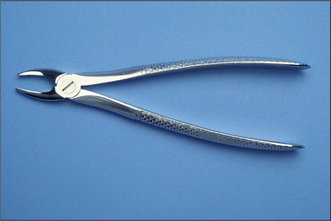
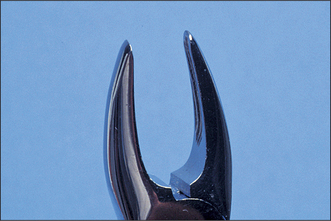
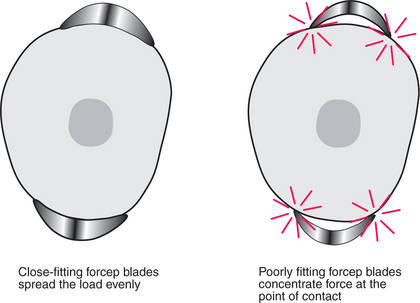
Fig. 4.3 Fit of the beaks of upper straights around a tooth root. If the blades fit closely around the root, the load will be evenly distributed (left). If there is a poor fit, the load will be concentrated at the points of contact (right).
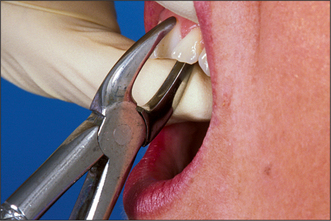
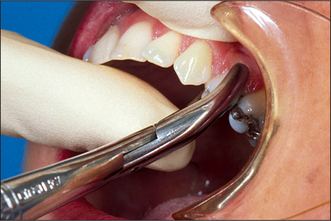
These forceps can be applied to the long axis of anterior teeth, gaining access by the patient opening their mouth fairly widely (Fig. 4.4). However, if one were to attempt to use these forceps on an upper first premolar, there is a risk of traumatizing the lower lip. Forceps for use in the upper jaw further back than the canine have a curve in the beak (Fig. 4.5), which keeps them above the lip when they are in the long axis of the tooth. The beaks of these forceps are also concave on their inner aspect to fit the root of upper premolars.
These forceps could be used to extract posterior teeth, but for teeth with multiple roots, forceps are available with beaks specifically designed to fit complex root forms (Fig. 4.6). In principle, the more closely the beaks are adapted to the roots, the more widely the forces of extraction are distributed and the lower the likelihood of tooth fracture. The buccal beak has a point to fit into the bifurcation, with concavities on either side to fit around the buccal roots and a broader concave palatal beak. Because of this distinction between buccal and palatal beaks, there must be separate designs for left and right sides of the mouth.
For all upper extractions it is necessary to push firmly in the long axis of the tooth during extraction (see p. 32). For this reason many forceps for upper posterior teeth have a curve at the end of the handle (‘Read pattern’) so that they fit in the palm of the hand (Fig. 4.7). This inevitably means that such forceps must have separate designs for right- and left-handed operators (Fig. 4.8).
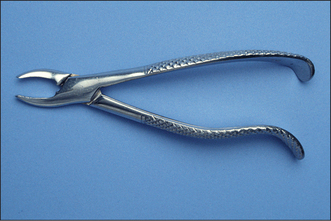
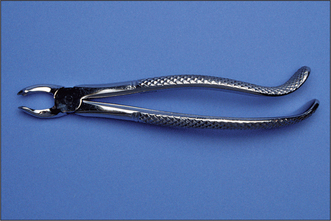
Fig. 4.8 Upper left molar forceps for left-handed use.
Compare the handle shape with that in Fig. 4.7.
Access for extraction of teeth far back in the mouth can be difficult. A further variation involves a step in the beaks of the forceps (Fig. 4.9), which enables you to put the beaks on the upper third molar whilst avoiding the lower lip.

Forceps for lower teeth
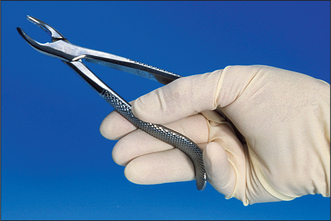
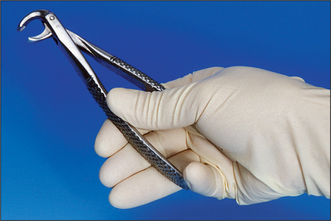
If you were to attempt to apply upper anterior forceps to a lower anterior tooth you would have difficulty in getting past the nose and upper alveolus. In the UK it is usual to overcome the problem by using forceps with a right-angled bend in them; this permits the handles to come straight out of the mouth when the beaks are in the long axis of the tooth (Fig. 4.10). The beaks of these simple forceps are similar to those used on upper anteriors. Such forceps can be used effectively on all lower teeth, from second premolar to second premolar.
Just as with the forceps for upper teeth, beak design has been modified for multiple-rooted teeth. Full molar forceps have a point and two adjacent concave facets on both buccal and lingual beaks (Fig. 4.11).
Other variations
The upper and lower premolar-style forceps are available with narrower beaks for teeth with very small roots, such as lower incisors, or for single retained roots of multi-rooted teeth. They are designated with the suffix ‘N’ (for narrow) on their catalogue number. The narrow variant of the upper straight forceps is designated ‘S’ (for small), but there is a broad, short variant for canines also denoted ‘S’.
Smaller versions of forceps are available for use on deciduous teeth, which some operators like to use to access lower third molars where vertical space is at a premium.
Forceps designed to actively lift multi-rooted teeth out of their sockets by forcing pointed blades beneath the bifurcation (‘cowhorns’) do not allow the tooth to be firmly grasped and carry a small risk of fracturing the jaw by forcing roots apart if the tooth does not move. Similar forceps have been designed with beaks to cut or fracture a molar tooth (‘eagle beaks’). The potential risk associated with the use of these instruments makes them unsuitable for beginners: they should be used, only with great care, by the experienced operator.
Practitioners in the USA use forceps, the handles of which enter the mouth from the front, to extract lower teeth. This results in a very different extraction movement.
HOW TO HOLD FORCEPS TO BEST EFFECT
During all extractions it is necessary to push the forceps firmly towards the apex of the tooth. For maxillary teeth this is achieved by pushing on the end of the handle. In order to maintain that position, the end of the handle must rest centrally in the palm of the hand, with the wrist held straight (Fig. 4.12). The first three fingers are placed around the handles and initially the little finger is placed between the handles to help hold them apart. The little finger can be brought around the handle once the forceps are thoroughly applied. The thumb is braced on the handle but not placed around it—that could produce too great a compressive force and tends to misalign the instrument in the hand. The thumb should not be placed between the handles as this also misaligns the instrument and tooth breakage during extraction risks injury to the thumb.
For mandibular extraction the position of the forceps is very similar (Fig. 4.13), but it is not necessary to push in the long axis of the forceps, so rigid adherence to keeping the end of the handle in the palm is less important. Nevertheless, the further the hand is from the hinge and beaks, the greater will be the leverage applied, and the lower the amount of interference of the hand with the patient’s face.
HOW TO POSITION YOURSELF AND YOUR PATIENT
The positioning outlined below is intended for extraction in a patient who is sitting up or partly supine and for an operator who is standing. It is perfectly possible to extract teeth low-seated, in the fully supine patient, but novices should start as shown here and modify the techniques for low-seated work later if they desire. The description assumes a right-handed operator, but a mirror image of the technique can be employed by left-handers.
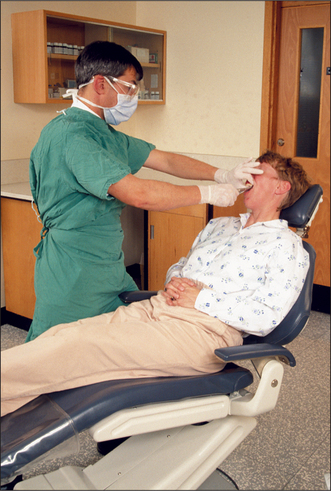
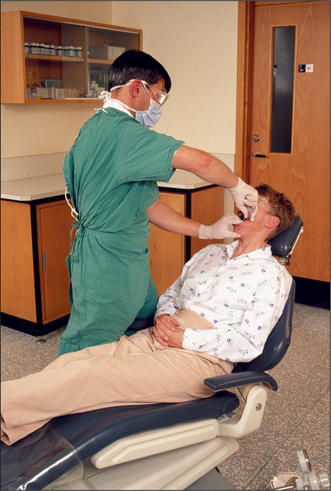
Extraction of maxillary teeth
The positioning is determined by the need to push in the long axis of the tooth. The operator stands in front and to the right of the patient (Fig. 4.14). The operator’s legs should be spaced so that it is possible to push hard with the right leg which should be to the rear and straight. The left leg should be forward and slightly bent. Both feet should be close to the chair and pointed towards the patient’s head. The back should be kept straight. The patient should be tipped back by about 30° so that the surgeon can see directly into the mouth. The height of the chair should be adjusted so that the tooth to be extracted is about at the height of the operator’s elbow. The patient’s head is tipped just far enough to their right that access to the tooth is comfortable.
Extraction of mandibular teeth
For teeth in the lower left quadrant, the operator stands much as for maxillary extractions (Fig. 4.15), but the patient can be placed a few inches lower. When the operator’s back is straight and the forceps are applied to the tooth, both of the operator’s wrists should be in a comfortable neutral position. This will be helped if the patient turns slightly toward the operator.
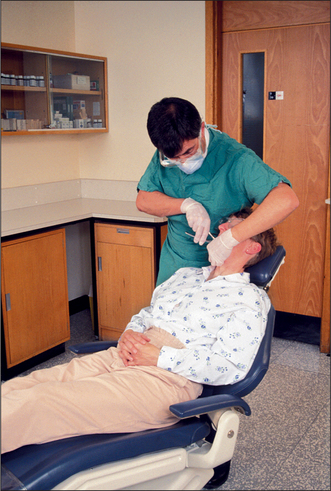
For teeth in the lower right quadrant the operator stands behind the patient (Fig. 4.16) but beside the head, usually on the patient’s right (occasionally, depending on the angulation of the tooth, it is more comfortable to stand on the other side). The chair can be tipped further back than for the maxillary teeth (maybe as much as 45°) and its height can be a little lower than when standing in front for the left side. There is little advantage in spreading the legs widely; for this extraction one is pushing down.
The supporting hand
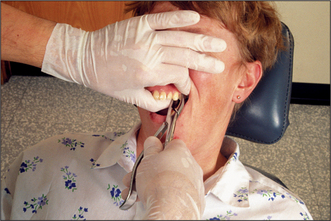
The left hand is used to support the jaw and stabilize it during extraction. It also holds soft tissue out of the way to permit good vision. For maxillary teeth, the index finger and thumb are placed either side of the alveolus adjacent to the tooth to be extracted (Fig. 4.17). This usually requires the elbow to be up in the air. The remaining fingers are either kept straight or bunched tightly, so that they do not rest hard against the face or eyes.
For extractions in the mandible two fingers and the thumb are used (Fig. 4.18). For the lower left this means placing the index and second fingers either side of the alveolus in the mouth and the thumb beneath the mandible outside the mouth to lift up. For the lower right use the index finger and thumb inside the mouth and the second finger beneath the jaw, supporting it.
It is important in all these manoeuvres to ensure that no soft tissues are trapped against the teeth, because this could cause pain or injury.
HOW TO REMOVE THE TOOTH WITH MINIMUM EFFORT
An extraction can be described as comprising two movements: the forceps are applied along the root of the tooth with apical pressure, then the blades are closed while maintaining the apical pressure; the second movement loosens or displaces the tooth.
A tooth is held in place by the periodontal ligament, and if that is disrupted the tooth is readily removed, provided that the shape of the surrounding bone does not prevent it. Some teeth generally have conical or near-conical roots. For these teeth, rotation around their long axis breaks the ligament and they can be lifted out.
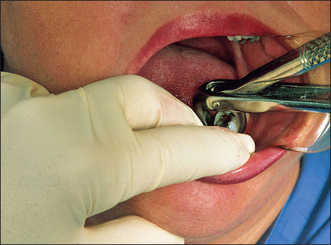
Maxillary central incisor
The action to remove a maxillary central incisor is to push in the long axis of the tooth, gently turning the forceps around the root, but not gripping it, until the forceps blades are well up the root. Then the tooth is grasped firmly (still pushing hard in its long axis) and turned around its long axis until the forceps blades almost touch the adjacent teeth. The tooth is turned in the opposite direction again until the blades almost touch the adjacent tooth. At this point the tooth can be gently delivered down through the socket. Do not pull on teeth. It is likely that some teeth will break if you do—and even if you are successful in removing the tooth, there is a chance you will damage one in the opposing arch.
Maxillary incisors and canines, mandibular premolars and canines
This rotatory action can also be applied to maxillary incisors, canines, mandibular premolars and canines. However, some care should be exercised with maxillary lateral incisors and mandibular canines, which sometimes have marked flattening of their root and may resist this movement. The approach can be extended to mandibular or maxillary third molars if they have conical roots and often also to mandibular second molars.
Mandibular incisors
Mandibular incisors usually have roots too flattened to permit this rotatory movement. For these teeth apply the forceps as described above, getting as far towards the apex as possible before grasping the tooth. Still pushing toward the apex, steadily lean the tooth toward the labial side until it just moves (about 5°). Then tip it lingually to the same degree, a little more labially and so on. Some such teeth are removed readily towards the labial side, some go more readily lingually and some respond better to some rotatory movement for delivery. Beware! Lower incisors are very close together.
Maxillary premolars
About half of maxillary first premolars have two spindly roots. These teeth should be treated similarly to lower incisors, with progressive buccolingual displacement, but once significant movement has occurred the tooth should be delivered down through the socket, not displaced a great distance to either side and certainly not rotated. Maxillary second premolars are also occasionally two-rooted and are readily removed the same way as the first premolar.
Maxillary molars
Maxillary molars are often best displaced buccally (again whilst pushing hard in the long axis of the tooth). With any multi-rooted tooth, if a root breaks it is likely to be the root on the side to which the tooth is moved. Fractured buccal roots of the maxillary molar are more accessible than palatal ones. The bone on the buccal side is also thinner and more malleable than that on the palatal side. In addition, displacement toward the palatal side usually brings the forceps rapidly into contact with the lower lip, which can be crushed.
Mandibular molars
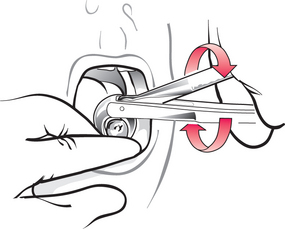
Mandibular molars can also be displaced directly to the buccal side. However, often the bone does not yield readily, leading to a very difficult extraction or a significant risk of tooth fracture. If the forceps handles are moved bodily in a ‘round and round’ (or ‘figure-of-eight’) motion (Fig. 4.19), while maintaining the relationship of the beaks to the tooth, a tooth can often be wriggled up through the socket, like taking a post out of a hole in the ground. In theory this movement must include a component of mesiodistal rocking of the tooth, which in turn must put pressure on the adjacent teeth. However, the author has not witnessed any damage done in this way.
Modifying techniques
No two extractions are the same (any more than any two people are), so it is necessary to adapt skills, considering what you are attempting to achieve and any problems that may arise. With experience you will become better at feeling the direction a tooth ‘wants’ to go. This feeling is better picked up if the tooth displacement movements are slow and deliberate. The method of tooth extraction should be modified to take account of this feel. It should also be modified if the ‘standard’ displacement would seriously risk tooth fracture. An example of this would be a maxillary molar with extensive palatal caries. Displacing this tooth buccally tends to allow the palatal beak to slip into the carious cavity, so such a tooth should be displaced palatally, taking great care of the lower lip! In general, displace the tooth toward the carious side.
WHAT IS REQUIRED AFTER THE EXTRACTION?
Bodily displacement of a tooth commonly results in outward bending (or fracturing) of alveolar bone. It is important that this bone is squeezed back into place with finger pressure after the extraction.
It is usual to place a rolled-up gauze swab over the extraction socket for a few minutes, to reduce the degree of postoperative bleeding and help to keep blood localized rather than allowing the mouth to fill up. Bleeding should have stopped in 10 minutes.
Postoperative instructions should include the advice listed in the following.
Postoperative instructions to patients
You have just had a tooth removed. Please take the time to look through these notes and keep them for reference
There is little published evidence that the general measures (such as hot salt-water mouthwashes) outlined above make much difference to healing, but they are commonly recommended throughout Britain. Each dental hospital tends to have its own guidance.
It is essential to check that bleeding has stopped before the patient leaves. The gauze should be removed from the mouth and the wound examined under a good light.
An entry should be made in the patient’s record, indicating:
THE FRACTURED TOOTH
It is not uncommon for a tooth to fracture during extraction. This may be noted from the crack heard at the time or because part is evidently missing on removal. A fractured surface is sharp edged. If there is any doubt as to how much of the tooth has fractured, a radiograph should be taken.
Because you have judged that it is appropriate to take the tooth out, it is generally appropriate to complete the extraction when part has fractured, and not simply to abandon the procedure.
However, it may be appropriate to leave part of a tooth root in situ (at least at that time) if:
There are also some additional provisos:
By choice, if the remaining piece is accessible, it should still be removed with forceps. If that is not possible, remove the root with elevators (see below).
If satisfactory access for an elevator is not available it may be made via the mucosa (a transalveolar approach, sometimes called a ‘minor surgical’ or a ‘flap procedure’).
ELEVATORS
Elevators are single-bladed instruments used as levers or wedges, placed between tooth and bone and turned around their long axis to dislodge the tooth or root. They cannot grasp the tooth and frequently can only move the tooth in one direction (away from the point of application).
There are two main classes (Fig. 4.20): straight elevators including the Coupland’s chisel (or gouge), which comes in three sizes, and the smaller straight Warwick James; angled elevators including the right and left curved Warwick James and the Cryer’s elevators.
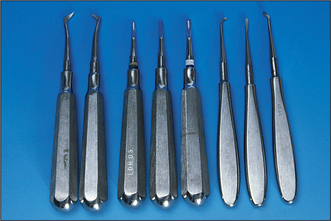
Fig. 4.20 A selection of straight and angled elevators.
From left to right: a pair of Cryer’s elevators, Coupland’s chisels numbers 1, 2 and 3, left curved, straight and right curved Warwick James elevators.
Principles
Because an elevator is used as a lever, it applies force both to the tooth to which it is applied and to the fulcrum (bone) against which it rests. If that fulcrum is another tooth that tooth could be dislodged. The elevator must rest only on the tooth to be removed, unless all the teeth that might be damaged are to be removed at the same sitting.
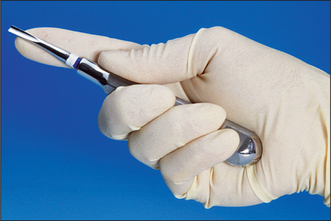
The instrument is held in the palm of the hand, with the index finger along the axis (Fig. 4.21). It is essential to maintain sound support for an elevator throughout its use. A finger rest is obtained on an adjacent tooth, alveolus or other solid structure. Without such a rest, considerable damage may be done if the instrument slips.
Elevators should be used only by rotation around their long axis. The force applied at the tip of the elevator is dependent on the force (torque) applied by the hand holding it and the ratio of the diameters of the handle and tip. The approximate ratios of handle to tip diameter are 2 for the Cryer’s, 6 for the straight Warwick James and 7 for the medium Coupland’s elevators.
For an elevator 15 cm in length, applying force to the tooth by moving the handle bodily further increases the force applied about tenfold. This makes it readily possible to apply excessive force to the jaws.
Situations in which elevators may be very effective
When one root of a lower first molar fractures a little below bone level, it is likely to be inaccessible to forceps (Fig. 4.22). A Cryer’s elevator placed intothe empty root socket and turned will lift the root out. It is important not to place the elevator too far down the socket as it merely jams. It must not rest against the adjacent tooth. If the root is still not accessible it is possible to remove about 0.25 mm of the crest of the interseptal bone at a time with the elevator, until the elevator rests on the root. The root then lifts up as the elevator is rotated.
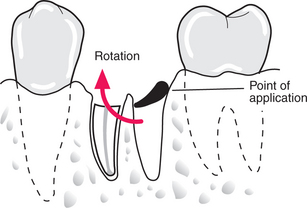
Fig. 4.22 Removal of the single retained root of a lower molar by applying the Cryer’s elevator through the empty root socket.
When a root of a lower premolar has fractured, if a flap is raised and some bone removed it is possible to make a small groove in the root and use the Cryer’s elevator to remove it (Fig. 4.23).
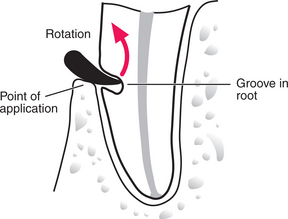
Fig. 4.23 Removal of a mandibular premolar root with an angled elevator after removal of some buccal bone and placement of a groove in the buccal aspect of the root.
For removal of retained roots of upper or lower molar teeth, grooves are made in the bone mesially, distally and in the bifurcation, after raising a mucoperiosteal flap, and a Coupland’s elevator is placed in from the buccal side to elevate each root in turn (Fig. 4.24).
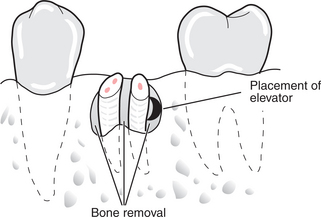
Fig. 4.24 Removal of retained roots of a lower molar.
Bone has been removed mesially, distally and between the roots. A Coupland’s elevator is placed between bone and root.
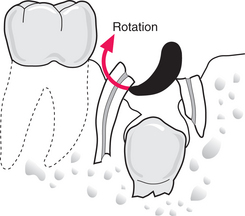
A small Coupland’s or a straight Warwick James elevator is also suitable for elevating a distoangular maxillary third molar downwards and backwards (Fig. 4.25). The curved Warwick James was designed for the purpose but it tends to move the tooth directly backwards, which may increase the risk of a fractured tuberosity.
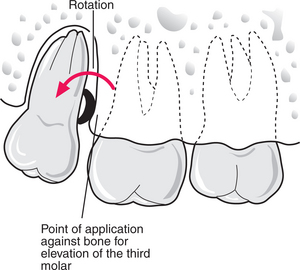
Fig. 4.25 Removal of a maxillary third molar.
The Coupland’s is placed concave face towards the tooth, but resting on bone.
The curved Warwick James is, however, ideal for elevation of the fractured roots of a deciduous molar (Fig. 4.26). The point is placed between the roots retained and over the crown of its successor. This markedly reduces the risk of displacing the unerupted tooth, which would be caused by placement of an elevator mesially or distally.
Many surgeons like to start all maxillary extractions by separating the buccal plate of bone from the tooth with a Coupland’s elevator. This can be a good way of developing the skill of handling elevators and reduces extraction forces.
The above list is only a selection of many possible uses, but elevators are not the solution to all problems. For instance, should a root of a maxillary molar fracture but be inaccessible to forceps, an elevator placed up through the socket has a very high chance of pushing the root into the maxillary antrum. Such a root is better approached surgically.
LUXATORS
Luxators look like the Coupland’s elevator, but they are not designed to be used like one. The blade is much finer and much sharper than a conventional elevator and to some degree flexible. The intended use is to incise the periodontal ligament, in order to allow removal of the tooth with little or no force and no bone damage. They have not been widely adopted. (See also comment on the Periotome, Ch. 11, p. 151.)
THE TRANSALVEOLAR APPROACH
If it is not possible to remove a tooth (or root) directly from within the socket (what might be called an intra-alveolar approach), access is made through the side of the alveolus (a transalveolar approach).
The need to cover the operative site after tooth removal is satisfied by raising a flap of mucoperiosteum to expose the tooth site at the beginning of the operation, retaining its vitality and replacing it at the end of the procedure. This reduces pain and the time taken for healing. Mucoperiosteal flaps, however, are not only raised to give access in routine tooth extraction: identical techniques are used for access to bone for any dentoalveolar disease.
Flap design
There are several principles underlying the design of a mucoperiosteal flap. The flap must:
The principles may be seen well in relation to one of the most common procedures: the surgical removal of the retained roots of a lower first molar.
In general, if the flap is extended from one tooth behind the tooth concerned to one tooth in front, including the most anterior interdental papilla on the flap (do not bisect the interdental papilla), it will be adequate in length (Fig. 4.27). If mucoperiosteum were separated away from the bone on a convex surface the attached gingiva would tear, so a ‘relieving incision’ is made extending down into the sulcus. In this case the relieving incision would extend down from the interspace between the two premolar teeth. This would breach principle 4 as the incision would run dangerously close to the mental nerve, so the flap is extended one tooth further forward. The interdental papilla between the canine and first premolar is included in the flap, which makes repair easier. This flap design is sometimes called ‘two sided’. The blood supply is not dependent on particular named ‘axial’ vessels and consequently is determined in part by the width of the base of the flap. A broad flap also gives good access.
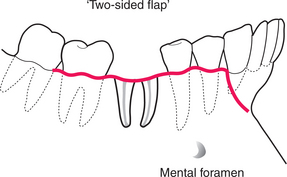
Fig. 4.27 A standard flap design for access to the roots of a lower first molar. This ‘two-sided’ flap has been extended anteriorly to include the mental nerve.
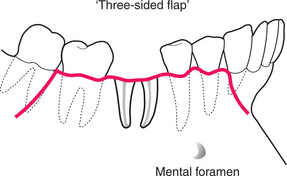
A second relieving incision may be placed posteriorly (Fig. 4.28). This does increase the access gained with relatively small flaps, but can make repositioning and suturing the flap more difficult. This ‘three-sided’ flap can be of value on the very convex anterior maxilla (for example, for surgical endodontics).
Most surgical removal of roots is performed from the buccal aspect of the ridge as this is more accessible, but on occasion it is necessary to raise a flap on the palatal or lingual side. Here there is no need for a relieving incision as the flap is displaced from a concave surface.
Surgical procedure
The scalpel is held in a pen grip, with a finger rest on a sound support. Incisions are made full thickness through mucosa and periosteum to bone and extended by cutting with the bow of the blade. A suitable list of instruments is given in Appendix A.
The gingival margin incision is made holding the scalpel in the long axis of the tooth, at the posterior extent of the flap and drawing the blade around the tooth in the gingival crevice. The sharp edge of the scalpel must be kept immediately against the tooth surface to prevent inadvertent laceration of the gingiva. Then the scalpel is turned so that the bow of the blade rests on the gingival margin just in front of the canine/premolar papilla and is drawn downwards and slightly forwards, curving into the sulcus, cutting full depth to bone. This should be extended to about the level of the apices of the teeth.
Start by turning out the interdental papillae using an instrument such as a curved Warwick James elevator, or by separating the flap from bone in the relieving incision. The most difficult part to raise is often at the mucogingival junction; this is better done last. A periosteal elevator or Howarth’s raspatory is applied firmly to the bone surface, pushed beneath the edge of the periosteum (Fig. 4.29) and worked backwards and forwards until a definite pocket at the correct plane has been made. This is extended backwards, close to the gingival margin, turning the flap outwards. It is essential to raise the flap to expose all of the area of interest (usually beyond the apices of the tooth to be removed). Although people talk of ‘raising’ or ‘lifting’ a flap, lifting movements tend to allow the dissection to occur superficial to periosteum.
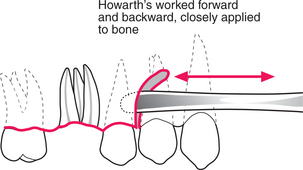
Fig. 4.29 The Howarth’s or other periosteal elevator is worked forwards and backwards, firmly applied to bone, to gain access to the subperiosteal plane.
Once reflected, the flap is held out of the way or ‘retracted’ with an instrument such as a Lack’s tongue retractor or a rake retractor. The instrument must not pull so hard as to tear the flap, or strip periosteum beyond the area required and should be kept still once it is in position.
Removal of bone to reach the roots is most commonly performed with a bur (a round tungsten carbide-tipped surgical bur is suitable), although under general anaesthesia some surgeons prefer to use a chisel. During drilling it is important that the bone is cooled with running saline, which also washes debris away from the operative site. Avoid excessive pressure and blunt burs. Also beware overheating of the drill due to worn bearings; this can result in a severe burn to the lip. Bone removal must gain access to the roots for their removal (as in Fig. 4.24). Space must be made to place an elevator next to the root and into which to displace the root. In this situation remove bone buccally to see the roots and the bifurcation; remove it distally and mesially to place elevators, and between the roots to make space into which to displace roots. This also permits division of the tooth. Divide the tooth, starting from the bifurcation and cutting occlusally. Sometimes it is not necessary to run the bur all the way through to the lingual side (which risks some damage to lingual mucosa); the roots can be split apart if the cut goes two-thirds of the way. It is wise to use the root surface to guide the bone removal; it is easy to lose your way if you come out buccally away from the tooth. Equally it is not helpful to tunnel down the side of the tooth with a bone cut only the width of the bur; that does not permit adequate vision.
An elevator such as a Coupland’s chisel is placed between the roots and turned around its long axis to split the roots. That may also permit the turning out of one root towards the buccal side and occlusally. The Coupland’s chisel is now placed on the other side of the remaining root and turned to elevate it out. Having removed the roots, smooth off grossly sharp bone, or that which has been leant on hard and devitalized and irrigate the wound with saline.
Reposition the flap and retain it with sutures. Rapidly resorbing synthetic sutures, such as polygalactin, are suitable for use in the mouth. Black silk is still a useful material when it is essential that sutures remain in place for a week or more (such as closure of an oroantral communication) or where precise tensioning is important (such as for control of postextraction haemorrhage). Sutures are placed both in the relieving incision and interdentally.
Suturing
Most wounds can be closed satisfactorily in the mouth with interrupted sutures.
The needle is held at the end of the needle holders (Fig. 4.30), at right angles to the needle holders and about one-third of the way from the hub to the tip of the needle. The edge of the flap is turned outwards with toothed dissecting forceps and the needle is placed through the flap 1–2 mm from the edge, perpendicular to the mucosal surface. The needle is then grasped on the other side of the mucosa and turned around its curvature to pull it through. The mucosa on the other side of the wound is then turned out and the needle is passed out through it, again perpendicular to the surface.
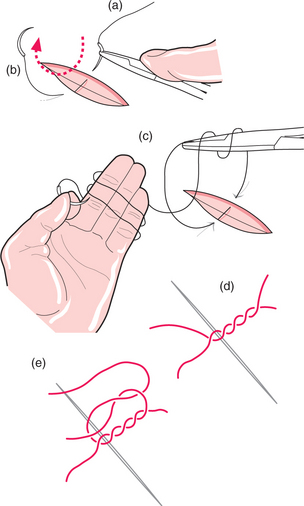
Fig. 4.30 Placement of suture.
The needle is held between finger and thumb and the suture is pulled through the tissue until the free end is about 10 cm long, gathering up excess suture by winding it around the fingers. The needle is held in the left hand and two loops are made around the needle holders held in the right. The loose end of the suture is held in the needle holders and the loops are slid off the needle holders over it. The needle holders (still holding the free end of the suture) are held close to where the suture comes through the mucosa and the needle end of the suture is firmly pulled to tighten the knot. Beware not to rest the suture on the lip as the suture is pulled: it can cut tissues like cheesewire. Now a further single loop, in the opposite direction, is made around the needle holders from the long end of the suture and again the free end of the suture is grasped, the loop slid off and the knot tightened. The ends are now cut, leaving about 5–8 mm beyond the knot.
If significant bone has been removed, or if the patient is at particular risk of infection, it is usual to prescribe an antibiotic such as metronidazole (200 mg three times daily for 5 days), as well as an analgesic such as ibuprofen (600 mg three times daily for 3 days). It is not necessary to review the patient unless problems are anticipated, but it is essential that the patient knows how to contact the surgeon in the event of problems.
COMPLICATIONS OF EXTRACTION: RECOGNITION, AVOIDANCE AND TREATMENT
A complication is any event that would not normally occur and which might increase the patient’s suffering. The range of potential complications is vast. It includes adverse events occurring locally, nearby or at distant sites, some things that occur immediately and others that occur a little later or are greatly delayed, some are rare and some frequent, some are serious and some inconsequential. There is considerable variation in the degree to which complications are predictable or preventable. The implications of adverse events are also determined in part by the patient’s expectations, the reason for surgery and the manner in which the event is managed once it is recognized.
What should you do when something does go wrong?
In Table 4.1 is an illustrative list of some complications of tooth extraction, divided according to the time and site of occurrence.
Table 4.1 Complications of tooth extraction
| Local | Regional/distant | |
|---|---|---|
| Immediate | Fractured crown, root, alveolus, tuberosity, mandible, adjacent tooth | Crushed or burnt lip; injury to inferior dental or lingual nerves; |
| Tear of gingiva, alveolar mucosa | lacerated tongue or palate | |
| Oroantral communication; fractured instrument | Swallowed or inhaled instrument or tooth | |
| Delayed | Dry socket; local infection | Spreading infection |
| Delayed or secondary haemorrhage | Myofascial pain dysfunction | |
| Osteonecrosis | Injection track haematoma | |
| Late | Alveolar atrophy | Osteomyelitis; actinomycosis |
Some complications are sufficiently common and amenable to treatment to justify further description.
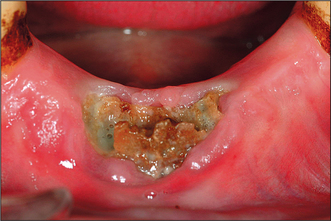
Dry socket
Dry socket (alveolar osteitis, alveolitis sicca dolorosa, infected socket) occurs after about 3% of routine extractions. It is recognized by pain at the site of extraction, often aching or throbbing in nature but remarkably constant in severity (including during the night), starting within a day or so of a tooth extraction. The pain is often resistant to common analgesics. Examination reveals a socket partly or totally devoid of blood clot with exposed, rough, painful bone (Fig. 4.31). Greyish remnants of clot may be present. The surrounding mucosa and the whole alveolus may be red, swollen and tender. Inflammation spreads through the alveolus mesiodistally, resulting in tenderness of the adjacent teeth to pressure. Occasionally a patient will believe that the wrong tooth has been extracted because of the pain in the adjacent tooth. Be aware that misdiagnosis can occur. The mouth smells and tastes foul (a smell of anaerobic bacterial activity or rotting meat). There may be a local lymphadenitis, but severe systemic response in the form of fever is rare.
If no treatment were provided the condition would eventually resolve spontaneously, but it may take up to 4 weeks and during that time the pain would persist. Similar pain is experienced whenever an area of bone is left exposed in the mouth and usually settles when the exposed (and non-vital) bone is either eventually covered by granulation tissue or is separated from the underlying bone and sequestrated. A few untreated cases of dry socket may progress to infection that spreads through the bone marrow (osteomyelitis).
There is obviously a bacterial component to this condition. Its incidence may be reduced by the prophylactic administration of metronidazole, or by the irrigation of the gingival crevice with chlorhexidine before extraction. It should be noted, however, that routine prophylactic administration of antibiotics before extraction is not justified. There are similarities to acute ulcerative gingivitis in the high spring and autumn prevalence, frequency in smokers and possible relationship to female sex hormones. However, some aspects of the condition’s behaviour are not so obviously infective in nature.
The condition is most prevalent in patients in their fourth decade. It is more common after extractions of posterior and difficult teeth and seen more often in the lower jaw than the upper. Dry socket is more likely to occur after extractions under local anaesthesia than under general anaesthesia and is less frequent after multiple extractions.
It is probable that the condition represents the outcome of a mixture of disease processes in which trauma, local fibrinolysis and bacterial clot degradation all play a part. Some patients are particularly prone to dry socket, without any other evident medical problem.
Investigation need not be extensive; the condition can usually be diagnosed confidently on clinical grounds. A radiograph is valuable, both as a baseline against which to check bone change, should there not be a rapid resolution, and to assure the dentist and patient that no root has been left behind.
Treatment of the condition is primarily symptomatic. The socket should be irrigated with warm saline to remove the debris. A variety of antiseptic dressings is available to cover the exposed bone. A proprietary, eugenol-containing, soft, fibrous paste can be tucked into the coronal part of the socket to cover the bone. It can be left in situ and is usually shed spontaneously from the socket over a few days. Pain relief is usually very effective within hours. If relief is not achieved in a reasonable time, repeat irrigation and dressing of the wound is usually effective. Alternative dressings (each of which must be removed about a week later) include Whitehead’s varnish on ribbon gauze, Bismuth Iodoform and Paraffin Paste on gauze (which may have lidocaine (lignocaine) paste added to it). Zinc oxide and eugenol cements are not recommended as they tend to adhere strongly to the bone.
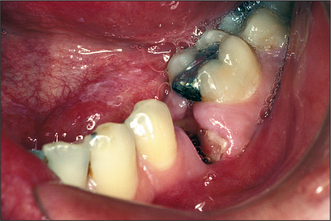
Osteonecrosis of the jaw (ONJ)
It has become apparent since about 2002 that patients taking bisphosphonate drugs (such as zoledronate, alendronate and pamidronate), which reduce bone resorption, are at risk of developing osteonecrosis, particularly after tooth extraction. The condition is recognized as failure to heal, exposure of dead bone (Fig. 4.32) and, often, associated infection. The condition persists with bone remaining exposed and failing to sequester for many months or years. Stopping use of the drug does not appear to make much difference to the outcome, probably because the half-life of the drugs, in the bone, is of the order of months to years. Tooth extraction should, if possible, be avoided in patients taking these drugs.
Postextraction haemorrhage
After a routine extraction it is expected that bleeding will cease after no more than 10 minutes. If bleeding continues, the area should be inspected for signs of mucosal tearing or other evident cause for continued haemorrhage. In the absence of any such sign, a further period of 10 minutes with firm pressure on the wound should be tried. Every effort should be made to determine whether the bleeding is arising from mucosa or bone.
If tears in the mucosa are found they should be sutured. They can be remarkably difficult to find if they have occurred posteriorly, especially lingual to a lower third molar or posteriorly to a maxillary third molar. Suturing can be effectively performed with a variety of materials, but black silk permits the knot to be precisely tensioned.
If bleeding continues, the next action is to suture the mucosa over the socket, not in an attempt to approximate the mucosal edges but to pull the gingival margin tightly down onto the bone edge of the socket. This restricts the blood supply to the gingiva, from which the bleeding frequently originates. A suture taking bites of tissue from all four corners of the socket, pulled together as a figure of eight, works well.
If suturing alone is not successful, a resorbable haemostatic agent (e.g. oxidized cellulose, fibrin foam, gelatin foam, collagen granules, alginate fibres) is placed in the socket and the wound resutured. Usually a bleeding socket responds to these measures. However, if bleeding continues consideration should be given to the possibility of factors other than a purely local minor problem.
Bleeding, of almost any cause, can be arrested by packing the socket with gauze soaked in an antiseptic such as Whitehead’s varnish. This material slowly sets to a firm consistency over hours to days and is well tolerated against bone. It does not become foul for a matter of weeks, so can be left in place for some time if necessary. Because of its consistency the dressing can be compressed into the socket and secured readily with sutures. However, it should be removed, normally at about one week.
In transalveolar (surgical) removal of teeth vigorous bleeding can occur from a defined point in the bone. Such bleeds are often best dealt with by pushing a small quantity of bone wax (a malleable wax commercially available for this purpose) into the bleeding point. This material is not resorbable and tends to become infected if used in large quantities; it should thus be used sparingly. Alternatively, adjacent bone may be crushed into the bleeding point with artery forceps.
Significant arterial or venous bleeds from soft tissue are best dealt with by ligation. A pair of artery forceps is clipped over the bleeding point, leaving the tips showing, then a suture (such as polyglycolic acid) is tied around the forceps and slipped over the end and tightened.
Smaller bleeding points can be dealt with by diathermy or even by clipping the vessel temporarily without a suture.
Tests of bleeding and clotting function
If bleeding continues despite reasonable attempts to stop it, or if it restarts within 3 days, bleeding and clotting function tests should be performed. These include the international normalized ratio (INR) (for the extrinsic part of the coagulation cascade), activated partial thromboplastin time (APTT) (for the intrinsic part) and a platelet count, which may be done as part of a full blood count that will also include haemoglobin estimation. Any further investigations that might be indicated as a result of these tests may be better performed in a haematology unit.
Antiplatelet drugs, anticoagulants and patients with a known bleeding tendency
It is not usual to ask patients about to have extractions to stop taking drugs they are taking to reduce platelet activity such as aspirin or clopidogrel. The incidence of abnormal bleeding in such individuals is low. Patients on warfarin therapy, however, require very careful management. It is now recommended (UK Medicines Information 2004) that provided the INR is 4.0 or less on the day of extraction, treatment may proceed but the sockets should be dressed with a resorbable haemostatic agent such as oxidized cellulose and sutured. Clinical trials have shown few serious bleeding complications with this approach. However, this line is not accepted for general practice use throughout the UK and practitioners should familiarize themselves with local policy before carrying out extractions in this way in general dental practice.
Patients with a known blood-clotting disorder will be under the care of the regional haemophilia centre. Such units are generally extremely helpful in preparation and after care of the patient for dental purposes, but they must be consulted early in the planning process. Patients may require both factor replacement and antifibrinolytic medication.
Fractured alveolus
Most extractions result in delivery of the tooth, intact, with no other tissue apart from some periodontal ligament. However, bone can fracture in a number of circumstances.
A small piece of buccal plate of bone is sometimes removed with the tooth. Provided that it is small, and that the mucosa is not torn in removing it, this is of little consequence. Sharp edges of bone beneath mucosa may need to be smoothed.
A maxillary molar standing alone, or associated with a large maxillary antrum, is particularly prone to fracture of the tuberosity. The tuberosity is also vulnerable to a fully erupted maxillary third molar being elevated backwards (see comments about effects of large elevators). In such circumstances, if the bone fragment is small and the antrum will not be left exposed, it may be best to dissect the bone out with the tooth then close the wound. For large fragments, however, the extraction should be abandoned and the fractured piece should be splinted (other temporary means of pain control may be required) and the tooth surgically removed about 4 weeks later, once the bone has healed.
Fractures may also occur if an instrument is forced between teeth or between roots that do not displace out of their sockets, or if undue force is used in any extraction. It is difficult to measure exactly what constitutes excessive force other than by its adverse effects. However, it is very difficult for most dentists extracting most teeth to apply sufficient force in the correct direction to actually do damage. The human body is remarkably resistant to steadily applied force. It is important to be prepared to stop if it appears that reasonable force is not achieving the goal.
MacGregor A.J. Aetiology of dry socket. British Journal of Oral Surgery. 1968;6:49-58.
MacGregor A.J. Factors affecting the fracture of teeth during extraction. British Journal of Oral Surgery. 1969;7:55-62.
Meechan J.G., MacGregor I.D., Rogers S.N., Hobson R.S., Bate J.P., Dennison M. The effect of smoking on immediate postextraction socket filling with blood and on the incidence of painful socket. British Journal of Oral Surgery. 1988;26:402-409.
Rood J.P., Murgatroyd J. Metronidazole in the prevention of dry socket. British Journal of Oral Surgery. 1979;17:62-70.
UK Medicines Information. Surgical management of the primary care dental patient on warfarin. [Online]. 2004 [cited]; Available at: URL: http://www.ukmi.nhs.uk/med_info/documents/Dental_Patient_on_Warfarin.pdf
SELF-ASSESSMENT
Answers on page 263.