Preoperative Room Considerations
After studying this chapter, the reader will be able to:
• Explain the ideal layout of a surgery suite and adjacent areas.
• Differentiate between nonmovable (permanent) and movable equipment in a surgery room.
• Explain the cleaning of the equipment located in the surgery room.
• Describe the steps used to manufacture surgical instruments.
• Describe the function of an anesthesia machine.
• List the individual components of an anesthesia machine.
• Describe the method for performing a leak check of an anesthesia machine.
• Describe the difference between rebreathing and non-rebreathing circuits and the indications for their use.
• Describe how to calculate the size of rebreathing bag to be used.
• Describe the use of different oxygen flow rates and the indications for their use.
• List the common surgical instruments used in general, orthopedic, and ophthalmic surgery in veterinary medicine.
• Describe the different styles of suture needles.
• Describe the characteristics of suture material.
• List examples of suture material and their main properties.
• List examples of equipment used perioperatively in veterinary surgery.
One of the most challenging and rewarding activities that a technician can participate in is surgery. In order to ensure positive, successful outcomes, careful preparation is imperative. It is the technician’s responsibility to ensure that everything is in order before the surgeon can begin his or her portion.
For elective (non–life-threatening) procedures the facilities should be properly prepared. Preparations include the room, the equipment, and the instruments. Once all this has been accomplished the animal can be prepared for the procedure.
Layout of the Surgery Suite
The American Animal Hospital Association (AAHA) recommends three distinct and separate areas for a surgical facility: the preparation area, the scrub area, and the surgery room. Although AAHA certification is not a legal requirement for veterinary facilities, a surgical facility should create the best environment for the patient. In addition, some state licensing boards have specific requirements regarding surgical facilities that a veterinary hospital must meet to pass inspection and to receive authorization to offer surgery.
Preparation Area
Ideally, the preparation area should be adjacent to the surgery room. The “prep” room can be used for patient preparation and the storage of surgical supplies. AAHA also recommends placement of storage and cabinets in the prep area, not the surgery room. The surgeon can use the preparation area to scrub and gown for surgery if a separate scrub area is not available. It is ideal to have a separate anesthesia machine for the prep room so that cross-contamination does not occur when the machine is moved from one room to another. The prep area is used for clipping the patient. Procedures classified as “dirty” should be done in the prep area. Procedures such as abscessed wound care, débridement of old wounds, and treatment of impacted anal sacs are often defined as “dirty.”
Scrub Area
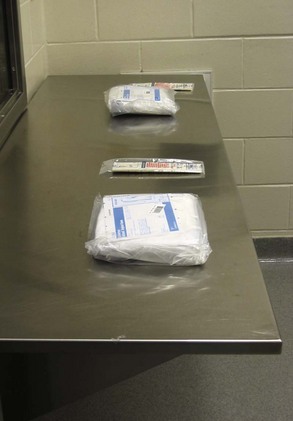
The scrub area may be a small area with the scrub sink, autoclave, and room to gown and glove (Figure 1-1). This is a transitional area where the veterinarian and technician can prepare to move into the surgery room. Adding the autoclave to the space makes it a dual-purpose area that works well for personnel, because the counter area would not be in use for pack preparation while the surgeon and assistant are gowning and gloving for surgery.
Surgery Room
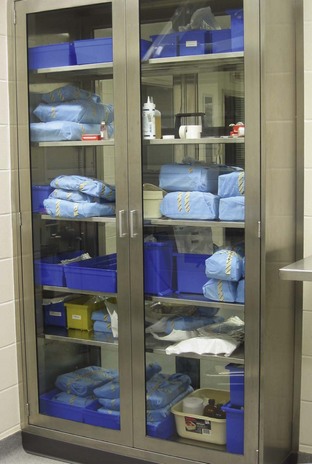
Ideally, the surgery room is a separate room that should be used only for surgery. The AAHA recommends that the surgery room be easily cleanable and be closed off as needed. Closing the door minimizes traffic, maximizes cleanliness, and helps ensure that the surgery room is used only for aseptic procedures. The room should be a “dedicated” room reserved for clean surgical procedures. It should be used only for surgery, not for other types of procedures that may introduce bacteria into the room. The surgery room should be large enough that personnel can easily move around the surgery table without contaminating the surgical field or the surgeon. If present, cabinets should be off the floor and constructed of nonporous material. Keeping cabinets off the floor allows for adequate cleaning underneath and prevents dust and debris from collecting around the base of the cabinets. The cabinets that hold sterile supplies should have doors that can be closed to protect the packs and other supplies from dust, debris, and other contaminants (Figure 1-2).
The surgery room should also be free of clutter and items that may collect dust or harbor bacteria. It should have a door that can be closed, and this door should be opened only when necessary to limit the amount of traffic and air flow in and out of the room. “Tacky mats,” which have a strong adhesive coating for dirt removal, historically have been used to decrease the amount of debris entering the surgery room. However, the U.S. Centers for Disease Control and Prevention (CDC) found that tacky mats in operating rooms do little to minimize the overall degree of floor contamination. If possible, the air pressure should be greater in the surgery room to reduce the influx of bacteria from the rest of the veterinary facility.
Equipment Cleaning
Different types of equipment are located in a surgery room. Some equipment is nonmovable (i.e., permanently affixed), and some is movable. Cleaning of these pieces of equipment varies according to their use and design.
Nonmovable (Permanent) Equipment
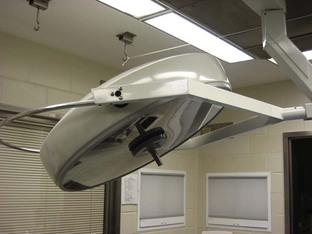
Permanent items are pieces of equipment that are attached to the floor, wall, or ceiling in the surgery room. These pieces are usually not moved from the room because of their weight or the physical difficulty of moving them. These items should be wiped down daily before surgery with a cloth dampened with isopropyl alcohol or some other disinfectant to remove any dust that may have accumulated. The surgery room should never be dry dusted. Nonmovable pieces of equipment include the following:
• Surgery lights (Figure 1-3)
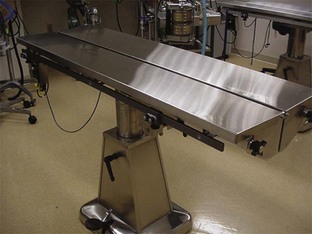
• Surgery table (Figure 1-4)
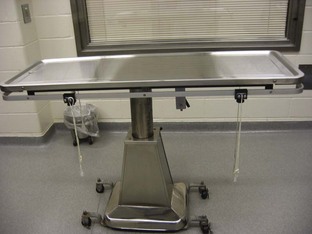
Movable Equipment
Movable pieces of equipment can be transported to other areas of the hospital. Movable items should not leave the surgery room, but in many veterinary facilities, they serve dual purposes and are moved to other areas of the hospital. If these items must be moved, they must be cleaned and disinfected thoroughly before being returned to the surgery room. Movable equipment items include the following:
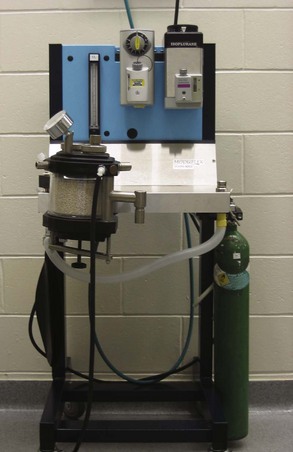
• Anesthesia machine (Figure 1-5)
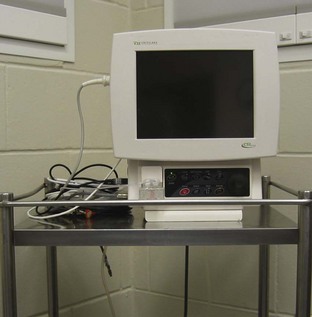
• Electrocardiogram (ECG) machine (Figure 1-6)
• Intravenous (IV) drip stand (or IV pole)
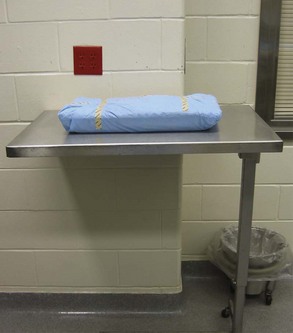
• Instrument table, mayo stand (Figure 1-7)
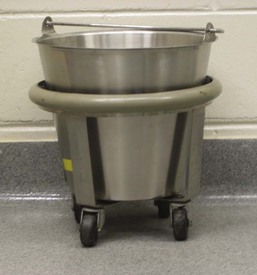
• Kick bucket (Figure 1-8)
General Cleaning Instructions
All equipment should be wiped daily before surgery with the appropriate cleaning or disinfecting solution. It is important to follow the manufacturer’s instructions because improper cleaning or use of inappropriate solutions may damage the equipment. The CDC states that the manufacturers of medical equipment should provide care and maintenance instructions that are specific to the equipment. This information should include the equipment’s compatibility with chemical germicides, whether it can be immersed for cleaning, and how it should be decontaminated. The CDC also states that in the absence of any instructions from the manufacturer, items that are considered noncritical (stethoscopes, BP cuffs, knobs of equipment) can be cleaned and then disinfected with alcohol.
Anesthesia Machine
One purpose of an anesthesia machine is to deliver inhalation anesthesia to the patient and then remove the unneeded gases from the patient and the surgery suite. Generally this is accomplished with the use of a corrugated tubing system. The inhalation anesthetic gas is delivered to the patient through oxygen molecules (i.e., oxygen is the carrier gas for the anesthetic gas). Another purpose of an anesthesia machine is to deliver oxygen (O2) as the sole gas, as in cardiopulmonary resuscitation (CPR). For the anesthesia machine to perform as intended, it must do the following:
1. Deliver O2 at a controlled rate.
2. Vaporize (turn a liquid into a gas) a designated concentration of liquid anesthetic, mix the anesthetic with oxygen, and deliver the mixture to the patient.
3. Remove exhaled gases from the patient, then dispose of the gases through a scavenging system or recirculate them (after removing the carbon dioxide) to the patient.
The ability of the anesthesia machine to function properly depends on the equipment being in good repair and properly maintained.
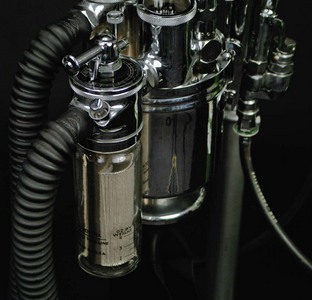
Anesthesia machines are configured in many forms, depending on the manufacturer. Well-known producers of anesthesia machines include North American Matrix (Figure 1-9), Drager (Figures 1-10 and 1-11), and Ohmeda Medical. Some machines are designed with the simplest intent of delivering inhalation anesthesia (see Figures 1-9 and 1-10). Others have accessories and the ability to provide automatic ventilation, multiple inhalation gas choices (e.g., nitrous oxide, isoflurane, sevoflurane), and space for placement and storage of monitoring devices (see Figure 1-11). Regardless of the machine’s appearance, the basic function remains the same.
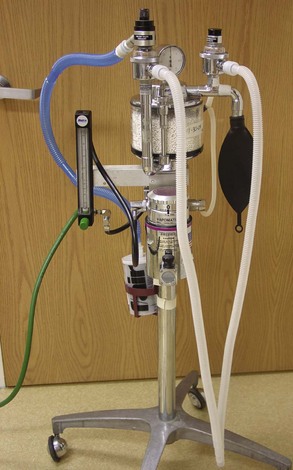
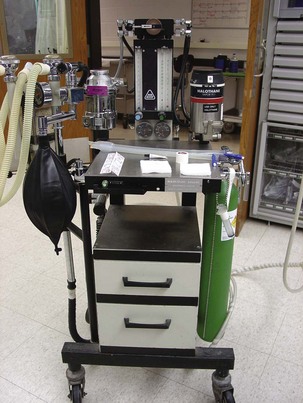
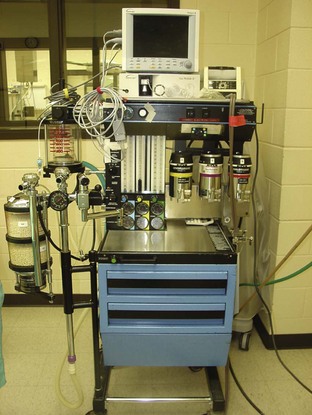
FIGURE 1-11 Complex anesthesia machine with multiple vaporizers, storage for monitoring devices, and a ventilator.
Components
The anesthesia machine has many components working together to perform its intended function properly. To best understand how the machine works, it is necessary to identify and understand each component. This basic information not only provides a working knowledge of the machine, but also assists the technician with troubleshooting problems in the event of a malfunction. Tracing the oxygen flow through the machine allows a view of all the components of the machine.
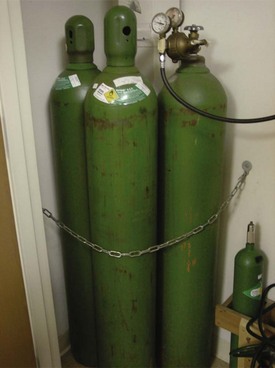
Oxygen Source
The oxygen source can be a localized cylinder or a large, centrally located source (Figure 1-12). Cylinders are available in different sizes; the two most common sizes are the “E” and “H” tanks. The “E” tanks are smaller and generally attached to the machine, whereas the “H” tanks are larger and generally stand alone away from the anesthesia machine, often chained against a wall. Tanks are color-coded for easy recognition (green in the United States, white in Canada) and have a pressure reading of 2200 pounds per square inch (psi) when full. When opening a tank, personnel should remember the rule of “righty tighty, lefty loosey.” When turning the valve clockwise (to the right), the tank is being closed; turning the valve counterclockwise (to the left) opens the tank. Using 100% O2 from an oxygen source is justified because (1) the O2 acts as a carrier for the vaporized anesthetic gas and delivers it to the patient, and (2) anesthetized patients have a decreased tidal volume, so an increased O2 concentration will compensate for the decrease in tidal volume.
Pressure-Reducing Valve
The first pressure-reducing valve in the system should be found near the oxygen source tank. This valve reduces the pressure leaving the tank and entering the machine to 40 to 45 psi. The lower-pressure gas is carried through the source lines to the anesthesia machine.
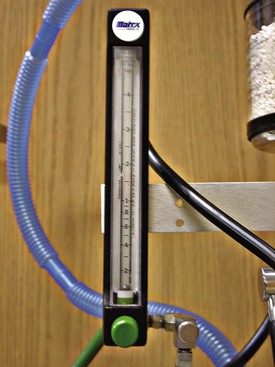
Flowmeter
Next in the flow of O2 is the oxygen flowmeter (Figure 1-13). The flowmeter further reduces the pressure of the gas to 15 psi. This is very close to atmospheric pressure and is well tolerated by patients. The flowmeter regulates how much O2 is entering the system and being delivered to the patient. O2 flow is measured in liters per minute (L/min) or milliliters per minute (mL/min). The O2 flow is regulated by a knob at the bottom of the flowmeter. Personnel must take care to avoid excessive tightening of the knob when turning off the flow. When reading the flowmeter, the “float” needs to be properly read. Ball floats are read on the scale where the middle of the ball sits on the graduations. Floats with a point are read at the top of the float. Graduations on the flowmeter may be in 100-mL increments until the 1-L level, then in 500-mL increments thereafter.
Fast Flush Valve
Next in the order of O2 flow through the machine is the fast flush valve. On many anesthesia machines the oxygen flush valve is found near the oxygen flowmeter. The fast flush valve allows quick infusion of only O2 into the breathing circuit. This infusion can occur because, with a vaporizer “out of the circle,” the vaporizer is bypassed with the tubing arrangement of the machine. The fast flush valve should never be used with a non-rebreathing system for two reasons. First, the pressure of O2 coming out of the system is too high and may harm the patient. Second, the non-rebreathing systems use such a high O2 flow that the valve’s purpose becomes moot; the high flows result in O2 levels similar to those achieved with the fast flush valve. The fast flush valve should never be used if the pressure relief, pop-off, valve is closed. This could lead to a dangerous increase in pressure in the patient’s lungs and atelectasis.
During the recovery phase, the fast flush valve is frequently employed to dilute residual anesthetic gases that remain in the system. Flushing the system of residual gases will hasten the patient’s recovery because less anesthetic gas is present.
Vaporizer
The vaporizer is usually found next when tracing O2 flow. The vaporizer inlet is the point where the O2 enters the vaporizer to carry anesthetic gas molecules to the patient. The vaporizer outlet is the point at which the O2 and anesthetic gas leave the vaporizer to enter the circuit. (Up to this point, the O2 flow has been “out of the circle,” assuming the anesthesia machine being used has the vaporizer out of the circle. The “circle,” or circuit, is the loop that the gases travel to cycle in and out of the patient when a rebreathing [“recycling”] system is used.) The primary function of the vaporizer is to house or hold liquid anesthetic and to vaporize that liquid into a gas form that can be delivered to the patient in a controlled manner. The vaporizer is likely the most expensive component of the anesthesia machine and therefore must be used appropriately.
Vaporizers are calibrated internally for a specific type of inhalation anesthetic. Only the type of anesthetic for which the machine has been calibrated should be used in the vaporizer. All designs of vaporizers have some style of indicator window at the base of the unit. This window allows determination of the amount of liquid anesthetic remaining in the machine. Once the level reaches a half to one quarter remaining, liquid anesthetic should be added to avoid running out during a procedure. If the vaporizer does need to be filled while the machine is in use, personnel must be sure to turn off the vaporizer before filling it. This action prevents the anesthetic from bubbling out and contaminating the environment with anesthetic fumes. Some vaporizers have two indicator windows, one to show anesthetic level and one to show when to refill. Vaporizers have some type of device to determine the amount of anesthetic being delivered to the system. Depending on the type of vaporizer, this amount is determined as a percentage or just a setting on the dial.
Vaporizers should be serviced annually to ensure a properly functioning mechanism. In the event that a vaporizer needs to be shipped for servicing, it should be drained of any liquid anesthetic to avoid any accidental spill or leaks during shipping.
Both precision and nonprecision vaporizers are available (Table 1-1). However, nonprecision vaporizers are infrequently used now.
TABLE 1-1
Comparison of Precision and Nonprecision Vaporizers
| Precision Vaporizer | Nonprecision Vaporizer | |
| Temperature compensation | Output not affected by ambient temperature in most models | Output affected by ambient temperature |
| Flow compensation | Output not affected over a wide range of oxygen flow rates | Output affected by oxygen flow rate |
| Back-pressure compensation | Changes in back pressure do not affect output | Changes in back pressure affect output |
| Maintenance requirements | Requires periodic factory recalibration and cleaning | Minimal; can be done by hospital staff |
| Cost | High | Minimal |
| Anesthetics commonly used | Isoflurane, sevoflurane, halothane (i.e., those with high vapor pressure) | Methoxyflurane (i.e., those with low vapor pressure); isoflurane and halothane with low-flow techniques |
| Control over anesthetic concentration | Precise; given as a percentage | Not precise; given as a control lever setting (1-10) |
| Position relative to anesthetic circuit | Out of circle (VOC) | In circle (VIC) |
From McKelvey D, Hollingshead KW: Veterinary anesthesia and analgesia, ed 3, St Louis, 2003, Mosby.
Precision vaporizer: The precision vaporizer has many advantages over the nonprecision style (Figure 1-14). Precision vaporizers are used with high-vapor-pressure anesthetics and are always found out of the circle. The liquid phase of a high-pressure anesthetic vaporizes easily and quickly and must be delivered in a controlled state. If uncontrolled delivery occurs, the concentration of the drug in the carrier gas could easily become excessive and dangerous. Three factors affect vaporizer function and are compensated for in the precision vaporizer: (1) temperature, (2) gas flow rate, and (3) back pressure. First, if the room temperature is cold, the amount of volatile anesthetic vaporized may be less than the amount indicated on the dial. In a warm room, however, the amount of anesthetic vaporized may be much higher, and therefore a higher level will be delivered to the patient than indicated on the dial setting. The precision vaporizer is constructed with insulation to the liquid anesthetic chamber, so the problems with temperature are eliminated.

The second factor that the precision vaporizer compensates for is the carrier gas flow rate. The O2 flow rate can affect the amount of vaporized anesthetic delivered to the patient. Extremely high flows (>10 L/min) or extremely low flows (<500 mL/min) are difficult to compensate for, and therefore they should not be used routinely. In a vaporizer that is compensated, the amount of vaporized gas will match the amount indicated on the dial. As the O2 flow rate is reduced from 300 to 200 to 100 mL/min, the reliability of the dial setting becomes more questionable. Because the flow is reduced, less fresh gas is being delivered. Even though the amount of vaporized gas being sent to the circuit is constant, the amount of gas delivered to the patient is reduced. Vaporizer settings for lower O2 flow rates need to be adjusted to deliver the amount of anesthetic gas that is actually desired.
The third factor affecting vaporizer function and compensation is back pressure. Vaporizers exposed to pressurized gas may release additional anesthetic agent, increasing the concentration in the circuit. This occurs when an animal is “bagged.” Modern precision vaporizers are designed to adjust for any increase in pressure so that the amount of anesthetic released is not affected.
Precision vaporizers are designed to eliminate or reduce the effect of these three factors on the liquid anesthetic and its vaporization. Precision vaporizers have a dial that shows, in a percent unit, the amount of anesthetic that is being delivered to the circuit.
Nonprecision vaporizer: Nonprecision vaporizers are seen less and less in veterinary medicine with the development of safer inhalant anesthetics that require precision vaporizers. Inhalants usually used in nonprecision vaporizers are not even available anymore. A nonprecision vaporizer is basically a glass canister that allows liquid anesthetic to vaporize at an uncontrolled rate (Figure 1-15). This uncontrolled vaporization is the main reason that only anesthetics with low vapor pressure should be used in this type of vaporizer. Low-vapor-pressure liquid anesthetics are those that vaporize slowly. This slow vaporization means that a level of approximately 4% concentration is the maximum that will be reached in the carrier gas. This level of anesthetic is relatively safe for most patients because of the high blood gas solubility and the drug’s slow onset of action. The construction of the nonprecision vaporizer does not permit compensation for the three factors that affect anesthetic vaporization. The lack of compensation results in less accurate delivery of the anesthetic occurs, increasing the risk to the patient.
Unidirectional Inspiratory Valve
The unidirectional inspiratory valve, also called the inspiration valve or flutter valve, is a component of anesthesia machines designed to allow movement of gases in only one direction (Figure 1-16A). It consists of a thin, plastic circular piece (wafer) that moves (flutters) each time the patient inspires. As the patient inspires, the gases are moved through this valve, then through corrugated tubing, and are delivered via the endotracheal tube to the patient.
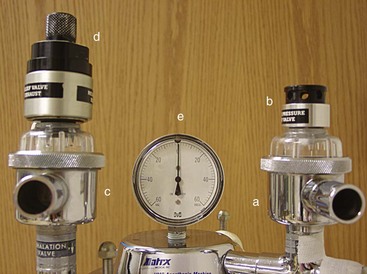
Negative-Pressure Relief Valve
The next part in many anesthesia machines is the negative-pressure relief valve (Figure 1-16B). This valve is primarily intended as a safety device. If negative pressure is detected in the system, this valve will allow room air to enter the system. Negative pressure may occur, for example, if the oxygen source is empty. Without this safety device, the patient would be without oxygen. The negative-pressure relief valve allows room air into the system, thereby providing 21% O2 rather than no O2. Negative pressure may also result if an active scavenging system is being used with the vacuum set too high or if the O2 flow rate is too low.
Corrugated BreathingTubing and Y-Piece
Gases pass through the tubing as the patient inspires and expires. This corrugated tubing is available in a variety of materials, lengths, and diameters. Although there is no formula to determine the size of tubing to use, shorter tubing with a smaller diameter generally is used for smaller patients, weighing 7 to 20 kg. Larger tubing is used with patients weighing more than 20 kg. It is important to remember that this tubing is not unidirectional; tube ends can be placed on either the inspiratory valve or the expiratory valve. The unidirectional valves determine gas flow direction. The tubes come together at a Y-piece that connects to the patient either via the endotracheal tube or mask.
Unidirectional Expiratory Valve
The unidirectional expiratory valve functions on the same premise as the inspiratory (“inhalation”) valve, except it works with expired gases (Figure 1-16C). As the patient exhales, the gases travel though the corrugated tubing to the unidirectional expiratory valve. As with the inspiratory valve, a wafer of plastic moves or “flutters” as the expired gases pass through the valve. The movement of these two valves is also a good indicator of the patient’s respiration for the anesthetist.
Adjustable Pressure Relief Valve (“Pop-off” Valve)
The adjustable pressure relief valve is generally located close to the unidirectional expiratory valve (Figure 1-16D). The pop-off valve has several functions in the anesthesia machine. First, it can act as a vent. When in the completely open position, the pop-off valve prevents buildup of pressure in the system. This is important because if pressure builds up in the system, the alveoli of the lungs expand and may rupture, leading to atelectasis. Second, the pop-off valve can be used to determine flow rate techniques (e.g., low flow). When varying degrees of “open” are used (i.e., pop-off valve is partially opened), different O2 flow rates can be used. Higher flow rates need to be used with a wide-open pop-off valve, and lower flow rates can be used with the valve partially closed or “closed,” meaning mostly closed. (The only time the pop-off valve should be completely closed is when “bagging” the patient, and even then it is only temporarily closed because the patient cannot breathe against a closed pop-off valve.) Any level of closure is dangerous because the pressure may build in the system and cause alveolar damage.
Manometer
The manometer is the pressure gauge of the anesthesia machine (Figure 1-16E). This component only measures the pressure in the system; the manometer does not regulate the pressure. The pressure reading of the system, as indicated by the manometer, is useful information because it gives the anesthetist a good indication of the pressure in the patient’s lungs. The unit of measure for the manometer is in centimeters of water (cm H2O). Some manometers may have a double scale, one in cm H2O and the other in millimeters of mercury (mm Hg). Personnel must be careful to read the correct scale because the graduations between the units are not the same and therefore display different information. For example, 20 mm Hg of pressure is approximately at the same graduation as 33 cm H2O, but a reading of 33 cm H2O is a dangerous pressure for a patient. It is a rare situation that would require the pressure reading on the manometer to exceed 20 cm H2O, even when “bagging” the patient. Normal resting pressure, with the pop-off valve open, should read 0 cm H2O. The manometer and the pop-off valve have a direct relationship; the more closed the pop-off valve, the higher the pressure reading on the manometer.
Rebreathing Bag (Reservoir Bag)
The rebreathing bag is a rubber bag that may serve different purposes depending on the circuit with which it is being used. One purpose, when the bag is being used with a rebreathing system, is to allow the patient to rebreathe some of the exhaled gases stored in the rebreathing bag. The level of fullness of the bag adjusts as the gases enter and leave the circuit. The reservoir bag deflates as the patient inspires and inflates as the patient expires. This movement is a good indication of respiratory rate that the anesthetist can monitor. An indirect level of respiratory quality can also be assessed on the basis of how much of the bag is deflated with each breath (i.e., shallow breaths are evident as barely moving the bag).
Another purpose of the rebreathing bag, regardless of the circuit, is to allow manual ventilation of the patient (“bagging”). Whether as an alveolar expanding “sigh” or as a resuscitative measure, being able to provide manual ventilation to the animal is essential. When providing artificial ventilation, the first step is to close the pop-off valve. Then, the rebreathing bag is squeezed to a pressure no greater than 20 cm H2O on the manometer, and the pop-off valve is immediately opened. It is important to ventilate the patient with as normal a respiratory character as possible. For example, a pattern of longer inspiration and then quick expiration best simulates a “normal” breath.
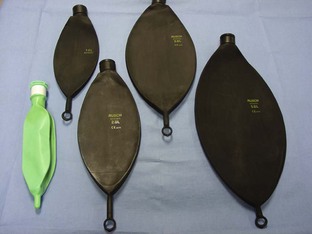
With the rebreathing bag storing excess gases and providing backup quantities of gases to be inspired, the proper size bag must be used. One formula to calculate bag sizes is simple and relies on the tidal volume of the patient (Box 1-1). Tidal volume is calculated as 10 mL/kg of body weight and is the volume of air inhaled during a normal breath at rest. That volume is then multiplied by a factor of 5 to ensure that enough gas will be available for the patient in the event of a full, deep breath. Another formula takes the animal’s body weight in pounds and multiplies it by a factor of 30 to determine the correct bag size.
Rebreathing bags are available in several sizes, ranging from 0.25 to 5.0 L for small animals (Figure 1-17). After calculating the volume needed, the bag is selected. If the calculation does not correspond to a bag size, round up to the next size to ensure the minimum volume required is provided (see Box 1-2 for examples).
Carbon Dioxide Absorber
As the patient exhales, the waste gases pass either to the carbon dioxide (CO2) absorber or to the scavenger. The CO2 absorber is a canister that contains a material made of either barium hydroxide lime (Baralyme, A-M Systems, Everett, WA) or sodium hydroxide lime (Sodasorb, WR Grace, Columbia, MD). The crystals absorb the exhaled CO2, and the resulting chemical reaction produces heat, water, and a color change. The crystals have a pH indicator added to allow for the color change. Once the crystals have undergone the chemical reaction, they are depleted. Fresh crystals are easily crushed, but depleted crystals are very hard and may exhibit a color change from white to violet (Figure 1-18). When isoflurane is used, the color change may be evident only while the crystals are exposed to the anesthetic gas. Once the vaporizer is turned off, the color will disappear. Generally, crystals are disposed of and replenished when 50% of the crystals in the canister display a color change. Crystal density should also be evaluated to determine when to change the canister. The hours of use should be tracked, rather than a set time frame of every week or every 2 weeks, to determine when to replenish the crystals.
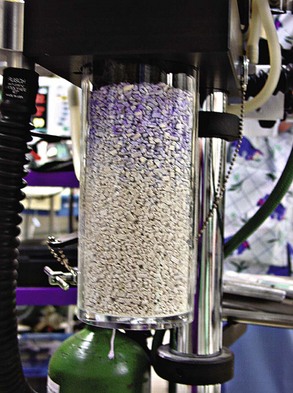
FIGURE 1-18 Carbon dioxide (CO2) canister. The machine is in use with a patient attached. Partially depleted crystals are evident by the color change at the top of the canister.
When the crystals are replaced, the old material can usually be disposed of in the regular trash, but the local health department may have other guidelines or ordinances; these can be consulted if disposal options are unclear. New crystals should be added to the canister in increments, and the canister should be shaken to settle the crystals. About  inch of air space is left at the top of the canister to allow proper gas flow over the crystals.
Scavenging System
It is important to use some type of system to evacuate waste gases from the anesthesia machine and out of the surgery suite. Two types of scavenging systems are available: active and passive. Active scavenging systems are mechanical devices attached to the anesthesia machine and then connected to a general building source that produces a vacuum to remove the gases. These systems are generally incorporated into the building plans for a new facility. The centrally located vacuum in this system removes the gases from the anesthesia machine and then evacuates the waste out of the building. Anesthesia machines require a local vacuum control on the machine as well as hosing to connect to the central source, similar to the oxygen hose used to connect with the general oxygen source.
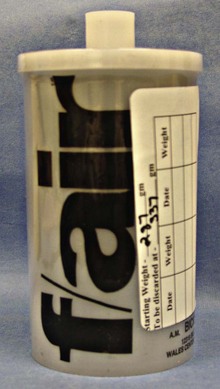
Passive scavenging systems rely on gravity to remove the gases from the system. Anesthetic gases are the heaviest of the expired gases and naturally gravitate to the lowest point. Tubing attached to the pop-off valve can carry the anesthetic waste gas either to an activated-charcoal canister attached to the base or stand of the machine or to an outside wall vent (Figure 1-19). Wherever the canisters are attached, it is important that they be suspended so that air can circulate through the vents found on the bottom of the canisters. If the canisters are placed on the floor, these vents are effectively plugged. To ensure that the canister is effectively scavenging the waste gases, its use needs to be monitored and documented. The canister should be weighed with a gram scale before its first use and before being suspended on the machine. After each use the canister should be reweighed and the weight recorded on the canister. Once the unit has gained 50 grams (g) from the initial weight, it should be disposed of because it will no longer adequately absorb the waste gas. Canisters can be disposed of in the regular trash. Hoses from the pop-off valve that attach to an outside wall vent should be no longer than 20 feet; longer hoses would compromise the system’s function. Scavenging to a vent limits the mobility of the anesthesia machine, but this arrangement is appropriate if the machine remains in the same area all the time. Scavenging of waste gas to the floor without any type of collection or evacuation is inappropriate and should not be done.
Leak Testing
Properly functioning equipment is extremely important in anesthesia. Technicians are responsible for maintaining equipment and should take this responsibility seriously. In addition to the use of a scavenging system, leak checking the machine aids in reducing and eliminating any gas that may be inappropriately leaving the system. Before every use, the anesthesia machine should be checked for a system leak. If the machine was cleaned or replenished or if hoses or bags were changed, the potential exists for a leak in the system. Box 1-3 outlines the steps for performing a machine leak check. Machine leak checks should be performed only with a rebreathing circuit. If a non-rebreathing system is required for the patient, once the machine leak check is completed, the machine can be converted to the appropriate system.
Any area on the machine has the potential for leaking, but some sites are more likely than others to develop leaks. One of the first places to check is the pop-off valve. This valve must be completely closed when doing the leak check. If the pop-off valve is left open, there is no way for pressure to build up in the system. Even if the pop-off valve is only partially closed, a leak will result, so complete closure of this valve is critical. Another common place for leaks is the rebreathing bag or the corrugated hosing. Many of these products are intended as single-use items, but the economics of veterinary medicine often dictate their reuse. Anesthetic gas can degrade the integrity of the rubber in these items, and areas of thinning or microscopic holes can develop. If the leak is isolated to the bag or hoses, these items should be discarded and replaced with new equipment. Another place for a leak is the occluding of the Y-piece. If the Y-piece is not fully occluded with a finger or the palm of the hand, a leak may persist.
Other, more subtle areas of the anesthesia machine that may leak include the metal rings on the inspiratory and expiratory valves. If removed or loosened for cleaning purposes, the rings may not have been securely replaced and fully tightened. Another “hidden” place for a leak is the CO2 absorber. When the canister is removed to replenish the crystals, the tightening mechanism may easily be left a little loose. Finally, all the tubing on the machine is continually exposed to the detrimental effects of anesthetic gas, which may lead to small, barely detectable holes in the tubing.
Regardless of the location of the leak, it needs to be corrected before the machine is used.
Breathing Circuits
The size of the patient determines the breathing circuit that should be used to deliver anesthetic gases. There are two types of circuits: rebreathing and non-rebreathing.
Rebreathing Circuit
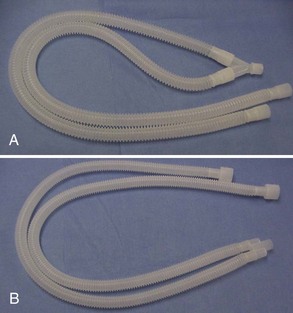
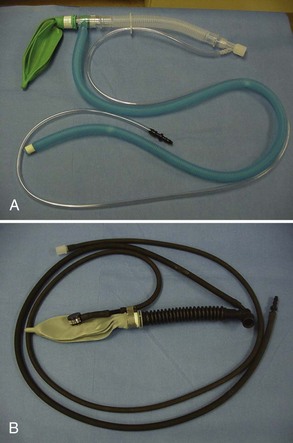
The rebreathing circuit is useful because it allows the recirculation of some expired anesthetic gases and permits a lower flow of oxygen because some of the gases are rebreathed. This circuit is used with patients that have a body weight greater than 7 kg. The traditional circuit is two corrugated hoses connected at one end by a Y-piece (Figure 1-20A-B). The hosing can be plastic or rubber, and the Y-piece can be plastic or metal. The open end of the tubing is placed on the inspiratory and expiratory valve openings on the anesthesia machine.
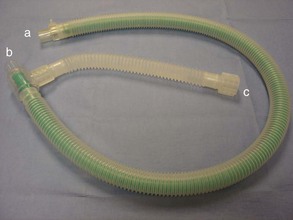
An alternative to the traditional rebreathing circuit is the Universal F circuit (Surgivet, Waukesha, WI) (Figure 1-21). This circuit is used with patients weighing more than 7 kg and offers some distinct advantages over the traditional circuit. The design of the inspiratory tube inside the expiratory tube allows the inspired gases to be warmed by the expired gases surrounding the tube. The single-tube design is also beneficial in offering less congestion at the head and mouth. This advantage is especially appreciated during a dental prophylaxis.
Non-Rebreathing Circuit
The non-rebreathing circuit is used so that none of the gases are rebreathed. Patients weighing less than 7 kg benefit the most from the use of this circuit because of the low gas resistance. The use of this circuit requires high flows of oxygen to ensure adequate levels of anesthetic.
A major advantage of the non-rebreathing system is that it has low resistance for breathing for the patient. Fresh gases are constantly being provided to the patient with minimal effort required of the animal. The design and high flows of the non-rebreathing system allow the gases to be “delivered” at the endotracheal tube, and the patient merely breathes a normal respiration and takes in fresh, new gases.
The disadvantage of the non-rebreathing circuit is the expense incurred because of the amount of oxygen used. Figure 1-22 shows two examples of non-rebreathing circuits.
Oxygen Flow Rates
Depending on the type of breathing circuit used, different O2 flow rates should be employed. Providing adequate oxygen to the patient is critical, but using an excessive amount of oxygen is wasteful.
Rebreathing circuits generally use a high O2 flow rate for induction and recovery, with large-volume delivery of gas. This perpetuates a speedy induction and assists in a quick recovery. Maintenance flows for rebreathing circuits are significantly less than the induction and recovery flow rates. Only enough oxygen to match the patient’s tidal volume is needed, because in addition to the fresh gas being supplied, the patient is rebreathing some of the gases already in the system. Usually a buffer is added in calculating the flow to allow for large breaths that may be given to or taken by the patient (Box 1-4).
Non-rebreathing systems also use high O2 flow rates (see Box 1-4), but the flows remain at a constant high flow whether the patient is undergoing induction, maintaining the desired depth of anesthesia, or recovering. Continuous high flow rates are necessary to provide adequate gases to the patient. Smaller patients cannot rebreathe any of the gases because of the difficulty in moving that much air with each respiration. Fresh gases need to be provided to these patients at all times.
Summary
Anesthesia can be a stressful time for the veterinary technician. However, a thorough understanding of the components of the machine, the flow of gas through the machine, and the options available to deliver the anesthetic gases to the patient can reduce the stress level and can even make surgery a rewarding part of the technician’s day.
Perioperative Equipment
Many pieces of equipment besides surgical instruments are critical to the success of a surgical procedure. Whether related to providing patient comfort, assisting the surgeon, or monitoring anesthesia, each item is an integral part of the process.
Patient Warming Devices
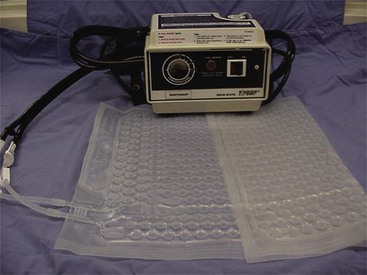
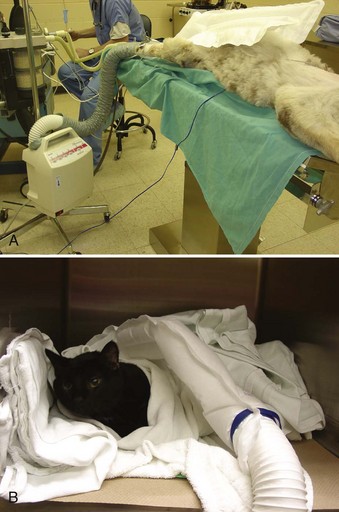
Circulating warm-water blankets are used frequently with surgical patients and critically ill patients. The circulating warm-water blanket is a good way to provide a heated surface on which the patient can lie during surgery (Figure 1-23). The heated surface helps prevent the loss of body heat to a cold metal surface, thereby diminishing the hypothermia that so often occurs during surgery. Water blankets are available in a variety of sizes, and some are considered disposable. Unless damaged by a patient, water blankets can be used repeatedly. A cat’s claw, a misplaced towel clamp, or even a set of teeth can easily puncture holes in the water blanket, making it unusable. Single puncture holes or small tears can be repaired with use of a vinyl patch kit in some cases, but more often the best solution is disposing of the blanket.
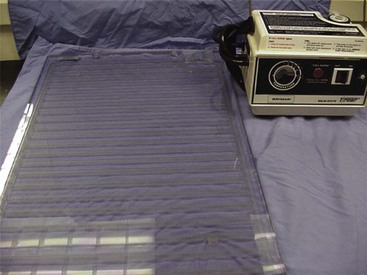
One alternative to constantly replacing the water blanket is using a hard heated pad (Figure 1-24). This pad, made of acrylic plastic glass (Plexiglas), operates on the same principle as the disposable pad and connects to many currently available circulating water pumps. The hard heated pad also is available in a variety of sizes. The main advantage to this style of heating system is the pad itself, because the acrylic plastic glass is puncture proof.
A relatively new device available for thermoregulation is a Hot Dog Warming Controller and Blanket (Augustine Temperature Management, Eden Prairie, MN; Figure 1-25). This system uses electricity to warm the pad but does not pose the same threat for thermal burns as a traditional heating pad poses. The Hot Dog Blanket has a sensor in the pad to regulate the heat generated. The pads are not puncture proof but are not harmed if punctured by a cat claw or other penetrating object. Pads are available in a variety of sizes, and cleanup is easily accomplished by spraying the pads with any commonly used disinfectant.
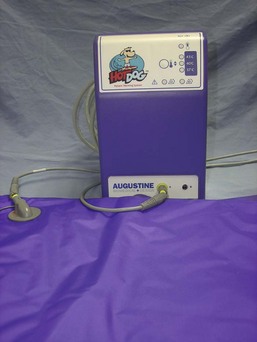
FIGURE 1-25 Hot Dog Warming Controller and Blanket (Augustine Temperature Management, Eden Prairie, MN).
Another option for thermoregulation of the surgical patient is the use of forced warm air (Figure 1-26). One example is the Bair Hugger (Arizant Inc., Eden Prairie, MN). The pad is placed around the patient, then “inflated” with warm air. A variety of pads are available to best suit the size of the patient. The constant flow of warm air that envelops the patient is very effective at maintaining or increasing their body temperature. Although expensive, this pad is a viable alternative or addition to a circulating warm-water blanket. The pad is not puncture proof, but there is less risk of puncture because the pad is not placed near the animal until the patient is anesthetized.
Surgical Lights
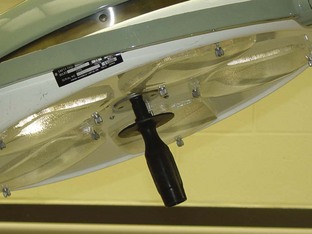
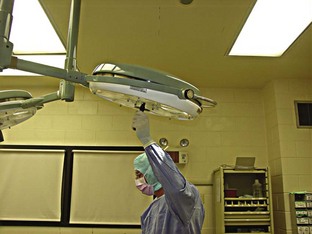
The lights used in the surgery room can make a huge difference for the surgeon. Adequate lighting is imperative. Many brands and styles of lights are available. Single-beam lights that have a mechanism for a wide lateral as well as a vertical range of motion are desirable. Ceiling or wall-mounted lights are a much better choice than the standing floor models. If installed in the ceiling, the lights are out of the way and easily manipulated. Removable light handles that can be autoclaved are a helpful feature because once wrapped and sterilized, the handles can be aseptically opened and placed on the sterile field (Figure 1-27). The surgeon or surgical assistant can then place the handles on the lights, allowing either person to adjust the lights directly (Figure 1-28).
Surgery Table
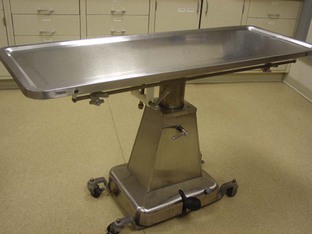
It is also important to have a quality surgery table. Many different types are available depending on the size of the surgery room and financial constraints. A tabletop can be a solid surface or can be designed in a split-surface style. The solid-top model is generally less expensive and can be more difficult to work with because fluids pool on the tabletop and can soil the patient (Figure 1-29). The split-top table has the double advantage of (1) a tray under the space in the table to collect any fluid that may run off the surgical field and (2) the ability to be adjusted to help maintain the patient (especially large, deep-chested dogs) in dorsal recumbency (Figure 1-30).
Another available feature in surgery tables is the incorporation of a heated tabletop. This heated surface aids in thermoregulation and eliminates the need for a circulating water blanket under the patient. Surgery tables should also have the capability to be raised and lowered and to tilt in one direction. Hydraulics or electric power can be employed to accomplish variation in height, whereas manual effort is generally required to tilt the table.
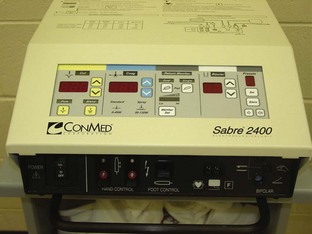
Electrosurgery
The use of electricity, transmitted through a special hand piece to cut or coagulate vessels, is very advantageous in surgery. Hemostasis is vital during surgery, and cautery is an important tool available to accomplish it. Both single-use and reusable cautery hand pieces are available. A member of the sterile team activates a hand piece by pushing switches or buttons on the hand piece or by stepping on a foot pedal (Figures 1-31 and 1-32).
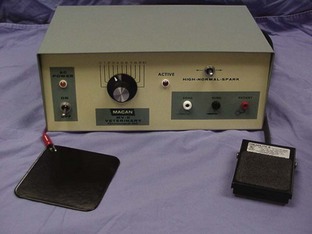
Electrosurgery can be either monopolar or bipolar. When monopolar electrosurgery is used, a ground plate must be placed under the patient. When the hand piece is activated, the electric current passes through the patient to the ground plate and then is diverted away from the patient. The ground plate must have sufficient contact with the patient to transmit the current properly to the ground plate. A water- or saline-saturated sponge should be placed on the ground plate between the patient and the plate. Alcohol is never used to saturate the sponge because it may lead to patient burns or even fire. Bipolar electrosurgery utilizes a hand piece that resembles a thumb tissue forceps. As the hand piece is activated, the current passes from one tip to another, and therefore no ground plate is needed.
Monopolar electrosurgery can be used in one of two ways. First, the hand piece can be activated, and the tip of the hand piece can directly touch the tissue or vessel that needs cauterizing (Figure 1-33). Second, a hemostat can be placed on the tissue or vessel that needs to be cauterized. The hemostat is then elevated off the surgical field so that the only metal touching the patient is the tip of the hemostat. The cautery hand piece tip can then be touched to the hemostat as the hand piece is activated. The metal of the instrument conducts the electric current, therefore cauterizing the tissue held in the clamp (Figure 1-34). Monopolar hand pieces can also be used with the appropriate tip, to make the surgical incision. Although wonderful at keeping bleeding to a minimum, an incision created with an electrosurgery unit takes longer to heal, because of the charring of the tissue. Bipolar electrosurgery hand pieces, by design, look like a thumb tissue forceps. Therefore they can pick up either tissue or a vessel that needs to be coagulated.
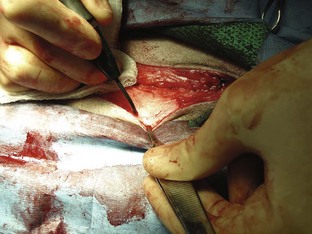
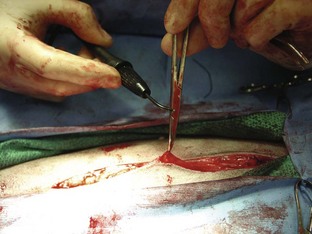
FIGURE 1-34 Electrocautery applied indirectly to the tissue to be cauterized through an instrument grasping the tissue.
Charred material may build up on the tip of the hand piece, impeding the flow of current. It may be cleaned by scraping with a scalpel blade (away from the sterile field) or by using a commercially available “scratch pad.”
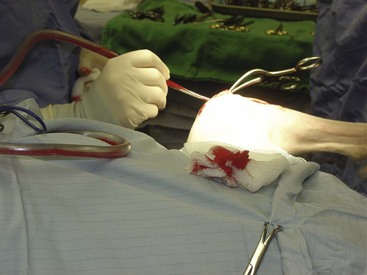
Suction
Suction can be defined as the ability to remove fluid or air from an area by using either a manual or a mechanical device. Suction can be performed with a syringe, a bulb syringe, or a mechanical pump. For application in surgery, the mechanical pump is most frequently used. Suction is an extremely important tool in surgery and if unavailable can make the procedure increasingly more difficult and frustrating for the surgeon. Whether an abdominal, orthopedic, or neurologic procedure is performed, having suction available is essential. For abdominal procedures, suction can be used to remove abdominal fluid in the event of a hemoabdomen or uroabdomen. Abdominal lavage is a common practice after an exploratory procedure, and mechanical suction assists in the removal of the lavage fluid better than any other option. Lavaging a joint, flushing a septic site, and removing bone dust created while drilling screw holes for a fracture repair are examples of how suction is useful in orthopedic surgery.
There are also risks associated with suction, and veterinary personnel must understand these risks to prevent unnecessary trauma to the patient. The vacuum pressure of the suction is easy enough to control with a manual device, but care must be taken to use appropriate levels of vacuum with mechanical devices. In abdominal procedures, if the vacuum level is too high, omentum may become entrapped in the suction tip and may be damaged. A sufficiently strong vacuum that meets the needs of the surgical procedure without being excessive, is the goal. Inappropriately low vacuum settings will not adequately suction the fluid and debris on the field and will prove to be frustrating.
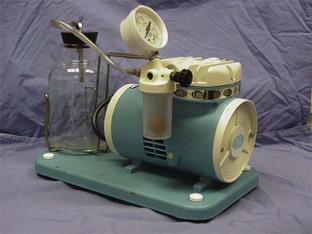
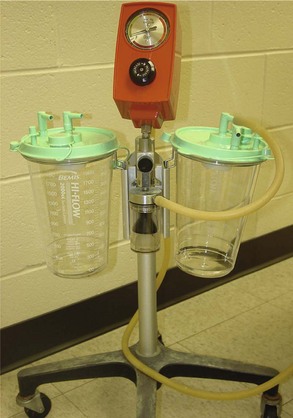
Suction Machines
Many different models of suction machines are available. Some models run on electric power; a motor is used to generate the vacuum (Figure 1-35). Other models require a central vacuum system to operate (Figure 1-36). Any type of machine requires some sort of bottle or receptacle for the collected fluid. Older models may still have glass jars, which can be dangerous and easily broken. Plastic bottles or canisters are more desirable. Usually the cover of the bottle has some type of “float” or safety device that will not allow fluid into the working mechanism of the suction machine if the bottles become too full.
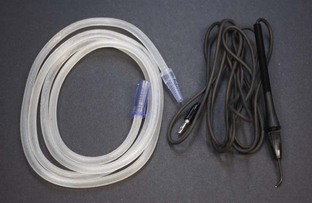
In addition to the suction machine, a suction tip and tubing are needed. Suction tubing is available in 6- and 10-foot lengths (Figure 1-37). The tubing is usually prepackaged and sterilized for single-time use. After the package is opened onto the sterile field, one end of the tubing is attached to the suction tip (usually sterilized separately), and the other end is dropped off the field to be connected to the nonsterile suction unit. Because of the length of the tubing and the difficulty in cleaning appropriately, this is one piece of equipment that is truly disposable and should be discarded after surgery. If for some reason the tubing is not used after being opened, it can be resterilized. Ethylene oxide sterilization must be used because this vinyl tubing will not withstand steam sterilization.
Suction Tips
Different designs of suction tips are more appropriate for some procedures than others.
Poole: A Poole suction tip is a two-piece instrument best used to remove large volumes of liquid or fluid (Figure 1-38). The inner cannula can be used alone or in conjunction with the outer basket. The basket is designed with many holes to remove the liquid quickly without entrapping any tissue.
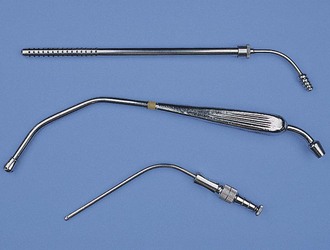
Frazier/Adson: The Frazier/Adson suction tip is a single tube with a fairly small opening (see Figure 1-38). Often there is a thumb hole to help control the amount of vacuum. This instrument is frequently used in orthopedic and neurologic procedures.
Yankauer: The Yankauer suction tip is also a single-tube design, but it is bulkier than the Frazier (see Figure 1-38). The Yankauer is a general-purpose suction tip.
Plastic Tubing Connector
Some surgeons have concerns that the abrasive metal tip of the Frazier suction tip may be traumatizing the bone or cartilage during orthopedic procedures. A good alternative is an Argyle Bubble connector (Figure 1-39). This plastic tubing connector fits securely into the suction hose and is small enough to be efficient and lightweight enough to be easy to use.
Surgical Instruments
Surgical instruments are a major investment for the veterinary hospital. It is important that instruments be used for their designed purpose. Improper use can damage or destroy instruments.
Manufacturing
Instruments are generally made of stainless steel, although some disposable models may be made of plastic. The stainless steel used is composed of iron, chromium, and carbon. Martensitic stainless steel has higher carbon content and is generally used for cutting instruments because the potential for hardness during the tempering stage is greater. Austenitic stainless steel has higher chromium content and lower carbon content. This metal is used for hemostats and needle holders. Austenitic steel is not as hard as martensitic steel, and as a result, tungsten carbide inserts are often added to the austenitic needle holders to increase their durability.
The following five steps are involved in the production of surgical instruments:
1. Forging: forming or shaping of an instrument by heating and hammering.
2. Milling: cutting a forged piece to produce a final product.
3. Tempering: hardening the instrument by slowly heating in a salt bath and then immersing in oil, or “quenching.”
4. Passivation: using a chemical bath to remove the particles created from grinding and other foreign materials, strengthen the steel, and aid in rust protection.
5. Polishing: refining the surface to produce a shiny or matte finish.
Components
Veterinary surgery personnel must know the basic parts of surgical instruments to use, clean, and inspect them appropriately (Figure 1-40).
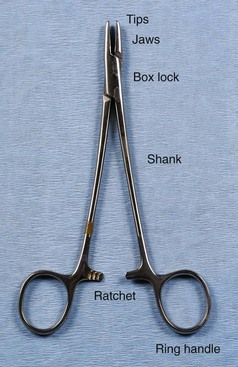
FIGURE 1-40 Basic components of a surgical instrument. (From Bassert JM, McCurnin DM, editors: McCurnin’s clinical textbook for veterinary technicians, ed 7, St Louis, 2010, Saunders.)
The first part of the instrument to identify is the jaw or tip. This area can be traumatic or atraumatic in design, depending on the intended use, and can be straight or curved. The jaw or tip can have serrations, teeth, or flat surfaces. Serrations can be horizontal, vertical, or a combination (e.g., Rochester Carmalt hemostatic forceps). The arrangement of the teeth can be 1 × 2, 2 × 3, and so on. Tips with a 1 × 2 configuration have one tooth on one side of the tip and two teeth on the opposite side. The teeth can also be arranged in rows (e.g., Adson Brown thumb tissue forceps). The tips or jaws can easily become damaged. Teeth and serrations of the tips or jaws should be thoroughly evaluated after each use to observe any defects that may have resulted from use. Blades are available on most types of scissors as curved or straight. Some types of scissors also have the option of blades with sharp or blunt tips. In a description or identification of instruments, the blades or tips can provide important information. For example, identifying an instrument as a “curved Metzenbaum dissecting scissors” defines the shape and type of scissors. Identifying an operating scissors as a “curved, sharp/blunt (s/b) operating scissors” reveals even more about the instrument.
The second important part of the instrument, the box lock, is present only on instruments with ring handles. The box lock is the joint or hinge of the instrument. This area absorbs great stress when the instrument is in use, and therefore the box lock must be inspected carefully to detect any cracks or evidence of degradation.
The third part of the instrument to identify is the shank (also referred to as the “shaft”) or body of the instrument. This part is usually the longest area and determines the instrument’s overall length. Instruments may range from 3 to 12 inches in total length depending on the length of the shank.
The ratchet is the next part of the instrument but it is found only on instruments with ring handles. The ratchet is a device with interlocking teeth that will lock an instrument jaw in a closed position. Degradation of this part of the instrument is usually seen as the inability of the ratchet to remain locked.
Some instruments also have ring handles, which serve as the means for using and controlling the instrument. Proper handling of an instrument with ring handles is achieved by placing the thumb and ring finger in the rings. The thumb ring should not advance beyond the first knuckle of the thumb, and the ring on the ring finger should not advance beyond the second knuckle. The index finger can rest on the shank to help stabilize the instrument (Figure 1-41).
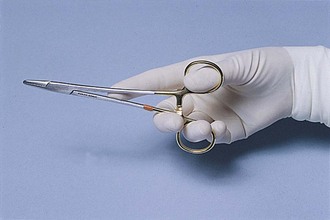
FIGURE 1-41 Thumb-ring finger grip for ring-handled instruments. (From Fossum TW, Hedlund CS, Hulse DA, et al: Small animal surgery, ed 3, St Louis, 2007, Mosby.)
General surgical instruments are available in a variety of sizes. Depending on the area of the body having surgery, shorter or longer instruments may make the task easier for the surgeon. For instance, needle holders may be found in sizes ranging from 4 to 12 inches. Thumb tissue forceps are also available in up to 12-inch lengths. Indications for use of the longer instruments include thoracic surgery on a deep-chested dog and an abdominal exploratory procedure on a large dog.
General Surgery Instruments
Many types of scissors are available to the veterinary surgeon (Figure 1-42). As with all instruments, it is important that scissors be used only for their intended function.
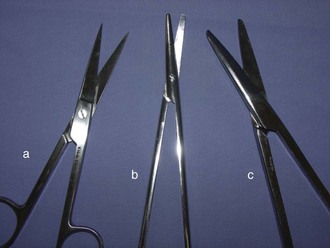
FIGURE 1-42 Surgical scissors. (a) Sharp/sharp straight operating scissors; (b) curved Metzenbaum dissecting scissors; (c) straight Mayo dissecting scissors.
Operating scissors: The intended use of operating scissors is to cut only inanimate objects (e.g., suture, paper drapes, and sponges). Its design can be straight or curved, and the blades can be sharp tipped or blunt tipped (Figure 1-43).
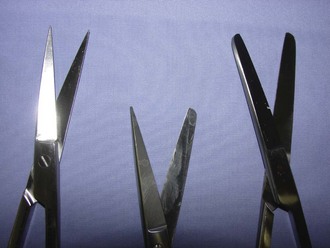
Mayo dissecting scissors: The Mayo dissecting scissors is used when cutting large muscle masses, cartilage, or any other nondelicate tissue. The blades are thick and approximately one-third the instrument’s length. The blades can be straight or curved.
Metzenbaum dissecting scissors: The Metzenbaum dissecting scissors is used for delicate surgical dissection. The blades are thin, delicate, and approximately one-fourth the instrument’s overall length. The shaft is long and thin, and the blades can be straight or curved.
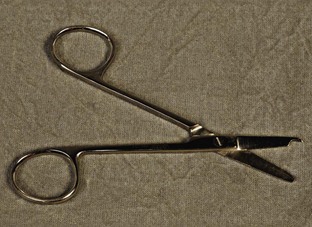
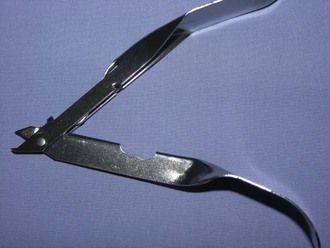
Suture removal scissors: Sometimes called a “suture scissors,” the suture removal scissors usually is not found in the surgery pack but rather is stored in the treatment area or examination room. The suture scissors has one blade in the shape of a hook that cradles the suture to be cut (Figure 1-44). This instrument is designed to remove external sutures from the skin.
Hemostats
Although there are many types of hemostats, only five styles are typically used in veterinary surgery (Figure 1-45). As their name implies, hemostats are used to aid in controlling hemostasis in the surgical field. Hemostats can have jaws that are straight or curved and serrations that are horizontal, vertical, or a combination. Serrations also may be partial or may extend the full length of the jaw.
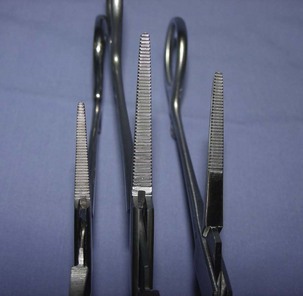
Halstead mosquito hemostatic forceps: The Halstead hemostat has small jaws with fine horizontal serrations that extend the entire length of the tip. The instrument is generally used to clamp small vessels (e.g., “skin bleeders”).
Kelly hemostatic forceps: The Kelly hemostat is larger than the Halstead hemostat. The horizontal serrations are wider and only extend half the length of the jaw. The Kelly hemostat can be used for medium-sized vessels or small tissue masses.
Crile hemostatic forceps: The Crile hemostat is similar to the Kelly hemostat, with the difference being how far the serrations extend along the jaws. The Crile hemostatic forceps has serrations that extend the entire length of the jaw.
Ferguson angiotribe: Although not a true “hemostat,” the Ferguson angiotribe is an extremely strong forceps that is quite traumatic, with a crushing jaw design that has one raised jaw and one recessed jaw. This clamp can be used on vessels of almost any size and on any tissue that will not need to be viable in the body (e.g., uterine stump) (Figure 1-46).
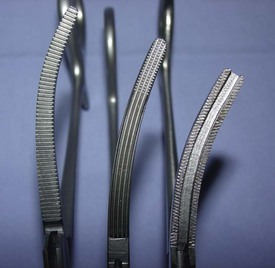
Rochester-Carmalt hemostatic forceps: The Rochester-Carmalt hemostat is quite different from other hemostats. The instrument has both horizontal and vertical serrations on the jaw near the tip. The result is a checkerboard appearance at the tip of the jaw. This hemostatic forceps is usually about 8 inches long, making it a large instrument, and the jaw is approximately  inches of the total length. It can be used to clamp large vessels or large tissue masses.
Rochester-Pean hemostatic forceps: The Rochester-Pean hemostatic forceps is a large hemostat (usually 8 inches in length) with horizontal serrations the entire length of the jaw. The jaw length is similar to that of the Rochester-Carmalt hemostatic forceps (≈ inches in length). The length is the factor distinguishing it from the Crile hemostatic forceps. This forceps can also be used to clamp large muscle/tissue masses or large vessels.
Needle Holders
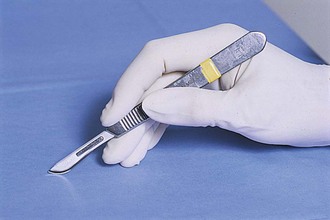
Needle holders have very short jaws that have a roughened platform in the tips to allow for a secure grip of the suture needle (Figure 1-47). As previously mentioned, tungsten inserts may be used in the jaws of needle holders to increase instrument longevity. Needle holders are the only surgical instruments designed with the specific intent of holding metal. Therefore the needle holder is the only instrument that should be used to hold needles or to place scalpel blades onto scalpel handles.
Derf: The Derf needle holder is small in length and is used with small animals, with special species, and in extraocular ophthalmic procedures (considered too large for intraocular surgery).
Olsen-Hegar: The Olsen-Hegar instrument is different from other needle holders in that it has scissors built into the jaws. This added feature is a time-saving device that allows the suture to be cut without having to reach for another instrument. The main disadvantage to having the scissors as part of this needle holder is that an inexperienced user may inadvertently cut suture material when trying to grasp the needle.
Mayo-Hegar: The Mayo-Hegar needle holder is a commonly used instrument available in a variety of lengths, depending on the surgical procedure and the surgeon’s preference (Figure 1-48).

Scalpels
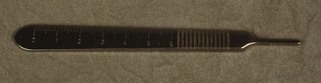
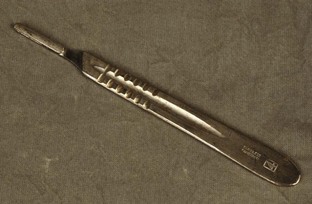
Scalpel blade handles: Scalpel blade handles are designed to hold scalpel blades for easier and safer use. Scalpel blades numbered 10 through 19 fit on the No. 3 scalpel handle (Figure 1-49). Blades numbered 20 through 29 fit on the No. 4 handle (Figure 1-50). Handles often have units of measurement on them to be used as needed. One such use may be as a reference marker for procedures requiring photographic documentation (e.g., mass removal, foreign body removal). Scalpel handles should be held in a pencil grip with the index finger on the noncutting edge of the blade to stabilize the scalpel (Figure 1-51).
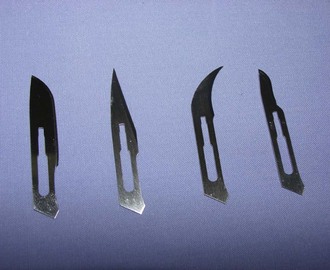
Scalpel blades: The most common scalpel blade used in small animal surgery is the No. 10 (Figure 1-52). This blade is used primarily for skin incisions. A No. 11 blade is tapered to a pointed shape and is generally used to create a “stab” incision. The No. 12 blade resembles a hook, with the cutting edge on the inside curve, and is frequently used to declaw a cat. A No. 15 blade has the appearance of a No. 10 blade, but with only half the No. 10’s length. The larger scalpel blades (Nos. 20 to 29) are generally reserved for use in large animal surgery.
Thumb Tissue Forceps
A thumb tissue forceps (casually referred to as a “pick-up”) is an instrument used to grasp and retract tissue on a short-term basis (Figure 1-53). Instruments in this category resemble a tweezers, but thumb tissue forceps should never be referred to as “tweezers.” A pencil grip is used to hold this instrument in the nondominant hand (Figure 1-54). The best control of pressure is achieved when the forceps is held as if it were a pencil. The shaft of a thumb tissue forceps is generally straight, but some designs have unique shapes to the shaft that help distinguish them from others (e.g., Adson, Bayonet). The tips can be toothed, smooth (atraumatic), or fairly traumatic in design.
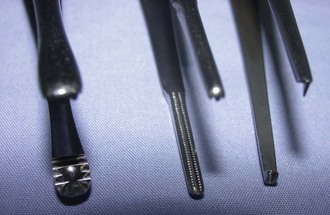
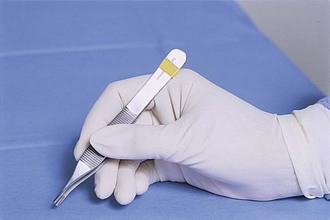
FIGURE 1-54 The pencil grip used for holding thumb tissue forceps. (From Fossum TW, Hedlund CS, Hulse DA, et al: Small animal surgery, ed 3, St Louis, 2007, Mosby.)
DeBakey thoracic thumb tissue forceps: Originally designed as a cardiovascular instrument, the DeBakey thoracic thumb tissue forceps is an excellent example of an atraumatic forceps that should be used only on delicate tissue. The tips have no teeth but rather a ridge or groove design. These forceps are often used in thoracic, vascular, or neurologic procedures.
Tissue thumb forceps: The tissue thumb forceps has a straight shaft and can range in length from 5 to 12 inches. The tips can have 1 × 2 or 3 × 4 teeth.
Russian thumb tissue forceps: The Russian thumb tissue forceps has a very traumatic, bulky tip. This instrument is generally reserved for use on skin or tissue that is being removed from the animal.
Adson thumb tissue forceps: The Adson thumb tissue forceps has a very narrow tip that broadens to a  -inch-wide shaft. The tips can be of various designs and are described as follows:
Adson dressing: The Adson dressing forceps tip has no teeth but does have flat, atraumatic serrations. This Adson style is generally used as an aid in placing or removing dressings on wounds.
Allis tissue forceps: The Allis tissue forceps is neither a hemostat nor a thumb tissue forceps. Its intended use of grasping tissue in a fairly traumatic way makes it a unique instrument. This ring-handled instrument has tips that may have teeth configured in a 3 × 4 or 4 × 5 style (Figure 1-55). Because of its traumatic nature, the Allis tissue forceps is generally used to grasp tough tissue (e.g., linea alba) or tissue being removed from the animal (e.g., tumor, skin).
Retractors
Retractors are instruments used to deflect or retract tissue or other structures away from the surgical field where the surgeon is working. Retractors can be handheld (Figure 1-56), which require at least two sterile members of the surgical team, or self-retaining (Figure 1-57).
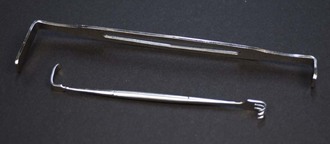
FIGURE 1-56 Handheld retractors. Top, U.S. Army retractor; bottom, Senn double-ended retractor. (Photo by John T. Miller.)
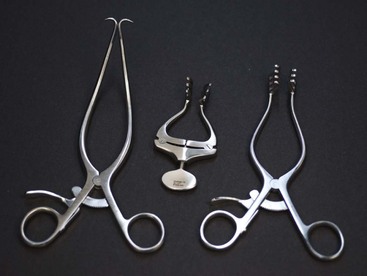
FIGURE 1-57 Self-retaining retractors. Left to right, Gelpi, Jansen, Weitlaner. (Photo by John T. Miller.)
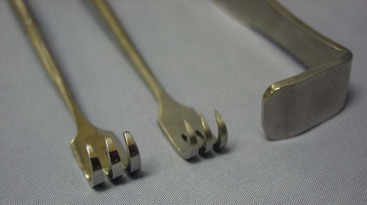
U.S. Army: This handheld retractor is a double-ended retractor with different lengths of blades on either end. It has no teeth on the blades and therefore causes little tissue trauma, other than pressure damage if applied too forcefully to the tissue (Figure 1-58).
Self-Retaining Retractors
Gelpi: With its single, sharp-pointed tips, the Gelpi self-retaining retractor is a fairly traumatic instrument. It has limited use in soft tissue surgery but is extremely useful in orthopedic and neurologic surgery.
Weitlaner: The Weitlaner self-retaining retractor has teeth in the jaw that can be blunt or sharp. Although it is used more often in orthopedic surgery, the blunt-toothed version can be used in some soft tissue surgical cases.
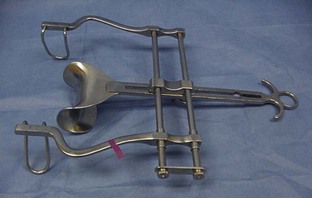
Balfour: The Balfour retractor is one of the few self-retaining retractors frequently used in soft tissue surgery (Figure 1-59). Available in adult and pediatric sizes, it is extremely useful for abdominal procedures. While keeping the abdominal walls in lateral retraction, it also has a third blade for cranial retraction as well. This widespread retraction provides excellent visualization of the abdominal cavity for the surgeon.
Towel Clamps
Towel clamps are instruments used to secure the sterile drapes to the patient during surgery or to secure the sterile drapes to one another (Figure 1-60). Towel clamps may have a penetrating design, which means the tips are sharp and pointed and are intended to pierce the patient’s skin to hold the sterile drape in place. They also may have a nonpenetrating style, which is more likely to be used to secure one drape to another.
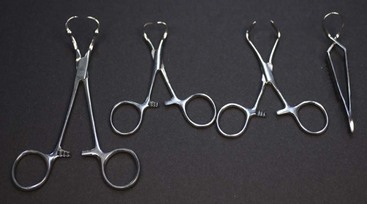
Backhaus: The most common style of towel clamp, the Backhaus has penetrating tips and is available in  - or
- or  -inch sizes.
Roeder: The Roeder style is unique in that it has balls on the tips. The balls prevent the towel clamp from being placed too deeply into the tissue.
 and
and  -inch sizes. The feature of nonpenetrating tips makes this an ideal clamp for securing second-layer drapes, whether cloth or paper, to the ground drapes.
Miscellaneous General Instruments
A few miscellaneous instruments are found in most veterinary surgical packs.
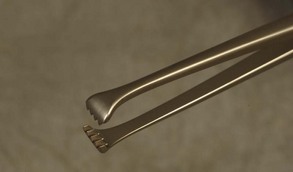
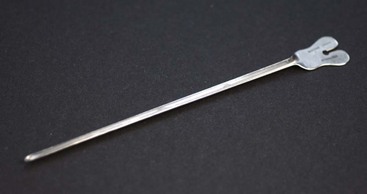
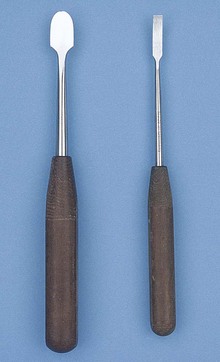
Snook spay hook: Some surgeons use the Snook spay hook to find and exteriorize the uterine horns when performing an ovariohysterectomy on dogs and cats.
Dowling spay retractor: The Dowling spay retractor was designed to assist the solo veterinary surgeon in performing an ovariohysterectomy on a canine or feline patient. By isolating the uterine horn with the retractor, the surgeon has better visualization and stabilization for ligation and excision (Figure 1-61).
Needle rack: The needle rack is a spring mounted on a metal base designed to store “eyed” free needles during the autoclaving process.
Groove director: The groove director is designed to aid the surgeon in making incisions on the linea alba. This instrument provides a “channel” that the scalpel can follow, to avoid accidental incising of abdominal viscera (Figure 1-62).
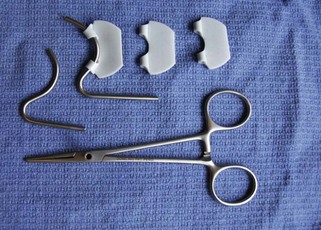
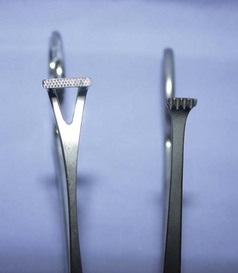
Staple remover: When skin staples are used instead of suture, a special instrument is required to remove the staples (Figure 1-63). The staple remover has two “teeth” on one side and one tooth on the other. To use it properly, the two teeth are placed between the staple and the patient; the single tooth then presses into the top of the staple. This arrangement bends the staple, removing the edges from the skin.
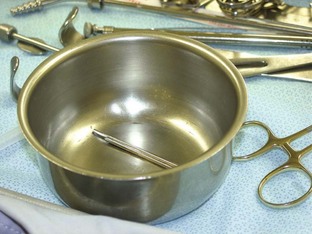
Bowls: Every instrument pack should have at least one bowl. The bowls can be used for holding saline for lavage or for storing sharps during the procedure to help keep the instrument table safe and clean (Figure 1-64).
Soft Tissue Surgery Instruments
Many instruments are available for use in soft tissue surgery. The use of specialized intestinal clamps, thoracic vascular clamps, or thoracic retractors can significantly enhance the efficiency with which the surgeon performs.
Intestinal Clamps
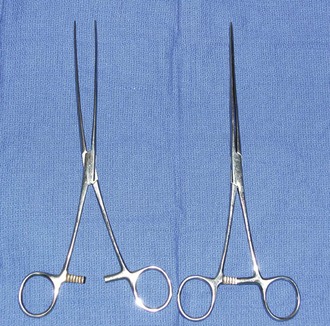
Intestinal clamps are varied in construction, and the type utilized in a procedure depends on the intended outcome of the tissue being clamped. Tissue that is not viable or that is being removed can be clamped with a more traumatic clamp, like a Rochester-Carmalt forceps. Tissue that merely needs to be manipulated but will remain in the patient needs to be handled with more care. Intestinal forceps such as Doyen intestinal forceps (Figure 1-65) and Babcock intestinal forceps allow handling of the delicate tissue without traumatization or compromise of blood flow. Due to similarities in appearance and construction, it is easy to confuse the Babcock intestinal forceps and the Allis tissue forceps (Figure 1-66). It is the responsibility of the veterinary technician to keep the two forceps separate and to understand the differences between the two very unique instruments.
Thoracic Instrumentation
Retractors: Thoracic surgery requires the use of appropriately designed instrumentation. A Finochietto retractor is designed to retract the thoracic wall. With the adjustable blades and sturdy construction, the Finochietto is the retractor of choice for thoracic surgery. Two sizes are available; large, which is appropriate in animals larger than 10 kg, and small, which is appropriate for animals smaller than 10 kg. Malleable retractors, although hand held, may be of use in thoracic surgery as well. The wide variety of widths available and the ability to conform the retractor to whatever depth and shape is needed are a benefit. For instance, a wide malleable retractor would be an effective instrument to employ to retract the lungs within the surgical field.
Thoracic forceps: Depending on the procedure being performed, specific thoracic clamps can be very beneficial. Satinsky clamps, Cooley clamps, and 90-degree Mixter forceps are all examples of vascular instrumentation that can make a surgical procedure easier. With different angles of jaws and different tips, these clamps can be utilized to clamp off vessels in places that are difficult to reach with conventional clamps.
Biopsy Instrumentation
Special instruments have been created for the efficient collection of a tissue biopsy specimen. Depending on the type of tissue to be biopsied (i.e., liver, kidney, bone), different pieces of equipment should be utilized to encourage the best possible sample.
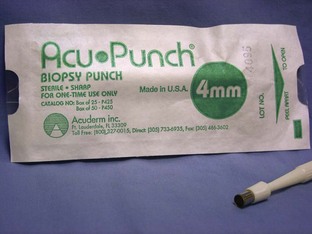
Punch biopsy: A punch biopsy instrument comes in a variety of sizes (Figure 1-67). Usually 2-mm, 4-mm, and 6-mm are available. The appropriate size to use is depends on the size of the tumor. The intent of the punch biopsy instrument is to collect a core sample from the suspicious tissue. A thumb tissue forceps and a Metzenbaum scissors are also needed when using a punch biopsy. The use of the punch biopsy is described in Chapter 7.
Needle punch biopsy: Needle punch biopsy instruments are currently manufactured by a variety of companies. Instruments are equipped with either a cutting or core biopsy needle and are available as manual and automatic devices. These instruments take a small piece of tissue (approximately the size of a pencil lead) for microscopic evaluation. Ultrasound-guided biopsies of internal organs, including liver, spleen, kidney, and prostate, are often performed with these instruments. The technique for using these types of biopsy punches is somewhat complicated, and the surgeon and technician must have a thorough understanding of the mechanics of the instrument in order for it to work properly. Chapter 7 contains a detailed description of how to use this type of instrument.
Bone biopsy: Bone biopsy specimens are often collected using either a Michele Trephine or a Jamshidi biopsy needle. Both these instruments obtain a core sample from the tissue. The Jamshidi needle biopsy yields a smaller sample but is a less invasive procedure. The Michele trephine collects a larger sample of tissue, but higher risks are associated with its use because of the size of the sample. A description of the technique for using these biopsy instruments can be found in Chapter 7.
Orthopedic Surgery Instruments
Many types of orthopedic instruments are available. The instruments described here are the basics needed for orthopedic surgery and provide a starting point for building an orthopedic surgical instrument inventory.
Bone Holders
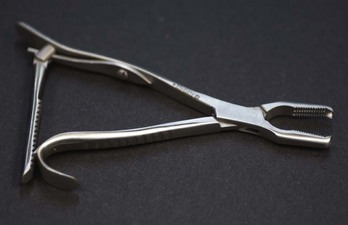
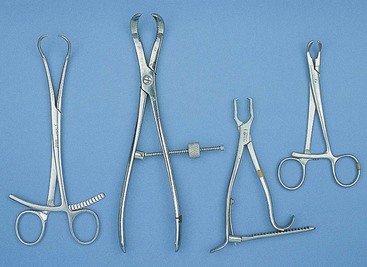
Bone-holding clamps are designed to hold bone fragments together until permanent fixation can be achieved. Bone holders can have pointed tips, toothed tips, or serrated tips (Figure 1-68). Bone holders are available in a variety of sizes and styles (Figure 1-69). Depending on the bone that is fractured and the type of fracture, certain styles of bone holders may be better suited than others.
Periosteal Elevators
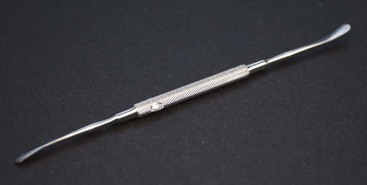
The periosteal elevator is used to prepare the fractured bone for permanent fixation. As the name implies, the intended use is to elevate the periosteum from the bone so that the implants can be placed. Periosteal elevators are available in many shapes and sizes, with the most popular styles being the Freer elevator (Figure 1-70), the ASIF (Association for the Study of Internal Fixation) or Synthes elevator (Figure 1-71), and the Adson elevator.
Bone Rongeurs
Rongeurs have cupped tips with sharp edges and work with a squeezing action of the handles (Figure 1-72). Rongeurs are used to break up bits and pieces of bone for grafting purposes. Pieces of bone too small to reattach to the animal are broken down into small pieces and packed around the fracture lines to encourage new osteoblast formation and promote healing. Rongeurs can also be used to remove pieces of unnecessary bone.
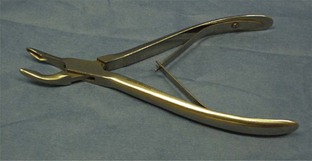
Bone Cutters
Bone cutters have handles with squeezing and spring action, similar to those of rongeurs. Bone cutters have cutting-edged tips designed to cut through bone and to remove small pieces of bone.
Bone Curettes
Bone curettes are single-handled instruments that have a cupped tip surrounded by sharp edges. They are used to collect (“harvest”) bone graft material or to shape and scrape bony surfaces.
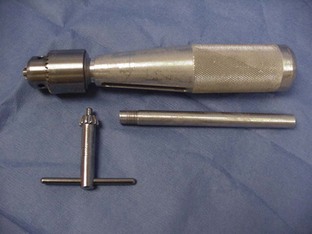
Hand Chuck (Jacob’s Chuck)
A hand chuck is designed to hold and drive intramedullary pins for repair of a fracture or for other orthopedic procedures requiring the use of pins (Figure 1-73). The hand chuck is a manual drill. It can hold wires with sizes from 0.035 inch and up to  inch. The pins are held securely in the hand chuck when the key is used to tighten the chuck. An extension piece is available to protect the surgeon from the pin, which may extend beyond the end of the chuck.
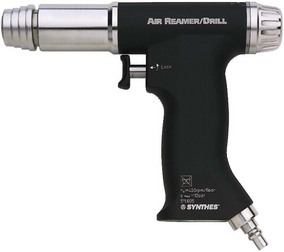
Surgical “Power Tools”
Many types of surgical procedures require the use of “power tools.” These tools can be powered by compressed nitrogen, batteries, or electricity. Fracture repair requires the use of a power drill to place implants. Neurosurgery requires the use of a specialized drill to remove the vertebral body bone. Even soft tissue surgery sometimes requires power tools. For example, a sternotomy for a thoracic surgery requires a power saw to open the sternum.
Some power devices are sold as individually functioning pieces, whereas others are available in sets that have interchangeable, multifunctional pieces. One available device has a pin driver, sagittal saw, and power drill in one set. This same set is also available in a larger/more powerful size to accommodate larger animals. Other styles of drills are available for use in neurosurgery. These drills have burrs, as opposed to drill bits, that attach to the hand piece to precisely shave or grind away the vertebral body bone. Some power tools are sold with their own sterilizing cases. The manufacturer’s recommendations should be consulted for the best way to sterilize specific power tools, such as the Synthes orthopedic drill (Figure 1-74).
Internal Fixation Implants
Implants can be used for internal fixation of bone fractures, as curative measures for traumatic situations (e.g., tibial plateau leveling osteotomy, cranial cruciate ligament repair), and to correct congenital limb deformities. Many types of implants are available, from pins and orthopedic wire to standard dynamic compression plates (DCPs) and specially designed bone plates. This section describes the basic types of implants and the equipment necessary to use them.
Intramedullary Pins
These implants are made of metal and range in size from  to
to  inch (Figure 1-75). Intramedullary (IM) pins are used to stabilize certain types of fractures or soft tissue in specific orthopedic situations. These pins can be smooth tipped or can have threaded ends. IM pins can be used alone or in conjunction with wire, plates, and screws. Pins can be placed with a hand chuck or a nitrogen air drill or electric drill.
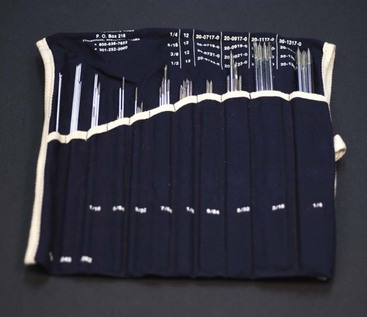
Pin Cutter
A pin cutter is used to cut pins once they have been placed in the animal (Figure 1-76). Depending on the size of the pin, a squeeze-handle cutter or a bolt cutter may be needed.
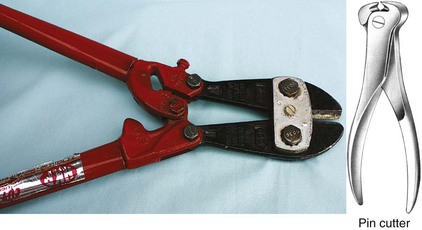
Orthopedic Wire
Orthopedic wire is stainless steel wire designed for long-term implantation in a patient (Figure 1-77). This wire is sized from 16 to 30 gauge; the smaller the number, the larger (thicker) the wire. The most common sizes used in veterinary surgery are 18, 20, and 22 gauge, but the choice depends on the size of the patient, the procedure performed, and the expected stress level of the wound (and therefore its ability to heal). Wire can be used in conjunction with pins, plates, or screws. Wire twisters are used to secure the wire and are available in many styles (Figure 1-78). Previously used needle holders are often reserved for the purpose of securing wires as well.
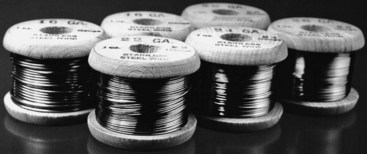
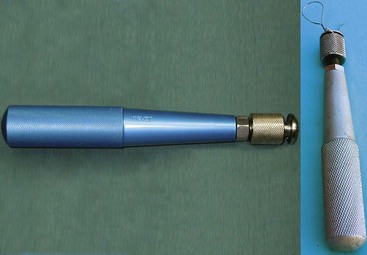
Bone Plates and Screws
Bone plates are stainless steel (except for vertebral plates, made of plastic) and are designed to aid in the reduction of fractures and the repair of bone fragments. Plates are available in a wide variety of sizes (Figure 1-79). The size chosen by the surgeon primarily depends on the size of the patient, the particular bone being repaired and its size. Plates can have different shapes (e.g., straight, T-plates, L-plates), widths (e.g., 2.0, 2.7, 3.5 mm), and lengths (e.g., four, five, six holes). The width number indicates the size of screw that should also be used to secure the plate, and the length is defined by the number of holes available to be filled with screws. Accordingly, the larger the implant, the more expensive the piece. Bone screws are sized to match the width of the plates. For example, a 3.5-mm plate would have 3.5-mm screws used with it. Bone screws also are sized by length. Screws can be anywhere from 6 mm to 45 mm long.
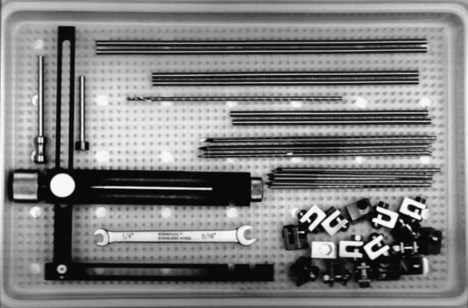
FIGURE 1-79 External fixation kit. (From Sonsthagen TF: Veterinary instruments and equipment, ed 2, St Louis, 2011, Mosby.)
Bone plating specialty instrumentation: Many special instruments are needed to place bone plates and screws to hold the plates to the bone. Placement of the screws requires that a hole be drilled with the appropriate size drill bit. After the hole has been made, a depth gauge is used to determine the length of screw that will be needed. After that, a tap is used to prethread the bone so the screw “grabs” onto the bone more securely. A dedicated screwdriver is then used to place the screw. Other instruments, such as drill sleeves, tap sleeves, and countersinks, are also used to place a screw (Figure 1-80). Bone plates can be bent and conformed to the shape of the bone by a variety of methods. Either handheld bone plate benders or a tabletop plate bender can be utilized (Figure 1-81).

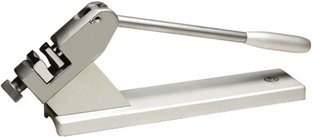
External Fixation Implants
External fixation implants are used, as their name implies, on the external surface of the skin to stabilize fractures. Often they are utilized for compound fracture repair. Rods, clamps, and sometimes rings are used with this method of stabilization. This type of surgical intervention is quite complicated, and explanation of this technique is well beyond the scope of this text. Chapter 7 briefly describes the use of these devices.
Neurosurgery Instruments
Proper instrumentation is absolutely essential for neurosurgery. Whether it is a Hall air drill or delicate instruments, successful surgical outcomes can be enhanced when the appropriate tools are used. Rongeurs should be used to remove the articular facets of the vertebrae prior to bone removal with the drill. Double-action rongeurs are preferred over single-action rongeurs. A Hall air drill, or other pneumatic drill, is a drill that, with the use of burrs, removes the three layers of the lamina, thereby allowing exposure of the spinal cord. Once the inner cortical layer is removed, periosteum is visible. A dental spatula is useful in lifting the periosteum off the cord. Dural hooks are useful in retracting periosteum away from the cord. Depending on the procedure being done, an ear curette, ophthalmic thumb tissue forceps, or iris spatulas may be needed.
Ophthalmic Surgery Instruments
Every veterinary surgical area should have a basic set of ophthalmic instruments available for use. These instruments are extremely delicate and expensive and should be handled with great care. Because of the nature of the tissue for which these instruments are routinely used, the tips are very fine, the shafts tend to be short, and the mechanism of use may be box lock or squeeze handle.
Beaver Blade Handle
The Beaver blade handle is used to hold Beaver scalpel blades (Figure 1-82F). Although some ophthalmic procedures can be performed using a No. 15 scalpel blade on a No. 3 handle, some intraocular procedures may require the use of a beaver blade.
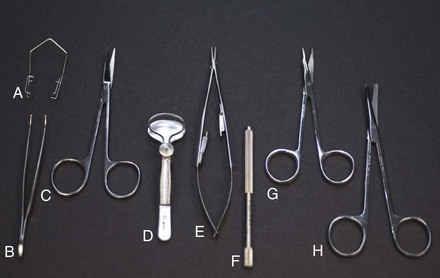
FIGURE 1-82 Ophthalmic surgery instruments. (a) Barraquer wire lid speculum; (b) curved 1 × 2 iris thumb tissue forceps; (c) straight iris scissors; (d) chalazion lid speculum; (e) Castroviejo locking needle holder; (f) Beaver blade handle; (g) Stevens tenotomy scissors; (h) curved baby Metzenbaum scissors. (Photo by John T. Miller.)
Lid Speculum
An eyelid speculum may or may not be used, depending on the procedure performed. For intraocular procedures, a Barraquer wire speculum is often used to retract the eyelids away from the surgical site (Figure 1-82A). For lid procedures, a chalazion lid speculum may be used (Figure 1-82D). This instrument is most helpful in the removal of an eyelid tumor.
Lacrimal Cannulas
Both straight and curved lacrimal cannulas are available. These stainless steel cannulas can be used to flush lacrimal ducts. One end of the cannula is adapted to accept a syringe to allow for infusion of solution. The other end is blunt or bulb shaped to permit easy passage into the lacrimal duct (Figure 1-83).
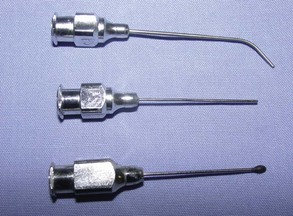
Thumb Tissue Forceps
Thumb tissue forceps are extremely delicate in design. Their function in ophthalmic surgery is the same as in general surgery. Gentle holding of tissue is imperative because the tips of these instruments are extremely delicate. It is crucial to handle the tissue of the eye and its associated structures in an atraumatic manner to avoid damaging the tissues. Examples of thumb tissue forceps are the iris 1 × 2 (Figure 1-82B), Bishop-Harmon, and Colibri.
Scissors
The scissors used in ophthalmic surgery may be miniature versions of general surgery instruments, such as the baby Metzenbaum dissecting scissors (Figure 1-82H). Others are specially designed and crafted for delicate eye surgery, such as the Castroviejo scissors. Many of the specialty scissors have a squeeze-action operation instead of the more traditional ring-handled mechanism. Two general-purpose utility scissors are typically used in ophthalmology: the Stevens tenotomy scissors (Figure 1-82G) and the iris scissors (Figure 1-82C). Compared with the Stevens tenotomy scissors, the iris scissors has a slightly longer blade, which tapers at a more constant rate from box lock to tip, as well as sharper points. Both of these scissors can be used to cut the extra-fine suture material used in ophthalmic surgery as well as tissue.
Needle Holders
The type of needle holder used depends on whether the surgical procedure is intraocular or extraocular. Extraocular procedures may be managed with a small (4-inch) Mayo-Hegar or Derf needle holder. Intraocular procedures may require a more delicate instrument, such as a Castroviejo needle holder (Figure 1-82E). As with the scissors, the specialty needle holders may have a squeeze-handle mechanism instead of the usual, bulkier ring-handle style.
Miscellaneous Ophthalmic Equipment
Hemostasis for ophthalmic surgery involves different concerns from those in general or orthopedic surgery. The delicate nature of the tissue surrounding the eye requires that materials other than sponges be used to perform hemostasis. For extraocular procedures (e.g., lid tumor, enucleation), regular, radiopaque surgical sponges are appropriate. For intraocular procedures (e.g., corneal laceration, lens luxation), a more delicate device is needed. Cotton-tipped applicators can be sterilized and used, or surgical spears (e.g., Weck-Cel cellulose sponge surgical spears, Medtronic, Inc., Jacksonville, FL) are available commercially (Figure 1-84). The spears have an arrow shape and permit pinpoint control of hemorrhages in a small working area.
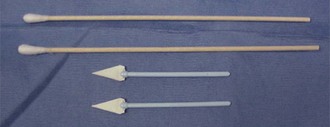
Surgical Needles
Many sizes and shapes of surgical needles are available. The needle point, the needle body, and the needle eye are considered in the categorization of needles (Figure 1-85).
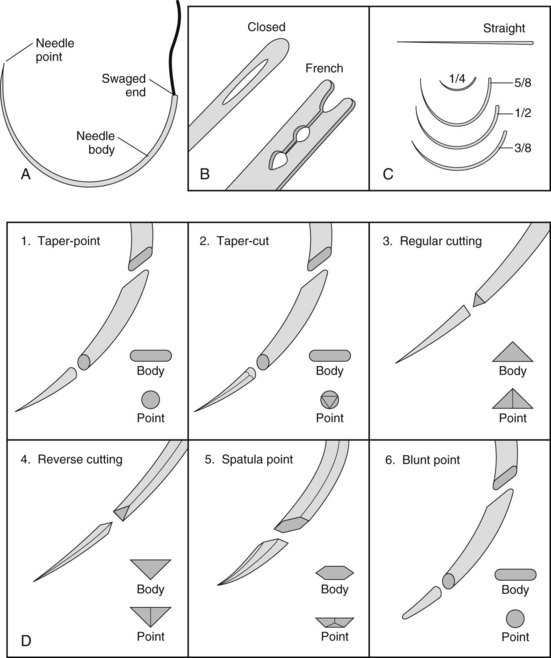
FIGURE 1-85 A, Basic components of a needle. B, Types of eyed needles. C, Needle body sizes. D, Needle body shapes. (From Fossum TW, Hedlund CS, Hulse DA, et al: Small animal surgery, ed 3, St Louis, 2007, Mosby.)
Needle Point
The needle point helps to determine the type of tissue in which the needle should be used. A taper-point needle has a sharp point that pierces and penetrates tissues without leaving small cuts because the cross section is rounded. The round needle body associated with the taper point is best used in tissue when a sealed suture line is needed, such as for suturing intestine or other hollow organs. Any tissue that should not be traumatized or is not difficult to pass a needle through will tolerate a taper needle.
A taper-cut needle is a combination of a round, tapered body and a reverse cutting point. This type of needle is easily used with tough fibrous tissue and some cardiovascular procedures. A reverse cutting needle has three cutting edges on the point—the cross section is triangular, with one of the cutting edges being the outside of the curve—and it maintains that shape in the body and is stronger than the conventional cutting needle.
A cutting-edge needle also has three cutting edges on the point and body, but the third cutting edge is on the inside of the curve. This style of needle may be most traumatic because the cutting edge on the inside of the curve cuts toward the edges of the wound, compromising the strength of the tissue.
Needle Body
The shape of the needle body can also vary widely. Needles can be straight, circular, or curved. Straight needles, sometimes referred to as Keith needles, are available but have limited application in veterinary medicine. One procedure made easier by the use of a Keith needle is the placement of a purse-string suture in the anus. The straight shape of the needle makes it easier to avoid the anal glands by allowing superficial placement of the suture.
Curved needles can either be full curve, half curve, or double curve. Needles that are double curved have both ends curved in opposite directions. Double-curved needles are generally reserved for use in large animal surgery, especially bovine surgical closures.
Half-curved needles are classified as such because only half the body of the needle is curved. They are rarely used in veterinary surgery.
Full-curved needles have the entire body of the needle involved in the curve. Varying degrees of curvature can be found, based on the portion of a full circle that is involved. For example, a  -circle needle means that if a full circle were divided into eight equal parts, the continuous curve of three of those parts would be this shape. Likewise, a half-circle needle would mean that four continuous parts (or half the circle) would be the shape of the needle. Other common circular needle shapes are
  -circle and
  -circle.
Suture Attachment End
The final portion of the needle is the suture attachment end. Some needles have eyes, which can be single or French style. Single-eyed needles must have the suture material passed through the needle eye. Suture is threaded through the eye from the inside of the curve to the outside. The threading of the needle results in a rather bulky portion of suture that must pass through the tissue, therefore creating excessive tissue drag and damage. The French-eyed needle has one complete eye and one split eye. The suture is passed through the complete eye and then pushed down through the split eye, which securely grips the suture.
The most atraumatic and therefore most common method of suture attachment is with the swaged needle, or eyeless needle. When the suture is manufactured, the needle and suture are attached to each other. With this type of attachment, the tissues undergo minimal damage because the point and diameter of the needle create the hole, and the suture simply follows along without causing further trauma. The ease of use and limited trauma of the eyeless needle make it the first choice of almost all veterinary surgeons.
Suture Material
The purpose of suture material is to hold together wound edges until the wound can withstand the stress of healing without additional support. Some examples of tissue instability that would require suture material are an intentional surgical incision, ligated vessels, and ligament, tendon, or muscle repair. Suture material is available in many forms, sizes, and colors. It is important to understand the terminology used when discussing suture to know the options available and to select the appropriate material for the procedure being performed. Although the technician will not be making the decision about which type of suture to use, he or she must have a working knowledge of the types of suture available (Table 1-2). The veterinary technician who can anticipate the type of suture that may be requested, on the basis of knowledge and experience, will be an invaluable member of the surgical team.

Characteristics
Tensile strength is the amount of force in psi that the suture can withstand (as an untied fiber) before it breaks.
Flexibility
Flexibility is the ease with which the suture is manipulated, either by the surgeon or in the tissue. Flexibility is somewhat determined by the size (diameter) and the material used to make the suture. For example, silk has better flexibility than stainless steel.
Absorbability
Suture can be classified as either nonabsorbable or absorbable. Nonabsorbable suture is not broken down by the body and can remain intact in the body for at least 2 years. Absorbable suture can be broken down by the body through different processes. During phagocytosis, leukocytes, usually neutrophils, are released and travel to the site of concern (incision) to ingest and destroy the microbes or, in the case of suture material, the foreign suture material. Suture is also absorbed through hydrolysis. The chemical compound in the suture is decomposed as it is exposed to water. Absorption of suture may begin as soon as 7 days after placement. Complete absorption may take 60 days to 2 years.
Capillarity
Capillarity describes the ability of the suture to allow microbes to “wick” (be carried) to the interior of the suture strand. This action can be curtailed if the manufacturer coats the suture at production to decrease the “wicking” action. Polytetrafluoroethylene (Teflon), wax, paraffin, silicone, and calcium stearate are substances used to coat suture. Generally, multifilament sutures are treated more often for capillarity than monofilament sutures.
Structure
There are two basic structure types of suture: multifilament and monofilament (Figure 1-86). Multifilament suture, also called braided suture, has two or more strands braided together to form the single strand of suture. Monofilament suture is a single, solid strand of suture material. Monofilament suture material tends to have less “tissue drag,” or friction, when it is being pulled through the tissues than multifilament suture material.
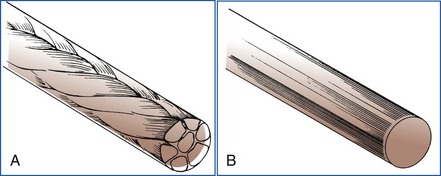
Knot Security
The ability of suture to hold the knots the surgeon has placed is imperative. Some types of suture materials hold knots better than other types. Usually, braided material has less knot slippage than monofilament suture. Once knots have been formed with the suture, they must stay secure. The slippage of a knot can result in the death of a patient if a knot that was around a major vessel slips, and the animal bleeds to death.
Color
Some sutures are dyed during the manufacturing process for easier identification after placement in the tissue. Suture material is available in dyed or undyed styles. Although not as great a concern with veterinary patients as with human patients, suture color should be considered in some cases. For example, if the patient is a black Labrador and both black nylon and blue polypropylene are available for the skin sutures, the blue sutures will be much easier to identify at suture removal in 10 days.
Origin of Material
Suture material is also classified by the origin of the material from which it is made. Natural suture material is a product made from fibers found in nature. Some examples are cotton, silk, and catgut (now made from sheep intestinal mucosa).
Synthetic material is other suture produced with the use of manufactured products. This group includes almost all the remaining suture not previously mentioned (e.g., nylon, polyglactin 910). Metallic suture is a small category of sutures and is limited to surgical stainless steel suture, which includes suture wire and staples.
The ideal suture material would have no knot slippage, would have high tensile strength, would be absorbable, would cause no tissue reactivity, would be easy to handle, and would be inexpensive. Unfortunately, no one “perfect” suture material exists, so the surgeon must consider all the characteristics of the material when deciding whether to use it for a particular procedure. In addition to the physical characteristics of the suture material, the surgeon must also consider the following criteria when selecting the suture type and size:
Sizing
Suture material is classified by size according to the United States Pharmacopeia (USP). The USP uses a numeric scale to denote size from fine to coarse. Hypodermic needles are classified by gauge, which indicates the diameter size of the needle. Intramedullary pins are classified by fractions of an inch to identify their size in diameter (e.g.,  ,
,  ,
,  ).
).
Suture is classified by the term ought. When sizing suture, the numeral “0” is used to represent “ought” or “zero.” The more zeros in a size, the smaller is the suture. For example, “0000” (pronounced “four-ought”) is the same as 4-0 (also pronounced “four-ought”). Similarly, “00” is the same as 2-0, which some refer to as “double-ought.” Size 5-0 suture material is smaller in diameter (finer) than 3-0 suture. Whole numbers alone can also be used to identify the size of suture (e.g., No. 1, No. 2, No. 3). In the sizing of suture material, whole numbers used alone, that is, without any “oughts,” increase in size with an increase in the number; the larger the number, the larger the suture. Suture is manufactured in a wide range of sizes, from 11-0 to No. 5. Smaller patients and more delicate tissue (ophthalmology or cardiovascular procedures) tend to use the small sizes, whereas the larger sizes are primarily used in large animal surgery.
Packaging
Most suture material is packaged as single-use items sterilized at the factory by the use of gamma radiation (Figures 1-87 and 1-88). Suture packaged and sterilized in this manner has a rather long shelf life, which is indicated by an expiration date on the box. Individual suture packs are opened on an as-needed basis, aseptically, onto the surgical field. Exposed but unused suture should not be resterilized but rather saved for use in nonsterile procedures (e.g., necropsy closure). If the inner suture pack was unopened and unused on the sterile field, resterilizing the package may be possible. Under no circumstances should suture be steam-sterilized. Any sterilization should be accomplished by the use of an ethylene oxide (EtO) sterilizer.
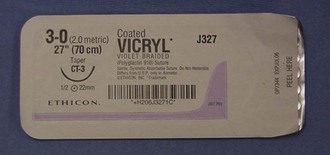
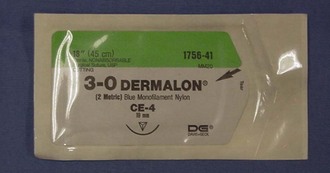
Another packaging option is to have long lengths (50-100 m) of suture placed on a reel or “cassette” by the manufacturer (Figure 1-89). Although economically a good idea, this method of storing suture material has a greater potential for contamination than individually packaged products. Also, a knot in the middle of the reel of suture is a common risk and can prove to be a difficult obstacle in removing suture from the cassette.
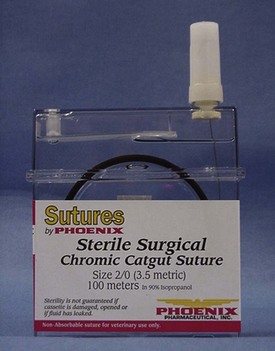
Staples
Internal and external staples are available for use in veterinary surgery and differ dramatically in cost, ease of use, and applicability.
External Staples
Skin (external) staples are stainless steel staples placed perpendicularly to an incision to close the wound (Figure 1-90A). If a patient has a history of postsurgical incisional licking or tissue reaction to other suture material, external staples may be a good option. Self-contained in a disposable stapling device, the staples can be placed quickly, significantly decreasing anesthesia time. Once placed in the skin, the staples take on a unique shape to inhibit accidental removal. A special staple removal device is required to remove the staples safely and comfortably from the patient at the appropriate time.
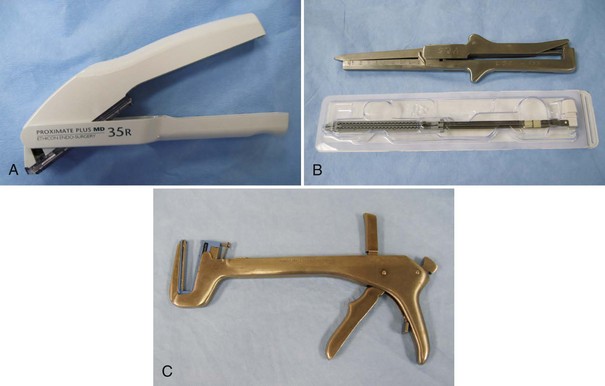
FIGURE 1-90 Surgical stapling equipment. A, Surgical skin stapler applies a single staple with each squeeze of the trigger (staple guns typically hold 25-35 staples). B, Gastrointestinal anastomosis (GIA) stapler. Staple cartridges are for one-time use and are purchased in presterilized packages. C, Thoracoabdominal (TA) stapler. Staple cartridges are purchased as for GIA stapler. Shown here with staple cartridge in place. (From Bassert JM, McCurnin DM, editors: McCurnin’s clinical textbook for veterinary technicians, ed 7, St Louis, 2010, Saunders.)
Internal Staples
Specific soft tissue cases may benefit from the use of internal stainless steel staples. Internal staples may be most advantageous in certain thoracic cases (e.g., pulmonary resection, excision of tumors in certain locations). Thoracoabdominal (TA) staples are designed to place multiple rows of staples in tissue (Figure 1-90C). Special staples are also used with gastrointestinal procedures, such as gastrointestinal anastomosis (GIA; Figure 1-90B) and end-to-end anastomosis (EEA). A number may follow the initials of the staple type to indicate the length of the row of staples. For example, TA 90 is a row of staples 90 mm in length with the TA design. Special staplers are required for each of the different types of staples. Although expensive, these staples can save time in critical cases. The benefit must be weighed against the cost so that these staples are used judiciously.
Setting Up the Surgery Suite
After the surgery room has been appropriately cleaned for the start of the day, setup of the room may begin. It is most efficient to have a “case card” for each procedure performed by each surgeon. Each case card has listed on it all the supplies and equipment the surgeon will need for the procedure. It is important to minimize the traffic flow in and out of the surgery room, and having most if not all of the supplies in the room will accomplish this goal. Reducing the number of times the veterinary technician has to leave the room to retrieve something is also better time management. It is usually better to be over-prepared with supplies in the room than to constantly run out. In operating rooms at human hospitals, everything that enters the room, regardless whether it is used or not, gets thrown away at the end of the procedure. Fortunately this is not the case in veterinary surgery rooms. Unused items can be replaced on the storage shelf for use another day.
Types of Packs
A general soft tissue instrument pack will suffice for most surgical procedures, with the exception of ophthalmic surgery. Specialty instruments can be packaged separately or assembled together in a pack, whichever is better for the clinic. Retractors, periosteal elevators, rongeurs, and so on, can be packaged individually and opened on an as-needed basis. This arrangement gives flexibility to the surgical schedule, in that if only one instrument is needed, a whole pack does not need to be opened, thus avoiding the “down time” waiting for the pack to be reprocessed. Larger groups of instruments, such as multiple cardiovascular clamps or bone plating equipment, can be sterilized as a pack. It gives the surgeon the option of having many different instruments available to meet the needs of the case. Anything not stored in the room needs to be placed in the room prior to the beginning of surgery. It is important to remember those items not typically thought of as surgical supplies, for instance, urinary catheters, orogastric tubes, and medications. Forethought must be used, depending on the surgical procedure, to ensure that all necessary supplies are available.
Scheduling Surgical Procedures
When reviewing the surgical procedures planned for the day, it is important to remember to schedule them appropriately. A good rule to follow is to schedule cases from cleanest to dirtiest. It is also good to take into consideration the difficulty and anticipated length of each procedure. Surgeons and staff will be more fresh and alert in the morning than at 3 pm. More difficult cases should therefore be scheduled earlier in the day. In orthopedic cases, any joint replacement procedure should be scheduled first thing in the morning. In fact, the room should be set up the night before, and no traffic allowed into the room until the patient is wheeled in. Subsequent procedures for the day may be scheduled as follows: a metatarsal fracture, a cranial cruciate ligament (CCL) repair, and finally, a compound radial fracture repair. For soft tissue procedures, any noninfective intrathoracic procedures should go first, followed by clean abdominal, contaminated, and, finally, dirty procedures.
In addition to difficulty, length, and contamination, there are other things to consider when developing the daily schedule. Patient status is paramount in determining the schedule. Some patients may require an earlier time on the schedule even though it conflicts with some of the other parameters. Animals in critical condition that require surgery to survive obviously take precedence. Another consideration should be equipment needs and turnover. Scheduling three procedures back to back that will need the same equipment may not be the best idea. The potential for down time with the patient on the table while the equipment is cleaned and prepared must be considered. Given all things equal, procedures that need the same equipment should be spread out throughout the day to allow for reprocessing.
Conclusion
Time the veterinary technician spends readying the surgical suite and the necessary equipment prior to bringing the patient into the surgery room is important. Being ill prepared will compromise the patient, try the surgeon’s patience, and overall prove to be a very inefficient use of time. Taking those few extra moments at the beginning of the day and of each case will ensure a smooth surgical event.
Key Points
1. The surgery suite ideally should consist of a preparation area, a scrub area, and a surgery area.
2. The preparation area should be next to the surgery room and used for patient preparation and the storage of supplies.
3. Surgical procedures classified as “dirty” should be done in the preparation area, not in the surgery room.
4. The scrub area can also be used as the sterilization area and the place for gowning and gloving.
5. Ideally, the surgery room should be a separate room. (Some state licensing boards require the surgery room be a separate room.)
6. There should be minimal cabinets in the surgery room, and if possible, the cabinets should be mounted on the wall.
7. Permanent (nonmovable) equipment consists of surgery lights, surgery table, and radiographic view box.
8. Movable equipment consists of anesthesia machine, monitoring equipment (ECG, blood pressure, airway), heating pads, IV drip stand, instrument table or Mayo stands, suction unit, cautery unit, and kick bucket.
9. All equipment should be damp-wiped daily before surgery.
10. The manufacturer’s instructions for cleaning of equipment should always be followed.
11. Proper use of surgical instruments is vital to maintain the health and usefulness of the instrument.
12. Every instrument needs to be evaluated frequently to assess its ability to function properly.
13. Each component of the anesthesia machine has a specific purpose and must be in good working order for the machine to function.
14. The flowmeter reduces the oxygen pressure to the atmospheric pressure of 15 psi, which is well tolerated by the patient.
15. The use of the fast flush valve should be avoided when a non-rebreathing system is used.
16. Only the liquid anesthetic for which a vaporizer has been calibrated should be used in the vaporizer.
17. The pressure reading on the manometer should not exceed 20 cm H2O when a patient is being ventilated.
18. The CO2 absorber removes carbon dioxide from the exhaled breath of the patient.
19. Appropriate scavenging of waste anesthetic gas is essential for the safety of the staff.
20. The use of a suture needle is determined by its shape.
21. All the characteristics of suture material should be considered before the decision is made as to type of material to use in any particular case.
22. External warming devices should be employed to help maintain patient body temperature during anesthesia.
23. Cautery can be activated by hand or foot control devices and can be monopolar or bipolar in function.
24. Suction tip styles vary widely and have recommended intended uses.
25. A No. 40 or 50 clipper blade should be used to remove hair from the surgical site.
26. Pulse oximeters measure the level of oxygen saturation of the blood.
27. Capnometry is the measurement of the level of exhaled CO2; a normal reading is 35 to 45 mm Hg.
28. Blood pressure can be monitored by direct or indirect methods.
1. Why is it important to use surgical instruments only for their designed purpose?
b. To protect their useful life.
c. The high-quality instruments are expensive and should be handled with care.
2. Why is it important for ratchets to remain locked when the jaw is closed?
a. The instrument needs to be a reliable mechanism of holding the target tissue (e.g., pedicle) or item (e.g., suture needle).
b. If the ratchets do not remain locked, complications (e.g., hemorrhage) could result.
c. Ratchets need to be protected by lock and key so that only the surgeon can unlock them when it is appropriate.
3. Which scissors is finer and more lightweight therefore used on delicate tissues?
4. Of the following needle holders, which have scissors included in the jaws?
5. True or False: The Allis tissue forceps is considered a traumatic type of forceps.
6. True or False: The Gelpi retractor is a handheld retractor that is frequently used in orthopedic surgery.
7. True or False: The Balfour retractor is a self-retaining retractor that is frequently used during abdominal exploratory procedures.
8. What part of the anesthesia machine converts the liquid anesthetic into a gas anesthetic?
9. Which valve allows for room air to enter the anesthesia system if negative pressure is detected in the system?
10. When might a situation of negative pressure exist in the anesthesia system?
a. When the oxygen source is depleted.
b. During anesthesia induction.
11. Which part of the anesthesia machine indicates the amount of pressure in the system?
12. When the rebreathing bag is being squeezed to ventilate the patient manually, the pop-off valve needs to be:
a. Open and then closed after giving a breath.
b. Closed and then opened after giving a breath.
13. Why is it important to confirm that the pop-off valve is completely open after the anesthesia machine and circuit are checked for leaks?
a. It can only reset if it is open.
b. When the patient is connected to the anesthesia machine with the pop-off valve closed, the patient will not be able to exhale.
c. It is not important; the pop-off valve can be open or closed after the system is checked for leaks.
14. Which of the following anesthesia monitoring devices is used primarily to measure the percentage of available hemoglobin that is saturated with oxygen?
15. Which of the following statements best describes the difference between direct and indirect (noninvasive) blood pressure monitoring?
a. Noninvasive blood pressure monitoring is more accurate.
b. Direct monitoring requires placing a catheter with a sensor in an artery, and indirect monitoring requires placing a catheter with a sensor in a vein.
c. Noninvasive pressure monitors can be placed only by veterinarians.
16. Ideally the surgery room is
a. at least 12 × 12 feet in dimension.
b. a separate room used only for surgery.
17. A 27-kg patient would need what size rebreathing bag?
18. The suction tip best used to remove large volumes of fluid is the:
19. Which instrument would be used to collect large amounts of bone graft material intraoperatively?
20. Of the procedures listed below, which should be scheduled as the first of the day?
Association of periOperative Registered Nurses (AORN). Standards, recommended practices, and guidelines: recommended practices for maintaining a sterile field. Denver: AORN; 2004.
Bassert JM, McCurnin DM, eds. McCurnin’s clinical textbook for veterinary technicians, ed 7, St Louis: Saunders, 2010.
Centers for Disease Control and Prevention (CDC), Healthcare Infection Control Practices Advisory Committee (HICPAC). Draft guidelines for environmental infection control in healthcare facilities. Atlanta: CDC; 2001.
Copich, W. Avoiding the common errors made in the designing of animal hospitals. Vet Clin North Am. 1972;2:537.
Crawford, L, Yu, ZJ, Keegan, E, et al. A comparison of commonly used surface disinfectants. Infect Control Today. Available at http://www.infectioncontroltoday.com/articles/0b1feat2.html, Nov 1, 2000.
Fossum, TW, Hedlund, CS, Hulse, DA, et al. Small animal surgery, ed 3. St Louis: Mosby; 2007.
Kennedy, J, Bek, J, Griffin, D, Selection and use of disinfectants, Institute of Agriculture and Natural Resources. University of Nebraska-Lincoln, 2000. Available at http://ianrpubs.unl.edu/animaldisease/g1410.htm.
1998. Recommended practices for environmental cleaning in the surgical practice setting. AORN J. 1998;67:448.
2002. Recommended practices for environmental cleaning in the surgical practice setting. AORN J. 2002;76:1071.
1998. Sacred cow survey. OR Manager. 1998;14:1.
Sonsthagen, TF. Veterinary instruments and equipment: a pocket guide, ed 2. St Louis: Mosby; 2011.
Thomas, JA, Lerche, P. Anesthesia and analgesia for veterinary technicians, ed 4. St Louis: Mosby; 2011.