Surgical Procedures
After completion of this chapter, the reader will be able to:
• Understand and give a description of each surgical procedure discussed.
• Properly position patients for specific surgical procedures.
• Drape the patient for specific surgical procedures.
• Discuss the advantages and disadvantages of specific surgical procedures.
• Identify surgical instruments and supplies that may be used for specialized surgical procedures.
• Discuss surgical options for various ophthalmic conditions.
• Discuss surgical options for aural hematomas.
• Identify and prevent common complications that may arise during surgical procedures.
• Properly identify the bones and joints of the dog and cat.
• Identify different types of fractures.
• Identify the different types of fixation devices related to fracture repair.
• Discuss the different repair options for cruciate ligament rupture.
• Identify specific biopsy instruments and understand tissue preservation techniques for biopsy samples.
• Discuss minimally invasive options to general surgery, such as endoscopy, laser surgery, and laparoscopy.
Responsibilities of the Surgical Technician
During a surgical procedure the veterinarian’s complete attention needs to be directed to the procedure being performed. Even the simplest of procedures can take a turn for the worse if the veterinarian is made to shift focus. The job of the veterinary technician is to ensure the vet does not become distracted or have to shift focus. To do this job, the technician must perform careful preplanning, as outlined in previous chapters. The technician should also strive to make sure that everything that could be required is ready in surgery prior to moving the animal into the surgery room.
Intraoperative duties usually involve assisting the surgeon during surgery as a “scrub nurse” (scrubbed-in, gowned, and gloved) or a circulating nurse. As a scrub nurse, the technician may give assistance for retraction of tissues, bone reduction, wound sponging, suction, and hemostasis. As a circulating nurse, the technician may give nonsterile circulating assistance. In many practices the technician may also be responsible for monitoring the anesthetized patient while acting as a scrub nurse or surgical assistant.
Being a competent surgical technician, or scrub nurse, requires (1) proficient knowledge of the surgical procedure, the surgical instruments, and aseptic and sterile techniques and (2) anticipation of the surgeon’s needs.
There are too many surgical procedures to list them all in the confines of this text. The goal of this chapter is to discuss some common procedures. At the end of the chapter, laparoscopic, endoscopic, and laser procedures are covered in more depth.
Abdominal Procedures
Definition
Abdominal exploratory surgery refers to surgical exploration of the abdominal cavity. Related terms include the following:
Indications
Exploratory surgery may be indicated for a variety of reasons. Most often an exploratory procedure is indicated for diagnostic or curative purposes. Diagnostic purposes include obtaining surgical biopsy specimens of abdominal organs for analysis because of a chronic disease process. Curative surgery may be required because of an acute abdomen, a sudden onset of clinical signs associated with the abdomen. Some causes of acute abdomen can be life threatening and may require an emergency exploratory laparotomy. Common indications for abdominal exploratory surgery are abdominal masses and traumatic injury to the abdomen.
Special Instruments
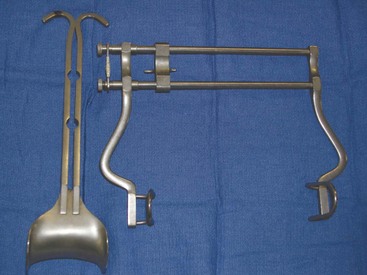
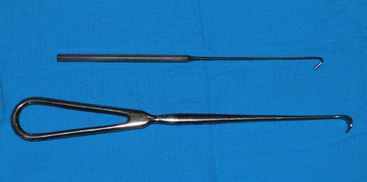
A routine surgical instrument pack should be sufficient for this procedure. A Balfour abdominal retractor—a self-retaining abdominal retractor—should be available (Figure 7-1). The Balfour retractor holds the abdomen open and allows for full exposure of abdominal contents. Balfour retractors are available in different sizes, and selection of the appropriate size is based on the size of the patient. Other special instruments may be needed, depending on the results of the abdominal exploratory surgery.
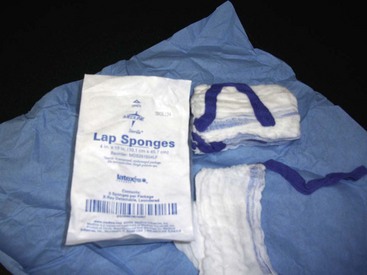
Sterile laparotomy sponges (Figure 7-2) should be available. Heated lavage fluid and suction may also be indicated.
Patient Positioning and Preparation
For abdominal exploratory surgery the patient should be positioned in dorsal recumbency for a ventral midline approach. The ventral abdomen should be clipped from just above the xiphoid process to the pubis. Adequate hair clipping is important because the incision may have to be extended either cranially or caudally for better exposure. Unless otherwise indicated, the bladder should be expressed before the animal is moved into the surgery room.
Patient Draping
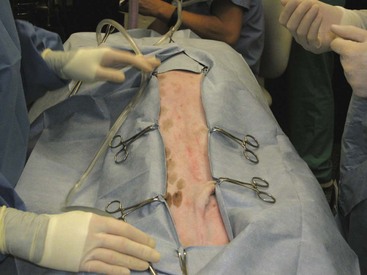
Forany abdominal procedure, a four-quarter draping method should be considered (Figure 7-3).
Abdominal Exploratory Procedure
A blade is used to incise the subcutaneous tissues, and the abdominal wall should be tented to make a sharp incision into the linea alba. The sterile surgical assistant can moisten laparotomy sponges and place them on either side of the incision. Exposure to the air and surgical lights cause the abdominal organs to become dry. Care should be taken to ensure exposed organs remain moist and covered with sterile laparotomy sponges. The sterile surgical assistant should also take care when handling the exposed viscera; gloves or sponges used should be moistened to reduce tissue damage.
The Balfour retractor may be placed to allow full exposure of the abdominal cavity. When placing a Balfour retractor, the assistant should visualize the insertion on the side of the surgeon, and the surgeon should visualize the insertion on the side of the assistant. This visualization is done to avoid entrapping any organs within the Balfour retractor.
The surgeon then performs a systematic exploration of the entire abdomen and its contents. Most surgeons have a system for exploring the abdomen and conduct the exploration the same way each time they perform the procedure. Such an approach ensures that all organs and structures are observed and a possible disease process is not overlooked. The technician should note any abnormalities seen within the abdominal cavity and record the findings in the pathology section of the surgery report (Box 7-1). A postoperative sponge count should take place prior to closure of the abdominal incision.
Abdominal Wall Closure
Surgical closure, including material is the veterinarian’s preference, but the technician should have the material prepared. There are typically three layers of closure:
Skin can be closed with a simple interrupted or continuous suture pattern or skin staples (see Chapters 1 and 6). The information on suture type, pattern, and closure layers should be included in the surgery report.
Postoperative Considerations and Instructions
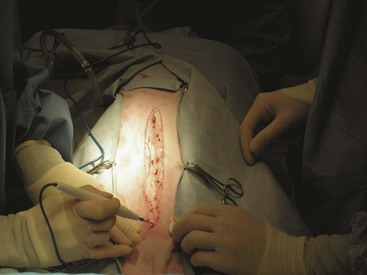
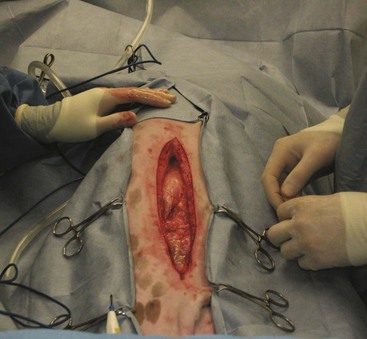
The incision should be checked at least once a day for redness, swelling, or discharge; twice-daily checks would be optimal (Figures 7-4 and 7-5). This careful examination should continue until the sutures are removed— typically 10 to 14 days postoperatively. Complications from a laparotomy procedure include dehiscence, evisceration, and sepsis. Dehiscence, separation of all layers of an incision or wound, may occur because of suture removal by the animal or as a result of suture breakage, knot slipping or untying. The sooner the problem is detected, the less likely more severe problems will occur. Dehiscence of all layers of the incision can lead to evisceration, exposure of the abdominal organs (Figure 7-6). Evisceration can result in sepsis and blood loss as a result of self-mutilation of the exposed intestine. If dehiscence with or without evisceration occurs, the situation must be attended to immediately.
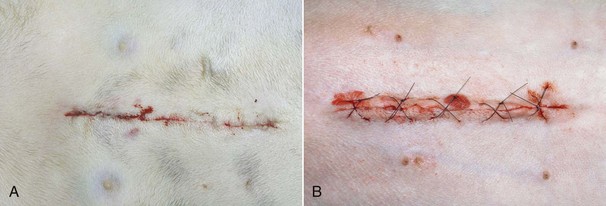
FIGURE 7-4 These photographs were taken four hours after surgery. A, A celiotomy incision following routine ovariohysterectomy. B, A celiotomy incision following severe traction on the skin during surgery for exposure. Note the minimal redness, swelling, and drainage from incision in A compared with that in B. (From Bassert JM, McCurnin DM, editors: McCurnin’s clinical textbook for veterinary technicians, ed 7, St Louis, 2010, Elsevier.)
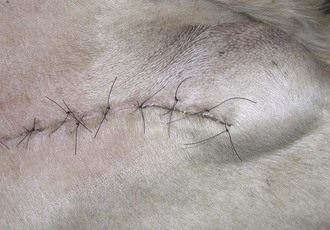
FIGURE 7-5 Note the swelling beneath the incision on the cranial thigh of this dog. The swelling was nonpainful, and the dog’s vital signs were normal. The swelling was diagnosed as a seroma. (From Bassert JM, McCurnin DM, editors: McCurnin’s clinical textbook for veterinary technicians, ed 7, St Louis, Elsevier, 2010.)
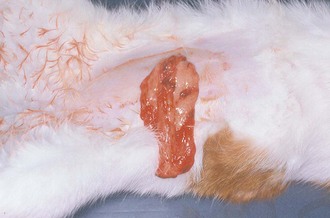
FIGURE 7-6 Complete dehiscence of an abdominal incision. Note the intra-abdominal contents protruding through the incision. (From Bassert JM, McCurnin DM, editors: McCurnin’s clinical textbook for veterinary technicians, ed 7, St Louis, 2010, Elsevier.)
Animals may also begin vomiting or become inappetent. Manipulation of the viscera can lead to ileus and or pancreatitis. If vomiting or anorexia is persistent 24 to 48 hours postoperatively, intravenous fluid therapy and additional diagnostic work may be necessary.
Surgery Report
A surgery report should be completed for each surgical procedure performed at the hospital. This is valuable information for any future procedures that may be performed on the animal as well as any legal issues that could arise. The surgery report provides patient information as well as protection for the hospital. The surgery report should consist of the hospital’s name; the owner’s name, address, and phone number; and the patient’s name, date of birth (DOB), species, breed, and hospital identification number, if applicable. A complete record of the procedure performed should be recorded on this form and placed in the animal’s record. Box 7-2 shows an example of a surgery report for an abdominal exploratory procedure.
Gastric Foreign Bodies and Gastrotomy
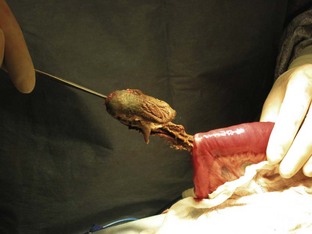
A gastric foreign body is any ingested foreign object that becomes lodged in the stomach and is unable to be digested; it may also be referred to as a “gastric obstruction.” A distinction is made between gastric foreign bodies, which are found in the stomach, and intestinal foreign bodies, which are found anywhere in the intestines (duodenum, jejunum, ileum, or large intestine). Linear foreign bodies are objects that usually consist of string or thread and are seen most often in felines. With linear foreign bodies, a part of the foreign object may become lodged under the tongue or in the stomach, while the rest of the object continues through the intestines. Linear foreign bodies may cause plication (pleating or folding) of the intestines (Figures 7-7 and 7-8).
Indications
A primary reason to perform a gastrotomy (incision into the stomach) is to remove a foreign body. In dogs, foreign bodies include rocks, plastic, toys, bones, coins, corncobs, and cassette tapes. Dogs tend to be indiscriminate eaters and eat or swallow an assortment of objects. Another indication to perform a gastrotomy is for the retrieval of full-thickness gastric biopsy specimens or removal of neoplasia. Common gastric neoplasias in dogs and cats include adenocarcinoma, lymphosarcoma, leiomyosarcoma, and leiomyoma.
Common foreign bodies in cats are trichobezoars (hairballs), string, yarn, and thread. In cats, linear foreign bodies are frequently affixed under the tongue or at the pyloric sphincter and may cause intestinal plication. If a linear foreign body is suspected, the base and underside of the tongue should be inspected for the presence of a foreign object. Younger animals are presented most often with foreign bodies because of their behavior, but an animal of any age can have a gastric or intestinal foreign body. Animals at higher risk for foreign bodies are those that have a history of foreign body ingestion or have conditions that predispose them to pica (craving for unnatural articles of food).
The most common clinical sign associated with a foreign body is vomiting. Vomiting may be intermittent, and some animals may otherwise act normal. Vomiting may be absent if the object is in the fundus of the stomach rather than obstructing the pyloric sphincter. Other clinical signs are lethargy, abdominal pain, anorexia, and depression. Clinical signs can be much worse if the foreign body has perforated the stomach and caused peritonitis (inflammation of the peritoneum).
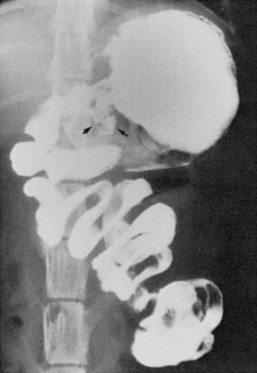
Diagnostic testing for gastric foreign bodies should include radiographs of the abdomen. Radiopaque foreign bodies may be apparent on survey films. Many foreign bodies are radiolucent and therefore may require contrast medium to identify. One common contrast study is the barium study. The patient is administered barium orally, then a series of films is taken at predetermined intervals. Either the foreign body becomes highlighted by the surrounding barium or the barium stops moving through the gastrointestinal (GI) tract. The time required for the barium to move through the stomach and into the intestines is compared to normal gastric emptying time. If a delay in gastric emptying is noted, a foreign body may be suspected.
Radiographs should be taken immediately prior to surgery to verify the location of the object. Even if only a short time has elapsed since the initial radiographs were taken, the object may have exited the stomach and entered the intestines or even traveled as far as the colon. In that case, unless the object has sharp edges, it is usually allowed to exit without intervention. If the object has moved to the colon and needs intervention to be removed, endoscopy is the preferred technique.
Special Instruments
A general soft tissue surgical pack should be sufficient for this procedure if only a gastrotomy is required. A Balfour abdominal retractor and sterile laparotomy sponges should be available. Heated lavage fluid and suction may also be indicated.
The technician should ensure that all instruments used within the stomach are kept away from the rest of the surgical instruments. The technician and surgeon must avoid contaminating the sterile abdomen with bacteria from the stomach. A good way to approach this situation is to have a sterile towel on which all gastric instruments can be placed during the gastrotomy. Once the gastrotomy is complete, the scrubbed-in personal (scrub team) should change gloves, and those instruments should be removed from the instrument table and replaced with new, sterile instruments.
Patient Positioning
The patient should be positioned in dorsal recumbency for a ventral midline incision. The patient should be clipped and prepared for an abdominal procedure.
Gastrotomy Procedure
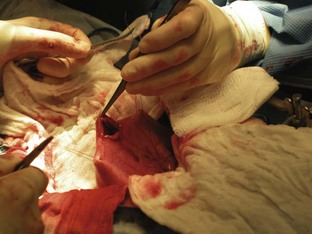
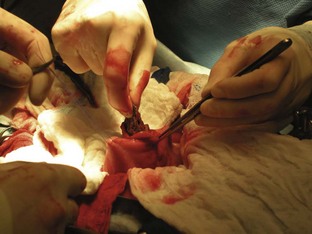
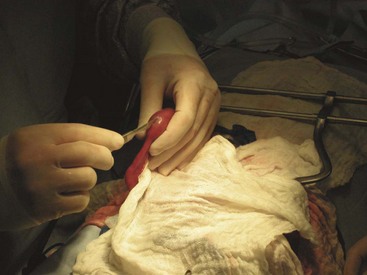
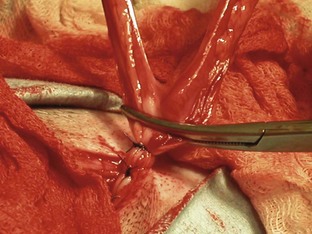
Once the patient has been positioned and prepared for surgery, a ventral midline incision through the skin, subcutaneous tissue, and linea alba is made from the xiphoid process caudal to the umbilicus. This incision may have to be extended caudally for more exposure. The surgeon should inspect the abdominal contents before proceeding with the foreign body removal. The stomach should be identified and isolated. The surgical assistant can isolate the stomach by packing it off from the rest of the abdominal contents. The surgeon then locates the area of the stomach to incise (Figure 7-9). Stay sutures are placed on either side of the proposed incision site (Figure 7-10). Stay sutures allow for manipulation of the stomach and prevent leakage of gastric fluid into the abdomen. A stab incision is made with a new scalpel blade (not the same one used to make the initial skin incision) between the stay sutures, in a hypovascular region of the ventral stomach. The surgical assistant should have the suction ready to place into the stab incision and drain the gastric fluid. The surgeon then extends the incision with Metzenbaum scissors. An Allis tissue forceps can generally be used to grasp the foreign body and remove it from the stomach (Figure 7-11).
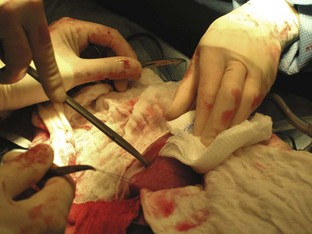
FIGURE 7-9 Placement of stay sutures in the gas-distended stomach of a dog with a gastric foreign body.
Stomach and Abdominal Wall Closure
The stomach can be closed in two layers. The first layer is a simple continuous pattern of a 2-0 or 3-0 absorbable suture. This suture pattern provides apposition. The second layer is a continuous inverting pattern of 3-0 absorbable suture. It may be beneficial to perform a local lavage of the gastric incision site to help dilute any pollutants. The gloves of the scrub team should be changed, and all instruments that were used within the stomach should be removed from the table. Any instruments used to close the abdomen should be instruments that were kept out of the stomach during surgery. A warm lavage of the entire abdomen should be performed, and the abdomen is closed routinely.
Postoperative Considerations and Instructions
One postoperative goal for gastrotomy patients is to correct any prior fluid loss or electrolyte imbalance. If the patient continues to vomit after surgery, food and water should be withheld and intravenous fluids should be continued. A centrally acting antiemetic can be administered to help control the vomiting. In the absence of vomitus, a bland diet can be introduced 12 to 24 hours postoperatively. Prognosis for the gastrotomy patient should be considered good if there were no perforations in the stomach from the foreign body. If perforations were evident, and peritonitis was present, the prognosis may be considered guarded. Box 7-3 shows an example of a surgery report for a gastrotomy.
Intestinal Foreign Bodies and Enterotomy
Foreign bodies of the intestines are any intraluminal obstruction of intestinal contents caused by an ingested object or objects; these bodies may also be referred to as “intestinal obstructions.”
Indications
A primary indication to perform an enterotomy (incision into the intestines) is to remove a foreign body. Some foreign bodies have the ability to pass through the esophagus and stomach but are too large to pass through the intestines. The objects found in dogs and cats as gastric foreign bodies can also be found in the intestines (e.g., corncobs, balls, bones, peach pits, linear objects such as string). Intestinal foreign bodies may cause a partial or complete obstruction of the intestinal bowel. Some foreign bodies may slowly make their way through the intestinal tract, causing damage or perforations along the way. Others may become lodged in a segment of intestine where they cause a complete obstruction. A complete obstruction prevents intestinal chyme (intestinal contents) to proceed beyond the obstruction. A partial obstruction may allow some intestinal contents to move beyond the point of the foreign object.
The most common clinical signs associated with an intestinal foreign body include abdominal pain, vomiting, diarrhea, depression, anorexia, and weight loss. The location (proximal vs. distal), type (partial vs. complete), and duration of the obstruction can be related to the clinical signs. Complete obstructions cause more acute and serious signs. More proximal obstructions may cause persistent vomiting and dehydration. Clinical signs of distal (e.g., ileum) and partial obstructions may include lethargy, intermittent anorexia, and intermittent vomiting.
Linear foreign bodies can manifest any or all of these clinical signs. A portion of the linear foreign body may become embedded at the base of the tongue or pylorus, while the rest of the object moves down the intestinal tract due to peristaltic movement. Continuous peristalsis and resultant plication of the intestines (folding or bunching up of the intestines on themselves along the length of the linear foreign body) can cause the linear foreign body to be pulled tightly. This tightly pulled string now acts as a knife along the compromised intestinal tissue and cuts into the mucosa of the intestines, causing perforations along the way. The damage to the mucosa and the perforations can result in peritonitis. The intestinal plication and peritonitis cause great abdominal pain. When the abdomen is palpated on a patient with plicated intestines and peritonitis, the abdominal muscles frequently tighten, indicating abdominal pain.
Another indication to perform an enterotomy is collection of a biopsy specimen from an intestinal segment. Malignant intestinal tumors are common and can cause partial or complete obstruction. The different types of intestinal neoplasias are mentioned in the following section on intestinal resection and anastomosis.
Special Instruments
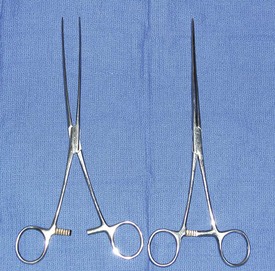
A general use soft tissue surgery pack in conjunction with Doyen intestinal clamps will be needed for an enterotomy. The Doyen clamps allow the surgeon to clamp the intestines on either side of the incision site (Figure 7-12). Doyen clamps are considered nontraumatic and prevent intestinal contents from leaking into the abdomen while the procedure is performed. If Doyen clamps are unavailable, the fingers of the assistant can serve the same purpose. If they do, it is important to make sure that the assistant’s gloves are moist to prevent tissue trauma. Sterile laparotomy sponges should be available. Heated lavage fluid and suction may also be indicated.
The surgical assistant must ensure that all instruments used within the intestines are kept away from the rest of the surgical instruments. This practice aids in avoiding contamination of the abdomen with intestinal bacteria. All instruments used in the intestines should be placed on a sterile towel during the enterotomy and then removed from the instrument table once the intestines are closed. The other option is to have an instrument set solely used for the GI tract, then replaced with a clean set after the intestinal closure. Once the enterotomy is complete, all scrubbed personnel should change gloves, and a new set of instruments can be introduced for closure of the abdomen. A Balfour retractor should also be available for better exposure of the abdomen.
Patient Positioning
The patient should be positioned in dorsal recumbency to perform a ventral midline incision. The patient should be clipped and prepared for an abdominal procedure.
Enterotomy Procedure
The skin, subcutaneous tissue, and linea alba can be incised from the xiphoid process to just cranial to the pubis. Once the abdominal cavity is opened, moistened lap sponges can be placed on either side of the body wall, and a Balfour may be inserted for maximum exposure. A full exploratory procedure should be performed before an enterotomy is begun. The GI tract should be examined completely. Once the intestinal foreign body is located (Figure 7-13), the affected intestine can be isolated from the abdomen by being packed off with lap sponges.
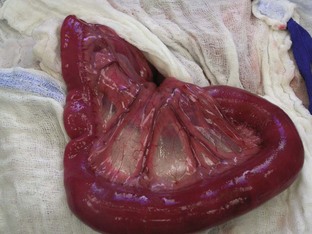
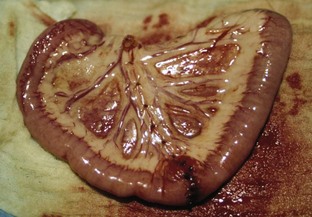
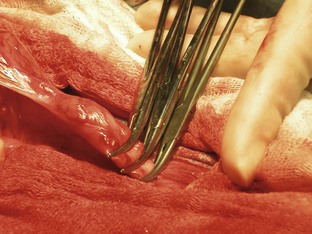
The surgeon needs to decide, from an analysis of the intestine, whether an enterotomy or a resection and anastomosis should be performed. If necrosis or perforations of the intestinal segment are absent, an enterotomy may be sufficient (Figure 7-14). The intestinal contents should be milked away from the foreign body site. Doyen clamps or the fingers of an assistant can be placed a few centimeters away on either side of the proposed enterotomy. The enterotomy incision should be made just distal to the foreign body on the antimesenteric border (the side of the intestine without the attached mesentery) of the intestine (Figure 7-15). This region is selected because the viability of the intestines proximal to the foreign body may be in question, and it is preferable to suture healthy intestine. The incision may need to be extended with Metzenbaum scissors to allow the removal of the foreign body (Figure 7-16). Forceps or gloved fingers may be useful in grasping and slowly removing the object.
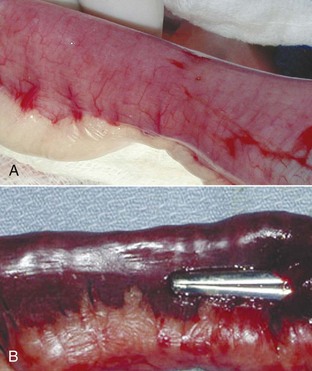
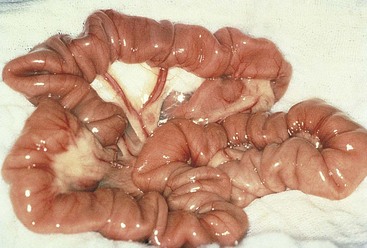
FIGURE 7-14 The normal intestine is pink with visible vessels and motility. Note the difference in color between the normal intestine (A) and the devitalized segment of bowel (B). (From Bassert JM, McCurnin DM, editors: McCurnin’s clinical textbook for veterinary technicians, ed 7, St Louis, 2010, Elsevier.)
Intestine and Abdominal Wall Closure
Once the foreign body is removed, the enterotomy incision can be closed (Figures 7-17 and 7-18). An absorbable monofilament taper point suture in a simple interrupted suture pattern may be used to close the incision. Multifilament suture should never be used in the GI tract; the braid of the suture can act as a wick for bacteria. A local lavage of the enterotomy site is warranted as is a warm abdominal lavage of the entire abdomen. All scrubbed personnel should change gloves, and the instruments used to perform the enterotomy should be placed aside. Clean instruments (those not used in the intestines) should be used to close the layers of the abdominal cavity. The abdominal cavity can be closed routinely.
Postoperative Considerations and Instructions
One postoperative goal for enterotomy patients is to correct any previous fluid loss or electrolyte imbalances. The owner should be informed of possible complications that could arise postoperatively. Complications include necrosis and perforations of the bowel, as well as leakage and dehiscence of the intestines. All these complications can lead to peritonitis. The prognosis for a patient with peritonitis may be considered “guarded.” If a simple enterotomy was performed and the bowel appeared healthy intraoperatively, a good prognosis can be given. Early identification of an intestinal foreign body is important for a positive outcome. Box 7-4 shows an example of a surgery report for an enterotomy.
Intestinal Resection and Anastomosis
Intestinal resection and anastomosis (R and A) is the excision of a segment of bowel followed by the reestablishment of the two remaining segments.
Indications
A primary indication for performing an intestinal resection and anastomosis is to remove a section of dead or diseased bowel. Box 7-5 lists the characteristics of devitalized intestinal tissue. Causes of devitalized bowel include foreign bodies, neoplasia, intussusception, necrosis, and ischemia. Ischemia or necrosis of the intestines can lead to peritonitis and a poor prognosis. Peritonitis is an inflammatory process that involves the serous membrane of the abdominal cavity. Leakage of GI contents is a main source of peritonitis.
As previously mentioned, common clinical signs associated with foreign bodies of the intestinal tract include vomiting, lethargy, abdominal pain, anorexia, and depression. Common clinical signs of neoplasia of the intestinal tract include vomiting, weight loss, flatulence, and melena. If an intestinal leakage has occurred and peritonitis is present, some common signs are abdominal pain, vomiting, shock, fever, and tachycardia.
Diagnostic tests should include radiographs and ultrasound (if available) of the abdomen as well as a complete blood analysis. If peritonitis is suspected and an abdominal effusion is identified in the abdomen, an abdominocentesis (puncture of abdominal cavity to obtain fluid) should be performed to determine the type of fluid present. Presence of bacteria in the abdominal fluid indicates a possible GI leak.
Special Instruments
A general use soft tissue surgical pack will be needed for the R and A procedure. A Balfour retractor will aid in abdominal exposure. Doyen clamps should be available for holding off intestinal contents. If Doyen clamps are unavailable, the fingers of an assistant can be used. Sterile laparotomy sponges should be available. Heated lavage fluid and suction may also be indicated.
As with enterotomy, the scrub team wants to avoid contaminating the abdominal cavity with intestinal contents, so sufficient laparotomy sponges should be available to pack off the intestinal segment. The scrub team will need to change their gloves as well as the instrument pack before closure of the abdomen.
Patient Positioning
The patient should be positioned in dorsal recumbency to perform a ventral midline incision. The patient should be clipped and prepared for an abdominal procedure.
Intestinal Resection and Anastomosis Procedure
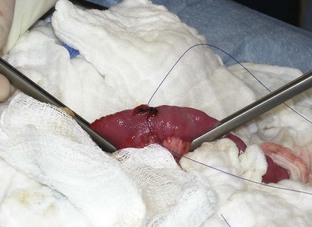
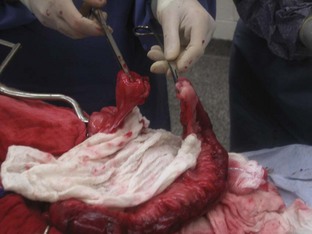
A ventral midline abdominal incision from the xiphoid process to the pubis should be made so that a full exploratory laparotomy can be performed. Moistened lap sponges can be applied to either side of the incision, and a Balfour retractor may be placed for better abdominal exposure. A full examination of the GI tract should be performed. The segment of diseased bowel should be identified, exteriorized, and packed off with lap sponges (Figure 7-19).
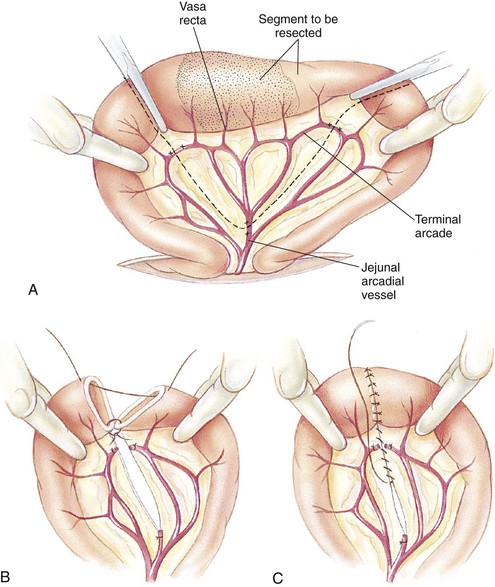
FIGURE 7-19 Jejunal resection and anastomosis. A, Carmalt forceps are placed on the region to be resected to avoid leakage of intestinal chyme. Fingers are used as Doyen clamps to help prevent leakage as well. Mesenteric vessels (jejunal arcadial and terminal arcade vessels) are ligated. B, After ligation, the mesenteric vessels are transected. Diseased portion of bowel is removed, and interrupted sutures are placed, starting at mesenteric border first. C, Additional interrupted sutures are placed at the antimesenteric border and continued around the bowel segment until the anastomosis is complete. (From Fossum TW, Hedlund CS, Hulse DA, et al: Small animal surgery, ed 3, St Louis, 2007, Mosby.)
The surgeon needs to assess the viability of the intestinal segment in question. The presence of peristalsis, vascular pulses, and intestinal color may aid in determining intestinal viability. If the intestinal segment is questionable, it may be the surgeon’s preference to resect that region. Neoplasia and necrosis of the intestines are conditions that would require resection. The blood vessels from the mesentery to the intestinal segment need to be ligated and transected. The intestinal contents (chyme) should be milked away from the area to be resected. The diseased region can be clamped with a crushing forceps (e.g., Carmalt). The area of the intestines to remain can be clamped with Doyen clamps, which are considered nontraumatic and should be gentle on the intestinal tissues. If Doyen clamps are unavailable, the moistened fingers of an assistant will provide the same function.
The surgeon then transects the intestines with a scalpel blade along the outside of the Carmalt forceps, and the intestinal segment along with the forceps is removed. A few millimeters of healthy tissue should be removed with the diseased segment to ensure that the anastomosis site is closed with healthy intestine (Figure 7-20).
Intestine and Abdominal Wall Closure
The technician holds the two segments of intestine close to each other so that they are aligned correctly. A single-layer, simple interrupted suture pattern is frequently used for an end-to-end anastomosis because it produces minimal stenosis or leakage and heals rapidly. A 3-0 or 4-0 monofilament absorbable suture should be used for the anastomosis site.
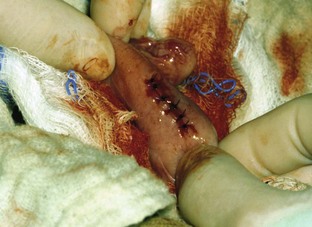
After the anastomosis has been completed, sterile saline can be injected into the surgical site to check for any leakage from the suture site (Figure 7-21). The intestines should be moderately distended with fluid while maintaining intestinal occlusion. Additional sutures can be placed in the event that leakage occurs. The mesenteric defect should then be closed in a simple continuous or interrupted suture pattern (Figure 7-22). If peritonitis was present, a closed suction drain may need to be placed to allow drainage of the abdominal cavity. A local lavage of the anastomosis site as well as a full abdominal lavage with warm saline should be performed in the event that leakage of the intestinal contents has occurred. If peritonitis was present, specimens for bacterial culture of the abdomen should be obtained before closure. The anastomosis site should be wrapped with omentum before closure. The scrub team needs to change gloves and the instrument pack to close the abdomen. The abdomen should be closed routinely.
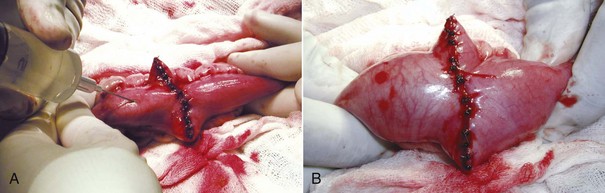
FIGURE 7-21 A, To check for leaks after intestinal anastomosis, the intestine is occluded on either side of the incision, and the occluded segment of intestine is filled with sterile saline. B, The incision is checked for leakage while the segment is filled with saline. (From Bassert JM, McCurnin DM, editors: McCurnin’s clinical textbook for veterinary technicians, ed 7, St Louis, 2010, Elsevier.)
Postoperative Considerations and Instructions
Animals found to have peritonitis during the procedure are usually more critical cases and will need more supportive postoperative care. If the patient is debilitated, IV nutrition may be warranted. IV antibiotics and fluids should be continued. Peritonitis has a high rate of morbidity, and this should be explained to the owner. The patient’s clinical signs should be closely monitored postoperatively. Any signs of depression, vomiting, fever, abdominal pain or tenderness, or discharge from the incision site could be the result of a dehiscence of the intestinal suture and the presence of peritonitis. Other complications associated with intestinal surgery are leakage of the surgical site, stenosis of the intestinal lumen, perforation, and death. A large intestinal resection can lead to short-bowel syndrome. The clinical signs of short-bowel syndrome include malnutrition, weight loss, and diarrhea. Treatment of short-bowel syndrome is based on the clinical signs but includes correction of fluid loss and electrolyte imbalances.
Nutritional support must be provided until the intestines adapt. Prognosis for the patient receiving an intestinal resection and anastomosis can be considered good if peritonitis was absent and removal of large amounts of intestine was averted. The healing process of the intestines is generally rapid but can be interrupted by associated factors, such as debilitation of the patient. Prognosis of the patient with peritonitis should be considered “guarded.” Box 7-6 shows an example of a surgery report for an intestinal resection and anastomosis.
Gastric Dilatation and Volvulus
Gastric dilatation and volvulus (GDV) refers to the swelling (specifically gaseous distension) and rotation of the stomach on its mesenteric axis. Dilatation is the stretching of an organ beyond its normal dimensions. Volvulus refers to the rotation of an organ. A small animal patient can have gastric dilatation without the volvulus, commonly referred to as a “simple gastric dilatation.” The generic term “bloat” does not distinguish between a simple gastric dilatation and gastric dilatation with a volvulus.
Indications
GDV is considered a true surgical emergency. Box 7-7 summarizes the common treatment for GDV.
GDV usually occurs in deep-chested, large-breed animals but is sometimes seen in smaller breeds and rarely in cats. A GDV may occur at any age but is generally noted in middle-aged to older dogs. The precise etiology of GDV is unknown, but many cases occur after ingestion of a large meal followed by strenuous exercise. Diet, amount of food ingested, frequency of feeding, feeding behavior, and exercise after a meal may all be contributing factors to the development of GDV. Other contributing factors include anatomic predisposition, ileus, trauma, primary gastric motility disorders, vomiting, and stress. The classic clinical sign of GDV is severe abdominal distension past the rib cage (Figure 7-23). Other signs include restlessness, hypersalivation, abdominal pain, nonproductive attempts to vomit (retching, “dry heaving”), and signs of shock.
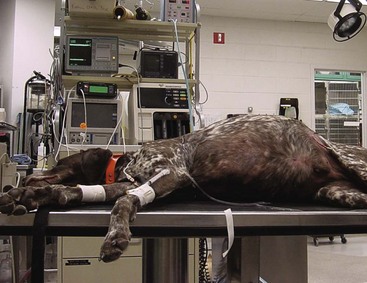
FIGURE 7-23 Nine-year-old German Shorthair Pointer with gastric dilatation and volvulus (GDV). Note the severely distended abdomen that protrudes past the rib cage.
The first step in the correction of GDV is to stabilize the patient and reverse shock. Compression of vessels by the distended abdomen decreases venous return to the heart (effectively reducing vascular volume) and cardiac output, thus initiating shock; if left untreated, these animals will die from cardiac collapse. Two large-bore IV catheters should be placed in either the cephalic or jugular veins. Venous return is compromised in the caudal half of the animal so catheters placed there will not be useful. IV fluids should be administered if shock is present. Oxygen should be available and should be administered if respiratory distress is evident.
The second step in the correction of GDV is to decompress the stomach to allow gas to escape. The gas is most likely associated with one of the following: aerophagia (habitual swallowing of air), bacterial fermentation (with associated carbon dioxide production), or metabolic reactions. The gastric gas is unable to escape through normal physiologic means, such as vomiting or eructation, because the esophageal and pyloric sphincters are often twisted or rotated closed. The technician needs to choose an appropriately sized orogastric tube in correlation with the animal’s size. The tube should be measured from the point of the nose to the xiphoid process (Figure 7-24). Tape can be applied to the tube to mark the appropriate length. A roll of tape placed between the upper and lower canine teeth can be used as a mouth gag to hold the patient’s mouth open for placement of the stomach tube (Figure 7-25). Lubricant can be applied to the end of the tube for easier passage. The tube can be placed through the hole of the tape roll and down the esophagus (Figure 7-26). Sedation may be required to help keep the animal relaxed and manageable. Damage to the esophagus can occur if the tube is aggressively forced down the esophagus.
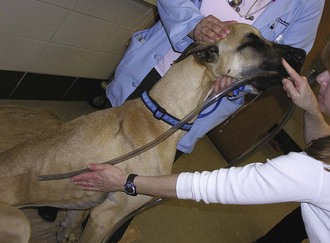
FIGURE 7-24 Before a stomach tube is passed, the length of tube to be passed is marked by measuring from the nose to the last rib. (From Bassert JM, McCurnin DM, editors: McCurnin’s clinical textbook for veterinary technicians, ed 7, St Louis, 2010, Elsevier.)
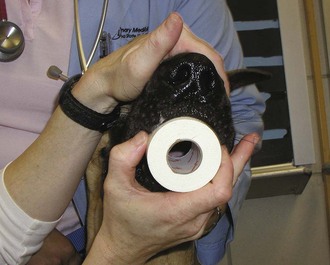
FIGURE 7-25 A roll of tape (pictured) or a mouth gag can be used to hold the mouth open while a stomach tube is passed. The assistant should hold the mouth gag in place by holding the mouth shut around the gag. (From Bassert JM, McCurnin DM, editors: McCurnin’s clinical textbook for veterinary technicians, ed 7, St Louis, 2010, Elsevier.)
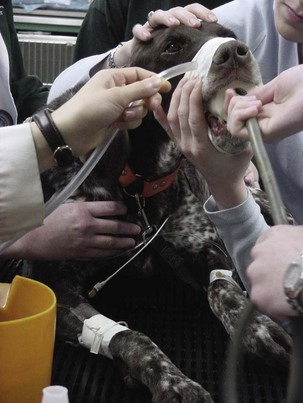
FIGURE 7-26 Placement of orogastric tube in a German Shorthair Pointer with GDV. Note the roll of tape between the upper and lower jaws for easier placement of the tube.
Once air has been removed from the stomach, the stomach should be lavaged with warm water to help remove any gastric contents. If attempts to pass the stomach tube are unsuccessful, percutaneous decompression with a trocar can be attempted. A 14-, 16-, or 18-gauge needle or catheter can be inserted through a quickly clipped and prepared body wall and into the stomach. This allows the evacuation of gas and relieves pressure on the vessels. It is imperative to pinch the gastric tube before removing it; failure to do so can result in aspiration of stomach contents.
The patient should be taken to surgery to correct the position of the stomach as soon as stabilization has been accomplished. The volvulus of the stomach hinders gastric blood flow and can cause necrosis of the stomach tissue. Timely treatment of GDV can produce survival rates approaching 85%.
Special Instruments
A general use soft tissue surgical pack should be sufficient for GDV surgery. A Balfour abdominal retractor, Army-Navy retractors, and extra towel clamps should be available. An appropriately sized orogastric tube is needed for intraoperative decompression of the stomach. Sterile laparotomy sponges should be available. Heated lavage fluid and suction may also be indicated.
Patient Positioning
The patient should be positioned in dorsal recumbency to allow a ventral midline incision to be made. The abdomen should be clipped from mid-thorax to the pubis. Adequate cranial clipping is important so that the surgeon can extend the incision as needed. Rotation of the stomach back to its normal position can be difficult if the proper exposure is not achieved. The entire abdomen should be clipped to allow a full abdominal exploratory surgery. The lateral aspects of the abdomen should be clipped as well, in the event that placement of a gastric feeding tube is warranted.
Procedure for Treatment of Gastric Dilatation and Volvulus
The surgeon makes a ventral midline incision from the xiphoid process to just caudal to the umbilicus. This incision can be extended for the exploratory procedure if necessary. Moistened laparotomy sponges should be placed on either side of the incision site, and a Balfour retractor may be positioned for better abdominal exposure. Upon entry into the abdominal cavity, the first structure noted is the greater omentum, which usually covers the dilated stomach during a GDV. Blood may be evident in the abdomen, usually from rupture of the short gastric vessels. An orogastric tube should again be passed through the mouth, down the esophagus, and into the stomach to allow decompression of gas and the release of gastric contents. A warm gastric lavage should be performed until the contents from the stomach are emptied and the lavage water collected is clear.
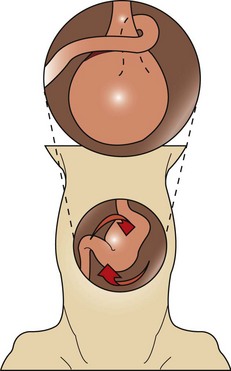
The surgeon then attempts to rotate the stomach back to its original position. Most stomachs twist or rotate in a clockwise direction and can rotate 90 to 360 degrees (Figure 7-27). Correction of the malpositioned stomach usually involves rotation in a counterclockwise direction. The surgeon grasps the stomach at the pylorus region with the right hand and the greater curvature of the stomach with the left hand. The greater curvature is pushed downward toward the floor while the pylorus is lifted up on. This procedure should return the stomach to its original placement. The stomach should then be explored for necrosis. If necrosis is evident, a partial gastrectomy may need to be performed. A full exploratory laparotomy should be conducted to be sure no damage has occurred to other abdominal organs. Often the spleen follows the path of the stomach, and a splenic torsion may be apparent. The spleen should be observed for damage, and a splenectomy performed, if warranted. A gastropexy procedure must be done to prevent future GDV.
Permanent Gastropexy Procedures
A gastropexy (“pexy”) procedure permanently affixes the stomach to the body wall and prevents further occurrence of GDV. Many educated owners of large-breed dogs may decide to have an elective gastropexy performed on their pets. This procedure can be done, for example, when a large-breed pet is admitted for an ovariohysterectomy (OHE). If available, a less invasive gastropexy procedure can be done laparoscopically. A variety of pexy procedures can be performed, although they vary on rates of dependability as well as frequency of surgical complications. The goal of all these procedures is to create a permanent adhesion between the gastric serosa and the peritoneal surface of the abdominal wall. For a permanent adhesion to form, the gastric muscle must be in contact with the body wall muscle. Gastropexy procedures include the following types:
Incisional gastropexy is a general term and is not necessarily specific to a particular technique. For example, some surgery textbooks refer to a muscular flap gastropexy as an “incisional gastropexy.” There is also an incisional gastropexy technique that involves tacking the stomach to the ventral midline abdominal incision by incorporating the sutures of the gastropexy into the sutures used to close the abdomen. This particular incisional gastropexy has the major disadvantage of potential problems if the abdomen needs to be opened again later. Also, the surgeon may be more likely to incise through the stomach inadvertently while making the midline incision. A third type of incisional gastropexy is probably the most common procedure for tacking the stomach to the abdominal wall. An internal incision is made into the right ventrolateral body wall, exposing the abdominal muscles. A second incision is made into the seromuscular layer of the stomach antrum. The edges of the gastric incision are sutured to the internal abdominal wall incision. This connection will form a permanent adhesion. This particular type of incisional gastropexy is considered simple and effective and has less potential for complications than other methods of gastropexy (Figure 7-28).
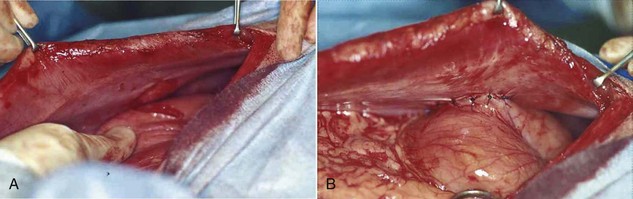
FIGURE 7-28 Incisional gastropexy. A, An incision is made into the seromuscular layer of the stomach antrum and is lined up with an incision in the ventrolateral abdominal muscle wall. B, Completed gastropexy showing the incision in the stomach sutured to the incision in the abdominal muscle wall. (Courtesy Dr. David Holt.)
Abdominal Wall Closure
After the gastropexy, the abdomen should be reevaluated. If all or a portion of the spleen appears nonviable, it should be removed. The abdomen should be flushed and then closed routinely.
Postoperative Considerations and Instructions
Dogs can have many complications after GDV repair. Cardiac arrhythmias are common and can continue for 2-3 days postoperatively. The arrhythmias are usually ventricular in origin. Treatment of the arrhythmias involves correction of electrolyte imbalances and maintenance of normal hydration state. If the arrhythmias are more severe and interfere with cardiac output or the animal has premature beats or a sustained cardiac rate above 160 beats per minute, IV drug intervention may be necessary. Lidocaine may be administered by constant rate infusion. The animal should be monitored for muscle tremors, vomiting, and/or seizures, which are signs of lidocaine toxicity. If they are noted, another antiarrhythmic, such as procainamide or sotalol, should be used.
Gastritis may occur secondary to mucosal ischemia. Vomiting should be monitored and can be treated with antiemetics. If no vomiting is reported, water can be offered 1 day after surgery, and food can be introduced in small quantities 24 to 48 hours after surgery. Fluid therapy should be maintained until oral intake is adequate.
Devitalized stomach tissue must be resected to avoid possible septic peritonitis. Gastric viability at surgery is subjective, and postoperative necrosis and perforation can occur postoperatively despite careful assessment. Timely correction of GDV is imperative for a good prognosis. The prognosis may be considered “guarded” if gastric necrosis was evident. Box 7-8 shows an example of a surgery report for GDV repair.
Reproductive Procedures
Definition
Ovariohysterectomy (OHE), also called spay or neuter, refers to the surgical excision of the ovaries and uterus.
Indications
The primary indication for OHE is to sterilize the animal so that it can no longer reproduce. Other indications are as follows:
• Neoplasia of reproductive tract.
• Treatment of neoplasia elsewhere in the body influenced by reproductive hormones (e.g., mammary tumors).
• Trauma or injury to reproductive tract.
• Stabilization of other systemic diseases (e.g., diabetes).
The OHE is one of the most common surgical procedures performed in small animal practice. Clients may inquire about ovariohysterectomies more than any other surgical procedure. The veterinary technician should be able to communicate to clients the advantages and disadvantages of having their pets spayed or neutered. Clients may have preconceived notions about spaying their pets, and the technician may be responsible for explaining to the client the importance of OHE and correcting any misconceptions.
Special Instruments
Surgeons may or may not use a spay hook (Snook hook) for OHE. The hook is used to exteriorize the uterine horn, allowing the surgeon to make a smaller abdominal incision if desired. Spay hooks come in an assortment of sizes; the technician should pick the size appropriate for the animal (Figure 7-29).
Patient Positioning
Most patients are positioned in dorsal recumbency for OHE. This positioning is best suited for a ventral midline incision. Some surgeons may prefer a lateral (flank) approach to the abdomen for an OHE, which requires positioning the patient in lateral recumbency. The ventral abdomen should be clipped and aseptically prepared from the xiphoid process to the pubis.
Patient Draping
The type of drape used for OHE is the surgeon’s preference. Because this is an abdominal procedure, a four-quarter draping method should be considered.
Canine and Feline Ovariohysterectomy Procedures
In dogs the start of the incision can be made 3 to 6 cm caudal to the umbilicus. In cats the incision should be started 3 to 4 cm caudally. An incision should be made through the skin (Figure 7-30) and the subcutaneous tissue and linea alba (Figure 7-31). The length of the incision is the surgeon’s preference.
The left abdominal wall is raised and the spay hook is slid down against the abdominal wall to grasp the horn of the uterus. The hook should be turned to trap the uterine horn, which can then be elevated from the abdomen. In dogs the suspensory ligament should be torn without tearing the ovarian vessels; this maneuver allows exteriorization of the ovary. Tearing the suspensory ligament is generally not necessary to exteriorize a cat’s ovary. Plucking of the ligament is the most painful portion of the procedure. The animal’s heart rate and respiratory rate generally increases at this time. Once the pedicle has been ligated the heart rate and respiratory rate should return to normal anesthetized levels. The method of ligation and transection of the pedicle is the surgeon’s preference. Surgeons may decide to use clips, the two-clamp method, or the three-clamp method (Figure 7-32). Carmalt, Kelly, or Crile forceps (see Chapter 1) may be used for clamping the pedicles. The forceps used depends on the size of the pedicle. Two clamps should be placed across the ovarian pedicle, proximal (deep) to the ovary, and one clamp across the ovarian ligament.
The technician should be knowledgeable about what type of suture the surgeon will be using and have it loaded and ready for use on the instrument table before it is needed. An absorbable suture material is usually used for pedicle ligation. The size of the suture is the surgeon’s preference and depends on the size of the pedicle. If clips are being used, the technician should have the clip applicator loaded and accessible for the surgeon.
The surgeon then places a ligature proximal to the ovarian pedicle clamp and securely ties the ligature. One clamp may be removed or “flashed” (unclamped and then reclamped) while the surgeon tightens the ligature. Flashing is done to compress the pedicle and secure the ligature so that it is less likely to slide off once the pedicle is transected. If the ligature is not secure and slides off the pedicle, the pedicle will bleed, and the patient could lose a significant amount of blood and die. If the ligature slides off, the pedicle must be isolated (this may require extending the incision more cranially) and the ligature replaced. A second ligature is placed proximal to the first (therefore flashing is not necessary to secure the second ligature) to provide additional security in preventing hemorrhage. The pedicle can then be transected at the level of the third clamp, between the clamp and the ovary. The same procedure can be done for the other uterine horn.
The body of the uterus should then be exteriorized, and a two-clamp or three-clamp method can be used. The clamps are placed onto the uterine body, cranial to the cervix. A ligature is placed closer to the cervix (Figure 7-33). A clamp should be placed distal to the ligatures. The surgeon then transects the uterine body between the clamp and the ligatures. The uterine stump should be checked for hemorrhage.
Excessive bleeding can occur if the ovarian pedicle and/or the uterine stumps are not properly ligated. The abdominal cavity should be carefully inspected for hemorrhage prior to closure.
Cesarean Section
Cesarean section, also referred to as “cesarotomy” or “hysterotomy,” is delivery of a fetus or fetuses by incision through the abdominal wall and uterus. The word “cesarean” has no relation to the birth of Julius Caesar, as some believe; it takes its name from the Latin word caedere, to cut.
Indications
The primary indication for a cesarean section is dystocia (difficult birth). Dystocia can develop from the following situations:
• Small pelvic canal size of dam.
• Previous pelvic trauma of dam.
• Uterine inertia (lack of contractility of uterus; can result from overstretching of uterus, toxemia, obesity, or exhaustion).
The objective of a cesarean section is to remove all the fetuses from the uterus as swiftly as possible. Although it may be performed as an intervention in an emergency, cesarean section is frequently planned for brachycephalic breeds (e.g., boxers, bulldogs, Pekingese, pugs) or animals with a history of dystocia.
Special Instruments
A general use soft tissue surgery pack should provide the surgeon with the necessary instruments needed for cesarean section. Extra hemostats should be available. Extra hands will also be needed to help warm and resuscitate the puppies or kittens.
Patient Positioning
For cesarean section the patient should be positioned in dorsal recumbency. For all three procedures, the ventral abdomen should be clipped, preliminary abdominal preparation performed, and urinary bladder emptied before the patient is taken to the surgery room. The animal should be rapidly anesthetized in the surgery room, and a final surgical prep should be performed while the surgeon and scrub assistant are preparing for surgery.
Cesarean Section Procedure
See Box 7-9 for an overview of three different methods of performing a Cesarean section:
After the animal is draped, a ventral midline incision should be made into the skin and subcutaneous tissue, from just cranial to the umbilicus and continuing caudally to the pubis. The external rectus sheath should be elevated with forceps before the stab incision is made into the abdomen, to avoid lacerating the uterus.
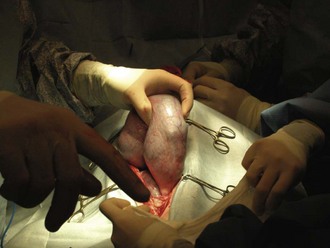
Cesarean without ovariohysterectomy: The uterine horns should be gently exteriorized from the abdomen (Figure 7-34). It is extremely important that this process be done carefully to avoid tearing the uterine vessels. The uterus should be isolated with moistened laparotomy sponges to help prevent contamination of the abdomen. The scrub nurse should have the sponges moistened in warm saline and ready to place under and around the uterus.
The surgeon then incises the uterine body. The uterine body should be tented on incision to avoid damage to the fetuses. The incision is made on the ventral aspect of the uterus and can be extended using Metzenbaum scissors (not a blade). Each horn should be emptied by squeezing each fetus cranially toward the incision (Figure 7-35). The fetus can then be gently lifted out of the uterus (Figure 7-36), and its amniotic sac manually ruptured. The scrub nurse should have hemostats available for clamping off the umbilical cord of each neonate. Once the cord is clamped, the surgeon severs it.
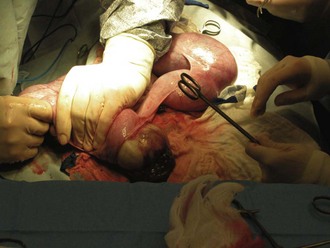
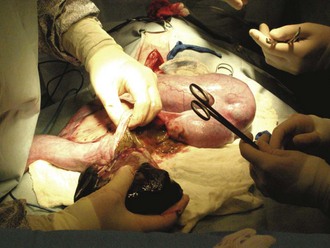
FIGURE 7-36 Removal of the fetus from the uterus. Note the abundance of laparotomy sponges isolating the uterus from the abdomen.
Care should be taken at this point to make every attempt to avoid contamination of the abdomen and surgical field with amniotic fluid. An abundance of lap sponges will aid in this endeavor. If the placenta easily separates from the uterus, it is removed with the neonate. Each neonate should be passed to a nonsterile assistant. When the fetuses are being passed to the nonsterile assistant, breaks in sterility can occur and should be monitored closely by a nonsterile technician.
The scrub nurse should always be focused on the surgical procedure and the patient in front of him or her. After removal of all obvious fetuses, a meticulous examination of the uterus should be performed from the ovaries to the cervix to make certain that no fetuses remain. A local lavage of the external uterus should be performed after closure of the uterine incision. The specific technique used for closure of the abdomen and the suture used to close the incision are the choice of the surgeon. An absorbable suture should be used for closure of the uterus. After closure of the uterine body, the abdominal cavity should be lavaged with warm saline in case the abdomen was contaminated with uterine contents (amniotic fluid). The adage “The solution to pollution is dilution” holds true for any surgical procedure in which bacteria may have entered the sterile abdomen (e.g., GI tract).
Cesarean followed by ovariohysterectomy: An OHE may be performed after the cesarean section, as previously described.
En bloc resection: The first step in an en bloc resection is to isolate the ovarian pedicles. Separation of the broad ligament from the uterus is done at the point of the cervix. Any fetuses within the vagina have to be directed back into the uterine body. The uterine body should be clamped at the cranial aspect of the cervix. Once the ovarian pedicles and the uterine body are clamped, the surgeon transects between the clamps, and the ovaries and uterus are removed. The uterus is handed off to nonsterile personnel. Again, breaks in sterility can easily occur at this time and should be monitored. The nonsterile personnel need to remove the fetuses from the uterus (see following discussion). Once the uterus is removed en bloc (“as a whole”), the surgeon ligates the ovarian and uterine pedicles with two ligatures. The pedicles should be examined for bleeding before closure. A warm lavage of the abdomen helps with any contamination of the abdomen from uterine spillage and also helps warm the dam.
Abdominal Wall Closure
Closure of the abdomen is done according to the surgeon’s preference. Some surgeons may finish with a subcuticular layer or intradermal layer rather than placing skin sutures (closing in three layers). This is done to avoid irritation of the neonates from the skin suture ends during the nursing process.
Neonatal Care
The care of the neonates generally is the responsibility of the nurse or technician. This job can be extremely rewarding, especially if the neonates are resuscitated successfully and can leave the hospital with their mother. If the neonates are transferred still in the uterus, the technician needs to incise the uterus, by tenting the uterus and using Metzenbaum scissors. Extreme caution must be used when incising the uterus so as not to injure the neonates. The amniotic sac on each neonate needs to be broken as well.
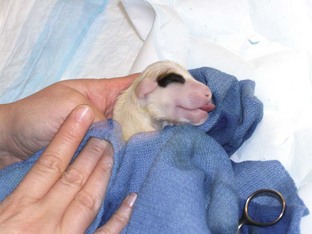
The technician should have a warm, dry area prepared for the neonates before surgery. The area should include some or all of the following: plenty of clean, warm towels; a radiant lamp; a hair dryer; and circulating warm-water heating pads. Drugs that should be available include naloxone (opioid antagonist), doxapram (respiratory stimulant), and epinephrine (cardiovascular stimulant). Suture and scissors should also be available to ligate the umbilical cords. The neonates should be dried off immediately with warm towels (Figure 7-37). A heating unit should be used to aid in the warming process. The neonates should be briskly rubbed to initiate spontaneous respiration.
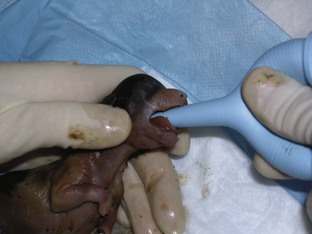
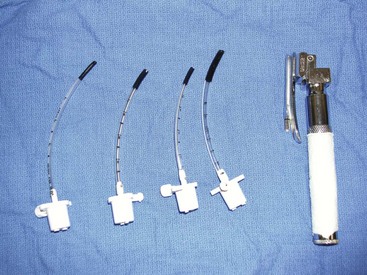
The nurse or technician also must ensure that the clamp on the umbilicus is secure and there is no unnecessary pulling on the umbilicus. Strain on the umbilical cord can cause abdominal herniation from the umbilical site. An infant suction bulb can be used to help aspirate fluid from the oropharynx and nares (Figure 7-38). If opioids were used as a premedication for the dam, a drop of naloxone can be placed under the tongue of each neonate to reverse the effects of the opioids on the neonates. If respiratory efforts of the neonate are slow to commence, a drop of doxapram placed under the tongue can be used to aid in respiratory stimulation. If the newborn has an appropriate heart rate (120-150 beats/min) but is still having respiratory-related issues, tactile stimulation and administration of oxygen by mask may be successful in instituting respiration. If respiratory efforts do not commence within about 30 seconds, or if bradycardia occurs, the nurse may need to administer positive-pressure ventilation by mask. The newborn may need to be intubated and ventilated until he/she starts to take breaths on his/her own (Figure 7-39).
Once respiration has been achieved, cardiovascular stability must be addressed, especially if the patient is bradycardic or has a weak heartbeat. If no heartbeat can be identified, chest compressions should be administered by fingers across the lateral chest wall. If chest compressions appear unsuccessful, epinephrine can be administered under the tongue.
Some neonates never achieve respiration or a heartbeat once retrieved from the uterus, but every attempt should be made to revive them. A newborn’s survival can depend on each individual situation. How long the fetus was wedged in the canal or how long the dam was in labor can determine the outcome. Whimpering and crying sounds from the newborns are always a good sign.
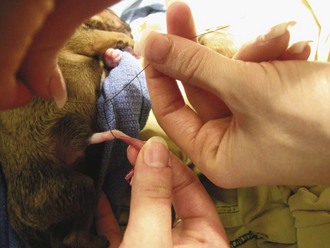
Once the newborn has been stabilized with an adequate respiratory rate and an adequate heart rate, the umbilical cord can be ligated and transected approximately 1 to 2 cm from the body (Figure 7-40). The newborns should be kept in a warm environment (about 90° F) until the mother’s surgery is complete, and oxygen supplementation may be a necessary part of a successful resuscitation (Figure 7-41).

The mammary glands of the dam should be cleaned after surgery to remove any surgical prep solutions as well as any blood. The newborns should be reunited with their mother, and nursing should commence as soon as possible. The mother’s behavior toward the newborns should be observed during the first few hours. Care should be taken not to return the newborns to their mother too soon. She could inadvertently injure them if she is not fully recovered. Some mothers may reject or kill their young, so careful observation is important.
To reduce stress and exposure to pathogens and nosocomial infections, the bitch and the newborns should be released from the hospital as soon as possible.
Box 7-10 shows an example of a surgery report for a cesarean section.
Pyometra
Pyometra describes a pus-filled uterus. The condition is more prevalent in dogs than cats but can be seen in both species. The condition can be referred to as either open or closed, depending on the cervix. In an open pyometra, the cervix is open, allowing the purulent discharge to drain. Both types are considered serious; as the purulent material accumulates, uterine rupture can occur.
Indication
An OHE is the recommended treatment for pyometra. Owners may wish to elect medical management of the condition if the animal is a valuable breeder. This should be discouraged because it is associated with severe complications. The adage “Never let the sun set on a pyometra” has its merits. A pyometra can rupture at any point, releasing all the purulent material into the abdominal cavity and leading to septicemia and/or endotoxemia. In addition, the rate of recurrence of pyometra after medical therapy is as high as 77%.
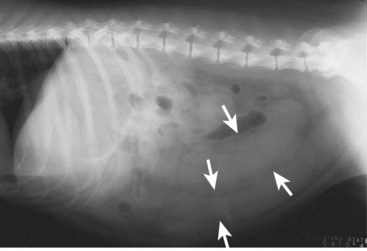
Most animals affected are 6 years or older intact females. It is possible for a condition known as stump pyometra to develop in a previously spayed female if ovarian tissue was left behind during the original procedure. The remnants of the uterus left near the cervix can become infected. Clinical signs are seen within 4 to 8 weeks after the last heat cycle and can include decreased appetite, lethargy, increased thirst and urination, and in some, but not all cases, foul-smelling vaginal discharge. A fluid-filled uterus may be detected on abdominal radiographs (Figure 7-42).
Special Instruments
A routine surgical instrument pack should be sufficient for this procedure. Sterile laparotomy sponges should be available. Heated lavage fluid and suction may also be indicated.
Patient Positioning
Patients are positioned in dorsal recumbency. The ventral abdomen should be clipped and aseptically prepared from the xiphoid process to the pubis.
Patient Draping
The type of drape used for a pyometra is the surgeon’s preference. Because this is an abdominal procedure, a four-quarter draping method should be considered.
Pyometra Surgery
A routine ovariohysterectomy is performed (see previous discussion). Care must be taken because the uterus is typically engorged and friable (Figure 7-43). The surgeon may require an assistant to scrub in to help lift and remove the uterus.
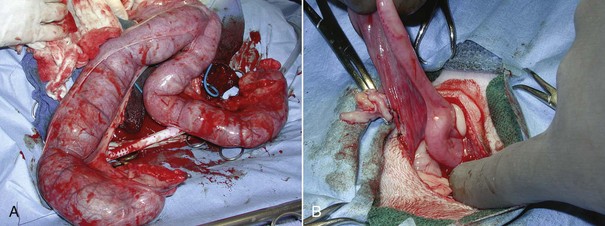
FIGURE 7-43 The uterus must be carefully handled in cases of pyometra because it is often large, friable, and heavy. Compare the pyometra uterus in A with the normal uterus in B. (From Bassert JM, McCurnin DM, editors: McCurnin’s clinical textbook for veterinary technicians, ed 7, St Louis, 2010, Elsevier.)
Canine and Feline Castration
Castration may also be referred to as a “neuter,” “alter,” or orchiectomy.
Routine Canine Castration
Indications: The primary indication for performing a canine castration is for sterilization of the dog. Other indications include the following:
• Prevention of aggressive behavior or fighting.
• Prevention of urine marking.
• Correction of congenital abnormalities.
• Treatment of scrotal or testicular neoplasia.
• Treatment of scrotal abscess, infection, or trauma.
• Treatment of disease elsewhere in the body related to hormones (e.g., prostatic disease, perineal hernias, perianal tumors).
Instrumentation: A general use soft tissue surgical instrument pack should be sufficient for canine castration.
Patient positioning: The canine patient should be placed in dorsal recumbency for castration. The scrotum should be examined and palpated for the presence of both testicles before anesthesia is induced. If both testicles are present, a routine castration can be performed. If only one testicle is present, the dog is considered “cryptorchid” and may require an inguinal or abdominal surgery to remove the other testicle.
For a routine castration the surgical site should be clipped from the tip of the prepuce to just above the scrotum. The clipped region should extend laterally into the inguinal section on both sides. The scrotum should not be clipped. The skin of the scrotum is delicate and sensitive and may be susceptible to clipper burns or tears. Irritation of the scrotum can cause the animal to lick or bite at the affected region postoperatively. The surgical site should be aseptically prepared.
Patient draping: A single fenestrated drape is appropriate for orchiectomy. The surgeon may elect to use a four-corner draping method. A single fenestrated drape is placed over the surgical region (the testicles and scrotum are draped out of the surgical field).
Canine castration procedure: The surgeon may decide to do an “open castration” or “closed castration.” In the closed procedure, the tunics are not incised, and the entire spermatic cord encased in its parietal vaginal tunic is ligated and transected. In the open procedure, the tunics are incised, and the contents of the cord are ligated and transected separately.
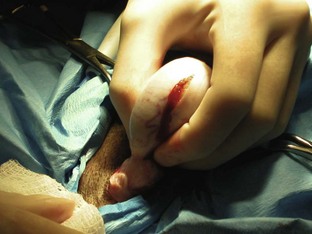
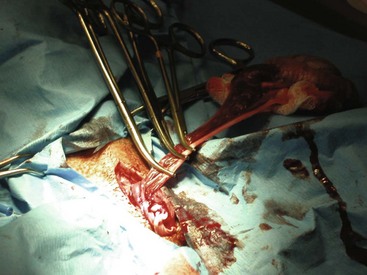
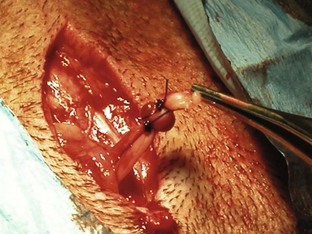
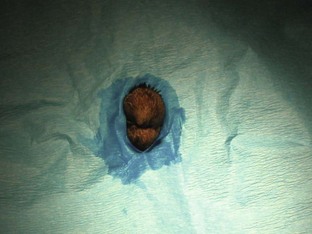
Open castration: The surgeon selects the first testicle and applies pressure cranially to advance the testicle into the prescrotal region. The skin and subcutaneous tissues and spermatic fascia are incised (Figure 7-44). The surgeon then incises the parietal vaginal tunic (Figure 7-45), and the testicle is gently extruded (Figure 7-46). A hemostat should be placed across the tunic at the attachment of the epididymis. The ligament of the tail of the epididymis is separated from the tunic. Three clamps can be placed across the spermatic cord (Figure 7-47). The vascular cord and the ductus deferens are recognized and can be individually ligated using an absorbable suture. The surgeon may decide to ligate the vascular cord and ductus deferens together. A circumferential ligature is then placed around both the ductus deferens and the vascular cord. A hemostat is placed on the cord close to the testicle. The cord is then transected between the hemostat and ligatures (Figure 7-48). The cord is examined for bleeding and returned within the tunic. The second testicle can be removed in the same manner.
Closed castration: Closed castration is performed much like open castration except for the incision of the parietal vaginal tunics. Once the skin, subcutaneous tissue, and spermatic fascia are incised, the spermatic cord is exteriorized. Ligatures are placed around the entire spermatic cord and tunics, and the cord is then transected.
Postoperative considerations and instructions: Common complications associated with canine castration include hemorrhage and scrotal hematoma. A scrotal hematoma may be the result of a hemorrhaging vessel (or vessels). Care should be taken during the surgery to provide appropriate hemostasis to avoid such complications. Cold compresses can be placed to aid in hemostasis postoperatively if hemorrhage has occurred. A complete scrotal ablation (removal of scrotum) may be necessary if hemostasis was unsuccessful. Other complications include self-inflicted trauma to the incision and infection or dehiscence of the incision site.
Box 7-11 shows an example of a surgery report for a canine castration.
Routine Feline Castration
Indications: The primary indication to perform a castration is for sterilization of the male cat. Other indications include the following:
• Prevention of aggressive behavior or fighting.
• Prevention of urine spraying or marking.
• Correction of congenital abnormalities.
• Treatment of scrotal neoplasia.
• Treatment of scrotal abscess, infection, or trauma.
• Treatment of endocrine abnormalities.
• Treatment of disease elsewhere in the body related to hormones (e.g., prostatic disease, perineal hernias).
Instrumentation: No special instrumentation is required to perform a feline castration. The surgeon may prefer to use metal clips rather than the spermatic cord to tie a knot, or may prefer using suture for ligation.
Patient positioning: The feline patient may be positioned for castration in lateral or in dorsal recumbency with the legs tied cranially. The positioning of the patient is the surgeon’s preference.
Patient draping: A single fenestrated drape should be sufficient for orchiectomy (Figure 7-49).
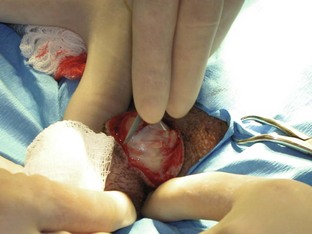
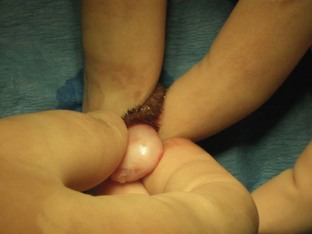
Feline castration procedure: An examination of the testicles should be conducted before anesthesia is induced, to ensure that both testicles have descended into the scrotum. The male cat should be positioned according to the surgeon’s instructions (lateral or dorsal recumbency). The testicles should be prepared for surgery by gently plucking the hair from the scrotum. The scrotum should then be prepped and draped with proper aseptic technique. One testicle is held in place while the surgeon makes an incision over it (Figure 7-50). The parietal vaginal tunic is incised, and the testicle can then be extruded from the scrotum with gentle force (Figures 7-51 and 7-52).
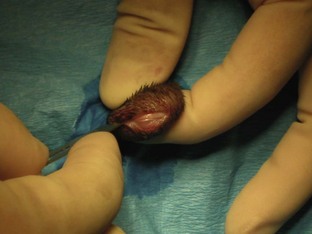
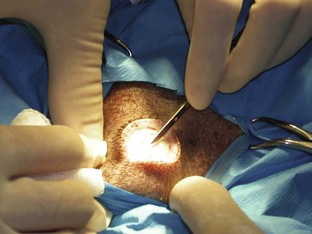
FIGURE 7-50 Incision is made through the skin and parietal vaginal tunic of the feline scrotum for orchiectomy.
The spermatic cord can be ligated and transected using different techniques. Metal clips can be used for ligation of the spermatic cord. Once the clips are in place, the testicle can be transected. Another option for ligation of the spermatic cord is using hemostats and suture. Three hemostats are placed on the spermatic cord, and the testicle is then transected. A ligature is placed around the cord just below the forceps.
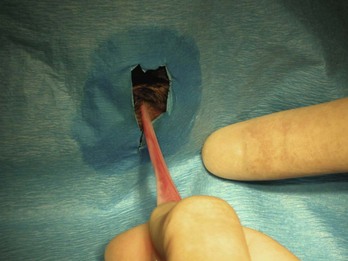
Another type of procedure uses the reproductive anatomy to tie knots. In one such procedure the ductus deferens and the spermatic vessels are separated and used to tie square knots. Another such procedure uses an overhand technique (Figures 7-53 to 7-55). This is done by placing a hemostat on top of the spermatic cord and wrapping the cord over and around the hemostat. The cord is then grabbed by the hemostats and clamped near the testicle. The testicle is transected and the cord pulled through to make a knot on itself.
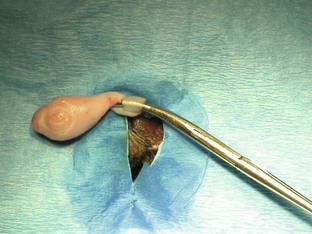
FIGURE 7-53 Overhand technique for feline castration. A hemostat is placed on top of the spermatic cord, and the cord is wrapped over and around the hemostat. The cord is grabbed with the hemostat and clamped near the testicle.
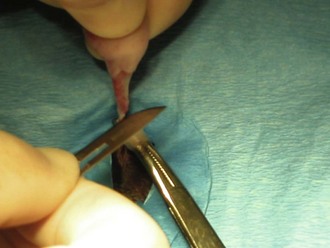
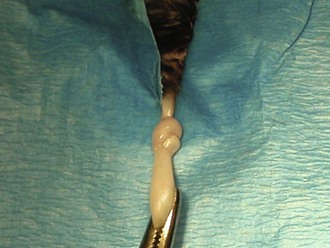
FIGURE 7-55 The spermatic cord is pulled through and a knot is made with the cord in the overhand technique for feline castration.
All these procedures are acceptable methods for feline castration; the choice is left to the surgeon’s discretion. The scrotum itself is left unsutured.
Postoperative considerations and instructions: Scrotal bleeding can be a common complication associated with feline castration. A cold compress can be placed on the scrotum for several minutes to aid in hemostasis. If hemorrhage continues, another surgery may be required to ligate a bleeding vessel. General discharge instructions are listed in Chapter 10. Box 7-12 shows an example of a surgery report for a feline castration.
Cystotomy
Cystotomy refers to a surgical incision into the bladder to expose the lumen or interior of the urinary bladder.
Indications
A primary indication for performing a cystotomy is to remove cystic calculi. Removal of bladder stones is probably the most common bladder surgery performed in small animal surgery. In the dog the most frequent urolith observed is the struvite (45% to 50% of all calculi). Other uroliths found in the dog include calcium oxalate, urate, silicate, and cystine crystals. Uroliths are most frequently noted in middle-aged dogs, although they can occur at any age.
Clinical signs associated with bladder stones include hematuria, stranguria, dysuria, and pollakiuria. Stones may also become wedged in the urethra of male dogs and cause obstructions of the urethra. Animals with suspected cystic calculi should have radiographs. Abdominal radiographs of animals with calculi frequently reveal radiopaque densities in the urinary system. Obstruction of the urethra can lead to a buildup of urine in the bladder and can cause bladder distension. Bladder distension can lead to a rupture if left untreated. Rupture of the bladder can also result from trauma (e.g., being hit by a car) or from improper placement of a urinary catheter or forceful expression of the bladder. Most abdominal procedures require expression of the bladder before transport into surgery. The bladder of a trauma patient should not be expressed before surgery. The condition of the bladder may be in question, and attempts to express a traumatic bladder may lead to a bladder rupture. Clinical signs of bladder rupture can include shock, fever, hematuria, anuria, and abdominal pain. Urine in the abdominal cavity can cause uremia and dehydration. A bladder rupture can lead to death if identification of the rupture is delayed. Uroabdomen can be diagnosed by the performance of an abdominocentesis. Creatinine and urea measurements of the abdominal cavity fluid are compared with blood serum levels. If the levels of creatinine and urea in the abdominal fluid are greater than in the blood serum, an uroabdomen can be diagnosed. A contrast cystourethrogram can also be performed to diagnose the exact region of the bladder leakage.
Other indications to perform cystotomy include neoplasia and congenital abnormalities. The most common neoplasia associated with the bladder in dogs and cats is transitional cell carcinoma. In the dog, bladder cancer makes up less than 1% of all canine cancers. The incidence of bladder cancer in cats is much lower.
Table 7-1 lists treatment options and preventive measures for different types of canine urolithiasis. Box 7-13 lists canine predispositions for urinary calculi.
TABLE 7-1
Treatment and Prevention of Canine Urolithiasis
| Urolith Type | Treatment Options | Preventive Measures |
| Struvite | Surgical removal or dissolution Hill’s s/d diet Control infection Urease inhibitor? Keep urine pH <6.5, blood urea nitrogen (BUN) <10 mg/dL, and urine specific gravity <1.020 |
Hill’s c/d diet Monitor urine pH and urine sediment; eliminate infections quickly and appropriately |
| Calcium oxalate | Surgical removal | Hill’s u/d diet or Hill’s w/d diet plus potassium citrate |
| Urate | Surgical removal or dissolution Hill’s u/d diet Allopurinol Control infection |
Hill’s u/d diet Allopurinol if necessary Correct congenital portosystemic shunts |
| Silicate | Surgical removal | Hill’s u/d diet Prevent consumption of dirt |
| Cystine | Surgical removal or dissolution Hill’s u/d diet d-Penicillamine N-(2-Mercaptopropionyl)-glycine (MPG) |
Hill’s u/d diet Thiol-containing drugs if necessary |
From Fossum TW, Hedlund CS, Hulse DA, et al: Small animal surgery, ed 3, St Louis, 2007, Mosby.
Special Instruments
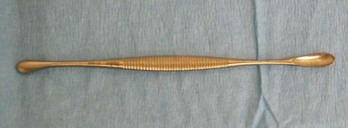
A general use soft tissue surgery pack will be sufficient for cystotomy. A bladder spoon should be available (Figure 7-56). Bladder spoons can aid in the retrieval of cystic calculi, especially those located in the neck of the bladder. A Balfour abdominal retractor should also be available.
Patient Positioning
The patient should be positioned in dorsal recumbency to perform a ventral midline incision.
Cystotomy Procedure
The entire abdomen should be clipped from xiphoid process to the pubis. The patient should be prepped from the xiphoid process to the pubis in the event an unexpected finding requires an extended incision. This additional clipping and prepping allows the surgeon to extend the incision cranially if desired. A ventral midline incision beginning at the umbilicus and extending caudally to the pubis should be sufficient for cystotomy. The subcutaneous tissues and linea alba should be incised on the midline. Moistened lap sponges should be placed on either side of the incision, and a Balfour retractor positioned for better exposure of the abdomen. The bladder should be isolated, and lap sponges positioned beneath the bladder to segregate it from the rest of the abdomen. Stay sutures should be placed at the apex of the bladder to assist in manipulation as well as to prevent spillage of urine into the abdomen (Figure 7-57). The scrub nurse should grasp the stay sutures and gently lift upward to avoid spillage of urine.
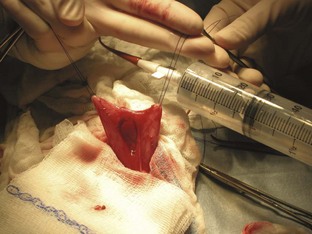
FIGURE 7-57 Cystotomy incision into the ventral aspect of the bladder. Note that stay sutures are used to lift gently upward on the bladder to avoid leakage of urine. A red rubber catheter is placed to flush any stones in the urethra back into the bladder. (Modified from Fossum TW, Hedlund CS, Hulse DA, et al: Small animal surgery, ed 3, St Louis, 2007, Mosby.)
The surgeon makes a stab incision on the ventral aspect of the bladder in a hypovascular region. The technician should have suction ready to place into the stab incision to remove the urine from the bladder before leakage occurs. The stab incision can then be extended with Metzenbaum scissors. A bladder spoon can be used to aid in the removal of cystic calculi, especially at the neck region of the bladder (Figure 7-58). A red rubber catheter can be passed through the urethra, and sterile saline should be flushed through the catheter to confirm the urethral passage is clear of cystic calculi and is patent. Cystic calculi should be flushed back into the bladder if possible to avoid having to perform an urethrotomy (incision into the urethra).
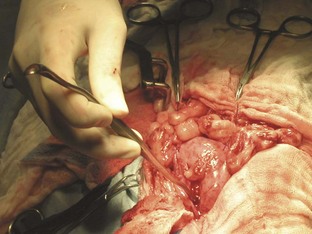
Cultures of the bladder should be obtained. Some surgeons may also prefer to take a sample of the bladder for biopsy or culture. The bladder should be examined for deficiencies and closed according to the surgeon’s preference. Closure of the bladder can consist of a two-layer or three-layer continuous closure or a simple interrupted suture pattern (Figure 7-59). The stay sutures can be removed, and the abdomen should be lavaged with warm saline. The abdomen should be closed routinely. Bladder stones retrieved from the bladder should be submitted for analysis.
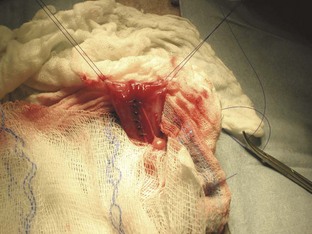
Onychectomy
Onychectomy, or declawing, is the removal of the claw and its associated third phalanx (Figure 7-60).
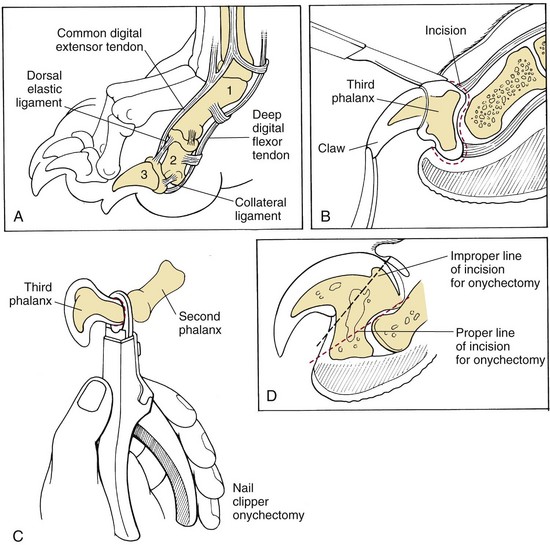
FIGURE 7-60 A, Distal phalangeal anatomy for onychectomy. B, Dissection onychectomy disarticulates the third phalanx by transecting tendons, ligaments, and other soft tissue attachments. C, Nail clipper onychectomy should remove the entire ungual crest but often leaves a portion of the ventral flexor process of P3. D, Proper and improper lines of transection. (Modified from Fossum TW, Hedlund CS, Hulse DA, et al: Small animal surgery, ed 3, St Louis, 2007, Mosby.)
Indications
An onychectomy is usually an elective procedure to prevent the cat from scratching furniture of the owners. Occasionally it is a non-elective procedure, required to remove neoplasia of the claw and or phalanx or to remove an infected nail bed. Elective declaws are usually performed between 3 and 12 months of age and are typically done on the front paws only. A declawed cat should be kept indoors, but in the event that the cat were to get outside it would still have its back claws as a means of defense. This is a painful procedure, and proper analgesia and pain management protocols need to be initiated prior to surgery.
Special Instruments
The procedure can be done in one of three methods, use of the Rescoe Nail Trimmer technique (Rescoe, Walled Lake, MI) scalpel blade, or the CO2 laser. Each requires its own instrumentation. A tourniquet will be required to control hemorrhage.
Patient Positioning
The cat is typically placed in lateral recumbency. The feet are not clipped unless the cat is a long-haired breed, and are surgically scrubbed. If the laser method is used, alcohol should not be used as it will likely ignite when the laser beam hits the prepared area. The toe nails should not be clipped because their length will aid in nail manipulation during the procedure (Figure 7-61). A tourniquet is placed on the limb, but not tightened, prior to aseptic preparation.
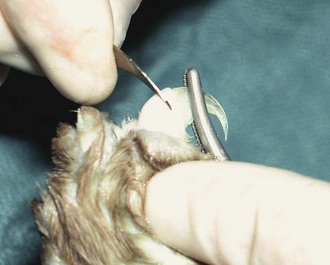
Declaw Procedure
Once the foot has been scrubbed, a tourniquet should be positioned distal to the elbow and tightened. Placing the tourniquet proximal to the elbow can lead to radial nerve damage (Figure 7-62). At this time a nerve block may be performed (Figure 7-63).
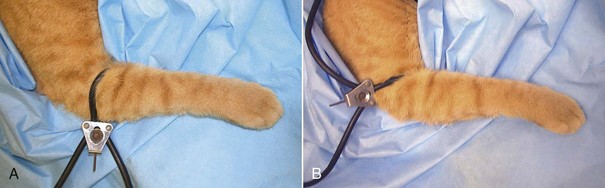
FIGURE 7-62 Declaw. A tourniquet should always be placed, distal to the elbow (A) rather than proximal to the elbow (B) to help prevent permanent radial nerve damage. (From Bassert JM, McCurnin DM, editors: McCurnin’s clinical textbook for veterinary technicians, ed 7, St Louis, 2010, Elsevier.)
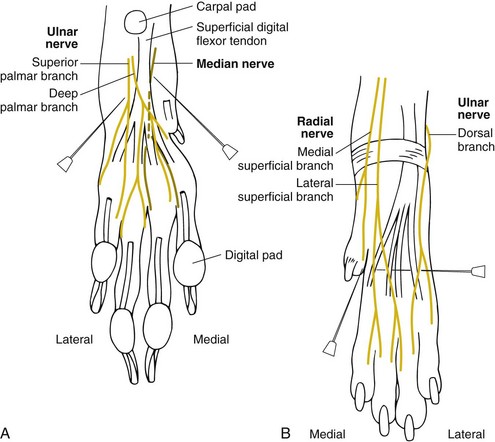
FIGURE 7-63 Sites for nerve blocks of sensory innervation to the feline forepaw. A, Extend the carpus and palpate the superficial digital flexor tendon along the palmar aspect of the paw. Block the median nerve with bupivacaine just medial to the superficial digital flexor tendon. Similarly, block the palmar branches of the ulnar nerve along the lateral superficial digital flexor tendon. B, Block dorsal digital nerves II to V by inserting the needle from lateral to medial just distal to the carpus. Inject bupivacaine as the needle is withdrawn. Block dorsal digital nerve I at the articulation between metacarpal I and II with bupivacaine. (From Fossum TW, Hedlund CS, Hulse DA, et al: Small animal surgery, ed 3, St Louis, 2007, Mosby.)
For the Rescoe technique, extend the claw cranially and position the blade on the dorsal surface of the digit between the second and third phalanges. Care must be exercised to avoid cutting the footpad. As the cutting blade of the nail trimmer is advanced, the pad should be moved caudally and the nail should be rotated dorsally and caudally. This process is repeated for each digit.
With the blade technique, a No. 12 scalpel blade is used to excise the third phalanx. First the collateral ligaments are cut, and then the nail itself is cut away from the pad and underlying tissue.
For both the Rescoe and blade techniques, sutures or surgical glue can be placed to appose the skin edges after nail removal. If glue is used it should not be placed on exposed bone or dropped into the wound. The wound should be closed first, and then a drop of glue added. Paws are bandaged snugly with gauze and tape. Care must be taken not to make the bandage too tight, as vascular compromise and skin sloughing could occur. Once the bandage has been placed, the tourniquet can be removed.
The last technique uses a laser to disarticulate the third phalanx. A tourniquet is not necessary with this procedure because the site does not typically bleed when cut with the laser. Saline-soaked sponges are needed to cover the remainder of the cat’s foot, all instruments, and the surgeon’s fingers. The sponges prevent burning by absorbing the extra energy given off by the laser.
The patient preparation for a laser declaw is similar to that for the standard declaw. Care must be taken not to use flammable liquids when prepping the paw skin. The surgeon will choose the wattage, mode, and tip size used for the procedure. The technician will ensure that the surgery room and its occupants are “laser safe.” A hemostat can be positioned on the claw for manipulation and extension of the nail. A 360-degree circumferential incision is made through the skin and the underlying fascia between the second and third phalanges. This incision exposes the common digital extensor tendon. The laser is then used to transect the common digital extensor tendon as well as the deeper synovial layer at its insertion on the distal phalanx. Gentle distraction of the nail at this point exposes the collateral ligaments. The collateral ligaments are then incised bilaterally, and the joint (second/third phalanges) can be disarticulated. The third phalanx is further freed up by laser transection of the deep digital flexor tendon caudal to its ungual process. Care should be taken to avoid thermal damage to the digital pad and other soft tissue attachments, which can be caused by misdirection of the laser beam. This procedure should be repeated on each remaining claw.
At the end of the laser procedure, each digit should be meticulously examined. Any char noted on the digit should be removed with sterile gauze. Bandages can be placed for significant hemorrhage, but the laser declaw procedure is usually associated with minimal or no hemorrhage.
Postoperative Considerations and Instructions
It is imperative that multimodal pain management be used for this procedure. Pain medication should be given for at least 4-5 days postoperatively. Bandages are removed within 24 hours, before the cat leaves the hospital. The owner should be advised to provide shredded paper or pelleted litter to prevent contamination of the paws with clay litter. Regular litter can be re-introduced after 10 days. The cat’s activity should be restricted and excessive grooming should be discouraged until the paws have healed.
In addition to the general postoperative and discharge instructions for any declaw surgery, more specific recommendations exist for laser declaw surgery. As stated, postoperative pain tends to be decreased with a laser declaw, but not absent. As with any procedure, appropriate analgesics should be administered postoperatively. Slight epithelial swelling is normal after surgery and may aid the redundant epithelium in covering the surgical site. Closure of the laser declaw site is usually not indicated. In most cases the patient bears weight on the paws the same day or 1 day postoperatively.
Ear Procedures
Definition
Aural hematoma refers to the formation of a hematoma within the auricular cartilage on the concave surface of the ear. The hematoma forms when the cartilage in the ear pinna fractures, usually from violent head shaking or scratching at the ears secondary to otitis, foreign bodies in the ear canal, atopy, or ear mites. It is important to treat the underlying cause of the aural hematoma to prevent further injury and recurrence. Auricular hematomas occur most frequently in pendulous-eared dogs, but they also occur in cats and erect-eared dogs.
Indications
Surgical correction of an aural hematoma should be performed as soon as possible to relieve the animal’s pain and to prevent a permanently thickened, cauliflower-like ear.
Instrumentation
A soft tissue surgery pack will provide the surgeon with the necessary instruments for surgical correction of an aural hematoma.
Treatment Options
A variety of treatment options exist for the repair of aural hematomas. The objectives of these treatments are to eliminate the hematoma and prevent reappearance of the condition. This section describes only one common treatment option.
Incision drainage procedure: Incision drainage is probably the most widely used procedure for the treatment of aural hematomas. Its purpose is to eliminate dead space between the layers of cartilage until scar tissue can form. An incision (S-shaped or straight) is made directly over the entire hematoma. Fibrin and blood clots are removed, and the area is lavaged. Several vertical mattress sutures are placed on the concave surface of the ear around the incision (Figure 7-64) to avoid pocket formation where fluid can collect. The incision itself should remain open to allow continual drainage.
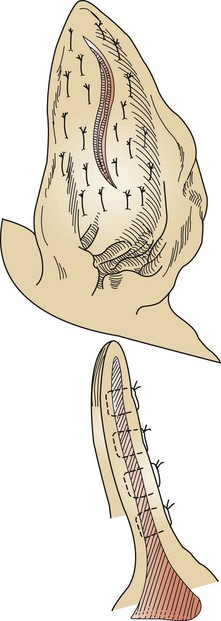
FIGURE 7-64 Sutures should be placed vertically rather than horizontally for aural hematoma repair. Sutures may be placed through the cartilage without incorporating the skin on the convex surface of the ear, or full-thickness sutures may be used. (From Fossum TW, Hedlund CS, Hulse DA, et al: Small animal surgery, ed 3, St Louis, 2007, Mosby.)
Box 7-14 shows an example of a surgery report for incision drainage.
Lateral Ear Canal Resection
Indications
Lateral ear canal resection is indicated for animals with chronic otitis externa or neoplasia. Lateral wall resection allows drainage of the ear canal while affording ventilation of the canal. Bacteria thrive in moist and humid environments, so allowing ventilation reduces the risk of infection. Surgery improves the chronic condition in many patients, but it is not a cure. Appropriate medical management is usually required in conjunction with surgery.
Patient Positioning
The patient should be positioned in lateral recumbency with the affected ear upward and the head slightly elevated. A sandbag can be placed under the head for elevation.
Patient Draping
A four-quarter draping method should be used for lateral ear resection. The inner and outer aspects of the pinna should be aseptically prepared and can be left in the surgical field.
Lateral Ear Resection Procedure
The entire ear, including both sides of the pinna and the adjacent skin, should be clipped and aseptically prepared. The ear canal should be lavaged and cleaned before the patient enters the surgery room. Once the animal is prepped and draped, the surgeon makes two parallel skin incisions from the tragus ventrally past the horizontal ear canal. The incision should extend past the region where the canal becomes horizontal. The skin flap is then excised at the proximal region. A vertical incision is made in the subcutaneous tissue over the vertical canal. The subcutaneous tissue is then reflected dorsally, exposing the auricular cartilage of the vertical canal. The cartilage of the vertical canal is then cut distally along the same incision line. The cartilage flap is reflected distally, and the opening of the horizontal canal observed. The proximal two thirds of the cartilage flap are excised, and the remaining third is reflected ventrally to form a “drainboard,” which is then sutured to the ventral skin incision. The drainboard technique was established by Zepp to maintain horizontal canal patency (Figure 7-65).
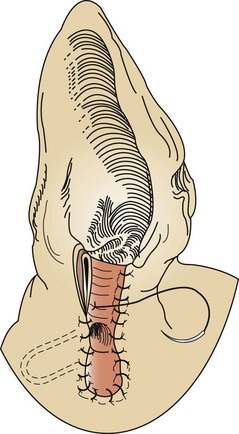
Postoperative Considerations and Instructions
A bandage may be placed over the ear after the lateral ear canal resection. The owner should be made aware of possible mutilation of the surgical site by the pet. An Elizabethan collar should be sent home with the owner to avoid self-mutilation complications. Although complications are uncommon, insufficient drainage and sustained ear infections may be seen postoperatively. Most lateral ear resections still require medical management by the owner. Before leaving the hospital, the owner should also be instructed on how to clean and administer medication in the horizontal canal. Because the anatomy of the ear canal has changed, the tympanic membrane is more susceptible to damage. Analgesics should be sent home with the owner. Suture removal should be performed 10 to 14 days after surgery.
Box 7-15 shows an example of a surgery report for a lateral ear resection.