The Postoperative Patient
After completion of this chapter, the reader will be able to:
• Monitor the patient during the anesthesia recovery period:
• Identify the proper time to extubate the patient.
• Safely extubate the patient.
• Recognize and administer prescribed treatments for postanesthesia complications, such as hypothermia, emergence delirium, and prolonged recovery.
• Recognize and administer prescribed treatments for postsurgical complications, such as hemorrhage, seroma, dehiscence, self-trauma, and infection.
• Thoroughly and properly cleanse wounds, understanding the principles of lavage and débridement.
• Maintain and monitor bandages, casts, splints, and slings.
• Maintain and monitor surgical drains.
• Maintain and monitor indwelling venous and urinary catheters.
• Provide nutritional support for postoperative patients through the techniques of force-feeding and tube feeding.
• Understand the basic forms of physical therapy.
• Provide effective postoperative analgesia.
• Understand the importance of preemptive, presurgical analgesia on the success of postoperative analgesia.
• Safely combine different classes of analgesics to provide effective postoperative pain management.
The work of the veterinary technician is still far from complete even when the last suture is placed and the surgeon leaves the surgical table. The patient still needs to recover from the anesthesia. The surgical wounds need to heal. The surgical procedure has yet to be proved successful. The patient and the owner need help and guidance during the recuperation period. Careful patient monitoring and owner mentoring are important responsibilities of the veterinary technician.
Compassion, caring, and concern are the hallmarks of an excellent technician. All hospitalized patients need an advocate. The observant technician who advocates for the patient’s needs and points out changes in the patient’s physical status to the attending veterinarian is an invaluable asset to both the patient and the veterinarian.
Recovery from Anesthesia and Extubation
Shepherding the patient from the surgical plane of anesthesia back to consciousness is the first step in the recovery process. The recovery period starts with the cessation of anesthesia and continues until the patient’s vital signs and level of consciousness have returned to normal.
First, the patient must be safely extubated. The steps in the process of extubation are outlined in Box 8-1.
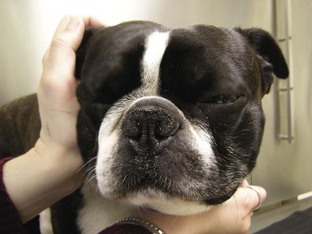
Brachycephalic breeds of dogs, such as English Bulldogs, Pugs, and Pekingese, are prone to developing complications while recovering from anesthesia. These short-headed dogs frequently have stenotic nares and elongated soft palates and are predisposed to laryngeal obstruction during sedation. An elongated soft palate can occlude the larynx and prevent the passage of air through the mouth. The stenotic nares do not allow sufficient air to pass through the nasal passages (Figure 8-1). When managing a brachycephalic dog under anesthesia, the best course of action is to delay extubation as long as possible. Many anesthetists will extubate brachycephalic dogs only after they can lift their heads by themselves. Allow these patients to recover as fully as possible before pulling the ET tube. Once the ET tube is out, closely monitor the patient for any signs of dyspnea and cyanosis (blue mucous membranes).
Postoperative Monitoring
Close monitoring and documentation of vital sign values are usually discontinued after the patient is extubated and placed in the recovery cage. Although the recovery period technically begins when the animal is disconnected from anesthesia, the patient is not completely recovered until all physiologic parameters, including neurologic responses, are normal. This period lasts for hours. Potential complications include airway obstruction, hypotension, thermoregulatory problems (primarily hypothermia), and cardiac arrhythmia. Although patient monitoring may not need to be as frequent, regular monitoring should continue.
The recovery area should be a separate and quiet area in the animal hospital dedicated to recovery from anesthesia. The recovery area should be constantly staffed with one or more technicians. The area should be fully stocked with drugs and equipment necessary to handle any emergency. In small hospitals with limited personnel, the recovering patients should be placed in a staffed area where they will be observed frequently. Patients should never be left unattended, because many accidents can occur during this time.
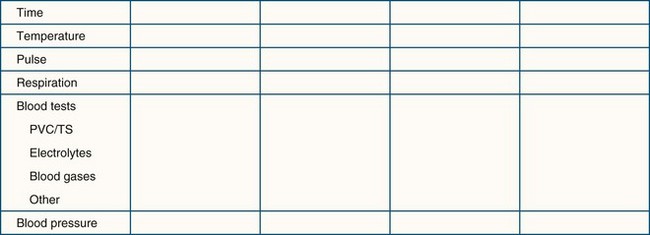
At-risk patients should be monitored closely while recovering. A charting system should be used to help the recovery technicians identify trends and initiate appropriate treatments. The vital signs may be plotted on a graph similar to the anesthesia form, or the vital sign readings may be written in a chart (Figure 8-2).
Complications Related to Anesthesia
Most patients lose body heat while they are anesthetized. Mild hypothermia, or body temperature no lower than 97° F (about 36° C), is expected and is usually well tolerated by the patient. A body temperature below 93° F (about 34° C) is worrisome and can affect the patient’s recovery adversely. As the body temperature decreases, the amount of anesthetic required decreases. The metabolism of the body cells functions best at normal body temperature. As the body temperature drops, normal metabolism slows down, adversely affecting the functioning of all organs of the body. The brain and heart are particularly sensitive to hypothermia.
Hypothermia results when body heat loss exceeds heat production. Causes of hypothermia are related to the effects of anesthesia and the consequences of surgery. Preanesthetic and analgesic drugs can alter the thermoregulatory center in the brain, thus interfering with the maintenance of a constant, optimum body temperature. As the body cools, the anesthetized animal cannot compensate by shivering or seeking a warmer environment. Muscular activity involved with shivering increases body heat. The anesthetized patient is lying still, so body heat production from muscular activity is absent.
All animals undergoing a surgical procedure are at risk for development of hypothermia. Neonates, very lean animals (Body Condition Score < 2/5 or 4/9), and geriatric animals are at greatest risk for hypothermia. Numerous procedures are performed on the surgical patient that increase the loss of body heat (Box 8-2).
Various means to prevent hypothermia during surgery are discussed in Chapter 2. Treatment of hypothermia is discussed here. Many of the treatment measures are similar to the measures used to prevent hypothermia. The hypothermic patient needs to be monitored closely and frequently. Placing pads or blankets with circulating warm water or air under, over, and around the patient is a first step (Figure 8-3). SnuggleSafe Microwave Heat Pad (SnuggleSafe, Lenric C21 Ltd., Littlehampton, West Sussex, UK), sacks of rice or lentils heated in a microwave oven, and warm water bottles or bags can supplement other measures. The patient, including his/her head, can be placed under a “tent” made by blankets and warming objects. The air under the blankets is warmer than the room air; breathing in the warmed air helps warm the body. Fluids administered subcutaneously or intravenously should be warmed to approximately 98° to 99° F. The fluid temperature can be tested on the technician’s wrist, as in testing for the proper temperature of baby formula before feeding. Warming devices for intravenous (IV) fluids are also available.

FIGURE 8-3 Gaymar convection-air patient-warming system blanket is placed over cat recovering from anesthesia. The warm air diffuses around the patient, providing a warm microenvironment.
Water-filled balloons or latex gloves can be used instead of bottles. Expired fluid bags can be heated in a microwave oven and are effective in warming the patient. These are softer than bottles and mold to the contours of the patient’s body. Towels or blankets can be warmed in the dryer and then wrapped around the patient with an outer blanket to help trap the heat.
Uncooked rice or lentils can substitute for the water in bottles, balloons, or gloves. The rice-filled containers are placed in a microwave oven for several minutes. The time required depends on the power level used, the oven’s wattage, and the size of the bottle or bag. The technician must experiment beforehand to determine the proper heating time needed. These containers tend to remain warmer for a longer time than water bottles. Care must be taken not to leave plastic containers in the microwave too long; overheating could melt the plastic. The technician must ensure that none of these warming devices is in direct contact with the skin, which might cause thermal burns. Either the patient or the warming device should be wrapped in at least a single layer of cloth to protect the skin. The patient is unable to move away from these heat sources if they are too warm or if damage to the skin is occurring.
As the warm water bottle cools and its temperature falls below the temperature of the hypothermic patient, the bottle that was warming the patient will now be cooling the patient. The water bottles should be rewarmed frequently. Also, leaking of the warm water on to the patient is a concern. A wet patient is at risk of becoming a colder patient.
Electric heating pads should not be used. They can become too hot for the recumbent patient, and severe thermal burns of the skin may occur. Such burns usually do not become evident until several days later. Large areas of skin that were in contact with the electric heating pad may be affected. Significant skin sloughing can be a serious complication.
Emergence Delirium
Occasionally when recovering from general anesthesia, the animal exhibits signs of excitement, possibly with exaggerated and uncontrollable movements. The patient may thrash around in the cage, cry out, or “paddle” all four legs. This phenomenon is called emergence delirium (Figure 8-4).
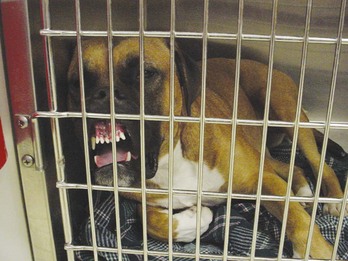
FIGURE 8-4 Dog exhibiting emergence delirium. Between periods of thrashing in the cage, the dog presses its nose against the cage door.
Emergence delirium occurs for several reasons. During the recovery process the animal travels back through the stages of anesthesia. Stage II is the “excitement” stage of anesthesia. In some cases the patient passes slowly through stage II and spends several minutes exhibiting signs of excitement. Analgesic and anesthetic side effects contribute to the development of emergence delirium. Opioids are given for their analgesic effects, but these drugs can sensitize the patient to loud auditory stimuli and bright visual stimuli. When stimulated, these patients may be aroused and may exhibit erratic behavior. Dissociative anesthetic agents are known to cause hallucinations in humans, so animals also may undergo hallucinations when given these agents.
If the patient thrashes violently in the cage, problems may arise. The surgical site may undergo severe trauma and possibly dehiscence. The animal may smash its head against the hard side of the cage, causing bruising, scraped skin, and even fractured teeth. Toes can become wedged into the bars of the cage, causing skin damage or even broken bones. The patient that is wildly thrashing in the cage may also become hyperthermic, so a body temperature reading should be taken as soon as possible. Howling and screeching may become loud and may disturb other patients, hospital personnel, and clients.
The animal undergoing emergence delirium needs to be approached carefully. This animal is capable of hurting itself as well as the staff. Nevertheless, this patient needs to be calmed down; in some cases, “tincture of time” and holding the animal are sufficient. Some animals benefit from administration of a tranquilizer. The technician should notify the veterinarian in charge of the case for a consultation if the animal has injured or may injure itself or if the delirium lasts several minutes.
Prolonged Recovery
Some animals may take an unexpectedly long time to recover from the anesthesia. Most animals are able to maintain sternal recumbency and lift their head within several minutes after extubation. The patient that is unable to raise its head or to be aroused while recovering in its cage is a concern for the recovery room nurse. There are many reasons why a patient may have a prolonged recovery from anesthesia.
Anesthesia-Related Causes
Excessive depth of anesthesia: If the patient was maintained for a long time under anesthesia (>1 hour) and the depth of anesthesia was maintained at a deep level (stage III, plane 3), the patient will have a high concentration of the anesthetic in the body tissues. Gas anesthetics must pass out of the body tissues into the bloodstream and be eliminated by the lungs. A small percentage of a gas anesthetic is metabolized by the liver.
Breed predisposition: “Sight hounds” are sensitive to barbiturate anesthetics. In most dogs, barbiturates are redistributed from the vessel-rich tissues of the brain and muscles to the fat stores. Once in the fat stores, the barbiturate slowly reenters the bloodstream and is eventually metabolized in the liver. Sight hounds do not typically have as much fat on their bodies as most other breeds. Therefore, when the muscles become saturated, the barbiturate has no place for storage and is recirculated back to the brain, thus prolonging anesthesia recovery.
Patient-Related Causes
Hypotension, poor perfusion, or shock: The patient that is in shock or has hypotension is not effectively perfusing the organs and tissues. The anesthetic is therefore not being delivered to the organs that will eliminate it.
Liver or kidney disease: Many anesthetics are metabolized and eliminated through the liver or kidneys. Patients with compromised liver or kidney function eliminate these anesthetic agents more slowly than patients with healthy organs. Preanesthetic blood tests help identify such patients. The dose of anesthetic should then be reduced for these patients, or that anesthetic should not be used.
Intracranial disease: Patients with an altered level of consciousness caused by central nervous system (CNS) disease are especially sensitive to the side effects of certain anesthetics. Some anesthetics increase intracranial pressure. Patients with a history of head trauma or seizures may not be able to tolerate anesthetic agents that lower the seizure threshold. In these patients a different anesthetic protocol should be used.
Hypoglycemia: Neonatal patients are extremely susceptible to development of hypoglycemia. Glucose is stored in the form of glycogen in the liver for use between periods of eating. Because of their small size and immature livers, these animals tend to not have as much stored glycogen and will become hypoglycemic much sooner than one would expect. These patients should not be fasted, or fasted for only 1 to 2 hours, before anesthesia. Hypoglycemia adversely affects the patient’s recovery from anesthesia and predisposes the patient to seizures. Food should also be offered as soon after anesthesia recovery as possible. Once they are swallowing, normothermic, and have had their pain managed, the patients can be offered food.
Hypothermia: The cells of the body function best at normal body temperature. The cellular enzymes involved in metabolizing anesthetic drugs are less active when the body temperature falls. Bradycardia and subsequent perfusion abnormalities are other consequences associated with hypothermia. If perfusion and circulation are adversely affected, the anesthetic cannot be redistributed to the organs that will eliminate it.
Therapeutic Measures
The patient recovering slowly from anesthesia needs to be assessed by the veterinarian, who may order laboratory tests to be run. Additional nursing care measures may be instituted as well. Close monitoring is important because this is a fragile patient in which a life-threatening complication could develop. Several methods can be used to hasten the patient’s recovery from anesthesia.
Physical stimulation: Physical stimulation by rubbing, massaging, and turning is a simple way to increase the patient’s level of consciousness. Talking to or whistling to the animal can help speed up the recovery.
Ventilation: The patient that is still intubated can be manually ventilated with pure oxygen. Gas anesthetic agents are mainly eliminated through the lungs. Ventilating the patient with pure oxygen and increasing the frequency of respirations raises the rate at which the gas anesthetic leaves the body. Care must be taken not to overventilate the patient and cause apnea. The pure oxygen in the system triggers the respiratory center to decrease respirations, causing a decrease or cessation of respirations.
Fluid therapy: A bolus of IV fluids can help increase the blood pressure of the hypotensive patient and improve perfusion of internal organs such as the lungs, liver, and kidneys. Warmed fluids can help raise the core body temperature.
Reversal agents: Some injectable anesthetic agents have reversal agents. The technician should consult with the veterinarian before administering a reversal agent. Giving an opioid antagonist, such as naloxone, reverses all the effects of the opioid, including its analgesic effects. The loss of analgesic effects could be detrimental to the patient. Doxapram is a respiratory stimulant that helps to arouse the deeply anesthetized patient; it is not a specific reversal agent.
Warming measures: The hypothermic patient recovers slowly from anesthesia and will benefit from warming measures (see earlier discussion).
Dextrose: Hypoglycemia may be documented through a blood test or may be suspected from the patient’s symptoms and risk factors. Clinically, patients with hypoglycemia may appear disoriented, may gaze blankly off into space, may be slow to respond to noxious stimuli, and may have either a prolonged recovery from anesthesia or seizures.
Dextrose solution administered intravenously is the preferred treatment. For IV administration of sterile 50% dextrose, diluted 1 : 1 with sterile water. The solution should be administered slowly to patients with marked hypoglycemia. The desired effect includes increased awareness and consciousness. A constant-rate infusion (CRI) of 2.5% to 5% dextrose solution may be required to maintain blood glucose levels high enough to eliminate signs of hypoglycemia (see the Appendix for instructions).
Dextrose should not be given orally. Oral administration may lead to aspiration if the gag reflex is diminished or absent. Dextrose should also not be given by intramuscular (IM) or subcutaneous (SC) injection. The dextrose solution is hypertonic and will draw fluid into the subcutaneous space, causing cellular dehydration and cell death, and the dextrose will not be efficiently absorbed into the bloodstream because of poor peripheral perfusion.
Complications Related to Surgery
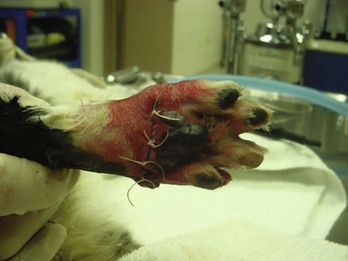
The surgical incision should be routinely inspected during postoperative monitoring. Any bleeding at the surgical site should be attended to (Figure 8-5). If direct pressure applied to the site for 5 to 10 minutes does not stop the bleeding, a bandage should be applied if possible, and the surgeon notified. Excessive bleeding at the surgical site that does not stop may indicate that bleeding is also occurring internally.

FIGURE 8-5 Bleeding at the surgical site is often seen when drains are placed. It is important to clean the blood from the surgical site or cover the site with a bandage temporarily. Dogs and cats otherwise are driven to lick at the surgical site covered with blood.
Internal bleeding can manifest as the following clinical signs: pale mucous membranes, slowed capillary refill time (>2 seconds), rapid respiratory rate, abdominal bloating, swelling at or around the surgical site, and hypotension, ultimately culminating in hypovolemic shock. An abdominocentesis (abdominal tap, “belly tap”) can be performed using a 22-gauge needle and syringe. Collecting frank blood from the abdominocentesis is a positive diagnosis for internal bleeding into the peritoneal cavity. A thoracocentesis (“chest tap”) is performed if internal bleeding is suspected after thoracic surgery.
Excessive postsurgical bleeding occurs for several reasons. The patient may have a coagulation disorder. A surgical ligature around a major vessel may have dislodged. Smaller arteries that were not bleeding intraoperatively because of hypotension may begin to bleed as the patient regains normal blood pressure and the effects of anesthesia wear off.
Coagulation disorders may predispose the patient to hemorrhage. Certain breeds, such as Doberman Pinschers, may have a genetic disorder called von Willebrand’s disease, which manifests as a primary coagulation problem. Animals with chronic liver disease may have secondary coagulation problems caused by a clotting factor deficiency. Clotting factors are produced primarily in the liver, and when it is not functioning properly, these may not be synthesized normally or in sufficient amounts to allow formation of a stable blood clot. Preanesthetic assessment of animals with chronic liver disease usually includes a coagulation profile. This usually consists of a complete platelet count, prothrombin time (PT), and an activated partial thromboplastin time (aPTT). Certain toxins, such as rodenticides, can cause coagulation disorders. Platelet disorders caused by immune-mediated disease (e.g., immune-mediated thrombocytopenia) or infectious disease (e.g., Rocky Mountain spotted fever) predispose the patient to hemorrhage.
In some cases the surgeon may decide to re-anesthetize the patient and “go back in.” The patient may need to be surgically explored to find the bleeding vessel or vessels. This patient is at high risk. Fluid therapy should be maintained, and colloid fluids may replace the crystalloid fluids. It is important to be prepared for emergency situations and to work efficiently. An additional venous access site may be needed for administering a blood transfusion or blood component therapy. In general, a “blood transfusion” refers to administering whole blood (fresh or stored) from one patient to another. Depending on how recently the whole blood was collected from the donor and when it is administered to the recipient, it may contain red blood cells (RBCs), white blood cells (WBCs), platelets, plasma proteins, and functional coagulation factors. Blood component therapy involves separating out the parts of whole blood and administering only those parts that the patient needs (e.g., plasma, packed RBCs) and that will extend the usefulness of the blood collected from the donor (Table 8-1).
TABLE 8-1
Blood and Fluid Products: Indications for Use and Doses
| Product | Indications | Infusion Rate |
| Isotonic crystalloid solutions* | Shock Dehydration Maintenance |
Dogs: Up to 90 mL/kg (to effect) Cats: Up to 60 mL/kg (to effect) Maintenance rate is approximately 66 mL/kg/day for a 10-kg dog; larger dogs need less (e.g., 44 mL/kg/day for a 40-kg dog), whereas smaller dogs need more (e.g., 81 mL/kg/day for a 5-kg dog) |
| Hetastarch | Shock Hypoalbuminemia |
Dogs: 10–20 mL/kg/hr (shock) Cats: 10–15 mL/kg/hr over 10–15 min (shock) 5–10 mL/kg (can repeat) or constant-rate infusion (1–2 mL/kg/hr) up to 20 mL/kg/day (hypoalbuminemia) |
| Dextran 70 | Shock Hypoalbuminemia |
Dogs: 10–20 mL/kg/hr (shock) Cats: 10–15 mL/kg/hr (shock) 5–10 mL/kg (can repeat) or constant-rate infusion (1–2 mL/kg/hr) up to 20 mL/kg/day (hypoalbuminemia) |
| 25% Human serum albumin | Shock Hypoalbuminemia |
5–25 mL/kg; maximal volume 2–4 mL/kg (bolus or slow push) 0.1–1.7 mL/kg/hr as a constant-rate infusion‡ |
| 7% Hypertonic saline† | Shock Hypoalbuminemia |
4 mL/kg over 5 min, then isotonic crystalloids (10–20 mL/kg/hr) to effect |
| Fresh whole blood | Anemia Hemorrhage Coagulopathy Shock |
10–22 mL/kg; in general, 2 mL/kg will raise the PCV by 1% For shock: 22 mL/kg/hr maximum |
| Stored whole blood | Anemia Hemorrhage |
10–22 mL/kg; in general, 2 mL/kg will raise the PCV by 1% |
| Packed red blood cells | Anemia Hemorrhage |
6–10 mL/kg and then reassess the patient’s PCV to determine if more is necessary; in general, 1 mL/kg will raise the PCV by 1% |
| Platelet-rich plasma | Thrombocytopenia Coagulopathy |
1 unit/3–10 kg |
| Fresh-frozen plasma | Coagulopathy Hypoproteinemia Disseminated intravascular coagulation |
10–20 mL/kg; then reassess serum albumin or antithrombin III concentration to determine if more is necessary |
| Cryoprecipitate | Von Willebrand’s disease Hemophilia |
1 unit/5–15 kg |
| Oxyglobin | Anemia Shock |
Dogs: 15–30 mL/kg at a maximum rate of 10 mL/kg/hr Cats: 5–10 mL/kg at a maximum rate of 5 mL/kg/hr |
*Monitor central venous pressure to prevent fluid overload.
†To prolong the effect of hypertonic saline, hetastarch or other colloid may be administered simultaneously. Do not exceed the maximum rate for either fluid.
‡Data from Mathews KA, Barry M: The use of 25% human serum albumin: outcome and efficacy in raising serum albumin and systemic blood pressure in critically ill dogs and cats, J Vet Emerg Crit Care 15:110, 2005.
Modified from Fossum TW, Hedlund CS, Hulse DA, et al: Small animal surgery, ed 3, St Louis, 2007, Mosby.
The blood pooling in the abdomen or thorax can be aseptically collected, passed through a blood transfusion micropore filter, and re-administered to the patient. This procedure is called an autotransfusion. If an exogenous source of blood is needed, ideally crossmatched units of blood are administered. Whole blood increases the colloid pressure and oxygen delivery to the tissues. Administering blood rich in clotting factors improves coagulation. Some practices have blood products such as fresh plasma, fresh frozen plasma, and platelet-rich plasma available for administration.
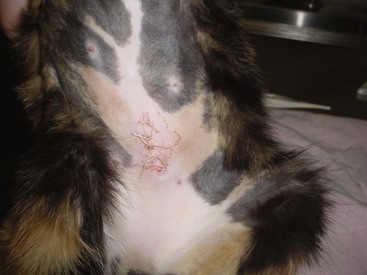
Another manifestation of excessive bleeding is the formation of a hematoma at the surgical site, such as in the scrotal sac after a castration procedure (Figure 8-6). The surgical site may be traumatized if the patient has a difficult recovery (e.g., emergence delirium). Clots covering the cut ends of small subcutaneous blood vessels can become dislodged, allowing blood to pool under the skin at the suture site. Initially, a soft, fluctuant swelling is observed. Aspirating the lump with a 22-gauge needle and syringe shows the lump to be filled with blood. The presence of the hematoma impedes the healing process.
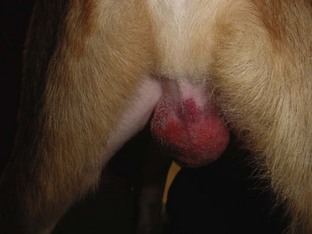
FIGURE 8-6 Postoperative scrotal hematoma: Bleeding into the scrotal sac has occurred. This picture was taken 18 hours after the castration surgery.
The surgeon may order application of warm, moist compresses to the area multiple times daily. This helps speed up the flow of blood into the area allowing quicker reabsorption of the hematoma. The surgeon may choose to suction the blood with a needle and syringe, followed by application of a pressure bandage. Alternatively, a Penrose drain can be surgically placed for continuous drainage.
Seroma
A seroma is a collection of tissue fluid in a pocket under the skin that forms at an area of excessive movement. A seroma may develop at the surgical site in a patient that is overactive postoperatively. The irritation from the scraping of rough sutures causes inflammation. When tissues are inflamed, serum leaks from the capillaries. The serum collects in the potential space between the skin and muscle layers (Figure 8-7). This seroma interferes with the normal healing process. If the serum leaks through the skin suture line, bacteria from the skin may contaminate the serum in the pocket, and an abscess may form.
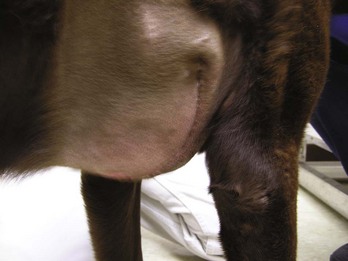
FIGURE 8-7 Formation of large seroma around the surgical site caused when dog scratched at the site over a 24-hour period.
Seromas appear as lumps at the surgical site. An abscess, hematoma, or hernia can resemble a seroma. Aseptically aspirating the mass with a 22-gauge needle and syringe allows a differential diagnosis. A straw-colored or light red fluid is seen if the mass is a seroma. Hematomas are filled with blood. Purulent fluid fills the syringe when the swelling is caused by an abscess. The syringe appears empty or has a small drop of liquefied fat if the lump results from herniation of omentum.
Seromas are treated much like hematomas. Small seromas can be managed by warm, moist compresses applied multiple times during the day. The pocket can be drained using a syringe and needle, followed by a pressure bandage. Large seromas need to be drained surgically (Figure 8-8). Surgical drainage also allows the surgeon to explore the surgical site to ensure that all the muscle-layer sutures are intact.

Dehiscence
Postoperative dehiscence is the premature loss of sutures that allows the surgical site to open. Dehiscence exposes underlying tissues to contamination. Any or all layers of the surgical closure may undergo dehiscence. If a thoracic surgical site dehisces, pneumothorax can follow. Dehiscence can have serious and even fatal consequences.
The animal can cause dehiscence by excessively licking the surgical site. Infection of the site can also weaken the tissues, and the suture can tear through the skin and muscles. Blunt trauma to the surgical site can cause sutures to rip through healthy tissue. Active playing with other dogs or falls while climbing steps postoperatively can create blunt trauma extensive enough to lead to dehiscence.
Self-Trauma
Self-trauma may be a problem in the postoperative patient. Excessive licking, scratching, or rubbing of the surgical site slows the healing process and can lead to dehiscence.
Animals instinctually lick their wounds. Sutures are at risk of being removed by the animal before healing is complete. When licking occurs, bacteria from the mouth can be deposited deep into the surgical incision. The surgical site becomes contaminated, and the animal runs the risk of infection.
Preventive Measures
Prevention of self-trauma is essential. The strategy for keeping the postoperative patient free of self-trauma requires two tactics: (1) preventing the animal from reaching the surgical site and (2) preventing the animal from wanting to reach the surgical site.
Block access to surgical site:
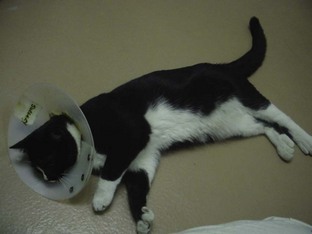
Elizabethan collar: The flat, plastic Elizabethan collar, or “E-collar,” is placed around the neck. It is attached to the animal’s collar, or a gauze strip is threaded through the collar stays. The plastic shield blocks the patient from licking surgical sites caudal to the neck (Figure 8-9). The animal can still scratch or rub the site. It is important to make sure that the patient can eat and drink with the E-collar. The pet is awkward and has no peripheral vision while wearing the collar. The pet should never be loose outside while wearing an E-collar. The pet will probably knock things over and collide with door frames. It is also imperative to ensure that the animal can still eat and drink with the E-collar in place. In some instances, the E-collar makes contact with the floor around the bowl, preventing the animal’s mouth or tongue from reaching the bowl.
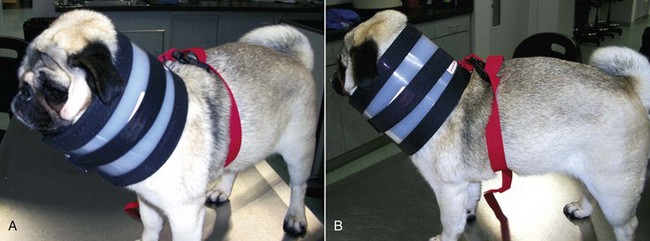
BiteNot collar: While fitted with The BiteNot Collar (BiteNot Products, Inc., San Francisco), the patient is unable to bend its neck to reach any part of its body and lick. As with an E-collar, the pet wearing the BiteNot Collar can still scratch or rub at the site (Figure 8-10).
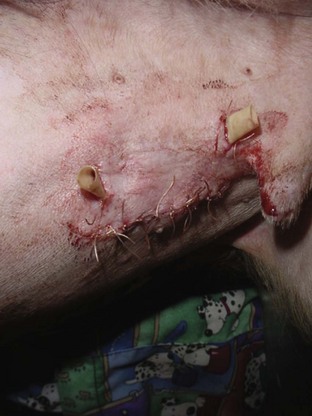
Bandaging the area: A bandage may be enough to block the patient from licking the area. Surgical sites are not always in areas that can be easily bandaged. A pet may find a way to remove the bandage or may even eat the bandage. Thus it is essential that the bandage be monitored closely for signs of slipping or wetness and for tooth marks (Figure 8-11).
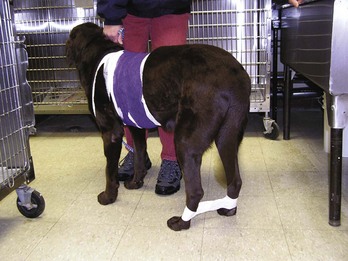
FIGURE 8-11 This pet had a bandage that encircled the chest. The bandage covered Penrose drains that had been placed to drain a seroma. The bandage also helped to keep the dog clean during the first 12 hours postoperatively. The hind legs are taped together (“hobbled”) to prevent scratching at the chest area with the rear paws.
Basket muzzle: A dog can be fitted with a basket muzzle, which prevents the patient from chewing at the site. The dog may rub the site with the muzzle and may also be able to lick. However, this type of muzzle may act as an effective psychological barrier.
Hobbles: Taping the hind legs together can prevent the patient from scratching at the surgical site (Figure 8-12).
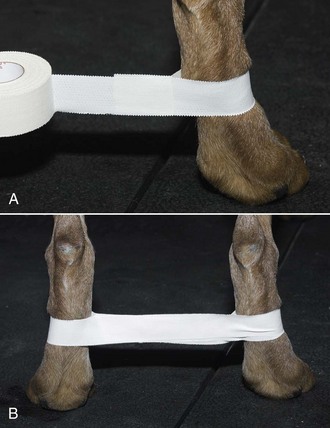
FIGURE 8-12 Hobbles. A, Adhesive tape wide enough to cover half of the metatarsal region is placed loosely around the metatarsal region. B, The tape is then adhered together between the legs and placed around the opposite metatarsus. The hind limbs are positioned apart at a distance equal to the width of the pelvis. (From Bassert JM, McCurnin DM, editors: McCurnin’s clinical textbook for veterinary technicians, ed 7, St Louis, 2010, Saunders.)
Block desire to reach surgical site:
Foul-tasting product applied around the site: Bitter-apple liquid and Yuk2e or YukForte ointments (Vet Planet LLC, Boyds, MD) are examples of bitter-tasting applications that can be placed on the skin around the surgical site. The foul taste may deter the patient from licking the area.
Infection
When the surgical site becomes infected, healing is delayed. The patient is in pain and may have a fever. The surgical site is swollen, red, and draining, and the sutures are at risk of falling out.
Surgical débridement and resuturing may be necessary. Some animals may have an allergic reaction to the absorbable sutures that has the appearance of an infected wound. In either instance, the surgeon will cut away the dead tissue and suture healthy tissue together using less reactive suture material. The patient will most likely receive systemic antibiotic therapy. Warm, moist compresses and cleaning of the site with dilute antiseptic solution also may be prescribed.
Postoperative Nursing Care
A wound occurs whenever there is an interruption in the normal integrity of the tissue. Wounds can be purposeful, such as a surgical incision, or incidental, such as a traumatic injury. Wound healing begins directly after the injury occurs and is a dynamic process, with more than one phase of wound healing occurring at the same time (Box 8-3).
Wound healing can be influenced by many factors, including host factors, wound characteristics, and external factors (Box 8-4). Successful management of the wound requires accurate assessment and planning.
Wound Classification
Wounds are classified by several means. One method of classification is by etiology, or cause. In this scheme a surgical wound is called an incisional wound, because the soft tissue damage (or wound) is caused by the surgeon’s scalpel. Another method of classification is based on the duration and degree of wound contamination. Class 1 wounds are 0 to 6 hours old with minimal contamination; most surgical wounds fall into this class. Class 2 wounds are 6 to 12 hours old with significant contamination. Class 3 wounds are more than 12 hours old with profound (gross) contamination. However, this system fails to address the contaminated wounds that are new or a few hours old, such as traumatic wounds sustained in animal fights or automobile accidents.
A more useful classification scheme is based only on the degree of contamination. Age of the wound is not part of this system. Using degree of contamination to classify wounds guides the veterinarian in making decisions regarding wound management. There are four classes: clean, clean-contaminated, contaminated, and infected (Box 8-5).
Clean Wound
Surgical wounds made under aseptic conditions are considered “clean.” Surgical sites of castration or ovariohysterectomy are considered examples of “clean” wounds (Figure 8-13).
Clean-Contaminated Wound
Surgical wounds that are contaminated with contents from the gastrointestinal (GI), respiratory, or urinary tract are considered clean-contaminated wounds. The contamination is minimal and easy to remove. Traumatic wounds can be considered clean-contaminated wounds after lavage and débridement (Figure 8-14).
Contaminated Wound
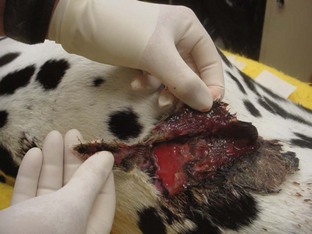
These types of wounds have heavy contamination. Foreign material (e.g., grass, asphalt) and compromised tissue are incorporated in the wound. The wound can become contaminated when there is major spillage from the GI tract. Wounds sustained in fights are another example of contaminated wounds. Wounds located within the mouth cavity are immediately contaminated by oral cavity flora (Figure 8-15).
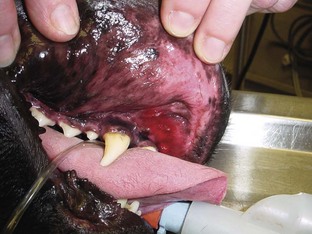
FIGURE 8-15 The wound in this dog’s mouth was caused by a spider bite. Dark red tissue is necrotic. Wound was flushed with sterile saline, and dog received a regimen of broad-spectrum antibiotics. Because the wound was located in a contaminated area, in this case the mouth, the wound was initially classified as a “contaminated” wound.
Infected Wound
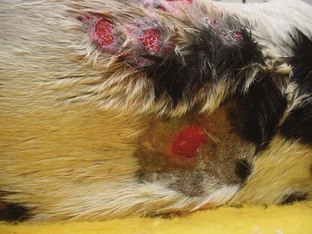
Infected wounds are inflamed, contaminated with many bacterial organisms (by definition more than 100,000/gram of tissue), purulent discharge (pus), and varying amounts of necrotic (dead) tissue. Traumatic or surgical wounds can progress to become infected if treatment is inadequate or nonexistent (Figure 8-16).
Wound Cleansing
Regardless of the wound classification, it must be managed properly in order to facilitate healing. Box 8-6 lists the fundamentals of wound management. Surgical site preparation, sterile gloving, sterile draping, use of sterile instruments, and adherence to aseptic technique all minimize initial contamination of the surgical wound. Circumstances such as immunosuppressed patient status, self-mutilation, or unavoidable intraoperative contamination can render the surgical wound contaminated. Cleansing of contaminated wounds facilitates healing. Whether caused by surgery or trauma, contaminated wounds are cleansed of debris and protected from microorganisms through numerous means, including lavage, débridement, dressings, and antimicrobial agents.
Lavage
Lavage is the procedure of forceful rinsing of a wound (Figure 8-17). Anesthesia may be necessary if the patient is in pain and struggles. Thorough lavage flushes out foreign debris, purulent fluid, and microorganisms from a wound. The goal of a successful lavage is to reduce the number of microorganisms in the wound to a level that the immune system can handle. As the criticalists say, “the solution to pollution is dilution.”
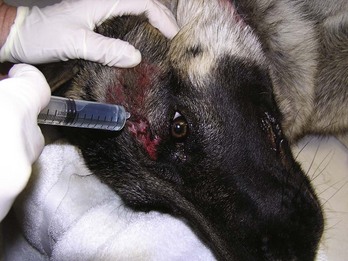
FIGURE 8-17 Lavage procedure. Syringe with dilute chlorhexidine solution (1 : 40 dilution) is flushed around the wound to rinse debris and blood from the area.
Solutions used to lavage external wounds include tap water, sterile saline, lactated Ringer’s solution, diluted chlorhexidine, and diluted povidone-iodine. Although tap water is not sterile, it is still a safe and effective lavage agent for external wounds that do not penetrate a body cavity (thorax or abdomen) or joint. Two percent chlorhexidine solution is diluted 1 : 40 with water to make a 0.05% concentrated solution for lavage. Povidone-iodine (10% stock solution) is diluted 1 : 10. These diluted solutions should be prepared fresh daily; their potency diminishes with time. (See Table 8-2 for a list of lavage solutions with their advantages and disadvantages.)
TABLE 8-2
| Cleanser | Advantage | Disadvantage |
| Tap water | Availability Inexpensive Ease of application |
Hypotonic Cytotoxic trace elements Not antimicrobial |
| Balanced electrolyte solution: Lactated Ringer’s solution (LRS) Normosol |
Isotonic Least cytotoxic |
Not antimicrobial |
| Normal (0.9%) solution | Isotonic | Slightly more acidic than LRS Not antimicrobial |
| 0.05% Chlorhexidine (1 part stock solution to 40 parts sterile water or LRS) or (≈25 mL stock solution per liter) |
Wide antimicrobial spectrum Good residual activity Not inactivated by organic matter |
Precipitates in electrolyte solutions More concentrated solutions are cytotoxic and may slow granulation tissue formation Proteus, Pseudomonas, and Candida are resistant Corneal toxicity |
| 0.1% Povidone-iodine (1 part stock to 100 parts LRS) or (≈10 mL stock to 100 mL LRS) |
Wide antimicrobial spectrum | Inactivated by organic matter Limited residual activity Cytotoxic at concentrations greater than 1% Contact hypersensitivity Thyroid disorders if absorbed |
Modified from Fossum TW, Hedlund CS, Hulse DA, et al: Small animal surgery, ed 3, St Louis, 2007, Mosby.
Débridement
Débridement is the removal of adhered debris and dead tissue from the wound. Surgical débridement is the cutting away of dead tissue from the living tissue until fresh bleeding edges are exposed. Dead tissue or foreign material left in a wound will delay healing. After the area is debrided, the fresh skin edges are sutured together. Usually, surgical débridement is performed with the patient under anesthesia. General anesthesia is used if the animal is stable and the involved area is large. Local anesthesia is often administered for debilitated animals and smaller wounds (see anesthesia texts for specific techniques).
During the early phase of wound healing, débridement may need to occur. The primary layer of bandage material can provide a means of débridement. Dry mesh gauze directly applied to an open wound with embedded foreign material or necrotic tissue is called a dry-to-dry bandage. Removal of the dry-to-dry bandage can be painful.
Mechanical débridement can also be accomplished on a daily basis through the use of wet-to-dry bandaging techniques. The wet-to-dry bandage is used with open wounds that have embedded foreign material, devitalized tissue, and viscous exudates. A primary layer of sterile, saline-soaked gauze sponges is applied directly to the wound. A secondary layer of dry gauze sponges and rolled-cotton batting is layered onto the primary layer and then secured to the animal with rolled gauze and tape. The dressing is changed two or three times daily. When the primary layer is removed, the foreign matter and necrotic debris that have dried to the gauze are pulled off the wound. As with dry-to-dry bandaging, the patient may need to be sedated for bandage changes because this procedure tends to be painful.
Wet-to-dry and wet-to-wet bandages have the disadvantage of possible bacterial growth in the bandage. A moist environment at the wound surface dilutes the viscous exudates, allowing the secondary layer to absorb the fluid more readily.
Enzymatic preparations of trypsin or chymotrypsin can be applied to wounds to digest and remove necrotic tissue. This technique is indicated when (1) further surgical débridement may damage important nerves and blood vessels, (2) deeper fistulas exist, or (3) the patient is a poor anesthesia risk.
Wound Dressings
Wound dressings are categorized as two types, semi-occlusive and occlusive. Wound dressings are the contact, or primary, layer of a bandage. Semi-occlusive dressings include the wet-to-dry bandages used to debride wounds mechanically. Cotton and polyester gauze pads, petroleum jelly–coated gauze pads, antibiotic ointment–coated polyethylene glycol sponges, and polyurethane foam sponges are examples of nonadherent, semi-occlusive dressings. Semi-occlusive dressings allow excess fluid to be absorbed by the secondary layer.
Occlusive wound dressings are impermeable to air and produce a moist environment that facilitates wound healing. These dressings are used in the later stages of wound healing, when the bandage needs less frequent changing. Examples of occlusive dressings are natural cellulose and gelatin, as well as polyethylene polymers attached to a synthetic film. These occlusive wound dressings do not adhere to the wound.
Antimicrobial Agents
Antimicrobial agents may be applied topically to superficial wounds. However, the use of antimicrobial agents is not a substitute for appropriate and careful débridement and lavage. Large multiuse tubs of antimicrobial agents may be a source of patient-to-patient contamination through introduction of bacteria unless aseptic technique is used to retrieve the contents. Just because the product contains an antibiotic does not ensure that there is no bacterial growth in the tub. A better option is the use of single-dose packets of antibiotic ointment. Topical treatment can be discontinued once granulation tissue appears in the wound.
Drains
A drain is a surgically placed implant that is temporarily affixed in the wound. The drain provides a channel through which unwanted fluid or gas may leave the wound. When surgery or other trauma to the skin disrupts the hypodermis, the skin may no longer adhere to the underlying fascia. This creates a potential space that the body will try to fill with tissue fluid. Healing occurs most rapidly if the fluid is evacuated. Drawing the fluid out through a needle is only effective temporarily. Continuous drainage needs to be provided.
The two basic categories of drains are passive and active. Passive drains use gravity and overflow gradients to evacuate the fluid or gas. Active drains create negative-pressure gradients to the area and suck the fluid and gas from the wound.
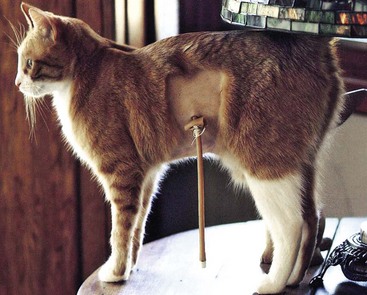
Passive drains are typically made of soft, pliable latex tubing. Red rubber tubes and silicone tubes are stiff, less compliant, and potentially more irritating. “Teat cannulas,” originally made to drain purulent fluid from infected mammary glands in cows, are also used to drain aural hematomas in dogs. Teat cannulas are made of polyethylene plastic and are quite hard (Figure 8-18).
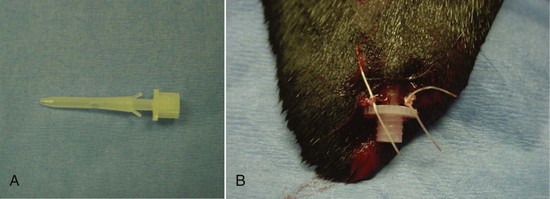
FIGURE 8-18 Plastic “teat cannulas” are also used to drain aural hematomas in dogs. A, Teat cannula has two small prongs that help keep it in place. B, Cannula is sutured into place at the most dependent aspect of the hematoma pocket to allow gravity to assist in drainage.
The passive drain exits the skin at the most ventral (gravity-dependent) spot possible. The drain does not exit from the primary surgical incision. A small stab incision is made through the skin adjacent to the surgical incision. The drain is secured to the skin by one or two sutures. The opposite end of the drain may remain buried below the skin or may exit at the opposite end of the wound. Whether the end of the drain is buried or exits to the surface, a suture secures the end of the drain (Figure 8-19).
An active drain is usually made out of polymeric silicone (Silastic), red rubber, polyethylene, or polypropylene plastic. The drain is fenestrated (has holes) in multiple places. The fenestrated section of the drain is placed in the area that requires draining. Many commercial suction devices are available. Attaching a syringe to the tube can make a simple, homemade suction device. The plunger of the syringe is pulled back and secured by a pin placed through a predrilled hole in the plunger’s shaft to hold the plunger in place.
All drains must be kept clean. Dried fluid accumulates around the drain where it exits the skin. Placing a warm, moist cloth over the drain loosens the dried material. The cloth is soaked in a bowl of water or dilute solution of an antiseptic such as chlorhexidine (1 : 40 dilution). This procedure may need to be repeated several times daily. The skin surrounding the drain may become raw and irritated from contact with the serous or purulent fluid. Petrolatum-based ointments applied to the skin can facilitate cleaning and protect the skin from further damage.
The veterinary surgeon determines the best time to remove the drain. Usually, the drain is removed 3 to 5 days after surgery. Any dried fluid is cleaned out, and all sutures securing the drain are cut. The drain is firmly grasped and pulled out with one swift motion. If the proximal end of the drain is not buried, one end is freed and pulled as much as possible from the incision and then cut. The other end is then freed, and the remainder of the drain removed.
If the patient has removed the drain prematurely, the owner should be asked to bring the drain in for inspection. It is important to determine that the pet has removed the entire drain. A piece of drain left under the skin will fester. The immune system will treat the piece of drain as a foreign invader, surrounding it with fluid and inflammatory cells. This drain piece will have to be surgically removed.
Wound Closure
The choice of wound closure will be based on the nature of the wound. They may be closed immediately, primary closure, several days after the injury, delayed primary closure, after the formation of granulation tissue forms, secondary closure, or they may not be surgically closed, secondary intention or contraction or epithelialization (Box 8-7).
Wounds heal quickest when sutured closed. Depending on the level of contamination, however, the wound may not be sutured closed immediately. If a wound is sutured closed immediately, it has received primary closure. If a wound is left open for a few days, protected with dressings, and sutured closed later, delayed primary closure has been performed. Leaving the wound open for a longer period (5-7 days) and then suturing it closed is known as secondary closure. It is important to appose healthy skin edges that have an adequate blood supply with sutures or staples. Apposing necrotic skin edges or compromised skin edges (rather than healthy skin edges) together will result in dehiscence (sutures pull apart) and delayed healing.
Some wounds may be left to heal closed without suturing. This method is known as second-intention healing (Figure 8-20). Scarring is most likely to occur in second-intention healing.
Bandages, Splints, Casts, and Slings
Bandages, splints, casts, and slings are frequently applied after surgical procedures or trauma to a limb. The purposes of these applications are to protect wounds, speed the healing process, and immobilize the extremities. Immobilization helps the patient by decreasing pain and facilitates healing by securing bone fragments and soft tissue pieces close together to allow healing.
Bandages have three basic layers: primary (contact) layer, secondary (padded) layer, and tertiary (outer) layer (Table 8-3). The primary layer is in contact with the wound. This contact layer may adhere to the open wound or may be nonadherent. Adherent materials such as cotton gauze are usually applied early in the healing process and allow débridement when the bandage is changed. Nonadherent dressings are used later in the healing process or to cover wounds closed by sutures.
TABLE 8-3
Characteristics of Primary, Secondary, and Tertiary Bandage Layers
| Type | Indication and Purpose | Example |
| PRIMARY | ||
| Adherent | No longer indicated in wound care | Dry gauze (dry-to-dry) Wet gauze (wet-to-dry) |
| Hypertonic | Contaminated and infected wounds; hypertonicity is antimicrobial and draws fluid and tissue debris from wound | Hypertonic Sodium Chloride Dressing (20%) (e.g., CURASALT*) |
| Nonadherent semiocclusive | Moderately or copiously exudative wounds; keeps wound surface moist, draws fluid and tissue debris from wound | Transparent polyurethane film—Polyskin II* With hydrophilic properties: Hydrogel (e.g., Curagel*), Absorptive foam (e.g., Hydrasorb*) Hydrocolloid (e.g., Ultec Hydrocolloid Dressing*) |
| Nonadherent occlusive | Minimally exudative wounds; partial-thickness wounds (abrasions); keeps wound surface moist and promotes epithelialization; protects new epithelium | Without hydrophilic properties: OpSite,* Tegaderm Transparent Dressing,* BIOCLUSIVE Transparent Dressing† With hydrophilic properties: Hydrogel (e.g., NU-GEL†); Hydrocolloid (e.g., Hydrocol Dressing†) |
| Nonadherent without occlusive properties | Intact wound surface (e.g., surgical wound, recently epithelialized wound) | Petrolatum-impregnated gauze (e.g., Adaptic†); rayon or Teflon pads (e.g., Telfa pads†) |
| SECONDARY | ||
| Padding | Absorbs exudate, pads and supports the wound | Cast padding—Specialist Cast Padding‡ Roll cotton |
| TERTIARY | ||
| Conforming gauze | Conforming and holding layer | Conforming gauze (e.g., Kling*) |
| Nonocclusive elastic adhesive tape | Holding and protective layer, permeable to moisture | Elastikon* |
| Nonocclusive elastic bandage | Holding and protective layer, permeable to moisture | Vetrap§ |
| Occlusive tape | Contraindicated | Waterproof tape |
| Occlusive wrap | Contraindicated | Plastic wrap |
*Tyco Healthcare/Kendall, Mansfield, MA.
†Johnson & Johnson Medical, Arlington, TX.
‡Johnson & Johnson Orthopaedics, Raynham, MA.
§3M Animal Products, St. Paul.
From Bassert JM, McCurnin DM, editors: McCurnin’s clinical textbook for veterinary technicians, ed 7, St Louis, 2010, Saunders.
The secondary layer secures the contact layer to the wound and provides an absorptive layer for blood, serum, and purulent fluid. This padded layer also provides support to the extremity. It applies pressure to the wound, thus compressing any dead space and preventing hemorrhage. Rolled cotton, synthetic polyester batting, multilayer absorbent pads, or cast padding may be used. Rolled gauze is used to hold the layer in place, with pressure applied to compress the padding underneath. It is important not to use too much pressure and occlude the blood supply to the extremity. Mastering the technique of applying the proper pressure and placing a comfortable, supporting bandage on a patient requires practice. Thus, an experienced technician or veterinarian should supervise the first few bandage wrappings attempted by newer personnel.
When a bandage, cast, or sling is applied immediately after trauma to an extremity, swelling of the limb is expected. When the limb is confined by such a stabilizing measure, swelling may result in cessation of blood flow to the extremity. Toes can be left exposed at the distal end of the bandage or cast to monitor the amount of swelling under the bandage. The nails of the two middle toes should be only a few millimeters apart. If the nails are farther apart, the toes are swollen. If the toes look swollen, the bandage should be removed immediately.
The tertiary layer of the bandage is made of porous adhesive tape or elasticized tape, such as Vetrap (3M, St Paul, MN) or Elastikon (Tyco Healthcare/Kendall, Mansfield, MA). This layer provides protection to the secondary layer. If this outer layer becomes wet, either from moisture on the outside (e.g., soiled by rainwater) or seepage from the inside, the entire bandage must be changed immediately.
It is important to keep these bandages intact, secure (no slipping down the leg), and dry. The animal may try to remove the wrappings by gnawing, violently shaking the extremity, or prying off the bandage. After several days, stretching of the outer layer and compression of the inner padding will loosen the bandage, which may slip or shift position. Also, the skin adjacent to the edges of the bandage, sling, splint, or cast may become abraded. Wetness, staining, and odor may also be noted. If any of these problems occurs, the bandage, cast, or splint should be changed.
Intravenous Catheter Maintenance
IV catheters are placed and maintained for extended periods in some surgical patients. Common veins used for peripheral catheter placement include the left and right cephalic, left and right lateral saphenous (dogs), and left and right medial saphenous (cats). The left and right jugular veins are generally used for central catheters. Central catheters (“central lines”) allow the technician to measure central venous pressures and collect blood samples for frequent blood glucose checks without a separate venipuncture for each sample collected.
All IV catheters provide direct access to the patient’s vascular system, and therefore all catheters should be placed using aseptic technique. (See Chapter 2 for more information on IV catheterization techniques.) All connections among the catheter, connector sets, and IV lines need to be left untaped but secure. Access to these connections must be available at all times without untaping the connections. The patient often attempts to pull or chew out the catheter. Sufficient taping and restraint devices (e.g., E-collar) can prevent many problems. Figure 8-21 shows a cage that was occupied by a cat that pulled off the catheter cap (catheter remained intact).

A peripheral IV catheter requires replacement every 3 days (72 hours) with a new catheter placed in a different vein. A catheter placed into a central vein may remain in place for 5 to 7 days if there is no indication of phlebitis and the catheter remains patent. The old catheter is removed only after the new catheter is secured in place. If no continuous infusion is being administered through the catheter, the catheter is flushed with 1 to 5 mL of heparinized saline every 6 to 8 hours. This procedure helps ensure that the catheter remains patent the entire 72 hours. Bandages securing catheters in place should be changed if they become soiled with vomitus or other contaminants.
Each time the catheter is flushed, the insertion site and all connections should be checked. If the tape is soiled, it should be retaped. If swelling is noted in the paw, the tape may be wrapped too tightly, and it should be replaced. If swelling is noted proximal to the catheter, the catheter may be perivascular (not in the vein). If the catheter bandage is soaked, the entire catheter should be replaced at a different site. The old catheter site is covered for a few minutes with a piece of gauze. A spot of antibiotic ointment can be applied to the gauze, which is secured by adhesive tape.
When administering medication through the catheter, the technician should check for patency using a heparinized saline flush prior to drug administration. After the medication is administered, the catheter is flushed again with heparinized saline. Blood samples are often collected through the IV catheter, but the clinician must keep in mind that residues from medications administered through the catheter could interfere with test results. A three-syringe technique can be used to help decrease the incidence of contaminants in a blood sample collected from an IV catheter. A 3-mL syringe is half filled with heparinized saline, and blood is withdrawn into the syringe from the catheter. This helps clean any contaminants from the catheter. Then the second syringe is used to withdraw the appropriate sample and place it in the desired collection tubes. Lastly, the original syringe is used to replace the withdrawn blood and flush the catheter with the remaining heparinized saline.
Urinary Catheter Maintenance
Patients recovering from back surgery, urinary tract surgery, and orthopedic procedures may have a urinary catheter. The urinary catheter helps ensure urethral patency, allows for quantification of urine production, and helps keep the patient clean.
The catheter is placed aseptically. The distal end is secured to the patient with tape and sutures. An empty, sterile IV fluid bag and administration set are connected to the distal end of the catheter. The bag is suspended below the level of the bladder for urine flow by gravity.
It is important to check the patency of the urine collection system regularly. The tubing may become kinked. As the patient turns in the cage, the collection tubing may become twisted and cause the tube’s lumen to collapse. The collection tube can be pinched in the cage door as it is closed. Blood clots can be passed and form obstructions in the tubing. The catheter and tubing should be checked for leaks. Often the patient attempts to pull out the catheter, and tooth marks may be detected. Leaking systems are replaced, and the patient is fitted with an Elizabethan collar to prevent further problems. Replacement of the entire collection system every 24 hours is recommended to decrease the incidence of opportunistic bacterial infections.
Nutritional Support
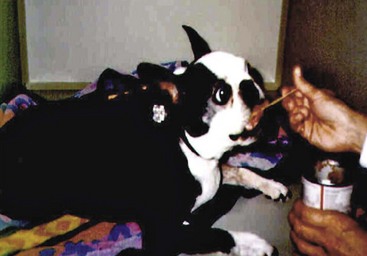
All animals need to maintain appropriate levels of nutrient intake, but this need is especially important in patients recuperating from surgery and serious illness. Inadequate nutrition can negatively affect the animal through decreased wound healing, suppression of the immune system, decreased cardiac and respiratory function, and increased bacterial translocation from the gut. Voluntary oral intake is the preferred route for food administration but may be insufficient to meet the animal’s energy requirements. The animal needs to be able to consume at least 85% of the calculated resting energy requirements (RER) to be able to feed orally. Feeding a calorically dense, highly palatable food may help increase voluntary oral intake (Figure 8-22). If needed, oral intake can be supplemented with the use of assisted feeding techniques, pharmacologic appetite stimulants, and tube feedings.
Assisted feeding is best accomplished with pureed or liquid diets and a catheter tip syringe. The food needs to be of a consistency that can be easily administered through the syringe. If necessary, small amounts of water can be added to commercial gruel diets to increase their ease of passage through the syringe and catheter. The food may be smeared on the animal’s lips to initiate licking and cleaning. A lump of food may be applied to the roof of the mouth. A liquid diet may be squirted through a syringe into the cheek pouch. Assisted feeding is a labor-intensive and time-consuming process and frequently falls short of the required caloric goal. Additionally, calculating the actual amount of food that the animal consumed can be very tricky. The animal often fights the feedings and may become stressed. Aspiration of the food into the lungs from the mouth during the struggle is a major concern. No patient should be allowed to have a decreased nutrient intake for longer than 3 days, which includes the time prior to surgery. Metabolic changes will start occurring within this time that can have a significantly negative impact on recovery.
Animals should be offered food as soon after anesthesia recovery as possible. They need to be able to protect their airway, to be normothermic, and to be able to swallow prior to being fed. There is no nutritional reason to delay postoperative feeding and numerous reasons why the animals should be fed. Delayed wound healing has been demonstrated in animals from which food has been withheld in the first 24 hours postoperatively. With small and neonatal animals, feeding is even more important as their functional reserves are significantly less than older, larger animals.
Several pharmacologic agents are thought to increase the appetite of dogs and cats. The benzodiazepine tranquilizer diazepam has been shown to stimulate the appetite of cats. An IV injection generally induces the cat immediately to eat any palatable food within reach. The food should be in place and warmed to body temperature before the cat is returned to the cage after the injection. Cyproheptadine is a serotonin antagonist that stimulates the appetite of both dogs and cats. It is typically given orally. It is not unusual for a cat or dog to “pout” his/her way through any appetite stimulation. Corticosteroids and progestational steroids (e.g., megestrol) work well in humans but are seldom used in dogs and cats because of potential adverse side effects, such as diabetes mellitus, immunosuppression, and delayed healing. When these medications are given as treatment for a disease, increased appetite may be a beneficial side effect of treatment.
Acupuncture also may stimulate a surgical patient’s appetite postoperatively, in addition to providing some pain relief. A veterinary acupuncturist should be consulted for these cases.
Effective pain management is also important; many animals have suppressed appetite secondary to unrecognized or untreated pain. Nausea caused by therapeutic medications such as narcotics and antibiotics can also suppress appetite. If it is seen, a decision to change medications may need to be made if possible to allow increased food intake.
The initial amount of food that the patient will need per day is calculated in the following way:

For those who do not have calculators that can do logarithms, the following formula can also be used:


Calculate food intake by finding RER and then determine the caloric density of the food being used. Divide the caloric density by the RER to determine the quantity that should be fed every 24 hours. If the animal has not eaten in more than 3 days, start the initial food intake at 30% to 50% of RER for the first 24 hours. Small frequent meals also help to decrease food-related discomfort as well as nausea.
Enteral tube feeding may be necessary to meet nutritional needs. Neonatal animals adapt well to repeated orogastric tubing. Juvenile and adult animals deal better with the placement of a semipermanent, indwelling feeding tube. The feeding tube may be placed through the nose, esophagus, or stomach. A tube placed through the abdominal wall into the stomach, known as a gastric tube, is the easiest of all feeding tubes to maintain but does require more anesthesia and equipment than some of the other types of tubes available.
Using an indwelling feeding tube is convenient and less time-consuming, and less stressful to the patient than force-feeding, but indwelling tubes are not without problems. A nasoesophageal or esophagostomy tube (Figure 8-23) that passes down the esophagus may irritate the esophagus or, if passed through the cardiac sphincter into the stomach and irritate the stomach wall, cause gastroesophageal reflux and may initiate vomiting. The tube can be vomited up, displacing it from the esophagus so that it instead comes out of the mouth, and the patient may then chew through it. A nasogastric tube must be very small in diameter to pass through the nasal turbinates and therefore can easily become obstructed when food is administered through it. The nasogastric tube can cause nosebleeds, sneezing, and inflammation of the nasal passage with mucous discharge. Premature removal of the tube by the patient is a complication inherent in all types of feeding tubes.

The gruel or liquid diet may be homemade or commercially purchased. The benefit of commercially prepared recovery diets is that their nutrient content and caloric density are known, making food administration calculations easier. Any food that can be blenderized can be fed through a feeding tube. Feeding of a raw or uncooked diet through a feeding tube is not recommended because of the possibility of bacterial contamination of the food. When the tube feedings are initiated, the amounts should be small (2-10 mL, depending on animal’s size) and administered frequently (about every 2 hours). The desired amount to be fed is based on the RER. For the first day, 50% of the RER is divided up into multiple equal-sized feedings administered every 2 to 4 hours. Use of a gastrostomy tube should be delayed for 24 hours after it is placed to allow a temporary stoma to form internally between the visceral peritoneum and the parietal peritoneum (Figure 8-24).
Vomiting of food occurs most frequently in the first or second day. Once the feedings are tolerated, larger amounts and less frequent feedings can be done. After the first day, 75% to 100% of RER can be given divided up into four to six equal feedings throughout the day. The food is slowly administered over 10 to 20 minutes through the feeding tube with use of either an infusion pump or a catheter-tipped syringe to allow the stomach to accommodate gradually to the presence of the food. After the food is injected, 10 to 15 mL of water is slowly administered through the catheter to rinse the inside of the tube and remove any food that may have remained in the tube. This step helps prevent tube obstruction. The tube is closed with a Luer-Slip adapter plug. How the tube is managed externally depends on which type of feeding tube is placed, the condition of the animal, and the desires of the veterinarian. Some tubes are not secured at all to the animal, and others are glued or sutured in place.
Depending on type selected, the feeding tube may remain in place for a period of 3 to 5 days to the remainder of the animal’s life. Tube removal also depends on which tube is selected.
Physical Therapy
Physical therapy techniques can benefit most patients. Immobility resulting from sickness, trauma, or surgical procedures can complicate recuperation. Physical therapy techniques enhance patient comfort, prevent complications from disuse, and hasten healing. The success of many orthopedic procedures rests on the rehabilitation of the patient. Veterinarians, veterinary technicians, and owners can perform many physical rehabilitation techniques to improve surgical outcomes and ensure client satisfaction. Some states have limited the practice of physical therapy on animals to licensed physical therapists. Therefore, many veterinarians prefer to use the term “physical rehabilitation” when referring to the following techniques.
Massage, application of heat or cold, bandaging, range-of-motion (ROM) exercises, and physical exercise are all therapeutic techniques that may be prescribed. Under the supervision of the attending veterinarian, the veterinary technician or owner may perform the techniques with the patient. Detailed descriptions of these techniques are found in other texts and articles; this section briefly describes the various types of physical therapy that may be used postoperatively.
In the first 72 hours after surgery, opioid analgesics, anti-inflammatory drugs, passive ROM exercises, and cryotherapy are used to decrease pain, prevent edema formation, and gradually improve range of motion. Pain management is discussed later. Cryotherapy is the application of cold, such as ice packs wrapped in a towel, to the affected limb. The packs can be affixed to the limb with elastic wraps. The cold packs are applied for up to 30 minutes two to four times a day. The cold causes vasoconstriction, which decreases blood flow and limits edema formation. The cold temperature of the tissue also reduces nerve conduction, producing analgesia.
Passive ROM exercises are exercises that support a joint while moving it to the extent of its limitations (Figure 8-25). The best time to perform passive ROM exercises is shortly after administration of analgesic drugs. This procedure should be performed slowly with the muscles relaxed, as follows: While supporting the limb, slowly and gently flex and extend each joint one at a time, taking care to keep all the joints in the working extremity in their normal anatomic alignment throughout the exercise. Flex and extend each joint only to the extent that the joint just begins to resist the degree of flexion or extension applied to it. Passive ROM helps prevent contracture, improve blood and lymph flow, maintain normal range of joint movement, and stimulate sensory awareness. Ten to 15 repetitions should be performed two or three times daily. Treat every joint of the affected limb, starting with the joint distal to the injury or surgical site.
Between 3 and 5 days after surgery, other physical therapy procedures may be added. Cryotherapy is replaced with thermotherapy. Warm, moist heat is applied to the injured area. The heat causes vasodilation, increases local circulation, and provides mild pain relief. Thermotherapy should be applied for 10 to 20 minutes before passive ROM, massage, or exercise. Massage therapy relaxes muscles, breaks down adhesions, improves blood and lymph flow, and relieves pain. The massage session starts with gentle running of the hands over the surface of the animal’s skin (effleurage, frottage). The stroking movements should start distally and move proximally. The second massage method kneads the muscles in small circles with the pads of the fingers (not the fingertips) or the heel of the hand with a gradual increase in pressure (pétrissage). The massage session lasts about 20 minutes and is done every 24 to 48 hours (Figure 8-26).
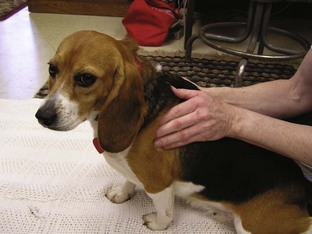
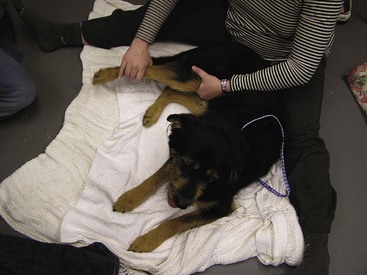
FIGURE 8-26 Massage can relax the pet as well as increase blood and lymph flow, relieve pain, and break down adhesions.
Exercise that elevates the heart rate and increases muscle tone can be initiated about 2 weeks after surgery. Initial exercise is assisted by slings and harnesses. Swimming is also a good initial exercise; the buoyancy of the water helps support the patient. This low-impact exercise is replaced in a few weeks with unassisted exercise, such as leash walks. As the patient’s stamina increases, the length of time spent exercising also increases.
Although physical therapy has many benefits, contraindications to it do exist. Massage should not be performed over open wounds, infected areas, or malignant tumors. Animals with thromboembolic disease and those receiving anticoagulants should not be massaged. Cryotherapy is avoided in patients with ischemic injury, diabetes mellitus, vasculitis, or indolent pressure sores. ROM procedures should not be performed on nonstabilized legs after a severe orthopedic injury (e.g., fracture, ligament rupture). Bandaging to prevent or reduce edema needs to be performed carefully to prevent vascular compromise of the limb. Exercise regimens and active ROM procedures must start slowly and increase gradually in length and frequency.
Postoperative Analgesia
The ease and success of managing postoperative pain are directly related to preoperative analgesia. That is, the more successful the attempts to preempt surgical pain, the easier it is to control postoperative pain with minimal additional analgesics. Assuming adequate preemptive analgesia, the overall goal of postoperative pain management should be to maintain the analgesic plane achieved throughout the procedure.
The patient should recover quietly and calmly without displays of overt signs of pain (e.g., vocalization, excessive movement, abnormal body posturing). At no time should the patient be required to return to a painful state and “request” additional analgesics during the immediate postoperative period. Some patients experience pain that persists or develops despite adequate doses of analgesics and must be treated with additional analgesia or analgesic techniques. This type of pain is termed breakthrough pain because it has “broken through” the usual analgesic barriers.
Postoperative pain management also includes medications dispensed for home use. This is a service and level of care that veterinary medicine has not sufficiently advocated until recently. Now, with veterinarians’ increased awareness of the options available for take-home pain medication and the benefits to the patient, effective pain management can continue throughout the at-home recovery period.
Common Analgesic Classes
The two classes of analgesia most often used postoperatively are opioids and nonsteroidal anti-inflammatory drugs (NSAIDs). These two classes of agents can be used individually, but the drugs may be most efficacious when used in combination with each other. Postsurgical pain should be managed aggressively for anywhere from 24 hours up to a full week or more, depending on its severity. In general, experts agree that most patients with soft tissue elective surgery should receive opioids for 24 hours and NSAIDs for 3 to 4 days postoperatively. Patients that have emergency or nonroutine soft tissue procedures (e.g., thoracotomy, gastric dilatation–volvulus repair) may be managed initially with opioids alone until their cardiovascular health is restored. A major concern is the effect of opioids on GI motility. Although morphine may slow GI motility, the benefit of opioids outweighs the risk of altered GI function, because stress and pain are likely to play a larger role in decreasing GI motility than short-term postoperative opioid administration. Patients with severe GI disease may benefit from the addition of a CRI of lidocaine for systemic analgesia, provided that the patient does not have cardiovascular disease (see the Appendix).
Patients may also benefit from postoperative local anesthetics, such as bupivacaine, which can be instilled through indwelling chest tubes or by soaker catheter.
Patients undergoing orthopedic procedures should receive postoperative opioids for 24 to 72 hours of and NSAIDs for at least 1 week. The exact type of opioid is matched to the expected level of pain. The appendix provides specific protocols for postoperative pain management, including take-home medications.
Wind-Up
Patients who do not respond satisfactorily to maximum dose and frequency of opioids and require additional analgesia may have experienced the phenomenon known as wind-up. In this condition the spinal cord has become hypersensitized to incoming pain signals as a result of constant bombardment. Once hypersensitization occurs, traditional analgesia may no longer be adequate. There are several effective techniques for managing wind-up, including CRI of morphine, ketamine, or lidocaine. Ketamine blocks sensitization of neurons in the spinal cord, essentially “unwinding” it, and may allow the patient to become responsive to usual dosing regimens, as described earlier.
Dispensed Analgesia
Nonsteroidal Anti-inflammatory Drugs
The availability of veterinary NSAIDs has greatly improved outpatient pain management. These relatively inexpensive analgesics provide long-lasting perioperative and chronic pain relief in convenient oral formulations. Once-daily administration tends to improve owner compliance. NSAIDs provide adequate pain relief to many patients during the at-home recovery period, especially if therapy was instituted preoperatively. Some patients require additional take-home medications, most often opioids.
Opioids
Several oral opioids are available for take-home use; however, because of the potential for human abuse of these controlled drugs, care must be taken in prescribing them. Sustained-release morphine is available and can be used in dogs, but morphine is difficult to obtain in sufficiently small doses to administer safely to cats. On the basis of research at the University of Florida, buprenorphine can be safely and efficaciously administered to cats by the transbuccal (sublingual) route. Small, single-dose aliquots can be prepared for administration by owners at home. The opioid fentanyl is available in a transdermal patch (Duragesic, Janssen Pharmaceuticals), which can be applied in the hospital to provide up to 3 days of postoperative analgesia for hospitalized as well as discharged patients. A fentanyl patch does require up to 24 hours to become fully effective, so additional forms of pain relief may be necessary to cover this period adequately.
Butorphanol tablets are not recommended for take-home analgesia because of butorphanol’s extremely short duration of action. Just because an animal is sedated does not mean that its pain has been addressed.
The synthetic opioid tramadol is available in tablet form. Tramadol is gaining popularity for long-term use in dogs and cats as an effective nonscheduled take-home analgesic. Tramadol can be used as an adjunct to NSAIDs for the treatment of moderate to severe pain.
Key Points
1. When monitoring recovery of a patient intubated with an ET tube, the technician must be prepared for the animal to awaken quickly. The ET tube is untied from the head or muzzle. All limbs should be untied and the patient placed in lateral recumbency. A syringe is at hand if needed to deflate the ET tube cuff. The technician should never leave the patient unattended on the table, and it is best to have a hand on the patient at all times.
2. The ET tube should not be removed until the patient has regained the ability to swallow.
3. Extubation of a brachycephalic breed should be delayed until the patient can raise its head without assistance.
4. All patients should be closely monitored until fully recovered.
5. When the body temperature is below 97° F, immediate and active measures should be taken to warm the patient. Additional postoperative opioid analgesics should not be given until the patient’s temperature is above 98° F.
6. When treating an animal for hypothermia, do not assume that the measures are successful. Monitor the patient’s body temperature, and confirm that the body temperature is rising.
7. A patient thrashing in a cage during recovery must be protected from injury, but the staff should ensure that the animal does not cause injury to itself or others.
8. The technician who thinks a patient is not recovering as expected should notify the attending veterinarian. The cause of the delayed recovery needs to be identified and corrected.
9. Attention to the surgical wound is an important part of the recovery process. Any change in the wound’s condition should be reported immediately to the surgeon.
10. Débridement and lavage are important steps in the wound cleansing process.
11. Bandages, casts, splints, and slings must be monitored closely for displacement, patient mutilation, wetness, and odor.
12. A drain must be kept clean so that drainage can continue as long as needed and the skin around the exit wound for the drain does not become irritated by the draining fluid.
13. Indwelling IV and urinary catheters need regular inspections to ensure that they are functional and have not been disturbed by the patient.
14. A patient that will not eat will not heal quickly and is predisposed to development of complications.
15. Enteral tube feeding may be necessary to meet nutritional needs.
16. Any food that can be blenderized can be fed through a feeding tube.
17. Feeding of a raw or uncooked diet through a feeding tube is not recommended because of the possibility of bacterial contamination of the food.
18. Use of a gastrostomy tube should be delayed for 24 hours after it is placed to allow a temporary stoma to form internally between the visceral peritoneum and parietal peritoneum.
19. Physical therapy techniques used during the recuperative period can greatly improve patient outcome and enhance client satisfaction.
20. Providing adequate preoperative analgesia (“preemptive analgesia”) makes it easier to achieve successful postoperative pain management.
21. Postoperative pain management should continue at home. Oral analgesics and transdermal analgesic patches can provide continued pain relief after the patient leaves the veterinary hospital.
22. The best pain relief is achieved by combining different classes of analgesics that block or prevent pain by different mechanisms of action. Postoperatively, these typically include oral opioids and NSAIDs.
1. When does the postoperative recovery period begin for the surgical patient?
a. As soon as the surgeon begins closing the incision.
b. On discontinuation of anesthesia.
c. On regaining full mental capacity.
d. On return of normal vital signs (temperature, pulse, respiration) and consciousness.
2. True or False: Brachycephalic breeds should have the endotracheal tube removed at the first sign of return of the ability to swallow.
3. True or False: Once the patient is extubated, the anesthetist can relax because all risks associated with anesthesia immediately cease on extubation.
4. True or False: All animals that undergo an anesthetic/surgical procedure are at risk for hypothermia.
5. What phrase is used to describe the excitement and exaggerated and uncontrollable movements some patients exhibit during the recovery phase of anesthesia?
6. Which of the following conditions can contribute to a prolonged recovery from anesthesia?
7. Which of the following methods can hasten a patient’s recovery from anesthesia?
8. Which of the following postoperative complications involves premature suture loss and surgical site opening?
a. The process of removing dead tissue and debris from a wound.
b. The name given to a divorce caused by a household of too many dogs.
c. A way to check for a fluid wave in the abdomen of animals with suspected ascites or hemoabdomen.
10. Topical antimicrobial medications are usually:
b. Discontinued once granulation tissue appears in the wound.
c. Only used once granulation tissue appears in a wound.
11. Which of the following statements is true?
a. Bandages, splints, and casts are used to immobilize bones and joints.
b. Immobilization helps decrease pain associated with fractures.
c. Immobilization facilitates healing by securing bone fragments close together.
12. With a bandaged limb, leaving the toes exposed:
a. Is useful to monitor the amount of swelling that may occur under the bandage.
b. Is an example of a poorly placed bandage.
c. Allows the animal’s caregiver to compare the toes on the bandaged limb with the toes on the other limb.
13. Which of the following statements regarding drains is true?
a. Drains are usually removed 3 to 5 days after surgery.
b. Petrolatum-based ointments applied to the skin around the drain’s exit site help prevent exudates from accumulating and clogging the drain’s exit site.
c. All types of drains have hollow lumens to allow for the fluid to drain out of the wound through them.
14. Which of the following statements regarding urinary catheters is true?
a. Catheters help ensure urethral patency.
b. Catheters allow measurement of urine production, which reflects the condition of the kidneys.
15. True or False: Physical therapy should be performed shortly after analgesics have been administered to the surgical patient.
16. True or False: Cold generally is applied to recent wounds and heat to wounds at least 3 to 5 days old.
17. Massage provides which of the following benefits to the surgery patient?
18. The terms effleurage and pétrissage refer to which physical therapy modality?
19. What is the minimum amount that an animal should consume orally before assisted feeding is needed?
20. How long should an animal be allowed to not eat before intervention is sought?
21. How can a veterinary technician determine whether a patient’s pain was successfully managed through surgery and into the postoperative phase?
a. Recovery from anesthesia is smooth.
b. The patient is calm and quiet postoperatively.
c. Signs of overt pain (e.g., vocalization, excessive movement) are absent.
22. Which of the following statements regarding postoperative analgesia is true?
a. Patients undergoing soft tissue elective surgery should receive opioids for 24 hours and NSAIDs for 3 to 4 days postoperatively.
b. Patients undergoing emergency or nonroutine soft tissue surgery should never receive opioids.
c. Patients undergoing surgery of the gastrointestinal tract should never receive NSAIDs.
d. Patients undergoing orthopedic surgery should receive opioids and NSAIDs only for the first 24 to 72 hours postoperatively.
23. True or False: NSAIDs are the only class of analgesics that may safely be sent home with the owner for at-home pain management following surgery.
Bassert JM, McCurnin DM, eds. McCurnin’s clinical textbook for veterinary technicians, ed 7, St Louis: Saunders, 2010.
Clark, B, McLaughlin, RM. Physical rehabilitation in small-animal orthopedic patients. Vet Med. 2001;96:3.
Davidson, EB. Managing bite wounds in dogs and cats. Part II. Compend Contin Educ Pract Vet. 1998;20:9.
Fossum, TW, Theresa, W. Small animal surgery, ed 3. St. Louis: Mosby; 2007.
Fowler, D, Williams, JM. Manual of canine and feline wound management and reconstruction. Shurdington: British Small Animal Veterinary Association; 1999.
Manning, AM, Rush, J, Rudnick, D. Physical therapy for critically ill veterinary patients. Part II. The musculoskeletal system. Compend Contin Educ Pract Vet. 1997;19:7.
Simpson, AM, Radlinsky, M, Beale, BS. Bandaging in dogs and cats: basic principles. Compend Contin Educ Pract Vet. 2001;23:1.
Slatter, D. Textbook of small animal surgery, ed 3. Philadelphia: Saunders; 2003.
Taylor, R, McGehee, R. Manual of small animal postoperative care. Baltimore: Williams & Wilkins; 1995.
Wortinger, A. Nutrition for the veterinary technician and nurse. Ames, Iowa: Wiley-Blackwell; 2007.