Preoperative Patient Considerations
After completion of this chapter, the reader will be able to:
• Understand the importance of and be able to perform a complete physical examination on the day of a scheduled surgery.
• Know the legal significance of a signed surgical consent form.
• Explain to clients the details in a surgical consent form.
• Collect and analyze preanesthesic diagnostic tests.
• Describe what is considered a minimum database for particular patients.
• Bring the veterinarian’s attention to any abnormal or invalid results.
• Understand the reasons for premedicating surgical patients.
• Explain the importance of preemptive analgesia.
• Describe the drug options available for preemptive analgesia.
• Explain the mechanisms of action of the different types of analgesics.
• Discuss the indications for placement of an intravenous (IV) catheter.
• Identify appropriate sites for placement of IV catheters.
• List the supplies required for IV catheter placement.
• Discuss the technique for IV catheterization of peripheral vessels.
• Identify the components of an endotracheal (ET) tube.
• Discuss factors considered for determining ET tube size.
• List supplies required for endotracheal intubation.
• Identify the anatomic structures of the larynx.
• Discuss the differences between the one-person technique and the two-person technique of performing endotracheal intubation.
• Discuss methods of assessing proper ET tube placement.
• Describe hair removal protocols for a variety of soft tissue, orthopedic, neurologic, and miscellaneous surgical cases.
• List antiseptic products available for use to prepare patients for surgery.
• Discuss different patterns used in applying materials for the surgical preparation.
• Discuss potential patient reactions from clipper or chemical irritation.
• Secure the patient to the surgery table in a safe, accessible manner.
• Properly position the patient for various surgical procedures, providing access to the (1) surgical site, (2) IV catheter site, (3) ET tube, (4) other venous access sites, and (5) monitoring sites.
• Perform a sterile preparation of the surgical site.
History Taking
The ability to collect a history that is both concise and chronologically accurate is a skill that takes practice. After the client (owner, guardian) and patient (animal) have been brought into the examination room and introductions have been made, a good starting point for collecting the history is to confirm the patient’s signalment. Confirming the patient’s age, gender, and breed with the owner, then comparing this information with the patient’s medical record, ensures the record’s accuracy and clarifies any confusion should a discrepancy be found.
Once the patient’s signalment has been established and verified, the client should be asked about the chief complaint (or reason for the visit). This is usually a brief but complete description of the current problem; for example, “HBC [hit by car] 2 days ago and fractured right femur.” Once the chief complaint has been established or confirmed, ask the client to explain the sequence of events, starting from the beginning of the particular problem.
While collecting a history, the technician should avoid asking leading questions. Leading questions make the client feel compelled to answer a certain way; for example, “You don’t feed your dog anything other than dog food, do you?” The owner feels compelled to answer in the negative because the question is leading toward or encouraging a specific answer. Formatting the question in a different way encourages the owner to answer the question truthfully, without prejudice. “What do you feed your dog?” is a nonleading, nonthreatening question that usually yields more useful information than the first example. Follow-up questions should be asked when appropriate. If there is a concern regarding the dog’s nutritional status or body condition, it would be appropriate to ask how much and how often the dog is fed, in addition to what the dog is fed. A concluding question for the specific topic is often revealing as well. A final question about the dog’s diet could be asked as follows: “Is there anything else your dog eats?” Again, this is a nonleading question and allows the owner to share information that may be helpful or even significant.
During the history it is important to review what other treatments have been tried to address the current problem, including any attempts by the owner to treat the problem at home. In addition, it is important to establish the nature of the treatment and the patient’s response to each treatment. A review of the current medications and supplements that the animal may be given, including both over-the-counter (OTC) and prescription medications, is an important part of the history. Certain medications and supplements may interact with diagnostic tests or premedications and anesthetic drugs.
Once the history of the current problem has been thoroughly investigated, a general question about any previous medical problems is appropriate. If a patient has had surgery or medical treatment in the past, additional follow-up questions may be in order. A good way to conclude the history-taking session is to ask the owner whether there is anything else that would be helpful to know but that was not addressed. Occasionally, this general question reminds clients about something else that is relevant to the situation or that they wanted to ask.
Allowing the animal to explore the examination room at will (e.g., letting the cat out of the carrier) during the history taking helps the technician determine the patient’s general attitude and condition without even touching it. In addition, most animals will take this opportunity to familiarize themselves with the scents and sounds of the hospital, and they may even relax if given a chance to explore the exam room on their own terms. An observant technician can establish a first impression of the patient’s personality and degree of anxiety during the history.
After the history has been collected, the details need to be recorded in chronologic order in the medical record.
Physical Examination
The veterinary technician should be adept in the performance of the physical examination (PE), even though veterinarians may elect to perform the PE themselves. The veterinary medical team will consult the PE findings when determining the appropriate anesthetic and surgical protocols for the patient. The owner’s presence during the PE allows for ongoing communication between the technician or veterinarian and the owner in regard to the findings and provides a historical perspective to unusual findings. This is especially true for any physical findings that might affect the surgical procedure or anesthetic protocols (e.g., retained testicles, pregnancy).
The complete PE should become a routine for the veterinary technician. This routine should be carried out in the same manner every time the PE is performed (e.g., head to tail or by body systems). This approach minimizes the possibility of forgetting to check a vital system and helps ensure patient safety. Being able to perform a complete PE is the first step in being the patient’s advocate. The PE reveals the needs of the patient more than any other diagnostic procedure, and knowing their needs is the only way to advocate for patients.
Even if the animal was seen recently, it is imperative that a thorough PE is performed the day of the surgery, ideally with the owner present. The goal of this chapter is not to detail every aspect of a PE, but rather to give an abbreviated overview. Many wonderful textbooks have complete chapters dedicated to performing PEs.
General Body Condition and Mentation
The patient’s general body condition (e.g., “strong and healthy” or “weak and emaciated”) and mentation (e.g., “bright, alert and responsive” [BAR] or “dull and depressed”) should be observed and noted during the history taking. The patient’s ability to see and hear is assessed during the history taking as well. If the patient is clearly distressed or aggressive, it is appropriate to request an assistant and to use a restraint device (e.g., muzzle) before the “hands-on” portion of the PE. If the patient is scared and timid, a slow, calm, and soft-spoken approach may sufficiently relax and calm the patient to allow for a thorough PE. Any gait abnormalities (lameness, ataxia), muscle atrophy, or asymmetry should be noted while observing the animal during the history taking and should be examined more closely during the hands-on examination.
The complete exam should include an evaluation of the temperature, pulse, and respiration (TPR).
Thoracic Auscultation
Thoracic auscultation requires using a stethoscope to listen to the chest for both heart and lung sounds (Figure 2-1). The heart and lungs are heard best with the animal standing still on all four legs. A talented veterinary technician will quickly learn how to keep a cooperative animal standing quietly while auscultating the thorax without an assistant (Figure 2-2). Occasionally it is necessary to prevent a dog from panting or a cat from purring. To stop a dog from panting, use the hand with the wristwatch to extend the neck by gently lifting up on the dog’s mandible using the top surface of the hand, while the other hand holds the stethoscope to the patient’s chest. Clamping the mouth shut to try to prevent a dog from panting (Figure 2-3) frequently results in excessive movement as the dog tries to wriggle out of the technician’s grip. Most dogs tolerate a gentle lift of the mandible with the top of the hand better and stand quietly long enough to count a heart rate. To stop a cat from purring, it may be necessary to restrain the cat firmly near a sink and turn on the water to a slow stream.
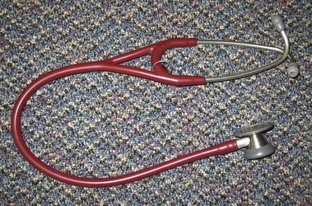
FIGURE 2-1 Typical stethoscope, with both diaphragm and bell in chest piece. Swiveling the chest piece determines whether the diaphragm or bell is used for auscultation. Note the curvature in the stems of the ear pieces. The stems should be placed in the examiner’s ear canals and pointing toward the nose.
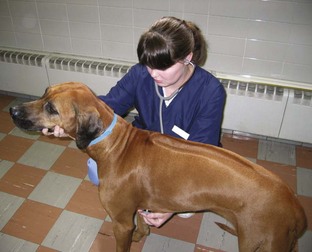
FIGURE 2-2 If the patient is cooperative, one technician can easily restrain the patient in a standing position while auscultating the thorax.
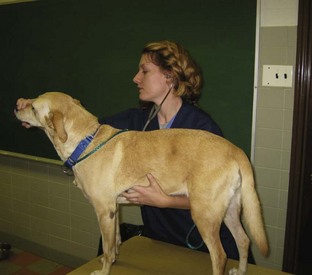
FIGURE 2-3 Preventing a dog from panting by gently closing the mouth while auscultating the thorax helps the examiner hear heart sounds over breath sounds.
Begin auscultating the heart by placing the diaphragm of the stethoscope’s chest piece just caudal to the point where the dog’s left elbow meets the chest. For cats a more ventral placement of the chest piece may be necessary to hear the heart best. One heartbeat normally has two sounds; that is, the “lub-dub” is two sounds but one heartbeat. Once the distinctive lub-dub heart sounds have been identified, time 15 seconds on a watch and count the number of heart sounds heard. To determine the heart rate, multiply the number of beats heard in 15 seconds by 4; this number is the heart rate in beats per minute. Systolic murmurs are usually heard as a swishing sound between the lub-dub (“lub-shh-dub”). Moving the stethoscope one rib space cranially or caudally may amplify the sound of the murmur. The rib space where the murmur is heard the loudest is the point of maximum intensity (PMI). The rib space can be identified by counting backward from the last (13th) rib. Keep in mind that some murmurs are heard loudest on the right side of the chest. The presence of a murmur and the PMI of the murmur should be noted in the medical record.
The lungs should fill up the pleural space when fully expanded during maximum inhalation. Normal lung sounds should be distinct but soft and free of any wheezing, crackling, and popping sounds. Normal lung sounds should be heard equally well on the left and the right sides of the thorax. Be sure to listen to both sides (cranial and caudal, dorsal and ventral) for lung sounds. One breath is a two-part movement: inhalation and exhalation. To determine the respiratory rate (number of breaths per minute), count the number of breaths in 15 seconds and multiply that number by 4. Any increased effort by the animal to breathe (dyspnea) and any increase or absence of lung sounds must be noted in the medical record and addressed. Usually, addressing respiratory abnormalities includes giving the patient supplemental oxygen. The lungs should be assessed, not only for respiratory rate but also for crackles, wheezes, and any other abnormalities. Any abnormalities or noteworthy findings in the PE need to be recorded in the medical record and brought to the attention of the attending veterinarian.
Taking the Temperature
Ideally the temperature is taken rectally with a well-lubricated thermometer. Some patients strongly resist this part of the PE, and therefore taking the temperature should be saved for the end of the examination so that the patient may be more cooperative for most of the PE. Some states no longer allow the sale or purchase of mercury thermometers, but it is still important that every veterinary technician can read a mercury thermometer (Figure 2-4). Most mercury thermometers require 90 to 120 seconds to record the patient’s temperature (check the manufacturer’s recommendation). Most digital thermometers emit a series of audible beeps within 60 seconds to indicate that the final temperature has been recorded.
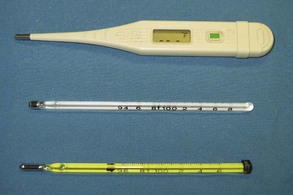
FIGURE 2-4 Digital thermometer (top) and two mercury thermometers. Note the differing ranges between the lower and upper limits of the two mercury thermometers (94° F to 108° F and 96° F to 106° F).
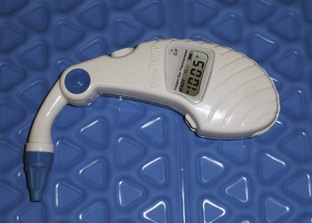
If it is not possible to take the temperature rectally, an aural temperature measurement can be taken. There are several styles of ear thermometers on the market. Ear thermometers read the temperature of the tympanic membrane using infrared technology. The probe sits several millimeters off the ear drum as it records the temperature. This space and the shape of the animal’s ear canal can lead to inaccurate readings (Figure 2-5).
Consent Form
A consent form is a piece of paper that identifies the patient (name, signalment, and descriptors such as hair coat color and body weight), the specific procedure(s) to be performed along with the potential risks to the patient, the physician(s) who will perform the procedures, and the signature of the owner consenting to the procedure(s). Frequently, the receptionist merely hands the consent form to the owner to sign when the animal is brought to the hospital on the day of the scheduled procedure. Because the consent form contains such important information, however, the veterinary technician familiar with the surgical procedure should review the form in detail with the owner at completion of the PE. This gives the owner the opportunity to ask any last-minute questions about the procedure before the animal is admitted to the hospital. Open and clear communication is essential to avoid any confusion and to prevent miscommunication that could lead to legal complaints later. Many legal complaints originate with poor or rushed attempts at client communication.
Descriptions of the procedures should be written out and should be all inclusive; that is, everything that will be done to the animal needs to be listed. This form also should document whether or not the patient was fasted appropriately, should include a notation that the owner received an estimate for the procedure(s) to be performed, and should provide a way of contacting the owner during the time the procedure(s) will be performed. It is extremely important that the owner can be contacted during the procedure, should the need arise (Figure 2-6).

Preanesthetic Diagnostic Tests
With the ever-increasing standards of care in veterinary medicine and the owner’s expectations for the surgical patient’s optimum health care, the minimum preanesthetic diagnostic database, or minimum database (MDB), is continually rising in scope. Information collected in the history and PE will help determine which diagnostic tests should be performed before the patient is anesthetized. What is considered the MDB for an elective surgical procedure on a young, healthy animal will be different from the MDB for a procedure on a geriatric patient with preexisting health problems. The MDB results may suggest additional diagnostics may be indicated, or that the original anesthetic protocol may have to be amended.
Minimum Database
A minimum database for a young, healthy surgical candidate should include a packed cell volume, total solids, blood glucose, blood urea nitrogen (BUN), and alanine aminotransferase. These tests should be considered a starting point, and other diagnostic tests should be performed if any of these four basic parameters cause any concern. These tests are generally easy to run, can usually be performed as “point of care” or “in-house” tests, and require only a small amount of blood. With minimal time and effort, much useful information can be gained from these tests. Several laboratories and in-house analyzer companies sell packaged pre-anesthetic test panels, making the process even easier.
Packed Cell Volume (Hematocrit)
The packed cell volume (PCV), or hematocrit (Hct), is the percentage of whole blood that is made up of red blood cells (RBCs). Low PCVs are found in cases of decreased RBC production (as in chronic renal failure), decreased RBC life span (as with some autoimmune diseases and parasite infections), and blood loss (secondary to trauma, blood-clotting disorders, or gastric ulcers). Increased PCV may indicate dehydration (common) or absolute polycythemia (rare). Any values outside the normal ranges need to be brought to the attending clinician’s attention.
Checking a PCV requires microhematocrit tubes, a tube sealant (e.g., Critoseal), a centrifuge, and a hematocrit card reader (Figure 2-7). If whole blood is collected in a syringe without an anticoagulant, heparinized microhematocrit tubes should be used for this test. If blood is collected into a heparinized syringe or placed in a Vacutainer tube with anticoagulant (ethylenediaminetetraacetic acid [EDTA]) in it, a plain microhematocrit tube should be used. Glass microhematocrit tubes are generally easier to work with than the plastic variety.
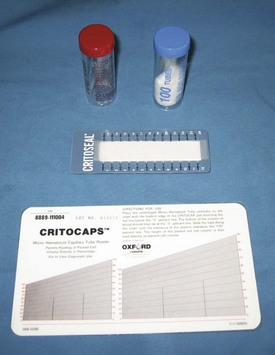
FIGURE 2-7 Heparinized (red) and plain (blue) microhematocrit tubes (top), packed cell volume (PCV) card reader (bottom), and clay to seal blood in microhematocrit tube (middle).
After spinning the microhematocrit tube for the appropriate time in the centrifuge (Figure 2-8), the tube is placed on the card reader. Line up the top of the clay with the “0%” line on the card reader. Roll the tube across the card until the top of the plasma lines up with the 100% line on the card. Read the percentage line that crosses the point where the packed RBCs are separated from the plasma, at the “buffy coat”; this percentage is the PCV (Figure 2-9). The buffy coat usually appears as a small column of white between the packed RBCs below it and the clear plasma above it. The buffy coat contains white blood cells (WBCs) and platelets. The area just above the buffy coat can be examined under a microscope to perform a heartworm screening for live microfilaria.


FIGURE 2-9 To read packed cell volume (PCV) on a card, line the top of the clay plug on the 0% line and the top of the plasma on the 100% line. PCV is read on the line where plasma and packed red blood cells meet. On this sample, PCV is approximately 40%.
Normal range of packed cell volume:
Plasma is the liquid (noncellular) component of blood that separates out from the packed RBCs after whole blood is placed in a microhematocrit tube, sealed with the clay, and spun in a centrifuge. Normally, plasma is clear and colorless. If the plasma has any color, the color should be noted next to where the PCV percentage is recorded in the medical record and brought to the attention of the veterinarian.
Total Solids or Proteins
Total solids (TS) or total proteins (TP) provide information on the animal’s plasma protein levels. There are three major plasma proteins: albumin, globulin, and fibrinogen. These levels have a direct effect on serum oncotic pressure. The lower the TP value, the lower the serum oncotic pressure. Changes in serum oncotic pressure directly affect changes in the patient’s fluid shifts between the interstitium and the vasculature. With a low serum oncotic pressure, fluid tends to accumulate in the interstitium, resulting in edema. On the other hand, with a high serum oncotic pressure, fluid shifts out of the interstitium and back into the vasculature (blood vessels).
Elevated plasma protein values are associated with dehydration, malignancies (e.g., lymphosarcoma), and infections. Decreased plasma protein values are associated with inadequate production (albumin is made in the liver), inadequate intake (starvation), increased loss (renal disease, blood loss, parasites), and inadequate absorption from the gastrointestinal tract (pancreatic disease, inflammatory bowel disease).
In addition, plasma protein levels are important because some anesthetics (some barbiturates) are highly bound to proteins. If a patient is hypoproteinemic, more free drug (not bound to plasma proteins) will be available to function as an anesthetic, effectively increasing the dose. Therefore the animal’s protein levels should be noted when deciding which anesthetics to use, or the anesthetic dose may need to be adjusted accordingly.
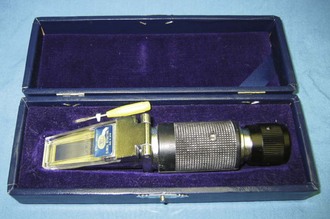
Supplies needed to check plasma proteins include a refractometer (Figure 2-10) and microhematocrit tubes. After the PCV level is checked, snap the glass microhematocrit tube in the area of the plasma column. Take care not to touch or scratch the glass platform of the refractometer with the sharp edges of the microhematocrit tube. Allow the plasma to drip onto the refractometer out of the microhematocrit tube. The TS level is read on the scale seen in the refractometer.
Blood Glucose
Blood glucose (BG) levels indicate carbohydrate metabolism and measure the endocrine function of the pancreas. Eating raises BG levels, and fasting lowers them. Stress will elevate BG levels in cats. In juvenile patients and diabetic patients, BG values may need to be checked intraoperatively and postoperatively if the procedure is especially long.
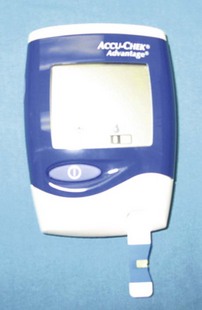
Glucometers are available at most pharmacies and are easy to use (Figure 2-11). Usually, only a drop of fresh whole blood is required. Some glucometers (e.g., Roche’s ACCUCHEK Advantage, Roche Diagnostics, Indianapolis, IN) can determine BG levels using blood collected in EDTA or heparin, two types of anticoagulants, but they will not accurately measure BG in serum. It is important to use recently collected blood because glucose values are affected by how long the blood sits before it is analyzed. Likewise, it is important to follow the manufacturer’s guidelines and directions. Any invalid results should be addressed (e.g., repeat with another sample) and any abnormal results should be brought to the attending veterinarian’s attention and addressed.
Blood Urea Nitrogen
Urea is a nitrogenous compound that is a product of amino acid breakdown in the liver. BUN levels are used to evaluate the kidney’s ability to remove nitrogenous wastes (urea) from the blood. If the kidneys are not working properly, an insufficient amount of urea is removed from the plasma, resulting in increased BUN levels.
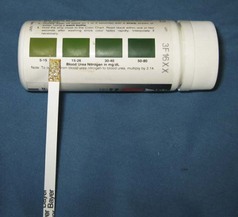
An estimate of the patient’s BUN value can be assessed quickly using a reagent strip (e.g., Azostix, Siemens Healthcare Diagnostics, Washington, DC; Figure 2-12). Blood mixed with the anticoagulants EDTA or heparin (as long as it does not contain an ammonium salt) will not affect the estimated BUN of an Azostix; however, neither serum nor plasma should be used for this test. Supplies needed to check BUN on a reagent strip include the reagent strip, fresh blood sample, watch with second hand, and a strong stream of water to rinse the strip. The color change on the reagent strip is compared with the color scale on the bottle for the strips. The corresponding color match between the reagent strip and the bottle indicates the estimated BUN (Figure 2-13).
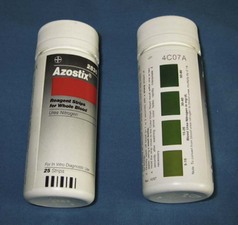
FIGURE 2-12 Bottle of reagent strips (Azostix, Siemens Healthcare Diagnostics, Washington, DC) used to estimate blood urea nitrogen (BUN); color scale is used to estimate BUN value.
Some anesthetics are primarily metabolized by the kidneys, and if there is any question of the patient’s renal function, choosing a drug that is not primarily metabolized by the kidneys ought to be considered. Further diagnostic tests assessing kidney function (e.g., urinalysis) should be considered as well.
Alanine Aminotransferase
Alanine aminotransferase (ALT) is an enzyme found in high concentration in the liver cells of dogs, cats, and primates. Damage to hepatocytes can elevate blood ALT levels. Certain drugs, such as anticonvulsants and corticosteroids, can also raise blood levels. ALT, while not indicative of specific liver disease, can be used as a general hepatic screen.
Additional Tests
Other diagnostic tests specific to the patient’s history and PE findings should be performed before any surgery. Generally, preanesthetic diagnostics are noninvasive and may eliminate (“rule out”) the need for more invasive procedures. However, these diagnostic tests may support the need for additional, more invasive diagnostics or procedures. For example, the logical progression of diagnostic testing for a puppy with vomiting and diarrhea would start with an intestinal parasite test (“fecal”) and a parvovirus (“parvo”) test, followed by abdominal radiographs, then an abdominal ultrasound, and finally an abdominal exploratory procedure. In addition, the puppy with vomiting and diarrhea should receive a complete blood count (CBC) and serum chemistry panel and electrolyte panel to aid in determining what type of intravenous fluids or additional support (e.g., antibiotics, parenteral nutrition, plasma transfusion) is indicated.
It is important to note that preanesthetic diagnostic tests will not be the same for every patient and that not all preanesthetic diagnostics are limited to blood tests (e.g., CBC; serum chemistry, electrolyte, thyroid, and clotting panels; heartworm and feline leukemia virus tests; blood cultures). For example, intestinal parasite tests, radiographs, diagnostic ultrasounds, urinalyses, and electrocardiograms may need to be performed before surgery on certain patients, depending on the history and PE findings.
Preoperative Medications
Once all the preanesthetic diagnostic tests have been performed and analyzed, if the results still indicate that surgery is necessary and is the appropriate next step, the patient is premedicated for anesthesia.
Surgical patients are routinely premedicated with a combination of agents, including analgesics, sedatives, and at times anticholinergics. The purpose of administering these agents before induction is threefold. First, the patient is more relaxed, allowing a less stressful transition to anesthesia. Second, pain management is provided at the optimum time, before surgical tissue trauma occurs. Third, appropriate premedications (“premeds”) ease the transition out of anesthesia, facilitating a smooth recovery. Anticholinergics may be added to prevent some of the undesired effects of the analgesia and sedation, mainly bradycardia.
Balanced Anesthesia
Premedication is an important part of balanced anesthesia. The objective of balanced anesthesia is to combine several agents, in smaller dosages, to maximize the positive effects, such as analgesia and muscle relaxation, while minimizing the negative effects, like cardiac and respiratory depression. The goal is to calm the patient, minimize pain, and reduce the adverse effects of the agents used (Box 2-1).
Principles of Pain Management
The basic principles of current pain management involve (1) preemptive (preventive) analgesia, (2) multimodal analgesia (using different classes of drugs simultaneously to interrupt the pain pathway at various points), and (3) appropriate follow-up analgesia. Using this strategy, veterinarians design an analgesic plan for each patient that maximizes pain control, keeps patients on an analgesic plane, and reduces unwanted side effects.
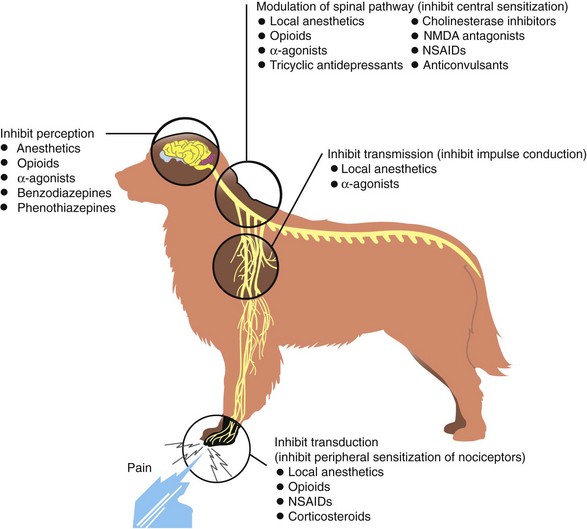
These simple principles have evolved from our current understanding of the pain pathway, or nociception. Pain signaling occurs in a distinct pathway that begins at the onset of a noxious stimulus. The stimulus may be tissue trauma, surgical incision, or even heat. When tissue is traumatized, the first phase of the nociceptive pathway is triggered, and the event is converted to a signal that can be sent to the central nervous system (CNS) for processing. This phase is called transduction. The second phase, transmission, is the propagation of the impulses up toward the spinal cord. Once in the spinal cord, pain signals may undergo a number of different effects. Some signals are handled locally by the release of endogenous opioids, whereas others are sent to the brain for further processing. This sorting process is called modulation, the third phase; pain signals are said to be “modulated” in the spinal cord. The fourth and final phase of nociception, perception, occurs only in the conscious patient. Perception is “knowing” that pain is present and usually results in such reactions as withdrawal, vocalization, and, in some cases, aggression. Anesthesia interrupts the perception phase only. It is important to remember that interfering with perception alone does not address transduction, transmission, or modulation. Patients who undergo surgery only with anesthesia have essentially no pain management; the spinal cord is continually bombarded by pain signals, which will become evident as soon as the animal wakes.
The four distinct phases of the pain pathway allow pain to be interrupted at more than one juncture. Pain management specialists believe that interrupting nociception or pain perception can be achieved most effectively by targeting multiple points along the pathway. The analgesic drugs currently available target one or more of the nociceptive phases, although each class of agents exerts a major effect on one of the four phases (Figure 2-14). This is the rationale for combining different analgesics as premedications for surgery, a process called multimodal analgesia.
Analgesics
Optimum premedication for surgery is likely to include several agents, as just discussed. Four classes of drugs can be effectively used to deliver preemptive analgesia: opioids (e.g., butorphanol, buprenorphine, morphine, fentanyl), nonsteroidal anti-inflammatory drugs (NSAIDs; e.g., carprofen, meloxicam, deracoxib), local anesthetic agents (e.g., bupivacaine, lidocaine), and α2-adrenergic agonists (e.g., medetomidine, xylazine). (The appendix provides complete dosage information.) The most effective time to administer analgesia is before tissue trauma or damage occurs. Preemptive analgesia, the anticipation of pain and its treatment in advance, is a critical pain management strategy. Most patients require less anesthesia and actually experience less pain on recovery with smaller doses of analgesics when effective preemptive analgesia is administered.
Table 2-1 summarizes the side effects of analgesics. Note that not all the agents described in this table are approved for use in veterinary patients. Some are approved for use in dogs but not cats, and some are approved for use as single agents rather than in combination with other drugs. However, although the U.S. Food and Drug Administration (FDA) has not approved all the previously cited analgesics for use in veterinary medicine, the Animal Medical Drug Use Clarification Act of 1994 (AMDUCA) permits veterinarians to use them on an “extra-label” basis.
TABLE 2-1
| Agent | Adverse Effects | Monitoring |
| Opioids | Sedation, low blood pressure, respiratory depression | Mentation, blood pressure, respiratory rate and quality |
| Local anesthetics | None unless given by CRI With CRI: nausea, vomiting, neurologic signs, seizures |
Observe regularly for muscle tremors and GI upset |
| Nonsteroidal anti-inflammatory drugs | GI disturbances, GI bleeding, renal disturbances | General observation, hydration status, stool quality, urine production |
| α2–agonists | Bradycardia, cardiac arrhythmias, hypertension, peripheral vasoconstriction | Palpate femoral pulse rate and quality; auscultate heart; monitor blood pressure. |
Opioids
Opioids, the mainstay of acute pain management, provide analgesia by binding to specific opioid receptors in both the CNS and the peripheral nervous system (PNS). Opioids work at several locations along the pain pathway, affecting nociceptive signal transduction, modulating signals at the spinal level, and inhibiting perception of pain. In addition to providing analgesia, opioids help reduce anxiety and nonpainful distress.
Almost every patient expected to experience pain is a candidate for opioid analgesia. As a class, opioids produce minimal side effects in animals. The only cases in which opioids may be contraindicated are patients with head trauma, because even mild respiratory depression associated with opioids may worsen potential intracranial pressure. Opioids are most effective when administered before the onset of pain. Opioids can be administered through the conventional intravenous (IV), intramuscular (IM), and oral (PO) routes. Other, less common but effective routes of administration are transdermal (e.g., fentanyl), epidural, and intra-articular, as well as by constant-rate infusion. Buccal administration has become a popular route for buprenorphine in the cat, whose unique oral pH allows for excellent absorption by this route. (See the Appendix for an in-depth description of these techniques).
How opioids work: Opioids bind to opioid receptors in the spinal cord. The mu (µ) and kappa (κ) opioid receptors are primarily responsible for producing analgesia, with the µ receptor producing the most profound analgesia. The κ receptors produce much milder analgesia. Both receptor types are also responsible for producing respiratory depression, euphoria, sedation, and miosis. An opioid can interact with one or more types of opioid receptor. Drugs that bind to a receptor and cause expression of activity are called agonists. Drugs that bind to receptors and block their action are called antagonists. There are further subclassifications into full (pure) agonists, partial agonists, and mixed agonist-antagonists. The opioid drugs are classified by these subdivisions, which describe their potential action and duration.
Pure agonists (e.g., morphine, hydromorphone) bind and stimulate all types of opioid receptors, causing maximum analgesia. They are extremely effective but of only moderate duration, typically about 4 hours. Full agonists are also the most likely to have side effects.
Partial agonists function much the same as full agonists, but the interaction occurs with less than full activity at the receptors. Buprenorphine is a µ partial agonist. Although buprenorphine only partially binds to the µ receptor, it does so with great affinity. Therefore, although it provides analgesia of less intensity than morphine, buprenorphine has a much longer duration of action, up to 8 to 12 hours.
Agonist-antagonist opioids (e.g., butorphanol) bind to more than one type of opioid receptor, having an effect at one type but blocking effects at another receptor. Butorphanol binds and activates κ receptors to produce analgesia and sedation; it also binds with µ opioid receptors, blocking (antagonizing) the receptors. For this reason, butorphanol is considered a mild analgesic with extremely short duration, less than 1 hour in most cases. Butorphanol does produce profound sedation for up to 2 hours, outlasting the analgesia provided. Co-administration with butorphanol may result in reversal of the µ effects of full opioid agonists.
Antagonist opioids fully or partially reverse the effects of opioid agonists. Naloxone is a pure opioid antagonist that completely reverses the effects of all opioid agonists at all receptor sites. Butorphanol can be used as a partial reversing agent, reversing µ activity but not κ effects.
Side effects: Opioids have few clinically significant cardiovascular effects, other than bradycardia, in dogs and cats when administered at recommended doses. However, opioid-induced bradycardia is responsive to anticholinergics and can be reduced if a patient is pretreated with an anticholinergic. Respiratory depression is a common side effect with opioids in humans but rarely is clinically significant in veterinary patients. Emesis (vomiting) is a common side effect of some opioids, particularly morphine and hydromorphone. Vomiting typically occurs once when opioids are used as a premedication rather than when administered to an animal already in pain. Panting is a fairly common side effect of many opioids, especially at higher doses. This potential side effect may not be clinically important, but it can make patient monitoring difficult postoperatively because it is difficult to differentiate between panting as a sign of pain and panting as a reaction to an opioid.
Nonsteroidal Anti-inflammatory Drugs
NSAIDs have been used in human and veterinary medicine for many decades to treat fever, inflammation, and pain. More recently, NSAIDs have been shown to be quite efficacious for treating inflammation and pain associated with surgery, and several NSAIDs have been approved for preoperative use in dogs. NSAIDs can be incorporated into premedication protocols to control mild to moderate pain associated with surgery. For maximum effect, NSAIDs should be administered preoperatively, up to 1 to 2 hours before tissue trauma. When they are used in this way, controlling inflammation before it begins, dramatic results can be observed in the postoperative period. Patients who receive preemptive NSAIDs tend to recover with significantly less pain and often require less postoperative analgesia than those who do not. This class of drugs can be safely combined with opioids to provide excellent multimodal analgesia. NSAIDs are available in several formulations, including oral tablets, chewable forms, liquids, and injectable solutions.
How Nonsteroidal Anti-inflammatory Drugs Work
When cells are damaged as a result of trauma, surgery, or disease, fatty acids such as arachidonic acid (AA) are released from cell membranes. The release of AA triggers a cascade of biochemical activities that ultimately produce prostaglandins, which serve many functions in the body; some prostaglandins are essential for normal homeostasis, and some result in inflammation and pain. The enzyme cyclooxygenase (COX) metabolizes AA to prostaglandin and is the target of NSAIDs. To date, two forms of COX enzymes have been identified. These enzymes are closely related and are now known as COX-1 and COX-2. Each converts AA to prostaglandins, although the prostaglandins produced by each COX enzyme appear to serve very different functions. COX-1 is continuously present in most cells and is important for normal body functions. In the stomach, COX-1 plays a key role in maintaining integrity of gastric mucosa. In platelets, COX-1 is essential for thromboxane A2 production. In contrast, COX-2 is not readily present in the cells, but it is rapidly synthesized in response to various inflammatory stimuli. Once induced by tissue injury, COX-2 converts AA into prostaglandins that create inflammation and pain. Both COX-1 and COX-2 play a vital role in the kidney as important mediators of salt and water balance, rennin (chymosin) release, and vascular tone. NSAIDs exert their anti-inflammatory effects by inhibiting activity of COX-1, COX-2, or both. This inhibitory activity varies between NSAID compounds and with animal species.
Side effects: As a class, NSAIDs are associated with specific types of potential side effects. Some of these are species specific and drug specific, as in the case of acetaminophen metabolism in cats. Possible side effects associated with NSAIDs include gastrointestinal tract damage, hepatopathy, renal toxicity, impaired platelet function, and cartilage destruction. Administration of NSAIDs should be restricted to well-hydrated, normotensive animals with normal hepatic and renal function, no hemostatic abnormalities, and no evidence of gastric ulceration.
Alpha2-Adrenergic Agonists
Alpha2-adrenergic agonists (α2-agonists) are short-duration sedative-analgesic–muscle relaxants that can be rapidly reversed with α2-antagonists. This characteristic makes these drugs suitable for procedures requiring short-term restraint and analgesia as well as premedication for longer surgical procedures. Use of α2-antagonists as premedications may result in substantial reduction in both induction and inhalant anesthetic dosages. α2-agonists are nonnarcotic and nonscheduled agents. Medetomidine and xylazine are the two α2-agonists currently approved for use in dogs in the United States. Medetomidine is a dose-dependent sedative-analgesic often used as a preanesthetic agent in healthy animals. Onset of effect is 5 to 15 minutes depending on route of administration, which can be IV or IM, and sedation can last up to 90 minutes.
How α2-agonists work: α2-agonists inhibit release of the excitatory neurotransmitter norepinephrine to produce analgesia and sedation. These agents interrupt the pain pathway by inhibiting nerve impulse transmission, modulating nociceptive signals in the spinal cord, and inhibiting perception within the brain. Because α2-adrenoceptors are found in various sites throughout the body, α2-agonists normally induce a number of physiologic changes in addition to sedation, analgesia, and muscle relaxation. Administration results in physiologically normal peripheral vasoconstriction, which creates a transient increase in blood pressure. Because the normal cardiovascular response to these events is a reflexive decrease in heart rate, patients are expected to become bradycardic. All cardiovascular parameters smoothly return to presedation levels on reversal of the agent with atipamezole.
Side effects: α2-agonists can have profound effects on the CNS and cardiovascular system, but using low dosages can minimize these adverse events. Bradycardia and vomiting are the most common side effects. All α2-agonists have potential side effects, including hypertension, bradycardia and heart block, respiratory depression, excessive CNS depression, vomiting, increased urine production, and peripheral vasoconstriction.
Candidates for α2-agonist administration should be healthy, have sound cardiovascular systems, and be exercise tolerant. An α2-agonist should never be administered to an animal with a compromised cardiovascular or respiratory system.
Local Anesthetics
Local anesthetics are inexpensive to use and quite effective in blocking the transmission of nociceptive signals at the source. Use of local anesthetics offers three major benefits. First, these agents produce true analgesia, that is, a complete absence of pain. Second, they are nonscheduled agents, requiring no cumbersome paperwork. Third, the techniques used to administer local anesthetics are relatively easy to perform. Most blocking techniques are well within the skill level of licensed veterinary technicians. Local anesthetics can and should be used in any surgical patient with an identifiable site for nerve blockade. For example, local anesthetics can be used effectively in patients undergoing thoracotomy, elbow surgery, maxillomandibular procedures, local excisions, feline declawing, and knee or cruciate repair. Anesthetic agents can be administered to create local and regional anesthesia and analgesia (Box 2-2).
In addition, local anesthetics are most often the drugs of choice for epidural anesthesia and analgesia. This technique is a good alternative to general anesthesia or as an adjunct to inhalant anesthesia, especially for patients at high risk during general anesthesia and those undergoing painful orthopedic surgeries of the hind limb. Finally, an IV constant-rate infusion of a local anesthetic can provide sustained pain control in a variety of patients undergoing extensive nerve trauma, such as limb amputation. Lidocaine and bupivacaine are the agents most often used for dogs and cats. Lidocaine is characterized by rapid onset (5-10 minutes) but short duration (45-90 minutes). In contrast, bupivacaine has a longer onset (15-20 minutes) but provides up to 6 hours of analgesia (Table 2-2).
TABLE 2-2
Comparison of Local Anesthetic Agents
| Drug | Onset | Duration |
| Lidocaine | 5-10 minutes | 45-90 minutes |
| Bupivacaine | 15-20 minutes | Up to 6 hours |
How local anesthetics work: Local anesthetics act by inhibiting transduction and transmission of nerve impulses and by modifying the signals at the spinal cord. Local anesthetics inhibit generation and transmission of nerve impulses by blocking sodium channels in the neuron’s cell membrane. This effect slows the rate of depolarization of the neuron cell membrane and prevents the threshold potential from being reached.
Side effects: When administered at an appropriate dose, local anesthetics have relatively few, if any, adverse side effects. The potential systemic side effects of local anesthetics involve the CNS and cardiovascular system. Other potential side effects include development of methemoglobinemia, nerve and skeletal muscle toxicities, and allergic reactions, including hypersensitivity and anaphylaxis.
Sedation and Tranquilization
Sedatives alone do not possess any analgesic properties but are an important adjunct to premedication protocols. Sedation should be incorporated into preoperative regimens to reduce stress, fear, and anxiety, all of which exacerbate pain, and vice versa. However, sedatives alone (with the exception of α2-agonists) should never be administered to an animal without analgesia when pain is anticipated. Sedation alone may decrease the animal’s ability to express pain and give the false impression that the animal is pain free. The most frequently used sedatives for premedication include the tranquilizing agents phenothiazines (acepromazine) and benzodiazepines (diazepam, midazolam).
Anticholinergics
Anticholinergic drugs such as atropine and glycopyrrolate are sometimes added to premedication protocols that are expected to produce profound, sustained bradycardia. For example, anticholinergics are frequently given to patients who receive opioids and are expected to have a long gas inhalation anesthesia time. Anticholinergics are given to reduce bradycardia and to dry oral secretions. Atropine sulfate has a quick onset of action and rapid elimination and can be given subcutaneously (SC), IM, or IV to prevent or to treat bradycardia and to dry oral secretions. Glycopyrrolate can be given SC, IV, or IM, although onset of action is substantially increased when given IV. Glycopyrrolate is typically used to prevent bradycardia rather than treat it once it has occurred. The effects of glycopyrrolate are much longer lasting than those of atropine.
Anticholinergics can increase the incidence of cardiac arrhythmias and sinus tachycardia. Increasing heart rate is not always beneficial to the patient because higher heart rates do not necessarily translate into better perfusion. Whether or not an anticholinergic should be routinely administered in conjunction with drugs that lower heart rate (e.g., α2-agonists) has been the subject of considerable scientific debate. Initially, treatment of α2-agonist–induced bradycardia was thought to be beneficial. Currently, however, anticholinergic drugs are not generally recommended to prevent periods of expected transient bradycardia. Bradycardia that is considered life threatening because it is associated with poor perfusion can be rapidly corrected with atropine. The most practical approach may be to avoid “routine” use of anticholinergics, administering them on a case-by-case basis only to patients in need.
Antibiotics
An important consideration is whether or not the surgery patient needs intraoperative antibiotics and, if antibiotics are indicated, which type is appropriate. If the procedure is elective and a possible break in sterility during it is not a concern, antibiotics are generally unnecessary. However, if the surgical procedure is done specifically to treat contaminated or infected wounds, or if possible contamination during an elective procedure is a concern, intraoperative antibiotics may be indicated. Specific guidelines for prophylactic antibiotic use follow this section on wounds.
When determining whether antibiotics are indicated, it is helpful to know what type of wound is present. See Chapter 8 for a discussion on wound classifications.
Prophylaxis refers to the measures taken in the prevention of disease. The administration of antibiotics just before and during surgery is known as perioperative prophylaxis. The purpose of this practice is to decrease the chances of postoperative infection of the surgical site. Few surgical cases or circumstances warrant prophylactic antibiotic treatment; one example is an orthopedic procedure involving the placement of implants.
The choice of antibiotic depends on the type of bacterial contamination expected. For example, staphylococci from the skin are of concern in orthopedic procedures. Gram-negative bacteria (e.g., Escherichia coli) are of concern in large-bowel procedures. The antibiotic’s spectrum of activity should be narrow and limited to the predicted bacterial contaminant.
The antibiotic must be administered by IV injection just before induction. The dose may be repeated during the surgical procedure to ensure adequate serum levels throughout the surgery. The antibiotic administration is usually not continued after the procedure is completed. Antibiotics that cannot be administered IV are not used as prophylactic antibiotics.
If an animal is taken to surgery with an infection that is already established, the clinician may have prescribed antibiotics for a period before the surgery. This situation is not considered “prophylactic” in nature. The antibiotics have been prescribed in response to an already established infection. In this case, it is important to continue the administration perioperatively and postoperatively, during the recuperative period. The antibiotic may need to be administered by injection (SC, IM, or IV) immediately before the surgery. Oral antibiotic administration can be reinstituted as soon as the animal can tolerate (“keep down”) food and water after the surgery.
Intravenous Catheters
After the patient has received the appropriate premedication, an IV catheter should be placed. In addition to the analgesic benefits provided by premedicating the surgical patient, premedication makes for a more sedate and cooperative patient when the catheter is placed.
The placement of an IV catheter offers many benefits to the surgical patient. Once an IV catheter has been placed, it is easier for the veterinary technician to administer, as well as less stressful for the patient to receive, multiple IV medications. Puncturing through the skin and vein (venipuncture) for every injection is unnecessary when an IV catheter is in place. Also, the patient with an IV catheter is not poked with a needle every time an IV medication is administered. Likewise, the veterinary technician does not need to find a “good” vein for every drug administered intravenously. Many drugs needed by a surgical patient are intended to be, and some can only be, administered intravenously, and the IV catheter allows for easier administration of these drugs. For example, induction agents for general anesthesia, analgesics, antibiotics, and fluids may need to be given to the surgical patient at some point during its hospital stay. Having established access to the vascular system through an IV catheter aids in the efficiency of administering these medications. From a safety standpoint, having venous access allows for immediate administration of emergency drugs if necessary.
The type and placement site of the catheter greatly influence its capabilities. Peripheral catheters are completely adequate for short-term use (1-3 days), anesthesia induction, and medication administration. However, for long-term use (>3 days), extended fluid therapy, or systemic monitoring, a jugular catheter (central line) should be placed.
Peripheral Catheters
Peripheral catheters are most often placed in the following sites:
Almost any palpable vessel can be used to place a catheter.
Supplies
Regardless of the site, the basic supplies needed to place the catheter remain the same (Figure 2-15).
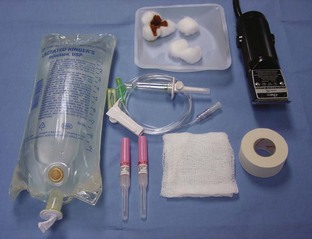
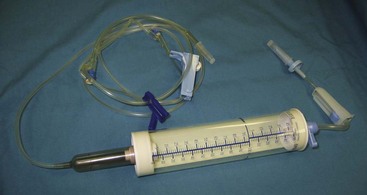
FIGURE 2-15 Supplies required for placement of IV catheter and administration of IV fluids. From left: IV fluid bag (1-L bag of lactated Ringer’s solution shown), cotton balls and scrub product, IV fluid administration set, IV catheters, gauze squares, tape, and clippers.
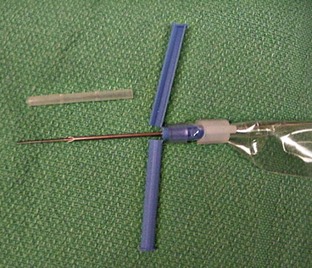
Catheter: Many styles of catheters are available for use. The three most common styles are the over-the-needle catheter, the through-the-needle catheter, and the butterfly catheter (Figure 2-16). The choice of catheter style is primarily determined by the site of placement and the intended use. The over-the-needle type is typically used for short-term and surgical catheters and is usually placed in a peripheral vein (e.g., cephalic vein). The butterfly catheter is useful when vascular access is required for medications that need to be administered once (as in outpatient treatments) and slowly (i.e., over 1-3 minutes). Butterfly catheters are sharp and rigid and are not intended to remain in a patient that is not being directly monitored (i.e., with hands-on monitoring). Through-the-needle catheters are often placed in the jugular veins of animals that will need intensive nursing care postoperatively (Figure 2-17).
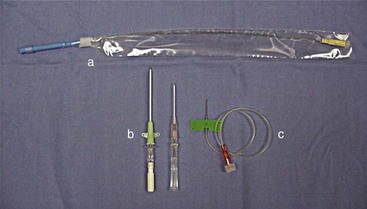
FIGURE 2-16 Examples of IV catheters (a) through-the-needle catheter; (b) over-the-needle catheters; (c) butterfly catheter.
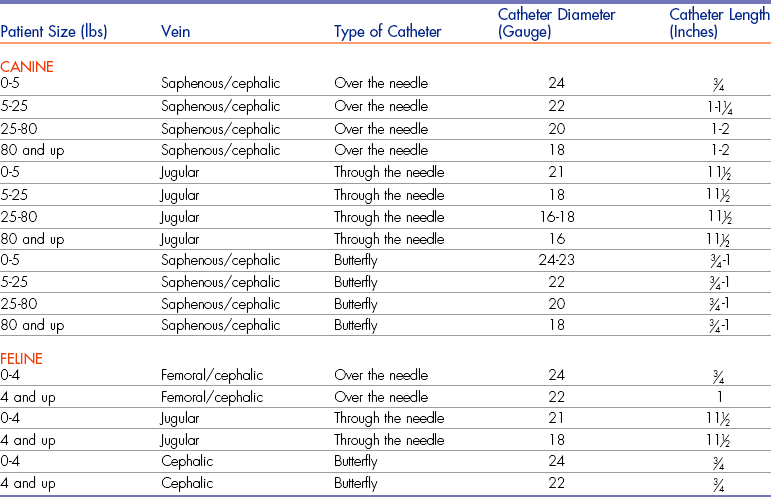
The choice of catheter size is primarily influenced by five factors: (1) site of placement, (2) length of time the catheter will be needed, (3) reason for placement, (4) diameter of the vessel, and (5) length of the vessel working area. Catheter diameter (gauge) should be chosen after evaluation of the vessel’s size and the reason for placement. The length of the catheter needs to be considered after the vessel has been chosen so that the length of the working area is known. For example, a 2-inch catheter placed in the cephalic vein of a dachshund is inappropriate, because once completely seated, the catheter would be proximal to the patient’s elbow and would be more likely to kink every time the leg was bent. Table 2-3 provides guidance in making appropriate catheter selections based on the factors listed.
Injection caps, T-ports, and fluid administration sets: Injection caps may be placed on the catheter if occasional injections or blood sample collections are anticipated (Figure 2-18). An injection cap allows for repeated punctures through the cap without resulting in damage to or leaking from the cap. Needle-less styles of injection caps are available and are a good option because they reduce accidental needle punctures of workers.
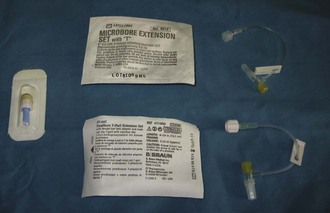
T-ports (or T-sets) serve the same purpose as an injection cap and also allow easier access to the catheter (see Figure 2-18). The short tubing incorporated into the design of the device allows sample collection or medication administration to be done more easily. A fluid administration set of the appropriate size should be used if continuous infusion of fluids or IV medications is anticipated, and the set can be connected to the T-port.
Usually an administration set supplying 15 or 20 drops/ mL (macrodrip set) is used for patients weighing more than 7 kg. Sets supplying 60 drops/mL (microdrip set) are used for patients weighing less than 7 kg for more accurate fluid administration. For extremely small patients, a Buretrol solution administration set (Baxter, Deerfield, IL) can be employed for the most accurate measurement of fluids administered, and it is especially useful if an electric fluid infusion pump is not available (Figure 2-19).
Extension sets: An extension set may be used in conjunction with an administration set to allow for better animal mobility in the cage postoperatively. The administration sets are often not long enough to be practical, so extension sets may be used.
Tape: The tape is one of the most important components of the catheter. Without proper anchoring, even the best placed catheter is useless. The technique for taping can vary from technician to technician, the only constant being that the catheter must be secure without being too tight. A loose tape job would allow the catheter to lose patency, but applying the tape too tightly could occlude blood flow. Typically, 1-inch and  -inch tape are used in varying orders to secure the catheter. If
  -inch tape is not available, the 1-inch tape can be ripped in half. The first piece of tape should be long enough to encircle the patient’s limb or neck, depending on where the catheter is placed. Two additional pieces of tape, the same length as the first, will be needed to secure the catheter further in place.
Catheter “Prep” materials: Clippers with a number 40 (No. 40) blade are required for hair removal from the catheter site (Figure 2-20). The amount of hair to remove depends on the catheter site and the patient’s size. In general, for peripheral veins, a margin of  to 2 inches on all sides of the proposed puncture site is appropriate (clipping an area of this size often requires clipping the entire circumference of the limb). For catheters placed in the jugular vein, a larger area should be clipped.
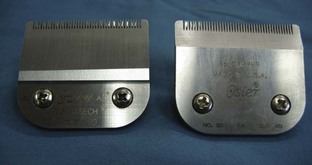
FIGURE 2-20 Two types of clipper blades, a No. 50 (left) and a No. 40 (right), that can be used to clip hair in preparation for surgery or placement of an IV catheter.
Preparation materials include cotton balls saturated with either dilute (50 : 50) povidone-iodine scrub or chlorhexidine scrub for the cleansing step and cotton balls saturated with 70% isopropyl alcohol for the rinsing step. Jugular catheter sites may be prepared with saturated gauze sponges instead of cotton balls.
Fluids or heparinized saline: Either continuous infusion of IV fluids or regular flushing of the catheter with heparinized saline is necessary to maintain patency of the catheter once it is placed. If fluids are used, 0.9% sodium chloride (NaCl) or lactated Ringer’s solution (LRS) is most often used (Box 2-3).
Bandage materials: Bandage materials are needed if the catheter is to remain in place after the surgical procedure is completed. Antibiotic ointment, elastic gauze, and elastic tape (or Vetrap, 3M, St Paul, MN) are the materials of choice. (It should be noted that the benefits of using antibiotic ointment are anecdotal. Research in human medicine has shown that the use of such ointments at the catheter insertion point has actually led to antibiotic resistance and fungal growth.) Usually, 1-inch widths of all materials work best, given the area that will be bandaged on most dogs and cats, but personal preference eventually becomes the determining factor. Tegaderm (3M) is a sterile, transparent, breathable adherent dressing used to cover the insertion site of the catheter. This dressing is impervious to liquids and bacteria and therefore is effective in maintaining a catheter. Other sterile wound dressings may be used, depending on the indication for and placement site of the catheter.
Even with aseptic placement and appropriate bandaging, peripheral catheters should remain in place for only 3 days. Daily evaluation of the catheter and insertion site helps prevent phlebitis and detects any problems early. It is helpful to write the date, time, and initials of the technician placing the catheter on the outer bandage as well as on the inner tape. This information ensures that the catheter is replaced in the appropriate time frame.
Placement Technique
Box 2-4 details the placement of IV catheters in a peripheral vein.
Box 2-4 Technique for Placement of a Peripheral Intravenous Catheter
1. Before beginning the placement of the catheter, be sure all supplies are available and readily accessible.
2. Clip an ample amount from the area where the catheter is to be placed. Bear in mind that no component of the catheter and no accessories (e.g., injection cap, end of fluid line) should be resting in hair once the catheter has been placed. When in doubt, shave more than would seem necessary.
3. After clipping, remove all loose hair from the tabletops and dispose of it in the waste can.
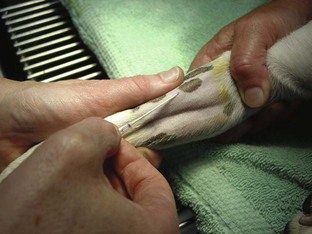
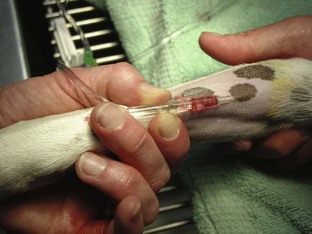
4. To begin, the restrainer should occlude the vessel to be catheterized. Proper restraint must be used to prevent contamination of the prepped catheter site (Figure 2-21).
5. Cleanse the area using a surgical scrub product and rinsing agent combination, either povidone-iodine/70% isopropyl alcohol or chlorhexidine/70% isopropyl alcohol (Figure 2-22). Cotton balls are best used to help prevent depositing excessive amounts of fluid on the area. The target pattern should be used when preparing the area. Begin at the proposed puncture site and move in a circle progressively toward the hair margins. Cotton balls that have left the center of the area must never return to the center. A rinsing agent should be used in the same manner to remove the scrub from the skin. A minimum of three “cycles” of scrub/rinse should be performed. If, however, after the third rinse the skin is still dirty, continue cleansing until the skin is clean. No final prep solution is necessary unless the catheter will be left in place after the surgery is completed. In this case, apply the solution using the target pattern as previously described.
6. Open the catheter using aseptic technique. Remove both the injection plug at the end of the catheter and the cover on the catheter. If the cap at the end of the catheter has a paper filter, the cap may be left in place as the catheter is placed. The filter will allow the blood to “flash back” while preventing excessive bleeding. Take care to avoid touching the exposed catheter.
7. Place the thumb of the nondominant hand parallel to, but not touching, the prepared vessel. The same hand should be holding the leg in extension as well.
8. Hold the catheter at the junction of the catheter and stylet with the thumb and index finger of the dominant hand (Figure 2-23).
9. Ensure that the bevel of the stylet is facing up.
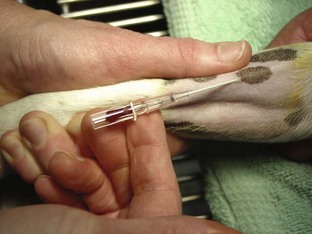
10. Using a 10- to 20-degree angle, quickly penetrate the skin with the catheter and then insert it into the vessel.
11. Check the stylet for blood flow (Figure 2-24). If flow is present, advance both the catheter and the stylet 1 to 2 mm. Check the stylet again. If blood flow is still present, grasp the stylet with the hand that is holding the leg. Using the other hand, advance only the catheter into the vessel (Figure 2-25). (It is possible to use one hand to hold the stylet and advance the catheter; grasp the stylet with the middle and ring fingers while using the index finger to advance the catheter.) Be sure to advance the catheter all the way to the hub. If blood flow is not present, redirect the catheter until blood flow is established.
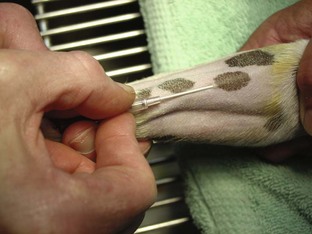
12. Using the other hand, quickly remove the stylet and connect either an injection cap, a T-port, or a fluid administration set to the catheter hub (Figures 2-26 and 2-27).
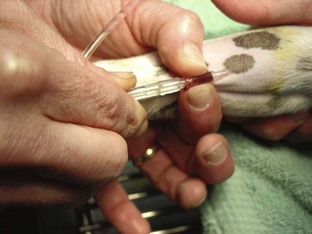
FIGURE 2-26 Attachment of injection port, T-port, or fluid administration set to catheter hub. Note hand placement to stabilize hub.
13. If using a fluid administration set, be sure to turn on the fluids to maintain a patent line. If using an injection cap or a T-port, flush the catheter with 2 mL of heparinized saline. (It may be easier to insert an injection cap, secure the catheter with the first piece of tape, and then hook up the fluid line. The weight of the fluid line may otherwise pull the catheter out.)
14. Use a dry gauze sponge to remove any blood on the clipped area or hair near the catheter.
15. Begin securing the catheter by using a  -inch-wide piece of tape long enough to encircle the limb at least once. Place the tape, sticky side up (Figure 2-28), under the hub of the catheter all the way up to the puncture site. Bring the long side of the tape over the hub (Figure 2-29) and tape all the way around the leg, leaving a tab of tape folded over (Figure 2-30) to aid in removal of the tape when the catheter is removed later. This piece should be snug, but not occlusive, because it is the “anchor” for keeping the catheter in place.
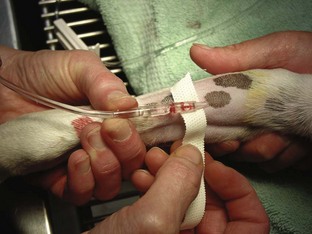
 -inch piece of tape, sticky side up, under hub of catheter.
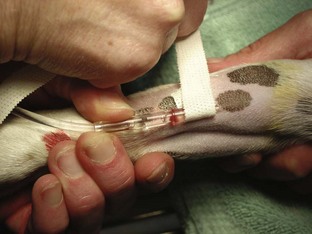
16. Place a 1-inch-wide piece of tape, sticky side down, under the catheter all the way up to the first piece of tape (Figure 2-31). Bring the long side of the tape over the catheter hub and around the leg, securing the hub of the catheter. Be sure the connection of the fluid line and the catheter is not covered.
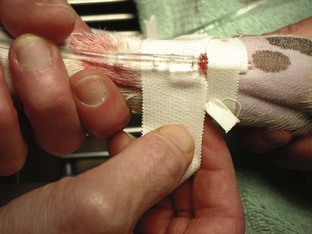
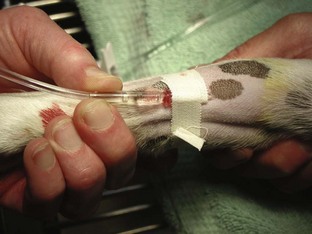
17. The final step in securing the catheter is to use the piece of tape to secure the fluid line with a stress loop (Figure 2-32). When making the stress loop, be sure not to kink the line to impair or obstruct the flow of fluid. Tape the loop to one of the other pieces of tape to ensure that it is secure.
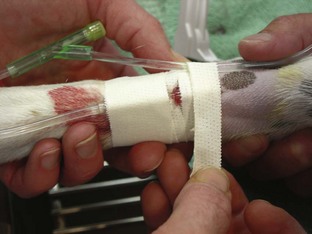
FIGURE 2-32 A stress loop is made by carefully folding a length of the IV fluid line and taping it securely to patient’s leg. The stress loop relieves direct pressure at the connection between catheter (or T-port) and fluid administration set should patient exert tension on administration set, making it less likely that patient will pull the catheter out while shifting positions and moving about the cage.
18. Ensure that the catheter is still patent by checking the limb for any swelling or “blebs.” Generally the fluids will not run if the catheter is not in the vessel. The drip chamber of the fluid administration set can also be observed to see that the fluid is flowing. Another trick to check catheter placement is to place the bag of fluid lower than the patient’s heart and see whether blood flows back into the catheter.
Jugular Catheters
Some surgical patients require intense postoperative critical care. If part of this care requires central venous pressure (CVP) measurements or long-term fluid therapy, a jugular catheter (central line) should be placed.
Supplies
The supplies required for placement of a jugular catheter are similar to those used for a peripheral vein catheter. Jugular catheters are longer, usually 8 to 12 inches, and can be single lumen or double lumen. The extra length is needed to ensure placement of the catheter close to the right atrium of the heart, which is required to measure CVP. Because they are long-term catheters, jugular catheters should always be secured with a sterile bandage in addition to the tape. Antimicrobial ointment, elastic gauze, and elastic tape can be used for the bandage.
Placement
With the animal in lateral recumbency, a large area is clipped over the ventrolateral neck to reveal the jugular vein. The site is aseptically prepared as done for a peripheral catheter. Because these catheters are generally left in place for a longer time, a final “paint” is applied after the last rinse. The person placing the catheter should wear sterile gloves, and a sterile drape should cover the prepared area. Different catheters need to be inserted with different techniques, so it is best to consult and follow the manufacturer’s recommendation for the catheter used.
After the catheter has been placed and is secured, it is essential to maintain the patency of the line. The administration of fluids will aid in ensuring line patency. If fluids are not being administered, heparinized saline should be used to flush the line at regular intervals (e.g., every 6 hours).
Sample Collection
Sample collection from the catheter is easily accomplished and much less stressful on the patient than performing a venipuncture each time a sample is needed. The clinician must keep in mind that residues from medications administered through the catheter could interfere with test results. A three-syringe technique can be used to help decrease the incidence of contaminants in a blood sample collected from an IV catheter. A three-mL syringe is half-filled with heparinized saline, and blood is withdrawn into the syringe from the catheter. This helps clean any contaminants from the catheter. The second syringe is used to withdraw the appropriate sample and place it in the desired collection tubes. Lastly, the original syringe is used to replace the withdrawn blood and flush the catheter with the remaining heparinized saline.
Central Venous Pressure
CVP monitoring is done to assess how well blood is returning to the heart as well as how effectively blood is pumped from the heart. This procedure is helpful in monitoring a patient with right-sided heart failure because blood backs up into the vena cava in such a patient. CVP monitoring also helps to assess overhydration with fluids because as blood volume increases, CVP rises. A water manometer is connected to the catheter to determine the measurement. A normal reading for cats and dogs is less than 8 cm H2O.
Endotracheal Intubation
Endotracheal (ET) tubes are an important piece of anesthetic equipment. They are used for two main reasons: administration of oxygen and inhalation anesthetics and assistance with resuscitative needs.
Components of Tube
All ET tubes have several components (Figure 2-33). It is important to know each of these components in order to use the tubes properly and evaluate the integrity of each tube before use.
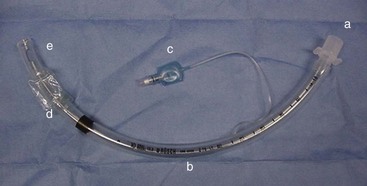
FIGURE 2-33 Endotracheal tube; a, hose connector; b, body; c, cuff indicator; d, cuff; e, Murphy eye.
• The hose connector is found at one end of the ET tube. It connects the tube to the Y-piece, non-rebreathing system, or Ambu bag.
• The body is the major portion of the ET tube. Several numbers may be found on the tube body. The length measurements are in 2-mm increments and identify the length of the tube. The manufacturer’s name may also be seen on the body. The large bold number is the size of the internal diameter in millimeters. The most common tubes are available in sizes ranging from 3.0 to 12.0 mm in 0.5-mm increments.
• The cuff indicator is used to determine the pressure of the cuff on the trachea once air has been infused into the cuff.
• The cuff is present to permit the creation of a leakproof system. Air is infused into the cuff, via the cuff indicator, to ensure a seal between the ET tube and the lumen of the trachea. The cuff prevents the patient from inhaling room air, which would dilute the gas delivered to the patient during anesthesia. The cuff also prevents the patient from exhaling anesthetic gas into the operating room and from aspirating any vomitus while intubated.
• The Murphy eye is found at the tip of the ET tube. It allows airflow in the event that the end of the tube becomes occluded with respiratory secretions (mucous plugs).
Box 2-5 explains how to check an ET tube for leaks before using it in a patient.
Selection of Proper Tube Size
The largest size ET tube possible, without being traumatic, should be used. Generally, tube size is based on a patient’s weight, although palpation of the trachea and experience will aid in this decision. Table 2-4 is provided as a reference. Because of the variability in patient size, multiple tubes should be set aside for possible use and checked for leaks with every patient. An acceptable practice is to choose the size thought to be needed, in addition to a tube 0.5 mm smaller and a tube 0.5 mm larger.
Supplies
Using the proper supplies in the proper manner will significantly increase the success rate of intubation (Figure 2-34).
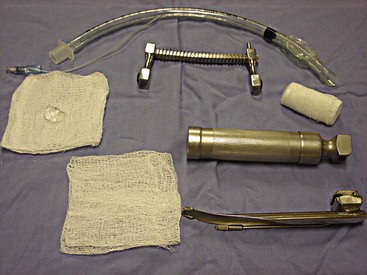
Endotracheal Tube
Both clear and colored ET tubes are available. Although the two types work equally well, the clear tubes have two distinct advantages. First, any type of occlusion in the tube (e.g., blood, mucus) is more easily identified in a clear tube than in a colored or nonclear tube. Second, clear tubes allow visualization of the fog that moves along the lumen of the ET tube as the patient breathes. This is another useful means of quickly confirming that the patient is breathing.
Securing the Tube
A method of securing the tube in place is necessary. Rolled gauze is most commonly used to secure the ET tube to the patient once proper placement has been established. Any width can be used, although 2-inch gauze is most often employed. The gauze should be a nonstretch type, like muzzle gauze. Kling gauze can stretch, leading to tube slippage. The gauze is placed on the tube to indicate the depth of placement of the ET tube in the patient. Another method of securing the tube is using pieces of IV lines or plastic ties. The plastic can be cleaned and used with many different patients; it can also be less “messy” for performing dental procedures. The plastic or tubing is placed in a similar fashion to the gauze. Proper depth of insertion is determined by measuring the tube before placement. Box 2-6 describes the procedure for measuring the tube for proper placement in the patient.
Sterile Lubricant
Sterile lubricant is needed to lubricate the tip and cuff of the ET tube to permit easier passage of the tube through the larynx. The lubricant should be placed on a clean gauze sponge or clean paper towel and then applied to the tube. Water can also be used to lubricate the tube.
Cuff Syringe
The cuff syringe, or “puffer cuffer,” is needed to inflate the cuff of the ET tube. Generally, a 6- or 12-mL syringe is used. It should be readily available throughout the procedure, but the syringe should not be placed in a pocket, out of sight. Securing a syringe case to an accessible area of the anesthesia machine provides reliable storage for constant availability.
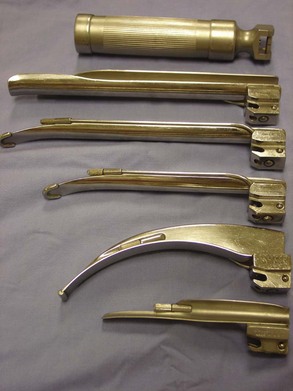
Laryngoscope or Light Source
The use of some type of light source significantly enhances the process of intubation. Easy visualization of the larynx permits greater success of first attempts to intubate. Laryngoscopes are composed of two major parts: the blade and the handle (Figure 2-35). The blade houses the light bulb and can be curved or straight. Curved blades are commonly identified as Miller blades, and straight blades are often called Wisconsin blades. The numbers included in the identification process refer to the length of the blade. The higher the number, the longer the blade. Often, “0” blades work well with cats, No. 1 blades for small dogs, No. 2 for medium-sized dogs, and No. 3 blades for large dogs. The handle houses the batteries that power the laryngoscope. Alternative light sources include floor lamps and overhead lights.
Mouth Speculum
The use of a mouth speculum is not necessary, but its use can be advantageous to some. First, the mouth can be opened wider to allow better visualization, therefore increasing success rates for endotracheal intubation. Second, the speculum prevents the patient from biting the ET tube if the patient transitions into a lighter stage of anesthesia. Third, the speculum helps the restrainer keep the mouth open.
Tube Placement
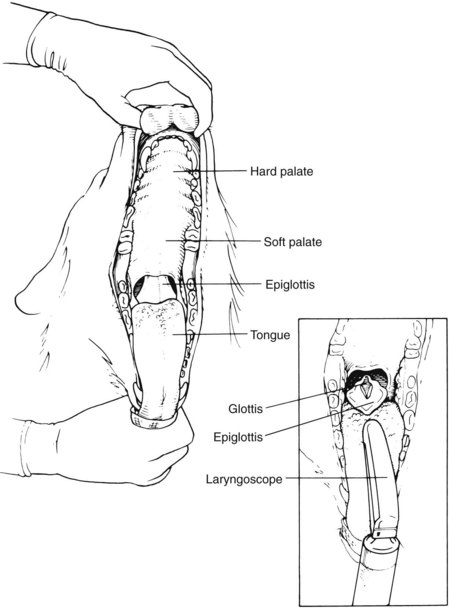
Proper knowledge of the anatomy of the throat is critical to placement of the ET tube. Proper recognition of structures assists in the detection of abnormalities and helps ensure proper placement of the tube. Figure 2-36 displays the anatomy of the throat. When one is viewing the throat, the following structures can be seen: vocal folds, epiglottis, and glottis. The vocal folds are the most lateral structures, located on the lateral edges of the glottis. The epiglottis is a triangular flap of tissue that covers (or protects) the glottis when in the “up” or most dorsal position. The epiglottis must be lying down for intubation to be accomplished. The vocal folds are located on the lateral edges of the glottis. The glottis is the most ventral opening in the throat. The esophagus runs along the dorsal surface of the trachea, just left of center.
One-Person Technique
Box 2-7 describes the technique for performing single-person endotracheal intubation.
Two-Person Technique
Box 2-8 describes the technique for performing two-person endotracheal intubation.
Box 2-8 Two-Person Endotracheal Intubation
1. The restrainer holds the patient in sternal recumbency.
2. The restrainer opens the mouth by holding the maxilla in one hand and the mandible in the other hand.
a. In a dog, the maxilla should be held caudal to the canine teeth.
b. In a cat, the maxilla should be held just caudal to the ear pinna so that the skull is in the palm of the restrainer’s hand.
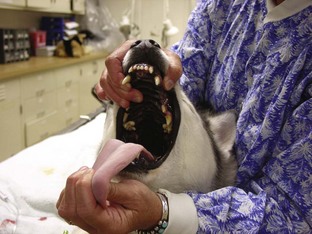
3. The hand holding the mandible grasps the tongue and fully extends it over the mandibular incisors (Figure 2-37).
4. The restrainer lifts the head and extends the neck to aid the intubator’s visualization.
5. Using the laryngoscope, the intubator illuminates the larynx for proper visualization (Figure 2-38).

6. The intubator visualizes the glottis and passes the tube between the vocal folds into the glottis (Figure 2-39).

7. The intubator advances the tube to the predetermined depth as indicated by the preplaced gauze tie.
8. The intubator secures the tube to the patient:
a. For a dog, tie the gauze in a bow on the muzzle (Figure 2-40). The gauze should be snug but should not constrict circulation.
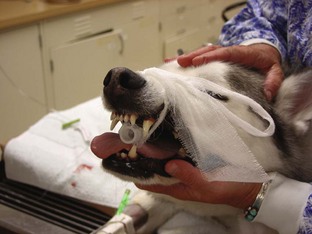
b. For a cat or brachycephalic dog, tie the gauze in a bow caudal to the ears at the base of the skull.
Laryngospasms
Certain species, most often cats and rabbits, experience the phenomenon of laryngospasm during endotracheal intubation. If excessively stimulated, the muscles of the larynx spasm, and the vocal folds clamp shut. Application of 0.05 mL of 2% lidocaine to each vocal fold (dripping the lidocaine out of a tuberculin syringe onto the vocal folds with the needle removed) just before attempting intubation will significantly decrease the occurrence of laryngospasm. Care must be taken with this step because laryngeal paralysis can occur. A safer tactic to avoid laryngospasm is good technique. Repeated stimulation of the area may cause the muscles to spasm, so avoiding unnecessary touching of the area until the tube is actually passed is beneficial.
Confirmation of Proper Tube Placement
The following methods are used to confirm proper placement of the ET tube:
Cough: Many animals cough as the tube is passed into the trachea. Although fairly accurate, this method can be deceiving because as the animal coughs, the ET tube may move off the glottis and into the esophagus as it is advanced.
Fogging in the tube: When an ET tube has been properly placed in the trachea, there should be fogging of the lumen of the tube with each expiration. This method can be employed only if a clear tube is used.
Blowing of gauze or hair: A few strands of gauze or hair placed at the connector end of the ET tube blow away with each expiration if the tube is correctly placed. A disadvantage is that the hair may move from the tube because of excessive movement of room air rather than expiration.
Air movement: If the ET tube is in the trachea, forced air should be felt at the connector end of the tube with each expiration. Bilateral chest compressions can be used with this method to ensure placement. Care must be taken to avoid compressing the abdomen, because an incorrectly placed tube may provide a false-positive assessment.
Palpation: Palpation of the ventral neck should result in the identification of one “tube.” If the ET tube is in the trachea, only one firm, tubelike structure should be felt. If the ET tube is in the esophagus, however, two firm, tubelike structures are palpated.
Whatever method is used to ascertain correct tube placement, it should be performed before the patient is connected to the anesthesia machine. Once the patient is connected to the machine, a double check of placement can be done. Movement of the flutter valves and the rebreathing bag with each inspiration and expiration confirm proper placement. A stethoscope can also be used to auscultate bilateral lung sounds, the presence of which ensures that the tube has not migrated too far down in the trachea.
Once the patient is successfully intubated, the intended surgical site can be prepared.
Patient Preparation
Proper preparation (“prepping”) of the surgical patient is a critical part of the surgical process. The veterinary technician should be the primary staff member responsible for this task. Proper prepping should include the following steps:
• Extremely dirty patients may require a bath before surgery. The bath decreases overall body soil and aids in reducing the risk of postoperative complications from iatrogenic contamination. However, the patient’s hair coat must be completely dry before general anesthesia is induced. Wet animals are at an increased risk of hypothermia while under anesthesia.
• A double check (with the neck ID band, cage card, and medical record) and triple check (with the surgeon) of the patient’s correct identity and exact procedure are made. Cross-check that the consent form has been signed by the client for the correct procedures. If the procedure is an amputation, double-check (with the record and consent form) and triple-check (with the surgeon) that the correct limb is being prepared. Any radiographs taken before anesthesia should be in the surgery room and hung on the view boxes.
Anesthesia Form
The anesthesia form “tells the story” of the anesthesia event from beginning to end. It is an important piece of the patient’s medical record and can serve as a legal document. It can help guide the choice of anesthetic protocols to follow in the future. The anesthesia form documents vital signs and their trends intraoperatively. For example, a graph of the patient’s blood pressure may be a line that goes down over time, with an occasional spike as the procedure proceeds, indicating that the trend for the overall blood pressure is dropping, which is a cause for concern.
The anesthesia form should be filled out completely and accurately, starting the minute the patient is given any premedications. The following paragraphs entail the information typically found in each section of the form.
Demographics
The demographics section records the owner’s name and the patient’s signalment, with date of birth (DOB). The technician should fill in the blanks using the information from the medical record.
Preanesthetic Values and Disposition
The preanesthetic values and disposition section of the anesthesia form records the date and patient’s weight, identifies the clinician, and lists the surgical procedure(s) to be performed, as follows:
Weight: Be sure to enter both pounds (lb) and kilograms (kg).
Procedures: More than one procedure may be done. List the procedures in the order they will be performed.
Preanesthetic values (Pre-anes. values): Temperature (Temp), heart rate (HR), respiratory rate (RR), mucous membrane color and capillary refill time (MM/CRT), packed cell volume (PCV), total protein (TP), renal function, and hydration are the values obtained just before premedication is given.
ASA status: The American Society of Anesthesiologists (ASA) rating system is used to assess a particular patient’s risk for an anesthetic procedure, helping to define the patient’s anesthetic risk category (Table 2-5).
TABLE 2-5
American Society of Anesthesiologists (ASA) Rating System for Anesthetic Risk (ASA Status)*
| Category | Physical Condition | Examples Of Possible Situations |
| Class I: Minimal risk | Normal healthy patient with no underlying disease | Ovariohysterectomy; castration; declawing procedure; hip dysplasia radiographs |
| Class II: Slight risk | Patient with slight to mild systemic disturbances Patient able to compensate; no clinical signs of disease |
Neonatal or geriatric patients; obese patients; fracture without shock; mild diabetes; compensated heart or kidney disease; full-blown estrus |
| Class III: Moderate risk | Patient with moderate systemic disease or mild clinical signs | Anemia; anorexia; moderate dehydration; low-grade kidney disease; low-grade heart disturbances, heart murmur, or cardiac disease; moderate fever |
| Class IV: High risk | Patient with preexisting systemic disease or severe disturbances | Severe dehydration; shock; anemia; uremia or toxemia; high fever; uncompensated heart disease; diabetes; pulmonary disease |
| Class V: Grave risk | Surgery often performed in desperation on patients with life-threatening systemic disease or disturbances not correctable by surgery; includes all moribund patients not expected to survive 24 hours | Advanced cases of heart, kidney, liver, lung, or endocrine disease; profound shock; major head injury; severe trauma; pulmonary embolus |
*ASA recommends that every patient with ASA status of III, IV, or V have a responsible person solely dedicated to managing the patient during the anesthetic period. However, more veterinarians are finding it advantageous to have an anesthetist assigned to all patients under anesthesia.
Preanesthetic disposition (Pre-anes. disposition): Circle the descriptive term that best describes how the patient appears before any premedication is given.
Preanesthetic Drugs
Preanesthetic drugs are usually given IM or SC to relax and sedate the patient. This relaxed state generally allows for a more willing patient when it is time to place the IV catheter and induce anesthesia. The following information should be entered in the preanesthetic drug section:
Drug: Write out full name of drug.
Dose: Write in a weight unit, such as mg. It is important here to avoid units of volume, such as mL, because one drug may be available in different concentrations. Depending on which concentration of the drug is used, the amount of mg in 1 mL of the same drug varies. The important amount to know is how many milligrams of the drug the patient received, not how many milliliters, which depends on the concentration.
Anesthetic Induction
Anesthetic induction drugs are generally given IV and have a rapid onset and short duration. Anesthesia induction should be a rapid and smooth event that brings the patient to a level of anesthesia that allows the patient to be quickly and safely intubated with an ET tube. The following information about anesthetic induction should be noted on the anesthesia form:
Dose: Use a weight unit (e.g., mg) only. Remember that this information cannot be filled in before the drug is given. IV induction agents are given to effect. The desired effect is sufficient muscle relaxation of the jaw and diminished gag reflex such that the patient can be intubated. For example, the calculated IV dose may be 2 mL, but the patient may require only 1 mL for sufficient relaxation to be intubated. The amount of milligrams of induction drug in the 1 mL administered is what needs to be recorded here. This underscores the importance of filling out the dose box after the induction drug is administered. Induction agents given by the IM or PO route are based on the calculated dosage rate.
Route: This is the route of administration of the induction drug.
Time: Note the time the drug was administered. In the case of gas induction, note the time the anesthetic gas was first turned on.
Breathing System
Breathing system: Check that appropriate breathing system is used (non-rebreathing system).
Size of tube: Record size of ET tube used. The size is stamped on the side of the ET tube. If a patient’s medical history includes recent general anesthesia, the anesthesia form for that procedure may help in tube selection for this procedure.
Recumbency: Enter the position in which the patient is placed for the procedure. For example, “LL” may be entered here for “left lateral” recumbency (patient’s left side is in contact with surgery table). Recumbency is important to note, especially if a complication occurs (e.g., nerve paralysis in a limb, burn from heating pads). If more than one procedure is performed, the patient may be in more than one position during this anesthetic period.
Intraoperative Updates
It is important to keep the anesthesia form as current as possible throughout the surgical procedure. Record all information every 5 minutes (heart and respiratory rates, level of anesthetic, oxygen flow rate, patient’s depth of anesthesia); fluids need to be updated every 15 minutes.
Figure 2-41 describes the graph component of the anesthesia form.
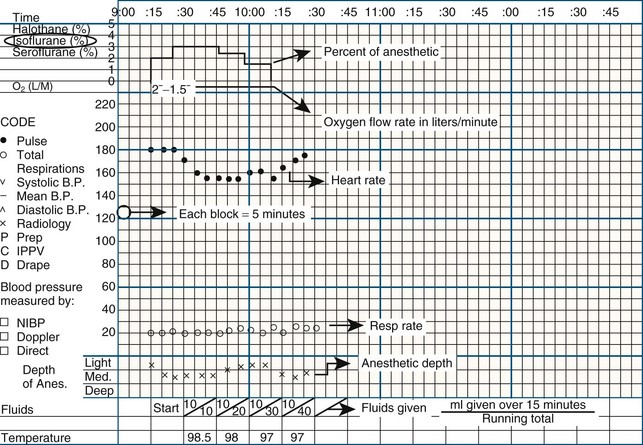
FIGURE 2-41 Graph component of the anesthesia form.
Time: Each block (or small square) represents 5 minutes. If “start anesthesia” time is 9:15, start recording all the parameters at the 15-minute mark (see graph).
Percentage of anesthetic: A record of the percentage of anesthetic gas being delivered to the patient. It corresponds to the settings on the vaporizer (%).
Oxygen flow rate: A record of the flow of oxygen throughout the procedure. This corresponds to the rate of flow at which the flowmeter is set on the anesthesia machine.
Heart and respiratory rates: Record every 5 minutes. See “Code” at far left.
Anesthetic depth: Subjective assessment of the patient’s depth of anesthesia graphed over time reveals whether the patient may be “getting light” or “getting too deep” for the specific procedure. Assessment is affected by trends in heart and respiratory rate, pupil position, and presence or absence of reflexes.
Fluids given: A record of how many milliliters (mL) of fluid the patient received throughout the procedure. Top number is the number of mL give over 15 minutes (mL/hour divided by 4). Bottom number is a running total of how much the patient has received at that particular point in the procedure, again in 15-minute blocks. First box is usually written as “start,” but “0/0” is also acceptable.
Temperature: Is measured every 15 minutes; however, you may not be able to obtain a body temperature measurement once the procedure has started and the patient has been draped.
Hair Removal
Once the patient has been stabilized under anesthesia, the process of clipping may begin. It is ideal to have the patient positioned for the preparation in the same way as for the procedure (Figure 2-42). Although this may be easily accomplished (for an exploratory laparotomy) or may be more of a challenge (perineal surgery), it is an important step to ensure an appropriate “prep” of the surgical area can be accomplished. Except in an emergency, it is recommended that the anesthetist be comfortable with the patient’s level of anesthesia before any manipulation begins. Emergency procedures are more critical and time is of the essence; therefore the anesthetist may not have the patient at the ideal anesthetic depth before the prep begins. While waiting for the nonemergency patient to stabilize at the appropriate anesthetic level, the surgery technician (frequently the circulating nurse) can complete some of the prep tasks, such as securing the leg ties to the patient and manually expressing the bladder.
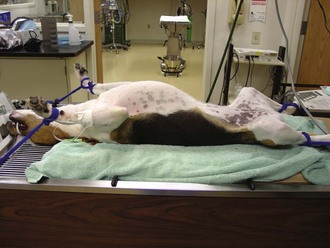
The area of hair clipped needs to be neat, tidy, and symmetric (Figure 2-43). The client’s impression of the clip’s appearance may influence the client’s impression of the entire clinic and staff. Clipping should be done only with a surgical clipper blade. This design has close-set teeth to achieve the closest possible shave. When clipping, the person performing the clip needs to hold the clippers in a pencil grip (Figure 2-44). This grip permits the greatest amount of control and maneuverability. Other grips will prove to be cumbersome and may strain the wrist and arm. The clipper should be held flat against the patient’s skin for the closest shave. The hand not holding the clipper can tense the skin to encourage as easy a movement as possible for the clipper (Figure 2-45).
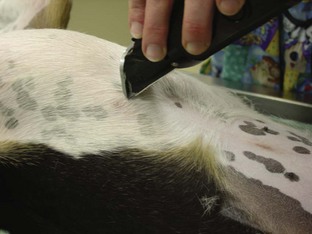
FIGURE 2-43 Holding clipper at 90-degree angle to skin creates an even, neat margin for clipped area.
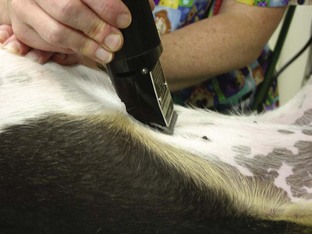
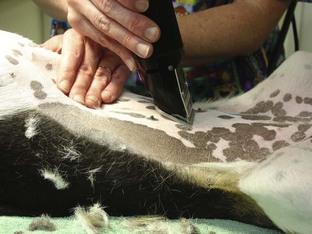
Alternative hair removal products are not routinely used in veterinary surgery. Depilatories generally are not effective given the length of the hair. Using a razor after the initial clipping may provide a close shave, but there is a high risk that it will cause skin trauma.
The amount of hair to be removed depends entirely on the surgery being performed. For general soft tissue surgery, a good rule of thumb is to clip two (2) clipper-blade widths in every direction from the proposed incision site. However, depending on the size of the animal, its length of hair, and the procedure being done, the clip may be altered. For example, a gastrotomy will require a very different clip than a prostatic biopsy. The technician should be sure to check with the surgeon for any special circumstances or anticipated additional procedures. Preoperative clipping and prepping need to include preparations for any ancillary procedures that may be done (e.g., chest tube placement, drain placement, feeding tube placement). Table 2-6 provides clipping guidelines for specific procedures.
TABLE 2-6
Clipping Guidelines for Selected Soft Tissue Surgical Procedures
| Soft Tissue Procedure/Area | Guidelines |
| Exploratory laparotomy | Mid-sternum to pubis; laterally to edge of ribs |
| Gastric, liver, splenic | Mid-sternum to pubis; laterally to edge of ribs |
| Urinary bladder | Umbilicus to caudal pelvis; laterally to edge of ribs |
| Kidney | Mid-sternum to pubis; laterally to edge of ribs |
| Prostate | Umbilicus to caudal pelvis, including prepuce; laterally to edge of ribs |
| Uterine, ovarian | Xiphoid to pubis; laterally to edge of ribs |
| Ventral neck | Cranially to mid-mandible; caudally to thoracic inlet; laterally to commissure of lips |
Orthopedic preps use the rule of thumb of clipping the limb from the joint distal to and the joint proximal to the surgical incision. The limb needs to be clipped circumferentially to allow complete limb draping and manipulation. As with soft tissue procedures, the rule for clipping may need to be adjusted according to the patient’s size, the surgeon’s preference, and additional procedures to be performed (e.g., bone graft harvest, drain placement). Tables 2-7 (forelimb) and 2-8 (hind limb) provide clipping guidelines for most orthopedic procedures.
TABLE 2-7
Clipping Guidelines for Selected Forelimb Orthopedic Procedures
| Forelimb Area | Guidelines |
| Digit | Nails to mid-humerus; use towel clamp through nail to suspend limb |
| Metacarpal | Nails to mid-humerus; use towel clamp through nail to suspend limb |
| Carpus | Second metacarpal to mid-humerus |
| Radius, ulna | Mid-metacarpals to shoulder; ventrally to midline; cranially to thoracic inlet; caudally to seventh rib |
| Elbow | Carpus to dorsal midline; ventrally to ventral midline; cranially to thoracic inlet; caudally to seventh rib |
| Humerus | Carpus to dorsal midline; ventrally to ventral midline; cranially to base of neck; caudally to seventh rib |
| Scapula | Mid-radius to 2 clipper-widths past dorsal midline; cranially to base of neck; caudally to tenth rib |
TABLE 2-8
Clipping Guidelines for Selected Hind Limb Orthopedic Procedures
| Hind Limb Area | Guidelines |
| Digit | Nails to mid-femur; use towel clamp through nail to suspend limb |
| Metatarsal | Nails to mid-femur; use towel clamp through nail to suspend limb |
| Tarsus | Second metatarsus to mid-femur |
| Tibia, fibula | Mid-metatarsals to hip; ventrally to midline; cranially to last rib |
| Stifle | Tarsus to hip; cranially to last rib; caudally to tuber ischii |
| Femur | Tarsus to dorsal midline; cranially to last rib; caudally to tuber ischii |
| Hip | Tarsus to 2 clipper-widths past dorsal midline; cranially to last rib; caudally to tail head |
| Pelvis | Depends on area of pelvis to have surgery (ilium vs. pubis vs. ischium); consult surgeon |
Neurologic surgical patients are usually quite easy to clip, especially when the surgical site is a caudal thoracic or lumbar vertebral space. Clipping two vertebral spaces cranial and two vertebral spaces caudal to the affected site is usually adequate. As with other surgical procedures, communication with the surgeon is critical to ensure adequate prepping of the neurologic surgical patient. Particularly in the event of a cervical vertebral procedure, the technician should be sure to ascertain whether the surgeon will make a ventral or dorsal incision. If multiple intervertebral spaces are affected, clipping should extend from the most cranial to the most caudal space affected. Table 2-9 provides clipping guidelines for neurologic surgical procedures.
TABLE 2-9
Clipping Guidelines for Selected Neurologic Procedures
| Vertebrae | Guidelines |
| Cervical: ventral approach | Mid-ventral mandible to mid-sternum; laterally to halfway between dorsal and ventral midline |
| Cervical: dorsal approach | Mid-skull to two vertebral spaces caudal to affected space; laterally to halfway between dorsal and ventral midline |
| Thoracic | Two vertebral spaces cranial and caudal to affected space; laterally to edge of transverse process |
| Lumbar | Two vertebral spaces cranial and caudal to affected space; laterally to edge of transverse process |
Some procedures may fall into either the soft tissue category or the orthopedic category, depending on the reason for surgery. For example, aural surgeries are generally considered soft tissue, but if a bulla osteotomy is done, it is more of an orthopedic procedure. Likewise, facial surgery is soft tissue surgery if it is a tumor removal or nasal procedure, but if there is maxillary or mandibular involvement, the procedure is considered orthopedic. Table 2-10 provides guidelines for clipping for these types of surgical procedures.
TABLE 2-10
Clipping Guidelines for Miscellaneous Surgical Procedures
| Procedure/Area | Guidelines |
| Aural | Lateral canthus of eye; dorsal midline on head and neck; ventrally to ventral midline |
| Ophthalmic: intraocular | Trimming of eyelashes; limited skin clip because of potential irritation |
| Ophthalmic: extraocular | Entropion, ectropion: one clipper-width past lateral canthus, lower lid, and medial canthus Enucleation: midline of muzzle to cranial edge of ear pinna; dorsally to midline; ventrally to commissure of lip |
| Facial | Procedures vary widely among nasal, maxillary, and mandibular; best to consult surgeon |
| Perineal | Dorsally to tail head; laterally to tuber ischii (bilaterally); ventrally to mid-thigh (caudal aspect) |
After clipping, the patient and the area must be thoroughly vacuumed (Figure 2-46). The hair removed from the animal must be cleared from the surgical site as well as from the work area. Loose hair can be a source of contamination in the surgery room, so it is important to avoid transporting any hair into the surgical suite. Brushing away loose hair from the clipped site with a hand is not as effective as vacuuming (Figure 2-47).
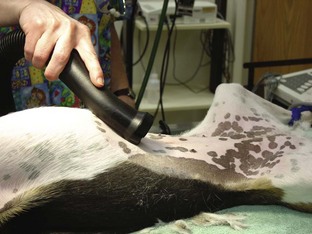
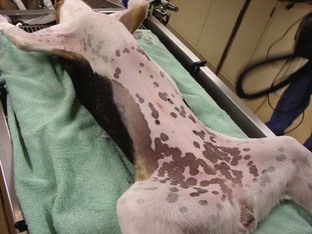
Urination
The urinary bladder should be emptied independently by the animal or manually by the technician before the surgical prep. Caution should be used if the abdomen has been traumatized or if the procedure will involve the urinary bladder. Expression of the bladder may be contraindicated and may do more damage to the bladder in these situations. The technician may contact the surgeon either to request permission to attempt manual expression or to state that the bladder was not expressed. The patient undergoing nonabdominal surgery must also undergo bladder emptying if possible. Otherwise, the patient may urinate during the surgical procedure, soaking the table linens as well as the patient’s hair coat and skin. Lying in urine for any period exposes the patient to the risk of “urine scald” (the moist, irritating effect of urine in contact with the skin). Even if the animal does not urinate during the surgery, it will probably do so during recovery. The patient soaked in urine is at increased risk not only of urine scald but also of contamination of the surgical wound with urine. For patients that will require critical care nursing postoperatively, a urinary catheter may be placed to prevent these problems.
The bladder can be expressed with the patient either in dorsal or in lateral recumbency. Some type of receptacle should be used to collect the expressed urine to avoid saturating the fur with urine or having the urine pool under the animal. During expression of the bladder, care is taken to use gentle, constant pressure rather than a pulsating action.
Surgical Site Preparation
The skin of a patient cannot be “sterilized,” in the true definition of the word, but reducing the contaminants on the skin can greatly reduce the risk of wound infection. Multiple options exist for the products used to prep the patient as well as for the applicators used to apply these products. The use of the particular cleansing products, in a particular fashion and in a particular order, is done to render the skin as clean as possible by eliminating or decreasing as many of the skin flora as possible.
Antiseptics
The first product used in the preparation of the patient is a “scrub” product. This solution has a soap or detergent base and therefore creates a sudsy appearance when used. Some properties of the scrub product are desired for maximum effect. Although no available scrub product has all the desired qualities to achieve maximum effect, the choice of product should contain as many of these qualities as possible.
One product available for use as a patient scrub is povidone-iodine. This scrub is an iodine-based product that has a detergent and a wide spectrum of antimicrobial activity. Povidone-iodine is bactericidal, virucidal, fungistatic, and fungicidal. Its toxicity to tissues is relatively low, and it is inexpensive and readily available. Because of the iodine base, it does stain clothing and discolor the white hair of animals. Povidone-iodine has a better residual activity level than hexachlorophene but is not as effective as chlorhexidine. The povidone-iodine scrub is generally diluted 50 : 50 with tap water when used.
Chlorhexidine gluconate is another scrub product available. Its residual effect is the best of any available product, and it works well in the presence of organic material. Chlorhexidine has shown bactericidal action against 30 bacterial genera, including E. coli and Pseudomonas species. It also has demonstrated virucidal and fungicidal properties. Chlorhexidine scrub has relatively low tissue toxicity, except for mucous membranes. Although it is more expensive than other products, it does have the advantage of not staining. Chlorhexidine is generally used in a 60 : 40 dilution with tap water.
Rinsing Agents
After the application of a scrub product, a rinsing agent is needed to remove the detergent. A common rinsing product is 70% isopropyl alcohol, which is effective against most gram-negative bacteria. Alcohol coagulates protein, contraindicating its use on open wounds and mucous membranes. Isopropyl alcohol is generally well tolerated by patients, and it is inexpensive and readily available. Alcohol can be used with either povidone-iodine or chlorhexidine scrub. Residual properties of the chlorhexidine seem to be enhanced when it is used with 70% isopropyl alcohol, whereas povidone-iodine does not show any increase in residual activity.
Alcohol’s tendency to evaporate rapidly is both an advantage and a disadvantage. The advantage of rapid evaporation is the ability to move quickly through the prepping process without diluting subsequent products. The extreme cooling effect that results from rapid evaporation is a disadvantage. Use of excessive amounts of alcohol to prepare the patient can significantly contribute to the hypothermia experienced by the anesthetized patient. Alcohol that is allowed to pool under an animal or saturate the fur can contribute to the risk of thermal burn if electrocautery is used. Therefore, alcohol should not be used as a rinsing agent if electrocautery will be used intraoperatively.
Another rinsing agent available is bottled sterile water or sterile saline. Sterile water or saline is effective at removing the detergent product, although it has no antimicrobial properties itself. For prepping of open wounds, compound fractures, or mucous membranes, this is the rinsing agent used. Because 70% isopropyl alcohol is not appropriate in certain situations, sterile water or sterile saline is a practical and reasonable alternative.
Applicators
Regardless of the prepping products used, applicators used can vary widely depending on the site being prepared. The most common applicator used is a gauze sponge. Sponges can be used individually as needed and saturated with the product by squirting the liquid from a bottle onto a dry sponge, or sponges can be mass-produced and stored in jars or plastic containers. If mass-produced, the prep sponges and the containers need to be dumped and cleaned weekly to inhibit the growth of contaminants. It is best to place the sponges needed in a separate, smaller container (e.g., “weigh boat”) to avoid reaching into the large storage container with dirty hands.
As applicators, cotton balls usually are practical only when prepping small areas, so their use is limited. Cotton balls would be indicated for IV catheter sites and perhaps ophthalmic procedures.
Similarly, a cotton-tipped applicator is usually chosen only for intraocular procedures. The limited amount of preparation needed for the eye can be best accomplished with the delicate control provided by a cotton-tipped applicator.
A spray bottle is an appropriate “applicator” only for application of the final “paint” solution (e.g., povidone-iodine). This is an efficient method of application but can be messy. The mist from the spray bottle can easily be deposited on the patient’s skin as well as other areas. Monitoring devices, table linens, and even the rest of the animal may be covered with a mist of paint solution.
Special Male Dog Preparation
In preparation of the abdomen of a male dog, one task must be done before the surgical site prep is started. After all the hair has been removed from the prepuce, the sheath must be flushed to remove potential contaminants, as follows:
1. Combine 1 mL of povidone-iodine solution with 9 mL of tap water.
2. Insert the syringe tip into the prepuce and inject 5 mL of solution (Figure 2-48). Pinch the prepuce around the syringe tip before removing the syringe.
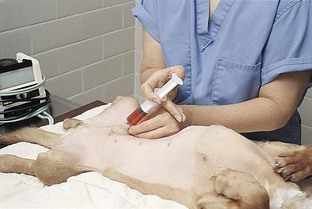
FIGURE 2-48 Prepuce of a male dog should be flushed before surgical site is prepared for abdominal procedure. (From Fossum TW, Hedlund CS, Hulse DA, et al: Small animal surgery, ed 3, St Louis, 2007, Mosby.)
3. While still pinching the prepuce closed, gently massage the solution in the prepuce.
4. Place a towel over the end of the prepuce to absorb the solution.
5. Release the pinch hold on the prepuce.
6. Repeat the process with the remaining 5 mL of solution. This step is required only for intra-abdominal procedures when the prepuce will be in the draped surgical field.
Patterns for Scrubbing
Depending on the area of the body that is undergoing surgery, one of three patterns of action should be used to prepare the site: target, orthopedic, or perineal.
Target Pattern
The most common pattern is the target pattern, which resembles a target or bull’s-eye. This pattern is primarily used to prepare surgical sites for abdominal, thoracic, and neurologic procedures. The prep begins after the hair has been removed by the clipper and vacuumed from the area. The first step is to take one of the rinsing sponges and wipe around the periphery of the clipped margin. This action moistens the hair and flattens it down, helping to keep the hair from flying onto the clipped area once the prep begins.
To begin preparation of the surgical site, pick up one scrub sponge and fold it in half and then in half again, or bring all four corners to the center and hold the sponge by the corners. Either method produces a smaller contact surface that will be easier to control. Always start at the proposed incision site (Figure 2-49), and then move the sponge progressively outward in a circle until the hair is reached (Figure 2-50). Excessive pressure is not encouraged because it may abrade the skin; the wound may be more prone to healing complications if the dermal layer is compromised. Once the hair or any other dirty or contaminated area has been touched with the sponge, the sponge must never return to the incision site.
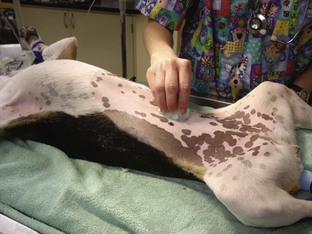
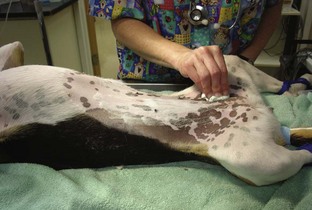
The surgical site should be rinsed with 70% isopropyl alcohol. The same target pattern should be used with the alcohol rinsing sponges as with the scrub sponges (Figure 2-51). The process of scrub, then rinse should be performed a minimum of three times. If, dirt is still present with the last rinse, repeat the process until the last rinse gauze is clean.
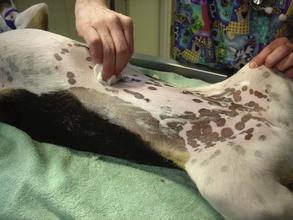
Orthopedic Pattern
The second prep pattern is used with orthopedic procedures. After the hair has been removed from the surgical site (Figure 2-52), any hair remaining on the foot must be covered. An inverted examination glove is placed over the foot (Figure 2-53) and secured with tape (Figure 2-54). To avoid a tourniquet effect, be sure the tape is not applied too tightly. Cover with tape (or Vetrap), again not too tightly. Also, make a stirrup to allow suspension of the limb for preparing and draping; take a long piece of white tape (≈2-3 feet), leaving 2 to 3 inches at either end, then fold the remainder of the tape on itself to make it  inch wide. Place the ends of the stirrup on either the medial and lateral or the anterior and posterior sides of the gloved foot. Secure the stirrup to the foot with tape (Figure 2-55). The limb should be suspended for the preparation to allow access to all surfaces of the limb. Place the stirrup over the hook of an IV pole and then fully extend the pole to elevate the limb (Figure 2-56). In the event of a fracture, it is imperative that the limb and bones be supported as the pole is extended. With fractures, the extension of the limb may actually provide some distraction and traction to fatigue the muscles, which will aid in reduction of the fracture. Once the limb is suspended, clipping can be completed (Figure 2-57), and the scrub prep can begin.
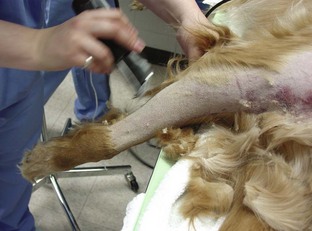

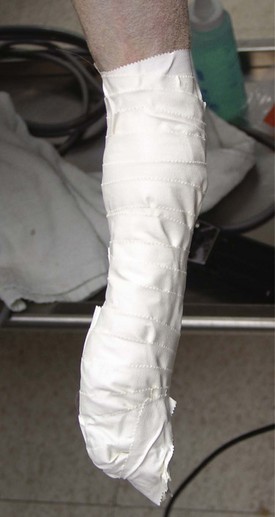
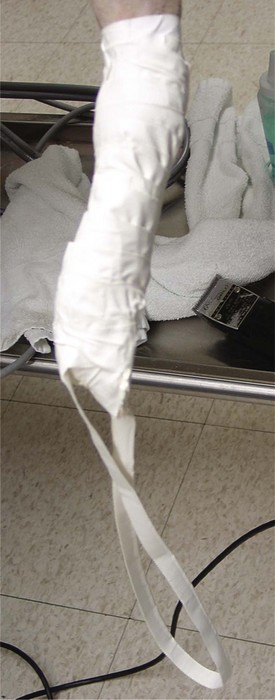
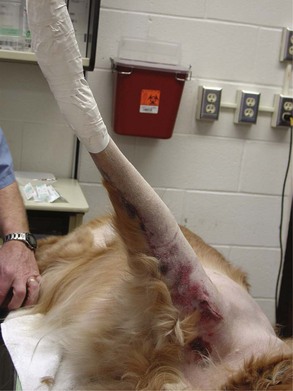
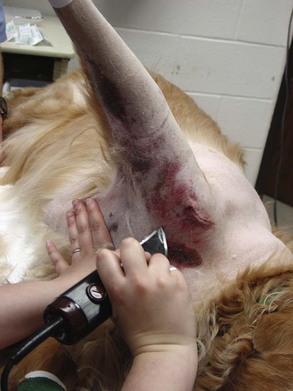
With a scrub sponge in hand, begin the prep at the tape edge of the suspended limb. Scrub the limb from distal to proximal, moving circumferentially around the limb. As the sponge dries out, discard it and continue with a new sponge. As with the target pattern, the wrist must be kept moving to provide the scrubbing action. Repeat the scrub a minimum of three times before rinsing to achieve the best antimicrobial efficacy. The rinsing agent is applied in the same pattern, starting at the taped foot and moving proximally to the dorsal midline (Figure 2-58). Generally a final solution is not applied because another prep will be done once the patient is positioned on the surgery table.

After the final rinse, place a clean towel over the medial surface of the “down” limb. This provides a clean surface on which the prepped limb can lie. The final prep is performed in the surgery room, so the towel only needs to be clean, not sterile. Carefully lower the limb, supporting any broken bones, to the towel (Figure 2-59). The patient is now ready to be transported to the surgical suite.
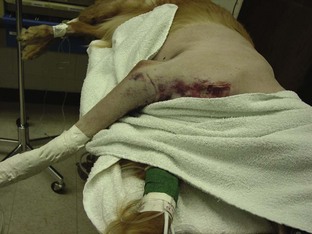
Perineal Pattern
The third pattern that can be used is that for perineal surgery. It is important that a purse-string suture be placed in the anus before the preparation is begun. This suture prevents the evacuation of fecal material onto the surgical site during the procedure. The purse-string suture needs to be placed carefully to avoid puncturing the anal glands. It is the technician’s responsibility to ensure that the suture is removed after the procedure; a reminder note on the anesthetic monitoring sheet helps the technician remember this task.
The perineal pattern is basically three separate target patterns performed in a particular sequence. The first step is to do a target pattern on the clipped area to the right of the anus. The second step is to perform another to the left of the anus, and the third pattern is done on the anus itself. The “dirty” area should always be prepared last to minimize contamination. As with other patterns, the scrub is followed by a rinsing agent.
Potential Reactions
If dull clipper blades are used or the technique is harsh, clipper burn can occur. Clipper blades should be checked before use for chipped or missing teeth, rust, and other inhibitors of performance. Such inhibitors will pull on the skin and can cause clipper burn. Using excessive pressure with the clippers can also cause clipper burn. Irritation of the skin can inhibit wound healing if the irritation is over the proposed incision site. Irritation can also promote bacterial growth, which could cause an infection. Clipper burns on the peri-incisional skin can be an irritation to the animal, promoting excessive licking, which can also compromise the healing process.
Chemical-Related Reactions
Reactions to prepping products generally manifest as plaques or wheals. Certain breeds (Labrador, Shar Pei) seem more prone to these reactions, although any breed may be affected. Povidone-iodine tends to cause more reactions than chlorhexidine. If a patient has a chemical-related reaction, a notation should be made in the medical record so that an alternative product can be used the next time.
Initial Preparations And Positioning
Finishing Preparation of Surgical Site
The final sterile scrub is performed in the surgical suite after the patient has been positioned appropriately on the surgery table. It is difficult, if not impossible, to maintain asepsis of the intended site when moving the patient from the prep area into the surgical suite. Contaminated clothing or personnel will likely have some contact with the intended surgical site during transfer and positioning of the patient, so the final sterile scrub is performed after the patient is positioned. Details for the final sterile scrub are covered later in this chapter. The patient needs to be positioned and secured appropriately to provide adequate exposure of the surgical site and sufficient access to the patient for monitoring vital signs.
Securing Patient in Position on Surgery Table
Properly securing the animal to the table aids in the aseptic preparation of the surgical site and ensures that the surgeon has an immobile subject with adequate room for working. The techniques used are dictated by the surgical procedure. The animal’s limbs may be tied to the table. The body may be braced in position by a V-trough or sandbags. The head, neck, or abdomen may need to be elevated through the use of a foam rubber tube or rolled towels. The patient’s legs should not be forced to bend or extend beyond their natural anatomic limitations. Bony prominences should be cushioned to protect against excessive compression.
The use of a sturdy, flexible cord is common practice for securing the animal’s limbs in position to the table. Most surgery tables are fitted with four stays (supports) located near the corners of the table. Some tables have adjustable stays that are capable of sliding and thus accommodating patients of various sizes. The end of the cord can be wrapped in a figure-eight fashion around the stay with a half-hitch loop to secure the cord in place. It is important to tie the cord to the table with a quick-release method because the patient may need to be untied quickly. The cord should be wrapped around the stays only two or three times, and then locked with a half-hitch loop at the end (Figure 2-60). If the surgery table does not have stays to secure the cords, they can be tied to each other under the tabletop. The knot used should be a quick-release knot such as a bow tie (Figure 2-61).
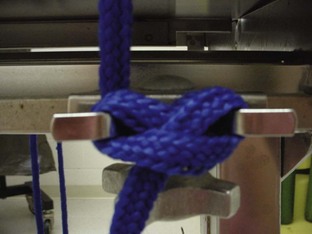
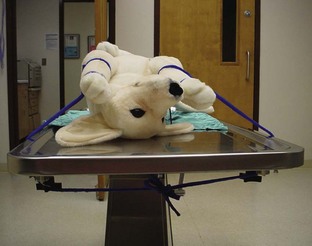
FIGURE 2-61 Two half-hitch loops are placed on each foreleg; then the end of each rope is extended underneath the tabletop and tied with a bow tie.
It is best to spread out the distribution of pressure around the limb by placing two half-hitch loops, one proximal to and the other distal to the elbow, carpus, or hock (Figure 2-62). If the animal has a catheter in its leg, both loops should be placed distal to the catheter. The tie may prevent the administration of fluid to the animal during the procedure if the cord loop is placed proximal to the catheter. The paws should be checked throughout the surgical procedure. If the paw becomes swollen or the toes feel unusually cold compared with the opposite paw, the ties are too tight and are cutting off circulation to the paw. In this situation the cord needs to be loosened and repositioned.
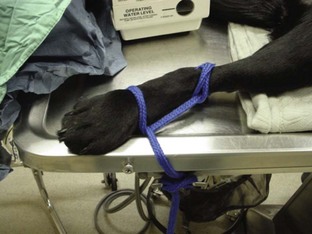
FIGURE 2-62 Two half-hitch loops are tied around the limb. This technique distributes the pressure on the limb evenly between the two hitches. Care is taken to keep all the joints of the leg in anatomic alignment; that is, the limb is not forced into an unnatural position that may strain or torque the joints.
Positioning for Specific Procedures
For abdominal procedures the patient is placed in dorsal recumbency and secured by all four legs to the table. Keeping the patient in perfect dorsal recumbency is a challenge in the animal with a deep-chested conformation. Deep-chested dogs need to be placed in a V-trough or braced up by sandbags (Figures 2-63 and 2-64). Some surgery tables are designed with built-in adjustability to form a V-trough (Figure 2-65). Another technique to keep the patient balanced on the table involves tying the forelegs crossed over the chest (Figure 2-66).
Castration
For canine castration, the veterinary surgeon may prefer dorsal recumbency or a modified version of this position. For modified dorsal recumbency, the hind legs are secured to the table. The forelegs are not tied, and the cranial half of the dog rolls toward the side on which the surgeon stands (Figure 2-67).
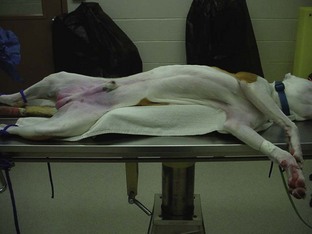
For feline castration, the cat is placed in dorsal recumbency with the hind legs pulled toward the head. The legs may be taped into position, held by the assistant, or tied to the surgery table (Figure 2-68).
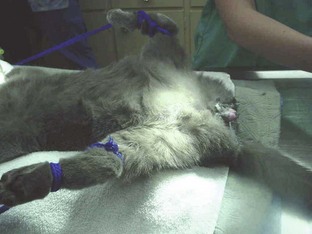
Orthopedic and Extremity Surgery
The patient is placed in lateral recumbency for procedures involving the extremities. If the left limb is the focus, the patient is positioned in right lateral recumbency. If the right limb is the surgical site, the patient is placed in left lateral recumbency. The paw is wrapped in gauze and tape. The limb is suspended from above by tying the tape around the paw and tying the tape to an IV pole. The leg is clipped and scrubbed in this position. All sides of the leg are prepared (Figure 2-69).
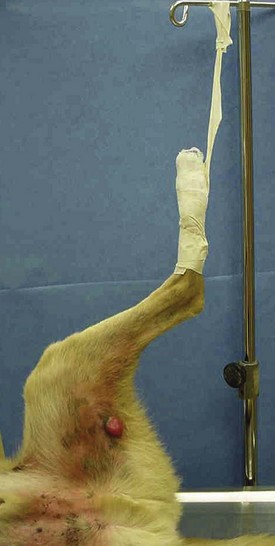
Tail and Perianal Surgery
The patient is placed in ventral recumbency for procedures involving the tail or perianal area. The forelegs are secured to the table, with the hind legs hanging over the edge at the end of the table. A rolled towel is placed under the caudal abdomen for extra padding. A piece of adhesive tape is placed in a spiral on the tail, with a long extension of the tape attached above to an IV pole or other object (Figure 2-70).
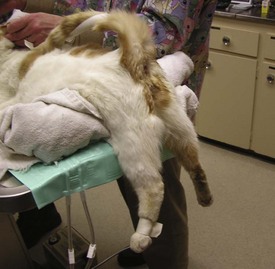
Back Surgery
The patient having back surgery is placed in ventral recumbency. Positioning in a V-trough or placing sandbags on both sides helps brace the patient and prevents listing to one side. The forelegs are extended cranially. The hind legs are bent in a natural sitting or squatting position. A strip of adhesive tape may provide additional stabilization across the shoulders (Figure 2-71).
Final (Sterile) Surgical Site Preparation
Once the patient has been transported and appropriately positioned on and secured to the surgery table, the final surgical prep is performed in the surgical room. The area is scrubbed and rinsed as described early in the chapter. In some university or specialty clinic settings, the doctor may wish the final prep to be performed sterilely (i.e., applied by the sterile surgical assistant); however, in most small animal settings this is not the case. Box 2-9 lists the procedure for a sterile final prep.
Solutions (“Paint”)
The final step in the surgical site preparation is the application of the solution product, or “paint.” Povidone-iodine solution is in the same chemical family as the scrub, but the paint does not contain a detergent. The solution also has a stronger concentration of iodine, therefore increasing its potential for staining. It is corrosive when it contacts metal. The full-strength solution is applied to the patient and remains on the surgical site. It has much better efficacy when allowed to dry on the patient’s skin before the drapes are applied or the incision is made.
A second current option for a final solution is chlorhexidine gluconate. As with povidone-iodine, chlorhexidine as a solution contains no detergent. This product is diluted to a 0.2% solution (30 mL/gallon of distilled water) when used as a final paint. Chlorhexidine also has better efficacy when allowed to dry on the patient’s skin before the incision is made.
It is important to remember that only povidone-iodine scrub should be followed by povidone-iodine solution. Likewise, only chlorhexidine scrub should be followed by chlorhexidine solution. Using a povidone-iodine scrub with a chlorhexidine solution, or vice versa, is counterproductive and strongly discouraged.
Regardless of which product is used, the same method of application is utilized. The first squirt from the spray bottle should be directed into the kick bucket. This removes any debris and bacteria from the nozzle. Then, using a swiping motion, the technician applies a light mist from the spray bottle to the center of the proposed surgical site, and allows it to dry.
Techniques For Maintaining Body Temperature
Ideally, if the surgical suite has been thoroughly prepared for the day’s procedures, any devices available to help maintain the surgical patient’s body temperature will have been turned on and allowed to warm up before the patient is moved into the surgery room. It is preferable to place a patient on a warming device rather than arrange a warming element underneath a patient already positioned on the surgery table.
Several factors contribute to hypothermia in the surgical patient (see Chapter 5). The following devices and techniques should be used as available and appropriate to prevent hypothermia:
• A pad with circulating warm water is placed under the patient as soon as the animal is under anesthesia. Electric heating pads can become too hot and can burn the patient’s skin and therefore should not be used. The circulating warm-water pad avoids the risk inherent with electric heating pads because the water is constantly circulating between the pad under the patient and the warming unit (see Figures 2-72 and 2-73). Water bottles do not provide a constantly renewable source of heat and also carry the risk of leaking. A wet patient can quickly become a cold patient.
• Warm-air convection blankets consist of an electrical unit that warms air and pumps it through a tube to a pad. The pad has a series of holes that allows the warm air to escape slowly. The pad is laid on top of the patient, or the patient rests on top of the pad; this creates a warm microenvironment. When used for the surgical patient, the unit is not activated until the surgeon has completed draping the patient (Figure 2-74).
FIGURE 2-74 Convection-current patient-warming system (Gaymar Industries, Inc., Orchard Park, NY). The disposable blanket is lying on top of the patient. Air is warmed and pumped into the blanket, through which the warmed air slowly diffuses around the patient.
• Some stainless steel surgery tables are fitted with heating coils that warm the entire surface of the table to approximate body temperature. The need for warm-water blankets and bottles is eliminated while the patient is on the heated surgery table.
• The SnuggleSafe Microwave Heat Pad (SnuggleSafe, Lenric C21 Ltd., Littlehampton, West Sussex, UK) is a flat plastic disc that is placed in a microwave oven for a set number of minutes. This disc retains heat much longer than warm water bottles (Figure 2-75).
FIGURE 2-75 SnuggleSafe Microwave Heat Pad (SnuggleSafe, Lenric C21 Ltd., Littlehampton, West Sussex, UK).
• A plastic bottle (e.g., soda bottle) can be filled with dry, uncooked rice and heated in a microwave oven. The bottle with rice holds heat longer than a water bottle and eliminates the risk of leaking water on the patient.
• The bag of IV fluids can be warmed in a microwave oven to approximately the same temperature as body temperature. The line for the IV administration set can run through a bowl of warm water to make the fluid warmer before going into the patient.
• Plastic bubble wrap can be wrapped around the patient’s extremities, including the head. The plastic wrap is light but provides warmth by retaining the body heat that would be lost through the extremities (Figures 2-76 and 2-77).
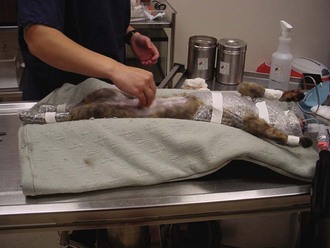
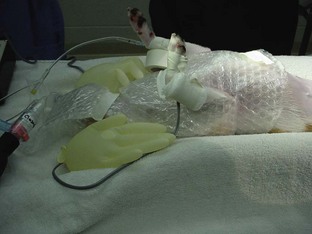
Key Points
1. Taking an accurate history and recording it in a concise, chronologic order create the foundation for the treatment plan for each surgical patient.
2. During the interview of the history taking, the technician needs to confirm the patient’s signalment (age, gender, breed) and chief complaint (reason for the visit to the surgical hospital).
3. While the client is being interviewed, the patient should be allowed to explore the examination room at will, and the technician should make a mental note of the patient’s overall condition and mentation (mental status, attitude).
4. The physical examination needs to be thorough and systematic and performed on the day of the scheduled surgery with the owner present.
5. Any abnormalities found on the physical examination need to be brought to the attention of the attending veterinarian and recorded in the medical record.
6. The consent form should identify the patient, the procedures to be performed on the patient, the potential risks involved with those procedures, the name of the veterinarian who will perform the procedures, and a place for the owner to sign indicating consent.
7. The consent form should provide confirmation that the patient was fasted appropriately before admission, that the owner was given an estimate for the costs of the procedures, and that the owner’s phone number is readily available so he or she can be contacted during the procedure if necessary.
8. Selection of preanesthetic diagnostic tests depends on the patient’s age and health status, type of surgery, and results of initial diagnostic screening tests.
9. Preoperative medications should provide preemptive analgesia and tranquilization and allow for easier anesthesia induction and smoother recovery from anesthesia.
10. To provide the most effective pain prevention and relief, different types of analgesics with different mechanisms of action (multimodal analgesia) need to be administered to surgical patients.
11. The benefits of placing an IV catheter for every anesthetic procedure outweigh any risks.
12. The five factors that should be considered in the choice of a catheter are site of placement, length of time the catheter will be needed, reason for placement, diameter of vessel, and length of vessel.
13. Catheter sites must be aseptically prepared to avoid complications.
14. Having all supplies readily available will aid in the success of the placement procedure.
15. Some surgical patients may require intensive care after surgery and may be better served by placement of a jugular catheter.
16. Successful ET tube placement depends on using the appropriate equipment and minimizing irritation to the patient.
17. Most patients can be intubated using the one-person technique, although the two-person technique is generally the more common practice.
18. Multiple options are available for checking the ET tube for proper placement in the trachea.
19. Clean, neat, symmetric clipping is an important skill to master for the patient’s well-being as well as good client relations.
20. Appropriate hair removal helps to prevent contamination of the surgical site.
21. Rather than pressure, contact time is the important consideration when one is using skin preparation materials.
22. When preparing a surgical site, the technician should always move the applicator from clean to dirty surfaces to avoid introducing contaminants to the proposed incision site.
23. It is important to position the animal on the surgery table in the most natural position possible that does not put excess stress on joints, severely compress blood vessels and nerves, or compromise the well-being of the patient in any way.
24. Quick-release knots are tied in the cords securing the patient to the table so that the patient can be easily and efficiently untied.
25. The cords securing the animal to the table can cause problems if wrapped around the legs too tightly. Check the paws repeatedly throughout the procedure.
1. What information is included in the patient’s signalment?
2. Why is it important to review all medications and supplements that a patient is taking before beginning the surgery?
a. To avoid possible drug interactions.
b. To know whether other diagnostic tests are indicated.
c. To make any necessary adjustments to the anesthesia protocol.
3. Why are leading questions inappropriate to ask during the history taking?
a. They make the owner feel compelled to answer a certain way.
b. They may encourage the owner to answer inaccurately.
4. Which of the following should be assessed during the history taking?
a. Patient’s attitude and mental status.
b. Patient’s previous medical problems and treatments.
c. Patient’s ability to see and hear.
5. Why should taking the patient’s temperature be saved for the end of the physical examination (PE)?
a. It is the least important part of the PE.
b. Most animals dislike having their temperature taken, and it is easier to perform a PE on a cooperative patient; taking the temperature early during the PE may make the patient uncooperative for the rest of the examination.
c. By the end of the PE, the examiner should have already ascertained whether the patient is febrile, and only then does the temperature need to be taken.
6. Which of the following should be performed on the day of the surgery?
a. Thorough physical examination.
b. Review of the patient’s medical history with the owner.
c. Verbal review of the consent form and obtaining of the owner’s signed consent for anesthesia and surgery.
7. Which tactic(s) may stop a cat from purring during thoracic auscultation?
a. Gently squeezing the thorax with one hand while the other holds the stethoscope on the chest wall.
b. Massaging under the cat’s chin.
c. Holding the cat near a sink or faucet, with or without the water running.
8. The minimum database (MDB) for a young, healthy feline patient having elective surgery would most likely include which of the following diagnostic tests?
a. CBC, parvovirus test, electrolytes, and blood typing.
b. CBC, serum chemistry panel, FeLV/FIV test, intestinal parasite test, and urinalysis.
c. FeLV/FIV test, abdominal radiographs, and ECG.
9. What is the purpose of premedicating a patient before inducing anesthesia for surgery?
a. To provide a smooth transition to anesthesia.
b. To provide preemptive analgesia.
10. True or False: Anesthesia (as provided by gas anesthetics) provides multimodal analgesia.
11. Which of the following provide multimodal analgesia?
a. Gas anesthetics, morphine, butorphanol, and fentanyl.
b. Nonsteroidal anti-inflammatory drugs (NSAIDs), carprofen, and meloxicam.
d. Opioids, NSAIDs, local anesthetic agents, and α2-adrenergic agonists.
12. True or False: Anticholinergics, such as glycopyrrolate and atropine, increase the heart rate and provide purely beneficial effects for the patient.
13. All of the following are goals of balanced anesthesia except:
a. Maximize the effects of certain drugs.
b. Minimize the side effects of certain drugs.
14. True or False: Peripheral catheters generally suffice for short-term use (1-3 days), and central lines are more appropriate for long-term vascular access (>3 days).
15. True or False: Central venous pressure measurements require that a central line be placed.
16. How can the patient’s correct identity be verified?
17. Why should the patient’s identity be verified before the animal is anesthetized for surgery?
a. To avoid anesthetizing the wrong patient.
b. To avoid performing surgery on the wrong patient.
c. It is not necessary to cross-check the patient’s correct identity because any good technician should be able to distinguish all black cats in the hospital on any given day on the basis of physical appearance alone.
18. What is the primary purpose of the anesthesia form?
19. Why does an orthopedic “clip and prep” of an extremity need to include a circumferential clip around the entire limb?
a. If the incision goes all the way through the limb and out the other side, the other side will already be prepared for this scenario.
b. If the surgeon mistakenly incises the wrong side of the limb with the first incision, and if the leg is clipped circumferentially, the mistake is easily corrected.
20. What needs to be done to the patient after the hair clip and before the patient is moved into the surgery suite?
a. Vacuum the clipped hair and clipped area of skin.
b. Check to see whether the bladder needs expressing.
21. True or False: It is accepted practice to scrub a patient initially with a povidone-iodine product.
22. Which of the following contributes to hypothermia in the anesthetized patient?
a. Anesthetic-induced muscle relaxation.
b. The surgical prep using water and alcohol.
c. Administering room-temperature IV fluids.
23. True or False: The first spray of the final prep should be directly over the incision site.
24. True or False: Prophylaxis antibiotic therapy should be administered to all surgical candidates.
25. What are some safe techniques for preventing hypothermia in small animal surgical patients?
26. Which of the following is the next step after the patient has been induced with anesthesia and the intended surgical site has been clipped and had initial prep?
a. The patient is moved to the surgery room, positioned on and secured to the table, then draped, and the surgeon begins surgery by making an incision.
b. The final prep is applied, and the patient is moved to the surgery room and positioned on and secured to the table.
c. The patient is moved to the surgery room, the final prep is performed, and the patient is positioned on and secured to the table.
d. The patient is moved to the surgery room and is positioned on and secured to the surgery table, and the final prep is performed.
27. Which of the following is true regarding positioning patients on the surgery table?
a. The particular position of the limbs is insignificant because the patient is anesthetized and cannot feel any pain that might be associated with awkward positioning.
b. Bony prominences should be cushioned to protect against excessive compression.
c. The patient’s legs should not be forced into unnatural anatomic alignment.
28. What position is the patient placed in for abdominal exploratory surgery?
29. What can be done to help prevent a deep-chested dog from tilting to the side while in dorsal recumbency?
30. True or False: For orthopedic surgeries of the extremity, only the side of the limb to be incised needs to be clipped and prepped.
31. What position is the patient placed in on the surgery table for thoracic surgery?
32. True or False: When scrubbing the skin of the intended surgical site, sufficient friction should be generated to cause hyperemia.
33. True or False: Chlorhexidine scrub or solution can be used as the final, sterile surgical paint.
16. Cross-check the signalment and description in the medical record, cross-check the neck ID band or cage card, and ask a coworker (e.g., surgeon) to confirm the patient’s identity.
18. The anesthesia form “tells the story” of the anesthesia event from beginning to end. It is an important piece of the patient’s medical record and can serve as a legal document. It can help guide the choice of anesthetic protocols to follow in the future.
19. e. The entire circumference of the extremity needs to be clipped and prepped so that the surgeon can move and manipulate the leg without contaminating the sterile field.
Bassert JM, McCurnin DM, eds. McCurnin’s clinical textbook for veterinary technicians, ed 7, St Louis: Saunders, 2010.
Cunningham, JG. Textbook of veterinary physiology, ed 4. St Louis: Saunders; 2008.
Fossum, TW, Hedlund, CS, Hulse, DA, et al. Small animal surgery, ed 3. St Louis: Mosby; 2007.
Romich, JA. An illustrated guide to veterinary medical terminology. Albany, NY: Delmar; 2000.
Stoeberl, TA. Preparing the small animal patient for surgery. AHT. 1983;4:271.
Thomas, JA, Lerche, P. Anesthesia and analgesia for veterinary technicians, ed 4. St Louis: Mosby; 2011.