Machine Checkout and Quality Assurance
Overview
Although the large majority of anesthesia critical incidents and catastrophes involve human error, some events involve overt equipment failure or failure of the anesthesia provider to discover an equipment problem. Most equipment problems in anesthesia practice are preventable, and this chapter is intended to help practitioners achieve that goal.
The analogy between administering general anesthesia and piloting a commercial jet may be somewhat overused, but it is singularly relevant in this context. The aviation industry has developed extraordinarily thorough plans involving “acute” and “chronic” interactions with its principal equipment, the commercial passenger jetliner. The acute component is the immediate preflight check to verify that a particular aircraft should fly safely that day on a given trip; the chronic component is the elaborate scheme of scheduled preventive maintenance, repair, exchange of old parts for new, and safety inspections of structural components. These are all oriented toward ensuring that the aircraft will fly safely for the designated interval of weeks or months covered by that particular action. In anesthesia practice, the analogy is obviously appropriate to an anesthesia equipment quality assurance (QA) program. The acute effort is the preanesthetic equipment check, and the chronic component is the vital and ongoing QA mechanism that involves preventive maintenance, testing for safe function, and the detection of expected wear prior to the failure of a piece of equipment.
Preflight checkout procedures in aviation have changed as technology has advanced. Aircraft systems have become more automated, and modern “glass cockpit” instrument displays have reduced the workload involved in operating multiple complex systems. This has allowed two crew members to do work that previously required three or more, with increased reliance on automated systems that function with minimal pilot input. Anesthesia equipment has also evolved rapidly, with increasing reliance on automated systems to function properly with minimal input by the anesthesia professional. Nevertheless, human vigilance will remain important as the ultimate watchdog and guarantor of machine safety.
Background
Because the practice of anesthesia is heavily dependent on the correct functioning of a large number of diverse pieces of equipment, and because anesthesia professionals usually have technical and mechanical proclivities, reports of problems with anesthesia equipment have been prominent in the anesthesia literature virtually since its inception. A great many of the “classic” traditional problems that had been common since recognizable anesthesia machines came into use—such as fresh gas rotameter leaks, ventilator leaks, and disconnections of poorly designed hose or tubing connectors—have been largely eliminated by the adoption and implementation of rigorous so-called voluntary design and fabrication standards by anesthesia machine manufacturers.1 By no means does this suggest that equipment problems do not arise today. On the contrary, some problems—such as absent, broken, or stuck unidirectional breathing system valves, or failure to remove the wrapper on prepackaged carbon dioxide absorbent inner canisters—are still a concern today. Also, because of the increasing complexity and integration of multiple parts and functions that had been separate (replaceable) components of anesthesia delivery systems, scrupulous attention to acute and chronic QA of anesthesia equipment is more important than ever. However, many of the details and the specific problems have changed, and advances have been made in the study of human interaction with the anesthesia system. Improving the “user friendliness” of anesthesia technology and study of the human factors in both routine and crisis anesthesia situations has been made possible in part by major growth and development of almost frighteningly realistic high-fidelity patient simulators—mannequins in particular, but also screen-based computer programs—that enable trials and modification of equipment and protocols without patient risk. Further, current simulators allow specific training of anesthesia professionals to deal with extremely rare catastrophic situations.2 Although required to be familiar with and prepared to react to these challenges, everyone hopes to never encounter them in real life, such as crossed oxygen and nitrous oxide pipelines.3
Although historic perspectives are valuable with regard to anesthesia equipment, current concerns are more important than reproducing a litany of hundreds of problems that have been identified with anesthesia equipment over the years. Classic treatises on anesthesia equipment provide useful references for reviewing the spectrum of defects and problems that have been reported with anesthesia equipment.4 Rendell-Baker5 edited a classic monograph that described 48 specific safety-related problems with anesthesia machines. Among these, in order of frequency, were problems with 1) the vaporizer, 2) the breathing system, 3) the gas flowmeters, 4) the mechanical functions of the machine, and 5) human engineering. In another classic, Spooner and Kirby6 outlined some of the data collected by the ECRI Institute regarding the role of equipment in anesthesia accidents. In the American Society of Anesthesiologists (ASA) Closed Claims Study, one report noted that only 2% of claims were apparently caused by the gas delivery equipment; however, 76% of those involved catastrophic adverse outcomes.7 These data again suggest that a combination of the occasional overt device failure along with a large component of various types of human error lead to anesthesia mishaps.
Further, classic pioneering work by Cooper and associates8 suggested that among anesthesia critical incidents, 82% involved human error, and only 14% resulted from overt equipment failure. Of course, many of the human errors involved unrecognized problems with the equipment, such as breathing system disconnection, that were not classic equipment failures—and that would not necessarily have been prevented or mitigated by the preanesthetic checkout (PAC) of the anesthesia equipment. Among the equipment failures, 20% involved the breathing circuit, 18% airway components, 12% laryngoscopes, and 12% the anesthesia machine. Failure to perform a normal checkout was cited 22 times on a list of 481 factors associated with 359 incidents. Follow-up studies of 1089 preventable critical incidents found that only 4% of incidents with substantive negative outcomes involved equipment failure.9 Of all incidents reported in the various parts of the study, 11% to 19% involved equipment failure. However, 129 (22%) of 583 instances of human error involved anesthesia machine use, indicating that the interaction of the anesthesiologist with normally functioning equipment accounts for many problems. Minimizing this type of problem by eliminating defects in the delivery system prior to the start of any anesthetic is the goal of a thorough preuse anesthesia equipment checkout.
Many other studies have also implicated the failure to perform an adequate PAC of the equipment as a factor in critical incidents and accidents. For example, 1 of the 11 cases reported in the analysis of severe anesthesia injuries at the Harvard teaching hospitals was caused by a misconnection of a vaporizer that had just been returned from servicing, a condition that would have been detected by a thorough preuse checkout of the anesthesia equipment.10
Preanesthesia Checkout
It is a well-accepted dictum that a thorough and stepwise anesthesia apparatus checkout should be performed prior to the delivery of anesthesia. Even in surveys that identify poor provider compliance with PAC procedures, most participants feel that such checks improve patient safety.11 This perception is indeed correct, as it has been clearly demonstrated that a PAC performed with a checklist and protocol is associated with a decreased risk of perioperative morbidity and mortality.12 It is important to note that a PAC is a checklist. The obvious industry parallel is aviation, in which a strict adherence to pre-event checklists (e.g., before start, at takeoff, on approach) is known to enhance compliance with important steps and procedures and to save lives. The unfortunate difference between anesthesiology and aviation is that pilots seem to use checklists much more regularly, possibly in part because the pilot of an airplane is always the first one to a crash scene. Through leadership and the personal effort of many, great progress has been made over the past decades in enhancing the knowledge of the anesthesia workstation and in introducing anesthesia equipment preuse checkout guidelines. What is striking, however, is that despite these efforts, our overall performance in “preflighting” the anesthesia workstation seems to be less than optimal. This is both troubling and perplexing given the pivotal role that the anesthesia machine plays in anesthesia practice and patient safety, and the fact that anesthesia professionals, by nature, are savvy about and comfortable with technology.
Data predating the first publication of the U.S. Food and Drug Administration (FDA) Anesthesia Apparatus Checkout Recommendations in 1986 demonstrated a low level of proficiency by anesthesiologists in detecting life-threatening machine problems. Using a machine with five intentionally created faults, researchers found that anesthesiologists detected on average only 2.2 serious problems (44%); and 7.3% found no faults at all despite knowing ahead of time that the machine was intentionally altered.13 At that time, available preuse checkout procedures for anesthesia machines were provided and promoted by individual machine manufacturers. Given the design and engineering perspectives of the manufacturers and their liability concerns, the machine-specific checkout recommendations were not entirely “user friendly,” nor were they well suited for clinical application. This also parallels current times, when manufacturer checkout recommendations still tend to be long and sometimes unwieldy, making them difficult to use routinely.
Prompted by a series of anesthesia machine–related accidents, in 1984 the FDA met with representatives from the ASA, anesthesia equipment experts, and anesthesia machine manufacturers to discuss methods of reducing patient risk during anesthesia.14,15 During that meeting the FDA was asked to take the lead in the development of the first generic anesthesia apparatus checkout recommendations. This general guideline was intended to instruct users on how to perform a preuse checkout, to promote the concept of a preuse checkout, and to create a framework that providers could modify to meet their local needs.14 This first preuse checkout was released in final form in August of 1986. These recommendations contained 25 primary items, with some having up to six subitems. The guideline intended that a comprehensive checkout be accomplished at the beginning of the day (“day check”) followed by an abbreviated check prior to subsequent cases (“case check”). The 1986 PAC guideline was fairly detailed, proved to be very time consuming, and was found to be not extensively used.16
In an attempt to evaluate compliance with the 1986 checklist, the FDA surveyed anesthesiology providers at 125 hospitals in four states and found that only 70% of facilities acknowledged they had a documented anesthesia machine preuse checkout at their site.17 Only 73% of the sites reported that a preuse checkout was routinely carried out at the beginning of each day or shift, and only 59% reported that a preuse checkout was accomplished between cases. Of those hospitals that acknowledged having a documented checkout, only 26% used the FDA’s version. The issuance of the 1986 recommendations also did not appear to improve the ability of anesthesiologists to detect anesthesia machine faults. Testing this hypothesis, March and Crowley15 showed that 188 anesthesiologists, using their own methods, could detect only one of four preset faults. When the same subjects used the FDA checklist to asses a different set of failures, detection performance improved only modestly. The authors concluded that the introduction of the FDA checklist did not improve the ability of anesthesiologists to detect anesthesia machine faults.
Recognizing that there was poor compliance with the 1986 guideline, the FDA revised the PAC in the early 1990s, working once again with anesthesiology professional organizations and industry. Other factors, including the development of monitoring standards by the ASA, the retirement of many older machines, and the introduction of newer-generation anesthesia machines following the new American Society for Testing and Materials (ASTM) specifications also provided impetus for the update of the guidelines.16 The revised checklist was issued in 1993 and included only 14 major steps, many with several bulleted instructions (Fig. 32-1).18 Although the checklist was fairly comprehensive and universal, a stated intent of the authors, similar to the 1986 version, was to encourage users to “modify [the guideline] to accommodate differences in equipment design and variations in local clinical practice” and to subject modifications to local peer review. It also encouraged users to “refer to the operator’s manual for the manufacturer’s specific procedures and precautions,” particularly when addressing the machine’s low-pressure system leak test.18 Even without modification, the 1993 PAC was applicable to most machines of the day and was nicely formatted to fit onto a single page. It is interesting to note that like the 1986 guideline, the FDA did not mandate the use of the 1993 Anesthesia Apparatus Checkout Recommendations. It was made clear in the Federal Register in 1994 that the FDA recommendations only offered guidance and encouraged modification to accommodate differences in equipment design and variations in local clinical practice.19 Even though the FDA authorized the matter, it did not undertake direct regulatory action.
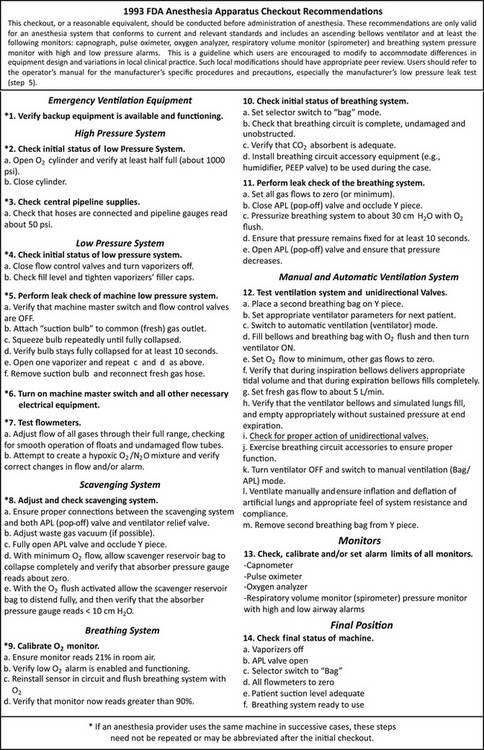
FIGURE 32-1 The Food and Drug Administration (FDA) 1993 anesthesia apparatus checkout recommendations. Users of the guideline were encouraged to modify the checklist to accommodate for differences in machine design and then subject the changes to peer review. The FDA also encouraged users to refer to the operator’s manual to identify manufacturer-specific procedures and precautions to modify the checklist.
Although the data are limited, evidence that the 1993 PAC recommendations led to improved user compliance and better detection of machine faults was not forthcoming. When anesthesiology providers of different backgrounds and experience levels were asked to use their own anesthesia preuse checkout procedures to check a fault-laden machine, and then went on to check another sabotaged machine using the 1993 FDA checkout procedure, researchers detected no difference in the rate of fault detection using either method.20 In fact, despite having the FDA checklist in hand, 41% of the participants could not identify more than 50% of the faults. Using a prospective crossover design, Blike and Biddle21 found that anesthesiology providers missed “easy” anesthesia machine faults 30% of the time and “difficult” anesthesia faults 62% of the time when provided with the FDA checklist. Larson and colleagues22 observed 87 participants at a “nationally attended anesthesia meeting” when they were asked to perform a checkout on an anesthesia machine with preset faults. The average number of faults detected by all participants was 3.1 of 5 total faults. Interestingly, the authors showed a negative correlation between level of experience and the ability to detect faults. In other controlled settings, where anesthesiologists would be anticipated to be thorough and accurate regarding the checkout procedure, the data also indicate poor performance. Olympio and colleagues23 observed anesthesiology residents checking out the machine and noted a low performance rate (69%), which improved by only 12% after focused instructional review. It is important to note that the residents knew in advance that their performance would be evaluated. In another experimental setting, Armstrong and colleagues24 observed anesthesiologists in a simulator who knew only that they were involved in a study to evaluate the simulator as a testing tool, and they were aware that simulated patient or technical problems would be presented during the case. The researchers quietly graded the quality of the anesthesia checkout and found that the subjects, on average, checked 50% or fewer of 20 key items. Performance was noted to be poor regardless of the age or experience of the anesthesiologist.
As tempting as it may be to implicate the checklists in these failures, human factors and training issues are more likely to blame. In particular, a lack of cultural discipline in the routine, proper use of a PAC is seemingly the principal problem. As noted, pivotal work by Cooper and colleagues8 demonstrated that in 22% of equipment-related mishaps, a failure to check or inspect was identified as an associated factor. Similarly, in a 1981 survey of anesthetic misadventures, human error was found to be more often responsible than equipment failure, and a failure to perform a machine checkout was the factor most likely associated with an equipment-related issue.25 In 1992 Mayor and Eaton26 found that almost 41% percent of anesthesia providers admitted to performing inadequate machine checks, and few followed published guidelines. In an Internet-based survey of anesthesiology providers and anesthesia technicians published in abstract form in 2005, 29% of respondents rated their competence in performing the 1993 FDA preuse checkout as poor.27 Reasons cited in the same survey for skipping the checkout included unfamiliarity with the procedure, a belief that the machine self-check alone was sufficient, and that checkout took too long to perform. Finally, in a 2007 survey conducted in the United Kingdom, researchers found that most anesthetists admitted to only partially checking the anesthesia machine; only 12% performed a check between cases, and only 27% identified an alternate means for ventilation prior to anesthesia.11
It seems that no matter how well conceived and heavily promoted PAC recommendations have been, their adoption and routine use has not been consistent. Underlying this issue seems to be an inconsistent understanding of the anesthesia machine. What currently compounds the issue is the growing assortment of anesthesia machine designs and features that depart significantly from the more generic, older-generation gas machines and workstations. When these factors are combined with a misunderstanding of and overreliance on “automated” machine checkout functions, the potential for a suboptimal PAC is significant.
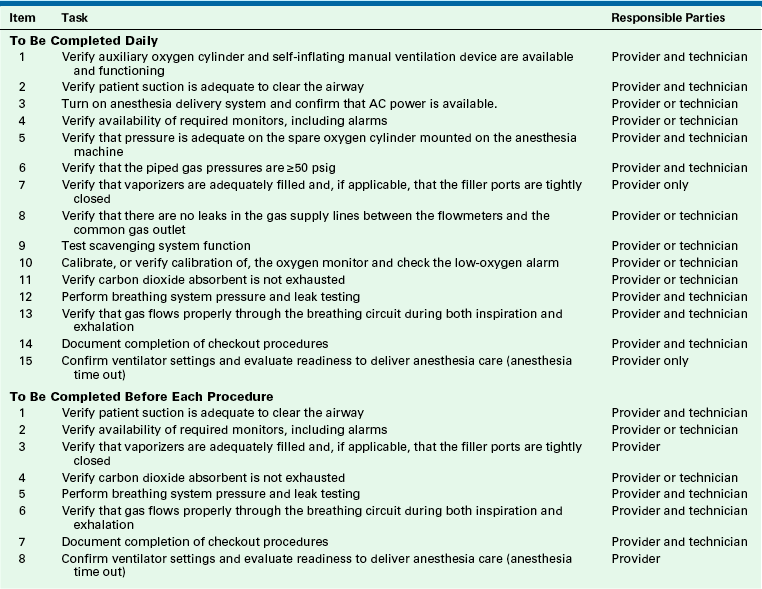
To improve PAC compliance and performance, it is recommended that individual anesthesia departments align the ASA’s most recent 2008 Guideline for Designing Pre-Anesthesia Checkout Procedures with their respective manufacturer’s suggested checkout procedures in order to develop their own effective, workstation-specific PAC checklists (Table 32-1).28 In addition to developing effective PACs, it is also important that anesthesia providers remain knowledgeable about their equipment and embrace a “checklist culture.” The 2008 guideline can be found at http://www.asahq.org for members within the “Standards, Guidelines, and Statements” tab (under Recommendations and Clinical Management Tools, ASA Committees: Anesthesia Machine Preoperative Checkout Procedures section) along with workstation-specific PACs from individual departments that can be used for PAC development.28
2008 Recommendations for Preanesthesia Checkout Procedures
The 2008 recommendations were developed with the knowledge that the existing PAC was not well understood, nor was it reliably used by anesthesia providers, and that anesthesia delivery systems have evolved to the point where one checkout procedure is no longer universally applicable.28 Although anesthesia providers were encouraged to modify the 1993 PAC to meet their own equipment needs, it was essentially applicable to almost any machine when it was published. As stated, it was a nearly universal checklist. However, diligent users of the 1993 PAC came to realize that it became increasingly difficult to strictly apply as a newer generation of machines began to emerge. The newer generation machines differed in their functions and features and in their checkout procedures, and they have become increasingly diverse even among themselves. For precisely these reasons, the authors of the ASA’s 2008 Recommendations for Pre-Anesthesia Checkout Procedures created a template to develop “checkout procedures that are appropriate for each individual anesthesia machine design and practice setting,” instead of a detailed PAC.28 Their goal was to provide guidelines applicable to all machines, so that individual departments could develop their own PAC, which could be performed consistently and expeditiously. In fact, the footer of the document reads “Guideline for Designing Pre-Anesthesia Checkout Procedures.”
The 2008 recommendations warn against an overreliance on automated machine checkouts, alerting that anesthesiology providers may be unaware of what is actually assessed by these features and that they may omit important preuse checkout items if they place all their faith in an automated checkout. When developing a local PAC, a detailed understanding of what is actually checked by the machine is required. However, this is not always easy to ascertain by simply reviewing user manuals.
The 1993 version of the PAC placed all of the responsibility of the preuse checkout on the anesthesia provider. The authors of the 2008 guidelines recognized that using anesthesia technicians and/or biomedical technicians to perform some aspects of the checkout procedures may improve compliance with a department’s PAC and could add redundancy to critical steps. Although the 2008 guidelines suggest which steps may be checked by “a qualified anesthesia technician, biomedical technician, or manufacturer-certified technician,” this should indeed be an institutional decision, because skill levels, work flow patterns, and training requirements vary greatly. The 2008 guidelines did not intend to make the use of technician checks mandatory. Regardless of who participates in the PAC, the anesthesia care provider is ultimately responsible for the proper and safe functioning of the equipment.
The items and rationale statements listed below, excerpted directly from the 2008 Recommendations for Pre-Anesthesia Checkout Procedures, are intended to describe a basic approach to developing sound institution-specific PAC procedures designed “for the equipment and resources available.” They identify items that need to be checked as part of a complete PAC. The method used to check each item will be dependent upon the specific equipment. Also identified in the recommendations are the suggested frequency of the checks, and the suggested responsible parties either individually, alternatively (“or”), or redundantly (“and”). It is important to recognize that the guidelines are not all inclusive; they simply suggest the minimum machine-related items that should be assessed prior to use. A local PAC checklist should represent a workable merger between these guidelines and the manufacturer’s checkout recommendations. As in the prior PAC guidelines, items that require checkout prior to each procedure are distinguished from those that need only to be checked daily.
Minimum PAC Checklist
Item 1: Verify auxiliary oxygen cylinder and self-inflating manual ventilation device are available and functioning
Responsible Parties: Provider and technician
Failure to be able to ventilate is a major cause of morbidity and mortality related to anesthesia care. Because equipment failure with resulting inability to ventilate the patient can occur at any time, a self-inflating manual ventilation device (e.g., Ambu bag) should be present at every anesthetizing location for every case and should be checked for proper function. In addition, a source of oxygen separate from the anesthesia machine and pipeline supply, specifically an oxygen cylinder with regulator and a means to open the cylinder valve, should be immediately available and checked. After checking the cylinder pressure, it is recommended that the main cylinder valve be closed to avoid inadvertent emptying of the cylinder through a leaky or open regulator.28
This step was item 1 on the 1993 PAC and remains so in the 2008 recommendations. It is the most important item on the checklist. No matter what happens to the machine, you should always be prepared to keep the patient alive without it. The auxiliary ventilation device should be self-inflating, which would exclude the disposable Mapleson circuits often found in and out of the operating room (OR); these devices should be located at “every anesthetizing location,” and the guideline further recommends that they be checked for proper function (Fig. 32-2). The recommendation also states that the auxiliary oxygen source should be separate from the machine and its pipeline supply, “specifically an oxygen cylinder.” Ensuring that properly filled portable cylinders with attached flowmeters are available at specific locations requires an institutional logistic commitment and careful attention to detail by support staff. Incorporating technicians into this step would likely be very useful.
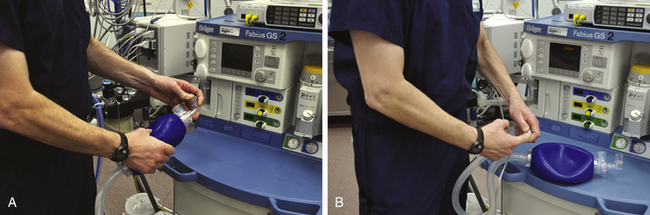
FIGURE 32-2 Inspection of a self-inflating resuscitation bag. Squeeze the bag and ensure that air flows out of the elbow connection. A, Next, occlude the elbow connection and squeeze the bag to check the inlet valve, bag, and other components for significant leaks. B, Occlude the reservoir tube inflow, then collapse the bag to assess the outlet check valve. The bag should remain collapsed if inflow is occluded.
Item 2: Verify patient suction is adequate to clear the airway
Responsible Parties: Provider and technician
“Safe anesthetic care requires the immediate availability of suction to clear the airway if needed.”28
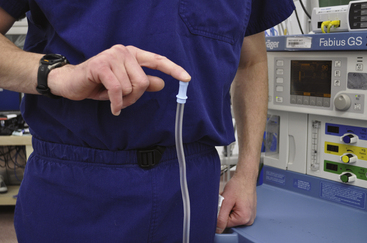
This step moved up from the last position on the 1993 PAC recommendations. Suction is critically important to anesthesia care, because it is the only major piece of equipment used routinely by anesthesiologists whose function cannot be replaced in a life-threatening crisis by the anesthesiologist’s own body. An anesthesiologist can monitor, ventilate, and even intubate if necessary without any equipment at all. An anesthesiologist cannot, however, adequately clear a pharynx full of secretions or vomitus without an adequately functioning suction; thus suction is a genuinely vital piece of anesthesia equipment. One simple way to check the suction is to determine whether there is enough negative pressure for the tubing to attach to the operator’s finger and support its own weight while suspended in the air (Fig. 32-3).
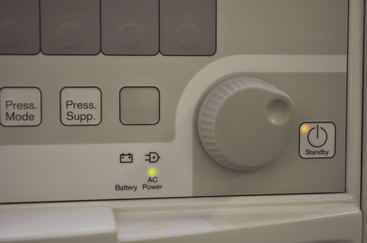
Item 3: Turn on anesthesia delivery system and confirm that AC power is available
Responsible Parties: Provider or technician
Anesthesia delivery systems typically function with back-up battery power if AC power fails. Unless the presence of AC power is confirmed, the first obvious sign of power failure can be a complete system shutdown when the batteries can no longer power the system. Many anesthesia delivery systems have visual indicators of the power source showing the presence of both AC and battery power. These indicators should be checked, and connection of the power cord to a functional AC power source should be confirmed. Desflurane vaporizers require electrical power and recommendations for checking power to these vaporizers should also be followed.28
Most anesthesia machines provide some indication that the machine is plugged into AC power, or that it is not and is on battery power (Fig. 32-4). Ensuring that the machine is plugged into AC power should be a checklist item. Some newer generation machines perform a battery check automatically and report problems to the operator during start-up checks, whereas some machines require a manual assessment of battery power, such as unplugging the machine from the outlet and pressing a battery test button. If not an automated function, checking the battery power is another example of how an anesthesia technician could unburden anesthesia providers.
Item 4: Verify availability of required monitors and check alarms
Responsible Parties: Provider or technician
Standards for patient monitoring during anesthesia are clearly defined. The ability to conform to these standards should be confirmed for every anesthetic. The first step is to visually verify that the appropriate monitoring supplies (BP cuffs, oximetry probes, etc.) are available. All monitors should be turned on and proper completion of power-up self-tests confirmed. Given the importance of pulse oximetry and capnography to patient safety, verifying proper function of these devices before anesthetizing the patient is essential. Capnometer function can be verified by exhaling through the breathing circuit or gas sensor to generate a capnogram, or verifying that the patient’s breathing efforts generate a capnogram before the patient is anesthetized. Visual and audible alarm signals should be generated when this is discontinued. Pulse oximeter function, including an audible alarm, can be verified by placing the sensor on a finger and observing for a proper recording. The pulse oximeter alarm can be tested by introducing motion artifact or removing the sensor. Audible alarms have also been reconfirmed as essential to patient safety by ASA, American Association of Nurse Anesthetists, Anesthesia Patient Safety Foundation, and the Joint Commission. Proper monitor functioning includes visual and audible alarm signals that function as designed.28
Verifying the availability and proper functioning of standard and other required monitors is a relatively straightforward task. However, the process of checking alarm thresholds, and possibly resetting them, can be tedious. It is possible for alarm settings on monitors to vary within individual facilities, because of provider manipulation of alarms for case requirements, a lack of standard default settings, and a failure to routinely reset alarm limits. Departmental alarm default settings can be established and programmed into anesthesia workstation monitors. Alarm limit settings also include anesthesia machine alarms such as volume, pressure, and inspired oxygen concentration limits (Fig. 32-5). It is advisable to ensure that critical alarm limits are set to values that allow them to do what they were intended to do. Here, anesthesia technicians can improve the quality of the preuse checkout by checking the function of standard monitors and confirming that critical alarm thresholds are set to established default values.
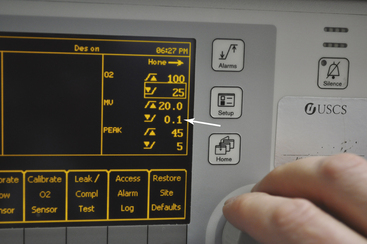
FIGURE 32-5 Setting machine alarm limits. Alarm limit values are easy to adjust, although this task could be time consuming during routine preuse checkout. Safe default values can be established locally and set by trained technicians, which will help keep limits consistent. Note the inappropriately low minute ventilation threshold default on this machine (arrow).
Item 5: Verify that pressure is adequate on the spare oxygen cylinder mounted on the anesthesia machine
Responsible Parties: Provider and technician
Anesthesia delivery systems rely on a supply of oxygen for various machine functions. At a minimum, the oxygen supply is used to provide oxygen to the patient. Pneumatically powered ventilators also rely on a gas supply. Oxygen cylinder(s) should be mounted on the anesthesia delivery system and determined to have an acceptable minimum pressure. The acceptable pressure depends on the intended use, the design of the anesthesia delivery system, and the availability of piped oxygen.28
Verification of oxygen cylinder pressure is accomplished by opening the oxygen cylinder(s) on the back of the machine and evaluating the tank gauge pressure located on the front of the machine, although some newer machines may also have a tank gauge located on the back of the machine. The 1986 PAC guideline recommended to “replace any cylinder with less than 600 psig.”29 The 1993 PAC guideline recommends that the oxygen cylinder be “at least half full (about 1000 psig)” during checkout. The current recommendations do not provide a specific value, but some manufacturer’s manuals still suggest the 1000 psig minimum.30
It is important to understand that it is theoretically possible for the tank gauge pressure to read higher than the actual pressure in the tank; this is because on many machines, the tank gauge pressure reflects the pressure in the pipeline segment between the yoke check valve and low-pressure side of the pressure-reducing regulator (Fig. 32-6). When the tank pressure falls below the pressure it contained when it was previously opened, the gauge will continue to reflect the higher pressure in the segment unless the wall supply pressure within the machine dips low enough for the pressure-reducing regulator to open to the tank supply route. A situation like this could occur, theoretically, if the provider were to leave the tank valve open during the PAC, and the tank were to drain down low or even empty through a leak at the yoke assembly. If a provider or technician then opened the tank valve, the gauge pressure would read the pressure remaining in the piping segment, not within the tank, because the segment pressure is higher than the pressure in the tank. This is due to the one-way nature of the yoke check valve. Unless tank pressure can overcome the upstream segment pressure, actual tank pressure will not be reflected on the gauge. In fact, even if the tank is completely removed, segment pressure will still be reflected on the gauge (Fig. 32-7).
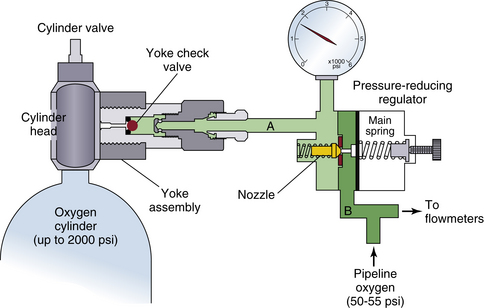
FIGURE 32-6 High-pressure inlet segment of many anesthesia machines. When the cylinder valve is opened on the tank, gas flows through the yoke check valve from the tank into the high-pressure segment (A). If the pressure in the pipeline oxygen segment (B) is sufficient—that is, high enough to overcome the pressure-reducing regulator main spring pressure—it will hold the regulator nozzle closed, and cylinder gas and its corresponding pressure will be confined to segment A. (This is why it is important to disconnect the pipeline supply at the wall in the case of an oxygen pipeline contamination). Segment A will remain pressurized even if the tank is removed, or if the tank is open and bleeding down, because the yoke check valve will be held closed by segment A pressure. This can cause the cylinder gauge pressure reading to be erroneous because of its connection to segment A rather than the cylinder itself. (Modified from Operating principles of Narkomed anesthesia systems, ed 2. Telford, PA, 1998, Dräger Medical.)
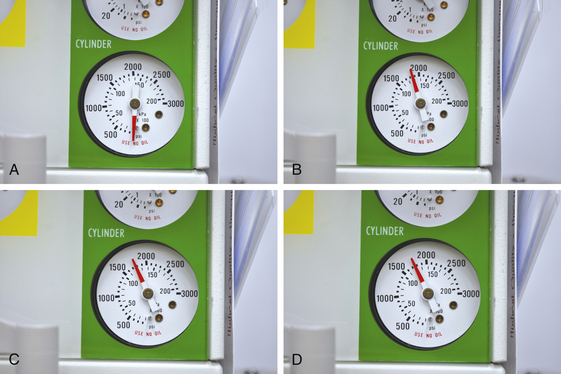
FIGURE 32-7 Erroneous oxygen cylinder pressure caused by the presence of the yoke check valve. A, Closure of the oxygen cylinder valve, disconnection of the wall oxygen supply, and depression of the O2 flush button results in zero gauge pressure. B, Connection of the O2 supply line and opening of the O2 cylinder valve demonstrates approximately 1850 psig cylinder pressure. C, Removal of the O2 cylinder and depression of the O2 flush results in minimal gauge deflection. D, Attaching an empty O2 cylinder to the yoke assembly and opening the cylinder valve results in no change in gauge pressure.
This possible error can be overcome by bleeding the oxygen tank gauge down to zero prior to checking oxygen tank pressure. This can only be accomplished by disconnecting the wall oxygen source, closing the O2 tank valve, and draining down all machine oxygen pressure using the oxygen flush button or the oxygen flow control valve. Disconnection of the oxygen pipeline supply was a recommended step in the 1986 FDA PAC but not in the 1993 version. Likewise, there is no mention in the 2008 guideline, although many machine users’ manuals recommend this step in their respective daily checkout procedures.30-35 During development of the 1993 PAC, it was noted that provider failure to reconnect the main oxygen supply line during the PAC was not a rare occurrence. There was also a concern that daily removal and reconnection of the oxygen supply line connector could contribute to wear or breakdown. Given these concerns, disconnection of the oxygen pipeline supply is not a specified recommendation within the 1993 and 2008 guidelines.36 Some newer generation machines measure tank pressure prior to the outlet check valve, which eliminates this concern completely. Additional bulleted comments in this item of the 2008 guidelines include:
Typically, an oxygen cylinder will be used if the central oxygen supply fails.28
Auxiliary oxygen cylinders will be used if the pipeline supply of oxygen fails or becomes contaminated. During a simulated gas pipeline crossover accident, researchers found that several participants used the machine’s auxiliary oxygen flowmeter as a presumed external source of oxygen, yet none properly disconnected the wall oxygen line while the inspired oxygen concentration declined in the face of sustained pipeline pressure.3
If the cylinder is intended to be the primary source of oxygen (e.g., remote-site anesthesia), then a cylinder supply sufficient to last for the entire anesthetic is required.28
The amount of oxygen required for a case begins with estimating the patient’s anticipated needs and then determining the requirements of the mechanical ventilator if driven by gas (see below). It is always wise to estimate finite-source oxygen needs (e.g., a tank) by applying a wide margin on the side of safety.
If a pneumatically powered ventilator that uses oxygen as its driving gas will be used, a full “E” oxygen cylinder may provide only 30 minutes of oxygen. In that case, the maximum duration of oxygen supply can be obtained from an oxygen cylinder if it is used only to provide fresh gas to the patient in conjunction with manual or spontaneous ventilation. Mechanical ventilators will consume the oxygen supply if pneumatically powered ventilators that require oxygen to power the ventilator are used. Electrically powered ventilators do not consume oxygen so that the duration of a cylinder supply will depend only on total fresh gas flow.28
Generally speaking, mechanical ventilators using a bellows are typically gas driven, with either oxygen or air, and piston driven ventilators are electrically driven. This underscores the importance of machine familiarity.
The oxygen cylinder valve should be closed after it has been verified that adequate pressure is present, unless the cylinder is to be the primary source of oxygen (i.e., piped oxygen is not available). If the valve remains open and the pipeline supply should fail, the oxygen cylinder can become depleted while the anesthesia provider is unaware of the oxygen supply problem.28
The interface between the oxygen tank and the yoke assembly is very vulnerable to leaking. As alluded to above, if the oxygen tank pressure were to steadily decrease during the day, the provider would possibly be unaware, because real-time tank pressure measurement could be blocked by the yoke check valve. If tank pressure on the machine was measured prior to the yoke check valve, which is currently the exception, actual tank pressure would be continuously displayed, and this problem would be immediately recognized.
Other gas supply cylinders (e.g. Heliox, CO2, Air, N2O) need to be checked only if that gas is required to provide anesthetic care.28
Item 6: Verify that piped gas pressures are 50 psig or greater
Responsible Parties: Provider and technician
A minimum gas supply pressure is required for proper function of the anesthesia delivery system. Gas supplied from a central source can fail for a variety of reasons. Therefore the pressure in the piped gas supply should be checked at least once daily.28
Normal pipeline pressures in the United States for common gases (O2, air, N2O) are 50 to 55 psig (345 to 380 kPa).37 Pipeline pressure gauges on anesthesia machines include standard numeric analog gauges, analog gauges that highlight acceptable ranges, and digital pressure gauges (Fig. 32-8). Although the guideline suggests verifying gauge pressures, an inspection of the supply hoses and connections is also recommended by some manufacturers. Checking that “hoses are connected” was a checklist item on the 1993 PAC. Despite gas-specific connectors, misconnections of gas hoses have been reported.38-40 Likewise, medical gas supply lines behind the walls of the OR are not immune from misconnection or contamination.41-45 A preuse check that includes a quick daily inspection of connections, supply hoses, gas pressures, and the presence of more than 90% oxygen in the inspiratory limb will greatly minimize risk.
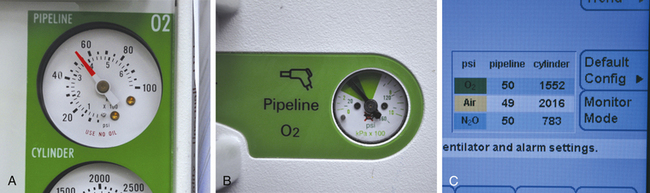
FIGURE 32-8 Pipeline pressure gauge examples. A, Standard analog gauge. B, Analog gauge with standard pressure ranges highlighted for psi (dark green) and kPa (light green). C, Digital pressure gauge.
An important safety item on all machines is an audible and visual alarm that warns the operator of diminishing oxygen supply pressure. The only way to evaluate this item is to disconnect the wall oxygen supply and shut off any oxygen supply tanks. Likewise, an evaluation of the machine’s oxygen failure protection device or fail-safe feature would also require disconnection of the O2 supply hose. These two checks were not included in the 1993 guideline or in the current version, presumably because they are too time consuming relative to their risk-preventative value. Also, and as alluded to above, daily removal of the oxygen supply hose may introduce a risk greater than that posed by the potential for failure of these features. An evaluation of these features is usually part of routine preventative maintenance.
Item 7: Verify that vaporizers are adequately filled and, if applicable, that the filler ports are tightly closed
Frequency: DailyResponsible Parties: Provider and also the technician if redundancy is desired
If anesthetic vapor delivery is planned, an adequate supply is essential to reduce the risk of light anesthesia or recall. This is especially true if an anesthetic agent monitor with a low agent alarm is not being used. Partially open filler ports are a common cause of leaks that may not be detected if the vaporizer control dial is not open when a leak test is performed. This leak source can be minimized by tightly closing filler ports. Newer vaporizer designs have filling systems that automatically close the filler port when filling is completed. High and low anesthetic agent alarms are useful to help prevent over- or under-dosage of anesthetic vapor. Use of these alarms is encouraged, and they should be set to the appropriate limits and enabled.28
Although not part of the 2008 guideline, some manufacturers recommend a check of their machine’s vaporizer interlock system, which if present prevents more than one vaporizer from being activated simultaneously. If this step is added to a local checklist, make sure that when one vaporizer handwheel is turned to a setting greater than zero that any other vaporizers remain locked in the zero position. Test the system for all mounted vaporizers, and then ensure all vaporizers are placed back to the zero position. This is also a good time to make certain that the vaporizers are firmly mounted.
Item 8: Verify that there are no leaks in the gas supply lines between the flowmeters and the common gas outlet
Frequency: Daily and whenever a vaporizer is changed
Responsible Parties: Provider or technician
The gas supply in this part of the anesthesia delivery system passes through the anesthetic vaporizer(s) on most anesthesia delivery systems. In order to perform a thorough leak test, each vaporizer must be turned on individually to check for leaks at the vaporizer mount(s) or inside the vaporizer. Furthermore, some machines have a check valve between the flowmeters and the common gas outlet, requiring a negative pressure test to adequately check for leaks. Automated checkout procedures typically include a leak test but may not evaluate leaks at the vaporizer, especially if the vaporizer is not turned on during the leak test. When relying upon automated testing to evaluate the system for leaks, the automated leak test would need to be repeated for each vaporizer in place. This test should also be completed whenever a vaporizer is changed. The risk of a leak at the vaporizer depends upon the vaporizer design. Vaporizer designs where the filler port closes automatically after filling can reduce the risk of leaks. Technicians can provide useful assistance with this aspect of the machine checkout, since it can be time consuming.28
This step checks the integrity of the so-called low-pressure system (LPS) of the anesthesia machine, which is traditionally defined as the section downstream from the flow control valves to the common gas outlet. Leaks in this section of the machine are associated with hypoxemia or patient awareness under anesthesia.46,47 Leaks here are commonly related to the anesthetic vaporizer, the vaporizer mounting, or the flowmeter tubes.
Because of significant machine design differences, several tests have been described to check for leaks within the LPS.47 These tests use either positive pressure, assessing either leak flow or system pressure stability, or negative pressure to facilitate leak detection in this vulnerable part of the anesthesia machine (Figs. 32-9 and 32-10). Historically, selecting the proper test was confusing, because some machines have an outlet check between the common gas outlet and the vaporizers (many Ohmeda machines), but others do not. The check valve is meant to minimize the effects of intermittent backpressure on vaporizer output. For machines without an outlet check valve, positive-pressure tests of the LPS are generally sufficient. These include simple pressurization of the patient breathing circuit or more complex positive-pressure testing of the LPS using specialized bulbs, manometers, and/or flowmeters.24,32,48
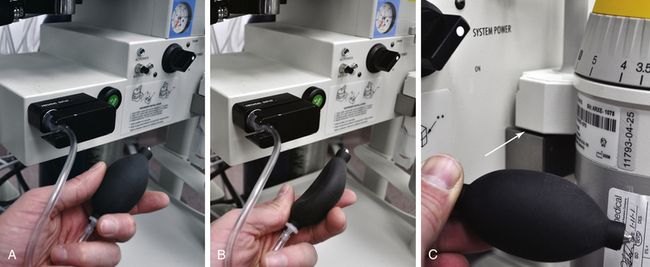
FIGURE 32-9 The universal negative-pressure low-pressure system leak test. A, With the machine off and the flow control valves fully closed, a specially configured suction bulb is connected to the common (fresh) gas outlet. B, The bulb is pumped until it is fully collapsed; it is then observed to verify that it stays collapsed for more than 10 seconds, indicating that the low-pressure side of the machine is gas tight. Then, each vaporizer is opened in turn, and the maneuver is repeated to establish that no leak is associated with that vaporizer. C, The vaporizer was intentionally tilted on its mount in order to cause a low-pressure system leak resulting in immediate reexpansion of the suction bulb.
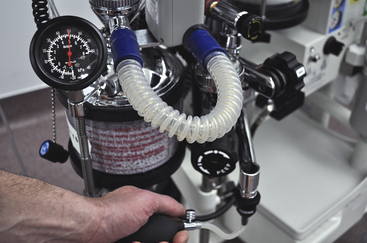
FIGURE 32-10 Dräger (Telford, PA) positive-pressure breathing system leak test specified for the Narkomed 2, 3, 4, GS & M model anesthesia workstations. This particular procedure uses a sphygmomanometer bulb with bag-mount adapter and a length of tubing that short circuits inspiratory and expiratory ports. The test is negative if bulb-generated pressure decreases no more than 20 cm H2O from 50 cm H2O in 30 seconds.
Again, the presence of an outlet check valve precludes manual positive-pressure testing of the low-pressure system, because the valve is held closed by downstream positive pressure. To eliminate confusion with this, the 1993 PAC’s “Leak Check of the Machine Low-Pressure System” prescribed the so-called universal leak test, a negative-pressure test that checks for leaks in the LPS regardless of whether an outlet check valve is present. When compared to several other LPS leak tests performed on machines with and without outlet check valves, the universal leak test was found to be the most sensitive.49 This simple-to-perform yet often neglected test requires that the machine be turned off and that the flow control valves be fully closed to prevent any flow of gas into the low-pressure system. A specially configured suction bulb, which can either be constructed or obtained from the manufacturer, is then attached to the common gas outlet via tubing and a 15 mm adapter (Figs. 32-11 and 32-12; see also Fig. 32-9). The bulb is then squeezed repeatedly until it is fully collapsed. If the bulb does not stay collapsed for a specified period of time, air is being sucked by the bulb into the machine via a leak that will allow gas to escape when the machine is pressurized. The same maneuver is carried out with each vaporizer opened in turn to check for associated leaks. The specified period of bulb collapse varies by reference from 10 seconds in popular texts to 30 seconds in some workstations’ user manuals.31,32,47,50,51 Although small leaks may require more than 10 seconds for bulb reinflation, it is likely that the collapsed bulb will be noted to be steadily expanding before that time.49 The most important aspect about the universal negative-pressure leak test is that it eliminates any potential for error where an operator might mistakenly apply a positive-pressure leak test to a machine with an outlet check valve.
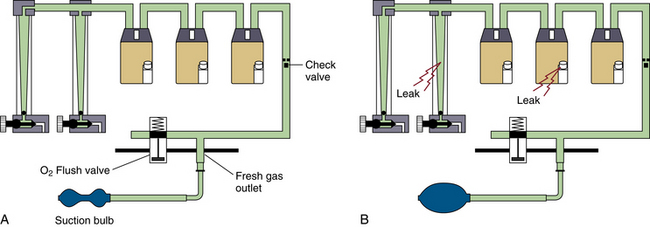
FIGURE 32-11 The universal negative-pressure low-pressure system leak test. A, With the specially configured suction bulb connected to the common (fresh) gas outlet and collapsed, subatmospheric pressure is created in the low-pressure circuit, opening the outlet check valve (if present) and exposing the vaporizers, tubing, and associated piping and connections to the vacuum. B, Leaks in the system will draw in ambient air and reexpand the suction bulb. (Modified from Operating principles of Narkomed anesthesia systems, ed 2. Telford, PA, 1998, Dräger Medical.)
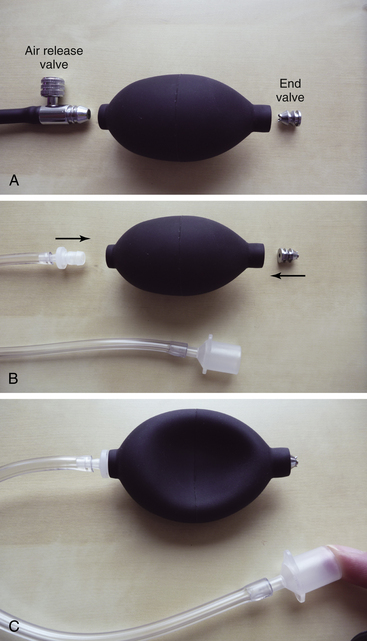
FIGURE 32-12 Constructing a negative-pressure system leak test suction bulb from a sphygmomanometer bulb. A, Remove the air release valve and discard. Remove the end valve. B, Reverse the end valve and reinsert. Find or purchase a tight-fitting connector, some extra tubing, and a suitable endotracheal tube adapter. Insert the connector into the bulb. C, Squeeze the bulb and occlude the adapter. The apparatus should remain collapsed for more than 60 seconds.31
Many of the newer generation anesthesia machines do not have an accessible common gas outlet; therefore manual LPS testing cannot be performed. These machines presumably test the integrity of the LPS via an automated checkout. However, some machines of the current generation still require a manual LPS leak test (Table 32-2). For those that do, the universal leak test can be applied unless clearly instructed otherwise by the manufacturer. A locally developed PAC should indicate which steps are required on the specific machine to accomplish this important step.
TABLE 32-2
Low-Pressure System Leak Tests for Various Anesthesia Workstations
| Machine | Test Method |
| Datex-Ohmeda Aestiva/5 | Manual: negative pressure or positive pressure∗‡ |
| Datex-Ohmeda Aisys with ACGO | Manual: negative pressure or positive pressure∗‡ |
| Datex-Ohmeda Aisys without ACGO | Automatic |
| Datex-Ohmeda S/5 Aespire | Manual: negative pressure or positive pressure∗‡ |
| Datex-Ohmeda ADU | Automatic |
| Dräger Narkomed 2B | Manual: positive pressure†‡ |
| Dräger Narkomed M | Manual: positive pressure†‡ |
| Dräger Narkomed MRI | Manual: positive pressure†‡ |
| Dräger Fabius MRI | Automatic† |
| Dräger Fabius Tiro | Automatic† |
| Dräger Narkomed Julian | Automatic† |
| Dräger Narkomed 6000 & 6400 | Automatic† |
| Dräger Fabius GS | Automatic‡ |
| Dräger Apollo | Automatic‡ |
| Penlon Prima SP3 | Manual: positive pressure‡ |
| Mindray (Datascope) AS 3000 | Automatic‡ |
ACGO, auxiliary common gas outlet.
∗ISO 5358 or BSI standard positive low-pressure leak test.
†Must manually open vaporizers to check them.
‡Narkomed positive-pressure test using sphygmomanometer squeeze bulb, adapter, and inspiratory-expiratory port interconnection hose (universal negative-pressure leak test will work as well).
Information from user’s manuals from Dräger Medical (Telford, PA), Datex-Ohmeda (GE Healthcare, Waukesha, WI), Mindray DS USA Inc. (Mahwah, NJ), and Penlon Limited (Abingdon, UK).
Item 9: Test scavenging system function
Responsible Parties: Provider or technician
A properly functioning scavenging system prevents room contamination by anesthetic gases. Proper function depends upon correct connections between the scavenging system and the anesthesia delivery system. These connections should be checked daily by a provider or technician. Depending upon the scavenging system design, proper function may also require that the vacuum level is adequate, which should also be confirmed daily. Some scavenging systems have mechanical positive and negative pressure relief valves. Positive and negative pressure relief is important to protect the patient circuit from pressure fluctuations related to the scavenging system. Proper checkout of the scavenging system should ensure that positive and negative pressure relief is functioning properly. Due to the complexity of checking for effective positive and negative pressure relief, and the variations in scavenging system design, a properly trained technician can facilitate this aspect of the checkout process.28
A test of the scavenging system begins by checking the proper assembly and integrity of each component and connection within the system, including the gas-transfer tubes leading from the adjustable pressure-limiting (APL) valve and the ventilator relief valve to the scavenging interface. In the case of many modern machines, a single transfer tube may lead from a compact breathing system to the scavenger interface. The integrity of the vacuum tubing leading from the wall outlet to the scavenger interface should also be checked.
There exist two types of scavenging interface systems, open and closed. Closed scavenging systems are isolated from the environment by pressure relief valves, so the relationship between waste-gas flow, vacuum flow, and the size of the system’s reservoir bag determine the effectiveness of the gas elimination. Some closed systems may contain only a positive-pressure relief valve, which protects the breathing circuit from overpressurization (positive end-expiratory pressure [PEEP]) if obstruction occurs downstream from the scavenger interface. These systems rely on passive outflow of waste gas, not a central vacuum, and they do not require a reservoir bag (Fig. 32-13). They are designed to vent into nonrecirculating heating, ventilation, and air conditioning (HVAC) systems or simply to the building’s exterior. They are uncommon. A manufacturer’s recommended test of this “passive” scavenger interface involves creating gas flow (pressure) within the breathing system by occluding the patient Y-piece, or short-circuiting the inspiratory and expiratory limbs of the breathing circuit with the breathing hose, occluding the exhaust hose outlet on the scavenging interface, and ensuring that the flow of gas exits the system through the positive-pressure safety relief valve, so excess pressure (>10 cm H2O) does not build up in the breathing circuit.
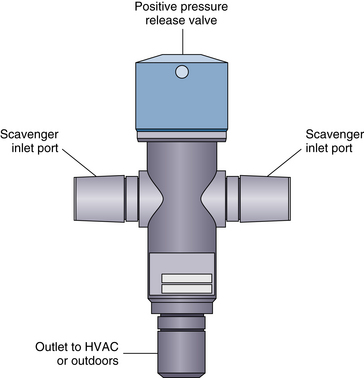
FIGURE 32-13 Passive “closed” scavenger assembly. Formal testing involves occluding the exhaust hose outlet on the scavenging interface, pressurizing the breathing circuit, and ensuring that gas exits the system through the positive-pressure safety relief valve, preventing pressure buildup in the breathing circuit. HVAC, heating, ventilation, and air conditioning unit. (Modified from Operating principles of Narkomed anesthesia systems, ed 2. Telford, PA, 1998, Dräger Medical.)
Closed systems with positive- and negative-pressure relief valves, a reservoir bag, and active gas elimination via central vacuum are more common (Fig. 32-14). Negative-pressure relief valves within these systems prevent subatmospheric pressure from occurring within the patient breathing circuit as a result of the application of excessive suction. An adjustable needle valve regulates the waste-gas exhaust flow. A check of positive-pressure relief is conducted as described above. Some manufacturers recommend that the suction needle valve be turned off for this step. A check of negative-pressure relief is conducted by setting the scavenger interface suction to a routine setting, turning off all flow control valves on the anesthesia machine, and occluding inflow into the patient breathing circuit at the patient Y-piece, or short-circuiting the inspiratory and expiratory limbs of the breathing circuit with the breathing hose and at the breathing bag mount. At this point, the breathing pressure gauge should indicate a negligible negative pressure (e.g., no lower than −1.0 cm H2O). Generally speaking, the scavenger suction on active systems should be adjusted so the reservoir bag is never overinflated or underinflated; rather, it should remain slightly inflated during routine use. Because the volume of gas being passed into the scavenging system varies, it may be necessary to adjust the needle valve. Given the diversity of breathing systems, this check serves as another instance in which users must consider manufacturer specified protocols when developing a local PAC.

FIGURE 32-14 Active “closed” scavenger assembly. Positive-pressure relief testing can be conducted as described for passive systems. Negative-pressure relief testing involves occluding the patient Y-piece after turning off all flow control valves and ensuring that circuit breathing pressure indicates only a negligible negative pressure (e.g., more than −1.0 cm H2O). Scavenger suction should be adjusted so the reservoir bag is neither overinflated or underinflated during routine use. (Modified from Operators instruction and setup manual: Narkomed M anesthesia system, Telford, PA, 2001, Dräger Medical.)
Open scavenger systems are simpler to understand and use, and they are easier to check out. Open systems contain no valves and are open to the environment (Fig. 32-15). The patient breathing circuit is much less likely to be subject to overpressure or negative pressure, assuming the conduits are patent, and adequate suction is present. As in the case of the active closed scavenger system, inadequate suction will result in waste anesthetic gases venting into the room. After ensuring that all gas-transfer tubes and suction lines are properly connected, the scavenger suction needle valve is adjusted to place the flowmeter bobbin between the indicator lines. A positive- and negative-pressure test is then conducted as described above.
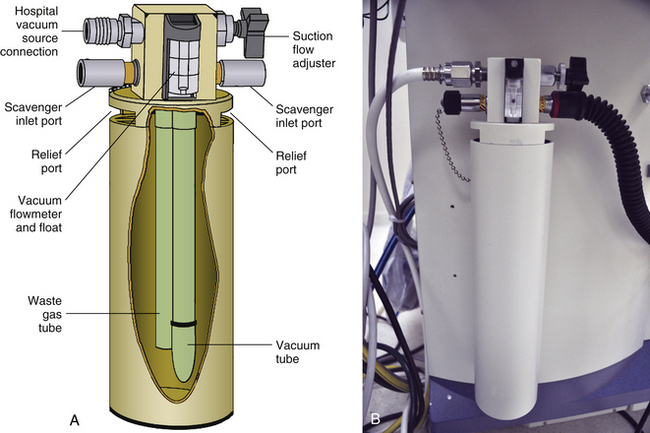
FIGURE 32-15 “Open” scavenger assembly. The preuse check involves ensuring that gas flows freely from the patient breathing circuit into the scavenger and that the vacuum flow to the scavenger is adequate. (Modified with permission from Operating principles of Narkomed anesthesia systems, ed 2. Telford, PA, 1998, North American Dräger. Courtesy Dräger Medical.)
The 1993 PAC prescribed a simple procedure for checking the scavenging system that eliminated several steps described in manufacturer’s user’s manuals. It can be applied to both closed and open scavenging systems. For every machine, the evaluation of the scavenging system is a manual evolution; there are no automated checks.
Item 10: Calibrate, or verify calibration of, the oxygen monitor and check the low oxygen alarm
Responsible Parties: Provider or technician
Continuous monitoring of the inspired oxygen concentration is the last line of defense against delivering hypoxic gas concentrations to the patient. The oxygen monitor is essential for detecting adulteration of the oxygen supply. Most oxygen monitors require calibration once daily, although some are self-calibrating. For self-calibrating oxygen monitors, they should be verified to read 21% when sampling room air. This is a step that is easily completed by a trained technician. When more than one oxygen monitor is present, the primary sensor that will be relied upon for oxygen monitoring should be checked. The low oxygen concentration alarm should also be checked at this time by setting the alarm above the measured oxygen concentration and confirming that an audible alarm signal is generated.28
The importance of the oxygen monitor cannot be overstated; therefore a proper evaluation of its function is imperative. It is the only monitor positioned to detect oxygen delivery problems downstream from the flow control valves.47 All other oxygen-related safety devices are located upstream from the flow control valves.51 Traditionally, most machines have used a galvanic cell oxygen sensor located near the patient breathing circuit inspiratory valve. In most cases it is simple to access. In this position, the sensor is exposed to the gas as it flows toward the patient after the fresh gas flow is introduced. These electrochemical devices have a finite life span that is inversely proportional to the amount of oxygen exposure.50 They are also vulnerable to drift; therefore daily verification of calibration is recommended, with recalibration as necessary.
The procedure to verify 21% fraction of inspired oxygen (FIO2) calibration varies among machines, but it often involves removing the sensor housing from the breathing circuit (Fig. 32-16, A). At this time, the low-oxygen alarm should also be tested. It should alarm if the low limit is set above 21% (see Fig. 32-16, B). A prudent default setting would be somewhere between 25% and 30%, unless oxygen concentrations below this value are used routinely. In any case, it should always be set to at least 21%. The steps involved in recalibrating the sensor to room air always involve removing the sensor from the breathing circuit. After calibration verification or recalibration, the breathing system is flushed with 100% oxygen. This should result in an oxygen concentration reading of more than 90% (see Fig. 32-16, C). Users and technicians should be aware that when a new oxygen sensor is placed into the sensor housing, it may take up to 90 minutes before it stabilizes and is ready for calibration.52
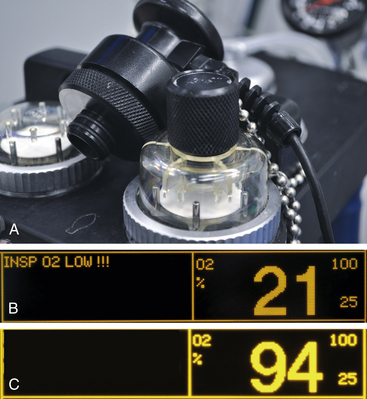
FIGURE 32-16 Testing the low oxygen concentration alarm and calibrating the oxygen sensor. A, Removal of the oxygen-sensor housing exposes the sensor to ambient air. B, When the oxygen concentration decreases below the alarm threshold value, which in this case is set at 25%, the visual and auditory low inspired oxygen concentration alarms should activate. C, After replacing the oxygen sensor, the oxygen flush button should be used to bring the fraction of inspired oxygen to at least 90%.
Some newer generation anesthesia machines do not contain an in-circuit galvanic sensor. These machines rely on the sidestream-sampling gas analyzer to measure FiO2. In this case, it is the FiO2 sensor on the gas analyzer that requires some sort of daily check. Removal of the sample line can be done to check room air calibration. This serves as another example of growing machine diversity and the importance of machine familiarity as it pertains to daily use and local PAC development.
Item 11: Verify carbon dioxide absorbent is not exhausted
Responsible Parties: Provider or technician
Proper function of a circle anesthesia system relies on the absorbent to remove carbon dioxide from rebreathed gas. Exhausted absorbent as indicated by the characteristic color change should be replaced. It is possible for absorbent material to lose the ability to absorb CO2, yet the characteristic color change may be absent or difficult to see. Some newer absorbents do change color when desiccated. Capnography should be used for every anesthetic and, when using a circle anesthesia system, rebreathing carbon dioxide as indicated by an inspired CO2 concentration >0 can also indicate exhausted absorbent.28
It is important for providers to know that absorbent color change is not as reliable as is the presence of inspired CO2 on capnography in identifying exhausted absorbent. Absorbent “regeneration,” indicator deactivation, inner canister channeling, and coloration of the absorbent canister wall are examples of circumstances that can mislead the practitioner regarding the actual absorptive capacity.50,53 Therefore a normal-appearing absorbent may be significantly degraded in its ability to remove CO2. However, it is no longer advised for providers to manually exercise (i.e., breathe in and out of) the breathing circuit and absorbent to assess the absorbent during preuse checkout. Visual inspection must suffice.
In addition to the exhaustion of CO2 absorptive capacity, absorber desiccation is another potential hazard. Exposure of volatile anesthetics to desiccated carbon dioxide absorbents that contain sodium, potassium, or barium hydroxide may result in severe exothermic reactions and/or the production of toxic byproducts such as carbon monoxide.54 Whereas colorimetric indicators identify the exhaustion of most absorbents, currently only one absorbent provides a permanent colorimetric indicator of both desiccation and exhaustion (Amsorb Plus, Armstrong Medical, Lincolnshire, IL).54,55 Currently no consistently reliable steps can be included in a PAC procedure to identify absorbent desiccation. However, certain scenarios increase the risk of absorbent desiccation, and if recognized these should prompt the provider performing the preuse check to ensure that the absorbent is replaced. Prolonged fresh gas flow during periods of nonuse is thought to be the main factor associated with absorber desiccation. Situations in which gas has been flowing for indeterminate periods—such as over a weekend, with an infrequently used remote-site machine, when gas flows are found during the daily preuse check—should therefore prompt concern. In 2005 the Anesthesia Patient Safety Foundation (APSF) convened a Carbon Dioxide Absorbent Desiccation Safety Conference and published a consensus statement aimed at reducing the risk of adverse reactions associated with carbon dioxide absorbents (Box 32-1). These recommendations should be referenced in developing a departmental risk-management strategy.
Item 12: Breathing system pressure and leak testing
Responsible Parties: Provider and technician
The breathing system pressure and leak test should be performed with the circuit configuration to be used during anesthetic delivery. If any components of the circuit are changed after this test is completed, the test should be performed again. Although the anesthesia provider should perform this test before each use, anesthesia technicians who replace and assemble circuits can also perform this check and add redundancy to this important checkout procedure. Proper testing will demonstrate that pressure can be developed in the breathing system during both manual and mechanical ventilation and that pressure can be relieved during manual ventilation by opening the APL valve. Automated testing is often implemented in the newer anesthesia delivery systems to evaluate the system for leaks and also to determine the compliance of the breathing system. The compliance value determined during this testing will be used to automatically adjust the volume delivered by the ventilator to maintain a constant volume delivery to the patient. It is important that the circuit configuration that is to be used be in place during the test.28
It is not rare for either the disposable breathing circuit components or the fixed anesthesia machine components to leak; therefore a leak check of the breathing system is of paramount importance. Traditionally, this test has been performed manually after an inspection of the breathing circuit, removal of the gas sampling line, and capping of the gas sampling line port. With the machine set in the “bag” or manual mode of ventilation, the gas flows are set to zero (or the minimal settings), the APL valve is closed, the patient Y-piece is occluded, and the breathing system is pressurized with the oxygen flush button to about 30 cm H2O (Fig. 32-17). The circuit passes the leak test if it holds this pressure for at least 10 seconds. Some manufacturers may specify a low oxygen flow rate during the test.32 PAC developers should refer to the user’s manual in this regard. A decrease in pressure during the test should prompt a check of all plug-in, push-fit, and screw connectors and the seal of the absorber canister along with a careful inspection of the disposable tubing.
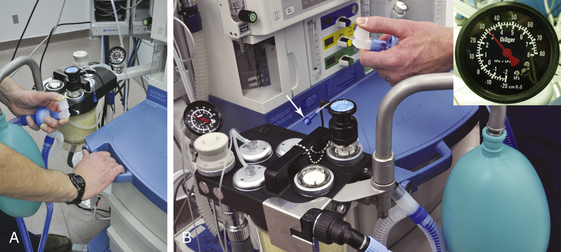
FIGURE 32-17 Manual breathing system pressure and leak testing. The breathing system pressure and leak testing should be performed with the circuit configuration to be used during anesthetic delivery. A, The patient Y-piece or elbow is occluded, and the oxygen flush button is used to pressurize the breathing circuit to approximately 30 cm H2O. B, The circuit should hold pressure at this level for at least 10 seconds. It is important to ensure that the gas flows are set to zero, or their minimal values, and that the gas sample line is removed (arrow) and its circuit port is occluded.
One of the most common locations of a circuit leak is at the absorber canister, and it is particularly important for the anesthesia provider to apply this check rigorously immediately after the absorbent has been changed, because obstructed disposable canisters (plastic wrapper still on) or incorrectly seated or poorly sealed reusable canisters (often an absorbent granule on the rubber gasket) probably constitute the most frequent anesthesia machine problem still occurring.
On many modern anesthesia machines, breathing circuit leak testing is an automated feature, although manual steps are still required for test preparation. Circuit compliance is often also automatically assessed during this phase to guide ventilator tidal volume delivery. It is therefore important that the test be performed with the circuit that will be used.
The APL valve can also be assessed at this time by opening it widely after the pressure test and ensuring that the breathing circuit pressure decreases rapidly to zero. A prompt pressure drop should occur regardless of APL valve design. Modern APL valves differ from the traditional variable-resistor valves in that they are designed to maintain a relatively stable circuit pressure through a range of fresh gas flows, living more up to the name “pressure limiting.” Like any mechanical device, however, this feature has been reported to fail.56 The ability of a modern APL valve to maintain stable circuit pressure can be easily assessed, if deemed necessary, by setting the APL valve to 30 cm H2O, occluding the patient Y-piece in a manual mode of ventilation, increasing gas flow to approximately 5 L/min, and ensuring that the circuit pressure, once stable, remains within a range close to that set on the APL valve. This range may be specified in some user’s manuals and altogether absent in others.57
Item 13: Verify that gas flows properly through the breathing circuit during both inspiration and exhalation
Responsible Parties: Provider and technician
Pressure and leak testing does not identify all obstructions in the breathing circuit or confirm proper function of the inspiratory and expiratory unidirectional valves. A test lung or second reservoir bag can be used to confirm that flow through the circuit is unimpeded. Complete testing includes both manual and mechanical ventilation. The presence of the unidirectional valves can be assessed visually during the PAC. Proper function of these valves cannot be visually assessed, since subtle valve incompetence may not be detected. Checkout procedures to identify valve incompetence that may not be visually obvious can be implemented but are typically too complex for daily testing. A trained technician can perform regular valve competence tests. Capnography should be used during every anesthetic, and the presence of carbon dioxide in the inspired gases can help to detect an incompetent valve.28
The original 1986 FDA checklist recommended that the person checking the anesthesia machine inhale and exhale into the patient connector while observing the unidirectional valves for free gas flow in the correct direction and no flow in the opposite direction. Although it is controversial for the anesthesia provider to breathe in and out of the machine and through the next patient’s breathing circuit, it is still important that the circuit be exercised to ensure that unidirectional flow is present and unimpeded. This test of circuit flow is easily accomplished by placing a “test lung” or an extra breathing bag at the patient elbow. In the “bag” or manual mode of ventilation, the operator ventilates the artificial “lung” with the breathing bag then actively “exhales” (squeezes) the test lung back to the breathing bag in a to-and-fro motion (Fig. 32-18). This is the so-called flow test. During inspiration, the inspiratory valve should open and the expiratory valve should close, and vice versa for exhalation. A major malfunction of a unidirectional valve can be visually assessed, although subtle valve leaks (reverse flow) may only be apparent via capnography during anesthesia or through formal machine evaluation. Obstruction to flow during the flow test manifests as a “tight” breathing bag on inspiration, whereas expiratory limb obstructions cause impeded exhalation. Some form of flow test should be conducted, because leak testing does not reliably identify circuit obstruction or unidirectional valve malfunction. Undetected circuit obstructions are particularly ominous and can manifest dramatically and sometimes immediately following induction.58-60
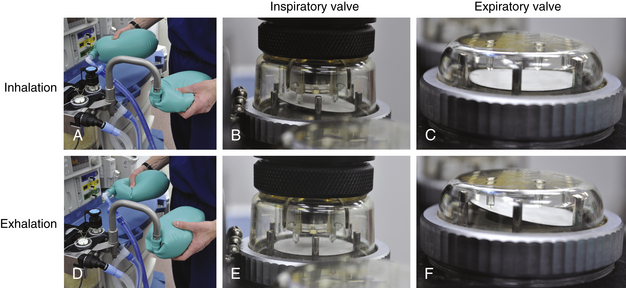
FIGURE 32-18 Verification that gas flows properly through the breathing circuit during both inspiration and exhalation with the to-and-fro flow test. Top, A test lung or second reservoir bag can is placed on the patient elbow piece. A squeeze of the breathing bag should cause flow through inspiratory limb, open the inspiratory valve, fill the test lung, and hold the expiratory valve closed. Bottom, A reciprocal squeeze of the test lung should cause flow through expiratory limb, open the expiratory valve, fill the breathing bag, and hold the inspiratory valve closed. Circuit flow during the test should be smooth and unimpeded.
It cannot be stated definitively that all automated machine checks routinely assess for unimpeded circuit flow. Although most users’ manuals for machines that perform automated aspects of the preuse checkout describe a leak test function, none were identified that specifically describe a flow test. In fact, some modern machines that incorporate automated checkout steps, including a leak test, recommend a manual assessment of the inspiratory and expiratory valves.57
Item 14: Document completion of checkout procedures
Responsible Parties: Provider and technician
Each individual responsible for checkout procedures should document completion of these procedures. Documentation gives credit for completing the job and can be helpful if an adverse event should occur. Some automated checkout systems maintain an audit trail of completed checkout procedures that are dated and timed.28
Documentation of completion of the anesthetic checkout procedure by providers should be contained within the anesthetic record. Currently, there is no guidance regarding where anesthesia or biomedical technician documentation of checkout procedures should occur. However, it would be prudent to maintain a detailed departmental log as a QA tool (see below).
Item 15: Confirm ventilator settings and evaluate readiness to deliver anesthesia care (anesthesia time out)
Frequency: Immediately prior to initiating the anesthetic
This step is intended to avoid errors due to production pressure or other sources of haste. The goal is to confirm that appropriate checks have been completed and that essential equipment is indeed available. The concept is analogous to the “time out” used to confirm patient identity and surgical site prior to incision. Improper ventilator settings can be harmful, especially if a small patient is following a much larger patient or vice versa. Pressure limit settings (when available) should be used to prevent excessive volume delivery from improper ventilator settings. Items to check: Monitors functional? Capnogram present? Oxygen saturation by pulse oximetry measured? Flowmeter and ventilator settings proper? Manual/ventilator switch set to manual? Vaporizer(s) adequately filled?28
This last step serves as a recommended final preinduction checklist of the machine and other important items, including the application of essential monitors. It is a “pre-takeoff” checklist for anesthesia providers. Some providers rely on final check mnemonic devices such as the “MS MAIDS” checklist (Box 32-2). Regardless of the configuration, a final checklist that verifies key safety items is just as important in anesthesia as it is in aviation.
Although the 2008 Guidelines for Designing Pre-Anesthesia Checkout Procedures are comprehensive, there are several steps that were part of the 1986 or 1993 recommendations that do not appear in the current guideline yet are sometimes found within machine users’ manuals. The use of these steps should be based on local needs and/or requirements, because the 2008 recommendations are not restrictive or intended to be limiting. Some of these items have been mentioned above:
1. Disconnecting the central oxygen supply line to assess the low oxygen supply pressure alarm and to purge the tank pressure gauges to zero
2. Inspecting the gas supply hoses for cracks or wear
3. Testing the flowmeters for smooth operation
4. Testing the proportioning system by attempting to create a hypoxic O2/N2O mixture
Automated Anesthesia Machine Checkout Procedures
Important points to consider regarding automated PAC features or self-tests are that 1) they differ among manufacturers and models, 2) it is sometimes difficult to determine precisely which segments or components are actually being checked from reading the user’s manual, and 3) no machine automatically checks all of the items on an effective PAC; at least some manual steps will be required. It has been suggested that many providers do not understand exactly what is being checked by automated checks, or they make false assumptions regarding their respective machine’s automated checkout procedure. It is therefore easy to understand why the authors of the ASA’s 2008 Recommendations for Pre-Anesthesia Checkout Procedures warned about an overreliance on the automated machine checkout. For example, one manufacturer’s self-test screen reports a “leakage” amount, but the display or manual does not specify which segments and components are assessed. The operator must make an assumption that the LPS is also being tested for leaks, and the manual does not state that any vaporizer should be turned on during leak testing. Finally, it is not clear in this unspecified manual whether the circuit is assessed for proper unidirectional flow or obstruction.
When developing a local PAC procedure, providers should gain familiarity with their machine’s automated checkout procedure via the user’s manual and direct communication with the manufacturer if necessary. Once clear on the actual scope of the automated test, an effective departmental PAC checklist can be created. If an important item is not actually part of the described self-check or is not suggested in the user’s manual, it should not be assumed that it is not important. Not requiring that conventional vaporizers be opened during a leak test of the LPS is an example of this problem. Further, if an important checklist item cannot be confirmed to be accomplished by the machine’s self-test function, through either the user’s manual or the manufacturer, it should be assumed that it does not occur, and this step should be accomplished manually if possible. An example of this would be a circuit “flow test.”
Machine-Embedded Preanesthesia Checklists
Some anesthesia machines have embedded checklists that are displayed during machine checkout (Fig. 32-19). Like their paper counterparts, they help guide users through manual and self-test functions. If an embedded checklist provides a complete solution for a respective department, it can be used exclusively. However, it is possible that local requirements may exceed or depart to some degree from the workstation’s embedded checklist. In these cases, the use of the embedded checklist, or a modification thereof, can become a line item within the local PAC.
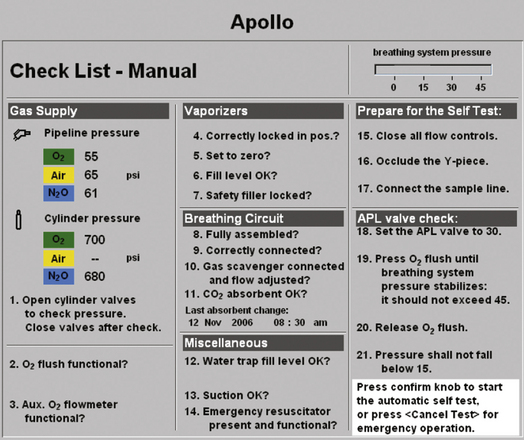
Using Technicians to Perform Aspects of the Preanesthesia Checklist
The 2008 recommendations for Pre-Anesthesia Checkout Procedures identify aspects of the PAC that could be completed by a “qualified anesthesia and/or biomedical technician,” although the ultimate responsibility for the preuse check remains with the provider. This represents a departure from the previous guidelines, which placed all of the tasks upon the anesthesia provider. The main benefit of using technicians to perform some aspects of the PAC is enhanced compliance by balancing tasks between anesthesia providers and technicians. Other potential benefits include redundant checks of critical items; possible identification of machine problems earlier in the day, so they can be addressed sooner; and enhanced technician familiarity with the anesthesia workstation. A training syllabus may be required for anesthesiology technicians, because a multistep anesthesia workstation precheckout is often not part of their responsibilities. If they are incorporated into daily and precase machine checks, their specific responsibilities can be outlined in the form of a separate technician checklist.
Preuse Checkout of the Anesthesia Machine in an Emergency Situation
During certain emergency circumstances, there may be no time to perform a proper PAC. These are usually circumstances in which the pace of events is impossible to control (e.g., a “crash” cesarean section, trauma surgery, or emergency cardiac surgery). Ideally, daily or morning checks at potential anesthetizing locations should ready machines for use. However, emergent situations often occur at odd hours and prior to daily PACs. Also, circuit changes, routine maintenance tasks such as an absorbent change, and other manipulations may occur during the day that are unbeknownst to the anesthesia providers. Such events could introduce serious faults, such as leaks or obstructions (see above), or other failures.61-63 Under these conditions it is still important to know that the machine is, at least, potentially usable, and a minimal check should be performed (Table 32-3).
TABLE 32-3
Proposed Emergency Situation Preanesthesia Checkout
| Ambu bag | Present |
| Machine status | On |
| Self-test | Bypass if applicable |
| Breathing circuit | Circuit intact, absorbent canister closed |
| Pipeline pressure | 50 to 55 psig |
| Circuit, manual leak test | Circuit holds pressure |
| Suction | Available |
| Monitors | Ready |
| Airway | Ready |
| IV | Ready |
| Drugs | Ready |
Some modern machines may require an operator-selected bypass of the start-up or automated check-out procedure to ready the machine for routine use.
Anesthesia providers may encounter machines that are not turned on when needed in an emergency. Older generation anesthesia machines were usually ready for immediate use after powerup. However, some modern machines either automatically self-test or anticipate a user-initiated self-test after startup. For example, after turning on the Dräger Julian anesthesia workstation, about 40 seconds elapse for software loading, then an embedded checklist is presented.64 Normally, after manual completion of the checklist items, the user confirms completion, which then initiates a 3- to 4-minute self-test. This would be obviously unsatisfactory during an emergency; in such as case, the patient can be manually ventilated immediately after turning on the machine. However, software loading still requires about 40 seconds, and the user still must initiate, and then cancel, the self-test. Although this entire process takes only about a minute, the user must be familiar with the steps involved in bypassing normal startup procedures. It may be useful then to include a small “Emergency PAC” within departmental PAC procedures, particularly when local machines require a nonintuitive emergency start-up process.
Developing a Local Preanesthesia Checkout Checklist
The goal of a PAC is to properly evaluate and configure the anesthesia workstation, so it is nearly ensured that it can perform its functions properly and safely. Similar to a pre-takeoff checkout of an aircraft, the PAC is a systematic task list consisting of numerous critical steps. It is therefore the perfect situation in which to use a checklist. The goals of the checklist are to guide the operator through an effective PAC and to promote compliance through ease of use. A checklist is a visual memory aid used to help overcome the limitations of short-term human memory, ensuring that a particular series of specified actions or procedures are accomplished.65 A PAC checklist can also serve as a quality control tool by codifying important items onto an organized list used by all providers.66 Although checklists have historically seen of little use in medicine, recent successes have highlighted their effectiveness.67,68 As useful as they may be, however, a simple checklist like the PAC cannot stand alone. It must be combined with a general foundational knowledge of the anesthesia delivery system, knowledge about the respective workstation, and a positive attitude toward the use of the checklist. This concept is well understood in aviation. Pilots are very familiar with their aircraft, they use procedural checklists as memory aids in checking out their machinery, and they work within a safety culture that embraces the checklist. Based on the current available literature, anesthesia professionals seem to have less understanding of equipment used, have not been shown to be consistent when it comes to checking equipment prior to use, and tend to reject the use of checklists.11,21,69,70 Anesthesia providers and their patients stand to benefit if we, too, commit to maintaining a sound knowledge of our workstations and advocate the use of checklists.
The essential items required for local PAC checklist development are the 2008 Recommendations for Pre-Anesthesia Checkout Procedures, the respective workstation user’s manual, and an anesthesia machine reference text, such as this book. It should be understood that the ASA 2008 Recommendations do not relieve users of their responsibility to be aware of any special procedures or precautions outlined by the manufacturer of their specific machine. However, the PACs found in manufacturer’s users’ manuals tend to be several pages long, and they may contain items not specified in professional society recommendations, such as the ASA’s guidelines. Local PAC developers will quickly recognize these competing objectives of completeness and brevity during the design process. An excessively long checklist will probably not be routinely completed properly, and an underinclusive PAC could miss key items. Alternatively, some manufacturers omit important steps in their PAC recommendations; not opening the vaporizers during leak testing is such an example.
Several basic premises are involved in effective checklist design. First, a checklist like the PAC is a series of read-and-do tasks, either action items (“Open the O2 cylinder”) or verification items (“Verify that the tank pressure reads >1000 psig”). In aviation it would be referred to as a “do-list,” and like an aircraft checklist, it should avoid elaboration or explanation.65,66 Next, the principle that form should follow function is operative when designing an effective PAC. The design of the checklist must support its function to the fullest extent possible, and the checkout procedure should be ergonomically ordered so as to minimize redundant movements and save time by placing procedures in a rational sequence. This is a well-recognized factor in the design of aviation checklists. A Federal Aviation Administration (FAA) monograph addressing human performance considerations in the use and design of aviation checklists states that “The [designer] should ensure that the checklist is configured in an order that is both compatible with the aircraft system’s operational sequence and at the same time complement the crew’s ability to perform tasks in a logical and consistent order.”71 An effective “flow pattern” will contribute to efficiency and compliance.
Finally, the checklist should be as short as possible yet be detailed enough so that critical items are not omitted. From a human factors and performance point of view, a shorter and less elaborate checklist will enhance use, but it may not be sufficiently detailed to provide those less familiar with the workstation with adequate guidance. Unlike pilots, anesthesia providers do not spend countless hours on equipment-focused training, which is where the aviation/anesthesia analogy weakens significantly. PAC developers will quickly recognize this dilemma and may choose to create a slightly more detailed version for trainees or new employees and another version for those more familiar with their respective workstations. Because a PAC should ideally be confined to one page, a laminated card with the detailed, instructional version on one side and the succinct, true checklist on the other may be optimal (Tables 32-4 and 32-5). Additional checklist design and use considerations are presented in Box 32-3.
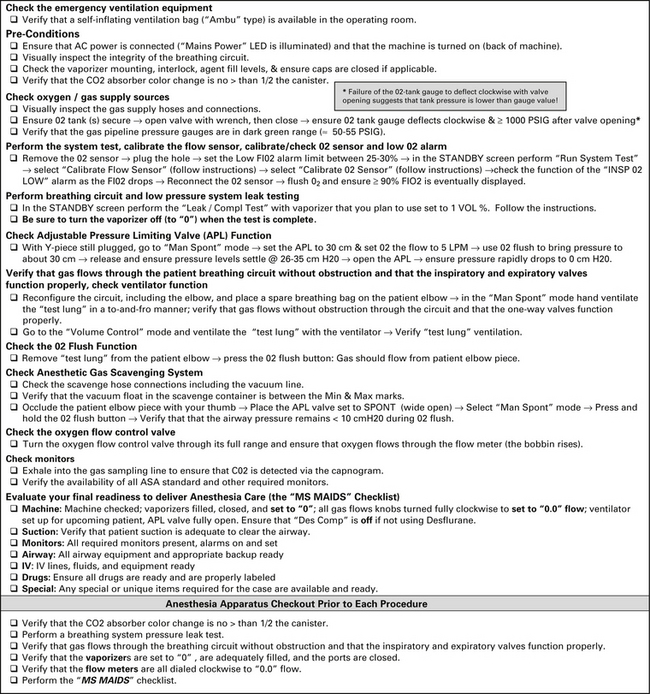
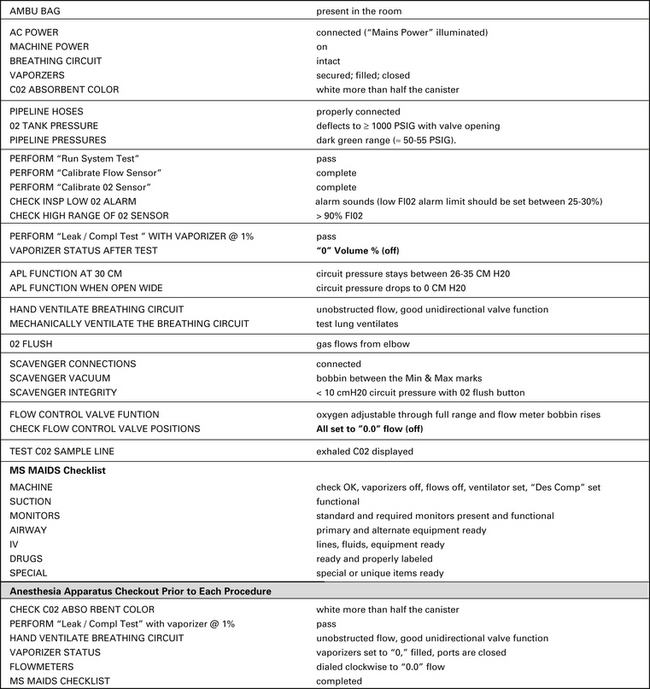
Equipment Quality Assurance
As opposed to the “acute” preanesthesia checkout, the “chronic” component of anesthesia equipment management is a comprehensive QA program that involves equipment evaluation, purchasing, installation, initial inspection, periodic safety inspections, preventive maintenance, repair, record keeping, and machine retirement. Coupled with specific attention to pieces of equipment can be a periodic safety inspection of the anesthetizing environment. A classic comprehensive review article72 includes a 49-point safety inspection that is intended to be performed annually and covers anesthetizing areas (i.e., a suite of operating rooms), individual anesthetizing locations, and equipment. All facilities in which anesthesia is given should have this type of thorough safety inspection at least annually.
Prepurchase Evaluation
The QA or quality management program begins well before any anesthesia equipment is purchased. When new equipment is needed or contemplated, designated members of the anesthesia department must take responsibility for writing specifications for what is needed and then evaluating potential products. Anesthesiologists who will actually be using the equipment must be involved; these tasks should not be delegated to support personnel, purchasing agents, or a product evaluation committee of the facility as a whole. A proposed piece of equipment must meet applicable codes and standards. This usually will be the case when major manufacturers are involved. Thorough questioning of sales representatives and further investigation if there are any doubts should prevent the purchase of new equipment that does not meet current standards. Additional information can often be obtained from the ECRI Institute through its monthly publication Health Devices. The ECRI Institute conducts evaluations and gives ratings of the various brands and models of a specific type of product. The anesthesia literature occasionally may be of help, and when major purchases are contemplated, a computerized literature search for information may reveal relevant publications. Further, proprietary services will, for a contract fee, survey an anesthesia department’s practice patterns, existing equipment, current needs, and projected future needs and then provide recommendations for purchases of specific capital equipment by brand and model.
When purchasing new equipment, such as an integrated monitoring system, it is prudent to consider several factors. The system must be user friendly and human engineered so that the anesthesia personnel can easily set up the parameters they need for a given case and be able to acquire the data from the monitor. The monitoring system should be easy to interface with current or future electronic record-keeping systems, and the system should be trialed using actual cases for a significant period of time. The system needs to be tested with all possible monitoring modes running simultaneously, because an integrated system may function properly when just the electrocardiogram (ECG), blood pressure, and pulse oximeter modules are in use but may fail when multiple invasive pressures, cardiac output, and electroencephalogram (EEG) are added. Finally, multiple people in the department must trial the system. This should include the most and the least technologically adept personnel, because all will have to eventually be comfortable using it.
A similar analysis must be performed when purchasing new anesthesia machines. This is especially important if the department is considering buying electronic anesthesia machines for the first time. As previously discussed, these machines will have a totally different checkout procedure than the traditional anesthesia machine. Even though they have self-test programs, it may actually take longer to properly check the electronic machine than it would to check a traditional machine. Other important factors include emergency case usage, usability in a power failure, and functional changes from traditional machines; for example, to increase gas flow on many electronic machines, the flow control knob is turned clockwise; this is opposite to mechanical machines, in which increases in flow require the flow control knob to be turned counterclockwise. In addition, interfacing with electronic record keepers and the cost and availability of manufacturer-specific disposable parts, such as carbon dioxide absorbents, must be considered. Once again, the machine should be trialed by various anesthesia personnel, in different case scenarios, prior to purchase.
Incoming Inspection
When new equipment arrives, it must be inspected and checked for proper function before it is put into service. Any electrical device must be tested for leakage current and compliance with standards, usually in the facility’s own maintenance shop or by an outside evaluator not associated with the manufacturer. Complex equipment such as anesthesia machines, ventilators, and physiologic monitoring systems should be assembled and then tested for correct function by a person from the equipment manufacturer or an associated manufacturer’s agent. This leads to the manufacturer’s certification that the equipment is safe and ready for use. (Note that these certification documents become the start of the unique file of records and information that will stay in the anesthesia department and track the piece of equipment throughout its life.) Allowing relatively untrained or inexperienced personnel to assemble and certify new equipment, even if they do it perfectly, can present serious adverse medicolegal implications. Any untoward development in the future involving the new equipment will prompt a review of the records and an automatic assumption of malfeasance, if the people initially handling the equipment were not fully qualified to do so.
Record Keeping
As noted, a unique record must be kept for each piece of capital equipment (anything with a serial number) that comes into the anesthesia workplace. This record can be a page or, more likely, a section in a master equipment logbook that should be maintained in every anesthesia department or environment. In addition to the certifying document, the exact make, model, serial number, and any in-house identification must be recorded. This not only allows immediate identification of any equipment involved in a recall or product alert but also serves as the permanent repository of the record of every instance of inspection, problem, problem resolution, maintenance, and servicing until that particular piece is discarded. For electrical equipment that will undergo periodic inspection and testing, it is convenient to create stickers with blanks for all the necessary information to be entered and to have these filled out by the technician performing the inspection. These stickers are then affixed in sequence in the master log over the life of that piece of equipment. This log should be kept up to date at all times. There have been rare but frightening examples of potentially lethal problems with anesthesia machines leading to product alert notices that require immediate identification of certain equipment, its location, and its service status.
Maintenance and Service
There is a distinction between equipment failure as a result of progressive deterioration of components over time from continued use and catastrophic, unexpected failure, which usually is not predictable. Preventive maintenance is intended to anticipate what is essentially predictable failure—such as worn O-rings, gaskets, and rubber bellows—and to replace the weakened component before it eventually does fail. Because of the potential liability implications of a catastrophic failure, manufacturers expend a great deal of effort constructing a preventive maintenance schedule for their capital equipment. Preventive maintenance should be performed often enough and thoroughly enough to prevent most predictable failures while still maintaining reasonable cost. Users sometimes believe manufacturers are too cautious and that they prescribe too much periodic maintenance in order to generate service business. These users are tempted to lengthen the maintenance cycles or to limit the extent of the service. Although this can save money in the short term, the liability implications in the event of a catastrophic anesthesia equipment failure that causes or contributes to patient harm are unacceptable. This functionally obligates users to attempt to adhere to the prescribed maintenance and service regimen that comes with the equipment from the manufacturer.
Safety inspections and functional testing are integral components of preventive maintenance. Clear protocols that use discrete, highly visible checklists for each type of equipment often come from the manufacturer and, if not, these should be developed by agents of the users. In facilities with a large number of each type of equipment, use of such protocols should simplify the repetitive tasks for service personnel and help to ensure that all the points are covered for each unit of that type. Of course, copies of the completed form should be stored permanently in the departmental master equipment log.
The question of who should maintain and service anesthesia equipment has been widely debated and is very important. Needs and resources differ. The fundamental options are 1) factory service representatives, who are directly employed by the manufacturer or the manufacturer’s agent to work on the equipment made by that company; 2) independent service contractors, who usually work on all brands of equipment and who may or may not have some type of relationship with the various manufacturers but are not employed by them; and 3) personnel within the anesthesia group or department or the maintenance and engineering department of the health care facility; these can be either formal biomedical engineers or less formal technicians. The order of the three options approximately represents decreasing average cost and increasing liability implications for the practitioners using the equipment. These issues should not necessarily drive the decision as to which to choose, but they certainly can be taken into consideration. The fundamental issue is straightforward: the person performing preventive maintenance and service must be qualified to do so, and documentation of that qualification must be maintained.
Whether service personnel are qualified may be, at times, somewhat difficult to ascertain, but judicious investigation of references and direct questioning of the service personnel regarding their education, training, and experience is appropriate. Direct contact with the supervisor or manager responsible for the work of the service person is strongly advised. This indicates the importance that the practitioners attach to maintenance and service. Whether a technician who spent a week at a course at an equipment manufacturer’s factory can perform the most complex repairs of computerized gas machines, for example, depends on a variety of factors.
Ultimately, the practitioner using the equipment must decide the competence level of the personnel who repair the equipment. Failure to be involved and to have some oversight in this process exposes the practitioner to increased liability in the event of an untoward outcome associated with improperly maintained or serviced equipment. Importantly, such situations are fortunately very rare. However, as with so many things in modern anesthesia practice, the continual background threat of liability implications is enough to prompt specific plans and actions in this regard.
Daily Support
In addition to periodic preventive maintenance and servicing, adequate day-to-day clinical maintenance of anesthesia equipment must be addressed. Because budgets of facilities with surgical suites are constantly under scrutiny, anesthesia technicians seem to be a popular target for cost cutters. It is dangerous false economy to decrease the number of technicians to below that genuinely needed to retrieve, clean, sort, disassemble, sterilize, reassemble, store, and distribute the equipment of daily anesthesia practice. Inadequate service in this area truly creates an accident waiting to happen. Although it is desirable that all anesthesia practitioners be able to change the carbon dioxide absorbent on their anesthesia machines, some might be sufficiently unfamiliar with the procedure as to create a hazard in the process. Many other sources of potential danger arise from a lack of adequate technical support personnel, intended to execute tasks such as this and thereby provide the correctly functioning wherewithal for anesthesia practice.
Retirement of Equipment
There appears to be a strong sentiment against using the word obsolete to refer to older anesthesia equipment. The concept has adverse medicolegal implications and dwells in the past, whereas a safety improvement effort involving new equipment looks to the future. It has been stated, however, that replacement of “obsolete” anesthesia machines and monitoring equipment is one key element of a risk-modification program.73 Ten years has been frequently cited as an estimated useful life for an anesthesia machine, but this is simply an opinion and is probably at least in part related to depreciation tables used by hospital actuaries. Certainly, unmodified anesthesia machines that are significantly more than 10 years old may not meet the minimum specifications outlined by the ASTM F1850-00 (2005) Standard Specification for Particular Requirements for Anesthesia Workstations and Their Components. Furthermore, there is every indication that technology will continue to advance at an accelerating rate. Note that some anesthesia equipment manufacturers, anxious to minimize their own potential liability, have refused to support with parts and service some of their older pieces of equipment still in use, particularly gas machines. This fact should send a very strong message to practitioners that such equipment must be replaced as soon as possible.
The ASA published a guideline in 2004, developed by its Committee on Equipment and Facilities, entitled “Guideline for Determining Anesthesia Machine Obsolescence,” which stated:
Anesthesia equipment can become obsolete if essential components wear out and cannot be replaced. It may also become obsolete as a result of changes in medical practices, changes in the training and experience of anesthesia providers, and/or development of new safety features. An anesthesia machine should not be considered obsolete solely because it has reached an arbitrary age. Furthermore, a machine should not be expected to meet all of the performance and safety requirements specified in United States or international equipment standards published after the machine was manufactured. It is the responsibility of the anesthesia provider to determine if a machine’s failure to meet newer standards represents a sufficient threat to patient safety to render the machine obsolete.
This type of statement emphasizes that the users of anesthesia equipment should be able to knowledgeably decide whether equipment is obsolete, again illustrating that anesthesia professionals need to know their equipment thoroughly and must ask many questions of the personnel who service and maintain it (see also Chapter 30 and Box 30-6).
The summary message is that a great many technologic advances have been made in anesthesia equipment, particularly in gas machines, that were specifically intended to increase the safety of the patients anesthetized with that equipment. Exactly how fast these improvements are incorporated into daily use will depend on the circumstances of a given anesthesia practice, published and de facto standards and guidelines, applicable regulations, and the relevant medicolegal climate.
Equipment Crisis Management
Finally, should equipment fail, it must be removed from service and replaced if that anesthetizing location will still be used. Groups or departments are obligated to have sufficient back-up equipment to cover any reasonable incidence of failure, predicted on the basis of past experience and manufacturer’s guidelines. The equipment removed from service must be clearly marked with a sign to that effect, so that it is not put back into service by well-meaning support personnel or even other practitioners; the sign should include the date, time, person discovering the fault, and details of the problem. The responsible personnel must be notified so that they can remove the equipment, make an entry in the log, and initiate repair. A piece of equipment either directly or indirectly involved in possibly causing an anesthesia accident must be immediately sequestered and not touched by anybody, particularly not by any equipment service personnel. There may be strong pressure to return a major piece of equipment, such as a gas machine, to service if there is no spare available; this temptation must be resisted. If a severe accident occurred, it may be necessary for the equipment in question to be inspected at an appointed time by a group consisting of qualified representatives of the manufacturer, the service personnel, the plaintiff’s attorney, the insurance companies involved, and the practitioner’s defense attorney. Also, major equipment problems involving obvious or suspected hazards should be reported immediately to the electronic Medical Device Reporting system of the FDA and thus to the Manufacturer and User Facility Device Experience Database (http://www.fda.gov/MedicalDevices/Safety/ReportaProblem/default.htm). This system accepts voluntary reports from users and requires reports from manufacturers when there is knowledge that a medical device has been involved in a serious incident. This is a logical progression of an equipment QA process.
Conclusion
Implementation of the acute and chronic components of an anesthesia equipment QA program should help to minimize the likelihood of equipment-related untoward events during anesthesia care. Both the preanesthesia checklists and the equipment management programs outlined in this chapter are intended as models. Individual anesthesia practitioners, groups, and departments must adapt these principles to their own particular situations, taking into account the type of equipment, practice environments, and local characteristics. Incorporation of the spirit of the recommendations more than the letter is the key. It is important to recall that human error is implicated in the vast majority of adverse outcomes from anesthesia care; overt equipment failure or problems appear to be involved in only a small fraction of these cases. Nonetheless, this fraction is virtually reducible to zero with rigorous application of the principles of equipment checkout and QA.
References
1. Lees D.E. Anesthesia machine and equipment standards. Eichhorn J.H., ed. Problems in anesthesia. Philadelphia: Lippincott; 1991;vol. 5:205–218.
2. Waldrop W.B., Murray D.J., Boulet J.R., et al. Management of anesthesia equipment failure: a simulation-based resident skill assessment. Anesth Analg. 2009;109:426–433.
3. Mudumbai S.C., Fanning R., Howard S.K., et al. Use of medical simulation to explore equipment failures and human-machine interactions in anesthesia machine pipeline supply crossover. Anesth Analg. 2010;110:1292–1296.
4. Petty C. The anesthesia machine. New York: Churchill Livingstone; 1987.
5. Rendell-Baker L. Problems with anesthetic gas machines and their solutions. In: Problems with anesthetic and respiratory therapy equipment. Boston: Little Brown; 1984:1–82.
6. Spooner R.B., Kirby R.R. Equipment-related anesthetic incidents. In: Pierce E.C., Cooper J.B., eds. Analysis of anesthetic mishaps. Boston: Little Brown; 1984:133–147.
7. Caplan R.A. Liability arising from gas delivery equipment. ASA Newslett. 1998;62:7–9.
8. Cooper J.B., Newbower R.S., Long C.D., et al. Preventable anesthesia mishaps: a study of human factors. Anesthesiology. 1978;49:399–406.
9. Cooper J.B., Newbower R.S., Kitz R.J. An analysis of major errors and equipment failures in anesthesia management: considerations for prevention and detection. Anesthesiology. 1984;60:34–42.
10. Eichhorn J.H. Prevention of intraoperative anesthesia accidents and related severe injury through safety monitoring. Anesthesiology. 1989;70:572–577.
11. Langford R., Gale T., Mayor A. Anaesthetic machine checking guidelines: have we improved our practice? Eur J Anaesth. 2007;24:1050–1056.
12. Arbous M., Anneke E., Jack W., et al. Impact of anesthesia management characteristics on severe morbidity and mortality. Anesthesiology. 2005;102(2):257–368.
13. Buffington C.W., Ramanathan S., Turndorf H. Detection of anesthesia machine faults. Anesth Analg. 1984;63(1):79–82.
14. Carstensen P. FDA issues pre-use checkout. APSF Newslett. 1986;1(3):13–20.
15. March M.G., Crowley J.J. An evaluation of anesthesiologists’ present checkout methods and the validity of the FDA checklist. Anesthesiology. 1991;75(5):724–729.
16. Lees D.E. FDA preanesthesia checklist being evaluated, revised. APSF Newslett. 1991;6(3):25–36.
17. Withiam-Wilson M.J. FDA pre-use equipment checklist spurred by accidents, studies. APSF Newslett. 1991;6(3):25–36.
18. FDA Publishes final version of revised apparatus checkout. APSF Newslett. 1994;9(3):26–27.
19. Anesthesia apparatus checkout recommendations. Federal Register 1994 July 11. Document number 94-16618. Accessed 2011 Mar 2 at http://www.federalregister.gov/articles/1994/07/11/94-16618/anesthesia-apparatus-checkout-recommendations-1993-availability.
20. Manley R., Cuddeford J.D. An assessment of the effectiveness of the revised FDA checklist. AANA J. 1996;64(3):277–282.
21. Blike G., Biddle C. Preanesthesia detection of equipment faults by anesthesia providers at an academic hospital: comparison of standard practice and a new electronic checklist. AANA J. 2000;68(6):497–505.
22. Larson E.R., Gregory A.N., Brian D.O., et al. A prospective study on anesthesia machine fault identification. Anesth Analg. 2007;104(1):154–156.
23. Olympio M.A., Goldstein M.M., Mathes D.D. Instructional review improves performance of anesthesia apparatus checkout procedures. Anesth Analg. 1996;83(3):618–622.
24. Armstrong-Brown A., Devitt J.H., Kurrek M., et al. Inadequate preanesthesia equipment checks in a simulator. Can J Anaesth. 2000;47(10):974–979.
25. Craig J., Wilson M. A survey of anaesthetic misadventures. Anaesthesia. 1981;36(10):933–936.
26. Mayor A.H., Eaton J.M. Anaesthetic machine checking practices: s survey. Anaesthesia. 1992;47(10):866–868.
27. Lampotang S., Moon S., Lizdas D.E., et al. Anesthesia machine pre-use check survey—preliminary results. American Society of Anesthesiologists Annual Meeting. Oct 24, 2005. abstract #A1195
28. Sub-Committee of ASA Committee on Equipment and Facilities: Recommendations for pre-anesthesia checkout procedures, 2008. Accessed 2011 Mar 1 at http://www.asahq.org/clinical/fda.htm.
29. Eichhorn J.H. Anesthesia equipment: checkout and quality assurance. In: Ehrenwerth J., Eisenkraft J.B., eds. Anesthesia equipment. ed 1. St Louis: Mosby; 1993:473–491.
30. Operators instruction manual: Narkomed 6400 anesthesia system. Lübeck, Germany: Dräger Medical; 2002.
31. Operation manual, part 1: Aestiva/5 7100. Madison, WI, 2001, Datex-Ohmeda.
32. User’s reference manual-part 1: S/5 Aespire. Madison, WI, 2002, Datex-Ohmeda.
33. Service manual: Datascope AS3000 anesthesia delivery system. Mahwah, NJ, 2008, Mindray North America.
34. Operator’s instruction and setup manual: Narkomed M anesthesia system. Lübeck, Germany: Dräger Medical; 2001.
35. Operator’s instruction and setup manual: Narkomed 2B anesthesia system. Lübeck, Germany: Dräger Medical; 1998.
36. J. Jeffrey Andrews, M.D., Professor and Chair, University of Texas Health Science Center San Antonio. Personal communication, February 9, 2011.
37. National Fire Protection Association. NFPA 99: Standard for health care facilities. 2005. http://www.nfpa.org/aboutthecodes/AboutTheCodes.asp?DocNum=99 NFPA. Accessed 2011 Feb 24 at
38. O’Connor C.J., Jr., Hubin K.F. Bypassing the diameter-indexed safety system. Anesthesiology. 1989;71(2):318–319.
39. Ellett A.E., Justin C.S., Ifune C., et al. A near miss: a nitrous oxide-carbon dioxide mix-up despite current safety standards. Anesthesiology. 2009;110(6):1429–1431.
40. Neubarth J. Another hazardous gas supply misconnection. Anesth Analg. 80(1), 1995.
41. Krenis L.J., Berkowitz D.A. Errors in installation of a new gas delivery system found after certification. Anesthesiology. 1985;62(5):677–678.
42. Jardine D.S. An epidemic of hypoxemia in two intensive care units: cause and human response. Anesthesiology. 1992;77(5):1038–1043.
43. Sprague D.H., Archer G.W. Intraoperative hypoxia from an erroneously filled liquid oxygen reservoir. Anesthesiology. 1975;42(3):360–362.
44. Moss E. Medical gas contamination: an unrecognized patient danger. J Clin Monit. 1995;11(1):73–76.
45. Eichhorn J.H. Medical gas delivery systems. Int Anesthesiol Clin. 1981;19(2):1–26.
46. McIntyre J.W. Anesthesia equipment malfunction: origins and clinical recognition. Can Med Assoc J. 1979;120(8):931–934.
47. Riutort K.T., Brockwell E.C., Brull S.J., Andrews J.J. The anesthesia workstation and delivery systems. In: Barash P.G., Cullen B.F., Stoelting R.K., eds. Clinical anesthesia. ed 6. Philadelphia: Lippincott Williams & Wilkins; 2009:644–694.
48. Prima SP3 anaesthetic machine range user’s manual. Abingdon, UK, 2005, Penlon Limited.
49. Myers J.A., Good M.L., Andrews J.J. Comparison of tests for detecting leaks in the low-pressure system of anesthesia gas machines. Anesth Analg. 1997;84(1):179–184.
50. Dorsch J.A., Dorsch S.E. Understanding anesthesia equipment, ed 5. Philadelphia: Lippincott Williams & Wilkins; 2008.
51. Brockwell R.C., Andrews J.J. Inhaled anesthesia delivery systems. In: Miller R., Eriksson L.I., Fleisher L.A., eds. Miller’s anesthesia. ed 7. Philadelphia: Churchill Livingstone; 2010:667–718.
52. Aisys user’s reference manual. Madison, WI, 2009, Datex-Ohmeda.
53. Andrews Johnston R.V., Jr., Bee D.E., Arens J.F. Photodeactivation of ethyl violet: a potential hazard of sodasorb. Anesthesiology. 1990;72(1):59–64.
54. Olympio M. Carbon dioxide absorbent desiccation safety conference convened by APSF. APSF Newslett. 2005;20(2):25–44.
55. Ciarán Magee Dr. Technical Director, Armstrong Medical Limited. Coleraine, Ireland. Personal communication. January 20, 2011.
56. Souvatzis X., Askitopoulou H. Malfunction of an adjustable pressure limit valve. Eur J Anaesthesiol. 2007;24(11):978–980.
57. Operator’s instruction and setup manual: Fabius GS. Lübeck, Germany: Dräger Medical; 2002.
58. Dean H.N., Parsons D.E., Raphaely R.C. Case report: bilateral tension pneumothorax from mechanical failure of anesthesia machine due to misplaced expiratory valve. Anesth Analg. 1971;50(2):195–198.
59. Norman P.H., Daley M.D., Walker J.R., et al. Obstruction due to retained carbon dioxide absorber canister wrapping. Anesth Analg. 1996;83(2):425–426.
60. Monteiro J.N., Ravindran M.N., D’Mello J.B. Three cases of breathing system malfunction. Eur J Anaesthesiol. 2004;21(9):743–745.
61. Ianchulev S.A., Comunale M.E. To do or not to do a preinduction check-up of the anesthesia machine. Anesth Analg. 101(3), 2005. 774,
62. Ezaru C.S. Preinduction check-up of the anesthesia machine. Anesth Analg. 2006;102(5):1588–1589.
63. McLean J.S., Houston P., Dumais R. Erroneous connection of the fresh gas flow to the anesthesia circuit. Can J Anaesth. 2003;50(1):93.
64. Julian anesthesia workstation operating instructions. Lübeck, Germany: Dräger Medical; 2000.
65. Federal Aviation Administration [FAA]: Flight Standards Information Management System. General technical administration, Chapter 32: Manuals, procedures, and checklists for 14 CFR parts 91K, 121, 125, and 135; Section 12, aircraft checklists for 14 CFR parts 121/135. Washington, DC, 2007, FAA. Accessed online 2011 Feb 24 at http://fsims.faa.gov/wdocs/8900.1/v03%20tech%20admin/chapter%2032/03_032_012.pdf.
66. Degani A., Wiener E.L. Cockpit checklists: concepts, design, and use. Hum Factors. 1993;35(2):345–359.
67. Pronovost P., Needham D., Berenholtz S., et al. An intervention to decrease catheter-related bloodstream infections in the ICU. N Engl J Med. 2006;355(26):2725–2732.
68. de Vries E.N., Prins H.A., Crolla R.M.P.H., et al. Effect of a comprehensive surgical safety system on patient outcomes. N Engl J Med. 363(20), 2010. 1928-1937
69. Gawande A. The checklist manifesto: how to get things right. New York: Metropolitan Books; 2009.
70. Winters B.D., Ayse P.G., Lehmann H., et al. Clinical review: checklists—translating evidence into practice. Crit Care. 13(6), 2009.
71. FAA Office of Integrated Safety Analysis, Human Factors Analysis Division: Human performance considerations in the use and design of aircraft checklists, January 1995. Accessed online 2011 Feb 24 at http://www.faa.gov/about/office_org/headquarters_offices/avs/offices/afs/afs200/branches/afs210/training_aids/media/checklist.doc.
72. Duberman S.M., Wald A. An integrated quality control program for anesthesia equipment. Chapman-Cliburn G., ed. Risk management and quality assurance: issues and interactions. Chicago: Joint Commission on Accreditation of Healthcare Organizations; 1986:105–112. (A special publication of the Quality Review Bulletin).
73. Pierce E.C. Risk modification in anesthesiology. Chapman-Cliburn G., ed. Risk management and quality assurance: issues and interactions. Chicago: Joint Commission on Accreditation of Healthcare Organizations; 1986:20–23. (A special publication of the Quality Review Bulletin).