CHAPTER 15 Impression Materials and Procedures for Removable Partial Dentures
Impression materials used in the various phases of partial denture fabrication may be classified as rigid, thermoplastic, or elastic substances. Rigid impression materials are those that set to a rigid consistency. Thermoplastic impression materials are those that become plastic at higher temperatures and resume their original form when cooled. Elastic impression materials are those that remain in an elastic or flexible state after they have set and have been removed from the mouth.
Although rigid impression materials may be capable of recording tooth and tissue details accurately, they cannot be removed from the mouth without fracture and reassembly. Thermoplastic materials cannot record minute details accurately because they undergo permanent distortion during withdrawal from tooth and tissue undercuts. Elastic materials are the only ones that can be withdrawn from tooth and tissue undercuts without permanent deformation and therefore are used generally for making impressions for removable partial dentures, immediate dentures, crowns, and fixed partial dentures when tooth and tissue undercuts and surface detail must be recorded with accuracy.
Rigid Materials*
Plaster of Paris
One type of rigid impression material is plaster of Paris, which has been used in dentistry for over 200 years. Although all plaster of Paris impression materials are handled in approximately the same manner, the setting and flow characteristics of each manufacturer’s product will vary. Some are pure and finely ground with only an accelerator added to expedite setting within reasonable working limits. Others are modified impression plasters to which binders and plasticizers have been added to permit limited border manipulation while the material is setting. These do not set as hard or fracture as cleanly as pure plaster of Paris and therefore cannot be reassembled with as much accuracy if fracture occurs.
Plaster of Paris was once the only material available for removable partial denture impressions, but now elastic materials have completely replaced the impression plasters in this phase of prosthetic dentistry. It can be used for making accurate transfers of abutment castings or copings in the fabrication of fixed restorations and internal attachment dentures and for making rigid indexes and matrices for various purposes in prosthetic dentistry. Modified impression plasters may be used to record maxillomandibular relationships.
Metallic Oxide Paste
A second type of rigid impression material is metallic oxide paste, which is usually some form of a zinc oxide–eugenol combination. A number of these pastes are available; however, they are not used as primary impression materials and should never be used for impressions that include remaining natural teeth. They also are not to be used in stock impression trays.
Metallic oxide pastes are manufactured with a wide variation of consistencies and setting characteristics. For convenience, most of them are dispensed from two tubes; this enables the dentist to dispense and mix the correct proportion from each tube on a mixing slab. The previously prepared tray for the edentulous ridge segments is loaded and positioned in the mouth with or without any attempt at border molding. Border molding with metallic oxide impression pastes is not advisable because wrinkles will occur if movement is permitted at the time the material reaches its setting state.
As with all impression techniques, the accuracy of the primary impression and of the impression tray has a great influence on the final impression. Some metallic oxide pastes remain fluid for a longer period than do others, and some manufacturers claim that border molding is possible. In general, however, all metallic oxide pastes have one thing in common with plaster of Paris impression materials: they all have a setting time during which they should not be disturbed and after which no further border molding is effective.
Metallic oxide pastes, which are rigid substances, can be used as secondary impression materials for complete dentures and for extension base edentulous ridge areas of a removable partial denture if a custom impression tray has been properly designed and attached to the removable partial denture framework (see Chapter 16).
Metallic oxide pastes can also be used as an impression material for relining distal extension denture bases and may be used successfully for this purpose if the original denture base has been relieved sufficiently to allow the material to flow without displacement of the denture or the underlying tissues.
Thermoplastic Materials*
Modeling Plastic
Like plaster of Paris, modeling plastic is among the oldest impression materials used in prosthetic dentistry. This material is most often used for border correction (border molding) of custom impression trays for Kennedy Class I and Class II removable partial denture bases. It is manufactured in several different colors, each color being an indication of the temperature range at which the material is plastic and workable. A common error in the use of modeling plastic is that it is often subjected to higher temperatures than intended by the manufacturer. It then becomes too soft and loses some of its favorable working characteristics. If a temperature-controlled water bath is not used, a thermometer should be used to maintain the water temperature. If modeling plastic is softened at a temperature above that intended by the manufacturer, the material becomes brittle and unpredictable. Also, there is the ever-present danger of burning the patient when the temperature used in softening the modeling plastic is too high.
The most commonly used modeling plastic for corrected impressions of extension base areas is the red (red-brown) material, in cake form, that softens at about 132° F. It should never be softened at temperatures much above this. Neither it nor any other modeling plastic should be immersed in the water bath for an indefinite period. It should be dipped and kneaded until soft and subjected to no more heat than necessary before the tray is loaded and it is placed in the mouth. Then it may be flamed with an alcohol torch for the purpose of border molding, but it should always be tempered by being dipped back into the water bath before its return to the mouth to avoid burning the patient. The modeling plastic then may be chilled using a water spray before removal from the mouth, although this is not necessary if care is used in removing the impression. During sectional flaming and border molding, the modeling plastic should be chilled in ice water after each removal from the mouth; then it may be trimmed with a sharp knife without danger of fracture or distortion.
Red, gray, and green modeling plastics are obtainable in stick form for use in border molding an impression or an impression tray. The green material is the lowest fusing of the modeling plastics. The red and gray sticks have a higher and broader working range than do the cakes of like color so they may be flamed without harming the material. The gray material in stick form is preferred by some dentists for border molding because of its contrasting lighter color. The choice between the use of green and gray sticks is purely optional and entirely up to the dentist.
Some dentists still prefer to use modeling plastic as a secondary impression material to record edentulous ridges in removable partial denture fabrication. When this is done, it is generally used only as a means of building up the underside of the denture before the tissues are recorded with some secondary impression material (see Chapter 16).
Impression Waxes and Natural Resins
A second group of thermoplastic impression materials consists of those impression waxes and resins commonly spoken of as mouth-temperature waxes. The most familiar of these have been the Iowa wax (Kerr Co., Romulus, MI) and the Korecta waxes (D-R Miner Dental, Concord, CA), all of which were developed for specific techniques.
Knowledge of the characteristics of mouth-temperature waxes is important if they are to be used correctly.
The Iowa wax was developed for use in recording the functional or supporting form of an edentulous ridge. It may be used as a secondary impression material or as an impression material for relining the finished removable partial denture to obtain support from the underlying tissues. The mouth-temperature waxes lend themselves well to all relining techniques as they will flow sufficiently in the mouth to avoid displacement of tissues. As with any relining technique, it is necessary that sufficient relief and venting be provided to give the material the opportunity to flow.
The difference between impression wax and modeling plastic is that impression waxes have the ability to flow as long as they are in the mouth and thereby permit equalization of pressure and prevent displacement. The modeling plastics flow only in proportion to the amount of flaming and tempering that can be done outside of the mouth; this does not continue after the plastic has approached mouth temperature. The principal advantage of mouth-temperature waxes is that, given sufficient time, they permit a rebound of those tissues that may have been forcibly displaced.
The impression waxes also may be used to correct the borders of impressions made of more rigid materials, thereby establishing optimum contact at the border of the denture. All mouth-temperature wax impressions have the ability to record border detail accurately and include the correct width of the denture border. They also have the advantage of being correctable.
Mouth-temperature waxes vary in their working characteristics. They are designed primarily for impression techniques that attempt to record the tissues under an occlusal load. In such techniques, the occlusion rim or the arrangement of artificial teeth is completed first. Mouth-temperature wax is then applied to the tissue side of the denture base, and the final impression is made under functional loading by using various movements to simulate functional activity. These mouth-temperature materials also may be used successfully in open-mouth impression techniques. Iowa wax will not distort after removal from the mouth at ordinary room temperatures, but the more resinous waxes must be stored at much lower temperatures to avoid flow when they are out of the mouth. Resinous waxes are not ordinarily used in removable partial denture impression techniques except for secondary impressions.
Elastic Materials*
Reversible Hydrocolloids
Reversible (agar-agar) hydrocolloids, which are fluid at higher temperatures and gel on reduction in temperature, are used primarily as impression materials for fixed restorations. They demonstrate acceptable accuracy when properly used; however, the reversible hydrocolloid impression materials offer few advantages over the irreversible (alginate) hydrocolloids when used as a removable partial denture impression material. Present-day irreversible hydrocolloids are sufficiently accurate for making master casts for removable partial dentures. However, border control of impressions made with these materials is difficult.
Irreversible Hydrocolloids
Irreversible hydrocolloids are used for making diagnostic casts, orthodontic treatment casts, and master casts for removable partial denture procedures. Because they are made of colloid materials, neither reversible nor irreversible hydrocolloid impressions can be stored for any length of time, but must be poured immediately.
These materials have low tear strength, provide less surface detail than other materials (e.g., mercaptan rubber base), and are not as dimensionally stable as other materials. They can, however, be used in the presence of moisture (saliva); are hydrophilic; pour well with stone; have a pleasant taste and odor; and are nontoxic, nonstaining, and inexpensive. The combination reversible-irreversible hydrocolloids have demonstrated a tendency to separate and should be used with that understanding. The hydrocolloids can be acceptably disinfected with a spray solution of 2% acid glutaraldehyde, stored in 100% humidity, and poured within 1 hour.
Mercaptan Rubber–Base Impression Materials
The mercaptan rubber–base (Thiokol) impression materials can also be used for removable partial denture impressions and especially for secondary corrected or altered cast impressions. To be accurate, the impression must have a uniform thickness that does not exceed 3 mm ( inch). This necessitates the use of a carefully made individual impression tray of acrylic-resin or some other material possessing adequate rigidity and stability. Those materials that are highly cross-linked (medium and heavy body) do not recover well from deformation and should not be used when large or multiple undercuts are present. For example, when large numbers of teeth with natural tooth contours that display multiple undercuts remain, these materials will be subjected to clinically significant distortion upon withdrawal. The long-term dimensional stability of these materials is poor because of water loss after setting. The material must be held still during the impression-making procedure because it does not have a snap set; it should be allowed to rebound for 7 to 15 minutes after it is removed from the mouth and should then be poured immediately. Many of these materials have an unpleasant odor and can stain clothes. These materials are moderately inexpensive, have high tear strength and long working and setting times (8 to 10 minutes), and can be disinfected in liquid, cold-sterilizing solutions. The accuracy of mercaptan rubber base is acceptable for making impressions for removable partial dentures; however, as with hydrocolloid impression materials, certain precautions must be taken to avoid distortion of the impression. Mercaptan rubber–base impression materials do have an advantage over hydrocolloid materials in that the surface of an artificial stone poured against them is of a smoother texture and therefore appears to be smoother and harder than one poured against a hydrocolloid material. This is probably so because the rubber material does not have the ability to retard or etch the surface of the setting stone. Despite their accuracy, this has always been a disadvantage of all hydrocolloid impression materials. The fact that a smoother surface results does not, however, preclude the possibility of a grossly inaccurate impression and stone cast resulting from other causes. Rubber-base impression materials possess a longer setting time than the irreversible hydrocolloid materials and lend themselves better to border molding in adequate supporting trays.
Polyether Impression Materials
Polyether impression material is an elastic-type material, as are the polysulfide and silicone materials. These materials have demonstrated good accuracy in clinical evaluations and are thixotropic, which provides good surface detail and makes them useful as a border molding material. It should be noted, however, that these materials are not compatible with the addition reaction silicone impression materials and should not be used to border mold custom trays when the silicone impression materials are to be used as the final impression material. The polyethers are also hydrophilic, which produces good wetability for easy cast forming.
The polyethers have low to moderate tear strength and much shorter working and setting times, which can limit the usefulness of the material. The flow characteristics and flexibility of the polyether materials are the lowest of any of the elastic materials. These characteristics can limit the use of polyethers in removable partial denture impression procedures. The stiffness of the material can result in cast breakage when removal of the cast from a custom tray is attempted. These materials have a higher permanent deformation than the addition reaction silicones. Some have an unpleasant taste, and because the material will absorb moisture, it cannot be immersed in disinfecting solutions or stored in high humidity for any extended period of time. The materials should be poured within 2 hours; however, manufacturers claim that if the impression is kept dry, clinically acceptable casts can be poured for up to 7 days.
Silicone Impression Materials
The silicone impression materials are more accurate and easier to use than the other elastic impression materials. The condensation silicones have a moderate (5 to 7 minutes) working time that can be altered by adjusting the amount of the accelerator. They have a pleasant odor, moderately high tear strength, and excellent recovery from deformation. These materials can be used with a compatible putty material to form fit a custom tray. Silicone impression materials are hydrophobic, which can make cast formation a problem. These materials can be disinfected in any of the disinfecting solutions with no alteration in accuracy. Ideally, these materials should be poured within 1 hour.
The addition reaction silicones are the most accurate of the elastic impression materials. They have less polymerization shrinkage, low distortion, fast recovery from deformation, and moderately high tear strength. These materials have a working time of 3 to 5 minutes, which can be easily modified with the use of retardants and temperature controls. They are available in both hydrophilic and hydrophobic forms, have no smell or taste, and also come in putty form, to assist in form fitting the impression tray at chairside. Most of the addition reaction silicones are available in automixing devices, can be poured up to 1 week after impression making with acceptable clinical results, and are stable in most sterilizing solutions. Sulfur in latex gloves and in ferric and aluminum sulfate retraction solution may inhibit polymerization. Many of the hydrophobic types are difficult to pour with stone, and adhesion to acrylic-resin trays is not good. The putties for these materials have a relatively short shelf life, and they are more expensive than the other elastic impression materials.
Impressions of the Partially Edentulous Arch
An impression of the partially edentulous arch must record accurately the anatomic form of the teeth and surrounding tissues. This is necessary so that the prosthesis may be designed to follow a definite path of placement and removal and so that support, stability, and retention derived from the abutment teeth may be precise and accurate.
Materials that could be permanently deformed by removal from tooth or tissue undercuts should not be used. The thermoplastic impression materials and metallic oxide pastes are therefore excluded for recording the anatomic form of the dental arch. Rubber-base materials that are highly cross-linked should not be used when large or multiple undercuts are present because these materials will be subjected to considerable distortion upon withdrawal. Plaster of Paris and modeling plastic are capable of recording tissue detail accurately, but they must be sectioned for removal and subsequently reassembled, which often leads to permanent deformation.
The introduction of hydrocolloids as impression materials was a giant step forward in dentistry. For the first time, impressions could be made of undercut areas with a material that was elastic enough to be withdrawn from those undercuts without permanent distortion. It permitted the making of a one-piece impression, which did not require the use of a separating medium, and was and still is an acceptably accurate material when handled properly.
The principal differences between reversible and irreversible hydrocolloids are as follows:
Reversible hydrocolloid does have some disadvantages. It must be introduced into the mouth while warm enough to be a sol, and then it converts to an elastic gel on cooling. Therefore there is an ever-present danger of burning the tissues of the mouth—a burn that is painful and slow to heal. It requires warming and tempering equipment that is thermostatically controlled and necessitates the use of water-jacketed impression trays for cooling.
All hydrocolloids are dimensionally stable only during a brief period after removal from the mouth. If exposed to the air, they rapidly lose water content, with resulting shrinkage and other dimensional changes. If immersed in water, they imbibe water, with accompanying swelling and dimensional changes. All hydrocolloid impressions should be poured immediately, but if they must be stored for a brief period, they should be in a saturated atmosphere rather than immersed in water. This can be accomplished simply by wrapping the impression in a damp paper towel or sealing it in a plastic bag.
Hydrocolloids also exhibit a phenomenon known as syneresis, which is associated with the giving off of a mucinous exudate. This mucinous exudate has a retarding effect on any gypsum material, which results in a soft or chalky cast surface. Sometimes this is detected only by close examination of the impression after removal from the cast. Nevertheless, such a cast surface is inaccurate and ultimately will result in an inaccurate removable partial denture framework. Pouring the cast immediately and using some chemical accelerator, such as potassium sulfate, to counteract the retarding effect of the hydrocolloid can prevent this inaccuracy. All modern irreversible hydrocolloid impression materials have an accelerator incorporated into the powder and no longer need to be treated with a fixing solution.
Because no heat is used in the preparation of irreversible hydrocolloid, there is no danger of burning the patient. For this reason, the patient should be more relaxed and cooperative during the positioning of the tray. However, some disadvantages are associated with the use of irreversible hydrocolloid. This material gels by means of a chemical reaction that is accelerated by the warmth of the tissues, whereas reversible hydrocolloid gels from the tray in toward the tissues, because of the cooling action of the water that circulates through the tray. In the irreversible hydrocolloid, gelation first takes place next to the tissues, and any movement of the tray during gelation will result in internal stresses that are released on removal of the impression from the mouth. A distorted and therefore inaccurate impression results from an irreversible hydrocolloid impression that is not held immobile during gelation.
Another disadvantage of irreversible hydrocolloid is that it must be introduced into the mouth at approximately 70° F, which results in an immediate increase in the viscosity and surface tension of the material. Air bubbles are therefore harder to dispel, and it is inevitable that more air will be trapped in an irreversible impression than in a reversible impression. Every precaution must be taken to avoid the entrapment of air in critical areas.
Important Precautions to Be Observed in the Handling of Hydrocolloid Impressions
Some important precautions to be observed in the handling of hydrocolloid are as follows:
Step-by-Step Procedure for Making a Hydrocolloid Impression
The step-by-step procedure and important points to observe in the making of a hydrocolloid impression are as follows:
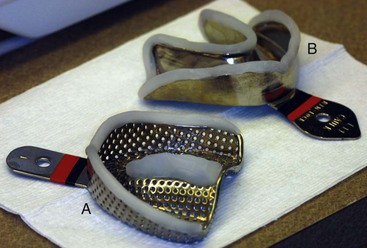
Figure 15-1 A, Maxillary impression tray with palatal portion built up with baseplate wax to prevent impression material from sagging away from palatal surface. B, Mandibular impression tray with periphery wax added to lingual flanges to prevent tissues of the floor of the mouth from rising inside the tray. The posterior end of the tray is extended with periphery wax to cover the retromolar pad regions.
A cast should be poured immediately into a disinfected hydrocolloid impression to avoid dimensional changes and syneresis. Circumstances often necessitate some delay, but this time lapse should be kept to a minimum. A delay of 15 minutes will satisfy the disinfection requirements and should not be deleterious if the impression is kept in a humid atmosphere.
Step-by-Step Procedure for Making a Stone Cast From a Hydrocolloid Impression
The step-by-step procedure for making a stone cast from the impression is as follows:
 to
to  inch) at its thinnest portion and should be extended beyond the borders of the impression so that buccal, labial, and lingual borders will be recorded correctly in the finished cast. A distorted cast may result from an inverted impression.
Possible Causes of an Inaccurate and/or a Weak Cast of a Dental Arch
The possible causes of an inaccurate cast are as follows:
Individual Impression Trays
This chapter has previously dealt with making an impression in a rigid stock tray of the anatomic form of a dental arch for making a diagnostic cast, a working cast for restorations, or a master cast. There are times, however, when a stock tray is not suitable for making the final anatomic impression of the dental arch. Most tooth-supported removable partial dentures may be made on a master cast from such an impression. Some maxillary distal extension removable partial dentures with broad palatal coverage, particularly those for a Kennedy Class I arch, may also be made on an anatomic cast, but usually these necessitate the use of an individually made tray.
A stock tray must be sufficiently rigid to avoid distortion during the impression and cast forming procedures and should fit the mouth with about 4 to 5 mm clearance for the impression material without interfering with teeth or bordering tissues; otherwise an individual tray made of some acrylic-resin tray material should be used for the final anatomic impression.
Most stock or disposable removable partial denture trays are of the rim-lock or perforated varieties. Both are made in a limited selection of sizes and shapes. Wide selections of trays are available that can be used for partially edentulous patients, including trays for both bilateral and unilateral edentulous areas.
All of these trays have reinforced borders. Although a complete denture impression tray is, or should be, made of material that permits trimming and shaping to fit the mouth, the existence of a beaded border and the rigidity of a stock removable partial denture tray allow no trimming and little shaping. The resulting impression is often a record of border tissues distorted by an ill-fitting tray rather than an impression of tissues draping naturally over a slightly underextended impression tray.
An individual acrylic-resin tray, on the other hand, can be made with sufficient clearance for the impression material and can be trimmed just short of the vestibular reflections to allow the tissues to drape naturally without distortion. The removable partial denture borders may then be made as accurately as complete denture borders with equal advantages.
Although techniques have been proposed for making individual impression trays that incorporate plastic tubing for water-cooling reversible hydrocolloid impressions, the final anatomic impression usually will be made with irreversible hydrocolloid, mercaptan rubber, or silicone impression materials.
Technique for Making Individual Acrylic-Resin Impression Trays
The diagnostic cast is often adequate for preparation of the individual tray. However, if extensive surgery or extractions were performed after the diagnostic cast was made, a new impression in a rigid stock tray and a new cast must be made. The procedures for making the new cast are identical to those described previously.
A duplicate of the diagnostic cast, on which the individual tray can be fabricated, should be made because the cast on which an individual tray is made is often damaged or must be mutilated to separate the tray from the cast. Obviously the original diagnostic cast must be retained as a permanent record in the patient’s file. Several techniques may be used to make individual impression trays. One technique for making an individual maxillary tray is described in Figures 15-3 and 15-4. This format could be used for both autopolymerizing acrylic-resin and visible light-cured (VLC) acrylic-resin. The VLC custom tray materials are premixed sheet materials that, when polymerized, provide a highly stable, distortion-free custom impression tray that is ready to use in minutes. These materials are provided by the manufacturers in sheet forms of various sizes, thicknesses, and colors.
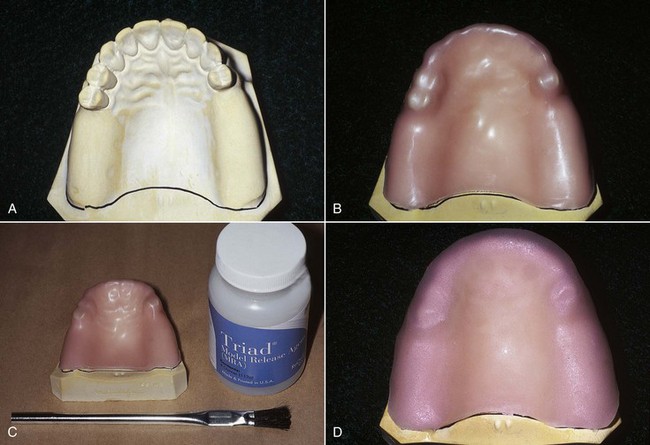
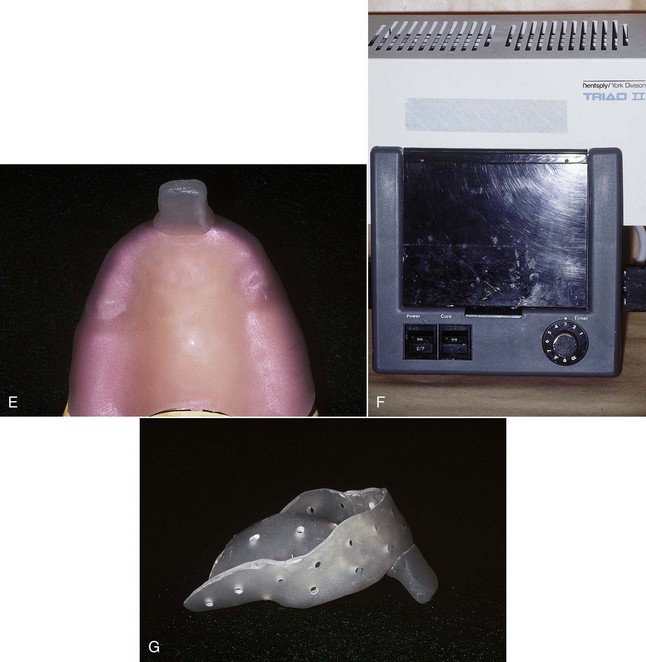
Figure 15-3 A, Desired outline of the tray is drawn on the diagnostic cast. The tray must include all teeth and tissues that will be involved in the removable partial denture. B, One thickness of baseplate wax is adapted to the cast and is trimmed to the penciled outline, which is 2 to 3 mm short of the desired border. The posterior palatal seal region is not covered by wax but will be included in finished tray. Two thicknesses of baseplate wax cover the teeth. A window is created in the wax spacer over the incisal edges. C, A model release agent is painted on the stone surfaces of the cast that will be contacted by the resin. D, The visible light-cured (VLC) resin tray material is removed from the light-proof wrap and shaped to the desired outline in a uniform manner. E, A handle is added to provide a means to place and remove the tray, as well as to pass the tray from assistant to dentist. Its form should consider the lip length and need to manipulate the perioral region. F, Before the tray is placed in the curing oven, an air barrier coating is painted on the surface. The tray is then polymerized as per manufacturers’recommendations. G, As soon as the tray material has hardened, the tray is removed from the cast, and the wax spacer is removed from the rough tray. An acrylic-resin trimmer in the lathe is used to rough finish the tray. Holes are drilled through the tray, spaced approximately 4.5 mm apart. These holes will serve to lock the impression material in the tray. In addition, excess impression material is forced out of the holes when the impression is made, thereby minimally displacement of soft oral tissues. These two features will assist in correctly orienting the individualized impression tray in the mouth.
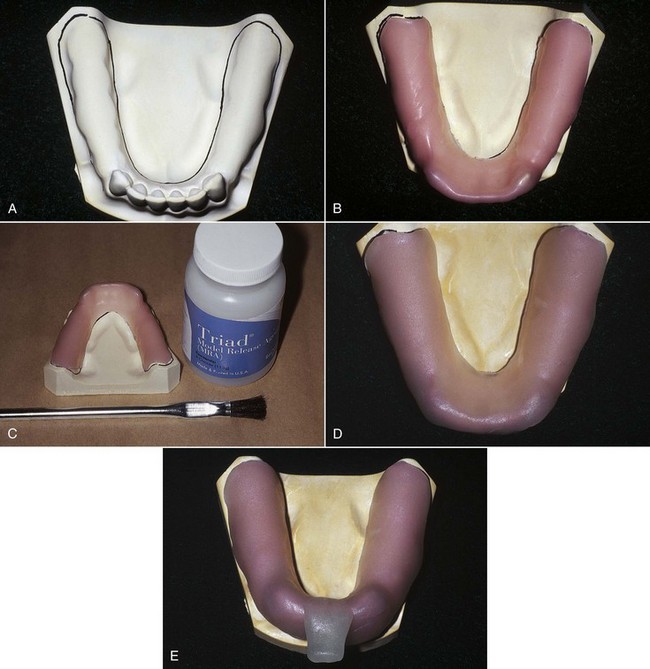
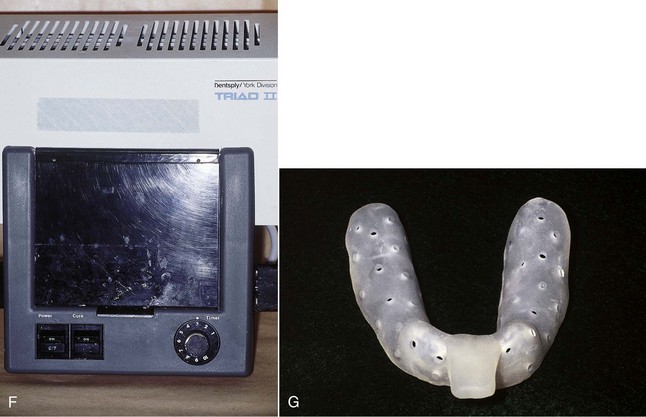
Figure 15-4 A similar technique to the one used for fabrication of the maxillary tray in Figure 15-3 is used for the mandibular tray. A, Outline of the tray is penciled on a duplicate mandibular diagnostic cast. B, A single sheet of baseplate wax is adapted to the outline of the tray, and another sheet of baseplate wax is adapted over the teeth. A window is cut in the spacer to expose the incisal edges of the lower central incisors to serve as a stop in seating the tray. C, A model release agent is painted on regions of the cast to be in contact with the resin. D, A visible light-cured (VLC) tray material wafer is adapted over the cast and spacer. E, A handle is formed with excess tray material, as previously described. F, An air barrier coating is painted on the tray material and it is processed as described in Figure 15-3. G, Following processing, multiple holes are placed throughout the tray.
A technique for making an individual maxillary tray with light-polymerized resin is as follows:
 -inch) intervals, with the exception of the alveolar groove areas, if an irreversible hydrocolloid impression material is to be used (see Figures 15-3 and 4).
The technique for making an individual mandibular VLC resin tray follows the same procedures. The buccal shelf regions on the mandibular cast are not covered by the wax spacer because these areas provide the primary support for the mandibular removable partial denture (RPD) and serve as posterior stops in orienting the tray in the patient’s mouth. During impression making, these areas will permit selective placement of tissues in the mandibular stress-bearing areas.
If mercaptan rubber is to be used, perforations are not usually necessary to lock the material in the tray, as the adhesive provided by the manufacturer provides reliable retention, and some confinement of these materials is desirable. However, a series of perforations are necessary in the median palatal raphe and incisive papilla areas of the maxillary tray so that excess impression material will escape through them, thus providing relief of the tissues in this area. For the same reasons, perforations are placed in the alveolar groove of the mandibular tray. With the use of adhesives, the impression material is not easily removed from the tray should a faulty impression have to be remade, but this is an inconvenience common to all newer elastic materials and does not prevent reuse of the impression tray. Opaque elastic impression materials and adhesives can prevent the detection of undesirable pressure areas when an impression is evaluated.
Master casts made from impressions in individual acrylic-resin trays are generally more accurate than those made in rigid stock trays. The use of individual trays should be considered a necessary step in making the majority of removable partial dentures when a secondary impression technique is not to be used. Reasons and methods for making a secondary impression will be considered in Chapter 16.
Final impressions for maxillary tooth–supported removable partial dentures often may be made in carefully selected and recontoured rigid stock impression trays. However, an individual acrylic-resin tray is preferred in those situations in the mandibular arch when the floor of the mouth closely approximates the lingual gingiva of the remaining anterior teeth. Recording the floor of the mouth at the elevation it assumes when the lips are licked is important in selecting the type of major connector to be used (see Chapter 5). Modification of the borders of an individual tray to fulfill the requirements of an adequate tray is much easier than is the modification of a metal stock tray.