Chapter 6 Foot and Ankle
The procedures for taping the majority of sports injuries are illustrated in this and the following chapters. The purpose of these procedures is to provide protection while allowing functional movement, thus preventing further damage to the injured structure or adjacent areas. Inherent in each approach, and essential to accurate assessment of every injury, are medical diagnosis, treatment and appropriate follow-up.
T.E.S.T.S. charts in this section put each taping technique into perspective relative to total injury management. They include key points under the headings of Terminology, Etiology, Symptoms, Treatment and Sequelae. These charts are meant as helpful guides and are not to be considered as in-depth analyses with all possible complications.
A thorough understanding of the techniques illustrated in these chapters, combined with experience in handling a wide range of injuries, will enable the taper to adapt and apply effective taping techniques to the many unusual and/or challenging situations which inevitably arise.
ANATOMICAL AREA: FOOT AND ANKLE
FOOT AND ANKLE TAPING TECHNIQUES
The articulations of the foot and ankle are numerous and complex. The joints of the foot and curvature of the arches of the foot permit adaptation to irregular terrain. These joints offer suppleness and shock absorption through elasticity. This varied bony architecture and mobility predisposes to different types of injuries. Taped support can alleviate many stresses related to these conditions.
The talo-crural (the true ankle) joint is mainly responsible for dorsiflexion and plantarflexion while the sub-talar joint allows more lateral mobility – inversion and eversion (sideways deviation) – permitting the foot to adapt to all angles of incline or slope. This relatively mobile ankle joint complex is dependent on numerous ligaments for its stability, and on tendons for its dynamic support. Forces through this relatively fragile joint make it vulnerable to stresses. The ankle is most easily injured during weight-bearing activities which require quick changes of direction.
A variety of taping techniques are highly effective in supporting both ligamentous and musculo-tendinous conditions related to the ankle joint. With the application of proper taping techniques, the athlete can rapidly resume normal competitive activity and/or intense training.
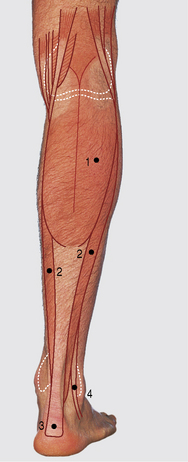
SURFACE ANATOMY
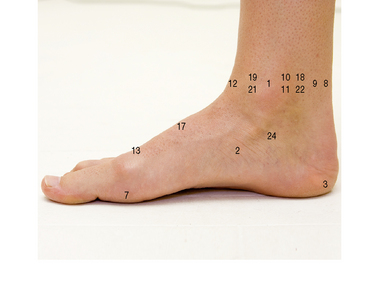
Right ankle and foot, from the medial side. The most prominent surface features are the medial malleolus, the tendo-calcaneus at the back and the tendons of tibialis anterior and extensor hallucis longus at the front.
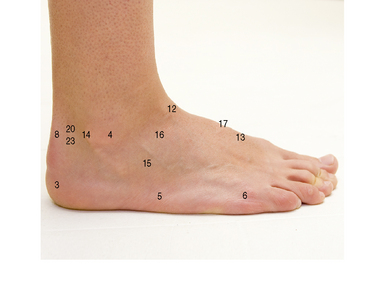
Right ankle and foot, from the lateral side. The most prominent surface features are the malleolus, the tendo-calcaneus at the back and the tendons of tibialis anterior at the front.
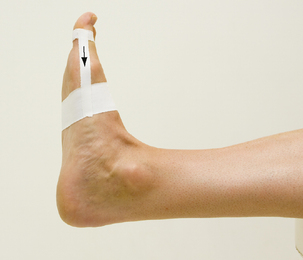
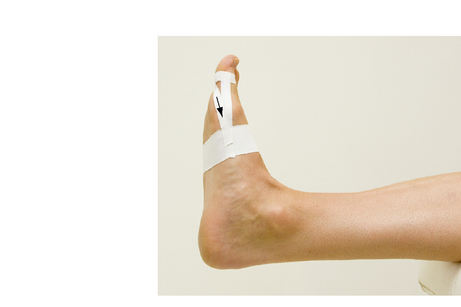
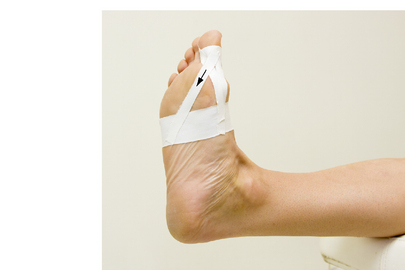
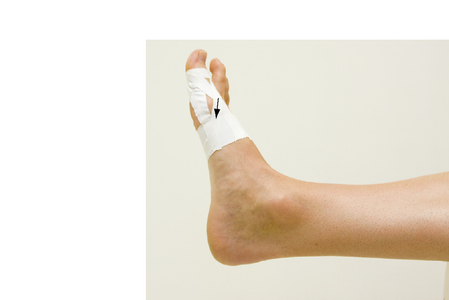
TAPING FOR TOE SPRAIN
Indications for use
• Sprains of the first metatarsophalangeal (MTP) joint.
• For medial collateral ligament sprain: abduct the toe and reinforce the medial restraining tape strips.
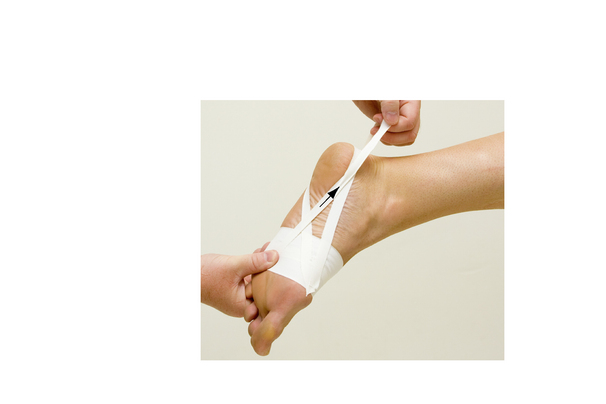
• For plantar ligament sprain (hyperextension injury): reinforce the X on the plantar surface to limit extension.
• For lateral collateral ligament sprain: reinforce with buddy taping to the first toe (for an example of buddy taping with fingers, see p. 209).
• For dorsal capsular sprain (hyperflexion): reinforce the X on the dorsal surface to limit flexion.
• Hyperflexion of first MTP joint: ‘turf toe’.
• Contusion of the first MTP joint: ‘jammed toe’, ‘stubbed toe’.
 NOTES:
• The styloid process at the base of the fifth metatarsal is a sensitive area vulnerable to pressure, pain and blisters if tape is too tight.
• To avoid constriction, minimal tension must be used when wrapping circumference anchors.
• Application of lubricant to adjacent toes and/or the inside of the toe box of the shoe will prevent chafing.
• Trimming toenails will lessen the risk of irritation.
• Careful application of a minimum amount of tape is particularly important when taping for sports that require tight-fitting shoes or boots.
For additional details regarding an injury example, see T.E.S.T.S. chart (p. 61).
 NOTE:
NOTE: NOTE:
NOTE: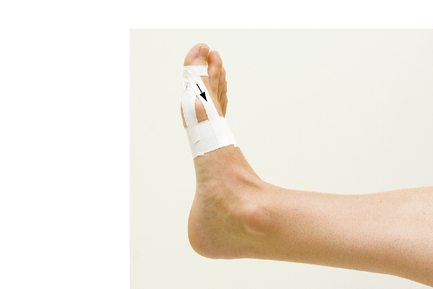
 NOTE:
NOTE: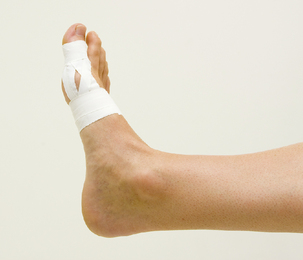
 NOTE:
NOTE:ANATOMICAL AREA: FOOT AND ANKLE
INJURY: TOE SPRAIN
• sprain of medial or lateral collateral ligament
• hyperflexion with capsular injury
• hyperextension with capsular injury
• sudden forced flexion, extension or abduction
• sudden longitudinal impact against a hard surface
• repetitive dorsiflexion of great toe (as in kicking a ball or sprinting) can cause a synovitis
• tenderness of the first metatarsophalangeal joint
• resistance testing (neutral position): no significant pain on moderate resistance
ANATOMICAL AREA: FOOT AND ANKLE
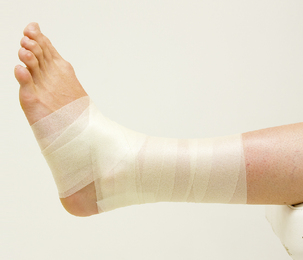
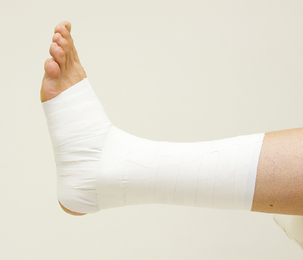
TAPING FOR LONGITUDINAL ARCH SPRAIN/PLANTAR FASCIITIS
Indications for use
 NOTES:
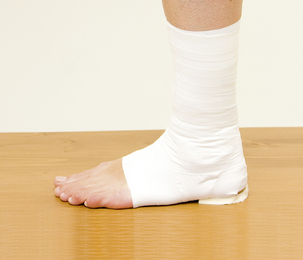
• Remember the foot will spread when weight bearing, rendering the tape job tighter.
• Pressure on the base of the fifth metatarsal can cause pain.
• Pressure on the neighbouring blood vessels can cause pain and compromise circulation.
• Tape thickness must be kept to a minimum for sports requiring tight-fitting footwear.
• Excessive medial tension must be avoided, especially in ankles predisposed to inversion sprain.
For additional details regarding an injury example, see T.E.S.T.S. chart (p. 67).
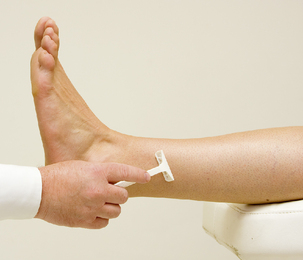
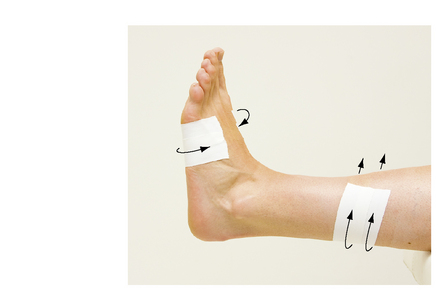
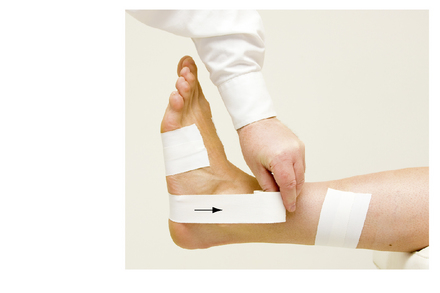
Positioning
Either lying prone with knee slightly bent or sitting facing the taper (as illustrated).
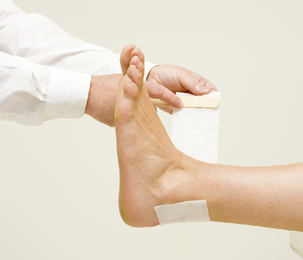
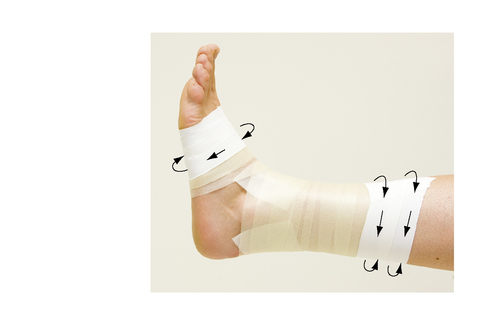
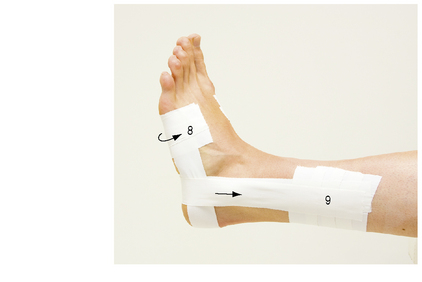
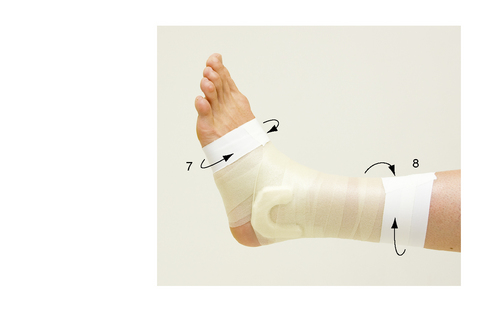
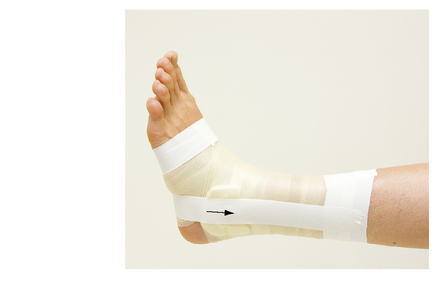
Procedure
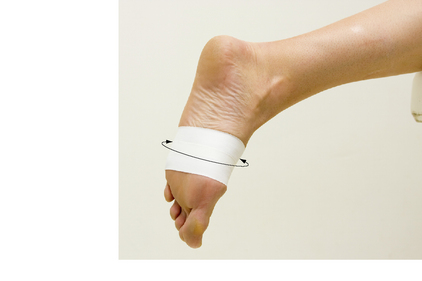
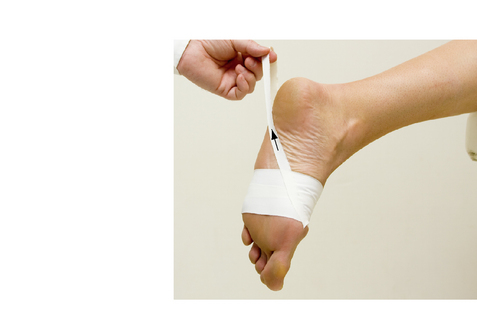


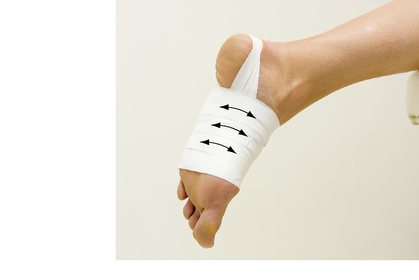
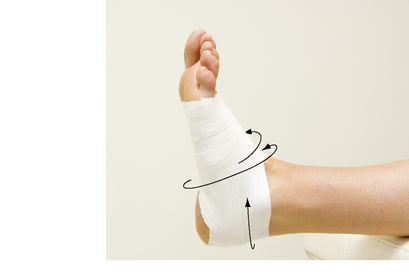
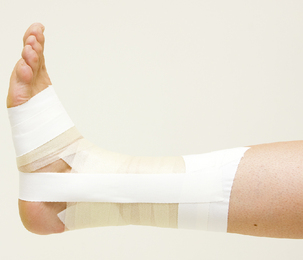
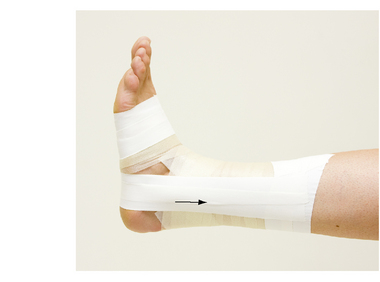
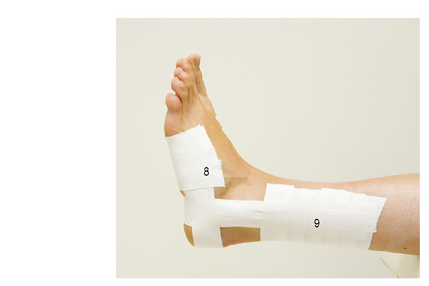
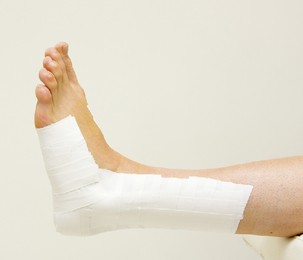
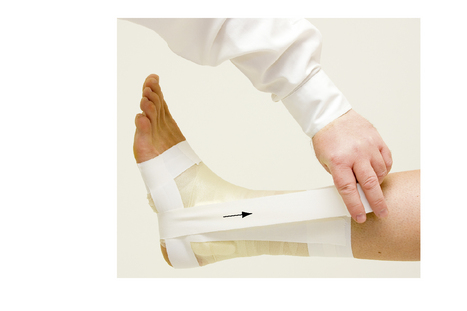
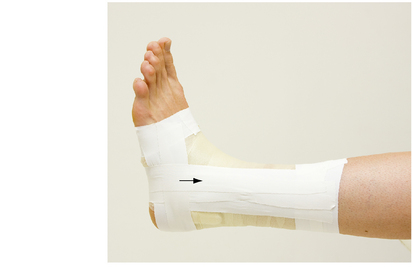
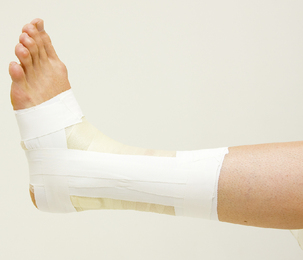
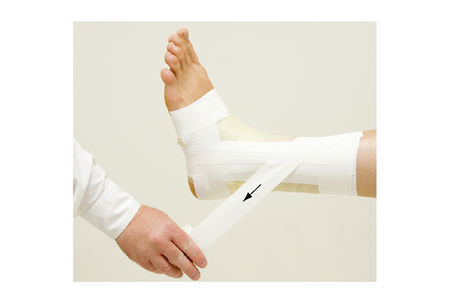
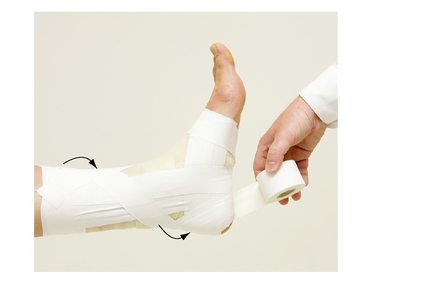
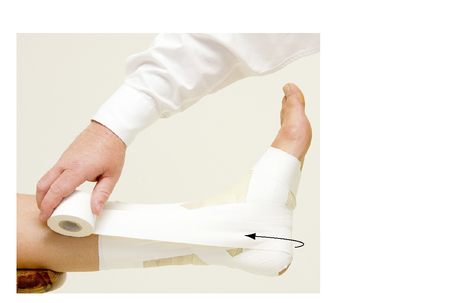
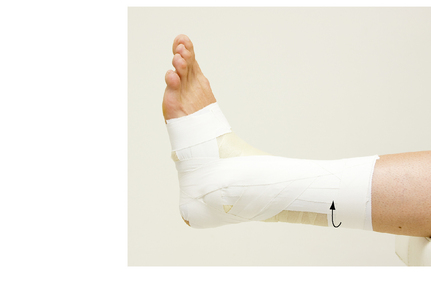
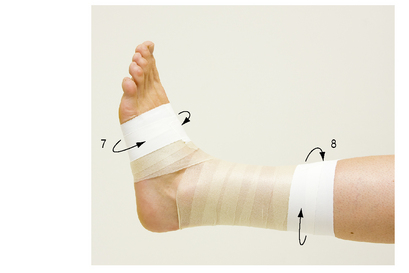
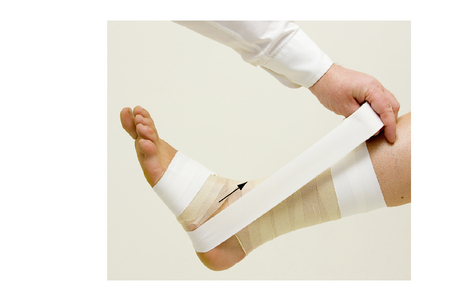
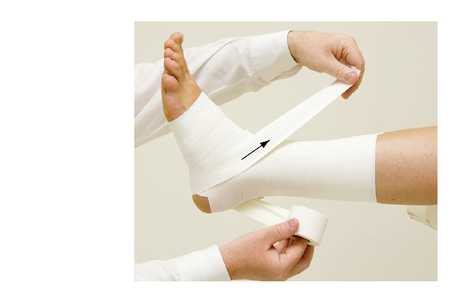
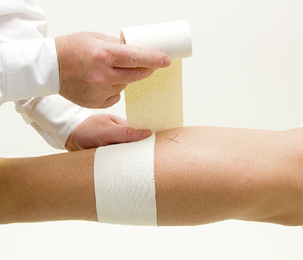
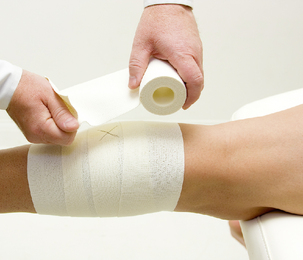
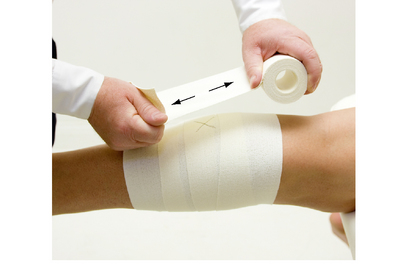
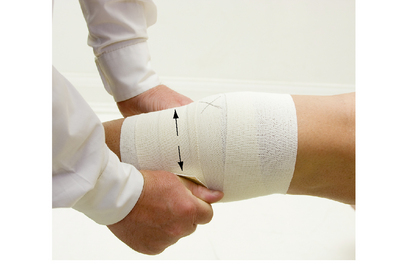
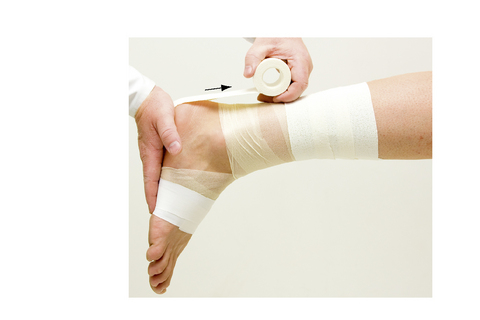
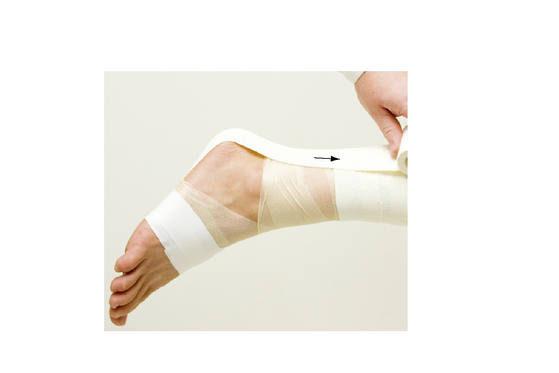
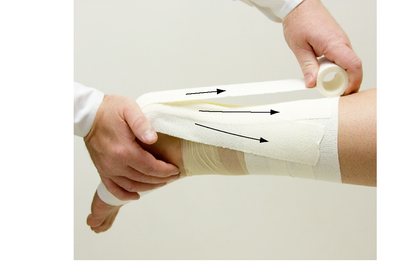
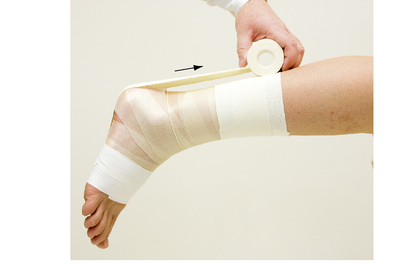
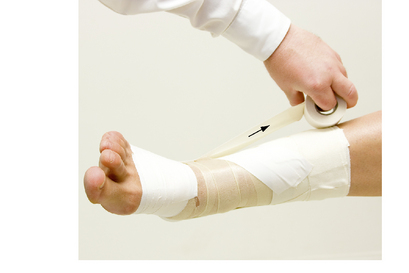
7. Close up with circumferential strips of 3.8 cm non-elastic tape. Apply with a light pressure as the natural spread of the foot on weight bearing will tighten the tape job. Start at the head of the metatarsals, overlapping each previous tape by at least a half, progressing towards the heel.
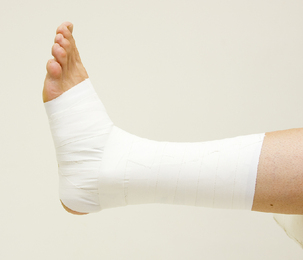
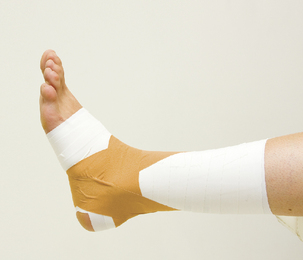
8. Test for degree of support. There should be a significant reduction of pain on weight bearing.
 NOTE:
NOTE: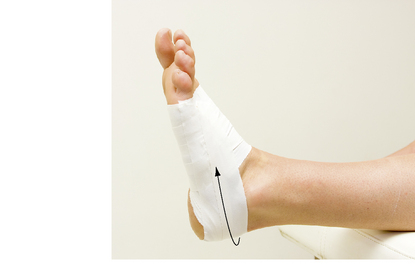
 NOTE:
NOTE:Apply lubricant and heel and lace pads to the anterior ankle and posterior heel if friction spots are likely to develop.

ANATOMICAL AREA: FOOT AND ANKLE
CONDITION: PLANTAR FASCIITIS
• intrinsically tight plantar fascia
• sudden change in training routine, i.e. distance, frequency, speed, change of terrain
• pain and tenderness on plantar aspect of foot, more concentrated on the medial aspect of the calcaneal attachment
• active movement testing: no significant pain on weight bearing
• passive movement testing: pain on full stretch of fascia
• resistance testing (neutral position): no significant pain
• Support: taping: Longitudinal Arch (see p. 62).
• Rest: reduction of weight-bearing activities
• selective stretching of tendo Achilles and plantar fascia
• strengthening of plantar muscles
• heel lifts can be helpful in acute phase (a bevelled doughnut depression will reduce pressure pain)
ANATOMICAL AREA: FOOT AND ANKLE
TAPING FOR: PREVENTIVE PROPHYLACTIC ANKLE SPRAINS
Indications for use
• preventive taping to protect lax ligaments and ‘weak’ ankles
• final stages of ankle sprain rehabilitation, when less specific ligamentous reinforcement is sufficient
• for chronic medial sprains (deltoid ligament): reverse strips (steps 6–8, 10–12, 14 and 16) to reinforce medial rather than lateral support
 NOTES:
• It is essential to confirm the site of any injury or laxity prior to taping, so that appropriate reinforcements can be made.
• The athlete should be asked if they have any taping preferences. e.g. light tape or tight. Tension can be adjusted to suit during the procedure.
• Pressure on the base of the fifth metatarsal can cause pain. Pressure on the neighbouring blood vessels can cause pain and compromise circulation.
• Proprioception retraining is extremely important to ensure a total recovery programme.
For additional details regarding an injury example, see T.E.S.T.S. chart (p. 61).
Positioning
Lying supine (face up) or long sitting (knees extended) with ankle held at 90 ° angle over the end of the table and supported at the midcalf (a 90 ° angle is the ‘normal standing’ angle).
 TIP:
TIP:Procedure
 TIP:
TIP: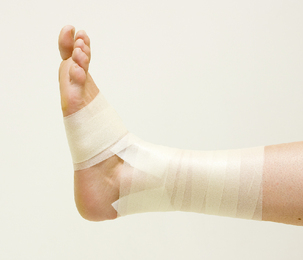
 NOTE:
NOTE:Comfeel™ may be applied prior to lace and heel pads and would negate the need for underwrap. The more contact between the tape and the skin, the more likely you are to have an unyielding tape job.
 TIP:
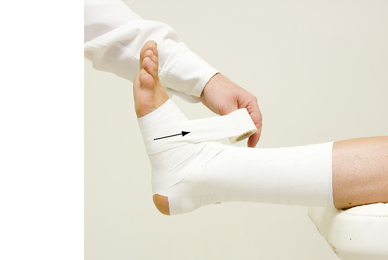
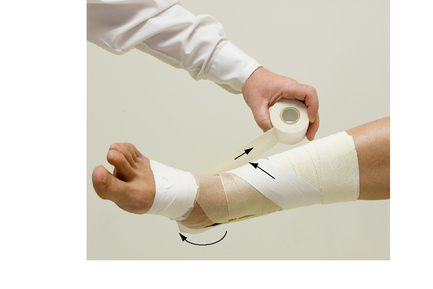
TIP:When applying the anchor strips midcalf, be sure that the strip is held horizontally at the back and wraps around the natural contours, rising up to cross more superiorly on the anterior surface.
 NOTE:
NOTE: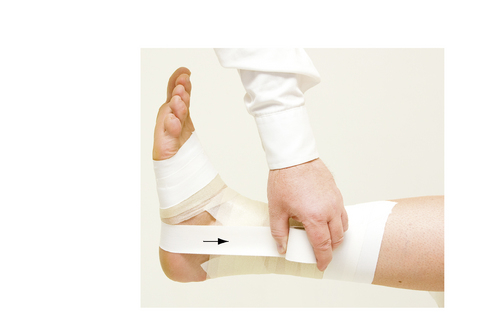
 TIP:
TIP:Make sure the ankle is held at an angle of 90 ° throughout this procedure and make sure you secure the stirrup to the anchor before tearing the tape from the roll.


 TIP:
TIP:
 NOTE:
NOTE:A second figure of eight can be applied to offer greater support or to cover any remaining open areas.
 NOTE:
NOTE:ANATOMICAL AREA: FOOT AND ANKLE
TAPING FOR: ANKLE SPRAIN/CONTUSION: ACUTE STAGE
Indications for use
• acute (inversion) lateral ankle sprain
• acute (eversion) medial ankle sprains: reverse strips to support medially damaged structures
• splinting for suspected ankle fracture: use less tension and apply equally to both sides
 NOTES:
• Ensure that the correct diagnosis has been made. If in doubt, refer!
• Take care to apply adequate, localized compression over the basic taping without compromising circulation. (Take care not to cause a tourniquet effect.)
• Ensure that the athlete has been thoroughly instructed in (and understands) the immediate care for the first 72 hours: R.I.C.E.S.
Check regularly for signs of numbness, swelling or cyanosis (blueish colouring) of the toes.
• Should the tape become too tight due to continued swelling (even after R.I.C.E.S.) loosen the tape or completely reapply.
For additional details regarding an injury example, see T.E.S.T.S. chart (p. 36–38).
Positioning
Lying supine (face up) with a cushioned support under the midcalf and with the injured ankle held at 90 ° throughout this procedure (a 90 ° angle is the ‘normal standing’ angle).
Procedure
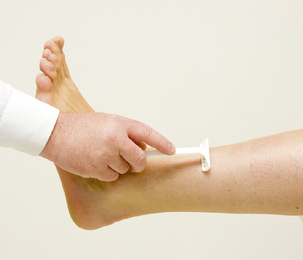
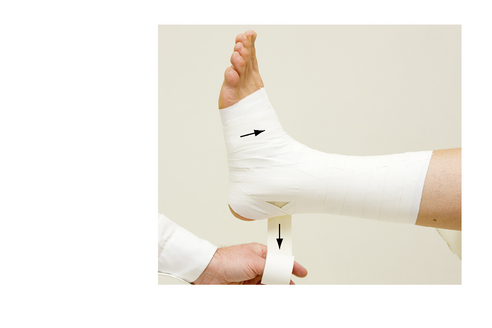
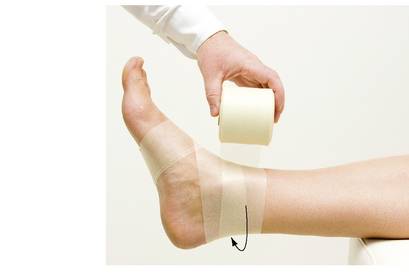
3. Apply two open anchors of 3.8 cm non-elastic tape around the lower third of the calf. Be sure to leave an opening at the front.
 TIP:
TIP:Ensure the anchors at horizontal at the back of the calf apply to the skin then follow the natural contours of the skin.
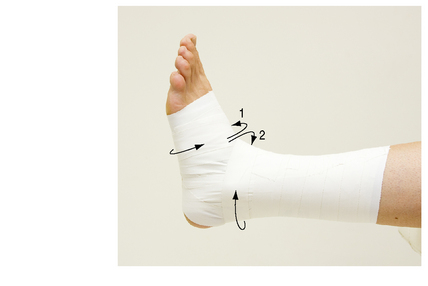
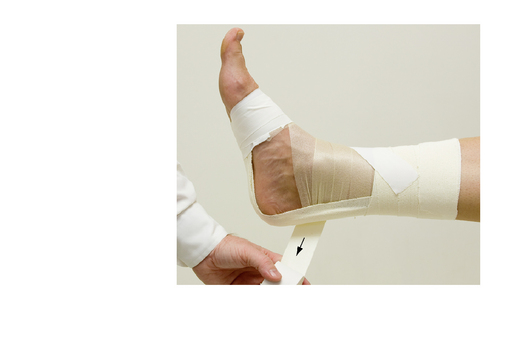
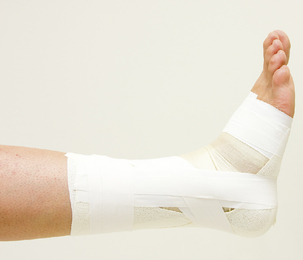
5. Apply a stirrup of 3.8 cm non-elastic tape from the upper anchor on the medial side, cover the posterior edge of the medial malleolus, pass beneath the heel and slightly behind the lateral malleolus. Pull up strongly to apply specific tension over the lateral side and affix the tape to the upper anchor laterally.
 NOTE:
NOTE:When taping medially injured structures, this stirrup is applied in reverse, starting on the lateral side and pulling up strongly on the medial side.

6. Apply an open anchor around the upper end of this stirrup, overlapping the original anchor by a half anteriorly.
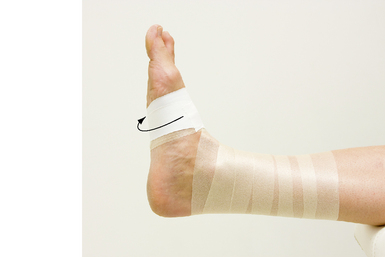
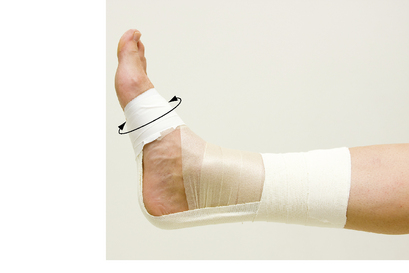
7. Apply a horizontal strip from the anchor on the medial side of the foot, passing around the calcaneum below the level of the malleoli, applying tension as it is applied to the lateral side of the anchor.

 TIP:
TIP: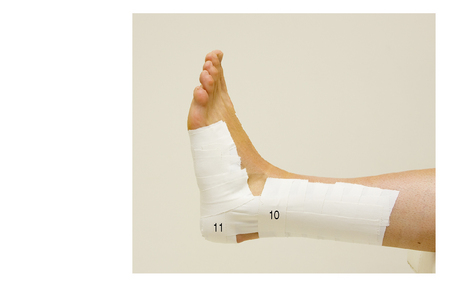
 NOTE:
NOTE:

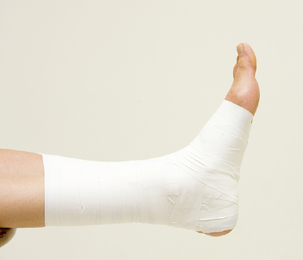
15. Apply a pair of vertical strips, lightly covering the tape ends on either side of the gap anteriorly from the shin to the ankle.
16. Apply a second pair of parallel strips from the forefoot, pulling up slightly and covering the previous strips at the ankle.
17. Gently test the degree of restriction. There must be no laxity on lateral stressing. The pain should be significantly reduced on testing.

 TIP:
TIP:Allow slight plantarflexion while applying this strip to ensure continuous adhesion of the tape at the front of the ankle.
 NOTE:
NOTE: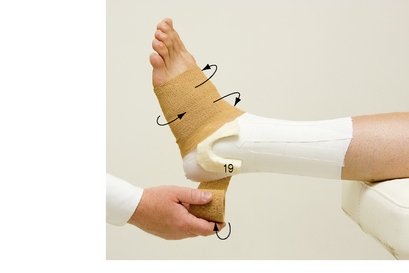
 TIP:
TIP:
ANATOMICAL AREA: FOOT AND ANKLE
TAPING FOR LATERAL ANKLE SPRAIN: REHABILITATION STAGE
Indications for use
• lateral ankle sprains (INVERSION sprain)
• injuries of the calcaneo-fibular and the anterior talo-fibular ligaments: in combination, the most common ankle sprain
• for medial ankle sprains (deltoid ligament): use a horseshoe instead of a J shape on the medial side in step 6 and reverse steps 9–11 and 15–16 for medial instead of lateral reinforcement
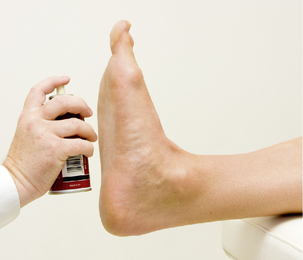
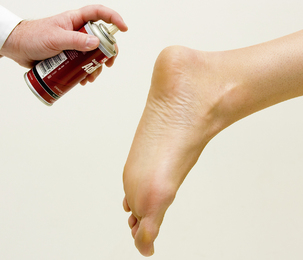
Skin toughener spray/adhesive spray
3.8 cm (1.5 in) non-elastic tape
Taping is adapted throughout the progressive rehabilitation healing stages:
1. subacute stage: (48–72 hours post injury): support with felt J and heel lift while beginning to bear weight
2. functional stage: specific ligamentous support with reinforcement of stability for moderate to dynamic activity
3. return to sport stage: reintegration with support adapted to specific sports requirements ranging from training to competition.
 NOTES:
• Ensure that the injury has been properly evaluated by a competent sports medicine specialist, and that X-rays have been taken, particularly if an avulsion fracture is suspected.
• DO NOT USE THIS TECHNIQUE FOR AN ACUTE ANKLE INJURY. It should only be applied when acute swelling has subsided (for acute ankle injury taping see appropriate guide).
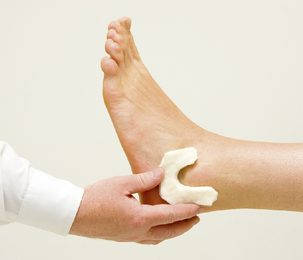
• Placement of a felt horseshoe controls residual perimalleolar swelling, particularly useful in the subacute phase when localized swelling can become chronic.
• Partial weight bearing with crutches is recommended when starting to bear weight.
• Progression to full weight bearing is permitted only if pain free.
• Use of a heel lift assists ‘push-off’ and reduces the need for dorsiflexion range, allowing weight bearing with less effort and stress.
• Weight-bearing activities may be continued and progressed only if there is no pain during or after activity.
For additional details regarding an injury example see T.E.S.T.S. chart (p. 92).
Positioning
Lying supine (face up) or long sitting (with knees extended), support at midcalf with the foot off the end of the table. The ankle must be held at an angle of 90 ° throughout the taping technique (a 90 ° angle is the ‘normal standing’ angle).
Procedure
 TIP:
TIP: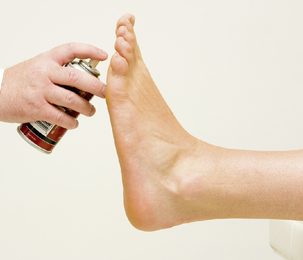

 TIP:
TIP: NOTE:
NOTE: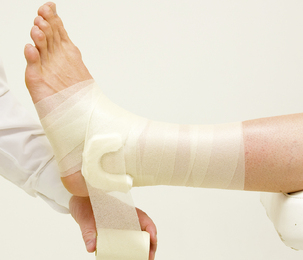
 TIP:
TIP:Ensure the anchors are horizontal at the back of the calf, apply to the skin and then follow the natural contours of the skin.
9. Apply a stirrup of 3.8 cm non-elastic tape from the upper anchor on the medial side, cover the posterior edge of the medial malleolus, pass beneath the heel and slightly behind the lateral malleolus. Pull up strongly to apply specific tension over the lateral side and affix the tape to the upper anchor laterally.

 TIP:
TIP:Ensure that the end of the tape is securely fixed to the anchor. Apply strong tension on the lateral side.

 TIP:
TIP: NOTE:
NOTE:A third horizontal strip may be necessary when taping larger feet and when additional stability is required.
 NOTE:
NOTE:These stirrups may be ‘fanned’ when the athlete is at the returning to sport stage of rehabilitation (see fanned stirrups, p. 94).
 NOTE:
NOTE:Be careful to start with the appropriate angle so that the tape will follow the natural contours and end up in the appropriate place.
 TIP:
TIP:Support and hold the foot in eversion (turned outwards) to ensure a shortened position for the ligaments while applying this important supporting strip.
 NOTE:
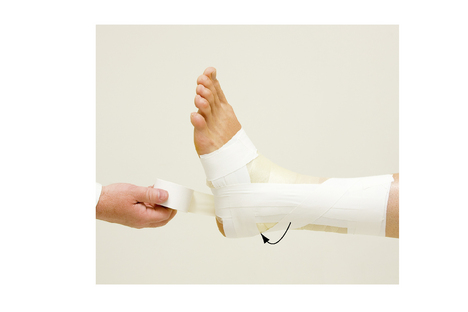
NOTE:If using an elastic adhesive bandage (EAB), allow the tape to recoil before applying, when no tension is needed.
 TIP:
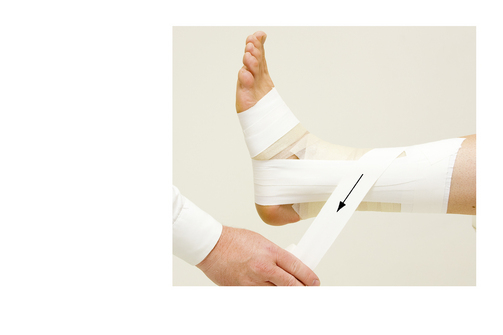
TIP:When pulling the EAB up with tension, hold the tape against the underlying tape below the point at which you want to apply the tension. Apply tension and then press up against the underlying tape. Move your point of contact to where you want to release the tension and hold the tape against the underlying tape here. Allow the EAB to recoil before proceeding with the technique.
 TIP:
TIP:Apply a second figure of eight if necessary to cover any open areas (overlap the first figure of eight by half).
 NOTE:
NOTE:For return to dynamic activity, a heel locking figure of eight or a reverse figure of eight can be applied in place of the regular figure of eight.
 TIP:
TIP: NOTE:
NOTE:ANATOMICAL AREA: FOOT AND ANKLE
INJURY: LATERAL ANKLE SPRAIN
(typically a combination of two ligaments: calcaneo-fibular and anterior talo-fibular)
• forced inversion with plantarflexion
• often secondary to inadequate rehabilitation of a previous ankle sprain (reduced proprioception)
• local pain, swelling, discolouration and tenderness anteriorly and inferior to the lateral malleolus
• active movement testing: pain on plantarflexion with inversion
• passive movement testing: pain on plantarflexion with inversion
• resistance testing (neutral position): no significant pattern of pain with moderate resistance
• taping: first 48 hours: Acute Ankle Injury (open basketweave) (p. 76)
• continued therapy including:
• progressive pain-free rehabilitation including:
• gradual painfree reintegration to sports activity with specific taping
• anterior talo-crural and sub-talar instability if ligaments are not supported in a shortened position during healing phase
• weakness and/or tendinitis of peroneal muscles
• extensor digitorum longus is often injured simultaneously, predisposing to chronic residual weakness
• repeated injury caused by poor proprioception and joint instability
• chronic swelling in the sinus tarsi and around the tip of the lateral malleolus
ANKLE SPRAIN REHABILITATION – ADVANCED
SPECIAL ADAPTATIONS: SPORT-SPECIFIC ANKLE TAPING VARIATIONS
During the subacute and rehabilitation stage of ankle sprains, the tape job is adapted to the varying needs of the injury. Each tape job must be adjusted for the anatomy of the specific ligament, the degree of injury and the current stage of healing. As the athlete gradually returns to sports activity, his or her sport-specific requirements must also be accommodated.
 NOTE:
NOTE:Prior to initial application of ankle rehabilitation taping strategies, the ankle must be fully evaluated by a qualified person, for example a doctor, in order to identify the injured structures and to ensure that no other complications exist.
The following specialized strip adaptations may be used by the experienced taper in combination with the previously described strips to adapt to a wide range of situations.
Specialized strips for sports-specific techniques include:
• fanned stirrups: allows freer plantarflexion (useful when tight boots are required for a specific sports activity)
• V-lock: for extra heel stability (useful when the number of tape strips must be kept to a minimum, i.e. when the athlete must wear tight boots)
• heel-locking figure of eight: reinforces stability when the level of recovery permits a return to activity
• reverse figure of eight: reinforces stability without restricting plantarflexion (useful when plantarflexion is needed for sports participation)
SPECIALIZED STRIP: FANNED STIRRUPS
Advantages
• allows more plantarflexion than straight basketweave stirrups
• mimics multi-angled ligamentous support
• allows minimal tape thickness over bony prominences
• useful when tight-fitting footwear is required as in figure skating, ice hockey, speed skating and downhill skiing where tape thickness over the malleoli must be kept to a minimum

 TIP:
TIP: NOTE:
NOTE:SPECIALIZED STRIP: V-LOCK
 TIP:
TIP: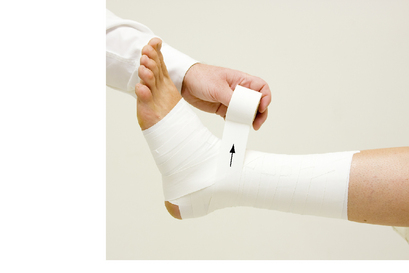
 TIP:
TIP: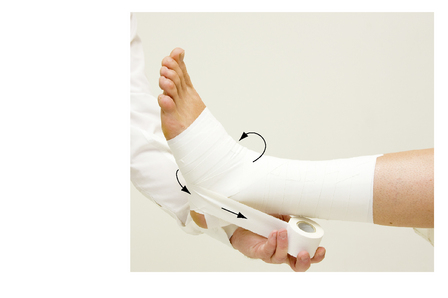
 TIP:
TIP:
 NOTE:
NOTE:SPECIALIZED STRIP: HEEL-LOCKING FIGURE OF EIGHT
Procedure

1. Begin taping by applying steps 1–5, 7–14 of Ankle rehabilitation taping. Fanned stirrups may also be used if desired.
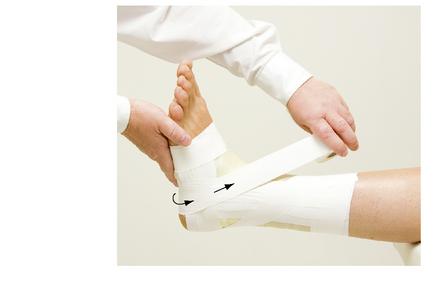
2. Start strip on the dorsum of the foot, from lateral to medial, pass under the instep.
3. Pull up strongly on the lateral side.
4. Carefully cross the tape over the extensor tendons (without wrinkling) and pass horizontally behind the medial side to wrap around the Achilles tendon.
 TIP:
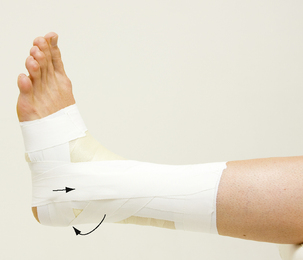
TIP:Ensure that the tape is high enough at the back so that it is at the same level when it crosses itself again anteriorly.

 TIP:
TIP:The ankle must be adequately dorsiflexed in order to allow the tape to pass posteriorly without bending, wrinkling or causing a pressure ridge.
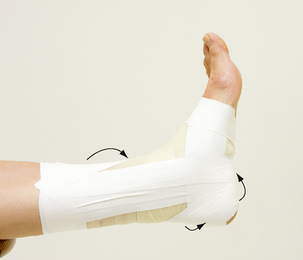
 TIP:
TIP:Repeated application using a practice strip will aid in judging taping angles and will improve proficiency significantly.


 NOTE:
NOTE: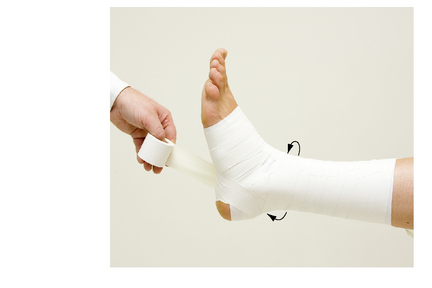
 NOTE:
NOTE: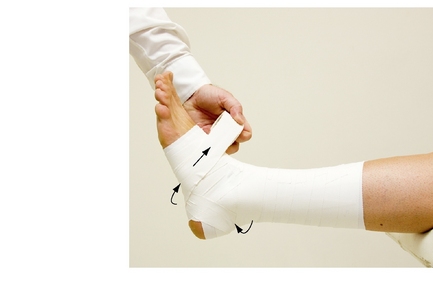
ANKLE SPRAIN REHABILITATION – ADVANCED
SUBSECTION FOR INDIVIDUAL LIGAMENT SPRAINS
The following is a detailed subsection on ankle sprains that may not be of interest to all readers. It is included to provide healthcare professionals intensively treating athletes with methods of specific taped support for isolated ligament sprains.
The T.E.S.T.S. charts in this section describe location and make-up of the individual ligaments in Terminology. The sequence and frequency of occurrence are included with Etiology, Symptoms, Treatment and Sequelae. This section illustrates how the rehabilitation taping elements are adjusted and adapted for the progressive stages of healing, the anatomy of the individual ligaments, and the varying demands of different sports.
The purpose of this subsection is to show how taping can be designed to support specific ligaments and how it can be constantly progressed and adapted to meet the changing needs of the healing structure and the varying demands of different sports.
Should any given technique not provide the necessary pain-free support, consider the following:
• question the original diagnosis and reassess the injury
• question the stage of healing: has the ankle suffered from further injury or an aggravation of the original injury, thereby prolonging the subacute stage?
• question the appropriateness of this taping technique for this injured structure and this stage of healing
• question your technique of application: could your skills be improved? (practise with a test strip)
• are the fundamental needs of the athlete met with adequate support yet sufficient mobility?
 NOTE:
NOTE:These procedures are intended as guidelines and suggestions and are by no means ‘carved in stone’. They represent practical adaptations that have proven useful through theorization, application of knowledge and experience.
 TIP:
TIP: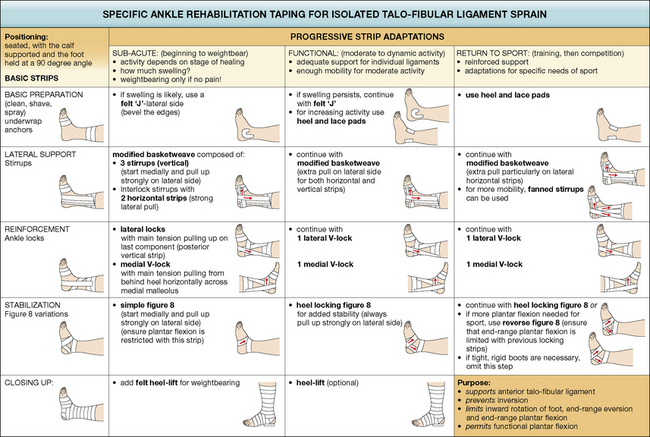
 TIP
TIPANATOMICAL AREA: FOOT AND ANKLE
INJURY: ANTERIOR TALO-FIBULAR LIGAMENT SPRAIN
• anterior portion of lateral ligamentous complex
• short, superficial band of fibres
• from the anterior portion of lateral malleolus forward to the neck of the talus
• see anatomy illustration, p. 55
• forced inversion with plantarflexion
• the most commonly injured ankle ligament
• often secondary to inadequate rehabilitation of a previous ankle sprain (reduced proprioception)
• often injured in combination with the fibulo-calcaneal ligament
• local pain, swelling and discolouration
• tenderness just anterior to the lateral malleollus
• active movement testing: pain on plantarflexion with inversion
• passive movement testing: pain on plantarflexion with inversion
• resistance testing (neutral position): no significant pattern of pain with moderate resistance
• taping, first 48 hours: Acute ankle injury (open basketweave) (p. 76)
• continued therapy including:
• progressive pain-free rehabilitation including:
• gradual pain-free reintegration to sports activity with specific taping. Ankle rehabilitation taping for isolated anterior talo-fibular ligament sprain: see p. 103 (when injured in combination with fibulo-calcaneal ligament, refer to lateral ankle sprain, p. 82)
• anterior talo-crural instability if ligament is not supported in a shortened position during healing phase
• weakness and/or tendinitis of peroneal muscles
• chronic residual weakness of extensor digitorum longus (often injured simultaneously)
• repeated injury caused by poor proprioception and joint instability
 TIP
TIPANATOMICAL AREA: FOOT AND ANKLE
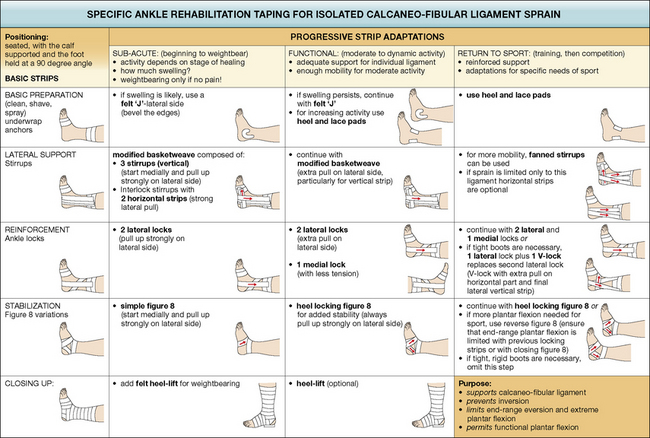
INJURY: CALCANEO-FIBULAR LIGAMENT SPRAIN
• middle third of the lateral ankle ligamentous complex
• from tip of fibula inferiorly, and posteriorly to lateral tubercle on the calcaneus
• see anatomy illustration, p. 55
• a medial force on the lower leg when a dorsiflexed foot is relatively fixed in or forced into inversion
• more often sprained than medial side due to:
• most frequently injured in combination with the anterior talo-fibular ligament
• local pain, swelling and discolouration
• tenderness on lateral side of ankle inferior and slightly posterior to the tip of the malleolus
• active movement testing: pain on inversion
• passive movement testing: pain on inversion
• resistance testing (neutral position): no significant pattern of pain on moderate resistance
• taping: first 48 hours: Acute Ankle Injury (open basketweave) (p. 76)
• continued therapy including:
• progressive pain-free rehabilitation including:
• gradual reintegration to sports activity with specific taped support. See Ankle Rehabilitation taping for isolated fibulo-calcaneal ligament sprain: p. 105 (when injured in combination with anterior talo-fibular ligament, refer to taping for lateral ankle sprain, rehabilitation stage: p. 82
• lateral instability if ligament is not supported in a shortened position during the healing phase
• peroneal strain often accompanies this sprain, predisposing to persistent weakness and/or tendinitis of peroneal muscles
• chronic swelling inferior and posterior to tip of lateral malleolus
 TIP
TIPANATOMICAL AREA: FOOT AND ANKLE
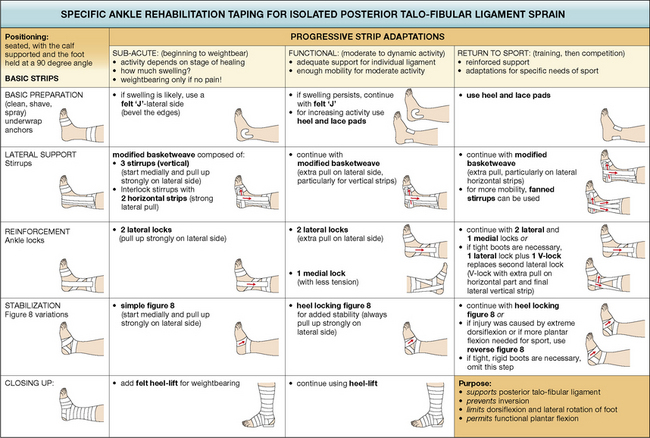
INJURY: POSTERIOR TALO-FIBULAR LIGAMENT SPRAIN
• posterior band of the lateral ligamentous complex
• from the posterior aspect of the malleolus to the posterior-lateral tubercle of the talus
• see anatomy illustration, p. 55
• weight-bearing plantarflexion with stressed external rotation of the foot
• usually only ruptured in severe sprains or dislocations
• pole vaulters, parachute jumpers and ice hockey players (high-speed impact with boards) are prone to this injury
• local pain, swelling and discolouration
• tenderness posterior to the lateral malleous deep into the peroneal tendons
• active movement testing: pain on end-range dorsiflexion possible
• passive movement testing: posterio-lateral pain on end-range dorsiflexion
• resistance testing (neutral position): no significant pattern of pain on moderate resistance
• taping: first 48 hours: Acute Ankle Injury (open basketweave) (p. 76)
• Continued therapy including:
• progressive pain-free rehabilitation:
• gradual pain-free reintegration to sports activity with specific taping. See Ankle rehabilitation taping for isolated posterior talo-fibular sprains, p. 107
• lateral instability if ligament is not supported in a shortened position during the healing phase
 TIP
TIPANATOMICAL AREA: FOOT AND ANKLE
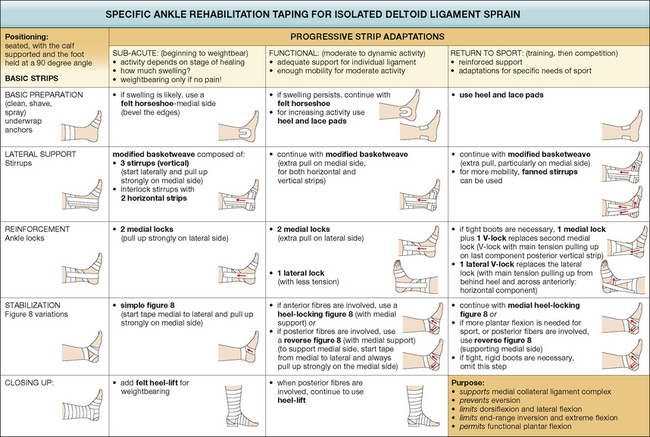
INJURY: DELTOID LIGAMENT SPRAIN
• medial lateral ligamentous complex
• superficial and deep portions
• from the medial malleolus anteriorly to the navicular (superficial) and to the talus (deep), inferiorly to the calcaneus and posteriorly to the talus (both superficial and deep fibres)
• see anatomy illustration, p. 54
• a lateral force on the lower leg when foot is relatively fixed in extension
• local pain, swelling and discolouration
• locations of tenderness around medial malleolus is indicative of injury site
• active movement testing: pain on eversion
• passive movement testing: pain on eversion
• resistance testing (neutral position): no significant pattern of pain on moderate resistance
• taping: first 48 hours: Acute Ankle Injury (open basketweave with medial reinforcement) (p. 76)
• continued therapy including:
• progressive pain-free rehabilitation including:
• gradual pain-free reintegration to sports activity with specific taping. See Rehabilitation taping for isolated deltoid ligament sprain, p. 109
• medial instability if ligament is not supported in a shortened position during the healing phase
 TIP
TIPANATOMICAL AREA: FOOT AND ANKLE
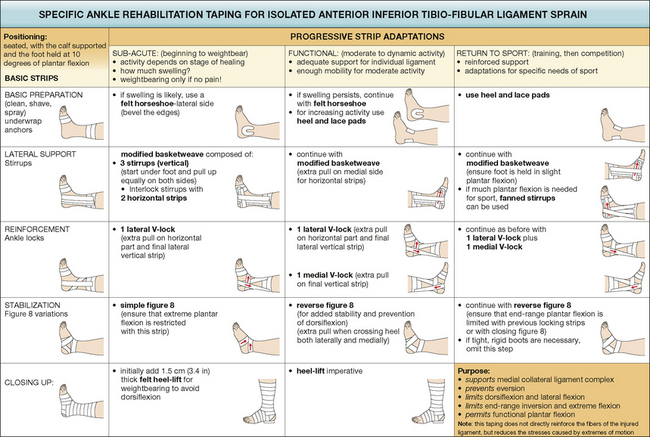
INJURY: ANTERIOR INFERIOR TIBIO-FIBULAR LIGAMENT SPRAIN
• anterior aspect of the ligamentous mortice of the talo-crural joint (ankle proper) running from the anterolateral border of the tibia to the anteromedial border of the fibula meeting just superior to the talus. This ligament is thinner and weaker than its counterpart, the posterior inferior tibio-fibular ligament
• see anatomy illustration, p. 55
• stressed in full dorsiflexion: the wider aspect of the talus jams between the malleoli
• stressed severely when a dorsiflexed foot is rotated laterally, forcing the malleoli to separate
• can be accompanied by posterior fibulo-calcaneal ligament sprain
• local pain, swelling and discolouration
• tenderness anteriorly on palpation between the tibia and fibula just superior to the talus
• active movement testing: pain on dorsiflexion at end-range; increased with active eversion
• passive movement testing: pain on dorsiflexion at end-range
• resistance testing (neutral position): no significant pattern of pain on moderate resistance
• taping: first 48 hours: Acute Ankle Injury (open basketweave – position with slight plantarflexion)
• continued therapy including:
• progressive pain-free rehabilitation including:
• prevention of recurrent sprains
• gradual pain-free reintegration to sports activity with specific taping. See rehabilitation taping for isolated anterior inferior tibio-fibular ligament sprains, p. 111
• needs greater non-weight bearing (NWB) rehabilitation phase due to inherent displacing stress caused by weight bearing
• lateral talo-crural instability if ligament is not supported in shortened position during healing phase
• permanent instability of the ankle mortice
• dysfunction of the superior tibio-fibular joint
• peroneal strain and residual weakness often accompany this sprain
ANATOMICAL AREA: THE CALF
TAPING FOR CALF CONTUSION OR STRAIN
Purpose
• applies localized specific compression to the bruised or torn tissues (decreases subsequent swelling, bleeding and the chances of further tissue damage in the area)
• supports the calf muscles by elastic reinforcement assisting plantarflexion
• prevents full stretch of the musculo-tendinous unit by restricting dorsiflexion
Indications for use
 NOTES:
For additional details regarding an injury example, see T.E.S.T.S. chart, p. 117.
Positioning
Lying prone at the end of a low bench with a folded towel placed under the thigh superior to (above) the patella and the calf extending over the end of the bench.
Procedure
1. Make sure the area to be taped is clean and relatively hair free; shave if necessary
2. Check skin for cuts, blisters or areas of irritation before spraying with skin toughener or spray adhesive. Spray circumferentially to the entire calf and let dry completely.
3. Localize the exact site of the contusion or muscle strain. Beginning 7.5 cm below the lower aspect of the injury, using light tension, wrap 7.5 cm elastic adhesive tape around the limb. Repeat this strip, overlapping the previous one by 1.25 cm (1/2 in) until the entire injured area is covered and surpassed by 7.5 cm.
 NOTE:
NOTE:This first layer of tape forms a foundation for the compression strips, which avoids excessive tension on the skin.
 NOTE:
NOTE:
 NOTE:
NOTE:
 TIP:
TIP:Ensure that the tape job extends at least one full tape-width lower and higher than the area of the injury.
 NOTE:
NOTE:The finished compression taping should have no wrinkles, should be neat in appearance and have continuous, localized pressure over the injured site from distal to proximal.
7. For dynamic support, use the compression taping as the proximal anchor and apply the Achilles tendon taping technique. This will protect and support the entire musculo-tendinous unit for weight-bearing activities. (See Achilles tendon taping technique, p. 118.)
ANATOMICAL AREA: CALF
INJURY: CALF STRAIN
• gastrocnemius or soleus strain
• Achilles tendon complex strain: ‘pulled’ heel cord
• degree of severity: 1st to 3rd – see strain chart, p. 36
• sudden forced dorsiflexion during active plantarflexion
• explosive plantarflexion against resistance
• history of sudden sharp pain
• feeling of ‘being shot’ in the calf
• varying degrees of pain at injury site
• local swelling and gradual discolouration
• passive movement testing: pain on dorsiflexion (1st and 2nd degrees)
• active contraction of dorsiflexors to induce relaxation and improve flexibility of calf (isometric at first)
• continued therapy including:
• rehabilitation programme: non-weight bearing initially, progressing to dynamic pain-free reintegration with taped support
• transverse friction massage (only after several weeks when scar tissue is adhering)
ANATOMICAL AREA: CALF
TAPING FOR ACHILLES TENDON INJURY
Indications for use
• diffuse heel pain (possible bursitis)
• calf strain; use in combination with Compression Taping
• calf contusion: use in combination with Compression Taping
• peroneus longus strain or tendinitis: use in combination with Peroneus Longus Support Strips, p. 125
• tibialis posterior strain or tendinitis: use in combination with Tibialis Posterior Support Strips, p. 129
 NOTES:
• Be sure that a thorough assessment of the region has been carried out prior to taping.
• If a third-degree strain is suspected, the athlete must be seen by a surgeon as soon as possible.
• Evaluate the site of injury; pain may be located at the base of the Achilles tendon, in the belly of the muscle or at the musculo-tendinous junction.
• During taping, neutral alignment of the foot can be controlled by the taper whose thigh is used to counter-pressure against the athlete’s great toe.
• Because Achilles taping pulls the foot into plantarflexion, the ankle is rendered less stable and the risk of an inversion sprain is increased (step 13 demonstrates preventive measures).
• Once taped, a felt or foam heel lift in the athlete’s shoe will shorten and help support the Achilles tendon by improving its mechanical advantage.
For additional details regarding an injury example see T.E.S.T.S. chart, p. 124.
Position
Lying prone (face down) with the shin resting on a cushioned support and the foot protruding over the edge of the table (for steps 1–4 it is more convenient to have the subject supine with the lower limb extending over the end of the table at midcalf).
Procedure
 NOTE:
NOTE:Heel and lace pads should be used when the taping is to assist the athlete to resume training or competition.
 TIP:
TIP: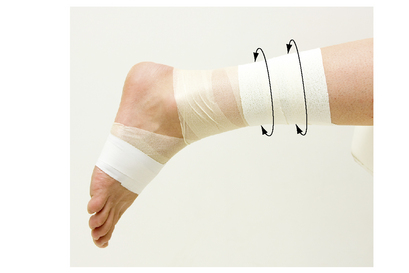
 TIP:
TIP: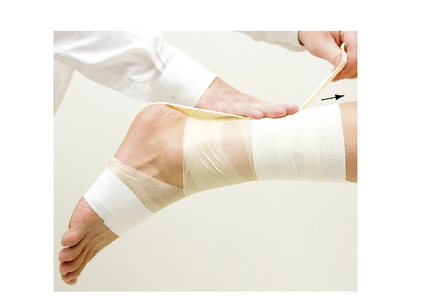
 TIP:
TIP:Maintain strong tension while adhering the upper end of this strip to the calf anchor before cutting the tape
 NOTE:
NOTE: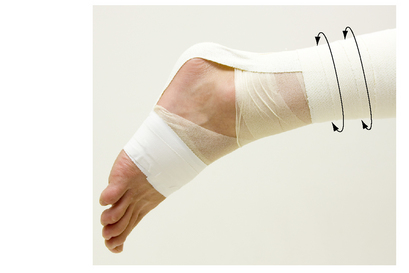

 NOTE:
NOTE:Once the foot is held in plantarflexion, ankle stability is compromised based on the demands of the sport and the individual’s ankle stability; the use of one or two ankle locks is recommended as outlined in the following, optional, procedure (steps 13 and 14).
 NOTE:
NOTE:
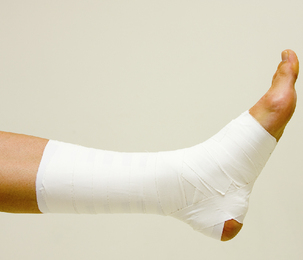
16. Close up the entire tape job, covering any open areas.
17. Test limits of taping restriction to ensure adequate pain-free support. Dorsiflexion must be limited by at least 30 °. There should be no pain on passive dorsiflexion.
18. For the acute and subacute stages cut a 2 cm felt heel lift, bevelled at the anterior (front) edge, and place it under the heel to raise it, thereby reducing tension on the tendon.
 TIP:
TIP:ANATOMICAL AREA: CALF
INJURY: ACHILLES TENDINITIS
• structural strain from repeated quick push-offs as in repetitive running
• sudden change in training; increased distance, speed or intensity; change of terrain (example: hills vs level ground)
• new footwear: inadequate heel support
• tenderness plus swelling around tendon
• localized pain (usually mid-tendon) spreads as condition progresses
• acute posterior heel pain on weight-bearing plantarflexion (particularly after resting)
• active motion testing: possible pain on plantarflexion
• passive movement testing: usually painful on dorsiflexion
• resistance testing (neutral position): possible weakness and marked pain on moderate resistance
• Achilles tendon taping, p. 118
• total rehabilitation programme with emphasis on full flexibility, eccentric strengthening through range of motion and dynamic proprioception
• progressive reintegration to regular sports activity with taped support as above
ANATOMICAL AREA: CALF
TAPING FOR: PERONEUS LONGUS TENDON INJURY
Indications for use
 NOTES:
For additional details regarding an injury example see T.E.S.T.S. chart, p. 128.
Positioning
Lying supine (face up) to start, then prone (face down) with the shin resting on a cushioned support and the foot protruding over the edge of the table.
Procedure

 NOTE:
NOTE: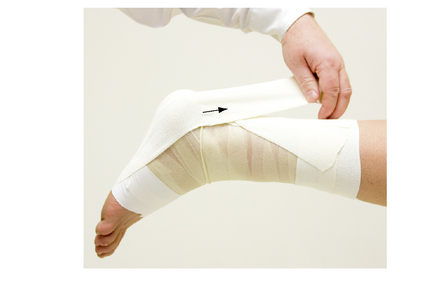
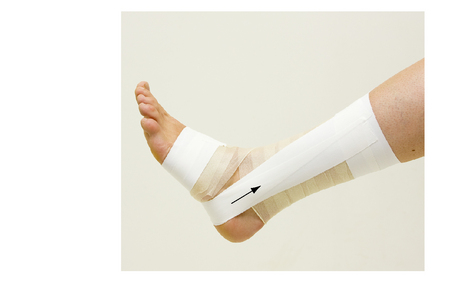
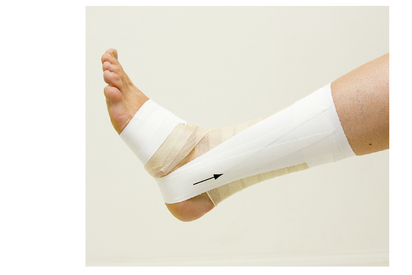
2a Affix, without tension, a strip of 5 cm (2 in) elastic adhesive bandage to the plantar surface of the foot, starting on the medial side and leading diagonally across to the lateral side of the heel.
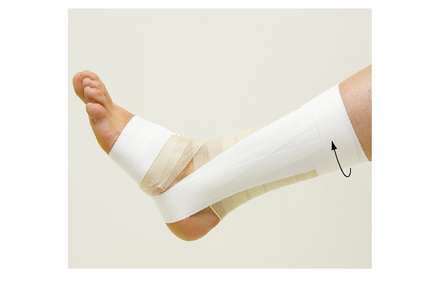
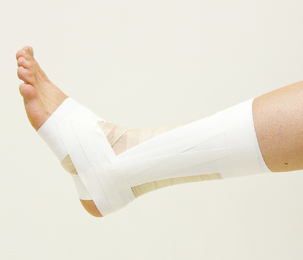
2b Holding the foot in plantarflexion and significant eversion, pull the tape up strongly across the lateral side of the heel.
 TIP:
TIP:
 TIP:
TIP:

 TIP:
TIP:ANATOMICAL AREA: CALF
INJURY: PERONEUS LONGUS TENDINITIS
• poor foot biomechanics (more common with high arches)
• weakness and/or inflexibility of lateral ankle muscles
• chronic overstretch or overuse
• subsequent to peroneus longus strain or chronic ankle sprains
• repeated running on hard surfaces
• sudden change in terrain, speed, intensity, frequency, resistance, etc.
• localized thickening and tenderness of tendon
• localized heat and redness along tendon possible
• passive movement testing: pain on dorsiflexion with inversion (1st- and 2nd-degree sprains)
• resistance testing (neutral position): pain with or without weakness on eversion with plantarflexion
• taping for Peroneus Longus adaptation of Achilles Tendon Taping
• selective strengthening of peroneus longus; non-weight bearing initially, progressing gradually to eccentric full weight bearing
• flexibility then strengthening of all ankle musculature
• thorough biomechanical assessment and re-education
• gradual (pain-free) reintegration to sports activities with taped support as above
• total rehabilitation: progressive exercise programme for flexibility, strength and dynamic proprioception
 NOTE:
NOTE:ANATOMICAL AREA: CALF
TAPING FOR: TIBIALIS POSTERIOR TENDON INJURY
Indications for use
 NOTES:
For additional details regarding an injury example see T.E.S.T.S. chart, p. 132.
Positioning
Lying supine (face up) to start with, then lying prone (face down) with the shin resting on a cushioned support and the foot protruding over the edge of the table.
Procedure
 NOTE:
NOTE: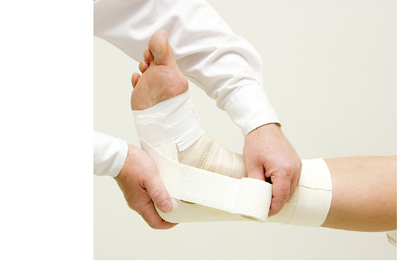
2a Affix, without tension, a strip of 5 cm (2 in) elastic adhesive tape to the plantar surface of the foot, starting on the lateral side and leading diagonally across to the medial side of the heel.
2b Holding the foot in plantarflexion and significant inversion, pull the tape up strongly across the medial side of the heel.
 TIP:
TIP: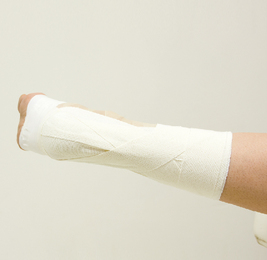
 TIP:
TIP: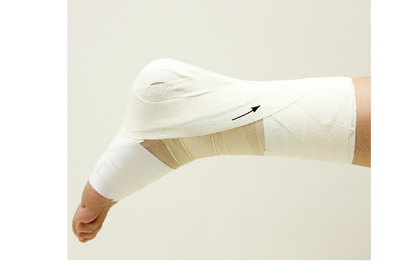
 NOTE:
NOTE:
 TIP:
TIP:ANATOMICAL AREA: CALF
INJURY: TIBIALIS POSTERIOR TENDINITIS
• overly pronated or flat feet
• poor foot biomechanics (a fixed forefoot inversion with a valgus calcaneus)
• weakness and/or inflexibility of medial ankle muscles
• chronic overstretch or overuse
• subsequent to tibialis posterior strain or chronic ankle sprains
• repeated running on hard surfaces
• sudden change in terrain, speed, intensity, frequency, resistance, etc.
• pain posterior to medial malleolus extending up to posteromedial border of tibia (can radiate down to the medial arch)
• localized swelling and thickening of tendon
• exquisitely tender on palpation of inflamed site
• local heat and redness over tendon possible
• passive movement testing: pain on dorsiflexion with eversion
• resistance testing (neutral position): pain with or without weakness on resisted inversion with plantarflexion
• taping for Tibialis Posterior adaptation of Achilles Tendon taping, p. 118
• selective strengthening of tibialis posterior; non-weight bearing initially, progressing to eccentric full weight bearing
• strengthening and flexibility of all ankle musculature
• thorough biomechanical assessment and re-education
• gradual pain-free reintegration programme with taped support as above
• total rehabilitation: progressive exercise programme for flexibility, strength and dynamic proprioception
 NOTE:
NOTE: