CHAPTER 32 Pit and Fissure Sealants
Deep pits and fissures in teeth are risk factors for dental caries.1 Topically applied fluorides are most effective in preventing dental caries formation on the smooth surfaces of the teeth and least effective in pits and fissures. Although the overall rate of smooth surface caries has decreased, 80% of all caries in young permanent teeth occur in the pits and fissures.2 Research has shown that the incidence of caries can be reduced 17% to 54% by applying sealants to the occlusal surfaces of posterior teeth with deep pits and fissures.2 Therefore it is important to consider the placement of pit and fissure sealants in planning dental hygiene care for the maximum prevention and control of dental caries.
Sealant placement is both a preventive and a therapeutic intervention. Preventive sealants are those placed in caries-free teeth in an effort to prevent dental caries. Therapeutic sealants are those placed in teeth with incipient lesions in an effort to stop the decay process.
A pit and fissure sealant is a thin plastic coating of an organic polymer (resin) placed in the pits and fissures of teeth (Figure 32-1). The sealant acts as a physical barrier to oral bacteria and carbohydrates, thereby preventing dental caries (Figure 32-2). The sealant bonds mainly by mechanical retention to the enamel tooth surface, forming a protective layer so that caries-producing bacteria cannot colonize within pits and fissures. Pit and fissure sealants along with fluoride therapy, oral hygiene instruction, modification of caries risk factors, increasing of caries protective factors, and dietary counseling are integral components of any caries-prevention program (Box 32-1).
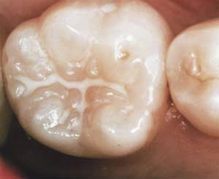
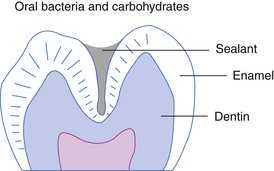
Figure 32-2 Sealant acts as a physical barrier to oral bacteria and carbohydrates.
(From Preventing pit and fissure caries: a guide to sealant use, Boston, 1986, Massachusetts Department of Public Health and Massachusetts Health Research Institute.)
INDICATIONS FOR SEALANT PLACEMENT
Caries Risk Assessment
Dental caries involves an interaction among pathologic factors and protective factors. Pathologic factors include acidogenic (acid-producing) bacteria; low saliva flow caused by salivary gland dysfunction or the use of multiple medications; and the frequent consumption of fermentable carbohydrates in the diet. Protective factors include calcium phosphate, proteins, and fluoride in the saliva; normal salivary flow; and antibacterial agents if needed.1 During the assessment phase of the dental hygiene process the dental hygienist assesses the caries risk of the client (see Chapter 16) and in collaboration with the dentist recommends pit and fissure sealant placement, if indicated, along with other caries prevention and control strategies. Dental sealants are indicated for clients of any age with the following:
Tooth Assessment
Pit and Fissure Anatomy
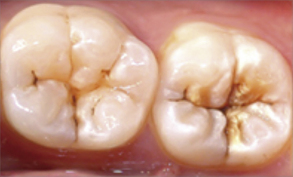
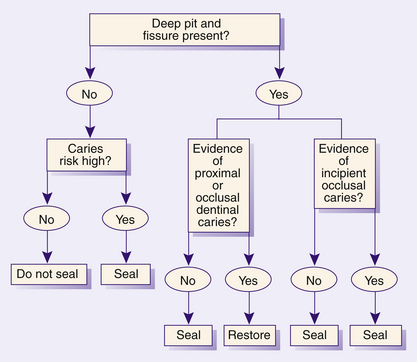
Tooth assessment to determine the need for sealant placement involves identifying the pit and fissure morphology of the tooth. If the occlusal contour shows deep and irregular pits and fissures and there is no radiographic evidence that the tooth has proximal dental caries, then a sealant should be placed2 (Figure 32-4). Figure 32-5 outlines the guidelines for making critical decisions about sealant placement. Sealant placement targets teeth with anatomy most at risk for pit and fissure caries and is not directed to all teeth with pits and fissures. Tooth surfaces most at risk for dental caries in young children are occlusal surfaces of permanent first and second molars, followed by buccal surfaces of lower molars and lingual surfaces of upper molars.4 Primary second molars that demonstrate deep pits and fissures also are included in the sealant component of the dental hygiene care plan. Newly erupted teeth need to be sealed as soon after full eruption as possible. Retention rates of dental sealants are higher for fully erupted teeth than for partially erupted teeth. The pits and fissures of molars remain susceptible to dental caries into adolescence and adulthood; therefore posteruptive age of teeth should not be used as the sole criterion for sealant placement.5 Also, it has been demonstrated that sealants can be placed effectively on the buccal pit and lingual pit surfaces of teeth.6
Incipient Caries
Clients with incipient caries (caries limited to the enamel surface) can benefit from having sealants placed. Sealants placed over incipient carious lesions can stop the caries from progressing into the dentin surface provided the sealant remains intact.7
Pit and fissure morphology makes it difficult to evaluate whether or not occlusal surfaces are capable of remineralization. In addition, occlusal decay is not apparent on dental radiographs until the carious lesions are advanced. As discussed in Chapter 14, current research does not support the process of pressing a sharp explorer into the pits and fissures of teeth to identify incipient carious lesions. The resistance of the explorer against the tooth can simply be the physical wedging of the instrument in the pit or fissure and not a carious lesion. Moreover, the explorer’s force can cause an incipient lesion to cavitate. This cavitation allows bacteria to penetrate deeper into the tooth and ultimately accelerates the caries process. Tooth remineralization in incipient carious lesions is best achieved by encouraging the client to use preventive and protective practices such as fluoride rinses or xylitol chewing gum.
Contraindications to Sealant Placement
If there is radiographic evidence of proximal dental caries, then sealant placement in occlusal pits and fissures is contraindicated and the client needs to be referred to the dentist to have the tooth restored. In addition, if the pits and fissures are well coalesced and self-cleansing, then sealants are contraindicated because such occlusal contours are at low risk for developing caries.
Retention Rates
The ability of a pit and fissure sealant to prevent dental caries is highly dependent on its ability to be retained on the tooth surface (sealant retention). The most common reason for sealant failure is salivary contamination during sealant placement. Other factors include clinician inexperience, lack of client cooperation, and less-effective sealant material used (resin-based sealants are superior to glass ionomer sealants).8 Current evidence suggests that topical fluoride treatments do not interfere with retention rates of sealants.9
Sealant Guidelines from the American Academy of Pediatric Dentistry
Current literature supports the use of dental sealants in both primary and permanent teeth. There are a variety of sealant materials available to the dental hygienist. It is critical to follow each manufacturer’s instructions for optimum sealant placement and retention. The following are the American Academy of Pediatric Dentistry guidelines for pit and fissure sealants10:
 Bonded resin sealants, placed by appropriately trained dental personnel are safe, effective, and underused in preventing pit and fissure caries on at-risk surfaces. Effectiveness increases with good technique, appropriate follow-up, and resealing as necessary. Sealant benefit is increased by placement on surfaces judged to be at high risk or on surfaces that already exhibit incipient carious lesions. Placing sealants over minimal caries has been shown to be effective at inhibiting lesion progression. Appropriate follow-up care, as with all dental treatment, is recommended. Presently the best evaluation of risk is done by an experienced clinician using indicators of tooth morphology, clinical diagnostics, past caries history, past fluoride history, and present oral hygiene. Caries risk and therefore sealant benefit may exist in any tooth with a pit or fissure, at any age, including primary teeth of children and permanent teeth of children or adults. Sealant placement methods need to include careful cleaning of the pits and fissures without removal of any appreciable enamel. Some circumstances may indicate use of a minimal enamoplasty technique.
TYPES OF SEALANTS
Sealants are classified by their method of polymerization, their sealant content, and their color.
Classification by Polymerization Method
Sealants can be categorized by the method required to convert them from the liquid state to the solid state. The process by which sealants harden is known as polymerization. Polymerization can be accomplished by self-curing (autopolymerization) or light curing with a visible light (photopolymerization).
Self-Curing or Autopolymerized Sealants
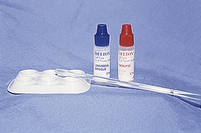
Autopolymerized sealants come in two components: a universal liquid monomer and a catalyst (Figure 32-6). When the two components are mixed together, they harden (polymerize). Polymerization starts as soon as mixing begins, and the material hardens within 60 to 90 seconds. Self-curing sealants are used in community health or school-based programs because there is no special equipment required.

Photopolymerized or Visible Light–Cured Sealants
Photopolymerized sealants harden when exposed to a restorative curing light. Because no mixing time is required, the clinician controls the start of polymerization.
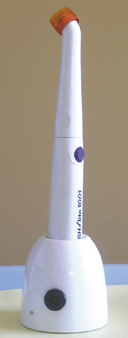
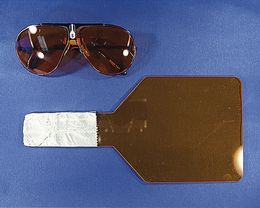
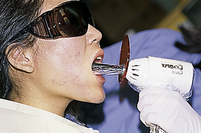
Today, handheld cordless visible lights (curing lights) are commonly used (Figure 32-7) primarily for curing tooth-colored restorations. Using a curing light to polymerize sealants increases the working time because the sealant will not polymerize until exposed to the curing light. Usual polymerization time is 10 to 20 seconds. Special lenses in eyeglasses or a handheld shield is used to protect the client and clinician from potential retinal damage from the curing light (Figure 32-8). Unlike self-cured sealant methods, the photopolymerized sealant method requires additional time for infection control. The curing light tip, a semicritical item, is most likely to be in contact with mucous membranes and therefore requires sterilization of the tip or the use of a plastic barrier. Plastic barriers, however, must not decrease the intensity of the light beam. If the output intensity of the curing light is less than 280 mW/cm2, the polymerization process of the monomer will be incomplete and early loss of the sealant may occur. Research indicates the Sani-Shield barrier (DW Technology, Las Vegas, Nevada) to be the least likely to interfere with light output intensity. The intensity of the curing light can be measured with a dental radiometer.
Comparison of Shrinkage Patterns
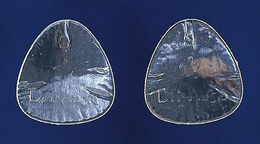
Autopolymerized sealants cure or shrink toward the center of the material and provide a good sealant to tooth margins. On the other hand, photopolymerized sealants shrink toward the source of initiation or toward the curing light. Therefore the sealant margins with light-cured sealants may be compromised and prone to marginal leakage and ultimately partial loss (Figure 32-9).

Classification by Sealant Content
The American Dental Association evaluates the effectiveness and safety of sealant materials. Most sealants are made of bisphenol A glycidyl methylacrylate (Bis-GMA). The three types of sealants available based on content are filled, unfilled, and fluoride-releasing.
Filled Sealants
Filled sealants are a mixture of resins, chemicals, and fillers. The resins contain monomers and chemicals to hold the filler particles together. The purpose of the filler is to increase bonding strength and resist occlusal forces and wear. In addition, fillers increase the rate of flow (viscosity) of the sealant, promoting easy and thorough flow into the depths of pits and fissures. The monomers are liquid at room temperature and are activated or hardened by either chemical reactions or exposure to a curing light.
The fillers are usually glass and quartz particles of high hardness. Ground quartz (silicon dioxide) particles are categorized as large particle–sized fillers, which give strength and hardness to the material. Silica particles are considered small particle–sized fillers (microfill) and are less able to handle strong abrasive or occlusal forces. The ultimate combination of durability and strength in a composite sealant is with hybrid materials. This is a mixture of small and midsize particles that make up 50% to 70% of the total weight of the composite, and each filler particle is coated with saline to provide greater bonding strength between fillers and resins.
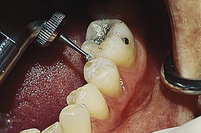
Research indicates that filled sealants are twice as wear-resistant as unfilled sealants and that a 10- to 20-second light cure is all that is needed for the filled sealant to have adequate bonding to the enamel surface. Because of hardness and wear resistance, filled sealants must be checked after placement with articulating paper for occlusal high spots and adjusted with a slow-speed handpiece and round burr.
Unfilled Sealants
Unfilled sealants are clear, making it difficult to see during placement. Because unfilled sealants do not contain particles, they are less resistant to wear over the long term. Unfilled sealants are best used when the “high spots” in the occlusion cannot be adjusted with a dental handpiece. These sealants are most useful in school-based settings.
Fluoride-Releasing Sealants (Glass Ionomer Sealants)
In restorative dentistry, glass ionomers are used as cavity liners or intermediary bases to occupy a small space between the tooth and the restoration. Glass ionomer material also is used for sealants owing to its ability to flow easily into pits and fissures. A benefit to glass ionomer sealants is that this material can be purchased with a slow-releasing fluoride, which will enhance the caries resistance of the tooth or remineralize an incipient carious lesion at the base of the pit or fissure. Studies show, however, that glass ionomer sealants may crack readily when placed and show high rates of occlusal wear.
PROCEDURE FOR SEALANT PLACEMENT
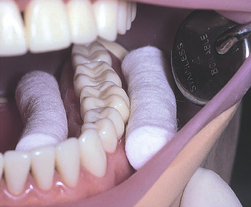
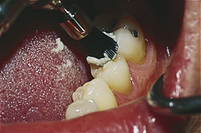
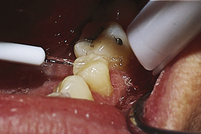
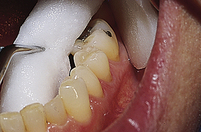
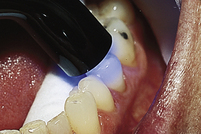
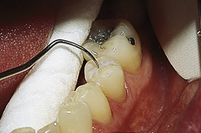
The proper placement of a sealant requires that the tooth be isolated and dry to ensure that the treatment site is visible and accessible. A rubber dam is effective for isolation when several teeth in the quadrant are worked on; however, bibulous pads (e.g., Dri-Angles) placed over Stensen’s duct and proper placement of cotton rolls in the vestibules and at the sides of the tongue are effective in promoting moisture control (Figures 32-10 and 32-11).
It is critical to keep the working site free of water and saliva. The saliva ejector should be used to aid in moisture control, and the teeth should be thoroughly dried with compressed air. The use of hydrophilic primers aids in drying the enamel surface, which enhances the sealant attachment to the etched surface. Other critical factors that influence sealant retention are surface cleanliness and the successful creation of etched micropores on the enamel surface.
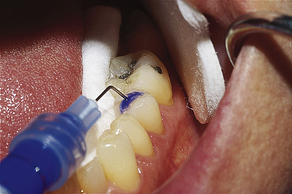
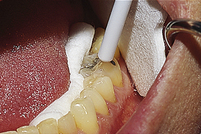
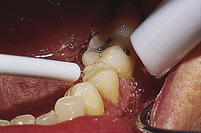
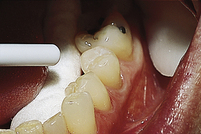
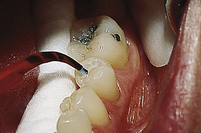
Once isolated, cleaned, and dried, the enamel surface is ready for acid etching. An acid etching solution is applied to the tooth. The acid supplied by most manufacturers is concentrated to a level of 35% to 38% phosphoric acid in either liquid or gel form. The acid etching creates microscopic pores on the enamel to increase surface irregularities for sealant retention. The liquid acid is applied with a fine plastic-bristled brush, using a continuous dabbing motion. The gel is placed on the tooth surface with a special syringe and left undisturbed (Figure 32-12). Many dental hygienists prefer to use gels because they are colored, making it easy to tell where the gel has been applied. Care should be taken that the acid does not come in contact with mucosal surfaces.
The sealant brush should approach the etched tooth with a low contact angle of <90 degrees. With a small contact angle there is a greater ability of the liquid sealant to penetrate into the newly created enamel micropores on the tooth surface. This process is known as wetting when there is maximum penetration of a liquid (sealant) to a solid structure (tooth). Wetting plays a significant role in determining the penetration, adhesion, and ultimately retention of sealants (Figure 32-13). Detailed methods for placement of light-cured and self-cured sealants are described in Procedures 32-1 and 32-2.
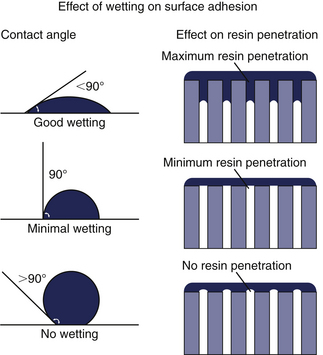
Figure 32-13 For maximum sealant penetration, apply at a low contact angle of <90 degrees.
(From Albers HF: Tooth-colored restoratives, ed 9, Hamilton, Ontario, Canada, 2002, BC Decker.)
Procedure 32-1 APPLYING LIGHT-CURED (PHOTOPOLYMERIZED) SEALANTS
Photographs courtesy Catrin Backlund.
STEPS
Procedure 32-2 APPLYING SELF-CURED (AUTOPOLYMERIZING) SEALANTS
STEPS
CLIENT EDUCATION TIPS
Explain that sealants prevent the initiation and progression of dental caries. Sealants are not permanent and therefore may need to be replaced.LEGAL, ETHICAL, AND SAFETY ISSUES
Care must be taken when using the acid-etch solution to avoid contact with any body tissues other than the tooth surface to be sealed. Clients must understand that sealants are not permanent and may need to be replaced for continued protection against pit and fissure caries. It is legal for dental hygienists to place dental sealants in all 50 states. Supervision requirements and clinical setting vary from state to state. The American Dental Hygienists’ Association Office of Governmental Affairs has the most recent information concerning setting and supervision requirements for each of the 50 states.KEY CONCEPTS
Epidemiologic data reveal that dental caries are concentrated more on the occlusal surfaces than on smooth surfaces of the teeth. Clients’ risk for developing dental caries is determined by identifying their prior caries experience, fluoride history, tooth morphology, and plaque load. This information is integral to assessing their need for dental sealants. Sealant placement should be targeted to the most susceptible surfaces of the most susceptible teeth. A dental hygiene diagnosis related to dental sealants is based on the client’s deficits in the human needs for a biologically sound dentition, conceptualization and problem solving, and responsibility for oral health. Before a dental sealant is placed, the tooth surface to be sealed must be cleaned, dried, etched, rinsed, and then dried again. When placing a dental sealant it is important to allow the material to flow into the grooves of the tooth surface. This minimizes the presence of air bubbles. Use of the “wetting” technique during the sealant placement maximizes the penetration of the sealant into the enamel micropores. Autopolymerization causes the sealant material to harden chemically by mixing an activator with a catalyst.CRITICAL THINKING EXERCISES
Patient Profile: Sonia is a 15-year-old Hispanic female who visits the dental office for an examination and oral prophylaxis.
Chief Complaint: “I am here today because I noticed black spots on the chewing surfaces of some of my back teeth, and my mouth always feels dry.”
Health History: Client reports that she has allergy symptoms all year round. Her symptoms are relieved by taking Claritin once daily.
Dental History: She has not seen a dentist in 2½ years. Her dental examination reveals the presence of three carious lesions: No. 18 MO, No. 30 DO, and No. 3 O. She has incipient carious lesions on the occlusal surfaces of No. 2, No. 14, No. 15, and No. 19.
Social History: She is single and lives at home with her parents. Sonia states that she drinks approximately three soft drinks a day to relieve her dry mouth.
Oral Self-Care Assessment: The client states that she brushes her teeth with a fluoride toothpaste three times a day. However, her technique reveals that when brushing she covers only the facial surfaces of her maxillary and mandibular teeth. She uses no interdental aids.
Supplemental Notes: Client has generalized gingival inflammation but very little calculus.
Refer to the Procedures Manual where rationales are provided for the steps outlined in the procedures presented in this chapter.
1. Featherstone J.D., Domejean-Orliaguet S., Jenson L., et al. Caries risk assessment in practice for age 6 through adult. J Calif Dent Assoc. 2007;35:703.
2. Brown L.J., Kaste L., Selwitz R., Furman L. Dental caries and sealant usage in U.S. children, 1988-1991: selected findings from the Third National Health and Nutrition Examination Survey. J Am Dent Assoc. 1996;127:335.
3. Rethman J. Trends in preventive care: caries risk assessment and indications for sealants. J Am Dent Assoc. 2001;131(Suppl):8S.
4. Feigal R.J., Donly K.J. The use of pit and fissure sealants. Pediatr Dent. 2006;28:143.
5. U.S. Department of Health and Human Services. Oral health in America: a report of the Surgeon General. In U.S. Department of Health and Human Services, National Institute of Dental and Craniofacial Research. Rockville, Md: National Institutes of Health; 2000.
6. Feigal R.J., Musherurue P., Gillespie B., et al. Improved sealant retention with bonding agents: a clinical study of two-bottle and single-bottle systems. J Dent Res. 2000;79:1850.
7. Mertz-Fairhurst E.J., Curtis J.W.Jr., Ergle J.W., et al. Ultraconservative and cariostatic sealed restorations: results at year 10. J Am Dent Assoc. 1998;129:55.
8. Simonsen R.J. Glass ionomer as fissure sealant—a critical review. J Public Health Dent. 1996;56:146.
9. Warren D.P., Infante N.B., Rice H.G., et al. Effect of topical fluoride on retention of pit and fissure sealants. J Dent Hyg. 2001;75:21.
10. American Academy of Pediatric Dentistry. Clinical guideline on pediatric restorative dentistry. Chicago: American Academy of Pediatric Dentistry; 2004.
Visit the  website at http://evolve.elsevier.com/Darby/Hygiene for competency forms, suggested readings, glossary, and related websites..